
NS42LCD - Television INSIGNIA - Free user manual and instructions
Find the device manual for free NS42LCD INSIGNIA in PDF.
| Product Type | 42-inch LCD Television |
| Brand | Insignia |
| Model | NS-42LCD |
| Screen Size | 42 inches (107 cm) |
| Dimensions (W × H × D) | 107.7 × 86.1 × 34.5 cm |
| Weight | 36.5 kg |
| Power Supply | 100 - 240 V AC, 50/60 Hz |
| Power Consumption | 250 W max. |
| TV Standards | NTSC-M, ATSC |
| Available Channels | VHF 2-13, UHF 14-69, Cable 1-125, CADTV 1-135, TVN 2-69 |
| Video Inputs | HDMI, VGA, Component (x2), Composite (AV1/AV2), S-Video |
| Audio Inputs | Audio L/R for each composite and component input, PC audio input (VGA) |
| Outputs | Optical digital audio output S/PDIF, AV output (video + audio), headphone jack |
| Antenna Connectors | Over-the-air antenna (AIR) and cable (CABLE) |
| USB Port | For software update only |
| Speakers | External speakers provided, can be attached to the TV |
| Remote Control | Programmable universal remote control, AA batteries (×2) |
| Main Features | Multilingual OSD menu, PIP/PBP/POP, electronic program guide, closed captions, sleep timer, parental control, screen saver |
| Operating Temperature | 5 °C to 40 °C |
| Included Accessories | User guide, remote control, batteries, external speakers |
| Warranty | 1 year (parts and labor) |
| Maintenance and Cleaning | Wipe with a soft, dry cloth; for stubborn dirt, use a soft cloth with mild soapy solution or eyeglass cleaner. Do not use alcohol, thinner, or benzene. |
| Safety | Do not expose to rain or moisture; do not open; refer all repairs to qualified personnel; do not block ventilation openings; unplug during thunderstorms. |
| Spare Parts and Repairability | Use only replacement parts specified by the manufacturer; contact a qualified technician for any repairs. |
Frequently Asked Questions - NS42LCD INSIGNIA
User questions about NS42LCD INSIGNIA
0 question about this device. Answer the ones you know or ask your own.
Ask a new question about this device
Download the instructions for your Television in PDF format for free! Find your manual NS42LCD - INSIGNIA and take your electronic device back in hand. On this page are published all the documents necessary for the use of your device. NS42LCD by INSIGNIA.
USER MANUAL NS42LCD INSIGNIA
Insignia NS-42LCD 42-inch LCD TV
Contents
Introduction 3
Important safety information ....3
Features.....5
Setting up your TV 8
Using your TV 22
Maintaining....37
Troubleshooting....38
Specifications. 38
Warranty....39
Français. 41
Español 83
Introduction
Congratulations on your purchase of a high-quality Insignia product. Your NS-42LCD represents the state of the art in LCD TVs and is designed for reliable and trouble-free performance.
Important safety information
Warning
To reduce the risk of electric shock, do not remove the cover or back. No user serviceable parts inside. Refer servicing to qualified service personnel.
To reduce the risk of fire or electric shock, do not expose your TV to rain or moisture.
Caution
To prevent electric shock, match the wide blade on the power cord plug to the wide slot on an electric outlet. If the plug does not fit, consult a licensed electrician to replace the obsolete outlet. Do not modify the power cord plug, or you will defeat this safety feature.
This symbol indicates that dangerous voltage constituting a risk of electric shock is present within your TV. This label is located on the back of your TV.

This symbol indicates that there are important operating and maintenance instructions in the literature accompanying your TV.
Warning
Your TV contains tin-lead solder and a fluorescent lamp containing a small amount of mercury. Disposal of these materials may be regulated for environmental reasons. For disposal or recycling information, contact your local authorities or the Electronic Industries Alliance at www.eia.org.
Read instructions
Read all of the safety and operating instructions before you use your TV.
Retain instructions
Retain safety and operating instructions for future reference.
Follow warnings and instructions
Follow all warnings on your TV and in the operating instructions. Follow all operating and use instructions.
Water and moisture
Do not use your TV near water. For example, do not use it near a bath tub, wash bowl, kitchen sink, or laundry tub, in a wet basement, or near a swimming pool.
Cleaning
Unplug your TV before cleaning. Do not use liquid or aerosol cleaners. Use only a damp cloth to clean the exterior of your TV.
Ventilation
Slots and openings in the cabinet and the back or bottom are provided for ventilation, reliable operation, and protection from overheating. These openings must not be blocked or covered. Do not block the openings by placing your TV on a bed, sofa, rug, or other similar surface. Do not place your TV near or over a radiator or heat register. Do not place your TV in a built-in installation, such as a bookcase or rack, unless you provide correct ventilation or follow the manufacturer's instructions.
Heat
Make sure that your TV is located away from heat sources such as radiators, heat registers, stoves, or other products (including amplifiers) that produce heat.
Grounding or polarization
Do not defeat the safety purpose of the polarized or grounding-type plug. A polarized plug has two blades with one wider than the other. A grounding type plug has two blades and a grounding prong. The wide blade or grounding prong are provided for your safety. If the plug does not fit, contact an electrician to replace the obsolete outlet.
Power cord protection
Route power cords so that they are not likely to be walked on or pinched by items placed on or against them. Pay particular attention to cords at plugs, convenience receptacles, and the point where they exit from your TV.
Attachments
Do not use attachments not recommended by Insignia because they may cause hazards.
Stand
Do not place your TV on an unstable cart, stand, tripod, bracket, or table. Your TV may fall, causing serious personal injury and serious damage to your TV. Use only with a cart, stand, tripod, bracket, or table recommended by the manufacturer, or sold with your TV. If you mount your TV to the wall, follow the manufacturer's instructions and use a mounting accessory recommended by the manufacturer. Your TV and cart combination should be moved with care. Quick stops, excessive force, and uneven surfaces may cause your TV and cart combination to overturn.
Lightning
For added protection for your TV's receiver during a lightning storm, or when it is left unattended and unused for long periods of time, unplug it from the power outlet and disconnect the antenna or cable system. This helps prevent damage to your TV from lightning and power line surges.
Servicing
Do not attempt to service your TV yourself because opening or removing covers may expose you to dangerous voltage or other hazards. Refer all servicing to qualified service personnel.
Replacement parts
When replacement parts are required, make sure that the service technician uses replacement parts specified by the manufacturer that have the same characteristics as the original part. Unauthorized substitutions may result in fire, electric shock, personal injury, or other hazards.
Overloading
Do not overload power outlets and extension cords because this can result in a risk of fire or electric shock.
Object and liquid entry
Never push objects of any kind into your TV through openings because objects may touch dangerous voltage points or short out parts that could result in a fire or electric shock. Never spill liquid of any kind on your TV.
Damage requiring service
Unplug this TV from the power outlet and refer servicing to qualified service personnel under the following conditions:
- When the power supply cord or plug is damaged or frayed.
- If liquid has been spilled or objects have fallen into your TV.
- If your TV has been exposed to rain or water.
- If your TV does not operate normally by following the operating instructions. Adjust only those controls that are covered by the operating instructions because incorrect adjustment of other controls may result in damage and will often require extensive work by a qualified technician to restore your TV to its normal operation.
- If your TV has been dropped or damaged in any way.
- When your TV exhibits a distinct change in performance.
Replacement parts
When replacement parts are required, make sure that the service technician uses replacement parts specified by the manufacturer that have the same characteristics as the original part. Unauthorized substitutions may result in fire, electric shock, personal injury, or other hazards.
Safety check
After completing any service or repair to this TV, ask the service technician to perform routine safety checks to determine that your TV combo is in correct operating condition.
Power source
Operated your TV only from the type of power source indicated on the marking label. If you are not sure of the type power supplied to your home, consult your TV dealer or local power company.
Lightning
For added protection for your TV's receiver during a lightning storm, or when it is left unattended and unused for long periods of time, unplug it from the power outlet and disconnect the antenna or cable system. This helps prevent damage to your TV from lightning and power line surges.
Screen protection
Your TV's screen is made of glass. Do not drop your TV or hit the glass screen. If the screen breaks, be careful of broken glass.
Pixel defect
Your TV's screen is designed to display finely detailed pictures. Occasionally, a few non-active pixels may appear on the screen as fixed points of blue, green, or red. This is not a defect and does not affect your TV's performance.
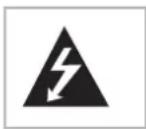
Outdoor antenna grounding
If an outside antenna or cable system is connected to your TV, make sure that the antenna or cable system is grounded to provide some protection against voltage surges and built-up static charges. Article 810 of the National Electrical Code, ANSI/NFPA No. 70, provides information with respect to correct grounding of the mast and supporting structure, grounding of the lead-in wire to an antenna discharge unit, size of grounding conductors, location of the antenna-discharge unit, connection to grounding electrodes, and requirements for the grounding electrode.
| 1 Electric service equipment |
| 2 Power service grounding electrode system |
| 3 Ground clamps |
| 4 Grounding conductors |
| 5 Antenna discharge unit |
| 6 Grounding clamp |
| 7 Antenna lead-in wire |
Note to CATV system installer
This reminder is provided to call the CATV system installer's attention to Article 820-40 of the NEC that provides guidelines for correct grounding and in particular, specifies that the cable ground must be connected to the grounding system of the building as close to the point of cable entry as practical.
Features
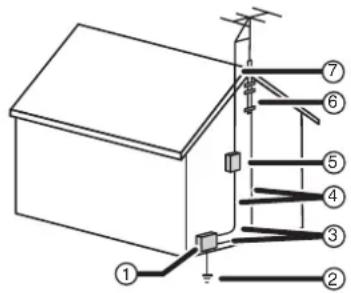
TV front
natural_image
Front view of a blank rectangular monitor with a labeled point (1) pointing to the bottom right corner (no text or symbols on the screen itself)Item Description
1 Remote control sensor—Point the remote control at this sensor while pressing the remote's buttons.
TV top
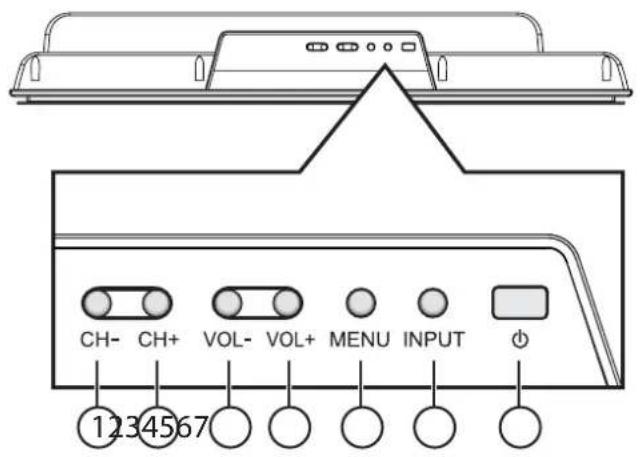
Item Description
1-2 CH-/CH+—Press to change channels. While in an OSD menu, press to highlight options.
3-4 VOL-/VOL+—Press to change the volume. While in an OSD menu, press to adjust the value of an option.
5 MENU—Press to access the OSD menu's main page.
6 INPUT—Press to select the input signal source.
7 POWER—Press to turn the TV ON (from Standby mode) or to activate Standby (from On mode).
Notes
- POWER, CH+/-, VOL+/-, INPUT, and MENU buttons on the TV have the same functions as the corresponding buttons on the remote control.
- This user guide describes procedures based on using the remote control, not the TV controls.
TV back
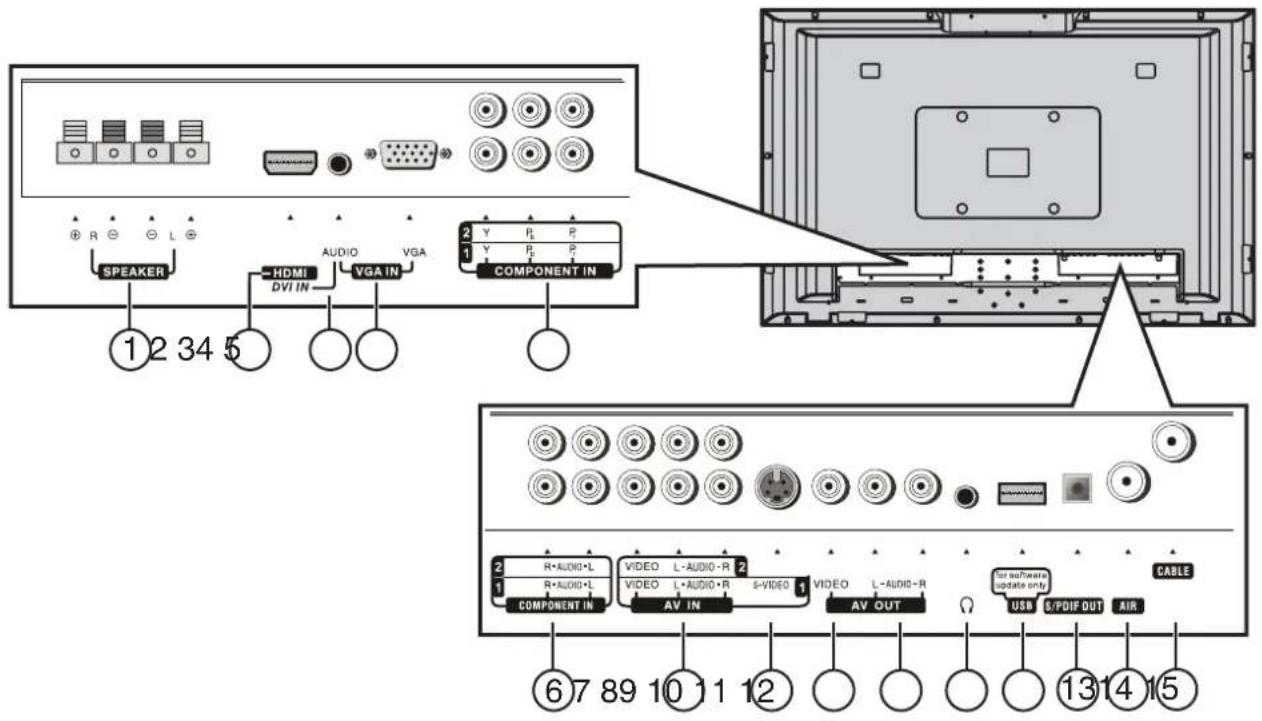
| Item Description |
| 1 Speaker output jacks |
| 2 HDMI input jack—Connect devices with an HDMI interface (for example, a set-top box or DVD player) to this connector. |
| 3 Audio in jack—Connect audio input (such as from a computer) to this jack. |
| 4 VGA port—Connect devices with a VGA interface (for example, a computer) to this port. |
| 5 Component video 1 and 2 jacks—Connect the component video output jacks of a DVD player or set-top box to these jacks. |
| 6 Component audio 1 and 2 jacks—Connect the audio output jacks of a DVD player or set-top box to these jacks. |
| 7 AV 1 and 2 jacks—Connect the AV output jacks of a VCR or DVD player to these jacks. |
| Item Description | |
| 8 S-VIDEO jack—Connect the S-Video output jack of a VCR or DVD player to this jack. | |
| 9 VIDEO out jacks—Connect to a VCR's or DVR's video input jacks to record programs. | |
| 10 | AUDIO out jacks—Connect to a VCR's or DVR's audio input jacks to record audio for programs. |
| 11 | Headphone jack—Connect headphones to this jack. |
| 12 | USB port—For software (firmware) updates only. |
| 13 | S/PDIF optical digital audio out jack—Connect an optical digital audio device to this jack. |
| 14 | AIR antenna jack—Connect an indoor or outdoor antenna to this jack. |
| 15 | CABLE jack—Connect a cable TV system to this connector. |
Remote control
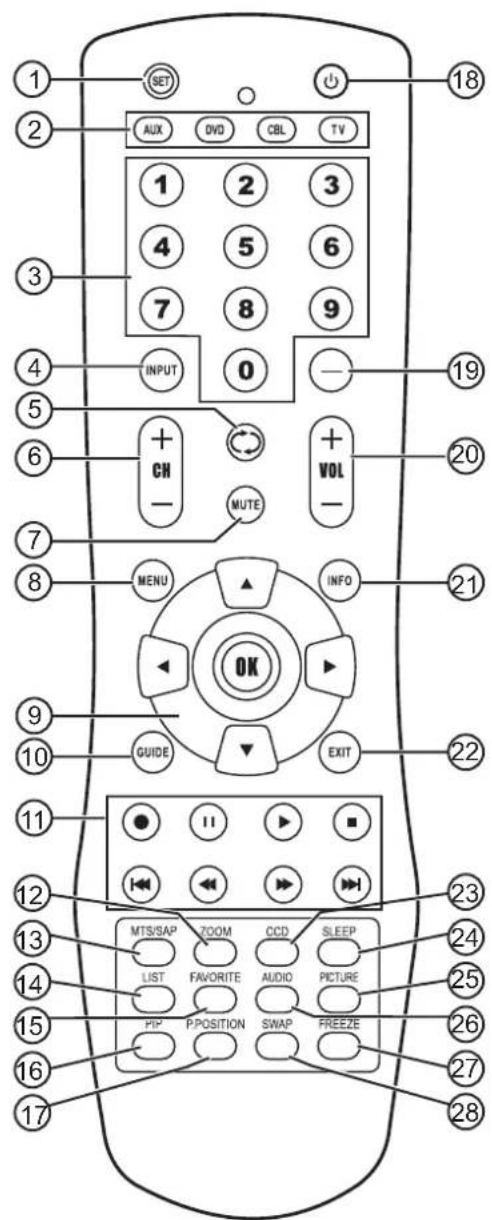
| Number Button Description | |
| 1 SET Press to program the remote control. For more information, see “Programming your remote control” on page 16. | |
| 2 Device TV-Press to select the TV. DVD-Press to select a connected DVD player. CBL-Press to select cable or satellite TV. AUX-Press to select a device assigned to this button. | |
| 3 Numbers Press to enter channel numbers. In an OSD menu, press to enter your parental controls password. | |
| 4 INPUT Press to select the video source. | |
| 5 Press to go to the last viewed channel. | |
| 6 CH +/- Press to change TV channels. | |
| 7 MUTE Press to mute the sound. |
| Number Button Description | ||
| 8 MENU Press to open the on-screen menu(OSD). | ||
| 9 | ▼▲◀▶ OK | Press the arrows to move around inthe OSD. Press OK to confirmchanges or to toggle options in theOSD. |
| 10 | GUIDE Press to display the on-screenElectronic Program Guide (EPG). | |
| 11 | ● | Press to start a recording on aconnected device, such as a VCR. |
| II | When playing a DVD, press tofreeze the screen image. Pressagain to unfreeze the image. | |
| ▶ | Press to start DVD or CD playback. | |
| ■ | Press to stop DVD or CD playback. | |
| I◀◀ | Press to skip the previous chapteron a DVD or previous track on a CD. | |
| ◀◀ | Press to fast-reverse on a DVDor CD. | |
| ▶▶ | Press to fast-forward on a DVD orCD if a DVD or CD player isconnected. | |
| ▶▶ | Press to skip the next chapter on aDVD or next track on a CD. | |
| 12 | ZOOM Press to select the aspect ratio. | |
| 13 | MTS/SAP | In analog TV mode, press to selectMONO, STEREO, or SAP. In DTVmode, press to select the audiotrack. |
| 14 | LIST | Press to display a program list. |
| 15 | FAVORITE | Press to display a Favorite programlist. |
| 16 | PIP | Press to select PIP/PBP/POP/fullscreen modes. |
| 17 | P.POSITION | Press to select the PIP sub-pictureposition. |
| 18 | ⏻ | Press to turn on your TV or put itinto Standby mode. |
| 19 | — | Press to select a sub-channel. |
| 20 | VOL+/- | Press to adjust the volume. |
| 21 | INFO | Press to display status information. |
| 22 | EXIT | Press to close the OSD. |
| 23 | CCD | Press to turn Closed Captions onand off. For more information, see“Viewing Closed Captions” on page31. |
| 24 | SLEEP Press to set the sleep timer. Formore information, see “Setting theSleep timer” on page 30. | |
| 25 | PICTURE Press to select the picture mode. | |
| 26 | AUDIO | Press to select the sound mode. |
| 27 | FREEZE | Press to freeze the video image.Press again to unfreeze the image.Do not freeze the video image forlong periods of time. You maydamage the TV screen. |
| 28 | SWAP Press to swap the main and subpictures while in PIP or PBP mode. | |
Setting up your TV
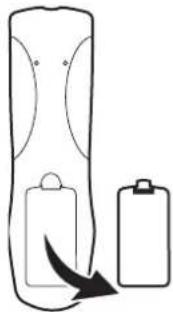
Installing batteries into the remote control
To install the remote control batteries:
1 Remove the battery cover.
natural_image
Simple line drawing of a cylindrical device with a battery and arrow indicating rotation (no text or symbols)2 Insert two AA batteries into the battery compartment. Make sure that you match the + and - symbols on the batteries with the + and - symbols in the battery compartment.
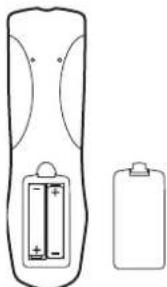
natural_image
Diagram of a remote control with two batteries and a separate battery (no text or symbols)3 Replace the cover.

Notes
- Do not mix batteries of different types.
- Do not mix old and new batteries.
- Remove batteries when the charge is depleted.
- Battery chemicals can cause a rash. If the batteries leak, clean the battery compartment with a cloth. If chemicals touch your skin, wash immediately.
- If the remote control is not going to be used for an extended period of time, remove the batteries.
Connecting power
To connect your TV to a power outlet:
- Plug the power cord into a standard AC power outlet.
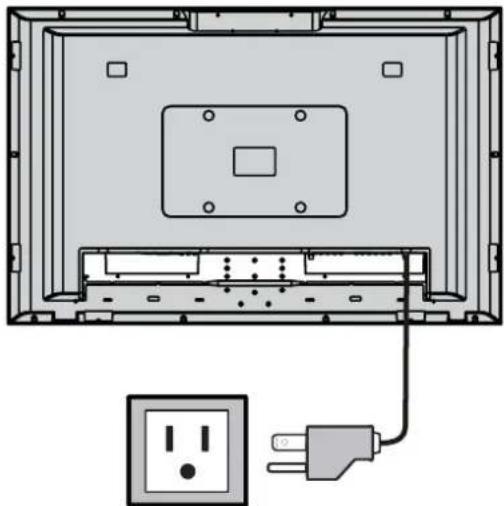
natural_image
Diagram of an open computer monitor showing internal components and a separate socket connected to a power outlet (no text or symbols present)Notes
- Make sure that you use the correct type of power. See the label on your TV.
- If you do not intend to use your TV for an extended period of time, unplug the power cord from the electrical outlet.
Connecting external speakers
1 Connect the speaker audio cables to the external speaker output jacks on the TV matching the + and - ends of the cables with the color on the jacks.
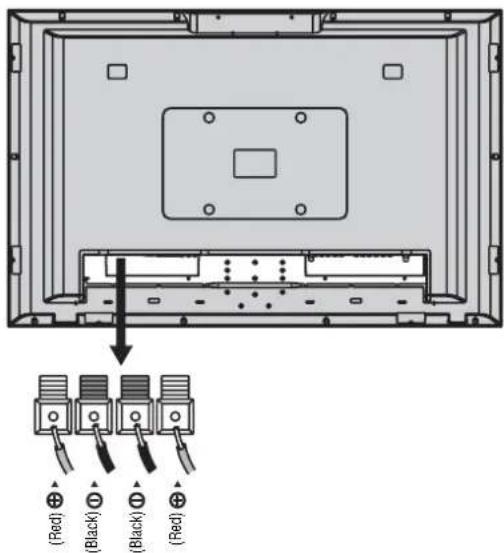
Notes
- Unplug the TV set and all connected components before connecting the speakers.
• The illustration may differ from your model.
Attaching the included speakers
Caution
Do not lift or move the TV while holding the speaker.
Installing the speakers
1 Unplug the TV and all connected components.
2 Place the TV face-down on a stable, soft, non-marring surface.
3 Carefully remove the screw covers (1), then remove the four screws (2) from under the covers.
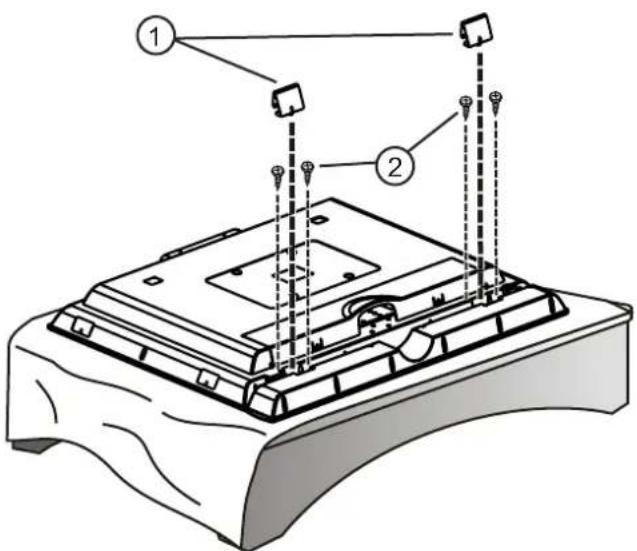
4 Attach the speakers to the TV through the speaker-fixed connectors using the above screws (from Step 3), then securely tighten them.
5 Install the two Speaker Connecting Covers to the corresponding places on the TV.
6 Connect the speaker audio cables to the external speaker output jacks on the TV matching the + and - ends of the cables with the color on the jacks.
Connecting an antenna
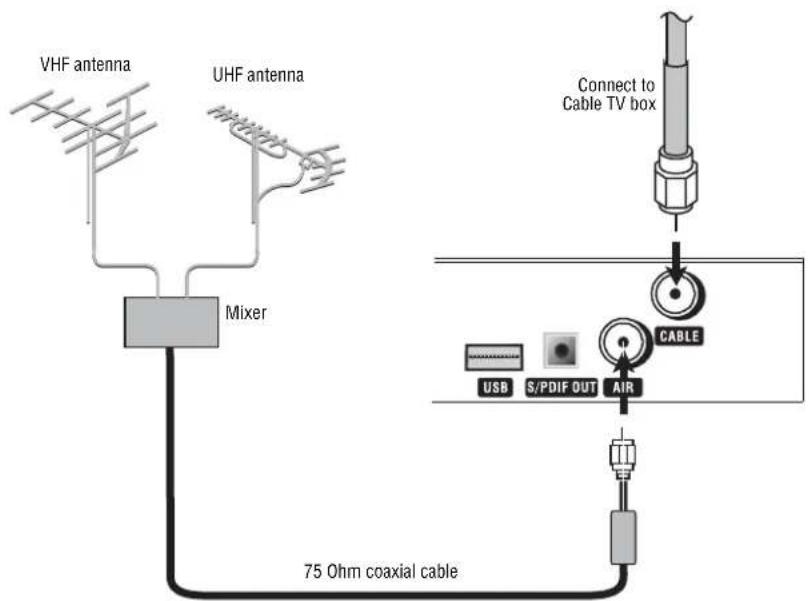
About antenna connections
For acceptable reception of VHF and UHF channels, an external antenna is required. For best reception, we recommend an outdoor antenna.
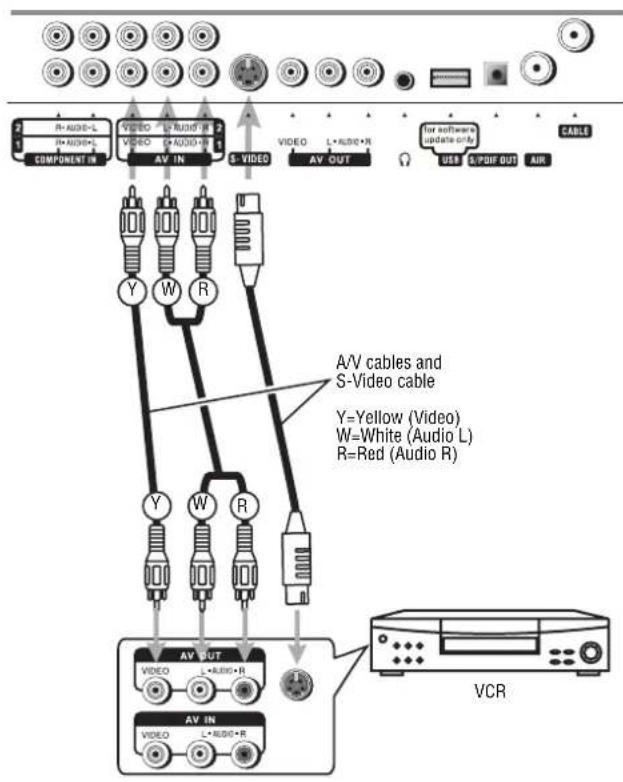
Antenna cables come in two types: 75 ohm and 300 ohm.
If your antenna cable has a 75 ohm connector, connect the cable to the coaxial jack on the back of your TV.
If your antenna cable has a 300 ohm connector, connect the cable to a 300-75 ohm adapter (not included), connect the adapter to a 75 ohm cable, then connect the other end of the 75 ohm connector to the coaxial jack on the back of your TV.
Precautions
- Carefully check the terminals for position and type before making any connections.
- Loose connectors can result in image or color problems. Make sure that all connectors are securely inserted into their terminals.
- When connecting an external device, turn it off before trying to connect it.
Note
- A local television service center or dealer may be able to help you get the correct antenna system (and accessories) for your particular area.
- Anything related to installing an antenna, installing accessories, or upgrading your current system is your responsibility.
To connect an antenna:
1 If you watch broadcast stations without using a set-top box, connect the antenna to the AIR connector on the back of the TV.
- OR -
If you use cable TV, connect the cable box's cable to the CABLE connector on the back of the TV.
2 Select the TV Source (AIR or CABLE) in the CHANNEL SETUP menu, then perform an auto channel search. For more information, see "Memorizing channels" on page 24.
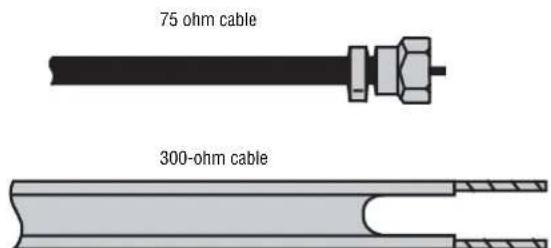
Connecting digital optical audio
For a full home theater sound experience, you should connect your stereo or audio processor to the S/PDIF OUT (Optical) jack on the TV.
Note
The S/PDIF OUT jack can output digital audio from TV programs only.
To connect optical audio
1 Connect an optical audio cable to the S/PDIF OUT jack on the back of the TV.
2 Connect the cable to the S/PDIF IN jack on your stereo or audio receiver.
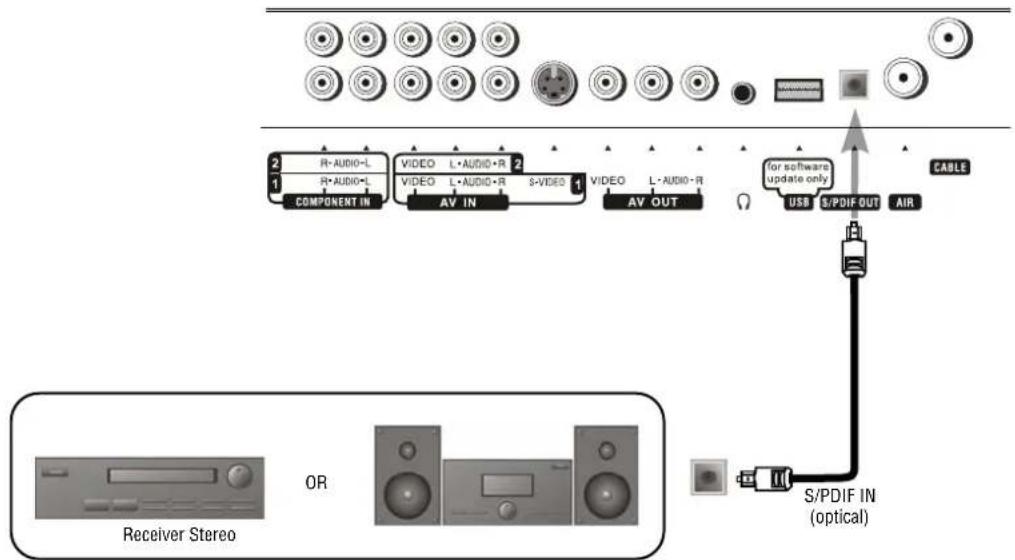
Connecting a VCR
To connect a VCR:
1 Connect the audio/video cables to the Audio (L/R)/Video jacks on the unit and VCR.
Note
For better video, you can connect to the S-VIDEO jack if your source device supports it. S-VIDEO input uses the same circuit as Video1, and if both standard A/V inputs and S-VIDEO inputs are connected, S-VIDEO has priority. Use one or the other.
To play video from your VCR:
2 Turn on your TV, then press INPUT. The INPUT SELECT menu opens.
3 Press ▲ or ▼ to select AV1/SVideo, then press OK to confirm.
4 Turn on your VCR, insert a videotape, then press Play on the VCR.
flowchart
graph TD
    A["Component IN"] --> B["AV IN"]
    B --> C["AV OUT"]
    C --> D["AV OUT"]
    D --> E["AV IN"]
    E --> F["AV OUT"]
    F --> G["VCR"]
    style A fill:#f9f,stroke:#333
    style G fill:#ccf,stroke:#333
    note right of B: A/V cables and S-Video cable
    note right of C: Y=Yellow (Video)
    note right of D: W=White (Audio L)
    note right of E: R=Red (Audio R)
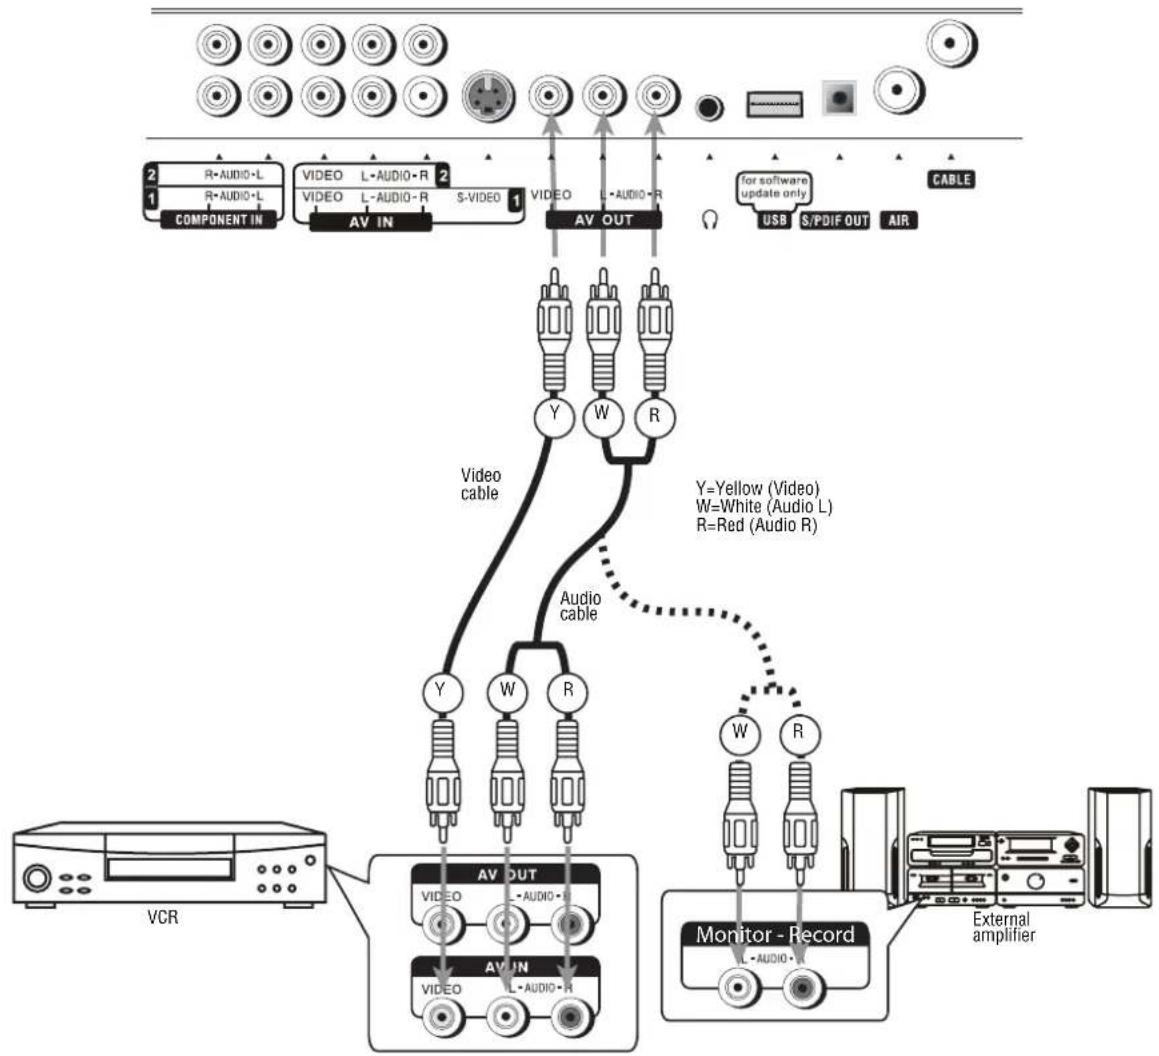
Connecting a VCR (for recording) or external amplifier
flowchart
graph TD
    A["Component In"] -->|R=AUDIO+L 1| B["AV IN"]
    C["Video L=AUDIO+R 2"] -->|S=VIDEO 1| D["AV OUT"]
    E["Video L=AUDIO+R"] --> D
    F["for software update only"] --> D
    G["USB S/PDIF OUT AIR"] --> D
    H["VCR"] --> I["AV OUT"]
    I --> J["Monitor - Record"]
    K["Audio cable"] -.-> L["Y=Yellow (Video) W=White (Audio L) R=Red (Audio R)"]
    L --> M["W R"]
    N["External amplifier"] --> O["Monitor - Record"]
    P["Audio cable"] --> Q["Y"]
    P --> R["W"]
    P --> S["R"]
To connect a VCR or amplifier:
1 Connect the video cables to the Video jacks on the TV and VCR.
2 Connect the audio cables to the TV, then connect them to the Audio (L/R) jacks on either the VCR or an external amplifier.
Note
Only analog TV programs and AV1/AV2 input sources can be output through the AV output jacks.
To record a program:
1 Turn on your TV, then select a program you want to record.
2 Turn on your VCR, then insert a videotape for recording.
3 Press the Record button on the VCR to begin recording.
Note
The operations of the amplifier may be different depending on your model. Read the amplifier's user guide to confirm correct operation.
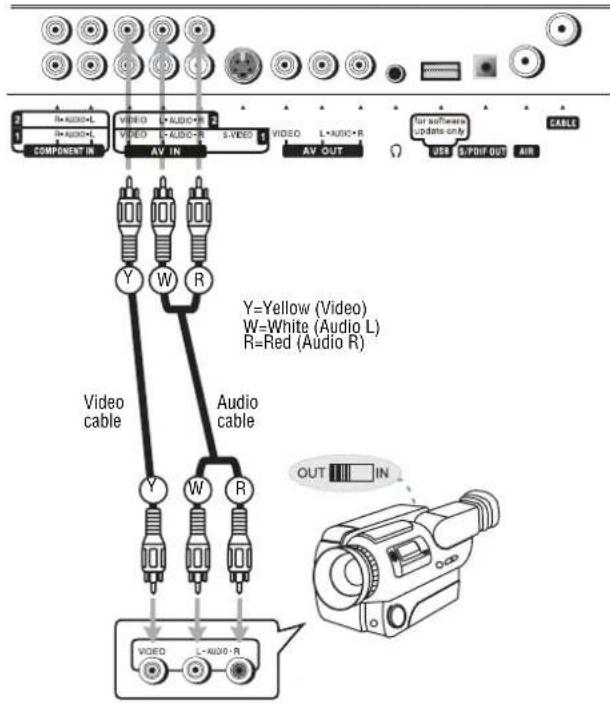
Connecting a camcorder
flowchart
graph TD
    A["Component IN"] --> B["Video"]
    A --> C["AV IN"]
    D["Video"] --> E["Y=Yellow (Video)"]
    D --> F["W=White (Audio L)"]
    D --> G["R=Red (Audio R)"]
    H["Video"] --> I["Y"]
    H --> J["W"]
    H --> K["R"]
    L["AV OUT"] --> M["For software update only"]
    N["USB Q/PIF OUT AIR"] --> O["CABLES"]
To connect a camcorder:
1 Connect the Audio/Video cables to the back of the TV.
2 Connect the audio/video cables to the camcorder.
To play from a camcorder:
1 Turn on your TV, then press INPUT. The INPUT SELECT menu opens.
2 Press ▲ or ▼ to select AV2, then press OK to confirm.
3 Turn on your camcorder, then set it to output mode.
4 Insert a tape into the camcorder, then press the camcorder's Play button.
Note
The operations of the camcorder may be different and is dependant on your model. Please read the user manual of your camcorder to confirm operation.
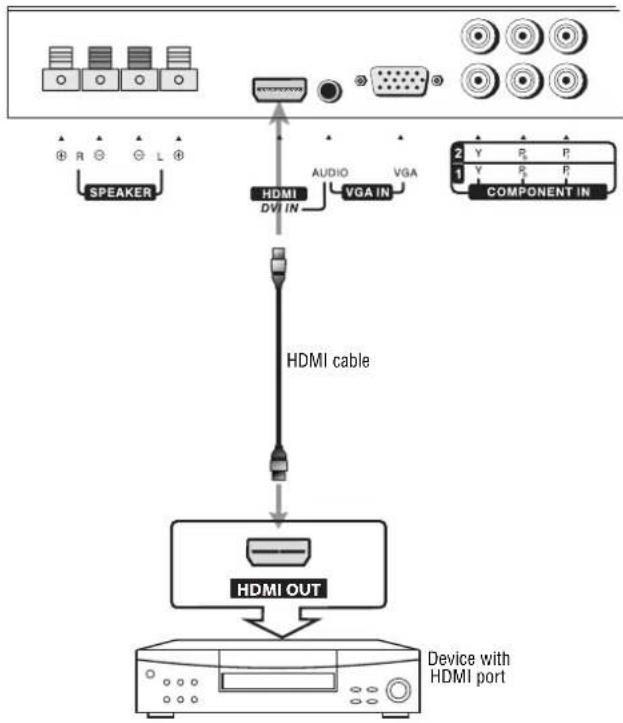
Connecting an HDMI device
flowchart
graph TD
    A["Speaker"] --> B["HDMI"]
    C["Speaker"] --> D["DI IN"]
    E["Speaker"] --> F["VGA IN"]
    G["Speaker"] --> H["COMPONENT IN"]
    I["HDMI OUT"] --> J["Device with HDMI port"]
    style A fill:#f9f,stroke:#333
    style C fill:#f9f,stroke:#333
    style E fill:#f9f,stroke:#333
    style G fill:#f9f,stroke:#333
    style I fill:#ccf,stroke:#333
    style J fill:#ccf,stroke:#333
To connect a DVD player or set-top box using HDMI:
- Connect the HDMI cable between the HDMI interface on the unit and HDMI output on the DVD player (or STB).
1 Connect the HDMI cable to the HDMI port on the back of the TV.
2 Connect the HDMI cable to the HDMI OUT port on the DVD player or set-top box.
To play from a DVD player or set-top box using HDMI:
1 Turn on your TV, then press INPUT. The INPUT SELECT menu opens.
2 Press ▲ or ▼ to select HDMI, then press OK to confirm.
3 Turn on your DVD player or set-top box, and set them to the correct mode. See the device's user guide for more information.
Note
If the device has only DVI output, use a DVI-to-HDMI adapter cable to connect to the HDMI port. Then connect the audio cable to the AUDIO jack next to VGA IN on the back of the TV.
Connecting component video

flowchart
graph TD
    A["Speaker"] --> B["COMPONENT"]
    C["HDMI"] --> B
    D["VGA IN"] --> B
    E["G"] --> B
    F["B"] --> B
    G["R"] --> B
    H["W"] --> I["AUDIO"]
    J["R"] --> I
    K["G"] --> I
    L["P"] --> I
    M["Y"] --> I
    N["P"] --> I
    O["S"] --> P["DI"]
    Q["AV OUT"] --> P
    R["R-AUDIO"] --> P
    S["S-VIDEO"] --> P
    T["DVI"] --> P
    U["AV OUT"] --> V["DI"]
    W["AV OUT"] --> V
    X["AV OUT"] --> V
    Y["AV OUT"] --> V
    Z["AV OUT"] --> V
    AA["AV OUT"] --> V
    AB["AV OUT"] --> V
    AC["AV OUT"] --> V
    AD["AV OUT"] --> V
    AE["AV OUT"] --> V
    AF["AV OUT"] --> V
    AG["AV OUT"] --> V
    AH["AV OUT"] --> V
    AI["AV OUT"] --> V
    AJ["AV OUT"] --> V
    AK["AV OUT"] --> V
    AL["AV OUT"] --> V
    AM["AV OUT"] --> V
    AN["AV OUT"] --> V
    AO["AV OUT"] --> V
    AP["AV OUT"] --> V
    AQ["AV OUT"] --> V
    AR["AV OUT"] --> V
    AS["AV OUT"] --> V
    AT["AV OUT"] --> V
    AU["AV OUT"] --> V
    AV["AV OUT"] --> V
    AW["AV OUT"] --> V
    AX["AV OUT"] --> V
    AY["Speaker"] --> AZ["COMPONENT"]
    BA["Speaker"] --> BB["COMPONENT"]
    BC["HDMI"] --> BD["COMPONENT"]
    BE["VGA IN"] --> BD
    BF["G"] --> BD
    BG["B"] --> BD
    BH["R"] --> BD
    BI["R"] --> BD
    BJ["G"] --> BD
    BK["W"] --> BD
    BL["R"] --> BD
    BM["W"] --> BD
    BN["R"] --> BD
    BO["AUDIO"]
    BP["L-AUDIO-R"]
    BQ["S-VIDEO"]
    BR["DVI"]
    BS["AV OUT"] --> BT["DI"]
    BU["AV OUT"] --> BT
    BV["AV OUT"] --> BT
    BW["AV OUT"] --> BT
    BX["AV OUT"] --> BT
    BY["AV OUT"] --> BT
Component color provides the luminance and color signals over separate channels, which provides the clearest, sharpest video available for your TV.
To connect a device using component video:
1 Connect the component video cable to the Y, Pb, and Pr input jacks on the TV.
2 Connect the cable to the Y, Pb, and Pr output jacks on the device.
3 Connect the audio cable to the AUDIO input jacks on the TV and the AUDIO output jacks on the external device.
To play component video from an external device:
1 Turn on your TV, then press INPUT. The INPUT SELECT menu opens.
2 Press ▲ or ▼ to select Component1 or Component2, then press OK to confirm.
3 Turn on your external device, and set it to the correct mode. See the device's user guide for more information.
Connecting a computer
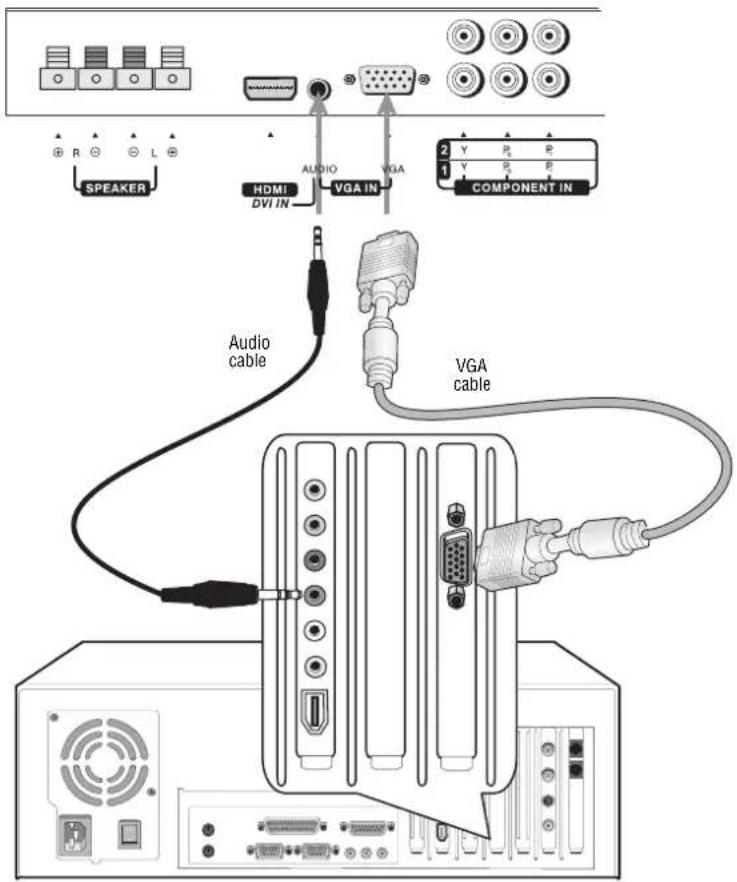
To connect a computer:
1 Connect a VGA cable to the VGA port on the computer and the VGA port on the TV.
2 Connect an audio cable to the LINE OUT or HEADPHONE jack on the computer and AUDIO input jack on the TV.
To play video from a computer:
1 Turn on your TV, then press INPUT. The INPUT SELECT menu opens.
2 Press ▲ or ▼ to select Analog RGB, then press OK to confirm.
3 Turn on your computer, and adjust the display properties as required.
Changing the on-screen menu language
You can change the language that the on-screen menu displays.
To change the on-screen menu language:
1 Press MENU, then press ◀ or ▶ to display the SYSTEM SETUP menu page.
2 Press to enter the System Setup menu.
3 Press ▼ or ▲ to select Language, then press ◀ or ▶ to select the language you want.
4 Press EXIT to return to TV viewing.
Programming your remote control
The remote control can control four devices, such as a VCR, DVD player, cable or satellite receiver, amplifier or tuner, or similar device.
To program the remote control:
1 Find the code for the device you want to program. (See "Device codes" on page 17.) If more than one code is listed for a device, write down all of the codes.
2 Turn on the device you want to program, and load any media if required (for example, a DVD).
3 Press a device key on the remote control.
- Use
DVD for DVD players or VCRs. - Use boxes.
CBL for cable or satellite set-top - Use
AUX for any other device.
4 Press and hold the SET button on the remote control until the LED blinks twice, then release the button.
5 Enter the first five-digit code for your device. The LED blinks once as each digit is entered. If the code is correct, the LED blinks twice.
Note
If the LED does not blink twice, repeat Steps 3 through 5 using a different code.
6 Aim the remote control at the device, then press the button. The device should turn off.
Note
If the device does not turn off, repeat steps 4 through 6 using a different code. If you cannot find a code that works, see "Searching for your code" on page 16.
7 Repeat Steps 1 through 6 to program additional devices. For future reference, write down each working device code below:
- AUX Code:
• CBL Code: ____ - CD Code:
- DVD Code:
- SAT Code:
- TNR Code:
- VCR Code:
8 Press the SET button to save the code and exit.
Searching for your code
If your device does not respond to the remote after trying all codes listed for your brand, or if your brand is not listed, try searching for your code.
To search for a code:
1 Press a device key.
2 Press and hold the SET button until the LED blinks twice, the release the button.
3 Enter 991, then the device group number (0=cable, 1=TV, 2=VCR, 3=audio). The LED blinks twice.
4 Aim the remote control at the device, then press the button. The remote sends codes from its library to the selected device, starting with the most common code first. If the device responds, go to Step 7.
5 If the device does not respond, press the CH+ button. Your remote control will try the next code. Keep pressing the CH+ button until the device responds. You can press the CH- button to try a previous code. Continue until the device responds.
6 To search for a code for another device, repeat steps 1 through 5.
7 Press the SET button to save the code and exit.
Checking the codes
If you programmed a device by searching for a code, you may want to know what four-digit code the remote is using.
To check the code:
1 Press the device button on the remote control.
2 Press and hold the SET button until the LED blinks twice, then release the button.
3 Enter 990. The LED blinks twice.
4 Press 1 and count the LED blinks. This is the first digit of the code. For example, if the LED blinks twice, the first digit is 2. If the LED does not blink, the first digit is 0.
5 Repeat step 4 using 2 for the second digit, 3 for the third digit, 4 for the fourth digit, and 5 for the fifth digit.
6 Press the SET button to exit.
Programming the volume lock
The remote control comes preset to let you control the volume of each connected device. You can change the volume lock so that one device's volume controls volume in all modes.
After you lock the volume control, you can unlock the volume control for a specific device so you can control the volume for that device independently.
To lock the volume control:
1 Press and hold the SET button until the LED blinks twice, then release the button.
2 Enter 993, then press the device button for the device you want to control the volume. The LED blinks twice. When you press the VOL+, VOL−, or MUTE button on the remote control, the device you selected controls the volume regardless of which device you are using.
To unlock the volume control:
1 Press and hold the SET button until the LED blinks twice, then release the button.
2 Enter 993, then press VOL+ button. The LED blinks four times. The volume control is unlocked.
To unlock a single device's volume control:
1 Press the device key.
2 Press and hold the SET button until the LED blinks twice, then release the button.
3 Enter 993, then press VOL—button. The LED blinks four times. The volume control for the device you selected is unlocked.
Device codes
VCR codes
| ABS 21972 | |
| Admiral 20048, 20209 | |
| Aiko 20278 | |
| Aiwa 20037, 20479 | |
| Alienware 21972 | |
| America Action 20278 | |
| American High 20035 | |
| Amoisonic 20479 | |
| Anam 20162, 20037, 20240, 20278 | |
| Anam National 20162 | |
| Asha | 20240 |
| Audiovox | 20037, 20278 |
| Beaumark | 20240 |
| Bell & Howell | 20104 |
| Broksonic | 20184, 20121, 20209, 20002,20479 |
| Calix 20037 | |
| Canon | 20035 |
| Carver | 20081 |
| CCE 20072, 20278 | |
| Changhong | 20048, 20081 |
| Citizen | 20037, 20278 |
| Colt | 20072 |
| Craig | 20037, 20047, 20240, 20072 |
| Curtis Mathes | 20060, 20035, 20162 |
| Cybernex | 20240 |
| CyberPower | 21972 |
| Daewoo | 20045, 20104, 20278 |
| Dell | 21972 |
| Denon | 20042 |
| DirecTV | 20739 |
| Durabrand 20039, 20038 | |
| Electrohome | 20037 |
| Electrophonic | 20037 |
| Emerex | 20032 |
| Emerson | 20035, 20037, 20184, 20240,20045, 20121, 20043, 20209, 20002, 20278, 20479 |
| Fisher | 20047, 20104 |
| Fuji | 20035, 20033 |
| Fujitsu | 20045 |
| Gateway | 21972 |
| GE | 20060, 20035, 20240 |
| General | 20045 |
| Go Video | 20432 |
| GoldStar | 20037, 20209, 20038, 20225 |
| Haojie | 20240 |
| Harman/Kardon | 20081, 20038 |
| Harwood | 20072 |
| Hewlett Packard | 21972 |
| HI-Q | 20047 |
| Hitachi | 20037, 20042, 20055 |
| Howard Computers | 21972 |
| HP | 21972 |
| Hughes Network Systems | 20042, 20739 |
| iBUYPOWER | 21972 |
| JVC | 20045, 20067 |
| KEC 20037, 20278 | |
| Kenwood | 20067, 20038 |
| KLH 20072 | |
| Kodak | 20035, 20037 |
| Kolin | 20043 LG 20037, 20045, 20042, 20209,20038 |
| Logik | 20072 |
| LXI | 20037 |
| Magnavox | 20035, 20039, 20081 |
| Magnin | 20240 |
| Marantz | 20035, 20081 |
| Marta 20037 | |
| Matsushita | 20035, 20162 |
| Media Center PC | 21972 |
| MEI | 20035 |
| Memorex | 20035, 20162, 20037, 20048,20039, 20047, 20240, 20104, 20209, 20479 |
| MGA 20240, 20043 | |
| MGN Technology 20240 | |
| Microsoft 21972 | |
| Mind 21972 | |
| Minolta 20042 | |
| Mitsubishi 20067, 20043 | |
| Motorola 20035, 20048 | |
| MTC 20240 | |
| Multitech 20072 | |
| NEC 20035, 20037, 20048, 20104,20067, 20038 | |
| Newave 20037 | |
| Nikko 20037 | |
| Noblex 20240 | |
| Northgate 21972 | |
| Olympus 20035 | |
| Optimus | 21062, 20162, 20037, 20048,20104, 20432 |
| Orion | 20184, 20209, 20002, 20479 |
| Panasonic | 21062, 20035, 20162, 20616,20225 |
| Penney | 20035, 20037, 20240, 20042,20038 |
| Pentax | 20042 |
| Philco | 20035, 20479 |
| Philips | 20035, 20081, 20739, 20618 |
| Pilot | 20037 |
| Pioneer 20042, 20067 | |
| Polk Audio | 20081 |
| Profitronic | 20240 |
| Proscan | 20060 |
| Protec | 20072 |
| Pulsar | 20039 |
| Qisheng | 20060 |
| Quasar | 20035, 20162 |
| Radix 20037 | |
| Randex 20037 | |
| RCA | 20060, 20035, 20240, 20042,20880 |
| Realistic | 20035, 20037, 20048, 20047,20104 |
| ReplayTV 20616 | |
| Runco | 20039 |
| Sampo | 20037, 20048 |
| Samsung | 20240, 20045, 20432 |
| Sanky | 20048, 20039 |
| Sansui 20067, 20209, 20479 | |
| Sanyo | 20047, 20240, 20104 |
| Scott | 20184, 20045, 20121, 20043 |
| Sears | 20035, 20037, 20047, 20042,20104 |
| Sharp | 20048, 20209 |
| Shintom | 20072 |
| Shogun | 20240 |
| Singer | 20072 |
| Sonic Blue | 20616 |
| Sony 20035, 20032, 20033, 20636,21972 | |
| STS 20042 | |
| Sylvania | 20035, 20081, 20043 |
| Systemax | 21972 |
| Tagar Systems | 21972 |
| Tashiko 20037 | |
| Tatung | 20045, 20067 |
| Technics | 20035, 20162 |
| Teco 20035, 20037, | 20048, 20038 |
| Teknika 20035, 20037 | |
| Tivo 20636, 20618, | 21503, 20739 |
| TMK | 20240 |
| Toshiba | 20045, 20042, 20067, 20043,21503,21008, 21972 |
| Totevision | 20037, 20240 |
| Touch | 21972 |
| Unitech 20240 | |
| Vector | 20045 |
| Vector Research | 20038 |
| Victor | 20067 |
| Video Concepts | 20045 |
| Videomagic | 20037 |
| Videosonic | 20240 |
| Viewsonic | 21972 |
| Wards | 20060, 20035, 20048, 20047,20081,20240, 20042, 20072 |
| WhiteWestinghouse | 20209, 20072 |
| XR-1000 | 20035, 20072 |
| Yamaha | 20038 |
| Zenith | 20039, 20033, 20209, 20479 |
| ZT Group 21972 |
DVD player codes
| Aiwa | 20641, 21912 |
| Akai 20770 | |
| Allegro | 20869 |
| Apex Digital | 20672, 20717, 20797, 21061,20796, 21056, 21937, 20794, 21020, 21915 |
| Blaupunkt | 20717 |
| Blue Parade | 20571 |
| Broksonic | 20695 |
| Changhong | 20627, 21061 |
| CineVision | 20869 |
| Coby 21086 | |
| Curtis Mathes | 21087 |
| CyberHome | 21024, 21023, 21129, 20816, 21117 |
| Daewoo | 20833, 21172, 20869 |
| Denon | 20490 |
| DVD2000 | 20521 |
| Emerson | 20591, 20675 |
| Enterprise | 20591 |
| Fisher | 21919 |
| Funai 20675 | |
| Gateway 21158, 21073 | |
| GE 20522, 20717 | |
| Go Video 20744, 20833, 21099, 20783,21075, 20869, 21730 | |
| Greenhill 20717 | |
| Harman/Kardon 20582, 20702 | |
| Hitachi 20573, 20664, 21919 | |
| Hiteker 20672 | |
| Initial 20717 | |
| Integra 20627, 21924 | |
| JBL 20702 | |
| JVC 20558, 20623, 20867 | |
| Kenwood 20490, 20534 | |
| KLH 20717, 21020, 21149 | |
| Koss 20651, 21980 | |
| Lasonic 20798 | |
| LG 20591, 20869, 20801 | |
| Liquid Video | 21980 |
| Lite-On | 21158, 21058 |
| Loewe | 20511 |
| Magnavox | 20503, 20539, 21976, 21914, 20675 |
| Marantz | 20539 |
| Memorex 20695 | |
| Microsoft | 20522 |
| Mintek | 20717 |
| Mitsubishi | 21521, 20521 |
| Nesa | 20717 |
| Norcent | 21003 |
| Onkyo | 20503, 20627, 21924, 20792 |
| Oritron | 20651, 21980 |
| Panasonic | 20490, 21762, 21990 |
| Philips | 20503, 20539, 20646, 21914 |
| Pioneer | 20525, 20571 |
| Polaroid | 21086, 21061 |
| Polk Audio | 20539 |
| Portland | 20770 |
| Proscan | 20522 |
| Qwestar | 20651 |
| RCA | 20522, 20571, 20717, 20822 |
| Rio | 20869 |
| Rotel | 20623 |
| Sampo | 20752, 20698 |
| Samsung 20490, 20573, 21932, 21075, 20820 | |
| Sansui | 20695 |
| Sanyo | 20695 |
| Sharp | 20630, 20752 |
| Sharper Image | 21117 |
| Sherwood | 20770 |
| Shinco 20717 | |
| Shinsonic | 20533 |
| Sonic Blue | 20869, 21099 |
| Sony 20533, 20864, 21033, 21904, 21903 | |
| SVA 20717 | |
| Sylvania | 20675 |
| Symphonic | 20675 |
| Teac | 20717, 21984, 20809 |
| Technics | 20490 |
| Theta Digital | 20571 |
| Toshiba | 20503, 20695 |
| Urban Concepts | 20503 |
| Xbox 20522 | |
| Yamaha | 20490, 20539, 20545 |
| Zenith | 20503, 20591, 20869 |
Cable converter codes
| ABC | 00003, 00008, 00014 |
| Americast | 00899 |
| Bell & Howell | 00014 |
| Bell South | 00899 |
| Clearmaster | 00883 |
| ClearMax 00883 | |
| Coolmax 00883 | |
| Daeryung | 01877, 00877, 00477, 00008 |
| Digi 00637 | |
| Director | 00476 |
| Dumont | 00637 |
| Gehua | 00476 |
| General Instrument | 00476, 00810, 00276, 00003,00014 |
| GoldStar | 00144 |
| Hamlin | 00009, 00273 |
| Hitachi 00014 | |
| Jerrold 00476, 00810, 00276, 00003,00012, 00014 | |
| KNC | 00008 |
| LG 00144 | |
| Memorex 00000 | |
| Motorola 00476, 00810, 00276, 01254,01376 | |
| MultiVision | 00012 |
| Pace | 01877, 00237 |
| Panasonic | 00000, 00008, 00107 |
| Panther | 00637 |
| Paragon | 00000 |
| Philips | 00317, 01305 |
| Pioneer | 01877, 00877, 00144, 00533 |
| Pulsar | 00000 |
| Quasar | 00000 |
| RadioShack | 00883 |
| Regal | 00279, 00273 |
| Runco | 00000 |
| Samsung | 00000, 00144 |
| Scientific Atlanta | 01877, 00877, 00477, 00008 |
| Sony 01006 | |
| Starcom 00003, 00014 | |
| Supercable 00276 | |
| Supermax 00883 | |
| Tocom 00012 | |
| Torx 00003 | |
| Toshiba 00000 | |
| Trans PX 00276 | |
| Tristar 00883 | |
| TS 00003 | |
| V2 00883 | |
| Viewmaster 00883 | |
| Vision 00883 | |
| Vortex View 00883 | |
| Zenith 00000, 00525, 00899 | |
Audio amplifier codes
| Bose 30674 | |
| GE | 30078 |
| JVC | 30331 |
| Marantz | 30321 |
| Nakamichi 30321 | |
| NEC | 30264 |
| Optimus | 30395 |
| Realistic | 30395 |
| Sansui | 30321 |
| Shure | 30264 |
| Sony | 30689 |
| Soundesign | 30078 |
| Victor | 30331 |
| Wards | 30078 |
| Yamaha | 30354, 30133 |
Audio amplifier/tuner codes
| ADC | 30531 |
| Aiwa | 31405, 31243, 30121 |
| Anam | 31609, 31074 |
| Audiotronic | 31189 |
| Bose | 31229 |
| Capetronic | 30531 |
| Carver | 31189 |
| Coby | 31263 |
| Denon | 31360, 31142, 30904 |
| Fonmix | 31360 |
| GloryHorse | 31263 |
| Harman/Kardon | 30110 |
| Hitachi | 31273 |
| Inkel | 30027 |
| Integra | 30135 |
| JBL | 30110 |
| JVC | 30074, 31263 |
| Kenwood | 31313, 31570, 30027 |
| KLH | 31428 |
| Magnavox | 31189, 31269, 30531 |
| Marantz | 31189, 31269, 30039 |
| MCS | 30039 |
| Onkyo | 30842, 30135 |
| Optimus | 31023, 30670, 30531, 31074 |
| Panasonic | 31518, 30039 |
| Philips | 31189, 31269 |
| Pioneer | 31023, 30150, 30014, 30630, 30531 |
| Proscan | 31254 |
| Qisheng | 31609 |
| Quasar | 30039 |
| RadioShack | 31263 |
| RCA | 31023, 31609, 31254, 30531, 31074 |
| SharperImage | 31263 |
| Silsonic | 30176 |
| Sony | 31258, 31759 |
| Soundesign | 30670 |
| Stereophonics | 31023 |
| Sunfire | 31313 |
| Teac | 31074, 31267 |
| Technics | 31308, 31518, 30039 |
| Thorens | 31189 |
| Victor | 30074 |
| Wards | 30014 |
| Yamaha | 30176, 31276, 31176 |
CD player codes
| Aiwa | 30157 |
| Burmester | 30420 |
| California Audio Labs | 30029 |
| Carver | 30157, 30179 |
| Denon | 30873 |
| DKK | 30000 |
| DMX Electronics | 30157 |
| Dynamic Bass | 30179 |
| Fisher | 30179 |
| Garrard | 30420 |
| Genexxa | 30032 |
| Harman/Kardon | 30157, 30173 |
| Hitachi | 30032 |
| Integra | 30101 |
| JVC | 30072 |
| Kenwood | 30826, 30626, 30028, 30037, 30036, 30190 |
| Krell | 30157 |
| Linn | 30157 |
| Magnavox | 30157 |
| Marantz | 30626, 30029, 30157 |
| MCS | 30029 |
| Miro | 30000 |
| Mission | 30157 |
| MTC | 30420 |
| NSM | 30157 |
| Onkyo | 30868, 30101 |
| Optimus | 31063, 30000, 30032, 30037, 30420, 30179, 31075, 30145 |
| Panasonic | 30029 |
| Parasound | 30420 |
| Philips | 30626, 30157 |
| Pioneer | 31063, 31062, 30032 |
| Polk Audio | 30157 |
| Proton | 30157 |
| QED | 30157 |
| Quad | 30157 |
| Quasar | 30029 |
| RadioShack | 31075 |
| RCA | 31062, 30032, 30420, 30179, 30053 |
| Realistic | 30420, 30179 |
| Rotel | 30157, 30420 |
| SAE | 30157 |
| Sansui | 30157 |
| Sanyo | 30179 |
| SAST | 30157 |
| Sharp | 30861, 30037 |
| Silsonic | 30888, 30036 |
| Sonic Frontiers | 30157 |
| Sony | 30490, 30000, 30100 |
| Soundesign | 30145 |
| TAG McLaren | 30157 |
| Tascam | 30420 |
| Teac | 30420 |
| Technics | 30029 |
| Victor | 30072 |
| Wards | 30157, 30053 |
| Yamaha | 30888, 30036 |
| Zonda | 30157 |
Satellite receiver codes
| AlphaStar | 00772 |
| Chaparral | 00216 |
| Crossdigital | 01109 |
| DirecTV | 00392, 00566, 00639, 01142, 00247, 00749, 01749, 00724, 00819, 01856, 01076, 01109, 00099, 01392, 01640, 01442, 01414, 01108 |
| Dish Network System | 01005, 00775, 01505 |
| Dishpro | 01005, 00775, 01505 |
| Echostar | 01005, 00775, 01505 |
| Expressvu | 00775 |
| GE | 00566 |
| General Instrument | 00869 |
| GOI | 00775 |
| Goodmans | 01246 |
| Hisense | 01535 |
| Hitachi | 00819, 00222, 01250 |
| HTS | 00775 |
| Hughes Network Systems | 01142, 00749, 01749, 01442 |
| HLo | 01535 |
| JVC | 00775 |
| LG | 01414,01226 |
| Magnavox | 00724, 00722 |
| Memorex | 00724 |
| Mitsubishi | 00749 |
| Motorola | 00869 |
| NEC | 01270 |
| Next Level | 00869 |
| Panasonic | 00247, 00701 |
| Paysat | 00724 |
| Philips | 01142,00749, 01749, 00724, 01076, 00722, 00099, 01442 |
| Proscan | 00392, 00566 |
| Proton | 01535 |
| RadioShack | 00869 |
| RCA | 00392, 00566, 00855, 00143, 01392 |
| Samsung | 01276, 01109, 01108 |
| Sanyo | 01219 |
| SKY | 00856 |
| Sony | 00639, 01640 |
| Star Choice | 00869 |
| Tivo | 01142, 01442 |
| Toshiba | 00749, 01749, 00790, 01285 |
| UltimateTV | 01640, 01392 |
| Uniden | 00724,00722 |
| US Digital | 01535 |
| USDTV | 01535 |
| Voom | 00869 |
| Zenith | 00856, 01856 |
Using your TV
Turning the TV on and off
To turn on your TV:
1 Make sure that the power cord is connected to your TV and a power outlet.
2 Press the button to turn on your TV.
3 Press the button again to turn off your TV. You should wait at least three seconds before turning the TV on again.
Using the remote control
To use the remote control:
- Point the remote control towards the remote sensor on the front of your TV.
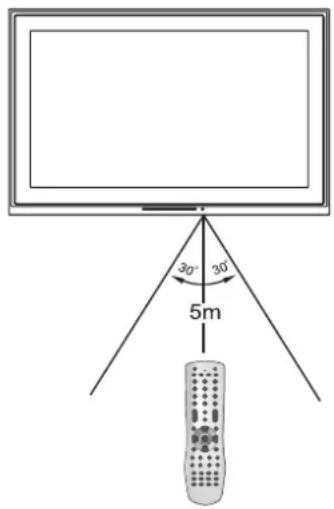
Notes
- This remote control is an universal remote control. If your remote control does not work correctly when you operate the unit, please try to press TV button.
- Objects between the remote control and sensor window may prevent proper operation.
Cautions
- Do not expose the remote control to shock or liquids.
- Do not use the remote control in an area with high humidity.
- Do not place the remote control in direct sunlight.
- Do not place objects, such as furniture, between the remote control and the remote sensor.
- The remote control may not work if direct sunlight or bright light shines on the remote sensor. Either move your TV or change the angle at which you use the remote control.
Navigating the menus
This TV has a simple, easy-to-use on-screen menu (OSD) for accessing and adjusting TV features. You can also display the status of TV features while watching a program.
| Main Menu Overview (TV Mode)(Items marked with * do not appear in all modes) | |||||
| PICTURE IMAGE ADJUST AUDIO SYSTEM SETUP | CHANNEL SETUP | CONTENT | |||
| BrightnessContrastSharpnessColorTintBacklightColor TempUser Color Temp* | Image sizeH position*V position*Freeze Image | Headphone volumeTrebleBassBalanceFocus window out*AVC | LanguageScreen SaverTransparencyOSD Time OutClock SetupSource Name EditClosed Caption Setup | TV SourceCurrent ChannelChannel LabelChannel SkipFavorite ChannelAuto SearchInput SelectSignal Strength* | Content Password*Set PasswordPassword ConfirmParental ControlMovie BlockCanadian EnglishCanadian FrenchTV Blocking |
Menu navigation
To navigate through the OSD:
1 Press MENU to display the Main Menu.
2 Press or to select the menu page you want, then press to enter that menu.
3 Within the menu, press or to select a setting, and press or to adjust the setting or enter a sub-menu. For some settings, you must press OK to confirm or toggle the setting.
4 Press MENU to return to the previous menu, and press EXIT to exit the OSD and return to TV viewing.
Note
To simplify the procedures in this user guide, it's assumed that you use the remote control for navigating the menus, although some button actions can be duplicated using buttons on the TV.
Selecting the input source signal
1 Press the INPUT button to display INPUT SELECT menu.
INPUT SELECT
√ TV
AV1/SVideo
AV2
Component1
Component2
Analog RGB
HDMI
Up/Down:Change
OK:Select Input:Exit
2 Press or to select the input source you want, then press OK to confirm. (Analog RGB=VGA)
3 Press INPUT to clear the screen.
Note
- You can also use the CHANNEL SETUP menu to select the input source.
- To edit the source name (for example, to change "Analog RGB" to "VGA"), see "Editing the video source names" on page 29.
Displaying the information banner
The information banner displays status information such as channel number and signal source. Depending on the mode, different information is displayed.
To display the information banner:
- Press INFO. The information banner appears. In DTV mode, it displays:
• Channel number and name
- Air or Cable
- Resolution
- Current time
- Caption icon (if closed caption is offered), Clock icon (if timer has been setup) and Lock icon (if blocking scheme is enabled)
- Current program broadcast progress
- Current program start and end play times
Note
Information banner content varies, depending on the broadcaster and your settings.
Memorizing channels
When you turn on the TV for the first time, you should perform an auto channel search to set up stations on your TV. Before you perform an auto search, you should select the correct TV source.
Selecting the TV source
Before your TV can memorize the available channels, you must specify the type of signal source that is connected to the TV. (For example, an antenna or cable system.)
To select a source:
1 In single window status (with no picture-in-picture setting active), press MENU to display the Main Menu.
Note
If a picture-in-picture mode is active, your TV cannot do an auto search.
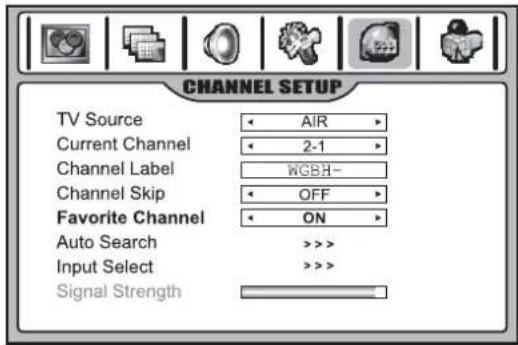
2 Press or to display the CHANNEL SETUP menu page, then press to enter the menu.
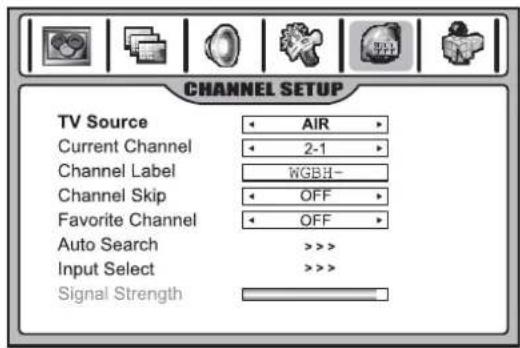
3 Press ▼ or ▲ to select TV Source, then press ◀ or ▶ to select AIR or CABLE.

AIR if using an antenna. CABLE if using Cable TV.
Auto channel search
You should perform an auto search to search for available broadcast and cable/set-top box channels. After the TV finishes searching for channels, the TV stores the valid channels in memory.
- If TV Source is set to AIR, highlight Auto Search, then press or The TV begins searching for all available TV or DTV channels.
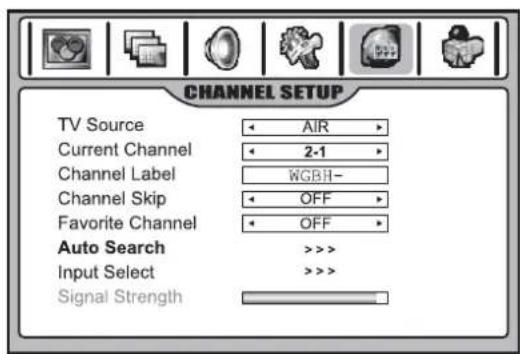
- OR -
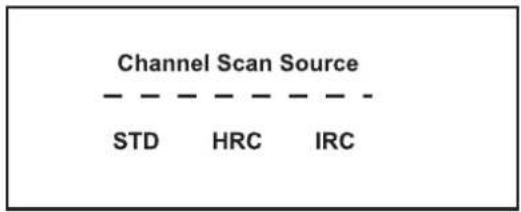
If TV Source is set to CABLE, highlight Auto Search, then press ◆ or ▶The Channel Scan Source window opens. Press ◆ or to select STD (the most common type of Cable TV), HRC, or IRC, then press OK to begin the auto channel search. The TV begins searching for all available CATV or CADTV channels.
Note
f you want to stop the auto search, press MENU.
Skipping channels
After saving channels into memory, you can skip unnecessary channels so that only the channels you want to watch are selected with the CH+/-buttons.
To skip channels:
1 Open the CHANNEL SETUP menu.
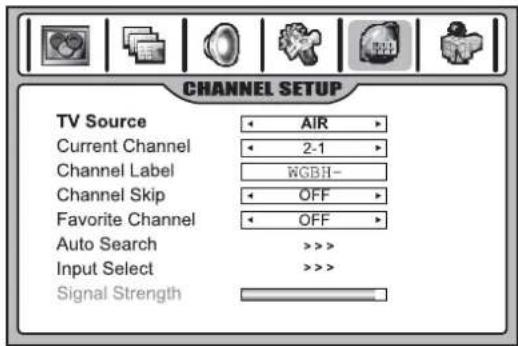
2 Highlight Current Channel, then press ◀ or ▶ to select an unwanted channel.
3 Highlight Channel Skip, then press ◀ or ▶ to change the setting to ON.
4 If you want to skip other unwanted channels, repeat Steps 2-3.
5 Press EXIT to exit. The channels you specified will be skipped the next time you press the CH+/- buttons.
Checking the DTV signal strength
You can check the DTV signal strength bar to check the strength of your DTV signal and to determine whether you need to adjust your antenna or digital cable input. The stronger the signal strength, the less likely you are to experience picture degradation.
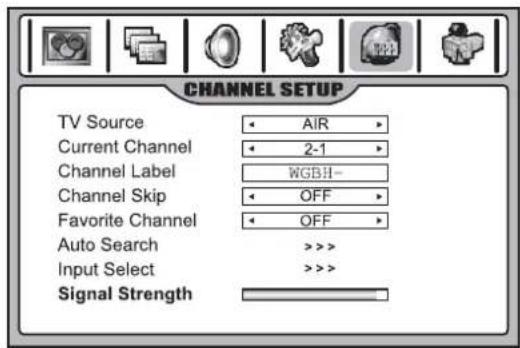
To check DTV signal strength:
- Open the CHANNEL SETUP menu. At the bottom of the screen, the Signal Strength bar is displayed, indicating the strength and quality of signal for the current DTV channel.
Adding a channel label
You can assign a name to analog channels.
To add a label to a channel:
1 Navigate to the CHANNEL SETUP menu, then highlight Channel Label.
2 Press OK to enter into channel label editing mode.
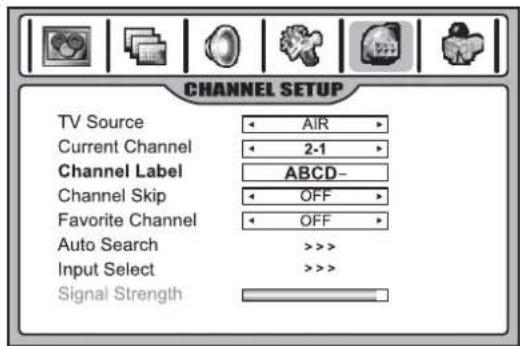
3 Press or to move the cursor, and press or to select the character.
4 Press MENU to exit the editing mode.
5 Press EXIT button to return to TV viewing.
Note
The names of digital broadcasting channels are automatically assigned, so cannot be assigned by users.
Favorite channel setup
You can create a favorite channel list, so you can quickly and easily tune to your favorite channels. You can program up to ten channels.
To create a Favorite channel list:
1 Open the CHANNEL SETUP menu.
2 Highlight Current Channel, then press ◀ or to select your favorite channel.
3 Highlight Favorite Channel, then press ◀ or ▶ to select ON.
4 Repeat the above steps to set more favorite channels (up to ten).
5 To access your favorite channels, press FAVORITE, press or to select the channel, then press OK to tune to that channel.
Selecting channels
Information about USA channel numbering
• ATSC/PSIP channels have two-part channel numbers:
• Major channel number (the "5" in channel 5-1")
- Minor channel number (the "1" in channel "5-1")
- In the United States, the major channel number is usually the same for both analog and digital channels. (It is equal to the NTSC channel number for existing broadcasters.) A minor channel number of 0 is used for a broadcaster's analog channel.
Example:
• Original NTSC channels for Des Moines, Iowa:
5, 8, 11, 13, 17
- Possible NTSC + ATSC Channels for Des Moines:
5-0, 8-0, 11-0, 13-0, 17-0 (channel numbers for existing analog channels)
• 5-1, 5-2, 8-1, 8-2, 8-3, 8-4, 13-1 (channel numbers for digital channels)
Using the CH+/- buttons
To use the CH+/- buttons:
- Press CH+ or CH-. The TV cycles among all available channels found (but skipping the channels that are set to be skipped).
Using the number pad
- Press the number buttons (0-9) and the dash (-) button to go directly to that channel.
For example, if you want to select channel 8-3, press 8-3 on the remote control. (Make sure that you press the buttons within three seconds of each other, or the channel won't be entered correctly.)
Note
In some situations, virtual channel numbers do not correspond to physical frequencies.
- To select an analog channel, you can directly input its major channel number without entering the minor channel number (0).
Switching between two channels
To switch between two channels:
- Press (Last). The TV tunes to the last channel you viewed. Press again to switch back to the original channel.
Selecting a channel using the Program list
After auto-search, a program (channel) list is created. You can select channels from the program list.
To select a channel using the Program list:
1 Press LIST. The PROGRAM LIST opens.
2 Press or to highlight the channel, then press OK to select.
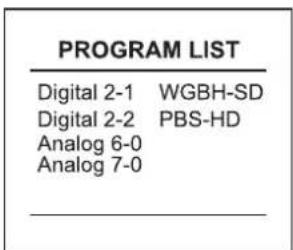
Note
The above illustration is only an example. Your screen may vary.
Selecting a channel using the Favorite list
If you have created your Favorite channel list, you can use the list to tune to your favorite stations.
To select a channel using the Favorite list:
1 Press FAVORITE. The Favorite list opens.
2 Press or to highlight the channel, then press OK to select.
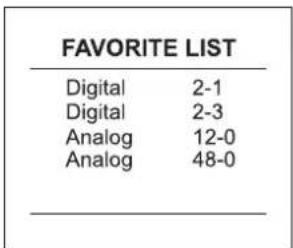
Note
• Information displayed in this list is only for the channel being viewed in the main window.
- The above illustration is only an example. Your screen may vary.
Adjusting picture quality
Customizing the picture
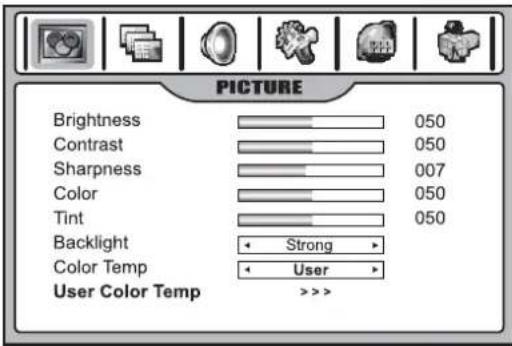
1 Press MENU to display the Main Menu.
2 Press or to display the PICTURE menu page, then press to enter the menu.
Note
The OSD illustrations shown are as the menu appears in TV mode. The menu items may appear different when the TV is in a different mode.
3 Press or to select a setting, then press ◀ or ▶ to adjust the setting's value.
| Option Function Controls | |||
| Brightness Adjusts screen brightness for easier viewing of a dark picture, such as night scenes and dark objects. | lighter darker | ||
| Contrast Adjusts image contrast. stronger | weaker | ||
| Sharpness | Adjusts and improves image sharpness. | sharper softer | |
| Color | Adjusts color saturation. | stronger weaker | |
| Tint | Adjusts tint. | greenish purplish | |
| Backlight | Adjusts panel backlight brightness. | Strong/Weak/Medium | |
| Color Temperature | Adjusts the color temperature of the image. Set toWarm(to enhance “hotter” colors such as red), or set toCoolto see less intense colors with more blue. | Cool/Warm/User | |
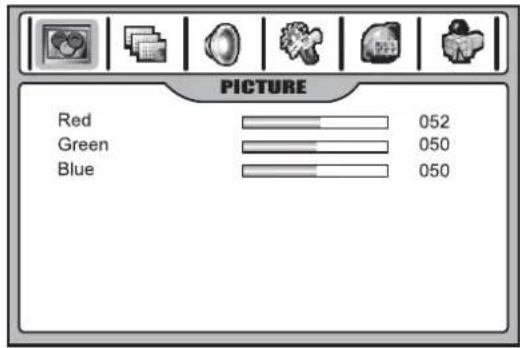
| User Color Temperature | Red | Adjusts the red of the image. | |
| Green | Adjusts the green of the image. | ||
| Blue | Adjusts the blue of the image. | ||
4 When Color Temp is set to User, you can enter into a User Color Temp sub-menu to customize the color temperature.
5 Press EXIT to return to TV viewing.
Selecting the picture mode
You can select the picture quality instantly among three preset modes and one user-set mode.
To select the picture quality:
- Press the PICTURE button repeatedly to select a picture setting. You can select:
• NATURE: Select for a normal picture.
• SOFT: Select for a finely detailed picture.
• BRIGHT: Select for a bright picture.
- USER: The picture quality you set.
Adjusting the image
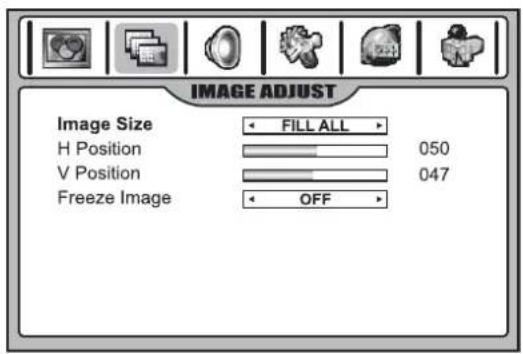
Adjusting image aspect ratio
You can choose the aspect ratio (display proportions) according to your video signal type or personal preference.
To adjust the image aspect ratio:
1 Press the ZOOM button repeatedly to select the desired aspect ratio. You can also adjust Image size in the IMAGE ADJUST menu.
You can select:
• NORMAL
Selects the correct aspect ratio to match the source's image. (4:3 to 4:3, 16:9 to 16:9)
• WIDE
Stretches the picture horizontally at the edges, while maintaining a good aspect ratio at the center of the screen.
• ZOOM
Magnifies the picture while maintaining correct screen proportions.
• FILL ALL
Displays a full-screen picture.
Adjusting screen position
To adjust the screen position:
1 Navigate to the IMAGE ADJUST menu.
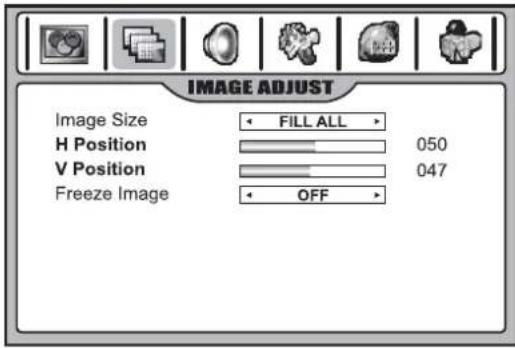
2 Highlight H Position or V Position, then press or to adjust the settings.
Note
You can adjust screen position only for analog channels. It's unnecessary to adjust screen position for digital channels.
Freezing the picture
You can freeze the picture on the screen. Although a non-moving picture remains on the screen, the video source will still be playing in the background (unless you pause playback).
To freeze the picture:
1 Press the FREEZE button. The image freezes on the screen. Press FREEZE again to resume viewing the video playback.
2 You can also set Freeze Image to ON in the IMAGE ADJUST menu to freeze the picture. To restore, set it to OFF.
Note
If a fixed image is displayed on the screen for a long time, that fixed image may become imprinted on the screen and remain visible.
Adjusting sound
Adjusting the volume
To adjust the volume:
- Press the VOL+ or VOL- buttons.
To mute the volume:
- Press the MUTE button to temporarily turn off all sound. Press the MUTE button again to restore sound.
Customizing the sound
1 Press MENU to display the main menu.
2 Press or to display the AUDIO menu page, then press to enter the menu.
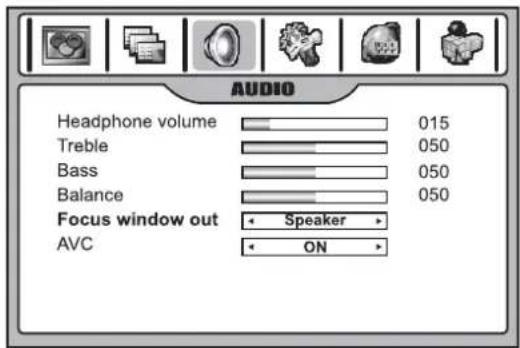
3 Press or to select a setting, then press ◀ or ▶ to adjust the setting.
4 Press EXIT to return to TV viewing.
| Option Function Controls | ||
| Headphone volume | Adjusts headphone volume. stronger◀ weaker | |
| Treble Adjusts | treble (high sounds). | ▶ stronger◀ weaker |
| Bass Adjusts | bass (low sounds) | ▶ stronger◀ weaker |
| Balance | Adjusts volume balance (left and right volumes). | ▶ Higher volume from right speaker.◀ Higher volume from left speaker. |
| Focus window out (PIP or PBP mode only) | In twin window mode (PIP or PBP), ifSpeakeris selected (default), the focus window's sound is output from speakers while the other window's sound is output from the headphones jack.IfHeadhoneis selected, then the focus window's sound is output from the headphones jack, while the other window's sound is output from speakers.IfBothis selected, then the focus window's sound is output from speakers and the headphone jack. (The other window's sound is automatically set to None). | Speaker/Headphone/Both |
| AVC (auto volume control) | Each broadcasting station has its own signal conditions, which can make it necessary to adjust the volume every time the channel is changed. Turning AVCOnlets you automatically adjust the volume of the channel you want by lowering the sound output when the modulation signal is high or by raising the sound output when the modulation signal is low. | ON/OFF |
Note
- The menu items differ, depending on the current TV mode.
- The Focus Window Out menu is available only in a twin-window mode (PIP or PBP) and either window program is not in Rating Blocked mode. If Both is selected and, later, either window program enters a Rating Blocked mode, the sound mutes. To cancel mute, exit the Rating Blocked state for the program, then change this setting to a different value.
- The main picture is the default focus window. You can select the sub-picture as the focus window by pressing OK. A green border appears around the focus window.
Selecting the sound mode
You can quickly select the sound quality from three preset modes and one user-set mode.
To select a sound mode:
- Press the AUDIO button repeatedly to select the sound quality you want. You can select:
• NEWS: Select for a speech or conversation program.
• MOVIE: Select for a movie program.
• MUSIC: Select for a music program.
- USER: The sound quality you set.
Setting up Stereo/SAP broadcasts
This TV can receive MTS stereo programs and any SAP (Secondary Audio Program) that may accompany the stereo program. This type of signal is available only from analog channels.
You can select Stereo or SAP only when the TV station transmits these signals. Mono sound is automatically received if the broadcast is only in monophonic. You can also select Mono if you are having difficulty receiving a stereo signal.
To select the MTS/SAP audio mode:
1 When viewing an analog channel, press the MTS/SAP button. The AUDIO MODE menu opens.
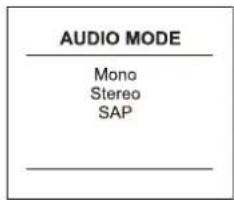
2 Press or to select MTS mode you want (Mono, Stereo or SAP), then press OK to confirm.
Note In a multi-window mode, Stereo or SAP can be selected only for the main picture.
Selecting the digital audio mode
DTV can simultaneously transmit many audio tracks (for example, simultaneous translations of the program into foreign languages). The availability of these optional audio tracks depends upon the program. A digital audio mode is only available while the TV is in DTV mode.
To select the digital audio mode:
1 When viewing a digital channel, press the MTS/SAP button. The AUDIO MODE menu opens.
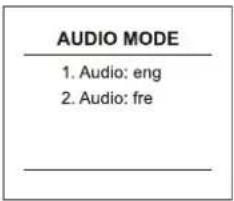
2 Press or to select the audio mode you want, then press OK to confirm.
Note
In a multi-window mode, the MTS/SAP button can only be used for the main picture.
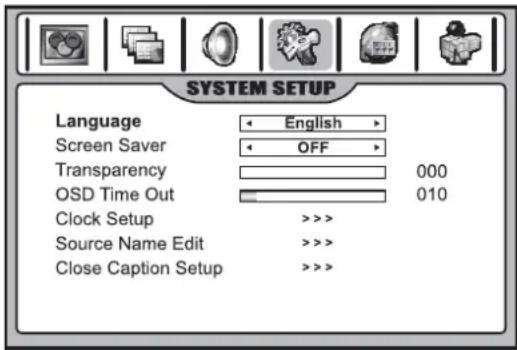
Changing system settings
You may change systems such as OSD language, screen saver, and menu transparency.
To change system settings:
1 Press MENU, then press ◀ or ▶ to display the SYSTEM SETUP menu page.
2 Press to enter the menu.
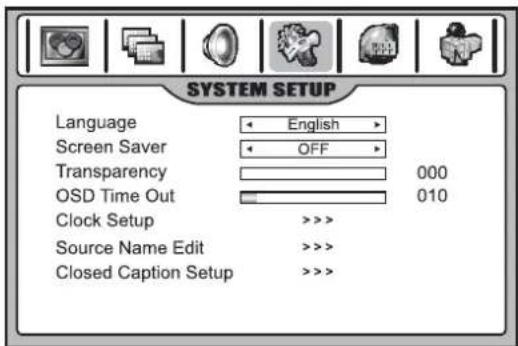
3 Press or to select a setting, then press or to adjust the setting or enter a sub-menu. In some settings and menus, you must also press OK to confirm or toggle a setting.
4 Press EXIT to return to TV viewing.
| Option Function | |
| Language Selects the OSD menu language. | |
| Screen Saver While the Screen Saver is on, the TV displays the message “No Signal” when no signal has been received for several seconds. | |
| Transparency Adjusts menu transparency. | |
| OSD Time Out Selects the length of time the OSD displays without any input before turning off. | |
| Option Function | |
| Clock Setup Sets the auto clock, manual clock, and On/Off timer. | |
| Source Name Edit | Lets you edit the source name of channels for your personal preference. |
| Closed Caption Setup | Select Closed Caption mode. Also lets you customize the format of captions from DTV programs |
Editing the video source names
You can name the video sources to make your input source selection easier.
To edit video source names:
1 Navigate to the SYSTEM SETUP menu, then highlight Source Name Edit.
2 Press to enter the menu.
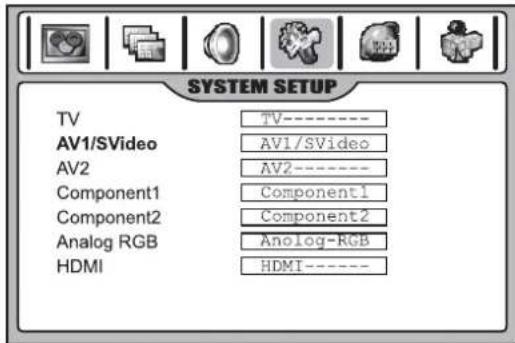
3 Press or to select the source you want to edit, then press OK to enter into source name editing mode.
4 Press or to move the cursor, and press or to select a character.
5 Press MENU to exit the editing mode.
Note
TV source can't be edited.
Setting the clock and timers
Setting Auto Clock
Auto Clock sets the current time automatically from a digital channel signal. The digital channel signal includes information for the current time provided by the broadcasting station. If the current time is set incorrectly by Auto Clock, set the clock manually.
Note
If the TV loses power, the time is reset.
To set Auto Clock:
1 Press MENU, then press ◀ or ▶ to display the SYSTEM SETUP menu page.
2 Press to enter the menu.
3 Highlight Clock Setup, then press ◀ or ▶ to enter the menu.
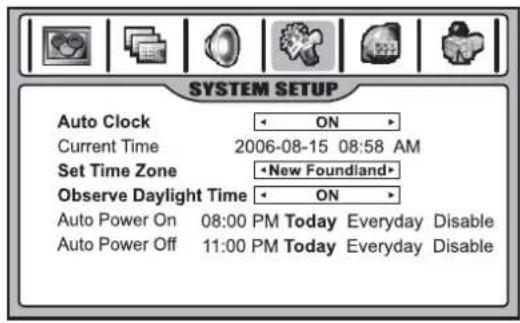
4 Highlight Auto Clock, then press ◀ or ▶ to turn Auto Clock ON.
5 Highlight Set Time Zone, then press ◀ or ▶ to select your viewing area time zone: Atlantic, New Foundland, Samoa, Hawaii, Alaska, Pacific, Mountain, Central, or Eastern.
6 If your viewing area observes Daylight Saving Time, set Observe Daylight Time to ON in the menu
Setting the clock manually
If the current time setting is wrong, reset the clock manually. If the TV loses power, the clock is reset.
To manually set the clock:
1 Navigate to the SYSTEM SETUP menu, then to the Clock Setup sub-menu.
2 Highlight Auto Clock, then press ◀ or ▶ to select OFF.
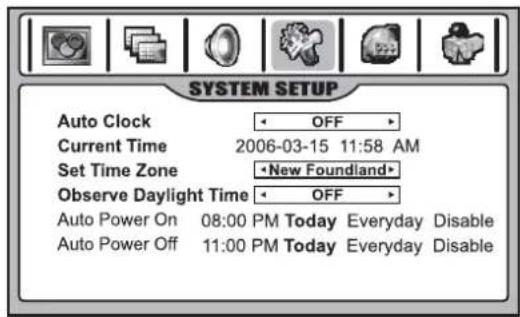
3 Press ▲ or ▼ to highlight Current Time, then press ◆ or to select either the year, date, or time option.
4 Press the number buttons to set the year, date, and time. To select AM or PM, move the cursor to the appropriate position, then press OK to toggle.
5 If your area observes Daylight Saving Time, set Observe Daylight Time to ON in the menu.
Setting the Auto On/Off timer
Auto Power On or Off only works if the current time has been set. The TV must be in Standby mode for Auto Power On to work.
Note If the TV loses power, the time settings are cleared.
To set the Auto On/Off timer:
1 Navigate to the SYSTEM SETUP menu, then to the Clock Setup sub-menu.
2 Highlight Auto Power On or Auto Power Off.
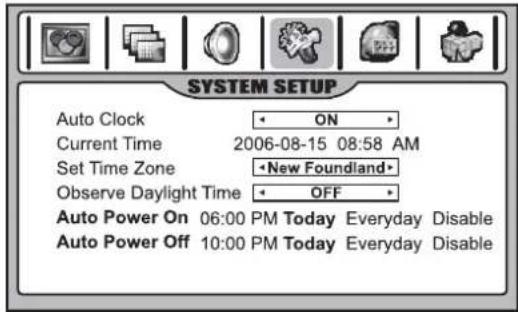
3 Press or to select either the hour or minute.
4 Press the number buttons to change the time. To select AM or PM, move the cursor to the appropriate position, then press OK to toggle.
- If you want the timer to work only today, highlight Today, then press OK to activate it (displayed in purple).
- If you want the timer to work every day, select Everyday, then press OK to activate it (displayed in purple).
- To cancel the timer, select Disable, then press OK to activate it (displayed in purple).
5 Press EXIT to return to TV viewing, or press MENU to return to the previous menu.
Setting the Sleep timer
The Sleep timer lets you select the amount of time before your TV turns off automatically. This setting is cleared when the TV is turned off.
To set the Sleep timer:
1 Press the SLEEP button repeatedly to cycle through the available times.
2 To cancel the timer, press SLEEP repeatedly until OFF is selected.
Viewing Closed Captions
This TV can display the closed captions that are broadcast with many TV programs. These captions are usually subtitles for the hearing impaired or are foreign language translations. All VCRs record the closed caption signal from television programs, so home-recorded videotapes can also provide closed captions. Also, most pre-recorded commercial videotapes provide closed captions. Check for the closed caption symbol in your television schedule and on the tape packaging:
Note
- Closed Captioning works only in TV and AV modes.
- Not all programs and videos offer Closed Captioning. Look for the Closed Captioning symbol to ensure that captions are available.
Setting up Closed Captioning
To set up Closed Captioning:
1 Press CCD repeatedly to select Caption ON, MUTE ON, or OFF.
- MUTE ON shows the captions (if available on program) when the TV sound is muted.
- You can also navigate to the SYSTEM SETUP men, then to the Closed Caption Setup sub-menu, and select Closed Caption Control. Next, press or to select Caption ON, MUTE ON, or OFF.
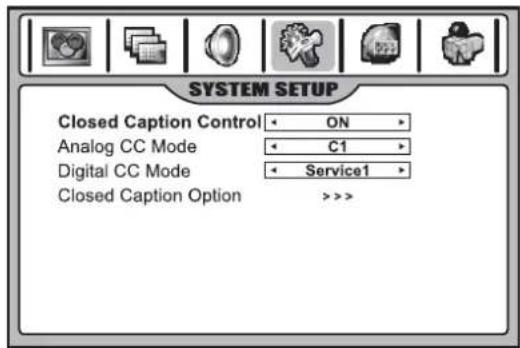
Selecting analog or digital modes
Captions and text, if provided by the broadcaster, are available for both digital and analog channels.
Select a caption mode for displaying captioning information. Analog captions display information on the screen (usually the program dialog). Text from digital modes displays information, usually at the bottom of the screen, and is used for a data service (generally not program related).
To select digital or analog modes:
1 Navigate to the SYSTEM SETUP menu, then highlight Closed Caption Setup.
2 Press to enter the menu.
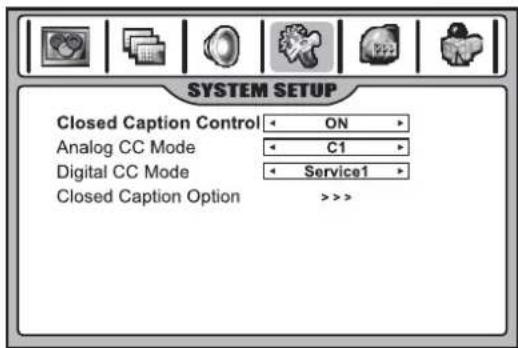
3 Highlight Analog CC Mode, or Digital CC Mode. then press or to select the mode.
Customizing Closed Captioning
You can customize the digital closed captions that appear on your screen.
To customize digital Closed Captions:
1 Navigate to the SYSTEM SETUP menu, then highlight Closed Caption Setup.
2 Press to enter the menu.
3 Highlight Closed Caption Option, then press or to enter the sub-menu.
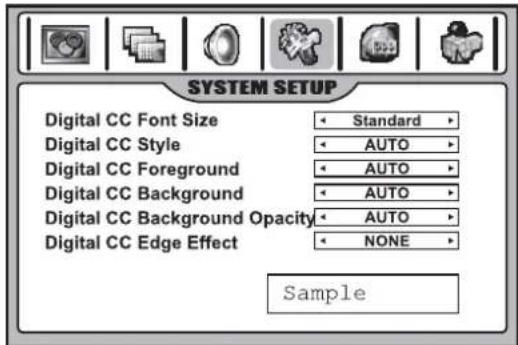
4 Press or to select the item you want to change, then press or to customize the setting to your preference. A preview sample at the bottom of the screen lets you see the effect your change will have on the captions' appearance.
You can change the following settings:
- Font Size: Sets the size of the words.
• Style: Sets a style for the words.
• Foreground: Sets a color for the text.
• Background: Sets a background color. - Background Opacity: Sets the opacity of the background color. A low opacity means a high transparency (the screen image shows through the background).
- Edge Effect: Sets an edge effect.
Setting parental controls
Parental controls allow TV programs and movies to be restricted and TV usage to be controlled based on ratings data. It prevents children from watching violent or sexual scenes that may be harmful.
Restriction of TV programs includes two ratings that contain information about the program: the MPAA rating and the TV Parental Guidelines. MPAA ratings are based on age appropriateness. TV Parental Guidelines are based on age and content.
Since a TV program may use either the MPAA rating or the TV Parental Guidelines, both should be adjusted for complete control.
Understanding movie ratings (MPAA)
| Rating Description | |
| G GENERAL | AUDIENCES. All ages admitted. |
| PG PARENTAL | GUIDANCE SUGGESTED. Some material may not be suitable for children. |
| PG-13 PARENTS | STRONGLY CAUTIONED. Some material may be inappropriate for children under 13. |
| R RESTRICTED | Under 17 requires accompanying parent or adult guardian. |
| NC NO ONE | 17 AND UNDER ADMITTED. |
| X X Rating is | an older rating, similar to NC-17, but may be encoded in the data of older movies. |
| NR NOT RATED. | |
For example, if you block PG-13 in the MPAA ratings, the higher ratings of R, NC, X, and NR are automatically blocked.
Understanding TV ratings
TV ratings include two components: a general criteria (age-based) and a detailed criteria (content-based). The content-based ratings include the following:
• D: Sexually suggestive dialog
• L: Adult language
• S: Sexual situations
• V : V i o l e n c e
• FV: Fantasy violence
| Rating | Content-based | |||||
| D | L | S | V | FV | ||
| Age-based | Y (All children) | × | × | × | × | × |
| Y7 (Direct to Older Children) | × | × | × | × | • | |
| G (General Audience) | × | × | × | × | ||
| PG (Parental Guidance Suggested) | • | • | • | • | ||
| 14 (Parents Strongly Cautioned) | • | • | • | • | ||
| MA (Mature Audience Only) | • | • | • | |||
| × = Content rating can be set, but this rating is not normally broadcast by TV stations.• = Content rating can be set. | ||||||
Note
- Age-based ratings can be modified by the content-based ratings, but only in the combinations indicated by a “•” in the table above.
- Choosing lower age-based rating blocks the higher age-based ratings regardless of content ratings settings.
For example, when Y7 in the age-based rating is set to BLOCK, the higher ratings of G, PG, 14, and MA are automatically blocked. In addition, D, L, S, V, and FV-content programs are automatically blocked.
Setting up the Parental Control password
To use Parental Controls, you must first set your password.
To set your password:
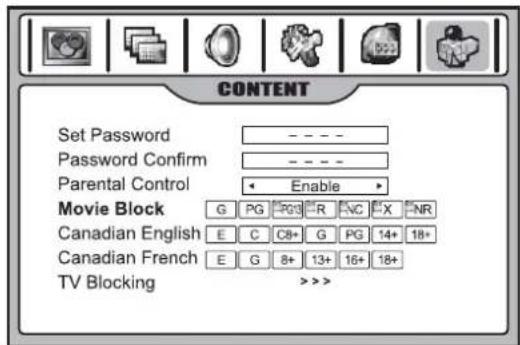
1 Press MENU, then press ◀ or ▶ to open the CONTENT menu.
2 Press to enter the menu.
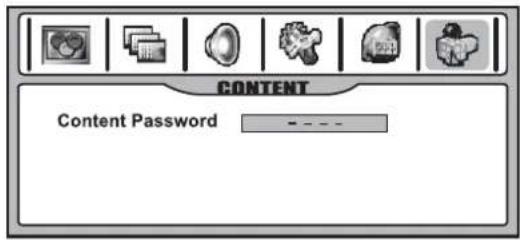
3 Enter the four-digit password as requested (the factory preset password is 1111). The entire CONTENT menu appears.
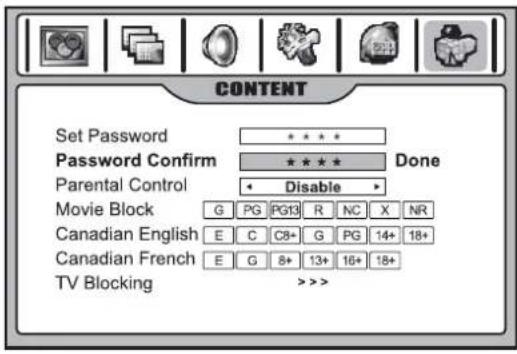
4 Highlight Set Password, enter a new password, then enter it again to confirm. Your new password has been created.
Enabling Parental Controls
1 Use the password to access the CONTENT menu.
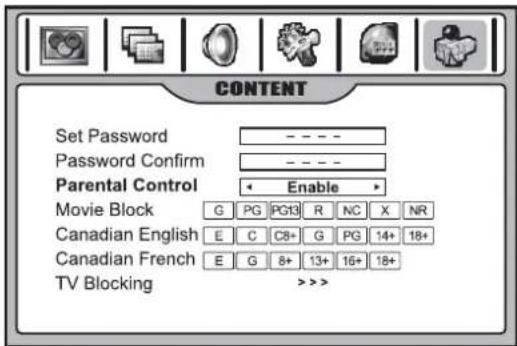
2 Highlight Parental Control, then press ◀ or ▶ to select Enable. The blocking scheme you set up is enabled. If you want to disable the blocking scheme, select Disable.
Setting up MPAA ratings
1 Use the password to access the CONTENT menu.
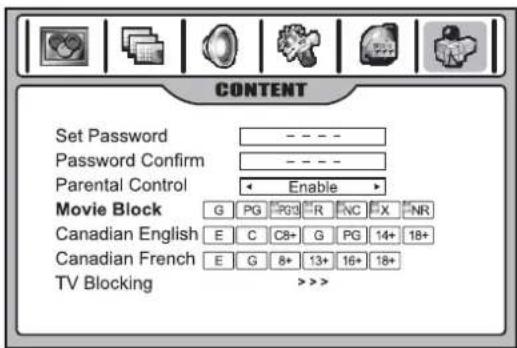
2 Highlight Movie Block, press ◀ or ▶ to select the rating you want, then press OK to either block the rating (a lock icon appears) or unblock (no lock icon).
For example, when PG13 in the age-based rating is blocked, this automatically blocks the higher ratings R, NC, X, and NR.
Setting up TV ratings
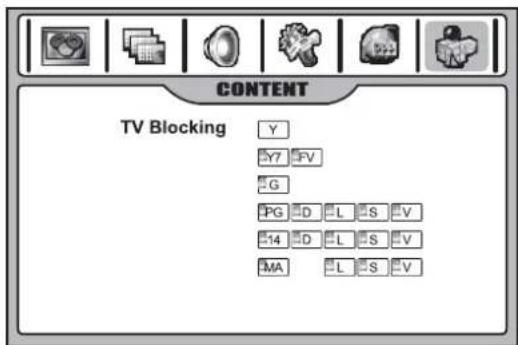
1 Use the password to access the CONTENT menu.
2 Highlight TV Blocking, then press ◀ or ▶ to enter the menu.
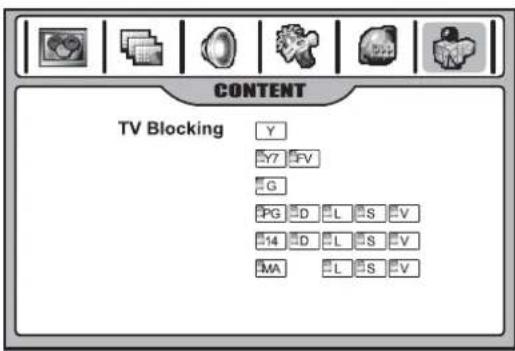
3 Within the menu, press ,▼ , or to ▶ select, then press OK to either block (a lock icon appears) or unblock (no lock icon). For example, when Y7 in the age-based rating is set to BLOCK, this automatically blocks the higher ratings: G, PG, 14, and MA. Also, D, L, S, V, and FV in Content are automatically blocked.
4 Press EXIT to return to TV viewing, or press MENU to return to the previous menu.
Setting up Canadian English ratings
1 Use the password to access the CONTENT menu.
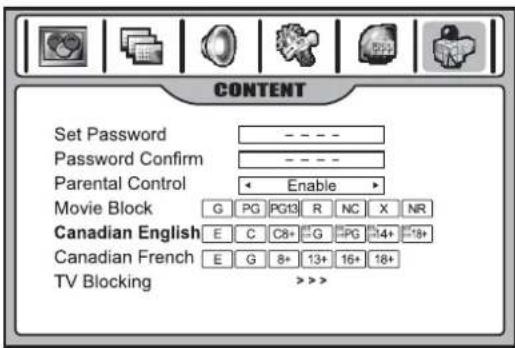
2 Highlight Canadian English, press ◀ or ▶ to select the rating you want, then press OK to either block the rating (a lock icon appears) or unblock (no lock icon).
3 Press EXIT to return to TV viewing, or press MENU to return to the previous menu.
| Canadian English Ratings | |
| E Exempt—Exempt programming includes news, sports, documentaries and other informational programming, talk shows, music videos, and variety programming. | |
| C Programming intended for children under age 8.No offensive language, nudity, or sexual content. | |
| C8+ Programming generally considered acceptable for children 8 years and over. No profanity, nudity, or sexual content. | |
| G General programming, suitable for all audiences. | |
| PG Parental Guidance suggested. Some material may not be suitable for children. | |
| 14+ Programming contains themes or content which may not be suitable for viewers under the age of 14. Parents are strongly cautioned to exercise discretion in permitting viewing by pre-teens and early teens. | |
| 18+ Intended for viewers 18 years and older and might contain depictions of violence. |
Setting up Canadian French ratings
1 Use the password to access the CONTENT menu.
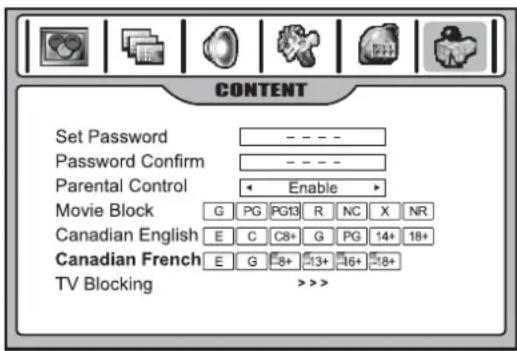
2 Highlight Canadian French, press ◆ or ▶ to select the rating you want, then press OK to either block the rating (a lock icon appears) or unblock (no lock icon).
3 Press EXIT to return to TV viewing, or press MENU to return to the previous menu.
| Canadian French Ratings | |
| E Exempt—Exempt programming. | |
| G General—Programming intended for audiences of all ages. Contains no violence, or the violence content is minimal or is depicted appropriately. | |
| 8+ 8+ General—Not recommended for young children. Programming intended for a broad audience but contains light or occasional violence. Adult supervision recommended. | |
| 13+ Programming may not be suitable for children under the age of 13. Contains either a few violent scenes or one or more sufficiently violent scenes to affect them. Adult supervision strongly suggested. | |
| 16+ Programming may not be suitable for children under the age of 16. Contains frequent scenes of violence or intense violence. | |
| 18+ Only for adult viewing—Could contain frequent violent scenes and extreme violence. |
Setting up RRT5 criteria ratings
If the broadcasting program uses RRT5 (Rating Region Table-Region5) criteria rating in accordance with the FCC Rules, its rating can be downloaded to this TV and can be used for parental controls.
To set up RRT5 ratings:
1 Use the password to access the CONTENT menu.
2 Highlight the rating choice at the last line of the menu screen, then press ◄or ↕o enter the menu. Ratings and additional options appear on the screen.
3 Within the menu, press ,▼, ,or ▶ to ▶ select a rating's submenu, or highlight RESET to reset all ratings. (After resetting, the rating will still appear if it continues to be broadcast by the TV station.)
4 Press OK to either block (a lock icon appears) or unblock (no lock icon) a rating.
5 Press EXIT to return to TV viewing, or press MENU to return to the previous menu.
Note
The actual menu options of this rating vary, depending on the broadcaster.
Using picture-in-picture
To select multi-window modes:
- Press the PIP button repeatedly (within three seconds of each press) to select the multi-window mode you want. You can choose PIP, PBP, POP, and Full Screen modes.
Note
If you wait longer than three seconds between PIP button presses, and when the current view is a multi-window mode, press PIP again, and the screen changes to full screen mode.
Full screen
In Full Screen mode, only one window appears.
PIP (picture-in-picture)
PIP lets you view two different pictures on your TV screen at the same time. One picture will be large, and the other picture will show a smaller image.
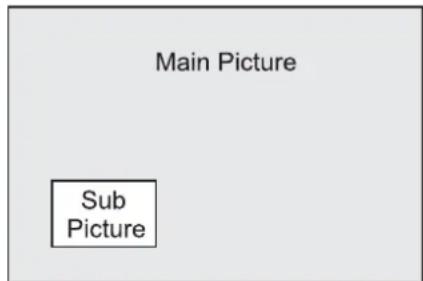
Note
The main picture source can be any video type except HDMI, but the sub-window can display only analog TV channels or A/V programs.
PBP (picture-by-picture)
PBP mode splits the screen into two, allowing two pictures to be shown on the TV screen at the same time. Each picture is given half the screen.
| Main Picture | Sub Picture |
Note
The main picture source can be any video type except HDMI, but the sub-window can display only analog TV channels or A/V programs.
POP (picture-out-of-picture)
You can use POP to scan the programs of all memorized channels on the three mini-windows, while the main window displays the current program.

Note
The main picture source can be any video type except HDMI, but the sub-window can display only analog TV channels
Swapping the PIP/PBP picture
To swap the PIP/PBP picture:
1 Press the SWAP button.
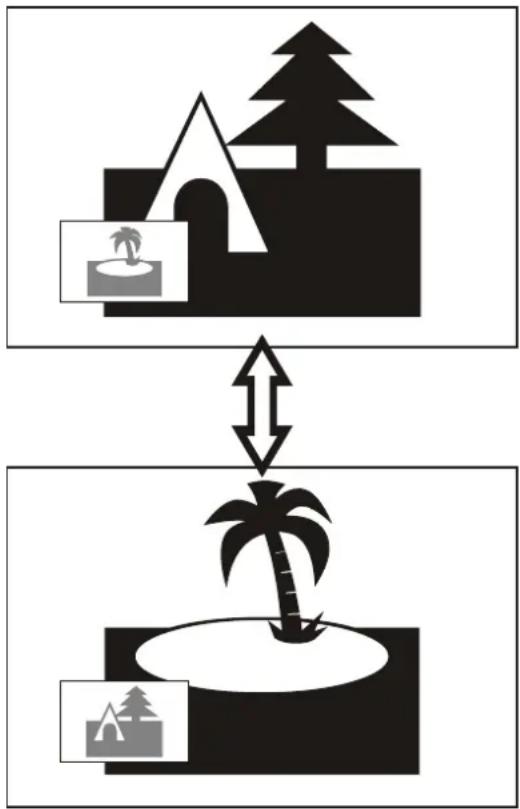
flowchart
graph TD
    A["Campsite"] --> B["Palm Tree"]
    B --> C["Campsite"]
    style A fill:#f9f,stroke:#333
    style B fill:#ccf,stroke:#333
    style C fill:#cfc,stroke:#333
Note
The SWAP button works only when the main picture displays an analog TV channel or A/V program.
Selecting the PIP sub-picture position
To select the PIP sub-picture position:
1 In PIP mode, press the P.POSITION button to cycle through the available sub-picture positions.
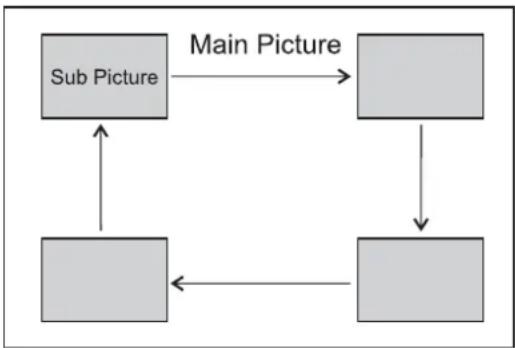
flowchart
graph TD
    A["Sub Picture"] --> B["Main Picture"]
    B --> C[" "]
    C --> D[" "]
    D --> E[" "]
    E --> F[" "]
    F --> G[" "]
    G --> H[" "]
    H --> I[" "]
    I --> J[" "]
    J --> K[" "]
    K --> L[" "]
    L --> M[" "]
    M --> N[" "]
    N --> O[" "]
    O --> P[" "]
    P --> Q[" "]
    Q --> R[" "]
    R --> S[" "]
    S --> T[" "]
    T --> U[" "]
    U --> V[" "]
    V --> W[" "]
    W --> X[" "]
    X --> Y[" "]
    Y --> Z[" "]
Selecting the focus window
While in a multi-window mode, you can select any of the windows to make changes on the window.
To change the focus window:
1 Press OK. The focus changes from the main picture to any of the sub-pictures.
2 While a picture is the focus window, you can apply many operations to it such as channel select, volume control, and input source select.
3 In POP mode, you can press OK to select the three mini windows as a focus window. "1,2,3" appears on the screen. Before the on-screen message disappears, press 1, 2, or 3 on the remote control to choose the program to be displayed on the main window.
Note
Normally the main picture is the default focus window. Many (but not all) operations can be applied to the focus window.
Using the electronic program guide
Your TV has an electronic program guide to help you navigate through viewing options. The electronic program guide (EPG) supplies program information, such as program lists for channels and times for available programs. Sometimes detailed program information is also available on the EPG. (The availability and the amount of program details vary. depending on the broadcaster.)
Notes
• The EPG works only with digital channels.
• To enable the EPG to work correctly, you must set the Auto Clock to ON.
To display the electronic program guide:
1 Press the GUIDE button. The EPG appears. (Example shown below.)
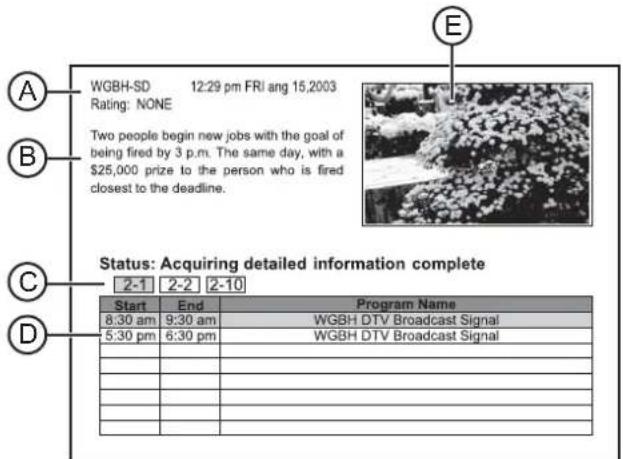
Item Description
A Shows current time, date, current program's station and rating, and more.
B Displays additional and detailed information about a particular program. (The availability of additional details depends on the broadcaster.)
C Displays all available sub-channels within an ATSC channel.
D Displays the currently selected sub-channel's information, such as the program list, and start and end times of all available programs.
E Displays a preview of the currently selected sub-channel.
2 To exit, press GUIDE again.
3 Press OK to move the focus to different windows. After a window is active, a green border appears around it and you can apply operations to it.
4 If the bottom half of the EPG is active, press or to select the channel you want. (After the channel is selected, its relevant program information is displayed).
5 Press or to select a different program at this channel. (After the program is selected, the top left window displays detailed program information, if available.)
6 If additional and detailed information about the selected program appears in the top left window, you can press OK to highlight it (a green border appears around it), then press ▲ or ▶ to scroll the page (if required) to view more information.
7 All available sub channels within an ATSC channel will be displayed.
Adjusting the image
Adjusting the image for PC/Component mode
Before adjusting the image, make sure that you select the correct source (Analog RGB or Component).
To adjust the image for PC/Component mode:
1 Press MENU, then press ◀ or ▶ to display the IMAGE ADJUST menu page.
2 Press to enter the menu.
Menu in Component mode
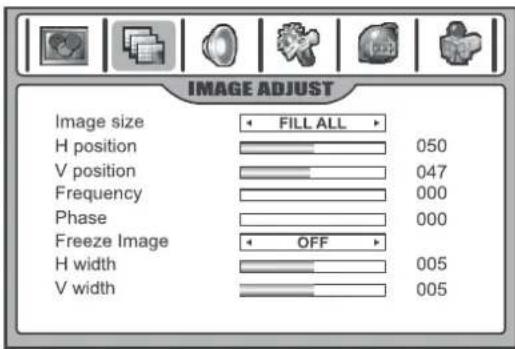
Menu in PC mode

3 Within the menu, press or to select an option, then press or to adjust the setting.
| Setting Description | |
| Image size Selects | a desired image size (aspect ratio).The choice may be different in different mode. (see “Adjusting the image” on page 27 for more information.)You can press ZOOM on the remote control to select the aspect ratio. |
| H position Moves | the image on the screen left/right. |
| V position Moves | the image on the screen up/down. |
| Frequency Adjusts | the sample frequency. |
| Phase | Improves the focusing of a stable image. |
| Freeze Image | Select ON to freeze the image on the screen. Select OFF to reactivate the image.You can press FREEZE on the remote control to freeze the image, and press again to restore. |
| H width(component mode only) | Adjusts the horizontal width of the image. |
| V width(component mode only) | Adjusts the vertical width of the image. |
| Auto Adjust(PC mode only) | Highlight Auto Adjust, then press ◀ or ► to start auto adjustment. The TV automatically adjusts the image settings, such as frequency and position. |
4 Press EXIT to exit.
Adjusting the image for HDMI mode
Select the HDMI source before adjusting the image.
To adjust the image for HDMI mode:
1 Press MENU, then press ◀ or ▶ to display the IMAGE ADJUST menu page.
2 Press to enter the menu.
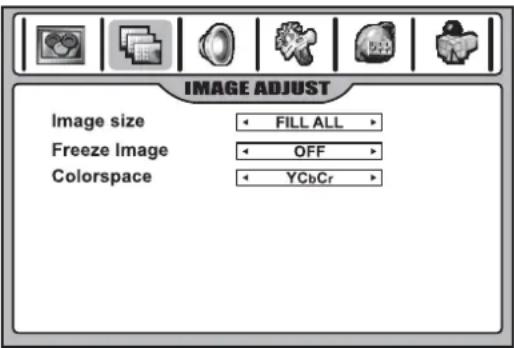
3 Within the menu, press or to select an option, then press or to adjust the setting.
| Setting Description |
| Image size Selectsa desired image size (aspect ratio).(See “Adjusting the image” on page 27 for more information.)You can press ZOOMon the remote control to select. When a 1080i or 1080p signal is received, this cannot be adjusted. |
| Setting Description | |
| Freeze Image | Select ON to freeze the image on the screen. Select OFF to reactivate the image. You can press FREEZE on the remote control to freeze the image, and press again to restore. |
| Colorspace | When the TV converts a DVI signal to a HDMI signal, sometimes abnormal color appears. If this situation occurs, you can try to adjust this item. |
4 Press EXIT to exit.
Maintaining
LCD display panel information
Markings or a retained image on the LCD panel, resulting from a fixed image being displayed for long periods of time, is not an operating defect and as such is not covered by the warranty. This product is not designed to display fixed-image patterns for extended periods of time.
Important information regarding the use of video games, computers, captions, or other fixed-image displays
The extended use of fixed-image program material can cause a permanent "shadow image" on the LCD panel.
This background image is viewable on normal programs in the form of a stationary fixed image. This type of irreversible LCD panel deterioration can be limited by observing the following steps:
- Reduce the brightness/contrast setting to a minimum viewing level.
- Do not display the fixed image for extended periods of time.
- Turn the power off when not in actual use.
Cleaning and maintenance
To clean this TV, wipe with a soft, dry cloth. If the surfaces are extremely dirty, use a soft cloth dipped in a soap and water solution or a weak detergent solution.
- Use eyeglass cleaner to remove stubborn dirt from the LCD.
- Never use alcohol, paint thinner, or benzine to clean this TV.
- Before using a chemically treated cloth, read the instructions that came with the cloth carefully.
Care of remote control
- Keep the remote dry. If it gets wet, wipe it dry immediately.
- Use and store the remote control only in normal temperature environments.
- Handle the remote control gently and carefully. Don't drop it.
- Wipe the remote control with a damp cloth to keep it looking like new.
Troubleshooting
Before calling for repair service, check the following items for possible remedies to an encountered symptom.
| Symptoms Possible solution | |
| No power • Make sure that the AC power cord is plugged into a power outlet. • Unplug the power cord, wait for 60 seconds, re-insert the plug into the power outlet, and turn on the TV again. | |
| No picture • Check video connections at the back of the TV to see if they are correctly connected. • Adjust the contrast and brightness settings. • Select a correct input. • Make sure that a non-compatible signal is not being input. | |
| Good picture but no sound | • Increase the volume. • Make sure that the TV is not muted. |
| Good sound but poor color | • Adjust the contrast, color and brightness settings. |
| Poor picture • Sometimes, poor picture quality occurs when an activated S-VHS camera or camcorder is connected while another activated peripheral is connected. In this case, turn off one of the peripherals. • make sure the room isn't too bright. | |
| Horizontal dotted line | • This may be caused by electrical interference (such as a hair dryer, or nearby neon lights). • Turn off the equipment. |
| Remote operation fails | • This remote control is a universal remote control. If the remote control does not work correctly when operating the TV, try pressing the TV button. • Make sure the batteries have a full charge. Replace if necessary. • Clean the remote control sensor lens on the TV. • Do not use the remote control under strong or fluorescent lighting. • The batteries should be inserted with polarity (+,-) aligned according to the diagram in the battery compartment. |
| Snowy picture and noise | • Check the A/V connections. |
| No stable or not synchronized VGA picture | • Make sure that you have selected the correct VGA mode in your PC. |
| No output from one of the speakers | • Adjust balance in the AUDIO (SOUND) menu. |
| Control buttons do not work | • Method 1: Press POWER on the TV and wait for three seconds, then the TV turns off. Continue to wait for several seconds, then turn on the TV again. (Recommended because all of the settings you have made will not be cleared.) • Method 2: Unplug the power cord, wait for a few seconds, then plug the power cord back in and turn on the TV again. (All of the settings you have made will be cleared.) |
Symptoms Possible solution
| The picture leaves “trails” or appears slightly delayed | When the TV is used in rooms (locations) with low temperature, the picture may leave trails or appear slightly delayed. This is not a malfunction, and the TV will recover when the temperature returns to normal. |
Note
If your problem is not solved, turn your TV off and then on again.
Warning
Never attempt to repair a defective TV yourself.
Troubleshooting the remote control
| Symptom Possible solution | |
| LED does not blink when a button is pressed | Replace the batteries. |
| LED blinks when a button is pressed, but device does not respond | Make sure that you are at less than 15 feet (4.6 meters) from the device, and that you point the remote control at the remote sensor on the device. |
| LED blinks one long blink | You pressed an incorrect button. Start the procedure over again. |
| Remote control does not control a device or only controls some features of the device | Make sure that the device has a remote sensor, then try another code. |
| No volume on a device See “Programming the volume lock” on page 17. | |
Specifications
| Power supply AC 100-240V 50/60 Hz | |
| Power consumption 250 W (maximum) | |
| Screen 42" | |
| Weight | 80.3 lbs. (36.5 kg) |
| Dimensions | 42.4 × 33.9 × 13.6"(107.7 × 86.106 × 34.544 cm) |
| Channel coverage | VHF: 2-13UHF: 14-69CATV: 1-125CADTV: 1-135DTV: 2-69 |
| TV system | NTSC-M, ATSC |
| Accessories | User guideRemote control |
| Temperature | Storage: 32 ~ 122°F(0 ~ 50°C)Working: 41 ~ 104°Ftemperature: 5°C to 40°C) |
Warranty
1-year limited warranty
Insignia Products ("Insignia") warrants to you, the original purchaser of this new NS-42LCD ("Product"), that the Product shall be free of defects in the original manufacture of the material or workmanship for a period of one (1) year from the date of your purchase of the Product ("Warranty Period"). This Product must be purchased from an authorized dealer of Insignia brand products and packaged with this warranty statement. This warranty does not cover refurbished Product. If you notify Insignia during the Warranty Period of a defect covered by this warranty that requires service, terms of this warranty apply.
How long does the coverage last?
The Warranty Period lasts for 1 year (365 days) from the date you purchased the Product. The purchase date is printed on the receipt you received with the Product.
What does this warranty cover?
During the Warranty Period, if the original manufacture of the material or workmanship of the Product is determined to be defective by an authorized Insignia repair center or store personnel, Insignia will (at its sole option): (1) repair the Product with new or rebuilt parts; or (2) replace the Product at no charge with new or rebuilt comparable products or parts. Products and parts replaced under this warranty become the property of Insignia and are not returned to you. If service of Products or parts are required after the Warranty Period expires, you must pay all labor and parts charges. This warranty lasts as long as you own your Insignia Product during the Warranty Period. Warranty coverage terminates if you sell or otherwise transfer the Product.
How to obtain warranty service?
If you purchased the Product at a retail store location, take your original receipt and the Product to the store you purchased it from. Make sure that you place the Product in its original packaging or packaging that provides the same amount of protection as the original packaging. If you purchased the Product from an online web site, mail your original receipt and the Product to the address listed on the web site. Make sure that you put the Product in its original packaging or packaging that provides the same amount of protection as the original packaging.
Where is the warranty valid?
This warranty is valid only to the original purchaser of the product in the United States and Canada.
What does the warranty not cover?
This warranty does not cover:
- Customer instruction
- Installation
- Set up adjustments
- Cosmetic damage
- Damage due to acts of God, such as lightning strikes
- Accident
- Misuse
- A b u s e
- Negligence
- Commercial use
- Modification of any part of the Product, including the antenna
This warranty also does not cover:
- Damage due to incorrect operation or maintenance
- Connection to an incorrect voltage supply
- Attempted repair by anyone other than a facility authorized by Insignia to service the Product
- Products sold as is or with all faults
- Consumables, such as fuses or batteries
- Products where the factory applied serial number has been altered or removed
REPAIR REPLACEMENT AS PROVIDED UNDER THIS WARRANTY IS YOUR EXCLUSIVE REMEDY. INSIGNIA SHALL NOT BE LIABLE FOR ANY INCIDENTAL OR CONSEQUENTIAL DAMAGES FOR THE BREACH OF ANY EXPRESS OR IMPLIED WARRANTY ON THIS PRODUCT, INCLUDING, BUT NOT LIMITED TO, LOST DATA, LOSS OF USE OF YOUR PRODUCT, LOST BUSINESS OR LOST PROFITS. INSIGNIA PRODUCTS MAKES NO OTHER EXPRESS WARRANTIES WITH RESPECT TO THE PRODUCT, ALL EXPRESS AND IMPLIED WARRANTIES FOR THE PRODUCT, INCLUDING, BUT NOT LIMITED TO, ANY IMPLIED WARRANTIES OF AND CONDITIONS OF MERCHANTABILITY AND FITNESS FOR A PARTICULAR PURPOSE, ARE LIMITED IN DURATION TO THE WARRANTY PERIOD SET FORTH ABOVE AND NO WARRANTIES, WHETHER EXPRESS OR IMPLIED, WILL APPLY AFTER THE WARRANTY PERIOD. SOME STATES, PROVINCES AND JURISDICTIONS DO NOT ALLOW LIMITATIONS ON HOW LONG AN IMPLIED WARRANTY LASTS, SO THE ABOVE LIMITATION MAY NOT APPLY TO YOU. THIS WARRANTY GIVES YOU SPECIFIC LEGAL RIGHTS, AND YOU MAY ALSO HAVE OTHER RIGHTS, WHICH VARY FROM STATE TO STATE OR PROVINCE TO PROVINCE.
Copyright
© 2006 Insignia. Insignia and the Insignia logo are trademarks of Best Buy Enterprise Services, Inc. Other brands and product names are trademarks or registered trademarks of their respective holders. Specifications and features are subject to change without notice or obligation. For service and support call (877) 467-4289.
natural_image
Simple line drawing of a blank rectangular monitor with a label pointing to it, no text or symbols present.Élément Description
natural_image
Simple line drawing of a cylindrical device with a battery and arrow indicating motion (no text or symbols)natural_image
Simple line drawing of a remote control with battery and battery casing (no text or symbols)natural_image
Diagram of an open computer monitor showing internal components and a separate socket connected to a power outlet (no text or symbols present)Remarques
Remarques
OK:Select Input:Exit
- OU -
Compréhension de la classification TV
Remarque
Remarque
natural_image
Front view of a blank rectangular monitor with a numbered label pointing to the bottom right corner (no text or symbols on the screen itself)natural_image
Simple line drawing of a cylindrical device with a battery and arrow indicating rotation (no text or symbols)natural_image
Simple line drawing of a remote control with battery and indicator lights (no text or symbols)natural_image
Diagram of an open computer monitor showing internal components and a connected power outlet (no text or symbols)Notas
Notas
- O -
Nota
e s ) , ×
Nota
flowchart
graph TD
    A["Campsite"] --> B["Palm Tree"]
    B --> C["Ground"]
Nota
- Insignia NS-42LCD 42-inch LCD TV
- Contents
- Introduction
- Important safety information
- Warning
- Caution
- Read instructions
- Retain instructions
- Follow warnings and instructions
- Water and moisture
- Cleaning
- Ventilation
- Heat
- Grounding or polarization
- Power cord protection
- Attachments
- Stand
- Lightning
- Servicing
- Replacement parts
- Overloading
- Object and liquid entry
- Damage requiring service
- Safety check
- Power source
- Screen protection
- Pixel defect
- Outdoor antenna grounding
- Note to CATV system installer
- Features
- Item Description
- Notes
- TV back
- Setting up your TV
- Installing batteries into the remote control
- To install the remote control batteries:
- Connecting power
- To connect your TV to a power outlet:
- Connecting external speakers
- Attaching the included speakers
- Installing the speakers
- Connecting an antenna
- About antenna connections
- Precautions
- Note
- To connect an antenna:
- Connecting digital optical audio
- To connect optical audio
- Connecting a VCR
- To connect a VCR:
- To play video from your VCR:
- Connecting a VCR (for recording) or external amplifier
- To connect a VCR or amplifier:
- To record a program:
- Connecting a camcorder
- To connect a camcorder:
- To play from a camcorder:
- Connecting an HDMI device
- To connect a DVD player or set-top box using HDMI:
- To play from a DVD player or set-top box using HDMI:
- Connecting component video
- To connect a device using component video:
- To play component video from an external device:
- Connecting a computer
- To connect a computer:
- To play video from a computer:
- Changing the on-screen menu language
- To change the on-screen menu language:
- Programming your remote control
- To program the remote control:
- Searching for your code
- To search for a code:
- Checking the codes
- To check the code:
- Programming the volume lock
- To lock the volume control:
- To unlock the volume control:
- To unlock a single device's volume control:
- Device codes
- Using your TV
- Turning the TV on and off
- To turn on your TV:
- Using the remote control
- To use the remote control:
- Cautions
- Navigating the menus
- Menu navigation
- To navigate through the OSD:
- Selecting the input source signal
- INPUT SELECT
- Displaying the information banner
- To display the information banner:
- Memorizing channels
- Selecting the TV source
- To select a source:
- Auto channel search
- Skipping channels
- To skip channels:
- Checking the DTV signal strength
- To check DTV signal strength:
- Adding a channel label
- To add a label to a channel:
- Favorite channel setup
- To create a Favorite channel list:
- Selecting channels
- Information about USA channel numbering
- Example:
- Using the CH+/- buttons
- To use the CH+/- buttons:
- Using the number pad
- Switching between two channels
- To switch between two channels:
- Selecting a channel using the Program list
- To select a channel using the Program list:
- Selecting a channel using the Favorite list
- To select a channel using the Favorite list:
- Adjusting picture quality
- Customizing the picture
- Selecting the picture mode
- To select the picture quality:
- Adjusting the image
- Adjusting image aspect ratio
- To adjust the image aspect ratio:
- Adjusting screen position
- To adjust the screen position:
- Freezing the picture
- To freeze the picture:
- Adjusting sound
- Adjusting the volume
- To adjust the volume:
- To mute the volume:
- Customizing the sound
- Selecting the sound mode
- To select a sound mode:
- Setting up Stereo/SAP broadcasts
- To select the MTS/SAP audio mode:
- Selecting the digital audio mode
- To select the digital audio mode:
- Changing system settings
- To change system settings:
- Editing the video source names
- To edit video source names:
- Setting the clock and timers
- Setting Auto Clock
- To set Auto Clock:
- Setting the clock manually
- To manually set the clock:
- Setting the Auto On/Off timer
- To set the Auto On/Off timer:
- Setting the Sleep timer
- To set the Sleep timer:
- Viewing Closed Captions
- Setting up Closed Captioning
- To set up Closed Captioning:
- Selecting analog or digital modes
- To select digital or analog modes:
- Customizing Closed Captioning
- To customize digital Closed Captions:
- Setting parental controls
- Understanding movie ratings (MPAA)
- Understanding TV ratings
- Setting up the Parental Control password
- To set your password:
- Enabling Parental Controls
- Setting up MPAA ratings
- Setting up TV ratings
- Setting up Canadian English ratings
- Setting up Canadian French ratings
- Setting up RRT5 criteria ratings
- To set up RRT5 ratings:
- Using picture-in-picture
- To select multi-window modes:
- Full screen
- PIP (picture-in-picture)
- PBP (picture-by-picture)
- POP (picture-out-of-picture)
- Swapping the PIP/PBP picture
- To swap the PIP/PBP picture:
- Selecting the PIP sub-picture position
- To select the PIP sub-picture position:
- Selecting the focus window
- To change the focus window:
- Using the electronic program guide
- To display the electronic program guide:
- Adjusting the image for PC/Component mode
- To adjust the image for PC/Component mode:
- Adjusting the image for HDMI mode
- To adjust the image for HDMI mode:
- Maintaining
- LCD display panel information
- Important information regarding the use of video games, computers, captions, or other fixed-image displays
- Cleaning and maintenance
- Care of remote control
- Troubleshooting
- Warranty
- 1-year limited warranty
- How long does the coverage last?
- What does this warranty cover?
- How to obtain warranty service?
- Where is the warranty valid?
- What does the warranty not cover?
- Copyright
- Élément Description
- Remarques
- Compréhension de la classification TV
- Remarque
- Notas
- Nota
Brand : INSIGNIA
Model : NS42LCD
Category : Television