USER MANUAL LE55B1381 HAIER
TFT-LED TV OWNER S MANUAL'
Please READ this manual carefully before operating your TV, and retain it for future reference.
MODELS:
LE55B1381


The lightning flash with arrowhead symbol, within an equilateral triangle is intended to alert the user to the presence of uninsulated dangerous voltage within the product's enclosure that may be of sufficient magnitude to constitute a risk of electric shock.

The exclamation point within an equilateral triangle is intended to alert the user to the presence of important operating and maintenance (servicing) instructions in the literature accompanying the appliance.
WARNING: TO PREVENT FIRE OR SHOCK HAZARD, DO NOT EXPOSE THIS APPLIANCE TO RAIN OR MOISTURE.
CAUTION: TO PREVENT ELECTRIC SHOCK DO NOT USE THIS POLARIZED PLUG WITH AN EXTENSION CORD, RECEPTACLE OR OTHER OUTLET UNLESS THE BLADES CAN BE FULLY INSERTED TO PREVENT BLADE EXPOSURE.
CAUTION: These servicing instructions are for use by qualified service personnel only. To reduce the risk of electric shock, do not perform any servicing other than that contained in the operating instructions unless you are qualified to do so.
Important Safety Instructions
1) Read these instructions.
2) Keep these instructions.
3) Heed all warnings.
4) Follow all instructions.
5) Do not use this apparatus near water.
6) Clean only with dry cloth.
7) Do not block any ventilation openings. Install in accordance with the manufacturer's instructions.
8) Do not install near any heat sources such as radiators, heat registers, stoves, or other apparatus (including amplifiers) that produce heat.
9) Do not defeat the safety purpose of the polarized or grounding-type plug. A polarized plug has two blades with one wider than the other. A grounding type plug has two blades and a third grounding prong. The wide blade or the third prong are provided for your safety. If the provided plug does not fit into your outlet, consult an electrician for replacement of the obsolete outlet.
10) Protect the power cord from being walked on or pinched particularly at plugs, convenience receptacles, and the point where they exit from the apparatus.
11) Only use attachments/accessories specified by the manufacturer.
12) Use only with the cart, stand, tripod, bracket, or table specified by the manufacturer, or sold with the apparatus. When a cart is used, use caution when moving the cart/Apparatus combination to avoid injury from tip-over.
13) Unplug this apparatus during lightning storms or when unused for long periods of time
14) Refer all servicing to qualified service personnel. Servicing is required when the apparatus has been damaged in any way, such as power-supply cord or plug is damaged, liquid has been spilled or objects have fallen into the apparatus, the apparatus has been exposed to rain or moisture, does not operate normally, or has been dropped.
15) The apparatus shall not be exposed to dripping or splashing and that no objects filled with liquids, such as vases, shall be placed on the apparatus.
16) The mains plug or appliance inlet is used as the disconnect device, remain it readily operable during the apparatus normal use.
Class I apparatus shall be connected to a mains socket outlet with a protective earthing connection.

FCC STATEMENT
Haier is committed to safely recycling electronic products and product materials.
Please check fora local recycling location in the United Statesat:1800RECYCLING.COM or call 1.800.RECYCLING.
This equipment has been tested and found to comply with the limits for a Class B digital device, pursuant to Part 15 of the FCC Rule. These limits are designed to provide reasonable protection against harmful interference in a residential installation. This equipment generates, use and can radiate radio frequency energy and, if not installed and used in accordance with the instructions, may cause harmful interference to radio communications. However there is no guarantee that interference will not occur in particular installation. If this equipment does cause harmful interference to radio or television reception, which can be determined by turning the equipment off and on, the user is encourage to try to correct the interference by one or more of the following measures:
*Reorient or relocate the receiving antenna.
*Increase the separation between the equipment and receiver.
*Connect the equipment into an outlet on a circuit different from that to which the receiver is connected.
*Consult the dealer or an experienced radio/TV technician for help.
This device compiles with Part 15 of the FCC Rules. Operation is subject to the following two conditions:
(1) This device may be not cause harmful interference.
(2) this device must accept any interference received, including interference that may cause undesired operation.
FCC CAUTION:
To assure continued compliance and possible undesirable interference, the provided ferrite cores must be used when connecting this display to video equipment; and maintain at least 15.7" spacing to other peripheral device.
CANADIAN NOTICE:
This Class B digital apparatus compiles with Canadian ICES-003.

ENERGY STAR compliant (models - LE55B1381)
By being ENERGY STAR compliant you are assured that your Haier model is helping the environment by using less energy while saving you money. ENERGY STAR is a joint program of the U.S.Environmental Protection Agency and the U.S.Department of Energy promoting energy efficiency.
SAVE THESE INSTRUCTIONS
Thank you for purchasing a Haier product. This easy-to-use manual will guide you in getting the best use of your product. Remember to record the model and serial number. They are on the label on the back of the unit.
Model number
serial number
Date of purchase
Staple your receipt to your manual. You will need it to obtain warranty service.
Contents
| Warning | 1 |
| Safety Instructions | 2-3 |
| Unit and Accessories | 5 |
| Product Features | 5 |
| Introduction | 6-10 |
| 1. Front View | 6 |
| 2. Rear View | 7 |
| 8Instruction for Wall Mount.3 |
| 4. Base Stand Assembly Instructions | 9 |
| 5. Remote Control | 9-10 |
| Connection | 11-13 |
| Basic Operation | 14 |
| OSD Menu | 15-22 |
| 1. Picture menu | 15 |
| 2. Audio menu | 16 |
| 3. Time menu | 17 |
| 4. Setup menu | 18 |
| 5. Lock menu | 19 |
| 6. Channel menu | 20-21 |
| 22edomBSU.7 |
| Simple Troubleshooting | 23 |
| Warranty | 24 |
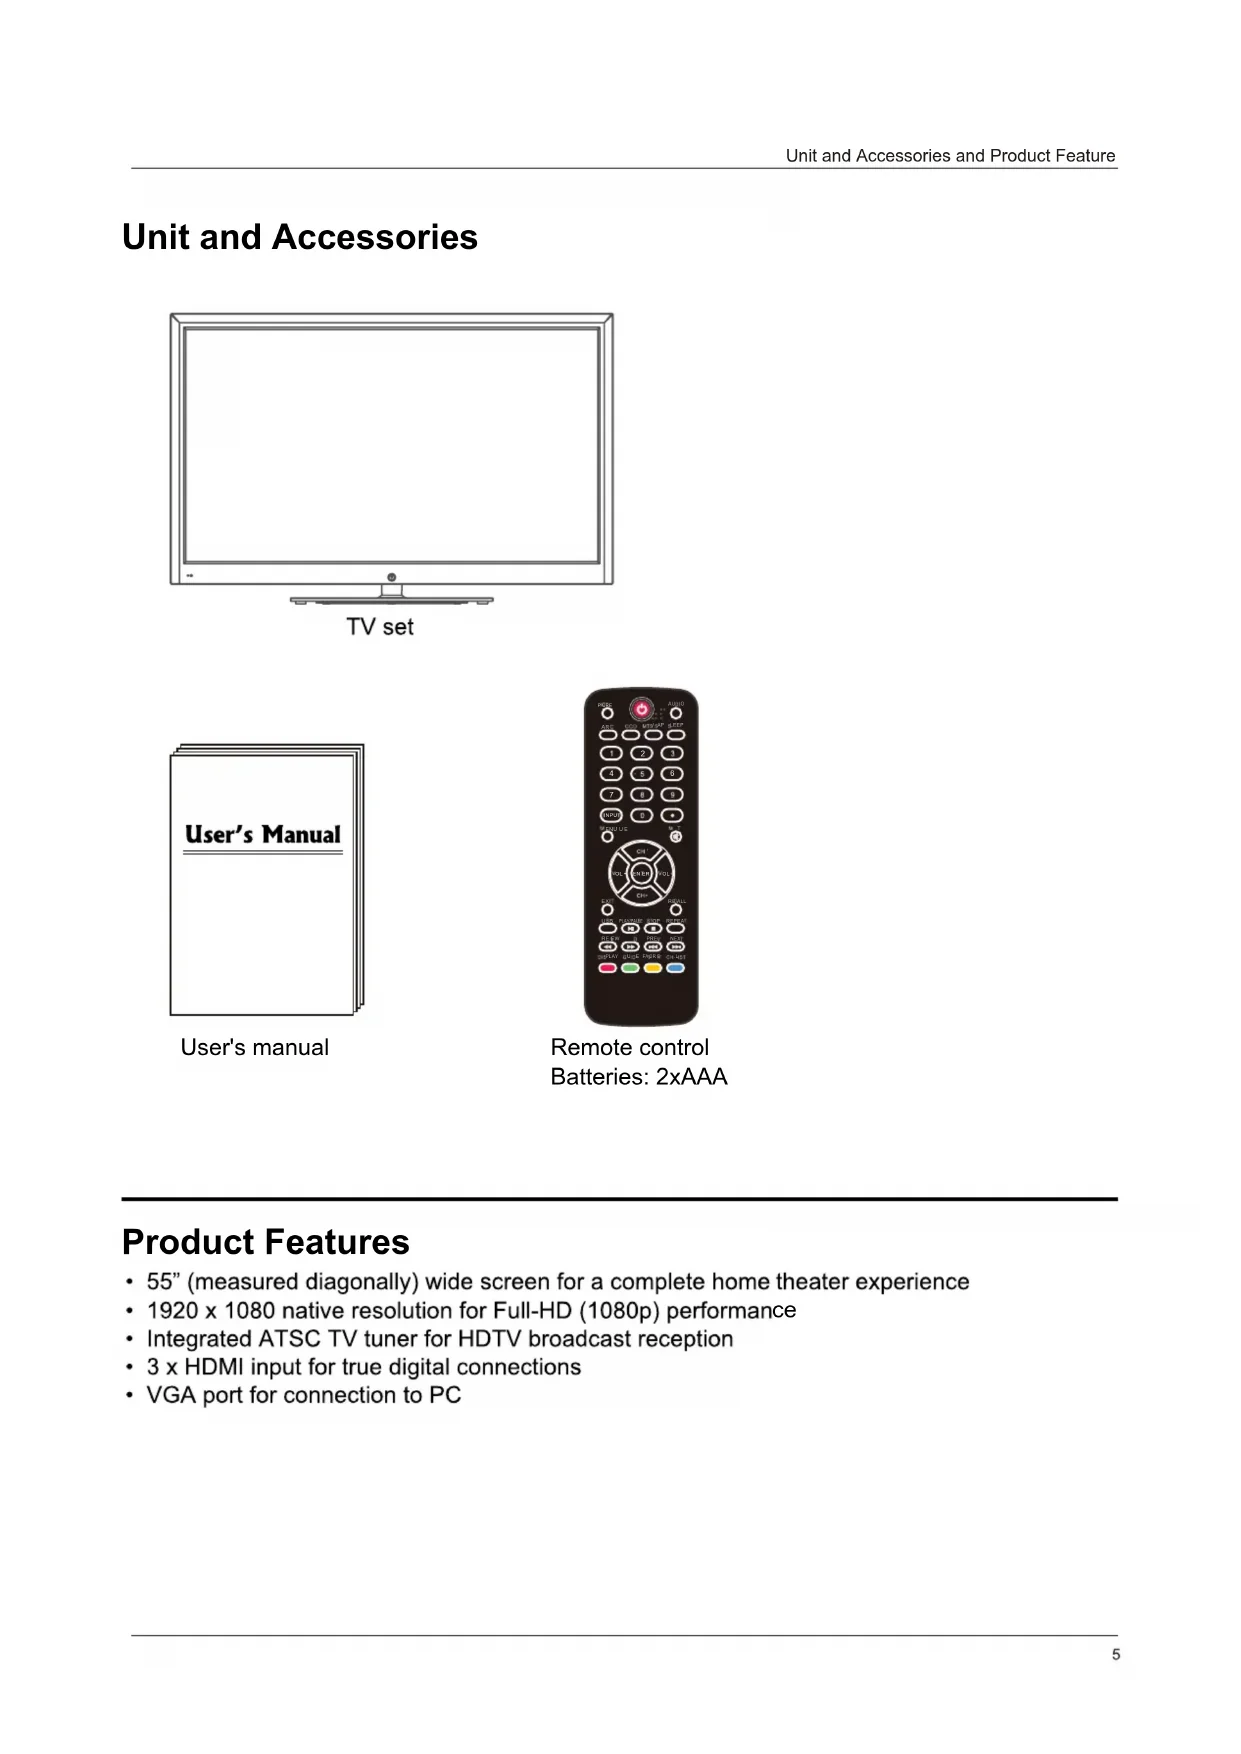
Unit and Accessories
natural_image
Line drawing of a flat-screen monitor with blank screen area and stand (no text or symbols)
TV set

User's manual
Remote control
Batteries: 2xAAA
Product Features
- 55" (measured diagonally) wide screen for a complete home theater experience
- 1920 x 1080 native resolution for Full-HD (1080p) performance
- Integrated ATSC TV tuner for HDTV broadcast reception
- 3 x HDMI input for true digital connections
• VGA port for connection to PC
Introduction
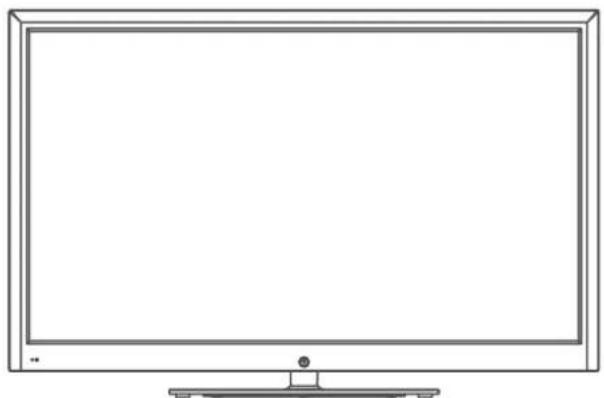
1. Front View
O Infrared (IR) Receiver (Do not block)
o LED Indicator
1). Infrared (IR) Receiver: Receives the IR signals from the remote control.
LED Indicator: Press POWER to turn on / off.
Indicator on (Red)
Standby mode
Indicator on (Green)
Power on mode
The effective receiving range for the signal is up to 30 feet from the front of the remote control window, and 30^ to the left or right side and 20^ above or below the remote control window.
2).

The functions of the buttons:
INPUT: Press to change the input source.
MENU: Press to display the OSD (on screen display) menu, press again to exit the menu.
VOL+/-: Press to adjust the volume.
CH ∧/ ∨: Press to scan through channels.
POWER/STANDBY: Turn on/off (standby) the TV set.
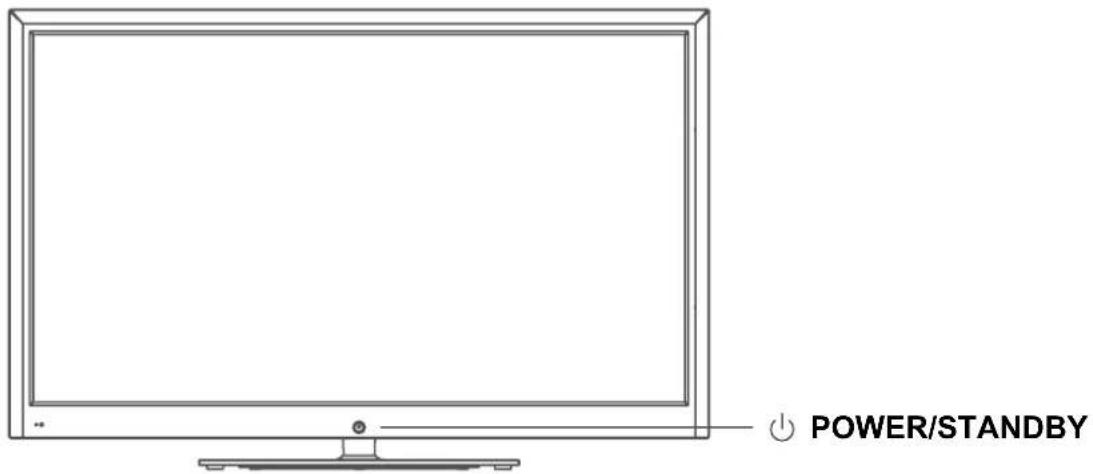
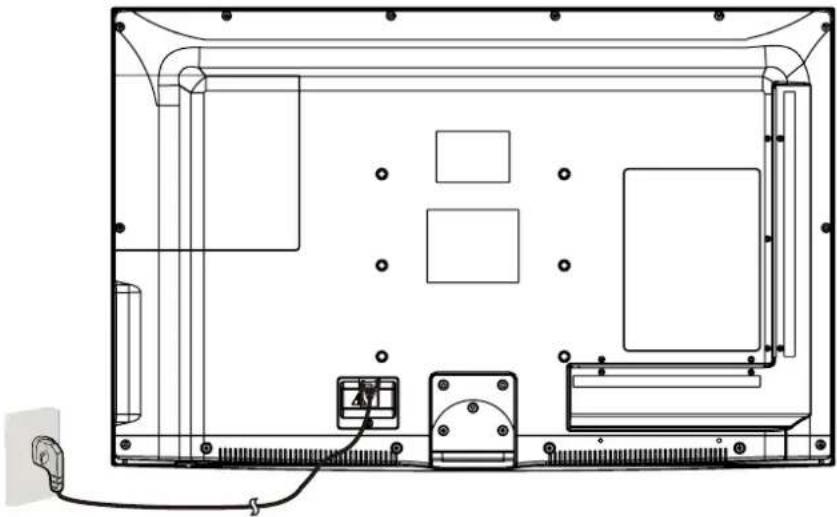
- Rear View
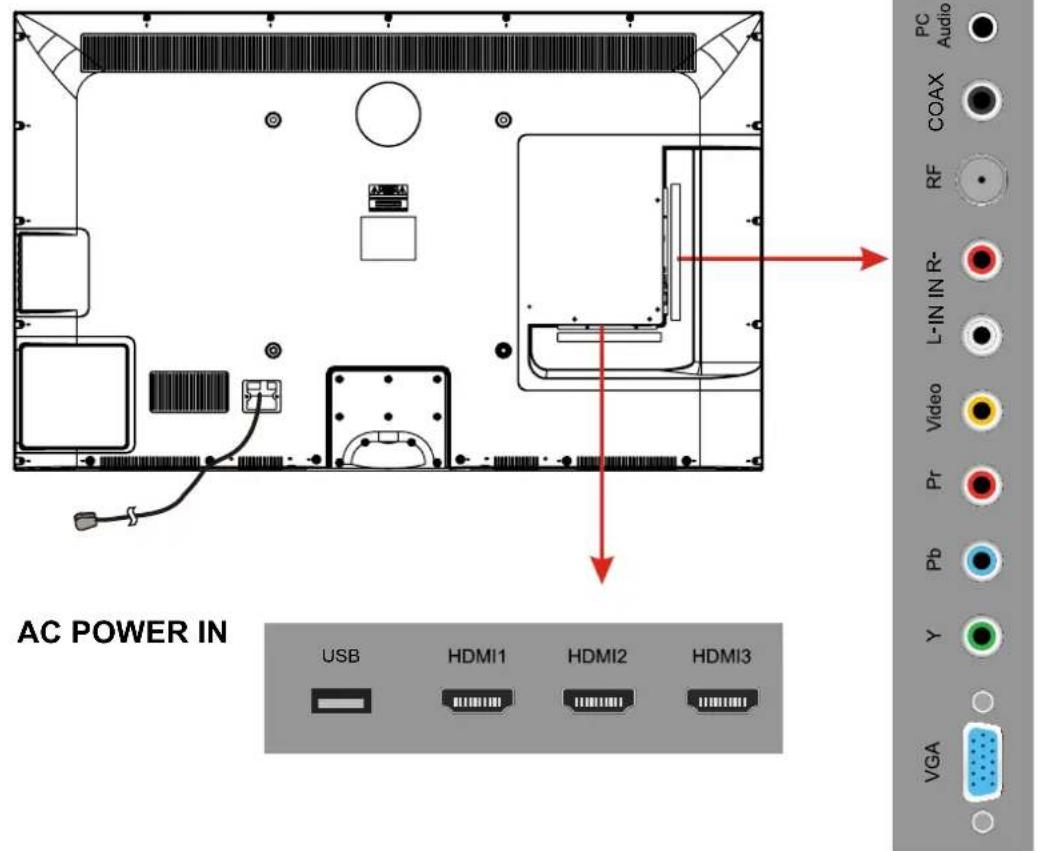
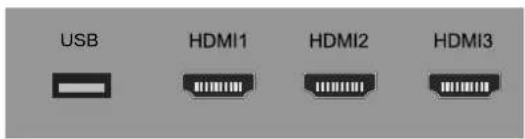
USB: Insert USB storage device to the USB port to view JPEG photos, or listen to MP3 music. This port is also used for software updates.
HDMI1/2/3 : Connect the source(s) for digital video such as a Blu-ray player, video game console, or set top box through this all digital connector.
VGA: Connect a VGA (D-sub 15) cable from the 15-pin VGA connector on your PC.
PC audio: Connect an audio cable from the audio output or headphone jack of your PC.
Component
YPbPr: Connect the component video cables from a device, such as a DVD Player or cable box. Use red for Pr, blue for Pb, and green for Y.
R/L IN: Connect the audio cables from the component video device. Use red for right audio (R) and white for left audio (L).
AV IN (Composite)
VIDEO: Connect the cable for composite video from a device, such as a DVD player, VCR, or camcorder.
R/L IN: Connect the audio cables from the composite video device. Use red for right audio (R) and white for left audio (L).
COAX : Digital audio output.
RF: Connect to an antenna or digital cable (out-of-the-wall, not from Cable Box) for Digital TV.
Headphone: Connect headphones. When it is inserted to the jack, the integrated speakers will be muted.
AC POWER IN : Connect the power cable to a wall outlet.
3. Instruction for Wall Mount
A wall mount kit (purchased separately) will allow you to mount your TV on the wall. For detailed information on installing the wall mount, refer to the instructions provided by the wall mount manufacturer. It is strongly recommended to contact a technician for professional assistance for wall mount installation.
HAIER is not responsible for any damage to the product or injury to yourself or others resulting from wall-mounting.
Dimensions for Mounting Hole Pattern
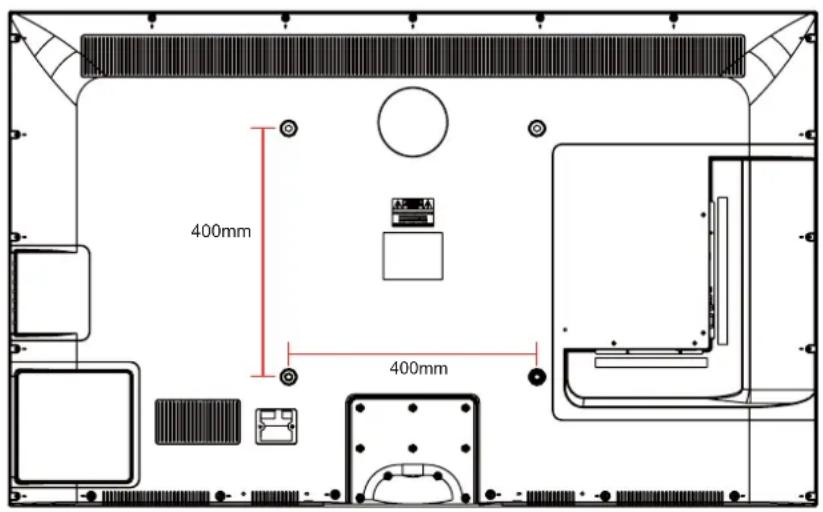
- This TV is compatible with a 400mm x 400mm mounting hole pattern.
- Please insert the screw accessory into the wall mount hole before fastening the screw.
- 4 pcs of type M6 screws are required for installing the wall mount bracket to your TV. Do not use screws that are longer than 30 mm. Screws that are too long may cause damage to the inside of the TV set.
- Do not fasten the screws too tight for this may damage the TV or cause the TV to fall, resulting in personal injury. HAIER is not liable for these kinds of incidents.
- Do not mount your TV at more than a 15 degree tilt.
- Always use at least two people to mount the TV to a wall.
- Do not install your Wall Mount Kit while your TV is turned on. It may result in personal injury due to electric shock.
- We suggest that you keep your TV at least 2.36 inches (60 mm) from the wall to prevent cable interference.
- Before mounting your TV on the wall, you need to remove the base if you attached it.
- For your safety, please use only with UL listed wall mount brackets that can support the weight of the TV without stand: 31lbs (42") / 36lbs (46").
Instructions for fixing TV stand
Note: the pictures below are only for reference
- Remove the the Rear Board from the Rear Cabinet of the TV by removing the screw.
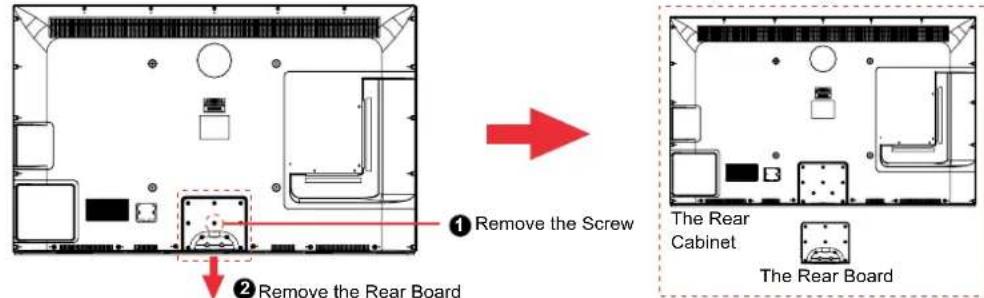
- Put the Rear Board on the Stand Neck, and fix the rear board with the screws supplied (4 x B4 x 16).

- Put the Rear Board on the Rear cabinet of TV, and fix the rear board with the screws supplied (8x2836/M4x12, 2xB4x16).

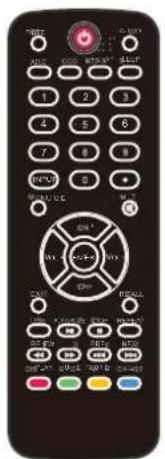
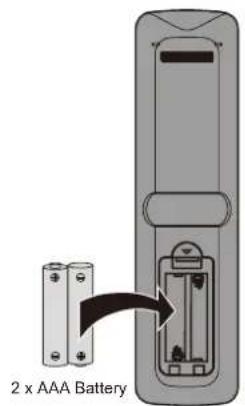
5. Remote Control
Installing Batteries
- Open the battery compartment cover on the back of the remote control.
- Insert two 1.5V AAA size batteries observing the polarity markings inside the battery compartment. Don't mix different types or used batteries with new ones.
- Close the cover.

Batteries shall not be exposed to excessive heat such as direct sunlight or fire.
- The remote control should be operated within 30 feet (7m) and 30^0 to the left and right of the IR receiver at the front of the TV.
- Used batteries should be disposed of properly.

The remote control is using infrared (IR) signals. Point it towards the front of the TV. The remote control may not work correctly if it is operated out of range (see previous page).
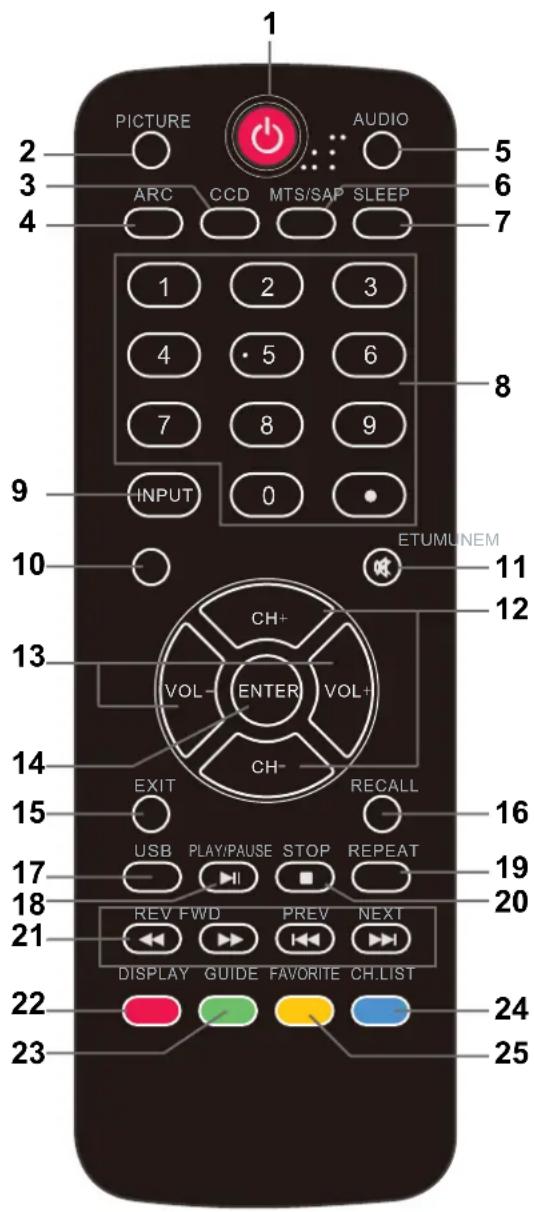
- POWER(red button): Turn the TV on/off (standby).
- PICTURE: Press to select the available video picture modes: Standard, Mild, Custom, Vivid, Power Saving.
- CCD: Press to display the closed captions.
- ARC: Press to select the zoom mode (aspect ratio control): Normal, Zoom, Wide, Cinema.
- AUDIO: Press to select the sound mode: Standard, Music, Theater, Custom.
- MTS/SAP: For analog TV, press to switch the sound mode: Stereo, SAP or Mono. For digital TV, press to switch the audio language if the TV program provides an alternative.
- SLEEP: Press to set the sleep timer: (off / 5 / 10 / 15 / 30 / 45 / 60 / 90 / 120 / 180 / 240 mins). The TV will automatically turn off (standby mode) after the selected period of time passes.
- Numercal Keys: Press to enter a TV channel number (Press "•" to choose the sub-channel).
Example: channel 5-1. Press the "5" button, then press the "●" button within 2 seconds, and then press the "1" button within 2 seconds.
- INPUT: Press to show the input source list. Use the up and down arrow keys to select a source, and then press the ENTER key.
- MENU: Press to display the OSD (on screen display) menu.
- MUTE: Press to mute the sound. Press again or press VOL+ to unmute.
- CH ∧ /∨: Press to scan through the channels.
- VOL+/-: Press to adjust the volume.
12/13. Arrow Keys(< > ∧ ∨): Allows you to navigate the on-screen menus and adjust the system settings.
- ENTER: CONFIRM button.
- EXIT: Press to exit the OSD menu.
- RECALL: Return to the previous channel viewed.
-
USB: Press to enter the USB mode.
-
PLAY/PAUSE: Press to play/pause music or photo slideshow in USB mode.
- REPEAT: Press to turn repeat on/off in USB music mode.
- STOP: Press to stop playing music or to return to the file list while a photo is displayed.
- Reverse, Fast forward, Preview, Next: Use these buttons to control music/photo playback.
- DISPLAY: Press to show the information about the input source, such as TV channel information, display resolution, current time, etc.
- GUIDE: Press to display the Electronic Program Guide.
- CH.LIST: Press to display the channel list.
- FAVORITE: Press to show the Favorite Channel List. Use the up and down arrow keys to select a channel, and then press ENTER.
Connection
Power Cord Connection
natural_image
Technical line drawing of a device rear panel with internal components and wiring (no text or symbols)
- Connect the TV to a wall outlet using the included AC power cord.
- When you connect the power cord, the TV enters into standby mode and the LED indicator on the front of the TV will be red.
- Turn on the TV by pressing the POWER button on the TV or remote control, and the LED indicator will become green.
Note: It is recommended to unplug the TV if it will not be used for a long time, such as during a vacation.
flowchart
graph TD
    A["External Antenna"] --> B["Coaxial Antenna Cable"]
    C["Wall jack with F-Connector"] --> B
    B --> D["RF"]
    style A fill:#f9f,stroke:#333
    style C fill:#ccf,stroke:#333
    style D fill:#cfc,stroke:#333
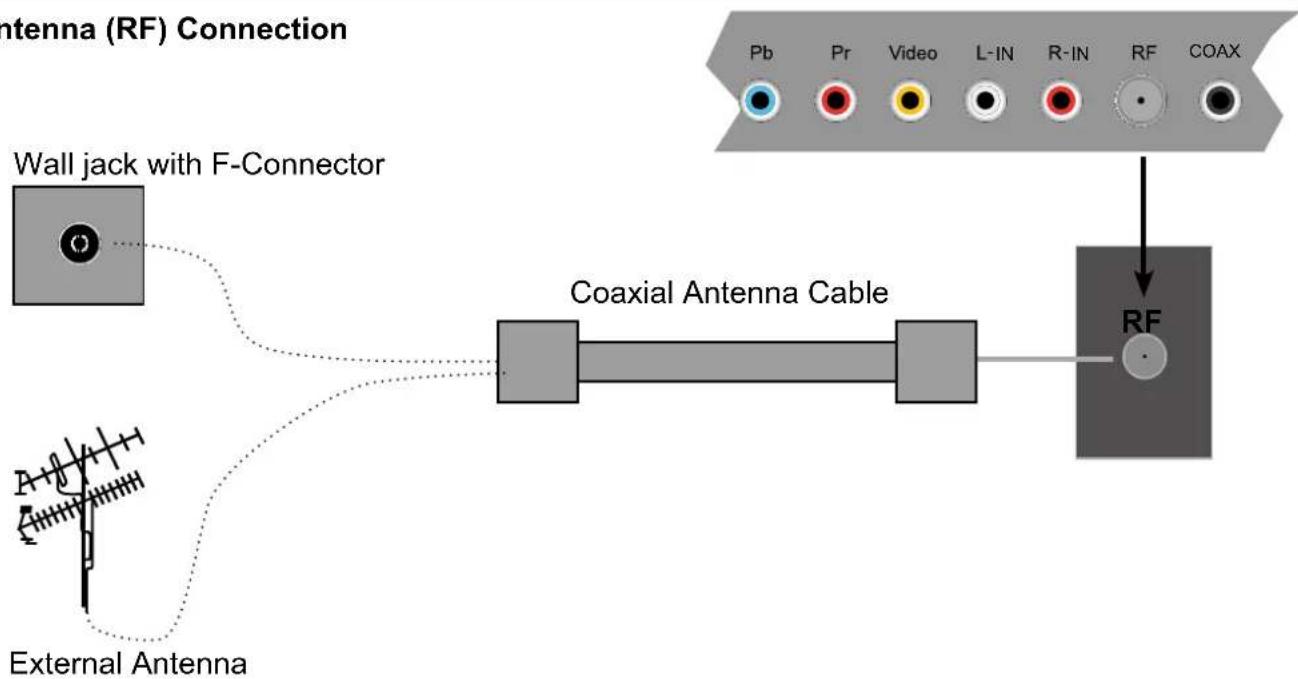
Press the INPUT button on the remote control to display the input source menu, use the ∧/∨ buttons to select TV, and then press the ENTER button to confirm. You will need to perform a channel scan to be able to view TV channels. Please see the auto scan section on page 20.
Note: All cables shown are not included with the TV.
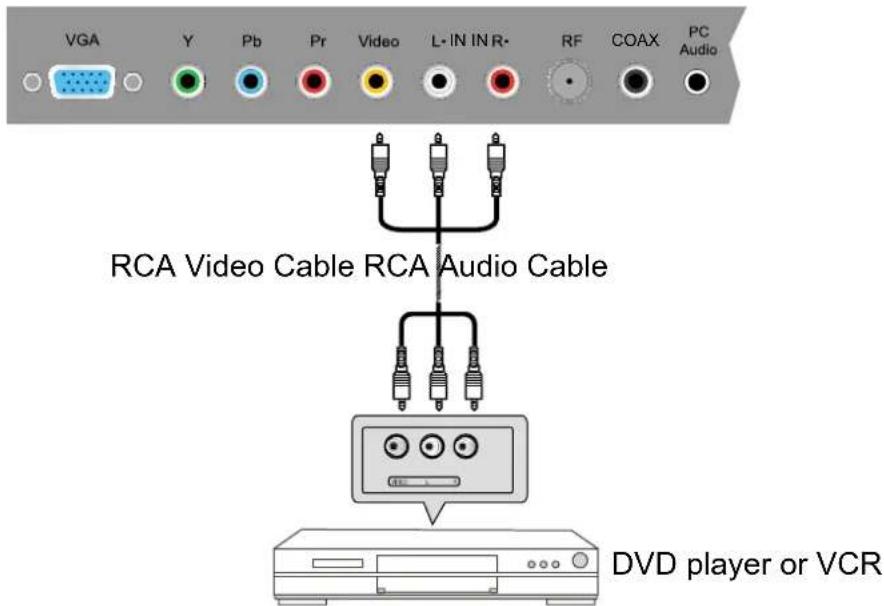
- Connect the VIDEO and AUDIO output jacks on the DVD player or VCR to the AV IN jacks on the TV set using RCA cables.
- Match the jack's colors: Video=yellow, Audio left=White, Audio right=red.
- Turn on the DVD player/VCR, and select "AV" in the input source menu.
YPbPr (Component) Connection
Note: All cables shown are not included with the TV.
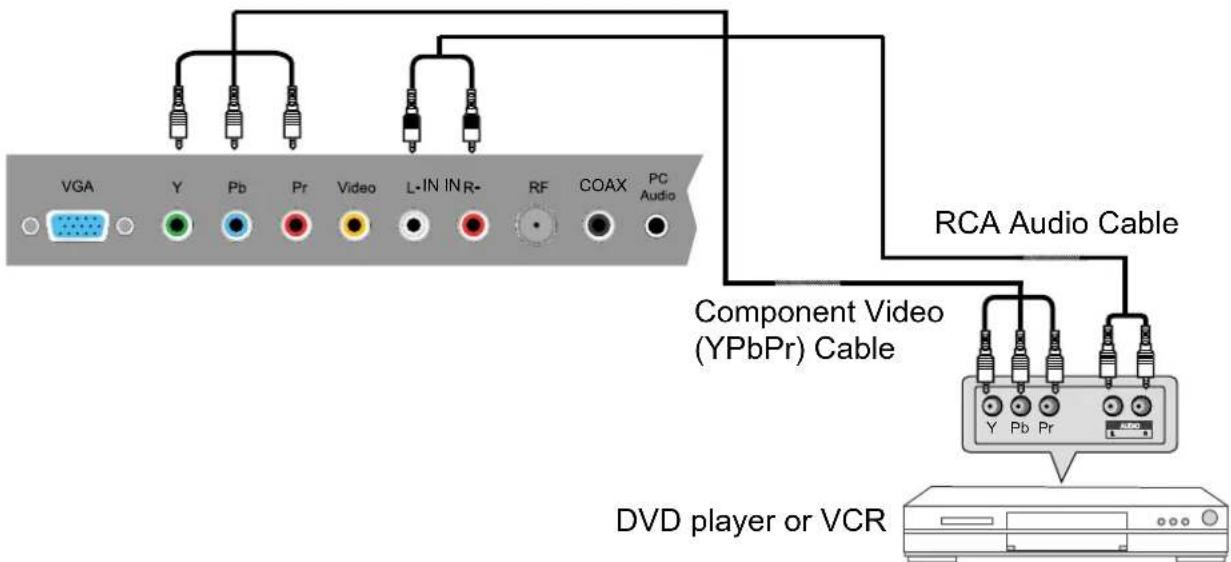
- Connect the YPbPr output jacks on the DVD player or VCR to the YPbPr input jacks on the TV set component video (YPbPr) cable. The picture quality is improved compared to the video (composite) input.
- Match the jacks colors: Y=Green, Pb=Blue, Pr=red.
- Connect the audio output jacks on the DVD player or VCR to the audio input jacks on the back of the TV with a RCA audio cable.
- Turn on the DVD player or VCR, and select "Component" in the input source menu.
HDMI Connection
Note: All cables shown are not included with the TV.
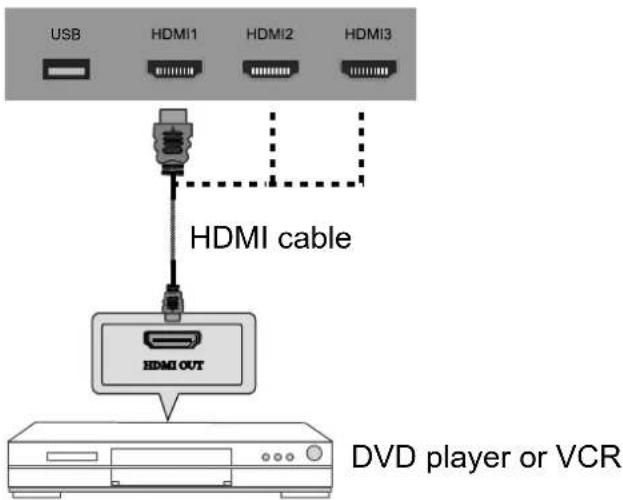
- Connect the HDMI port on the DVD player to the HDMI port on the back of the TV with a HDMI cable.
- Turn on the DVD player, and select "HDMI1/2/3" in the input source menu.
- HDMI (High Definition Multimedia Interface) is the first all digital consumer electronics A/V interface that supports uncompressed audio and video
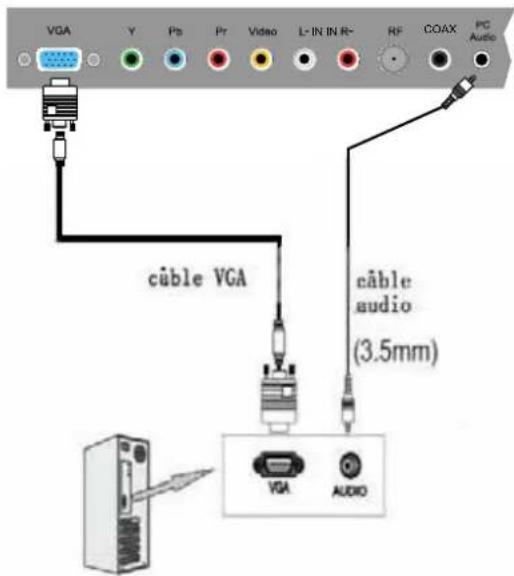
PC Connection
Note: All cables shown are not included with the TV.
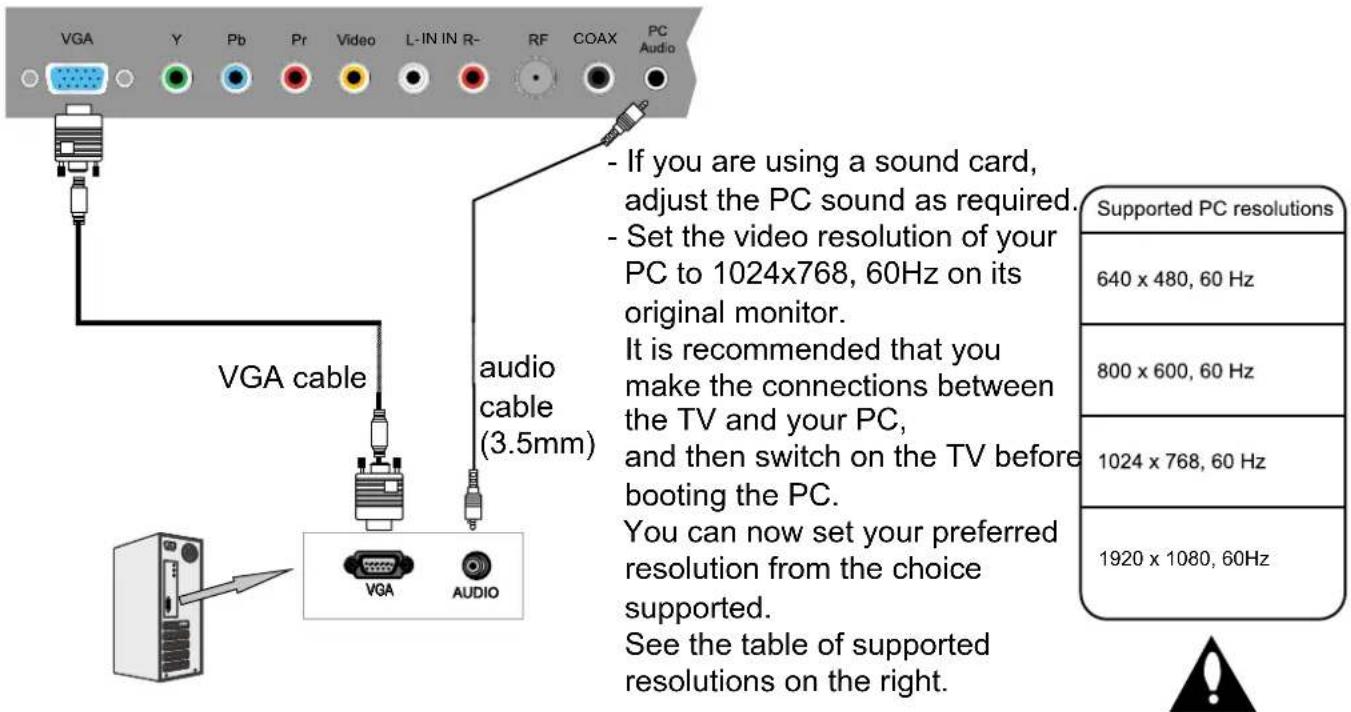
- Connect the VGA port on the PC to the VGA port on the back of the TV with a VGA(D-sub 15) cable.
- Connect the audio output or headphone jack on the PC to the PC AUDIO jack on the back of the TV with a 3.5mm audio cable.
- Turn on the PC, and select "VGA" in the input source menu.
Basic Operation
Power on/off
- Connect the TV to a wall outlet using the included AC power cord.
2.-To turn on the TV
Press the POWER button on the TV or remote control.
-To turn off the TV
Press the POWER button on the TV or remote control.
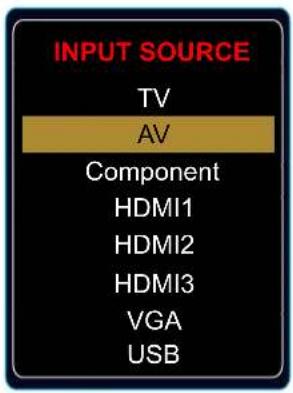
Press the INPUT button on the remote control to display the input source menu, and use the ∧/∨ buttons on the remote control to select the input source. Press the ENTER button on the remote control to switch to the selected input.
Note: Before you select the input source, make sure the connections are properly connected.
Press the MENU button to display the OSD menu as shown below:
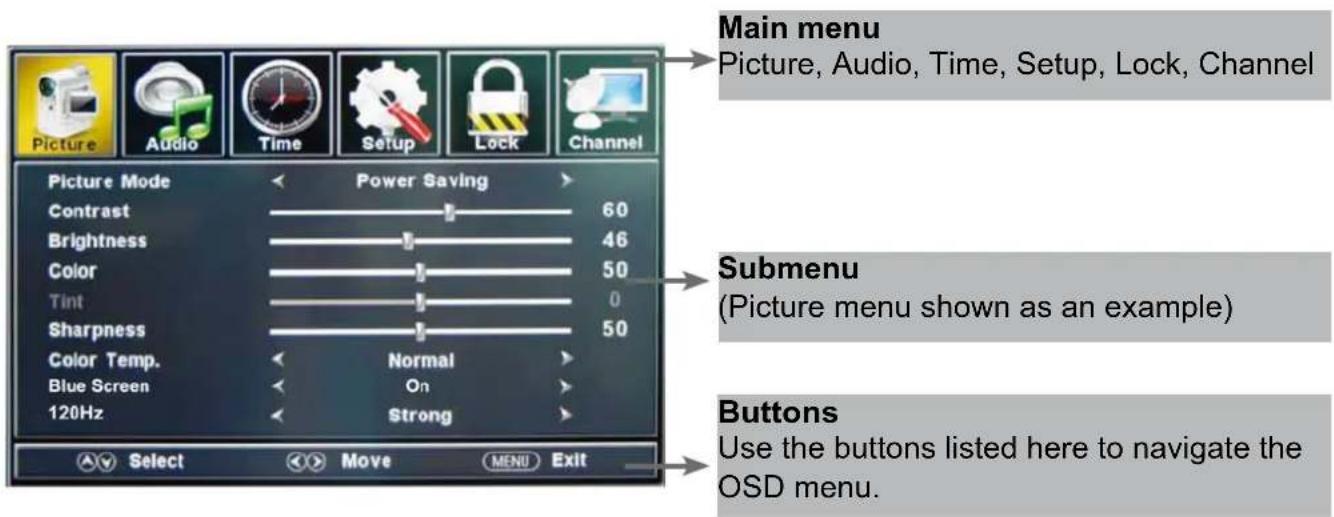
Use the K buttons to select the main menu, and press the button to enter the submenu. In the submenu, use the / buttons to select the function item.
Adjust ("Contrast" shown in above example) with the / buttons;
Select ("Picture Mode" as shown in above example) with the < / buttons;
Enter the submenu ("Close Caption" item in Setup menu for example) with > button.
* (Press the MENU button to return to the upper menu.)
* (Press the EXIT button to exit the menu display.)
Note1: Some options can only be accessed in certain modes.
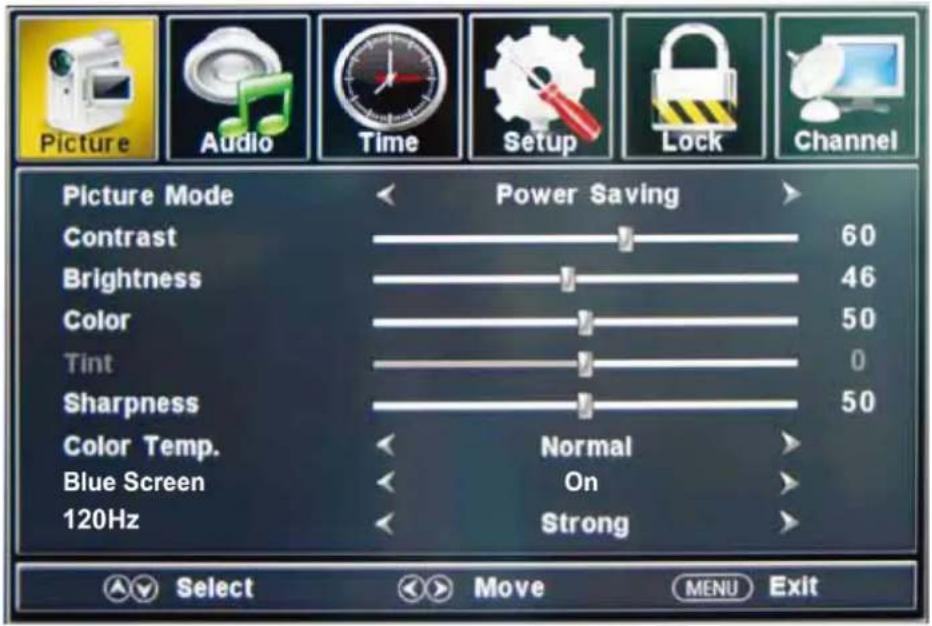
Description
Picture mode: Select between Standard, Mild, Custom, Vivid and Power saving.
You may select the picture mode directly by pressing the PICTURE button on the remote control.
Contrast: Control the difference between the bright and dark regions of the picture.
Brightness: Adjust brightness of the picture.
Color: Adjust the amount of color in the picture.
Tint: Adjust the tint (color tone) of the picture.
Sharpness: Set the amount of fine detail in the picture.
Color Temp.: Select between Normal, Cool and Warm.
When the TV is no signal, You can the background to blue or others. Blue Screen:
120Hz: Set the 120Hz refresh rate: Normal, Strong and Off.
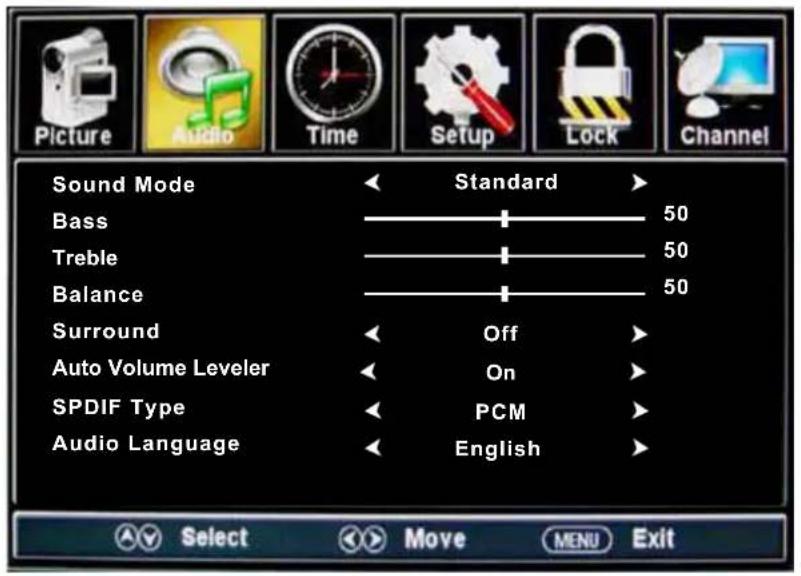
Description
Sound Mode: Select your desired picture mode as follow: Standard, Music, Theater and Custom.
Bass: Adjust the bass (low frequency audio).
Treble: Adjust the treble (high frequency audio).
Balance: Left and right stereo audio channels balance.
Surround: Activate or deactivate the surround sound function.
AVL: Auto volume level control.
SPDIF Type: Select SPDIF type: PCM or RAW.
Audio Language: Select the audio language.

Description
Sleep timer: Set the sleep timer: (off / 5 / 10 / 15 / 30 / 45 / 60 / 90 / 120 / 180 / 240 mins). The TV will automatically turn off (standby mode) after the selected period of time passes. Time zone: Select your time zone: Eastern, Central, Mountain, Pacific, Alaska, or Hawaii. Daylight Saving Time (Could only be activated in DTV mode): Turn on/off daylight saving time. Clock: The time is set automatically, and you cannot manually adjust the time.
Description
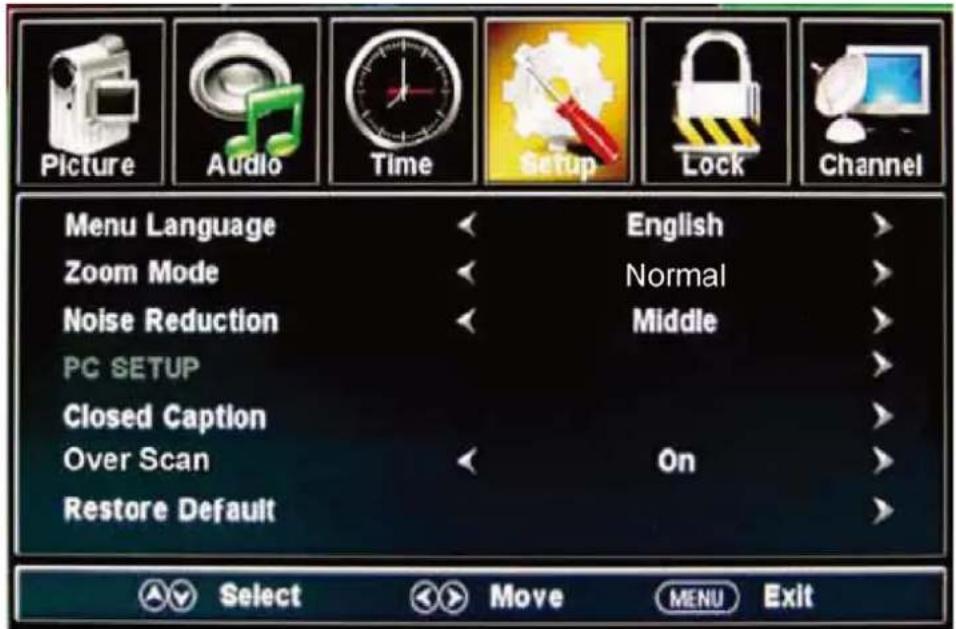
Menu Language: Select the OSD menu language.
Zoom Mode: Select the zoom mode: Normal, Zoom, Wide, or Cinema.
Noise reduction: Select the noise reduction mode: Weak, Middle, or Strong.
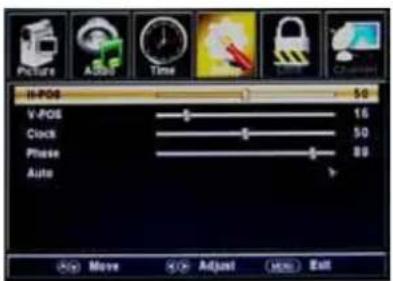
PC SETUP: If the video input signal comes from your PC, you may adjust the V-Position, H-Position, Clock, Phase or perform an Auto adjustment. Menu shown in the image on the right.
Closed Caption:
CC Mode: Select the CC Mode: On, Off and CC on Mute. Menu shown in the image on the right.
Basic Selection: Select the analog TV captions: CC1, CC2, CC3, CC4, Text1, Text2, Text3 or Text4.
Advanced Selection: Select the digital TV captions: Service1, Service2, Service3 Service4, Service 5 or Service 6.
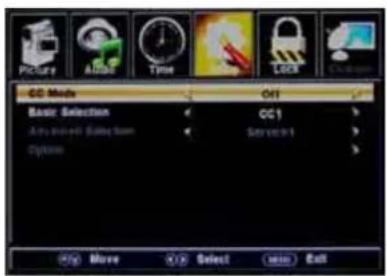
Option: Customize the font, style, color, etc. of the captions.
Overs Scan: Turn on/off the over scan function.
Restore Default: Restore all settings to the factory default settings.
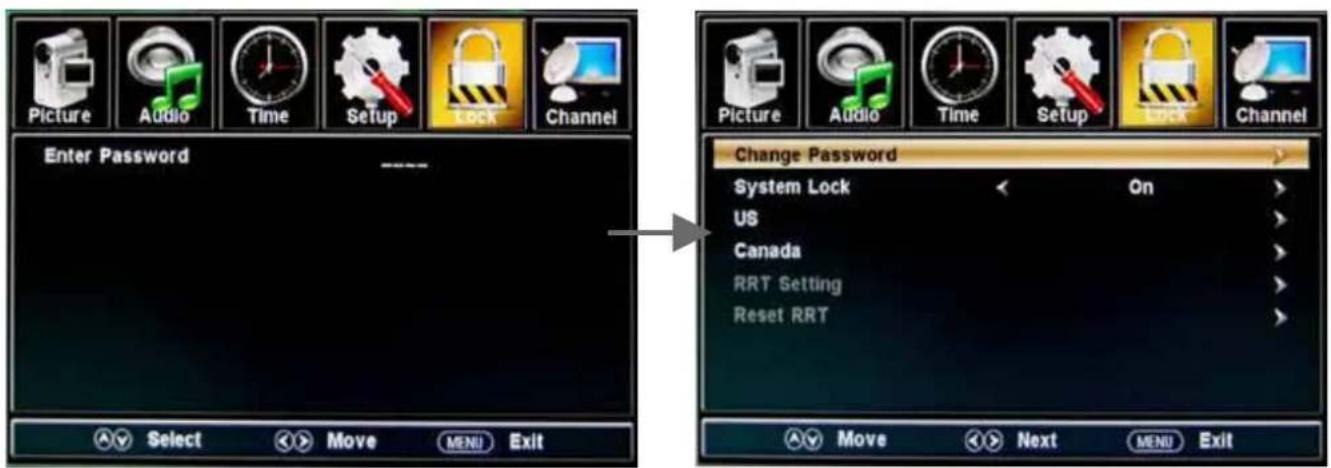
You must enter the password to gain access to the Lock menu. The default password is 0000. You may modify the following options:
Description
Change password: Change the password, you must enter the new password twice to confirm it. Note: Do not forget the password.
System Lock: Allows you to turn on or off the system lock. If deactivated, the functions described below will not be activated.
This option menu allows you to block programming based on the TV or MPAA rating.
US:
TV: Use the ∧/∨ buttons to select the desired rating and press the > button to block or unblock.
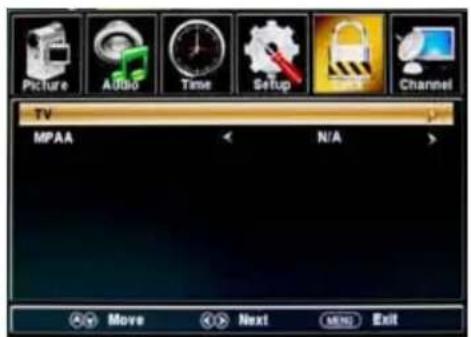
MPAA: The Movie rating (MPAA) is used for movies rated by the Motion Picture Association of America (MPAA) as broadcasted on cable TV and not edited for television. Use the ∧/∨ button to select N/A, G, PG, PG-13, R, NC-17 or X.
| RATING | DESCRIPTION |
| G | General Audiences. Movie is appropriate for all ages. |
| PG | Parental Guidance Suggested. May contain material not suited for younger viewers. |
| PG-13 | Contains content that may not be appropriate for viewers under the age of 13. |
| R | Restricted. Contains adult content, no one under 17 admitted without parent. |
| NC-17 | No one 17 and under admitted. |
| X | Adults only. |
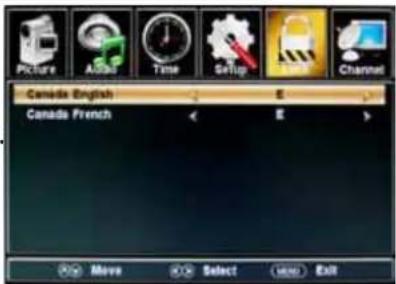
Canada:
Canada English: Select : E, C, C8+, G, PG, 14+ and 18+.
Canada French: Select : E, G, 8ans+, 13ans+, 16ans+ and 18ans+
Reset RRT: Allows you to reset the RRT setting.
Description
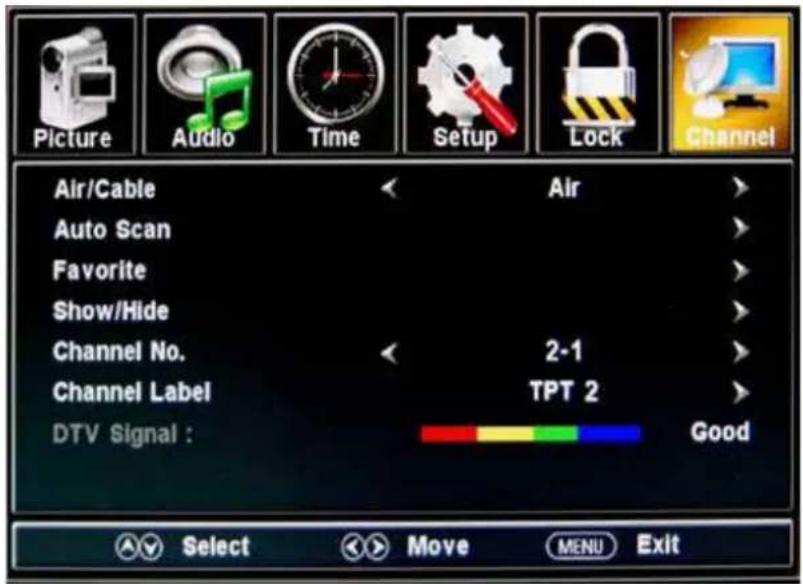
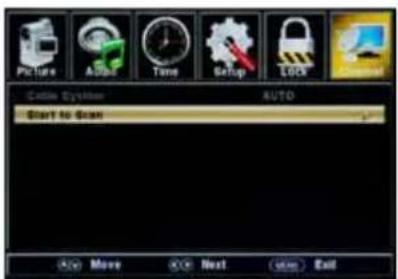
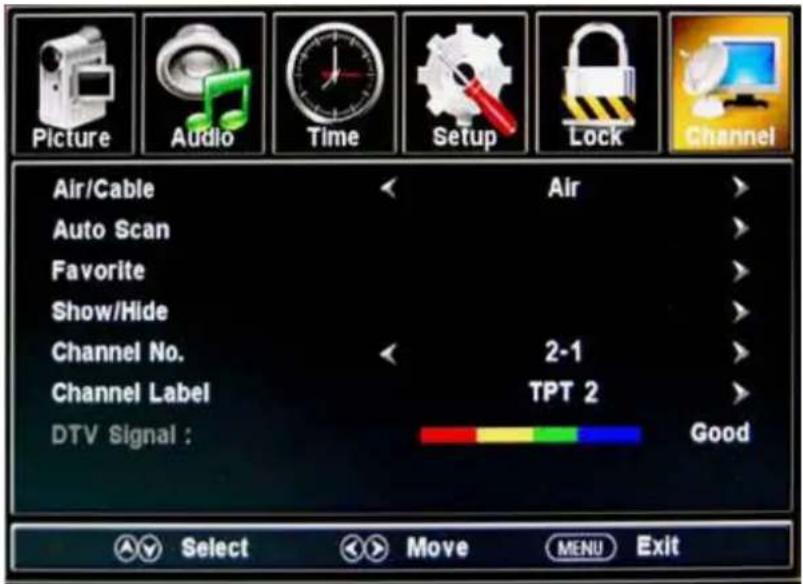
Air/Cable: Select Air or Cable.
If you select "Cable", the following items(Favorite, Show/Hide, Channel NO, Channel Label and DTV Signal) will be unavailable.
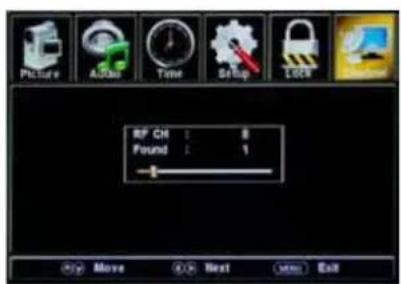
Auto Scan: Enter the Auto Scan menu to start auto scan. See image on the right.
★ If you select "Cable" as the input signal, you can also select the Cable System: Auto, STD, IRC and HRC. Use the ∨ button to highlight "Start to Scan", then press the > button to search the channels automatically.
The receivable channels will be stored automatically.
When searching channels, press MENU to stop.
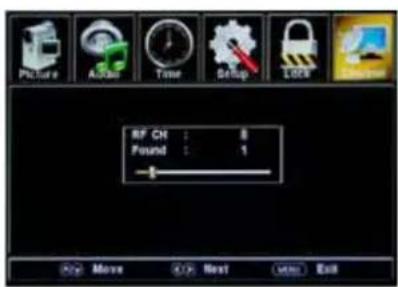
★ If you select "Air" as the input signal, you can press the > button to search the channels automatically.
The receivable channels will be stored automatically.
When searching channels, press MENU to stop.
NOTE: It may take a while to auto scan in "Air" mode, please wait patiently.
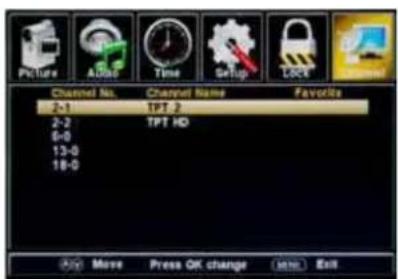
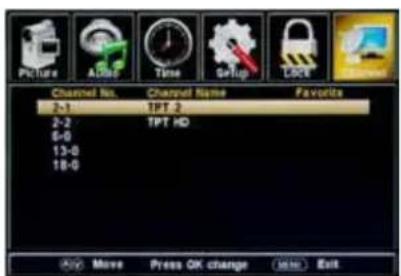
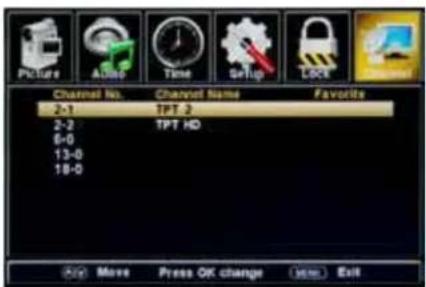
Favorite: Add/remove channels to/from the favorite channels list.
Use the ∧/∨ button to highlight the desired item, then press the ENTER button to add or remove the highlighted channel as a favorite. See image on the right.
Show/Hide: Allow you to show or hide the channels.
Use the ∧/∨ button to highlight the desired item, then press the ENTER button to show or hide the highlighted channel.

Channel No.: Show and select the channel.
Channel Label: Change the label (name) of a channel.
Press the < / > button to select the position, and press the / button to select the letter.
DTV Signal: Shows the quality of the digital signal: Good, Normal, Bad.
7. USB mode
1). Insert a USB device.
2). Press the USB button on the remote control, the TV will search for the device automatically, and display the menu shown below.
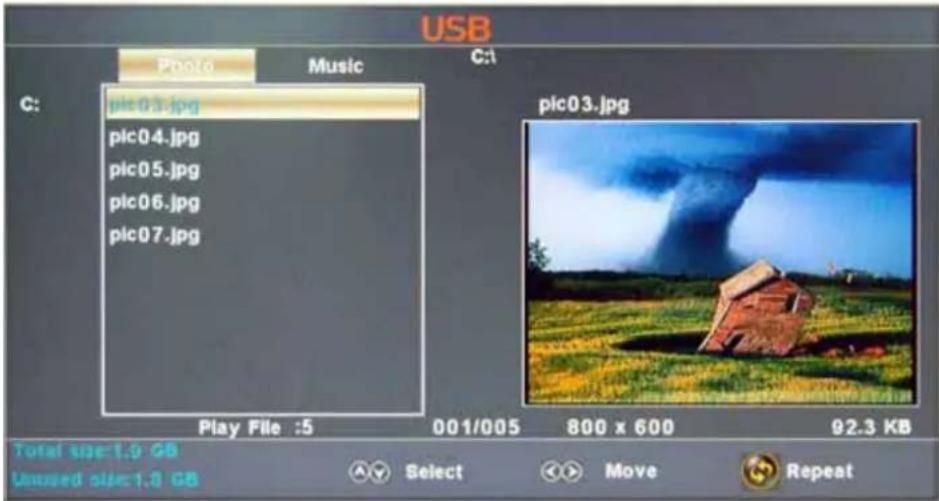
Description
Note: You could enter the USB menu by selecting the USB source in the input source menu.
Operation:
- Press the <> buttons to select Photo files or Music files.
- Press the ∧ ∨ buttons to select a file or folder, and press the ENTER button to play the file or open the folder.
Operation buttons
▶/II: Play or pause.
■ : Stop.
◀ : Reverse
▶▶: Fast forward
◀◀: Previous chapter
▶▶: Next chapter
REPEAT: Press to change the programing mode.
Simple Troubleshooting
If the display fails or performance dramatically deteriorates check the Display in accordance with the following instructions. Remember to check the peripherals to pinpoint the source of the failure.
If the display still fails to perform as expected, contact customer assistance: 1-877-337-3639.
No power
- Check all connections to the TV.
- Press either the power button or the Standby button on the Remote control.
No picture or sound
- Ensure that the TV is plugged in and the power is on.
- Ensure that the aerial is connected.
- Try a different program.
Poor picture quality
- Check the aerial connections.
- Check that the channel is tuned in properly.
- Adjust the picture settings: brightness, color, sharpness, contrast, hue.
- Make sure that the TV is not located close to electrical appliances that may emit radio frequency interference.
No colour
- Adjust the color setting.
- Check that the program is broadcast in color.
- Check that the channel is tuned properly.
TV does not respond to remote control
- Check that there are no obstructions between the remote control and the TV.
- Check that the remote control is within range of the TV.
- Check that the batteries in the remote control and not weak or exhausted.
Warranty
This Haier brand product, when shipped in its original container, will be free from defective workmanship and materials, and agrees that it will, at its option, either repair the defect or replace the defective product with a new or re-manufactured equivalent at no change to the purchaser, for parts or labor for the periods set forth below:
This warranty does not apply to the appearance of the product or the exterior of the product, which has been damaged or defaced, altered or modified in design or construction. It does not apply to the additional excluded items set forth below:
The warranty commences on the date the item was purchased and the original purchase receipt must be presented to the authorized service centerbefore warranty repairs are rendered.
The limited warranty described herein is in addition to whatever implied warranties may be granted to purchasers by law. ALL IMPLIED WARRANTIES INCLUDING THE WARRANTIES OF MERCHANTABILITY AND FITNESS FOR USE ARE LIMITED TO THE PERIOD(s) FROM THE DATE OF PURCHASE SET FORTHBELOW. Some states do not allow limitations on how long an implied warranty lasts, so the above limitation may not apply to you.
Neither the sales personnel of the seller nor any other person is authorized to make any warranties other than those described herein, or to extend the duration of any warranties beyond the time period described herein on behalf of Haier.
The warranties described herein shall be the sole and exclusive warranties granted by Haier and shall be the sole and exclusive remedy available to the purchaser. Correction of defects in the manner and for the period of time described herein, shall constitute complete fulfillment of all abilities and
Responsibility of Haier to the purchaser with respect to the product, and shall constitute full satisfaction of all claims, whether based on contract, negligence, strict duality or otherwise. In no event shall Haier be liable, or in any way responsible for any damages or defects in the product which were caused by repairs or attempted repairs performed by anyone other than an authorized service center or dealer; nor shall Haier be liable, or in any way responsible for incidental or consequential economic or property damage. Some states do not allow the exclusion of incidental or consequential damages, so that above exclusion may not apply to you.
THIS WARRANTY GIVES YOU SPECIFIC LEGAL RIGHTS. YOU MAY ALSO HAVE OTHER RIGHTSWHICH VARYFROM STATETO STATE.
Warranty period for this productone year parts and labor.
Additional items excluded from warranty coverage: non-rechargeable batteries.
Where to obtain service: For the location of the nearest Haier authorized service center or to obtain product literature, accessories, supplies or customer assistance, please call 1-877-337-3639.
What to do to obtain service: ship or carry in your product to an authorized service dealer or center. Be sure to have proof of purchase.
Haier®
TÉLÉ TFT-LED MANUEL D'USAGE
natural_image
Line drawing of a flat-screen monitor with a blank screen (no text or symbols)
Poste de télévision

AC POWER IN

Step 3

natural_image
Simple line drawing of a rectangular device with a handle and two buttons, no text or symbols present.
natural_image
Technical line drawing of a device rear panel with internal components and wiring (no text or symbols)
Note: All cables shown are not included with the TV.
Description
Description

Description
Description
natural_image
Line drawing of a flat-screen monitor with blank screen (no text or symbols)
Televisor

Baterías: 2xAAA
natural_image
Technical line drawing of a device interior with labeled components and wiring (no text or symbols)
Menú principal
Descripción
Descripción
Descripción
| RATING | DESCRIPTION |
| G | General Audiences. Movie is appropriate for all ages. |
| PG | Parental Guidance Suggested. May contain material not suited for younger viewers. |
| PG-13 | Contains content that may not be appropriate for viewers under the age of 13. |
| R | Restricted. Contains adult content, no one under 17 admitted without parent. |
| NC-17 | No one 17 and under admitted. |
| X | Adults only. |
Canadá:
6. Menú de canal

Descripción
Mostrar / Ocultar: Permite mostrar u ocultar los canales.