
GLGHT20B - Electric hedge trimmer Genesis - Free user manual and instructions
Find the device manual for free GLGHT20B Genesis in PDF.

| Product Type | Cordless Electric Hedge Trimmer |
| Brand | Genesis |
| Model | GLGHT20B |
| Power Source | 20V DC Lithium-Ion Battery |
| Battery Voltage | 20V DC |
| Battery Capacity | 2.0 Ah (Model GLAB2020B included) |
| Battery Type | Rechargeable Lithium-Ion |
| Blade Length | 50.8 cm |
| Cutting Capacity | 15.9 mm (max branch diameter) |
| No-Load Speed | 2600 strokes per minute |
| Charge Time | Approximately 80 minutes for a fully discharged 2.0 Ah battery |
| Charger Voltage | 120V AC, 50-60 Hz |
| Package Contents | Hedge trimmer, battery (GLAB2020B), charger, safety guard, front handle with switch, screws, screwdriver, user manual |
| Warranty | 2 years (household use, non-transferable) |
| Safety | Dual switch (front and rear) to prevent accidental starting |
| Blade Protection | Safety guard included, blade cover for storage |
| Blade Lubrication | Light machine oil before and after each use |
| Blade Maintenance | Manual sharpening with a file, maintaining the original angle |
| Intended Use | Trimming hedges, shrubs, and bushes (branches up to 16 mm diameter) |
| Battery Charge Indicator | 3 green LEDs on the battery pack |
Frequently Asked Questions - GLGHT20B Genesis
User questions about GLGHT20B Genesis
0 question about this device. Answer the ones you know or ask your own.
Ask a new question about this device
Download the instructions for your Electric hedge trimmer in PDF format for free! Find your manual GLGHT20B - Genesis and take your electronic device back in hand. On this page are published all the documents necessary for the use of your device. GLGHT20B by Genesis.
USER MANUAL GLGHT20B Genesis
Look for this symbol to point out important safety precautions. It means attention!!! Your safety is involved.

WARNING: Read and understand all warnings, cautions and operating instructions before using this equipment. Failure to follow all instructions listed below may result in electric shock, fire and/or serious personal injury.

WARNING: The operation of any tool can result in foreign objects being thrown into your eyes, which can result in severe eye damage. Before beginning tool operation, always wear safety goggles or safety glasses with side shields and a full face shield when needed. We recommend a wide vision safety mask for use over eyeglasses or standard safety glasses with side shields. Always wear eye protection which is marked to comply with ANSI Z87.1.
IMPORTANT SAFETY RULES
WARNING: Some dust created by this product contains chemicals known to the State of California to cause cancer, birth defects or other reproductive harm. Some examples of these chemicals are:
- Compounds in fertilizers.
- Compounds in insecticides, herbicides and pesticides.
- Arsenic and chromium from chemically treated lumber.
Your risk from these exposures varies, depending on how often you do this type of work. To reduce your exposure to these chemicals, wear approved safety equipment such as dust masks that are specially designed to filter out microscopic particles.
WARNING: When using electric gardening appliances, basic safety precautions should always be followed to reduce the risk of fire, electric shock, and personal injury. Read all instructions before using this appliance.
FOR ALL APPLIANCES
- Avoid dangerous environments - do not use appliances in damp or wet locations.
- Don't use in rain or in damp conditions.
- Keep children away - all people and pets should be kept at a distance from the work area.
- Dress properly - do not wear loose clothing or jewelry. They can be caught in moving parts. Wear protective clothing; use of work gloves, long pants, a long-sleeved shirt and safety footwear is recommended when working outdoors. Wear protective hair covering to contain long hair.
- Use safety glasses - always use a face or dust mask if the area in which you are working is dusty.
-
Use correct appliance - do not use appliance for any job except that for which it is intended.
-
Do not force appliance - it will do the job better and with less likelihood of a risk of injury at the rate for which it was designed.
- Do not overreach - keep proper footing and balance at all times.
- Stay alert. Use common sense. Do not operate appliance when you are tired or under the influence of drugs, alcohol or medication.
- When not in use, appliances should be stored indoors in dry places out of reach of children.
- Maintain appliance with care. Follow instructions for lubricating and changing accessories. Keep handles dry, clean, and free from oil and grease.
- Check damaged parts. Before using the appliance, make sure the safety guards are intact. Never use an appliance without its safety guard. Check to make sure moving parts are not binding and can operate freely.
- Check for broken or defective parts that can affect the safe operation of your appliance. A guard or other part that is damaged should be properly repaired or replaced by an authorized service center unless indicated elsewhere in this manual.
FOR BATTERY-POWERED GARDENING APPLIANCES
- Prevent unintentional starting. Make sure the switch is in the Off position before connecting the battery pack, picking up, or carrying the appliance. Carrying the appliance with your finger on the switch or energizing the appliance with the switch on invites accidents.
- Disconnect the battery pack before adjusting, changing accessories, or storing the appliance to reduce the risk of accidental starting
- Recharge only with the charger specified by the manufacturer. A charger that is suitable for one type of battery pack may create a risk of fire when used with another battery pack.
IMPORTANT SAFETY RULES
Use appliances only with specifically designated battery packs. Use of any other battery packs may create a risk of injury and fire.
- When battery pack is not in use, keep it away from other metal objects, like paper clips, coins, keys, nails, screws or other small metal objects, that can make a connection from one terminal to another. Shorting the battery terminals together may cause burns or a fire.
- Under abusive conditions, liquid may be ejected from the battery; avoid contact. If contact accidentally occurs, flush with water. If liquid contacts eyes, additionally seek medical help. Liquid ejected from the battery may cause irritation or burns.
- Do not use a battery pack or appliance that is damaged or modified. Damaged or modified batteries may exhibit unpredictable behavior resulting in fire, explosion or risk of injury.
- Follow all charging instructions and do not charge the battery pack or appliance outside of the temperature range specified in the instructions. Charging improperly or at temperatures outside of the specified range may damage the battery and increase the risk of fire.
ADDITIONAL SAFETY RULES FOR CORDLESS HEDGE TRIMMERS
- Check the work area before each use. Remove all objects such as rocks, broken glass, nails, wire, or string which can be thrown or become entangled in the product.
- Keep all parts of the body away from the cutter blade. Do not remove cut material or hold material to be cut when blades are moving. Make sure the switch is off when clearing jammed material. Blades coast after turning them off. A moment of inattention while operating the hedge trimmer may result in serious personal injury.
- Carry the hedge trimmer by the handle with the blade stopped. Proper handling of the hedge trimmer will reduce possible personal injury from the blades.
- DANGER - Keep hands away from the blades. Contact with blades will result in serious personal injury.
- Keep hands and feet away from the cutting device at all times and especially when switching the product on.
- Do not try to grasp or remove trimmings when the product is running. Only remove trimmings when the product is switched off and disconnected from the power supply.
- Never hold the hedge trimmer by the guard.
Always be sure of a safe and secure operating position, while using the hedge trimmer. - Never use the hedge trimmer standing on steps or a ladder. Do not work over shoulder height.
Always ensure the safety guard supplied is fitted before using the hedge trimmer. Never attempt to use an incomplete product or one fitted with an unauthorized modification.
- Check immediately if the hedge trimmer starts to vibrate abnormally. Excessive vibration can cause injury.
- Switch the hedge trimmer off when the cutting blade is blocked. Remove the battery pack, and then remove the blockage. Inspect the cutting blade for damage before using the product again.
- Know how to stop the hedge trimmer quickly in an emergency.
- Use the hedge trimmer only in daylight or good artificial light.
- Check the hedge for foreign objects before operation, e.g. wire fences. Take care that the cutting blade does not come into contact with wire or other metal objects.
- Hold the hedge trimmer properly, e.g. with both hands. Loss of control can cause personal injury.
- Have servicing performed by a qualified repair person using only identical replacement parts. This will ensure that the safety of the product is maintained.
- Do not modify or attempt to repair the hedge trimmer or the battery pack except as indicated in the instructions for use and care.
- Use designated battery packs (GenesisTM - Model GLAB2020B or GLAB2040B) and charger for this product. Use of any other batteries may result in a risk of fire.
WARNING: This appliance produces an electromagnetic field during operation. This field may under some circumstances interfere with active or passive medical implants. To reduce the risk of serious or fatal injury, we recommend persons with medical implants consult their physician and the medical implant manufacturer before operating this appliance.
SAVE THESE INSTRUCTIONS
If an extension cord is necessary, a cord with adequate size conductors that is capable of carrying the current necessary for your product must be used. This will prevent excessive voltage drop, loss of power or overheating. Grounded products must use 3-wire extension cords that have 3-prone plugs and receptacles.
NOTE: The smaller the gauge number, the heavier the cord.
| Recommended Minimum Wire Gauge for Extension Cords (120 Volt) | ||||||
| Nameplate Amperes (At Full Load) | Extension Cord Length (Feet) | |||||
| 25 50 | 75 100 | 150 | 200 | |||
| 0-2 | 18 | 18 | 18 | 18 | 16 | 16 |
| 2-3.5 | 18 | 18 | 18 | 16 | 14 | 14 |
| 3.5-5 | 18 | 18 | 16 | 14 | 12 | 12 |
| 5-7 | 18 | 16 | 14 | 12 | 12 | 10 |
| 7-12 | 18 | 14 | 12 | 10 | 8 | 8 |
| 12-16 | 14 | 12 | 10 | 10 | 8 | 6 |
IMPORTANT SAFETY INSTRUCTIONS FOR CHARGER & BATTERY
- Save these instructions. This manual contains important safety and operating instructions for your battery and charger.
- Before using the battery charger, read all instructions and cautionary markings on (1) Battery Charger, (2) Battery, and (3) Product using battery.
- Use only the charger which accompanied your product or direct replacements as listed in this manual. Do not substitute any other charger.
- Do not recharge the battery in damp or wet environments. Do not expose the battery pack to water or rain.
- Do not operate the charger with damaged cord or plug. Replace immediately.
- Do not operate a charger if it has received a sharp blow, been dropped or otherwise damaged in any way. Take it to a qualified serviceman.
- Do not disassemble a charger or a battery pack. Take it to a qualified service person when service or repair is required. Incorrect reassembly may result in a risk of electric shock or fire.
- Do not charge the battery pack when temperature is below 50^ (10^) or above 104^ (40^) . Store the product and battery pack in a location where temperature will not exceed 122^ (50^) . This is important to prevent serious damage to the battery cells.
- Place the charger on a flat non-flammable surface and away from flammable materials when re-charging the battery pack.
- To reduce risk of electric shock, unplug the charger from outlet before attempting any maintenance or cleaning.
- If operating time has become excessively shorter, stop operating immediately. It may result in a risk of overheating, possible burns and even an explosion.
-
Battery leakage may occur under extreme usage or temperature conditions. Avoid contact with skin and eyes. If liquid comes in contact with your skin, wash immediately with soap and water. If liquid gets into your eyes, wash them out with clear water for at least 10 minutes, and then seek medical attention right away.
-
Do not attempt to use a step-up transformer, an engine generator or DC power receptacle.
- Do not short the battery pack. Do not touch the terminal with any conductive material. Avoid storing battery pack in a container with other metal objects such as nails, coins, etc. Always protect the battery terminals when battery pack is not used.
- Do not charge a battery pack inside a box or container of any kind. The battery must be placed in a well ventilated area during charging.
- Do not allow anything to cover or clog the charger vents.
- Do not incinerate the battery pack even if it is severely damaged or is completely worn out. The battery pack can explode in a fire.
- Disconnect the charger from the power source when not in use. This will reduce the risk to electric shock or damage to the charger if metal pieces should fall into the opening. It also will help prevent damage to the charger during a power surge.
WARNING: A battery short can cause a large current flow, overheating, possible burns and even a breakdown.
IMPORTANT BATTERY INFORMATION: DISPOSING OF THE BATTERY
- Your batteries are LITHIUM-ION rechargeable batteries. Certain Local, State and Federal laws prohibit disposal of these batteries in ordinary trash.
- Consult your local waste authorities for your disposal/recycling options.
- More information regarding battery disposal in U.S. and Canada is available at: http://www.rbrc.org/index.html, or by calling 1-800-822-8837 (1-800-8BATTERY).
SAVE THESE INSTRUCTIONS

SYMBOLS
IMPORTANT: Some of the following symbols may be used on your product and appear throughout the manual. Please study them and learn their meaning for critical information to operate the tool safely.
| SYMBOL | DESCRIPTIONS | DESCRIPTIONS | SYMBOL | DESCRIPTION |
| V | Volts | RPM | Revolutions per minute | A |
| A | Amperes | SPM | Strokes per minute | B |
| Hz | Hertz | OPM | Oscillations per minute | C |
| W | Watts | ~or A.C. | Alternating current | D |
| n0 | No Load Speed | ---or D.C. | Direct current Do not turn the running blade | |
| kg | Kilograms | Do not use in wet conditions | E | |
| H | Hours | Battery cannot exceed 59 °C | F | |
| .../min | Per minute | Do not put battery in fire | G | |
UNPACKING & CONTENTS
IMPORTANT: Due to modern mass production techniques, it is unlikely the tool is faulty or that a part is missing. If you find anything wrong, do not operate the tool until the parts have been replaced or the fault has been rectified. Failure to do so could result in serious personal injury.
CONTENT IN PACKAGE
Description
Quantity
Hedge Trimmer 1
Battery Pack GLAB2020B 1
Charger 1
Safety Guard 1
Description
Quantity
Front Handle & Switch
6
Screws
Screwdriver 1
Operator's Manual
1
SPECIFICATIONS
Motor Power 20V DC
Cut Strokes per Minute 2600
Blade Length 20
Cutting Capacity 5/8
Battery 20V Lithium-ion, 2.0Ah
Charger 120V\~/60Hz,1.7A
Net Weight 5.0 lb.

- Rear Trigger Switch
- Front Switch
- Battery Pack
- Front Handle
- Safety Guard
- Blades
- Blade Tip Protection
- Blade Cover
- Charger
ASSEMBLY AND ADJUSTMENTS
WARNING: Always be sure that the product is switched off and the battery is disconnected before adjusting, adding accessories, or checking a function on the product.

INSTALLING FRONT SWITCH AND HANDLE (FIG 2)
- Install the front switch (2) by engaging the square blocks on the open ends of front switch with the square slots (2a) on the housing, following the angle shown in FIG 2.
- Install the front handle (4) by positioning it over the front switch, ensuring alignment with the screw holes (S2) on both sides of the housing.
- Tighten two screws (S1) on each side to secure the front handle in place.
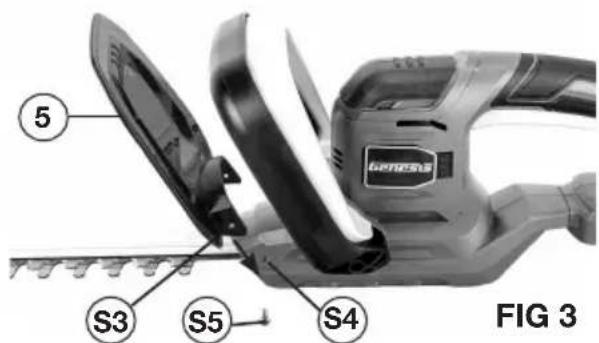
INSTALLING THE SAFETY GUARD (FIG 3)
- Slide the safety guard (5) onto the housing as shown in FIG 3. Ensure alignment of the screw holes (S3) on the guard with the screw holes (S4) on the housing.
- Tighten a screw (S5) on each side to secure the safety guard in place.

INSTALLING AND REMOVING THE BATTERY PACK (FIG 4)
FIG 4
ASSEMBLY AND ADJUSTMENTS
-
To install the battery pack, slide the battery pack (3) into the bottom of the rear handle all the way until it locks in place with a click, as shown in FIG 4. Lightly pull on the battery to ensure it is locked into place and will not accidentally fall out of the tool, causing an injury.
-
To remove the battery pack, pull the battery away from the tool while depressing the battery locking tab (3a).
OPERATION
WARNING: To reduce the risk of serious personal injuries, read and follow all important safety warning and instructions before using this product.
WARNING: Always be sure that the product is switched off before insertion or removal of the battery pack.
CHARGING THE BATTERY (FIG 5)
NOTE: Always check that the power supply corresponds to the voltage on the ratings plate.
- Plug the charger (9) into a 120 Volt AC power source. The green indicator light on the charger will illuminate, confirming it is powered.
- Connect the charger to the battery pack (3) as shown in FIG 5. The red light on the charger will illuminate, indicating that the battery is charging. Meanwhile, the power indicator lights (3b) on the battery pack will flash, indicating the charging status.
- All three indicator lights will turn solid green once charging is complete.
It is normal for the battery pack to become warm while charging. - If the battery pack is hot after continuous use in the tool, allow it to cool down to room temperature before charging. This will extend the life of your batteries.
NOTE: It takes approximately 80 minutes to charge up a completely discharged 2.0Ah battery pack.
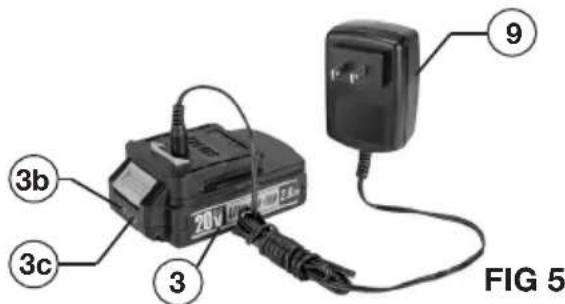
BATTERY POWER INDICATOR (FIG 5)
There is a battery power indicator on the battery pack. It has three green lights (3b).Depress the power indicator button (3c) on the side to check the battery power level. When all three lights illuminate, it indicates the battery is at full power. The battery is at half full power when two lights illuminate.When one light illuminates only, it indicates that the battery is at low power level and requires immediate charging.
WARNING: Always disconnect the battery pack from the product or place the switch in the locked or off position before any assembly, adjustments or changing accessories.
HOLDING THE HEDGE TRIMMER
The trimmer has both front and rear handles. With the blade directed away from you, hold the unit by both handles. The switch in the front handle can be activated on any of the three sides, giving you many choices for a comfortable grip when performing cutting operations.
WARNING: Always keep both hands on the hedge trimmer handles. Never hold shrubs with one hand while operating the hedge trimmer with the other hand. Failure to heed this warning may result in serious injury.
STARTING AND STOPPING THE TRIMMER
The hedge trimmer is equipped with two switches designed to be used together to prevent accidental start-ups.
- Hold on to the front switch (2-FIG 1) & handle (4-FIG 1).
Depress the front switch and hold. - Depress the rear trigger switch (1-FIG 1) to start the hedge trimmer.
The hedge trimmer will stop if you release either the front or rear switch.
APPLICATIONS
You may use this hedge trimmer for the purposes listed below.
- Trimming hedges, shrubs, and bushes with branch diameters less than 5/8 .
Before each use, inspect the entire product for damaged, missing, or loose parts such as screws, nuts, bolts, caps, etc. Securely tighten all fasteners and caps and do not operate this product until all missing or damaged parts are replaced.
USING THE HEDGE TRIMMER
WARNING: Clear the area to be cut before each use. Remove all objects such as cords, lights, wire, or loose string which can become entangled in the cutting blade and create a risk of serious personal injury.
-
Before starting the hedge trimmer, maintain proper footing and balance and do not overreach. Wear safety goggles, non-skid footwear and rubber gloves.
-
Hold the unit with both hands with the cutting blades directed away from you. Always use the hedge trimmer properly.
- Do not trim too much at one time. This can cause the blades to bind and slow, reducing the cutting efficiency.
- Do not force the hedge trimmer through heavy shrubbery. This can cause the blades to bind and slow down. If the blades slow down, reduce the pace of your work.
- Always cut stems or twigs that are less than 5/8'' thick. Use a non-powered hand saw or pruning saw to trim large branches.
- When trimming new growth, use a wide sweeping action, so that the stems are fed directly into the cutting blade. Older growth will have thicker stems and will be trimmed most easily by using a sawing movement.
- Always hold the hedge trimmer with both hands when operating. Use a firm grip on the handles. The unit is used for cutting in either direction in a slow, sweeping action from side to side.
TROUBLESHOOTING
| PROBLEM POSSIBLE CAUSE SOLUTION | ||
| Motor fails to start when switch is depressed. | Battery is not secure. | To secure the battery pack, make sure the latches on the top of the battery pack snap into place. |
| Battery is not charged. | Charge the battery pack according to the instructions included with your model. | |
| Motor runs but cutting blades do not move. | Hedge Trimmer damaged. Call for Genesis technical service. Do not use hedge trimmer. | |
| Hedge trimmer smokes during operation. | Hedge Trimmer damaged. Call for Genesis technical service. Do not use hedge trimmer. | |
| Motor hums, blades do not move. | Debris or other may be jamming the blades. | Remove battery, clear debris blockage from blades. |
MAINTENANCE
CLEANING
Avoid using solvents when cleaning plastic parts. Most plastics are susceptible to damage from various types of commercial solvents and may be damaged by their use. Use clean cloths to remove dirt, dust, oil, grease, etc.
WARNING: Do not at any time let brake fluids, gasoline, petroleum-based products, penetrating oils, etc., come in contact with plastic parts. Chemicals can damage, weaken or destroy plastic which may result in serious personal injury.
Electric products used on fiberglass material, wallboard, spackling compounds, or plaster are subject to accelerated wear and possible premature failure because the fiberglass chips and grindings are highly abrasive to bearings, brushes, commutators, etc. Consequently, we do not recommended using this product for extended work on these types of materials. However, if you do work with any of these materials, it is extremely important to clean the product using compressed air.
SHARPENING THE CUTTING BLADES
- Start and stop your hedge trimmer until the cutter blade and the guard are slightly offset. This will allow clearance for the file between cutter teeth and guard teeth.
- Remove the battery pack from your hedge trimmer.
- Clamp the blade assembly in a vise and file the exposed cutting surface of each blade tooth. Remove as little material as possible. Be sure to retain the original angle of each tooth when filing.
- Remove the hedge trimmer from the vise; restart it and stop it to expose the unsharpened edges of the blade teeth.
- Remove the battery pack and repeat the sharpening procedure above.
LUBRICATING THE BLADES
For best operation and longer blade life, lubricate the hedge trimmer blade with lightweight machine oil before and after each use.
- Remove the battery pack from the hedge trimmer.
- Lay the hedge trimmer on a flat surface. Apply some lightweight machine oil along the edge of the top blade. If you will be using the hedge trimmer for an extended period, it is advisable to stop, remove the battery, and oil the blade during use.
NOTE: Do not oil the blades while the hedge trimmer is running.
TRANSPORTING AND STORING
- Always place the blade cover (8-FIG 1) on the blade before storing or transporting the hedge trimmer. Use caution to avoid the sharp teeth of the blade.
- Clean the hedge trimmer thoroughly before storing.
- Store the hedge trimmer indoors, in a dry place that is inaccessible to children.
- Keep away from corrosive agents such as garden chemicals and deicing salts.
WARNING: Blades are sharp. When handling the blade assembly, wear non-slip, heavy-duty, protective gloves. Do not place your hand or fingers between blades or in any position where they could get pinched or cut. NEVER touch blades or service the unit with battery pack installed.
TWO-YEAR WARRANTY
This product is warranted free from defects in material and workmanship for 2 years after date of purchase. This limited warranty does not cover normal wear and tear or damage from neglect or accident. The original purchaser is covered by this warranty and it is not transferable. Prior to returning your tool to store location of purchase, please call our Toll-Free Help Line for possible solutions.
THIS PRODUCT IS NOT WARRANTYED IF USED FOR INDUSTRIAL OR COMMERCIAL PURPOSES. ACCESSORIES INCLUDED IN THIS KIT ARE NOT COVERED BY THE 2 YEAR WARRANTY.
TOLL-FREE HELP LINE
For questions about this or any other GENESIST™ Product, please call Toll-Free: 888-552-8665.
Or visit our web site: www.genesispowertools.com
©Richpower Industries, Inc. All Rights reserved
Richpower Industries, Inc.
736 Hampton Roar
Williamston, SC 29697
Printed in China, on recycled paper

Bloc-batterie 20V Lithium-ion, 2,0 Ah
Chargeur 120V/60Hz,1,7A
Poids net 2,3 kg
PRÉSENTATION DU PRODUIT

MONTAGE ET RÉGLAGES
Richpower Industries, Inc.
736 Hampton Road
Williamston, SC USA
www.genesispowertools.com
- Look for this symbol to point out important safety precautions. It means attention!!! Your safety is involved.
- IMPORTANT SAFETY RULES
- FOR ALL APPLIANCES
- FOR BATTERY-POWERED GARDENING APPLIANCES
- ADDITIONAL SAFETY RULES FOR CORDLESS HEDGE TRIMMERS
- SAVE THESE INSTRUCTIONS
- IMPORTANT SAFETY INSTRUCTIONS FOR CHARGER & BATTERY
- IMPORTANT BATTERY INFORMATION: DISPOSING OF THE BATTERY
- SYMBOLS
- UNPACKING & CONTENTS
- CONTENT IN PACKAGE
- Description
- Quantity
- SPECIFICATIONS
- ASSEMBLY AND ADJUSTMENTS
- OPERATION
- CHARGING THE BATTERY (FIG 5)
- BATTERY POWER INDICATOR (FIG 5)
- HOLDING THE HEDGE TRIMMER
- STARTING AND STOPPING THE TRIMMER
- APPLICATIONS
- USING THE HEDGE TRIMMER
- TROUBLESHOOTING
- MAINTENANCE
- CLEANING
- SHARPENING THE CUTTING BLADES
- LUBRICATING THE BLADES
- TRANSPORTING AND STORING
- TWO-YEAR WARRANTY
- TOLL-FREE HELP LINE
- PRÉSENTATION DU PRODUIT
- MONTAGE ET RÉGLAGES
Brand : Genesis
Model : GLGHT20B
Category : Electric hedge trimmer