
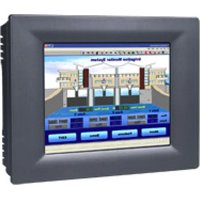
UTC510K - Industrial touchscreen Advantech - Free user manual and instructions
Find the device manual for free UTC510K Advantech in PDF.
| Product Type | Industrial Touch Screen |
| Brand | Advantech |
| Model | UTC510K |
| Power Supply | 12 V DC, 3 A min (DC input) or 56 V DC, 0.5 A min (PoE input) |
| Required Adapter Type | UL-certified AC adapter or UL-certified DC power supply, LPS marking or limited power source |
| Installation | Place the device on a reliable surface during installation. The power outlet should be near the device and easily accessible. |
| Maintenance and Cleaning | Disconnect the device before cleaning. Clean only with a damp cloth. Do not use liquid detergents or sprays. |
| Safety - Opening | Never open the device. Opening should only be done by a qualified technician. |
| Safety - Moisture and Liquids | Protect the device from moisture. Never pour liquid into any opening. |
| Safety - Overheating | Do not cover ventilation openings. Openings are for air convection. |
| Safety - Power Cord | Position the power cord away from high-traffic areas. Do not place anything on it. |
| Safety - Grounding | The power outlet must have a good grounding connection. |
| Safety - Voltage | Verify that the voltage of the power source is correct before connecting the device. |
| Safety - Extended Non-Use | Disconnect the device from the power source during prolonged periods of non-use to avoid damage from transient overvoltages. |
| Repairability | No user-serviceable parts. For service, contact qualified personnel. |
| Provided Documents | User manual (3 pages, PDF) |
| Available Languages | French, English (translation to other languages available upon request) |
Frequently Asked Questions - UTC510K Advantech
User questions about UTC510K Advantech
0 question about this device. Answer the ones you know or ask your own.
Ask a new question about this device
Download the instructions for your Industrial touchscreen in PDF format for free! Find your manual UTC510K - Advantech and take your electronic device back in hand. On this page are published all the documents necessary for the use of your device. UTC510K by Advantech.
USER MANUAL UTC510K Advantech
For more information on this and other Advantech products, please visit our website at:
http://www.advantech.com
For technical support and service, please visit our support website at:
http://www.advantech.com/support
This manual is for the UTC-510 Rev.A1.
Part No. 2048C51010
4th Edition,
Printed in Taiwan
April 2025
UTC-510 Appearance (Cont.) UTC-510
Please use only VESA(7575, M6*21L) compatible mounting - Detailed floor stand & wall mount datasheet available to download at Advantech website.
UTC-510 (LED Light Bar) Appearance

Front View

Rear View
Packing List
Before installation, ensure that the following items are included with the product:
- 1 x Panel PC
- 1 x UTC-510 startup manual
- 1 x Power adapter
If any of the above items are missing or damaged, contact your distributor or sales representative immediately.
I/O Ports Easy Setup
UTC-510D
A. DC power jack
F. Line-out
B. VGA
G.COM2
C. USB 3.0 X1, USB 2.0 x1 (for UTC-510D)
H.COM1
D. LAN ports
I. Power switch
E. MIC-in
UTC-510D PoE (DC version optional)
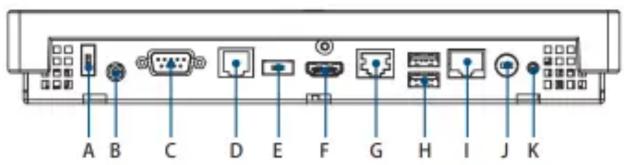
A. USB 2.0*(DC version only)
G. LAN PortS
B. Headset
H. USB 2.0 x2
C.COM1
I. LAN/POE Ports
D.COM2
J. DC Power jack
E. USB 3.0^* (DC version only)
(DC version only)
F. HDMI
K. Power switch
For Standard UTC-510 PoE Version, 1 x USB 2.0 (A port) and 1 x USB 3.0 (E port) are not suggested to use. The customer can change the configuration only when total power consumption is under 25.5 W.
UTC-510G
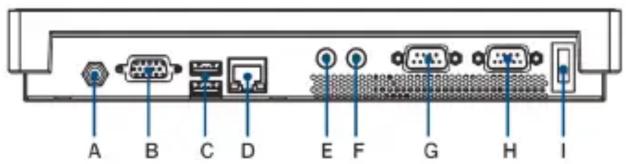
A. DC Power jack
E. MIC-in
B. VGA
F. Line-out
C. USB 3.0 X 2 (tor UTC-510G)
G.COM2
D. LAN POrtS
H.COM1
I. Power switch
UTC-510J

A. DC Power Jack
F. Mic-in
B.LAN1
G. Line-out
C.LAN2
H. Power Switch
D. HDMI
I.COM1
E. USB3.2 x4
J.COM2
2 UTC-510 Startup Manual
Power On Computer
- Connect an adaptor with input voltage rated 12V/3A for all UTC-510 SKUs.
- Be sure always handle the power cords by holding the plugs ends only. Please refer to I/O Ports section above to find the DC/AC inlet and power switch.
- Press the Power On/Off button. The PWR LED will turn green.
UTC-510 (PoE)
- Make sure PoE PSE complies with IEEE802.3at standard.
- Connect a LAN cable from PoE PSE to LAN/PoE Port on UTC-510 (PoE).
- Please refer to I/O ports section above to find the LAN/ PoE port and power switch.
CAUTION! UTC-510 (PoE) - A PoE Powered Device (PD) is a device powered by a PSE and thus consumes energy.

Always use Power Sourcing Equipment (PSE) which follows the IEEE 802.3at PoE standard, also known as PoE + or PoE plus, which provides up to 30W of DC power output. Only 25.5 W input is assured to be available at the powered device as some power dissipates in the cable. UTC-510 PoE version follows IEEE 802.3at PoE standard, also known as PoE + or PoE plus, provides up to 30W of DC power (Minimum 56V DC and 500mA ) on each port. Only 25.5 W is assured to be available for the powered device as some power dissipates in the cable. This product is intended to be supplied by an UL certified power adapter or UL certified DC source rated 12Vdc, 3A minimum (DC IN) or 56Vdc, 0.5A minimum (PoE IN), Tma 40 degree C, marked LPS or Limited Power Source. If you need further assistance, please contact Advantech for further information.
ATTENTION!
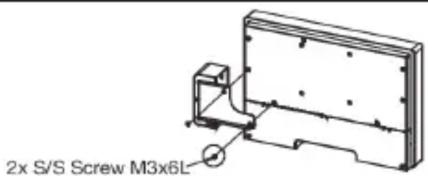
- Attach the UTC peripheral on the bottom.
- Re-use the screws that were removed from the frame.
- Connect the cable to an I/O port (USB).
UTC-510 Peripheral Series Installation Guide (Bottom)

Easy Setup (Cont.) Safety Instructions
UTC-510 Peripheral Series Installation Guide (Left Side View)

Safety Instructions
CAUTION! To prevent shock. Do not remove cover. No user serviceable parts inside. Refer servicing to qualified personnel.


- UTC-510 Appearance (Cont.) UTC-510
- UTC-510 (LED Light Bar) Appearance
- Packing List
- I/O Ports Easy Setup
- UTC-510D
- UTC-510D PoE (DC version optional)
- UTC-510G
- UTC-510J
- UTC-510 Startup Manual
- Power On Computer
- UTC-510 (PoE)
- UTC-510 Peripheral Series Installation Guide (Bottom)
- Easy Setup (Cont.) Safety Instructions
- UTC-510 Peripheral Series Installation Guide (Left Side View)
- Safety Instructions
Brand : Advantech
Model : UTC510K
Category : Industrial touchscreen