
Minitor VI - Radio transceiver MOTOROLA - Free user manual and instructions
Find the device manual for free Minitor VI MOTOROLA in PDF.
| Product Type | Two-way radio / pager |
| Brand | Motorola Solutions |
| Model | Minitor VI |
| Dimensions (approx.) | 65 x 115 x 38 mm (without clip) |
| Weight (approx.) | Approximately 170 g with lithium-ion battery |
| Power Supply | Rechargeable lithium-ion battery pack (UL and non-UL models) or 3× AAA 1.5 V alkaline battery compartment (non-UL models only) |
| Battery Life | Not specified in the manual, varies by usage |
| Frequencies | VHF (143-174 MHz) or UHF (406-430 MHz, 450-486 MHz, 476-512 MHz) depending on model |
| Number of Channels | 1 or 5 channels depending on model |
| Main Functions | Selective call (two-tone, long tone), monitor, scan (probability, priority, silent), voice storage (recording up to 8 min+), voice announcements, vibrate, status LED |
| Voice Storage | Adjustable duration: 15, 30, 60, 120 seconds or dynamic |
| Alert Types | Tone, vibrate, or tone+vibrate |
| LED Indicators | Red, yellow, green for battery status, messages, power on, activity |
| Intrinsic Safety | UL certified for hazardous areas (ANSI/ISA TIA 4950, CAN/CSA C22.2 No. 157-92) – specific models |
| Operating Temperature | Not specified in the manual |
| Cleaning | Soft, non-abrasive damp cloth with mild soap solution; for I/O connectors, use a DeoxIT series D pen |
| Belt Clip | Removable belt clip (rail and latch) |
| Typical Included Accessories | Battery pack, belt clip, charger (depending on kit), manual |
| Warranty | Pager: 2 years; accessories (battery, charger): 1 year |
| Programming | Via PPS software (Motorola) by an authorized dealer |
| Spare Parts / Repairability | Battery, alkaline battery compartment, chargers, cases – repairs by authorized center (call 1 800 548-9954) |
Frequently Asked Questions - Minitor VI MOTOROLA
User questions about Minitor VI MOTOROLA
0 question about this device. Answer the ones you know or ask your own.
Ask a new question about this device
Download the instructions for your Radio transceiver in PDF format for free! Find your manual Minitor VI - MOTOROLA and take your electronic device back in hand. On this page are published all the documents necessary for the use of your device. Minitor VI by MOTOROLA.
USER MANUAL Minitor VI MOTOROLA
natural_image
Black motorola device with two speakers and control buttons, no visible text or symbols on the device body.Contents
This User Guide contains all the information you need to use the MINITOR VI Pager.
Intrinsically Safe Radio
Information 1
Preparing Your Pager for Use . . . 4
Inspecting the Package Contents . . . 4
Attaching the Belt Clip 5
Preparing the Battery Pack .... 6 Preparing the Alkaline Battery Tray .... 6
Attaching the Battery Pack 9
Powering Up the Pager 11
Adjusting the Volume ..... 11
Identifying the Pager Controls . 12
Pager Controls 13
LED Indicators 14
Function Switch 16
Reset Button 17
Conditioning Your Pager For Operation 18
Pager Programming Software (PPS) 19
Stored Voice Duration 20
Announcements Type 20
Function Switch Announcements .. 21
Battery Level Announcement ..... 21
Fixed Volume Page Alert ..... 22
Priority Scan Time 22
Page Alert Duration 23
Unread Message Reminder ..... 23
Priority Tone Alert 24
Privacy 24
Always On 25
Function Switch Options ..... 25
Channel Options 31
Stored Voice Features and
Controls 33
Stored Voice Operation ..... 33
Stored Message Management .. 34
Cleaning Your Pager 36
Repair and Maintenance ..... 37
Accessories 37
Batteries and Chargers
Warranty 38
Limited Warranty 39
Intrinsically Safe Radio Information
Minitor VI LMR DEVICE FOR HAZ LOC is certified by UL to standards ANSI/ISA TIA 4950 and CAN/CSA C22.2 No. 157-92.
The following label specify the hazardous Class/Division/Group which will appear as follows:
| CULUSLISTED | Minitor VI LMR DEVICE FOR HAZ LOC is certified by UL to standards ANSI/ISA TIA 4950 and CAN/CSA C22.2 No. 157-92. |

WARNING
• DO NOT substitute components. Substitution of component could void the intrinsic safety rating and result in unsafe condition of hazardous areas.
- DO NOT change batteries or accessories in hazard areas, To reduce the risk of ignition of a flammable atmosphere, battery pack must only be changed in non-flammable areas.
- Unauthorized modification, or incorrect repair or service to the intrinsically safe product could adversely affect the certification rating and result in unsafe condition in hazardous areas.
- DO NOT operate a UL Listed Product in a hazardous atmosphere if it has been physically damaged (for example, cracked housing). An explosion or fire may result.
- DO NOT replace or change accessories in a hazardous atmosphere. Contact sparking may occur while installing or removing accessories and cause an explosion or fire.
- DO NOT disassemble a UL Listed Product unit in any way that exposes the internal electrical circuits of the unit.
UL Listed MINITOR VI Pagers
A03JAC8JA1ANVHF, 143 – 174MHz, Single Channel A03JAC9JA1ANVHF, 143 – 174MHz, Five Channel A04QAC8JA1ANUHF 406 – 430MHz, Single Channel A04QAC9JA1ANUHF, 406 – 430MHz, Five Channel A04RAC8JA1ANUHF, 450 – 486MHz, Single Channel A04RAC9JA1ANUHF, 450 – 486MHz, Five Channel A04SAC8JA1ANUHF, 476 – 512MHz, Single Channel A04SAC9JA1ANUHF, 476 – 512MHz, Five Channel
Preparing Your Pager for Use
Inspecting the Package Contents . .page 4 Attaching the Belt Clip. . . . . . . . page 5 Preparing the Battery Pack. . . . . . . page 6 Attaching the Battery Pack. . . . . . . page 9 Powering Up the Pager. . . . . . . page 11 Adjusting the Volume. . . . . . . . page 11
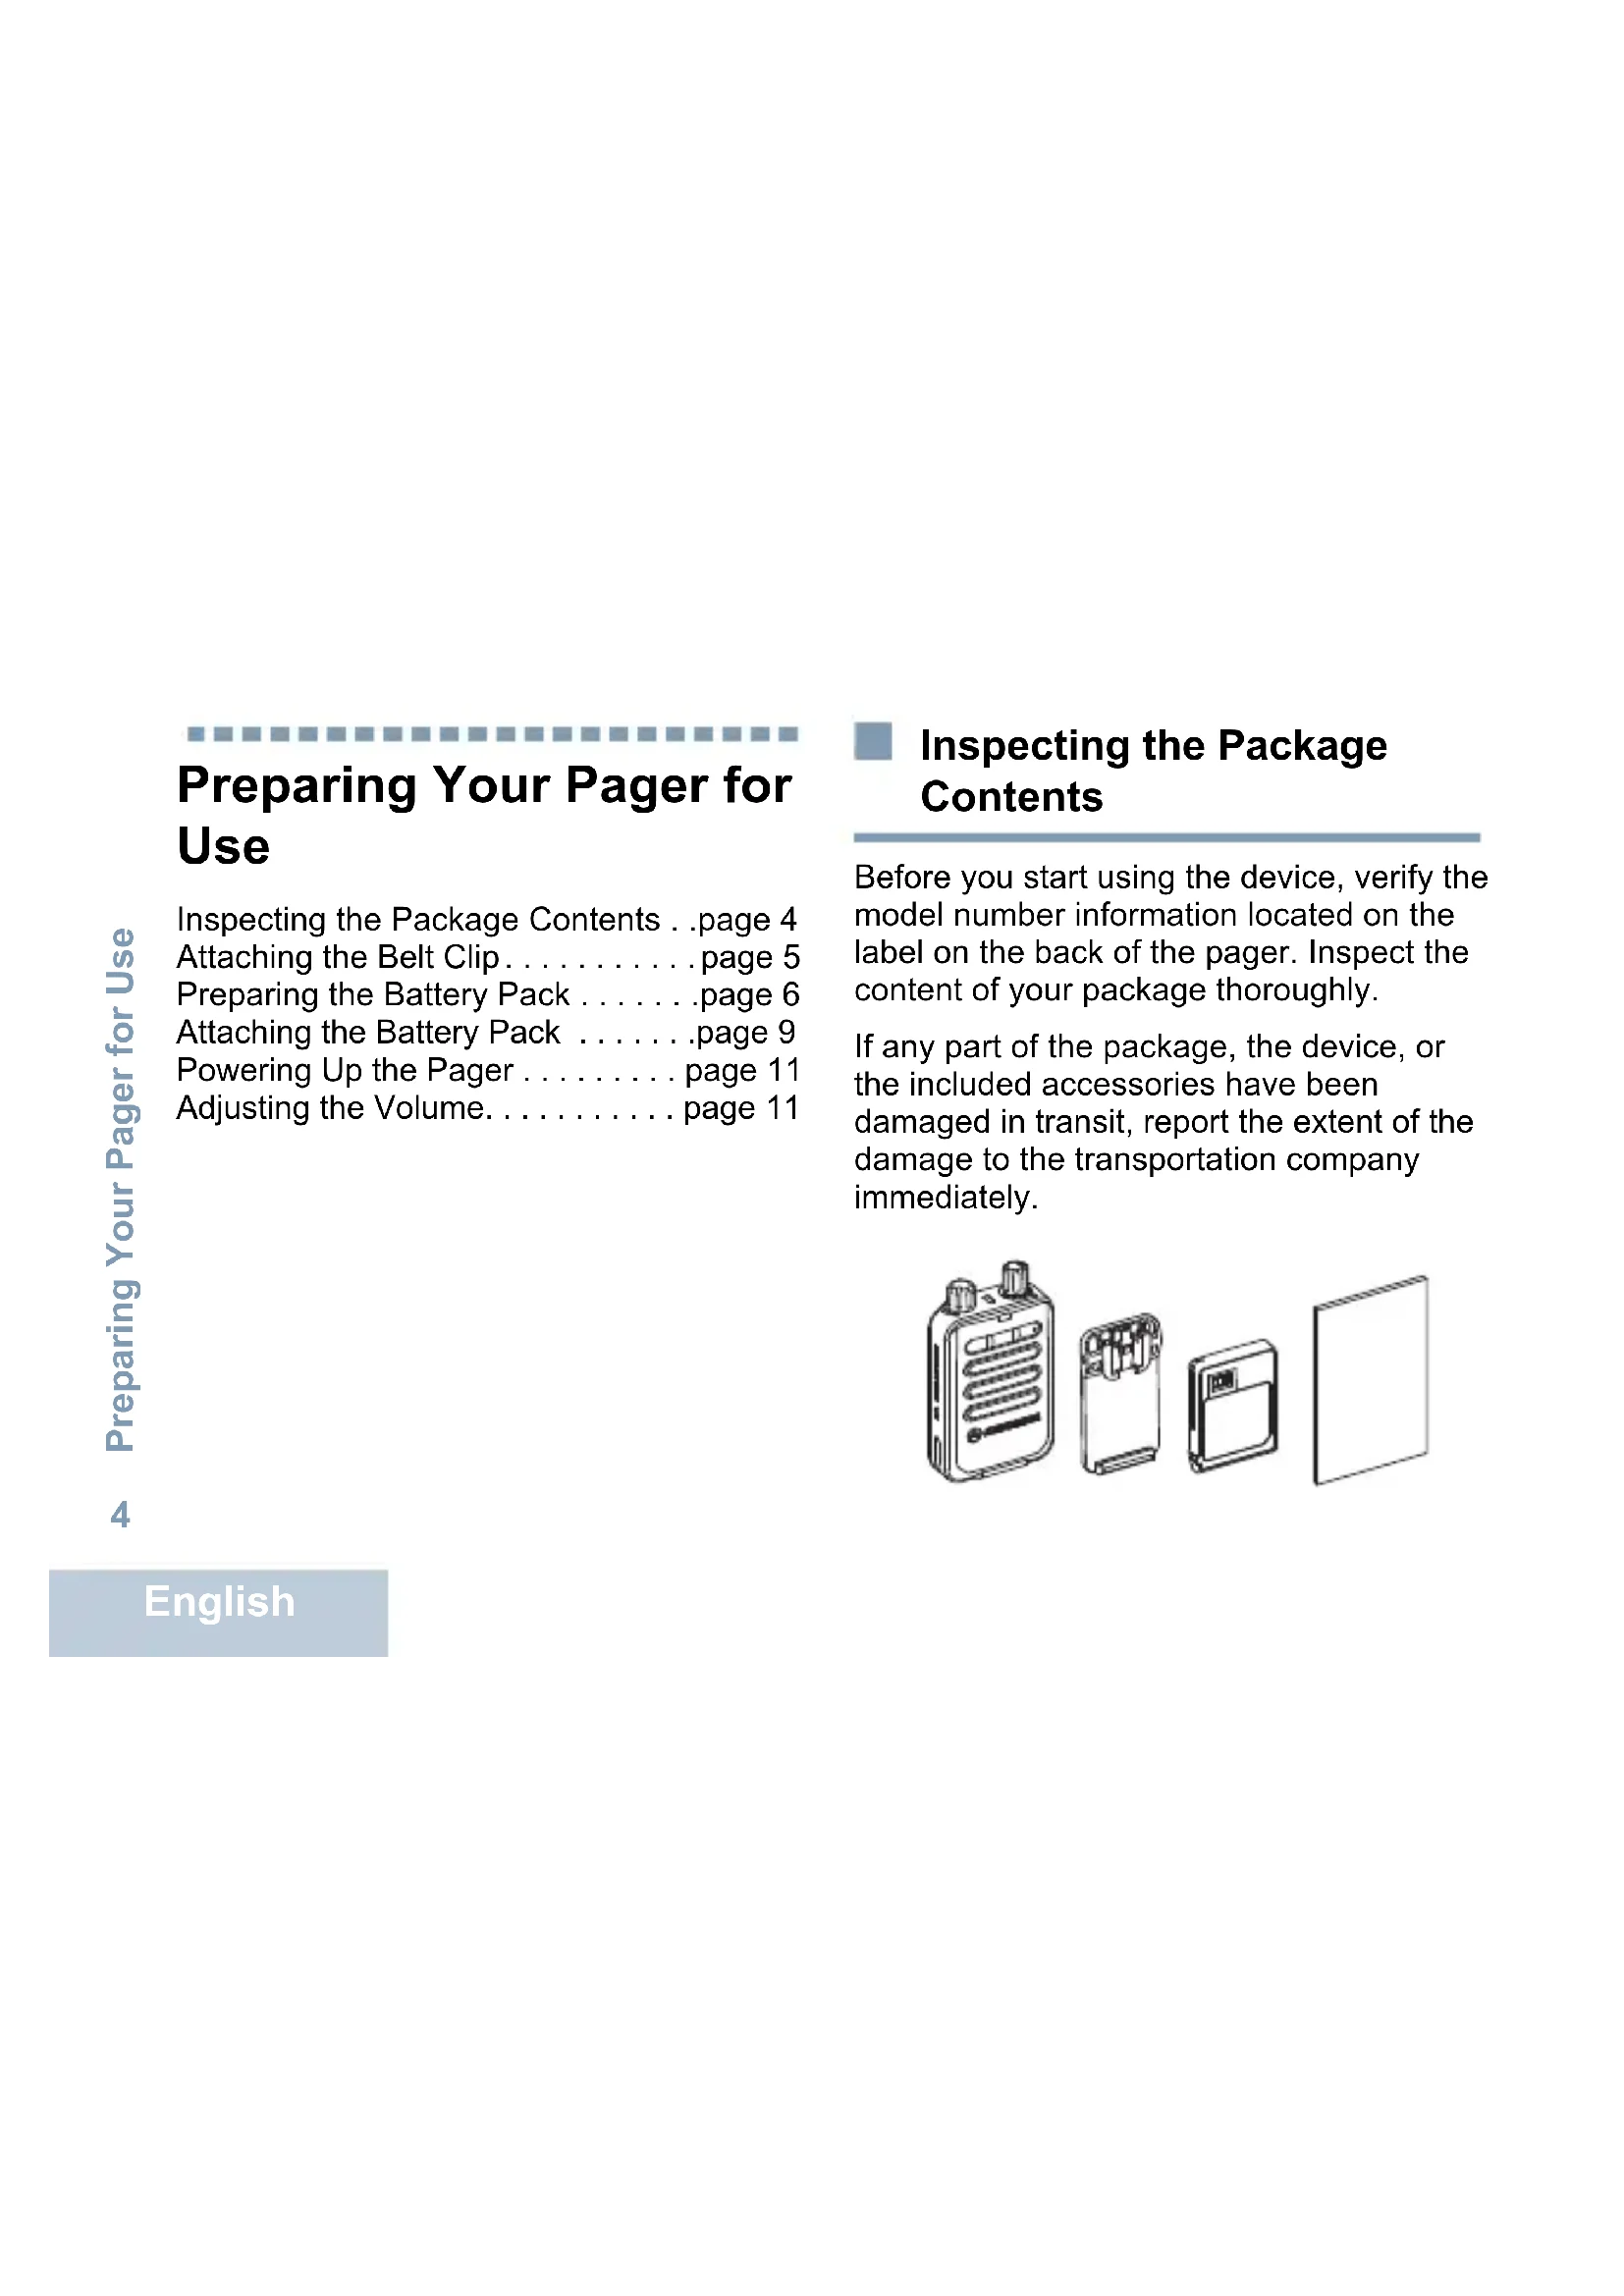
Inspecting the Package Contents
Before you start using the device, verify the model number information located on the label on the back of the pager. Inspect the content of your package thoroughly.
If any part of the package, the device, or the included accessories have been damaged in transit, report the extent of the damage to the transportation company immediately.
natural_image
Illustration of four electronic devices: a battery pack, a hard drive, a compact drive, and a blank board (no text or symbols)English
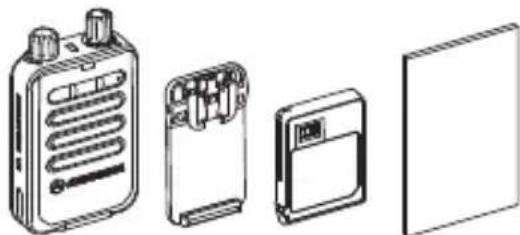
Attaching the Belt Clip
natural_image
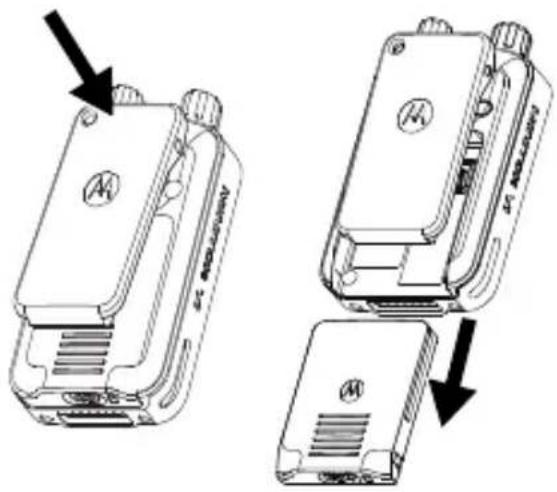
Technical line drawing of a mobile phone door with an inset close-up showing internal components (no text or symbols)- Align the rails on the clip to the grooves on the back of the pager and press downward until you hear a click.
natural_image
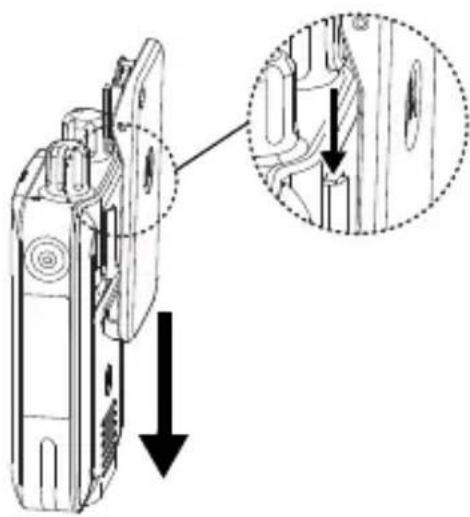
Technical diagram of a mobile phone receiver with an inset close-up showing the internal structure (no text or symbols present)- To remove, press and slide the belt clip latch upwards.
Preparing the Battery Pack
The pager is powered by a battery pack. The following types of battery packs are compatible, depending on the model purchased.
• Lithium-Ion battery pack (intrinsically safe UL model)
• Lithium-Ion battery pack (non-intrinsically safe model)
- Alkaline battery tray (optional accessory — for use with non-intrinsically safe models only, uses three 1.5 V AAA alkaline batteries)

Use ONLY 1.5 V AAA alkaline batteries in the alkaline battery tray. For use ONLY with Non-UL pagers, i.e. model numbers ending with "2AN".
Preparing the Alkaline Battery Tray
Note: The alkaline battery tray is an optional accessory for non-UL models. For more information, please refer to the Accessories list on page 37.
You will need to insert three 1.5 V AAA alkaline batteries in the alkaline battery tray before attaching it to the pager.
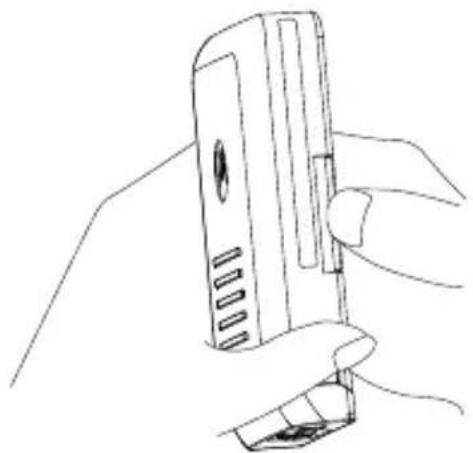
natural_image
Line drawing of a hand holding a handheld device (no text or symbols visible)- Place your finger at the notch, located on the side of the alkaline battery tray.
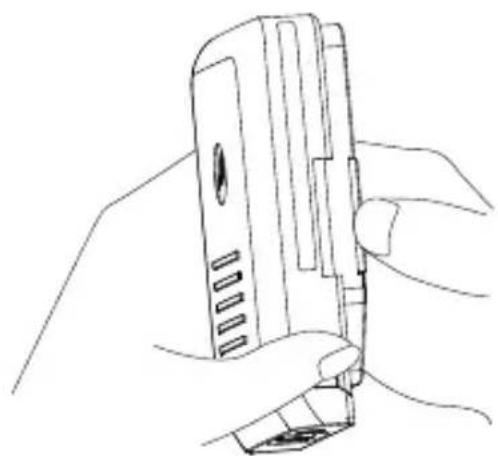
natural_image
Line drawing of a hand holding a handheld electronic device (no text or symbols visible)- Open the alkaline battery tray cover to access the alkaline battery tray compartment.
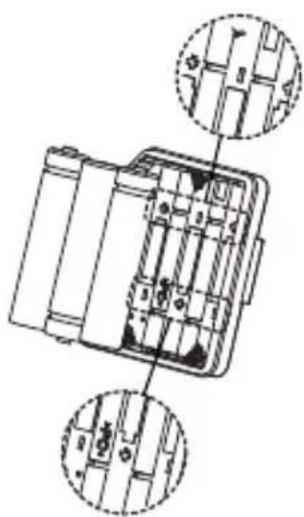
natural_image
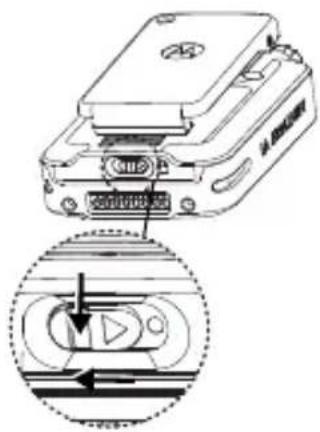
Technical line drawing of a mechanical device with two circular insets showing internal components (no text or symbols)- Insert three 1.5V AAA alkaline batteries.
Note: The terminal ends of each battery are indicated inside the alkaline battery tray compartment.
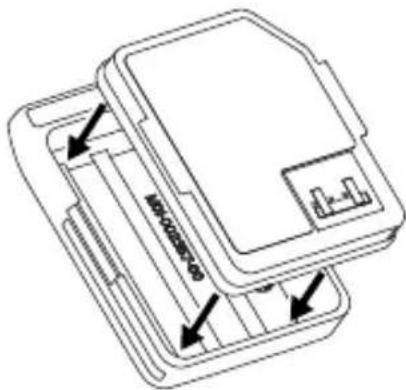
natural_image
Technical line drawing of a mechanical device with internal components and directional arrows (no text or symbols)- Replace the alkaline battery tray cover.
English
Attaching the Battery Pack
For best performance, the lithium-ion battery pack should be fully charged before it is used.
IMPORTANT: To avoid damage and comply with warranty terms, charge the battery pack using a Motorola Solutions charger as described in the Amplifier Charger RLN6506 User Guide (Motorola Solutions Publication Number 68012010008) and Standard Charger RLN6505 User Guide (Motorola Solutions Publication Number 68012010009).
Follow the procedures described next to attach the battery pack.
-
Press and hold the belt clip down.
-
Align the battery pack at the back of the pager.
- Slide the battery pack upwards to the maximum and slide the latch to the locked position.
Note: If the battery pack is not installed properly, the pager will not power up.
Follow the procedures described next to remove the battery pack.
- Press and hold the latch down, and slide the latch to the left to the unlocked position.
- Press and hold the belt clip down, and slide the battery pack downwards.
Powering Up the Pager
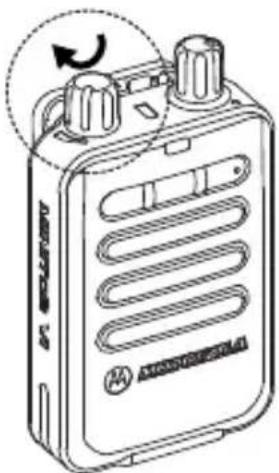
Rotate the On/Off/Volume Control Knob clockwise until you hear a click.
You will hear an audible beep and/or vibrate, depending on the Function Switch programming, indicating that the device is turned on.
If your pager does not power up, check your battery. Make sure that it is charged and properly attached. If your pager still does not power up, contact your dealer.
To turn off the pager, rotate this knob counterclockwise, beyond the white
natural_image
Line drawing of a portable electronic device with two rotary switches and a circular arrow indicating rotation (no text or symbols)volume level indicator, until you hear a click, unless the Always On feature is enabled.
For more details on Always On, refer to "Pager Programming Software (PPS) on page 19."
Adjusting the Volume
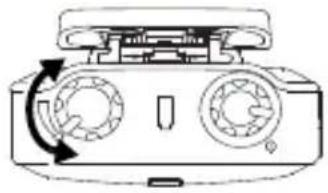
To increase the volume, turn the On/Off/Volume Control Knob clockwise.
natural_image
Diagram of a device with two circular ports and a rotating arrow indicating rotation (no text or symbols)To decrease the volume, turn this knob counterclockwise.
Note: Turning the knob counterclockwise beyond the white volume level indicator (until a click is heard) will turn off the pager.
Identifying the Pager Controls
Pager Controls ....page 13
LED Indicators.....page 14
Function Switch......page 16
Reset Button . . . . . . . . . . . . . . . page 17
Conditioning Your Pager For
1 On/Off/Volume Control Knob
2 Function Switch
3 LED Indicators
4 Reset Button
5 Stored Voice Operation Controls
6 Identification Label Area
LED Indicators
The pager provides an audiovisual indication to acknowledge device power up, an incoming message, unread message(s), the battery status, and the Scan mode.
Power Up
Device power up is indicated by audible beeps and simultaneous blinking of the red and yellow LEDs for four times.
Incoming Message
When an encoded message is received, the red LED blinks and an audible alert is heard and/or the pager will vibrate depending on programming.
English
Unread Message(s)
Unread message(s) is indicated by the red LED and it remains lit until the pager is power cycled or all new messages are played back.
If programmed, an audio reminder will be played every couple of minutes to indicate the unread message(s).
Battery Status
At any time, press and release the Reset button to view the battery status.
- Solid Green - Indicates that the battery level is high.
- Solid Yellow - Indicates that the battery level is medium.
- Solid Red - Indicates that the battery level is low.
- Blinking Red - Indicates that the battery level is critically low. The red LED and the battery LED will blink simultaneously every 2 minutes with a beep to remind you to charge and/or replace the battery. When the battery is completely discharged, the pager will play an audible alert before powering down.
Note: If the Battery Level Announcement option is enabled, the pager will also announce the battery level status when you press and release the Reset button.
Unprogrammed Channel
When the Function Switch is moved to an unprogrammed channel, the pager will play a low frequency tone.
Message Management
The yellow LED is turned on while in message management. There are four different tones defined within message management.
During message rewind, a tone is played after each 10 seconds skipback.
During message delete, a periodic tone is played to indicate that deletion is in progress until all unlocked messages are deleted.
While in Standby mode, if the fast forward or rewind button is pressed, the pager plays a tone to indicate that the buttons are not functional.
Scan Mode
A yellow LED indicates the activity on channel(s) in Scan mode. Different blinking patterns of the yellow LED indicate activity on different channels.
The number of consecutive blinks corresponds to the active channel.
Function Switch
The Function Switch can be configured up to eight different modes. Models with five channels can be programmed for different frequencies for these modes.
Channel Monitoring
When the Function Switch is set to a monitor position, all communications on the selected channel is heard through the speaker. In Monitor mode, the alert options are functional.

natural_image
Line drawing of a portable electronic device with ventilation slots and two knobs (no text or symbols)English
Scan (5 Channel Models Only)
Each function mode can scan two channels as long as the pager is programmed with two or more channels.
Reset Button
The Reset Button is multifunctional.
- Condition: After receiving an alert (and the Reset function is not programmed for Automatic Reset or the Delayed Reset timer has not expired)
Action: Press the Reset button to return your pager to the Standby mode.
• Condition: Privacy option is not enabled
Action: Press and hold the Reset button to place the pager in open squelch Monitor mode.
• Condition: Battery indication
Action: To view the battery level, press and release the Reset button.
• Condition: Push-to-Listen enabled
Action: After receiving an alert, press the Reset button to listen to an incoming message.
• Condition: Critically low battery alert reminder
Action: To disable the automatic critical battery alert reminder, press and release the Reset button while the reminder is in progress.
Conditioning Your Pager For Operation
Follow the procedures described next to condition your pager for operation.
- Set the Function Switch to a tone-alert position and power up the pager. You hear four short beeps. The red and yellow LED blinks indicating that the device has been powered up.
- Set the Function Switch to a monitor position.
-
Listen for a transmission and adjust the volume control to a comfortable listening level.
-
If no transmission is heard, hold down the Reset button and adjust the background noise to a comfortable listening level. If required, adjust the volume level when a voice signal is present.
- Set the Function Switch to the desired operating mode (for example, Selective Call, Monitor, or Scan with tone and/or vibrate alert, and so forth).
Pager Programming Software (PPS)
Take a moment to familiarize yourself with the available PPS programmable options:
Stored Voice Duration . . . . . . . page 20
Announcements Type . . . . . . . page 20
Function Switch Announcements . page 21
Battery Level Announcement .... page 21
Fixed Volume Page Alert. . . . . . . page 22
Priority Scan Time .... page 22
Page Alert Duration . . . . . . . . . page 23
Unread Message Reminder ..... page 23
Priority Tone Alert .... page 24
Privacy..... page 24
Always On . . . . . . . . . . . . . . . . . . page 25
Function Switch Options ..... page 25
Note: If your model does not support any of the features mentioned above, contact a Motorola Solutions authorized paging system dealer or call 1-800-548-9954 for more information or for the addition of these features.
Stored Voice Duration
This feature allows you to limit the length of an incoming message to be stored.
Note: A shorter message length allows for more number of total messages stored.
There are five options available.
• 15 seconds: First 15 seconds of a message is stored.
• 30 seconds: First 30 seconds of a message is stored.
- 60 seconds: First 60 seconds of a message is stored.
• 120 seconds: First 120 seconds of a message is stored.
- Dynamic: Complete message is stored regardless of the length of the message (depending upon the memory available).
Announcements Type
This feature allows you to select the voice type for announcements.
There are two options available.
• Male: All announcements will be played in the male voice.
• Female: All announcements will be played in the female voice.
Function Switch Announcements
This feature allows you to enable or disable the voice announcements when the pager is powered up or when the Function Switch is moved to a new position.
There are four options available.
• On: Voice announcements enabled.
- On Reset Only: Voice announcements enabled only when Reset button is released.
- On & On Reset: Voice announcements also enabled when Reset button is released.
• Off: Voice announcements disabled.
Battery Level Announcement
This feature allows you to enable or disable the voice announcements for the battery level when you press and release the Reset button.
There are two options available.
• On: Voice announcements enabled.
• Off: Voice announcements disabled.
Fixed Volume Page Alert
This feature allows you to fix the page alert volume level at its loudest setting.
There are two options available.
- On: The page alert volume level is fixed at the maximum. Turning the On/Off/Volume Control Knob changes only the voice message volume level.
- Off: Turning the On/Off/Volume Control Knob changes the voice message and the page alert volume level.
Priority Scan Time
This feature allows you to set a duration for the pager to wait before scanning the priority channels.
Note: This option is enabled only when one of the Function Switch positions is configured for priority scan.
The range of the Priority Scan Time is 0.64 seconds to 2.04 seconds; the default is 0.512 seconds.
Note: If the priority scan time is set to more than 0.512 seconds, you may miss an incoming message.
Page Alert Duration
This feature allows you to set the duration of page alerts.
There are two options available.
- Fixed: You can set the duration to a fixed value between 0.5 seconds to 2 minutes.
• Standard: The alert will last for a standard duration of two tones.
Note: If the duration is fixed and is longer than the duration of the second pager activation tone, you may miss either part of the message or the entire message depending on the message length.
Unread Message Reminder
This feature allows you to enable or disable the reminder that there is one or more unread messages in the pager.
There are two options available.
- On: Unread message reminder enabled.
- Off: Unread message reminder disabled.
Priority Tone Alert
This feature allows you to override the vibrate settings of the Function Switch for Call Address 1 on Frequency 1 to always sound a tone alert instead.
There are two options available.
- On: The pager sounds a tone alert instead of vibrating to indicate an incoming message - even when the alert type is set as vibrate.
- Off: The pager vibrates to indicate an incoming message - when the alert type is set as vibrate.
Privacy
This feature allows you to disable the ability to monitor the channel when you press and hold the Reset button - unless Push-To-Listen is enabled for silent scan or selective call modes.
There are two options available.
- On: Pressing and holding the Reset button does not place the pager in monitor mode.
- Off: Pressing and holding the Reset button places the pager in monitor mode.
Always On
This feature allows you to keep the pager on regardless of the On/Off/Volume Control Knob position.
There are two options available:
- On: The pager will remain powered up - even when the On/Off/Volume Control Knob is switched to off position
- Off: The pager turns off when the On/Off/Volume Control Knob is switched to off position.
Note: While Always On is enabled, the pager needs to be power cycled after you reattach the battery.
Function Switch Options
There are eight different Function Switch positions available, labeled from A to H. The following options can be programmed for each of the Function Switch positions.
Mode
This option allows you to select the mode of operation for different Function Switch positions.
There are six different modes available.
- Selective Call:
• This mode allows you to detect two-tone and long-tone pages.
- Only one frequency can be monitored for paging tones at any given time. When a page is detected, the pager generates a page alert and stores the message.
Note: The page alert may be an audible or a vibrate - depending on the Function Switch position.
- In Selective Call mode, the audio will remain turned off until a page is received, where upon your pager will alert, indicating the carrier squelch operation is enabled. The pager will then turn the audio off according to the current Reset mode.
• Additional programmable options are Off Duty, Priority Tone Alert, Push-To-Listen, and Privacy mode.
Note: Selective Call can be set for up to five different frequencies, labeled as F1, F2, F3, F4, and F5.
• Monitor:
- This mode allows you to monitor activity on a programmed frequency (carrier squelch operation).
- Only one frequency can be monitored at a time. When a page is detected, the pager generates a page alert and stores the message.
Note: Monitor can be set for up to 5 different frequencies, labeled as F1, F2, F3, F4, and F5.
• Probability Scan:
- This mode allows you to monitor traffic on two different frequencies.
- The pager monitors any activity on both frequencies. If activity is detected on either frequency, the receiver will lock on to that frequency until the transmission ends.
Note: Neither frequency will have monitoring precedence over the other.
- When the pager is locked on to either of the scanned frequencies, the pager will sound an alert to the correct address tones for that frequency and start message storage. The pager will turn the audio off according to the current Reset mode. The receiver will then resume the scan activity.
• Priority Scan:
- This mode allows you to monitor traffic on two different frequencies.
• One frequency must be preprogrammed as a priority frequency; and the second frequency can be preprogrammed as a non-priority frequency.
Note: The priority frequency has monitoring precedence over the non-priority frequency.
- If the receiver is in the Scan mode and is monitoring frequency activity on a non-priority frequency, the receiver will scan back to the priority frequency at programmed intervals. If activity is detected on the priority frequency the receiver will then lock on to that frequency. Scanning is stopped until the priority frequency becomes inactive.
- At this time the receiver will resume the priority scan activity. The pager will only alert on the detection of alert tones on the priority frequency. The pager will then turn the audio off according to the current Reset mode. Address detection is turned off for the non-priority frequency.
- Silent Scan:
- This mode allows you to monitor traffic on two different frequencies.
Note: Neither frequency will have monitoring precedence over the other.
- The receiver alternately scans the two frequencies and the audio remains turned off. When a page is detected, the pager generates a page alert and performs message storage.
- Upon receiving a page, the audio will turn on immediately after the page
alert (enabling the carrier squelch operation). The pager will then turn the audio off according to the current Reset mode. The receiver will then resume the silent scan activity.
- Disabled:
- This mode allows you to disable a Function Switch position. When programmed, the pager will play a low frequency tone when switching the channel knob to this position.
Alert Type
This option allows you to set the type of alerts to be activated when the pager is powered up or when there is an incoming page.
There are three different alert types available.
- Tone: The pager plays a tone.
• Vibrate: The pager vibrates.
- Tone & Vibrate: The pager plays a tone and vibrates simultaneously.
Note: While the pager is in the Amplifier Charger it will not alert if it is set to vibrate.
Announcements
When the Function Switch announcements are enabled, you can set the type of announcements to be played. These announcements are played when the pager is powered up or when the Function Switch is moved to a new position. There are three different announcement types available.
- Standard: Announces the mode, frequency number, and alert type that are programmed for the current switch position. For priority scan, the first frequency announced is the priority channel.
- Enhanced: In addition to the Standard announcement, announces On/Off Duty, Push-To-Listen, Priority Alert, and Privacy when programmed for the current switch position.
- Custom: Plays the custom function switch announcements stored. You can store up to eight different custom announcements in the pager.
Enable On/Off Duty
This option is available for Selective Call and Silent Scan modes only. It allows you to program a specific address as Off Duty, thereby ignoring that address. By clicking on the checkbox, the on or off selection gets enabled in the corresponding channel tab.
Note: While programming the addressed as on or off for any channel position, at least one address must be programmed as On Duty.
Push-To-Listen
This option is available for Selective Call and Silent Scan modes only. When this option is enabled, after the page alerts, you must hold down the Reset button to monitor the incoming message. This option does not affect the storing voice process.
The Alert Type is set to vibrate by default. It is compatible with the Off Duty mode (if the call address is set for either On or Off Duty).
Channel Options
You can program up to five different receiving frequencies and their corresponding parameters like bandwidth, tone system, and coding option.
Channel Bandwidth
The pager can operate on 12.5 KHz Channel Spacing (Narrowband) or 25 KHz Channel Spacing (Wideband).
Reset Function
Sets the method to reset the pager after receiving a page. There are eight different reset functions available.
• Automatic: Resets the pager when carrier drops.
- Delayed: Waits momentarily before checking for carrier drop to reset the pager.
- Muted Delayed: Waits momentarily before checking for carrier drop to reset the pager. During the momentary wait period mutes the speaker and stored voice recording during carrier drop.
- Revert: Reverts to Monitor mode after receiving a Selective Call page.
- Delayed Revert: Waits momentarily before checking for carrier drop and then reverts to Monitor mode.
- Muted Delayed Revert: Waits momentarily before checking for carrier drop and then reverts to Monitor mode. During the momentary wait period mutes the speaker and stored voice recording during carrier drop.
- Time-out: Resets the pager after a preprogrammed amount of time.
- Manual: Audio remains turned on until the Reset button is pressed while in Selective Call and Silent Scan modes.
Audible and Vibrate Alerts
For each call address, determines which alert tone to play and which pattern to vibrate upon receipt of a page.
For each channel, the pager can support up to 15 call addresses (10 individual and 5 group). Each call address can be programmed to alert with different tone and vibrate patterns.
- Tone Alert: Select from 10 pre-programmed tones and up to 5 custom audio alerts.
• Vibrate Alert: Select either a continuous or pulsed vibrate pattern.
Note: Whether the pager provides an audible, vibrate, or combined audible/vibrate alert depends upon the Alert Type Function Switch option setting.
Stored Voice Features and Controls
The pager can store at least 8 minutes of voice messages. Messages are stored according to their length. If preferred, the pager can be programmed to store messages in fixed lengths of 30, 60, or 120 seconds instead. Minitor VI provides a list of controls for stored message management – fast forward, rewind, skip to next, return to previous, lock, unlock, and delete all.
Stored Voice Operation
The message is stored only when a properly encoded message is received.
Note: Other communications monitored on the channel that do not alert your pager are not stored.
The message recording cycle is complete under any of the following conditions:
- When the Stored Voice Duration for the message is reached.
- When the squelch circuit no longer detects carrier signal and no Reset Function timer is active.
- When the Delayed Reset cycle is complete and carrier is no longer detected.
- When the Timed-out Reset cycle is complete.
Note: If channel traffic occurs after the page and message, and before carrier signal is lost, that will also be stored in memory.
Stored Message Management
Your pager offers extended capability to manage the stored messages. There are three multifunction buttons available on the front side of device for message management.
Playback Button
Press the Playback button to playback a particular message stored in the memory of your pager. This is a multi-functional button offering different functionalities.
- Press in Standby mode to play back the most recent message.
- Press in Playback mode to stop the message playback.
- Press and hold in Standby mode to play back locked messages.
- Press and hold in Playback mode to lock or unlock the message.
Fast Forward Button
Press the Fast Forward button to skip to the next message or to fast forward the current message.
- Press to skip to the next message.
- Press and hold to fast forward the current message.
Rewind Button
Press the Rewind button to return to the previous message or to rewind the current message being played.
- Press to return to the previous message.
- Press and hold to rewind the current message.
Note: Press and hold the Fast Forward and Rewind buttons simultaneously to delete all stored unlocked messages. You need to unlock a locked message before you can delete it.
Cleaning Your Pager
To clean smudges and grime from the exterior of your pager, use a soft, non-abrasive cloth moistened in a mild soap and water solution. Use a second cloth moistened in clean water to wipe the surface clean. Do not immerse in water. Do not use alcohol or other cleaning solutions.
To clean the Pager I/O connector on bottom of the pager, Motorola Solutions recommends cleaning of the MINITOR VI I/O connector with 1104959T01 'DeoxIT® D-Series' cleaner (D100P supplier CAIG Labs).
Depress the tip of DeoxIT pen several times to ensure flow of the cleaning liquid to the pen tip and allow the tip of the
marker to get wet with the DeoxIT cleaning solution.
Gently rub the tip of the cleaning pen on the MINITOR VI I/O contacts covering the entire surface. Perform the cleaning of all 15 contacts.
During the cleaning process the pen tip wears off and accumulates contaminants over time. Motorola Solutions recommends to replace the pen tip after 15-20 pagers are cleaned.
Replacement tips (TIP-RD6) are available with supplier CAIG Labs. Motorola Solutions recommends cleaning MINITOR VI I/O connectors once a month if the pagers are used in dirty environments.
Repair and Maintenance
Your pager, properly handled, will provide quality service for years. However, should it ever require service, call 1-800-548-9954 for instructions.
Accessories
Motorola Solutions offers several accessories to increase communications efficiently and provide many unique benefits. Consult your Motorola Solutions sales representative for a complete list of accessories, prices, and applications.
• Desktop Battery Charger
- Desktop Battery Charger Amplifier with Antenna and Relay
- Nylon Carrying Case
- Alkaline Battery Tray (non-UL models only)
Batteries and Chargers Warranty
The Workmanship Warranty
The workmanship warranty guarantees against defects in workmanship under normal use and service.
| Lithium-Ion (Li-Ion) Batteries | One (1) Year |
| Chargers One (1) Year |
The Capacity Warranty
The capacity warranty guarantees 80% of the rated capacity for the warranty duration.
| Lithium-Ion (Li-Ion) Batteries | One (1) Year |
Limited Warranty
MOTOROLA SOLUTIONS COMMUNICATION PRODUCTS
I. WHAT THIS WARRANTY COVERS AND FOR HOW LONG
MOTOROLA SOLUTIONS, INC. ("MOTOROLA SOLUTIONS") warrants the MOTOROLA SOLUTIONS manufactured Communication Products listed below ("Product") against defects in material and workmanship under normal use and service for a period of time from the date of purchase as scheduled below:
| Minitor VI Pager Two (2) Years | |
| Product Accessories (Including Batteries and Chargers) | One (1) Year |
MOTOROLA SOLUTIONS, at its option, will at no charge either repair the Product (with new or reconditioned parts), replace it (with a new or
reconditioned Product), or refund the purchase price of the Product during the warranty period provided it is returned in accordance with the terms of this warranty. Replaced parts or boards are warranted for the balance of the original applicable warranty period. All replaced parts of Product shall become the property of MOTOROLA SOLUTIONS.
This express limited warranty is extended by MOTOROLA SOLUTIONS to the original end user purchaser only and is not assignable or transferable to any other party. This is the complete warranty for the Product manufactured by MOTOROLA SOLUTIONS. MOTOROLA SOLUTIONS assumes no obligations or liability for additions or modifications to this warranty unless made in writing and signed by an officer of MOTOROLA SOLUTIONS.
Unless made in a separate agreement between MOTOROLA SOLUTIONS and the original end user purchaser, MOTOROLA SOLUTIONS does not warrant the installation, maintenance or service of the Product.
MOTOROLA SOLUTIONS cannot be responsible in any way for any ancillary equipment not furnished by MOTOROLA SOLUTIONS which is attached to or used in connection with the Product, or for operation of the Product with any ancillary equipment, and all such equipment is expressly excluded from this warranty. Because each system which may use the Product is unique, MOTOROLA SOLUTIONS disclaims liability for range, coverage, or operation of the system as a whole under this warranty.
II. GENERAL PROVISIONS
This warranty sets forth the full extent of MOTOROLA SOLUTIONS's responsibilities regarding the Product. Repair, replacement or refund of the purchase price, at MOTOROLA SOLUTIONS's option, is the exclusive remedy. THIS WARRANTY IS GIVEN IN LIEU OF ALL OTHER EXPRESS WARRANTIES. IMPLIED WARRANTIES, INCLUDING WITHOUT LIMITATION, IMPLIED WARRANTIES OF MERCHANTABILITY AND FITNESS FOR A PARTICULAR PURPOSE, ARE LIMITED TO THE DURATION OF THIS LIMITED
WARRANTY. IN NO EVENT SHALL MOTOROLA SOLUTIONS BE LIABLE FOR DAMAGES IN EXCESS OF THE PURCHASE PRICE OF THE PRODUCT, FOR ANY LOSS OF USE, LOSS OF TIME, INCONVENIENCE, COMMERCIAL LOSS, LOST PROFITS OR SAVINGS OR OTHER INCIDENTAL, SPECIAL OR CONSEQUENTIAL DAMAGES ARISING OUT OF THE USE OR INABILITY TO USE SUCH PRODUCT, TO THE FULL EXTENT SUCH MAY BE DISCLAIMED BY LAW.
III. STATE LAW RIGHTS
SOME STATES DO NOT ALLOW THE EXCLUSION OR LIMITATION OF INCIDENTAL OR CONSEQUENTIAL DAMAGES OR LIMITATION ON HOW LONG AN IMPLIED WARRANTY LASTS, SO THE ABOVE LIMITATION OR EXCLUSIONS MAY NOT APPLY.
This warranty gives specific legal rights, and there may be other rights which may vary from state to state.
IV. HOW TO GET WARRANTY SERVICE
You must provide proof of purchase (bearing the date of purchase and Product item serial number) in order to receive warranty service and, also, deliver or send the Product item, transportation and insurance prepaid, to an authorized warranty service location. Warranty service will be provided by MOTOROLA SOLUTIONS through one of its authorized warranty service locations. If you first contact the company which sold you the Product (for example, the dealer or communication service provider), it can facilitate your obtaining warranty service. You can also call MOTOROLA SOLUTIONS at 1-800-927-2744 US/Canada.
V. WHAT THIS WARRANTY DOES NOT COVER
A) Defects or damage resulting from use of the Product in other than its normal and customary manner.
B) Defects or damage from misuse, accident, water, or neglect.
C) Defects or damage from improper testing, operation, maintenance,
installation, alteration, modification, or adjustment.
D) Breakage or damage to antennas unless caused directly by defects in material workmanship.
E) A Product subjected to unauthorized Product modifications, disassembles or repairs (including, without limitation, the addition to the Product of non-MOTOROLA SOLUTIONS supplied equipment) which adversely affect performance of the Product or interfere with MOTOROLA SOLUTIONS's normal warranty inspection and testing of the Product to verify any warranty claim.
F) Product which has had the serial number removed or made illegible.
G) Rechargeable batteries if:
• any of the seals on the battery enclosure of cells are broken or show evidence of tampering.
- the damage or defect is caused by charging or using the battery in equipment or service other than the Product for which it is specified.
H) Freight costs to the repair depot.
I) A Product which, due to illegal or unauthorized alteration of the software/firmware in the Product, does not function in accordance with MOTOROLA SOLUTIONS's published specifications or the FCC certification labeling in effect for the Product at the time the Product was initially distributed from MOTOROLA SOLUTIONS.
J) Scratches or other cosmetic damage to Product surfaces that does not affect the operation of the Product.
K) Normal and customary wear and tear.
VI. PATENT AND SOFTWARE PROVISIONS
MOTOROLA SOLUTIONS will defend, at its own expense, any suit brought against the end user purchaser to the extent that it is based on a claim that the Product or parts infringe a United States patent, and MOTOROLA SOLUTIONS will pay those costs and damages finally awarded against the end user purchaser in any such suit which are attributable to any such claim, but such defense and payments are conditioned on the following:
A) that MOTOROLA SOLUTIONS will be notified promptly in writing by such purchaser of any notice of such claim;
B) that MOTOROLA SOLUTIONS will have sole control of the defense of such suit and all negotiations for its settlement or compromise; and
C) should the Product or parts become, or in MOTOROLA SOLUTIONS's opinion be likely to become, the subject of a claim of infringement of a United States patent, that such purchaser will permit MOTOROLA SOLUTIONS, at its option and expense, either to procure for such purchaser the right to continue using the Product or parts or to replace or modify the same so that it becomes non-infringing or to grant such purchaser a credit for the Product or
parts as depreciated and accept its return. The depreciation will be an equal amount per year over the lifetime of the Product or parts as established by MOTOROLA SOLUTIONS.
MOTOROLA SOLUTIONS will have no liability with respect to any claim of patent infringement which is based upon the combination of the Product or parts furnished hereunder with software, apparatus or devices not furnished by MOTOROLA SOLUTIONS, nor will MOTOROLA SOLUTIONS have any liability for the use of ancillary equipment or software not furnished by MOTOROLA SOLUTIONS which is attached to or used in connection with the Product. The foregoing states the entire liability of MOTOROLA SOLUTIONS with respect to infringement of patents by the Product or any parts thereof.
Laws in the United States and other countries preserve for MOTOROLA SOLUTIONS certain exclusive rights for copyrighted MOTOROLA SOLUTIONS software such as the exclusive rights to reproduce in copies and distribute copies of such MOTOROLA SOLUTIONS software. MOTOROLA SOLUTIONS software may be used in only the Product in which the software was originally embodied and such software in such Product may not be replaced, copied, distributed, modified in any way, or used to produce any derivative thereof. No other use including, without limitation, alteration, modification, reproduction, distribution, or reverse engineering of such MOTOROLA SOLUTIONS software or exercise of rights in such MOTOROLA SOLUTIONS software is permitted. No license is granted by implication, estoppel or otherwise under MOTOROLA SOLUTIONS patent rights or copyrights.
VII. GOVERNING LAW
This Warranty is governed by the laws of the State of Illinois, U.S.A.
Notes
Table des matières
natural_image
Illustration of four electronic devices: a portable radio, a compact case, a floppy disk, and a blank panel (no text or symbols)natural_image
Technical line drawing of a mobile phone door with an inset close-up showing internal components (no text or symbols)natural_image
Technical line drawing of a handheld device with an arrow indicating upward motion, showing internal components and a dashed circular detail (no text or symbols)natural_image
Line drawing of a hand holding a handheld device (no text or symbols visible)natural_image
Line drawing of a hand holding a handheld electronic device (no text or symbols visible)natural_image
Technical line drawing of a mechanical component with two circular inset views showing internal components (no text or symbols)natural_image
Technical line drawing of a device casing with internal compartments and arrows indicating assembly or movement (no text or symbols)natural_image
Line drawing of a portable electronic device with two rotary knobs and a circular arrow indicating rotation (no text or symbols)natural_image
Diagram of a device with two circular gauges and a top handle, showing rotational arrow (no text or symbols)natural_image
Line drawing of a portable electronic device with ventilation slots and two knobs (no text or symbols)Écoute des canaux
VI. DISPOSITIONS RELATIVES AUX BREVETS ET AUX LOGICIELS
Motorola Solutions, Inc.
1303 E. Algonquin Rd., Schaumburg,
IL 60196, U.S.A.
MOTOROLA, MOTO, MOTOROLA SOLUTIONS and the Stylized
M logo are trademarks or registered trademarks of Motorola
Trademark Holdings, LLC and are used under license.
All other trademarks are the property of their respective owners.
© 2013 and 2017 Motorola Solutions, Inc.
All rights reserved.
68009690001-DB

Printed in
- Contents
- Intrinsically Safe Radio
- Preparing Your Pager for Use . . . 4
- Identifying the Pager Controls . 12
- Pager Programming Software (PPS) 19
- Stored Voice Features and
- Intrinsically Safe Radio Information
- UL Listed MINITOR VI Pagers
- Preparing Your Pager for Use
- Inspecting the Package Contents
- Attaching the Belt Clip
- Preparing the Battery Pack
- Preparing the Alkaline Battery Tray
- Attaching the Battery Pack
- Powering Up the Pager
- Adjusting the Volume
- Identifying the Pager Controls
- LED Indicators
- Power Up
- Incoming Message
- English
- Unread Message(s)
- Battery Status
- Unprogrammed Channel
- Message Management
- Scan Mode
- Function Switch
- Channel Monitoring
- Scan (5 Channel Models Only)
- Reset Button
- Conditioning Your Pager For Operation
- Pager Programming Software (PPS)
- Stored Voice Duration
- Announcements Type
- Function Switch Announcements
- Battery Level Announcement
- Fixed Volume Page Alert
- Priority Scan Time
- Page Alert Duration
- Unread Message Reminder
- Priority Tone Alert
- Privacy
- Always On
- Function Switch Options
- Mode
- - Selective Call:
- • Monitor:
- • Probability Scan:
- - Silent Scan:
- - Disabled:
- Alert Type
- Announcements
- Enable On/Off Duty
- Push-To-Listen
- Channel Options
- Channel Bandwidth
- Reset Function
- Audible and Vibrate Alerts
- Stored Voice Features and Controls
- Stored Voice Operation
- Stored Message Management
- Playback Button
- Fast Forward Button
- Rewind Button
- Cleaning Your Pager
- Repair and Maintenance
- Accessories
- Batteries and Chargers Warranty
- The Workmanship Warranty
- The Capacity Warranty
- Limited Warranty
- MOTOROLA SOLUTIONS COMMUNICATION PRODUCTS
- WHAT THIS WARRANTY COVERS AND FOR HOW LONG
- GENERAL PROVISIONS
- STATE LAW RIGHTS
- HOW TO GET WARRANTY SERVICE
- WHAT THIS WARRANTY DOES NOT COVER
- PATENT AND SOFTWARE PROVISIONS
- GOVERNING LAW
- Notes
- Table des matières
- Écoute des canaux
- DISPOSITIONS RELATIVES AUX BREVETS ET AUX LOGICIELS
Brand : MOTOROLA
Model : Minitor VI
Category : Radio transceiver