
4TC65FV1U - TV SHARP - Free user manual and instructions
Find the device manual for free 4TC65FV1U SHARP in PDF.
Download the instructions for your TV in PDF format for free! Find your manual 4TC65FV1U - SHARP and take your electronic device back in hand. On this page are published all the documents necessary for the use of your device. 4TC65FV1U by SHARP.
USER MANUAL 4TC65FV1U SHARP
[ ENGLISH ] Contents Front Cover Contents
2. TV setup operation
3. Connection/External Devices
2. TV and Channel settings (TV tuner
models only) 2-1. How to tune the Analog Broadcast channels 2-1. How to tune the Digital Broadcast channels 2-1. Channel Management 2-1. Auto Channel Update (Antenna input only) 2-1. Channel Update Message (Antenna input only) 2-2. Set the Audio Language (Antenna input only) 2-2. Set the Sound Track (Antenna input only) 2-2. Set the Audio Type (Antenna input only) 2-2. Set the Visually Impaired (Antenna input only) 2-2. How to change Audio output 2-3. How to enable EPG 2-4. How to operate Parental Controls 2-5. How to set your device name 2-5. System Information 2-5. Screen
3. Connection/External Devices
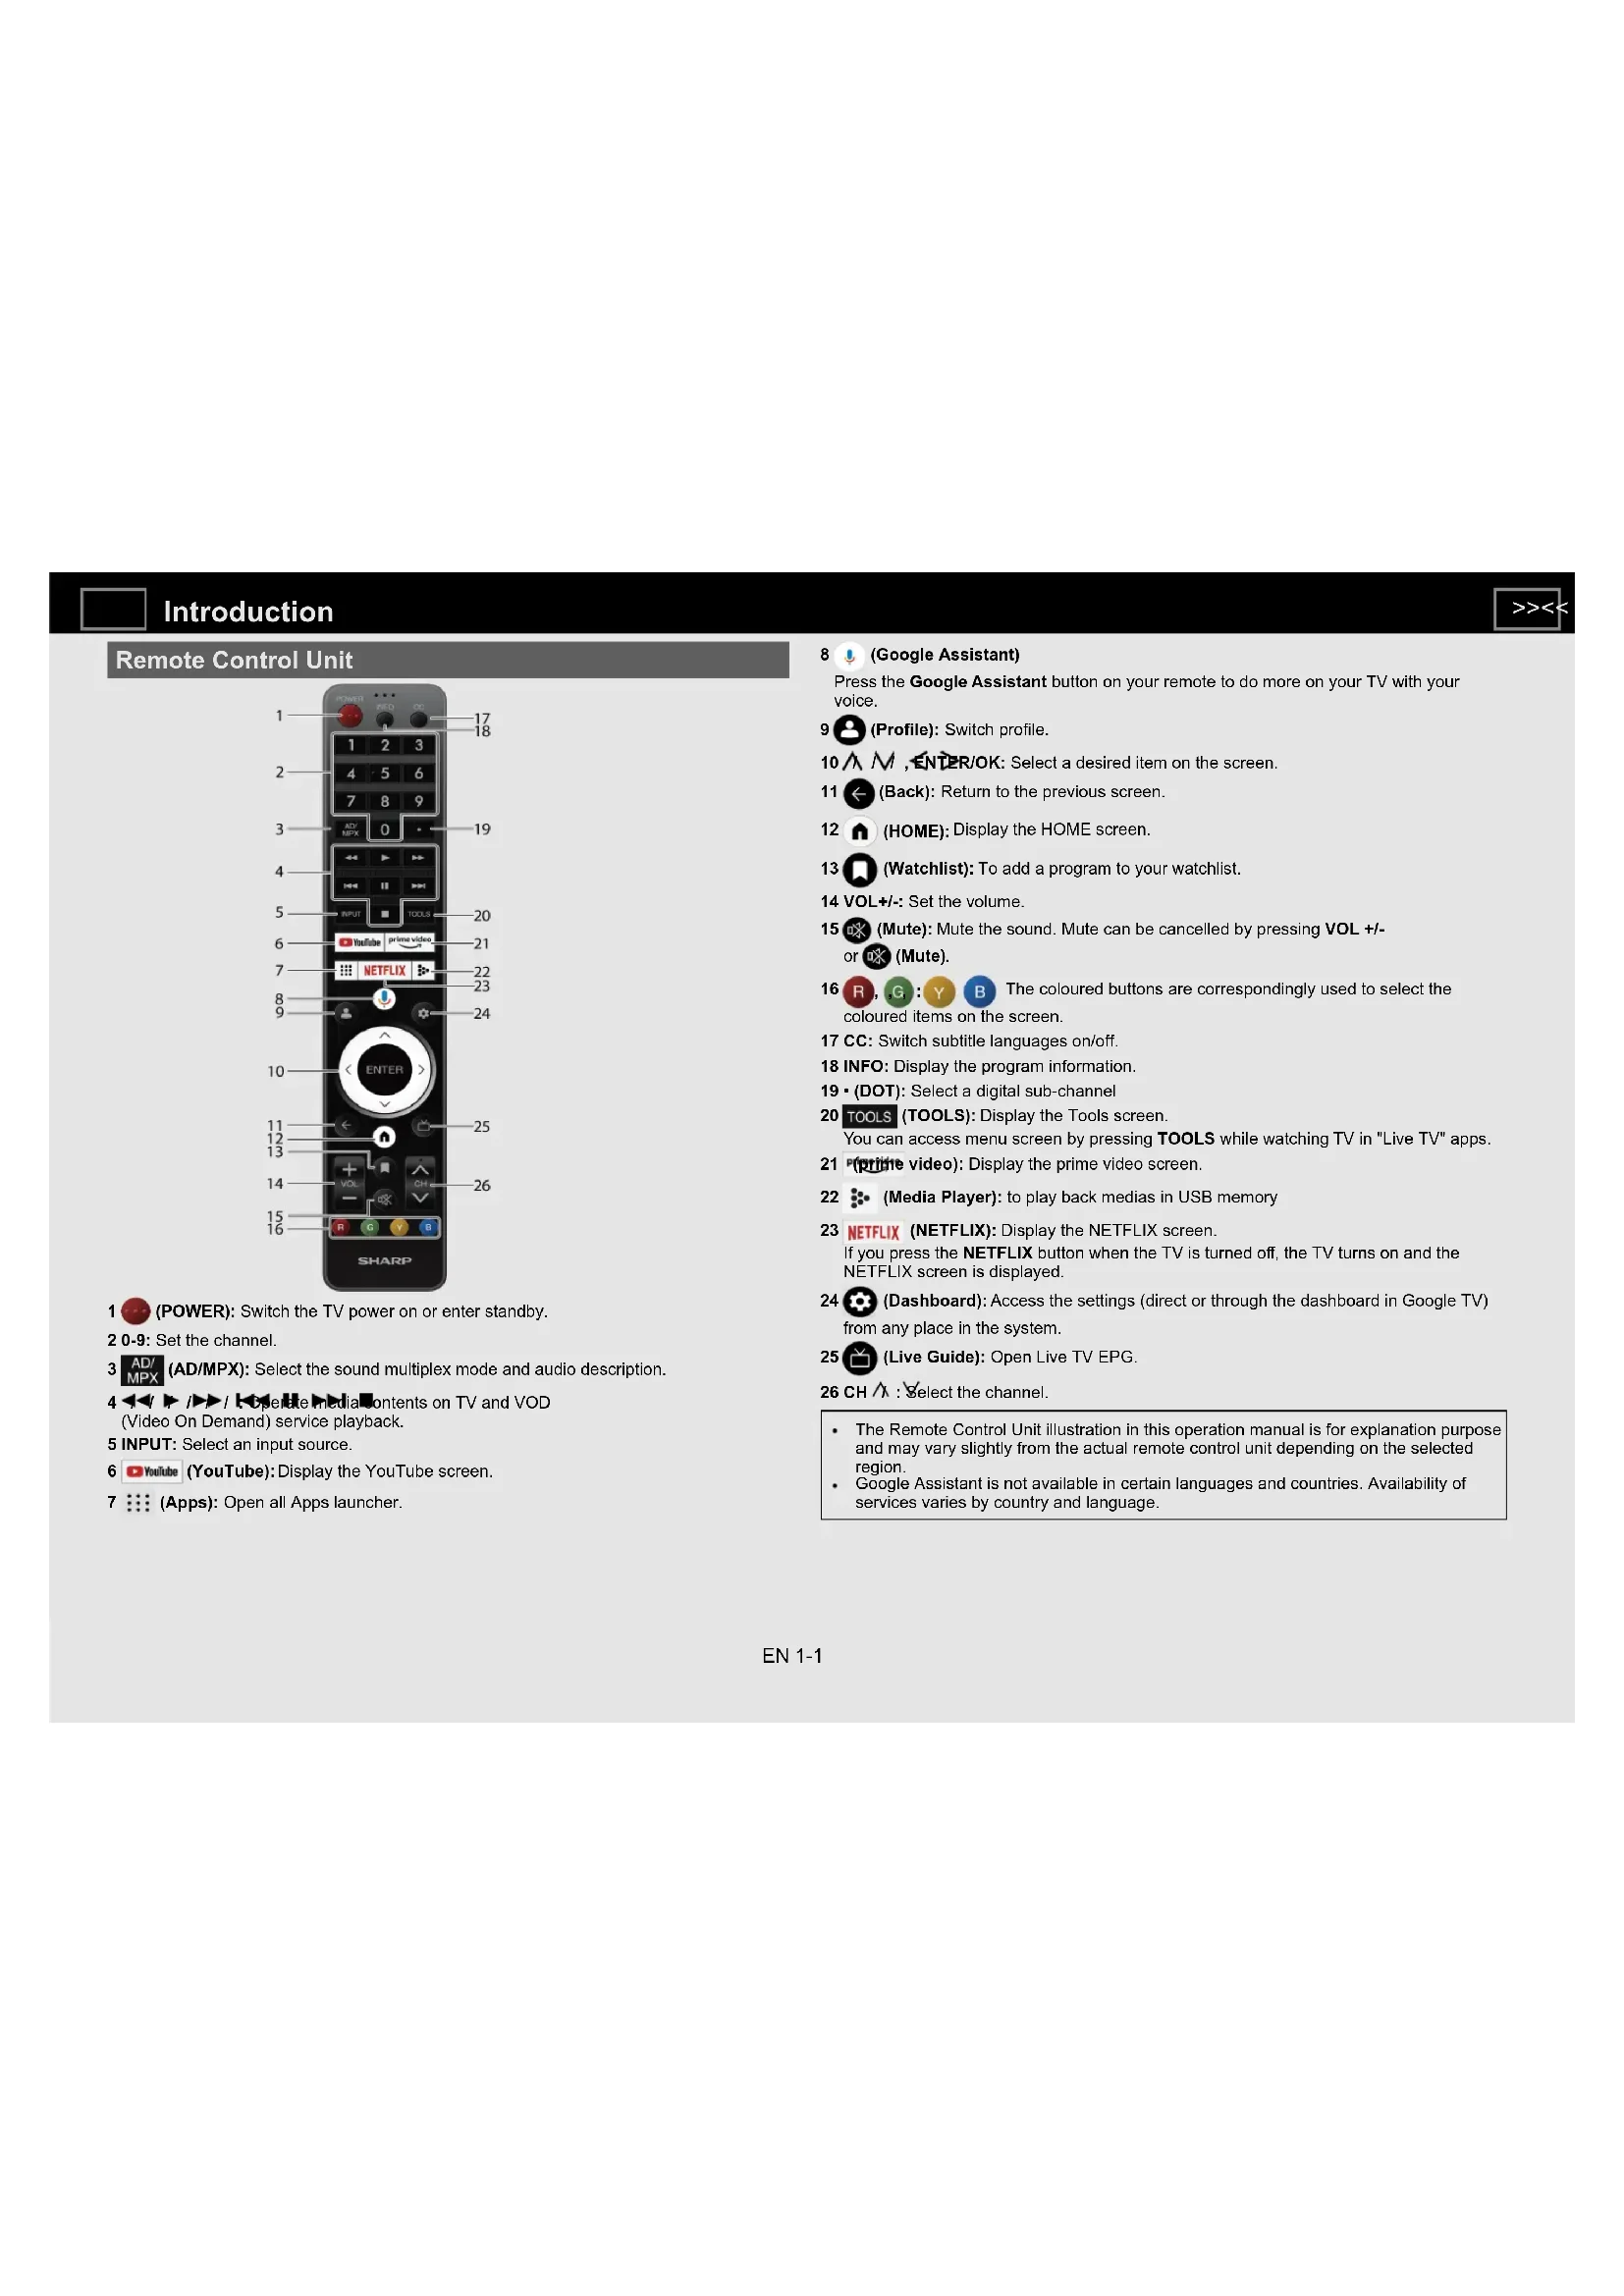
(AD/MPX): Select the sound multiplex mode and audio description. 4 / / / / / / : Operate media contents on TV and VOD x (Video On Demand) service playback. 5 INPUT: Select an input source.
(Apps): Open all Apps launcher. The Remote Control Unit illustration in this operation manual is for explanation purpose and may vary slightly from the actual remote control unit depending on the selected region. Google Assistant is not available in certain languages and countries. Availability of services varies by country and language.
(Google Assistant) x Press the Google Assistant button on your remote to do more on your TV with your x voice.
(Back): Return to the previous screen.
(Mute): Mute the sound. Mute can be cancelled by pressing VOL +/- xx or (Mute)
The coloured buttons are correspondingly used to select the xx coloured items on the screen. 17 CC: Switch subtitle languages on/off. 18 INFO: Display the program information. 19 • (DOT): Select a digital sub-channel
(TOOLS): Display the Tools screen. xx You can access menu screen by pressing TOOLS while watching TV in "Live TV" apps. 21 (prime video): Display the prime video screen.
(Media Player): to play back medias in USB memory
(NETFLIX): Display the NETFLIX screen. xx If you press the NETFLIX button when the TV is turned off, the TV turns on and the xx NETFLIX screen is displayed.
(Dashboard): Access the settings (direct or through the dashboard in Google TV) xx from any place in the system.
(Live Guide): Open Live TV EPG. 26 CH / : Select the channel. Introduction EN 1-1 >><<HOME screen Connect to (HOME) for apps, games, movies and more. Example NOTE The on-screen displays in this manual are for explanation purposes and may vary slightly from the actual display. Google TV™ selections (For you / Movies / Shows / Apps / Library / Search). The contents of the programs that user is watching or watched are displayed here. Among the applications installed on the TV, the icons for the favorite applications are shown inside here. (favorite applications can be added / deleted / changed its order by users.) User's Google Account. Introduction EN 1-2 >><<Auto installation When the TV is powered on for the first time after purchase, the initial auto installation wizard appears. Follow the menus and make the necessary settings one after another. Confirm the following before turning on the power Is the antenna cable connected? Is the AC cord plugged in? 1 Press / POWER on the TV. The initial auto installation wizard appears. 2 You have to follow the procedure shown to pair the remote control unit x with the TV. 3 Setting the OSD language. x Press / to select the desired language, and then press ENTER. 4 Setting the region or country. x Press / to select your region or country, and then press ENTER. NOTE Digital broadcasting cannot be viewed in the area where digital broadcasting is not yet launched. DTV concerned menu may not displayed in some region. 5 Press / to select "Set up Google TV" or "Set up basic TV". If select "Set up Google TV", the screen will jump to step 6. If select "Set up basic TV", after select your Wi-Fi network, the screen will jump to step 7. 6 Press / to select your Wi-Fi network. 7 Select "OK" for Energy Saving Tips. 8 Select "ACCEPT" for Network Privacy Policy. For "Set up basic TV", after select "ACCEPT", the screen will jump to step
9 Press / to sign into your Google Account. 10 Press / to select "Accept", "Terms of Service", "Play Terms of xx Service" and "Privacy Policy". 11 Select "Accept" to confirm your selection of these Google services xx settings. For "Set up basic TV", after select "Accept", the screen will jump to step 15. 12 Select "Continue" for Google Assistant settings. 13 Select "Allow" or "No thanks" for search across all your TV apps. 14 Select "Confirm" to choose your subscriptions. 15 Press / to select "Agree to Terms of Use and Continue", "View SHARP Terms Of Use" or "View SHARP Privacy Policy". 16 Please set a password. 17 Select TV mode. xx Press / to select where you will use this TV, and then press xx ENTER. Home: "Home" mode is optimized for efficient energy usage for home use. If you plan to use this TV at home, please select "Home". Retail: "Retail" mode is optimized for store demo with fixed settings. "Retail" mode is for store demo only and setting are not saved. Please select "Retail" to proceed. NOTE Retail: A demonstration image will be displayed after initial auto installation is completed. If you have chosen "Retail" by mistake, go to " (Dashboard)" > "Settings" > "System" > "Store Mode" > "Continue" > "Off". 18 Press / to select "Off" or "On" to enable Chromecast built-in™. 19 Press / to select "Only digital channels", "Only analog channels", "Digital and analog channels" or "Skip Scan" to start channel scan. 20 The description of Nexflix screen will appear. Select "Next" to finish Netflix setup procedure. Select "Setup Network" if Wi-Fi network is not connected. 21 Press ENTER to start exploring your Google TV . Initial setup EN 1-3 >><<To search for new software updates via Over-The-Air Press " (Dashboard)". Select "Settings" > "System" > "About" > "System update". NOTE Make sure your TV is connected to the internet when performing software updates via OTA. After finished downloading, please allow some time to apply the installed updates. During installation, please do not perform any operations, including power off or unplug your TV. Software updates performance is depending on internet connection. OAD (TV tuner models only) Press " (TOOLS)". Select "TV options" > "Advanced Options" > "OAD". This function is for automatically download the data for the version update software over digital broadcasts when the "Auto Download" is set to "On". To download, follow the instructions when the download message appears during a digital broadcast. Once the software upgrade is done, the TV will automatically go to standby state with Red LED. CAUTION Do not disconnect the AC cord when the software upgrade is in progress, as this may cause the upgrade to fail. Software License Press " (TOOLS)". Select "TV options" > "Advanced Options" > "Open Source Licenses". You can read the software licenses in the on-screen display menu. Software composition The software included in this product is comprised of various software components whose individual copyrights are held by SHARP or by third parties. Software Version Press " (Dashboard)". Select "Settings" > "System" > "About" > "Software Version". You can check the current version of the software on the screen. Software Updates EN 1-4 >><<How to tune the Analog Broadcast channels Press " (TOOLS)". Select "TV options" > "Settings" > "Channels & Inputs" > "Channels" > "Analog". You can tune Analog broadcast channels manually. Select from the following available settings. Channel Scan / Update Scan / Analog Manual Scan How to tune the Digital Broadcast channels Press " (TOOLS)". Select "TV options" > "Settings" > "Channels & Inputs" > "Channels" > "Antenna". You can tune Digital broadcast channels manually. Select from the following available settings. Channel Scan / Update Scan / Single RF Scan / Manual Service Update / LCN / Channel Scan Type / Channel Store Type Channel Management Press " (TOOLS)". Select "Channels" > "Channel Management". Use this menu to set up a channel individually. Select from the following available settings. Channel Skip / Channel Swap / Channel Move / Channel Edit / Channel Delete / Clear Channel List Auto Channel Update (Antenna input only) Press " (TOOLS)". Select "TV options" > "Settings" > "Channels & Inputs" > "Channels" > "Auto Channel Update". Select from the following available settings. On / Off Channel Update Message (Antenna input only) Press " (TOOLS)". Select "TV options" > "Settings" > "Channels & Inputs" > "Channels" > "Channel Update Message". Select from the following available settings. On / Off TV and Channel settings EN 2-1 >><<Set the Audio Language (Antenna input only) Press " (TOOLS)". Select "TV options" > "Advanced Options" > "Audio" > "Audio Language". You can set primary language. Press " (TOOLS)". Select "TV options" > "Advanced Options" > "Audio" > "2nd Audio Language". You can set secondary language. NOTE If there are multiple languages in the broadcast, it will be played in the order of the first language and the second language. If the language specified by these is not broadcast, it will be played in the first language of the broadcast. Set the Sound Tracks (Antenna input only) Press " (TOOLS)". Select "TV options" > "Advanced Options" > "Audio" > "Sound Tracks". You can choose from the multilanguages options based on your preferences. NOTE Selectable item is depend on broadcast signal. Set the Audio Type (Antenna input only) Press " (TOOLS)". Select "TV options" > "Advanced Options" > "Audio" > "Audio Type". Select from the following available settings. Normal/ Audio Description/ Spoken Subtitle/ Hearing Impaired / Audio Description and Spoken Subtitles Set the Visually Impaired (Antenna input only) Press " (TOOLS)". Select "TV options" > "Advanced Options" > "Audio" > "Visually Impaired". Activate the audio guide for the visually impaired. NOTE Selectable item is depend on broadcast signal. How to change Audio output If multi sound are received, each time you press (AD/MPX) the mode switches. When watching Digital broadcasting You can select audio signal when watching a multi-language or stereo program. The sound mode screen disappears in six seconds. Selectable items vary depending on the received broadcasts. The audio description sound is selected depending on the main audio. TV and Channel settings EN 2-2 >><<How to enable EPG EPG What is an EPG? An "EPG (Electronic program Guide)" is a program schedule, which is displayed on the TV screen. The EPG is broadcasted together with DTV. The TV screen shows the EPG when the viewer presses (Live Guide) on the remote control, provided that the TV is receiving the digital broadcasting signal. The EPG enables you to search for a program, do timer view the program schedule in detail. Basic Operation Display the EPG screen Press (Live Guide). Press / to select the desired program. Press / to display program in the next time span. Close the EPG screen Press (Live Guide) again or (Back) to exit. NOTE EPG will be not displayed when the broadcast is not yet tuned after AC on. TV and Channel settings EN 2-3 >><<How to operate Parental Controls Press " (TOOLS)". Select "TV options" > "Parental Controls". This function allows TV channels to be restricted. It prevents children from watching violent or sexual scenes that may be considered inappropriate. If you have already set the password, enter it here. Channels Blocked You can block the viewing of any selected channel. Inputs Blocked You can block the viewing of any selected input. Change PIN You can set and change the Password by using 0-9. NOTE As a precautionary measure, make a note of your Password and keep it in a familiar place. PIN input is required when executing "Parental Controls" screen. The default PIN is "1234". Program Restrictions Used to enable or disable the parental control function. This function will not be selectable from the menu if you do not first configure your password. TV and Channel settings EN 2-4 >><<How to set your device name Press " (TOOLS)". Select "TV options" > "Settings" > "System" > "About" > "Device name". Set the name of the TV displayed. Use the software keyboard when you need to input text at device name setting. System Information Press " (TOOLS)". Select "TV options" > "Advanced Options" > "System Information". Check for system updates and view various information of signal. Screen Press " (TOOLS)". Select "TV options" > "Screen". This function changes the screen size. The Screen menu varies depending on the input source. For Standard-Definition signals Automatic: Keeps the original aspect ratio based on source information and enlarge the picture as much as possible. Full: For 16:9 squeeze pictures. Super zoom: Removes the black bars on the side of 4:3 broadcasts. There is minimal distortion. Unscaled: Detects the resolution of the signal and displays an image with the same number of pixels on the screen. 4:3: Keeps the original aspect ratio in a full screen display. Movie expand 14:9: For 14:9 letterbox pictures. Bars may appear on the top and bottom with some programs. Movie expand 16:9: For 16:9 letterbox pictures. Bars may appear on the top and bottom with some programs. NOTE Some items do not appear depending on the type of received signal. TV and Channel settings EN 2-5 >><<Network and Internet setup Connecting to the Internet To configure the network settings in order to enjoy streaming content and internet applications. NOTE When an Internet connection is made, LAN and wireless connection cannot be used at the same time. Use only one of the connection types. Using Wi-Fi This TV is equipped with a wireless LAN function. For a wireless LAN connection, you must use wireless setup to connect the access point and TV. Press " (Dashboard)". Select "Settings" > "Network & Internet" > "Wi-Fi" to select a network you want to connect to and set the password. NOTE Standby power consumption will be increase when Wow (Wake on wireless network) is turned ON. Using LAN Using a LAN cable (commercially available) to connect the LAN terminal on the TV to your broadband router (commercially available). How to connect: 1 Switch on the router (commercially available). Refer to the router's operation manual for switching on. 2 Connect the LAN terminal on the TV to the router (commercially available) with a LAN cable (commercially available). 3 Press " (Dashboard)". Select "Settings" > "Network & Internet" > "Wake configs". NOTE Standby power consumption will be increase when Wol (Wake on LAN) is turned ON. Connection/External Devices EN 3-1 >><<Network and Internet setup (Continue) NOTE This TV has a built-in wireless LAN function. Using a separate wireless USB LAN adapter may result in radio communications that do not comply with regulations on radio communications. Therefore, do not use a separate wireless LAN adapter. A wireless LAN connection and performance cannot be guaranteed for all residential environments. In the following cases, the wireless LAN signal may be poor or drop, or the connection speed may become slower. - When used in buildings made with concrete, reinforced steel, or metal - When placed near objects that obstruct the signal - When used with other wireless devices that emit the same frequency - When used in the vicinity of microwave ovens and other devices that emit a magnetic field, electrostatic charge, or electromagnetic interference When there is significant interference in the 2.4-GHz frequency (such as from other wireless LAN devices, Bluetooth
devices, 2.4-GHz cordless telephones, and microwave ovens), it is recommended that you use a wireless LAN router/access point that supports IEEE802.11ac (5 GHz) and set the access point to transmit at 5 GHz. For setup details, see the operation manual of your access point. Operations cannot be guaranteed when used with access points that do not have Wi-Fi
certification. A wireless LAN router/access point is required to connect the TV to the Internet using a wireless LAN. See the operation manual of your access point for setup. If your access point is set to a stealth mode (that prevents detection by other devices), you may not be able to establish a connection. In this case, disable the stealth mode on the access point. A stable connection speed is required to play back streaming content. Use LAN connection if the wireless LAN speed is unstable. Before transferring to a third party or disposal, be sure to initialise the wireless LAN settings. Please follow the legislation in your region when using the wireless LAN outdoors. If you have failed to connect to the Internet in the above operation, then an error message will appear. In this case, press (Dashboard) to exit from the connected TV feature to make changes to the network settings. If you still cannot connect to the Internet, please consult your Internet service provider or telephone company. You cannot configure the settings from " (Dashboard)" > "Settings" > "Network & Internet" while using an application. If you must configure your "Network" settings, press the (Dashboard) key to exit the function. Connection/External Devices EN 3-2 >><<Network and Internet setup (Continue) NOTE DISCLAIMERS This SHARP device facilitates the access to content and services provided by third parties. The content and services accessible via this device belong to and may be proprietary to third parties. Therefore, any use of such third party content and services must be in accordance with any authorization or terms of use provided by such content or service provider. SHARP shall not be liable to you or any third party for your failure to abide by such authorization or terms of use. Unless otherwise specifically authorized by the applicable content or service provider, all third party content and services provided are for personal and non-commercial use; you may not modify, copy, distribute, transmit, display, perform, reproduce, upload, publish, license, create derivative works from, transfer or sell in any manner or medium any content or services available via this device. SHARP is not responsible, nor liable, for customer service-related issues related to the third party content or services. Any questions, comments or service-related inquiries relating to the third party content or service should be made directly to the applicable content or service provider. You may not be able to access content or services from the device for a variety of reasons which may be unrelated to the device itself, including, but not limited to, power failure, other Internet connection, or failure to configure your device properly. SHARP, its directors, officers, employees, agents, contractors and affiliates shall not be liable to you or any third party with respect to such failures or maintenance outages, regardless of cause or whether or not it could have been avoided.
PARTICULAR PURPOSE OR ANY WARRANTIES OF SUITABILITY, AVAILABILITY, ACCURACY, COMPLETENESS, SECURITY, TITLE, USEFULNESS, LACK OF NEGLIGENCE OR ERROR-FREE OR UNINTERRUPTED OPERATION OR USE OF THE CONTENT OR SERVICES PROVIDED TO YOU OR THAT THE CONTENT OR SERVICES WILL MEET YOUR REQUIREMENTS OR EXPECTATIONS. SHARP IS NOT AN AGENT OF AND ASSUMES NO RESPONSIBILITY FOR THE ACTS OR OMISSIONS OF THIRD PARTY CONTENT OR SERVICE PROVIDERS, NOR ANY ASPECT OF THE CONTENT OR SERVICE RELATED TO SUCH THIRD PARTY PROVIDERS. IN NO EVENT WILL SHARP AND/OR ITS AFFILIATES BE LIABLE TO YOU OR ANY THIRD PARTY FOR ANY DIRECT, INDIRECT, SPECIAL, INCIDENTAL, PUNITIVE, CONSEQUENTIAL OR OTHER DAMAGES, WHETHER THE THEORY OF LIABILITY IS BASED ON CONTRACT, TORT, NEGLIGENCE, BREACH OF WARRANTY, STRICT LIABILITY OR OTHERWISE AND WHETHER OR NOT SHARP AND/OR ITS AFFILIATES HAVE BEEN ADVISED OF THE POSSIBILITY OF SUCH DAMAGES. Connection/External Devices EN 3-3 >><<Chromecast built-in Easily cast movies, shows, photos, and more from your phone, tablet, or laptop, right to your TV with Chromecast built-in. NOTE When the TV is turned off or the connection is ended on the device, you must connect the device again. For details about the operation of Chromecast built-in and Chromecast- enabled devices, check the manual for that device. Audio Devices HDMI Input eARC (Enhanced Audio Return Channel) Press " (TOOLS)". Select "TV options" > "Sound" > "eARC". You can select to listen to the TV sound only from the LINK-compatible audio system. Auto / Off Inputs Press " (TOOLS)". Select "TV options" > "Settings" > "Channels & Inputs" > "Inputs". Change the label for an input terminal, and switch between HDMI CEC Control Settings. NOTE Height speakers are activated with Dolby technology. Sound output depends on audio signal of the source. Basically, height speakers are enjoyed Dolby Atmos contents in Dolby Atmos mode. Audio Output Digital Output Press " (Dashboard)". Select "Settings" > "Display & Sound" > "Audio Output" > "Digital Output". This function allows you to select the digital audio signal type. Auto / Bypass / PCM / Dolby Digital Plus / Dolby Digital Digital Output Delay Press " (Dashboard)". Select "Settings" > "Display & Sound" > "Audio Output" > "Digital Output Delay". You can delay the output of audio to minimize the time gap between audio output and a visual display. Selected item button button Digital Output Delay For later delay For advance delay Blue Mute Press " (TOOLS)". Select "TV options" > "Advanced Options" > "Blue Mute". The TV screen will turn blue if no signal detected. On / Off Connection/External Devices EN 3-4 >><<Bluetooth setup This feature enable a TV to connect with other Bluetooth devices via Bluetooth connection. NOTE When you use the Bluetooth device with your TV for the first time, you must make pairing between the device and the TV. Once the pairing is correctly carried out, the Bluetooth device will be registered on the TV. Connectivity and reception range may depend on condition, environment, and distance of Bluetooth devices. Sound quality and compatibility are depending on Bluetooth devices. The Bluetooth Profile only supports HID, A2DP and AVRCP. Bluetooth devices You can add, delete or select Bluetooth devices. Connection/Selection Procedure 1 Turn the Bluetooth device on and put it in pairing mode. To put your Bluetooth device in pairing mode, refer to the operation manual of the device. 2 Press " (Dashboard)". Select "Settings" > "Remotes & Accessories" > "Pair accessory" to put the TV in pairing mode. A list of available Bluetooth device will be displayed. 3 Select the desired device from the list, then follow the on screen display instruction. If you are prompted to enter a password, refer to the operation manual of the device. After pairing is completed, the device connects to the TV. NOTE To pair the remote control unit with the TV, please hold (HOME) and button for 10 seconds. Wait for about 1 minute before pairing. NOTE When there is significant interference in the 2.4-GHz frequency (such as from other wireless LAN devices, Bluetooth
devices, 2.4-GHz cordless telephones, and microwave ovens), to prevent mutual interference, please turn off the power off unused devices. Connection/External Devices EN 3-5 >><<USB setup You can connect the TV to a USB memory device to enjoy viewing pictures, listening to music, and watching videos. NOTE Depending on the USB memory device, the TV may not be able to recognize the recorded data. It may take time to read the recorded data if the USB memory device contains many files or folders. Use only alphanumeric characters for naming files. File names (may vary depending on character set) may not be displayed. Connecting a USB Memory Device Insert the USB memory device with recorded photos, music or videos into the USB terminal on the TV. Use the specified external power supply for devices that can be externally powered. Do not remove a USB memory device from the TV while transferring files, using the slide show function, or switching screens, or before you exit "MultiMediaPlayer". Do not insert and remove a USB memory device to and from the TV repeatedly. When using a card reader, be sure to insert a USB memory device first. CAUTION Do not use a USB extension cable when connecting a USB memory device to the USB terminal on the TV. Using a USB extension cable with the USB memory device may prevent the TV from performing correctly. Operation using USB hubs is not guaranteed. Selecting the Folders to Play Back To play back data on a USB memory device insert the USB memory device on the TV. 1 Press " (HOME)" > "Your apps" > "MultiMediaPlayer" to open the Playback screen. 2 Press / to select "VIDEO", "PHOTO", "MUSIC" or "TEXT", and then press ENTER/OK. 3 Press / (or / ) to select the drive/server where you want to find your file, and then press ENTER. (Only can select if more than one USB input.) 4 Press / to select the desired folder, and then press ENTER. NOTE USB only support device up to DC5V 500mA. Connection/External Devices EN 3-6 >><<USB setup (Continue) USB Device Compatibility USB device USB Memory, USB card reader (Mass Storage class) File system FAT/FAT32 Photo file format Format JPEG, PNG, BMP NOTE Progressive jpeg format files are not supported. Music file format Format Sampling rate [KHz] Bitrate [Kbps] MP3 8/11.025/12/16/ 22.050/24/32/44.1/48 8~320 AAC 32/44.1/48 8~320 WMA 8/11.025/16/22.05/ 32/44.1/48/64/88.2/96 8~384 WAV 8/11.025/12/16/ 22.050/24/32/44.1/48 8~1024 NOTE If the TV is turned off and then on again, the number assigned to the USB may change. Video file format Container Video Music AVI MPEG-1 MPEG-2 MPEG-4 H.264 AV1 PCM MP2: MPEG-1 Layer2 MP3: MPEG-1 Layer3 AAC AC3 WMA MKV MPEG-1 MPEG-2 MPEG-4 H.264 VP8 H.265(HEVC) AV1 PCM MP2: MPEG-1 Layer2 MP3: MPEG-1 Layer3 AAC AC3 WMA VORBIS ASF MPEG-4 VC1(WMV3) AV1 MP3: MPEG-1 Layer3 WMA
MPEG-2 VC1(WMV3) H.264 H.265(HEVC) AV1 MP2: MPEG-1 Layer2 AAC AC3 MP4 MPEG-4 H.264 H.265(HEVC) VP8 VC1(WMV3) AV1 MP2: MPEG-1 Layer2 MP3: MPEG-1 Layer3 AAC NOTE USB 1.1 devices may not be played properly. Some video file formats may not be played depending on the file. Some images may not be displayed in the appropriate aspect ratio depending on the file format. File extensions are not used to determine the file format. Vertical video files are not supported. Portrait format cannot display. Only support landscape format. Connection/External Devices EN 3-7 >><<USB setup (Continue) Playing Back Files on a USB Memory Device Photo Mode/Music Mode/Video Mode Buttons for thumbnail/list operations Buttons Description
Select a desired item. ENTER/OK When selecting a folder icon: Enter this directory. When selecting a photo file: Enlarge the photo. When selecting an audio file: Play audio. When selecting a video file: Play the video file. (Back) Return to the previous process. (Blue) Change Thumbnail/List mode. (TOOLS) Display the Menu screen. NOTE When you are viewing the MultiMediaPlayer app in Music Mode, you cannot configure Picture/Audio settings. Menu for thumbnail operations Press / to select an item and make settings to your preferences. Example Sort - You can change the way in which files are ordered. - Press / to select "Type", "Date" or "Name" and then press ENTER. Media Type - Switch the media type when the Recursive parser display is displayed. Thumbnail Size - Change the thumbnail size. Small/Medium/Large Recursive Parser - Display all files according to the Media type settings. Photo Frame - You can add frame to your photo. NOTE You can see the file name, file size and pixel size of the selected photo in the upper-left corner of the screen. Connection/External Devices EN 3-8 >><<USB setup (Continue) Playing Back Files on a USB Memory Device (Continue) Photo Mode Slide Show The photos displayed on the thumbnail selection screen are displayed as a slide show. Buttons for slide show operation Buttons Description Play the Slide Show. Pause the Slide Show.
ENTER/OK Select the desired item. (Back) Return to the thumbnail selection screen. (TOOLS) Display the USB Menu screen. Menu for slide show Example Play/Pause Start or pause slideshow. Repeat Set whether to show the slide show repeatedly. None/Repeat One/Repeat All Shuffle On/Shuffle Off Shuffle the image files within the folder and display as a slide show. Duration Specify the length of time before the next image appears. Press / to select the desired length of the time, and then press ENTER. Short/Medium/Long Effect Specify the effect for transitioning to the next image. None/Dissolve/Wipe Right/Wipe Left/Wipe Up/Wipe Down/Box In/ Box Out/Random Rotate* Rotate the photo by 90 degrees to the right.
- Only displayed when playback is paused. Zoom* Zoom in on the image. 1 X/2 X/4 X
- Only displayed when playback is paused. Show Info Display the photo information. Photo Frame Image Display the photo in frame. Picture Settings See pages 5-1 to 5-3. NOTE The slide show continues until you press (Back)
For setting the slide show speed, select "Duration" on the Menu screen. Depending on the contents, the TV system cannot display the picture at its original resolution in some cases. TV system may adjust the picture resolution accordingly. Connection/External Devices EN 3-9 >><<USB setup (Continue) Playing Back Files on a USB Memory Device (Continue) Music Mode Playing Mode Buttons for playing mode Buttons Description The fast reverse speed changes every time you press . The fast forward speed changes every time you press . Pause the music. Go to the previous file. Go to the next file. / / / , ENTER/OK Select a desired item. (Back) Return to the previous process. (TOOLS) Display the Menu screen. NOTE The displayed play time may differ slightly from the actual play time depending on the files. Menu for playing mode Example Play/Pause Start or pause music. Repeat Configure the repeat playback settings. None/Repeat One/Repeat All Shuffle On/Shuffle Off Shuffle the music within the folder. Show Info Display audio information. Hide Spectrum/Show Spectrum Show or hide the spectrum. Lyric Options You can change the lyric display type. This is only available when a lyrics file (".lrc") is presented. Only UTF-8 character code lyric files (without BOM) are supported. Picture Off See page 7-1. Sound Settings See pages 6-1 to 6-2. Audio Output See page 3-4. Connection/External Devices EN 3-10 >><<USB setup (Continue) Playing Back Files on a USB Memory Device (Continue) Video Mode Playing Mode Buttons for playing mode Buttons Description The fast reverse speed changes every time you press . Play the video. The fast forward speed changes every time you press . Pause the video. Go to the previous file. Stop the video. Go to the next file. / / / , ENTER/OK Select a desired item. (Back) Return to the previous process. (TOOLS) Display the Menu screen. NOTE The displayed play time may differ slightly from the actual play time depending on the files. Menu for playing mode Example Play/Pause Start or pause the video. Repeat Configure the repeat playback settings. None/Repeat One/Repeat All Show Info Display the video information. Screen Mode This function changes the screen size. Full Screen/4:3/16:9/Auto Picture Settings See pages 5-1 to 5-3. Sound Settings See pages 6-1 to 6-2. Audio Output See page 3-4. Sound Tracks Display soundtracks info. Last Memory Press / to select "Off" or "Time", and then press ENTER. Seek Jump to the specific scenes. Connection/External Devices EN 3-11 >><<Google Assistant Talk to Google to control your TV using your voice. Press the Google Assistant button on your remote to do more on your TV with your voice. NOTE Google Assistant is not available in certain languages and countries. Availability of services varies by country and language. Find out more at https://support.google.com/assistant Google Account settings Accounts & sign-in Press " (Dashboard)". Select "Settings" > "Accounts & sign-in". To sign in, enter your email address and password. You can also sign in another account and kids account. Location Press " (Dashboard)". Select "Settings" > "Privacy" > "Location". Configure the location settings. Usage & diagnostics Press " (Dashboard)". Select "Settings" > "Privacy" > "Usage & diagnostics". Automatically send diagnostic information to Google, like crash reports and usage data from your device, apps, and Chromecast built-in. You can adjust these permissions at any time from device settings. Learn more at g.co/tv/diagnostics. Security & Restrictions Press " (Dashboard)". Select "Settings" > "Privacy" > "Security & Restrictions". Unknown sources. Allow installation of apps from sources other than the Play Store. Apps EN 4-1 >><<Unique feature from SHARP SHARP SELECT Press " (Apps)". Select "Your apps" > "SHARP SELECT" app. This app shows recommended apps that can be enjoyed with AQUOS. Apps EN 4-2 >><<Tools screen setting Tools menu screen 1 Press (TOOLS) to display the TOOLS screen. 2 Press / to select the desired menu. Channels - Program Guide, Channel, Channel Management TV options - Inputs, Picture, Screen, Sound, Power, Parental Controls, Manual OAD Download, Advanced Options, Settings 3 Press (TOOLS) to exit. Apps EN 4-3 >><<Picture Mode (Changing Pic. Quality) Press " (TOOLS)". Select "TV options" > "Picture" > "Picture Mode". Picture Mode gives you several viewing option to choose from to best match the surrounding environment of the TV, which can vary due to factors like room brightness, type of program watched or the type of device connected. Comfort: Reduce the blue light of the TV. Standard: Default picture settings for common users. Dynamic: For a clear-cut image emphasising high contrast. Sport: Useful for sports viewing. Movie: Dim down the color for long hour viewing. Game: Lower latency for fast gaming illustration. Eco: Reduce the backlight brightness to save power consumption. NOTE You can set the Picture Mode on each input individually. These settings will be automatically saved on each input for convenience. When playing Dolby Vision content, the "Picture Mode" selection will be displayed "Dolby Vision IQ", "Dolby Vision Dark" and "Dolby Vision Vivid". Configuring Picture settings Press " (TOOLS)". Select "TV options" > "Picture". Adjusts the picture to your preference with the following picture settings. Selected item button button Backlight The screen dims The screen brightens Brightness For less brightness For more brightness Contrast For less contrast For more contrast Saturation For less color saturation For more color saturation HUE Light orange become reddish Light orange become greenish Sharpness For less sharpness For more sharpness NOTE For resetting all Picture settings items to the factory preset values, press / to select "Reset to Default", press ENTER, press / to select "OK", and then press ENTER. Auto Brightness Automatically adjust the brightness of the screen. Off / On Picture settings EN 5-1 >><<Configure advanced Picture settings Press " (TOOLS)". Select "TV options" > "Picture" > "Advanced Settings". Gamma Adjusts the differences of picture tones between bright parts and dark parts. Dark / Middle / Bright Color Temperature For a better white balance, use color temperature correction. User Cool: White with bluish tone Standard: Warm: White with reddish tone Red/Green/Blue Gain: Adjusts the white balance by changing the value of each item Color Tuner color tone is managed using the six-color adjustment setting. Enable / HUE / Saturation / Brightness / Offset / Gain NOTE A lower value makes the image darker. HDR related settings Press " (TOOLS)". Select "Picture". HDR (High Dynamic Range) The HDR (High Dynamic Range) technology implements video image that is very similar to the image shown through human eyes by finely adjusting the contrast of the source. On: Enable HDR effect for HDR source. Off: Disable HDR effect for HDR source. NOTE This feature only available when input signal is playing HDR content. Unique Picture setting from SHARP Press " (TOOLS)". Select "TV options" > "Picture" > "Advanced Settings". DNR Reduces noise on screen and produces a clearer video image. Off / Low / Medium / Strong / Auto MPEG NR This feature improves the quality of pictures by reducing the block noise and mosquito noise without compromising the picture resolution. Off / Low / Medium / Strong Adaptive Luma Control Automatically adjusts the image contrast according to the scene. Off / Low / Medium / Strong Local Contrast Control Automatically adjusts the brightness of image contrast according to the scene. Off / Low / Medium / High Game Mode Lowers image brightness for easier viewing. Off / On Color Space Color Space refers to the range of color of image or video content that the SHARP TV can support. Auto / Off / sRGB/BT.709 / Adobe RGB / BT.2020 / DCI Dolby Vision Notification You can turn off or on Dolby Vision Notification on the screen. Off / On Blue Stretch This feature can make picture color temperature more bluish. Off / On Picture settings EN 5-2 >><<Unique Picture setting from SHARP (Continue) Press " (TOOLS)". Select "TV options" > "Picture" > "Advanced Settings". Local Dimming This feature can balances the backlight on the TV to make scene look darker or lighter. Off / Low / Middle / High 10-bit color Reproduction Set color tones. Off / Low / Middle / High Motion Enhancement Use Motion Enhancement to view fast-action video more clearly. Effect / Demo Partition / Demo Low Blue Light Adjust the differences of blue light color of the TV. Off / Low / Middle / High *Automatic Playback Optimization To optimize image quality based on content type when Dolby Vision content changes. Off / On *Dolby Vision PQ Calibration Select from the following available settings. View Mode: The "View Mode" is updated based on "End User Calibration". End User Calibration: You can set picture quality based on your preferences. Last Modified Time: The last date of setting was modified. *Light sense Automatically adjust brightness based upon the changing ambient lighting conditions. Off / On 11-Point White Balance Correction Adjust white balance to your preference. Enable / Gain / Red / Green / Blue AISR (AI Super Resolution) When input a signal other than 4K, outline of picture can be emphasized according to your preference. Off / Low / Middle / High
NOTE This feature only available when input signal is playing Dolby Vision content. Input settings PC Mode Press " (TOOLS)". Select "TV options" > "Picture" > "Advanced Settings" > "PC Mode". Adjusts the picture when a PC is connected to the TV via HDMI. Off / On ALLM (Auto Low Latency Mode) Press " (TOOLS)". Select "TV options" > "Picture" > "Advanced Settings" > "ALLM". To use "ALLM", you need to set the "HDMI EDID Version" to be "EDID 2.1". Auto Low Latency Mode enables the ideal latency setting to automatically be set allowing for smooth, lag-free and uninterrupted viewing and interactivity. Off / On HDMI RGB Range Press " (TOOLS)". Select "TV options" > "Picture" > "Advanced Settings" > "HDMI RGB Range". Sets the HDMI type for HDMI IN 1, 2, 3 and 4 terminals. This feature provides picture color quality of HDMI input signal. Auto / Full / Limit HDMI EDID Version Press " (TOOLS)". Select "TV options" > "Settings" > "Channels & Input" > "Inputs" > "Consumer Electronics Control (CEC)" > "HDMI EDID Version". When you use device that supports Variable Refresh Rate (VRR) such as game console, you need to set each HDMI input to be "EDID 2.1". EDID 1.4 / EDID 2.0 / Auto EDID / EDID 2.1 Picture settings EN 5-3 >><<Sound Style Press " (TOOLS)". Select "TV options" > "Sound" > "Sound Style". This function allows you to convert the audio quality. Select from the following available settings. User: customize the sound setting. Standard: Optimize sound quality for general content. Vivid: Enhances the treble and bass for a clearer sound. Sports: Simulates the larger space of a stadium or other venue. Movie: Optimize surround sound suitable for movie. Music: Optimize sound for listening to music. News: Makes voice clearer by lowering background sound. Configuring Sound settings Press " (TOOLS)". Select "TV options" > "Sound". You can adjust the sound quality to your preference with the followings settings. Selected item button button Balance Decrease audio from the right speaker Decrease audio from the left speaker Bass For weaker bass For stronger bass Treble For weaker treble For stronger treble NOTE For resetting all Sound settings items to the factory preset values, press / to select "Reset to Default", press ENTER, press / to select "OK", and then press ENTER. Configure advanced Sound settings Press " (TOOLS)". Select "TV options" > "Sound". Surround Sound The surround function produces Surround effect from the speakers. Off / On Equalizer Detail This function allows you to change the sound quality. 120Hz / 500Hz / 1.5KHz / 5.0KHz / 10.0KHz Speakers You can choose to listen TV sound from speaker system. On / Off Speaker Delay If you are hearing an audio delay across all sources or channels and you have a home theatre system or other speakers connected to your TV, you can access the Speaker Delay settings to increase the Speaker Delay. Selected item button button Speaker Delay For later delay For advance delay Dolby Audio / Height Speaker Select from the following available settings. Dolby Audio/Height Speaker / Sound Mode / Volume Leveler / Surround Virtualizer / Dolby Atmos NOTE When "Dolby Audio / Height Speaker" is "Off", you can select "Sound Style", "Balance", "Bass", "Treble", "Surround Sound" and "Equalizer Detail". When "Sound Mode" in "Dolby Audio / Height Speaker" is set to "User", you can turn on or off "Volume Leveler", "Surround Virtualizer" and "Dolby Atmos". Dialog Enhancer This function emphasises speech against background noise for greater clarity. Off / Low / Medium / High Sound settings EN 6-1 >><<Unique Sound setting from SHARP Press " (TOOLS)". Select "TV options" > "Sound". Auto Volume Control Different sound sources sometimes do not have the same loudness level, such as a program and its commercial breaks. The Auto Volume reduces this problem by equalizing it. Off / On Downmix Mode You can select the multi-channel downmix method that is compatible with your stereo system. Stereo / Surround Sound settings EN 6-2 >><<Sleep Timer Press " (TOOLS)". Select "TV options" > "Power" > "Sleep Timer". Allows you to set a time when the TV automatically switches to standby. Picture Off Press " (TOOLS)". Select "TV options" > "Power" > "Picture Off". When listening to music from a music program, you can turn the screen off and enjoy audio only. Switch Off Timer Press " (TOOLS)". Select "TV options" > "Power" > "Switch Off Timer". Allows you to set a time to shut off the TV automatically. Auto Sleep Press " (TOOLS)". Select "TV options" > "Power" > "Auto Sleep" > "4 hours" to continue watching TV. NOTE The default setting for "Auto Sleep" is "4 hours". Accessibility Press " (Dashboard)". Select "Settings" > "System" > "Accessibility". Configure Captions, High contrast text, Text to speech and Accessibility shortcut. Some of the Caption settings may not be applied. Language Press " (Dashboard)". Select "Settings" > "System" > "Language". You can select a language. Storage Press " (Dashboard)". Select "Settings" > "System" > "Storage". View the memory usage status. Energy saver Press " (Dashboard)". Select "Settings" > "System" > "Power & Energy" > "Energy saver". Set to turn off display screen to reduce the power consumption. Restart Press " (Dashboard)". Select "Settings" > "System" > "Restart". When your TV is not properly working, restart of the TV is required. Factory reset Press " (Dashboard)". Select "Settings" > "System" > "About" > "Reset" > "Factory reset". When you perform a reset, the TV will be returned to the factory preset values, and the Google Accounts will also be removed. NOTE Your purchased apps will remain. Other EN 7-1 >><<Power on behavior Press " (Dashboard)". Select "Settings" > "System" > "Power & Energy" > "Power on behavior". The default setting for "Power on behavior" is the Google TV home screen. You can change the TV startup behavior to "Last used input" if you prefer your TV to power on with the last watched TV channel. Timer Press " (Dashboard)". Select "Settings" > "System" > "Power & Energy" > "Timer". You can use this function to turn the TV on and off. NOTE "Auto Power On Time" / "Auto Power Off Time" is not available when you set "Power On Time Type" / "Power Off Time Type" to "Off". Automatic date & time Press " (Dashboard)". Select "Settings" > "System" > "Date & Time" > "Automatic date & time". This function allows you to set Date & Time automatically. Set date Press " (Dashboard)". Select "Settings" > "System" > "Date & Time" > "Set date". This function allows you to set date manually. NOTE "Set date" is not available when you set "Automatic date & time" to "Use network-provided time". Set time Press " (Dashboard)". Select "Settings" > "System" > "Date & Time" > "Set time". This function allows you to set time manually. NOTE "Set time" is not available when you set "Automatic date & time" to "Use network-provided time". Set time zone Press " (Dashboard)". Select "Settings" > "System" > "Date & Time" > "Set time zone". This function enable you to select your local time zone. Use 24-hour format Press " (Dashboard)". Select "Settings" > "System" > "Date & Time" > "Use 24-hour format". You can select the time format (either "24HR" or "AM/PM") for the clock time. Ambient mode Press " (Dashboard)". Select "Settings" > "System" > "Ambient mode". This function allows you to display your Google Photos or curated images from other sources when the TV is idle. Help & Feedback Press " (Dashboard)". Select "Settings" > "Help & Feedback". You can help improve Google TV when you share your feedback and tell us about any problems you have. Visit Google TV Help at g.co/tv/help. Other EN 7-2 >><<Troubleshooting Problem Possible Solution No power. Check if you pressed (POWER) on the remote control unit. Is the AC cord disconnected? Has the power been turned on? Unit cannot be operated. External influences such as lightning, static electricity, may cause improper operation. In this case, operate the unit after first turning off the power of the TV or unplugging the AC cord and replugging it in after 1 or 2 minutes. Remote control unit does not operate. Is the equipment to be operated by the remote control unit set correctly? Are batteries inserted with polarity (+, -) aligned? Are batteries worn out? (Replace with new batteries.) Are you using it under strong or fluorescent lighting? Is a fluorescent light illuminated near the remote control sensor? Picture is cut off/with sidebar screen. Are Screen adjustments such as picture size made correctly? Page 2-5 Strange color, light color, or color misalignment. Adjust the picture tone. Pages 5-1 to 5-3 Is the room too bright? The picture may look dark in a room that is too bright. Power is suddenly turned off. Is the sleep timer set? Page 7-1 Check the power control settings. Page 7-1 The unit's internal temperature has increased. Remove any objects blocking vent or clean. The top of the TV is hot. Since the air warmed by the heat generated from the internal circuit passes through the upper part due to natural convection, the upper part becomes warm. However, it is not a defect and does not affect the TV's functionality. Power may turn on by itself. Is "Auto Power On Time" set to "On"? Please check the setting. Page 7-2 Problem Possible Solution Even if you turn off, power lamp does not turn off. The power lamp does not go out even when the power is turned off. To turn the lamp off, you must unplug the power plug. No picture. Is the connection to the device correct? If the PC image is not displayed, check the following: - When connecting a laptop PC to the TV, check that display output mode of the PC is set to external monitor. Picture quality of HD programs is poor. To enjoy HD images from external equipment, you are required to set up HDMI connection. If the program content is not of HD quality, HD images cannot be displayed. Check that the program you are viewing provides HD images. The HD cable/satellite set-top box may need to be configured to output HD images via cable/satellite. The cable/satellite broadcast may not support a signal resolution of 1080p. The TV sometimes makes a cracking sound. This is not a malfunction. This happens when the cabinet slightly expands and contracts according to change in temperature. This does not affect the TV's performance. Do not open the rear cover of the cabinet to reconstruct the circuits. There exists high voltage within the cabinet and it may cause electric shock and injury. If maintenance is required, contact your dealer. NOTE If require any assistance with troubleshooting, please contact 1-800-BE- SHARP. Appendix EN 8-1 >><<Troubleshooting (Continue) Problem Possible Solution No sound. Is the connection to the device correct? Is the volume too low? Have you pressed (Mute) on the remote control unit? Check the audio output of the connected external equipment. Is the volume too low or muted? When external equipment is connected via an HDMI cable, you may need to configure the audio to be output through the HDMI cable. When connecting a PC via an HDMI-certified cable, check the following: - Is the audio output of the PC configured correctly? Check the audio output settings and output audio format in Sound Properties on the PC. The audio formats compatible with this TV are PCM, Dolby Digital. With other formats, audio cannot be output. Chromecast built-in image/ audio cannot be output to the TV. Check if the smartphone/tablet is connected in the same Wi-Fi network. Software updates via Over-The-Air (OTA) is not successful. Make sure your internet connection is working. If the TV is connected to Internet, but no connection available, please disconnect the internet from your TV and then reconnect again. Apps and services cannot be operated. Make sure your internet connection is working. Depending on certain apps and services, you may not be able to connect those apps and services if the date and time is incorrect. Set the date and time correctly. Page 7-2 Troubleshooting - Error Message The example of an error message displayed on a screen Possible Solution No broadcast now. (TV tuner models only) Check the antenna cable. Check that the antenna is correctly setup. Check the broadcast time in the program guide. An incompatible audio signal has been received. Check the output device settings. This message is displayed when an audio format other than PCM, Dolby Digital is input. - Set the audio output format of connected external HDMI equipment to PCM, Dolby Digital. - Refer to the operation manual of the external equipment for setting details. NOTE If require any assistance with troubleshooting, please contact 1-800-BE- SHARP. Appendix EN 8-2 >><<Trademarks Google TV is the name of this device's software experience and a trademark of Google LLC. Google, YouTube, Google Photos, Chromecast built-in and other marks are trademarks of Google LLC. Google Assistant is not available in certain languages and countries. Availability of services varies by country and language. Connecting RCA jack Instruction for using AV IN. Requires RCA jack conversion. Appendix Side terminal 3-Audio LYellow(Video)White(Audio L) Red (Audio R)VideoAudio LAudio R4-Video1-GND2-Audio R Game console, DVD player, etc. AV IN EN 8-3 >><<Dimensional Drawing 4T-C65FV1 Unit:mm/inch VESA SPEC 400 x 400