 — Car — Mode d'emploi PDF")
Sandero (2020) - Car DACIA - Free user manual and instructions
Find the device manual for free Sandero (2020) DACIA in PDF.
User questions about Sandero (2020) DACIA
0 question about this device. Answer the ones you know or ask your own.
Ask a new question about this device
Download the instructions for your Car in PDF format for free! Find your manual Sandero (2020) - DACIA and take your electronic device back in hand. On this page are published all the documents necessary for the use of your device. Sandero (2020) by DACIA.
USER MANUAL Sandero (2020) DACIA
DESCRIPTION GÉNÉRALE (1/3)
Introduction
DESCRIPTION GÉNÉRALE (2/3)
F.10


natural_image
Interior view of a car steering wheel with a highlighted dashboard showing navigation keys (no text or symbols)
PRÉSENTATION DES COMMANDES (5/7)
natural_image
Front view of a blank digital tablet device with control buttons and an 'A' label pointing to it (no text or symbols on screen)Marche
natural_image
Hand pressing a button on a digital tablet device (no text or symbols visible)Ecran multimédia 1
Appui court :
FONCTIONNEMENT ET UTILISATION (2/3)
natural_image
Front view of a blank digital tablet device with control buttons and a numbered label pointing to the left (no text or symbols on screen)
SOURCES AUDIO AUXILIAIRES (1/3)
SOURCES AUDIO AUXILIAIRES (2/3)

Formats audio
CONNECTER, DÉCONNECTER DES APPAREILS BLUETOOTH® (2/2)
Utilisation
natural_image
Close-up of a device with a rectangular component and two numbered annotations (1 and 2) pointing to it, no readable text or symbols present.PROJECTION SMARTPHONE (1/3)
Méthodes
PROJECTION SMARTPHONE (2/3)
A
PROJECTION SMARTPHONE (3/3)
B 2
Reconnaissance vocale
Activation/désactivation
Caméra de recul
CAMÉRA DE RECUL (2/3)
CAMÉRA MULTIVUES (1/2)
Présentation
Activation / Désactivation
CAMÉRA MULTIVUES (2/2)

LIRE UNE CARTE (1/3)
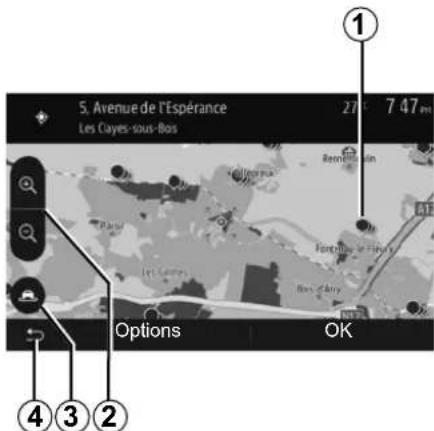
LIRE UNE CARTE (2/3)

LIRE UNE CARTE (3/3)
Nota :
natural_image
Illustration of a USB device connected to a computer monitor and keyboard, no text or symbols presentINDEX ALPHABÉTIQUE (1/3)
4x4 infos ......F.5, F.67
A
aigus ......F.27, F.28
Android Auto ^TM , CarPlay ^TM ......F.49 → F.52
destination ...... F.75 → F.80, F.78, F.85, F.88 → F.89
INDEX ALPHABÉTIQUE (2/3)
vocal F.12 → F.14, F.81 → F.86
H
heure F.95
affichage F.95
mode MANU/MANUEL F.20
mode MEMO F.21
MP3 F.24
Multi-Sense....F.68 → F.70
N
numéroter F.38
P
POI F.74, F.75 → F.80, F.87
reconnaissance vocale ......F.13, F.14, F.41 → F.43, F.51
réglages ......F.12 → F.14, F.22, F.91 → F.93, F.94 → F.95
réglages audio
station radio F.20 → F.23
Introduction to the controls. GB.8
Switch on/off. GB.15
Operate and use. GB.16
Volume GB.19
Multimedia GB.20
Listen to the radio. GB.20
Auxiliary audio sources GB.24
Audio setting. GB.27
Video GB.29
Phone GB.31
Pairing/unpairing Bluetooth® devices GB.31
Connecting/disconnecting Bluetooth® devices GB.35
Making, receiving a call GB.37
Phonebook GB.40
Using voice recognition GB.41
Wireless charger GB.44
Applications....GB.46
Smartphone Interface. GB.46
Android Auto™, CarPlay™ GB.49
Yandex.Auto GB.53
Vehicle. GB.56
Vehicle settings GB.56
Reversing camera GB.58
Multi-view camera GB.61
Eco driving GB.63
Remote engine start-up GB.64
4x4 info. GB.67
GB.1
Multi-Sense GB.68
Navigation GB.71
The navigation system GB.71
Reading a map. GB.72
Enter a destination GB.75
Guidance GB.81
Map settings. GB.87
Managing the favourites. GB.88
Navigation settings. GB.90
Settings GB.94
System settings GB.94
Updating the system. GB.96
Operating faults GB.102
PRECAUTIONS DURING USE (1/2)
It is essential to follow the precautions below when using the system, both in the interest of safety and to prevent material damage. You must always comply with the laws of the country in which you are travelling.

Precautions when operating the system
- Operate the controls (on the dash or near the steering wheel) and read the information on the screen only when road conditions allow.
- Set the volume to a reasonable level so that outside noise can be heard.
Precautions regarding navigation
- Use of the navigation system does not in any way replace the responsibility or vigilance of the driver when driving the vehicle.
- Depending on the geographical area, the map may not have the latest information on new roads. Be alert. In all cases, Road Traffic Regulations and road signs always take precedence over the directions of the navigation system.
Precautions concerning the equipment
- Do not attempt to dismantle or modify the system, as there is a risk of damage to equipment and fire.
- Contact a representative of the manufacturer in the event of malfunction and for all operations involving disassembly.
- Do not insert foreign bodies into the player.
- Do not use products containing alcohol and/or spray fluids on the area.
Precautions when using the phone
- There are laws which govern the use of phones in vehicles. They do not necessarily authorise the use of hands-free phone systems under all driving conditions: drivers must be in control of their vehicles at all times;
- Using a phone whilst driving is a significant distraction and risk factor during all stages of use (dialling, communicating, searching for a number in the handset memory, etc.).
GB.3
PRECAUTIONS DURING USE (2/2)
The description of the models given in this manual is based on the specifications at the time of writing. This manual covers all existing functions for the models described. Whether or not they are fitted depends on the equipment model, options selected and the country where they are sold. This manual may also contain information about functions to be introduced later in the model year. The screens shown in the user manual are not contractual.
Depending on the make and model of your telephone, some functions may be partially or completely incompatible with your vehicle's multimedia system.
For more details, please consult an Authorised Dealer.
GENERAL DESCRIPTION (1/3)
Introduction
If the vehicle is equipped, the multimedia system provides the following functions:
- RDS radio;
- DR radio;
- management of external audio sources;
- Hands-free phone;
- voice recognition;
– navigation assistance;
– road traffic information;
– information on areas for particular care; - Park Assist (reversing camera or multi-view camera);
- remote engine start-up programming;
- Information on the incline of the vehicle (4x4 information);
– information on your driving style and driving advice in order to optimise your fuel consumption.
Radio functions
The multimedia system can be used to listen to FM (frequency modulation), DR (digital audio) and AM (amplitude modulation) radio.
The DR system allows better sound reproduction and access to text information about the current programme etc.
The RDS system makes it possible to display the name of some stations or messages sent by FM stations to be displayed:
– general traffic information (TA);
- emergency message(s).
Auxiliary audio function
You can listen to your personal stereo directly through your vehicle's speakers. There are several ways of connecting your personal stereo, depending on the type of device you have:
- USB audio;
- Bluetooth® connection;
– smartphone replication.
For more information on the list of compatible devices, please contact an authorised dealer or visit the manufacturer's website if available.
GENERAL DESCRIPTION (2/3)
Hands-free phone function
The Bluetooth® hands-free system provides the following features without having to handle your phone:
– send/receive/suspend a call;
– consult the list of contacts from the phone memory;
- access the call logs for calls which have come through the system;
– dial emergency numbers.
Telephone compatibility
Some phones are not compatible with the hands-free system, and do not enable you to use all of the available functions or do not provide the best possible sound quality.
For more information on compatible phones, contact an authorised dealer or visit the manufacturer's website if available.
Remote engine start-up function
When fitted, this function lets you programme the engine to start remotely, in order to heat or ventilate the passenger compartment up to 24 hours before using the vehicle.
Driving Eco
The “Driving Eco” menu displays a real-time overall score that reflects your driving style.
Navigation assistance function
The navigation system automatically calculates the geographical position of the vehicle by receiving GPS signals. It suggests a route to your chosen destination using its road map. Finally, it indicates the route to take, step by step, using the display screen and voice messages.
Traffic information
This function keeps you informed about traffic conditions in real time.
Road safety alerts or alert points
This service allows you to receive alerts in real time, such as excess speed alerts or the position of road safety alert areas.

Your hands-free phone system is only intended to facilitate communication by reducing the risk factors, without removing them completely. You must always comply with the laws of the country in which you are travelling.
GB.6
GENERAL DESCRIPTION (3/3)
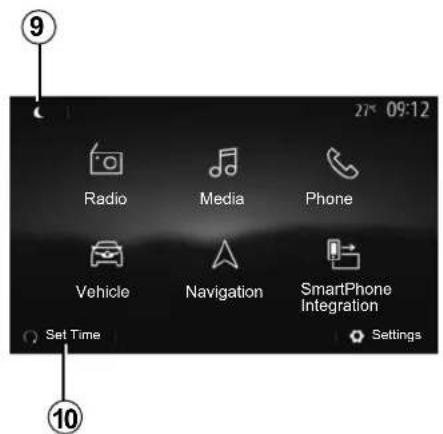
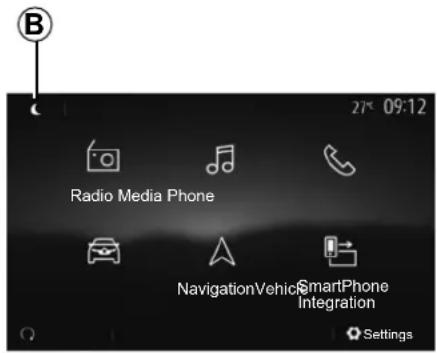
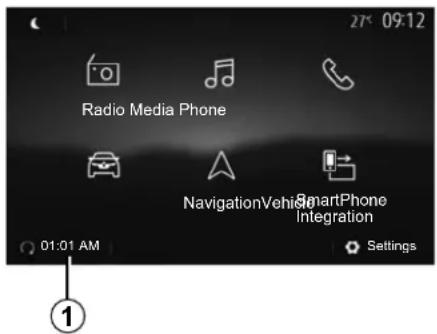
Displays
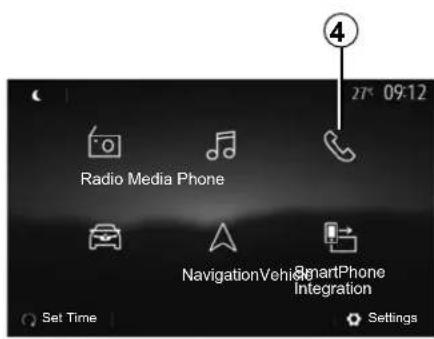
Menu screen
1 Mode selection area.
Displays the selected mode. When the mode selection area is touched, a drop-down menu will appear.
2 Table of contents area.
Shows the contents of a menu item and related information.
3 Shortcut to Android Auto™/Carplay™.
4 Telephone information area.
If the Bluetooth® system or smartphone replication is activated, your connected device's reception and battery level will be displayed.
5 Exterior temperature.
6 Time area.
7 Menu area:
- display subordinate menu of mode;
- shows current menu as highlighted.
8 Area Home or return to navigation.
Depending on the mode you are in, this area displays:
- the Home button: goes back the home menu;
– the Back button: goes back to the previous screen;
- the Flag button: return to the navigation screen.
9 Night mode.
10 Remote engine start selection area.
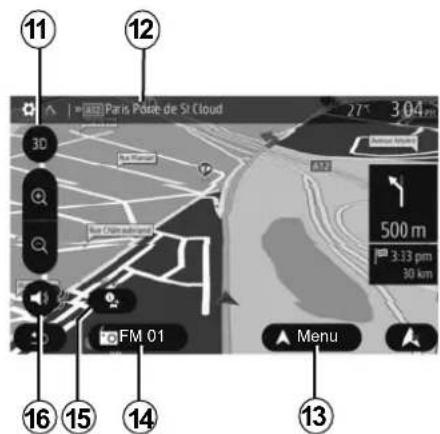
Navigation screen
Availability depends on the vehicle, country and/or regulation in place.
11 Map mode (2D/3D and 2D North).
12 Name of the next street to take on your route.
363 Options for route and map setting.
14 Current audio information.
15 Traffic information.
-16 Voice guidance ON/OFF.
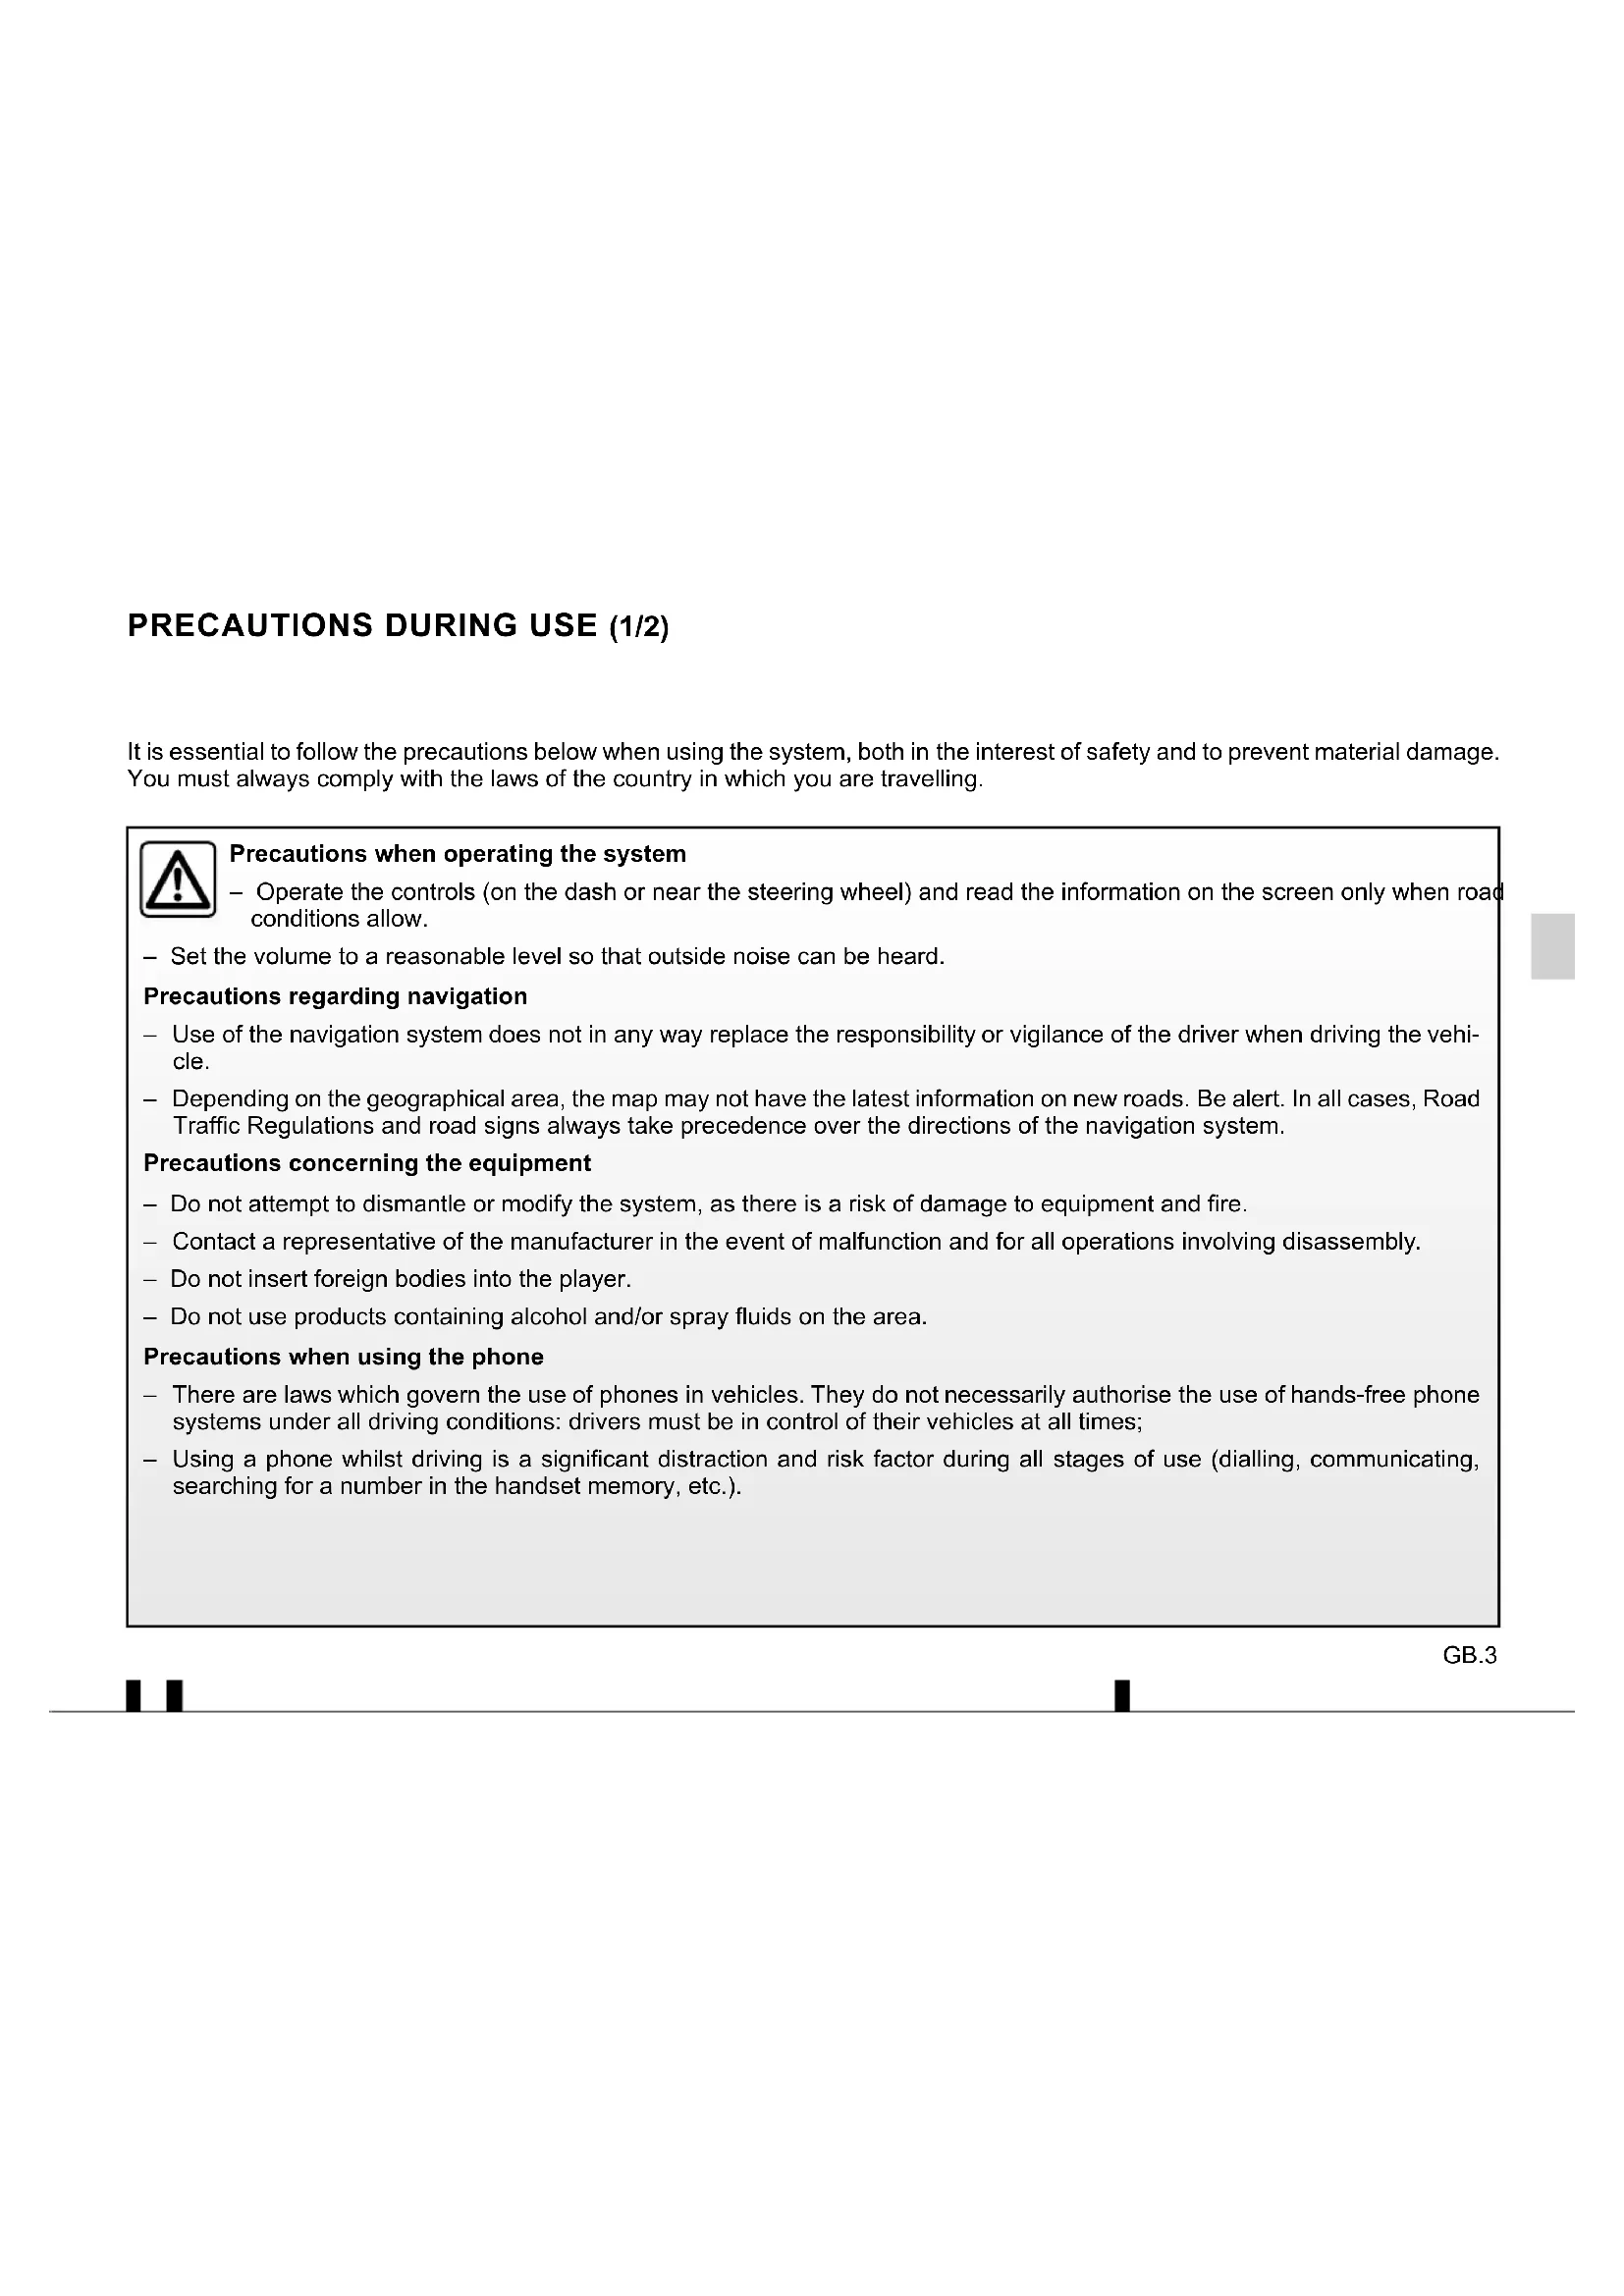
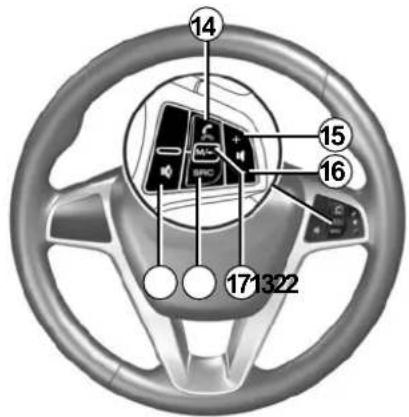
INTRODUCTION TO THE CONTROLS (1/7)
System panels
Screen selections are made by touching the desired selection on the screen.
Availability of the navigation screen depends on the vehicle, country and/or legislation in place.
GB.8
INTRODUCTION TO THE CONTROLS (2/7)
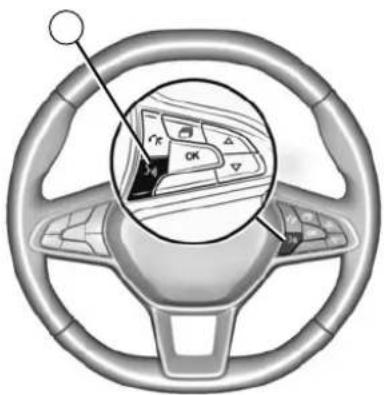
Steering column controls
Availability depends on the vehicle

GB.9
INTRODUCTION TO THE CONTROLS (3/7)

GB.10

INTRODUCTION TO THE CONTROLS (4/7)
Steering column controls


natural_image
Interior view of a car steering wheel with a highlighted dashboard showing navigation keys (no text or symbols)
GB.11
INTRODUCTION TO THE CONTROLS (5/7)
| Function | |
| 1 | Tap: standby screen ON / OFF.Press and hold (>10 seconds) if your system is no longer responding or in the event of deadlocking: this enables the multimedia system to be restarted. |
| 2, 15, 16 | Adjust the volume. |
| 3 | Access the “Home” menu. |
| Phone or auxiliary sources: exit the current window to return to the navigation screen (current) or to the previous screen. | |
| 4 | Access the menu “Vehice Settings”. |
| 5 | Delete Current Route. |
| 6 | Access the menu “Navigation”. |
| 7 | Access the media currently playing (FM/AM/DR/USB/Bluetooth®). |
| 8 | Traffic information in progress (TMC). |
| 9 | Return to previous screen/menu. |
| 10 | Mute/unmute the voice guidance. |
| 11 | Change the map zoom. |
| 12 | Change the map view mode (2D/3D/2D North). |
GB.12
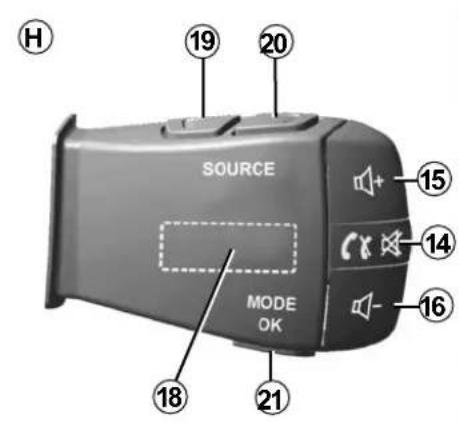
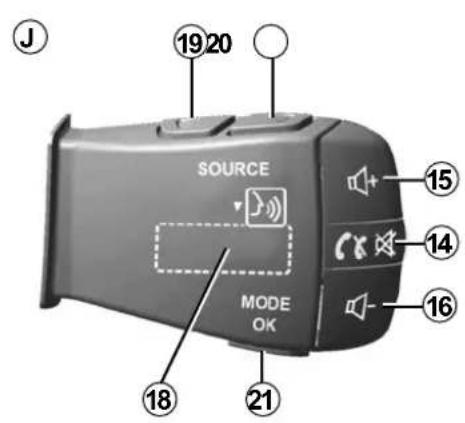
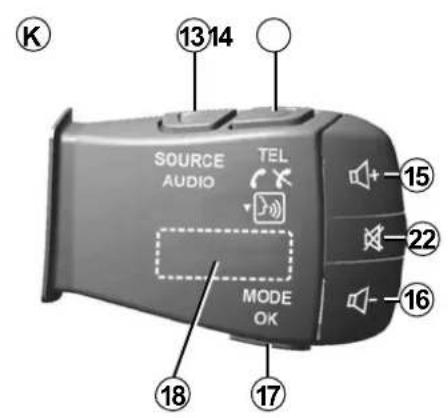
INTRODUCTION TO THE CONTROLS (6/7)
| Function | |
| 13 Select the audio source (FM/AM/DR/USB/Bluetooth®). | |
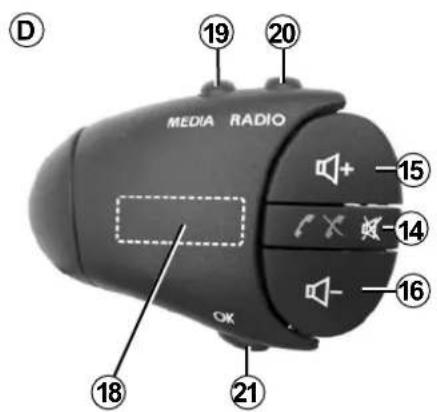
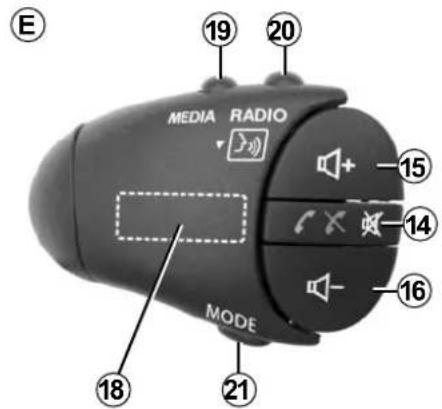
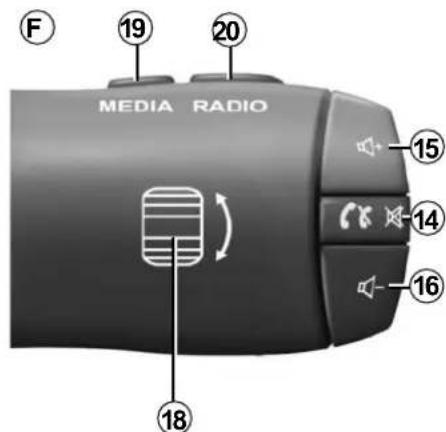
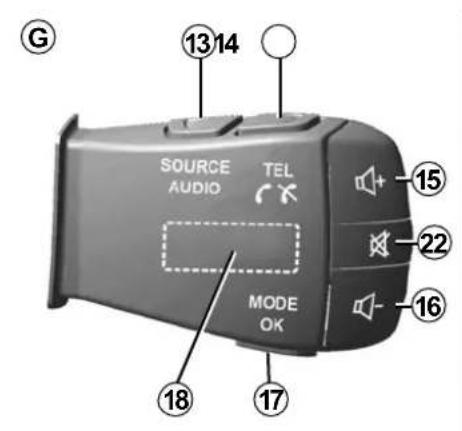
| 14 | When receiving a call:– Short press: answer the call;– Long press: reject the call.Brief press during a call: end call.When listening to an audio source: mute/unmute the sound (only for controls C, D, E, F, H and J).Brief press: access “Phone” menu (only for controls B and G).Tap: activate/deactivate your telephone voice recognition (only for controls A and K). |
| 15 Increase the volume of the audio source currently in use. | |
| 16 Decrease the volume of the audio source currently in use. | |
| 15+16 | Mute/unmute the sound (only for controls A, B and L). |
| 17, 21 | Radio: change the radio station mode (“Frequency”, “List”, “Presets”).USB/portable digital audio player media source: change the play mode for the media currently playing (“Main” or “List”). |
| 18 | Rear dial:– Radio: change radio mode (Frequency/List/Preset);– Media: previous/next track.Tap: confirm an action (only for control C). |
| 19 Go to the previous audio source (FM/AM/DR/USB/Bluetooth®). | |
GB.13
INTRODUCTION TO THE CONTROLS (7/7)
| Function | |
| 20 | Briefly press to go to the next audio source (FM/AM/DR/USB/Bluetooth®).Press and hold: activate/deactivate your smartphone voice recognition (only for control C, E and J). |
| 22 | Radio mute on/off.Pause/play an audio track.Interrupt the voice recognition voice synthesizer. |
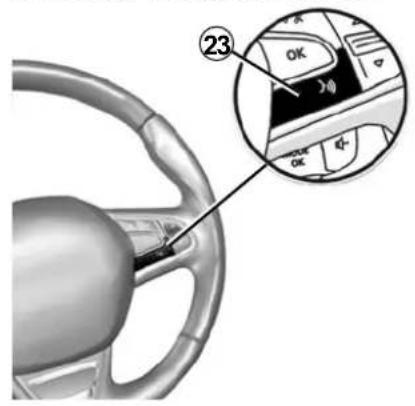
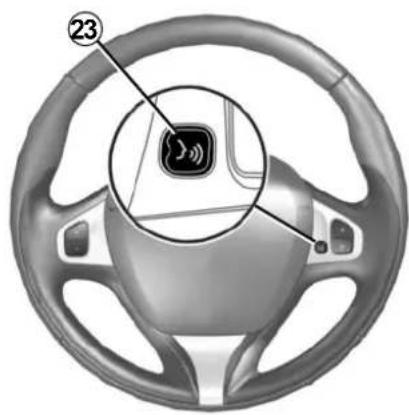
| 23 | Activate/deactivate voice recognition on your smartphone if it is connected to the multimedia system. |
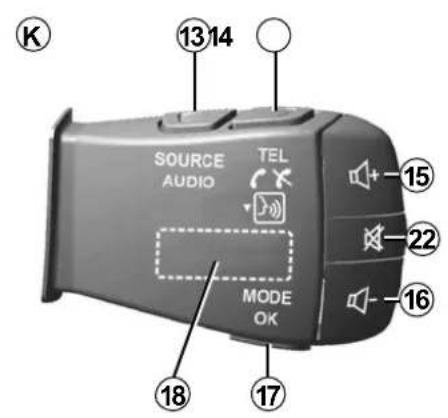
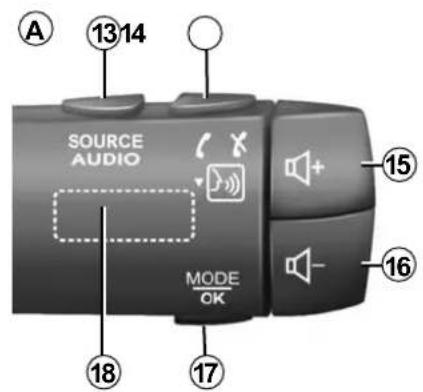
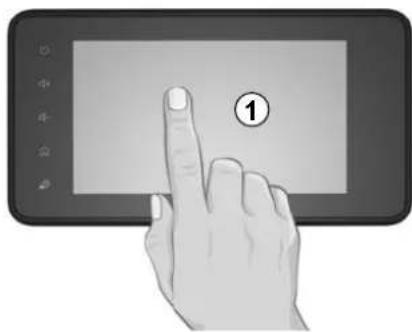
ON, OFF (1/2)

natural_image
Front view of a blank digital tablet device with control buttons and an 'A' label pointing to it (no text or symbols on screen)Switching on
The multimedia system switches on automatically when the ignition is switched on. In other cases, press button A to switch on the multimedia system.
With the ignition off, you can use the system for twenty minutes. Press the A button to make the multimedia system operate for approximately 20 minutes more.
Switching off
The multimedia system may take a few minutes to update and deactivate after the ignition is switched off, depending on the applications in operation.
Press and hold the A button (until a black screen appears) to restart the multimedia system.
For safety reasons, if the temperature is too low or too high inside the vehicle, the multimedia system will not start or will switch off automatically. Wait a few moments for the temperature to return to a more suitable level for the multimedia system to operate properly.
ON, OFF (2/2)

Standby screen
The standby clock mode allows the display screen to be switched off.
When in standby clock mode, the radio or guidance system does not operate.
Depending on the vehicle, the standby screen displays the time and exterior temperature.
Briefly press A to activate/deactivate the standby screen.
Night mode
Night mode switches off the screen backlighting.
To access the night mode, press B from the home screen.
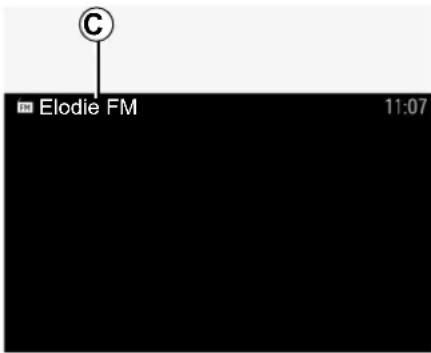
In this mode, the media source or radio station currently playing appears on the screen C.
Press the screen to exit dark mode.
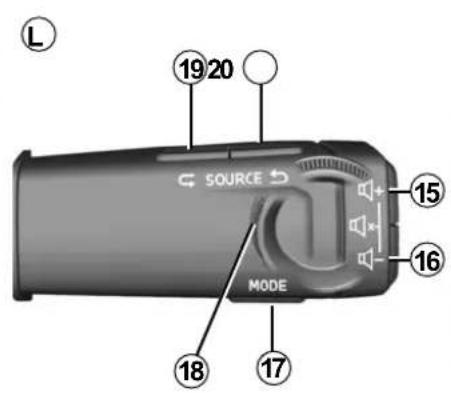
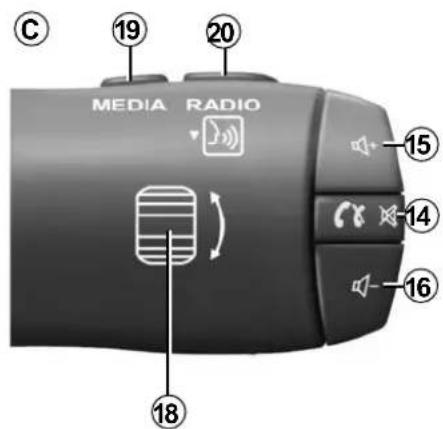
OPERATE AND USE (1/3)
natural_image
Hand pressing a button on a tablet screen (no text or symbols visible)Multimedia screen 1
Tap (short press):
- Item selection;
- Item execution (Media playing screen).
From the "Media" > "Player" menu, pressing the next button switches to the next title.
Press and Hold (long press):
– saving an item (radio station for example).
From the "Radio" > "Presets" menu, pressing and holding the preset number stores the radio station currently playing.
- Fast scroll.
When touching with long presses the list down buttons, scroll (per page) with acceleration.
- fast-forward or rewind (Media playing screen).
From the "Media" > "Player" menu, pressing and holding the "Fast forward/rewind" button fast forwards/rewinds the track playing.
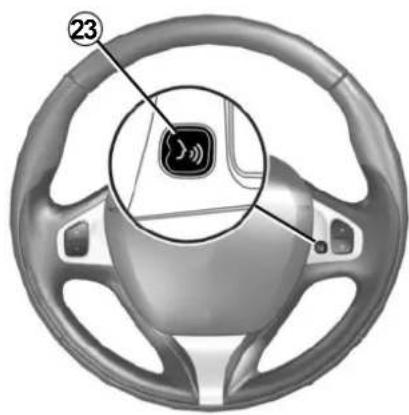
OPERATE AND USE (2/3)
Return to the "Home" menu.
The system goes directly to the "Home" menu if you press and hold 2 or briefly press 3 wherever you are in the system.
natural_image
Front view of a digital tablet device with control buttons and a numbered label pointing to the left (no text or symbols on screen)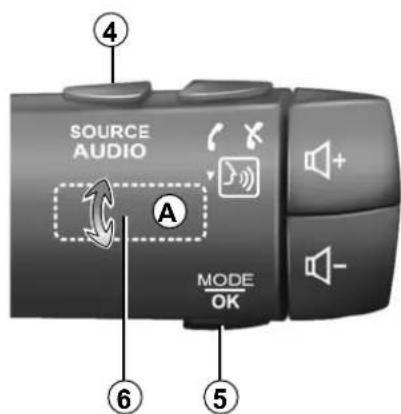
Audio: using the steering column controls
Availability depends on the vehicle
Press button 5 to change the radio station search mode.
Rotate wheel 6 to change the station (movement A).
Press 4 to change the source (USB, AM, FM, DR and Bluetooth®).
OPERATE AND USE (3/3)
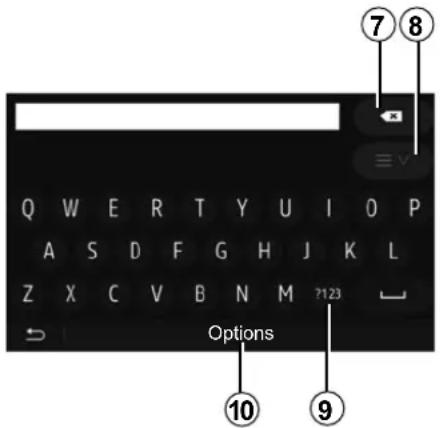
Using an alphabetical keyboard
When entering a heading using an alphabetical keyboard, choose each letter using the keypad.
When choosing each letter, the system will remove the brightness of certain letters to help entering them.
Press 7 to delete the last character entered.
Press 8 to display the list of results. If necessary, press 8 again to return to the alphabetical keypad.
Press 9 to use numbers or symbols. Press 10 to change the keyboard configuration.
VOLUME
Volume
Adjust the sound level when listening to the different sources, messages, ring-tones and phone communications:
- by turning or pressing button 1 on the front panel of the multimedia system;
- by pressing control 13 or 14 on the steering column control.
To adjust this function, please refer to the information on "Audio preferences" in the section on "Audio settings".
The radio source being listened to is interrupted when “TA” traffic information, news bulletins or a warning message is received.
Note: the volume set during playback is not stored for the next system restart.

Set the volume to a reasonable level so that outside noise can be heard.
Volume adjustment according to speed
When this function is activated, the audio and navigation volume will vary according to the vehicle speed.
To activate and adjust this function, please refer to the information on "Speed dependent volume control" of the section on "Audio settings".
Mute
To mute the sound:
- steering wheel control: briefly press button 21;
or
- multimedia panel: press button 3B; or
- steering column controls C, D, E, F, H and J: press button 12;
or
- steering column controls A, B and K: press buttons 13 and 14 simultaneously.
The "MUTE" icon is displayed at the top of the screen.
To continue listening to the current audio source:
- steering wheel control: briefly press button 21;
or
- multimedia panel: press button 3B; or
- steering column controls C, D, E, F, H and J: press button 12;
or
- steering column controls A, B and K: press buttons 13 and 14 simultaneously.
This function is deactivated automatically when the volume control is used or when a bulletin is broadcast (road traffic, news, emergency information etc.).
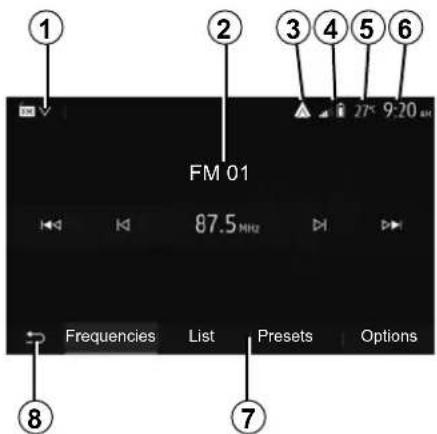
LISTENING TO THE RADIO (1/5)
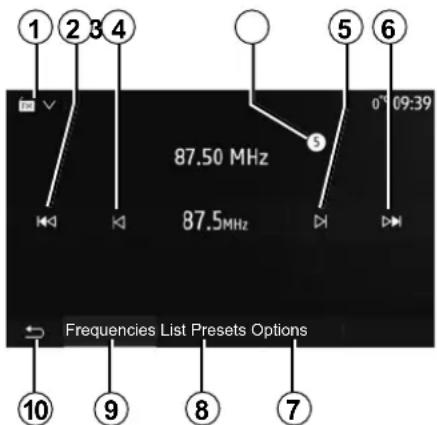
Selecting a wavelength
To choose a waveband:
- press 1;
- Select the "FM", "AM" or "DR" band (digital radio, on equipped vehicles) by pressing the band desired.
Choose a radio station "FM", "AM" or "DR".
There are different modes for choosing a radio station.
After selecting the waveband, select the mode by pressing the tabs 7, 8 or 9.
Several search methods are provided:
- "Frequency" mode (9 tab);
- "List" mode (tab 8);
- "Presets" mode (tab 7).
These modes can be changed using the steering column control.
Note: the 4 marker indicates the position in your saved list of the radio station currently playing.
"Frequency" Mode
This mode enables you to search for stations either manually or automatically by scanning the selected frequency range. Select "Frequency" mode by pressing 9.
To scan the frequency range:
- manually run through the frequencies in steps by repeatedly pressing 3 or 5;
– automatically go to the next station by pressing 2 or 6;
Repeat the operation each time the search stops if necessary.
You can also move the control knob on the steering column control to move to the next station.
Note: to go back to the welcome screen, press the 10 button.
LISTENING TO THE RADIO (2/5)
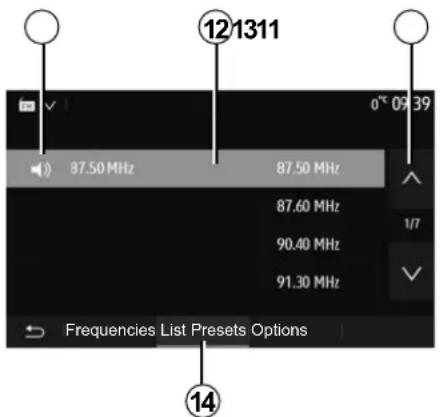
"List" mode
Select "List" mode by pressing 14.
This operating mode allows you to find a station easily by name from an alphabetical list (on "FM" and "DR" only).
Select the station required by pressing zone 12.
Press 13 to scroll through all the stations.
Note: the 11 symbol indicates the station you are currently listening to. The names of the radio stations that do not use RDS will not appear on the screen. Only their frequency is displayed and sorted at the end of the list.
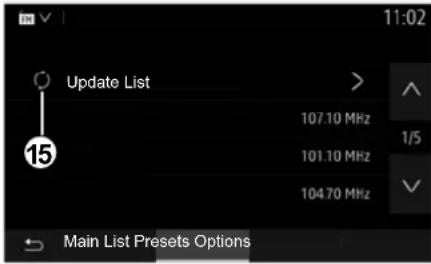
Updating the list
From "List" mode, press 15 to update the list of available radio stations.
The 15 symbol appears on the first page in the "List" mode.
Note: preferably update the "DR" list as soon as your system is switched on.
LISTENING TO THE RADIO (3/5)
"Presets" mode
Select "Presets" mode by pressing 18.
This mode allows you to recall on demand those stations which you have already stored (refer to information on
"Saving a station" in this section).
Press one of the buttons in zone A to choose the saved stations.
Note: to go back to the welcome screen, press the 10 button.
Storing a station
Select a radio station by using one of the modes described above. Press and hold one of the buttons on the zone A.
You can save up to twelve stations per waveband. If you change the region via the "RDS" function, the stored stations are not automatically updated. You must again store the station currently playing.
Note: the 16 symbol indicates the station you are currently listening to.
To move to the next page, press button 17.
LISTENING TO THE RADIO (4/5)
Radio settings
Display the settings menu by pressing 19. You can activate or deactivate functions by pressing "ON" or "OFF" (the configuration menu changes according to the band).
The available functions are as follows:
- "RDS";
- “AF”;
- "TA" (traffic information);
- "Region";
- "News";
- "AM";
- "DLS";
- "Announcement";
- "Update List".
"RDS"
The "RDS" function receives information transmitted by the radio station currently playing.
Your system may display the name of the radio station and text messages as well as receive traffic warnings or other information.
When the "RDS" function is activated, frequency retuning (AF) is automatically activated.
Traffic information is generally sent via "RDS".
Note: not all radio stations offer this possibility.
Poor reception can sometimes cause erratic and annoying changes in frequency. In this case you should deactivate the automatic frequency retuning.
"AF" (depending on the country)
The frequency of an FM station changes according to the geographical area. Some stations use the RDS system, mainly for automatic retuning of the AF frequency during car trips.
"TA" (traffic information)
When this feature is activated, your multimedia system searches for and plays traffic bulletins automatically as new reports are issued by some "FM" and "DR" radio stations.
Note: The automatic broadcasting of traffic information is deactivated when the audio system is set to the "AM" band.
Select a radio station which broadcasts traffic information. If you are listening to music from another source (USB flash drive, Bluetooth® etc.), the system automatically switches to the radio if a traffic announcement is received.
Traffic information is broadcast automatically and has priority over the source being listened to at the time.
Select "ON" to activate this function or "OFF" to deactivate it.
LISTENING TO THE RADIO (5/5)
"Region"
This setting enables the reception of specific regional programs. It temporarily deactivates automatic frequency retuning (AF) on a radio which uses regional frequencies.
The listener can keep listening to their program even if receiving a lesser signal.
Note:
- the "Region" setting only applies to the radio station currently playing;
- some radios broadcast on regional frequencies. In this case:
- with "Region" activated: the system will not switch to the transmitter for the new region, but the system will switch normally between the transmitters of the initial region;
- With "Region" disabled: the system will switch to the transmitter for the new region, even if the broadcast programme is different.
"News"
When this function is activated, it is possible to automatically listen to news as it is broadcast by certain "FM" or "DR" radio stations.
If you then select the other sources, when a broadcast of the selected programme type is made, it will interrupt the other sources.
Select "ON" to activate this function or "OFF" to deactivate it.
"AM"
You can activate or deactivate the "AM" band.
Select "ON" to activate this function or "OFF" to deactivate it.
“DLS”
Availability depends on the vehicle and country. Only in "DR".
Some radio stations broadcast text information relating to the programme being aired (the title of a track, for example).
"Update List"
To update the list of stations and obtain the most recent ones, press "Start".
Note: preferably update the "DR" list as soon as your system is switched on.
AUXILIARY AUDIO SOURCES (1/3)
Your system has two types of auxiliary inputs:
- for connecting an external audio source (MP3 player, portable music player, USB key, phone, etc).
- with Bluetooth® (Bluetooth® audio player, Bluetooth® phone).
To find the input position, please refer to the section on "Introduction to the controls".
Operating and connection principles
Connect your portable digital audio player to the USB port. Once it is connected, the system automatically detects the auxiliary source.
Note: the USB drive used must be FAT32 or NTFS formatted and have a maximum capacity of 32GB. Some formats may not be compatible with the system.

Selecting an auxiliary source
To select an input source, press 1. A list of available input sources is displayed instantly:
- USB: USB key, MP3 player, telephone, etc.;
- audio devices ;
- BT: Bluetooth® devices;
– Video: USB flash drive (MP4, 3GP, AVI, MPG and MPEG files).
Note: for your video files to be played using a USB drive, the following conditions must be met:
– video display format limited to a maximum definition of 800 x 480;
– frame rate limited to a maximum of 30 frames per second.
In navigation mode or when listening to the radio, select your auxiliary audio source by pressing "Home", then "Media".
The system starts playing the last audio track played.

Only handle the portable audio player when traffic conditions permit.
Store the portable audio player safely while driving (risk of being thrown in the event of sudden braking).
AUXILIARY AUDIO SOURCES (2/3)
Audio formats
Only MP3, WMA and FLAC formats are recognised by the multimedia system.
Fast winding
Long press 2 to fast forward or rewind. Playback resumes when the button is released.
Repeat
This function enables you to repeat one or all tracks.
Press 3 one or more times to repeat track(s).
Shuffle
This function lets you play all songs in shuffle mode. Press 4 to shuffle playback.
Auxiliary input: USB, Bluetooth® port
Connection: USB and portable digital audio player
Connect the socket of your portable digital audio player to the USB input on the unit.
Once the USB socket of the portable digital audio player is connected, the "USB" menu is displayed. The model or menu of the portable digital audio player may be displayed.
Note: it may not be possible to connect some types of portable digital audio player.
Use
Select the portable digital audio player from the drop-down list 1 on the multimedia system screen, then press the desired playlist or audio track.
Once connected, on some models you will no longer be able to directly control your portable digital audio player. Use the buttons on the front panel of your multimedia system to select audio files.
Charging with the USB port
Once your portable digital audio player's USB connector is plugged into the system's USB socket, you can charge or maintain the battery during use.
Note: some devices do not recharge or maintain battery charge level when they are connected to the USB port on the multimedia system.
The use of USB cables recommended by the phone manufacturer are advisable for correct functioning of the application.
AUXILIARY AUDIO SOURCES (3/3)
Connection: Bluetooth®
Refer to the section on "Connecting/disconnecting Bluetooth® devices". Once the Bluetooth® is connected, the "BT" menu is displayed.
Use
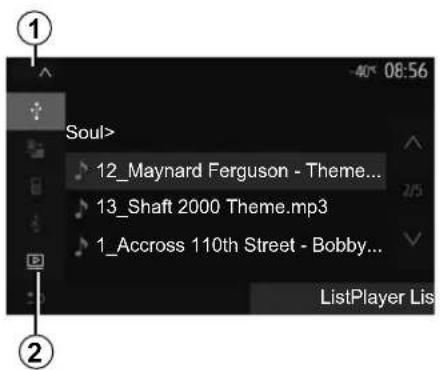
Select "BT" from the drop-down list 1, then press on the playback list or the desired audio track on the multimedia system screen.
All the audio tracks on your Bluetooth® device can be selected directly from the multimedia system screen.
Note: Once connected, you can no longer directly control your portable digital audio player. You must use the keys on the system's front panel.
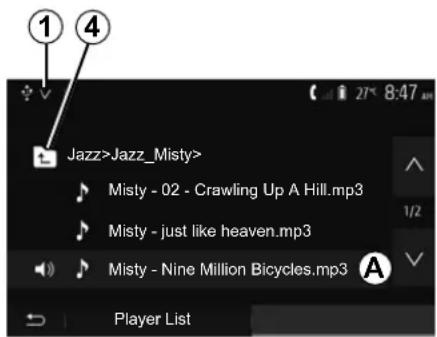
Selecting a track
To select an audio track within a folder, press "List", then select a track A from this list.
To go back to the previous level in the folder hierarchy, press 4. By default, albums are listed in alphabetical order.
Depending on the type of digital portable audio player, you can refine your selection by using folders or files.
Note: it is best to use a USB connection for easier music searches.
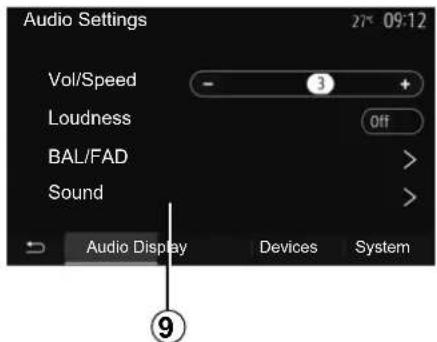
AUDIO SETTINGS (1/2)
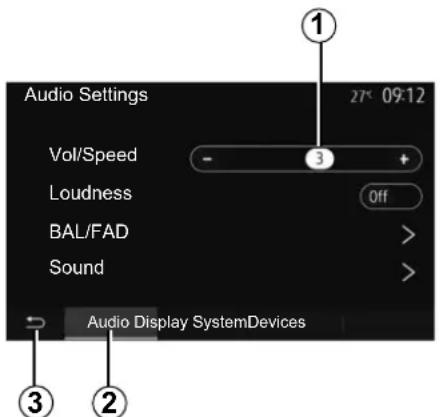
From the main menu, press "Settings" to display the settings menu. Press 2 to access the audio settings.
You can leave the settings menu and return to the welcome page by pressing 3.
Volume adjustment according to speed ("Vol/Speed")
When your vehicle speed exceeds approximately 25 mph (40 km/h), the volume level increases in relation to the original volume level.
Adjust the volume/speed ratio by pressing "+" or "-" in area 1.
You can deactivate this function by pressing “-” until “Off” appears.
"Loudness"
Press “On” or “Off” to activate/deactivate the loudness function, which increases the bass and treble.
AUDIO SETTINGS (2/2)
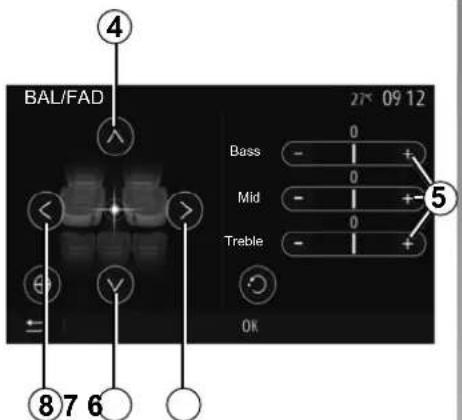
Right/left and front/rear balance
Tap 6 or 8 to adjust the sound the left/right balance.
Tap 4 or 7 to adjust the sound the front/rear balance.
After setting balance, press "OK" to confirm.
Bass, Mid, Treble
Press areas 5 "+" or "-" to adjust the bass, medium and treble.
Once the adjustments have been made, press "OK" to confirm.
Audio preferences
Display the audio preferences menu by pressing 9.
You can adjust the volume of each sound independently.
- "Audio";
- "TA";
- "Nav";
- "Phone";
- "Ring" (of the telephone);
- "VR".
To do this, press "+" or "-"
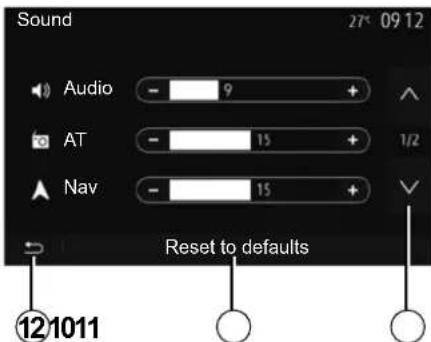
Press 10 to move to the next page.
Press 11 to reset all the audio preferences.
Tap 12 to go back to previous screen.
VIDEO (1/2)
Video
Depending on the country and/or regulation in place, the system may be able to play video files stored on your USB flash drive.
Insert your USB flash drive into the multimedia system. From the "Media" menu, press 1 then select "Video" 2 mode.
Note:
- some video formats may not be compatible with the system;
- the USB flash drive must be FAT32 or NTFS formatted and have a minimum capacity of 8GB and a maximum capacity of 32GB;
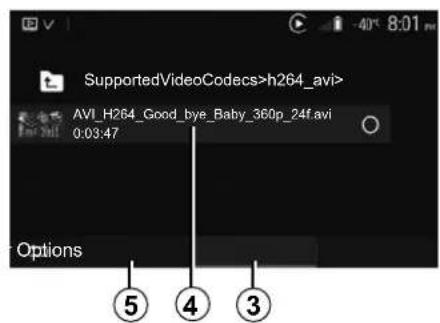
- the input sources described above may vary.
"List" mode
Press the "List" tab 3 to view the videos available. Select the video you would like to view by pressing the area 4. The selected video is played automatically.
"Player" mode
Press the "Player" tab 5 to view the selected video.
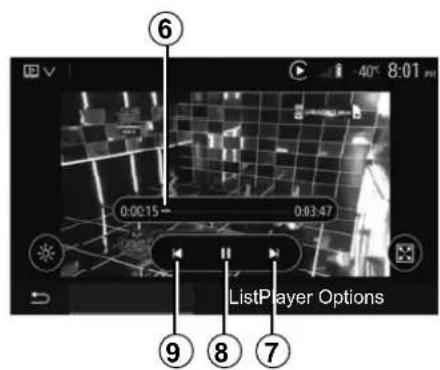
When playing a video, you can:
- press 9 to restart the video from the beginning, press 9 again to access the previous video;
- pause by pressing 8;
- access the next video by pressing 7;
- use the scroll bar 6 to move up and down rapidly;
Video playback is only possible when the vehicle is stationary.
VIDEO (2/2)
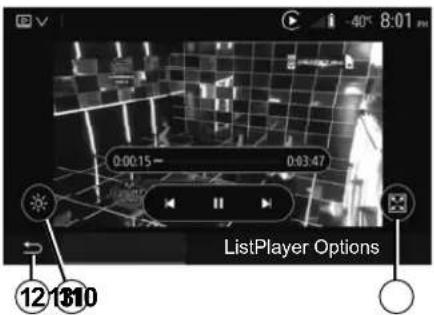
- view the video in full screen by pressing 10;
- adjust the brightness of the screen by pressing 11. A control bar will appear for you to perform the adjustment. Touch the screen outside this bar to make it disappear and continue the video playback;
- return to the previous menu by pressing 12.
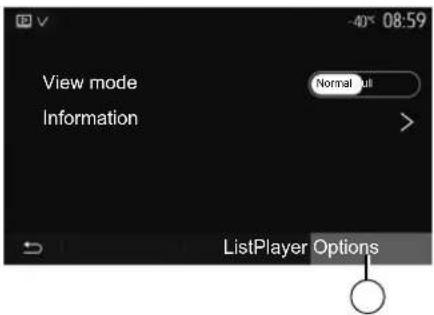
"Options" mode
Press the "Options" tab 13 to:
- access the playback settings;
- view detailed video information (title, type, date, etc.).
PAIRING, UNPAIRING BLUETOOTH® DEVICES (1/4)
Pairing another phone Bluetooth®
To use your hands-free phone system, you must pair your Bluetooth® mobile to your vehicle before using it for the first time.
Pairing will enable the system to recognise and store a Bluetooth® phone. You can pair up to five smartphones, but only one can be connected to the hands-free system at a time.
Pairing is carried out directly via the multimedia system or via your phone.
Ensure that the system and your smartphone are switched on and make sure that the Bluetooth® on your smartphone is activated, visible and identifiable to other devices (please refer to the instructions for your phone for further information).
Depending on the brand and model of your phone, the hands-free functions may be partially or fully incompatible with your vehicle system.
Pairing a Bluetooth® telephone from the multimedia system
- Activate your phone's Bluetooth® connection;
- press "Settings" > "Devices" > "Device Manager" > "Add" 1 > "OK" > "Search device";
- make sure your phone is activated and visible on the Bluetooth® link;
– select your phone from the list of devices found by the system; - A message is displayed on your phone screen.
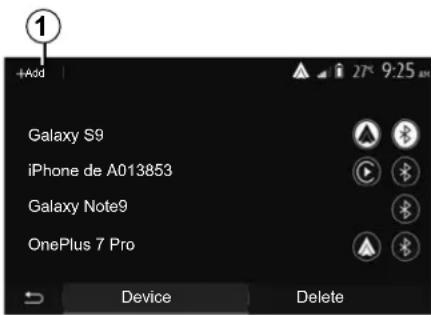
For a list of compatible telephones, consult the https://easyconnect.renault.com site.

For safety reasons, carry out these operations when the vehicle is stationary.
PAIRING, UNPAIRING BLUETOOTH® DEVICES (2/4)
Depending on the phone, press "Twin", "Pair" or "Connect" to authorise the pairing.
- Depending on the phone, enter the code displayed on the multimedia system screen on your telephone keypad;
- A second message appears on your phone screen offering to automatically pair to the multimedia system for future uses. Accept this authorisation to avoid the need to redo all these steps.
Transferring the phonebook
Depending on the type of phone, the system may prompt you to confirm the transfer of the phonebook and call log to the multimedia system during pairing.
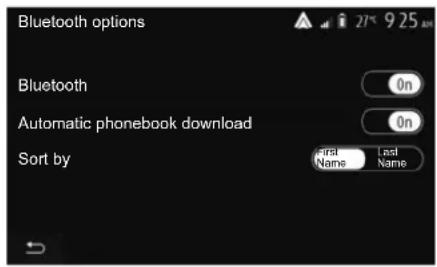
Accept sharing to find this information on your multimedia system. You can also authorise automatic sharing of the phonebook and call logs using "Bluetooth options" to enable the system to transfer them automatically during your next pairings.
Note: your multimedia system memory is restricted and it is possible that all your contacts may not be imported.
Your smartphone is now paired to your multimedia system.
Note: the pairing time varies based on the brand and model of your phone.
If pairing fails, redo the operation. If your phone is not visible by the system while searching for Bluetooth® devices then please consult your telephone manual.
PAIRING, UNPAIRING BLUETOOTH® DEVICES (3/4)
Pairing a Bluetooth® telephone to the multimedia system from the phone
- Activate the Bluetooth® connection of your phone and the system;
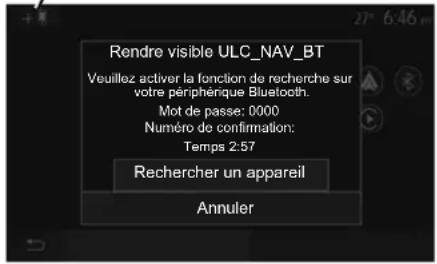
- from the main menu of your multi-media system, press "Settings" > "Devices" > "Device Manager" > "Add" 1 > "OK". You thereby make the system visible to other Bluetooth® phones;
- a message appears on the screen displaying a password and the time left during which the system remains visible;
- from your telephone, display a list of available Bluetooth® devices;
- select the multimedia system from the available devices in the time given and use your telephone keypad to enter the password displayed on the system screen (depending on the telephone).
A message appears on your telephone screen to notify you that it is now paired with the multimedia system.
Note: the pairing time varies based on the brand and model of your phone.
If pairing fails, redo the operation.

Your hands-free system is only intended to facilitate communication by reducing the risk factors, without removing them completely. Always comply with the laws of the country in which you are travelling.
When switching on the multimedia system, the last paired device will be automatically connected to the system.
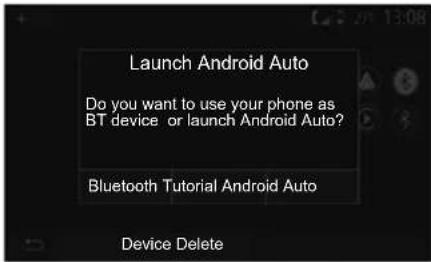
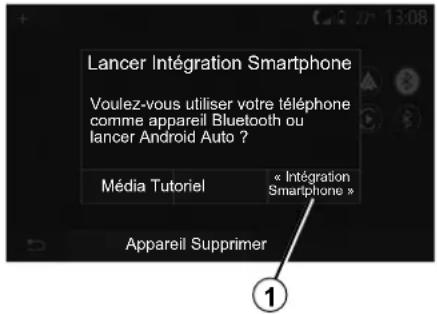
Pairing via Wi-Fi (Android Auto™/CarPlay™)
To access pairing via Wi-Fi, during the first Bluetooth® connection with your telephone you will be given the option to use your telephone as a Bluetooth® device or to connect via Wi-Fi (Android Auto™, CarPlay™) in order to use replicas of the apps on your smartphone. Tutorials are available to guide you when pairing via Wi-Fi. For more information, please refer to the sections entitled "Smartphone Interface" and "Android Auto™, CarPlay™".
PAIRING, UNPAIRING BLUETOOTH® DEVICES (4/4)
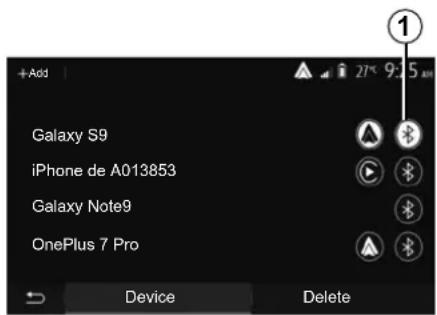
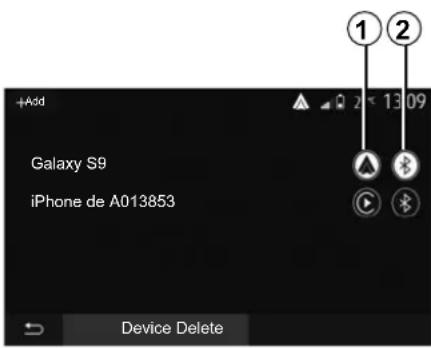
Unpair a Bluetooth® telephone from the multimedia system
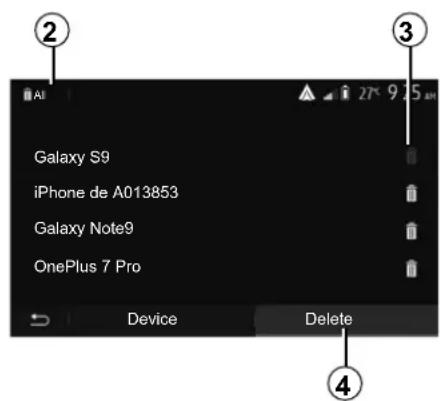
Unpairing erases a phone from the hands-free system memory. From the main menu, press "Settings" > "Devices", then "Device Manager". Press the "Delete" tab 4 then the "Recycle bin" icon 3 opposite the name of the smartphone you wish to delete from the list. Confirm your choice by pressing "OK".
Unpair all Bluetooth® telephones from the multimedia system
You can also delete all phones previously paired from the hands-free system memory. From the main menu, select "Settings" > "Devices" > "Device Manager" then the "Delete" tab and "All" 2. Confirm the deletion of all paired telephones by pressing "OK".
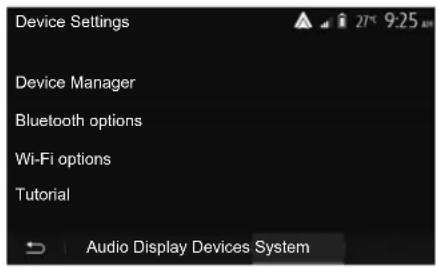
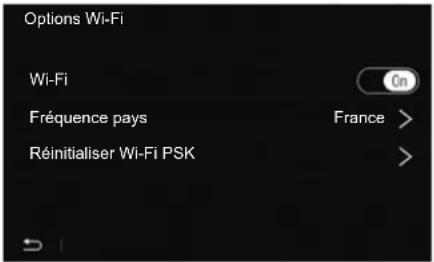
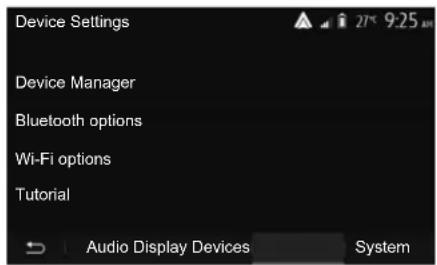
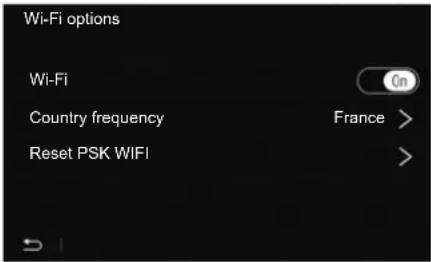
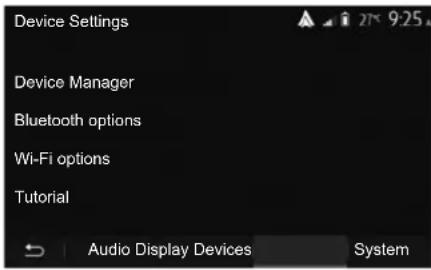
"Wi-Fi options"
To activate or deactivate Wi-Fi, select the country frequency or reset your Wi-Fi password.
"Tutorial"
Access smartphone integration tutorials for Android Auto or CarPlay as well as voice guidance for the voice recognition feature.
CONNECTING, DISCONNECTING BLUETOOTH® DEVICES (1/2)
Connecting a Bluetooth® paired phone
No phone can be connected to the hands-free phone system if it has not first been paired. Please refer to the section entitled "Pairing/unpairing Bluetooth® devices".
Your phone must be connected to the hands-free phone system in order to use all its functions.
Automatic connection
Once the system is switched on, the hands-free phone system will search for any paired phones present in the vicinity (the search may take a minute). It automatically connects to the last connected phone if:
- the Bluetooth® connection of the telephone has been activated;
– at the time of pairing, you previously authorised automatic connection for your telephone to the system.
Note:
- If a call is in progress at the time the connection is made, the sound is automatically transferred to the vehicle speakers;
- it is recommended to accept and authorise all messages which appear on your telephone while pairing with the system so that the automatic device recognition function operates smoothly.
Manual connection
From the main menu, carry out the following operations:
- press "Phone";
- press "View Bluetooth device list";
- select the name of the telephone to which you wish to connect.
Your telephone is connected to the multimedia system.
Connection failure
If connection fails, check that:
- your device is switched on;
- the device is configured to accept the system's automatic connection request;
- your device battery is not flat;
- your device has been paired to the hands-free system;
- the Bluetooth® for your device and the system are activated.
Note: Using your hands-free system for prolonged periods of time will discharge your device's battery more quickly.
CONNECTING, DISCONNECTING BLUETOOTH® DEVICES (2/2)
Changing a connected telephone
You can connect or disconnect a Bluetooth® device at any time.
From the main menu, press "Smartphone Integration", then select the device to connect and confirm by pressing "OK".
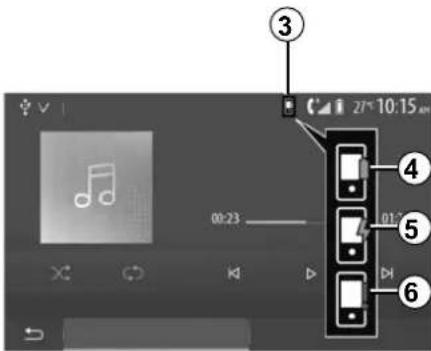
The Bluetooth® 1 icon appears in white opposite the name of your telephone to indicate that the connection has been established.
Disconnecting a connected telephone
To disconnect a telephone from your multimedia system, select the Bluetooth® icon 1, then "OK".
If a call is in progress when the phone is disconnected, the call will automatically switch to your phone.
MAKING, RECEIVING A CALL (1/3)
Making a call from the phonebook
With the telephone connected, from the "Phone device" menu, select "Phone Book" from drop-down menu "1".
Select the contact (or the suitable number of the contact has more than one). The call is made automatically by pressing the contact's number.
Note: you can make a call from the multimedia system using the voice recognition from your smartphone. Refer to the Section entitled "Using voice recognition".
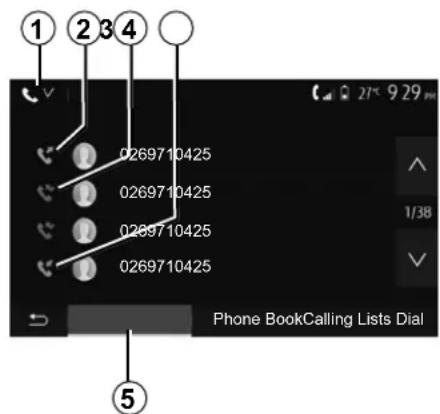
Dialling a number from the call history
You can use the call list stored on the phone memory to make a call.
After connecting your unit and Bluetooth® phone via Bluetooth® wireless technology, the numbers in your phone's "All Calls", "Outgoing Calls", "Incoming Calls", and "Missed Calls" lists are transferred automatically into the call list on your multimedia system.
From the "Calling Lists" tab 5 press 1 to filter the call log by call type and a dropdown list will appear:
- press the 2 icon to access the list of outgoing calls;
- press the 3 icon to access the list of missed calls;
- press the 4 icon to access the list of incoming calls;
- press the 1 icon to return to the list of all calls.
For each list, the contacts are listed from the most recent to the oldest. Select a contact to make the call.
MAKING, RECEIVING A CALL (2/3)
Entering a number
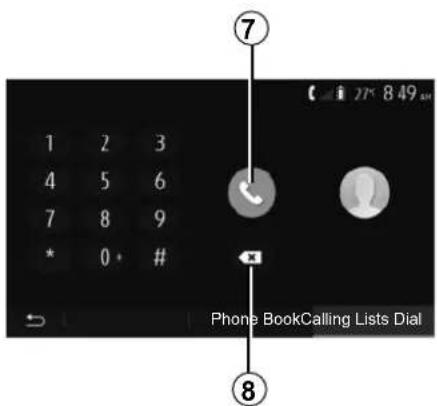
From the main menu, press "Phone", then "Dial".
Press the numbered buttons to dial the number, then press 7 to place the call.
To delete a number, press 8. Press and hold 8 to delete all the numbers at once.

It is recommended that you stop your vehicle before entering a number or searching for a contact.

Receiving a call
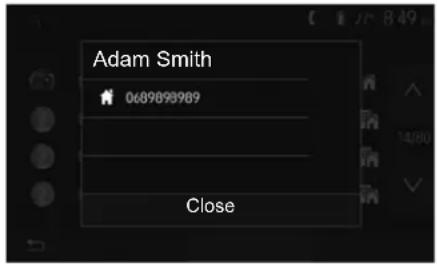
When receiving a call, a message is displayed on the multimedia system screen with the following information on the caller:
- the name of the contact (if the number is present in the phonebook list);
- caller's number;
- "Unknown Number" (if the number cannot be viewed).
Note: when the incoming call message appears on the screen during navigation, accept or reject the call to return to the navigation screen.
Note: you can answer or reject an incoming call by pressing the button on your vehicle's steering column.
MAKING, RECEIVING A CALL (3/3)
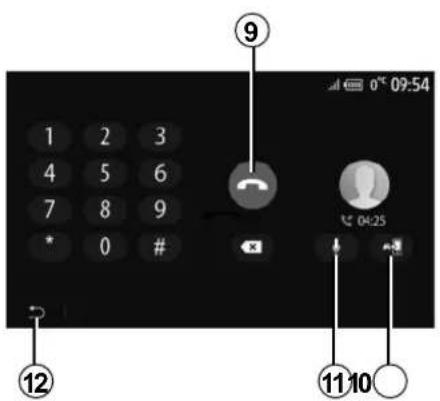
During a call
During a call you can:
- hang up by pressing 9;
-
toggle between the telephone loud speakers or the vehicle loud speakers by pressing 10;
-
deactivate or activate the microphone by pressing 11;
- press 12 to return to the previous screen (the navigation screen, for example) or the welcome screen.
PHONE BOOK
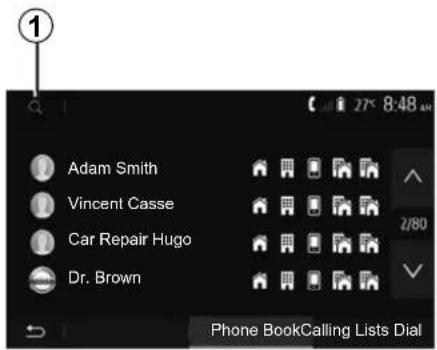
From the main menu, press "Phone" then "Phone Book" to access the system's phonebook.
Using your Phone Book
You can use the Phone Book entries stored on the memory of phone.
After connecting your system and your Bluetooth® phone using Bluetooth® wireless technology, your phonebook numbers are automatically transferred into the system if the contacts are stored in the telephone memory of your device.
Note: On some phones, the system may ask you to confirm the transfer of the phonebook to the system during pairing.
Calling a number in the Phone Book
After finding the contact in the phonebook you want to call, select the number to place the call.
Searching for a contact in the phonebook
Press 1 then enter the surname or first name of the contact you are seeking, using the digital keypad.
Depending on the make and model of your phone, transferring your contacts to the multimedia system may not work.

It is recommended that you stop your vehicle before entering a number or searching for a contact.
USING VOICE RECOGNITION (1/3)
Introduction
Your vehicle's multimedia system uses your telephone's voice recognition system to:
– control some of the vehicle multimedia system functions and some of your telephone functions by voice;
- enable you to use your multimedia system or your phone while keeping your hands on the steering wheel.
Note:
- the position of the voice recognition button may vary (steering wheel control, steering column control or multimedia system screen);
- when using voice recognition, the language set on your telephone will be the language used by your system;
- if your smartphone is not equipped with voice recognition, a message will be displayed on the multimedia system.
Activating the phone's voice recognition with the multimedia system
To activate your phone's voice recognition system you should:
- get a 3G, 4G or Wifi connection with your smartphone;
- activate the Bluetooth® on your smartphone and make it visible to other devices (please refer to your telephone manual for instructions);
- pair and connect your smartphone to the multimedia system (please refer to the section on "Pairing, unpairing Bluetooth® devices").
Note: marks 1 and 2 in the "Settings" menu > "Devices" then "Device Manager" indicates that your smartphone is paired and connected to your multimedia system. This is necessary in order to use voice recognition.
Press and hold the voice recognition button ➡ in order to activate.
When using your phone's voice recognition with the multimedia system, the transfer of cellular data required for its operation may generate additional costs not included in your phone service contract.
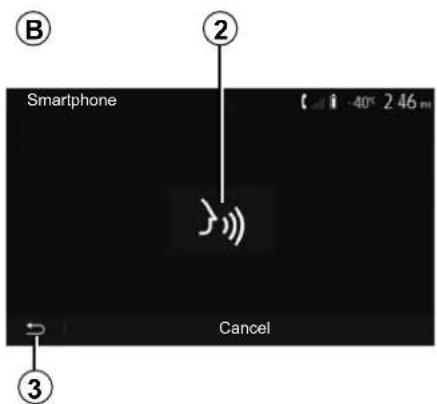
USING VOICE RECOGNITION (2/3)
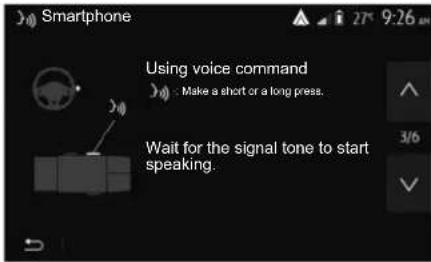
A
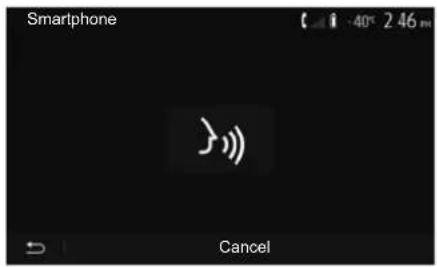
A beep sounds and the display on screen A indicates that voice recognition is activated.
Speak loudly and clearly.
Note: your smartphone's voice recognition system only enables you to use certain functions of your telephone. It does not enable you to interact with the other functions of your multimedia system such as the radio, the Driving Eco etc.
B
Use
Once activated, to restart the voice recognition system, tap on the steering wheel control, on the steering column control or on your multimedia system, or on the 2 button on your multimedia system screen.
You can go back to the main menu at any time by pressing 3.
To return to screen B press 4 in the main menu of your multimedia system.
Note: when using voice recognition, the "Media" and "Radio" functions will not be available or accessible from the main menu of your multimedia system.
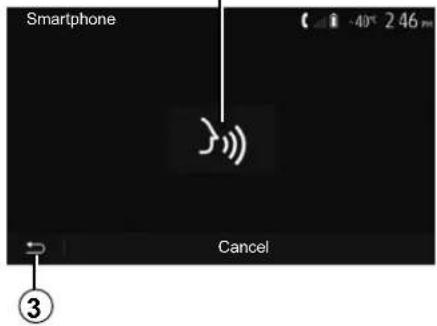
USING VOICE RECOGNITION (3/3)
Deactivation
Press button 2 on the B screen or press and hold the voice recognition button in your vehicle. An audible signal indicates that voice recognition is deactivated.
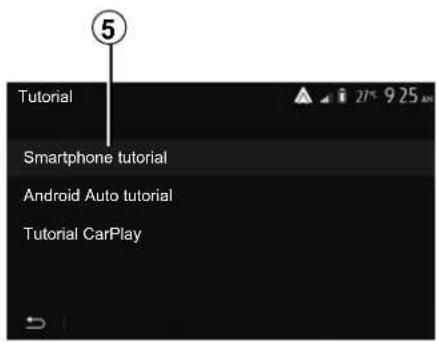
Help
You can get additional help on the operation and usage conditions of the voice recognition system.
To do so, from the main menu press "Settings" > "Devices" > "Tutorial" > "Smartphone tutorial" 5.
This function is presented in the form of screens explaining how to use voice recognition, alongside the:
- conditions of use;
- compatible telephones;
- the activation and deactivation of the function using the voice recognition button >> in your vehicle;
– method for interacting with the screen; - available functions;
– extent of the functions.
WIRELESS CHARGER (1/2)
Induction charging area
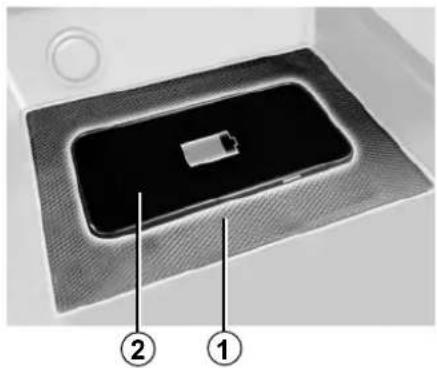
Depending on the vehicle, you can use the induction charging zone 1 to charge a smartphone without using a cable.
The dedicated location of this charging zone is identified by its associated symbol and may vary depending on your vehicle.
Note:
- for more information on compatible telephones, contact an authorised dealer or visit https://easyconnect.renault.com.
- it is preferable to remove the protective bodyshell or case from your telephone before charging to obtain optimal charging.
natural_image
Close-up of a device with a rectangular component and two numbered annotations (1 and 2) pointing to it, no readable text or symbols present.Charging procedure
Position your telephone in the 2 induction area 1.
Phone charging 2 is interrupted in the following cases:
- an object is detected in the induction area 1;
- the induction area 1 is overheating. Once the temperature has dropped, your telephone's charging procedure 2 will soon restart.
Charging progress
Depending on the vehicle and the wireless charging system, the multimedia system may inform you of your smartphone's 2 charging level 3:
- charging complete 4;
- charging in progress 5;
- object detected in the charging area/object overheating/charging procedure interrupted 6.
Note: the multimedia system will signal if your telephone 2 charging procedure is interrupted.
WIRELESS CHARGER (2/2)
Depending on the vehicle, the inductive charger may use BSD-3-Clause open source software under licence, which contains restrictions and limitations. Please inform yourself by consulting Open Source Initiative.
It is essential not to leave any objects (USB drive, SD card, credit card, jewellery, keys, coins etc.) in the induction charging area 1 whilst charging your phone. Remove all magnetic cards or credit cards from the case before positioning your telephone in the induction charging area 1.
Objects left in the induction charging area 1 may overheat. It is advisable to place them in the other storage areas provided. (storage compartment, sun visor storage compartment, etc.)
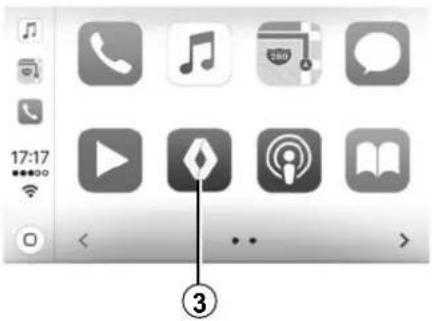
SMARTPHONE INTERFACE (1/3)
Methods
There are two ways to access the smartphone interface:
- connect the smartphone using a USB connection;
- wireless smartphone connection (availability depends on the vehicle and/or finish level).
A settings menu is available for the wireless connection.
"Wi-Fi options"
To access the "Wi-Fi options" menu, from the main menu press "Settings" then the "Devices" tab.
"Wi-Fi"
Select "On" or "Off" to activate or deactivate your vehicle's Wi-Fi connection.
"Country frequency"
From this menu you can select the country in which you are using your vehicle's Wi-Fi connection in order to adapt the connection frequency to the regulation in place in that country.
"Reset PSK WIFI"
Use this option to reinitialise all previous connections to your vehicle, in order to connect a new device or to fix a connectivity problem.
SMARTPHONE INTERFACE (2/3)
A
Connect the smartphone using a USB connection
First use
After connecting your smartphone to your vehicle's USB port, the A screen should appear:
- “Media”: enables you to use your smartphone for the following portable digital audio player functions:
- MTP (Media Transfer Protocole);
-
portable digital audio player.
-
"Tutorial": access tutorials on how to use smartphone interface applications;
-
"Smartphone integration": enables you to access the smartphone interface via the adapted application:
-
Android Auto™;
- CarPlay™.
Select the "Android Auto™, CarPlay™" option 1 to access the smartphone interface.
The smartphone interface application screen should appear on your multimedia system.
SMARTPHONE INTERFACE (3/3)
Connect the smartphone using a wireless connection
Availability depends on the vehicle and/or finish level.
First use
For this type of connection, you will need to carry out operations to pair your Bluetooth® telephone to the multimedia system:
- activate the Bluetooth® connection and the Wi-Fi connection on your telephone and on your multimedia system;
- from the main menu of your multi-media system, press "Settings" > "Devices" > "Device Manager" > "Add" 2 > "OK". You thereby make the system visible to other Bluetooth® phones;
- the B screen appears displaying a password and the time left during which the system remains visible;
– from your telephone, display a list of available Bluetooth® devices; - select the multimedia system from the available devices in the time given and use your telephone keypad to enter the password displayed on the system screen (depending on the telephone).
A message appears on your telephone screen to notify you that it is now paired with the multimedia system.

Once your smartphone is paired, the C screen should appear.
Select "Android Auto™, CarPlay™" 3 to access the smartphone interface.
The smartphone interface application screen should appear on your multimedia system.
ANDROID AUTO™, CARPLAY™ (1/4)
Android Auto™
Introduction
"Android Auto™" is an application that can be downloaded (from the application download platform on your smartphone) enabling you to use some applications and functions on your phone from your multimedia system screen.
Note:
- to determine if your smartphone is compatible with the "Android Auto™" application, please consult the official website of your telephone's operating system;
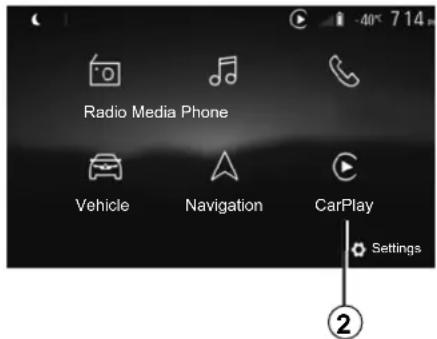
- the "Android Auto™" application functions when your smartphone is connected to your vehicle's USB port or via Wi-Fi (availability depends on whether your vehicle and smartphone are equipped). The voice recognition service must be activated. The "Android Auto™" application should be available from the 1 button in the main menu.
First use
Connect your phone to your multimedia system's USB port:
- accept the requests on your smartphone in order to use the "Android AutoTM" application;
- Confirm by pressing "Accept" on your phone.
The "Android AutoTM" application is launched on the multimedia system.
If the procedure described above fails, repeat the operation.
You can manage the devices connected to your multimedia system from "Settings" > "Devices" > "Device Manager".
Note: the first connection with "Android AutoTM" is made when the vehicle is stopped for the sole purpose of activating the multimedia system voice recognition.
The use of USB cables recommended by the phone manufacturer are advisable for correct functioning of the application.
ANDROID AUTO™, CARPLAY™ (2/4)
CarPlay™
Introduction
"CarPlay™" is a native service available on your smartphone which enables you to use some applications on your phone from your multimedia system screen.
Note:
- if your smartphone is not equipped with the "CarPlay™" service, please consult the official website of your telephone's operating system;
- the "CarPlay™" service functions when your smartphone is connected to your vehicle's USB port or via Wi-Fi (availability depends on whether your vehicle and smartphone are equipped). The SIRI service must be activated. The "CarPlay™" service should be visible from button 2 in the main menu.
The use of USB cables recommended by the phone manufacturer are advisable for correct functioning of the application.
First use
Connect your phone to your multimedia system's USB port.
The CarPlay ^™ service is launched on the multimedia system.
If the procedure described above fails, repeat the operation.
You can access a tutorial on connecting your smartphone to your multimedia system via "Settings" > "Devices" > "Tutorial".
ANDROID AUTO™, CARPLAY™ (3/4)
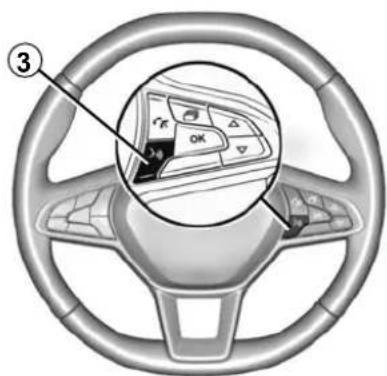
Once the "Android Auto™" application or the "CarPlay™" service is activated, you can use the voice recognition button in your vehicle to activate some of your smartphone functions by voice. To do this, press button 3 on the steering wheel of your vehicle (for more information, refer to the section on "Using voice recognition").
Note:
- you may use "Android Auto™" or "CarPlay™" to access your smartphone's navigation and music applications. These applications will replace similar applications integrated into your multimedia system which are already running. For example, only one navigation application, "Android Auto™"/"CarPlay™", or the application integrated into your multimedia system can be used; - when you are using "Android Auto™" or "CarPlay™", some multimedia system functions will continue to run in the background. For example if you start "Android Auto™" or "CarPlay™" and use the navigation on your smartphone while the radio on the multimedia system is currently playing, the radio will continue to be broadcast.
When you use the "Android Auto™" application or the "CarPlay™" service, the transfer of cellular data required for it to operate may lead to additional costs not included in your phone plan.
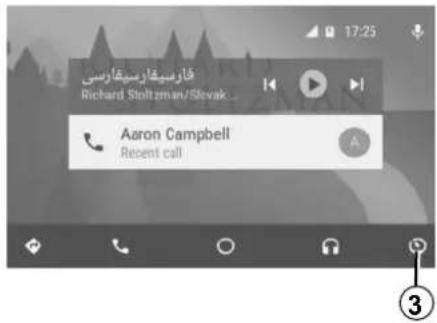
ANDROID AUTO™, CARPLAY™ (4/4)
Return to the interface of your multimedia system
To return to the interface:
- press the "Home" button on the front panel of your multimedia system or on the central control;
or - press button 3 on the multimedia system screen according to "Android Auto™" or "CarPlay™".
The functions of the "Android Auto™" application and the "Carplay™" service depend on the make and model of your telephone. For further information, please refer to the manufacturer's website if there is one.
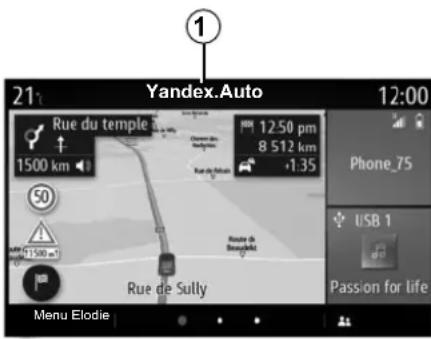
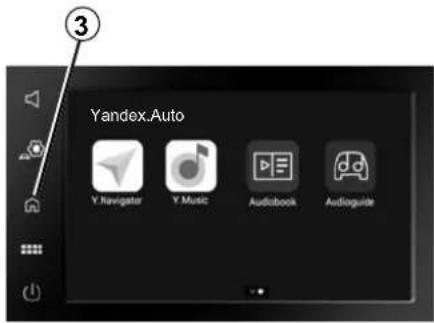
YANDEX.AUTO™ (1/3)
Introduction Yandex.Auto™
"Yandex.Auto™" is an application that can be downloaded using your smartphone in order to use some of your telephone applications via your multimedia system screen (availability depends on the country).
Note: the "Yandex.Auto™" application only works if your smartphone is connected to the USB port of your vehicle and if the voice recognition service is activated.
First use
Download and install the "Yandex. Auto™" application via your smartphone's application download platform.
Connect your phone to your multimedia system's USB port.
Accept the requests on your smartphone in order to use the app.
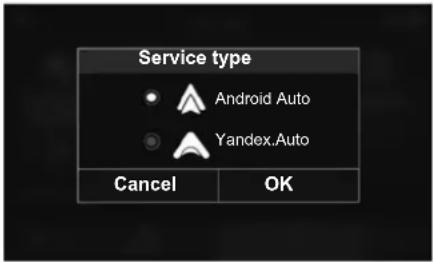
The multimedia system suggests "Android Auto™" or "Yandex.Auto™", depending on the country:
– the connection as an audio source;
- a tutorial on how the function works.
The app runs on the multimedia system and should be visible in area 1.
If the procedure described above fails, repeat the operation.
Special feature of "Yandex.Auto™"
The "Yandex.Auto™" app will only work if all of the following conditions are met:
- the smartphone is connected to your vehicle's USB port;
- the smartphone is connected to your multimedia system via Bluetooth®;
– the telephone is unlocked; - the "Yandex.Auto™" app is on your telephone screen.
YANDEX.AUTO™ (2/3)
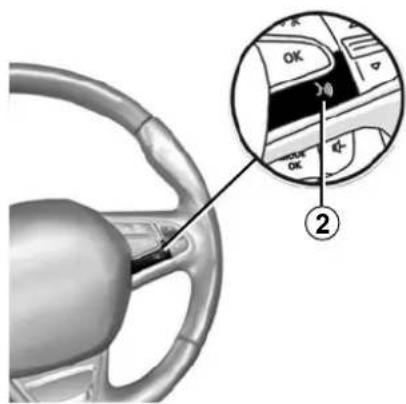
Voice recognition
Depending on the vehicle, once the "Yandex.Auto™" application is working with your multimedia system, you can activate the voice recognition button 2 in your vehicle to control some of your smartphone functions by voice:
- short press: activate/deactivate multimedia system voice recognition;
- long press: activate/deactivate voice recognition for your phone, if the phone is connected to the multimedia system.
Note: when you use "Yandex.Auto™" you can access navigation and music applications on your smartphone.
These applications will replace similar applications integrated into your multi-media system which are already running.
One navigation only, that of:
- "Android AutoTM";
- "Yandex.Auto™";
- "CarPlayTM";
- or the one included in your multimedia system can be used.
When you are using the "Yandex. Auto™" application, some of your multimedia system functions will continue to run in the background.
For example, if you start "Yandex. Auto™" and use the navigation on your smartphone while the radio on the multimedia system is currently playing, the radio will continue to be broadcast.
YANDEX.AUTO™ (3/3)
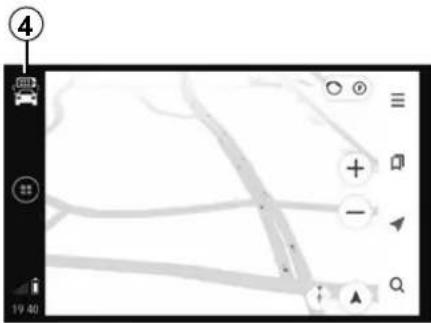
Return to the multimedia interface
Return to your multimedia system interface:
- press the Home page button 3 on the front panel of your multimedia system or on the central control;
or
- press button 4 on the multimedia system screen.
When you use the "Yandex.Auto™" application, the use of mobile data required for it to operate may lead to additional costs not included in your telephone subscription.
The availability of "Yandex.Auto™" application functions depends on your telephone brand and model. For further information, please refer to the manufacturer's website if there is one.
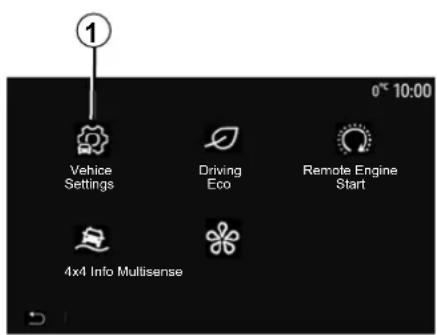
VEHICLE SETTINGS (1/2)
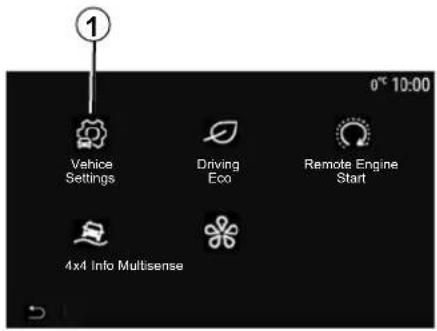
Introduction
From the main menu, press "Vehicle" then "Vehicle Settings" 1 to access this menu.
From this menu you can adjust the settings for driving aids, vehicle access and park assist.
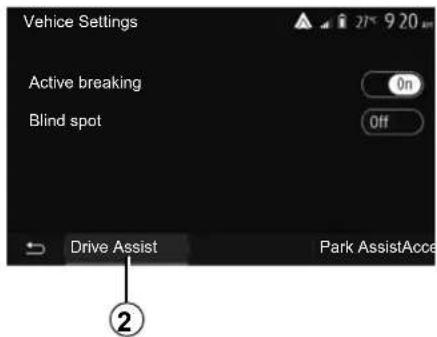
"Drive Assist" 2
Depending on the vehicle, from this menu you can activate/deactivate your vehicle's driving aids.
"Active breaking"
This function notifies the driver if there is a risk of collision. Select "ON" to activate this function. For further information, please refer to the "Active emergency braking" section in the vehicle user manual.
"Blind spot"
This function notifies the driver when another vehicle is in their blind spot. Select "ON" to activate this function. For further information, please refer to the "Blind spot warning" section in the vehicle user manual.
Note: the availability of options and settings may vary according to your vehicle and equipment level.

For safety reasons, carry out these operations when the vehicle is stationary.
VEHICLE SETTINGS (2/2)
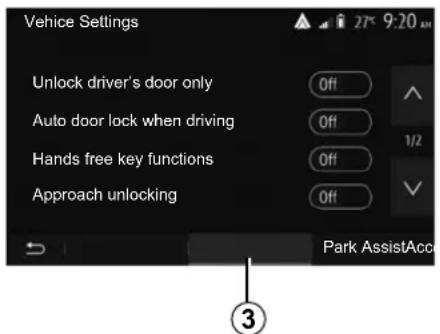
"Access" 3
This menu lets you activate/deactivate the following options:
- "Unlock driver's door only";
- "Auto door lock when driving";
- "Hands free key functions";
- "Approach unlocking";
- "Walk away closing";
-
"Silent mode";
-
"Auto relock sound";
- "Internal sequence sound";
- "Rear wiper when in reverse gear": the rear screen wiper is activated when reverse gear is engaged.
- this option only operates if the wind-screen wipers are activated;
– the availability of options and settings may vary according to your vehicle and equipment level.
Note:
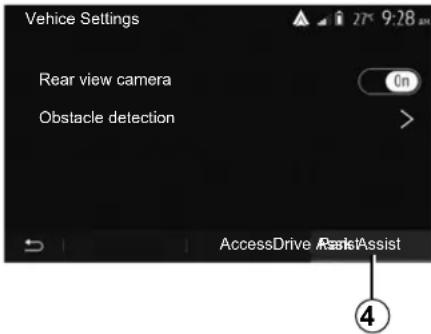
"Parking aids" 4
You can use this menu to activate/deactivate the reversing camera and to adjust the settings for obstacle detection during manoeuvres.
For further information, please refer to the section on "Rear view camera".

For safety reasons, carry out these operations when the vehicle is stationary.
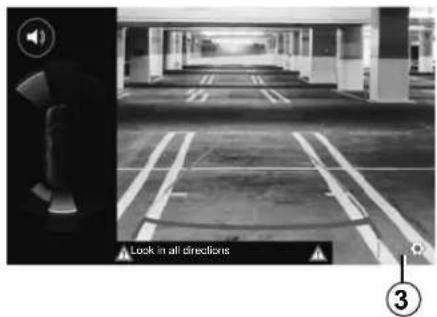
REVERSING CAMERA (1/3)
Operation
When shifting into reverse gear (and up to approximately five seconds after shifting to another gear), a view of the surroundings behind the vehicle is displayed on the multimedia system screen accompanied by the guide, a silhouette of the vehicle and a sound signal.
Ultrasonic sensors installed in your vehicle "measure" the distance between the vehicle and an obstacle.
When the red zone is reached, use the bumper image to stop accurately.
Note:
– for more information on using Park Assist, please see the vehicle user manual;
– ensure that the reversing camera is not obscured (dirt, mud, snow, etc.);
- once the reverse gear is engaged, the multimedia screen displays a view of the area behind the vehicle for several seconds.
Activation/deactivation
Reversing camera
You can activate/deactivate the reversing camera. To do this, from the main menu select "Vehicle" > "Vehicle Settings" 1 then press the "Park Assist" tab 2.

"Park Assist"
This menu allows you to activate/deactivate the reversing camera and set up "Obstacle detection".
REVERSING CAMERA (2/3)
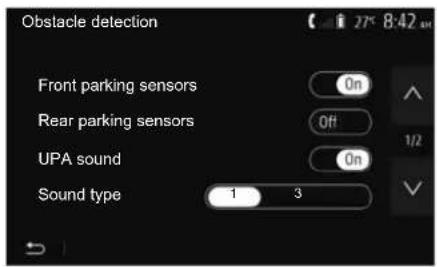
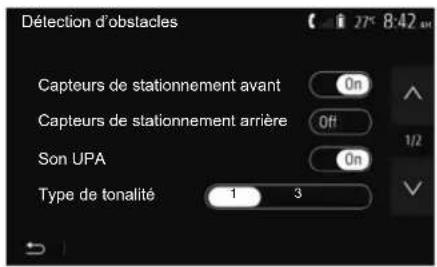
"Obstacle detection"
Depending on the vehicle, you can activate or deactivate your vehicle's front and/or rear sensors independently. Select "On" or "Off" to activate or deactivate the sensor(s) required.
Sound settings
You can activate/deactivate the audio alert and select from several sounds as well as adjust the volume of the obstacle sensors.
Display settings
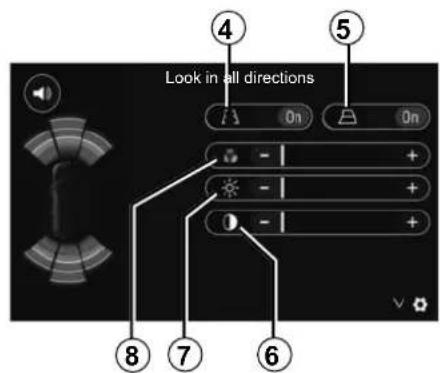
You can access the display settings with the 3 button.
From this menu you can activate/deactivate the fixed 4 or mobile 5 (depending on the vehicle) guide lines that indicate the distance behind the vehicle, and you can adjust the screen settings.
Press "+" or "-" to set the contrast 6, brightness 7 and colours 8.
REVERSING CAMERA (3/3)

This function is an additional aid. It cannot, therefore, under any circum-stances replace the vigilance or the sibility of the driver.
The driver should always be ready for sudden incidents while driving: always ensure that there are no small, narrow moving obstacles (such as a child, animal, pushchair, bicycle, stone, post, etc.) in the blind spot when manoeuvring.
The screen shows a reverse image.
The gauges are a representation projected onto flat ground. This information must not be taken into account when superimposed on a vertical object or an object on the ground.
Objects which appear on the edge of the screen may be deformed.
In very bright light (snow, vehicle in sunshine, etc.), the camera vision may be adversely affected.
MULTI-VIEW CAMERA (1/2)
Introduction
If the vehicle is equipped, four cameras are fitted at the front, in the door mirrors and at the rear of the vehicle to offer you additional aid during difficult manoeuvres.
Note: make sure that the cameras are not obscured (by dirt, mud, snow, condensation etc.).

This function is an additional aid. It cannot, therefore, under any circumstances replace the vigilance or the sibility of the driver.
The driver should always pay attention to sudden incidents during driving: always ensure that there are no moving obstacles (such as a child, animal, pram, bicycle, etc.) or small, narrow objects such as stones or posts in your path when manoeuvring.
Operation
When the reverse gear is engaged, the rear view camera displays the area to the rear of the vehicle on the multimedia screen.
You also have the option of choosing the view to be displayed on the multi-media screen by changing to manual mode.
Activation/deactivation
The system is activated when the vehicle is travelling at a speed below approximately 12 mph (20 km/h). When the vehicle exceeds this speed the system is deactivated.
The system can also be activated by pressing the activation button in your vehicle. For further information, please refer to the "Multi-view camera" section in the Vehicle User Manual.
Note: For more information on choosing Automatic or Manual mode, please refer to your vehicle's Driver's Handbook.
MULTI-VIEW CAMERA (2/2)

Camera choice
To activate the desired camera view, select this one on the multimedia screen:
- 1 Rear area view;
- 2 Front area view;
- 3 Right-hand side area view;
- 4 Left-hand side area view.
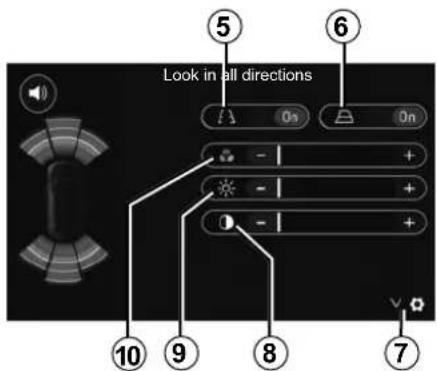
Settings
Press 7 to display a list of settings.
Activate or deactivate the display of fixed 5 or moving 6 guide lines.
Press "+" or "-" to set the contrast 8, brightness 9 and colours 10.
DRIVING ECO
Access the Driving Eco menu
From the main menu, press "Vehicle", then "Driving Eco".
The "Driving Eco" menu grants access to the following information:
- "Eco coaching";
- "Trip report";
- "Eco scoring".
"Eco coaching"
This menu assesses your driving style and gives you the best possible advice to optimise your fuel consumption.
![Driving Eco [13.107,0 km / ] Average consumption 4.3 L/100km Total consumption 2.7 L Average speed 44.2 km/h Dist. without consumption 0.3 km Eco coaching B ingTrip report](/content/2026/03/519989/images/8529573d147e494aee1249851689fa0c3de70b14563f046300159c9460763361.jpg)
"Trip report"
This menu shows you the data saved from your last journey:
- "Average consumption";
- "Total consumption";
- "Average speed";
- "Dist. without consumption".
Note: you can reset the data by pressing 1.
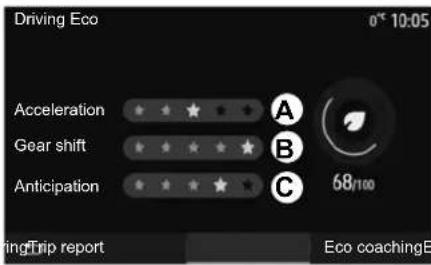
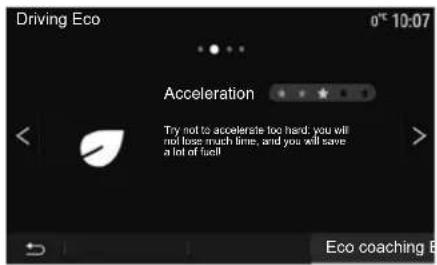
"Eco scoring"
This menu gives you an overall mark out of 100. The higher the score, the better your eco-driving performance:
– average acceleration performance (zone A);
- average gear change performance (zone B);
– average braking anticipation performance (zone C).
REMOTE ENGINE START-UP (1/3)
When fitted, this function lets you programme the engine to start remotely, in order to heat or ventilate the passenger compartment up to 24 hours before using the vehicle.
Adjust the heating level required (temperature, de-icing) before programming the function. Configuration and programming are done via the multimedia display.
Setting the start time for the function
- Switch on the ignition, then press 1 from the main menu. Screen A is displayed;
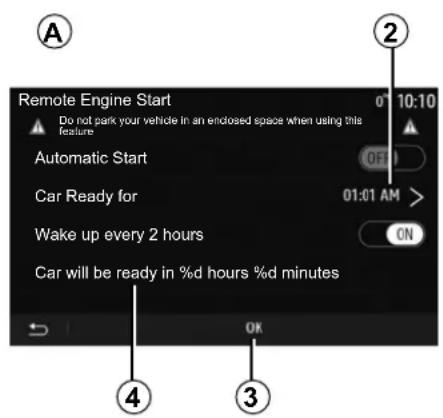
- select the "On" button on the "Automatic Start" line to activate the function;
- set the start time for when you wish to start to use your vehicle by pressing line 2;
- press on the "up" and "down" arrows to scroll through the hours and minutes until you get the desired time;
- press "Ok" to confirm. The 4 marker shows you the time left before the time you wished to use the vehicle;
- press "Ok" 3 to confirm and finalise the programming;

- adjust the air-conditioning controls to the desired temperature in the passenger compartment when starting up the engine, then set to de-icing mode (please see Section 2 of the vehicle manual);
To activate remote start-up by programming, you must select a time at least fifteen minutes later than the time displayed by the multimedia system.
REMOTE ENGINE START-UP (2/3)
- turn off the ignition.
When locking your vehicle, two flashes, then the hazard warning lights and indicator lights switching on for approximately three seconds indicate that the programming has been taken into account.
The remote engine start-up operates if:
- the lever is in neutral for vehicles with a manual or sequential gearbox;
– the lever is in position P for vehicles with an automatic gearbox;
– the ignition is switched off;
- all the opening elements (bonnet, doors, boot) are closed and locked when you leave the vehicle.
Note: you must switch off your multimedia system by pressing the "Off" button before leaving your vehicle in order for the remote engine start-up function to work.
"Wake up every 2 hours"
This function enables your vehicle to start automatically every two hours depending on the engine temperature.
To activate this function, press the "On" button 5.
Note: remember to switch off the ventilation system in order for the "Wake up every 2 hours" function to activate.
When this function is activated, the ventilation system will not activate during the first four start-ups, if they happen.
In very cold conditions, the vehicle will start automatically and will stay on for approximately ten minutes before switching off.
If the engine temperature does not require a restart, the vehicle will not start automatically during the first four reactivation times and will return to standby for two hours. The engine will be restarted if the engine temperature is too low.
In all cases, the last start-up will happen.
Approximately fifteen minutes before the programmed time, the engine starts and remains on for about ten minutes.
Note: the marker 6 reminds you of the vehicle start time that you have already set.
REMOTE ENGINE START-UP (3/3)
Depending on the vehicle, please ensure that consumers such as the wipers, exterior lights, radio, heated seats, heated steering wheel, etc. are disabled and all accessories are disconnected before leaving the vehicle.
Special feature on vehicles equipped with the "Wake up every 2 hours" function.
It is imperative that the vehicle is driven for at least 10 minutes between each use of the function. Risk of engine oil wear.

Do not park the vehicle or run the engine in locations where combustible substances or materials such
as grass or leaves can come into contact with the hot exhaust system.

Driver's responsibility when parking or stopping the vehicle
Never leave an animal, child or adult who is not self-sufficient alone on your vehicle, even for a short time. They may put themselves or others at risk, for example by starting the engine, switching on equipment such as the electric windows or by locking the doors etc. Also, in hot and/or sunny weather, please remember that the temperature inside the passenger compartment increases very quickly.
RISK OF DEATH OR SERIOUS INJURY.
In extreme conditions, the remote start-up by programming may not work.

Do not use the engine remote start-up function or its programming when:
– the vehicle is in a garage or in a confined space.
Risk of poisoning or suffocation by exhaust gas emissions.
– the vehicle is covered with a protective cover.
Fire hazard.
- the bonnet is open or before it opens.
Risk of burns or serious injury.
Depending on the country, the use of the remote starting function or its programming can be prohibited by the legislation and/or the regulations in force.
Before using this function, check the legislation and/or the regulations for the country in force.
4X4 INFO
Access the "4x4 Info" menu.
On equipped vehicles, from the main menu press "Vehicle" then "4x4 Info".
Inclinometer function
The Inclinometer function allows you to view:
- Wheel camber (drive) in degrees, in real-time (area A);
– Course, using a compass (area B); - Horizontal angle (pitch) in degrees, in real-time (area C ).
Note:
- the values showing the angle displayed on the screen may differ from reality by one to three degrees;
- the display is refreshed every second approximately.

"Altimeter" function
The "Altimeter" function allows you to:
- estimate the vehicle's altitude;
– display past and future gradients.
Note:
– the gradients are calculated according to your GPS position,
- your GPS position is refreshed approximately every second.
MULTI-SENSE (1/3)
Multi-Sense menu
On vehicles fitted with this, from the main menu press "Vehicle" then "Multi-Sense". This menu lets you customise the behaviour of some on-board systems.
Selecting mode
Available modes may vary according to the vehicle and equipment level. From the "Multi-Sense" menu, select the 1 mode desired:
- "My Sense" or "Normal", depending on the vehicle;
- "Sport";
- "Eco".
Note: the last active mode is not memorised when restarting the vehicle. By default, the vehicle restarts in either My Sense or Normal mode.
Sport mode
This mode enables an increased responsiveness from the engine and the gearbox. The steering is firmer.
Eco mode
Eco mode focuses on energy saving. The steering is smooth, engine and gearbox management enable fuel consumption to be lowered.
My Sense or Normal mode
My Sense, or Normal mode (depending on the vehicle) adopts your vehicle's standard settings by default. Depending on the vehicle equipment level, it is possible to manually reconfigure My Sense mode by modifying the driving, comfort and ambient lighting settings.
Mode configuration
Press "Mode Configuration" 2 to customise the following settings:
- "Steering";
- "Climate";
- "Ambient lighting";
- "Intensity";
- "Ambiance".
Note: certain "Multi-Sense" configuration settings are restricted according to your vehicle category and equipment level. These menus remain visible on the multimedia screen but are unavailable.

For safety reasons, carry out these operations when the vehicle is stationary.
MULTI-SENSE (2/3)
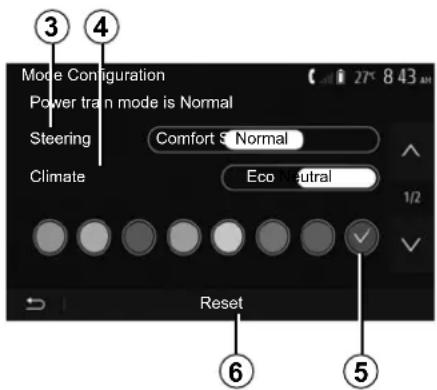
"Steering" 3
This setting offers several steering response modes:
- "Comfort";
- "Normal";
- "Sport".
Depending on the mode selected, the steering sensitivity can be adjusted to become heavier or more reactive in order to provide optimal balance between a smooth and accurate steering experience.
"Climate" 4
This setting offers several air conditioning operating modes:
- "Eco";
- "Neutral".
Depending on the mode selected, you will be offered the optimal balance between temperature comfort and fuel economy.
For further information on the air conditioning settings, which depend on the equipment level, refer to the section on "Climate" in your vehicle user manual.
"Ambient lighting"
This setting can be used to choose the ambient lighting colour type for your vehicle.
To change the ambient colour in your vehicle, select a 5 colour from those available.
"Intensity" 7
This setting enables you to adjust the brightness of the ambient lighting in your vehicle. To do this, press “+” or “-”.
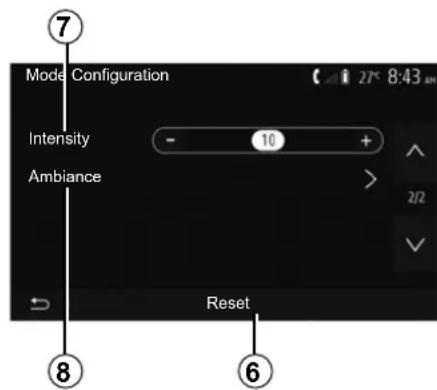
"Ambiance" 8
The selected colour and intensity can be applied to the following areas:
- "Dash Board";
- "Front";
- "Rear".
Press "On" or "Off" to activate/deactivate the ambient lighting in the area selected.
"Reset" 6
This option enables you to reinitialise the default values for the current mode.
MULTI-SENSE (3/3)
Multimode
On vehicles fitted with this, the A control located on the centre console enables you to change the driving mode without using the multimedia system.
Use the A control to select the mode desired:
- "Eco";
- "Normal" (press the centre button);
- "Sport".
The driving modes are similar to those in the "Multi-Sense" menu, Normal mode corresponds to My Sense mode and adopts the vehicle's standard settings. However, unlike the "Multi-Sense" menu, you can't configure and customise these driving modes.
Note: the last active mode is not memorised when restarting the vehicle. By default, the vehicle restarts in "Normal" mode.
A

The navigation system
On equipped vehicles, the navigation system will determine your location and guide you using the following information:
- of the GPS receiver;
- from the digital map.
GPS receiver
The navigation system uses GPS (Global Positioning System) satellites orbiting the Earth.
The GPS receiver receives signals transmitted from several satellites. The system can then locate the position of the vehicle.
Note: after moving a long distance without driving (ferry, rail freight), the system may take several minutes to adjust before retuning to normal operation.
The digital map
The digital map contains the road maps and town maps that the system requires.
"Maps" USB flash drive
Install the most recent version by inserting your USB flash drive into a computer that is connected to the internet. Refer to the section on "Map update".
Note: the USB key is not provided with the system.
If possible, always use the most recent version.
Insert USB key
Insert your USB drive into your vehicle's A port. To identify the location of the USB port A, please refer to the Vehicle User Manual (if necessary).
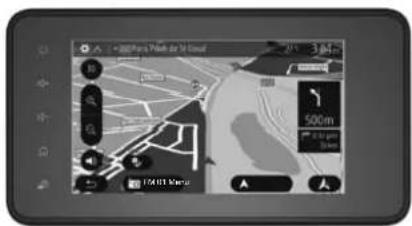
READ A MAP (1/3)

Displaying the map
To display the map around the current vehicle position, press "Home" > "Nav".
Touch the map screen.
To move around the navigation map, drag the desired direction on the screen. Depending on the screen, press 3 or 4 to return to your current location.
Press 2 to zoom in or out.
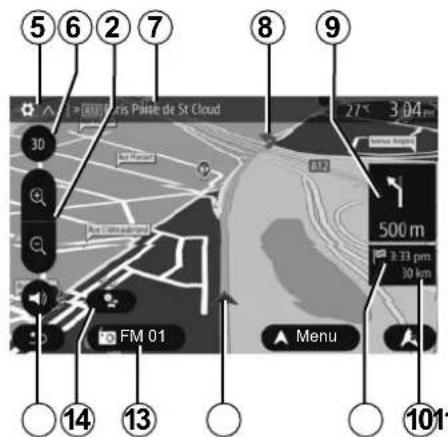
Map key
5 Navigation display options.
6 Access different display modes:
- 3D mode;
- 2D mode;
- 2D North mode (the top of the map always faces north).
7 Name of the next major road or road sign information.
8 Route calculated by the navigation system.
9 Distance to and indication of next change of direction.
10 Distance remaining to the destination.
11 Estimated time of arrival.
12 Location of the vehicle on the navigation map.
13 Media currently playing.
14 Traffic information. Press this area to find out about the different incidents present on your route.
15 Mute/unmute the voice guidance.
Position GPS
This function makes it possible to find out the geographical location of the selected position (Address/latitude/longitude).
Touch desired position on the screen. Press "Options" and then press "News" to find out the exact location of the selected position.
Map icons
The navigation system uses symbols 1 to display points of interest (POI). Refer to the information on "Displaying points of interest" in the section on "Map settings".
READ A MAP (2/3)
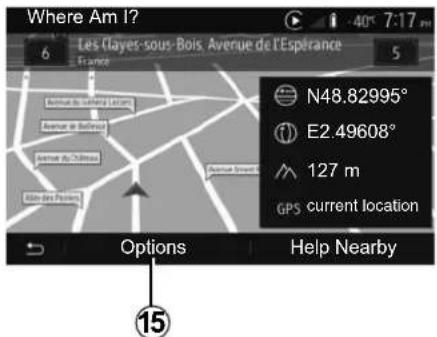
"Where Am I?"
This function allows you to check information about the current position and to search for POI nearby. It operates when GPS is activated.
With the route already in progress, press area 7 to access the "Where Am I?" screen.
This screen includes the following information:
- Latitude;
- Longitude;
- Altitude;
- house number;
- Current address.
Country information
Press 15 then "Country Info".
This function allows you to view country information depending on your current position.
This screen includes the following information:
- speed limit.
Speed limits are displayed for major roads. Displayed unit depends on active regional settings. If no data is available, then "--" is shown instead of table and number.
- Phone country code;
- emergency number;
- legal Restrictions effective in the country:
– maximum permitted blood alcohol level;
– high-visibility vest required;
– fire extinguisher required;
- headlights must be on at all times;
- spare bulbs required;
- first aid kit required;
- warning triangle required;
- helmets required for motorcyclists;
– snow chains required in winter;
- snow chains recommended in winter;
- winter tyres required in winter;
- winter tyres recommended in winter.
READ A MAP (3/3)
« Help Nearby »
This function allows you to search for assistance near your current position.
Press 16 to open a new screen for the quick search.
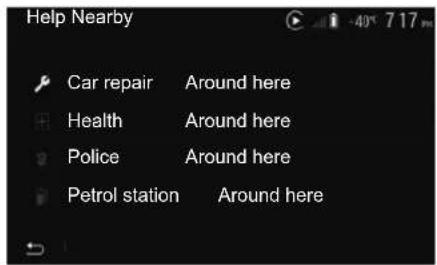
Information on this screen:
- car repair services;
– medical and emergency services; - police stations;
- petrol stations.
ENTERING A DESTINATION (1/6)
Destination menu
From the home screen, press "Nav" > "Menu" > "Destination" to access the destination menu.
The destination menu offers several methods to enter a destination:
- enter an address (complete or partial);
- select an address from "Points of interest";
- select a destination from the previous destinations;
- select an address from the Favourites;
- select for destination by using the map;
– select a latitude and longitude.
Entering an address
To enter an address, press 1.
This item allows you to enter all or part of the address: country, town, street and house number.
Note: only addresses known to the system through the digital map are authorised.
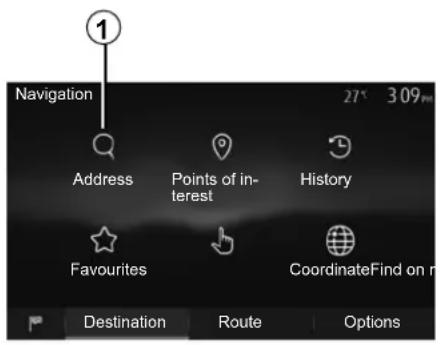
When using for the first time:
- press "Country";
- enter the name of the country required using the keypad.
When entering the address the system will remove the brightness of certain letters to help enter the address.
The system may suggest several country lists by pressing 2. Select the required country in the lists.
- Do the same for Town/Suburb, "Street", Side street and Street number.
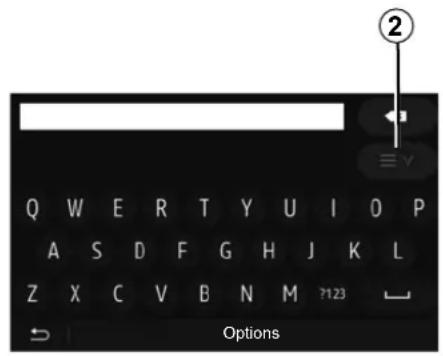
Note:
- Side street and Street number can be activated once you have selected "Street";
- when entering the street, it is not necessary to specify the type of road (street, avenue, boulevard etc.);
- the system stores previously address in its memory. Once you have entered a destination by address, that address will be displayed when the device is next used.
ENTERING A DESTINATION (2/6)
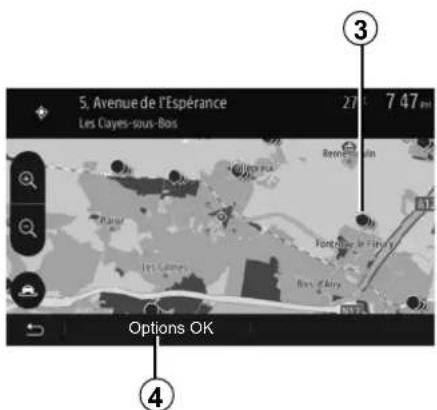
Select from the "Points of interest" (POI)
You can select your destination from the points of interest.
You can find a place in different ways:
- with the quick search feature, you can quickly find a nearby place by its name;
- with the preset search feature, you can find frequently searched types of places with only a few touches of the screen;
- you can search for a place by its category.
Quick search for points of interest
The quick search feature lets you quickly find a place.
Press the map somewhere to search for points of interest. Depending on your position, one or more 3 points will be displayed on the screen.
Press 4 and then "Points of interest around cursor" to show the list of points of interest with names and distance from the place selected.
Searching for points of interest using preset categories
The preset search feature lets you quickly find the most frequently selected types of places.
From the home screen, press "Nav" > "Menu" > "Destination" > "Points of interest" to access preset categories.
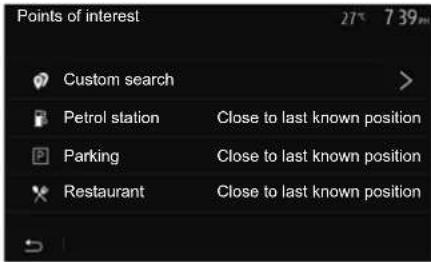
Categories(petrol station/parking/restaurant)
- If an active route exists, the points of interest "Petrol station" and "Restaurant" are searched for along the route. Point of interest "Parking" is searched around the destination.
- If there is no active route (destination is not selected), they are searched around the current position.
- If the current position is not available either (no GPS signal), they are searched around the last known position.
ENTERING A DESTINATION (3/6)
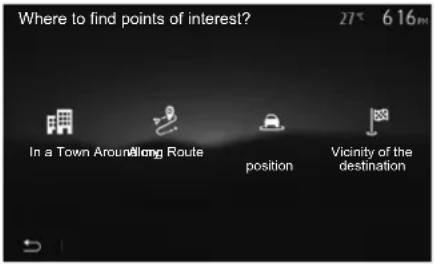
Searching for Points of Interest by category
You can search for points of interest by their categories and subcategories.
From the home screen, press "Nav" > "Menu" > "Destination" > "Points of interest" > "Custom search".
Select the area around which the place should be searched for:
- Press "In a Town" to search for a place in a selected town/suburb (the result list will be ordered by the distance from the centre of the selected city/town).
- Press "Along Route" to search along the active route, and not around a given point. This is useful when you search for a later stopover that results in a minimal detour only, such as searching for nearby petrol stations or restaurants (the result list will be ranked by the length of the necessary detour).
- Press "Around my position" to search around the current position or if it is not available, around the last known position (the result list will be ordered by the distance from this position).
- Press "Vicinity of the destination" to search for a place around the destination of the active route (the result list will be ordered by the distance from the destination).
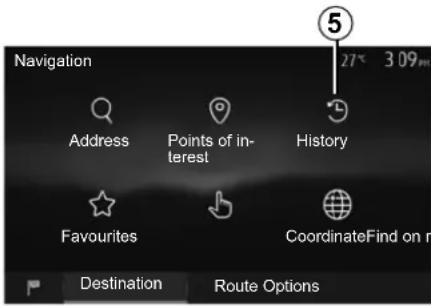
Selecting a destination from the previous destinations
Press 5 to find a destination you have previously defined.
ENTERING A DESTINATION (4/6)
Selecting an address from the Favourites
You can find the destination to a location stored in the Favourites. To utilize this function more effectively, we recommend that you save destinations to which you often travel in advance.
Firstly, save the favourite destinations by searching for the address. Please refer to the section on “Managing favourites”.
From the home screen, press "Nav" > "Menu" > "Destination" > "Favourites" to display the list of favourite destinations.

Selecting for destination by using the map
This allows you search for a destination by scrolling the map.
- From the home screen, press "Nav" > "Menu" > "Destination" > "Find on map" to select the destination on the map;
- Then press on the location on the map that you want to select as your destination. Point 6 is displayed;
- press 7 to confirm.
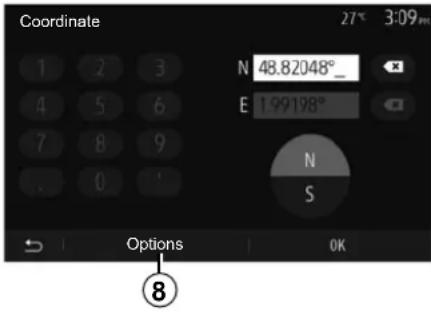
Entering the coordinate of the destination
This allows you search for a destination by entering its coordinate.
From the home screen, press "Nav" > "Menu" > "Destination" > "Coordinate".
You can enter the latitude and longitude values in any of the following formats: decimal degrees; degrees and decimal minutes; or degrees, minutes and decimal seconds.
Press 8 and then UTM to enter the coordinates in UTM format.
ENTERING A DESTINATION (5/6)
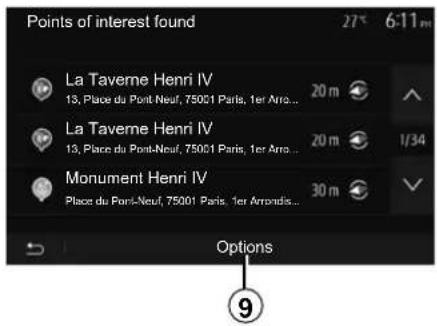
Sorting the list
The result of searching a destination by point of interest, history and favourites can be sorted by name and distance. If an active route exists, they can be sorted by detour. Press 9 to display the map on the screen.
Finding a destination by names
In case of selecting a destination by point of interest, history or favourites, you can search for destination in the list by their names. Press "Find" and enter the name using the keypad.
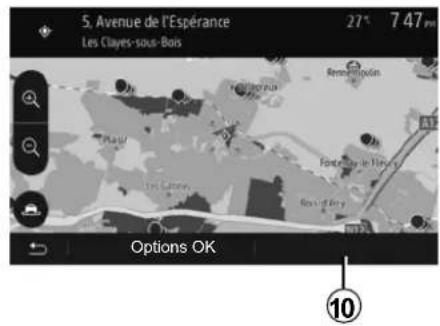
Confirming the destination
There are several possible options before confirming a destination:
- "OK";
- "Options".
A 10 second countdown will start. If you perform no action during this time, guidance will begin automatically.
"OK"
- If there is no active route (destination is not selected), press 10 to confirm the destination as a new route.
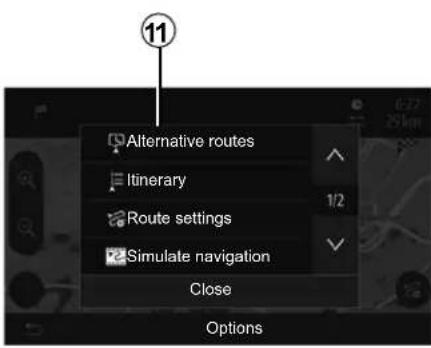
- If an active route exists, you can select the destination as a new route or stage. Press 10 and then press "New route" or "Waypoint".
"Options"
Before the 10 second countdown ends, the following choices will appear on the screen:
"Alternative routes"
Press 11 to change or modify the route.
ENTERING A DESTINATION (6/6)
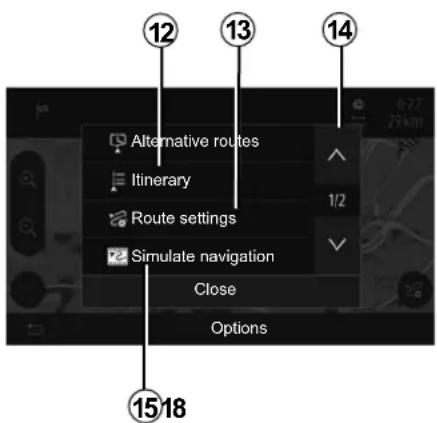
"Itinerary"
Press 12 to view a breakdown of your route. Please refer to the section on "Guidance".
"Route settings"
Press 13 to adjust your route depending on the desired roads and route mode.
"Simulate navigation"
Press 15 to view of simulation of the route you have selected. Please refer to the section on "Guidance".
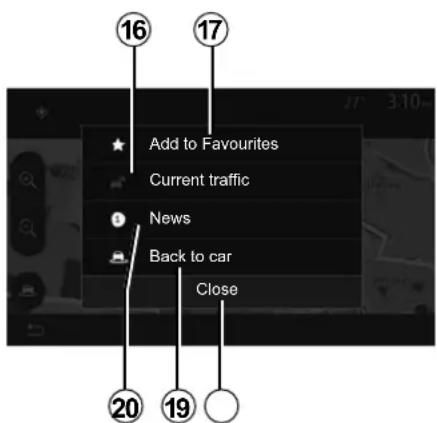
"Current traffic"
This function enables you to obtain information on traffic incidents over the course of your trip, or in your immediate vicinity. To access this, press 14 then select "Current traffic".
"Options"
At the end of the 10 second count-down, the following choices appear on the screen:
"Add to favourites"
Press 17 to save the selected destination in your favourite destinations.
"Current traffic"
Press 16 to obtain information about traffic incidents flagged on your route or in your immediate vicinity.
"News"
Press 20 to view the address, latitude, longitude and telephone number of a point of interest (only activated after selecting a point of interest).
"Back to car"
Press 19 to return to the current vehicle position.
Note: To close the "Options" window, press 18.
GUIDANCE (1/6)
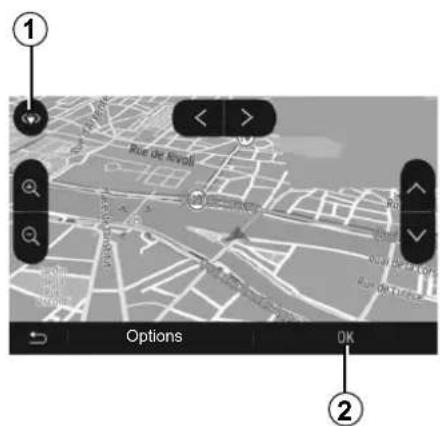
Activating guidance
Press 2 or wait 10 seconds after entering a destination. Guidance will begin.
Note: You can interact with the map at any time by sliding it in the desired direction or by pressing the screen.
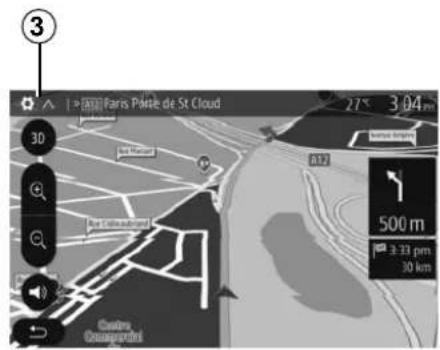
Guidance screens
The system will offer several different navigation maps.
Press 3 to change the map display and open the drop-down menu. Then select one of the different displays:
- 2D;
- 3D;
- 2D North.
You can also change the map display by pressing the compass 1 on the map.
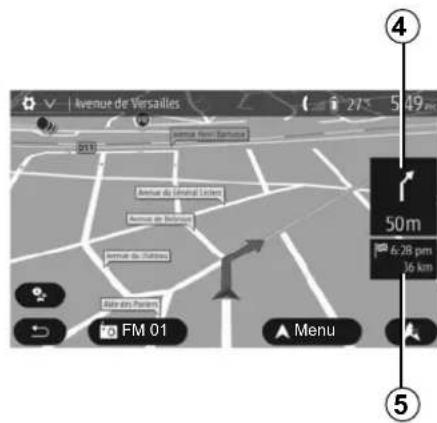
Full-screen mode (2D, 3D or 2D North)
This mode allows you to view the navigation map on the entire screen.
The information on the arrival time and the distance remaining to the destination are indicated in 5.
The indication for the next change of direction is located in 4.
GUIDANCE (2/6)
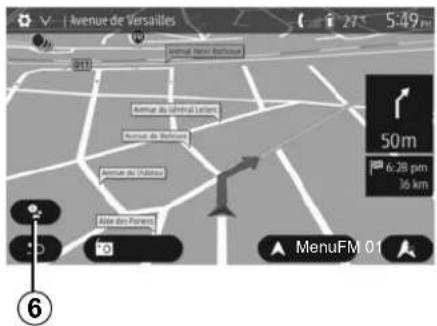
During guidance, before each change of direction.
Alternative route
The system offers an alternative route in the event of an accident or heavy traffic along the planned route. Press "Yes" or "No" as required.
Traffic summary
During guidance, you can get traffic information at any time by pressing 6.

The screen gives you various events appearing on your route. The system will let you know the length of the delays caused by these incidents on your trip. Press 8 to change the event display settings. Press 10 to make a detour, 9 to access traffic options (please refer to the section on "Navigation settings") or 7 to return to navigation.
Note: traffic information depends on your subscription and on signal reception.
Motorway junction view
During guidance, before each motor-way junction, the system will display a three-dimensional view of the junction.
Note: for some junctions, only a small turn arrow will appear on the map. The system will switch back to normal mode after you have passed the junction.
GUIDANCE (3/6)
Changing voice guidance language
Press "Home" > "Nav" > "Options" > "Voice settings" to change the language of the voice guidance.
Scroll the language list by pressing 12. Select the desired language and press 11 to confirm.
To set the voice guidance sound, please refer to the information on "Audio preferences" in the section on "Audio settings".
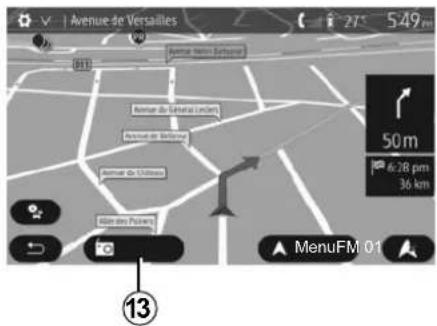
Listening to the radio during voice guidance
While listening to a radio station during voice guidance and before each change of direction, the system will temporarily cut the sound of the radio until you pass the junction.
You can access the radio station listening screen during navigation by pressing 13. To return to the navigation screen, press 14. To return to the main menu, keep 14 pressed down for around three seconds.
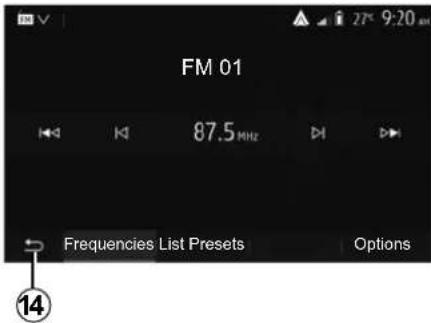
Route information
This function allows you to view your route.
Press "Home" > "Nav" > "Itinerary" after entering a destination.
Six choices will be given:
- "Edit route";
- "To avoid";
- "Overview";
- "Cancel Route";
- "Alternative routes";
- "Itinerary".
GUIDANCE (4/6)
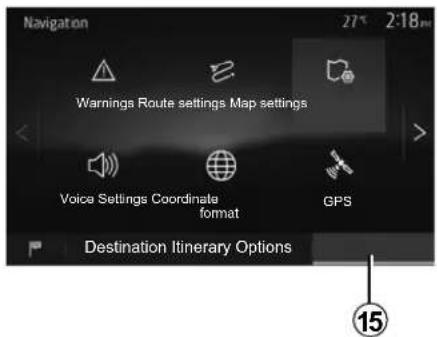
Route overview
From the home screen, press "Nav" > "Menu" > "Itinerary" > "Overview" to see a map with an overview of the active route.
The following information will be given:
– the name and/or address of the destination;
- The total time of the route;
- The total distance of the route;
- the special points and sections of the route (e.g. toll gates, toll roads, motorways, etc.);
- alternative routes (e.g.: "Short", "Fast", "Economical").
Press 15 to display the following options:
- "Warnings";
- "Route settings";
- "Map settings";
- "Voice settings";
- "Coordinate format";
- "GPS";
- "Map Update";
- "Traffic".
NB: for further information, please see overleaf.
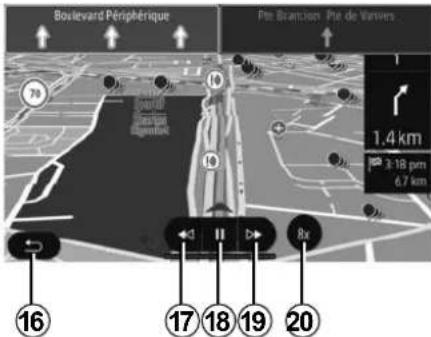
"Simulate navigation"
From the home screen, press "Nav" > "Menu" > "Itinerary" > "Overview" > "Options" > "Simulate navigation" to simulate the route you will take to the destination.
- Start or pause the simulation by pressing 18.
- Press 20 to increase the speed of the simulation.
- You can leave the route simulation at any given moment by pressing 16.
- To move to the previous/next manoeuvre, press 17 or 19.
GUIDANCE (5/6)
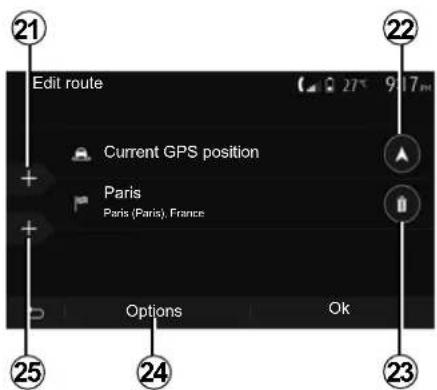
Edit route
Press "Home" > "Nav" > "Itinerary" > "Edit route" to change the route by adding, modifying or deleting steps.
Press 21 to add steps and 25 to add a new destination. It offers several methods to enter a destination. see the "Entering a destination" section.
- Press 23 to delete a destination.
- Press 24 to reorder the list.
- Press 22 to change the route departure address.
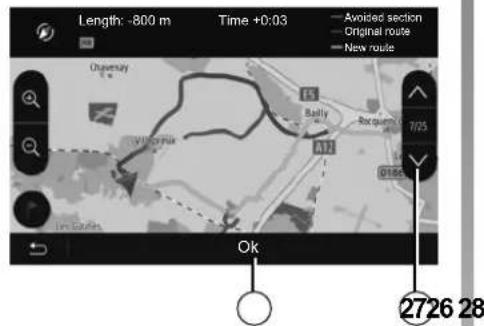
Avoidances
Press "Home" > "Nav" > "Itinerary" > "To avoid" to make a detour. Press an area of the list depending on the desired detour.
To change the area, press 27. Confirm the new route by pressing 26.
Cancel the route
At any given moment, you can stop the guidance.
Press "Home" > "Nav" > "Itinerary" > "Cancel Route" to cancel the active route.
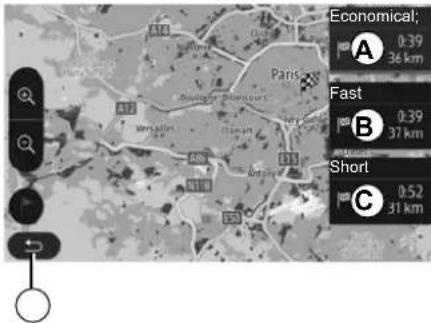
Route Alternatives
This section enables you to change the route planning method. Three modes are available, enabling you to change the route planning method.
- « Fast »;
- "Economical";
- « Short »
Please refer to the information on "Route settings" in the section entitled "Navigation settings".
Press "Home" > "Nav" > "Itinerary" > "Alternative routes" then A, B or C to confirm the new route. Tap 28 to go back to previous screen.
GUIDANCE (6/6)
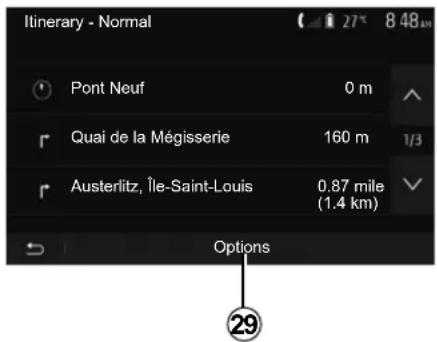
« Itinerary »
This function makes it possible to view the route plan. Several details of the route will appear:
– direction-change arrows;
- road number;
- distance before a fork.
Press 29 to sort the route details:
– summary:
shows only the main trip details (start, destination), the total distance, remaining time and arrival time;
- standard description:
shows all the stages and signpost information, road numbers, street names and distance. Also showing information and warnings, such as route section names entered by the driver, restrictions (access and manoeuvre restrictions), ignored user preferences, etc.;
- road list:
details the route by road numbers and street names. It also shows their length, average direction and travel time information. Elements of the trip are not shown in this mode.
« Route settings »
This item enables you to choose your route settings. Please refer to the information on "Route settings" in the section entitled "Navigation settings".
MAP SETTINGS

From the navigation menu, press 2 then 1 to access the map adjustment menu.
Adjusting view mode
This function allows you to switch the map view between a 3D, view and a 2D top-down view, and a view with north always facing upwards.
Press "3D", "2D" or "2D North".
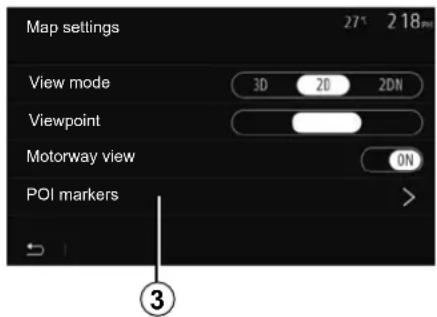
Adjusting viewpoint
This function allows you to adjust the basic zoom and tilt levels to your needs. Press the required zoom from three available levels.
Motorway View
This function allows you to activate or deactivate motorway view.
Press "On" to activate the function or press "Off" to deactivate it.
Display points of interest
You can select certain points of interest (visible at 100 m scale) to be displayed on the map.
To access this function directly, press 3 to display the points of interest on the map:
- accommodation;
- airport;
- automobile;
- business;
- café or bar;
- etc.
Press the markers to the left of the Points Of Interest to display/hide those that you wish to see appear (empty marker to hide, full marker to display).
Tap the name of the point of interest to open the list of its subcategories.
Note: in countries for which maps are not available, you can deactivate the navigation function. From the main menu, select "Settings" > "System", press "Off" opposite "Navigation" to deactivate the navigation function.
MANAGING THE FAVOURITES (1/2)
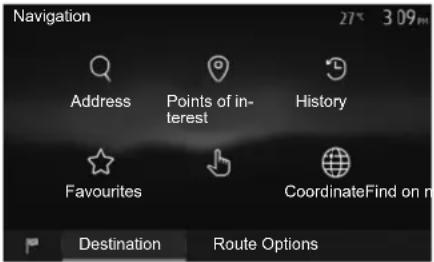
Creating an entry
From the home screen, press "Nav" > "Menu" > "Destination" to access the destination menu. You have a number of methods available to enter a destination:
- "Address": please refer to the information on "Entering an address" in the section on "Entering a destination".
-
"Points of interest": please refer to the information on "Selecting a point of interest (POI)" in the section entitled "Entering a destination".
-
"History": please refer to the information on "Select a destination from previous destinations" in the section entitled "Entering a destination".
- "Favourites": access destinations you have saved.
- "Find on map": please refer to the information on "Selecting a destination on the map" in the section on "Entering a destination".
- “Coordinate”: please refer to the information on “Entering destination coordinates” in the section on “Entering a destination”.
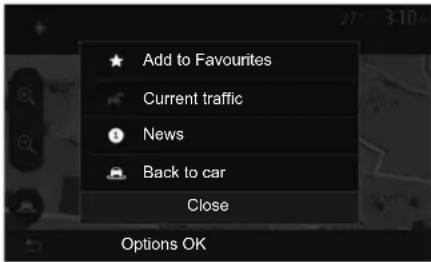
In all cases, once the address is confirmed, the system will locate it on the map. Press "Options" and then press "Add to favourites" to add the destination to Favourites.
Before saving a favourite destination, you can change its name using the digital keypad.
MANAGING THE FAVOURITES (2/2)
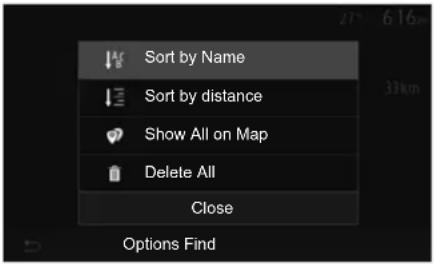
Sorting the list
The result of saved favourites can be sorted by name, distance, or all shown on a map. Press "Options".
Deleting the favourites
Press the favourite you want to delete. Press "Options", "Delete favourite" and confirm the deletion by pressing Delete.
To delete all favourites, press "Options" and then press "Delete all". Confirm this deletion by pressing "Delete all".
Searching the favourite
This function allows you to search the favourite destination in the list by name.
Press "Find" and enter the name of the favourite destination using the digital keypad.
NAVIGATION SETTINGS (1/4)
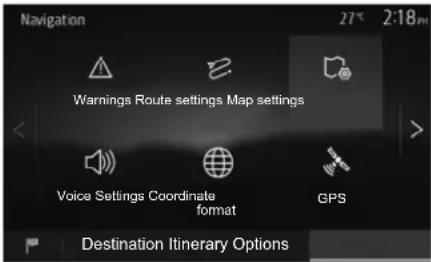
The "Options" tab at the bottom of the "Navigation" menu enables you to change the map display or the navigation settings.
«Warnings »
This item allows you to set up warnings.
Warning in the event of excess speed
Maps may contain information about the speed limits of the road segments. The system is able to warn you if you exceed the current limit.
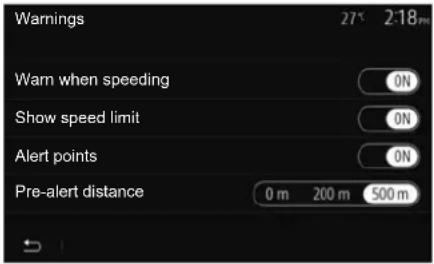
This information may not be available for your region, or may not be fully correct for all roads on the map.
The following warning types are available:
- beep: you receive a non-verbal warning when you exceed the speed limit;
- visual warning: the current speed limit is shown flashing in red on the map when you exceed it.
Press "On" or "Off" to activate or deactivate the warning.
Speed limit always visible
Activate or deactivate the speed limit display for the section of road by pressing "On" or "Off".
Alert point warnings
When the driver crosses the increased care area, a visual warning signal appears on the screen, along with a beep. These hazardous areas are sections of road on which drivers should take extra care. They can be permanent or temporary. You can activate or deactivate this function.
Pre-alert distance
You can choose a distance from a number of choices, to give the distance at which you wish to be notified of a hazardous area.
In certain countries it is illegal to download and activate the warning areas and this could lead to prosecution.
NAVIGATION SETTINGS (2/4)
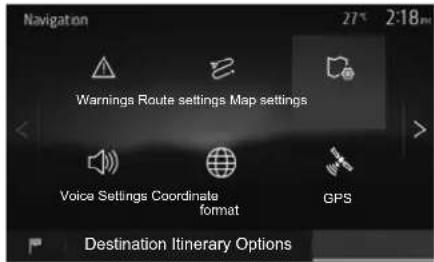
"Route settings"
This function allows you to set how routes will be calculated.
"Route planning method"
This system offers three criteria for calculating a route:
- "Fast": gives a quick route if you can travel at or near the speed limit on all roads;
- "Short": gives a short route to minimise the distance to travel;
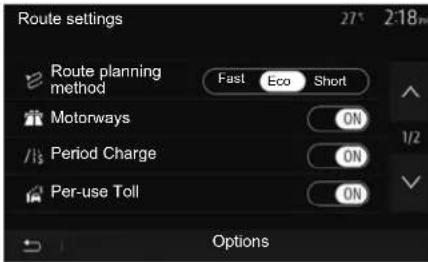
- "Eco": this mode produces a compromise between fast and short routing modes. If you can save a certain distance by travelling for slightly longer time in exchange, it will do just that. The resulting route might be shorter than the fast variant, but not significantly slower.
"Motorways"
You might need to avoid motorways when you are driving a slow car or you are towing another vehicle.
"Period charge"
You can authorise or refuse authorisation for roads requiring the purchase of special authorisation for a certain period.
"Per-use toll"
You can authorise or refuse authorisation for the use of toll roads.
"Ferries"
You can authorise or refuse authorisation for all types of ferries, boats and trains.
"Carpool/HOV"
This function enables you to view roads only intended for two drivers sharing.
"Unpaved roads"
You can authorise or refuse authorisation for the use of off-road tracks.

For safety reasons, carry out these operations when the vehicle is stationary.
GB.93
NAVIGATION SETTINGS (3/4)
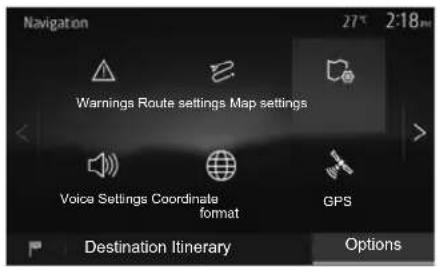
"Map settings"
Refer to the information in the section on "Map settings".
"Voice settings"
This function allows you to change the language of voice guidance. Please refer to the section on "Guidance" in this manual.
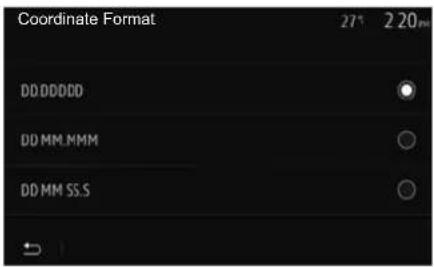
"Coordinate format"
This function allows you to change the format of coordinate.
This system offers three types of format.
A
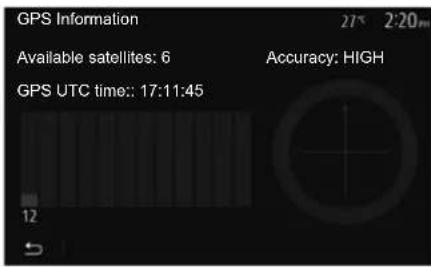
GPS
This function allows you to check the status of GPS satellites.
Press "GPS" to see the GPS information (screen A).

Precautions regarding navigation
Use of the navigation system does not in any way the responsibility or vigi- the driver when driving the
NAVIGATION SETTINGS (4/4)
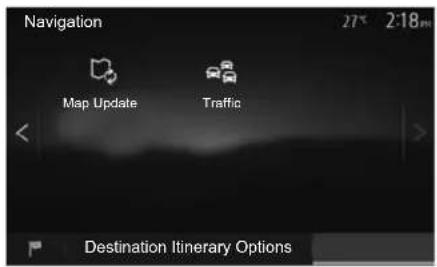
"Map Update"
This function enables you to check the dates of your last updates.
"Traffic"
This function enables you to activate or deactivate "Traffic info", the flagging of different events and to manage alternative routes in the event of accidents or traffic jams.
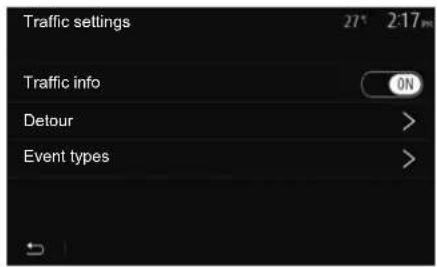
"Traffic info"
You an activate or deactivate warnings for different incidents occurring along your route.
"Detour"
This function allows you to save time when an incident occurs on your trip, by offering you an alternative route.
The multimedia system will offer you to choose a time after which a new route is suggested to you with a detour to save time.
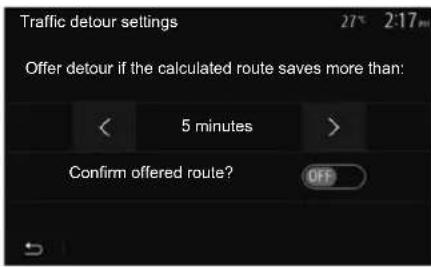
"Event types"
This function enables you to choose the types of events to be displayed during navigation:
- "All events";
- "Flow events";
- "Closure and block";
- "Accident";
- ...

For safety reasons, carry out these operations when the vehicle is stationary.
SYSTEM SETTINGS (1/2)
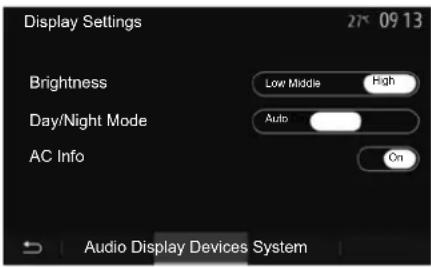
To access the multimedia system settings from the welcome screen, press "Settings", then select a section at the bottom of the screen.
Audio settings
Please refer to the section on "Audio settings".
Display settings
"Brightness"
You can set the brightness of the screen to your liking. You have the option of three modes:
- "Low";
- "Middle";
- "High".
"Day/Night Mode"
To improve the visibility of the navigation screen between day and night, you can change the combination of the colours of the map.
- "Auto": the GPS displays the map screen. The switch to daytime or night-time running lights is automatic, depending on whether the headlights are on.
- "Day": the map screen is always displayed with bright colours.
- "Night": the map screen is always displayed using darker colours.
"AC Info"
This function activates/deactivates the display of air conditioning information when adjusting settings.
Devices
Refer to the section entitled "Pairing/unpairing Bluetooth® devices".
SYSTEM SETTINGS (2/2)
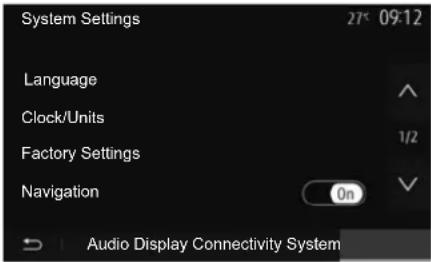
System setting
"Language"
This function allows you to change the language used in the system and voice guidance language.
To change the language, select the desired language and confirm your choice by pressing "OK".
"Clock"
Use this function to set the time display (12 or 24 hour clock).
Note: in versions with navigation, the time is set automatically by the GPS if the map of the country you are in is installed. In versions without navigation, the time can only be set manually.
To change the time manually, press "Clock/Units", then select "Time Setting".
"Units"
This function allows you to set the unit of distance displayed on your multimedia system. You can change the unit between the "km" and "mls".
Note: the settings for your multimedia system do not affect your vehicle's instrument panel display. For further information on the instrument panel display settings, please see the vehicle user manual.
"Factory Settings"
This function allows you to reset various settings to the default settings.
- All: resets all "Factory Settings" to default settings.
- Phone: Initializes all the settings related with phone.
- Navigation: Initializes all the settings related with navigation.
– Audio/Media/Radio/System: Initialises all the settings related with Audio, Media and Radio.
"Navigation"
This function enables you to activate or deactivate the system navigation.
"System Version"
This function allows you to check the version of system.
UPDATING THE SYSTEM (1/6)
For a specific planning of your route, please use the most recent maps.
Search for map updates on naviextras.com

To find out more, access the "Update maps" menu or click "More".
| Later | Close | More |
Updating the multimedia system without maps
In the case of vehicles not fitted with a navigation system, please consult an approved dealer.

natural_image
Illustration of a USB device connected to a computer monitor and keyboard, no text or symbols present.Update your multimedia system and map
Note: check if your systems are already up to date to avoid starting a procedure unnecessarily.
To update your multimedia system and its maps, you will need a USB flash drive and a computer connected to the Internet.
Use your computer to download updates from the Internet to the USB flash drive, then install the updates from the USB flash drive on your vehicle's multimedia system.
If the multimedia system software is not up to date, the Toolbox software will offer a system update before the map is updated. The system and map cannot be updated at the same time. The process must be repeated for each update.
You will need to proceed as follows:
- save the system to a USB flash drive;
- install the Toolbox software on your computer;
– download products from Toolbox to the USB flash drive; - Updating the multimedia system or map from the USB flash drive.
Follow the steps described below in sequence.
UPDATING THE SYSTEM (2/6)
Saving the system on a USB key
To save your multimedia system in your user profile, first connect an empty USB flash drive to the multimedia system to create a multimedia system imprint on the USB flash drive.
Note:
- to insert the USB flash drive in your multimedia system, refer to the information on "Inserting the USB flash drive" in the "Navigation system" section.
– the USB flash drive is not provided with the system; - the USB flash drive in use must be FAT32 formatted and have a minimum capacity of 4 GB and a maximum capacity of 32 GB;
- to save the system data to the USB flash drive, start the vehicle and do not switch off the engine while the data are loading;
- do not use any of the multimedia system functions during the procedure.
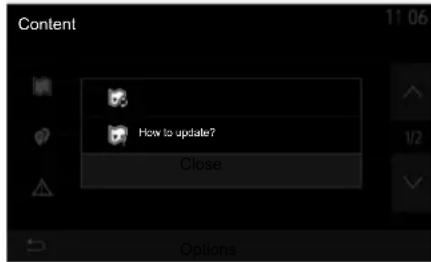
To save the system snapshot to the USB flash drive, you must:
- plug your USB flash drive into the USB socket on your multimedia system;
- from the main menu, select the "Navigation" menu;
-
select the "Options" menu;
-
select the "Map Update" menu from the second page of the "Options" menu;
- press the "Options" button at the bottom of the screen;
- select the "Update" function on your multimedia system screen.
This installs a fingerprint of your navigation system on the USB key which will be used by the Toolbox to save your system in your user profile and to let the Toolbox determine which updates are available for your navigation system.
When the process of data recording is finished, you may remove the USB key from the multimedia system.
System updates must be performed while the engine is running. Electric vehicles must be charging or with the engine running (READY warning light on).
UPDATING THE SYSTEM (3/6)
Installing the Toolbox software on your computer
Install Naviextras Toolbox in a few clicks on your computer. The Toolbox can be downloaded from the manufacturer's website.
Go to the website and click Register in the "Welcome Guest user" area at the top of the screen. Once your account has been created and saved, fill in the information requested (vehicle model, type of on-board multimedia system etc.) then download the software.
After downloading the software, start the installation.
Follow the instructions shown on the screen.
Downloading products from the Toolbox to the USB key
Connect to the Toolbox
Run the Naviextras Toolbox software and make sure your computer is connected to the Internet.
When you start Toolbox on your computer, insert the USB flash drive containing the snapshot of your multimedia system. Once the software has recognised the USB flash drive, two options are offered: Login and Register.
If you are not registered on the Naviextras.com website, you can do so from Toolbox by clicking on the login page. Follow the instructions shown on the screen.
If your subscription allows it, and if Toolbox finds your system on the list of supported systems, the welcome screen appears to enable you to connect to your Naviextras account.
Once connected to your Naviextras Toolbox account, and with your USB flash drive connected to your computer, you can obtain free or paid apps, services and content by selecting those you wish to install in your multimedia system from the Catalogue menu on the menu bar on the left hand side of the Toolbox screen.
In certain countries it is illegal to download and activate the warning areas and this may lead to prosecution.
The screens shown in the user manual are for illustration only.
UPDATING THE SYSTEM (4/6)
Updates from Toolbox to the USBkey
Click on Update in the menu bar on the left-hand side of the Toolbox screen.
The updates menu opens a screen showing all available updates, including:
- items that you have purchased but not yet installed (updates or extras);
- free updates and extras that you added to the installation file from the catalogue;
- system updates (if a newer version is available);
- special free updates.
The list shows all available updates by region in a list and on a world map.
By default, all items belonging to all regions are selected for installation. If you decide to skip a region for now, un-check the checkbox at the beginning of its table row. After reviewing the table, click "Install" at the bottom of the screen to start the installation process.
The Toolbox starts to download and install the selected updates. Please wait until you see the message indicating the update has finished.
Note: the download time for the app varies depending on the size of the app and on mobile network reception quality.
The Toolbox warns you if the selected items exceed the maximum capacity of the multimedia system. In this case, you can select which items can be installed or removed in the system so that it does not exceed the storage limit.
Even if items are removed in the system, you still have ownership of items and can install them later for free.
Please neither remove the USB key from the system, nor shut the system down while update is in progress.

In certain countries it is illegal to download and activate the speed camera warnings and this could prosecution.
GB.101
UPDATING THE SYSTEM (5/6)
Updating the system and map
When the installation process is completed, the USB key can be removed from the computer. Connect the USB key to the USB port of the vehicle multimedia system.
Note:
- to update maps, start the vehicle and do not switch off the engine while data is loading. When the multimedia system is turned on, it automatically identifies the available updates on the USB key, and offers to update the system or map from the updates found on the USB key. Do not switch off your multimedia system while the update is being installed;
- Downloading and installing a system update is only possible if there is a newer version available;
- the functions provided by the multi-media system depend on the model and equipment level of your vehicle.
A
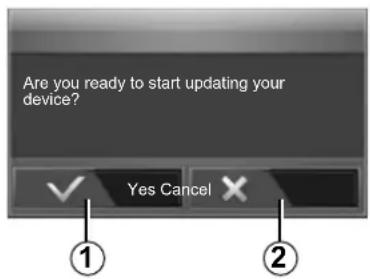
The A screen is displayed automatically once the USB flash drive is connected:
- press 1 to run the update;
– previous 2 to go back to the previous screen.
When you press the button 1, the update procedure is launched. Do not use any of the system functions during the update procedure.
When the update is completed, the multimedia system restarts with all new and up-to-date functionality.
The multimedia system might re-start automatically during the update process. Please wait for the radio screen to be displayed.
If the update is accidentally interrupted, restart the process from the beginning.
UPDATING THE SYSTEM (6/6)
Licence
To obtain the GPL, LGPL, MPL and other open source licence source codes in this product, please visit the dedicated website.
As well as the source code, all the terms of the licence, warranty exclusions and copyright details are available for download.
The dedicated site will also provide you with the open source code on a CD-ROM for a fee to cover distribution costs (such as media, despatch and handling costs) on request by email.
This offer is valid for three years as of the date on which you purchased the product.
Latest map guarantee
Once your new vehicle has been delivered, you will have a maximum of 90 days in which to update the map for free. Once this time has elapsed, you will need to pay for updates.
When navigation is started, the multimedia system offers to update your map. This reminder appears twice a year for seven years. You can:
- select "Later" and the reminder will appear the next time Navigation is activated;
- select "Close" and the reminder will no longer appear;
- select "More" and the system displays the "Map Update" menu.
OPERATING FAULTS (1/5)
| System | ||
| Description Causes Solutions | Standby. Ensure that the screen is not on standby. | |
| No image is displayed. The screen is on standby. | The system is deactivated. The interior temperature of the vehicle is too low or too high. | |
| The vehicle is switched off. Restart your vehicle. | ||
| No sound can be heard. | The volume is set to minimum or mute. Increase the volume or deactivate mute. | |
| The selected system source is not correct. | Check the selected system source and make sure the output source is the multi-media system. | |
| No sound comes from the left, right, front or rear speakers. | The balance or fader settings are incorrect. | Adjust the sound balance or fader correctly. |
| The displayed time is not correct. | The time setting is set to “Auto” and the system is no longer receiving a GPS signal. | With “Navigation”: drive your vehicle until a GPS signal is received. |
| Without “Navigation”: see the section entitled “System settings” to adjust the time. | ||
OPERATING FAULTS (2/5)
| Navigation | ||
| Description Causes Solutions | ||
| No sound can be heard. The volume on the | the “Nav” menu is muted or set to minimum. | Increase the volume (“Options” in the “Nav” menu) or deactivate the mute func-tion.The volume in GPS mode can be ad-justed during voice guidance. |
| The location of the vehicle on the screen does not correspond to its actual loca-tion. | Incorrect positioning of the vehicle caused by GPS reception. | Move the vehicle until reception of the GPS signal is improved. |
| The map version is out of date. Update the map. | ||
| The directions on the screen do not cor-respond to the actual road. | The version of sytem is out of date. Obtain | the latest version of the system. |
| Certain items on the menu are not avail-able. | Depending on the current command, some items will be unavailable. | |
| Voice guidance is unavailable. The navigation system does not include the intersection.Voice guidance is deactivated. | Increase the volume.Ensure voice guidance is activated. | |
| The directions of the voice guidance do not correspond to your exact location. | The voice guidance may vary according to the environment. | Drive according to the actual conditions. |
| The suggested route does not start or end at the required destination. | The destination is not yet recognised by the system. | Enter a road near to the required desti-nation. |
GB.105
OPERATING FAULTS (3/5)
| Phone | ||
| Description Causes Solutions | ||
| No sounds or ringtone can be heard. The | mobile phone is not connected to the system.The volume is set to minimum or mute. | Check that the mobile phone is switched on or connected to the system.Increase the ringtone volume or deactivate the mute function.Check the selected system source and make sure the output source is the multimedia system. |
| Impossible to make a call. The mobile phone | one is not connected to the system.The phone keypad has been locked. | Check that the mobile phone is switched on or connected to the system.Unlock the phone keypad. |
| Several audio sources are ejected during operation. | Restart the multimedia system by pressing and holding the on/off button (until the screen turns off). | |
OPERATING FAULTS (4/5)
| Media | ||
| Description Causes Solutions | ||
| No sound can be heard. The volume is set to minimum or mute. Increase the volume | or deactivate mute. | |
| The audio source is not switched on or connected to the system. | Check the selected system source and make sure the output source is the multi-media system. | |
| No external audio source (MP3 player, portable audio player, USB key or telephone etc) is recognised by the multimedia system. | Several audio sources are ejected during operation. | Restart the multimedia system by pressing and holding the on/off button (until the screen turns off). |
| Android AutoTM/CarPlayTM does not start on the multimedia system. | Android AutoTM/CarPlayTM is not configured correctly on your smartphone. | Visit the manufacturer's website for your smartphone for configuration information. |
| The USB cable is not compatible for data transfer. | Use a USB cable recommended by the telephone manufacturer for correct functioning of the application. | |
| The audio source is no longer recognised by the multimedia system during operation. | Restart the multimedia system by pressing and holding the on/off button (until the screen turns off). | |
| Audio source operation fault (voice recognition disconnected under SIRI/CarPlayTM/Android AutoTM, MP3 player, portable audio player or phone, etc.). | ||
GB.107
OPERATING FAULTS (5/5)
| Media | ||
| Description Causes Solutions | ||
| Android Auto^TM/CarPlay^TM operation fault. | Your smartphone is no longer compatible following an update to the Android Auto^TM/CarPlay^TM application. | Downgrade to the previous version or refer to the Android Auto^TM/CarPlay^TM settings for your smartphone brand. |
| Operational fault with geo-tracking applications. | The network is unavailable.Geo-tracking is not activated on your phone. | Find a location with a strong signal reception.Activate geo-tracking on your telephone. |
| Android Auto^TM Wi-Fi operating fault. Your | smartphone may not be compatible with the Android Auto^TM wireless replication function. | Check whether your smartphone is compatible with the Android Auto^TM wireless replication function. |
| Android Auto^TM/CarPlay^TM Wi-Fi operating fault. | The “Wi-Fi” function is not activated on the multimedia system. | Activate the Wi-Fi function from the multimedia system menu. |
| Android Auto^TM/CarPlay^TM Wi-Fi operating fault. | The “Wi-Fi” country is not configured on the correct channel of the multimedia system. | Configure the country in the Wi-Fi sub-menu of the multimedia system menu. |
| Android Auto^TM/CarPlay^TM Wi-Fi operating fault.“Connection fault” message | The “Connection fault” message may appear for certain smartphones when switched off, connected via Wi-Fi or in native app mode (Radio, Navigation etc.). | No effect other than the message appearing inadvertently. No solution (smart-phone fault) except leaving the smart-phone switched on or in Android Auto^TM/CarPlay^TM mode. |
ALPHABETICAL INDEX (1/3)
3
3D/2D mode GB.83
4
4x4 info GB.5, GB.69
A
address book ......GB.80, GB.90 – GB.91
Android Auto™, CarPlay™ GB.51 → GB.54
answering a call ....GB.13, GB.40
ARTIST GB.27
audio settings
sound settings GB.12 → GB.14
auxiliary source.... GB.26 → GB.28
B
BALANCE GB.29
BASS GB.29
bass GB.30
Bluetooth connection GB.37
Bluetooth® GB.33 → GB.37, GB.42
Bluetooth® portable audio player
pairing GB.27
unpairing GB.27
C
call GB.39, GB.42
call history......GB.39
call volume......GB.20
clock
display GB.97
clock GB.97
confirm a destination GB.81 - GB.82
connect a telephone ....GB.37
contacts list GB.42
controls GB.8 → GB.14, GB.18
D
default settings
smartphone interface GB.48 → GB.50
destination ... GB.77 → GB.82, GB.80, GB.87, GB.90 – GB.91
destination menu GB.77 → GB.82
detailed route ....GB.82, GB.85, GB.88
detour GB.87, GB.95
dialling GB.40
dialling a number ....GB.40
disconnect a telephone....GB.38
distance units....GB.97
E
ECO driving ....GB.65
ending a call ....GB.13
entering an address ......GB.77
F
fascias and steering wheel controls...... GB.8 → GB.14
fast winding....GB.26
favourite
add GB.82
delete GB.91
fuel consumption ....GB.65
fuel economy GB.65
functions GB.5 → GB.7
G
GPS
receiver GB.73, GB.94
reception ....GB.73
guidance
activation GB.83
map GB.83 → GB.88
voice GB.12 → GB.14, GB.83 → GB.88
GB.109
ALPHABETICAL INDEX (2/3)
L
language change GB.97
languages GB.97
LIST mode ....GB.22
M
MANU mode ....GB.21
map digitised map ....GB.73 display ....GB.12 → GB.14, GB.74, GB.89 scale ....GB.74 settings ....GB.89, GB.92
map symbols ......GB.74
media GB.12 → GB.14
MEMO mode GB.22
MENU GB.12
MP3 GB.26
Multi-Sense...... GB.70 → GB.72
multi-view camera....GB.5, GB.63 – GB.64
mute......GB.20
N
navigation settings route settings ....GB.81 – GB.82
numeric keypad GB.19
0
operating faults ....GB.15, GB.104 → GB.108
operation......GB.15 – GB.16
P
pairing a telephone GB.33 → GB.36
POI GB.76 → GB.82, GB.89
point of interest ....GB.75, GB.77 → GB.82, GB.89
precautions during use ....GB.3
GB.110
R
radio......GB.5, GB.12 → GB.14, GB.21 → GB.25
radio station GB.21 → GB.25
range of wavelengths GB.21 → GB.25
RDS GB.5
rear view camera ....GB.5, GB.60 → GB.62
receiving a call ....GB.40
remote engine start-up ...... GB.5 → GB.7, GB.66 → GB.68
reversing camera parameters ....GB.96
ringtone volume GB.30
S
screen menu ....GB.7 monitor ....GB.12, GB.15 – GB.16 navigation display ....GB.7, GB.83 → GB.88 navigation screen ....GB.83 → GB.88 settings ....GB.89
screens multimedia screen .... GB.8 → GB.14
select track ....GB.28
setting GB.88
settings audio ....GB.29 – GB.30, GB.96 balance ....GB.30 brightness ....GB.96 fader ....GB.30
settings ....GB.12 → GB.14, GB.24, GB.93 → GB.97 source audio ....GB.12 → GB.14
specific destination address in favourites ....GB.80
stage GB.87
steering wheel controls ....GB.21
ALPHABETICAL INDEX (3/3)
storing a radio station ....GB.22
switching off GB.15 – GB.16
system
update ...... GB.98 → GB.103
T
telephone GB.6
traffic information ....GB.5 → GB.7, GB.24, GB.82, GB.95
treble....GB.29 – GB.30
U
unpairing a telephone ....GB.36
USB
USB port ....GB.73
USB GB.73, GB.98 → GB.103
USB key......GB.31 – GB.32, GB.98 → GB.103
USB socket ... GB.5, GB.12, GB.26 → GB.28, GB.31 – GB.32,
GB.98 → GB.103
v
vehicle position ....GB.74
videos GB.31 - GB.32
voice control GB.43 → GB.45
voice recognition.....GB.13 – GB.14, GB.43 → GB.45, GB.53
volume GB.12 → GB.14, GB.20
volume: adapted to speed ....GB.20, GB.29
W
wireless charger
charging area ....GB.46 – GB.47
wireless charger ....GB.46 – GB.47
WMA GB.26
Y
Yandex.Auto GB.55 → GB.57