
MCCG937 - Vacuum Cleaner PANASONIC - Free user manual and instructions
Find the device manual for free MCCG937 PANASONIC in PDF.
| Product type | Domestic canister vacuum cleaner |
| Brand | Panasonic |
| Model | MC-CG937 |
| Power supply | 120 V AC, 60 Hz, 12 A |
| Power cord length | 7.3 m (24 ft) with cord rewinder |
| Main functions | Motorized brush, lighting device, suction regulator, brush height adjustment (XLO, LO, MED, HI), telescopic tube, air turbine, onboard accessories |
| Safety | Overload protector (motorized head), thermal protector, polarized plug, automatic shut-off in case of overheating |
| Maintenance and cleaning | Dust bag (C-19, MC-V295H), motor safety filter, HEPA exhaust filter (MC-V199H), belt (CB3, MC-V370B), side brushes |
| Warranty | 1 year (parts and labor) |
| Usage | Domestic use only, do not use outdoors |
| Included accessories | Combination brush, crevice tool, floor brush, air turbine, turbine holder |
Frequently Asked Questions - MCCG937 PANASONIC
User questions about MCCG937 PANASONIC
0 question about this device. Answer the ones you know or ask your own.
Ask a new question about this device
Download the instructions for your Vacuum Cleaner in PDF format for free! Find your manual MCCG937 - PANASONIC and take your electronic device back in hand. On this page are published all the documents necessary for the use of your device. MCCG937 by PANASONIC.
USER MANUAL MCCG937 PANASONIC
Operating Instructions
natural_image
Line drawing of a vacuum cleaner with handle and bulb (no text or symbols)Before operating your vacuum cleaner, please read these instructions completely.
© 2013 Panasonic Appliances Company of America,
Division of Panasonic Corporation of North America
IMPORTANT SAFETY INSTRUCTIONS....9
PARTS IDENTIFICATION 12-14
FEATURE CHART 15
ASSEMBLY 16
Power Nozzle 16
Canister....16
Hood 16
Hose 18
Tool Storage 18
Air Turbine and Caddy 20
TO OPERATE VACUUM CLEANER.... 22
Power Cord 22
On/Off Switch 24
Telescopic Wand Adjustments.... 24
Handle Adjustments.... 26
Suggested Pile Height Settings 26
Using Tools 28
Vacuuming Tips.... 32
FEATURES 34
Overload Protector 34
Edge Cleaner 34
Power Nozzle Storage....36
Thermal Protector 36
Hose Swivel 38
Suction Control 38
ROUTINE CARE OF VACUUM CLEANER 40
Changing Dust Bag.... 40
Motor Safety Filter Changing 42
Exhaust Filter Changing.... 44
Cleaning Exterior and Tools 46
POWER NOZZLE CARE.... 46
Removing Belt 48
Replacing Belt 50
Brush Servicing....52
Replacing Headlight Bulb.... 54
Removing Clogs....54
BEFORE REQUESTING SERVICE 56
WARRANTY 60-62
NOTES 66-67
WHAT TO DO WHEN SERVICE IS NEEDED 68
Table des matières
Please read IMPORTANT SAFETY INSTRUCTIONS on page 9 before use. Read and understand all instructions.
TO OUR VALUED CUSTOMER
We are very pleased to welcome you to the Panasonic family of products. Thank you for purchasing this product. Our intent is that you become one of our many satisfied customers.
Proper assembly and safe use of your vacuum cleaner are your responsibilities. Your vacuum cleaner is intended only for household use. The vacuum cleaner should be stored in a dry, indoor area. Read the Operating Instructions carefully for important use and safety information.
Special care is required when vacuuming certain types of carpet or floor covering. Always check the carpet or floor covering manufacturer's recommended cleaning instructions before vacuuming.
PLEASE PAY CLOSE ATTENTION TO ALL WARNING AND CAUTION STATEMENTS.

WARNING
WARNING statements are designed to alert you to the possibility of personal injury, loss of human life, and/or damage to the vacuum cleaner and/or personal property if the instructions given are not followed.

CAUTION
CAUTION statements are designed to alert you to the possibility of damage to the vacuum cleaner and/or personal property if the instructions given are not followed.

WARNING
TO AVOID ELECTRICAL SHOCK
Never vacuum damp or wet surfaces or liquids.
DO NOT store vacuum cleaner outdoors.
Replace worn or frayed power cord immediately.
Unplug from outlet when not in use and before servicing.
TO AVOID ACCIDENTS
- Except for hand-held vacuum cleaners, keep vacuum cleaner on floor - not chairs, tables, steps, stairs, etc.
- Store vacuum cleaner promptly after each use to prevent accidents such as tripping over power cord or vacuum cleaner.
- Use vacuum cleaner and accessories only in a manner intended by the manufacturer.
- Do not use an extension cord.
- Do not pull the vacuum cleaner beyond its power cord length. The plug might be damaged which can cause electrical sparking and fire.
IMPORTANT SAFETY INSTRUCTIONS
When using your vacuum cleaner, basic precautions should always be followed. Read all instructions in this manual before assembling or using your vacuum cleaner.

WARNING
To reduce the risk of fire, electrical shock, injury:
- Use only as described in this manual. Use only manufacturer's recommended attachments.
- DO NOT leave vacuum cleaner plugged in when not in use. Unplug from outlet when not in use and before servicing.
- To reduce the risk of fire, or electric shock – DO NOT use outdoors or on wet surfaces.
- DO NOT allow vacuum cleaner to be used as a toy. Close attention is necessary when used by or near children.
- DO NOT use with damaged cord or plug. If vacuum cleaner is not working as it should, or if it has been dropped, damaged, left outdoors, or dropped into water, return it to an Authorized Panasonic Servicenter.
- DO NOT pull or carry by cord, use cord as a handle, close door on cord, or pull cord around sharp edges or corners. Do not run vacuum cleaner over cord. Keep cord away from heated surfaces.
- DO NOT unplug by pulling on cord. To unplug, grasp the plug, not the cord.
- DO NOT handle plug or vacuum cleaner with wet hands.
- DO NOT put any objects into openings.
- DO NOT use with any opening blocked; keep free of dust, lint, hair, and anything that may reduce air flow.
- Keep hair, loose clothing, fingers, and all parts of body away from openings and moving parts.
- Turn off all controls before unplugging.
- Use extra care when cleaning on stairs. Do not put on chairs, tables, etc. Keep on floor.
- DO NOT use vacuum cleaner to pick up flammable or combustible liquids such as gasoline or use in areas where they may be present. The fumes from these substances can create a fire hazard or explosion.
- DO NOT pick up anything that is burning or smoking, such as cigarettes, matches, or hot ashes.
- DO NOT use without dust bag and/or filters in place.
- Unplug before connecting Air Turbine (if applicable).
- The hose contains electrical wires. DO NOT use when damaged, cut, or punctured. Replace if cut or worn. Avoid picking up sharp objects.
- Always turn off vacuum cleaner before connecting or disconnecting the hose, Air Turbine (if applicable) or nozzle.
- Hold plug when rewinding onto cord reel. DO NOT allow plug to whip when rewinding.
- You are responsible for making sure that your vacuum cleaner is not used by anyone unable to operate it properly.
- DO NOT operate vacuum cleaner without the exhaust filter or exhaust filter door in place (If applicable).
SAVE THESE INSTRUCTIONS THIS VACUUM CLEANER IS INTENDED FOR HOUSEHOLD USE ONLY
Note: Before you plug in your Panasonic vacuum cleaner, make sure that the voltage indicated on the rating plate located at the back of the vacuum cleaner is the same as your local supply.
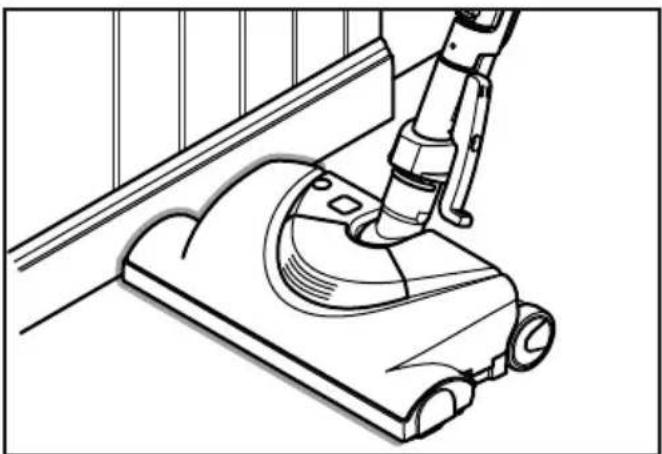
3-Way On/Off Switch (Off/Floor/Carpet)
➢ Insert wand into Power Nozzle until the wand button snaps into place.
TO REMOVE:
➢ Press wand quick release pedal.
➢ Pull wand out of Power Nozzle.
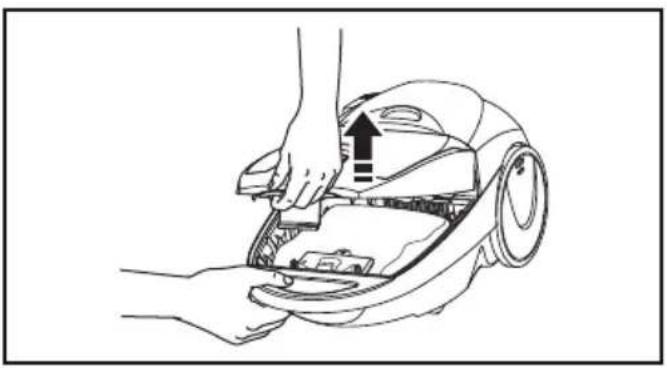
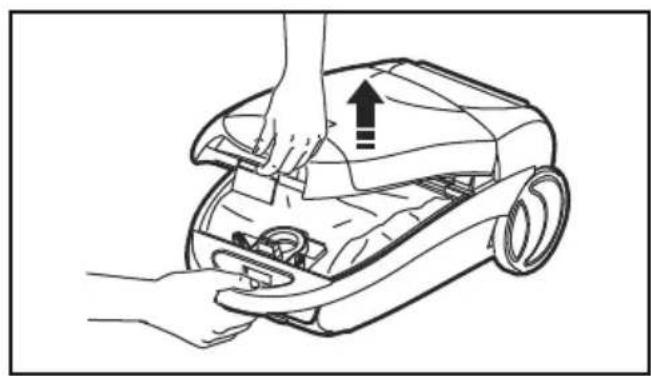
Canister
natural_image
Line drawing of a hand using a vacuum cleaner to adjust or install a component (no text or symbols present)➢ Open canister hood.
➢ Check dust bag (See CHANGING DUST BAG for instructions).
➢ Check filter (See MOTOR SAFETY FILTER CHANGING for instructions).
Hood
It is normal for the canister hood to come off when it is opened further than needed.
➢ Line up the hinges, insert them, and close the hood to replace it.
Assemblage
Tête motorisée
Line up the hose latch tab and notch in canister hood and insert hose into canister until it snaps in place.
NOTE: The vacuum cleaner will not start unless hose is fully inserted and snapped in place.
To Remove:
➢ Lift hose latch tab upward and pull up on hose.
➢ Insert handle into wand until lock button snaps in place.
➢ Be sure the hose is not twisted.
To Remove:
➢ Press handle quick release and pull up on handle.
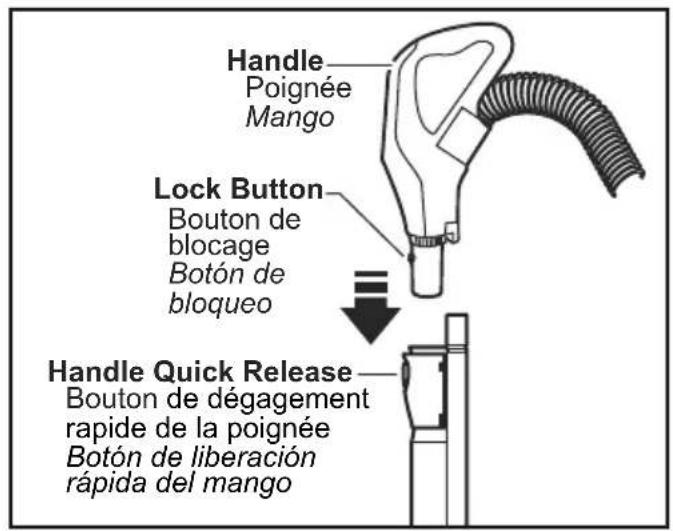
text_image
Handle Poignée Mango Lock Button Bouton de blocage Botón de bloqueo Handle Quick Release Bouton de dégagement rapide de la poignée Botón de liberación rápida del mangoTuyau
Tools are stored on-board the vacuum cleaner in the tool storage area.
To open, press cover release button on the tool storage cover.
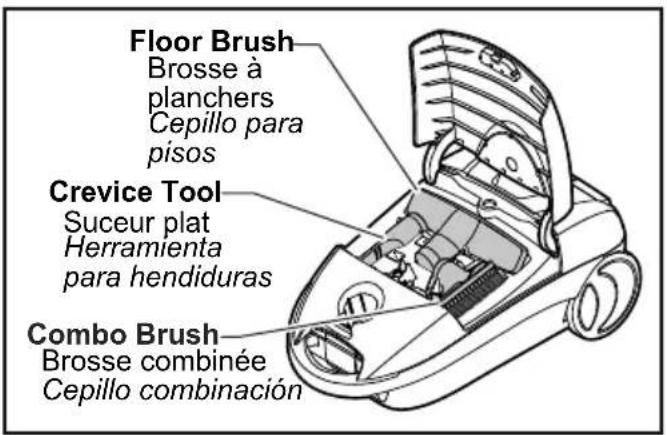
text_image
Floor Brush Brosse à planchers Cepillo para pisos Crevice Tool Suceur plat Herramienta para hendiduras Combo Brush Brosse combinée Cepillo combinación➢ Open cover to access tools as needed (See USING TOOLS).
Air Turbine and Caddy
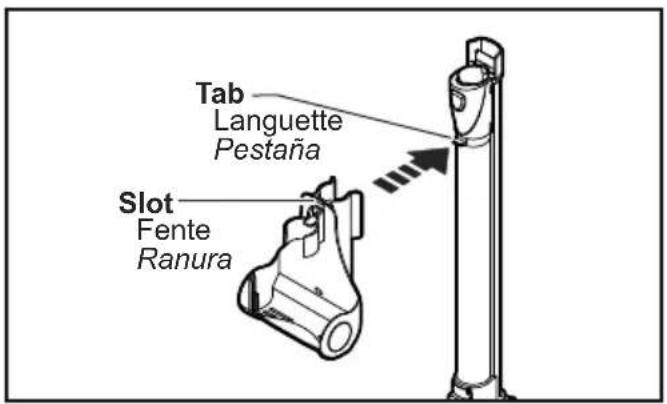
text_image
Tab Languette Pestaña Slot Fente RanuraTO ATTACH CADDY
Align the tab on the wand with the slot in the Air Turbine caddy.
➢ Press the caddy onto the upper wand. The caddy will snap into place
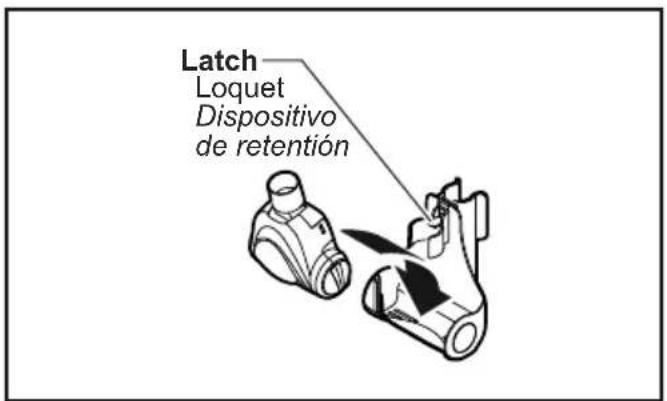
text_image
Latch Loquet Dispositivo de retentiónTO INSERT AIR TURBINE
➢ Place the front of the Air Turbine into the caddy.
Rotate the Air Turbine back until it snaps into place.
TO REMOVE AIR TURBINE
➢ Press the latch and lift the Air Turbine out of the caddy.
natural_image
Illustration of a hand holding a tool inside a circular prohibition symbol, with no text or symbols present.
CAUTION
Moving parts! To reduce the risk of personal injury, DO NOT touch the agitator when vacuum cleaner is on. Contacting the agitator while it is rotating can cut, bruise or cause other injuries. Always unplug from electrical outlet before servicing.
Use caution when operating near children.
Power Cord
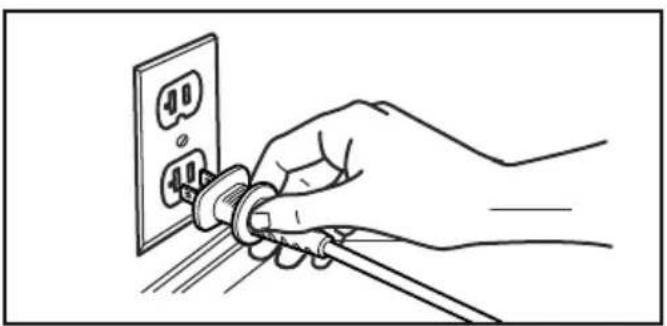
NOTE: To reduce the risk of electrical shock, this vacuum cleaner has a polarized plug - one blade is wider than the other. This plug will fit in a polarized outlet only one way. If the plug does not fit fully in the outlet, reverse the plug. If it still does not fit, contact a qualified electrician to install the proper outlet. DO NOT CHANGE THE PLUG IN ANY WAY. Only use outlets near the floor.
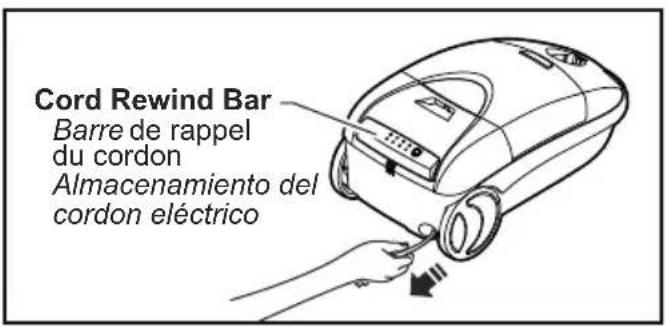
➢ Pull cord out of canister to desired length.
➢ Cord will not rewind until cord rewind bar is pushed.
natural_image
Line drawing of a hand inserting a plug into an electrical outlet (no text or symbols)Plug cord into 120-volt outlet located near the floor.
Fonctionnement

ATTENTION
natural_image
Line drawing of a hand using a vacuum cleaner to adjust the air gap (no text or symbols present)TO REWIND:
Unplug the vacuum cleaner.
➢ Hold the plug while rewinding to prevent damage or injury from the moving cord.
➢ Push cord rewind bar.
On-Off Switch
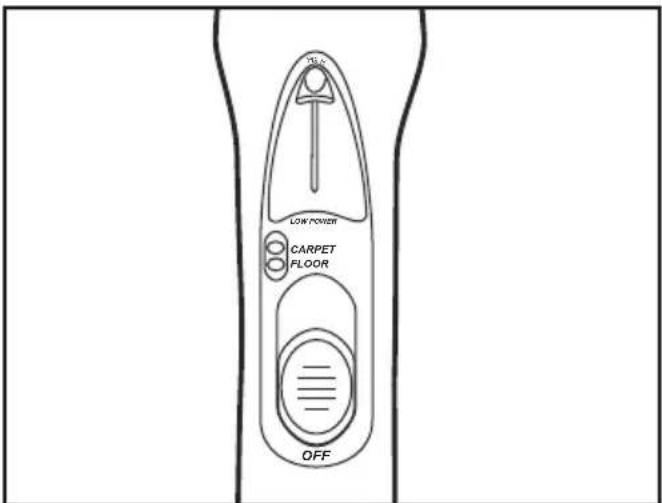
text_image
LOW POWER CARPET FLOOR OFF➢ Select a switch position on handle.
OFF
➢ FLOOR - turns on canister motor only
CARPET - turns on both canister and Power Nozzle motors
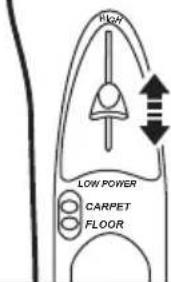
Telescopic Wand Adjustments
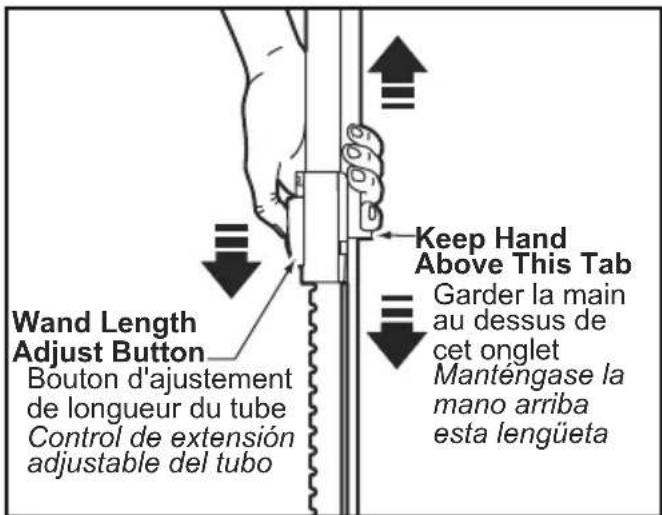
text_image
Wand Length Adjust Button Bouton d'ajustement de longueur du tube Control de extensión adjustable del tubo Keep Hand Above This Tab Garder la main au dessus de cet onglet Manténgase la mano arriba esta lengüetaThe wand length is adjustable and requires no assembly.
To adjust, simply push down on the wand adjust button and slide the upper wand to the desired height.
When adjusting the wand length you may have to hold the Power Nozzle with your hand or foot.
Pour ré en rou ler:
➢ Lower wand from upright position by pressing on the handle release pedal.
➢ Return wands to upright position for storage.
Suggested Pile Height Settings

For best deep down cleaning, use the "XLO" setting. However, you may need to raise the height to make some jobs easier, (such as throw rugs and some deep pile carpets) and to prevent the vacuum cleaner from shutting off. Suggested settings are: "XLO" - most carpets and bare floors. "LO" - low to medium pile. "MED" - medium to deep pile. "HI" - shag; deep pile; scatter rugs.
Select a pile height setting by pressing the small pedal on the rear. The pile height setting is shown in the window.
DO NOT attach or remove handle or wands while vacuum cleaner is ON. This could cause sparking and damage the electrical contacts.
ATTACHMENTS ON HANDLE
If the Power Nozzle is attached, turn vacuum cleaner off before removing handle from wands.
➢ Press handle quick release, then pull to remove handle from wand.
Slide attachments firmly on handle as needed (See page 30).
natural_image
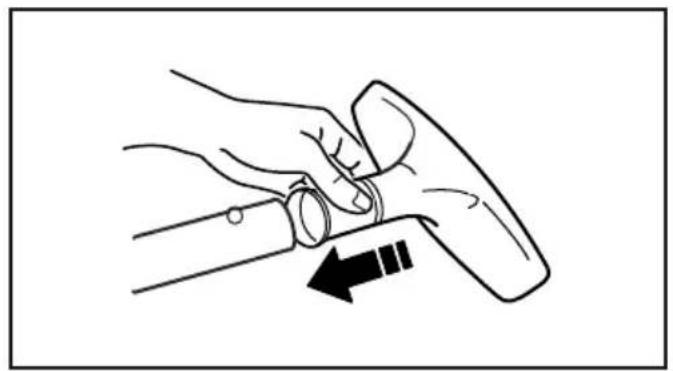
Line drawing of a hand holding a tool with an arrow indicating motion (no text or symbols)ATTACHMENTS ON WANDS

natural_image
Diagram of a robotic vacuum cleaner emitting exhaust air, showing motion trajectory (no text or symbols)If the Power Nozzle is attached, turn vacuum cleaner off before removing plug from wands.
To remove wands from Power Nozzle, lock wands in upright position.
➢ Press wand quick release pedal with foot and pull the wands straight up out of Power Nozzle.
➢ Put attachments on wands as needed (See page 30).
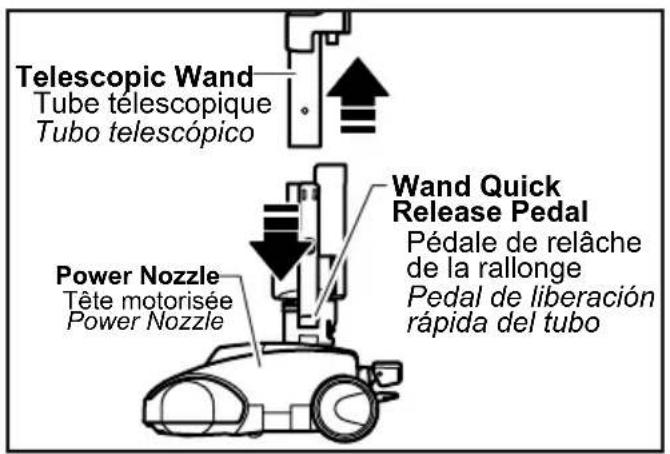
text_image
Telescopic Wand Tube telescopique Tubo telescópico Power Nozzle Tête motorisée Power Nozzle Wand Quick Release Pedal Pédale de relâche de la rallonge Pedal de liberación rápida del tubonatural_image
Simple line drawing of a mechanical component with a cylindrical top and textured base (no text or symbols)The Combination Brush may be used on the following items:
- Furniture
- Drapes
- Stairs
- Walls
natural_image
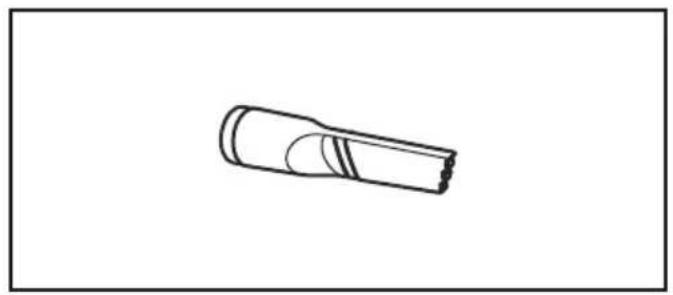
Simple line drawing of a cylindrical object with a flanged end and internal striped pattern (no text or symbols)The Crevice Tool may be used on the following items:
- Furniture
- Cushions
- Drapes
- Stairs
- Walls
natural_image
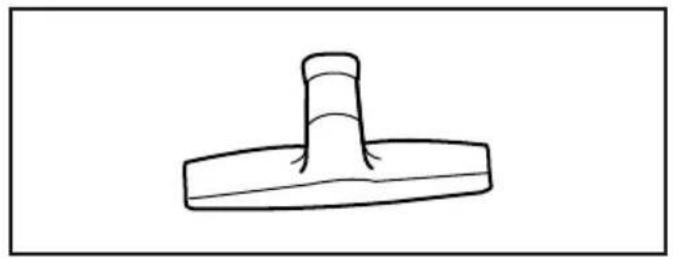
Simple line drawing of a mechanical component with a cylindrical top and base (no text or symbols)The Floor Brush may be used on the following items:
- Stairs
- Bare Floors
- Walls
natural_image
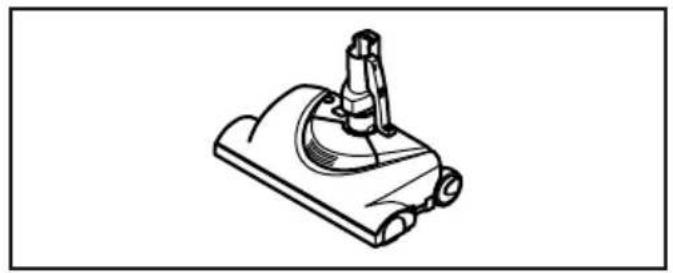
Line drawing of a mechanical device with a cylindrical component and base (no text or symbols)The Power Nozzle may be used on the following items:
- Carpeted Floors
- Rugs
natural_image
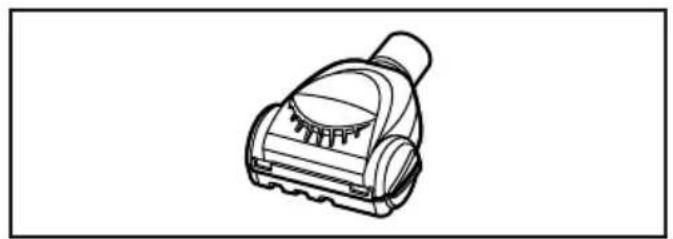
Line drawing of a vacuum cleaner device (no text or symbols)The Air Turbine may be used on the following items:
- Furniture
- Stairs
Note: Always clean tools before using.
natural_image
Line drawing of a person using a vacuum cleaner on a tiled floor, with motion arrows indicating airflow (no text or symbols)Suggested sweeping pattern:
For best cleaning action, the Power Nozzle should be pushed straight away from you and pulled straight back. At the end of each pull stroke, the direction of the Power Nozzle should be changed to point into the next section to be cleaned. This pattern should be continued across the rug with slow, gliding motions.
➢ Fast, jerky motions do not provide complete cleaning.
➢ Small areas can be cleaned without moving the canister.
Carpeted stairs need to be vacuumed regularly.
For best cleaning results, fully close the suction control.
The overload protector stops the Power Nozzle motor when the brush jams and prevents belt breakage.
NOTE: Canister motor will continue to run.
TO CORRECT PROBLEM:
➢ Turn off and unplug vacuum cleaner.
➢ Check brush and brush support areas for excessive lint build-up or jamming.
➢ Clean jammed area.
TO RESET:
➢ Press the belt reset button on top of the Power Nozzle. Plug in and turn on vacuum cleaner.
Edge Cleaner
natural_image
Line drawing of a vacuum cleaner using a mounted device (no text or symbols)Active brush edge cleaners are on both sides of the Power Nozzle.
Guide either side of the Power Nozzle along base-boards or next to furniture to help remove dirt trapped at carpet edges.
Caractéristiques
natural_image
Technical line drawing of a mechanical device with no visible text or symbolsThe wand has a "U" shaped flange that slides into the "U" shaped slot on the canister.
The slot allows the wands and Power Nozzle to be stored with the canister to conserve storage space. The canister must be stored on end for this feature to be used.
The wand will slip out of the slot as it is lifted up for use and will slide into the slot as it is lowered for storage.
The Power Nozzle must be in the flat position as shown in the illustration. Use the handle release pedal to place it in this position.
Thermal Protector
If a clog prevents the normal flow of air to the canister motor, the thermal protector turns the motor off automatically to allow the motor to cool in order to prevent possible damage to the vacuum cleaner.
To correct problem, turn off and unplug vacuum cleaner, remove clogs, and/or clean/replace filters.
➢ Replace full bag if necessary.
➢ Wait approximately fifty (50) minutes, plug vacuum cleaner in, turn on to see if thermal protector has reset.
natural_image
Diagram of a mechanical joint or connector with two threaded components and directional arrows indicating movement (no text or symbols)The hose swivel allows the hose to turn without moving the canister. This is helpful for cleaning in small areas.
➢ Check hose for twisting before pulling canister.
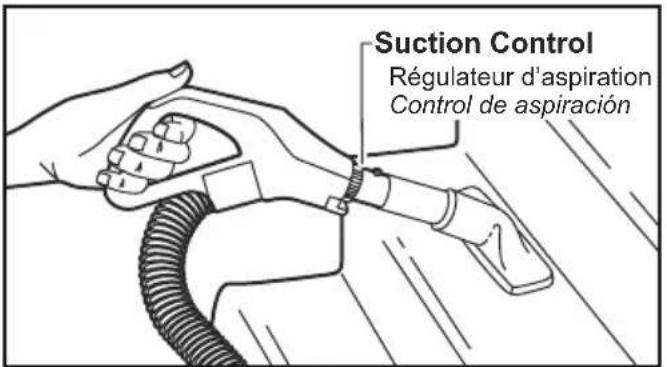
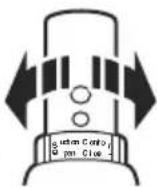
Suction Control
text_image
HIGH LOW POWER CARPET FLOORIncrease Suction
Augmentation l'aspiration Aumentar aspiración
Decrease Suction
Dimunition de l'aspiration Disminuir aspiración
➢ Suction control allows you to change vacuum cleaner suction for different fabric and carpet weight.
LOW POWER decreases suction for draperies and lightweight rugs
➢ HIGH increases suction for upholsteries and carpets.
Decrease Suction
Diminution de l'aspiration Disminuir aspiración
Increase Suction
Augmentation de l'aspiration Aumentar aspiración
➢ Suction control allows you to change vacuum cleaner suction for different fabric and carpet weight.
Opening control decreases suction for draperies and lightweight rugs.
➢ Closing control increases suction for upholstery and carpets.
Tuyau pivotant
Always operate vacuum cleaner with genuine Panasonic dust bag installed. Panasonic dust bags may be purchased through any authorized Panasonic dealer or ordered from service company. See CONSUMABLE PARTS.
natural_image
Line drawing of a hand using a vacuum cleaner to adjust or install the component (no text or symbols present)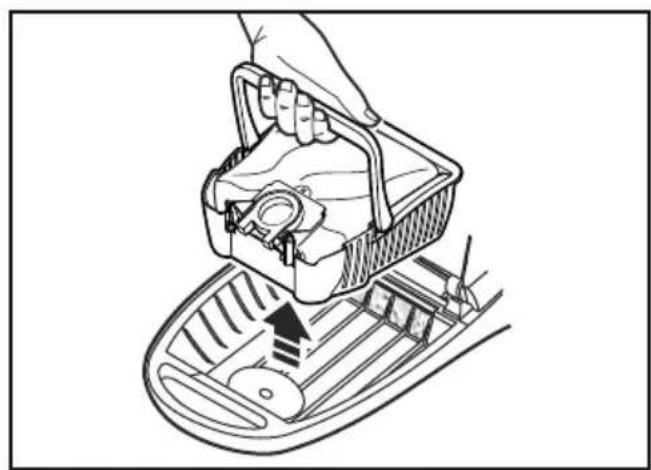
natural_image
Line drawing of a hand placing a plastic bag into a cart with an arrow indicating motion (no text or symbols)
natural_image
Line drawing of hands installing or adjusting a mechanical component inside a container (no text or symbols)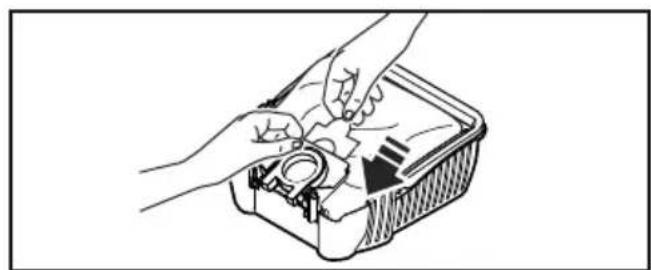
natural_image
Illustration of hands assembling a mechanical component in a container (no text or symbols visible)➢ Turn off and unplug vacuum cleaner.
➢ Pull hood release out and up, then lift canister hood.
Lift bag caddy out of canister.
➢ Remove cardboard tab from red bag mount by pressing away and lifting up.
➢ Pull bag out of the red bag mount.
➢ Raise red bag mount up.
Note: Creasing the cardboard will cause it not to lock in place and dirt may not all go into the bag (some will miss the bag and end up in the bag cavity.)
➢ Install bag into slots by pushing down until the cardboard tab locks into position and the holes align.
➢ Insert bag caddy into canister.
➢ Close and latch canister hood.
Plug cord into wall outlet.
NEVER REUSE A DUST BAG.
Motor Safety Filter Changing
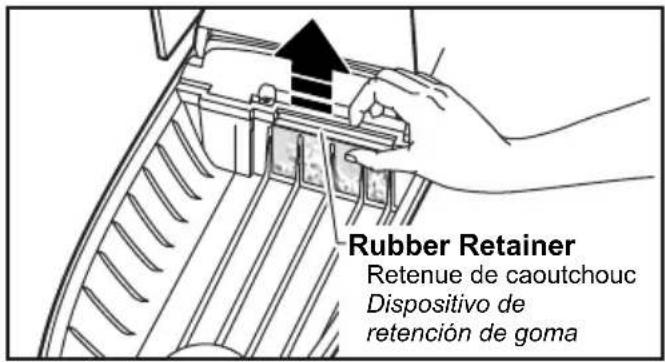
text_image
Rubber Retainer Retenue de caoutchouc Dispositivo de retención de gomaCheck motor safety filter occasionally and change when dirty.

natural_image
Line drawing of a hand holding a mechanical component with a downward arrow indicating a process (no text or symbols present)
WARNING
Electrical Shock Hazard
Do not operate the vacuum cleaner without the motor safety filter. Be sure the filter is dry and properly installed to prevent motor failure and/or electrical shock.
➢ Turn off and unplug vacuum cleaner.
➢ Lift rubber retainer and pull out motor safety filter as shown.
Replace filter.
➢ White side is mounted facing the dust bag.
Filter cannot be cleaned and should be replaced at least once a year.
➢ Insert bag and bag caddy.
DO NOT CLEAN FILTER WITH WATER.
➢ DO NOT operate the vacuum cleaner without filter.
Exhaust Filter Changing
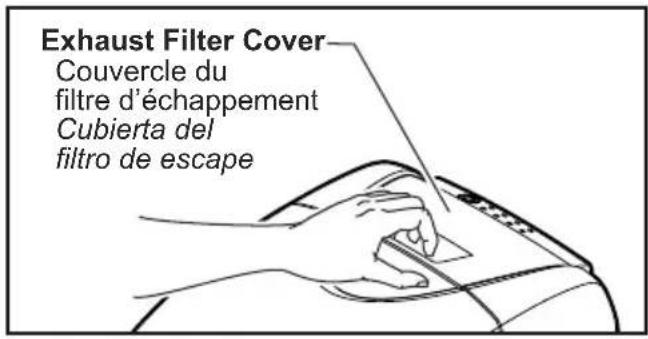
Fire and/or Electrical Shock Hazard
Do not operate with a clogged exhaust filter or without the exhaust filter or exhaust filter cover installed.
text_image
Exhaust Filter Filtre d'échappement Filtro de escapeEXHAUST FILTER HEPA
The exhaust filter cartridge must be replaced when dirty. The filter CANNOT be washed as it will lose its dust trapping ability. Replace the filter when the entire surface area is covered evenly. See CONSUMABLE PARTS.
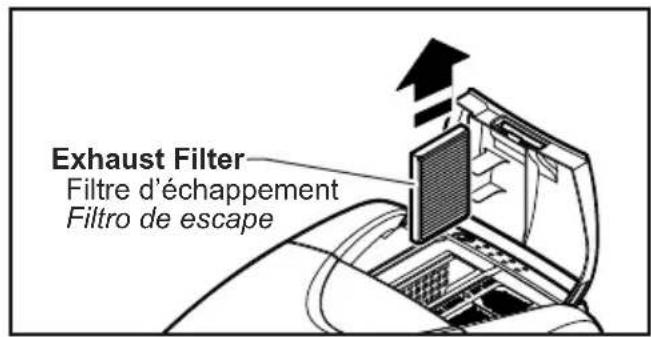
text_image
Exhaust Filter Filtre d'échappement Filtro de escape➢ Pull up on the exhaust filter cover.
Grasp the exhaust filter and pull out to remove.
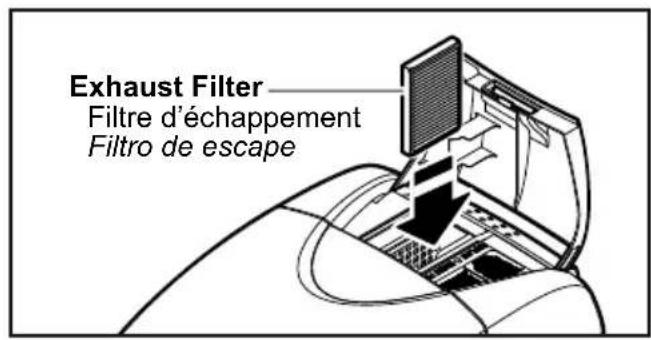
➢ Replace the exhaust filter cartridge, carefully positioning it so that the airflow direction indicated on the filter cartridge matches the direction indicated on the vacuum cleaner.
➢ Close the exhaust filter cover until it snaps into place.
Cleaning Exterior and Tools
➢ Turn off and unplug vacuum cleaner.
➢ Clean exterior using a clean, soft cloth that has been dipped in a solution of mild liquid detergent and water and wrung dry.
➢ DO NOT drip water on vacuum cleaner. Wipe dry after cleaning.
➢ DO NOT clean tools in dishwasher or clothes washer.
➢ Wash tools in warm soapy water, rinse and air dry.
➢ DO NOT use tools if they are wet.
POWER NOZZLE CARE
Always follow all safety precautions before performing maintenance to the Power Nozzle.

WARNING
Electrical Shock or Personal Injury Hazard.
Disconnect the electrical supply before performing maintenance to the vacuum cleaner. Failure to do so could result in electrical shock or personal injury from vacuum cleaner suddenly starting.
natural_image
Technical line drawing of a mechanical assembly with hands installing a component (no text or symbols present)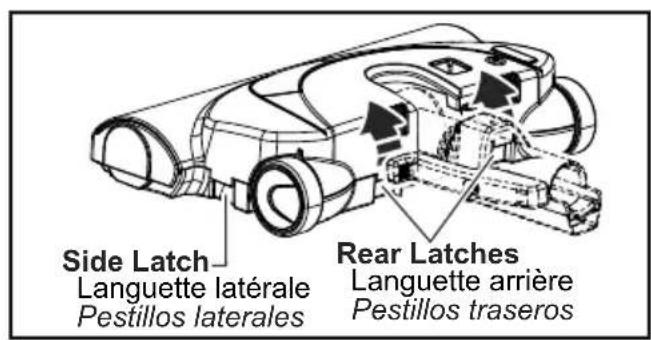
text_image
Side Latch Languette latérale Pestillos laterales Rear Latches Languette arrière Pestillos traseros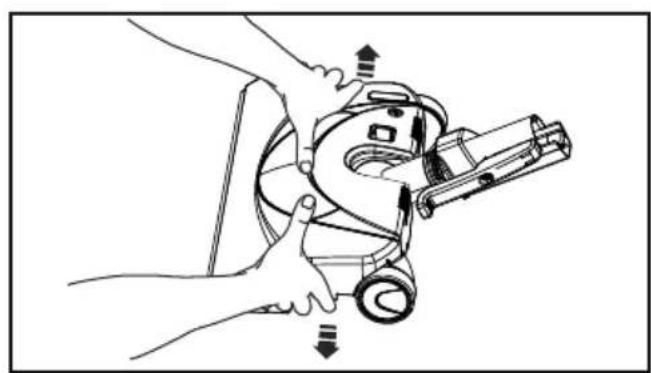
natural_image
Line drawing of hands operating a mechanical device with arrows indicating motion (no text or symbols)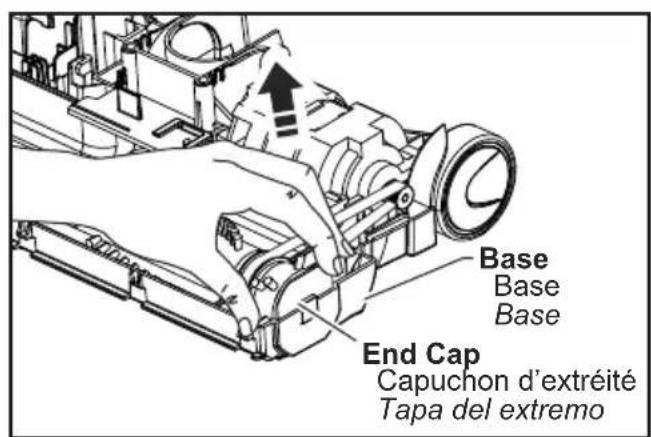
text_image
Base Base Base End Cap Capuchon d'extréité Tapa del extremoCheck and remove hair, string and lint build-up frequently in the Power Nozzle brush and brush support areas. If build-up becomes excessive, disconnect Power Nozzle from wand and follow the steps below.
➢ Turn off and unplug vacuum cleaner.
➢ Turn Power Nozzle over.
➢ Unscrew the two (2) Power Nozzle cover screws.
➢ Turn Power Nozzle right side up.
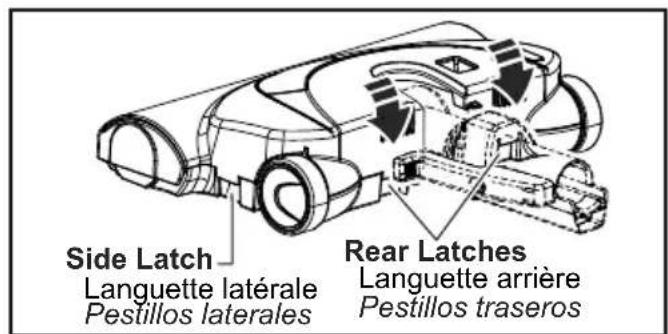
➢ Press handle release pedal and lower the swivel.
Lift rear latches up.
To remove cover, grasp the sides and pull out.
➢ Tilt cover forward from back until front snaps free.
Lift agitator assembly out.
Remove worn belt.
Agitator Assembly
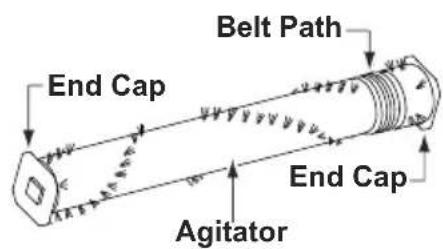
text_image
End Cap Belt Path End Cap AgitatorInstall new belt in belt path on the agitator assembly, then over the motor shaft. See. CONSUMABLE PARTS.
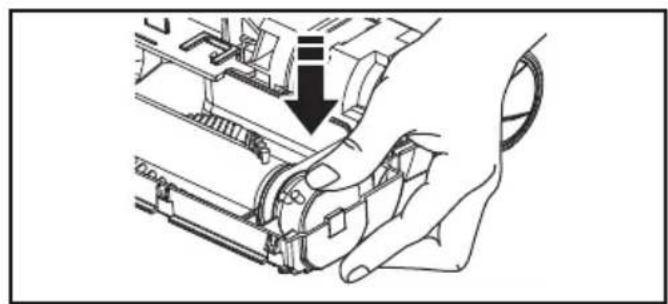
natural_image
Line drawing of a hand operating a mechanical device with a black arrow indicating the process (no text or symbols present)➢ Place agitator assembly back into Power Nozzle.
text_image
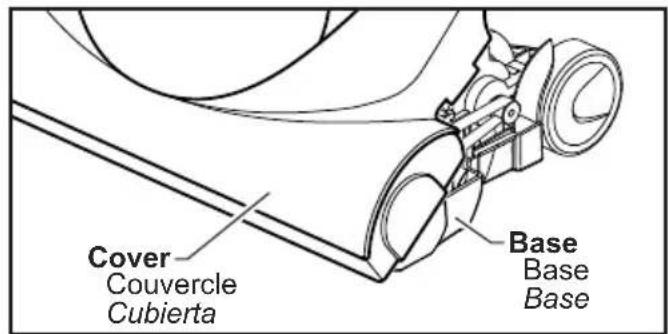
Cover Couvercle Cubierta Base Base Base➢ Line up front of cover and base.
Rest cover on front edge of base as shown.
➢ Tilt cover to back.
➢ Press cover firmly until latches snap into place.
➢ Replace cover screws.
text_image
Side Latch Languette latérale Pestillos laterales Rear Latches Languette arrière Pestillos traserosnatural_image
Diagram showing two circular views of a railway track with pulleys and overhead lines, no text or symbols present.Base Support Bars
Barres de support de la base
Barra de soporte de la base

WARNING
Electrical Shock Or Personal Injury Hazard
Disconnect electrical supply before performing maintenance to the vacuum cleaner. Failure to do so could result in electrical shock or personal injury from vacuum cleaner suddenly starting.
TO CHECK BRUSHES:
When brushes are worn to the level of the base support bar, replace the brush dowel.
TO REPLACE AGITATOR ASSEMBLY
➢ Remove Power Nozzle cover, agitator cover, belt and agitator assembly. (See REMOVING BELT).
➢ Replace agitator assembly.
➢ Replace belt, agitator cover, POWER NOZZLE cover and screws. (See REPLACING BELT).
Entretien des brosses

AVERTISSEMENT
natural_image
Illustration of hands connecting a cable to a connector with a clip, no text or symbols present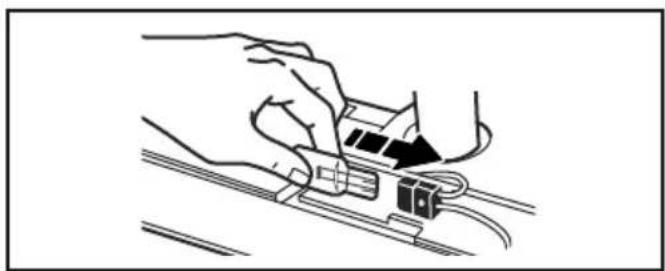
natural_image
Line drawing of hands connecting a cable to a connector (no text or symbols)➢ Remove POWER NOZZLE cover.
➢ Remove the light bulb by pulling straight out.
To replace the light bulb, carefully insert fully into slot.
➢ Only use a bulb rated 13V AC-9 Watts.
➢ Replace POWER NOZZLE cover.
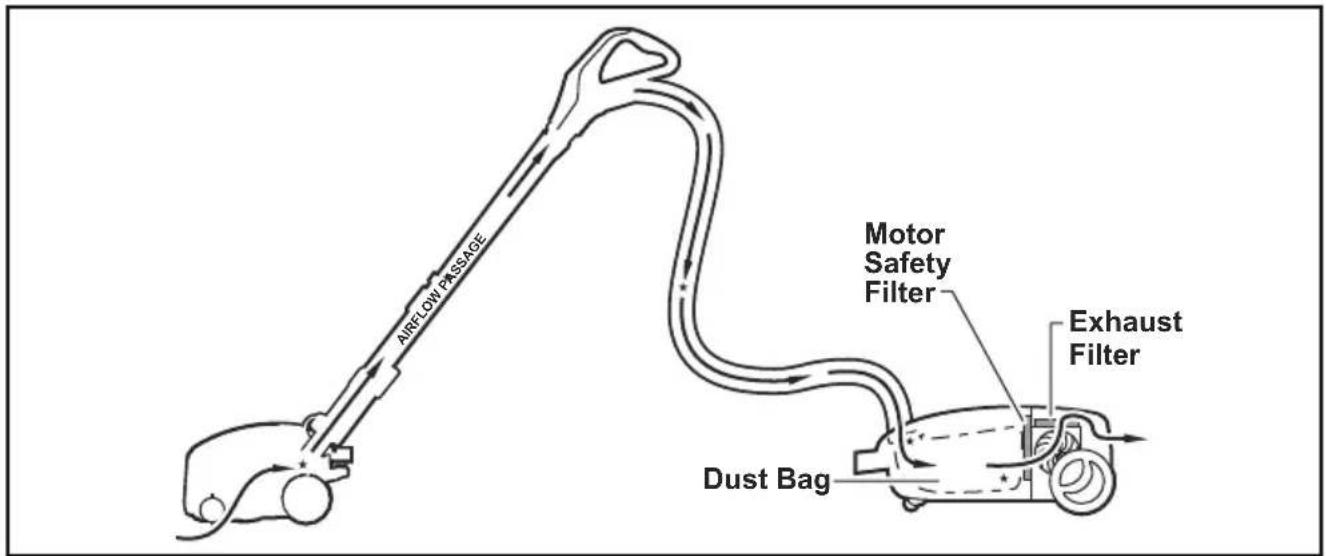
Removing Clogs
The vacuum cleaner creates suction that picks up dirt. Rapidly moving air carries the dirt to the dust bag through the air flow passage. The dust bag lets the air pass through, while it traps the dirt.
For best cleaning results, keep the airflow passage open. Check the starred areas occasionally for clogs. Unplug vacuum cleaner before checking airflow.
text_image
AIRFLOW PASSAGE Motor Safety Filter Exhaust Filter Dust BagWARNING Electric Shock or Personal Injury Hazard.
Disconnect the electrical supply before performing maintenance to the vacuum cleaner. Failure to do so could result in electric shock or personal injury from vacuum cleaner suddenly starting.
Review this chart to find do-it-yourself solutions for minor performance problems. Any service needed, other than those described in these Operating Instructions, should be performed by an authorized service representative.
| PROBLEM POSSIBLE CAUSE POSSIBLE | $OLUTION | |
| Vacuum cleaner won't start. | 1. Unplugged at wall outlet.2. Tripped circuit breaker/blown fuse at household service panel.3. Loose hose electrical connections. | 1. Plug in firmly, push ON/OFF switch to ON. (page 24)2. Reset circuit breaker or replace fuse.3. Reconnect hose ends. (page 18) |
| Poor job of dirt pick-up. | 1. Full or clogged dust bag.2. Clogged airflow passages.3. Dirty safety filter.4. Wrong pile height setting.5. Open suction control.6. Hole in hose.7. Worn Power Nozzle brushes.8. Worn or broken belt.9. Dirty agitator or end caps.10. Canister hood open. | 1. Change bag. (page 40)2. Clear airflow passages. (page 54)3. Replace filter. (page 42)4. Adjust setting. (page 26)5. Adjust control. (page 38)6. Replace hose.7. Replace agitator. (page 52)8. Replace belt. (page 48 & 50)9. Clean agitator and end caps. (page 48)10. Close and latch hood. |
| Vacuum cleaner starts but cuts off. | 1. Hose or hood electrical connections.2. Tripped overload protector in Power Nozzle.3. Tripped thermal protector | 1. Check connections, reconnect hose ends. (page 18)2. Reset overload protector. (page 34)3. Reset thermal protector. (page 36) |
| Power Nozzle will not run when attached. | 1. Power Nozzle connections unplugged.2. Worn or broken belt.3. Dirty agitator or end caps.4. Tripped overload protector in Power Nozzle. | 1. Plug in firmly. (page 16)2. Replace belt. (page 48 & 50)3. Clean agitaor and end caps. (page 48)4. Reset overload protector. (page 34) |
| Vacuum Cleaner picks up moveable rugs -or-Power Nozzle pushes too hard. | 1. Wrong pile height setting.2. Suction too strong. | 1. Adjust setting. (page 26)2. Open suction control. (page 38) |
| Light won't work. | 1. Burned out light bulb. | 1. Change light bulb. (page 54) |
| Cord won't rewind. | 1. Dirty power cord.2. Cord jammed. | 1. Clean the power cord.2. Pull out cord and rewind. (page 22 & 24) |
| Vacuum cleaner leaves marks on carpet. | 1. Wrong vacuuming pattern. | 1. See VACUUMING TIPS. (page 32) |
Guide de dépannage

Panasonic Consumer Marketing Company of North America, Division of Panasonic Corporation of North America
One Panasonic Way, Secaucus, New Jersey 07094
Panasonic Vacuum Cleaner Limited Warranty
Limited Warranty Coverage (For USA and Puerto Rico Only)
If your product does not work properly because of a defect in materials or workmanship, Panasonic Consumer Marketing Company of North America (referred to as “the warrantor”) will, for the length of the period indicated on the chart below, which starts with the date of original purchase (“warranty period”), at its option either (a) repair your product with new or refurbished parts, (b) replace it with a new or a refurbished equivalent value product, or (c) refund your purchase price. The decision to repair, replace or refund will be made by the warrantor.
| Product or Part Name Parts Labor | |
| Vacuum Cleaner 1 yr. 1 yr. |
During the "Labor" warranty period there will be no charge for labor. During the "Parts" warranty period, there will be no charge for parts.
This Limited Warranty Excludes both Labor and Parts for the following items which require normal replacement: Disposable Dust Bag, Filters, Belts, Light Bulbs, Agitator Brushes and Batteries (if supplied).
This warranty only applies to products purchased and serviced in the United States or Puerto Rico. This warranty is extended only to the original purchaser of a new product which was not sold "as is".
Carry-In or Mail in Service:
To find a service center please visit http://www.panasonic.com/help or call 1-800-211-PANA (7262).
IF REPAIR IS NEEDED DURING THE WARRANTY PERIOD, THE PURCHASER WILL BE REQUIRED TO FURNISH A SALES RECEIPT/PROOF OF PURCHASE INDICATING DATE OF PURCHASE, AMOUNT PAID AND PLACE OF PURCHASE. CUSTOMER WILL BE CHARGED FOR THE REPAIR OF ANY UNIT RECEIVED WITHOUT SUCH PROOF OF PURCHASE.
Limited Warranty Limits And Exclusions
This warranty ONLY COVERS failures due to defects in materials or workmanship, and DOES NOT COVER normal wear and tear or cosmetic damage. The warranty ALSO DOES NOT COVER damages which occurred in shipment, or failures which are caused by products not supplied by the warrantor, or failures which result from accidents, misuse, abuse, neglect, mishandling, misapplication, alteration, faulty installation, set-up adjustments, misadjustment of consumer controls, improper maintenance, power line surge, lightning damage, modification, introduction of sand, humidity or liquids, commercial use such as hotel, office, restaurant, or other business or rental use of the product, or service by anyone other than a Factory Service Center or other Authorized Servicer, or damage that is attributable to acts of God.
THERE ARE NO EXPRESS WARRANTIES EXCEPT AS LISTED UNDER "LIMITED WARRANTY COVERAGE".
THE WARRANTOR IS NOT LIABLE FOR INCIDENTAL OR CONSEQUENTIAL DAMAGES RESULTING FROM THE USE OF THIS PRODUCT, OR ARISING OUT OF ANY BREACH OF THIS WARRANTY. (As examples, this excludes damages for lost time, travel to and from the servicer, loss of or damage to media or images, data or other memory or recorded content. The items listed are not exclusive, but for illustration only.)
ALL EXPRESS AND IMPLIED WARRANTIES, INCLUDING THE WARRANTY OF MERCHANTABILITY, ARE LIMITED TO THE PERIOD OF THE LIMITED WARRANTY.
Some states do not allow the exclusion or limitation of incidental or consequential damages, or limitations on how long an implied warranty lasts, so the exclusions may not apply to you.
This warranty gives you specific legal rights and you may also have other rights which vary from state to state. If a problem with this product develops during or after the warranty period, you may contact your dealer or service center. If the problem is not handled to your satisfaction, then write to:
Consumer Affairs Department
Panasonic Consumer Marketing Company
661 Independence Pkwy
Chesapeake, VA 23320
PARTS AND SERVICE, WHICH ARE NOT COVERED BY THIS LIMITED WARRANTY, ARE YOUR RESPONSIBILITY.
Customer Services Directory (United States and Puerto Rico)
Obtain Product Information and Operating Assistance; locate your nearest Dealer or Service Center; purchase Parts and Accessories; or make Customer Service and Literature requests by visiting our Web Site at: http://www.panasonic.com/help
or, contact us via the web at: http://www.panasonic.com/contactinfo
You may also contact us directly at: 1-800-211-PANA (7262) Monday-Friday 9am-9pm, Saturday-Sunday 10am-7pm EST
For hearing or speech impaired TTY users, TTY: 1-877-833-8855
Accessory Purchases (United States and Puerto Rico)
Purchase Parts, Accessories and Instruction Books online for all Panasonic Products by visiting our Web Site at: http://www.pstc.panasonic.com
Or, send your request by E-mail to: npcparts@us.panasonic.com
You may also contact us directly at:
1-800-332-5368 (Phone) 1-800-237-9080 (Fax Only)
(Monday-Friday 9am-9pm EST)
Panasonic National Parts Center
20421 84th Avenue South,
Kent, WA 98032
(We accept Visa, MasterCard, Discover Card, and American Express)
For hearing or speech impaired TTY users, TTY: 1-866-605-1277
WARRANTY
Panasonic Canada Inc.
5770, Ambler Drive, Mississauga (Ontario) L4W 2T3
PANASONIC PRODUCT – LIMITED WARRANTY
EXCHANGE PROGRAM
Panasonic Canada Inc. warrants this product to be free from defects in material and workmanship under normal use and for a period as stated below from the date of original purchase agrees to, at its option either (a) repair your product with new or refurbished parts, (b) replace it with a new or a refurbished equivalent value product, or (c) refund your purchase price. The decision to repair, replace or refund will be made by Panasonic Canada Inc.
Vacuum Cleaner One (1) year
This warranty is given only to the original purchaser, or the person for whom it was purchased as a gift, of a Panasonic brand product mentioned above sold by an authorized Panasonic dealer in Canada and purchased and used in Canada, which product was not sold "as is", and which product was delivered to you in new condition in the original packaging.
IN ORDER TO BE ELIGIBLE TO RECEIVE WARRANTY SERVICE HEREUNDER, A PURCHASE RECEIPT OR OTHER PROOF OF DATE OF ORIGINAL PURCHASE, SHOWING AMOUNT PAID AND PLACE OF PURCHASE IS REQUIRED
LIMITATIONS AND EXCLUSIONS
This warranty ONLY COVERS failures due to defects in materials or workmanship, and DOES NOT COVER normal wear and tear or cosmetic damage. The warranty ALSO DOES NOT COVER damages which occurred in shipment, or failures which are caused by products not supplied by Panasonic Canada Inc., or failures which result from accidents, misuse, abuse, neglect, mishandling, misapplication, alteration, faulty installation, set-up adjustments, misadjustment of consumer controls, improper maintenance, power line surge, lightning damage, modification, introduction of sand, humidity or liquids, commercial use such as hotel, office, restaurant, or other business or rental use of the product, or service by anyone other than a Authorized Servicer, or damage that is attributable to acts of God.
Parts such as disposable dust bags, filters, belts, light bulbs and agitator brushes are not covered by this warranty.
THIS EXPRESS, LIMITED WARRANTY IS IN LIEU OF ALL OTHER WARRANTIES, EXPRESS OR IMPLIED, INCLUDING ANY IMPLIED WARRANTIES OF MERCHANTABILITY AND FITNESS FOR A PARTICULAR PURPOSE. IN NO EVENT WILL PANASONIC CANADA INC. BE LIABLE FOR ANY SPECIAL, INDIRECT OR CONSEQUENTIAL DAMAGES RESULTING FROM THE USE OF THIS PRODUCT OR ARISING OUT OF ANY BREACH OF ANY EXPRESS OR IMPLIED WARRANTY. (As examples, this warranty excludes damages for lost time, travel to and from the Authorized Servicer, loss of or damage to media or images, data or other memory or recorded content. This list of items is not exhaustive, but for illustration only.)
In certain instances, some jurisdictions do not allow the exclusion or limitation of incidental or consequential damages, or the exclusion of implied warranties, so the above limitations and exclusions may not be applicable. This warranty gives you specific legal rights and you may have other rights which vary depending on your province or territory.
CONTACT INFORMATION
For product information and operation assistance, please contact:
Our Customer Care Centre:
Telephone: 1-800-561-5505
Fax #: (905) 238-2360
For defective product exchange within the warranty period, please contact the original dealer or our Customer Care Centre.
Garantie
Panasonic Canada Inc.
5770, Ambler Drive, Mississauga (Ontario) L4W 2T3
PRODUIT PANASONIC - GARANTIE LIMITÉE
PROGRAMME D'ÉCHANGE
Panasonic Consumer Marketing Company of North America,
Division of Panasonic Corporation of North America
One Panasonic Way, Secaucus, New Jersey 07094
Consumer Affairs Department
Panasonic Consumer Marketing Company
661 Independence Pkwy
Chesapeake, VA 23320
PARTES Y SERVICIOS QUE NO ESTAN CUBIERTO POR ESTA GARANTIA LIMITADA, SON SU RESPONSABILIDAD.
If your Panasonic Vacuum Cleaner needs service, look in the yellow pages of the telephone book under HOME APPLIANCE SERVICE for your nearest Panasonic Services Company ("PASC") Factory Servicenter, or PASC authorized Servicenter, or call, 1-800-211-PANA (7262) toll free to find a convenient servicenter. DO NOT send the product to the Executive or Regional Sales offices. They are NOT equipped to make repairs.
If you ship the product
Carefully pack and send it prepaid, adequately insured and preferably in the original carton. Attach a postage-paid letter to the outside of the carton, which contains a description of your complaint. DO NOT send the product to the Executive or Regional Sales Offices. They are NOT equipped to make repairs.
PANASONIC CONSUMER ELECTRONICS COMPANY DIVISION OF PANASONIC CORPORATION OF NORTH AMERICA
One Panasonic Way Secaucus, New Jersey 07094 World Wide Web Address http://www.panasonic.com
What to do when service is needed Service après-vente (Canada)
WARRANTY SERVICE
For product operation and information assistance, please contact your Dealer or our Customer Care Centre at: Telephone #: (905) 624-5505 Fax #: (905) 238-2360 Web: www.panasonic.ca
For product repairs, please contact one of the following:
- Your Dealer who will inform you of an authorized Servicentre nearest you.
• Our Customer Care Centre at (905) 624-5505 or www.panasonic.ca
• A Panasonic Factory Servicentre listed on warranty page.