Omni S10 - Subwoofer Mirage - Free user manual and instructions
Find the device manual for free Omni S10 Mirage in PDF.

User questions about Omni S10 Mirage
0 question about this device. Answer the ones you know or ask your own.
Ask a new question about this device
Download the instructions for your Subwoofer in PDF format for free! Find your manual Omni S10 - Mirage and take your electronic device back in hand. On this page are published all the documents necessary for the use of your device. Omni S10 by Mirage.
USER MANUAL Omni S10 Mirage
natural_image
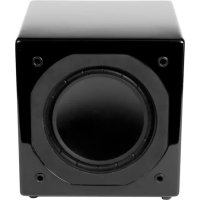
Black MRAGE audio amplifier with speaker chamber and control panel (no visible text or symbols on main body)OMNI SERIES
owners manual
S8
S10
S12
MIRAGE
ENGLISH: Important safety instructions - Read carefully!
Caution: To prevent the risk of electrical shock, match wide blades of plug to wide slot, fully insert.
Read Instructions: All safety and operating instructions should be read before the product is operated.
Retain Instructions: Safety and operating instructions should be retained for future reference.
Heed Warnings: All warnings on the product & operation instructions should be adhered to.
Follow Instructions: All operating and use instructions should be followed.
Cleaning: Unplug the product from the wall before cleaning. Do not use aerosol or liquid cleaners, just a damp cloth.
Attachments: Do not use attachments not recommended by the product manufacturer as they may cause hazards.
Water and Moisture: Do not use this product near water.
Ventilation: Openings in the cabinet are provided for ventilation and to ensure reliable operation and protect it from overheating so they must not be blocked or covered by placing the product on a bed, sofa or other similar surface. This product should not be placed in a built-in installation such as a bookcase or rack unless proper ventilation is provided or the manufacturer's instructions have been adhered to.
Power Sources: This product should be operated only from the type of power source indicated on the marking label. If you are not sure of the type of power supply in your home, call your local power company.
Grounding or Polarization: This product may be equipped with a polarized alternating current line plug. This plug will fit the power outlet in only one way as a safety feature. If you are unable to insert the plug, try reversing it. If the plug should still fail to fit, contact your electrician to replace your outlet. Do not defeat the safety purpose of the plug.
Power Cord Protection: Power supply cords should be routed so that they are not likely to be walked on or pinched by items placed upon or against them, paying particular attention to cords at plugs, convenience receptacles and the point where they exit from the product.
Overloading: Do not overload wall outlets or extension cords, as this can result in a risk of electrical shock.
Object and Liquid Entry: Never push objects of any kind into this product through openings as they may touch dangerous voltage points or short out parts that can result in a fire or electrical shock. Never spill liquid of any kind on the product.
Servicing: Do not attempt to service this product yourself as openings or removing covers may expose you to dangerous voltage or other hazards. Refer all servicing to qualified personnel.
Heat: This product should be situated away from heat sources such as radiators, heat registers, stoves, or other appliances (including amplifiers) that produce heat.
Non-Use Periods: The power cord of the product should be unplugged from the outlet when left unused for a long period of time.
Damage Requiring Service: The product should be serviced by qualified personnel when:
A. The power supply cord or the plug has been damaged; or
B. Objects have fallen, or liquid has been spilled into the appliance; or
C. The product has been exposed to rain; or
D. The appliance does not appear to operate normally or exhibits a marked change in performance; or
E. Product has been dropped, or the enclosure damaged.
F. If the product does not operate normally by following the operating instructions.
INTRODUCTION
Congratulations on your purchase of MIRAGE ^® speakers! Proprietary technology and high quality manufacturing will allow you to enjoy the most natural and accurate music reproduction for many years. The advice offered in this manual is aimed at helping you maximize and maintain peak performance, and therefore, your listening satisfaction. Please take the time to read all of the instructions contained in this manual to make certain your system is properly installed and functioning correctly.
BREAK-IN PERIOD
We strongly advise that you resist the temptation to play the MIRAGE speakers to their full capabilities or experiment with critical placement and listening until they have been properly broken in. This process should last approximately 50 hours. This can be easily be done by putting your compact disc player on Repeat mode, while playing a CD with a wide dynamic range at normal listening levels.
CABINET CARE
Great care and craftsmanship has gone into the construction and fi nish of the cabinet. Periodically use a soft, dry cloth to remove dust or fi ingerprints. Do not use paper towels or other abrasive materials as it may damage the fi nish.
NOTE: Please retain the carton and packing material for your MIRAGE products, to protect them in the event of a move or if they need to be shipped to a service center. Product received damaged by a service center that has been shipped by the end user in other than the original packaging will be repaired, refurbished and properly packaged for return shipment, at the end user's expense.
SUBWOOFER PLACEMENT
The placement of your new MIRAGE subwoofer is critical to its performance. The three most common locations include: in the corner of the room (which can result in a boomy or exaggerated low frequency response), placement along one wall but out of the corner (moderate bass performance with increased fi delity over corner placement), or alongside a front speaker (creating a better blend with the front speaker, but sacrifi cing overall volume). Experimentation with subwoofer placement is highly encouraged, as slight adjustments can create large benefits in sound reproduction. To further test subwoofer placement, install the subwoofer temporarily in your main listening position and while playing a familiar piece of music, walk around the listening room until you fi nd the best sounding position. This is a possible location for the subwoofer to be placed.
TERMINOLOGY AND CONTROLS
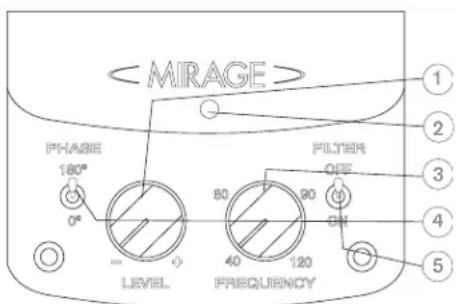
Front Panel
-
Subwoofer Level Control - This knob can be adjusted to control the level of output from your subwoofer. The level chosen should allow the subwoofer to blend its output with that of the rest of your audio system.
-
Status Indicator – The LED found on the front panel will illuminate when the subwoofer is connected to an AC source and the unit is active. The LED will display in red when the unit is plugged in but is not receiving a signal and will display green when the unit is active.
- Frequency Control – This control allows for the adjustment of the low-pass filter. Adjustments can infinitely be made from 40Hz to 120Hz. This will determine the highest frequency that the subwoofer will play.
- Phase Control – This switch allows for the adjustment of the phase of the subwoofer, in relation to the speakers used in your system, either 0 degrees or 180 degrees.
OWNERS MANUAL
- Filter Mode – This switch allows for the selection of either Filter On or Filter Off. (Please see the connections section for suggestions on which mode is appropriate for your installation).
Rear Panel
- Power Mode – This switch can be set to either On, Off or Auto. If the switch is in the Off position, the subwoofer will not power up. If the switch is in the On position, it will constantly remain on. If the switch is set to the Auto position, when a signal is present the subwoofer will turn on and will automatically turn off several minutes after a signal is no longer present.
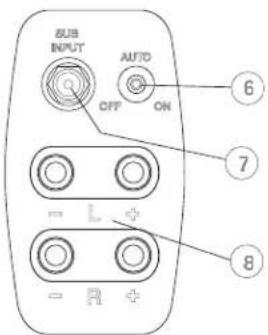
-
Sub In - This input is an RCA type mono input.
-
High-Level Input - These are 5-way binding post type speaker connectors. The High-Level inputs are designed to be used on receivers or amplifiers that do not incorporate any RCA type subwoofer outputs. If your receiver is equipped with an RCA type subwoofer output, these speaker level inputs should not be utilized.
CONNECTING YOUR MIRAGE SUBWOOFER
CAUTION: All power should be turned off to your system before any connections are made. Careful attention should be taken to ensure that all electronic components are not connected to an AC source. Not doing so could result in potential damage to the system.
There are two mutually exclusive methods to connect your subwoofer to your receiver:
Method 1 - RCA - For Home Theater or LFE Applications
- On the rear of the receiver there should be a single RCA type jack marked "Subwoofer Out". Connect a single RCA cable from that jack to the RCA Sub In (#7) on the rear of the subwoofer. A standard male to male RCA cable is needed.
- After connecting the single low level Sub In (#7) connection, plug your MIRAGE subwoofer into an AC outlet. Do not use the AC outlet on the rear of your receiver.
- Select either the Filter Mode On or Off (#5). The Filter Mode On switch position should be used when connecting your MIRAGE subwoofer to a receiver without bass management or when you wish to manually control the crossover and volume settings (such as in a music system). The Filter Mode Off switch position should be used when connecting to a receiver with bass management (such as in a digital surround sound movie system). This connection defeats the crossover feature on the MIRAGE subwoofer, allowing this control to be handled by the receiver. Adjusting the front panel Level Control (#1) will still be required.
- Ensure that the supplied vibration dampeners are installed in the high-level speaker inputs, as this ensures that the inputs will not vibrate audibly.
- See Final System Adjustments, below.
Method 2 - Speaker Level - For Music Applications
-
The other way to connect your subwoofer to your receiver is using a High-Level (#8) (speaker wire) connection. First remove the highlevel vibration dampeners that are installed between the terminals and then simply connect the speaker wires from the Front Left and Right Speaker Outputs on your receiver to the Left and Right Inputs on the rear of the subwoofer (#8). It is imperative that speaker polarities be maintained, one must connect the positive and negative wires to the appropriate positive and negative terminals. Failure to do so will result in an out of phase connection, severely limiting the amount of bass in your system.
-
After connecting the High-Level (#8) (speaker wire) between your receiver and subwoofer, ensure no fray wires are touching, as this could cause a short circuit and damage your electronics. Plug your MIRAGE subwoofer into an AC outlet. Do not use the AC outlet on the rear of your receiver.
- See Final System Adjustments, below.
Do NOT connect both RCA (#7) and High-Level (#8) connections simultaneously, as this will damage your MIRAGE subwoofer.
FINAL SYSTEM ADJUSTMENTS
- The Subwoofer is equipped with a master power switch which must be engaged prior to use. After having completed the break-in process, select the correct position for the Power Mode switch (#6), either On or Auto depending on your system. The Auto selection will leave the unit in a self-sensing mode, such that should the unit sense an audio signal it will turn itself on and then shut down after several minutes without signal, while in the On position the subwoofer always remains on. Should the system not be used for an extensive period of time, it is recommended that the subwoofer be unplugged from the AC outlet.
- Adjust the Level Control (#1) on the front panel of your MIRAGE subwoofer so that the volume of your subwoofer matches the overall system volume. This ensures a smooth transition between the low and high frequencies of your system.
- Adjust the Frequency Setting (#3) on your MIRAGE Speakers subwoofer so that the frequency range of the subwoofer blends well with that of the front speakers (For use with all settings, except when in Filter Mode Off). Setting the crossover too low will create a gap between the frequency response of the front speakers and that of the subwoofer, while setting the crossover frequency too high will create a doubling of certain frequencies, making the music sound boomy. When using small satellite speakers, the appropriate crossover frequency should be from 95Hz to 120Hz, for the bookshelf speakers 65Hz to 95Hz and for the large crossover fl oorstanding speakers 40Hz to 65Hz.
- Adjust the Phase control (#4) so that the subwoofer integrates fully with the rest of your audio system. This control is adjustable to either 0 degrees or 180 degrees, and ensuring that the subwoofer operates in phase with the rest of the system is critical, as an out of phase subwoofer will either sound like it is lacking in bass performance or that its timing is off. This setting will be determined by your listening position, the characteristics of your listening room and its interaction with your MIRAGE subwoofer. An out of phase speaker means that the speaker cone is moving inwards when it should be moving outwards, like the other speakers in your system, causing cancellations of certain frequencies. By adjusting the phase control, one can ensure that all speakers move in the proper direction, at the same time.
- Steps 2, 3 and 4 might require repeating in order to fine tune your system. Ensuring the proper blending between the speakers and the subwoofer is critical to the performance of your system, as a whole.
WARRANTY OUTSIDE OF THE UNITED STATES
Outside of North America, the warranty may be changed to comply with local regulations. Ask your local MIRAGE dealer for details of the LIMITED WARRANTY applicable in your country.
WARRANTY FOR THE UNITED STATES AND CANADA
Please see the warranty document on the back cover.
The lightning flash with arrowhead symbol within an equilateral triangle is intended to alert the user to the presence of uninsulated "dangerous voltage" within the products enclosure that may be of sufficient magnitude to constitute a risk of electric shock to persons.

The exclamation point within an equilateral triangle is intended to alert the user to the presence of important operating and maintenance (servicing) instructions in the literature accompanying the appliance.
"MIRAGE" and the "MIRAGE" logo are trademarks of Klipsch Group Inc ©2010
PLACERING AF SUBWOOFEREN
TILSLUTNING AF MIRAGE SUBWOOFER
LIMITED WARRANTY POLICY
IN THE UNITED STATES AND CANADA
MIRAGE warrants this product to the retail purchaser against any failure resulting from original manufacturing defects in work-manship or materials.
The warranty is in effect for a period of:
1) for the Speaker Section, five (5) years, and
2) for the Amplifier Section, one (1) year, from date of purchase by the original owner from an authorized MIRAGE dealer, and is valid only if the original dated bill of sale is presented when service is required. The warranty does not cover damage caused during shipment, by accident, misuse, abuse, neglect, unauthorized product modification, failure to follow the instructions outlined in the owner's manual, failure to perform routine maintenance, damage resulting from unauthorized repairs or claims based upon misrepresentations of the warranty by the seller.
WARRANTY SERVICE
If you require service for your MIRAGE speaker(s) at any time during the warranty period, please contact:
1) the dealer from whom you purchased the product(s),
2) MIRAGE, a division of Klipsch Group Inc. 3502 Woodview Trace, Indianapolis, IN 46268 Tel: 866-428-2122
3) Additional service centers can be found by checking the MIRAGE website: www.miragespeakers.com or, by calling the above number. You will be responsible for transporting the speakers in adequate packaging to protect them from damage in transit and for the shipping costs to an authorized MIRAGE service center or to MIRAGE. The MIRAGE Warranty is limited to repair or replacement of MIRAGE products. It does not cover any incidental or consequential damage of any kind. If the provisions in any advertisement, packing cartons or literature differ from those specified in this warranty, the terms of the Limited Warranty prevail.