B160100HDSI - Receiver Tripp Lite - Free user manual and instructions
Find the device manual for free B160100HDSI Tripp Lite in PDF.

| Product type | IP-based audio/video receiver for HDMI extension |
| Maximum resolution | 1920 x 1080 (1080p) |
| Maximum distance (point-to-point) | 100 m (328 ft) via Cat5e/6 cable |
| Maximum distance (via switch) | 200 m (656 ft) with Cat5e/6 cable |
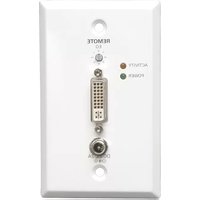
| Input connectors | 1 x RJ45 (network), 1 x HDMI (local out), 1 x RS-232 (DB9 or 3.5 mm), 1 x IR-IN |
| Output connectors | 1 x HDMI |
| Supported video formats | HDMI with HDCP, 3D |
| Network | Compatible with managed IGMP and unmanaged switches |
| IR control | Frequency 20-60 kHz, IR signal extension |
| RS-232 control | Up to 57,600 baud |
| Power | External power supply (included) |
| Power consumption | Approximately 5 W (typical) |
| Operating temperature | 0 °C to 40 °C (estimated) |
| Mounting | Wall, 19-inch rack, pole (mounting hardware included) |
| Included accessories | IR cables (IN and OUT), 3.5 mm/DB9 adapter, mounting hardware, manual |
| Warranty | 1 year |
| Maintenance | No special maintenance required. Clean the device with a soft, dry cloth. Disconnect before cleaning. |
| Safety | Use only with a dedicated network switch. Do not expose to moisture or extreme temperatures. |
Frequently Asked Questions - B160100HDSI Tripp Lite
User questions about B160100HDSI Tripp Lite
0 question about this device. Answer the ones you know or ask your own.
Ask a new question about this device
Download the instructions for your Receiver in PDF format for free! Find your manual B160100HDSI - Tripp Lite and take your electronic device back in hand. On this page are published all the documents necessary for the use of your device. B160100HDSI by Tripp Lite.
USER MANUAL B160100HDSI Tripp Lite
Audio/Video with RS-232 and IR Control over IP Extenders
Extender Kit Models:
B160-101-DPSI
B160-101-DPHDSI
B160-101-HDSI
B160-103-HDSI
B160-201-HSI
B160-202-HDSI
B160-301-HDSI
Transmitter Models:
B160-001-CSI
B160-001-DPSI
B160-001-HDSI
B160-001-VSI
Receiver Models:
B160-100-CSI
B160-100-DPSI
B160-100-HDSI
B160-100-VSI
B160-200-HSI
Espanol 25 • Français 50 • Pycckn 75
WARRANTY REGISTRATION
Register your product today and be automatically entered to win an ISOBAR surge protector in our monthly drawing!
www.triplite.com/warranty


Manufacturing Excellence.
1111 W. 35th Street, Chicago, IL 60609 USA • www.triplite.com/support
Copyright © 2019 Tripp Lite. All trademarks are the sole property of their respective owners.
Package Contents
| B160-001-CSI | B160-001-DPSI | B160-001-HDSI | B160-001-VSI | B160-100-CSI | B160-100-DPSI | B160-100-HDSI | B160-100-VSI | B160-200-HSI | B160-101-DPSI | B160-101-DPHDI | B160-101-HDSI | B160-103-HDSI | B160-201-HSI | B160-202-HDSI | B160-30-HDSI | |
| Transmitter (T), Receiver (R), Kit (K) | TTTT | RRRR | RRRR | KKKK | KKKK | KKKK | KKKK | KKKK | KKKK | KKKK | KKKK | KKKK | KKKK | KKKK | KKKK | |
| External Power Supply 1 | 11 | 11 | 11 | 11 | 22 | 22 | 42 | 44 | ||||||||
| IR-In Cable 000011 | 11 | 11 | 11 | 11 | 23 | |||||||||||
| IR-Out Cable 11100 | 000 | 11 | 11 | 13 | 12 | 1 | ||||||||||
| 3.5 mm to DB9 M/Adapters Cable | 110 | 10 | 00 | 00 | 11 | 10 | 80 | 21 | ||||||||
| 3.5 mm to DB9 M/Adapters Cable | 000 | 01 | 10 | 11 | 11 | 10 | 11 | 23 | ||||||||
| HDMI to DVIAdapters Cable | 001 | 00 | 01 | 00 | 01 | 2 | 40 | 44 | ||||||||
| Mounting Hardware YYY | YYYY | YYYY | YYYY | YYYY | YYYY | Y | ||||||||||
| Owner's Manual YYYYY | YYYY | YYYY | YYYY | YYYY | YYYY |
Optional Accessories
A008-006 Component Video Gold Cable - 6 ft.
N202-Series Cat6, 24 AWG, Solid-Wire Patch Cables
NSS-G16D2 16-Port Gigabit L2 Managed Switch with 8-Outlet PDU
NSS-G24D2 24-Port Gigabit L2 Managed Switch with 12-Outlet PDU
P502-Series VGA Cables with RGB Coax
P520-006 RS-232 Serial Extension Cable - 6 ft.
P561-Series DVI-D Single-Link Cables
P566-Series HDMI to DVI Adapter Cables
P568-Series High-Speed HDMI Cables
- P569-XXX-LOCK* High-Speed HDMI Cables with Ethernet and Locking Connectors
P580-Series DisplayPort™ Cables
P583-Series Mini DisplayPort to DisplayPort Cables
*XXX refers to the length, with cables available in 6 ft. (006), 10 ft. (010) and 15 ft. (015) lengths.
Product Features
- Extends and distributes audio/video, serial and IR control signals over Cat5/Cat6 cabling.
- Models available with Component Video + Stereo Audio, DisplayPort, HDMI**, and VGA + Stereo Audio.
- Converts source video to an IP-based signal that can be transmitted to and distributed through a network switch.
- Transmitters can be located up to 328 ft. (100 m) from the switch, with an additional 328 ft. (100 m) between the switch and the receiver, for a total distance of 656 ft. (200 m).
- Can also be used in a point-to-point installation where the transmitter directly connects to a receiver up to 328 ft. (100 m) away.
- Designed for managed network switches with IGMP, which allow login and remote management via the switch interface.
- Video source can be sent to any analog or digital display (e.g. Component Video to HDMI, VGA to HDMI, HDMI to DisplayPort, HDMI to HDMI).
- Display a single source on a single monitor or distribute a single signal to multiple monitors.
- B160-200-HSI and B160-201-HSI receiver units include two HDMI output ports for connection of two monitors.
- Connect up to 64 transmitters and 255 receivers in a single managed switch installation.
- Utilizes H.264 video compression standard.
- Extends IR control signals that control a source (such as a Blu-ray™ player) from a remote display.
Uses a 20kHz to 60~kHz IR frequency.
Supports RS-232 Serial baud rates up to 57600 bps.
VGA video models support video resolutions up to 1920 x 1440, including 1080p. - DisplayPort and HDMI models support video resolutions up to 1920 x 1080 (1080p).
Product Features
- Component video models support video resolutions up to 1080i.
Each transmitter features an HDMI output port for connecting a local monitor. - HDCP and 3D compatible.
- Includes mounting hardware for wall-mount, rack mount or pole mount installations.
- Plug and play; no software or drivers required.
**Connect a DVI source and/or monitor using an HDMI to DVI adapter (select models include an HDMI to DVI adapter). HDMI to DVI adapter cables (Tripp Lite P566-Series) are available, sold separately.
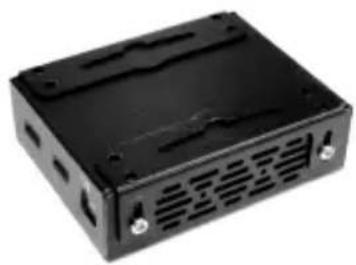
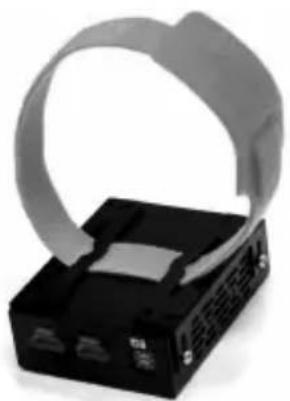
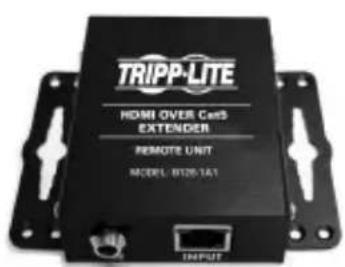
Mounting Instructions
Audio/Video over IP extenders include mounting hardware that allows for a variety of mounting options. The following images demonstrate these mounting methods.
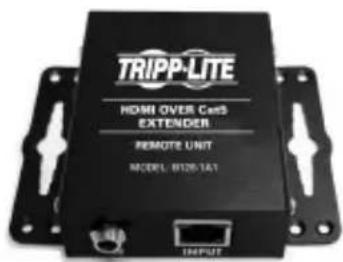
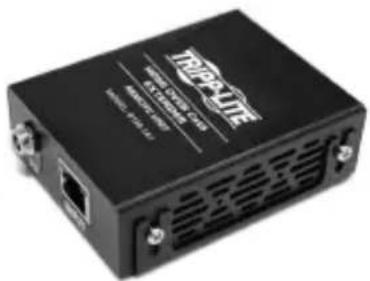
Note: Model B126-1A1 is shown for illustrative purposes; installation for Audio/Video over IP extender units is the same.
Wall-mount

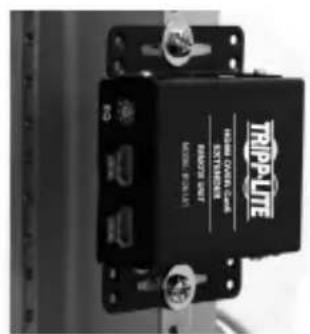
19" Rack-mount
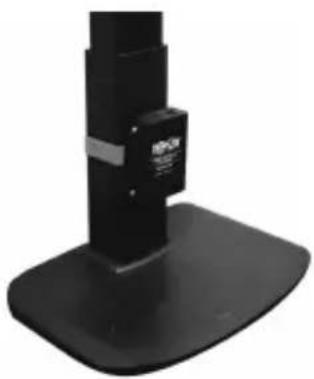
Pole-mount

Point-to-Point Installation
Notes:
- Test to ensure the entire installation works properly before pulling cables through ceilings/walls.
- To achieve maximum distance and performance, use 24 AWG solid wire Cat5e/6 cable. Using stranded wire cable or cable with a gauge (AWG) size higher than recommended will result in a shorter extension distance. Higher gauge cabling (such as 26 AWG) has a limited transmission capability compared to lower-gauge cabling. All Tripp Lite N202-Series Cat6 cables use 24 AWG solid wire cabling. Extended lengths of 23 AWG solid wire Cat6a cable are available from Tripp Lite as a custom order.
-
Transmitter and receiver kits are available in DisplayPort, HDMI and VGA, but separate transmitters and receivers can be purchased in any combination (e.g. Component Video to HDMI, VGA to HDMI, HDMI to VGA, HDMI to DisplayPort).
-
Ensure all equipment to be connected is powered off.
- Connect the audio/video source to the transmitter unit's input port (see Optional Accessories for available Tripp Lite audio/video cables).
- (Optional) Connect the computer's DB9 port to the transmitter unit's serial port. Depending on the model, the serial port will be either DB9 or 3.5mm . Models with 3.5mm jacks include a 3.5mm to DB9 adapter. Models with DB9 ports require standard RS-232 DB9 cable (sold separately) for connecting to a computer.
- (Optional) Connect the included IR-OUT cable to the transmitter unit's IR-OUT port. Place the sensor on the IR-OUT cable in an unobstructed area within clear view of the device being controlled.
Note: The IR-OUT cable receives the signal from the remote control and sends it to the device being controlled (e.g. Blu-ray player, etc.).
- (Optional) Using an HDMI cable, connect a local monitor to the transmitter unit's HDMI output port (see Optional Accessories for available Tripp Lite HDMI cables).
- Connect the external power supply to the local transmitter unit and plug it into a Tripp Lite Surge Protector, Uninterruptible Power Supply (UPS) or Power Distribution Unit (PDU).
Point-to-Point Installation
- Press the Up / Down buttons to set the Channel Number (0-63) on the front of the transmitter unit to a number that will also be used on the receiver unit.
Note: A locking mechanism prevents the Channel Number from being unintentionally changed. When the Channel Number is locked, hold down the Up and Down buttons until the Channel Number starts blinking. Then navigate to the desired Channel using the Up / Down buttons. Once the desired Channel Number has been selected, lock the Channel Number by holding down the Up and Down buttons until the Channel Number stops blinking.
- Using Cat5e/6 cable, connect the transmitter unit's RJ45 Output port to the receiver unit's RJ45 Input port.
Note: The maximum allowable cable length from transmitter to receiver is 328 ft. (100 m).
-
Connect a monitor to the receiver unit's audio/video Output port (See Optional Accessories for available Tripp Lite audio/video cables).
-
(Optional) Connect the serial device's DB9 port to the receiver unit's serial port. Depending on the model, the serial port will be either DB9 or 3.5mm . Models with 3.5mm jacks include a 3.5mm to DB9 adapter. Models with DB9 ports require standard RS-232 DB9 cable (sold separately) for connecting a device.
-
(Optional) Connect the included IR-IN cable to the receiver unit's IR-IN port. Place the sensor on the IR-IN cable in an unobstructed area within clear view of the device being controlled.
Note: The IR-IN cable accepts a signal from a remote control and sends it to a device being controlled on the other end of the installation.
- Connect the external power supply to the receiver unit and plug it into a Tripp Lite Surge Protector, Uninterruptible Power Supply (UPS) or Power Distribution Unit (PDU).
Point-to-Point Installation
- Press the Up / Down buttons to set the Channel Number (0-63) on the front of the receiver unit to a number also used on the transmitter unit.
Note: A locking mechanism prevents the Channel Number from being unintentionally changed. When the Channel Number is locked, hold down the Up and Down buttons until the Channel Number starts blinking. Then navigate to the desired Channel using the Up / Down buttons. Once the desired Channel Number has been selected, lock the Channel Number by holding down the Up and Down buttons until the Channel Number stops blinking.
- Power on all connected devices.
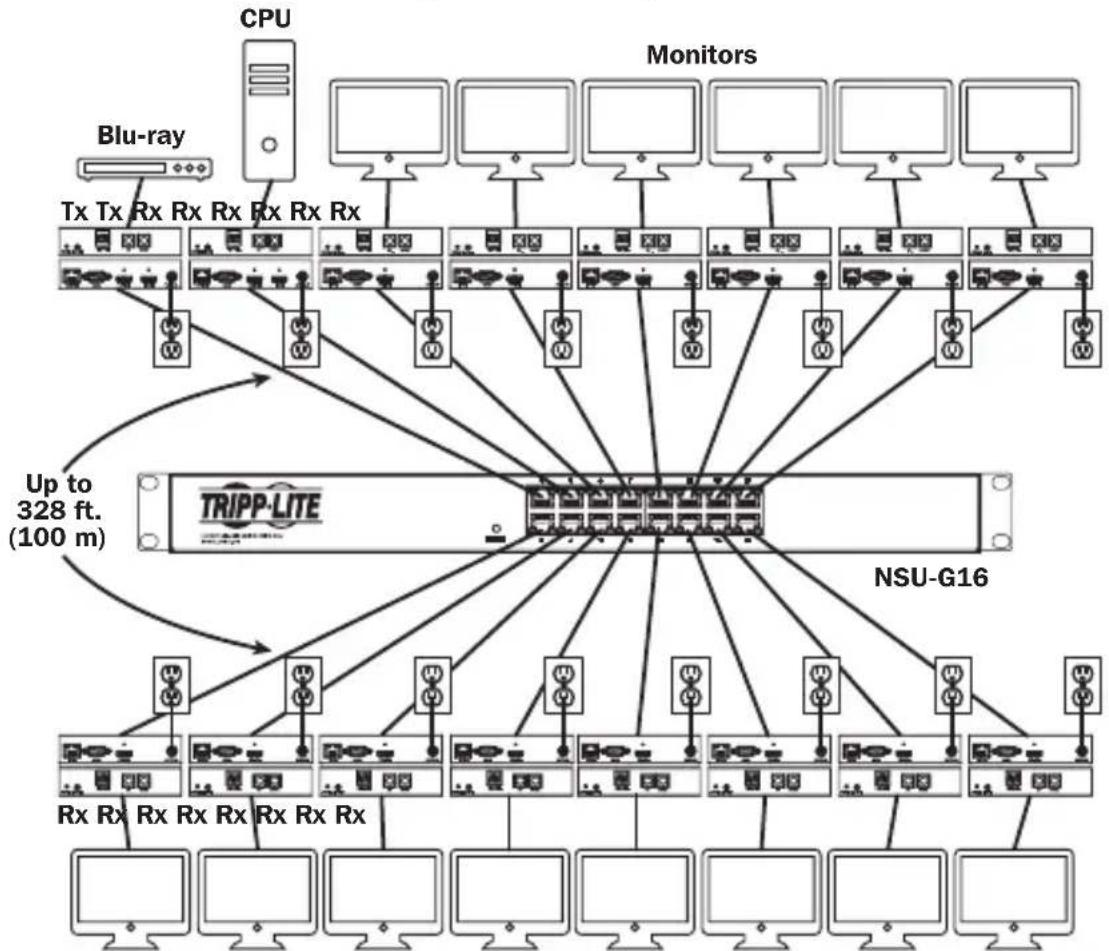
Point-to-Multipoint Installation - Managed Switch with IGMP
Notes:
- Test to ensure the entire installation works properly before pulling cables through ceilings/walls.
- To achieve maximum distance and performance, use 24 AWG solid wire Cat5e/6 cable. Using stranded wire cable or cable with a gauge (AWG) size higher than recommended will result in a shorter extension distance. Higher gauge cabling (such as 26 AWG) has a limited transmission capability compared to lower-gauge cabling. All Tripp Lite N202-Series Cat6 cables use 24 AWG solid wire cabling. Extended lengths of 23 AWG solid wire Cat6a cable are available from Tripp Lite as a custom order.
- B160-Series Audio/Video over IP Extenders are designed for use with a dedicated network switch. Connecting IP Extenders to a switch used with other networking equipment will result in degraded or non-functional product performance.
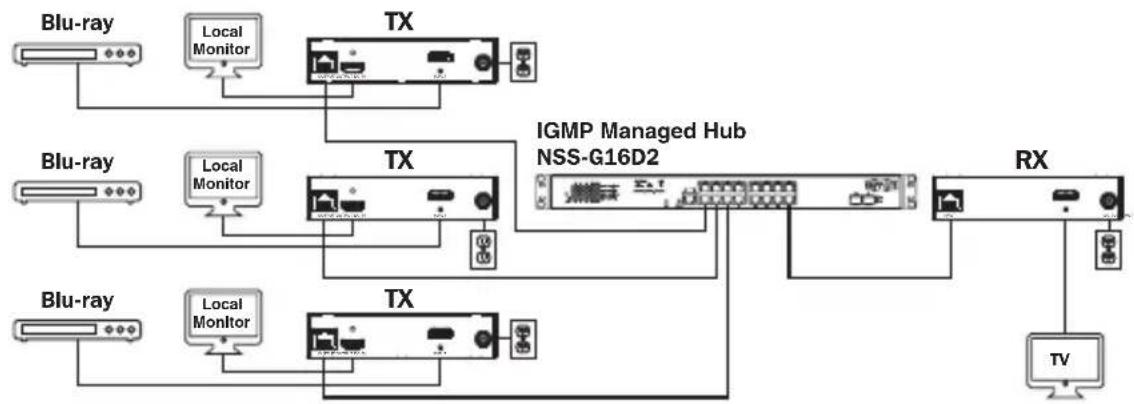
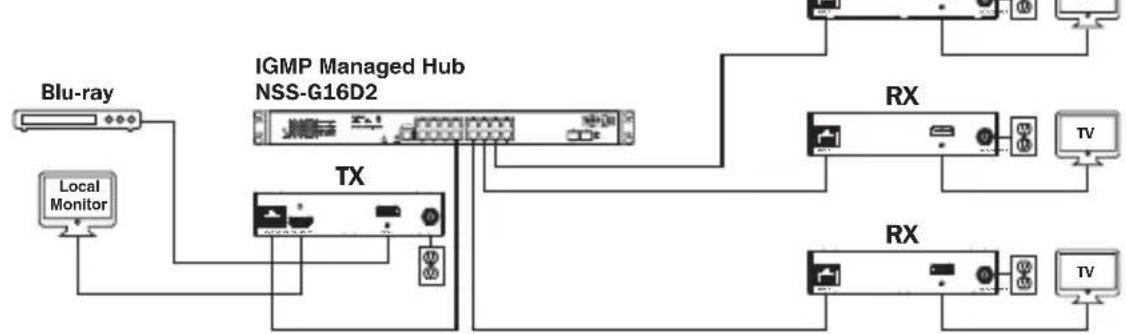
- The installation diagram on the next page shows HDMI transmitters and receivers only, though any combination of transmitters and receivers (e.g. Component Video, DisplayPort, HDMI, VGA) may be used. Up to 64 transmitters and 255 receivers can be connected in a single managed switch installation (the diagram shown stops at a single 16-port network switch).
- The installation diagram on the next page shows only required connections. Optional connections (such as the IR-IN and IR-OUT Cables) are not shown.
Point-to-Multipoint Installation - Managed Switch with IGMP
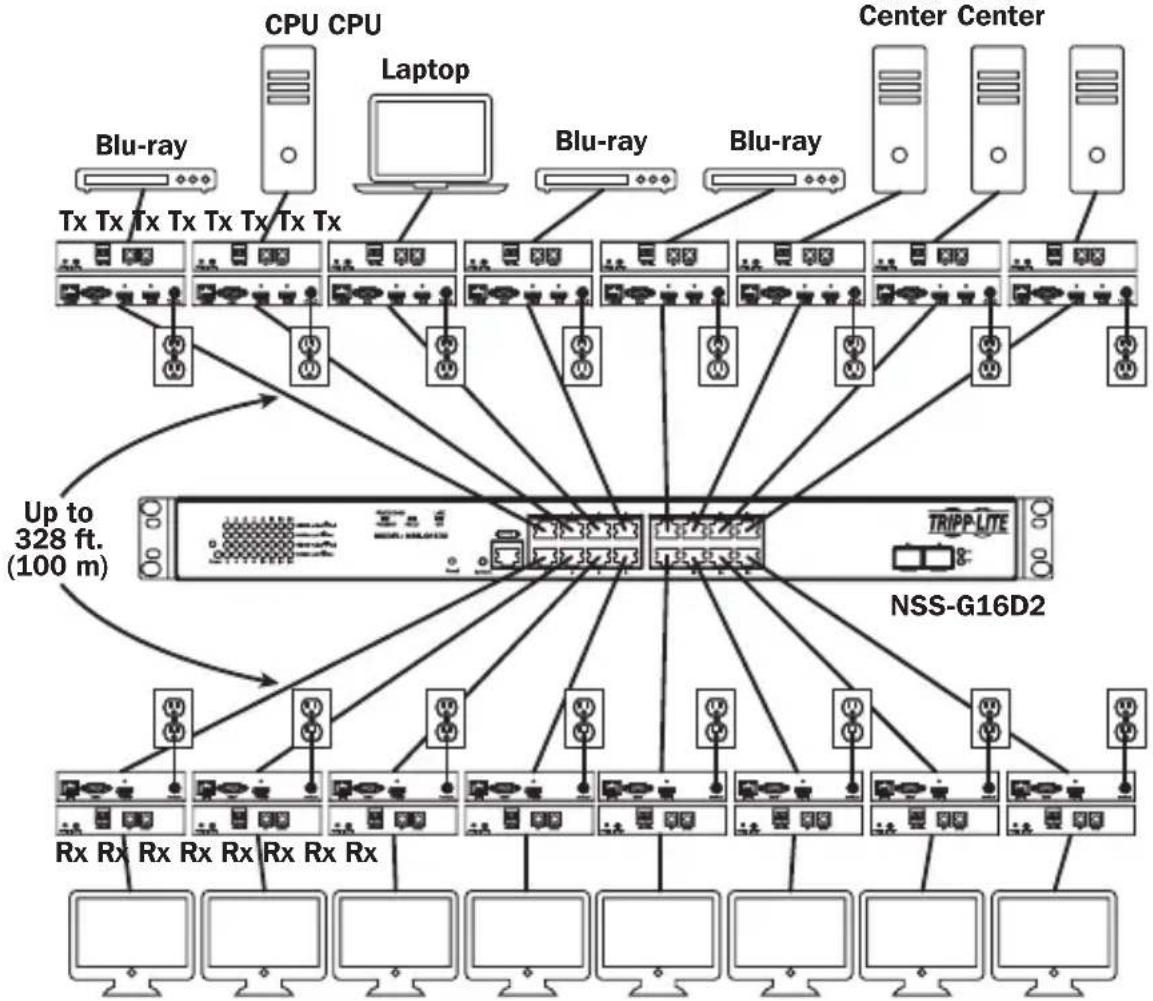
Installation Overview (All Models)
Point-to-Multipoint Installation - Managed Switch with IGMP
B160-103-HDSI Kit
B160-301-HDSI Kit
B160-202-HDSI Kit
Point-to-Multipoint Installation - Managed Switch with IGMP
- Ensure all equipment to be connected is powered off.
- Connect the audio/video source to the transmitter unit's input port (see Optional Accessories for available Tripp Lite audio/video cables).
- (Optional) Connect the computer's DB9 port to the transmitter unit's serial port. Depending on the model, the serial port will be either DB9 or 3.5mm . Models with 3.5mm jacks include a 3.5mm to DB9 adapter. Models with DB9 ports require standard RS-232 DB9 cable (sold separately) for connecting to a computer.
- (Optional) Connect the included IR-OUT cable to the transmitter unit's IR-OUT port. Place the sensor and cable in an unobstructed area within clear view of the device being controlled.
Note: The IR-OUT cable receives the signal from the remote control and sends it to the device being controlled (e.g. Blu-ray player, etc.).
-
(Optional) Using an HDMI cable, connect a local monitor to the transmitter unit's HDMI output port (see Optional Accessories for available Tripp Lite HDMI cables).
-
Set the Channel Number (0 to 63 are available) on the front of the transmitter to a desired number by pressing the Up / Down buttons. This number MUST be the same on all transmitter and receiver units in the installation. If you are using transmitter and receiver units that are all brand new, they will default to Channel Number 0 and you can leave the channel unchanged upon installation.
Note: A locking mechanism prevents the Channel Number from being unintentionally changed. When the Channel Number is locked, hold down the Up and Down buttons until the Channel Number starts blinking. Then navigate to the desired Channel using the Up / Down buttons. Once the desired Channel Number has been selected, lock the Channel Number by holding down the Up and Down buttons until the Channel Number stops blinking.
- Connect the RJ45 Output port on the transmitter unit to an RJ45 port on the network switch using Cat5e/6 cable.
Note: The maximum allowable cable length from transmitter to switch is 328 ft. (100 m).
Point-to-Multipoint Installation - Managed Switch with IGMP
Do not connect the external power supply to the transmitter at this time. The transmitter should not be powered on until all audio/video equipment is connected and powered on.
- To connect additional transmitter(s), repeat steps 2 through 7.
- Connect a monitor to the receiver unit's audio/video Output port (See Optional Accessories for available Tripp Lite audio/video cables).
- (Optional) Connect the serial device's DB9 port to the receiver unit's serial port. Depending on the model, the serial port will be either DB9 or 3.5mm . Models with 3.5mm jacks include a 3.5mm to DB9 adapter. Models with DB9 ports require standard RS-232 DB9 cable (sold separately) for connecting a device.
- (Optional) Connect the included IR-IN cable to the receiver unit's IR-IN port. Place the sensor on the IR-IN cable in an unobstructed area within clear view of the remote control.
Note: The IR-IN cable accepts a signal from a remote control and sends it to a device being controlled on the other end of the installation.
- Set the Channel Number (0 to 63 are available) on the front of the receiver to a desired number by pressing the Up / Down buttons. This number MUST be the same on all transmitter and receiver units in the installation. If you are using transmitter and receiver units that are all brand new, they will default to channel number 0, and you can leave the channel unchanged upon installation.
Note: A locking mechanism prevents the Channel Number from being unintentionally changed. When the Channel Number is locked, hold down the Up and Down buttons until the Channel Number starts blinking. Then navigate to the desired Channel using the Up / Down buttons. Once the desired Channel Number has been selected, lock the Channel Number by holding down the Up and Down buttons until the Channel Number stops blinking.
- Connect the RJ45 Input port on the receiver unit to an RJ45 port on the network switch using Cat5e/6 cable.
Note: The maximum allowable cable length from receiver to switch is 328 ft. (100 m).
Point-to-Multipoint Installation - Managed Switch with IGMP
Do not connect the external power supply to the receiver at this time. The receiver should not be powered on until all audio/video equipment is connected and powered on.
- To connect additional receivers, repeat steps 9 through 13.
- Power on all connected devices.
- Connect the external power supplies to all transmitter and receiver units in the installation, then plug the external power supplies into Tripp Lite Surge Protectors, Uninterruptible Power Supplies (UPS) or Power Distribution Units (PDU).
Operation of Point-to-Multipoint Installation - Managed Switch with IGMP
Notes:
- B160-Series Audio/Video over IP Extenders are designed for use with a dedicated network switch. Connecting IP Extenders to a switch used with other networking equipment will result in degraded or non-functional product performance.
-
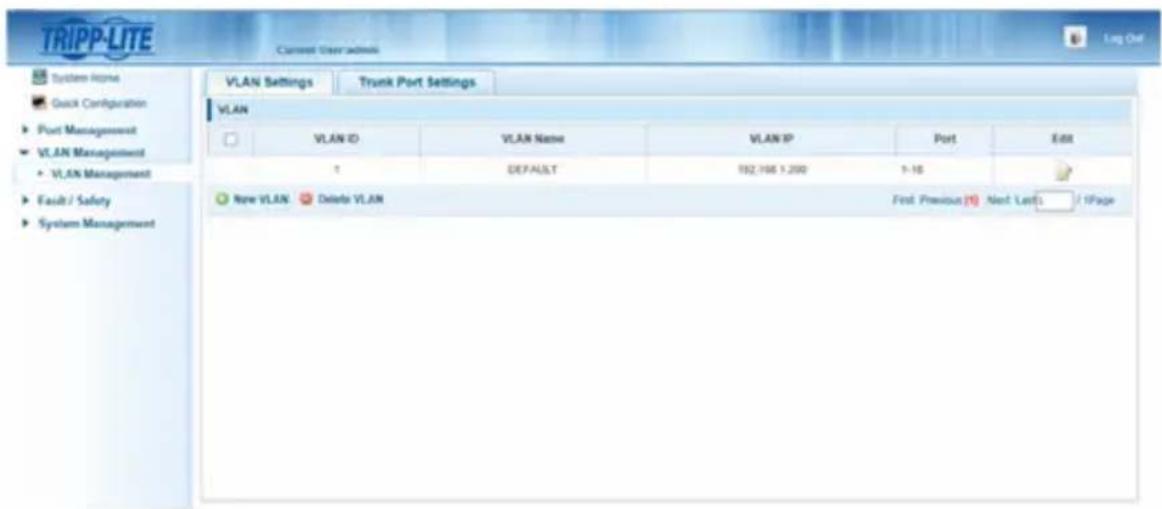
The model screenshots shown in the steps below are a Tripp Lite NSS-G16D2 Network Switch. Operation of different switches will vary by model.
-
Log into the network switch user interface.
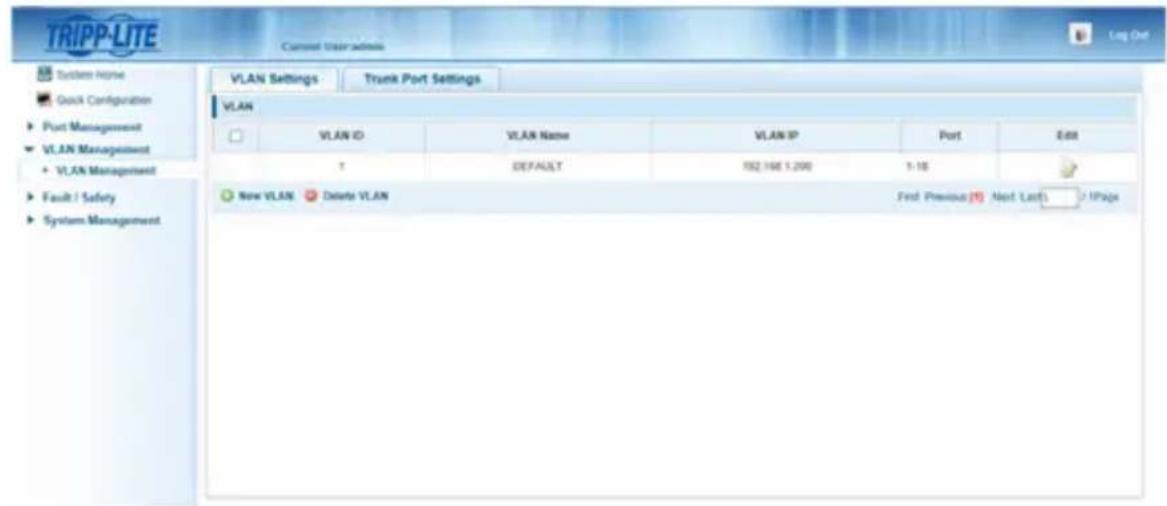
- Navigate to the VLAN Management section.
Operation of Point-to-Multipoint Installation - Managed Switch with IGMP
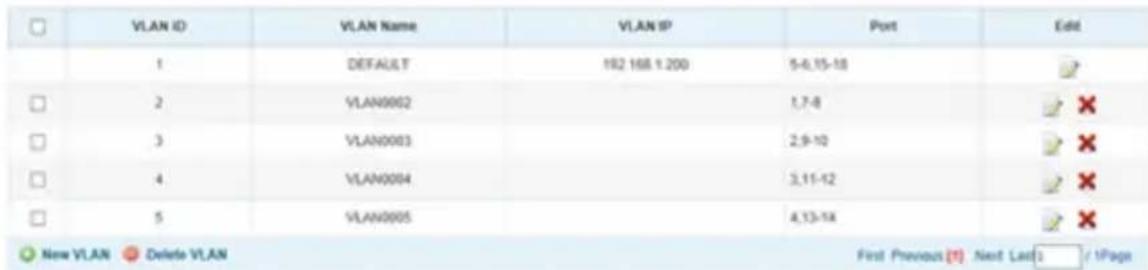
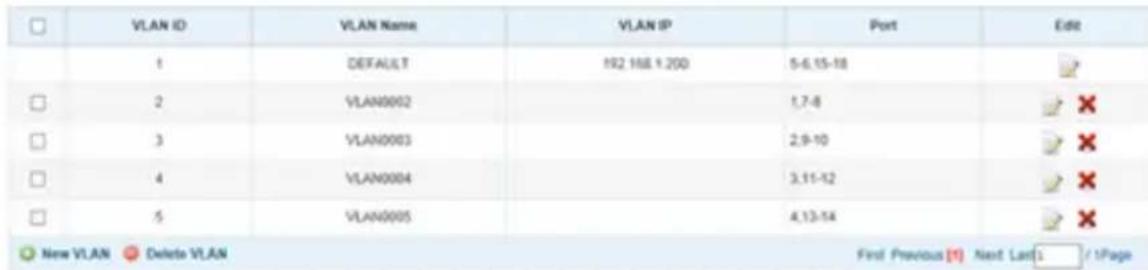
- In the VLAN Management section, create a new VLAN for each transmitter in the installation. The transmitter port number should always be the first number in the VLAN, followed by the port numbers (separated by commas) of all receiver units that will be transmitting audio/video to and from the selected transmitter. The screenshot below shows VLAN's for four transmitters (VLAN0002 through VLAN0005). VLAN0002 represents the transmitter connected to port 1, the audio/video of which is transmitted to the receivers connected to ports 7 and 8. Similarly, VLAN0003 represents the transmitter connected to port 2, whose audio/video is transmitted to receivers connected to ports 9 and 10.
-
To switch the source of the audio/video on a receiver, go to and edit the VLAN of the associated transmitters to add/remove the desired ports.
-
As more transmitters and receivers get added to the installation, simply add additional VLANs for the new transmitters and add the new receivers to the VLANs of the desired transmitters.
Point-to-Multipoint Installation – Unmanaged Switch
Notes:
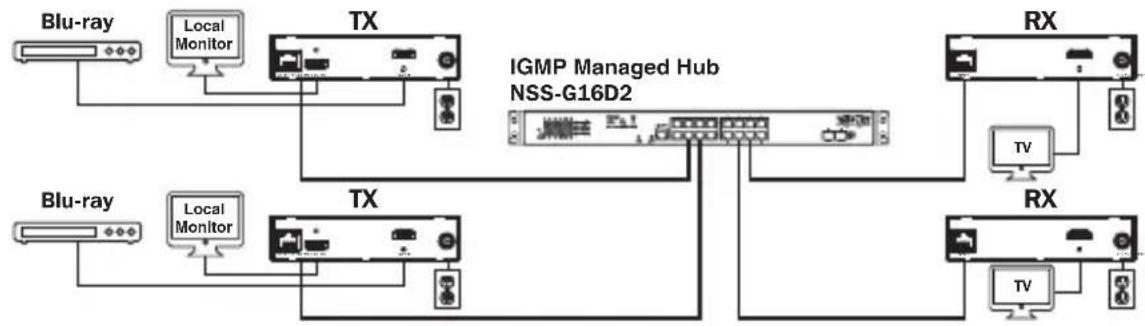
- Unmanaged switch installations are limited to two transmitter units. The number of receiver units is limited to the number of ports remaining on the unmanaged switch.
- Test to ensure the entire installation works properly before pulling cables through ceilings/walls.
- To achieve maximum distance and performance, use 24 AWG solid-wire Cat5e/6 cable. Using stranded-wire cable or cable with a gauge (AWG) size higher than recommended will result in a shorter extension distance. Higher-gauge cabling (such as 26 AWG) has a limited transmission capability compared to lower-gauge cabling. All Tripp Lite N202-Series Cat6 cables use 24 AWG solid-wire cabling. Extended lengths of 23 AWG solid-wire Cat6a cable are available from Tripp Lite as a custom order.
- B160-Series Audio/Video over IP Extenders are designed for use with a dedicated network switch. Connecting IP Extenders to a switch used with other networking equipment will result in degraded or non-functional product performance.
- The installation diagram on the next page shows HDMI transmitters and receivers only, though any combination of transmitters and receivers (e.g. Component Video, DisplayPort, HDMI, VGA) may be used.
- The installation diagram on the next page shows only required connections. Optional connections (such as the IR-IN and IR-OUT Cables) are not shown.
Point-to-Multipoint Installation – Unmanaged Switch
Installation Overview (All Models)
- Ensure all equipment to be connected is powered off.
- Connect the audio/video source to the transmitter unit's input port (see Optional Accessories for available Tripp Lite audio/video cables).
- (Optional) Connect the computer's DB9 port to the transmitter unit's serial port. Depending on the model, the serial port will be either DB9 or 3.5mm . Models with 3.5mm jacks include a 3.5mm to DB9 adapter. Models with DB9 ports require standard RS-232 DB9 cable (sold separately) for connecting to a computer.
Point-to-Multipoint Installation - Unmanaged Switch
- (Optional) Connect the included IR-OUT cable to the transmitter unit's IR-OUT port. Place the sensor on the IR-OUT cable in an unobstructed area within clear view of the device being controlled.
Note: The IR-OUT cable receives the signal from the remote control and sends it to the device being controlled (e.g. Blu-ray player, etc.).
- (Optional) Using an HDMI cable, connect a local monitor to the transmitter unit's HDMI output port (see Optional Accessories for available Tripp Lite HDMI cables).
- Set the Channel Number (0 to 63 are available) on the front of the transmitter to a desired number by pressing the Up / Down buttons. The channel number of all transmitters in the installation MUST be different.
Note: A locking mechanism prevents the Channel Number from being unintentionally changed. When the Channel Number is locked, hold down the Up and Down buttons until the Channel Number starts blinking. Then navigate to the desired Channel using the Up / Down buttons. Once the desired Channel Number has been selected, lock the Channel Number by holding down the Up and Down buttons until the Channel Number stops blinking.
- Connect the RJ45 Output port on the transmitter unit to an RJ45 port on the network switch using Cat5e/6 cable.
Note: The maximum allowable cable length from receiver to switch is 328 ft. (100 m).

Do not connect the external power supply to the transmitter at this time. The transmitter should not be powered on until all audio/video equipment is connected and powered on.
- To connect an additional transmitter, repeat steps 2 through 7.
- Connect a monitor to the receiver unit's audio/video Output port (See Optional Accessories for available Tripp Lite audio/video cables).
- (Optional) Connect the serial device's DB9 port to the receiver unit's serial port. Depending on the model, the serial port will be either DB9 or 3.5mm . Models with 3.5mm jacks include a 3.5mm to DB9 adapter. Models with DB9 ports require standard RS-232 DB9 cable (sold separately) for connecting a device.
Point-to-Multipoint Installation - Unmanaged Switch
- (Optional) Connect the included IR-IN cable to the receiver unit's IR-IN port. Place the sensor on the IR-IN cable in an unobstructed area within clear view of the remote control.
Note: The IR-IN cable accepts a signal from a remote control and sends it to a device being controlled on the other end of the installation.
- Set the Channel Number (0 to 63 are available) on the front of the receiver to match the channel number of the transmitter whose audio/video you want to receive by pressing the Up / Down buttons.
Note: A locking mechanism prevents the Channel Number from being unintentionally changed. When the Channel Number is locked, hold down the Up and Down buttons until the Channel Number starts blinking. Then navigate to the desired Channel using the Up / Down buttons. Once the desired Channel Number has been selected, lock the Channel Number by holding down the Up and Down buttons until the Channel Number stops blinking.
- Connect the RJ45 Input port on the receiver unit to an RJ45 port on the network switch using Cat5e/6 cable.
Note: The maximum allowable cable length from receiver to switch is 328 ft. (100 m).

Do not connect the external power supply to the receiver at this time. The receiver should not be powered on until all audio/video equipment is connected and powered on.
- To connect additional receivers, repeat steps 9 through 13.
- Power on all connected devices.
- Connect the external power supplies to all transmitter and receiver units in the installation, then plug the external power supplies into Tripp Lite Surge Protectors, Uninterruptible Power Supplies (UPS) or Power Distribution Units (PDU).
- Once in operation, change the monitor source signal by simply changing the channel of the corresponding receiver to match that of the transmitter with the desired source signal.
Troubleshooting
If unable to receive an acceptable image after following the installation instructions, try the following troubleshooting tips:
-
Are the included external power supplies connected and plugged into a working power source? For the product to function properly, it must be connected to and receiving power from the external power supply.
-
Was the power to the connected devices turned off prior to installation? If not, restart all connected devices.
-
Were the connected audio/video devices powered on before the transmitter and receiver units? If not, disconnect power from all transmitter and receiver units, then power them back on.
-
What resolution are you trying to obtain? Make sure the installation is within the maximum distance and resolution specs supported by the model as referenced in the Product Features section of this manual. If unable to obtain an acceptable image, try lowering the computer's video resolution or adjusting the refresh rate.
-
What type of cabling is used in the installation? Inferior cabling can result in poor performance. It is important to use cables that support the desired video resolution. To achieve maximum distance and resolution, 24 AWG solid-wire Cat5e/6 cable or 23 AWG solid-wire Cat6a cable must be used. Tripp Lite's N202-Series Cat6 cables use 24 AWG solid wire, as do the N022-01K-GY (Cat5) and N222-01K-GY bulk cables. The audio/video cables used must also support the desired video resolution. Inexpensive, low quality cables may not support the maximum resolution. It is recommended that you use the Tripp Lite cables listed in the Optional Accessories section of this manual.
-
Test the cables to ensure they are working properly. For example, connect the audio/video cable between a source and functioning monitor to ensure the cable is not defective. For Cat5e/6 cable, connect it between a computer and a network to verify it establishes a network connection.
Troubleshooting
-
Check cabling for any damages that may have occurred during installation. If a cable connector is loosened from pulling through ceilings/wall or the cable jacket is damaged with the wiring exposed, maximum performance will not be achieved.
-
Are the transmitter(s) and/or receiver(s) located in an area with exposure to higher temperatures? If the product is overheated, it will not function properly.
-
Do not set identical channel numbers for transmitters in an Unmanaged Switch installation. Doing so will result in no signal being displayed on monitors connected to receivers assigned to the same channel number. If this happens, change the transmitters' channel numbers to unique numbers and assign the desired channel number to the affected receivers. If audio/video does not reappear after doing this, disconnect power from the affected transmitter and receiver units, wait 10 seconds, and reconnect the power.
-
Do not connect more than two transmitters in an unmanaged switch installation. Unmanaged switch installations are limited to two transmitters, with the number of receivers being limited to the number of ports remaining on the unmanaged switch.
-
Do not connect other networking equipment to the network switch. The B160-Series Audio/Video over IP Extenders are designed for use with a dedicated network switch. Connecting them to a switch used with other networking equipment will result in degraded or non-functional product performance.
Warranty and Product Registration
1-Year Warranty
Tripp Lite warrants its products to be free from defects in materials and workmanship for a period of one (1) year from the date of initial purchase. Tripp Lite's obligation under this warranty is limited to repairing or replacing (at its sole option) any such defective products. To obtain service under this warranty, you must obtain a Returned Material Authorization (RMA) number from Tripp Lite or an authorized Tripp Lite service center. Products must be returned to Tripp Lite or an authorized Tripp Lite service center with transportation charges prepaid and must be accompanied by a brief description of the problem encountered and proof of date and place of purchase. This warranty does not apply to equipment, which has been damaged by accident, negligence or misapplication or has been altered or modified in any way.
EXCEPT AS PROVIDED HEREIN, Tripp Lite MAKES NO WARRANTYES, EXPRESS OR IMPLIED, INCLUDING WARRANTYES OF MERCHANTABILITY AND FITNESS FOR A PARTICULAR PURPOSE. Some states do not permit limitation or exclusion of implied warranties; therefore, the aforesaid limitation(s) or exclusion(s) may not apply to the purchaser.
EXCEPT AS PROVIDED ABOVE, IN NO EVENT WILL Tripp Lite BE LIABLE FOR DIRECT, INDIRECT, SPECIAL, INCIDENTAL OR CONSEQUENTIAL DAMAGES ARISING OUT OF THE USE OF THIS PRODUCT, EVEN IF ADVISED OF THE POSSIBILITY OF SUCH DAMAGE. Specifically, Tripp Lite is not liable for any costs, such as lost profits or revenue, loss of equipment, loss of use of equipment, loss of software, loss of data, costs of substitutes, claims by third parties, or otherwise.
PRODUCT REGISTRATION
Visit www.triplite.com/warranty today to register your new Tripp Lite product. You'll be automatically entered into a drawing for a chance to win a FREE Tripp Lite product!*
- No purchase necessary. Void where prohibited. Some restrictions apply. See website for details.
FCC Notice, Class B
This device complies with part 15 of the FCC Rules. Operation is subject to the following two conditions: (1) This device may not cause harmful interference, and (2) this device must accept any interference received, including interference that may cause undesired operation.
Note: This equipment has been tested and found to comply with the limits for a Class B digital device, pursuant to part 15 of the FCC Rules. These limits are designed to provide reasonable protection against harmful interference in a residential installation. This equipment generates, uses and can radiate radio frequency energy and, if not installed and used in accordance with the instructions, may cause harmful interference to radio communications. However, there is no guarantee that interference will not occur in a particular installation. If this equipment does cause harmful interference to radio or television reception, which can be determined by turning the equipment off and on, the user is encouraged to try to correct the interference by one or more of the following measures:
- Reorient or relocate the receiving antenna.
- Increase the separation between the equipment and receiver.
- Connect the equipment into an outlet on a circuit different from that to which the receiver is connected.
- Consult the dealer or an experienced radio/TV technician for help.
Any changes or modifications to this equipment not expressly approved by Tripp Lite could void the user's authority to operate this equipment.
Tripp Lite has a policy of continuous improvement. Specifications are subject to change without notice. Photos and illustrations may differ slightly from actual products.


1111 W. 35th Street, Chicago, IL 60609 USA • www.triplite.com/support
Copyright © 2019 Tripp Lite.
Note: El cable IR-IN accepts a new signal to the control remoto and the envia a new dispositivo that can be used to monitor the installation.
1111 W. 35th Street, Chicago, IL 60609 USA • www.triplite.com/support
1111 W. 35th Street, Chicago, IL 60609 USA • www.triplite.com/support
PykoBODCTBO N0Ib30BaTeJia
PetpancIaTOpbl aydno-/BndeocnHaIa c pa3bemom RS-232 n IK-ynpaBleHneM no npotoKoIy IP
Modell petpansTopoB B
KOMnneKeTe:
B160-101-DPSI
B160-101-DPHDSI
B160-101-HDSI
B160-103-HDSI
B160-201-HSI
B160-202-HDSI
B160-301-HDSI
Moden
pepeaTcuKOB:
B160-001-CSI B160-001-DPSI
B160-001-HDSI B160-001-VSI
Moden
PnEmHKnOB:
B160-100-CSI B160-100-DPSI
B160-100-HDSI
B160-100-VSI B160-200-HSI
English 1 • Espanol 25 • Français 50
EAC
TRIPP·LITE

PpOPOPMN MIOHIOO HONNOHO
1111 W. 35th Street, Chicago, IL 60609 USA • www.triplite.com/support
OxpaHareTcraBTopCKnM npaBOM © 2019 Tripp Lite.
Bce ToproBbIe 3HaKn ABnHOTc NCKNIOHTeBHO Co6CTBEHHOCTbO CBONX COOTBeTCTBYUINX BlaJeBueB.
CopejxHmoe ynaKOBKn
| Pyko80d80 non3080btegn | DA DA DA DA DA DA DA DA DA DA DA DA DA DA DA DA DA DA DA DA DA DA DA DA DA DA DA DA DA DA DA DA DA DA DA DA DA DA DA DA DA DA DA DA DA DA DA DA DA DA DA | 0010001000124044 | 1101011101123 | B160-101-HDSI | B160-101-HDSI | ||||||
| 000011000011101111111111111111111111111111111111111111111111111111111111111111111111111111111111111111111111111111 | B160-103-HDSI | B160-201-HSI | |||||||||
| 00001100001101111011123 | B160-202-HDSI | B160-202-HDSI | |||||||||
| 0000110000110111111111111111111111111111111111111111111111111111111111111111111111111111111111111111111111111 |
OnuohbHbIe KOMnKeKtUoUsne
CoeHHTbHbI Ka6eB nepeaun KOMnoHHTHO BuaEOcHHa c No30NoeHHbIMN BbIBOaMNA 008-006, dInHa 1,8 M
- CoeHNHTeBhIe Ka6eN Cat6 cepu N202 cOJHOKINbHbIMn npoBODaMn KaJI6pa 24 AWG
- 16-nopTObIy ynpaBJIeMbI cTeBoi KOMMyTaTOp Gigabit L2 MoJ. NSS-G16D2 c8-po3eToUhBM PDU
- 24-nopTObIy ynpabnembl ceTeBOK KOMMyTaTOp Gigabit L2 moJ. NSS-G24D2 c 12-po3eTochbIM PDU
VGA-ka6e n cepn P502 c KoaknaJIbHbIM pa3beMaMn RGB
- ydInHnteBbHbI Ka6eB P520-006 c nocJeIOBaTeBbHbIMn pa3beMaMn RS-232, dInHa 1.8 M
- OndokhaNbHbke Ka6eN DVI-D cepnn P561
Ka6eI-epexoHnKc cepn P566 c pa3bemamHDMI n DVI
- BbICOKOCKOPoCTbIe HDMI-ka6eJIncepn P568
- BbICOKoCKOpocThbIe HDMI-ka6eH P569-XXX-LOCK* cpa3beMaMn Ethernet nФнксуuIMN BnHTaMn
Ka6eJn DisplayPortTM cepyn P580
- Ka6eHn cepu P583 c pa3bemamMini DisplayPort n DisplayPort
*XXX COOTBETCTBYET DnHHe. BbInyckaemblc Ke6eIN HMeIOT DnHHy 1,8 M (006), 3 M (010) u 4,5 M (015).
XapakTepeNCTnKn npOdyKta
- 06ecneuBaetpeTpaHcIaIIO npacnpedeIeHne ayDIO-/BnDEocrHaIOB, a TaKxE CnHaIOB nCTaHNoHHOrO ynpabIeHnC nOcneIOBaTeIbHO nOdkNIOaEmbIX n HΦpaKpaChbIX yCTpOiCTB uepe3 ka6eI Cat5/Cat6.
- BынүйсаөмBLE модөг memeур разөмbl Component Video + Stereo Audio, DisplayPort, HDMI** n VGA + Stereo Audio.
- Ppeo6pa3yET BnDcOcHnA, noCTynaIOuI ONTOUHnKa, BCnHnA, KOtOpB MoKet nepeDaBaTbCnHa cTeBoi KOMMyTaTOP n pacnPdeJeTbCryepe3 Hero CnONb3OBaHmem npotoKoJa IP.
- IpepaTnKMOrT paonolaraTbca Ha pacctOHHIO 100 M OT KOMMyTaTopa, pacctOHHe MeJy KOMMyTaTOPOM IN PnEMHnKOM TaKKe MoXe CoCTaBJIaTb DO 100 M, YTO o6ecneuHbaET cyMMapHoE paCtOHHe Do 200 M.
Moryt taKke nCnoB3oBaTbcB yCTaHOBkax C DByxToeHuon TOnoIorne, rKe nepeDaTuNK noKnIOuayetc HEnOcpeCTBeHHo K pInemHnky Ha pacctOAHn Do 100 M. - Празназауньдя уралгамьх ceTeБых KOMMyTaTOPOB, pa6ToaUxux no npotoKony IGMP,чTo 06ecneuBaet B03MOxHOCb BXOda B CnCTeMy uДиCTaHNoHHOro yPpAByHnuepe3 nHTepfeK cOMMyTaTopa.
- Bundeocurhan OT nCTOUYHka MoXeT HAnpaBnTbCra Ha IIO6oI aHaIorOBbI IINu cIΦpOBoI dIcPNeI (HanpImep, uepe3 ka6eIb C pa3bemAmu Component Video-HDMI, VGA-HDMI, HDMI-DisplayPort, HDMI-HDMI).
- 06ecneuBAOT OTo6paXeHnE CnHaIa OT OndHO ro nCTouHnka Ha oNDOM MOHTope nn paCnpedeHnE OndHO rCnHaIa MeKdV HeCKoJIbKIMM MOHTOPaMn.
- Pnpemhble moyn B160-200-HSI n B160-201-HSI mMeot Dba BbixohbIX npTa HDMI nnoikJIOUeHnK DBYM MOHHTOpam.
- 06ecneuBAOT noKIOUeHne do 64 nepeaTukOB u 255 npueMHIKOB By cTaHOBKe COnHM ynpabJIeMbIM KOMMVTaTOPM.
-ИспобзveТСанДАрСжатиВиDEOCUHanaH.264. - PetpaHcIaIg Nk-cuHaIOB ynpabHeHn IcToHnKOM (HaNPmep npoIRpbBaTeJeM Blu-rayTM) ot DuctaHNOHHOrO nucnne.
-Испобзевский КергTNИК-уацт:20-60KFlU - PoiDJIepKka ckopocTei nepaun daHHbIX uepe3 nOcneIOBaTeIbHbI uHTepFeic RS-232 do 57600 6uT/c.
MoennpaaemmVGAonepkvaotBnedeopazpeuHndo1920x1440.Bknpuay 1080p
XapakTepeNCTnKn npOdykTa
- MoDéNi cpa3bēmAmi DisplayPort n HDMI noДeρЖиBaI T BnIeopa3peSeHnIa 1920 x 1080 (1080p).
- MoJIeI cpa3bEmamn Component Video noJpeXuBaHTo BUnEopa3peHEny do 1080i.
Kakdbi nepedaTcHK nMeET BbXoHNo npT HDMI dIy noKnHoueHn JOKaJbHOrO MOHTopa.
CobMeCTHMOCTb C CNTeMaMn HDCP n 3D.
B KOMNNEKT BKNIOUeHa MOHTaXHnOCHACTKa IIN KPeIJIeHnK CTeHe, B CTOnKe Nn Ha MaUte. - Пдклоченп lo texhONorHn Plug-and-play 6e3 Heo6xOIMocTn nCNoJIb3OBAHn KaKOrO-lIb6 nporpaMMHOrO obecneueHn nn dpaBepOB.
**06ecneuBAOT NOKIOUeHne NCTOHHa DVI-CIRHana n/nn MoHHTopa CnNoB3oBaHneM nepexoHnka HDMI-DVI (HeKOToPbIE MOeN KOMIIeKTyOTcpepeoxoHnKOM HDMI-DVI). BInyckaemble KOMNaHnei Tripp Lite Ka6eIN-epexoHnKn HDMI-DVI (cepN P566) npodaotc otDeNbHO.
Hnctpykunno moHTaJxu
IP-peTpaHcIaTopb ayDno-/BnDeocuHaIOB KOMPNeKTyOToC MOHTaXHOJ OCHAcTKo, 06ecneuBaHoue B03MOxHOCTb KpeJIeHn pa3NHybIMn CnOC6aMn. 3Tu CnOC6bI KpeJIeHn Ioka3aHbI Ha npEcdTaBHeHHbx HIXe UJIIOCTpaunax.
PpmeHne. Ha nIIOCTpaunx noka3aHa moenb B126-1A1; yctaHOBka IP-peTpaHcTApOB aynO-/BIndeocnHaNo OB cyueCTBnEeTc aHaONuHbIM cno6oM.
HaTeHHbIM MoHTax


MoHTaX B 19-ДIOIMOBOВ CTоИke

YCTaHOBka C DByXToUeHOn TOnOJOrNeI
Приимechanical:
Ipei npotraBauHem Ka6eNe uepe3 cTeHb/NoToJKN Heo6xOImo npOBepntb npabnlbHOCTb FyHKUHOPOBAHNA BCEY VCTAHOBKn.
ДяdoctнжehmaKcimamlbHoi nIpnO3BOUnteHbOCTn IcnoNb3yIte Ka6enbCat5e/6 c OndoxnHbHMn npoBdAmn Ka1nbpa 0,2 MM.ИcnoNb3OBaHne Ka6eЯ C MHOrOxNtBbIMn npoBdAmn NkabenaC npoBdAmn Ka1nbpa Bblse MMnpuBeTe KcokpaueHHIO DInHbpeTpacnau. Ka6eJe 6oJee BbICOKNX Ka1nbpoB (HaPmep, 0,13 MM) IMeOT orpAHueHHyo nepedaIOU cyoc6HOCTb NO cpaBHeHIO C Ka6eJaMn 6oJee Hn3KnX Ka1nbpoB. Bce Ka6eJe Cat6 cepnn N202 Mapkn Tripp Lite n3rotabnaioTcA nCNoNb3OBaHMe OndoxnHbIX npoBDoB Ka1nbpa 0,2 MM.По ИнDNyAJIbHOMу 3aKa3a KOMNaHn Tripp Lite moKeT n3roTabMaBaTb Ka6eJe Cat6a yBeJIueHHOIN dInHbI c NcNoNb3OBaHme OndoxnHbIx npoBDoB Ka1nbpa 0,26 MM.
-петачки и пемнки, постаягьь в komплесе, влусякaitс с разьемамn DisplayPort, HDMI n VGA, HO OTдьно peanizуье петачки и пемнки могут mEmtba pazьемы B liobix coetahnx (hanpimep, Component Video-HDMI, VGA-HDMI, HDMI-DisplayPort, HDMI-HDMI).
1.пелд haayamom yctahOBKN Bce noKIOHoe 6OpyoBaHne OJIXHO 6bIb o6ecToyeHO.
2. IopKIOHHTe NCTOuHk ayDnO-/BnDeocnHana K BXoHOMy npTy nepeaIoIero MoyJIa (BbInyckaemblc moJenn ayDnO-/BnDeoKa6ene Tripp Lite nepeuIcneHb B pa3dene OnuHaBHe kOMNKeTkyoune).
- (Heo6a3aTeNbHO) CoeHnHTe nopT DB9 KOMnbItepa c nocneIOBaTeNbHbIM npToM nepeaiooero MoyJr. B 3abucmocnt OTo MoeJI NocJeIOBaTeNbHbI NpO T MOxET IMeT b HTEpeFcDB9 nn 3,5 MM. MoJIc pa3bemAmN 3,5 MM KOMIIeKTyOTcra nepexoHNKOM 3,5 MM — DB9. IJa noDKIIOueHnK KOMNbItepy MoJIeN C npTaMn DB9 Tpe6yeTcra cHaIapTHbI Ka6eBc pa3bemAMR S-232 n DB9 (npOdaetc rOteNbHO).
- (Heo6a3aIbHo) BCTaBbTe BbIXOHOH IK-Ka6eJIb (IR-OUT) n3 KOMnIeKTA B npot IR-OUT nepeaofo moyra. UcTahOBnte daTnK Ha Ka6eJIb IR-OUT B CBO6oHOM OT npenrTcbn MeCe TaKIM 06pa30M, YTO6bl ynpabAneMoE yCTpoiCTBO HaxoHIOCb B npedeJax npamBo BuIMOCn. PpmeHne. Ka6eJIb IR-OUT npinHMaet cHnAn DnctaHIOHHoro ynpabInHn I nepeDaet ero Ha npapBnaeMoE yCTpoiCTBO (HaNPmep, nponrpblBaTeJIb Blu-ray n np.).
- (Heo6aTeBHO) IoknOHTe loKaHbM MoHtOp K BbIXOHMy npTy HDMI nepeaUoero Moyra c nmoosHDMI-ka6enr (BbInyckaembe moedn HDMI-ka6ene Tripp Lite nepeuCneBb pa3deJe OunnoHaJIbHbIe KOMnEKTyoune).
- IopknHHTe BHeHn 6Iok nTuHn K MeCTHOmy NepaOmeMy MOnyIO IN BKIOHTe ero B po3eTKy cTeBOrO fNbTpa, 6Ioka pacpeJeHn rntAHn (PDU) nn nctouHnka 6ecnepe60Horo
YCTaHOBka C DByXToUeHOn TOnOJOrNeI
nntanra (N5Pi) Tripp Lite.
- C nOMOuBIO KHOJOK Up/Down (BBepx/BHn3) Ha nepeDHeI naHeI nipepaIoUeTo MOyIa YCTaHOBHTe HOpE kaHaJa (0-63), COOTBeTCTByUoIi TOMy, KOToPbI 6yET NcNoJIb3OBaTbcA B npneMHOM MoIyIe.
PnmeaHne. Jra 3aunbIOT cnyauHoro n3MeHeHna Homepa KaHana npedycmotpeH mexaHn3m fKncauH. Pn 3aKcPOAHHom Homepe KaHana yepxNBaTe KhoNkUp (Bbepx) uDown (BHN3) hxaTbIMn Do Tex nop, noka Homep KaHana He NaHT MIRATb. 3aTe mpeiDITE Ha Jeelaembl KaHan C nomoUbIO KhoNOK Up/Down (Bbepx/Bn3). Iocne Bb6opa Jekaemoro Homepa KaHana 3aKcpye erO, yepxNBaJ KhoNkUp (Bbepx) u Down (Bn3) do tex nop, noka Homep KaHana He NpeKpaNT MIRATb.
- CoeMHHTe BbIXoHNo npT RJ45 (Output) nepeaouero Modyn c BxOndbIM npToM RJ45 npneMHoro Modyn (Input) npn nomou n Ka6ena Cat5e/6.
PpmeaHne. MaKcMaJIbHO DoIyCTMMA JInHa Ka6eJ, CoeINHIOeIero nepeDaTuK C npueMHNKOM, coCTaBnE T 100 M.
-
ПОДКИJOHTe MOHITOP K aydno-/BnDEOBbIXOdy (Output) npueMHoro MoDyra (BbInyCKaEMbIe MoDeN aydno-/BnDEoKa6beNe Tripp Lite cm.В pa3dene OOnuHaNbHbIe KomPnKeKtYuOuNe).
-
(Heo6aTeBho) CoeHnIte npT DB9 noCteBOatbHo nokKIOuAemoro yctpoCTBa c noCteBOAtbHbIM npToM npHmHO MOyJ. B 3abucmocTn OT moJeN noCteBOatbHbI npT moXet HMeTb nHTepfecn DB9 nn 3,5 MM. MoEJI C pa3bEmAMn 3,5 MM KOMNKeTcyOTc npexOHNkOM 3,5 MM — DB9. IInr noDknUoyEnra yctpoCTBa K moEJI M C npTAMn DB9 Tpe6yETcSTAndapThbI Ka6bI C pa3bEmAMn RS-232 n DB9 (npOdaetc OTDenbHO).
-
(Heob3aTeBHO) BCTaBbTe BxOJHOI K-Ka6eNb (IR-IN) n3 kOMnJIeKTA B npOT IR-IN npneMHoro MoUyI. YcTahOBtE DaTmK Ha Ka6eNb IR-IN B CBO6OJHOM OT npEnrTCTBn MeTe TaKIM O6pa30M, 7TO6bl ynpabJNeMoE yCTpOJCTBO HaxOJINOCb B npDeJax BuIMOCTn.
PpmeHne. Kaebb IR-IN npHHMaet cunHan ductaHIOHO ynpabHeHn I nepeaet ero Ha ynpabBnaeMOe yctpoCTBO, paCnoJooKeHHoe Ha dpYROM KOHcE yCTaHOBKn.
B 3TOT MOMENT NepedaTuk He doJxH 6bITb NOdkIIOUeH K BHeuHemy 6loky nHTaHn. NpedaTuk He cIeJyET 3aNTbIBaTb Do NOdkIIOUeHn I 3aNTbIBaHn BCEX 3JIemEHTOB ayDNo-/BundeOooOpudOBaHn.
- Дя подклоченя донончтель HorO(-bIX) nepedaTUnKa(-OB) NOBTOpTe DeiCTBnA, ONIcaHhble Bnn. 2-7.
- Поdkлочte moHTop k aydno-/BundeobbOxody (Output) npneMHoro MoDyIa(BbInyckaemble Moden aydno-/Bundeokabene Tripp Lite cm.В pa3dene OnucHOHaNbHbIe KOMPNeKToUoIe).
- (Heo63aTeBHO) CoeHHTe nopT DB9 nocJeOBATeBHO nokKIOUaEMoro yCTPOIcTBa c nocJeOBATeBbHM nopTOM npHemHOro moyJra. B 3abncmOCTn OT mOeJI npocJeOBATeBbHbI npT MoKeT Imetb HtepFeic DB9 uN 3,5 MM. MoeJI c pa3bemaMn 3,5 MM KOMJIeKTyOTcR nepexOHNKOM 3,5 MM — DB9. IЯ nocKnIOUeHn yCTPOIcTBa K MOeJIaM C npTaMn DB9 Tpe6yeTcSTaNdApTHbI Ka6eB c pa3bemaMn RS-232 n DB9 (npOJaETc OTrdeNbHO).
- (Heo6a3aTeNbHO) BCTaBbTe BxOJHOIHK-Ka6eNb (IR-IN) u3 KOMnneKTA B npT IR-IN npHemHOro MoDyJIy. YcTaHOBIne DaTuNK Ha Ka6eNb IR-IN B CBo6oHOM OT npEnrTcBm MeTe TaKIM O6pa30M, yTo6bl 6nOK dIcTaHUnOHoro ynpabHeHn HaxOuINcB npeJeNX BuIMOCtN.
PpmeHne. Kaebb IR-IN npHHMaet cunHan ductaHOnHoro ynpabHeHn I nepeaet ero Ha ynpabIaeMoE yctpoCTBO, paCnoJoxeHHoe Ha dpYROM KOHcE yCTaHOBKn.
- YctaHOBtTe XeIaEMbI HOMep KaHana (ot 0 do 63) c nOmoIbIO KhoNOK Up/Down (BBepx/Bn3) Ha nepedHe naHEn npEmHNka. 3TO T HOMep DOJIXEH 6bITb OINHaKOBbIM Ha BCex nepedaIounx I npEhembIX MOyJx yCTaHOBKn. EcnB BCE BXoJaIue B CnCTemy nepedaTUnk I npEemHKn paHee He NcNoIb3OBAJncb, To OHn BKIoUaIOTcH Na 3aDaHHom IO yMOJIuaHIO KaHane c Homepom 0, KOToPbI MoXHO OCTaBtB 6e3 N3MeHEn NocNe yCTaHOBKn.
PnmeHne. J3aunbIOTcnyauHoro nMeHeHnHomepa KaHana npedyCMOTpeh MexaHn3M 6nokpOBKn. Pn 3aKupobHom Homepe KaHana yepKnbte KhoNkUp (Bbepx) uDown (BHN3) hKaTbIMu Do tex nop, noka Hmep KaHana He NaHT MraTb. 3aTe mpeiDnte Ha JeMaemb kHaan cNoMoU bO KhoNOK Up/Down (Bbepx/Bn3). Iocne BbOpa Jenaemoro Homepa KaHana 3aKncpyte ero, yepKnbA KhoNkUp (Bbepx) u Down (Bn3) do tex nop, noka Hmep KaHana He NpeKpaNT MraTb.
- CoeHHnTe BbIXoHoi nopT RJ45 (Input) npneMHoro MoDyna cOdHM u3 nopTOB RJ45 ceTeBOro KOMMyTaTopa npu nOmoUkabena Cat5e/6.
PpmeHne. MaKcMaJIbHO IOnyCTUMaI KAnHa Ka6eIa, coeINHIOUeI npMeHHK c KomMyTaTOpOM, COCTABJET 100 M.
YCTaHOBka c MHOrOToUeHOn TOnOJOrNe- YnpaBJIeMbIKOMMyTaTOP CnCIOb3OBAHHeM npoToKoJa IGMP

B 3OT MOMENT pIpEMHnK He DoJIKeH 6bITb NOkLIOUeH K BHeUHemy 6IOky NHTAHnA. IpnEMHnK He CneIyET 3aNTbIBaTb Do NOkLIOUeHn U 3aNTbIBaHnBCE XIeMeHToB ayDnO-/BnDEoO6OpyDoBaHnA.
14.ДяпдклоченяdoonHHTeBHyx npneMHKOB nobTopte DeICTBn,OnncAHbIe B nI.9-13.
15. BkIIOHTe nITaHHe BCEx NOkKIOUeHHbIX yCTpoiCTB.
16. ПоdkлочиБВeшнue 6лOKИ пNTAHЯ КВсмпepаIoшIM И npneMHbIM MODYЛМ yCTaHOBKn, a 3aTeM BКlOUHTe BHeSHue 6лOKИ пNTAHЯВ po3eTKI ceTeBbIX ФиьТpoB, 6лOKOBpacpeДeLEHЯ пNTAHЯ (PDU) ИИ nICToUHmKOB 6ecpe6oHoro pNTAHЯ (IV5П) Tripp Lite.
Pa60ta yCTaHOBKn C DByxTOueHNo TOnOJOrNe - YnpaBnaembI KOMMyTaTOP cNcNoJIb3OBaHnEm npToKoJa IGMP
Приимechanical:
IP-peTpaHcIaTOpbl ayduo-/BuaeocnHaNoB cepm B160 npedha3HaauOTcI nncnoIb3ObaHna C BbIeJIeHHbIM ceTeBbIM KOMMyTaTOPOM. IOnKIIouHeNIE IP-peTpcaHcIaTOpOB K KomMyTaTopO, nCnoIb3yeMOMy CdpYIM CeTeBbIM 6OpuyoBaHnEM, npuBeTe K yxydUeHNIO XapaKTepuCTNK u3JeNIA UIN erO nONHO Hepa6oTOcNO6HOCTN.
- PnpctabnHbIe Hnke 3KpaHHbIe CHIMKU OTHOcTcK CteBOMy KOMMyTaTOpy Tripp Lite Moen NSS-G16D2. Nopdok pa60tbpa3nHbIX KOMMyTaTOPOB pa3nHuAeTCB 3aBNCMOCTN OT Moen.
1.BoiDnteBnolb3OBaTeJbckn INHTepcEic ceteBOrKOMMyTaTopa.
2. IpeenIte B pa3den VLAN Management (YnpaBneHne BnpyaHnoJIBC).
Pa60Ta yCTaHOBKc DByxToueHNo TOnoJOrney -YnpaBnaembI KOMMyTaTOP CnOJIb3OBAHHeM npToKoJa IGMP
- B pa3dene VLAN Management co3daIte HOByIO BnptyaIbHyIO JBC (VLAN) IJRA KAKDOrO nepedatnuka, nCnoJIb3yeMoRo B yCTaHOBKe. Homep npota nepedaTnuka o6ra3aTeIbHO DOJIkeH yka3bIBaTbcr nepBbIM B cIncKe npTOB VLAN; BCneI 3a Hm Uka3bIBaIOTCs (Yepe3 3aIpyU) HOMepa npTOB BceX npmeMHbIX MOdyNe, KOtOpBle 6yDuT nepedabAtb ayuNo-/BVneocnHaJIb Ha Bbl6paHHbI nepedatnuK IOT Hero. Ha npedctabHeHHom Hxke EKpaHHom CHMKe NOKa3AHb BVnptyaIbHbIe JBC drr qetbipex nepedaTnuKOB (VLAN0002-VLAN0005). VLAN0002 npedctabIae Tco6oN nepedaTnuK, noKnlueyHbIK NoPty 1, ayNo-/BVneocnHan Kotoporo nepedaETcH na npmeHHNK, noKnlueyHbIK NoPta7 u8. Po aHaONr C3TNM VLAN0003 npedctabJIeT co6oN nepedaTnuK, noKnlueyHbIK NoPty 2, che ayuNo-/BVneocnHan nepedaETcH ha npemeHHNK, noKnlueyHbIE K npotam 9 u 10.
-
Дя поченя nctouнka aydno-/Bndeocurhana, noctynaioero Ha npneMHNK, nepeiHTe B pa3den hactpoiku VLAN cBra3aHHbIX C HMM nepeaTuNKOB iDobabTe/ydaJIte COOTBeTCTByUOINe nopTbl.
-
No Mepe paCunepHn yCTaHOBKn 3a Cuet HOBbIX NpepaTNUKOB IN pPneMHNKOB CNeIyET npocTo Do6abTb BnptyaJIbHbIe JBC dIra HOBbIX NpepaTNUKOB IIO6aBJIrTB HOBbIe pPneMHKNB Hactpoikax BnptyaJIbHbIX JBC coOTBeTcByUOxN NpepaTNUKOB.
YCTaHOBKa CMHOrOToUcEuHoN TOnoIOrMei HeynpaBnaEmbI KOMMyTaTOp
Птумейань:
ByctaHOBkax c HeynpaBnEbIM KOMMyTaTopoM uNcNo nepeDaIOuX MoUnei orpaHnUBAeTcI Bvym. KonueCTBO npEmhblx MoUyne OrpaHnUBAeTcNcOm Cbo6OdbIX nopTOB HeynpabnEmoR KOMMyTaTopa.
- Ipeep npotraBaanem Kaenee che3 ctehbl/ntoTkn Heo6xOIMO npOBepuB npabnBHOCTb yHKUOHPOBAHNA BcE yCTaHOBKn.
-ДяdoctxkeHMAKcMaIbHOIN INPOn3BOaNTeHbOCTN McNoB3yInTe Ka6enbCat5e/6 c OndoxnblbHIMn PPOBaAMn KAn6pa 0,2 MM². NcnoB3oBAHne Ka6eJIcMHOxNlBbIMn PPOBaAMn NN Ka6eJIcNPOBdAmn KaN6pa BbIe MM² npNBedT K COKpaueHHIO DmHbpeTpAHCLaUN. Ka6eJI6Oe BbICOKNX KaN6pOB (HaNPmep, 0,13 MM²) IMeOT ORpaHueHHU nepeAIOuYO cnOC6HOCTb NO cpABHeHIO C Ka6eJIaMn 6Oone HN3KNX KaN6pOB. BCE Ka6eJI Cat6 cepNI N202 MapKn Tripp Lite n3rOtaBnBaHTcN c NcnoB3OBAHMe OndoxnblbHbIX PPOBOB KaN6pa 0,2 MM². IIO INDINUYaNbHOMy 3aKa3a KOMNaHry Tripp Lite MoKet N3rOtaBnBaTaB Ka6eJI Cat6a YBeHueHHO dnnHbC mCnoB3OBAHMe OndoxnblbHbIX PPOBOB KaN6pa 0,26 MM².
- IP-peTpaHcIaTOpb aydno-/BndeocuHaNoB cepm B160 npedha3HaauoTcI nncnoIb3ObaHna C BblJeHbIM cTeBbIM KOMMyTaTOPOM. NpdkIoueHne IP-peTpaHcIaTOpOB K KomMyTaTopO, nCnoIb3yEmomy CdpYMM cTeBbIM 6OpUdoBaHnEM, npuBeTe K yxUeHNIO XapaKtePncTIK n3DeNn erO noHoh hepA6OTocnoc6HoCTn.
Ha cxeme yctahOBKn, 306paXeHHo Ha cIeDyIOSe CTpaHnSe, NOKa3aHb IpePaTcNKu IN PpEmHNKu, IMeOuNe ToIbko pa3bEmbH HDM; Ha npakTuKe BO3MOxHO ICNoB3OBAHne IpePaTcNKo IN PpEmHNKOB CJIIO6bIM COUeTaHmE pa3bEmOB (HapPmep, Component Video, DisplayPort, HDM, VGA).
Ha cxeme yctaHOBKn, m3o6paXeHHoH ha cneDyIOSeI CTpaHnue, nOKa3aHb I TOnbKO Heo6xoIMMbIe coeINHeHn. Heo6aTeNbHbIe coeINHeHn (HaNPmEp, cNoMoUb Ko KaBeNeIR-IN u IR-OUT) He nOKa3aHbI.
YcTaHOBka CMHOrToOueHOn TOnoIOrNe- HeynpabIeMbI KOMMyTaTOp

KpaTkoe onncahne yctaHOBKn (IJa BceX moJeN)
1.перд haayam yctahOBKn BCE noKluyeHoe obopydobAHne doJxho 6bItb oectoyeHo.
2. ПОДКЛЮЧITE NGTOUHн AYdno-/BnDEOCnHana K BXODHMy NOpTy NpepaOuIeRo MOnyJIa (BbInySCaEMbIe MoDJIY aYdno-/BnDEoKa6eJIe Tripp Lite nepeuNcIeHb I B pa3deIe OOnNoHaJIbHbIe KOMNKeKTyOuIe).
YCTaHOBka cMHOrToOueHoi TOnoIOrnei HeynpaBnaEmbI KOMMyTaTOp
- (Heo6aTeBHO) CoeHInTe npT DB9 KOMnbIOTepa c nocJeIOBaTeBbHbIM npToM nepeJaIoUero MoyJIa. B 3abucmOcTu OT moJIeN IocJeIOBaTeBbHbI npT MOKeT IMeT b HTEpfeC DB9 nn 3,5 MM. MoJIeN C pa3bEmAmN 3,5 MM KOMnEeKTyOTcR nepeXoHNKOM 3,5 MM — DB9. JIra noJknIooHnRA K KombIOTepy moJIeN C npTaMn DB9 Tpe6yeTcR cTaNapThbIKa6JIb c pa3bEmAmN RS-232 u DB9 (npodaetc otdeNbHO).
- (Heo6aTeNo) BCTaBbTe BbIXOHOI NK-Ka6eJIb (IR-OUT) n3 KOMnEKeTA B nopT IR-OUT nepeaoJero moyra. UcTahOBITE DaTnK Ha Ka6eJIb IR-OUT B CBO6OHDom OT npenrTCTBm MeCTe TaKIM 06pa30M, qTO6bl ynpabIaeMoE yCTpoiCTBO HaxOINOCb B npedeJax BuDMocTn. PpmeHne. Ka6eJIb IR-OUT npinHMaet cRHaI dNCTaHIOHOrO ynpabIeHn I nepeaerero Ha ynpabIaeMoE yCTpoiCTBO (Hanpimep, nponrpblBaTeJIb Blu-ray n np.).
- (Heo6a3aTeIbHo) POKKIOUHTe IOKaIbHbIM MOHITOP K BbIXOHOmy npTy HDMI nepeaIoUero Moyra c nmoouHDMI-ka6eY (BbInyCKaEMbIe moJIeHDMI-ka6eN Tripp Lite nepeuCJIeHbI B pa3dene OOnIOHaIbHbIe KOMnNeKToUOme).
- YctahOBHTe JekaembH HOpE kaHana (OT 0 do 63) c nOmoU KhoNOK Up/Down (BBepx/Bn3) Ha nepeDHe naHEni nepeDaTuKna. Bce nepeDaTuKn, BXoJrue B coCTab yCTaHOBKn, DOJIHXbI NMeTb pa3HbI e Homepa KaHaIOB.
PpimmeaHne. 3aunbIOTcnyaHoro n3MeHeHnA Homepa KaHana npedyCMOTpeh MexaHn3M fKcaHn. Pn 3aФHKCupOBaHHOM Homepe KaHana ydepXuBaTe KhoNkUp (BBePx) uDown (BHN3) hKaTaBMn Do tex nop, noka Homep KaHana He NaHT MraTb. 3aTeM nepeyDnte Ha JKeJaEMbI KaHAn c NmOoBIO KhoNOK Up/Down (BBePx/Bn3). IocNe Bbl6opa Jxenaemoro Homepa KaHana 3aФHKCupyTe erO, ydepXuBaR KhoNkUp (BBePx) u Down (BHN3) do tex nop, noka Homep KaHana He npekpaTIT MraTb.
- CoeHInTe BbIXoHoi nopT RJ45 (Output) nepeaioero moyna c odHm n3 nopToB RJ45 ceteBoro KOMMyTaTopa npn noMoUk Ka6ena Cat5e/6.
PpmeHne. MaKcMaIbHo IOnyCTMma IInHa Ka6eNa, coeINHIOUeO npMeHHK c KOMMyTaTOPoM, coCTaBnEeT 100 M.

B 3TOT MOMENT nepedaTuk He doJxHe 6bITb noKluoyen K BHeuHemy 6nOky nHTaHn. NpedaTuk He cneJyET 3aNTbIBaTb Do noKluoyen H 3aNTbIBaHn BCEX 3JIeMeHToB ayDNo-/BnDeo06OpyDoBaHn.
8.Дя nodklouhenno dononHntbHoro nepeaTnka NOBTOPe DeICTBnA,OnncAHhble Bnn.2-7.
YCTaHOBKa C MHOrOToUcEHyoT OTONoIOrNei HeynpabJIeMbI KOMMyTaTOP
- Поdkлочte моннтор кaydno-/Видевьхody (Output) npneMHoro Modyna (BbInyckaemble Moden aydno-/Bndeoka6ene Tripp Lite cm.В pa3dene OOnhoHaBhbIe KOMnNeKtTuOuIe).
- (Heo6aTeNbHo) CoeHnIte nopT DB9 noCneIOBateNbHO noKluOaEMoro yctpoiCTBa c noCneIOBATENbHbIM npToM npHmHOro moyJra. B 3aBucmocTn OT moJeN noCneIOBateNbHbIM npT moKet nMeTb nHTepfEc DB9 nn 3,5 MM. MoJeN c pa3bemamn 3,5 MM KOMJIeKtYOTc npexoHNkOM 3,5 MM — DB9. Jn paraoknueHnry yctpoiCTBa K moJeN m c npTaMn DB9 tpe6yeTc rTaHapThb k6enb c pa3bemamn RS-232 n DB9 (npoJaETc oTdenho).
- (Heo6aTeBho) BCTaBbTe BxOJHOI K-Ka6eIb (IR-IN) u3 KOMnJIeKTA B npT IR-IN npHemOr MoyIy. UcTaHOBtE DaTUnK Ha Ka6eIb IR-IN B CBO6OJHom OT npEnrTCTBm MeTe TaKIM O6pa3OM, YTO6bl 6IOK dNCTaHOnOHoro ynpabJIeHn HaxOJINcR B npDeJax BNDIMOCtN.
PpmeHne. Kaebb IR-IN npHHMaet cunHan dctaHIOHoro ynpabHeHn I nepeaet ero ha ynpabIaeMOe yctpoCTBO, paonoloxehoe Ha nprom KOHcE yCTaHOBKN.
- UCTAHOBITE c nOMOsbK HONOK Up/Down (BBepx/BHn3) Ha nepeDnei naHei nepeDaTnka Homep KaHana (OT 0do 63), COBnaIauoIc Homepom KaHana toro nepeDaTuHa, yei aydno-/BNDeOCNRan Bbl XOTNe npNHMaTb.
PnmeaHne. 3aunb0 nuyauHoro nMeHnHn Homepa KaHana npdycmOTpeh MexaHnM 6nokpOBKn. Pn 3aKpOHOM Homepe KaHana yepxNBate KhoNkUp (Bbepx) uDown (BHN3) hxaTbIMu Do Tex nop, noka Hmep KaHana He NaHT MRAtb. 3aTe mpeDnte Ha Jekaembl KaHan c nomoubIO KhoNOK Up/Down (Bbepx/Bn3).Iocne BbIopa Jeknaemoro Homepa KaHana 3aKcpyte erO, yepxNBa KhoNk UP (Bbepx) u Down (Bn3) doTex nop, noka Hmep KaHana He NpeKpaNT MRAtb.
- CoeHInHe BbIXoHoi nopT RJ45 (Input) npneMHoro moDyra cOdHM u3 nopTOB RJ45 ceTeBOro KOMMyTaTopa npn noMoUu Ka6eJa Cat5e/6.
PnmueyaHne. MaKcMaJIbHO DoNyCTMma JInHa Ka6e, CoeINHIOUeI npMeMHIK C KOMMyTaTOPOM, coCTaJIaRET 100 M.

B 3TOT MOMENT npHemHK He dOJxeh 6bITb NOdkIIOueH K BHeUHEmy 6nOKy NHTAHNA.
PpHemHK He cIeJeT 3aNTbIBaTb Do NOdkIIOueHn I 3aNTbIBAHn BCex
3JIeMeHToB ayDNo-/Bunde0o6OpdyOBAHn.
14.Дя nodknoeHnI dOONHHTbHbIX npneMHKOB NOBTOPte DeNCTBn,OnncAHhle Bnn.9-13.
15. BkIIOUHTe NITaHHe BCEx IOdKIOUChENbIX yCTpoIcTB.
YCTaHOBKa CMHOrOToUcEuHoN TOnoIOrMei HeynpaBnaEmbI KOMMyTaTOp
-
ПОДКЛЮЧITE BHEUSHNE 6LOKИ ПИТАнЯ KО BCEM NpepaIoUIM I npIeMHbIM MOДУЯМ YCTaHOBKN, a 3aTeM BKJIQUHTe BHEUSHNE 6LOKИ ПИТАня Bpo3eTKI ceTeBbIX ΦиьТрOB, 6LOKOB pacnpedelenHa ПИТАнЯ (PDU) nII nctOuHnKOB 6ecnepe6oHoro ПИТАнЯ (N5П) Tripp Lite.
-
Дя сменихка постуноюго на монитор синда в поцесе pa6otbl сдует постот Измены Homek KaHа COOTBETCTBHyOJO npneMHka TAKIM O6pa3OM, YTO6bI OH COBna C HOMepom KaHа NepeDAtUHa, TpaHcHpyuOJOEO CINHAN OT HYXHOTo ICTOUYHKA.
BbIaBHeHne uYcTpaHHe HEnCpPaBHOCTeI
EcnBbInonHeHne yKa3aHn no yCTaHOBe He nO3BOJAE T NOyUHTb PpHEmIeMOro KaYeCTBa
N3O6paKeHn, nonpo6yTe BocNoJIb30BaTcR npNBedeHHbIMn Hxke peKOMeHaqIaMn N O BblBHeHIO u
yCTpaHEHIO HeCnpaBHoCTe:
-
Pookuehbln noctabmte B komneke BheHHe 6okn nntahna K pa6oTaoueMy nTochky nTuHa? Ira haJnxkaeero fynKuoHpoBaHna daHHoro n3deHn OHO dONXHO pOKluOaTbCk BHeHEmy 6Okny nTuHaN u 3anTbIbTaBcR OT Hero.
-
5bIIO IIN OTKIIIOUeHO NITaHHe NOkIIIOUeHHbIX yCTpOiCTB Do Hauana yCTaHOBKN? EcNI HeT, To nepe3anyCTIte Bce NOkIIIOUeHHbIe yCTpOiCTBa.
-
3aNTbIbAINCb IIN NOKIOUeHHbIe aydno-/BnDEOyCTpoiCTBa Do 3aNTbIBAHNApepaioxN npemMbIX Moyn? EcHn HET, OTCoEHNHTe NITaHne BCex nepeaioxN npemMbIX MOyn, a 3aTeM 3aNTaInTe INx CHOBA.
-
Kakoro pa3peuHn Bbl nbIaTeCb Iobtbc? POpO6Hee O MaKcMaJIbHbIX 3NaueHnx DnCTaHn n pa3peuHn cm. B pa3dJe ΦyHKUHOHaJIbHbIe BO3MOXHOCTN N3DeHn HaTOrAeRo pykoBODCTBa. B cnyae HeBO3MOXHOCTn NOlyeHn pPmeMlEmoR KaueCTBa N3o6paJxHn nonpO6yute yMeHbIITb BIndeopa3peuHne KOMlbIOTePa IIIN OTperynipOBaTb YactOTy O6HOBLeHn.
-
KaKoro Tnna Ka6eHn NcNoB3yIOTc B DaHHoYCTaHOBKe? NcNoB3OBAHne HeHaJIeKaUx Ka6eHm MoKet npIBecTn K yxydWeHnIO pa6OuX XapakTePrcNTk. Heo6xoJIMo NcNoB3OBA Tb Ka6eH, noDpeKINBaOuIe HxKhbl yPoBeHb BVNeOpa3PeSeHn. IInr DoCTNKeHn MaKcMaJIbHO nIcTaHcUNn Ipa3peSeHn Heo6xoJIMo NcNoB3OBA Tb Ka6eNB Cat5e/6 c OndoxNtBIMn npOBaMn KaN6pa 0,2 MM²nn Cat6a COnHOxNtBbIMn npOBaMn KaN6pa 0,26 MM². Ka6eNB Cat6 cepuN N202 MapKn Tripp Lite n3rotabNaOTc CncNoB3OBAHnEM OndoxNtBbIX npOBaOB KaN6pa 0,2 MM², TaK Jeku Ka6eNB B 6yxtax N022-01K-GY (Cat5) n N222-01K-GY. NcNoB3yEmble ayduo-/BnuDeOka6eHN TaKxe DOnJXHbI NpDiepxNBA Tb HyxHbI yPoBeHb BVNeOpa3peHn. DeWeBbI e Hn3KOKaueCTBeHbIe Ka6eNB MOryt He NoDpexNBA Tb MaKcMaJIbHO rO pa3peSeHn. PekomeHnyETc NcNoB3OBA Tb Ka6eNB MapKn Tripp Lite, nepeuNCleHHbIe B pa3dene OnuOHaNbHbIe KomnNeKTyouIe NaCToJeero pykoBOdCTBa.
-
Поберьтейнспльзуемыкави на педmetхн Надlexацero Функунонрованя. Hanpimep,дя пobерkn Испавноctуaydno-/Видекабеля coeindite chepe3 Hero paobotouшne nctochnk mOnHTop.Дя пobерkn kaebЯ Cat5e/6 ha obecneueHne cTeBOrO coeindhenny nodkluoyte ce ro nOMOsbIO KOMNbIbTeP K cETN.
BbIaBHeHne uYcTpaHHe HEnCpPaBHOCTeI
- Поберп Кабени на педmet наличma NOBpeхден, KOToPbIe MOrn npOn30HTN Bnpocce yctahOBKn.Всуаe pa36aantbHaHЯ Ka6eNbHoro pa3beMa npn npotraHbAHm Ka6eЯ che3 CTeHb/notoJKN uIN nobpexdeHЯ Ka6eNbHoi oboNoOuKn, Bbl3bBaIOUeRo orOJeHne npOBOD,doCTNXKeHne MaKcMmaJIbHbIX pa6Ouyx xapaKTepNCtHK He npedCTaBIAeTc BO3MOXhblM.
- He noBbepraotcIu nepeaTunk(-n) n/nn npneMHNK(-n) BO3deNCTBNUO NOBbIeHHbIX TemnepaTp B Tex MeCTax, rJe OHN yCTaHOBneHb? B cnuyae neperpeBa u3dene He MoKet yHKUHOHPOBaTB NaJIeKaUIM 6pa3OM.
- He yctaHaBnBaIte oINHaKOBbIe HOMepa KaHAnOB IJIpePaTcIKOB B yCTaHOBKe C nOJb30BaHHeM HeynpaBnEmoro KOMMyTaTopa. 3TO npIBeTe K OTCyTCTBIO OTO6paXeHna CnHaHa Ha MOHTopax, NOkNIOueHHbIX K npEeMHKaM, HAcTpoEHbIM Ha KaHaIb C OINHaKOBbIM Homepom. B 3To mClyae N3MeHInTe HOMepa KaHAnOB nepeDaTcIKOB Ha YHkaJIbHbIe N HAcTpoIte YKa3aHHbIe npEeMHKnHa KaHaJIbIC HyXHBIM HOMepaMn. EcnI nocIe BblONJIeHnIg 3Tnx DeIcTBn ayDnO-/BnDeoCnHaN He BOCCTaHaBnBAeTCR, OTKIOUHTe NITaHne COOTBeTCTByIOuNX nepeDaTcIKOB n npEeMHKnOB n NOkNIOUHTe erO cHOBa No IcTeueHm 10 cekyHd.
- He podknoyaTe 6Oee DByx nepeTaTnKOB B yCTaHOBKe C nCnoB3OBAHEm HeynpabMaEMoro KOMMyTaTopa. KoInuEcTBo nepeTaTnKOB B yCTaHOBkax C HeynpaBnaEmbIM KOMMyTaTopoM OgrpaHnUBaetcA DBym, a KOInuEcTBO npneMnKOB — YNCJOM OCTaBuxxCr nopTOB HeynpabMaEMoro KOMMyTaTopa.
- He nodklouaTe K cTeBOMy KOMMyTaTOpy KaKoe-Im6o Dpyroe cTeBoe o6opydoBaHne. IP-petpaHcIaTOpby ayDno-/BnDeocirHaNoB cepu B160 npedHa3HaayoTcI yncnoJIb3OBAHH C BblJeHbIM cTeBbIM KOMMyTaTOpom. Ix nodknUoyHeNe K KOMMyTaTOpy, nCnoJIb3yeMOMy C dpyrIM cTeBbIM o6OpyIOBaHNem, npBBeET K yxydWeHIO xapaKtepNCIK u3deNn IIN erO nonHO Hepa6oTOcNO6HoCTN.
TapaHTnHbIe 06a3aTeNbCTBa
Iapantma 1 ro
KoMaHn Tripp LrnpaTpyet OTCyTCTBne dekeKTOB MaTePnaIOB N3ROTOBHeN B TeueHe 01 (1) roda c MoneHa TepBOHaJIbHO Nookyn.
O6BaTeIbCTBa KOMnHn Tripp Lite no Hactoae rapaHTm OrpaHnUBAOTcpeMOTHom nIIm ZameHoi (no ee eHNHOuHOMy yCMOTpeHIO) IIO6bx
TAkHX deeKTHbIX u3denn. IIN naouehn ycyr no daHNO rapaHTm Heo6xOduMo NOUYt bomep Rurned Material Authorization (RMA -
pa3peSeHHe Ha Bo3bPaT MaepnAoob) ot KOMnHn Tripp Lite nIIM ee ABTop3ObaHHOr cpeBCHOR oceHtpa. N3dEInn doJXhbl 6bIt Bo3BaPeHb I
KoMaHn Tripp Lite nIIN abTop3ObaHHb CEpuChbI ueHTP tripp Lite C npdeOnlato TPAHCnptbXipacxoOIB COPOBOXDaTcK pATKM ONCAHEM
Bo3NKwE np6bEmbl dOKyMeHTOM, nIDTBepKDAUUM DaTy IM MeTo erO npNo6peTeHNA. DeiCTBne HAcToaee rapaHTm He paCnpocTaHAreTcHa
obOpdyobAHHe, NopEckJeHHeB pe3yIbTaTe aBapm, He6peXHO o6paueHn lnn HnepaBmHBO HO NCIOB3OBAHn, a TaKKe BuDOn3MeHeHoe KaKM
6bI To Hn 6blIO 6pa3OM.
3A NCKJIIOUHEM IPEJYCMOTPEHHbIX 3DcB CJUYAEB KOMIANHIA Tripp Lite HE IPEIOCTABJRET KAKNX-JI50 ABHBix INI NIOPA3YMEBAEMbIX TAPAHNTBI, BKIIQUAYAR TAPAHNTM KOMMEPYECKOIN PIPROHOCTUN INI PIPROHOCTN INI KAKOIN-JI50 KOHKPETHO CEIN. B HeKOTopbIX Wtatax/ ROCyapdCTbX ORpAHueHne INI NCKIOUHHe NOp4a3yMeBaEMbIX TAPAHNT He DOnyckaETCA; CNeIOBATEbHO, BbiyeKa3aHHe(-bie) OrpaHueHne(-i) INI NCKIOUHHe(-r) MOrTy He paocptpaHbTaHa NoKynatela.
3A NCKJIIOUHEM IPEYCMOTEHBx BbIe CUYAEB KOMPAHNA Tripp Lite HN INPNI KAKNX OCBTORETBAX HE HECET OTBETCTBEHHOCTN 3A IPIRMBIE, KOCBEHNbIE, CUYAHNBIE ININ IOBOHyB EybITK IN50 BybITK, ONPDEJENMBIE OOBbIMN OBCTOReTbCTBAMN, BO3HKAIUHNE B CBA3N CNCIOJIb3OBAHNE DAHHORO IN3DEINIA, DAXE B CNYAE EE INHOPMIMPOBAHNA O BO3MOXHOCTN HACTYNIIEHNA TAKNX y5bITKOB. B cactHOCTn, KOMPAHNA Tripp Lite He HeceT OTBcTBeHHoCTN 3a KaKNe-In6o IN3dejKKN, TaKe KaK ynuieHNbIe pIn6bInn Nn DoxoDb, NOtep aobyobAHNa, notep Bo3MOXHOCTn INCIOB3OBAHNA oObyoBaHna, noTepe nporpaMMHO oecneHn, notep daHHbIX, paXOnbHa 3aMeHHTeIN, yperynopbaHne npetehn trtpbNx nip.
Komna Hria Tripp Lite noctoanho coBepuehctbyet cboK npdykun. B Cb3n C 3mmb0MKHO 3meHHe TExHuecknx xapaKTePmCTNK 6e3 npedapntelbHorO yBeDOMJIeHn. BHeHn Bn pealbHbIX n3dien Mokket HeckonbKO OTImaTbcr O npedctabHeHoro Ha foToIpaqnx mnnIOCTpauixx.


PpOpyeHbBcUcHIO ENHCRS.
1111 W. 35th Street, Chicago, IL 60609 USA • www.triplite.com/support
19-05-366 93-36B2 RevB