THRAYF011D - Heating THOMSON - Free user manual and instructions
Find the device manual for free THRAYF011D THOMSON in PDF.
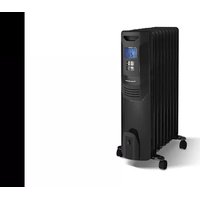
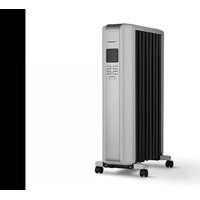
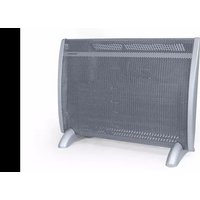
| Product type | Radiant electric heater with inertia |
| Brand | Thomson |
| Model | THRAYF011D |
| Power | 1000 W |
| Power supply | 230 V ~ 50 Hz |
| Protection class | II |
| Protection index | IP24 |
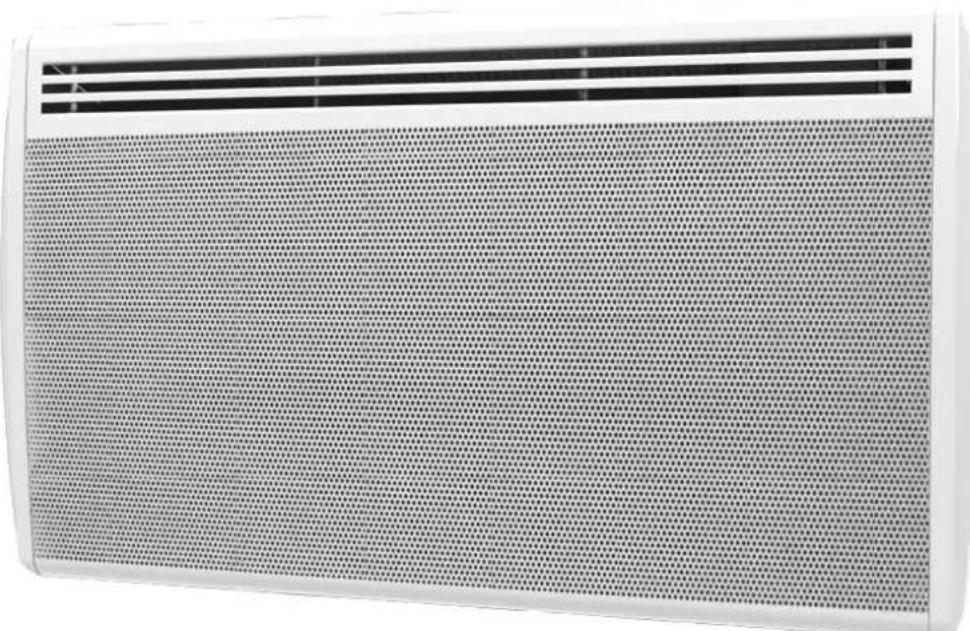
| Dimensions (W x H x D) | 57 x 45 x 11 cm |
| Weight | Approximately 5 kg |
| Heating type | Aluminum radiant heating element |
| Operating modes | Comfort, Eco, Frost-free, Program, Standby, Open window detection |
| Thermostat | Electronic with weekly programmer |
| Temperature adjustment | 5 °C to 30 °C |
| Display | LCD screen |
| Child lock | Yes (long press on M key) |
| Pilot wire | Yes (6 commands) |
| Installation | Wall mounting, outside volume and volume 2 bathroom |
| Electrical connection | Wall box, without plug, with 30 mA RCD |
| Maintenance | Damp cloth; do not use abrasive products |
| Warranty | According to conditions (excluding wear, misuse) |
| Standards | NF, CE, WEEE directive |
Frequently Asked Questions - THRAYF011D THOMSON
User questions about THRAYF011D THOMSON
0 question about this device. Answer the ones you know or ask your own.
Ask a new question about this device
Download the instructions for your Heating in PDF format for free! Find your manual THRAYF011D - THOMSON and take your electronic device back in hand. On this page are published all the documents necessary for the use of your device. THRAYF011D by THOMSON.
USER MANUAL THRAYF011D THOMSON
natural_image
Close-up of a textured fabric with uniform dark bands and no visible text or symbolsLIRE ATTENTIVEMENT LES INSTRUCTIONS
1. CONSIGNES DE SÉCURITÉ
AVERTISSEMENTS
support de fixation murale.
DIGITAL PANEL HEATER WITH ANTI FOULING GRIL
THRAYF011D - 1000W
THRAYF012D - 1500W
THRAYF013D - 2000W
INSTRUCTIONS MANUAL
natural_image
Close-up of a textured fabric with uniform dark bands and no visible text or symbolsREAD THESE INSTRUCTIONS CAREFULLY
1. SAFETY INSTRUCTIONS WARNINGS
- A means of disconnection must be incorporated in the wiring attachment according to the wiring rules.
- A means of disconnection from the power supply having a contact opening distance of all poles must be included in the fixed wiring in accordance with the installation requirements.
- WARNING: To avoid overheating, do not cover the heater.
- The appliance should not be placed immediately below a socket.
- The unit must not be exposed to dripping or splashing water.
- The appliance must not be used in the volume 0 or 1 of a bathroom. (See the paragraph INSTALLATION IN THE BATHROOM)
- The device must not be used outdoors.
- The device should not be removed to avoid the risk of electric shock.
- The device is only intended for domestic use.
- Do not apply pressure to the front of the unit or on the sides or on top.
- If the power cord is damaged, it must be replaced by the manufacturer, its service agent or similarly qualified persons in order to avoid a hazard.
- Move away the appliance from infants and people with physical, mental or sensory impaired. The device should not be used by these people.

- Place the unit at a minimum safe distance of one meter from any flammable materials (curtains, furniture ...).
- Do not install the unit near a stove, oven, gas flame or flammable liquids.
- Clean the unit with a slightly damp cloth after disconnecting the circuit breaker that supplies power.
- Do not use chemical solvents or abrasives to clean the surface of the appliance may scratch, damaged or even deformed.
CAUTION: To avoid hazard due to inadvertent resetting of the thermal cutout, this appliance must not be powered via an external switch, such as a timer, or connected to a circuit that is regularly in and off by the electricity supplier.
-Children under 3 years must be kept away unless constantly monitored.
-Children aged between 3 and 8 years must only turn on or off the unit provided it has placed or installed in its normal operating position expected and were trained and supervised in instructions for using the machine safely and understand the potential hazards.
-Children aged between 3 and 8 years must not connect, adjust or clean the heater or perform user maintenance.
WARNING - Some parts of this product may become hot and cause burns. Particular attention must pay in presence of children and vulnerable people.
- The heater must be installed so that switches and other control devices can not be touched by a person in the bath or shower.
-The appliance must be supplied through a residual current device (RCD) having a rated residual operating current not exceeding 30 mA.
-This product has the European EC conformity being compliant NF EN60335-1, NF EN60335-2-30 and Directive 2014/30/EU limiting radio interference.
-Regarding the instructions for the heater intended to be fixed by screws on the method of fixing and how to install the appliance, thanks to refer to the section "INSTALLATION".
-This appliance can be used by children aged from 8 years and above and persons with reduced physical, sensory or mental capabilities or lack of experience and knowledge if they have been given
supervision or instruction concerning use of the appliance in a safe way and understand the hazards involved.
-Children shall not play with the appliance.
-Cleaning and user maintenance shall not be made by children without supervision.
2. TECHNICAL SPECIFICATIONS
- Aluminum radiant heater
- Power supply: 230V \~ 50Hz
- NF
- Class: II
- Protection: IP24
- Model: THRAYF011D THRAYF012D THRAYF013D
- Power (W): 1000 1500 2000
3. INSTALLATION
RECOMMENDATIONS IMPORTANT READ BEFORE INSTALLATION
- Do not install the unit directly below a socket.
- Do not install the unit in a damp room or near a water source.
- Do not use the appliance outdoors.
- Do not install the unit in an air current that could disrupt its regulation.
- Do not place the unit near a barrier limiting the airflow around it.
- Attach the heater vertically to the wall as described below.
- Choose screws and plugs suitable for the wall material and weight of the unit.
FIXTURE
To hang the heater on the wall:
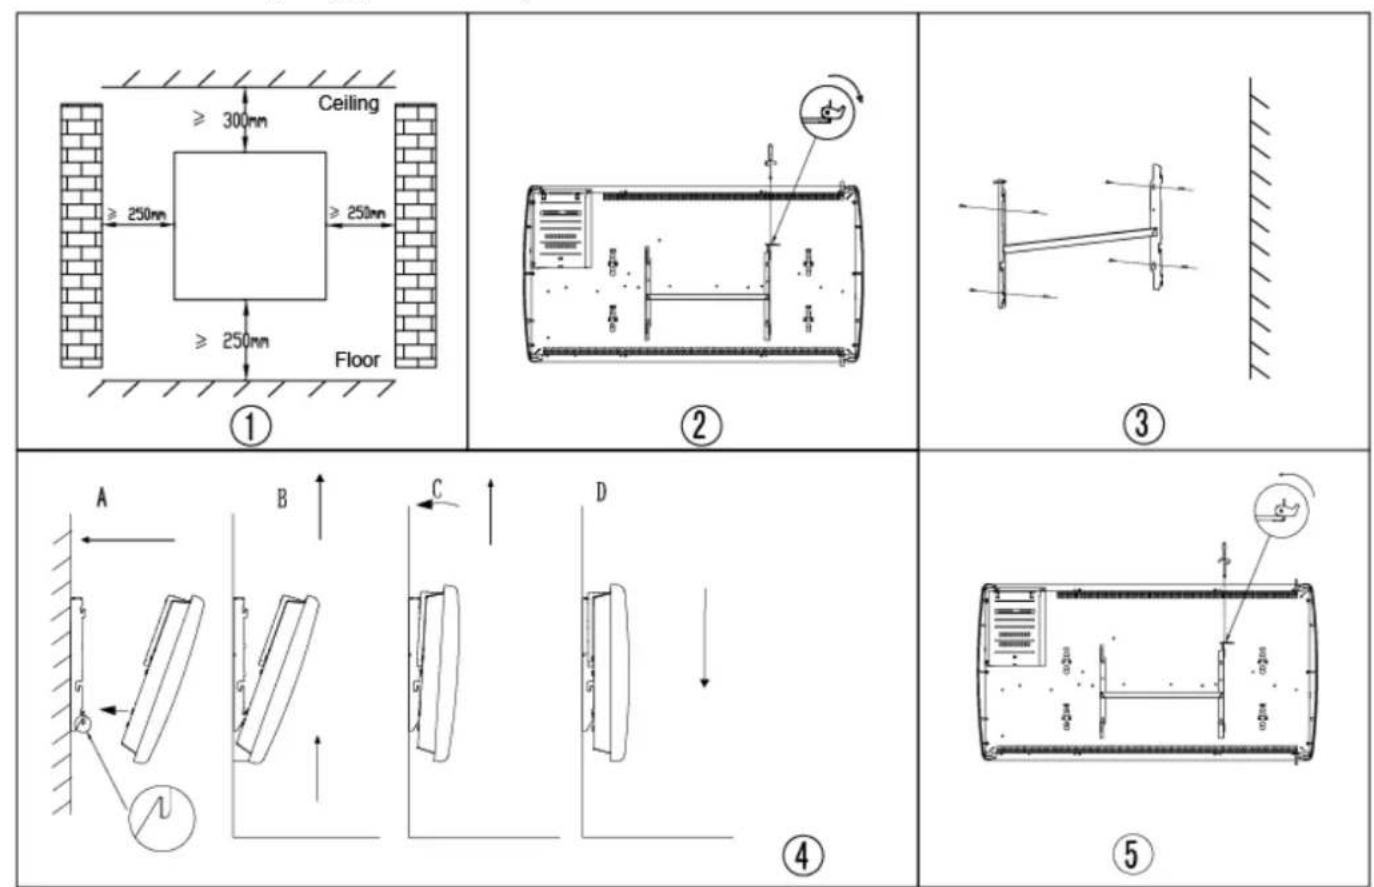
- Choose a suitable installation location for the heater. (Figure 1)
- Disassemble the wall bracket by loosening the screw (not screw off, only loosen) and sliding the metal slice out of the hole. Take out the bracket by pulling down (Figure 2).
- Verify that the bracket is perfectly horizontal with a spirit level and mark the location of 4 holes on the wall. Drill 4 holes in
the wall using a drill adapted to the diameter of pegs. Insert the pegs into the holes, then screw securely wall mount bracket onto the wall. (Figure 3)
- Place the heater against bracket (Figure 4):
A : Fix the heater on the 2 hooks that are downwards.
B : Pull the heater upwards whilst keeping it in the 2 lower hooks.
C : Fix the heater on the 2 hooks that are upwards.
D : Pull the heater down.
- Slide the metal slice into the hole, and fasten the screw to lock the wall mount bracket (Figure 5).
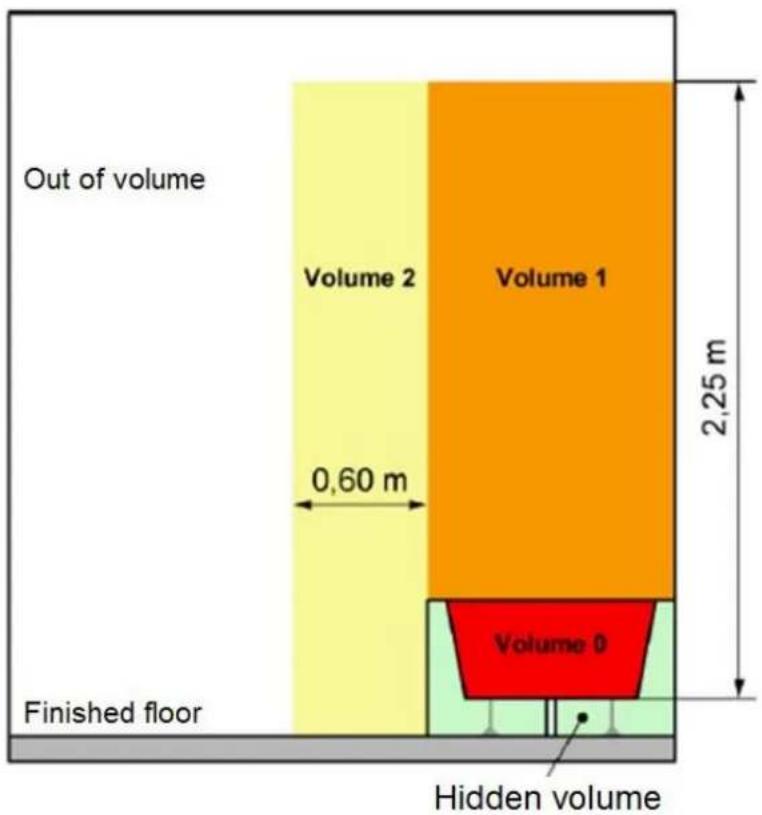
INSTALLATION IN THE BATHROOM
Warning: this product shall be used in volume
2 and out of volume only according to the national wiring rules (For France NF C 15-100) Note: The drawing is for reference only. We suggest that you contact a professional electrician for assistance.
ELECTRICAL CONNECTION
CAUTION: Before working, turn off the electricity at the main circuit breaker.
- The installation must be carried out in the rules of the art and meet the standards in force in the country (NF C15-100 in France)
- The unit must be connected to a standard wall box placed at least 25 cm from the floor.
- The appliance must not be connected to an outlet with a power plug.
- The appliance must be supplied through a residual current device (RCD) having a rated
residual operating current not exceeding 30 mA.
- The appliance must not be connected to the
earth wire (yellow and green wire).
ELECTRICAL CONNECTION
Blue or light gray wire connect to Neutral (230V) Brown or red wire connect to Phase (230V) Black wire connect to pilot wire. Optional function to use in case of control by pilot wire box (do not connect to ground).
- In the absence of pilot wire, insulate the bare end of the black wire to prevent electrical contact with the other wires or ground.
- USING THE HEATER
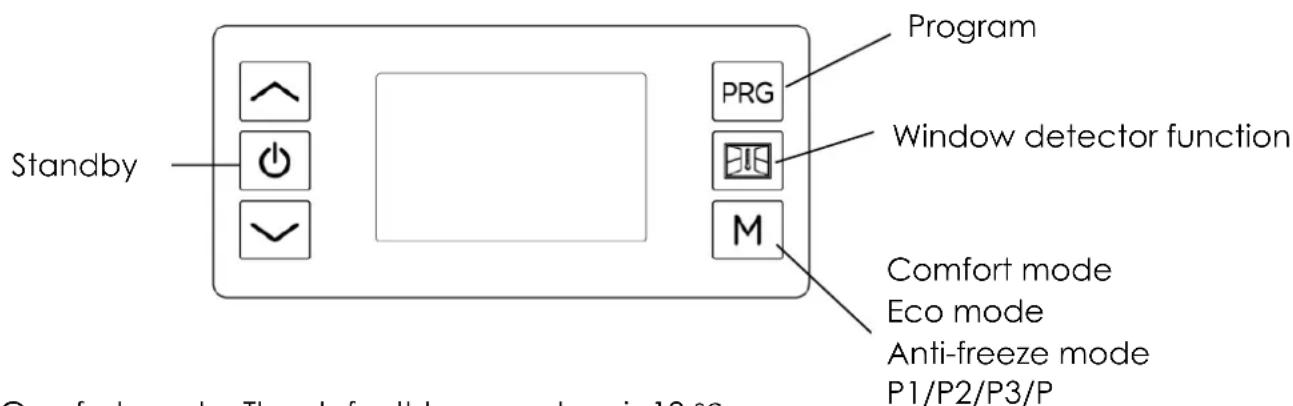
In Comfort mode: The default temperature is 19 °C In Eco mode: The default temperature is 15.5 °C
Standby mode (the device does not work but is energized)
Frost protection mode (the device maintains the room temperature at approximately 7 °C)
Comfort mode (Setting the desired temperature)
Eco mode (ECO Maintains temperature which is equal to the comfort temperature lowered by 3.5 °C. This mode reduces the temperature without disturbing the desired comfort mode temperature)
P Program mode (Set the daily timer programs by pilot wire)
Child lock (Lock the control panel by pressing the M button for 3 seconds to activate and deactivate)
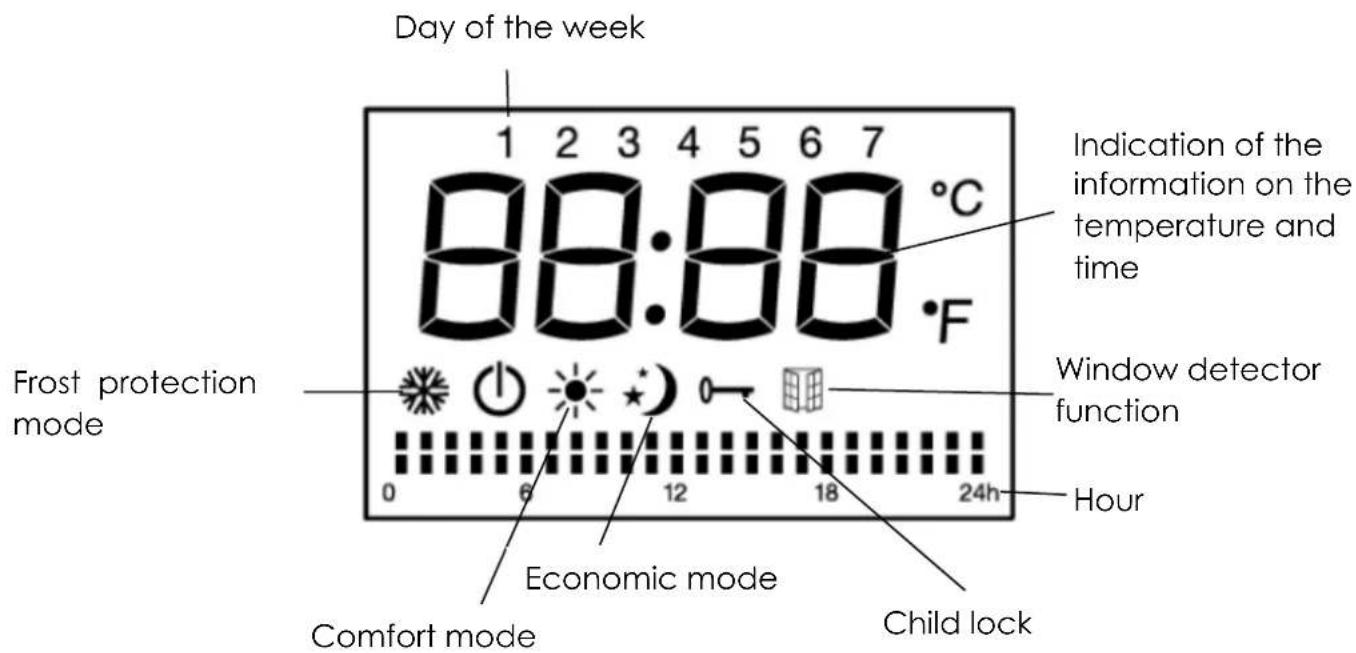
Press the button (1) to turn the device into Standby Mode or Comfort mode. Press the M key to select desired mode.
Note on the child lock
Stand by button (1) is still available when the child lock is activated.
The keypad is unlocked if:
1) The heater is put into standby mode by pressing the button standby
2) The heater is disconnected from the electric power supply.
Operation in comfort mode

In comfort mode, press on the button ↗ or ↙ to adjust the temperature between 5 °C and 30 °C. Press the other buttons except ↗ / ↙ to confirm the setting or adjustment will be confirmed automatically after 5 seconds.
The room thermostat can control the temperature. When the ambient temperature is above the set temperature, the unit stops heating.
Operating in Eco mode
Press the M button to select the economic mode.
By selecting this mode, the temperature of the comfort mode will be reduced by 3.5 °C
Operation in frost protection mode

By selecting this mode by pressing the M button, the temperature is maintained at 7°C.
Operating in program mode P1/P2/P3
Programs are preregistered to give you ease of use and achieve energy savings.
Press the M button to select one of three recorded programs P1, P2 or P3
Below the defined programming
Program I
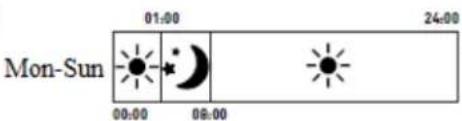
Mode P1 =
■ From Monday to Sunday : Comfort temperature from 8am to 1am & Eco temperature from 1am to 8am
Program II
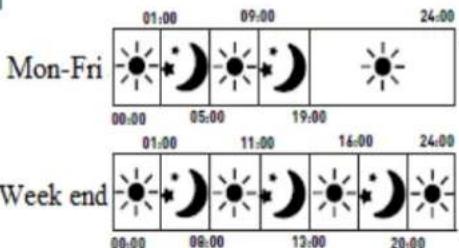
Mode P2 =
- From Monday to Friday: Comfort temperature from 5am to 9am – from 7pm to 1am & Eco temperature from 1am to 5am - from 9am to 7pm
- Week-end: Comfort temperature from 8am to 11am - from 1pm to 4pm – from 8pm to 1am & Eco temperature from 1am to 8am - from 11am to 1pm – from 4pm to 8pm
Program III
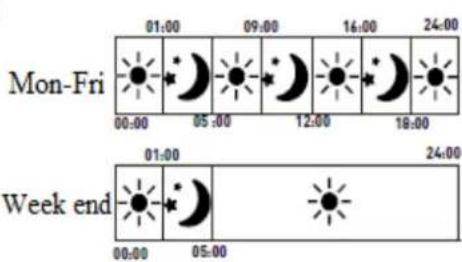
Mode P3 =
- From Monday to Friday: Comfort temperature from 5am to 9am – from 12pm to 4pm – from 6pm to 1am & Eco temperature from 1am to 5am - from 9am to 12pm – from 4pm to 6pm.
■ Week-end : Comfort temperature from 5am to 1am & Eco temperature from 1am to 5am
Operating in Program P mode
Press the M button to select Program mode P (pilot wire) and then program the external controller. When the external controller is programmed, the display shows:
| Setting of the mode pilot wire | Icon displayed |
| Comfort mode ⚙ | P ⚙ |
| Comfort mode ⚙-1 | P-1 ⚙ |
| Comfort mode ⚙-2 | P-2 ⚙ |
| Eco mode ⚙ | P ⚙ |
| Frost protection mode ⚙ | P ⚙ |
| Stand-by mode | P ⚙ |
Time setting
Press the buttons and at the same time to set the time. Press the button to change between hour / minute / week. Press the buttons to set hour / minute / week.
Press other buttons except the buttons ^ / √ to confirm the setting or adjustment will be confirmed automatically after 10 seconds.
Programs setting
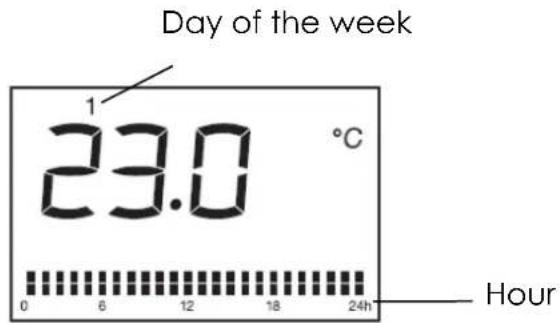
Press the button PRG to select the program prg. In program mode, press the PRG key to change between the "day (1-7)" and "heating mode of different time zones
(00h00-24h00)". Select the day (1-7) or the heating mode by pressing the buttons. When you set the "Heating of different time zones (00h00-24h00)",
press to select the time, on to choose one of the functions: comfort , economy or stand by the setting will be confirmed automatically after 30 seconds.
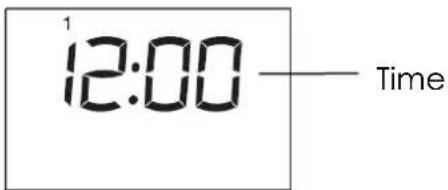
For example: choose day 1, temperature 23 °C, time 12:00, Comfort mode for 24 hours:
- Press the button PRG to select one of the program prg. In prg mode, then ^ / √ to select day 1.
- Press the PRG button again, press to select the time, on to select Comfort mode for 24 hours.
NOTE: If the power supply is cut, after recovery, set the time again and the unit will be in the mode and temperature before the power failure.
Function window opening and closing detection


Press to enter the window opening and closing function. The appliance will enter comfort mode by default. The appliance automatically switches to frost protection mode if temperature dropped detected. As soon as the unit detects an increase in temperature, it automatically returns to comfort mode. You can press M or PRG to select the other modes, or press the standby button to enter the standby mode.
NOTE: Under the window opening and closing detection function, the pilot wire mode is not available.
5. IN CASE OF PROBLEMS
- The appliance does not heat:
Ensure that the circuit breakers are switched on the installation, or the shedder did not cut the power supply (if the installation has one).
Select the COMFORT mode.
Increase the temperature setting.
- The appliance heats continuously:
Ensure that the device is not in a draft.
Reduce the temperature setting.
- The pilot wire programming does not work:
Select the COMFORT mode.
- The LED flashes rapidly:
Failure of the temperature sensor (Do not switch on the radiator as can be dangerous).
-The Control panel is blocked:
Must reset the heater. Turn off the main electric power. Press simultaneously the 2 buttons and ⏻(Increase and Stand by) do not release them and restore in the same time the main electric power.
6. CARE AND CLEANING
-Before cleaning the appliance, cut its power supply and wait until it is completely cooled.
-Use a damp cloth to clean the housing of the device.
-Clean input grids and air outlet regularly.
-Do not use water, liquids, abrasive detergents or chemicals (alcohol, petrol, etc.) for cleaning.
The warranty does not cover the wear parts of the product, nor the problems or damage resulting from:
(1) surface deterioration due to normal wear and tear of the product;
(2) defects or deterioration due to contact with liquids and corrosion caused by rust or the presence of insects;
(3) any incident, abuse, misuse, alteration, disassembly or Unauthorized repair;
(4) improper maintenance, improper use concerning the product or connection to an incorrect voltage;
(5) any use of accessories not supplied or not approved by the manufacturer.
The guarantee will be cancelled if the nameplate and / or serial number of the product are removed.

The European directive 2012/19/EU on Waste Electrical and Electronic Equipment (WEEE), requires that old household electrical appliances must not be disposed in the normal unsorted municipal waste stream. Old appliances must be cted separately in order to optimize the recovery and recycling of the materials contain and reduce the impact on human health and the environment.
The crossed out “wheeled bin” symbol on the product reminds you of your obligation, that when you dispose of the appliance it must be separately collected.
Consumers should contact their local authority or retailer for information concerning the correct disposal of their old appliance.
Model identifier: THRAYF011D
| Item | Symbol | Value | Unit | Item | Unit | |
| Heat output | Type of heat input, for electric storage local space heaters only (select one) | |||||
| Nominal heat output | P_nom | 0,6 | kW | manual heat charge control, with integrated thermostat | NA | |
| Minimum heat output (indicative) | P_min | 0 | kW | manual heat charge control with room and/or outdoor temperature feedback | NA | |
| Maximum continuous heat output | P_max.c | 0,6 | kW | electronic heat charge control with room and/or outdoor temperature feedback | NA | |
| Auxiliary electricity consumption | fan assisted heat output | NA | ||||
| At nominal heat output | el_max | NA | kW | Type of heat output/room temperature control (select one) | ||
| At minimum heat output | el_min | NA | kW | single stage heat output and no room temperature control | [no] | |
| In standby mode | el_SB | 0 | kW | Two or more manual stages, no room temperature control | [no] | |
| with mechanic thermostat room temperature control | [no] | |||||
| with electronic room temperature control | [no] | |||||
| electronic room temperature control plus day timer | [no] | |||||
| electronic room temperature control plus week timer | [yes] | |||||
| Other control options (multiple selections possible) | ||||||
| room temperature control, with presence detection | [no] | |||||
| room temperature control, with open window detection | [yes] | |||||
| with distance control option | [no] | |||||
| with adaptive start control | [no] | |||||
| with working time limitation | [no] | |||||
| with black bulb sensor | [no] | |||||
| Contact details | SCHNEIDER CONSUMER GROUP, 12, rue Jules Ferry, 93110 Rosny-sous-Bois, FRANCE | |||||
Model identifier: THRAYF012D
| Item | Symbol | Value | Unit | Item | Unit | |
| Heat output | Type of heat input, for electric storage local space heaters only (select one) | |||||
| Nominal heat output | P_nom | 0,9 | kW | manual heat charge control, with integrated thermostat | NA | |
| Minimum heat output (indicative) | P_min | 0 | kW | manual heat charge control with room and/or outdoor temperature feedback | NA | |
| Maximum continuous heat output | P_max,c | 0,9 | kW | electronic heat charge control with room and/or outdoor temperature feedback | NA | |
| Auxiliary electricity consumption | fan assisted heat output | NA | ||||
| At nominal heat output | eI_max | NA | kW | Type of heat output/room temperature control (select one) | ||
| At minimum heat output | eI_min | NA | kW | single stage heat output and no room temperature control | [no] | |
| In standby mode | eI_SB | 0 | kW | Two or more manual stages, no room temperature control | [no] | |
| with mechanic thermostat room temperature control | [no] | |||||
| with electronic room temperature control | [no] | |||||
| electronic room temperature control plus day timer | [no] | |||||
| electronic room temperature control plus week timer | [yes] | |||||
| Other control options (multiple selections possible) | ||||||
| room temperature control, with presence detection | [no] | |||||
| room temperature control, with open window detection | [yes] | |||||
| with distance control option | [no] | |||||
| with adaptive start control | [no] | |||||
| with working time limitation | [no] | |||||
| with black bulb sensor | [no] | |||||
| Contact details | SCHNEIDER CONSUMER GROUP, 12, rue Jules Ferry, 93110 Rosny-sous-Bois, FRANCE | |||||
Model identifier: THRAYF013D
| Item | Symbol | Value | Unit | Item | Unit | |
| Heat output | Type of heat input, for electric storage local space heaters only (select one) | |||||
| Nominal heat output | P_nom | 1,2 | kW | manual heat charge control, with integrated thermostat | NA | |
| Minimum heat output (indicative) | P_min | 0 | kW | manual heat charge control with room and/or outdoor temperature feedback | NA | |
| Maximum continuous heat output | P_max.c | 1,2 | kW | electronic heat charge control with room and/or outdoor temperature feedback | NA | |
| Auxiliary electricity consumption | fan assisted heat output | NA | ||||
| At nominal heat output | eI_max | NA | kW | Type of heat output/room temperature control (select one) | ||
| At minimum heat output | eI_min | NA | kW | single stage heat output and no room temperature control | [no] | |
| In standby mode | eI_sb | 0 | kW | Two or more manual stages, no room temperature control | [no] | |
| with mechanic thermostat room temperature control | [no] | |||||
| with electronic room temperature control | [no] | |||||
| electronic room temperature control plus day timer | [no] | |||||
| electronic room temperature control plus week timer | [yes] | |||||
| Other control options (multiple selections possible) | ||||||
| room temperature control, with presence detection | [no] | |||||
| room temperature control, with open window detection | [yes] | |||||
| with distance control option | [no] | |||||
| with adaptive start control | [no] | |||||
| with working time limitation | [no] | |||||
| with black bulb sensor | [no] | |||||
| Contact details | SCHNEIDER CONSUMER GROUP, 12, rue Jules Ferry, 93110 Rosny-sous-Bois, FRANCE | |||||