
Business Inkjet 1200DTWN - Printer HP - Free user manual and instructions
Find the device manual for free Business Inkjet 1200DTWN HP in PDF.
| Brand | HP |
| Model | Business Inkjet 1200DTWN |
| Type | Professional color inkjet printer |
| Dimensions (W × D × H) | Approximately 520 x 419 x 312 mm |
| Weight | Approximately 10.2 kg |
| Power supply | External power adapter, 100-240 V AC, 50/60 Hz |
| Main functions | Printing, automatic duplex printing (auto-duplex unit) |
| Input trays | Tray 1: 150 sheets, Tray 2: 250 sheets (plain paper) |
| Connectivity | USB 2.0, Parallel, Ethernet 10/100, Wi-Fi 802.11b/g |
| Ink cartridges | 4 separate ink cartridges (Cyan, Magenta, Yellow, Black) |
| Printheads | 4 individual printheads (CMYK) |
| Warranty | Hardware: 1 year, Software: 1 year, Cartridges: 6 months, Printheads: 1 year |
| Box contents | Printer, adapter, power cord, 4 cartridges, 4 printheads, startup CD, documentation, auto-duplex unit, tray 2, crossover cable |
| Maintenance | Printhead cleaning, cartridge replacement, automatic alignment |
| Safety | Unplug before cleaning, do not use near water, follow instructions |
| Spare parts and repairability | Printheads and cartridges user-replaceable; other parts by qualified technician |
| General information | Manual in multiple languages, online support at hp.com/support/businessinkjet1200 |
Frequently Asked Questions - Business Inkjet 1200DTWN HP
User questions about Business Inkjet 1200DTWN HP
0 question about this device. Answer the ones you know or ask your own.
Ask a new question about this device
Download the instructions for your Printer in PDF format for free! Find your manual Business Inkjet 1200DTWN - HP and take your electronic device back in hand. On this page are published all the documents necessary for the use of your device. Business Inkjet 1200DTWN by HP.
USER MANUAL Business Inkjet 1200DTWN HP
© 2004 Copyright Hewlett-Packard Development Company, L.P.
Edition 1, 9/2004
Reproduction, adaptation or translation without prior written permission is prohibited, except as allowed under the copyright laws.
The information contained herein is subject to change without notice.
The only warranties for HP products and services are set forth in the express warranty statements accompanying such products and services. Nothing herein should be construed as constituting an additional warranty. HP shall not be liable for technical or editorial errors or omissions contained herein.
Trademark credits
Microsoft® and Windows® are U.S. registered trademarks of Microsoft Corporation. All other products mentioned herein may be trademarks of their respective companies.
Always follow basic safety precautions when using this product to reduce risk of injury from fire or electric shock.
1 Read and understand all instructions in the documentation that comes with the printer.
2 Use only a grounded electrical outlet when connecting this product to a power source. If you do not know whether the outlet is grounded, check with a qualified electrician.
3 Observe all warnings and instructions marked on the product.
4 Unplug this product from wall outlets before cleaning.
5 Do not install or use this product near water, or when you are wet.
6 Install the product securely on a stable surface.
7 Install the product in a protected location where no one can step on or trip over the line cord, and the line cord cannot be damaged.
8 If the product does not operate normally, see "Maintaining and troubleshooting" in the onscreen user's guide on the Starter CD for your operating system.
9 There are no user-serviceable parts inside. Refer servicing to qualified service personnel.
Check the package contents.
1) Printer, 2) power adapter, 3) power cord, 4) four ink cartridges (cyan, magenta, yellow, black), 5) four printheads (CMYB),
6) Starter CD (software and onscreen user's guide),
7) printed documentation (setup poster and getting started guide),
8) auto-duplex unit (for automatic two-sided printing; HP Business Inkjet 1200d/1200dn/1200dtn/1200dtwn),
9) rear-access panel (HP Business Inkjet 1200),
10) tray 2 (HP Business Inkjet 1200dtn/1200dtwn),
11) cross cable (HP Business Inkjet 1200dtwn only).
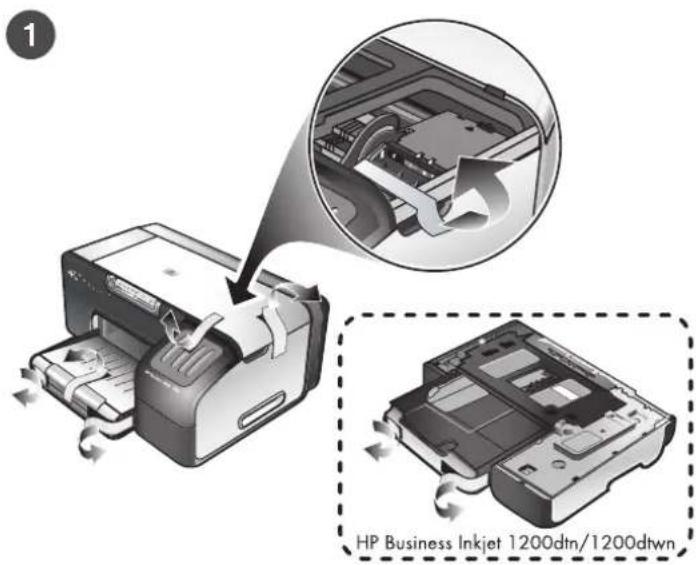
Step 1: Remove the packing tape and materials. Remove all packing tape from the printer. Open the top cover and remove the tape from the inside of the printer.
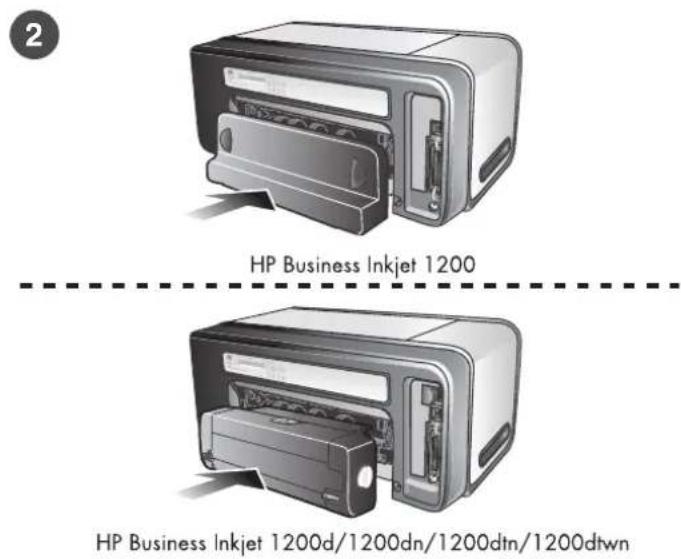
Step 2: Install the rear-access panel or the auto-duplex unit. On the back of the printer, insert the rear-access panel (HP Business Inkjet 1200) or the auto-duplex unit (HP Business Inkjet 1200d/1200dn/1200dtn/1200dtwn) until it clicks.
WARNING! Be careful to keep your fingers and hands clear of the bottom of the printer.
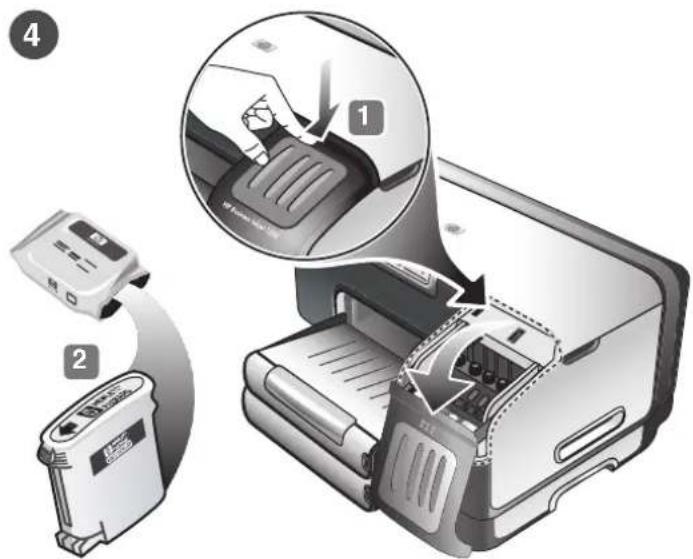
Step 4: Install the ink cartridges.
1) Press and release the ink cartridge cover to open the cover.
2) Remove each ink cartridge from its package.
CAUTION: HP recognizes customer's choice, but cannot guarantee the quality or reliability of non-HP ink cartridges. Printer services or repairs required as a result of using non-HP ink cartridges will not be covered under warranty.
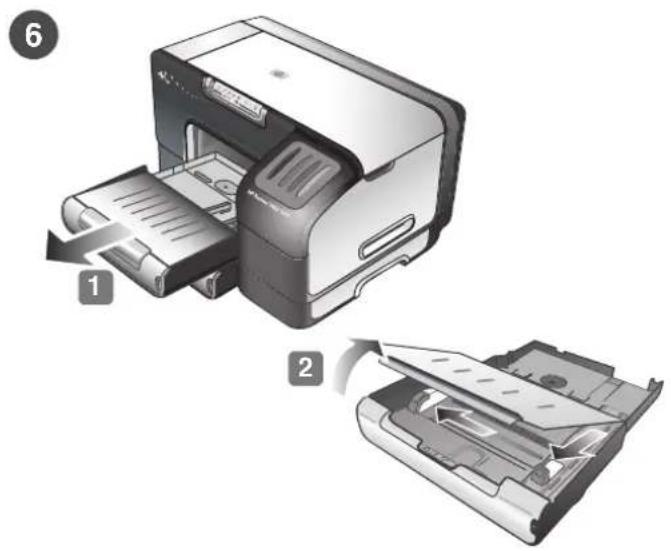
Step 6: Load paper in the trays.
1) Pull the tray out of the printer. 2) If you are loading tray 1, raise the output tray.

3) For paper between 11 inches and 14 inches (356 mm and 279 mm) long, move the latch on the tray to the right;
4) then lower the front of the tray.
5) Slide the guides in the tray to adjust them for the size that you are loading. 6) Insert up to 150 sheets of paper into tray 1 or 250 sheets of paper into tray 2, print-side down along the right of the tray. Note: Tray 2 can be loaded only with plain paper.
7) Lower the output tray (if you loaded tray 1). 8) Gently reinsert the tray. 9) Pull out the extension on the output tray.
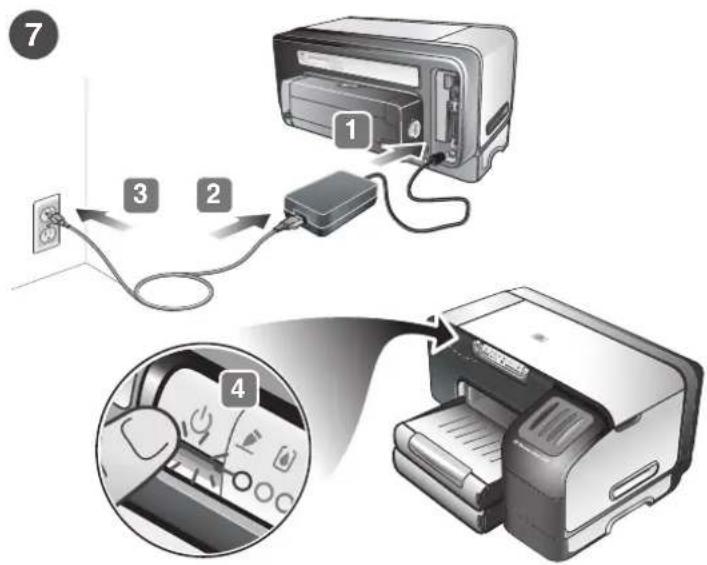
Step 7: Connect the power cord and turn on the printer.
1) Connect the power adapter into the printer. 2) Connect the power cord to the power adapter. 3) Connect the other end of the power cord to an alternating current (AC) power outlet.
4) Press the (power button) to turn on the printer.
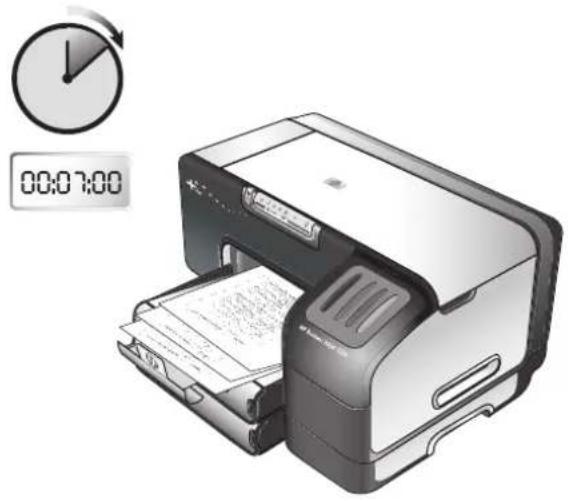
To ensure the best possible print quality, the printer aligns the printheads. At the beginning of the alignment process, the Power light blinks and the printer prints a status page. At the end of the process, the printer prints two auto-alignment pages. Printhead alignment takes approximately 7 minutes.
Step 8: Connect the printer.
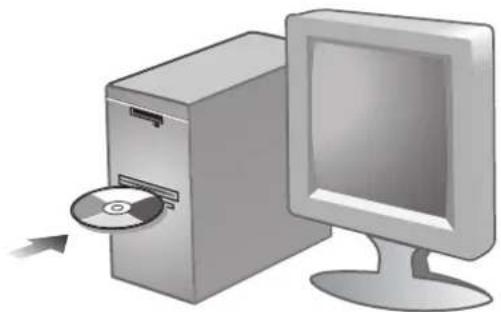
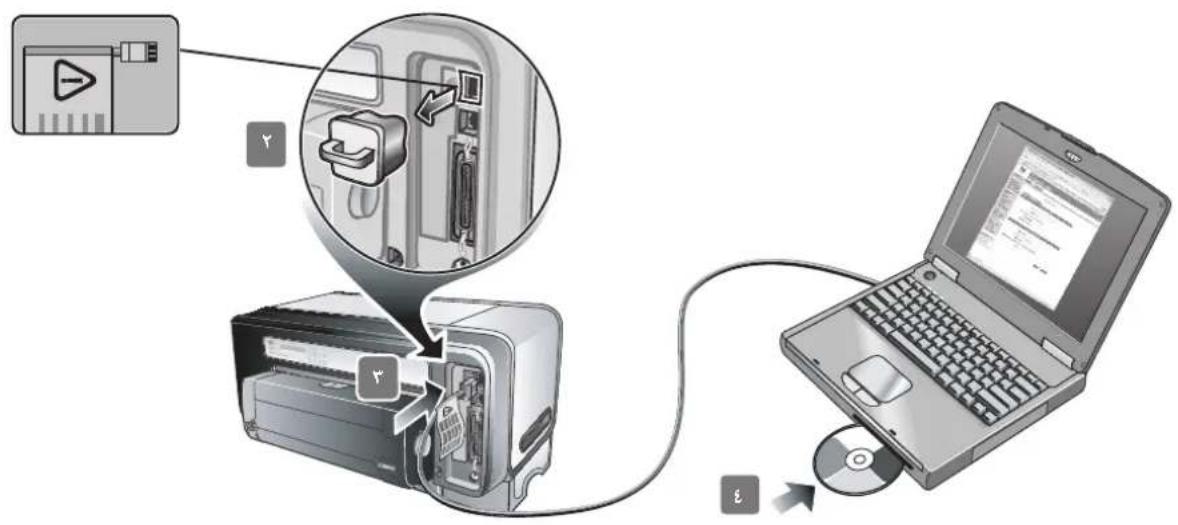
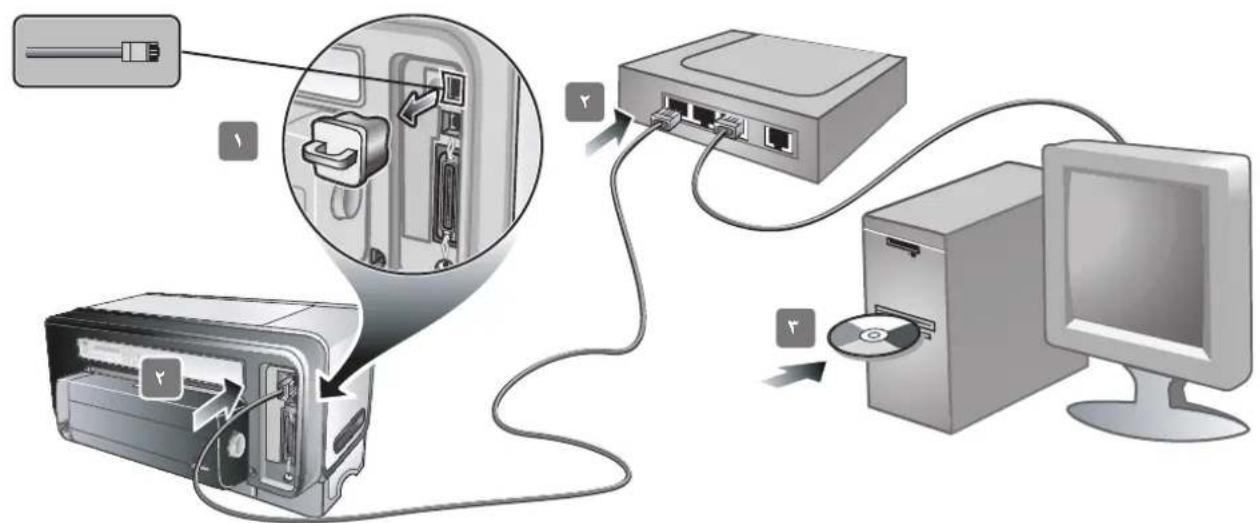
See the following instructions for your connection type (USB, parallel, wireless network, or wired network). For more information about installing software, see the onscreen user's guide on the Starter CD.
USB or parallel connection: 1) Insert the Starter CD into the CD drive. 2) Follow the onscreen instructions for your connection
Wireless connection: 1) Obtain the following information: the network name (SSID), communication mode (infrastructure or ad hoc), and the type of security the network uses (such as WPA, WEP, or none). For information about configuring these settings, see "Setting up the printer for wireless communication" on page 21.
CAUTION: It is recommended that the printer and the computers that use the printer be on the same subnet.
2) Remove the protective cover from the network port.
3) Temporarily connect the cross cable to the printer's network port and the computer. 4) Install the printer software for your communication mode. (See "Installing printer software and sharing the printer (Windows)" on page 22 and "Installing printer software and sharing the printer (Mac OS)" on page 22.)
5) When prompted, disconnect the cross cable.
Wired network: 1) Remove the protective cover from the network port. 2) Connect the network cable (sold separately) to the printer's network port and to an available port on the network hub, switch, or router. CAUTION: Do not plug the network cable into a port labeled WAN or Uplink in the hub, switch, or router. Do not plug the cross cable (provided with the HP Business Inkjet 1200dtwn printer) into the network hub, switch, or router. It is recommended that the printer and the computers that use
the printer be on the same subnet. Note: Repeat step 2 if the Link light on the network connector does not turn on.
See "Troubleshooting" on page 17 for more information.
3) Using the information on the configuration pages (such as the printer's IP address), install the printer software on each computer that will use the printer. For more information about sharing the printer on a network, see the onscreen user's guide.
Step 9: Test the printer software installation.
After you complete the software installation and connect the printer to the computer, print a document from an application that you use frequently to ensure that the software is installed correctly. If the document does not print, see "Troubleshooting" on page 17.
Step 10: Register the printer.
Register the printer to receive important support and technical information. If you did not register your printer while installing the software, you can register later at http://www.register.com.
Your printer is ready to use. For information about using the printer and troubleshooting, see the following resources:
- Onscreen user's guide and Readme file on the Starter CD.
HP Instant Support (see the onscreen user's guide)
Product support site at http://www.hp.com/support/businessinkjet1200
This section provides troubleshooting suggestions for some of the most common issues associated with hardware and software installation.
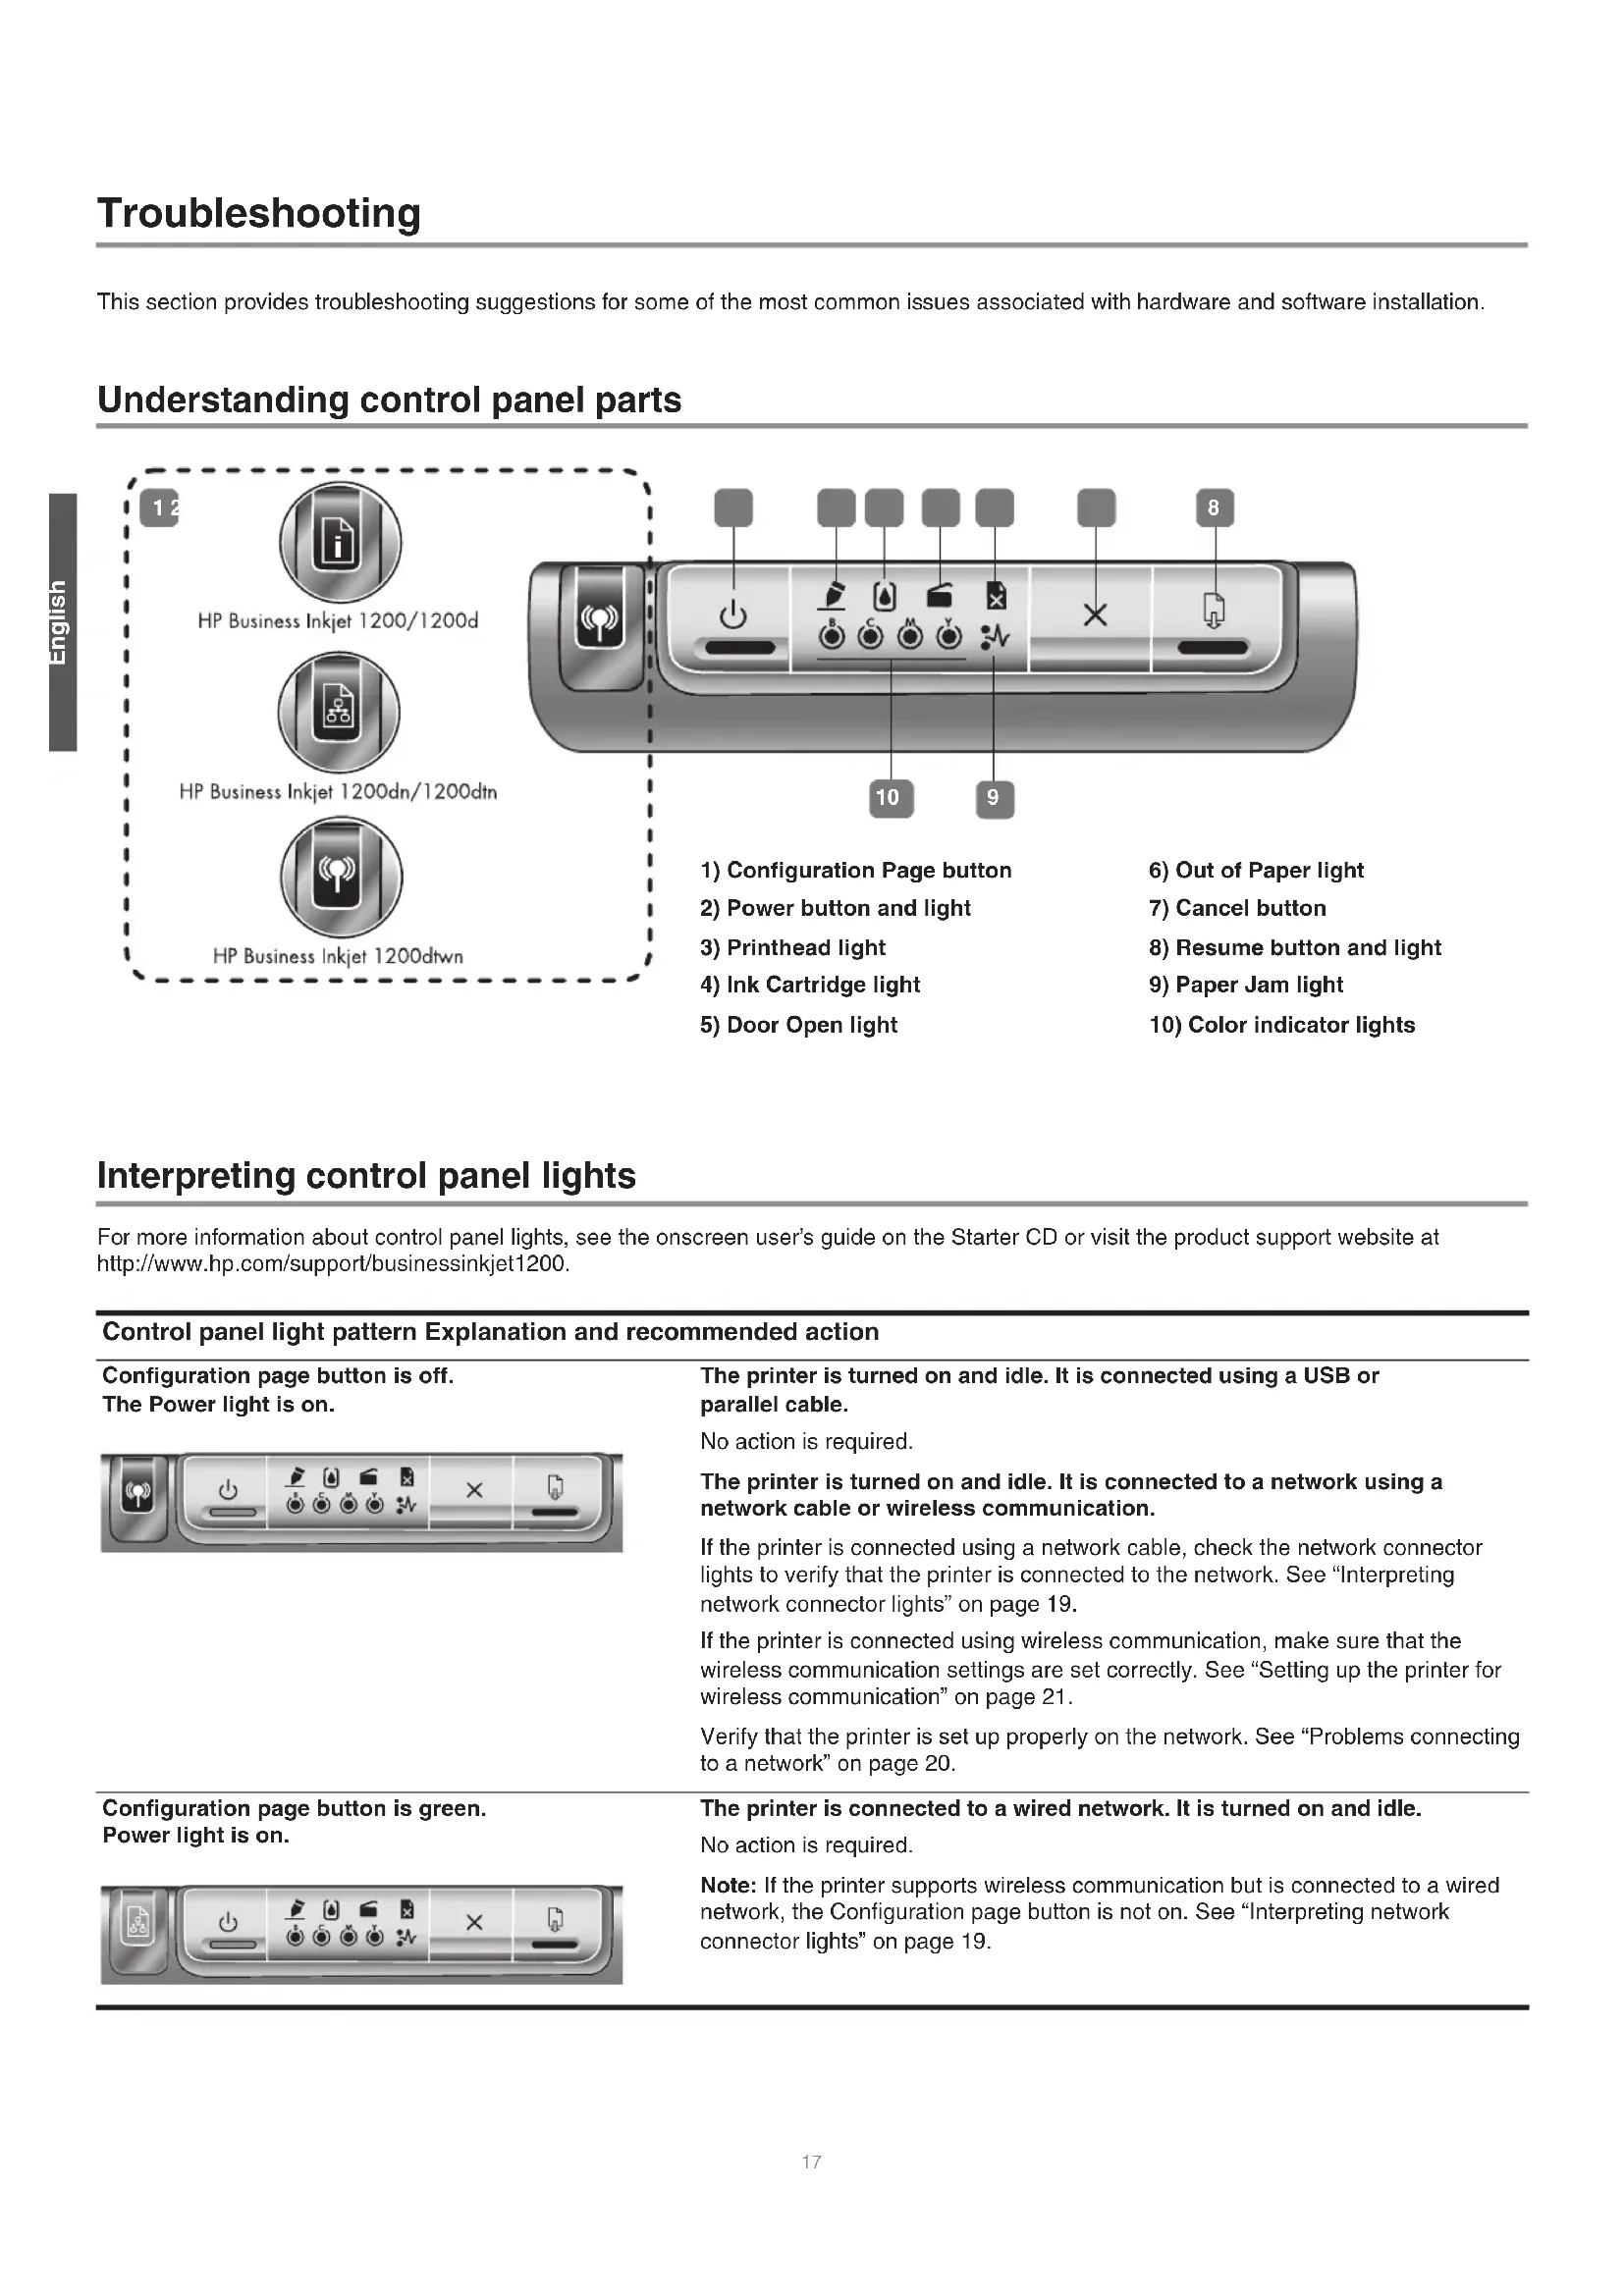
Understanding control panel parts

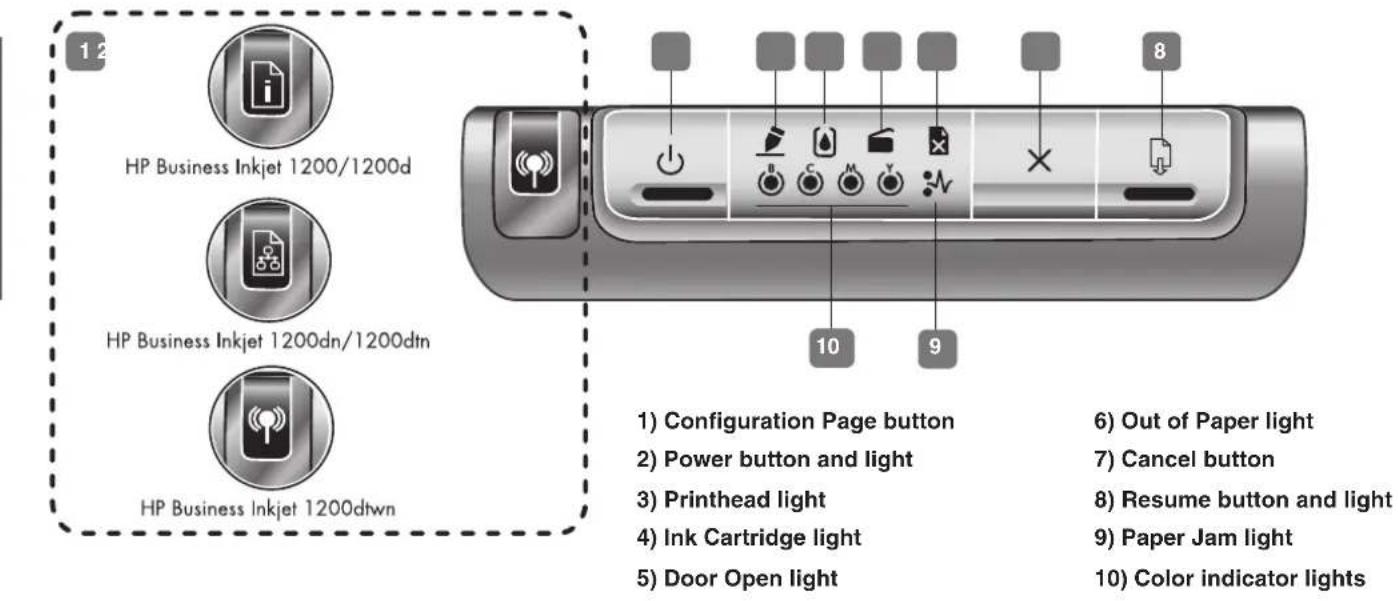
Interpreting control panel lights
For more information about control panel lights, see the onscreen user's guide on the Starter CD or visit the product support website at http://www.hp.com/support/businessinkjet1200.
| Control panel light pattern Explanation and recommended action | |
| Configuration page button is off. The Power light is on. | The printer is turned on and idle. It is connected using a USB or parallel cable. No action is required. The printer is turned on and idle. It is connected to a network using a network cable or wireless communication. If the printer is connected using a network cable, check the network connector lights to verify that the printer is connected to the network. See “Interpreting network connector lights” on page 19. If the printer is connected using wireless communication, make sure that the wireless communication settings are set correctly. See “Setting up the printer for wireless communication” on page 21. Verify that the printer is set up properly on the network. See “Problems connecting to a network” on page 20. |
| Configuration page button is green. Power light is on. | The printer is connected to a wired network. It is turned on and idle. No action is required. Note: If the printer supports wireless communication but is connected to a wired network, the Configuration page button is not on. See “Interpreting network connector lights” on page 19. |
Configuration page button is blue. Power light is on.
The printer is connected to a wireless network. It is turned on and idle. No action is required.

Power light is on. Out of Paper light blinks. Resume light blinks.
The printer is out of paper. Load paper in the printer, and then press (Resume button) to continue.

Power light is on. Paper Jam light blinks. Resume light blinks.
Paper is jammed in the printer. Clear the paper jam, and then press (Resume button) to continue. For more information, see the "Maintaining and troubleshooting" chapter in the onscreen user's guide."

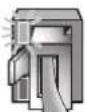
Power light is on. Door Open light is on. A cover is not closed completely.

Make sure all covers are completely closed.
Power light is on. Door Open light blinks. The rear-access panel or the auto-duplex unit is not inserted completely.

Make sure the rear-access panel (HP Business Inkjet 1200) or the auto-duplex unit (HP Business Inkjet 1200d/1200dn/1200dtn/1200dtwn) is inserted completely in the back of the printer.
Power light is on. Printhead light is on. The printhead latch is not secured properly.

Open the top cover and press down firmly on the printhead latch to ensure that it is secured properly. Also, make sure the protective tape on each printhead has been removed.
The Power light, the Ink Cartridge light, and one or more of the color indicator lights are on.
One or more of the ink cartridges is missing.

Install the ink cartridges and try to print.
If the error persists, replace the ink cartridge or cartridges indicated.
Power light is on. Printhead light and appropriate color One or more of the prinheads needs attention. indicator light blink. Reinstall the prinheads and try to print.

Try cleaning the printhead contacts. See Maintaining the printheads. If the error persists, replace the printhead or printheads indicated.
The Power light, the Printhead light, and one or more of One or more of the prinheads is missing.
the color indicator lights are on. Make sure that the protective tape on the printhead has been removed. Reinstall the prinheads and try to print.

Power light is on. One or more color indicator lights is on.

Power light is on. One or more color indicator lights blinks.

One or more ink cartridges is low on ink and will need to be replaced soon.
No action is required.
An ink cartridge is out of ink and must be replaced before you can continue printing.
Replace the ink cartridge indicated.
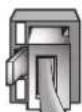
Understanding network connector parts
1) Activity light
2) Network connector
3) Link light

Interpreting network connector lights
Note: The printer's wireless communication is turned off when the printer is connected using a network cable.
Network light pattern Explanation and recommended action
Link light is on. Activity light is off.

The printer is connected to the network but is not receiving or transmitting data over the network. The printer is turned on and idle.
No action is required.
Link light is on. Activity light blinks. The printer is receiving or transmitting data over the network.
No action is required.
Link light is off. Activity light is off.
The printer is turned off or is not connected to the network.
If the printer is turned off, turn on the printer. If the printer is turned on and a network cable is connected, see "Problems connecting to a network" on page 20.
Problems printing an alignment page
Check the printer to ensure the following:
- Power light is on and not blinking. When the printer is first turned on, it takes approximately 45 seconds to warm up.
- No lights on the control panel are lit or blinking and that the printer is in the Ready state. If lights are lit or blinking, see Printer lights reference.
- Ensure power cord and other cables are working and firmly connected to the printer.
- All packing tapes and materials are removed from the printer.
- Printheads and ink cartridges are properly installed in their correct color-coded slots. Press down firmly on each one to ensure proper contact. Ensure you have removed the tape from each printhead.
-Printhead latch and all covers are closed.
Rear access panel or auto-duplex unit is locked into place.
Media is loaded correctly in the tray and is not jammed in the printer.
Problems installing software
Check the computer system to ensure the following:
The computer meets the system requirements (see the onscreen user's guide on the Starter CD).
Verify installation preliminaries
- Before installing software on a Windows computer, ensure all other programs are closed.
If the computer does not recognize the path to the CD drive that you type, ensure you are specifying the correct drive letter.
If the computer cannot recognize the Starter CD in the CD drive, inspect the CD for damage. Also, you can download the printer driver from http://www.hp.com/support/businessinkjet1200.
Reinstall the printer software
- If you are using Windows and the computer cannot detect the printer, run the Scrubber utility (located in the Utilities\Scrubber folder on the Starter CD) to perform a clean printer driver uninstallation. Restart your computer, and re-install the printer driver.
Problems connecting to a network
Note: After correcting any of the following, run the setup program again.
General network troubleshooting
-
If you are unable to install the printer software, verify that:
-
All cable connections to the computer and the printer are secure.
The network is operational and the network hub is turned on. -
All applications, including virus protection programs and personal firewalls, are closed or disabled.
Make sure the printer is installed on the same subnet as the computers that will be using the printer.
If the installation program cannot discover the printer, print the configuration page and enter the IP address manually in the installation program.
If you are using a computer running Windows, make sure that the network ports created in the printer driver match the printer IP address:
1) Print a configuration page. For instructions, see "Configuration page" on page 21.
2) From the Windows desktop, click Start, point to Settings, and then click Printers or Printers and Faxes.
3) Right-click the printer icon, click Properties, and then click the Ports tab.
4) Select the TCP/IP port for the printer, and then click Configure Port.
5) Compare the IP address listed in the dialog box and make sure it matches the IP address listed on the configuration page. If the IP addresses are different, change the IP address in the dialog box to match the address on the configuration page.
6) Click OK twice to save the settings and close the dialog boxes.
Problems connecting to a wired network
If the Link light on the network connector does not turn on, make sure that all of the "General network troubleshooting" conditions listed above are met.
- Though it is not recommended that you assign the printer with a static IP address, you might resolve some installation problems (such as a conflict with a personal firewall) by doing so. For more information, see the onscreen user's guide.
Problems setting up wireless communication
If you cannot communicate with the printer after completing the software installation and removing the network cable, then one or more of the following network settings in the printer might be wrong:
Network Name (SSID)
- Communication Mode
- Channel (ad hoc networks only)
- Security settings and encryption key
-For information about correcting these settings, see "Setting up the printer for wireless communication" on page 21.
Resetting printer network settings
If the printer is unable to communicate with the network, reset the printer network settings:
1 While pressing the Configuration Page button, press (Resume button) three times.
2 If you have installed the printer driver, uninstall and then re-install the printer driver.
Note: For late-breaking information, see theREADME file and release notes or visit the product support website at http://www.hp.com/support/businessinkjet1200.
Troubleshooting and configuration tools
The following tools are available for troubleshooting or configuring the printer. For more information about these tools, see the onscreen user's guide on the Starter CD.
Configuration page
Use the configuration page to view current printer settings, to help troubleshoot printer problems, and to verify installation of optional accessories, such as trays. The configuration page also contains a log of recent events. If the printer is connected to a network, an additional network configuration page prints; this page shows the network settings for the printer.
If you need to call HP, print the configuration page before calling.
To print a configuration page
Press the Configuration Page button once.
Embedded Web server (EWS)
When the printer is connected to a network, you can use the printer's EWS to view status information, change settings, and manage the printer at your computer.
To open the EWS
In a supported Web browser on your computer, type the IP address that has been assigned to the printer. For example, if the IP address is 123.123.123.123, type the following address into the Web browser: http://123.123.123.123.
The IP address for the printer is listed on the configuration page.
After you open the EWS, you can bookmark it so that you can return to it quickly in the future.
Setting up the printer for wireless communication
The printer is designed for 802.11g wireless networks and is compatible with 802.11b networks.
Note: For wireless communication to work successfully, the following settings must be identical on both the computer and the device.
Configuring basic wireless communication settings
In order to install the printer on a wireless network, you need to know the network's communication mode and its network name (SSID). Consult the configuration utility for your computer's network card or for your network's wireless access point (WAP).
Communication mode
There are two options for a network's communication mode.
Infrastructure (recommended)
When the printer is set to the infrastructure mode, the printer communicates with other devices on the network, whether the devices are wired or wireless, through a WAP. WAPs commonly act as routers or gateways on small networks.
- Ad hoc (advanced users only)
When the printer is set to the ad hoc communication mode, the printer communicates directly with other wireless devices without the use of a WAP.
For instructions on installing the printer on an existing ad hoc network, visit HP's Web site at http://www.hp.com/support.
Network name (SSID)
A network name, or Service Set Identifier (SSID), identifies a particular wireless network. In order to operate on a network, a device must know the network's network name.
Configuring wireless network security settings
Types of wireless security
You can configure the printer to use the following security options:
Open System (no security)
The network does not require security for authorization or encryption. This is the printer's factory default setting. The printer will attempt to detect and automatically associate to an Open System wireless network.
Wired Equivalent Privacy (WEP)
Wired Equivalent Privacy (WEP) provides security by encrypting data sent over radio waves from one wireless device to another wireless device.
Devices on a WEP-enabled network use WEP keys to encode data. If your network uses WEP, you must know the WEP key(s) it uses.
Wi-Fi Protected Access (WPA)
Wi-Fi Protected Access (WPA) provides security by doing the following:
- Encrypting data sent over radio waves from one wireless device to another wireless device
- Controlling access to network resources through authentication protocols
WPA either requires the use of an authentication server (best suited for enterprise networks) or a pass phrase known to all devices on the network.
Configuring security options
You must use the printer's embedded Web server (EWS) to configure security settings if your network uses WPA or WEP or if you were unable to install the printer software. For more information about opening the EWS, see "Embedded Web server (EWS)" on page 21.
To configure security options
1 Connect a cross cable (included with the HP Business Inkjet 1200dtwn) to the printer and the computer.
2 Open the printer's Embedded Web Server (EWS).
3 Click the Networking tab, and then click Wireless (802.11) in the left pane.
4 On the Wireless Setup tab, click Start Wizard.
5 Follow the instructions on the screen.
6 Click Apply, and then close the EWS.
To add hardware addresses to a Wireless Access Point (WAP)
MAC filtering is a security feature in which a Wireless Access Point (WAP) is configured ith a list of MAC addresses (also called "hardware addresses") of devices that are allowed to gain access to the network through the WAP.
If the WAP does not have the hardware address of a device attempting to access the network, the WAP denies the device access to the network.
If the WAP filters MAC addresses, then the printer's MAC address must be added to the WAP's list of accepted MAC addresses.
1 Press the Configuration Page button to print a configuration page.
2 Open the WAP's configuration utility, and then add the printer's hardware address to the list of accepted MAC addresses.
Installing printer software and sharing the printer (Windows)
You can install the printer software using infrastructure mode (recommended) or ad hoc mode.
Infrastructure mode
1 Connect the printer to the computer using network cross-over cable included with the printer.
-Or-
Connect the printer to the network with a network cable.
2 Insert the Starter CD in the computer's CD drive, and then follow the onscreen instructions.
3 On the Connection Type screen, select Wireless, and then click Next.
4 Follow the onscreen instructions to complete the software installation.
To share the printer with other computers
You must install the printer software on each computer that will use the printer. The cable is only needed when installing the printer software and configuring its wireless settings during the first installation on the network. The cable is not required for installing the printer on other computers on the network.
Ad hoc network (advanced users only)
Devices on the ad hoc network must:
-Be 802.11b-compatible
- Have ad hoc as the communication mode
- Have the same network name SSID
-Be on the same subnet
-Be on the same channel
- Have the same 802.11b security settings
Follow these steps to connect to the printer using its factory default ad hoc network settings:
1 Reset the printer's network settings. See "Resetting printer network settings" on page 20.
2 Open the configuration utility for your computer's wireless network card, then do the following:
a Create a new wireless profile with the following values: Communication mode: ad hoc Network Name (SSID):hpsetup Security (encryption):disabled
b Activate the profile.
3 Wait two minutes for the printer to obtain an IP address, then press the printer's Configuration page button to print the configuration pages.
4 On the network configuration page, verify the following:
The network name (SSID) is hpsetup
The communication mode is ad hoc
The IP address is not 0.0.0.0
If one of the above is not true, then repeat steps 1 through 5.
5 Insert the Starter CD in the computer's CD drive, and then follow the onscreen instructions.
6 On the Connection Type screen, select Wireless, and then click Next.
7 Follow the onscreen instructions to complete the software installation.
To share the printer with other computers
You must install the printer software on each computer that will use the printer. Follow the steps beginning on page 10 to install the printer software on other computers that will use the printer.
Advanced setup
For instructions on configuring the printer to operate on ad hoc networks other than the hpsetup factory default, visit the product support website at http://www.hp.com/support/businessinkjet1200.
Installing printer software and sharing the printer (Mac OS)
This section contains information about installing and configuring the wireless networking software for Macintosh computers.
Mac OS 9 (9.1 and later)
To set wireless network settings in an infrastructure network
1 Open the Airport Admin Utility, and then do the following:
a Click Base Station, and then select Equivelant Network Password.
b Write down the WEP key.
c Close the Airport Admin Utility.
2 Press the printer's Configuration Page button to print the configuration pages.
3 Click the Apple menu, point to Control Panels, click TCP/IP, and then do the following:
a Click File, and then click Configurations to open the Configuration dialog box.
b Click Duplicate, enter HP Business Inkjet 1200, and then click OK.
c Click Make Active to close the Configuration dialog box.
d From the Connect via menu, select AirPort.
e From the Configure menu, select Manually.
f Enter the printer's Subnet Mask and Default Gateway from the network configuration page.
g Enter 169.254.0.1 in the IP address box.
4 Open the AirPort Setup Assistant, and then follow the onscreen instructions for joining an existing wireless network. Use hpsetup as the existing network to join. You may also go to the Apple menu, select Airport, and then select hpsetup as the existing network to join.
5 Use the IP address listed on the network configuration page to open the printer's embedded Web server, and then enter the printer's security settings. (See "Configuring wireless network security settings" on page 21.) Use the WEP key you wrote down in step 1.
6 To return to your previous network settings, follow step 5 and selecting the name of your network instead of hpsetup.
7 Insert the Starter CD in the computer's CD drive, and then double-click the CD desktop icon.
8 Double-click the HP Inkjet Installer icon, then restart the computer when prompted.
9 Open the Chooser, then select the hp inkjet 6.x icon.
10 When asked if you want the computer to search for the printer, click Yes.
11 Select the printer, and then close the Chooser.
To set wireless network settings in an ad hoc network (advanced users only)
1 Reset the printer's network settings. See "Resetting printer network settings" on page 20.
2 Press the printer's Configuration Page button to print the configuration pages.
3 Open the AirPort Setup Assistant, and then follow the onscreen instructions for joining an existing wireless network. Use hpsetup as the existing network to join. You may also go to the Apple menu, select Airport, and then select hpsetup as the existing network to join.
4 Use the URL listed on the network configuration page to open the printer's Embedded Web Server, then enter the printer's security settings. (See "Configuring wireless network security settings" on page 21.)
5 Insert the Starter CD in the computer's CD-ROM drive, and then double-click the CD desktop icon.
6 Double-click the HP Inkjet Installer icon, and then restart the computer when prompted.
7 Open the Chooser, then select the hp inkjet 6.x icon.
8 When asked if you want the computer to search for the printer, click Yes.
9 Select the printer, then close the Chooser.
Mac OS X (10.1.5 and later)
To set wireless network settings in an infrastructure network (recommended)
1 Insert the Starter CD in the computer's CD-ROM drive, and then double-click the CD desktop icon.
2 Double-click the HP Inkjet Installer icon, then follow the onscreen instructions.
3 On the Connection Type screen, select Wireless, then click Next.
4 Follow the onscreen instructions to complete the software installation.
5 When prompted, enter the printer's security settings. (See "Configuring wireless network security settings" on page 21.)
6 On the Add Printer screen, click Open Print Center.
7 Click Add Printer.
8 Do one of the following depending on the version of Mac OS X you are using:
Mac OS X v 10.2.3 and higher: Select Rendezvous.
Mac OS X (10.1.5 and 10.2.2): Select HP IP Printing, and then click Discover.
9 Select the printer, click Add, and then close the Print Center.
To set wireless network settings in an ad hoc network (advanced users only)
1 Reset the printer's network settings. See "Resetting printer network settings" on page 20.
2 Press the printer's Configuration Page button to print the configuration pages.
3 Open the AirPort Setup Assistant, and then follow the onscreen instructions for joining an existing wireless network. Use hpsetup as the existing network to join.
4 Use the URL listed on the network configuration page to open the printer's Embedded Web Server, then enter the printer's security settings. (See "Configuring wireless network security settings" on page 21.)
5 Insert the Starter CD in the computer's CD-ROM drive, and then double-click the CD desktop icon.
6 Double-click the HP Inkjet Installer icon, and then follow the onscreen instructions.
7 On the Connection Type screen, select Wireless, and then click Next.
8 Close the setup utility and install the printer driver.
9 On the Add Printer screen, click Open Print Center.
10 Click Add Printer.
11 Do one of the following depending on the version of Mac OS X you are using:
Mac OS X (10.2.3 and higher): Select Rendezvous.
Mac OS X (10.1.5 and 10.2.2): Select HP IP Printing, and then click Discover.
12 Select the printer, and then click the Add button.
13 Close the Print Center.
Classic environment for Mac OS X (10.1.5 and later)
1 Install the printer software as specified for a computer with Mac OS X (10.1.5 and later). See "Mac OS X (10.1.5 and later)" on page 23.
2 Open the Chooser, and then select the hp inkjet 6.x icon.
Note: If you do not see the hp inkjet 6.x icon, then insert the Starter CD into the computer CD drive and follow the onscreen instructions to install the Mac OS 9 printer driver. Then repeat step 1.
3 When asked if you want the computer to search for the printer, click Yes.
4 Select the printer, and then close the Chooser.
Dier
Wired Equivalent Privacy (WEP)
Wi-Fi Protected Access (WPA)
WEP (Wired Equivalent Privacy)
WPA (Wi-Fi Protected Access)
Wired Equivalent Privacy (WEP)
Wi-Fi Protected Access (WPA)
-De communicatiemethode is ad hoc
Wired Equivalent Privacy (WEP)
Wi-Fi Protected Access (WPA)
HP product Duration of limited warranty
Software 1 year
Accessories 1 year
Ink cartridges 6 months
Printheads 1 year*
Printer peripheral hardware (see the following details) 1 year
*For more detailed warranty information, see http://wwwHp.com/support/businessinkjet1200.
Extent of limited warranty
1 Hewlett-Packard warrants to the end-user customer that the HP products specified above will be free from defects in materials and workmanship for the duration specified above, which duration begins on the date of purchase by the customer.
2 For software products, HP's limited warranty applies only to a failure to execute programming instructions. HP does not warrant that the operation of any product will be uninterrupted or error free.
3 HP's limited warranty covers only those defects that arise as a result of normal use of the product, and does not cover any other problems, including those that arise as a result of:
a Improper maintenance or modification;
b Software, media, parts, or supplies not provided or supported by HP; or
c Operation outside the product's specifications;
d Unauthorized modification or misuse.
4 For HP products, the use of a non-HP ink cartridge or a refilled ink cartridge does not affect either the warranty to the customer or any HP support contract with the customer. However, if product failure or damage is attributable to the use of a non-HP or refilled ink cartridge, HP will charge its standard time and materials charges to service the printer for the particular failure or damage.
5 If HP receives, during the applicable warranty period, notice of a defect in any product which is covered by HP's warranty, HP shall either repair or replace the product, at HP's option.
6 If HP is unable to repair or replace, as applicable, a defective product which is covered by HP's warranty, HP shall, within a reasonable time after being notified of the defect, refund the purchase price for the product.
7 HP shall have no obligation to repair, replace, or refund until the customer returns the defective product to HP.
8 Any replacement product may be either new or like new, provided that it has functionality at least equal to that of the product being replaced.
9 HP products may contain remanufactured parts, components, or materials equivalent to new in performance.
10 HP's Limited Warranty Statement is valid in any country/region where the covered HP product is distributed by HP. Contracts for additional warranty services, such as on-site service, are available from any authorized HP service facility in countries/regions where the product is distributed by HP or by an authorized importer.
Limitations of warranty
TO THE EXTENT ALLOWED BY LOCAL LAW, NEITHER HP NOR ITS THIRD PARTY SUPPLIERS MAKES ANY OTHER WARRANTY OR CONDITION OF ANY KIND, WHETHER EXPRESS OR IMPLIED WARRANTY OR CONDITIONS OF MERCHANTABILITY, SATISFACTORY QUALITY, AND FITNESS FOR A PARTICULAR PURPOSE.
Limitations of liability
1 To the extent allowed by local law, the remedies provided in this Warranty Statement are the customer's sole and exclusive remedies.
2 TO THE EXTENT ALLOWED BY LOCAL LAW, EXCEPT FOR THE OBLIGATIONS SPECIFICALLY SET FORTH IN THIS WARRANTY STATEMENT, IN NO EVENT SHALL HP OR ITS THIRD PARTY SUPPLIERS BE LIABLE FOR DIRECT, INDIRECT, SPECIAL, INCIDENTAL, OR CONSEQUENTIAL DAMAGES, WHETHER BASED ON CONTRACT, TORT, OR ANY OTHER LEGAL THEORY AND WHETHER ADVISED OF THE POSSIBILITY OF SUCH DAMAGES.
Local law
1 This Warranty Statement gives the customer specific legal rights. The customer may also have other rights which vary from state to state in the United States, from province to province in Canada, and from country/region to country/region elsewhere in the world.
2 To the extent that this Warranty Statement is inconsistent with local law, this Warranty Statement shall be deemed modified to be consistent with such local law. Under such local law, certain disclaimers and limitations of this Warranty Statement may not apply to the customer. For example, some states in the United States, as well as some governments outside the United States (including provinces in Canada), may:
a Preclude the disclaimers and limitations in this Warranty Statement from limiting the statutory rights of a customer (e.g. the United Kingdom);
b Otherwise restrict the ability of a manufacturer to enforce such disclaimers or limitations; or
c Grant the customer additional warranty rights, specify the duration of implied warranties which the manufacturer cannot disclaim, or allow limitations on the duration of implied warranties.
3 FOR CONSUMER TRANSACTIONS IN AUSTRALIA AND NEW ZEALAND, THE TERMS IN THIS WARRANTY STATEMENT, EXCEPT TO THE EXTENT LAWFULLY PERMITTED, DO NOT EXCLUDE, RESTRICT, OR MODIFY, AND ARE IN ADDITION TO, THE MANDATORY STATUTORY RIGHTS APPLICABLE TO THE SALE OF THE HP PRODUCTS TO SUCH CUSTOMERS.
Loljillll llllllllllllllllllllllllllllllllllllllllllllllllllllllllllllllllllllllllllllllllllllllllllllllllllllllllllllllllllllllllll l l l l l l l l l l l l l l l l l l l l l l l l l l l l l l l l l l l l l l l l l l l l l l l l l l l l l l l l l l l l l l l ll
all jilil
Jaaal Jg j gao aag aag gao Jaaal aai all sina
aaba aai aal aai yall g aayy aai aai ay
Lg i 1i 1i 1i 1i 1i 1i 1i 1i 1i 1i 1i 1i 1i 1i 1i 1i 1i 1i 1i 1i 1i 1i 1i 1i 1i 1i 1i 1i 1i 1i 1i 1i 1i 1i
j1 jj j 11s
Ll 100000000000000000000000000000000000000000000000000000000000
J 100000000000000000000000000000000000000000000000000000000
a a a a a a a a a a a a a a a a a a a a a a a a a a a a a a a a a a a a a a a a a a a a a a a a a a
g 13
10 1
y gll aaiall clllal l jaaal aai! clllaaegn e
12 1234567890123456789012345678901234567890123456789012345678901234567890123456789012345678901234567890123456789
aalalal alaguy y laljgyg ylllgl aalalal
HP.
aoljlll jss sll lgl y glll lal
aal 1 aai 1 aai 1 aai 1 aai 1 aai 1 aai
(1) 2xy + 5x - 1 = 0 .
Add Printer 1
Center
.Add Printer aLb aLc J 1
macosx jss
.Rendezvous: Lai Mac OS X v 10.2.3
HP IP Printing :Mac OS X (10.1.5 &10.2.2)
Discover
Printer Center 1
jssssssssssssssssssssssssssssssssssssssssssssssssssssssssssssssssssssssssssssss
()
14 2000
olalgall aiaa ciald olalgall iaag jgl biol.
Jie jbi jll lalaiil j. AirPort Setup Assistant 1
hpsetup.
.1221111111111111
Jolal jai aill gll piai i 111111111111111111111111111
()
(1) a4 = a1 + 3 = 4
joo jai jai jai jai jai jai jai jai jai jai jai
Wireless Connection Type
Next
A. aBb Caaa aaaa a
Open print 1abJg jie. Add Printer 1bLai Lsi
. Center
.Add Printer 2a1b a1c d e f g h i
Mac OSXgssgljlll!eLil
Rendezvous: (Mac OS X10.2.3)
HP IP Printing : (Mac OS X 10.1.5 & 10.2.2)
Discover
Add 1
.Print Center 111111111111
Mac OS X giiSLo Jzill pblil aSswSll
()
pIeBjJzjjg5jglallll 1
Jie jia jil llll lai jia AirPort Setup Assistant 1
hpsetup 1
. Airport . Apple
141111111111111111111111111111111111
jlll p jll l lalolg g g gall IP Jl jiee p
jolalolai jil) .aullall oai lai jai jai jai blll
- a b c d e f g h i j k l m n o p q r s t
.hpsetupo 2ydu ksww jzalg 0 ygal ggl, aallkwl ldlc! ll sall
Lgogjoljai jai jyssal gaoaalal aal al
j j HP Inkjet Installer
. ddi di llb la sie jss
HP inkjet 6.x .Chooser
Yes
.Chooser jlll j
jssssss) gssssll JssyI pss sss sss sss sss
(baa)
A
alolgall lalilzclall alolgall jjglal
y j 1
1111111111111111111111111111111
AirPort Apple aas s
Lipnniu npnnn nnnn nn nnnn nnnn nnnn nnnn nnnn nnnn nnnn nnnn nnnn nnnn nnnn nnnn nnnn nnnn nnnn nnnn nnnn nnnn nnnn nnnn nnnn nnnn nnnn nnnn nnnn nnnn nnnn nnnn nnnn nnnn nnnn nnnn nnnn nnnn
aalll aalll gall pala iial lalal alalg aagaa gall URL
AaJn JnJnJnJnJnJnJnJnJnJnJnJnJnJnJnJnJnJnJnJnJnJnJnJnJnJnJnJnJn
(1) a4 = a1 + 3 = 4 美国
Jgjoo jai jai jgi jssll gaaalall jolal al yao yag aaii iiaial
aal 1e aagaaal 1ai gai
y HP Inkjet installer 1
.
Wireless Connection Type
Next
l_2 : y = - 9x + 4 y = - 11x
jie jai bll (HP Business Inkjet 1200dtwn g)
.
EWS
(802.11) (Wireless) (Networking)
. Start Wizard, Wireless Setup
aLull lck jbi gill 10
.EWSJIiApply
5
profile
jL
1
Jaa 1
.profile.
Piligjie j 1
clialolall ciaiae gubil jayll clalolgo.
Luo zai,251 1
hpsetup (SSID)
ad hoc
IP
glll llll gnnn nnnn nn nnnn nnnn nnnn nnnn nnnn nnnn nnnn nnnn nnnn nnnn nnnn nnnn nnnn nnnn nnnn nnnn nnnn nnnn nnnn nnnn nnnn nnnn nnnn nnnn nnnn nnnn nnnn nnnn nnnn nnnn nnnn nnnn nnnn nnnn
L
Wireless Connection Type
Next.
Jss
(20 1
ylll 1111111111111111111111111111
gill gj jyssll jie lglbll jn
Aolll
p120
1 1
gall jj j j j j j j j j j j j j j j j j j j j j j j j j j j j j j j j j j j j j j j j j j j j j j j j j j j j j j j j j j
http://wwwHp.com/support/businessinkjet1200.
aIbll 5JLgog aIbll Jzolj
(Mac OS)
aJ 1
.
(1)
aaii iiaii Juaai pssuiz 1s uai suiuui
:Airport Admin Utility
.Equivariant Network Password Base Station
.WEP 11
Airport Admin Utility
olalgall 1000000000000000000000000000000000000000
e jnt. Control Panal appLE
:TCP/IP
a configurations 150
.Configuration
HP Business Inkjet 1200, Duplicate
OK
.
ssWAP" 1sLys Jdsabaiy aiaaae jnolie Lsy
JOSLKS (WAP) 1111111111111111111111111111111111
[1]gawall 1yL 1(ML) "j j j j (MAC) Jj j j
.(WAP) 3j36jc icS11Jc Jd
J1j, iSall jll all jll jll j4 all j4 jie (WAP) J1s
.5i11 1j111111111 (WAP)
JALIJA JALIJA (MAC) JNJJGIA (WAP) JJI JSLI
MACJLWJH WAPJL
1
.1JgALMACJIjogicraIJIgBlljogicL WAPJIggi
aIbll 5JLgog aIbll Jzolj
(Windows)
aagabgj(diy)zaiiiaaiyabpaiaaiyaiiaaiyaiiaaiyaiiaaiyai
.
zuii11 zuii11 zaijb
aallg 1
-
S_ AOB = 12 · AQ · BO = 12 × 2t × 5
yll lall lal p 1000000000000000000000000000000000000000
Laiu
Wireless Connection Type
Next
()
Jus y. aulls
aJL 1sLwUuIgolal jll
jaiy jaiy jaiy jaiy jaiy jaiy jaiy jaiy jaiy jaiy jaiy jaiy jaiy jaiy jaiy jaiy jaiy jaiy jaiy jaiy jaiy jaiy jaiy jaiy jaiy jaiy jaiy jaiy jaiy jaiy jaiy jaiy jaiy jaiy jali y
jssll jss sasall ssslls
a aaii 1
aalgl aalllg aall gaaalall
1
alglai
(EWS)
Jie 1.
IPjIgjjgjjgjjgjj
http://123.123.123.123
EWS pIe 1
a a a a a a a a a a a a a a a a a a
ailllll llll 1 aalld
JaiyI Jia aolal aiae ae,HP JaiyI Iaal
cIaolal aiae aclbbl
.12alj 8a jolalgall jus jge bai
LJUJI JUJU
≤ ( 1,0) ≤ ( 1,0) : | - | = | + |
2.5LwU1 JLoSgI gJ
aal 100000000000000000000000000000000000000000
(,)
aill jai jai all ool 10 aia jai jai jai jai lai i kai lii
15151515151515151515151515151515
WEP
JSLWJLJSLWJLJGJNOJGLUQ
(WPA) all 1234567890123456789012345678901234567890123456789012345678901234567890123456789012345678901234567890123456789
zjg jzjg j (j) (j)
A
1
131 121 121 121 121 121 121 121 121 121 121 121 121 121 121 121 121 121 121 121 121 121 121
j (WEP) (WPA)
jssssssssssssssssssssssssssssssssssssssssssssssssssssssssssssssssssssssssssssssssssssssssssssssss
"(EWS)
A. A. A. A. A. A. A. A. A. A. A. A. A. A. A. A. A. A. A. A. A. A. A. A. A. A. A. A. A. A. A. A. A. A. A. A. A. A. A. A. A. A. A. A. A. A. A. A. A. A.
aaii iiaii 1
jIgJgssS10
1
gaww g
aalj djj jll jg jll lll (SSID)
Jaiyolaoe aee eaepea aee ae aee
.
aL 15
IP 1jIgic g aalll jia gai gai jai jai
"olalall aio" jbl, laloll jgall. alalall gaiol (1
12 之
. Settings 15e! jj Start 1e jai jdi jki
. Printers and Faxes 154
Properties
.Ports jilio wiojdole ge jai
Configure port 1TCP/IP
ip Jj jie jy jyipipipipipipipipipipipipipipipipipipipipipipipipipipipipipipipipipipipipipipipipipipipipipipipipipipipipipipipipipipipipipipipipipipipipipipipipipipipipipipipipipipipipipipipipipipipipipipipipip
ailll lglg jll pssll
sLxUJusUJUs
Jy (Scrubber/Utilities) (Scrubber)
aill jiauuiy i jiuuii
1
a≤11Lg0gllx≤
Lusu cuiill slely p, yu Lua si maiy
LgXolgoIole Aov,AsSul10bAol
Laaa aalalai 1e aae
iiaaalljgssllj4j1jS1=
Jaa
25.11 Jago (1) 11.11.
<11 Jooogolc
L 15
a a a a a a a a a a a a a a a a a a a a a a a a a a a a a
http://www.hp.com/support/businessinkjet1200.
4 1
jus 1s j USB s 1s 2y 2o 2000
Jae 1
SLWJLJ 1sJLsIeJyUyUyUyUyUyUyUyUyUyUyUyUy
aagaaallll jnnsdssssssssssssssssssssssssssssssssssss
14 a 2
alaoa aaiiaaaiiall. 2xSLy xsiay aoaaaiibll
Jae gI pI 11100000
aalal


可知 l_e : y = - 12x^2 + 14x^2,( 0 < x < 1)
http://wwwHp.com/support/businessinkjet1200

2511 1000000000000000000000000000000000000000000000000000000000000000000000000000
(SSID):aI aI aI aI aI aI aI aI aI aI aI aI aI aI aI aI aI aI aI aI aI aI aI aI aI aI aI aI aI aI aI aI aI aI aI aI aI aI aI aI aI aI aI aI aI aI aI aI aI aI aI

jaii jaii jaii jaii jaii jaii jaii jaii jaii jaii jaii jaii jaii jaii jaii jaii jaii jaii jaii jaii jaii jaii jaii jaii jaii jaii jaii jaii jaii jaii jaii jaii jaii jaii jali jali jali jali jali jali jali jali jali jali jali jali jali jali jali jali jali jali jali jali jali jali jali jali jali jali jali jali jali jali jali jali jali jali
printed on recycled paper
Hewlett-Packard Development Company, L.P.
printed in Germany
http://wwwHp.com/support/businessinkjet1200

C8154-90003
- Trademark credits
- Check the package contents.
- Understanding control panel parts
- Interpreting control panel lights
- Understanding network connector parts
- Interpreting network connector lights
- Network light pattern Explanation and recommended action
- Problems printing an alignment page
- Check the printer to ensure the following:
- Problems installing software
- Check the computer system to ensure the following:
- Verify installation preliminaries
- Reinstall the printer software
- Problems connecting to a network
- General network troubleshooting
- Problems connecting to a wired network
- Problems setting up wireless communication
- Resetting printer network settings
- Troubleshooting and configuration tools
- Configuration page
- To print a configuration page
- Embedded Web server (EWS)
- To open the EWS
- Setting up the printer for wireless communication
- Configuring basic wireless communication settings
- Communication mode
- Network name (SSID)
- Configuring wireless network security settings
- Types of wireless security
- Open System (no security)
- Wired Equivalent Privacy (WEP)
- Wi-Fi Protected Access (WPA)
- Configuring security options
- To configure security options
- To add hardware addresses to a Wireless Access Point (WAP)
- Installing printer software and sharing the printer (Windows)
- Infrastructure mode
- To share the printer with other computers
- Ad hoc network (advanced users only)
- Advanced setup
- Installing printer software and sharing the printer (Mac OS)
- Mac OS 9 (9.1 and later)
- To set wireless network settings in an infrastructure network
- To set wireless network settings in an ad hoc network (advanced users only)
- Mac OS X (10.1.5 and later)
- To set wireless network settings in an infrastructure network (recommended)
- Classic environment for Mac OS X (10.1.5 and later)
- WEP (Wired Equivalent Privacy)
- WPA (Wi-Fi Protected Access)
- HP product Duration of limited warranty
- Extent of limited warranty
- Limitations of warranty
- Limitations of liability
- Local law
- all jilil
- (EWS)
- LJUJI JUJU
- a ≤ ( 1,0) b ≤ ( 1,0) : | a - b| = | a + b|
- 2.5LwU1 JLoSgI gJ
- (,)
- WEP
- 1
- sLxUJusUJUs
- a≤11Lg0gllx≤
- LgXolgoIole Aov,AsSul10bAol
Brand : HP
Model : Business Inkjet 1200DTWN
Category : Printer