RAF120B - Radio JVC - Free user manual and instructions
Find the device manual for free RAF120B JVC in PDF.
| Product type | Clock radio |
| Brand | JVC |
| Model | RAF120B |
| Mains power | 230 V ~ 50 Hz, 5 W |
| Backup batteries | 2 AAA 1.5 V batteries (not included) |
| Standby consumption | < 1 W |
| FM frequency range | 87.5 - 108 MHz |
| AM frequency range | 522 - 1620 kHz |
| Output power | 0.3 W RMS |
| Number of presets | 20 (10 FM + 10 AM) |
| Alarm functions | 2 alarms (buzzer or radio) |
| Sleep timer | Yes, adjustable from 10 to 90 minutes |
| Snooze function | Yes, 9 minutes |
| Display | Digital (time) |
| FM antenna | Wired, fully extendable |
| AM antenna | Built-in (rotate whole unit) |
| Clock setting | Manual via HR/MIN and SET buttons |
| Auto search | Yes, by holding TUNING |
| Maintenance | Clean with a soft, dry cloth |
| Double insulation | Yes (no grounding needed) |
| Safety | Do not expose to water or open flames |
| Operating temperature | Non-tropical (use in temperate climate) |
Frequently Asked Questions - RAF120B JVC
User questions about RAF120B JVC
0 question about this device. Answer the ones you know or ask your own.
Ask a new question about this device
Download the instructions for your Radio in PDF format for free! Find your manual RAF120B - JVC and take your electronic device back in hand. On this page are published all the documents necessary for the use of your device. RAF120B by JVC.
USER MANUAL RAF120B JVC
Hotline Darcy France
WERKING VAN HET DUBBEL ALARM
"OFF" is geselecteerd.
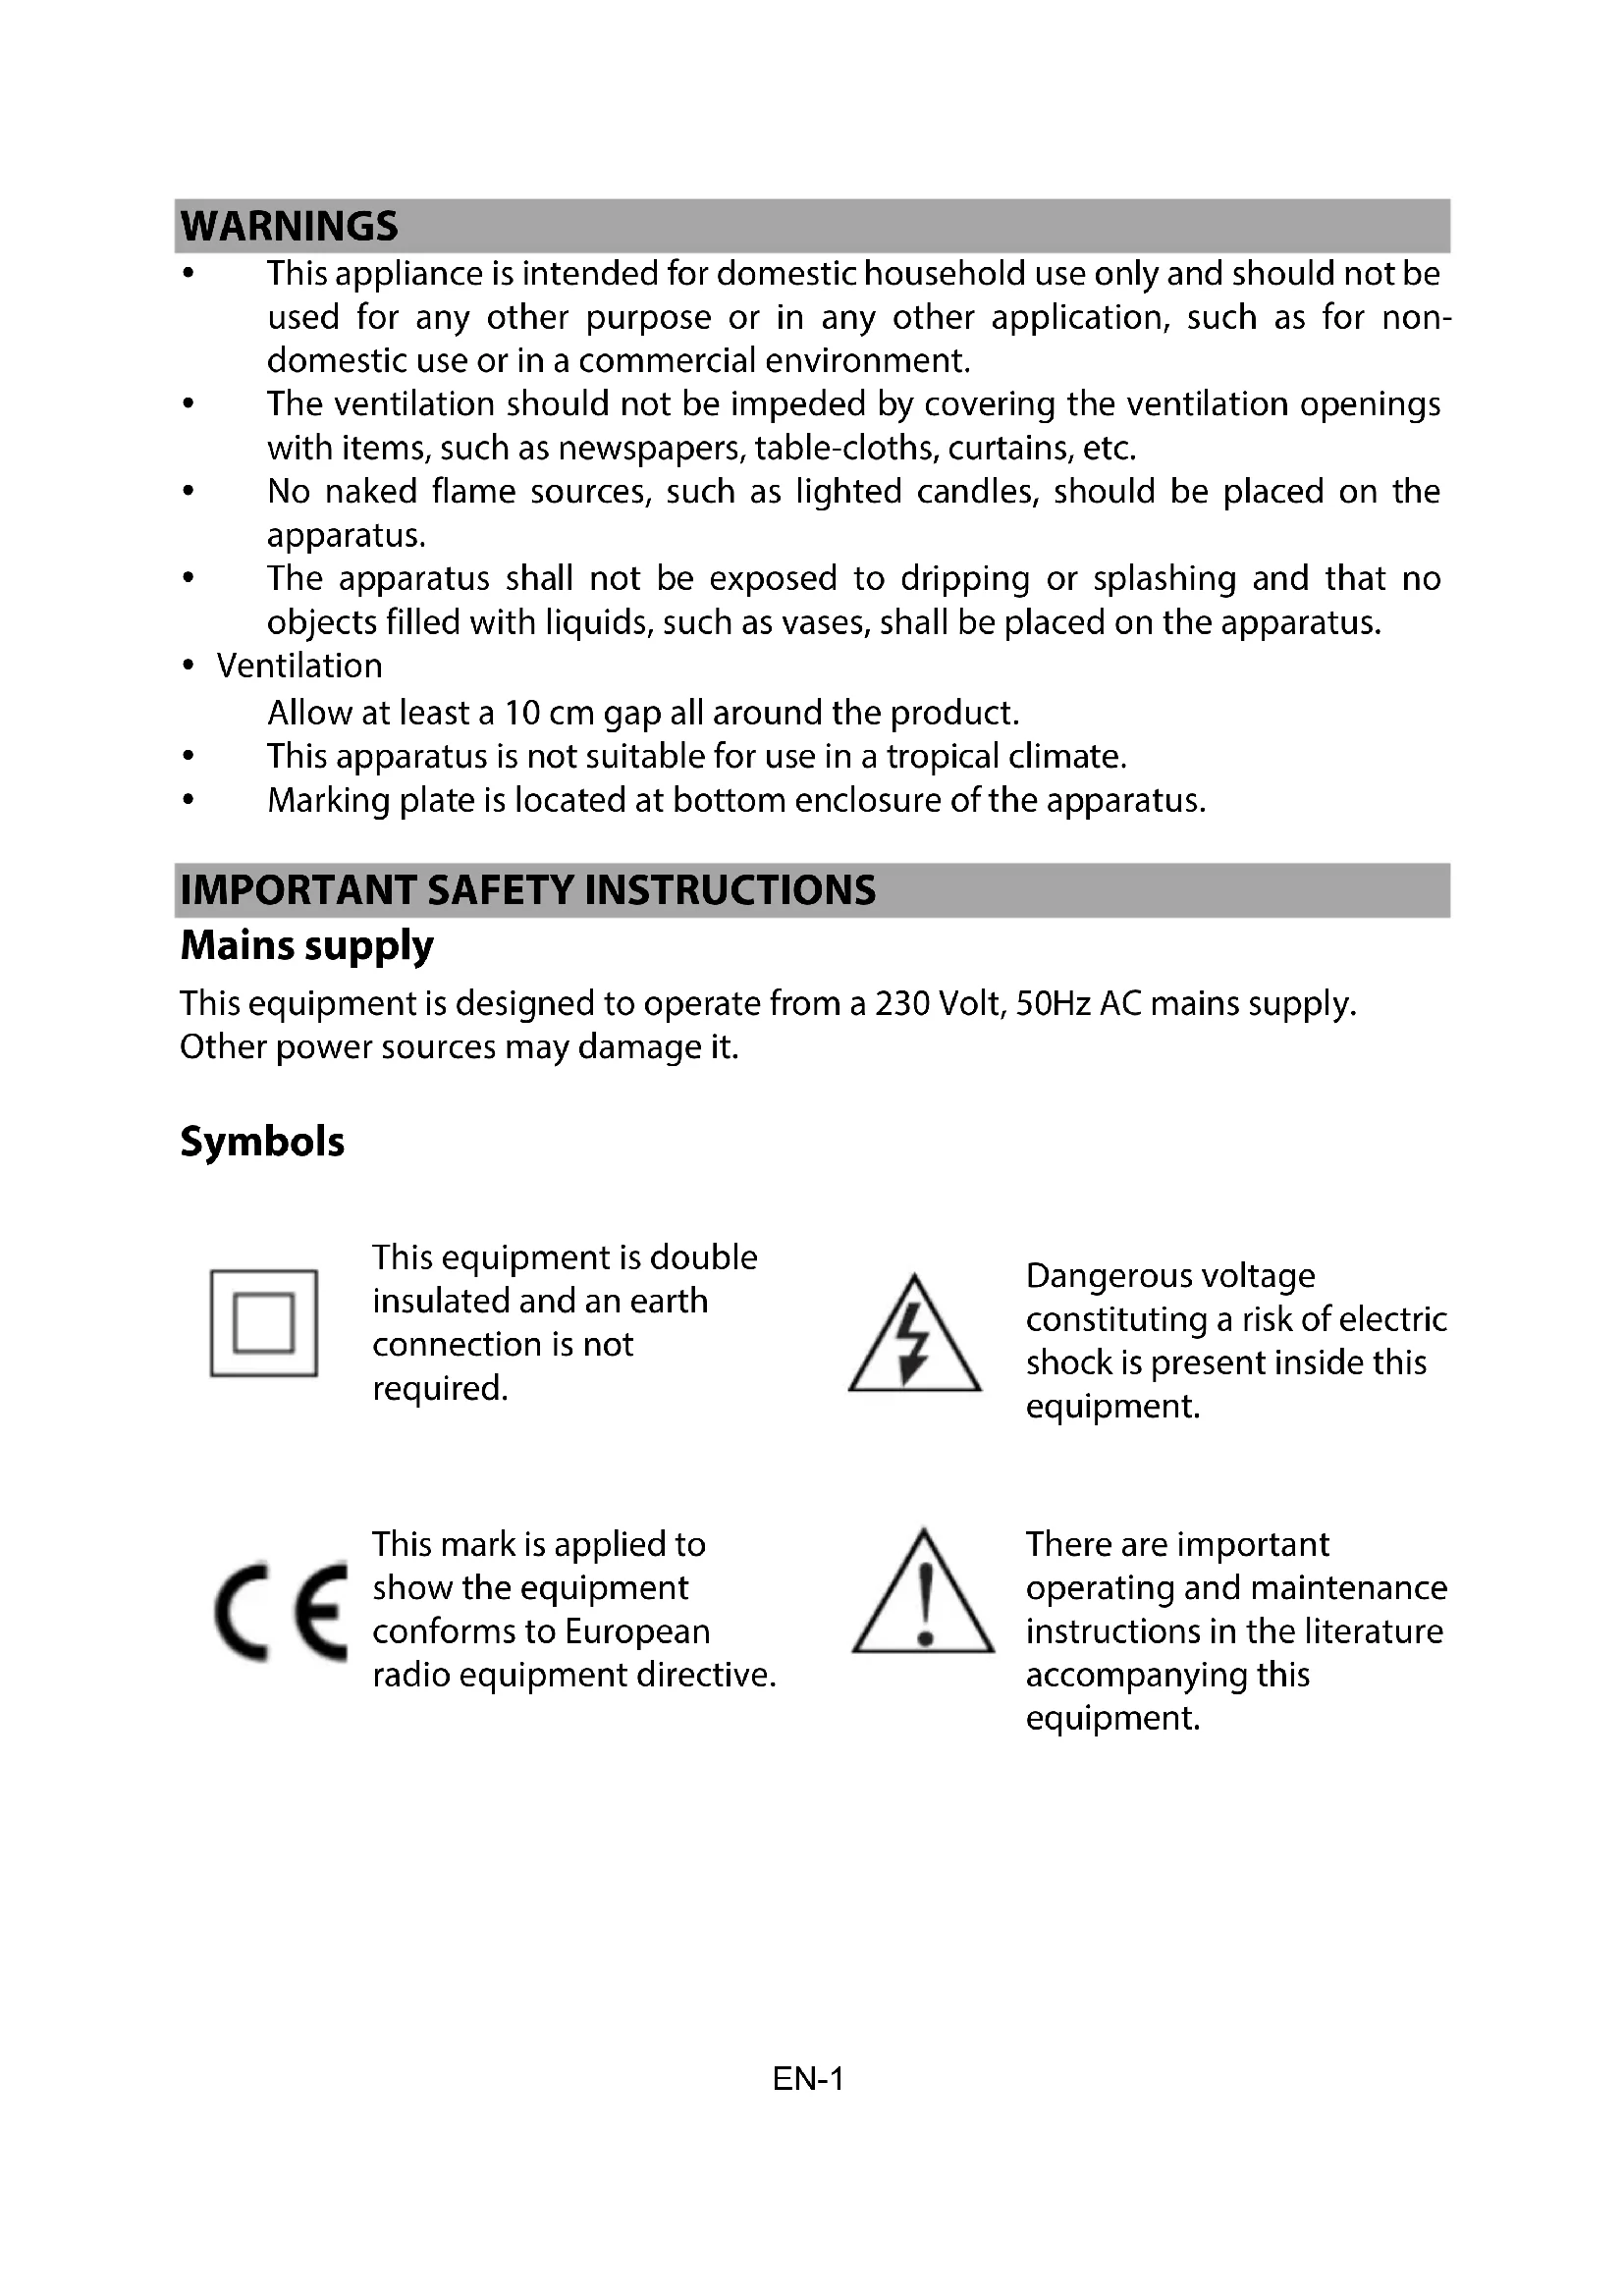
- This appliance is intended for domestic household use only and should not be used for any other purpose or in any other application, such as for nondomestic use or in a commercial environment.
- The ventilation should not be impeded by covering the ventilation openings with items, such as newspapers, table-cloths, curtains, etc.
- No naked flame sources, such as lighted candles, should be placed on the apparatus.
- The apparatus shall not be exposed to dripping or splashing and that no objects filled with liquids, such as vases, shall be placed on the apparatus.
- Ventilation
Allow at least a 10cm gap all around the product.
This apparatus is not suitable for use in a tropical climate.
- Marking plate is located at bottom enclosure of the apparatus.
IMPORTANT SAFETY INSTRUCTIONS
Mains supply
This equipment is designed to operate from a 230 Volt, 50Hz AC mains supply. Other power sources may damage it.
Symbols

This equipment is double insulated and an earth connection is not required.

Dangerous voltage constituting a risk of electric shock is present inside this equipment.

This mark is applied to show the equipment conforms to European radio equipment directive.

There are important operating and maintenance instructions in the literature accompanying this equipment.
Battery handling and usage
Only adults should handle battery. Do not allow a child to use this apparatus unless the battery cover is securely attached to the unit.
The battery type used in the unit is 2 × 1.5V AAA size batteries (not included) which are accessible and can be replaced.
Remove the battery cover located at the bottom of the unit to remove the batteries.
Disposal of a battery into fire or a hot oven, or mechanically crushing or cutting of a battery or expose to excessive heat such as sunshine, fire or the like that can result in an explosion.
Leaving a battery in an extremely high temperature surrounding environment that can result in an explosion or the leakage of flammable liquid or gas.
A battery subjected in extremely low air pressure that may result in an explosion or the leakage of flammable liquid or gas.
Different types of batteries or new and used batteries are not to be mixed.
Batteries are to be inserted with the correct polarity.
Exhausted batteries are to be removed from the product.
The supply terminal are not to be short-circuited.
LOCATION OF CONTROL
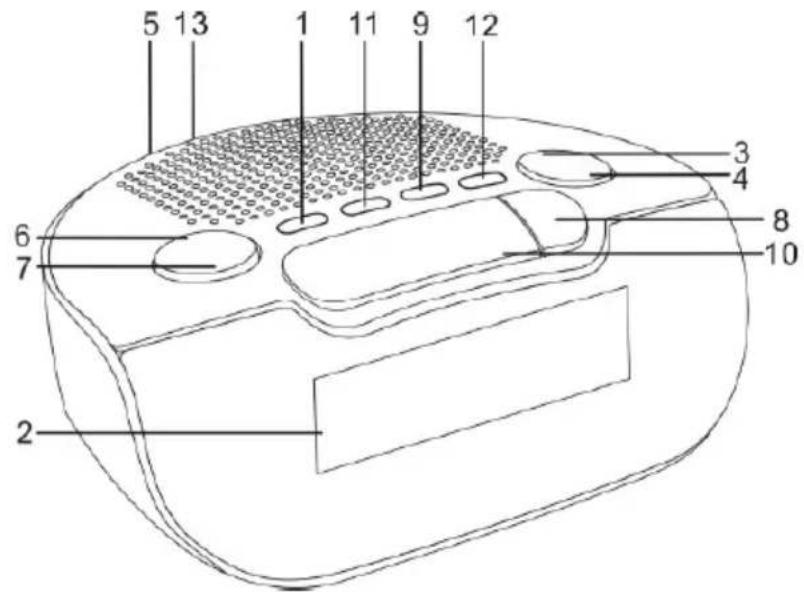
- POWER
- DISPLAY
- VOLUME / AL1
- VOLUME / AL2
- FMAERIAL
-
TUNING / HR
-
TUNING / MIN
- SLEEP
- SET
- SNOOZE
- BAND
- MEM
- BATTERY COVER
DISPLAY
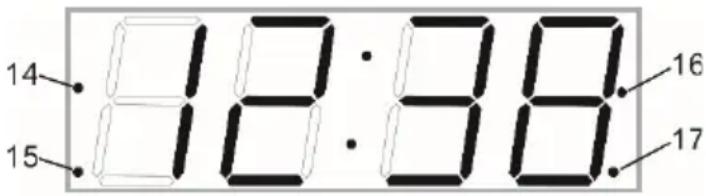
- Alarm 1 buzzer indicator
-
Alarm 1 radio indicator
-
Alarm 2 buzzer indicator
- Alarm 2 radio indicator
BATTERY BACKUP
The clock, alarm and preset stations settings can be protected against AC power failure with the batteries for a short period of time. If no backup batteries are installed or the power failure is prolonged, you will need to set the clock again.
STANDBY MODE
Place the unit on a flat stable surface and plug the power cord into the mains socket.
The unit is in standby mode and "0:00" will flash on the display.
SETTING THE CLOCK
- In standby mode, press and hold SET until the display flashes.
- Repeatedly press HR to set the hours.
- Repeatedly press MIN to set the minutes.
- Press SET to confirm.
The hour and minute digits will stop flashing.
POWER ON/RADIO MODE
Press POWER to switch the unit on and enters the radio mode.
The radio frequency will briefly appear on the display and then return to clock time.
RADIO ORERATION
- Press POWER to turn on the radio.
- The default FM frequency or the last frequency you tune the radio to.
The default FM radio frequency is 87.5 MHz. - Press BAND once to enter the AM radio mode.
The default AM radio frequency is 522kHz - Repeatedly press BAND to select the desired radio band.
- Adjust the volume by repeatedly pressing VOLUME / .
- Repeatedly press TUNING / to tune into the desired station.
- Press and hold TUNING / for auto forward or backward radio station searching.
87.5
NOTE:
- For the best FM reception, extend the FM aerial to its full length.
- For the best AM reception, rotate the unit to the position giving best reception.
PRESETTING YOUR FAVOURITE RADIO STATION
Up to 10 FM and 10 AM radio stations can be preset.
- Follow steps in "RADIO OPERATION" and tune into the station that you wish to preset.
- Press and hold SET for about 2 seconds, "P01" will flash on the display.
- Press SET again to store the station.
- Repeat steps 1 to 3 to store desired stations.
- To listen to preset radio stations, press MEM repeatedly to select the desired radio station.

DUAL ALARMS ORERATION
Before setting the alarm time, make sure the Clock has been set.
Setting Alarm 1 or Alarm 2
- In standby mode, press and hold AL1 or AL2 for 2 seconds.
The hour and minute digits will flash. - Set the alarm time by repeatedly pressing HR and MIN respectively.
- Press and hold HR and MIN respectively for fast advance.
- Press AL1 or AL2 again to select the alarm sound (OFF>BUZZER>RADO in cycle.
Checking alarm time
Press and hold AL1 or AL2 for 2 seconds, the alarm time will flash on the display. To turn off the alarm, press POWER and the alarm will come on again at the set time on the following days.
To cancel the alarm, repeatedly press AL1 or AL2 until the alarm indicator light goes out on the display.
Snoopze function
This function can be used to stop the alarm temporarily for about 9 minutes once the alarm is activated. When the snooze button is pressed, the buzzer or radio alarm sounds will stop and sound again after about 9 minutes.
The sleep function is designed to automatically turn off the Radio.
Setting sleep timer
- Press SLEEP.
- "90" will illuminate on the display.
- Repeatedly press SLEEP to select the desired sleep time from 90, 80, 70, 60, 50, 40, 30, 20 or 10 minutes.
- The radio will be turned off after the selected time has elapsed.

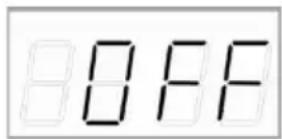
To check remaining sleep time, press SLEEP. To cancel sleep timer, press SLEEP until "OFF" is selected.
To turn off the radio before the sleep time has elapsed, press POWER.
SPECIFICATIONS
Power source : AC 230V~50Hz, 5W
Power consumption (clock only) :<1W
Frequency range
AM522-1620kHz
FM 87.5 - 108 MHz
Power Output
:0.3W RMS
Clock backup : 2 x 1.5V AAA size batteries (not included)
Alternating Current
DISPOSAL

As a responsible retailer we care about the environment. As such we urge you to follow the correct disposal procedure for the product, packaging materials and if applicable, accessories and batteries. This will help conserve natural resources and ensure that the materials are recycled in a manner that protects health and the environment. You
must follow laws and regulations about disposal. Waste electrical products and batteries must be disposed of separately from household waste when the product reaches the end of its life.
Contact the store where you bought the product and your local authority to learn about disposal and recycling.
The batteries must be disposed of at your local recycling point. See the operating instructions to find out how to remove the batteries for disposal.
We apologize for any inconvenience caused by minor inconsistencies in the operating instructions, which may occur as a result of product improvement and development.
EU Declaration of Conformity
Marque - Brand/Merk/ Marca
JVC
The object of the declaration described above is in conformity with the relevant Union harmonisation legislation:
This declaration of conformity is drawn up under the sole responsibility of the manufacturer.
The person responsible for this declaration is:
Place, Date / Lieu :
Ivy-sur-Seine, mars 25, 2022