
XR-2753 - Car radio SONY - Free user manual and instructions
Find the device manual for free XR-2753 SONY in PDF.


| Product type | Cassette car stereo with FM/MW/LW tuner |
| Brand | Sony |
| Model | XR-2753 |
| Dimensions (W x H x D) | Approx. 188 x 58 x 183 mm |
| Mounting dimensions (W x H x D) | Approx. 182 x 53 x 164 mm |
| Weight | Approx. 1.6 kg |
| Power supply | Car battery 12 V DC (negative ground) |
| Max output power | 35 W × 4 (at 4 ohms) |
| Cassette player section | 4 tracks, 2 stereo channels, wow and flutter 0.08% (WRMS), frequency response 30 – 20,000 Hz, signal-to-noise ratio 58 dB |
| FM ranges | 65.0 – 74.0 MHz (30 kHz step) / 87.5 – 108.0 MHz (50 kHz step) |
| FM sensitivity | 8 dBf |
| MW/LW ranges | MW: 531 – 1,602 kHz / LW: 153 – 281 kHz |
| MW/LW sensitivity | MW: 30 μV / LW: 50 μV |
| Main functions | Cassette player, FM/MW/LW tuner, BTM memory, AMS search, repeat play, intro scan, blank skip, automatic tuner activation (ATA), D-Bass, mute, wired rotary commander (RM-X2S optional) |
| Sound adjustments | Volume, bass, treble, balance, fader (front/rear) |
| Maintenance and cleaning | Clean playback heads with a suitable kit; replace fuse (amperage indicated on fuse holder) |
| Safety | Use a fuse of the same rating; remove the unit from the chassis to prevent theft; be cautious of heat after use |
| Spare parts and repairability | Consult an authorized Sony dealer for repairs; spare parts not detailed in the manual; optional accessory: rotary commander RM-X2S |
| General information | User manual available in multiple languages; reset required after connection or battery change; avoid cassettes longer than 90 minutes |
Frequently Asked Questions - XR-2753 SONY
User questions about XR-2753 SONY
0 question about this device. Answer the ones you know or ask your own.
Ask a new question about this device
Download the instructions for your Car radio in PDF format for free! Find your manual XR-2753 - SONY and take your electronic device back in hand. On this page are published all the documents necessary for the use of your device. XR-2753 by SONY.
USER MANUAL XR-2753 SONY
FM/MW/LW Cassette Car Stereo
Operating Instructions
Operating Instructions
Operating Instructions
Operating Instructions
Operating Instructions
EN
PL
BG
H
RF
For installation and connections, see the supplied installation/connections manual.
© 1997 by Sony Corporation
Welcome!
Thank you for purchasing the Sony Cassette Car Stereo. This unit lets you enjoy a variety of features by using a rotary remote.
EN
Table of contents
Getting Started
Resetting the unit 3
Cassette Player
Listening to a tape 3
Playing a tape in various modes .... 4
Radio
Memorising stations automatically — Best Tuning Memory (BTM) .... 5
Memorising only the desired stations.... 5
Receiving the memorised stations 6
Other Functions
Adjusting the sound characteristics ...... 6
Muting the sound 6
Changing the sound and beep tone 7
Additional Information
Precautions 7
Maintenance 8
Removing the unit 8
The rotary remote labels 9
Location of controls 10
Specifications 11
Troubleshooting guide 12
Index 13
Getting Started
Resetting the unit
Before operating the unit for the first time or after replacing the car battery, you must reset the unit.
Press the reset button with a pointed object, such as a ballpoint pen.
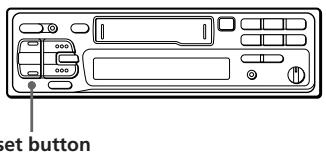
Note
Pressing the reset button will erase all the memorised programme and memory functions.
Cassette Player
Listening to a tape
Insert a cassette.
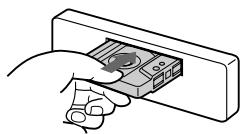
Playback will start automatically.
If a cassette is already inserted, press SOURCE repeatedly until "TAPE" is displayed.
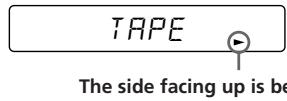
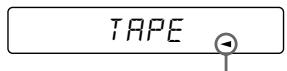
The side facing down is being played.
Tip
To change the tape transport direction, press MODE (◀) during tape playback.
To
Press
Stop playback

Eject the cassette

Fast-winding the tape
During playback, press either side of SEEK/AMS for one second.

Fast-forward
Rewind
To start playback during fast-forwarding or rewinding, press MODE (◀▶).
Locating the beginning of a track — Automatic Music Sensor (AMS)
You can skip up to nine tracks at one time.
During playback, press either side of SEEK/AMS momentarily.

To locate the succeeding tracks
To locate the preceding tracks
Note
The AMS function may not work when:
- the blanks between tracks are shorter than 4 seconds • there is noise between tracks
- there are long sections of low volume or quiet sections.
Changing the displayed items
Each time you press DSPL momentarily during tape playback, the displayed item changes as follows:
Tape playback ↔ Frequency*
* While the ATA function is activated.
Playing a tape in various modes
Searching for the desired track — Intro scan
Press ① during playback.
"INTRO" appears on the display.
The first 10 seconds of all the tracks are played.
When you find the desired track, press again. The unit returns to the normal playback mode.
Playing tracks repeatedly — Repeat play
Press ② during playback. "REP" appears on the display.
When the current played track is over, it will be played again from the beginning.
To cancel this mode, press again.
Playing a CrO₂ or Metal tape
Press ④ when you want to listen to a CrO₂ (TYPE II) or metal (TYPE IV) tape. "METAL" appears on the display.
To cancel this mode, press ④.
Switching to the radio while fast-winding a tape
— Automatic Tuner Activation (ATA)
Press ⑤ during playback. "ATA" appears on the display.
When fast-forwarding or rewinding with SEEK/AMS, the tuner will turn on automatically.
To cancel this mode, press ⑤.
Skipping blanks during tape playback — Blank skip
Press ⑥ during playback. "BL.SKIP" appears on the display.
Blanks longer than eight seconds will automatically be skipped during tape playback.
To cancel this mode, press ⑥.
Radio
Memorising stations automatically
— Best Tuning Memory (BTM)
This function selects from the currently received band the stations with the strongest signals and memorises them in order of their frequency.
PREVENTING ACCIDENTS!
When tuning in while driving, use the automatic tuning or memory preset search function instead of manual tuning.
1 Press SOURCE repeatedly to select the tuner. Each time you press SOURCE, the source changes as follows: TAPE ↔ TUNER
2 Press MODE repeatedly to select the band.
Each time you press ⒶMODE, the band changes as follows:
FM1 → FM2 → FM3 → MW → LW
3 Press BTM for two seconds.
Notes
- The unit will not store stations with weak signals on the preset number buttons. If there are only a few stations received, some preset number buttons will remain empty.
- When there is a preset number indicated on the display, the unit will store stations on all preset number buttons from the one currently displayed.
Memorising only the desired stations
Up to 6 stations on each band (FM1, FM2, FM3, MW and LW) can be stored on the preset number buttons in the order of your choice. Therefore, 18 FM stations can be memorised. If you try to store another station on the same preset number button, the previously stored station will be erased.
1 Press SOURCE repeatedly to select the tuner. 2 Press MODE repeatedly to select the band. 3 Press SEEK/AMS to search for the station you wish to store on a preset number button. 4 Press the desired preset number button (① to ⑥) for two seconds.
The number of the selected preset number button appears on the display.
Receiving the memorised stations
1 Press SOURCE repeatedly to select the tuner. 2 Press MODE repeatedly to select the band. 3 Press the preset number button (① to ⑥) momentarily on which the desired station is stored.
If you cannot tune in a preset station
Press either side of SEEK/AMS momentarily to search for the station (automatic tuning).
Scanning stops when a station is received. Press either side of the button repeatedly until the desired station is received.
Note
If the automatic tuning stops too frequently, press LCL momentarily to light up "LCL" on the display (local seek mode). Only the stations with relatively strong signals can be tuned in.
Tip
If you know the frequency, press and hold either side of SEEK/AMS until the desired station is received (manual tuning).
Other Functions
Adjusting the sound characteristics
1 Select the item you want to adjust by pressing SEL repeatedly. VOL (volume) → BAS (bass) → TRE (treble) → BAL (balance) → FAD (fader)
2 Adjust the selected item by pressing either ⊕ or ⊖.
Adjust within three seconds after selecting. (After three seconds the button will again serve as the volume control button.)
Muting the sound
Press MUTE.
The "MUTE" indication flashes.
To restore the previous volume level, press again.
Changing the sound and beep tone
Boosting the bass sound — D-Bass
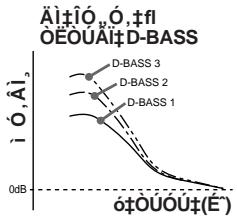
You can enjoy clear and powerful bass sound. The D-bass function boosts the low frequency signal with a sharper curve than conventional bass boost.
You can hear the bass line more clearly even if the vocal sound is the same volume. You can emphasize and adjust the bass sound easily with the D-bass control. This effect is similar to the one you get when you use an optional subwoofer system.
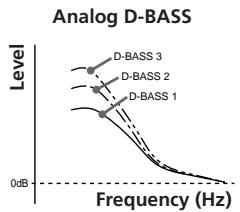
Adjusting the bass curve
Turn the D-BASS control to adjust the bass level (1, 2 or 3).
"D-BASS" appears in the display.
To cancel, turn the control to the OFF position.
Muting the beep tone
Press ⑥ while pressing SEL.
To obtain the beep tone again, press these buttons once more.
Additional Information
Precautions
- If your car was parked in direct sunlight resulting in a considerable rise in temperature inside the car, allow the unit to cool off before operating it.
- If no power is being supplied to the unit, check the connections first. If everything is in order, check the fuse.
- If no sound comes from the speakers of a 2-speaker system, set the fader control to the centre position.
- When the tape is played back for a long period, the cassette may become warm because of the built-in power amplifier. However, this is not a sign of malfunction.
If you have any questions or problems concerning your unit that are not covered in this manual, please consult your nearest Sony dealer.
To maintain high quality sound
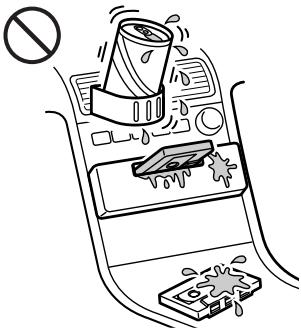
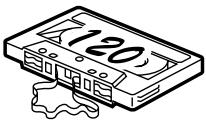
If you have drink holders near your audio equipment, be careful not to splash juice or other soft drinks onto the car audio. Sugary residues on this unit or cassette tapes may contaminate the playback heads, reduce the sound quality, or prevent sound reproduction altogether.
Cassette cleaning kits cannot remove sugar from the tape heads.
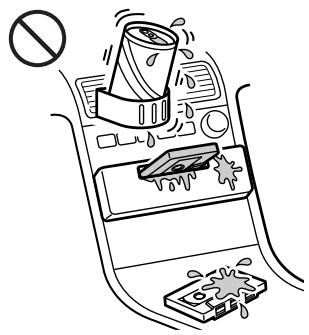
Notes on Cassettes
Cassette care
- Do not touch the tape surface of a cassette, as any dirt or dust will contaminate the heads.
- Keep cassettes away from equipment with built-in magnets such as speakers and amplifiers, as erasure or distortion on the recorded tape could occur.
- Do not expose cassettes to direct sunlight, extremely cold temperatures or moisture.
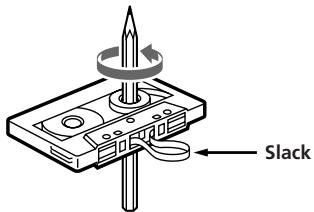
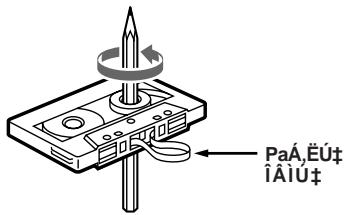
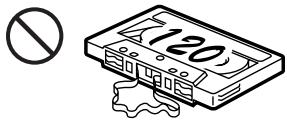
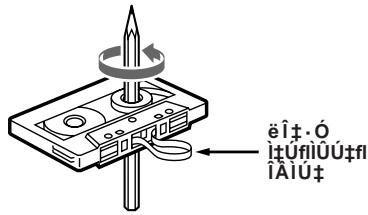
- Slack in the tape may cause the tape to be caught in the machine. Before you insert the tape, use a pencil or similar object to turn the reel and take up any slack.
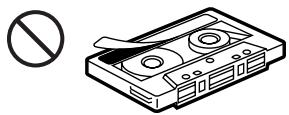
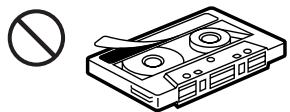
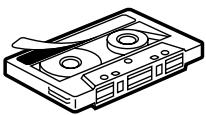
Distorted cassettes and loose labels can cause problems when inserting or ejecting tapes. Remove or replace loose labels.
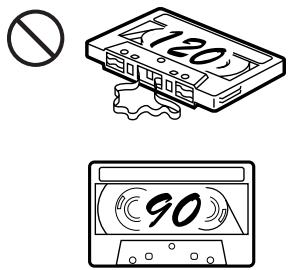
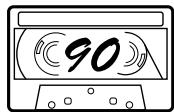
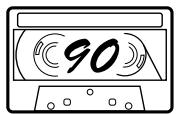
Cassettes longer than 90 minutes
The use of cassettes longer than 90 minutes is not recommended except for long continuous play. The tapes used for these cassettes are very thin and tend to be stretched easily. Frequent playing and stopping of these tapes may cause them to be pulled into the cassette deck mechanism.
Maintenance
Fuse Replacement
When replacing the fuse, be sure to use one with the correct amperage which is stated on the fuse case. Never use a fuse whose amperage rating exceeds the one supplied to the unit as this could cause a malfunction of the unit.
Warning
Never use a fuse with an amperage rating exceeding the one supplied with the unit as this could damage the unit.
Removing the unit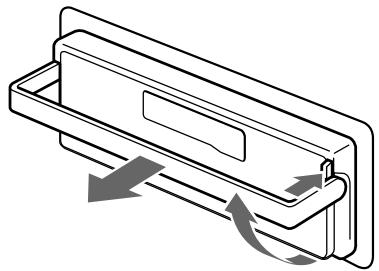
To prevent the unit from being stolen
When you leave your car, remove the unit from the bracket and take it away with you.
Caution
Be careful when you remove the unit. The rear of the unit becomes very hot just after operating it because of a built-in power amplifier.
The rotary remote labels
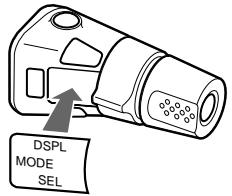
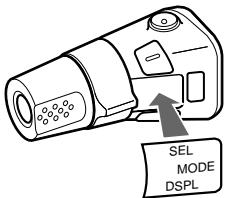
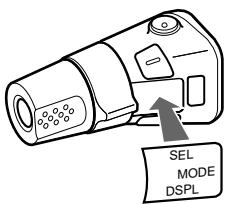
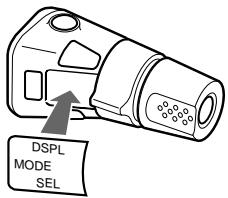
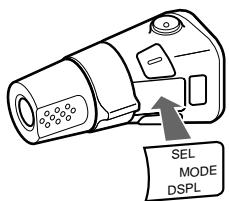
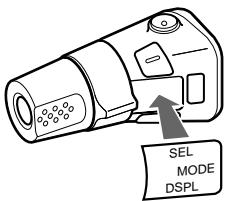
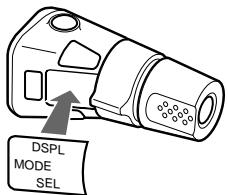
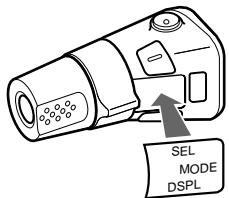
You can control this unit with the optional rotary remote (RM-X2S). Some labels are supplied with the rotary remote. Attach that label which matches the functions of the master unit and the mounting position of the rotary remote. When you mount the rotary remote, attach the label in the illustration below.
Location of controls
EN
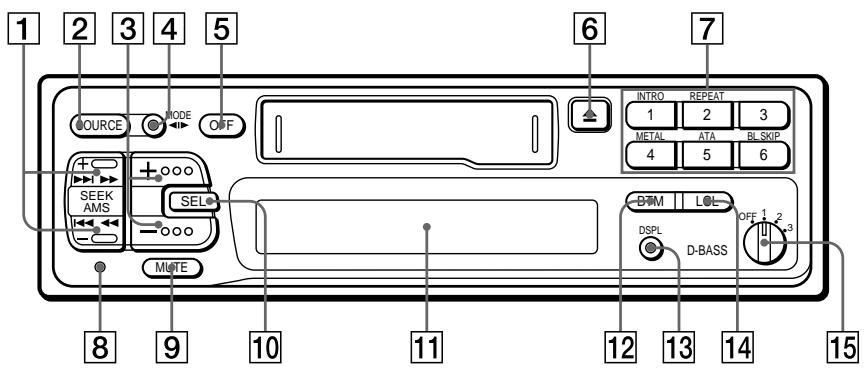
Refer to the pages for further details.
1 SEEK/AMS button 3, 4, 5, 6 2 SOURCE button (TAPE/TUNER) 3, 5, 6 3 + - (volume/bass/treble/balance/fader control) button 6 4 MODE (◄►) button During tuner reception: BAND select 5, 6
During tape playback: Transport direction change 3
5 OFF button 3 6 ▲ (eject) button 3 7 During radio reception: Preset number buttons 5, 6
During tape playback:
① INTRO button 4 ② REPEAT button 4 ④ METAL button 4 ⑤ ATA (Automatic Tuner Activation) button 4 ⑥ BL.SKIP (Blank Skip) button 4
8 Reset button 3
Press this button when you use this unit for the first time, when you have changed the car battery, or when the buttons of this unit do not function properly.
9 MUTE button 6 10 SEL (control mode select) button 6, 7 11 Display window 12 BTM (Best tuning memory) button 5 13 DSPL (display mode change) button 4 14 LCL button 6 15 D-BASS control 6
Specifications
Cassette player section
| Tape track | 4-track 2-channel stereo |
| Wow and flutter | 0.08 % (WRMS) |
| Frequency response | 30 – 20,000 Hz |
| Signal-to-noise ratio | 58 dB |
Tuner section
FM*
| Tuning range | 65.0 – 74.0 MHz(at 30 kHz step)87.5 – 108.0 MHz(at 50 kHz step) |
| Aerial terminal | External aerial connector |
| Intermediate frequency | 10.7 MHz |
| Usable sensitivity | 8 dBf |
| Selectivity | 75 dB at 400 kHz |
| Signal-to-noise ratio | 65 dB (stereo),68 dB (mono) |
| Harmonic distortion at 1 kHz | |
| 0.5 % (stereo),0.3 % (mono) | |
| Separation | 35 dB at 1 kHz |
| Frequency response | 30 – 15,000 Hz |
| Capture ratio | 2 dB |
* There are the numerical values mesured at 87.5 - 108.0 MHz.
MW/LW
| Tuning range | MW: 531 – 1,602 kHz |
| LW: 153 – 281 kHz | |
| Aerial terminal | External aerial connector |
| Intermediate frequency | 10.71 MHz/450kHz |
| Sensitivity | MW: 30 μV |
| LW: 50 μV |
Power amplifier section
| Outputs | Speaker outputs(sure seal connectors) |
| Speaker impedance | 4 – 8 ohms |
| Maximum power output | 35 W × 4 (at 4 ohms) |
General
| Outputs | Power aerial relay control lead |
| Tone controls | Bass ± 8 dB at 100 HzTreble ± 8 dB at 10 kHz |
| Power requirements | 12 V DC car battery(negative ground) |
| Dimensions | Approx. 188 × 58 × 183 mm(w/h/d) |
| Mounting dimensions | Approx. 182 × 53 × 164 mm(w/h/d) |
| Mass | Approx. 1.6 kg |
| Supplied accessories | Parts for installation and connections (1 set) |
| Optional accessories | Rotary commanderRM-X2S |
Design and specifications are subject to change without notice.
Troubleshooting guide
The following checklist will assist in the correction of most problems you may encounter with your unit.
Before going through the checklist below, refer to the operating procedures.
General
| Problem | Cause/Solution |
| No sound. | Adjust the volume with⊕.Set the fader control to the center position for 2-speaker systems. |
| No beep tone. | The beep tone is muted. |
Tape playback
| Problem | Cause/Solution |
| Playback sound is distorted. | Contamination of the tape head. → Clean the head. |
| The AMS does not operate correctly. | There is noise in the space between tracks.A blank space is too short (less than four seconds).▶▶ on (SEEK/AMS) is pressed immediately before the following track.◀◀ on (SEEK/AMS) is pressed immediately after the track starts.A long pause, or a passage of low frequencies or very low sound level is treated as a blank space. |
Radio reception
| Problem | Cause/Solution |
| Preset tuning is not possible. | Store the correct frequency.The broadcast is too weak. |
| Automatic tuning is not possible. | The broadcast is too weak. → Use manual tuning. |
If the above-mentioned solutions do not help to improve the situation, consult your nearest Sony dealer.
Index
A
Automatic Music Sensor (AMS) 4
Automatic tuning 6
Automatic Tuner Activation (ATA) 4
B, C
Balance 6
Bass 6
Best Tuning Memory (BTM) 5
Blank skip 4
D, E
D-BASS (D-Bass) 7
Display 4
F, G, H
Fader 6
Fast-forward 3
Fuse 8
I, J, K
Intro scan 4
L
Local seek mode (LCL) 6
M, N, O, P, Q
Manual tuning 6
Metal 4
Mute 6
R, S
Radio 5,6
Repeat play 4
Reset 3
Rewind 3
Rotary remote 9
T, U, V, W, X, Y, Z
Tape playback 3
Treble 6
Welcome!
FM1 → FM2 → FM3 → MW → LW
Automatic Tuner Activation (ATA) 4
B
Best Tuning Memory (BTM) 5
Fuse 9
— Automatic Music Sensor (AMS)
This function automatically skips blank sections and starts playback from the beginning of the next track.
During playback, press the button to skip to the next track.
Press and hold the button to fast-forward through the current track (SEEK/AMS).

To set the desired station, press and hold the button.
To set the desired station, press the button.
Memory
The AMS function may not operate correctly in the following cases:
• When there are long pauses between tracks
• When the recording level is low
• When the tape is old or worn, or when the tape head is dirty.
— Best Tuning Memory (BTM) function
With the help of the BTM function, the tuner automatically searches for stations with strong signals and stores them in memory.
Press the TUNER button repeatedly to select the desired band. Each time you press the button, the band changes as follows: FM1, FM2, FM3, MW, LW.
1 Press the SOURCE button repeatedly to select the TUNER. The display shows the band and frequency.
2 Press the MODE button repeatedly to select the desired band. Each time you press the button, the band changes as follows: FM1 → FM2 → FM3 → MW → LW.
3 Press the BTM button for a few seconds.
Notes
• If your car's antenna is not extended, the reception may be poor. In that case, extend the antenna fully. The antenna is built into the rear window or side window. If your car has a separate antenna, extend it. • In some areas, the reception may be weak even with the antenna extended. In that case, use the manual tuning function.
Storing stations automatically
The unit can store up to 6 stations per band (FM1, FM2, FM3, MW, and LW) in memory. The stations are stored in order of frequency. The FM bands can store up to 18 stations in total. In the following example, the stations are stored in the order of frequency, and the preset numbers are assigned automatically.
1 Press the SOURCE button repeatedly to select the TUNER. 2 Press the MODE button repeatedly to select the desired band.
3 Press the SEEK/AMS button to search for stations. The unit stops searching when it finds a station, and the station is stored in memory.
4 Press the number buttons (1 to 6) to select the preset station you want to store.
The number buttons are used to select preset stations. The preset number is displayed.
Storing stations manually
1 Press the SOURCE button repeatedly to select the TUNER. 2 Press the MODE button repeatedly to select the desired band. 3 Press the number buttons (1 to 6) to select the preset number you want to store.
In some cases, you may not be able to store stations automatically. In that case, store them manually.
çtÚÉOÏtÈUÁI túÍO Á%òt ÓÓÚÓ tǐÉÚA I‡ ÚÚÓI‡ (SEEK/AMS), Á‡ ‰‰‡ ïtÍA ÉÚA OÚ†ī'ÉflÚ‡ (t,ÚÓItÚÉ'i t‡OU OÉI‡). è AÛ' O, t¡AÚO OÓË ‡'ÓÍA tÓÓ'ÍA Ô ÉÂΆÍAÎ †‰ÉÓOU tî'Éfl. çtÚÉOÏtÉÚA ÓÓÕÍ%oÓ, tÚÁIÓÁ%oI tÓUÓ ïtÉUÁÎ -ÚÚÓÎt, ‰‰ÓÍtÚÓ ÁtÓÓ'ÍA Ó ÉÂÎtÍAÚÓ i‡ ÉÂÎtíÚ+ †‰ÉÓOU tî'Éfl.
á†.ÂÎÂÊ͇ ÇÕÛ•†È, ̃ ‡,ÚÓχÚË‘ìtÚ† ì†ÒÚ ÓÉ͇ òÕÊ ‡ Ú, %‰Â’ÃÓÚÓ, ï†ÚÉOÏÂÚÂÍ ‡UÍÓ-ÚÚÓ͇ (LCL), Á†‰‡ Ô ÓÓÑÍ, ÉÊ à ÂI ‡t Ê!‰£Í†-ÊñÚ† “LCL” (ÂÊÉÍ ÎÓΆÎÓ Ú’ ÔÂÎÂ). è‡Ó +‰ÉÔÓÙ†’ÊÉÔÓÚÍÓÕEÚÂÍÓÕÉÎÏÉ ÖÈ,,†¡ÏË ÎÓ,,†Ú%‡ ÔÂÍ†Ò ÓÊ,†ÚÕΉÚÓ,‡.
ë ',ÂÚ ÇÕÎÙ⁻†È, \~ ÁI‡ÂÚÂ\~ÂÒÚÓÚ†Ú, ï†ÚËÔÏÂÚÂË Â†‰ : ÉÚ‰i‡ ÓÚÓÚ †ïÉÛÂ͇·ÜUÓ͇ (SEEK/AMS) ,‰Ó͆ÚÓ òÂ Ô ÊÂ͇ ÊÂ͆í†Ú‡ †‰ÊŐÓ܆î^Èfl (``î† ì†ÓÚ ÓÊ͆).
Ñ Û,,Ë ÙÛIÍ^ËË
êÂ,,ÛÎË ñÎÂ ì‡ ι‡ ñÍÚ ÉÒÚËÏËÚÂ ì‡ Á,Û͇
1 àA- ÂUÂI‡ tÍÚ ÊOÜÉI‡Ú,ÍóflúÓ ÉOÍtÚÂ%‡ Â,,ÚÎE tÚÂ,ÍtÚOÏtÚÉOÍtÚ -ÛUÓI‡ (SEL) ÔOÕÎÂ%Õ,†ÚÁÎIÓ. VOL (ÕË·) → BAS (ÎËÕÎË) → TRE (,'ÊOÕÎË) → BAL (·†Î‡ÌÒ) → FAD (·†Î‡ÌÒ Ô Â%oìË/‡%òiË)
2 çtòU ÓEÚÂËÄ. ††ú†‡ †ÍUA ÊOÚËí‡ \~ ÁA ï†ÚËOÏÎÀ ï‡ Â‰ËI ÓU ·ÛUÓIËU + EÏË - .
àÁ,· ˜ÂÚ Â,,ÛÎË ‡ÎÂÚÓ, ‡ÎÏËÚ ͇ Ú Ñ ÒÂÎÙI‰ËÒΉËÁ-Ó ‡.(ëÎÂ‰Ú ÈÒÂÎÙI‰Ë ·ÛÚÓÌ-Ü \~ %oÂÈÒÚ,Ú,† ÓÚÍÓ,Ó Í‡ÚÓ Â,,Û·ÚÓ Á‡ òË·ڇ ͇ Á,Û͇.)
á‡,,ÎÛ⁻‡,‡ìÂ ì‡ Á,Û͇
ç‡ÚËÒÌÂÚ -ÛÚÓ̇ MUTE. àì%òE͇ÚÓ 'Ú "MUTE" Á‡ÔÓ\~, ‡ %ò‡ Ô EÏÈ,, ‡.
ᇉ‡, ‘ÁÒÚ‡IÓ,ËÚÂ Ô Â‰E-ÎÓÚÓ ìË,Ó ì‡ Á,Û͇, ì‡ÚËÒÎÂÚ ·ÛÚÓ· ÓÚIÓ,Ó.
è Óïflì‡ ì‡ Á,Ûí‡ Ñ Ô Â%ûÔ Â%ëÚÂÎÎÈfî ÒË,,̇Î
èÓ‰ÒËÎ,‡ÎÂ ì‡ ìËÒÍËÚ \~ÂÒÚÓÚË ì‡ Á,Û͇ — îÛÌÎ^Ëfl D-Bass
aÓÊÂUà %o‡ Ê i†óΆÊ%o‡, †Ú i‡ flòÂI ÊÏÓ\~Âi ËÉOÍÓ\~ÂOUÓUÂI Â, ÚI. îÜIÍ\~ÊflÚ‡ D-Bass ÔÓ%oÕÊÎ, ‡ ËÉOÍÓ\~ÂOUÓUÍÈfl ÓÊ,, i†í ÓÓ-ÕÉIÍÓ, ÓÚÍÓIÍÓÚÓ Ó-ÉIÍÓ, ÀIÈfl ÏÉOÍÓ\~ÂOUÓUÂIÙÕÉI, †ÚÂI. C ÂÁÜÎÚtÚÍÓÊÂUÃ%o‡‘ÚÂÚ ÙÉOÍÓ\~ÂOUÓUÍÈflA, ÚIÔÓ-flOÍÓ, %o Ê tÍÓ Ô‡ ÚÉflÚ‡ i‡ , ÓÍt·  O·Ò ·Ò \~†Ú‡ ÓÊ· i‡ Â, ÚIt. è ÔOÍÓ-Ú i‡ Â, ÜI†ÚÓ ‡ D-Bass íÕÉÂUÃ%o‡ÕÖ%o\~ U‡ÂUÂÉÎtÓU ÓÊÚÂIÀOÍÓ ÙÉOÍÓ\~ÂOUÓUÍÈfl Â, ÚI. ŌUÂÍU·Ú Â Ó \~'Éfl, ítÍÚÓ Ó É %oÓÔ`ÎÈÚÂÎÂI ÙÉOÍÓ\~ÂOUÓUÂI, ĒOÓÍÓ,,Ó, Ó'ÚÂÎ.
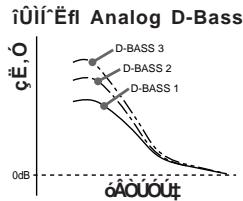
ç‡OÚ ÓÉÍt ïIËÓÍO\~ÂÔÚÓÛÍtÚt ÍIË,‡ á†, ÚÂÚ Â,,ÛÍtÚÓ ‡D-Bass, Á†‰‡ Â,,ÛIË ‡ÚAÏE,ÓÚÓÍtIËÓÍEÚ \~ÂÔÚÓÜË (1,2 ÉIË 3). ç‡ ÂÍ ‡I‡ Ó ÔÓfl,fl,‡ È!‰ÈÍt^ÈflÚ‡ "D-Bass".
Set the switch to the OFF position.
To turn on the device, press and hold the button (SEL). To turn off the device, press and hold the button again.
Additional information
Do not use as a life-saving device
• In the event of a malfunction, do not attempt to repair the device yourself. Contact a qualified service technician for assistance. • In the event of a malfunction, do not use the device if it has been dropped or damaged. Contact a qualified service technician for inspection. • In the event of a malfunction, do not use the device if the battery is leaking or damaged. Contact a qualified service technician for replacement. • In the event of a malfunction, do not use the device if the power cord is damaged. Contact a qualified service technician for replacement.
In the event of a malfunction, do not attempt to repair the device yourself. Contact a qualified service technician for assistance. This device complies with Part 15 of the FCC Rules. Operation is subject to the following two conditions: (1) This device may not cause harmful interference, and (2) this device must accept any interference received, including interference that may cause undesired operation.
Proceed to the following page →
Maintain high sound quality
In the event of a malfunction, do not attempt to repair the device yourself. Contact a qualified service technician for assistance. This device complies with Part 15 of the FCC Rules. Operation is subject to the following two conditions: (1) This device may not cause harmful interference, and (2) this device must accept any interference received, including interference that may cause undesired operation. Changes or modifications not expressly approved by the party responsible for compliance could void the user's authority to operate the equipment.
Battery disposal and recycling
• Clean the exterior with a soft, dry cloth. Do not use any solvents or abrasive cleaners. • Do not expose the device to extreme temperatures or direct sunlight. • Do not drop or subject the device to strong impacts. • Do not immerse the device in water or any other liquid. • Do not use the device near water or in damp environments. • Do not use the device if the battery is leaking or damaged. Contact a qualified service technician for replacement.
• Use only the specified battery type. Do not mix old and new batteries or different types of batteries. Remove the batteries if the device will not be used for an extended period.
Battery life: approximately 90 minutes
Battery life: approximately 90 minutes. The actual battery life may vary depending on usage conditions and settings. To extend battery life, reduce the volume and avoid using features that consume more power. When the battery is low, the device will indicate that it needs to be charged.
Power
Press the button. On the remote control, the button for the tuner is pressed (for example, FM), so the radio is turned on. On the remote control, the button for the tuner is pressed, the power is turned on. The radio is turned on. The button is pressed, the radio is turned on. The button is pressed, the radio is turned on.
Controls
The radio is turned on. The button is pressed. The radio is turned on. The button is pressed, the radio is turned on. The button is pressed, the radio is turned on.
Controls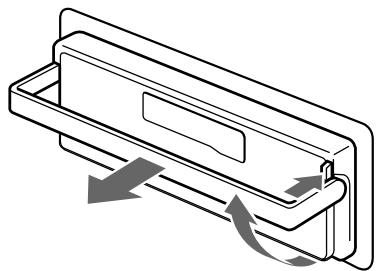
The radio is turned on. The button is pressed. The radio is turned on. The button is pressed, the radio is turned on.
Controls
The radio is turned on. The button is pressed. The radio is turned on. The button is pressed, the radio is turned on.
Controls
The radio is turned on. The button is pressed. The radio is turned on. The button is pressed, the radio is turned on.
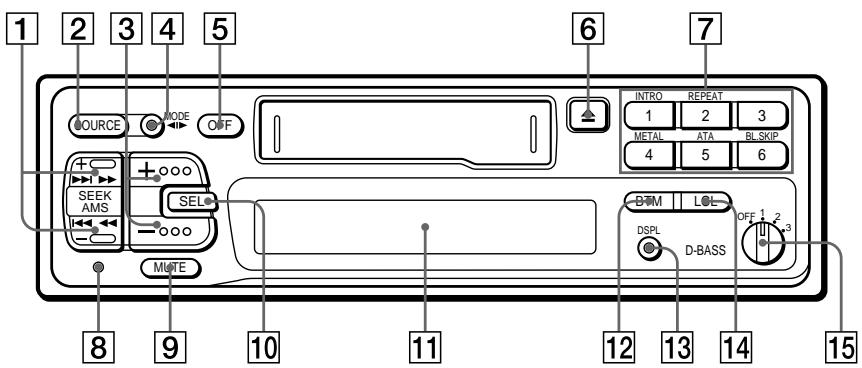
Controls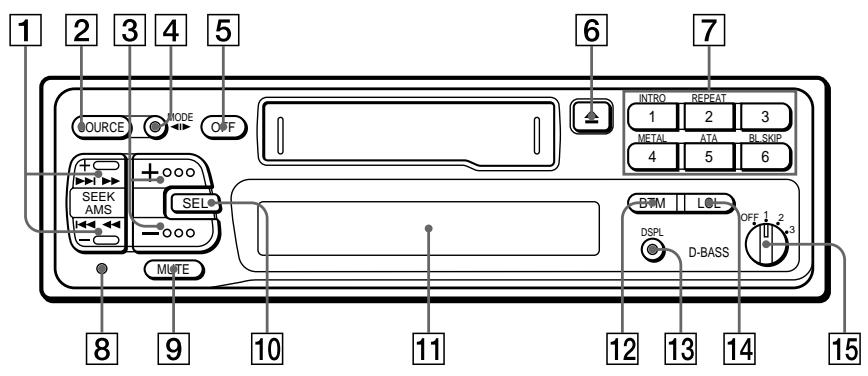
The radio is turned on. The button is pressed. The radio is turned on.
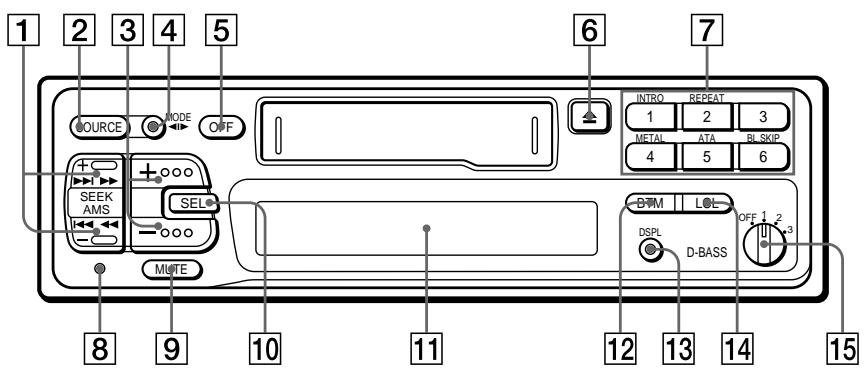
1 AUTO SEEK/AMS 3, 4, 5, 6 2 AUTO SOURCE (TAPE/TUNER) 3, 5, 6 3 AUTO (+) (volume/treble/bass/balance/fader) 6 4 AUTO MODE (◀▶) For radio: Band 5,6 For cassette: Playback direction 3 5 AUTO OFF 3 6 Button ▲ (eject) 3 7 For radio: Number buttons for preset stations 5,6 For cassette: ① AUTO INTRO 4 ② AUTO REPEAT 4 ④ METAL button 4 ⑤ ATA (Automatic Tuner Activation) 4 ⑥ BL.SKIP (Blank Skip) 4
8 RESET button 3 çÚÉÒÎÂÚAÚÓÁË-ÚÚÓÎÔ Ê Ô‘,Ó·\~†ÎÍÓ ÓÚÓÎÎÂ ì‡ †Ô‡ †Ú‡,Ô Ê ÒÎη ì‡ †ÎÜÎÎÎÚÓ ì‡Ú+ †Ú Éfl ÊÎÏÉ ÍÓ„†ÚÓ-ÚÚÓÎÈÚÂ ì‡ †Ô‡ †Ú‡ ΠÙÙÎ`ÉOÏÈ ‡Ú Ô †,ÊÎÏÔ. 9 MUTE button 6 10 SEL button (select mode) 6, 7 11 öí ‡ì 12 BTM button (Best tuning memory) 5 13 DSPL button (display mode) 4 14 LCL button 6 15 D-BASS button 7
Remote commander RM-X4S
Receiver section
Tone controls
4-speaker 2-channel stereo
Frequency response
0.08% (WRMS)
Frequency characteristics
30 – 20,000 Hz 58 dB
Signal-to-noise ratio
Separation
FM*
Tuning range
65.0 – 74.0 MHz
(at 30 kHz step)
87.5 – 108.0 MHz
(step 50 kHz)
Intermediate frequency
10.7 MHz
Intermediate frequency
Frequency range
10.7 MHz
Usable sensitivity
8 dBf
Sensitivity
75 dB at 400 kHz
Signal-to-noise ratio
65 dB (stereo)
68 dB (mono)
) at 1 kHz
Frequency range
0.5% (stereo)
0.3% (mono)
35 dB at 1 kHz
Separation
Frequency response
30 – 15,000 Hz
Signal-to-noise ratio
2 dB
* Tonal reproduction for stereo, measured at 87.5-108.0 MHz.
MW/LW
Operating range
MW: 531 – 1,602 kHz
LW: 153 – 281 kHz
Antenna impedance
10.71 MHz/450 kHz
MW: 30 μV
LW: 50 μV
Tuner section
Power
Power supply
High frequency amplifier
High frequency amplifier
4 – 8 ohms
Maximum power output
35 W × 4 (at 4 ohms)
Output power
at 4 ohms
at 2 ohms
at 1 ohm
Automatic antenna
Result of the test
Low frequency ± 8 dB
at 100 Hz
High frequency ± 8 dB
at 10 kHz
Distortion factor at electrical outlets
12V DC current from
Battery
(with engine running)
Size E
Dimensions 188 × 58 × 183 mm
(−, /‰)
Best Tuning Memory (BTM) 5
Blank skip 4
D-BASS (D-Bass) 7
Intro scan 4
Local seek mode (LCL) 6
Repeat play 4
Welcome!
FM1 → FM2 → FM3 → MW → LW
FM1 → FM2 → FM3 → MW → LW
To store stations using BTM, press and hold the button until the display flashes, then release.
For safety, do not use the unit while driving. Stop the car in a safe place before operating. Also, keep the volume at a moderate level so that you can hear outside sounds. If you have any questions or problems, consult your nearest Sony dealer.
The radio is designed to operate on the following bands: FM, MW, and LW.
The radio can be powered by batteries or an AC adapter. It has a built-in speaker and a headphone jack. The radio has a digital tuner with presets for FM, MW, and LW bands. It also has a sleep timer and an alarm clock function.
1. Press the SOURCE button to select the radio band.
2. Press the MODE button to select the tuning mode.
3. Press the SEEK/AMS button to search for the next available station. The radio will stop at the next strong signal.
4. Press the TUNE buttons (① – ⑥) to manually tune to a specific frequency.
The selected band and frequency are displayed on the LCD screen.
Cleaning
Cleaning the radio
1. Press the SOURCE button to select the radio band. 2. Press the MODE button to select the tuning mode. 3. Press the TUNE buttons (① - ⑥) to manually tune to a specific frequency.
Do not use abrasive cleaners or solvents.
Press the SEEK/AMS button to search for the next available station. The radio will stop at the next strong signal. The search direction can be changed by pressing the button again. The radio will search in the direction of increasing frequency.
Troubleshooting
If the radio does not work, check the batteries or the AC adapter. If the radio is connected to an AC adapter, make sure the adapter is plugged in properly. If the radio is battery-powered, make sure the batteries are installed correctly.
Specifications
1. Press the button, the adjustment is made in the following order: VOL (volume) → BAS (low frequency) → TRE (high frequency) BAL (balance between left and right speakers) → FAD (balance between front and rear speakers)
2. The adjustment is made. Press the button with (+) or (-).
Press the SOUND button
Press the MUTE button. The display shows "MUTE".
To return to the previous sound setting, press the MUTE button again.
Sound setting
D-Bass
The D-Bass is a bass amplifier with a built-in compressor. It is designed to provide a clear and powerful sound. The D-Bass features a 3-band EQ, a compressor, and a built-in tuner. The amplifier is housed in a rugged, compact enclosure. The D-Bass is ideal for bassists who need a reliable and versatile amplifier for practice, recording, and live performances.
Bass amplifier controls
Bass amplifier (1, 2 or 3)
can be used with a drum
machine or D-BASS.
About the tuner
Using the tuner
• Do not use the tuner with a bass that has a built-in preamp or active electronics, as this may damage the tuner. - The tuner is designed to work with passive basses. If your bass has active electronics, bypass the preamp or use a passive bass. • The tuner will not work if the bass is not plugged in. • The tuner will not work if the bass is muted. The tuner will only work when the bass is plugged in and the volume is turned up.
• The tuner will not work if the bass is not plugged in. The tuner will only work when the bass is plugged in and the volume is turned up.

Tuner with a duration of more than 90 minutes
The tuner will automatically turn off after 90 minutes of inactivity. This is to save battery life. The tuner will also turn off when the battery is low. To turn the tuner back on, press the power button.

Using the amplifier
Replacing the fuse
Before replacing the fuse, make sure the amplifier is turned off and unplugged from the power source. Remove the fuse holder from the back of the amplifier. Replace the fuse with a new one of the same rating. Make sure the fuse is properly seated in the holder. Then, reinsert the fuse holder into the amplifier.
Check the specified current, voltage, and power values, and the type of current, voltage, and power that are indicated on the nameplate, and the frequency, number of phases, and power factor.
Connection to the mains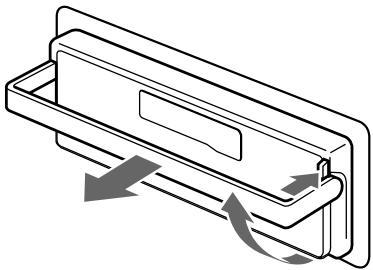
Protective earthing
If you leave the device, disconnect it from the mains and allow it to cool down.
Pre-operation
Check that the voltage and frequency of the mains match the values indicated on the nameplate, and that the protective earthing is properly connected.
Labels
Data plate
You can connect the device to a power outlet with a grounding contact (RM-X2S) using a grounding adapter, or to a power outlet without a grounding contact. If you use a grounding adapter, ensure that the grounding terminal is properly connected. If you use a grounding adapter, the device may not be fully grounded.
Location of controls
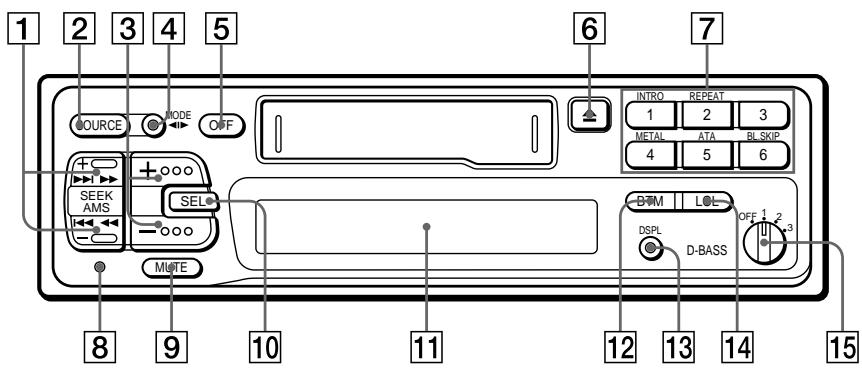
Under the front panel. On the indicated pages
1 SEEK/AMS buttons 3, 4, 5, 6 2 SOURCE button (TAPE/TUNER) 3, 5, 6 3 Volume control buttons (+/–) (volume, bass, treble, balance, fader, loudness) 6
4 MODE button (◀/▶) To change the radio band: Press BAND 5 To adjust the sound: Select the adjustment item 3
5 OFF button 3 6 ▲ button (eject cassette) 3
Sony Corporation Printed in Malaysia
- FM/MW/LW CASSETTE CAR STEREO
- WELCOME
- TABLE OF CONTENTS
- GETTING STARTED
- CASSETTE PLAYER
- RADIO
- OTHER FUNCTIONS
- ADDITIONAL INFORMATION
- RESETTING THE UNIT
- NOTE
- LISTENING TO A TAPE
- TIP
- FAST-WINDING THE TAPE
- LOCATING THE BEGINNING OF A TRACK — AUTOMATIC MUSIC SENSOR (AMS)
- CHANGING THE DISPLAYED ITEMS
- PLAYING A TAPE IN VARIOUS MODES
- SEARCHING FOR THE DESIRED TRACK — INTRO SCAN
- PLAYING TRACKS REPEATEDLY — REPEAT PLAY
- PLAYING A CRO₂ OR METAL TAPE
- SWITCHING TO THE RADIO WHILE FAST-WINDING A TAPE
- SKIPPING BLANKS DURING TAPE PLAYBACK — BLANK SKIP
- MEMORISING STATIONS AUTOMATICALLY
- PREVENTING ACCIDENTS
- NOTES
- MEMORISING ONLY THE DESIRED STATIONS
- RECEIVING THE MEMORISED STATIONS
- IF YOU CANNOT TUNE IN A PRESET STATION
- ADJUSTING THE SOUND CHARACTERISTICS
- MUTING THE SOUND
- CHANGING THE SOUND AND BEEP TONE
- BOOSTING THE BASS SOUND — D-BASS
- ADJUSTING THE BASS CURVE
- MUTING THE BEEP TONE
- PRECAUTIONS
- TO MAINTAIN HIGH QUALITY SOUND
- NOTES ON CASSETTES
- CASSETTE CARE
- CASSETTES LONGER THAN 90 MINUTES
- MAINTENANCE
- FUSE REPLACEMENT
- WARNING
- TO PREVENT THE UNIT FROM BEING STOLEN
- CAUTION
- THE ROTARY REMOTE LABELS
- LOCATION OF CONTROLS
- EN
- SPECIFICATIONS
- TROUBLESHOOTING GUIDE
- INDEX
- A
- B, C
- D, E
- F, G, H
- I, J, K
- L
- M, N, O, P, Q
- R, S
- T, U, V, W, X, Y, Z
- B
- STORING STATIONS AUTOMATICALLY
- STORING STATIONS MANUALLY
- Ñ Û,,Ë ÙÛIÍ^ËË
- ÊÂ,,ÛÎË ÑΠ̇ Ι‡ ÑÍÚ ÉÒÚËÏËÚ ̇ Á,Û͇
- Á‡,,ÎÛ⁻‡,‡Ì ̇ Á,Û͇
- È ÓÏFL̇ ̇ Á,Û͇ Ñ Ô Â%ÛÔ Â%ËÚÂÎÎÈFÎ ÒË,,̇Î
- ÈÓ‰ÒËÎ,‡Î ̇ ÌËÒÍËÚ \~ÂÒÚÓÚË Ì‡ Á,Û͇ — ÎÛÌÎ^ËFL D-BASS
- DO NOT USE AS A LIFE-SAVING DEVICE
- MAINTAIN HIGH SOUND QUALITY
- BATTERY DISPOSAL AND RECYCLING
- BATTERY LIFE: APPROXIMATELY 90 MINUTES
- POWER
- CONTROLS
- REMOTE COMMANDER RM-X4S
- RECEIVER SECTION
- SEPARATION
- FM
- MW/LW
- TUNER SECTION
- OUTPUT POWER
- THE RADIO IS DESIGNED TO OPERATE ON THE FOLLOWING BANDS: FM, MW, AND LW
- CLEANING
- CLEANING THE RADIO
- PRESS THE SOUND BUTTON
- ABOUT THE TUNER
- USING THE TUNER
- TUNER WITH A DURATION OF MORE THAN 90 MINUTES
- USING THE AMPLIFIER
- REPLACING THE FUSE
- PRE-OPERATION
- LABELS
Brand : SONY
Model : XR-2753
Category : Car radio