NSR20C - TV INSIGNIA - Free user manual and instructions
Find the device manual for free NSR20C INSIGNIA in PDF.


User questions about NSR20C INSIGNIA
0 question about this device. Answer the ones you know or ask your own.
Ask a new question about this device
Download the instructions for your TV in PDF format for free! Find your manual NSR20C - INSIGNIA and take your electronic device back in hand. On this page are published all the documents necessary for the use of your device. NSR20C by INSIGNIA.
USER MANUAL NSR20C INSIGNIA
Insignia NS-R20C Round Tube TV
Contents
Introduction 1
Safety information ....1 Features ....2
eatures....2 Front....2
Back 3
Remote....3
Setting up your TV ....3 Installing remote control batteries ....3
Connecting an outside antenna or cable TV . . . 4
Connecting a standard video device .....4
Connecting an S-Video device ....5 Using your TV.
ising your TV ....5 Turning your TV on and off ....5
Selecting the TV signal source .....5
Memorizing channels 5
Deleting a memorized channel .....5
Changing channels ....5 Adjusting the picture ....5
Adjusting the picture ....5 Selecting the picture mode 6
Selecting the picture mode ....6 Adjusting the volume....6
Adjusting the sound....6
Selecting the sound mode. 6
Setting the sleep timer....6 Selecting the closed portion mode....2
Selecting the closed caption mode ....6 Selecting the OSD language ....6
Selecting the OSD language ....6 Setting up parental controls.
Setting up parental controls. 6 Using the on-screen display (OSD) 7
OSD menus. 7
Maintaining....8
Troubleshooting 8
Specifications. 8
Legal notices 9 00 Day Limited Warranty 11
90-Day Limited Warranty ....11 Francis 13
Français.... 13
Introduction
Congratulations on your purchase of a high-quality Insignia product. Your NS-R20C represents the state of the art in television design and is designed for reliable and trouble-free performance.

Safety information

CAUTION RISK OF ELECTRIC SHOCK DO NOT OPEN

Warning
To reduce the risk of electric shock, do not remove the cover or back. No user serviceable parts inside. Refer servicing to qualified service personnel.
To reduce the risk of fire or electric shock, do not expose your TV to rain or moisture.
Caution
To prevent electric shock, match the wide blade on the power cord plug to the wide slot on an electric outlet. If the plug does not fit, consult a licensed electrician to replace the obsolete outlet. Do not modify the power cord plug, or you will defeat this safety feature.

This symbol indicates that dangerous voltage constituting a risk of electric shock is present within your TV. This label is located on the back of your TV.

This symbol indicates that there are important operating and maintenance instructions in the literature accompanying your TV.

This symbol indicates that this product incorporates double insulation between hazardous mains voltage and user accessible parts. When servicing, use only identical replacement parts.
Important safety instructions
1 Read these instructions.
2 Keep these instructions.
3 Heed all warnings.
4 Follow all instructions.
5 Do not use this apparatus near water.
6 Clean only with a dry cloth.
7 Do not block any ventilation openings. Install in accordance with the manufacturer's instructions.
8 Do not install near any heat sources such as radiators, heat registers, stoves, or other apparatus (including amplifiers) that produce heat.
9 Do not defeat the safety purpose of the polarized or grounding-type plug. A polarized plug has two blades with one wider than the other. A grounding type plug has two blades and a third grounding prong. The wide blade or the third prong is provided for your safety. If the provided plug does not fit into your outlet, consult an electrician for replacement of the obsolete outlet.
INSIGNIA™
10 Protect the power cord from being walked on or pinched particularly at plugs, convenience receptacles, and the point where they exit from the apparatus.
11 Only use attachments or accessories specified by the manufacturer.
12 Use only with a cart, stand, tripod, bracket, or table specified by the manufacturer.
13 Unplug this apparatus during lightning storms or when unused for long periods of time.
14 Refer all servicing to qualified service personnel.
Servicing is required when the apparatus has been damaged in any way, such as the power-supply cord or plug is damaged, liquid has been spilled or objects have fallen into the apparatus, the apparatus has been exposed to rain or moisture, does not operate normally, or has been dropped.
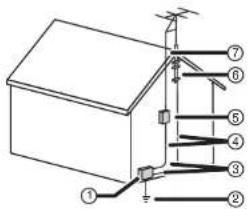
15 If an outside antenna or cable system is connected to your TV, make sure that the antenna or cable system is grounded to provide some protection against voltage surges and built-up static charges. Article 810 of the National Electrical Code, ANSI/NFPA No. 70, provides information with respect to correct grounding of the mast and supporting structure, grounding of the lead-in wire to an antenna discharge unit, size of grounding conductors, location of the antenna-discharge unit, connection to grounding electrodes, and requirements for the grounding electrode.
text_image
Technical diagram of a roof structure with numbered components and grounding symbols1 Electric service equipment
2 Power service grounding electrode system
3 Ground clamps
4 Grounding conductors
5 Antenna discharge unit
6 Grounding clamp
7 Antenna lead-in wire
Features
Front
text_image
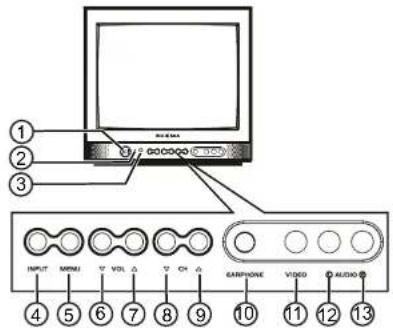
① ② ③ INPUT MIMEU VOL CH GARPHONE VIDEO AUDIO ④ ⑤ ⑥ ⑦ ⑧ ⑨ ⑩ ⑪ ⑫ ⑬ AUDIO| No. Component Description | |
| 1 Power button Press to turn your TV on or off. | |
| 2 Power indicator Turns red when your TV is in Standby mode. | |
| 3 Remote control sensor | Receives signals from the remote control. Do not block. |
| 4 INPUT Press to select the video input source. | |
| 5 MENU Press to open the on-screen display (OSD). | |
| 6 VOL ▽ | Press to decrease the volume. |
| 7 VOL △ | Press to increase the volume. |
| 8 CH ▽ | Press to change to a lower channel number. |
| 9 CH △ | Press to change to a higher channel number. |
| 10 EARPHONE Plug a set of headphones into this jack. | |
| 11 VIDEO Plug a video cable into this jack and into the VIDEO OUT jack on an external device. | |
| 12 AUDIO L Plug the left audio cable into this jack and into the left AUDIO OUT jack on an external device. | |
| 13 AUDIO R Plug the right audio cable into this jack and into the right AUDIO OUT jack on an external device. | |
Back
text_image
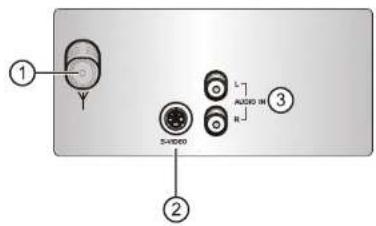
① SHAROD L AUDIO IN ③ ②| No. Jack Description | ||
| 1 Antenna Plug an outside antenna intothis jack. | ||
| 2 S-VIDEO Plug an S-Video cable intothis jack and into the jack onan S-Video device. | ||
| 3 AUDIO IN R/L Plug the left and right audiocables into these jacks andinto the left and right AUDIOOUT jacks on an externaldevice. | ||
Remote
text_image
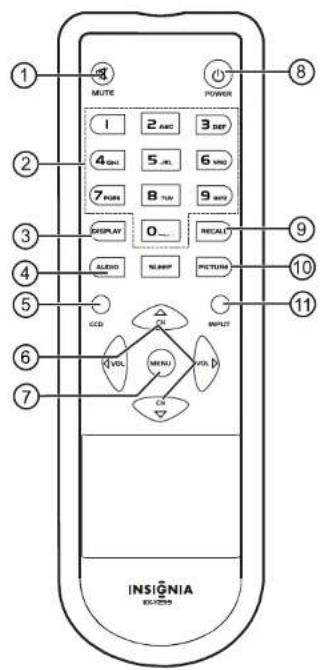
1 MUTE POWER 2 1 2 ANC 3 SRF 4 GHz 5 GHz 6 MHz 7 FLOW 8 TUN 9 MHz DISPLAY 0 ... RECAIT AUDIO RUNP PRETURN CCD INPUT VOL MINI MINI ON ON INSIGNIA RHOODS| No. Button Description | ||
| 1 MUTE Press to mute the sound. | ||
| Press again to restore the sound. | ||
| No. Button Description | ||
| 2 Number buttons Press to change the channel.To enter a two-digit channel number, press the two buttons within 1.5 seconds of each other. For example,to select channel 12, press 1 then press 2. The channel changes in about 1.5 seconds. If you press 0 before you press 1, the channel changes immediately. | ||
| 3 DISPLAY Press to display channel information. | ||
| 4 AUDIO Press to select the sound mode. Your can select STANDARD, NEWS, MUSIC, or MEMORY. You can set up your own sound mode settings and save them under the MEMORY mode. | ||
| 5 CCD Press to turn closed captioning on or off. | ||
| 6 CH △, CH ▽. VOL ▷, VOL ◀ | Press the channel buttons to change channels. Press the volume buttons to increase or decrease the volume. | |
| 7 MENU Press to open the on-screen display (OSD). | ||
| 8 POWER Press to turn your TV on or off. If your TV is in standby (power saving) mode, press to exit standby mode. | ||
| 9 RECALL Press to go to the previous channel you were watching. | ||
| 10 | PICTURE Press to select the picture mode. You can select STANDARD, DYNAMIC, MILD, or MEMORY. You can set up your own audio mode settings and save them under the MEMORY mode. | |
| 11 | INPUT | Press to select the video input source. |
Setting up your TV
Installing remote control batteries
To install remote control batteries:
1 Remove the battery cover.
2 Insert two AAA batteries into the battery compartment. Make sure that the + and - symbols on the battery match the + and - symbols inside the battery compartment.
3 Replace the battery cover.
Warning
Do not throw batteries into fire. Dispose of used batteries as hazardous waste.
Caulion
Do not drop or disassemble the remote control. Do not get the remote control wet.
Caution
When the remote control will not be used for a long period of time or when the batteries are word out, remove the batteries to prevent leakage.
Connecting an outside antenna or cable TV
text_image
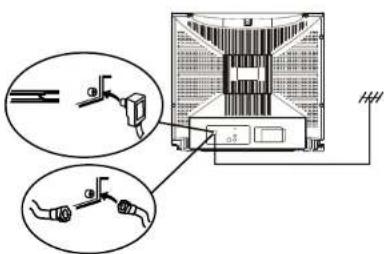
Technical diagram showing mechanical assembly with labeled components and detail viewsTo connect an antenna or cable TV:
1 Plug a 75-ohm cable into the antenna jack on the back of your TV.
2 Plug the other end of the cable into a cable TV or outside antenna source.
Note
If you use a 300-ohm flat cable, you need to connect a 300-to-75-ohm converter to the flat cable, then connect the converter to the antenna jack on the back of your TV. We recommend using a 75-ohm cable to reduce interference caused by radio waves.
Connecting a standard video device
text_image
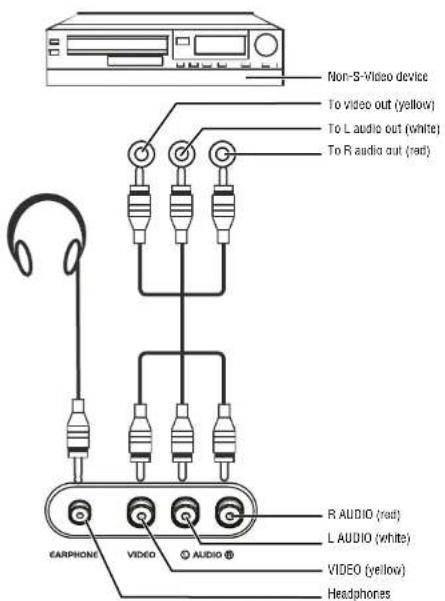
Non-S-Video device To video out (yellow) To L audio out (white) To R audio out (red) EARNHONE VIDEO AUDIO R AUDIO (red) L AUDIO (white) VIDEO (yellow) HeadphonesTo connect a standard video device:
1 Plug a video cable into the VIDEO jack on the front of your TV, then plug the other end of the video cable into the VIDEO OUT jack on the video device.
2 Plug the left and right audio cables into the AUDIO L and AUDIO R jacks on the front of your TV, then plug the other ends into the left and right AUDIO OUT jacks on the device.
Connecting an S-Video device
text_image
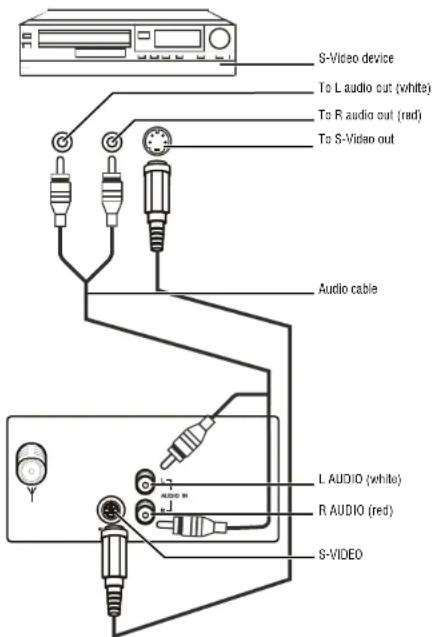
S-Video device To L audio out (white) To R audio out (red) To S-Video out Audio cable L AUDIO (white) R AUDIO (red) S-VIDEOTo connect an S-Video device:
1 Plug an S-Video cable into the S-VIDEO jack on the back of your TV, then plug the other end of the cable into the S-VIDEO OUT jack on the S-Video device.
2 Plug the left and right audio cables into the AUDIO L and AUDIO R jacks on the back of your TV, then plug the other ends into the left and right AUDIO OUT jacks on the device.
Using your TV
Turning your TV on and off
To turn your TV on and off:
1 Plug the power cord into a power outlet.
2 Press POWER.
Note
The power indicator turns off when your TV is active.
The power indicator turns red when your TV is in standby mode.
If your TV has a blue screen or a screen saver displayed, your TV goes into standby mode after five minutes.
Selecting the TV signal source
To select the TV signal source:
1 Press MENU. The on-screen display (OSD) opens.
2 Press MENU one or more times to highlight Tuning.
3 Press CH △ or CH ▽ to highlight SOURCE.
4 Press VOL ◀ or VOL ▷ on the remote control or VOL △ or VOL ▽ on the front of your TV to select AIR (outside antenna) or CABLE (cable TV).
Memorizing channels
When you memorize channels, your TV scans for available channels in your viewing area and stores the channel information in memory.
To memorize channels:
1 Press MENU. The on-screen display (OSD) opens.
2 Press MENU one or more times to highlight Tuning.
3 Press CH △ or CH ▽ to highlight AUTO SEARCH.
4 Press VOL ◀ or VOL ▷ on the remote control or VOL △ or VOL ▽ on the front of your TV to start scanning for channels. This process may take several minutes.
5 If you want to stop scanning, press MENU.
Deleting a memorized channel
If you to skip a channel when you use a channel buttons, you can delete the channel from memory.
To delete a memorized channel:
1 Tune to the channel you want to delete.
2 Press MENU. The on-screen display (OSD) opens.
3 Press MENU one or more times to highlight Tuning.
4 Press CH △ or CH ▽ to highlight DELETE CH.
5 Press VOL ◀ or VOL ▷ on the remote control or VOL △ or VOL ▽ on the front of your TV to select YES.
Changing channels
To change channels:
- Press CH △ or CH ▽. Or, press the number buttons to enter the channel number. For example, to select channel 12, press 1 then press 2. The channel changes in about 1.5 seconds. If you press 0 before you press 1, the channel changes immediately.
Adjusting the picture
To adjust the picture:
1 Press MENU. The on-screen display (OSD) opens.
2 Press MENU one or more times to highlight Picture.
3 Press CH △ or CH ▽ to highlight the option you want to adjust. You can select BRIGHTNESS, CONTRAST, COLOR, SHARPNESS, TINT, or COLOR TEMP.
INSIGNIA™
Insignia NS-R20C Round Tube TV
4 Press VOL ◀ or VOL ▷ on the remote control or VOL △ or VOL ▽ on the front of your TV to adjust the option.
Selecting the picture mode
To select the picture mode:
- Press PICTURE one or more times to select the picture mode you want. You can select STANDARD, DYNAMIC, MILD, or MEMORY. You can set up your own audio mode settings and save them under the MEMORY mode.
Adjusting the volume
To adjust the volume:
- Press VOL ◀ or VOL ▷ on the remote control or VOL △ or VOL ▽ on the front of your TV.
Adjusting the sound
To adjust the sound:
1 Press MENU. The on-screen display (OSD) opens.
2 Press MENU one or more times to highlight Sound.
3 Press CH △ or CH ▽ to highlight the option you want to adjust. You can select VOLUME, TREBLE, BASS, BALANCE, SURROUND, or STEREO.
4 Press VOL ◀ or VOL ▷ on the remote control or VOL △ or VOL ▽ on the front of your TV to adjust the option.
Selecting the sound mode
To select the sound mode:
- Press AUDIO one or more times to select the sound mode. Your can select STANDARD, NEWS, MUSIC, or MEMORY. You can set up your own sound mode settings and save them under the MEMORY mode.
Setting the sleep timer
To set the sleep timer:
- Press SLEEP one or more times to select the amount of time you want your TV to wait before it automatically turns off. You can select 30, 60, 90, or 120 minutes.
Selecting the closed caption mode
To select the closed caption mode:
1 Press MENU. The on-screen display (OSD) opens.
2 Press MENU one or more times to highlight Function.
3 Press CH △ or CH ▽ to highlight the CCD.
4 Press VOL ◀ or VOL ▷ on the remote control or VOL △ or VOL ▽ on the front of your TV to select a closed caption mode. You can select:
- OFF-Turns off closed captions.
- CC1—Displays captions in the primary language for a TV program.
- CC2-Displays captions in a secondary language for a TV program.
- CC3–Displays information provided by the broadcaster.
- CC4-Displays information provided by the broadcaster.
- T1—Displays information such as a program guide. This option covers a large portion of the screen.
- T2–Display information provided by the broadcaster. This option covers a large portion of the screen.
- T3—Display information provided by the broadcaster. This option covers a large portion of the screen.
- T4—Display information provided by the broadcaster. This option covers a large portion of the screen.
Selecting the OSD language
To select the OSD language:
1 Press MENU. The on-screen display (OSD) opens.
2 Press MENU one or more times to highlight Function.
3 Press CH △ or CH ▽ to highlight LANGUAGE.
4 Press VOL ◀ or VOL ▷ on the remote control or VOL △ or VOL ▽ on the front of your TV to select a language. You can select ENGLISH, FRENCH, or SPANISH.
Setting up parental controls
To set up parental controls:
1 Press MENU. The on-screen display (OSD) opens.
2 Press MENU one or more times to highlight Function.
3 Press CH △ or CH ▽ to highlight V-CHIP.
4 Press VOL ▷ on the remote control or VOL □ on the front of your TV.
5 Press the number buttons to enter the password. The default password is 0358.
6 Press CH △ or CH ▽ to select MPAA, then press VOL ◀ or VOL ▷ on the remote control to select the MPAA rating you want to block. The rating you select and all higher ratings are blocked. You can select:
- N/R-Not rated.
- G-General. Appropriate for all children.
• PG–Parental guidance suggested
- PG-13–Content may not be appropriate for children under 13.
- R-Restricted. Content may not be appropriate for children under 17 without parental guidance.
- NC-17-Content is not appropriate for children under 16.
- X–Adults only.
7 Press CH △ or CH ▽ to select TVPG SETTING, then press VOL ◀ or VOL ▷ on the remote control to open the TVPG SETTING sub-menu.
8 Press CH △ or CH ▽ to select the rating you want to block. The rating you select and all higher ratings are blocked. You can select:
• TV-Y-All children.
• TV-Y7-Children 7 and over.
• TV-G-General audiences.
• TV-PG-Parental guidance suggested.
• TV-14—Parental guidance strongly suggested.
• TV-MA-Mature audiences.
9 Press CH △ or CH ▽ to select CONTENT, then press VOL or VOL on the remote control to block TV programs with certain types of content. (CONTENT items are only available when CONTENT is turned on). You can select:
• D-Sexually explicit dialog.
• FV–Fantasy violence.
• L—Adult language.
• S—Sexual situations
• V-Violence.
Tip To return to a previous menu, select
Using the on-screen display (OSD)
Your TV has an OSD that lets you adjust setting for your TV.
To use the OSD:
1 Press MENU. The OSD opens.
2 Press MENU one or more times to select an OSD menu.
3 Press CH △ or CH ▽ to select a menu option.
4 Press VOL ◀ or VOL ▷ on the remote control or VOL △ or VOL ▽ on the front of your TV to adjust the option.
OSD menus
Picture menu
| 01 | |
| PICTURE | |
| ★ BRIGHTNESS | 14 |
| CONTRAST | 48 |
| COLOR | 52 |
| SHARPNESS | 29 |
| TINT | 00 |
| COLOR TEMP NORMAL | |
- BRIGHTNESS—Increase the brightness to add more light to dark areas of the picture, or decrease the brightness to add more dark to light areas of the picture.
- CONTRAST—Increase the contrast to adjust the white areas of the picture, or decrease the contrast to adjust the black areas of the picture.
• COLOR—Adjust the overall color of the picture.
- SHARPNESS—Increase the sharpness to show cleaner, clearer images, or decrease the sharpness to show a smoother picture.
- TINT—Increase the tint (color level) to add more green to skin tones, or decrease the tint to add more red to skin tones.
- COLOR TEMP—Select a preset color temperature. You can select NORMAL, WARM, or COLD.
Sound menu
| 01 | |
| SOUND | |
| VOLUME | 63 |
| TREBLE | 32 |
| BASS | 32 |
| BALANCE | 00 |
| SURROUND | ON |
| STEREO | PSEU |
• VOLUME—Increase or decrease the volume.
- TREBLE-Adjust the treble.
• BASS-Adjust the bass.
- BALANCE—Adjust the balance between the right and left speakers.
- SURROUND-Turn surround sound on or off.
- STEREO—Select the sound type. You can select NORMAL, ENHANCED, or MONO.
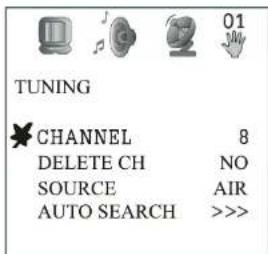
Tuning menu
text_image
TUNING CHANNEL 8 DELETE CH NO SOURCE AIR AUTO SEARCH >>>- CHANNEL—Select the TV channel. Press the volume buttons or the number buttons to select a channel.
- DELETE CH-Delete the currently selected channel from memory. When you use the channel buttons to select a channel, the channel you deleted will be skipped. You can still use the number buttons to select the channel.
- SOURCE—Select the TV signal source. You can select AIR for an antenna signal or CABLE for cable TV.
- AUTO SEARCH-Scan for available channels and store the channel information in memory.
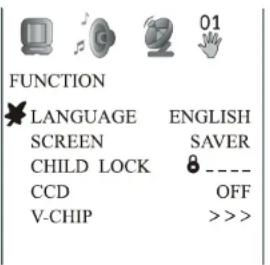
Function menu
text_image
FUNCTION LANGUAGE ENGLISH SCREEN SAVER CHILD LOCK 8 ---- CCD OFF V-CHIP >>>- LANGUAGE—Select the OSD language.
- SCREEN—Select the screen background when your TV is on but not receiving a signal. You can select OFF, BLUE BACK, or SAVER.
- CHILD LOCK-Turn the parental locks on or off. You must enter a four-digit password to change this option. The default password is MUTE+999.
- CCD—Select the closed captioning mode. You can select OFF, C1, C2, C3, T1, T2, T3, or T4.
- V-CHIP-Block or unblock TV programs. For more information, see "Setting up parental controls" on page 6.
Maintaining
- Unplug your TV from the power outlet before cleaning.
- Do not use liquid or aerosol cleaners.
- Do not spray water directly on the screen or exterior.
- Wipe the exterior with a soft cloth dampened with water.
Troubleshooting
| Problem Solution | |
| Picture has snow and sound is not clear. | Make sure that the outside antenna is connected correctly.Reposition the outside antenna. |
| Picture has a double or triple image, but sound is clear. | Connect your TV to an outside antenna.Make sure that you are using good quality cables.Reposition the outside antenna. |
| Picture has lines (waves) and sound is distorted. | Your TV may be experiencing electrical interference from cars, motorcycles, fluorescent lamps, or other appliances.Try moving your TV to a different location or plugging your TV into a different outlet that is on a different circuit from other appliances. |
| No sound. Make sure that the volume is turned up and that the sound is not muted. | |
| Problem Solution | |
| No picture and no sound. | Make sure that the power cord is plugged into a working power outlet.Make sure that your TV is turned on.Adjust the brightness and contrast settings.Make sure that the volume is turned up and that the sound is not muted. |
| Picture has no color. • Adjust the color controls. | |
| Picture is scrambled. • Change the channel. | |
| Picture has spots. Color can be affected by moving your TV, turning on appliances like a vacuum cleaner, or placing magnets too close to your TV.Turn off your TV using the POWER button on the front of your TV (not on the remote control). Leave your TV off for at least 15 minutes, then turn it back on.If the picture still has spots, turn off your TV using the POWER button on the front of your TV (not on the remote control). Leave your TV off overnight. | |
Specifications
| Receiving system TV: NTSC | |
| AV: NTSC:3.58 60 Hz | |
| Functions Front A/V | S-VideoHeadphoneCCDV-ChipParental lockAV stereo |
| Sound output 2 W × 2 | |
| Power supply 120 VAC | |
| Power consumption 75 W | |
| Remote control batteries | 1.5 V × 2 |
| Dimensions(W × D × H) | 19.7 × 18.7 × 17.9 inches(50.0 × 47.5 × 45.5 cm) |
| Weight | 45.1 lbs. (20.5 kg) |
Legal notices
FCC statement
Class B digital device
This equipment has been tested and found to comply with the limits for a Class B digital device, pursuant to part 15 of the FCC rules. These limits are designed to provide reasonable protection against harmful interference when the equipment is operated in a residential environment. This equipment generates, uses, and can radiate radio frequency energy and, if not installed and used in accordance with the instructions in this manual, may cause harmful interference to radio communications.
FCC warning
Pursuant to 47CFR, Part 15.21 of the FCC rules, any changes or modifications not expressly approved by the manufacturer could cause harmful interference and would void the user's authority to operate this device.
Caution
This is a CLASS B product. In a domestic environment this product may cause radio interference, in which case the user may be required to take adequate measures to counter interference.
Copyright
© 2007 Insignia. Insignia and the Insignia logo are trademarks of Best Buy Enterprise Services, Inc. Other brands and product names are trademarks or registered trademarks of their respective holders. Specifications and features are subject to change without notice or obligation. For service and support call (877) 467-4289.
90-Day Limited Warranty
Insignia Products ("Insignia") warrants to you, the original purchaser of this new NS-R20C ("Product"), that the Product shall be free of defects in the original manufacture of the material or workmanship for a period of 90 days from the date of your purchase of the Product ("Warranty Period"). This Product must be purchased from an authorized dealer of Insignia brand products and packaged with this warranty statement. This warranty does not cover refurbished Product. If you notify Insignia during the Warranty Period of a defect covered by this warranty that requires service, terms of this warranty apply.
How long does the coverage last?
The Warranty Period lasts for 90 days from the date you purchased the Product. The purchase date is printed on the receipt you received with the Product.
What does this warranty cover?
During the Warranty Period, if the original manufacture of the material or workmanship of the Product is determined to be defective by an authorized Insignia repair center or store personnel, Insignia will (at its sole option): (1) repair the Product with new or rebuilt parts; or (2) replace the Product at no charge with new or rebuilt comparable products or parts. Products and parts replaced under this warranty become the property of Insignia and are not returned to you. If service of Products or parts are required after the Warranty Period expires, you must pay all labor and parts charges. This warranty lasts as long as you own your Insignia Product during the Warranty Period. Warranty coverage terminates if you sell or otherwise transfer the Product.
How to obtain warranty service?
If you purchased the Product at a retail store location, take your original receipt and the Product to the store you purchased it from. Make sure that you place the Product in its original packaging or packaging that provides the same amount of protection as the original packaging. If you purchased the Product from an online web site, mail your original receipt and the Product to the address listed on the web site. Make sure that you put the Product in its original packaging or packaging that provides the same amount of protection as the original packaging.
To obtain in-home warranty service for a television with a screen 25 inches or larger, call 1-888-BESTBUY. Call agents will diagnose and correct the issue over the phone or will have an Insignia-approved repair person dispatched to your home.
Where is the warranty valid?
This warranty is valid only to the original purchaser of the product in the United States and Canada.
What does the warranty not cover?
This warranty does not cover:
- Customer instruction
- Installation
- Set up adjustments
- Cosmetic damage
• Damage due to acts of God, such as lightning strikes
- Accident
- Misuse
• Abuse
- Negligence
- Commercial use
- Modification of any part of the Product, including the antenna
- Plasma display panel damaged by static (non-moving) images applied for lengthy periods (burn-in).
This warranty also does not cover
• Damage due to incorrect operation or maintenance
- Connection to an incorrect voltage supply
- Attempted repair by anyone other than a facility authorized by Insignia to service the Product
- Products sold as is or with all faults
- Consumables, such as fuses or batteries
- Products where the factory applied serial number has been altered or removed
REPAIR REPLACEMENT AS PROVIDED UNDER THIS WARRANTY IS YOUR EXCLUSIVE REMEDY. INSIGNIA SHALL NOT BE LIABLE FOR ANY INCIDENTAL OR CONSEQUENTIAL DAMAGES FOR THE BREACH OF ANY EXPRESS OR IMPLIED WARRANTY ON THIS PRODUCT, INCLUDING, BUT NOT LIMITED TO, LOST DATA, LOSS OF USE OF YOUR PRODUCT, LOST BUSINESS OR LOST PROFITS. INSIGNIA PRODUCTS MAKES NO OTHER EXPRESS WARRANTIES WITH RESPECT TO THE PRODUCT, ALL EXPRESS AND IMPLIED WARRANTIES FOR THE PRODUCT, INCLUDING, BUT NOT LIMITED TO, ANY IMPLIED WARRANTIES OF AND CONDITIONS OF MERCHANTABILITY AND FITNESS FOR A PARTICULAR PURPOSE, ARE LIMITED IN DURATION TO THE WARRANTY PERIOD SET FORTH ABOVE AND NO WARRANTIES, WHETHER EXPRESS OR IMPLIED, WILL APPLY AFTER THE WARRANTY PERIOD. SOME STATES, PROVINCES AND JURISDICTIONS DO NOT ALLOW LIMITATIONS ON HOW LONG AN IMPLIED WARRANTY LASTS, SO THE ABOVE LIMITATION MAY NOT APPLY TO YOU. THIS WARRANTY GIVES YOU SPECIFIC LEGAL RIGHTS, AND YOU MAY ALSO HAVE OTHER RIGHTS, WHICH VARY FROM STATE TO STATE OR PROVINCE TO PROVINCE.
Contact Insignia:
For customer service please call 1-877-467-4289
www.insignia-products.com
INSIGNIA™ is a trademark of Best Buy Enterprise Services, Inc.
Distributed by Best Buy Purchasing, LLC.
Insignia, 7601 Penn Avenue South, Richfield, Minnesota, U.S.A.
television cablee 16
OSD menus (Menus OSD) .....20
Entretien. 21
text_image
Technical diagram of a house with numbered components and wiring connectionstext_image
Technical diagram showing mechanical assembly with labeled parts and magnified views of componentsOSD menus (Menus OSD)
Menu Picture (Image)
| 01 | |
| PICTURE | |
| ★ BRIGHTNESS | 14 |
| CONTRAST | 48 |
| COLOR | 52 |
| SHARPNESS | 29 |
| TINT | 00 |
| COLOR TEMP NORMAL | |
LA RÉPARATION OU LE REMPLACEMENT, TELS
QU'OFFERTS PAR LA PRESENTE GARANTIE, CONSTITUENT LE SEUL RECOURS DE L'ACHETEUR. INSIGNIA NE SAURAIT ÊTRE TENU POUR
RESPONSABLE DE DOMMAGES ACCESSOIRES OU CONSECUTIFS, RÉSULTANT DE L'INEXÉCUTION D'UNE GARANTIE EXPRESSE OU IMPLICITE SUR CE PRODUIT, Y COMPRIS, SANS S'Y LIMITER, LA PERTE DE
DONNÉES, L'IMPOSSIBILITÉ D'UTILISER LE PRODUIT, L'INTERRUPTION D'ACTIVITÉ OU LA PERTE DE PROFITS. INSIGNIA PRODUCTS N'OCTROIE AUCUNE AUTRE GARANTIE EXPRESSE RELATIVE A CE
PRODUIT; TOUTES LES GARANTIES EXPRESSES OU IMPLICITES POUR CE PRODUIT, Y COMPRIS MAIS SANS LIMITATION, TOUTE GARANTIE DE QUALITE
SANS LIMITATION, ROUTE GARANTIE DE QUALITÉ MARCHANDE, D'ADÉQUATION À UN BUT PARTICULIER, SONT LIMITEES À LA PERIODE DE GARANTIE
APPLICABLE TELLE QUE DÉCRITE CI-DESSUS ET AUCUNE GARANTIE EXPRESSE OU IMPLICITE NE S'APPLIQUERA APRÈS LA PÉRIODE DE GARANTIE
CERTAINS ÉTATS ET PROVINCES NE RECONNAISSENT PAS LES LIMITATIONS DE LA DURÉE DE VALIDITE DES GARANTIES IMPLICITES, PAR CONSEQUENT, LES
GARANTIES IMPLICATIONS, PAR CONSEQUENT, LES LIMITATIONS SUSMENTIONNÉES PEUVENT NE PAS S'APPLIQUER À L'ACHETEUR ORIGINAL. LA PRÉSENTE GARANTIE DONNE À L'ACHETEUR DES GARANTIES JURIDIQUES SPÉCIFIQUES: IL PEUT AUSSI
BÉNÉFICIER D'AUTRES GARANTIES QUI VARIENT D'UN ÉTAT OU D'UNE PROVINCE À L'AUTRE.
Pour contacter Insignia
Insignia, 7601 Penn Avenue South, Richfield, Minnesota, U.S.A.
INSIGNIA®
Distributed by Insignia® Products
7601 Penn Avenue South
Richfield, MN USA 55423-3645
www.Insignia-Products.com
© 2007 Insignia® Products
All rights reserved. All other products and brand names are trademarks of their respective owners.