
RS25J500DWW - Fridge SAMSUNG - Free user manual and instructions
Find the device manual for free RS25J500DWW SAMSUNG in PDF.

| Product Type | French Door Refrigerator |
| Brand | Samsung |
| Model | RS25J500DWW |
| Dimensions (W x D x H) | 908 x 864 x 1740 mm (35 3/4 x 34 x 68 1/2 in) |
| Total Height (with hinges) | 1776 mm (70 in) |
| Power Supply | 115-120 V AC, 10 A minimum |
| Refrigerant | R600a or R134a (check label) |
| Ice Maker Capacity | Water pressure required: 20 to 125 psi (138 to 862 kPa) |
| Dispenser | Cold water, cubed ice, and crushed ice |
| Main Features | Power Freeze, Power Cool, Energy Saver, Control Lock, child lock, water filter, LED lighting, auto defrost |
| Temperature Settings | Independent freezer and refrigerator with digital display |
| Water Filter | Replacement recommended every 6 months or 300 gallons |
| Cleaning | Use a soft cloth with mild detergent and warm water. Do not use abrasive products, benzene, thinner, or car cleaner. |
| Door Gasket Care | Clean regularly with a mild detergent and a damp cloth, then dry. |
| Safety | Grounding required, do not use an inappropriate extension cord, do not store flammable substances, risk of child entrapment (remove doors before disposal) |
| Warranty | 1 year labor and parts, 10 years inverter compressor (parts only) |
| Customer Service | 1-800-SAMSUNG (726-7864) in Canada |
Frequently Asked Questions - RS25J500DWW SAMSUNG
User questions about RS25J500DWW SAMSUNG
0 question about this device. Answer the ones you know or ask your own.
Ask a new question about this device
Download the instructions for your Fridge in PDF format for free! Find your manual RS25J500DWW - SAMSUNG and take your electronic device back in hand. On this page are published all the documents necessary for the use of your device. RS25J500DWW by SAMSUNG.
USER MANUAL RS25J500DWW SAMSUNG
Free Standing Appliance
Contents
Safety information 3
Important safety symbols and precautions 4
Critical installation warnings 5
Installation cautions 8
Critical usage warnings 9
Usage cautions 13
Cleaning cautions 16
Critical disposal warnings 17
Additional tips for proper usage 18
Setting up 19
Getting ready to install the refrigerator 19
Setting up the refrigerator 22
Removing the refrigerator doors 24
Leveling the refrigerator 29
Making minor adjustments between doors 30
31
Completing the set up 35
36
36
Using the control panel 38
Using the ice and cold water dispenser 41
43
Removing the freezer/fridge accessories 45
Cleaning the refrigerator 46
Changing the water filter 48
Troubleshooting 54
2 English
Safety information
- Before using your new Samsung Refrigerator, please read this manual thoroughly to ensure that you know how to operate the features and functions that your new appliance offers safely and efficiently.
- This appliance is not intended for use by persons (including children) with reduced physical, sensory or mental capabilities, or lack of experience and knowledge, unless they have been given supervision or instruction concerning use of the appliance by a person responsible for their safety. Children should be supervised to ensure that they do not play with the appliance.
- Because the following instructions cover various models, the characteristics of your refrigerator may differ slightly from the refrigerator described in this manual.
- If you have any question, contact us at 1-800-SAMSUNG or find help and information online at www.samsung.com.
- R-600a or R-134a is used as a refrigerant. Check the compressor label on the rear of the appliance or the rating label inside the fridge to see which refrigerant is used for your refrigerator. If this product contains flammable gas (Refrigerant R-600a), contact your local authority in regard to safe disposal of this product.
- It is hazardous for anyone other than an Authorized Service Person to service this appliance.
Warning; Risk of fire / flammable materials
Safety information
Important safety symbols and precautions
WARNING
Hazards or unsafe practices that may result in severe personal injury or death.
CAUTION
Hazards or unsafe practices that may result in minor personal injury or property damage.
NOTE
Do NOT attempt.
Do NOT disassemble.
Do NOT touch.
Follow directions carefully.
Unplug the power plug from the wall socket.
Make sure the machine is grounded to prevent electric shock.
Call the contact center for help.
These warning signs are here to prevent injury to you and others. Please follow them carefully.
After reading this section, keep it in a safe place for future reference.
STATE OF CALIFORNIA PROPOSITION 65 WARNING (US ONLY)
WARNING
Cancer and Reproductive Harm - www.P65Warnings.ca.gov.
4 English
Critical installation warnings

WARNING

-
Do not install the refrigerator in a damp location or place where it may come in contact with water.
-
Deteriorated insulation on electrical parts may cause an electric shock or fire.
- Do not place this refrigerator in direct sunlight or expose it to the heat from stoves, room heaters, or other appliances.
- Do not plug several appliances into the same multiple power strip. The refrigerator should always be plugged into its own individual electrical outlet which has a voltage rating that matches the voltage listed on the refrigerator's rating plate.
- This provides the best performance and also prevents overloading house wiring circuits, which could cause a fire hazard from overheated wires.
- If the wall socket is loose, do not insert the power plug.
- There is a risk of electric shock of fire.
- Do not use a cord that shows cracks or abrasion damage along its length or at either end.
- Do not bend the power cord excessively or place heavy articles on it.
- Do not twist or tie the power cord.
- Do not hook the power cord over a metal object, place a heavy object on the power cord, insert the power cord between objects, or push the power cord into the space behind the appliance.
- When moving the refrigerator, be careful not to roll over or damage the power cord
- This may result in an electric shock or fire.
- Never unplug your refrigerator by pulling on the power cord.
Always grip the plug firmly and pull straight out from the outlet.
- Damage to the cord may cause a short-circuit, fire, and or electric shock.
- Do not use aerosols near the refrigerator.
- Using aerosols near the refrigerator may cause an explosion or fire.
- Do not install this appliance near a heater or inflammable material.
Safety information
- Do not install this appliance in a humid, oily or dusty location, in a location exposed to direct sunlight and water (rain drops).
- Do not install this appliance in a location where gas may leak.
- This may result in an electric shock or fire.

- This refrigerator must be properly located and installed in accordance with the instructions in this manual before you use it.
- Connect the power plug in the proper position with the cord hanging down.
- If you connect the power plug upside down, the wire can get cut off and cause a fire or electric shock.
- When moving the refrigerator, be careful not to roll over or damage the power cord.
- This constitutes a fire hazard.
- Make sure that the power plug is not squashed or damaged by the back of the refrigerator.
- Keep the packing materials out of reach of children.
- There is a risk of death from suffocation if a child puts the packing materials on his or her head.
- The appliance must be positioned so that the plug is accessible after installation.
- Failing to do so may result in an electric shock or fire due to electric leakage.
- You need to remove all the protective plastic film before you initially plug the product in.
The refrigerator must be safely grounded.
- Always make sure that you have grounded the refrigerator before attempting to investigate or repair any part of the appliance. Power leakages can cause severe electric shock.
- Never use gas pipes, telephone lines, or other potential lightning attractors as an electrical ground.
- Improper use of the grounding plug can result in a risk of electric shock. If it is necessary to use an extension cord, use only a 3-wire extension cord that has a 3-blade grounding plug and a 3-slot receptacle that will accept the plug on the appliance. The marked rating of the extension cord should be AC115-120 V, 10 A, or more.
If a grounding adapter is used, make sure the receptacle box is fully grounded.
- Plug the power plug into the wall socket firmly. Do not use a damaged power plug, damaged power cord or loose wall socket.
- This may result in an electric shock or fire.

- If the power cord is damaged, have it replaced immediately by the manufacturer or one of its service agent.
- The wall socket must be easily accessible so that the appliance can be quickly disconnected from the wall socket in an emergency.
- It must be outside the area of the rear of the appliance.
- When positioning the appliance, ensure the power cord is not trapped or damaged.
- Do not locate multiple portable socket-outlets or portable power supplies at the rear of the appliance.
- Keep ventilation openings, in the appliance enclosure or in the built-in structure, clear of obstruction.
- Connect to potable water supply only.
- Do not store explosive substances such as aerosol cans with a flammable propellant in this appliance.
Safety information
Installation cautions
CAUTION
-
Allow sufficient space around the refrigerator and install it on a flat surface.
-
Keep the ventilation space in the appliance enclosure or mounting structure clear of obstructions.
- Allow the appliance to stand for 2 hours before loading foods after installation and turning on.
- We strongly recommend you use a qualified technician or service company to install the refrigerator.
- Failing to do so may result in an electric shock, fire, explosion, problems with the product, or injury.
Critical usage warnings

WARNING
- Do not insert the power plug into a wall socket with wet hands.
- Do not store articles on the top of the appliance.
- When you open or close the door, the articles may fall and cause personal injury and/or material damage.
- Do not insert hands, feet or metal objects (such as knives, etc.) into the bottom or the back of the refrigerator.
- This may result in an electric shock or injury.
- Any sharp edges may cause a personal injury
- Do not put a container filled with water on the refrigerator.
- If spilled, there is a risk of fire or electric shock.
- Children should be supervised to ensure that they do not play with the appliance.
- Keep fingers out of "pinch point" areas. Clearances between the doors and cabinet are necessarily small. Be careful when you open the doors when children are in the area.
- Do not let children hang on the door. A serious injury may occur.
- Do not let children go inside the refrigerator. Children could become trapped.
- Do not insert your hands into the bottom area under the appliance.
- Any sharp edges may cause personal injury.
- Do not let children step on a drawer cover.
- The drawer may break and cause them to slip.
- Do not overfill the refrigerator with food.
- When you open the door, an item may fall out and cause personal injury or material damage.
- Do not touch the inside walls of the freezer or products stored in the freezer with wet hands.
- This may cause frostbite.
- Never put fingers or other objects into the water dispenser hole, ice chute, or ice maker bucket.
Safety information
- It may cause personal injury or material damage.
- Do not use or place any substances sensitive to temperature such as inflammable sprays, inflammable objects, dry ice, medicine, or chemicals near or inside of the refrigerator.
- Do not keep volatile or inflammable objects or substances (benzene, thinner, propane gas, alcohol, ether, LP gas and other such products etc.) in the refrigerator.
- This refrigerator is for storing food only.
- This may result in fire or explosion.
- Do not store pharmaceutical products, scientific materials, or temperature sensitive products in the refrigerator.
- Products that require strict temperature controls must not be stored in the refrigerator.
- Do not place or use an electrical appliance inside the refrigerator, unless it is of a type recommended by the manufacturer.
- Do not stand on top of the appliance or place objects (such as laundry, lighted candles, lighted cigarettes, dishes, chemicals, metal objects, etc.) on the appliance.
This may result in an electric shock, fire, problems with the product, or injury.
Do not put a container filled with water on the appliance.
-
If spilled, there is a risk of fire or electric shock.
-
Do not use mechanical devices or any other means to accelerate the defrosting process, other than those recommended by the manufacturer.
- Do not damage the refrigerant circuit.
- Do not spray volatile material such as insecticide onto the surface of the appliance.
- As well as being harmful to humans, it may also result in an electric shock, fire or problems with the product.
- Never stare directly at the UV LED lamp for long periods of time.
- This may result in eye strain due to the ultraviolet rays.
10 English

-
Do not attempt to repair, disassemble, or modify the appliance yourself.
-
Do not use any fuse (such as cooper, steel wire, etc.) other than the standard fuse.
-
If your appliance needs to be repaired or reinstalled, contact your nearest service center.
-
Failing to do so may result in an electric shock, fire, problems with the product, or injury.
-
If the interior or exterior LED lamp has gone out, please contact your nearest service center.

- Children should be supervised to ensure that they do not play with the appliance.
- Keep fingers out of "pinch point" areas : clearances between the doors and cabinet are necessarily small.
Be careful when you open the doors when children are in the area. Do not let children hang on the door. If not, a serious injury may occur. Risk of children entrapment. Do not let children enter inside the refrigerator. - Bottles should be stored tightly together so that they do not fall out.
- This product is intended only for the storage of food in a domestic environment
- If a gas leak is detected, avoid any naked flames or potential sources of ignition and air the room in which the appliance is standing for several minutes.
- Do not touch the appliance or power cord.
- Do not use a ventilating fan.
- A spark may result in explosion or fire.
- Use only the LED Lamps provided by the manufacturer or its service agents.
Safety information
-
If the refrigerator emits a burning smell or smoke, unplug the refrigerator immediately and contact your Samsung Electronics service center.
-
If you experience difficulty changing a non-LED light, contact a Samsung service energy.
- If the product is equipped with LED Lamps, do not disassemble the Lamp Covers and LED Lamps yourself.
- Please contact your service agents.
- If dust or water enters the refrigerator, unplug the refrigerator and contact your Samsung Electronics service center.
- Otherwise there is a risk of fire.
Usage cautions

CAUTION
- Do not re-freeze frozen foods that have thawed completely.
- Do not place carbonated or fizzy drinks in the freezer compartment.
-
Do not put bottles or glass containers in the freezer.
-
When the contents freeze, the glass may break and cause personal injury.
- Use only the ice maker provided with the refrigerator.
- Have the refrigerator's water supply connected only to a potable water supply. To operate the ice maker properly, water pressure of 20 125 psi ( 138 862 kPa ) is required.
If you will be away from home for a long period of time (on vacation, for example) and won't be using the water or ice dispensers, close the water valve.
- Otherwise, water leakage may occur.
- If you won't be using the refrigerator for a very long period of time, (3 weeks or more) empty the refrigerator including ice bucket, unplug it, close the water valve, wipe excess moisture from the inside walls, and leave the doors open to prevent odors and mold.
12 English

-
Service Warranty and Modification.
-
Any changes or modifications performed by a 3rd party on this finished appliance are not covered under Samsung warranty service, nor is Samsung responsible for safety issues that result from 3rd party modifications.
- Do not block the air vents inside the refrigerator.
- If the air vents are blocked, especially with a plastic bag, the refrigerator can be over cooled. If this cooling period lasts too long, the water filter may break and cause water leakage.
- If the refrigerator is disconnected from the power supply, you should wait for at least five minutes before plugging it back in.
- If you have a long vacation planned or do not intend to use the refrigerator for a long period of time, empty the refrigerator including ice bucket, pull out the power plug, wipe excess moisture from the inside walls, and leave the doors open to prevent odors and mold.
- To get the best performance from the product:
- Do not place food too close to the vents at the rear of the appliance as it can obstruct free air circulation in the refrigerator compartment.
- Wrap food up properly or place it in airtight containers before putting it into the refrigerator.
- Do not place glass or bottles or carbonated beverages into the freezer. The container may freeze and break, and this may result in injury.
- Please observe maximum storage times and expiration dates of frozen goods.
- There is no need to disconnect the refrigerator from the power supply if you will be away for less than three weeks. However, if you will be away for more than three weeks, remove all the food and ice in the ice bucket, unplug the refrigerator, close the water valve, wipe excess moisture from the inside walls, and leave the doors open to prevent odors and mold.
- Fill the water tank, ice tray and water cubes only with potable water (mineral water or purified water).
- Do not fill the tank with tea or a Sports drink. This may damage the refrigerator.
Safety information
- Do not apply strong shock or excessive force onto the surface of glass.
- Broken glass may result in a personal injury and/or property damage.

-
If the product is flooded, make sure to contact your nearest service center.
-
There is a risk of electric shock or fire.
- Do not keep vegetable oil in your refrigerator's door bins. The oil can solidify, making it foul-tasting and difficult to use. In addition, the open container can leak and the leaked oil can cause the door bin to crack. After opening an oil container, it is best to keep the container in a cool and shaded place such as a cupboard or pantry.
- Examples of vegetable oil: olive oil, corn oil, grape-seed oil, etc.
14 English
Cleaning cautions

CAUTION
-
Do not directly spray water on the inside or outside the refrigerator.
-
There is a risk of fire or electric shock.
-
Do not use a hair dryer to dry the inside of the refrigerator. Do not place a lighted candle in the refrigerator to remove bad odors.
-
This may result in an electric shock or fire.

-
Remove any foreign matter or dust from the power plug pins. Do not use a wet or damp cloth when cleaning the plug.
-
Otherwise, there is a risk of fire or electric shock.

-
Before cleaning or performing maintenance, unplug the appliance from the wall socket.
-
Failing to do so may result in an electric shock or fire.
- Use a clean sponge or soft cloth and a mild detergent in warm water to clean the refrigerator.
- Do not use abrasive or harsh cleansers such as window sprays, scouring cleansers, flammable fluids, muriatic acid, cleaning waxes, concentrated detergents, bleaches, or cleansers containing petroleum products on exterior surfaces (doors and cabinet), plastic parts, door and interior liners, and gaskets.
- These can scratch or damage the material.
- Do not clean glass shelves or covers with warm water when they are cold. Glass shelves and covers may break if exposed to sudden temperature changes or impacts such as bumping or dropping.
Safety information
Critical disposal warnings

WARNING

DANGER: Risk of child entrapment.
Before you throw away your old refrigerator or freezer:
- Take off the doors and door latch.
- Leave the shelves in place so that children may not easily climb inside.
- Children trapped inside a refrigerator can hurt themselves or suffocate to death.
- Please dispose of the packaging material from this product in an environmentally friendly manner.
- Ensure that none of the pipes on the back of the appliance are damaged prior to disposal.
- R-600a or R-134a is used as a refrigerant. Check the compressor label on the rear of the appliance or the rating label inside the fridge to see which refrigerant is used for your refrigerator.
If this product contains flammable gas (Refrigerant R-600a), contact your local authority in regard to safe disposal of this product.
- When disposing of this refrigerator, remove the door/door seals and door latch so that small children or animals cannot become trapped inside. Children should be supervised to ensure that they do not play with the appliance.
If trapped inside, the child may get hurt or suffocate to death. - Cyclopentane is used in the insulation. The gases in the insulation material require a special disposal procedure. Please contact your local authorities in regard to the environmentally safe disposal of this product.
- Keep all packaging materials well out of the reach of children, as packaging materials can be dangerous to children.
- If a child places a bag over his or her head, the child could suffocate.
Additional tips for proper usage

NOTE
- In the event of a power failure, call the local office of your Electricity Company and ask how long it is going to last.
- Most power failures that are corrected in an hour or two will not affect your refrigerator temperatures. However, you should minimize the number of door openings while the power is off.
- But Should the power failure last more than 24 hours, remove and discard all frozen food.
- The appliance might not operate consistently (frozen contents can thaw or temperatures can become too warm in the frozen food compartment) when sited for an extended period of time in a location where ambient air temperatures are constantly below the temperatures for which the appliance is designed.
- In case of particular foods, keeping it under refrigeration can have a bad effect on preservation due to its properties.
- Your appliance is frost free, which means there is no need to manually defrost your appliance. This will be carried out automatically.
- Temperature rise during defrosting complies with ISO requirements. But If you want to prevent an undue rise in the temperature of the frozen food while the appliance defrosts, wrap the frozen food in several layers of newspaper.
- Do not re-freeze frozen foods that have thawed completely.
- Any increase in the temperature of frozen food during defrosting can shorten its storage life.
- Do not re-freeze frozen foods that have thawed completely.
Safety information
THIS APPLIANCE IS INTENDED TO BE USED IN HOUSEHOLD AND SIMILAR APPLICATIONS SUCH AS
- staff kitchen areas in shops, offices and other working environments;
- farm houses and by clients in hotels, motels and other residential type environments;
- bed and breakfast type environments;
- catering and similar non-retail applications.
Getting ready to install the refrigerator
Congratulations on your purchase of this Samsung French Door Refrigerator. We hope you enjoy the state-of-art features and efficiencies that this new appliance offers.
Selecting the best location for the refrigerator
Choose :
- A location with easy access to a water supply.
- A location without direct exposure to sunlight.
- A location with level (or nearly level) flooring.
- A location with enough space for the refrigerator doors to open easily.
- A location that allows sufficient space to the right, left, back, and top for air circulation. If the refrigerator does not have enough space, it can cause the bad influence to refrigeration efficiency and power consumption.
- A location that allows you to move the refrigerator easily if it needs maintenance or service.
- Do not install the refrigerator in locations where the temperature is over 110^ (43^) or below 50^ (10^) .
If your refrigerator is not level, the internal cooling system may not work correctly. Refer to drawing and dimensions below for overall space required for use.
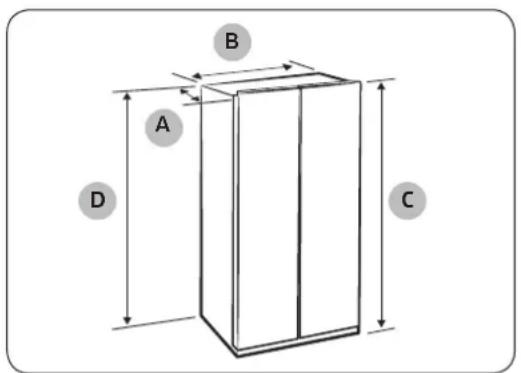
| Depth “A” 34" (864 mm) |
| Width “B” 35 3/4" (908 mm) |
| Height “C” 68 1/2" (1740 mm) |
| Overall Height “D” 70" (1776 mm) |
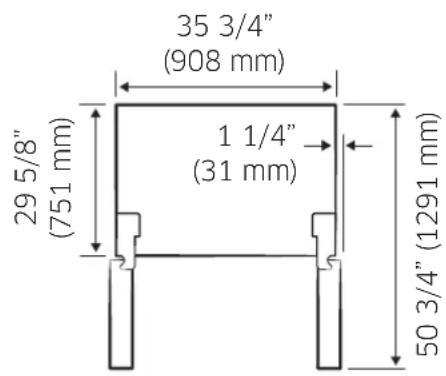

NOTE
Each measurement based on the design dimension, so it may differ depending on the measuring method.
When moving your refrigerator


CAUTION
- To prevent floor damage, be sure the front adjusting legs are in the up position (above the floor).
Refer to "Leveling the refrigerator" on page 31.
Flooring
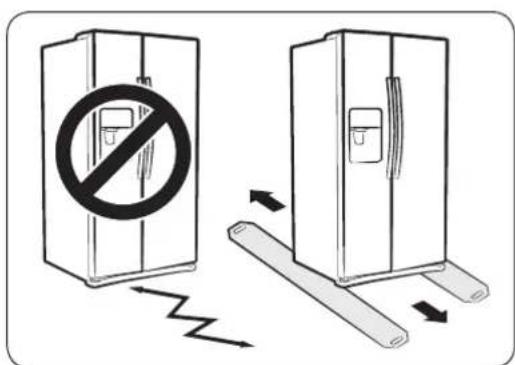
For proper installation, you must place this refrigerator on a level, hard surface that is the same height as the rest of the floor. This surface should be strong enough to support a fully loaded refrigerator. To protect the finish of the flooring during installation, cut a large section of the cardboard carton and place it under the refrigerator where you are working. When moving the refrigerator, you need to pull and push it straight forwards or back. Do not wiggle it from side to side.
CAUTION
- When installing, servicing or cleaning behind the refrigerator, be sure to pull the unit straight out and push back in straight after finishing.
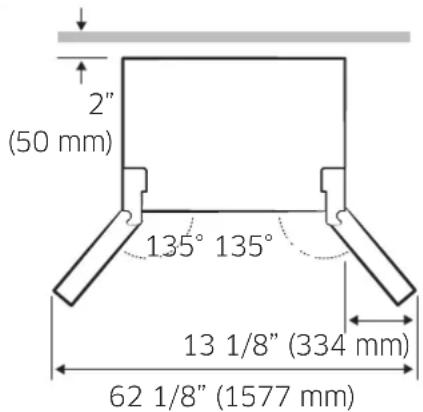
Important: Make sure that you can easily move your refrigerator to its final location by measuring doorways (both width and height), thresholds, ceilings, stairways, etc. The following chart details the exact height and depth of this Samsung Side by Side Refrigerator.
NOTE
- Make sure you disconnect the water supply line BEFORE removing the freezer door. To avoid damage, refer to "2. Separate the water supply line from the refrigerator" in the manual (page 25).
Setting up
Setting up the refrigerator
Installing the handlesr
Important: If you need to remove the refrigerator's doors to move it into place, install the handles after you put the doors back on.
Take the handles out of the right side door.
NOTE
- The handles are included in the package.
22 English
How to install the handles
Orient each handle so that the end with the sticker attached is at the top and the holes with the tightening screws are facing each other.
Then, follow the directions below to install each handle.
Fix the handles to the doors by sliding them down firmly.
Setting up
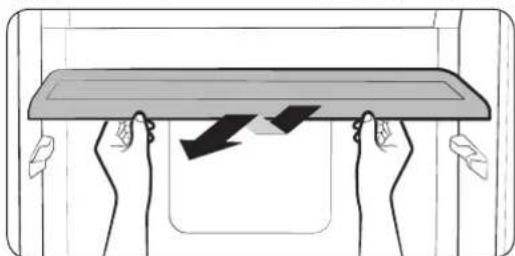
Removing the refrigerator doors
If your entrance won't allow the refrigerator to pass easily through it, you can remove the refrigerator doors.
To remove the doors, follow the steps below.
If you do not need to remove the doors, go to "Leveling the refrigerator" on page 31.
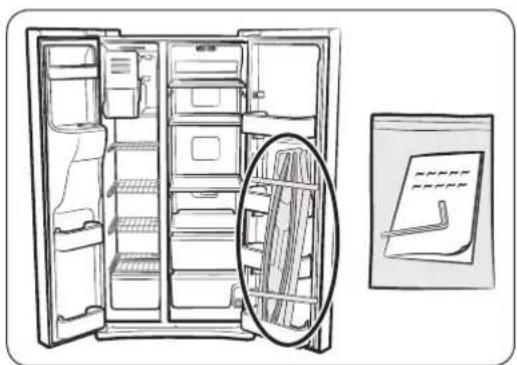
Tools you'll need


Philips Screwdriver Flat-blade Screwdriver Socket Wrench
(13/32") (10 mm)
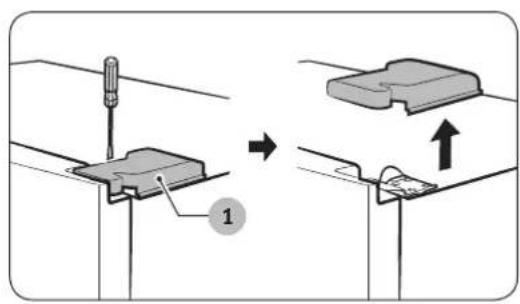
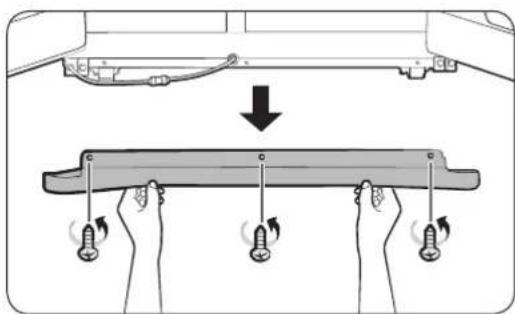
1. Removing the Front Leg Covers
Open both the freezer and refrigerator doors.
Unscrew the three screws holding the front leg cover in place by turning them counterclockwise.
When the screws are loose, remove the front leg cover.
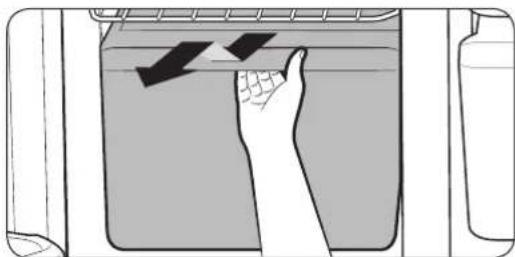
2. Separate the water supply line from the refrigerator
Remove one or two water lines, depending on the model, by pressing each coupler (1) and pulling the water lines (2) away.

NOTE
- Your refrigerator may have one or two water lines, depending on the model. If it has two, the lines are different colors. Make sure you match the colors when you re-attach them.

CAUTION
- Do not cut the water line.
Gently separate it from the coupler.
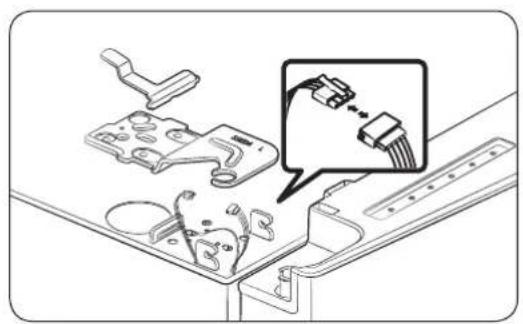
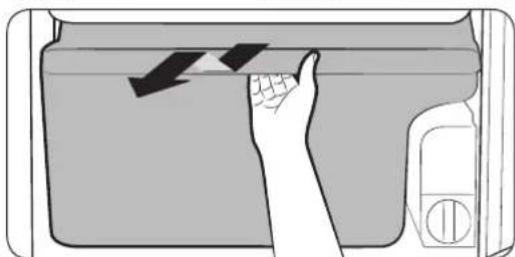
3. Remove the freezer door
A few things to mention first.
- Make sure that you lift the door straight up so the hinges are not bent or broken.
- Be careful not to pinch the water tubing and wire harness on the door.
- Place doors on a protected surface to prevent scratching or damage.
- Is necessary, have two people disassemble the doors.
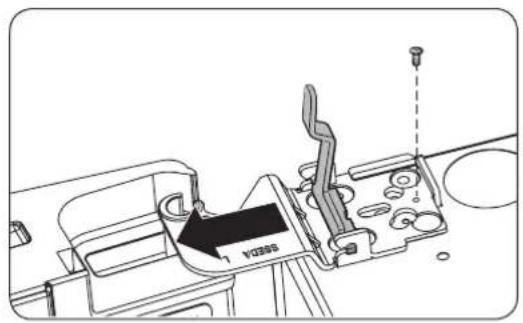
- With the Freezer door closed, remove the upper hinge cover (1) using a screwdriver, and then disconnect the wires by gently pulling them apart (2).

NOTE
- Be careful not to damage the sensor harness with the hinge cover.
Setting up
-
Disconnect the electrical harness.
-
Gently lift the clamp.
NOTE
-
To prevent damage to the clamp or injuries, do not lift the clamp forcefully.
-
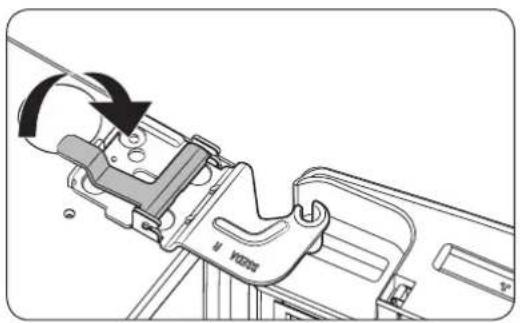
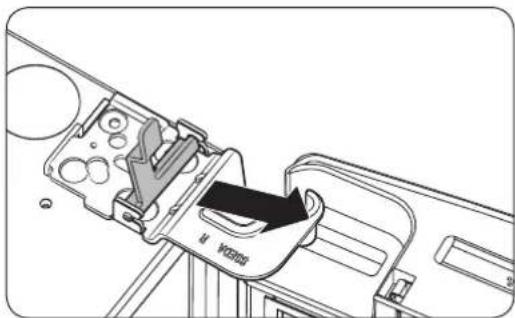
Pull the clamp to remove. Remove the ground screw by turning it counter-clockwise.
-
Open the door by 90 degrees. While holding the door, remove the hinge.
CAUTION
- If you remove the hinge without holding the door, the door may fall and cause injury.
-
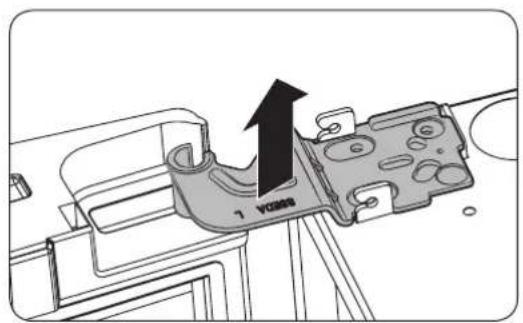
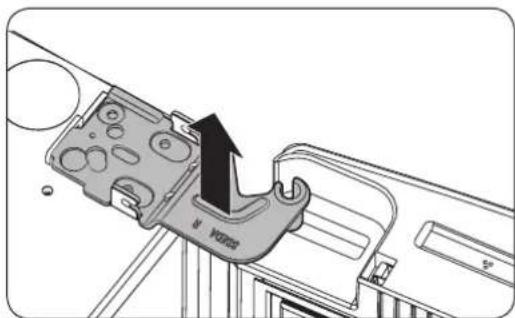
Open the Freezer door, and then remove the door from the lower hinge (3) by carefully lifting it up (4).
-
Remove the lower hinge (5) from the lower hinge bracket (6) by lifting the lower hinge up in the direction of the arrow.
CAUTION
- Make sure to put the water line through the lower hinge before assembling it.
Setting up
4. Remove the fridge door
- With the door closed, remove the upper hinge cover (1) using a screwdriver.
- Disconnect the electrical harness.
- Gently lift the clamp.
NOTE
- To prevent damage to the clamp or injuries, do not lift the clamp forcefully.
-
Pull the clamp to remove.
-
Open the door by 90 degrees. While holding the door, remove the hinge.
CAUTION
- If you remove the hinge without holding the door, the door may fall and cause injury.
- Do not remove the sensor assembly in the right upper hinge cover.
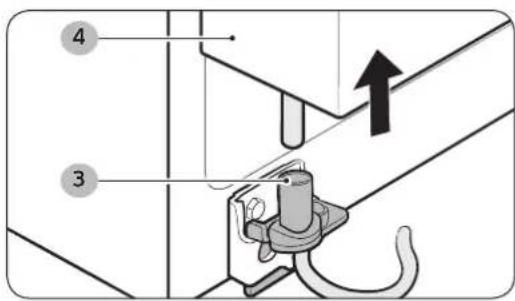
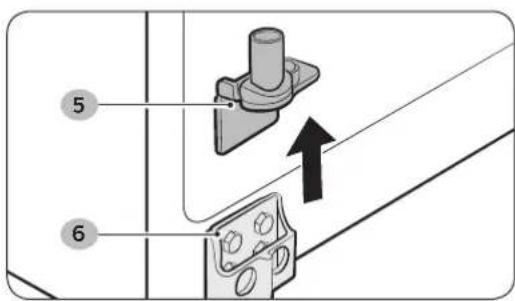
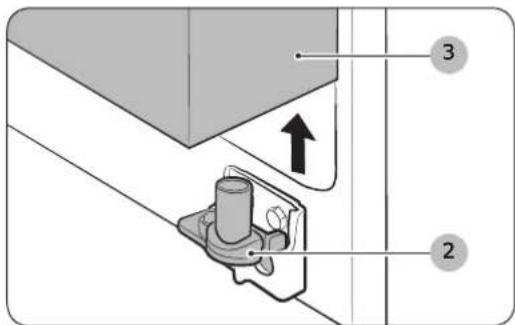
- Remove the door from the lower hinge (2) by lifting the door (3).
Setting up
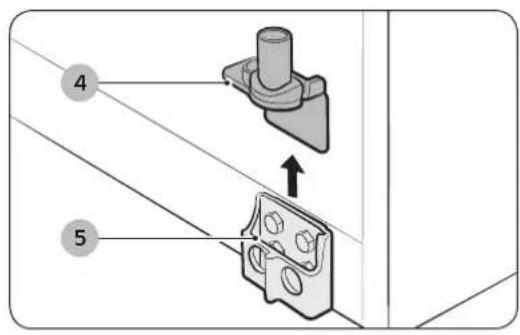
- Remove the lower hinge (4) from the lower hinge bracket (5) by lifting the lower hinge up in the direction of the arrow.
Re-attaching the Fridge Door
To re-attach the fridge door, replace parts in reverse order.
Re-attaching the Freezer Door
To re-attach the freezer door, replace parts in reverse order.
Re-attaching the Water Supply Lines
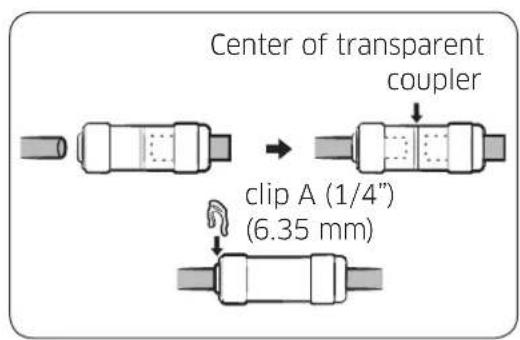
- The Water Lines must be fully Inserted into the center of the transparent coupler to prevent water leakage from the dispenser.
- Insert the 2 clips in the install pack as shown below, and then confirm that each clip holds the line firmly.
CAUTION
- Make sure the color of the water lines match.
30 English
Leveling the refrigerator
Make sure the refrigerator is level so that you can make final adjustments.
Use a level to test if the refrigerator is level both side to side and back to front.
If the refrigerator is not level, you will not be able to get the doors perfectly even, which may cause moisture condensation and increased energy bills.

NOTE
- The front of the refrigerator is also adjustable.
Before levelling the refrigerator, remove the front leg cover.
Open both the freezer and refrigerator doors.
Unscrew the three screws holding the front leg cover in place by turning them counterclockwise.
When the screws are loose, remove the front leg cover.
When the Freezer part is lower than the Fridge part.
Insert a flat-blade screwdriver into a slot on the Freezer Leg, then turn it clockwise.
When the Fridge part is lower than the Freezer part.
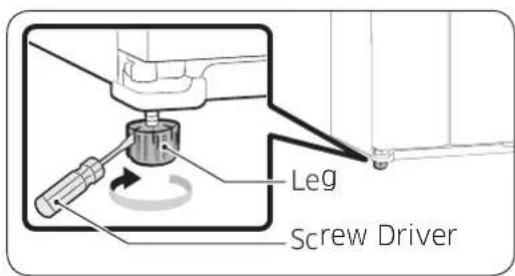
Insert a flat-blade screwdriver into a slot on the Fridge Leg, then turn it clockwise.

NOTE
Refer to the next section for the best way to make very minor adjustments to the doors.
Making minor adjustments between doors
A level refrigerator is necessary for getting the doors perfectly even.
Make sure your refrigerator is level before you begin.
If you need help leveling, review the previous section on leveling the refrigerator.
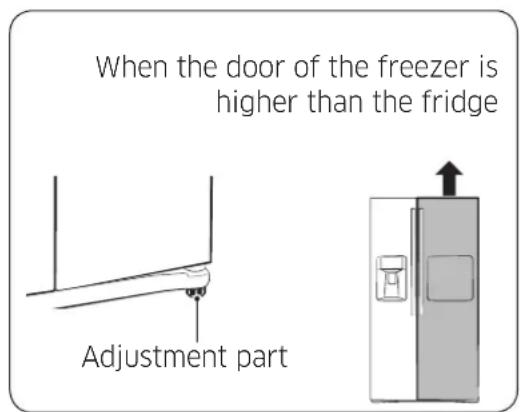
The process for adjusting each door is the same.
Open the doors and adjust them, one at a time, as follows:
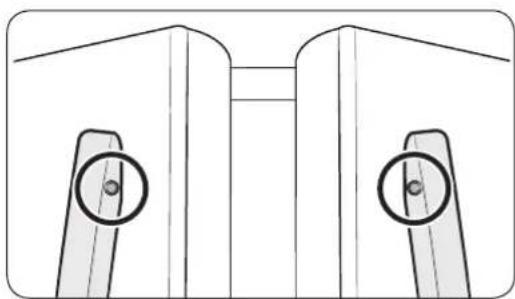
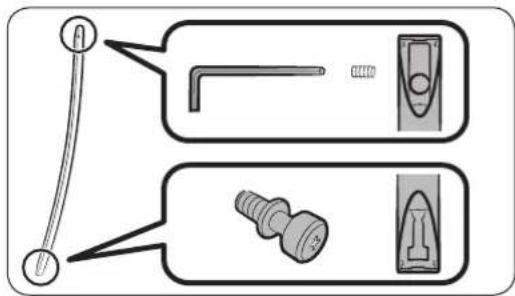
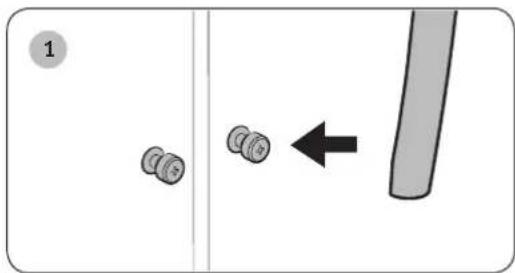
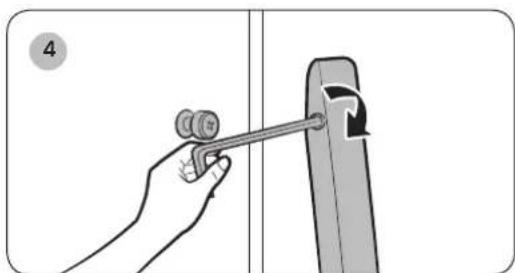
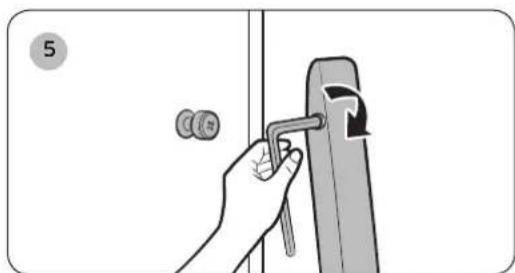
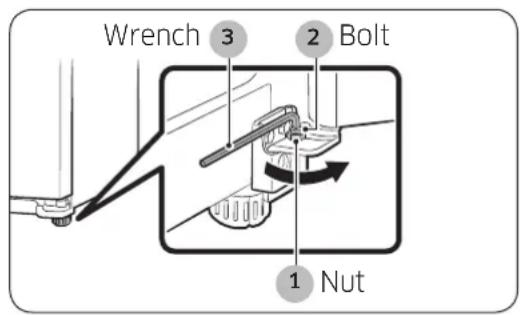
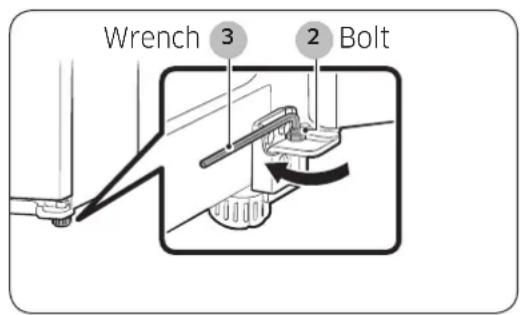
- Unscrew the nut (1) from the lower hinge until it reaches the upper end of the bolt (2).
NOTE
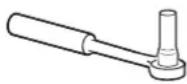
- When you release the nut (1), make sure that you use the hex wrench provided (3) to loosen the bolt (2) in a counterclockwise direction.
You should then be able to unscrew the nut (1) with your fingers.
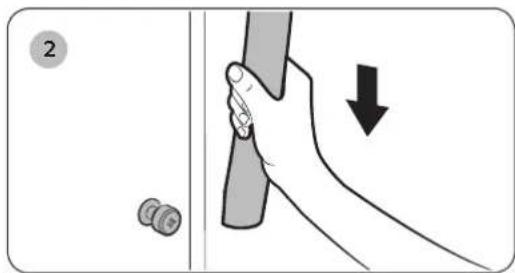
- Adjust the height difference between the doors by turning the bolt (2) clockwise ( ) or counter clockwise
NOTE
- When you turn clockwise (↓), the door will move up.
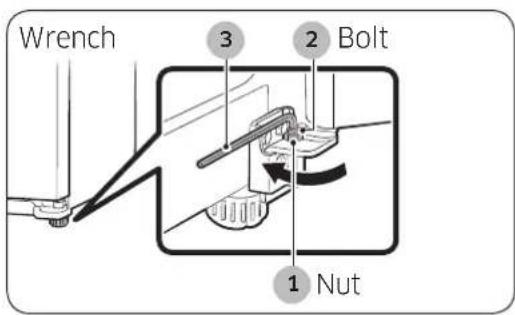
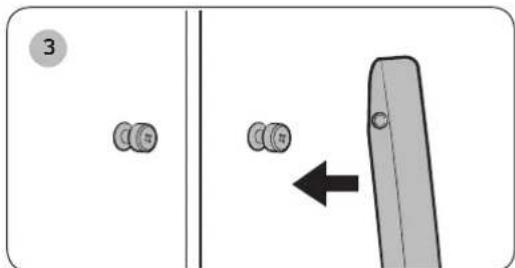
- After adjusting the doors, turn the nut (1) clockwise until it reaches the lower end of the bolt, then tighten the bolt again with the wrench (3) to fix the nut in place (1).
NOTE
If you do not secure the nut firmly, the bolt may release.
Installing the water dispenser line
A water dispenser is one of the helpful features on your new Samsung Refrigerator.
To help promote better health, the Samsung water filter removes unwanted particles from your water.
However, it does not sterilize or destroy microorganisms.
You may need to purchase a water purifying system to do that.
The water line also connects to the ice maker.
For the ice maker to operate properly, water pressure of 20 125 psi (138 ~ 862 kPa) is required.
If the refrigerator is installed in an area with low water pressure (below 20 psi), you can install a booster pump to compensate for the low pressure.
After you have connected the water line, make sure the water storage tank inside the refrigerator is properly filled.
To do this, press the water dispenser lever until water runs from the water dispenser.

NOTE
Water line installation kits are available at extra cost from your dealer.
We recommend using a water supply kit that contains copper tubing.
- Use the new hose-sets supplied with the appliance only. Do not re-use an old hose set.
Connecting to the water supply line
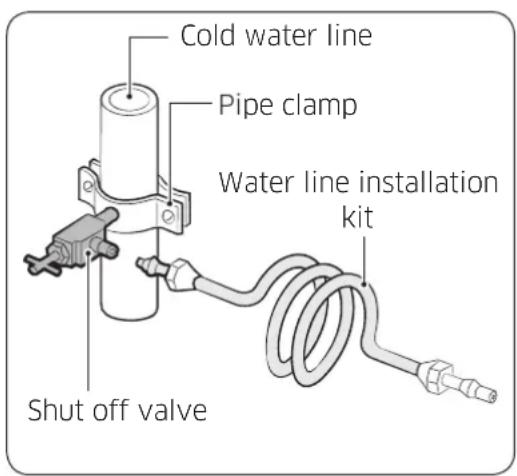
- First, shut off the main water supply line and turn the ice-maker off.
NOTE
- The refrigerator should NOT be plugged in at this point.
- Locate the nearest cold water drinking water line.
- Install the pipe clamp and shut off valve.
- Connect the water line installation kit to the shut off valve.
Connecting the water supply line to the refrigerator
There are several items that you need to purchase to complete this connection. You may find these items sold as a kit at your local hardware store.
| Use Copper Tubing | 1/4" (6.35 mm) copper tubing |
| 1/4" (6.35 mm) compression nut (1pc) | |
| Ferrule (2pc) | |
| Use Plastic Tubing | 1/4" (6.35 mm) plastic tubing → Molded end (Bulb) |
| 1/4" (6.35 mm) compression nut (1pc) |
34 English
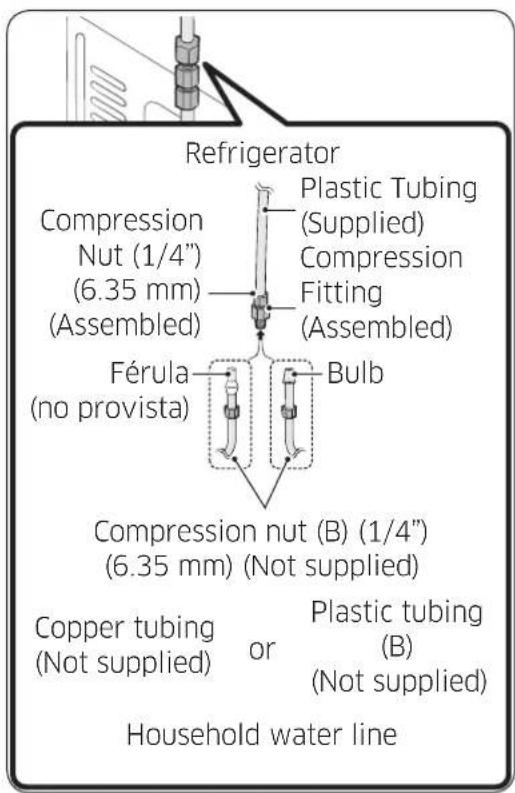
-
Connect the household water line to the assembled compression fitting.
-
If you are using copper tubing, slip the compression nut (B) (not supplied) and ferrule (not supplied) on the copper tubing (not supplied) as shown.
- If you are using plastic tubing (B), insert the molded end (Bulb) of the plastic tubing (B) into the compression fitting.

CAUTION
-
Do not use plastic tubing (B) without the molded end (Bulb).
-
Tighten the compression nut (B) onto the compression fitting. Do not over-tighten the compression nut (B).
- Turn the water on and check for any leaks inside the refrigerator, around the water filter, and in any connection areas. If you find water drops or leaks, turn off the main water supply. If the leaks are in the connection areas, check the connections and, if necessary, tighten. If there are leaks in the refrigerator, check the water filter and confirm it is in the locked position. Turn on the water supply and check for leaks again.
-
Plug in the refrigerator.
-
Flush 3 gallons of water through the filter before drinking or using the water from the refrigerator. (Flush approximately 6 minutes.) This will clean the water supply system and remove air from the lines.
To flush, press the Water button, and then press a large glass or cup against the water dispenser lever. Fill the glass, empty it into the kitchen sink after it is filled, and then repeat.
NOTE
Additional flushing may be required in some households.
6. Open the refrigerator door and make sure there are no water leaks coming from the water filter.
NOTE
After you turn on the refrigerator, let the ice maker make ice for 1 to 2 days. Over that period of time, throw out the first 1 or 2 buckets of ice the ice maker makes to ensure all impurities have been removed from the water line.
- Only connect the water line to a drinkable water source.
- If you have to repair or disassemble the water line, cut off 1/4 (6.35 mm) of the plastic tubing to make sure you get a snug, leak-free connection.
- You can test the water line quickly using a paper cup. Under normal conditions, the water dispenser can fill a 5.75 oz. (170 cc) cup in about 10 seconds.
Completing the set up
Now that you have your new refrigerator installed in place, you are ready to set up and enjoy the features and functions of the appliance.
By completing the following steps, your refrigerator should be fully operational.
- Make sure your refrigerator is in an appropriate location with reasonable clearance between it and the wall. Refer to installation instructions in this manual.
- Once the refrigerator is plugged in, make sure the interior light comes on when you open the doors.
- Set the Temperature control to the coldest temperature and wait for an hour.
The freezer will get slightly chilled and the motor will run smoothly.
Reset the refrigerator and freezer to the temperatures you want.
4. After you plug the refrigerator in, it will take a few hours to reach the appropriate temperature.
You can store food and drinks in the refrigerator after the temperature is sufficiently cool.

NOTE
- If condensation or water drops appear on both sides of the fridge door's central part, turn the Energy Saver mode off after removing the condensation.
(See the explanation of the Energy Saver button in "Using the control panel" on page 40.)
Preventing Power Cord Damage
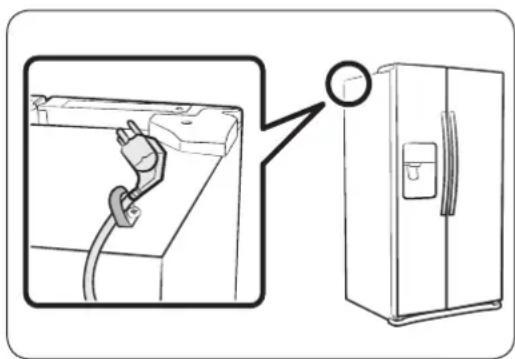
To prevent power cord damage, fix any excess power cord to the top rear of the refrigerator as shown in the illustration below.
Checking the control panel
| 01 Freezer / Energy Saver (3 sec) | Press the Freezer button to set the freezer temperature between cold and coldest. Press Freezer button for several times to activate the Power Freeze icon which speeds up the freezing process in the freezer. This can be helpful if you need to quickly freeze items that spoil easily or if the temperature in the freezer has warmed dramatically (For example, if the door was left open). If you need to freeze a large amount of food, activate the Power Freeze function at least 20 hours before you put the food into the freezer. Press and hold the Freezer button for 3 seconds to activate the Energy Saver function for better energy efficiency. If condensation occurs on the doors, turn the Energy Saver function off. |
| 02 Fridge / Control Lock (3 sec) | Press the Fridge button to set the Fridge temperature between cold and coldest. Press and hold the Fridge button for several times to activate the Power Cool function which speeds up the cooling process in the refrigerator. If you press and hold the Fridge button for 3 seconds, all buttons will be locked and the dispenser pad will not work. |
| 03 Ice / Ice Maker Off (3 sec) | Press the Ice button to select cubed ice or crushed ice. Press and hold the Ice button for 3 seconds to turn the ice making function off. Press and hold the Ice button again for 3 seconds to turn the ice making function back on. Note that Ice Maker Off mode will be deactivated if you press and hold the ice lever (marked “ICE” on the lever) for more than 5 seconds. |
| 04 Water / Reset Filter (3 sec) | Press the Water button to turn the water dispenser on. Press and hold the Water button for 3 seconds after changing the filter to reset the water filter indicator. |

NOTE
- To deactivate the secondary functions (such as Ice Off and Control Lock), press and hold the corresponding button again for 3 seconds.
Using the control panel
Freezer / Fridge (Temperature adjustment)
Press the Freezer or Fridge button until the desired temperature is set.
For a lower temperature, press the Freezer or Fridge button until more LEDs light (colder).
For a higher temperature, press the
Freezer or Fridge button until fewer LEDs light (less cold).
Each time you press the Freezer or Fridge button, the temperature indicator changes in the order shown below.
| Power Freeze | This icon lights when you activate the Power Freeze function. Power Freeze function generates cool air for 50 hours continuously, chilling the freezer more quickly. This function is useful when you need to decrease the temperature in the freezer quickly or to make more ice rapidly. When the freezer is cold enough or you have enough ice, just press the Freezer button again to cancel the Power Freeze function. |
| NOTE ·When you use this function, the energy consumption of the refrigerator may increase. Remember to turn it off when you do not need it and return the freezer to your original temperature setting. | |
| Energy Saver | This icon lights when you activate the Energy Saver function. The Energy Saver function is automatically set to “ON” when power is supplied to the Refrigerator. If condensation occurs on the doors, turn the Energy Saver function off. |
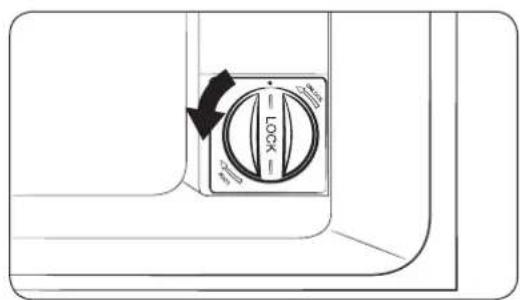
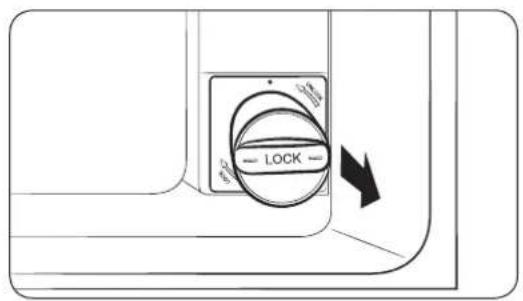
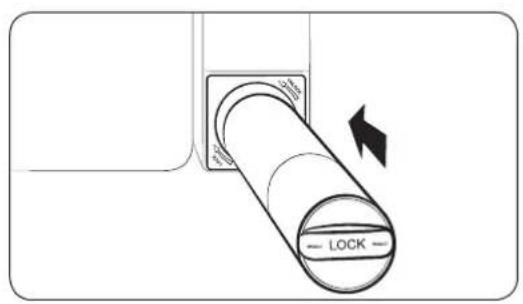
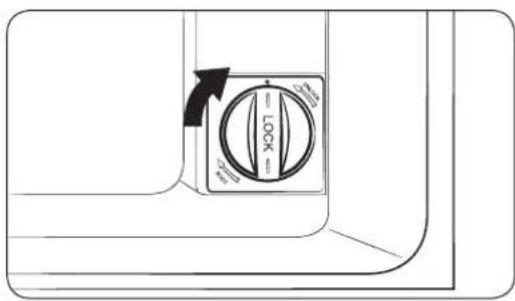
| Control Lock | This icon lights when you activate the Lock function. When the Lock icon is lit, all the panel buttons, including the Ice button and the dispensers, are locked and de-activated. Press and hold the Fridge button for 3 seconds to turn Lock off and re-activate the panel buttons. |
| Filter Indicator | This icon turns red when you need to change the filter, usually after the refrigerator has dispensed about 300 gallons of water (or after about 6 months). The icon will blink red for several seconds when you open or close the door. The filter Indicator will be Off when you initially insert the water filter. |
| Power Cool | This icon lights when you activate the Power Cool function. Power Cool function is great for a quick fridge cool down. If you activate the Power Cool function, the inside temperature of the Fridge decreases for about two and a half hours. When you want to turn Power Cool off, press Fridge button again. |
| Cubed | Enjoy cubed or crushed ice by selecting your preference from the digital control panel. The ice type light indicates the type of ice that is currently chosen. |
| Crushed | |
| OFF | This icon lights when you activate the Ice Off function. When the Ice Off icon is lit, the ice maker is turned off. |
| Ice Off | |
| Water | This icon lights when you activate the Water function. When the Water icon is lit, the water dispenser is on. |
Operating
Display Off To conserve energy, the Panel Display turns off automatically under the following conditions:
When no button has been pressed, when no doors have been opened, or when no Dispenser Lever has been pushed for a period of time.
However, the icon indicating your Water or Cubed / Crushed selection, stays on.
When you press a button, open a door, or push a Dispenser Lever, the Panel Display turns on again. Except for the Water and Ice buttons, all function buttons will become operational after you remove your finger from the button you are currently pressing.
CAUTION
- If the refrigerator's water supply line is not connected and water is not being supplied to the refrigerator, the refrigerator will make unusual noises if the ice maker is on or if you push the water dispenser lever.
To stop the noises, press the Ice button until the Ice Off icon lights up (at least 3 seconds) indicating that the ice maker is off.
If the water line is connected, and your refrigerator is making unusual noises, see if the water supply valve on the line connected to your refrigerator is closed, preventing water from flowing into the refrigerator.
If the valve is closed, open the valve.
Cooling Off Mode (Demo Mode/Shop Mode)
NOTE
- Cooling Off mode (also called Shop mode or Demo mode) is designed for use by retailers when they display refrigerators on the shop floor.
In Cooling Off mode, the refrigerator's fan motor and lights work normally, but the compressors do not run, and the refrigerator and freezer do not get cold.
- To start Cooling Off mode, Press and hold the Freezer button, the Ice button and the Fridge button for 5 seconds during normal operation.
The refrigerator chime sounds and Animaiton(Freeze/Fridge Temperature Indicator moving) appears on the display.
CAUTION
- If your refrigerator appears to be working, but it is not cooling, and the Freezer and Fridge Temperature Indicators are moving, the Fridge is in Cooling Off mode. To cancel Cooling Off mode, follow the directions above.
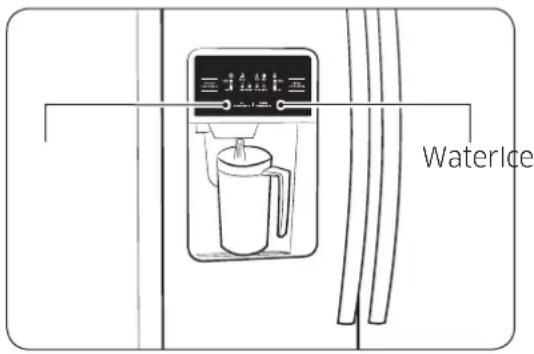
Using the ice and cold water dispenser
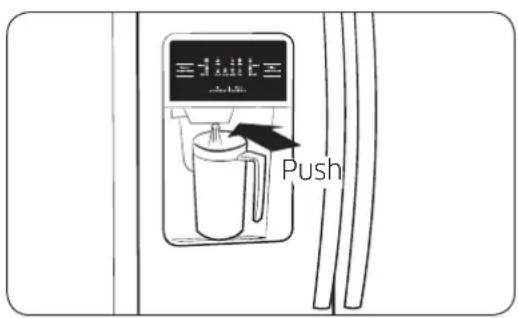
Using the water dispenser
Press the Water button on the control panel.
Place your glass under the water outlet, and then push against the dispenser pad until you hear a click.
Make sure the glass is in line with the dispenser to prevent the water from splashing out.
To get colder water
- The dispensed water is cool, not icy cold.
- When you want colder water, dispense ice into your glass first before filling it with water to prevent water from splashing out.
Using the ice dispenser
Press the Ice button to select the type of ice you want.
Place your glass under the ice outlet, and then push gently against the dispenser pad.
Make sure the glass is in line with the dispenser to prevent the ice from bouncing out.
When cubed ice is selected after you have dispensed crushed ice, a small amount of residual crushed ice might be produced.
Storing food
The Samsung Side-By-Side Refrigerator has been designed to provide you with maximum space saving features and functions.
Here are some of the customized compartments we have created to keep your food fresher, longer.
Important: To prevent odors from penetrating the ice in the ice maker, store all food securely in wraps or containers that are as airtight as possible.

CAUTION
- Because the following operating instructions cover various models, the instructions for your refrigerator may differ slightly from the instructions in this manual.
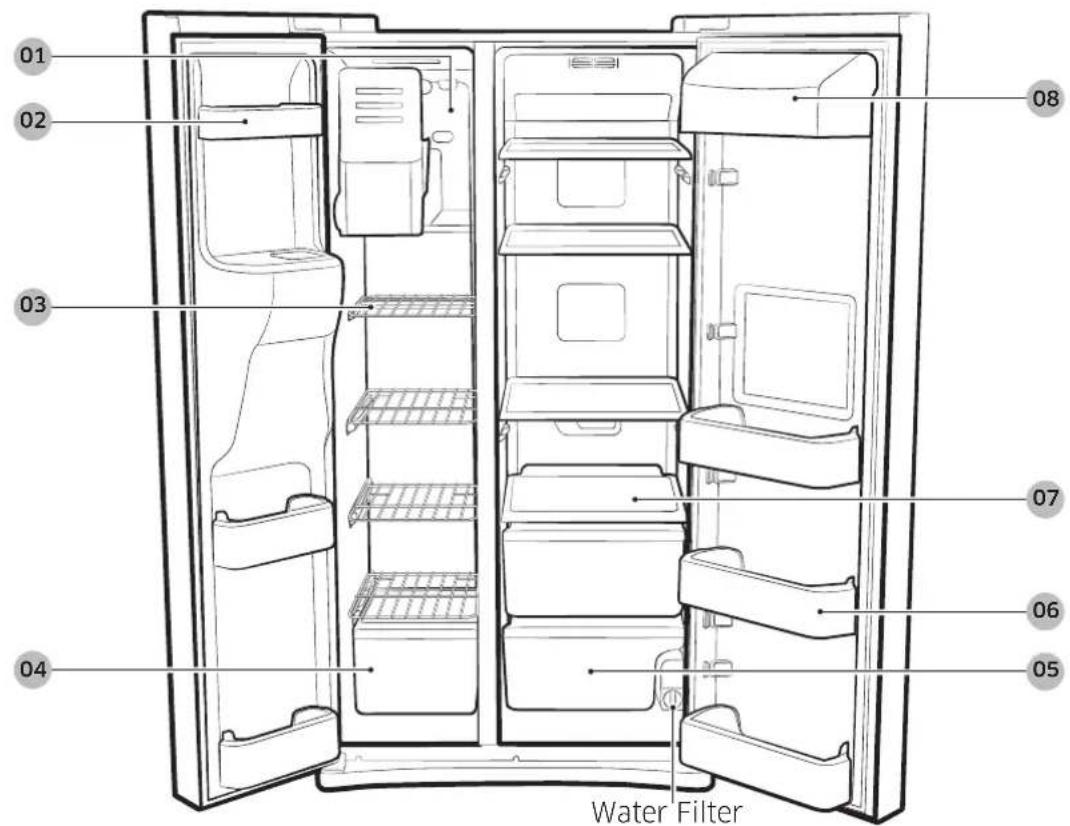
Storing Food in the Freezer
| 01 Xtra Space | Can be used for frozen foods such as pizza, pasta, burritos, and fajitas. To prevent odor penetration of the ice, stored food should be wrapped securely. |
| 02 Door Bins Can | be used for small packages of frozen food. |
| 03 Wire Shelf Can | be used to store frozen food. |
| 04 Freezer Drawer | Best used for storing meat or other frozen items. For safe keeping, stored food should be wrapped securely in foil or other suitable wrapping materials or containers. |
Storing Food in the Fridge
| 05 Fruit & Vegetable Drawer | Used to preserve the freshness of your stored vegetables and fruits. |
| 06 Door Bin | Designed to handle large, bulky items such as gallons of milk or other large bottles and containers. |
| 07 Glass Shelf | Designed to be crack-resistant. They can be used to store food and drinks. Circular marks on the glass surface are a normal phenomenon and can usually be wiped clean with a damp cloth. |
| 08 Dairy Bin | Can be used to store smaller dairy items like butter or margarine, yogurt, or cream-cheese bricks. |

NOTE
- Bottles should be stored tightly together so that they do not tip and fall out when the refrigerator door is opened.

WARNING
- If you plan to go away for a significant time, empty the refrigerator and turn it off. Wipe the excess moisture from the inside of the appliance and leave the doors open. This helps keep odor and mold from developing.
-
If the refrigerator is not to be used for a long period of time, pull out the power plug.
-
Deterioration of the power cord insulation may cause fire.
Removing the freezer/fridge accessories
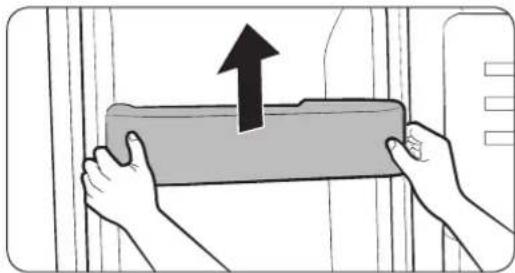
1. Door Bins
To remove, firmly grab the door bin with both hands and lift it up gently.
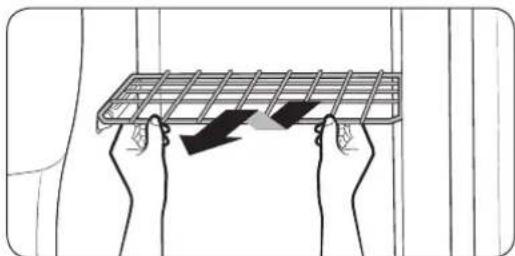
2. Shelves
Pull the shelf out as far as it goes.
Then lift it up and remove it.
(Wire Shelf/Glass Shelf)
3. Drawer
To remove, pull the drawers out as far as they go, and then lift up slightly and pull.
(Drawer/Fruit & VegetableDrawer)
Operating
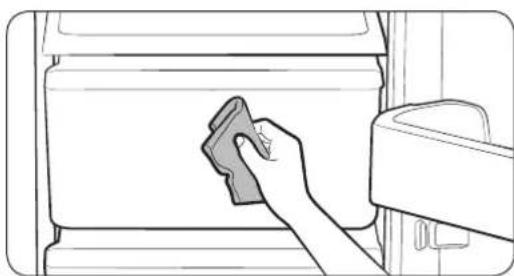
Cleaning the refrigerator
Caring for your Samsung Side-By-Side Refrigerator prolongs the life of your appliance and helps keep it odor and germ-free.
Cleaning the Interior
Clean the inside walls and accessories with a mild detergent, and then wipe dry with a soft cloth.
You can remove the drawers and shelves for a more thorough cleaning.
Just make sure to dry them before putting them back into place.
Cleaning the Exterior
Wipe the digital panel and display panel with a clean, soft cloth.
Spray water onto the cleaning cloth instead of spraying directly on the surface of the refrigerator. This helps ensure an even distribution of moisture on the surface.
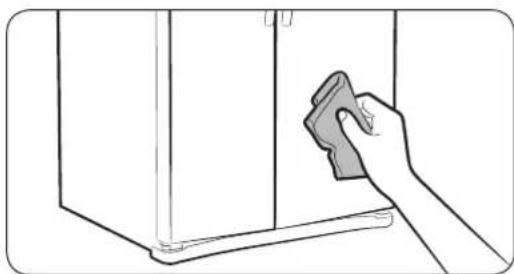
The doors, handles, and cabinet surfaces should be cleaned with a mild detergent, and then wiped dry with a soft cloth.
To keep your appliance looking its best, the exterior should be polished once or twice a year.
WARNING
- Do not use Benzene, Thinner, or Clorox (bleach)TM for cleaning.
They may damage the surface of the appliance and can create a risk of fire.
Cleaning the rubber door seals
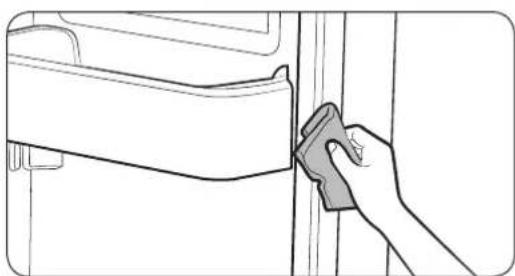
If the rubber door seals are dirty, the doors may not close properly, and the refrigerator will not operate efficiently. Keep the door seals free of grit or grime by cleaning the doors with a mild detergent and damp cloth. Wipe dry with a clean, soft cloth.

CAUTION
- Do not spray the refrigerator with water while it is plugged in, as it may cause an electric shock.
- Do not clean the refrigerator with benzene, thinner, or car detergent as there is a risk of fire.
Changing the LED type lighting

CAUTION
- Do not disassemble or replace the LED type lighting.
To change the LED type lighting, contact a Samsung service center.
Operating
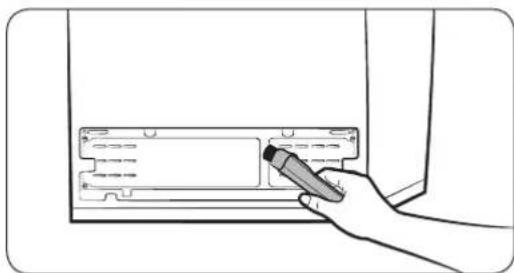
Changing the water filter

NOTE
- Replace the water filter when the water filter indicator turns red.
The water filter is located on the bottom right side of the refrigerator. - To make changing the water filter easier, you may want to shut off the water supply, and then drain any water remaining in the water line by pressing the Water button and then pressing a glass against the water dispenser pad.
- Turn the water filter 90^ counterclockwise.
- Pull the water filter out of the filter housing.
- Insert a new water filter into the filter housing.
-
Turn the new water filter 90^ clockwise.
-
Press and hold the Water button for 3 seconds after changing the filter to reset the filter indicator.
Confirm the indicator turns blue. When you replace the water filter, some water may leak from the water filter housing.
Make sure to wipe up any leakage that may have occurred.
Removing residual matter from inside the water supply line after installing a new filter
- Turn ON the main water supply.
- Press the Water button on the control panel. Place a cup or glass under the water outlet, and then push the cup or glass against the dispenser pad until you hear a "click".
- Flush 3 gallons of water through the filter. (Flush approximately 6 minutes.) This will clean the water supply system and remove air from the lines.
- Additional flushing may be required in some households.
- Open the refrigerator door and make sure there are no water leaks coming from the water filter.
NOTE
- A newly installed water filter cartridge may cause water to briefly spurt from the water dispenser.
This is the result of air getting into the line.
It poses no problem to the operation of the refrigerator.
Food storage tips
| Foods Refrigerator Freezer Storage Tips | |||
| Dairy products | |||
| Butter 2-3 Weeks | 6-9 Months W | Wrap or cover tightly. | |
| Milk 1-2 Weeks | Not recommended | Check date code. Most milk and similar products are sold in date-coded cartons that indicate a products's peak freshness. Re-seal with cap or wrap tightly. Do not return unused portions to original container. | |
| Cream Cheese, cheese food, and cheese spread | 2-4 Weeks | Not recommended | Check date code. Keep all cheese tightly packed in moisture proof wrap |
| Hard Cheese (unopened) | 3-4 Months 6 | Months | |
| Hard Cheese (opened) | 2 Months | Not recommended | |
| Cottage Cheese 10 | -15 Days | Not recommended | |
| Cream 7-10 Days | 2 Months | Check date code. Most yogurt, creams, and similar products are sold in date-coded cartons that indicate a product's peak freshness. Re-seal or cover tightly. Do not return unused portions to original container. | |
| Sour Cream | 2 Weeks | Not recommended | |
| Cream Dips (opened) | 1 Week | Not recommended | |
| Yogurt | 10-14 Days | Not recommended | Check date code. Keep covered. |
| Frozen Yogurt | na | 2 Months | |
| Eggs | |||
| Eggs (uncooked) | 3-4 Weeks | Not recommended | Check date code. Store eggs in coldest part of refrigerator and in their original container. |
| Eggs (cooked) | 1 Week | Not recommended | Store in covered container |
| Leftover egg dishes | 3-4 Days | Not recommended | Store in covered container |
English 53
| Foods Refrigerator Freezer | Storage Tips | |
| Fresh fruits | ||
| Apples 1 Month | Not recommended | |
| Bananas 2-4 Days | Not recommended | |
| Peaches, Melons, Pears, Avocados | 3-5 Days | Not recommended |
| Berries and Cherries | 2-3 Days 12 Months | |
| Apricots 3-5 Days | Not recommended | |
| Grapes 2-5 Days na | ||
| Pineapple (un-cut) | 2-3 Days | Not recommended |
| Pineapple (cut) 5-7 Days 6-12 Months | ||
| Citrus 1-2 Weeks | Not recommended | |
| Juice 6 Days | Not recommended | |
| Frozen Juice | Thawing only | 12 Months |
| Fish and shellfish | ||
| Fish | ||
| Fatty Fish (mackerel, trout, salmon) | 1-2 Days 2-3 Months | Keep in original wrapper and store in coldest part of refrigerator. Package in vapor-proof and moisture proof wrap for freezer. Freeze at 0 °F (or -18 °C). Thaw in refrigerator or check date code. Freeze in original packaging. |
| Lean Fish (cod, flounder, etc) | 1-2 Days 6 Months | |
| Frozen or Breaded | na | 3 Months |
| Shellfish | ||
| Shrimp (uncooked) | 1-2 Days 12 Months | To freeze, package in vapor-proof and moisture-proof container. |
| Crab | 3-5 Days 10 Months | |
| Cooked Fish or Shellfish | 2-3 Days 3 Months | |
54 English
| Foods Refrigerator Freezer | Storage Tips | ||
| Meat | |||
| Fresh, Uncooked | |||
| Chops 2-4 Days 6- | 12 Months | Check date code for use. Store in coldest part of refrigerator in original packaging. Package in moisture-proof and vapor-proof container for freezing. Recommended refrigerator temperature 33 °F to 36 °F (or 1 °C to 2 °C) and freezer temperature 0 °F to 2 °F (or -18 °C to -16 °C) | |
| Ground 1 Day 3-4 | Months | ||
| Roast 2-4 Days 6- | 12 Months | ||
| Bacon 1-2 Weeks | 1-2 Months | ||
| Sausage 1-2 Days | 1-2 Months | ||
| Steak 2-4 Days 6-9 Months | |||
| Poultry 1 Day 12 Months | |||
| Lunch meat 3-5 Days 1 Month | |||
| Cooked | |||
| Meat 2-3 Days 2-3 Months Check date code for use. Store in coldest part of refrigerator in original packaging. Package in moisture-proof and vapor-proof container for freezing. | |||
| Poultry 2-3 Days 4-5 Months | |||
| Ham | 1-2 weeks | 1-2 Months | |
Sources:
American Meat Institute Foundation. 1994. Yellow pages: answers to predictable questions consumers ask about meat and poultry. American Meat Institute Food Marketing Institute. 1999. The food keeper. Food Marketing Institute, Washington, D.C. Freeland-Graves, J.H. and G.C. Peckham. 1996. Foundations of food preparation, 6th ed. Prentice-Hall, Inc. Englewood Cliffs, NJ. Hillers, V.N. 1993. Storing foods at home. Washington State University Cooperative Extension, Pullman, WA. Publ. EB 1205. National Restaurant Association. 2001. Be cool-chill out! Refrigerate promptly. National Restaurant Association Education Foundation%s International Food Safety Council, Washington, D.C. USDA. 1997. Basics for handling food safely. U.S. Department of Agriculture, Food Safety and Inspection Service, Washington, D.C.
English 55
Troubleshooting
| Problem Solution | |
| The refrigerator does not work at all or it does not chill sufficiently. | ·Confirm that the power plug is properly connected. ·Is the temperature control on the display panel set to the correct temperature? Try setting it to a lower temperature. ·Is the refrigerator in direct sunlight or located too near a heat source? ·Is the back of the refrigerator too close to the wall and therefore keeping air from circulating? ·Check if the Cooling Off Mode is on. If the Freezer/Fridge temperature indicator is moving, refer to page 42 to cancel the Cooling Off Mode. |
| The food in the fridge is frozen. | ·Is the temperature control on the display panel set to the correct temperature? Try setting it to a warmer temperature. ·Is the temperature in the room very low? ·Did you store the food with a high water content in the coldest part of the fridge? |
| You hear unusual noise or sounds. | ·Confirm that the refrigerator is level and stable. ·If the refrigerator's water supply line is not connected and water is not being supplied to the refrigerator, the refrigerator will make unusual noises if the ice maker is on or if you push the water dispenser lever. To stop the noises, press the Ice button for at least 3 seconds until the Ice Off icon lights indicating that the ice maker is off. ·You hear a ticking sound from inside the refrigerator. This is normal and occurs because various parts in the refrigerator's interior contract or expand in response to temperature changes. |
| The front corners of the appliance are hot and condensation is occurring. | ·Some heat is normal as anti-condensators are installed in the front corners of the refrigerator to prevent condensation. ·Is the refrigerator door ajar? Condensation can occur when you leave the door open for a long time. |
| Ice is not dispensing. | Did you wait for 12 hours after installation of the water supply line before making ice? Is the water line connected and the shut-off valve open? Did you manually stop the ice making function? Make sure Ice Type is set to Cubed or Crushed. Is there any ice clumped in the ice maker bucket? Is the freezer temperature too warm? Try setting the freezer temperature lower. |
| You can hear water bubbling in the refrigerator. | This is normal. The bubbling comes from the refrigerant coolant liquid circulating through the refrigerator. |
| There is a bad smell in the refrigerator. | Has a food item spoiled? Make sure that strong smelling food (for example, fish) is wrapped so that it is airtight. Clean out your freezer periodically and throw away any spoiled or suspect food. |
| Frost forms on the walls of the freezer. | Is the air vent blocked? Remove any obstructions so air can circulate freely. Allow sufficient space between the foods stored for efficient air circulation. Is the freezer door closed properly? |
| Water dispenser is not functioning. | Is the water line connected and the shut-off valve open? Has the water supply line tubing been crushed or kinked? Make sure the tubing is free and clear of any obstruction. Is the water tank frozen because the refrigerator temperature is too low? Try selecting a warmer setting on the main display panel. |
WARRANTY ON SAMSUNG REFRIGERATOR
LIMITED WARRANTY (U.S.A.)
SAMSUNG REFRIGERATOR
LIMITED WARRANTY TO ORIGINAL CONSUMER PURCHASER WITH PROOF OF PURCHASE
This SAMSUNG brand product, as supplied and distributed by Samsung Electronics
America, Inc. (SAMSUNG) and delivered new, in the original carton to the original
consumer purchaser, is warranted by SAMSUNG against manufacturing defects in materials or workmanship for the limited warranty period of:
One (1) year parts and labor
Five (5) years parts and labor on Sealed Refrigeration System Only (Compressor, Evaporator, Condenser, Drier, and Connecting Tubing)
Ten (10) years part and Five (5) years labor on Digital Inverter Compressor Only
This limited warranty is valid only on products purchased and used in the United States
that have been installed, operated, and maintained according to the instructions attached
to or furnished with the product. To receive warranty service, the purchaser must contact
SAMSUNG at the address or phone number provided below for problem determination and
service procedures. Warranty service can only be performed by a SAMSUNG authority
service center. The original dated bill of sale must be presented upon request as proof of
purchase to SAMSUNG or SAMSUNG's authorized service center to receive warranty service.
SAMSUNG will provide in-home service within the contiguous United States during the
warranty period at no charge, subject to availability of SAMSUNG authorized servicers within
the customer's geographic area. If in-home service is not available, SAMSUNG may elect, at
its option, to provide transportation of the product to and from an authorized service center.
If the product is located in an area where service by a SAMSUNG authorized servicer is not
available, you may be responsible for a trip charge or required to bring the product to a
SAMSUNG authorized service center for service.
To receive in-home service, product must be unobstructed and accessible to the service agent.
During the applicable warranty period, a product will be repaired, replaced, or the purchase price refunded, at the sole option of SAMSUNG. SAMSUNG may use new or reconditioned parts in repairing a product, or replace the product with a new or reconditioned product.
Replacement parts and products are warranted for the remaining portion of the original
product's warranty or ninety (90) days, whichever is longer. All replaced parts and products are the property of SAMSUNG and you must return them to SAMSUNG.
This limited warranty covers manufacturing defects in materials or workmanship
encountered in normal household, noncommercial use of this product and shall not cover
the following: damage that occurs in shipment, delivery, installation, and uses for which
this product was not intended; damage caused by unauthorized modification or alteration of the product; product where the original factory serial numbers have been removed,
defaced, changed in any way, or cannot be readily determined; cosmetic damage including
scratches, dents, chips, and other damage to the product's finishes; damage caused by
abuse, misuse, pest infestations, accident, fire, floods, or other acts of nature or God;
damage caused by use of equipment, utilities, services, parts, supplies, accessories, applications, installations, repairs, external wiring or connectors not supplied or authorized by SAMSUNG; damage caused by incorrect electrical line current, voltage, fluctuations and surges; damage caused by failure to operate and maintain the product according to instructions; in-home instruction on how to use your product; and service to correct installation not in accordance with electrical or plumbing codes or correction of household electrical or plumbing (i.e., house wiring, fuses, or water inlet hoses). The cost of repair or replacement under these excluded circumstances shall be the customer's responsibility.
Visits by an authorized servicer to explain product functions, maintenance or installation are not covered by this limited warranty. Please contact SAMSUNG at the number below for assistance with any of these issues.
EXCLUSION OF IMPLIED WARRANTYES
IMPLIED WARRANTY, INCLUDING THE IMPLIED WARRANTY OF MERCHANTABILITY OR FITNESS FOR A PARTICULAR PURPOSE, ARE LIMITED TO ONE YEAR OR THE SHORTEST PERIOD ALLOWED BY LAW. Some states do not allow limitations on how long an implied warranty lasts, so the above limitations or exclusions may not apply to you. This warranty gives you specific rights, and you may also have other rights, which vary from state to state.
LIMITATION OF REMEDIES
YOUR SOLE AND EXCLUSIVE REMEDY IS PRODUCT REPAIR, PRODUCT REPLACEMENT, OR REFUND OF THE PURCHASE PRICE AT SAMSUNG'S OPTION, AS PROVIDED IN THIS LIMITED WARRANTY. SAMSUNG SHALL NOT BE LIABLE FOR SPECIAL, INCIDENTAL OR CONSEQUENTIAL DAMAGES, INCLUDING BUT NOT LIMITED TO TIME AWAY FROM WORK, HOTELS AND/OR RESTAURANT MEALS, REMODELING EXPENSES, LOSS OF REVENUE OR PROFITS, FAILURE TO REALIZE SAVINGS OR OTHER BENEFITS REGARDLESS OF THE LEGAL THEORY ON WHICH THE CLAIM IS BASED, AND EVEN IF SAMSUNG HAS BEEN ADVISED OF THE POSSIBILITY OF SUCH DAMAGES. Some states do not allow exclusion or limitation of incidental or consequential damages, so the above limitations or exclusions may not apply to you. This warranty gives you specific rights, and you may also have other rights, which vary from state to state.
SAMSUNG does not warrant uninterrupted or error-free operation of the product. No warranty or guarantee given by any other person, firm, or corporation with respect to this product shall be binding on SAMSUNG.
To obtain warranty service, please contact SAMSUNG at:
Samsung Electronics America, Inc.
85 Challenger Road
Ridgefield Park, NJ 07660
If your refrigerator needs service
Do not hesitate to call any Samsung Authorized Service Center nearby giving them your name, address and telephone number when your product is not functioning properly.
Warranty Information (CANADA)
Limited Warranty for Original Purchaser
This Samsung product is warranted by Samsung Electronics Canada Inc. (hereafter referred to as SECA) against manufacturing defects in material or workmanship for the following periods:
Labor:1 year (in-home)
Parts:1year
Inverter Compressor : 10 Years (Part only)
SECA further warrants that if this product fails to operate properly within the specified warranty period and the failure is due to improper workmanship or defective material, SECA will repair or replace the product at its option.
In-home service is not available in all areas. Contact us to find out if in-home service is currently available in your area by using the contact information at the back of this warranty.
All warranty repairs or part replacements must be performed by a SECA Authorized Service Center. (To find the nearest SECA Service Center, call 1-800-SAMSUNG (7267864) or visit our web site at www.samsung.com/ca)
Obligation to the Original Owner
The original dated sales receipt must be retained by the customer and is the only acceptable proof of purchase.
It must be presented to a SECA Authorized Service Center at the time service is requested before warranty services are rendered. On all carry-in models, transportation to and from the Authorized Service Center is the responsibility of the customer.
Exclusions of the Warranty
This warranty does not cover damage due to accident, fire, flood, and/or other Acts of God, misuse, incorrect line voltage, improper installation, improper or unauthorized repairs, commercial use, or damage that occurs during shipping. Customer adjustments which are explained in this owners manual are not covered under the terms of this warranty.
This warranty will automatically be voided for any unit found with a missing or altered serial number.
This warranty is valid only on products purchased and used in the Canada.
SAMSUNG CUSTOMER CARE CENTER
Samsung Electronics Canada Inc. 2050 Derry Road West, Mississauga,
Ontario L5N OB9 Canada
www.samsung.com/ca/support (English)
www.samsung.com/ca_fr/support (French)

Scan the QR code* or visit
www.samsung.com/spsn
to view our helpful
How-to Videos and Live Shows
- Requires reader to be installed on your smartphone
Contact SAMSUNG WORLD WIDE
If you have any questions or comments relating to Samsung products, please contact the SAMSUNG customer care center.
| COUNTRY CALL OR VISIT US ONLINE AT | ||
| U.S.A | 1-800-SAMSUNG (726-7864)1-844-SAM-PAYS (726-7297) | www.samsung.com/us/support |
| CANADA | 1-800-SAMSUNG(726-7864)1-844-SAM-PAYS (726-7297) | www.samsung.com/ca/support (English)www.samsung.com/ca_fr/support (French) |
Refrigerador
Manual del usuario
RS25J50*
- Nowhelming a conglomerados that can be found in the market.
American Meat Institute Foundation. 1994. Páginasasamarillas: respectas a preguntas previsibles que los consumidosores realizan con disrespect a la carne y a las aves. American Meat Institute Food Marketing Institute. 1999. The food keeper. Food Marketing Institute, Washington, D.C. Freeland-Graves, J.H. and G.C. Peckham. 1996. Foundations of food preparation, 6th ed. Prentice-Hall, Inc. Englewood Cliffs, NJ. Hillers, V.N. 1993. Storing foods at home. Washington State University Cooperative Extension, Pullman, WA. Publ. EB 1205.
National Restaurant Association. 2001. Be cool-chill out! Refrigerate promptly. National Restaurant Association Education Foundation 1 / 4 s International Food Safety Council, Washington, D.C. USDA. 1997. Basics for handling food safely. U.S. Department of Agriculture, Food Safety and Inspection Service, Washington, D.C.
Ridgefield Park, NJ 07660
National Restaurant Association. 2001. Be cool-chill out! Refrigerate promptly. National Restaurant Association Education Foundation 1 / 4 s International Food Safety Council, Washington, D.C. USDA. 1997. Basics for handling food safely. U.S. Department of Agriculture, Food Safety and Inspection Service, Washington, D.C.
Français 55
www.samsung.com/ca/support (English)
www.samsung.com/ca_fr/support (French)