AC24BT - Air-conditioner LG - Free user manual and instructions
Find the device manual for free AC24BT LG in PDF.
| Product type | Wall-mounted split air conditioner (wall mounting) |
| Brand | LG |
| Model | AC24BT |
| Power supply | 220-240 V ~ 50 Hz |
| Refrigerant | R32 (flammable) |
| Operating modes | Cooling, Heating, Dehumidification, Fan, Jet Mode, Auto Swing Mode, Auto Operation (AI) |
| Special functions | On/Off Timer, Simple Timer, Sleep, Auto Restart, Comfort Air, Energy Control, Energy Display, Air Purification (Ionizer/Plasma), Quiet Mode, Auto Clean, Smart Diagnosis |
| Connectivity | Wi-Fi 2.4 GHz (LG SmartThinQ app) |
| Remote control | Wireless, AAA 1.5 V batteries |
| Air filter | Washable, clean every 2 weeks |
| Maintenance | Clean the indoor unit with a soft, dry cloth. Do not spray water directly. Clean the air filter with warm water (max 40 °C) and mild detergent. |
| Safety | Detailed safety instructions: avoid sources of ignition, use by supervised children, professional installation, mandatory grounding, appropriate circuit breaker. |
| Spare parts and repairability | AAA batteries, air filter, remote control. Repairs reserved for authorized personnel. Use only original spare parts. |
| General information | 758-page manual available in multiple languages. Built-in self-diagnosis function. Weight and dimensions not specified in the manual. |
Frequently Asked Questions - AC24BT LG
User questions about AC24BT LG
0 question about this device. Answer the ones you know or ask your own.
Ask a new question about this device
Download the instructions for your Air-conditioner in PDF format for free! Find your manual AC24BT - LG and take your electronic device back in hand. On this page are published all the documents necessary for the use of your device. AC24BT by LG.
USER MANUAL AC24BT LG
Read this owner's manual thoroughly before operating the appliance and keep it handy for reference at all times.
TYPE: WALL MOUNTED
Original instruction
EN English FR Français EL Ελληνικά NL Nederlands PL Polski
HU Magyar BG Български HR Hrvatski CZ Čeština ET Eesti
MT Malti
RO Română
SK Slovenčina
SL Slovenščina
LV Latviešu
LT Lietuvių
GA Gaeilge SR srpski
МК Македонски
SQ Shqip
BS
Bosanski
MFL69780808
Rev.00_042518


www.lg.com
Copyright © 2018 LG Electronics Inc. All Rights Reserved.
TABLE OF CONTENTS
This manual may contain images or content different from the model you purchased.
This manual is subject to revision by the manufacturer.
SAFETY INSTRUCTIONS .... 3
IMPORTANT SAFETY INSTRUCTIONS....4
OPERATION 11
Notes for Operation 11
Parts and Functions.... 11
Wireless Remote Control....12
Restarting the Air Conditioner Automatically 17
Using the Mode Function....17
Using the Jet Mode Function....20
Using the Fan Speed Function....21
Using the Air Flow Direction Function....21
Setting the On/Off Timer....22
Using the Sleep Function (Optional)....23
Using the Simple Timer Function (Optional)....23
Using the Energy Display Function (Optional)....24
Using the Light Off Function (Optional) 24
Using the Comfort Air Function (Optional)....24
Using the Energy Control Function (Optional)....25
Using Special Functions....25
SMART FUNCTIONS....27
Using LG SmartThinQ Application....27
MAINTENANCE....30
Clean the Air Filter 32
TROUBLESHOOTING 33
SAFETY INSTRUCTIONS
EN
The following safety guidelines are intended to prevent unforeseen risks or damage from unsafe or incorrect operation of the appliance.
The guidelines are separated into ‘WARNING’ and ‘CAUTION’ as described below.

This symbol is displayed to indicate matters and operations that can cause risk. Read the part with this symbol carefully and follow the instructions in order to avoid risk.

WARNING
This indicates that the failure to follow the instructions can cause serious injury or death.

CAUTION
This indicates that the failure to follow the instructions can cause the minor injury or damage to the product.
The following symbols are displayed on indoor and outdoor units.

This symbol indicates that this appliance uses a flammable refrigerant. If the refrigerant is leaked and exposure to an external ignition source, there is a risk of fire.

This symbol indicates that the Operation Manual should be read carefully.

This symbol indicates that a service personnel should be handling this equipment with reference to the Installation Manual.

This symbol indicates that information is available such as the Operating Manual or Installation Manual.
IMPORTANT SAFETY INSTRUCTIONS

WARNING
To reduce the risk of explosion, fire, death, electric shock, injury or scalding to persons when using this product, follow basic precautions, including the following:
Children in the Household
This appliance is not intended for use by persons (including children) with reduced physical, sensory or mental capabilities, or lack of experience and knowledge, unless they have been given supervision or instruction concerning use of the appliance by a person responsible for their safety. Children should be supervised to ensure that they do not play with the appliance.
For use in Europe:
This appliance can be used by children aged from 8 years and above and persons with reduced physical, sensory or mental capabilities or lack of experience and knowledge if they have been given supervision or instruction concerning use of the appliance in a safe way and understand the hazards involved. Children shall not play with the appliance. Cleaning and user maintenance shall not be made by children without supervision.
Installation
- Do not install the air conditioner on an unstable surface or in a place where there is danger of it falling.
-
Contact an authorized service center when installing or relocating the air conditioner.
•Install the panel and the cover of the control box safely. -
Do not install the air conditioner in a place where flammable liquids or gases such as gasoline, propane, paint thinner, etc., are stored.
- Make sure that the pipe and the power cable connecting the indoor and outdoor units are not pulled too tight when installing the air conditioner.
- Use standard circuit breaker and fuse that conform to the rating of the air conditioner.
- Do not input air or gas into the system except with the specific refrigerant.
- Use non-flammable gas (nitrogen) to check for leak and to purge air; using compressed air or flammable gas may cause fire or explosion.
- The indoor/outdoor wiring connections must be secured tightly, and the cable should be routed properly so that there is no force pulling the cable from the connection terminals. Improper or loose connections can cause heat generation or fire.
- Install dedicated electric outlet and circuit breaker before using the air conditioner.
- Do not connect the ground wire to a gas pipe, a lightning rod, or a telephone ground wire.
- Keep any required ventilation openings clear of obstruction.
Operation
- Be sure to use only those parts listed in the service parts list. Never attempt to modify the equipment.
- Make sure that children do not climb on or hit the outdoor unit.
- Dispose of the batteries in a place where there is no danger of fire.
- Use only the refrigerant specified on the air conditioner label.
- Cut off the power supply if there is any noise, smell, or smoke coming from the air conditioner.
- Do not leave flammable substances such as gasoline, benzene, or thinner near the air conditioner.
- Contact an authorized service center when the air conditioner is submerged by flood waters.
- Do not use the air conditioner for an extended period of time in a small place without proper ventilation.
- In the event of a gas leak (such as Freon, propane gas, LP gas, etc.) ventilate sufficiently before using the air conditioner again.
- To clean the interior, contact an authorized service center or dealer. Using harsh detergents may cause corrosion or damage to the unit.
- Be sure to ventilate sufficiently when the air conditioner and a heating appliance such as a heater are used simultaneously.
- Do not block the inlet or outlet of air flow.
- Do not insert hands or other objects through the air inlet or outlet while the air conditioner is operating.
- Make sure that the power cable is neither dirty, loose, nor broken.
- Never touch, operate, or repair the air conditioner with wet hands.
- Do not place any objects on the power cable.
- Do not place a heater or other heating appliances near the power cable.
- Do not modify or extend the power cable. Scratches or peeling insulation on the power cables may result in fire or electric shock, and should be replaced.
-
Cut off the power supply immediately in the event of a blackout or a thunderstorm.
-
Take care to ensure that power cable could not be pulled out or damaged during operation.
- Do not touch refrigerant pipe, water pipe and any internal parts while the unit is operating or immediately after operation.
Maintenance
- Do not clean the appliance by spraying water directly onto the product.
- Before cleaning or performing maintenance, disconnect the power supply and wait until the fan stops.
Technical Safety
- Installation or repairs made by unauthorized persons can pose hazards to you and others.
- Any person who is involved with working on or breaking into a refrigerant circuit should hold a current valid certificate from an industry-accredited assessment authority, which authorizes their competence to handle refrigerants safely in accordance with an industry recognized assessment specification.
-
Servicing shall only be performed as recommended by the equipment manufacturer. Maintenance and repair requiring the assistance of other skilled personnel shall be carried out under the supervision of the person competent in the use of flammable refrigerants.
-
The information contained in the manual is intended for use by a qualified service technician who is familiar with the safety procedures and equipped with the proper tools and test instruments.
- Failure to read and follow all instructions in this manual can result in equipment malfunction, property damage, personal injury and/or death.
- The appliance shall be installed in accordance with national wiring regulations.
- When the power cord is to be replaced, the replacement work shall be performed by authorized personnel using only genuine replacement parts.
- This appliance must be properly grounded to minimize risk of electric shock.
- Do not cut or remove the grounding prong from the power plug.
- Attaching the earth wire to the power outlet cover screw does not ground the appliance unless the cover screw is metal, uninsulated, and the power outlet is grounded through house wiring.
- If you have any doubt whether the air conditioner is properly grounded, have the power outlet and circuit checked by a qualified electrician.
- The refrigerant and insulation blowing gas used in the appliance require special disposal procedures. Consult a service agent or a similarly qualified person before disposing of them.
- If the supply cord is damaged, it must be replaced by the manufacturer, its service agent or similarly qualified person in order to avoid a hazard.
- The appliance shall be stored in a well-ventilated area where the room size corresponds to the room area as specified for operation.
- The appliance shall be stored in a room without continuously operating open flames (for example an operating gas appliance) and ignition sources (for example an operating electric heater).
- The appliance shall be stored so as to prevent mechanical damage from occurring.

CAUTION
To reduce the risk of minor injury to persons, malfunction, or damage to the product or property when using this product, follow basic precautions, including the following:
Installation
- Do not install the air conditioner in an area where it is directly exposed to sea wind (salt spray).
• Install the drain hose properly for the smooth drainage of water condensation.
•Exercise caution when unpacking or installing the air conditioner. -
Do not touch the leaking refrigerant during installation or repair.
-
Transport the air conditioner with two or more people or use a forklift.
•Install the outdoor unit such that it is protected from direct sunlight. Do not place the indoor unit in a place where it is directly exposed to sunlight via the windows. - Safely dispose of packing materials such as screws, nails or batteries using proper packaging after installation or repair.
• Install the air conditioner in a place where the noise from the outdoor unit or the exhaust fumes will not inconvenience the neighbors. Failure to do so may result in conflict with the neighbors.
Operation
- Remove the batteries if the remote control is not to be used for an extended period of time.
- Make sure that the filter is installed before operating the air conditioner.
- Be sure to check if there is a refrigerant leak after installing or repairing the air conditioner.
- Do not place any object on the air conditioner.
- Never mix different types of batteries, or old and new batteries for the remote control.
- Do not let the air conditioner run for a long time when humidity is very high or when a door or a window has been left open.
- Stop using the remote control if there is a fluid leak in the battery. If your clothes or skin are exposed to the leaking battery fluid, wash off with clean water.
- Do not expose people, animals, or plants to the cold or hot wind from the air conditioner for extended periods of time.
- If the leaking battery fluid has been swallowed, rinse the inside of the mouth thoroughly and consult a doctor.
- Do not drink the water drained from the air conditioner.
- Do not use the product for special purposes, such as preserving foods, works of art, and etc. It is an air conditioner for consumer purposes, not a precision refrigeration system. There is risk of damage or loss of property.
- Do not recharge or disassemble the batteries.
Maintenance
- Never touch the metal parts of the air conditioner when removing the air filter.
- Use a sturdy stool or ladder when cleaning, maintaining, or repairing the air conditioner at a height.
- Never use strong cleaning agents or solvents when cleaning the air conditioner or spray water. Use a smooth cloth.
OPERATION
EN
Notes for Operation
Suggestion for Energy Saving
- Do not over-cool the space. This may be harmful for your health and may consume more electricity.
- Block sunlight with blinds or curtains while you are operating the air conditioner.
- Keep doors or windows closed tightly while you are operating the air conditioner.
- Adjust the direction of the air flow vertically or horizontally to circulate indoor air.
- Speed up the fan to cool or warm indoor air quickly, within a short period of time.
- Open windows regularly for ventilation. The indoor air quality may deteriorate if the air conditioner is used for long durations.
- Clean the air filter once every 2 weeks. Dust and impurities collected in the air filter may block the air flow or reduce the unit performance.
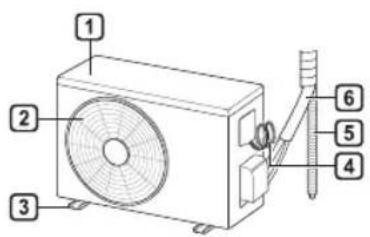
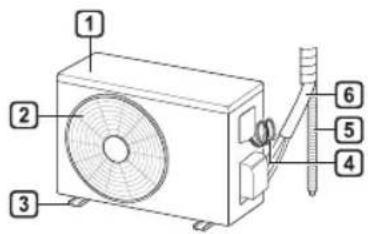
Parts and Functions
Indoor Unit Outdoor Unit
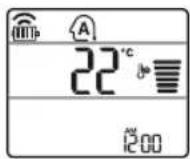
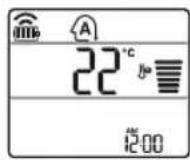
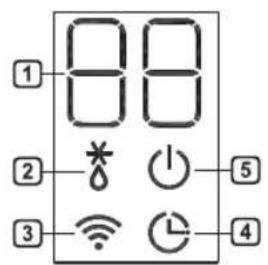
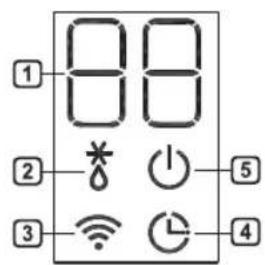
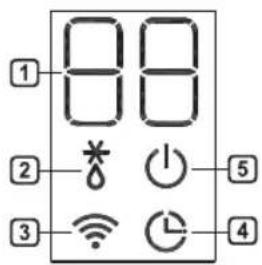
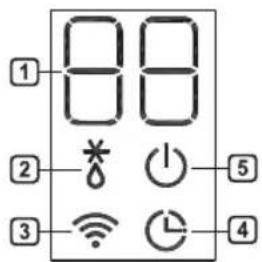
Indoor Display Screen
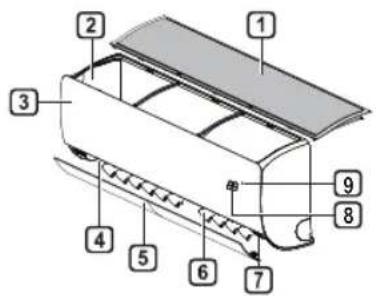


1 Air Filter
② Air Intake
3 Front Cover
4 Air Outlet
5 Air Deflector (Horizontal Vane)
6 Air Deflector (Vertical Louver)
7 On/Off Button
8 Display
9 Signal Receiver
NOTE
- The number and location of operation lamps may vary according to the model of the air conditioner.
- The feature may be changed according to the type of model.
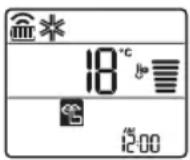
① Desired temperature / Room temperature
② Defrosting / Preheating
3 Wi-Fi
4 Timer
5 On/Off
Wireless Remote Control
Inserting Batteries
If the display screen of the remote control begins to fade, replace the batteries. Insert AAA (1.5 V) batteries before using the remote control.
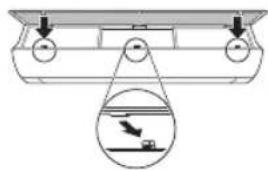
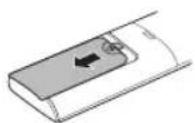
1 Remove the battery cover.
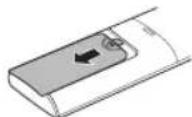
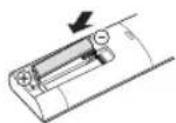
2 Insert the new batteries and make sure that the + and - terminals of the batteries are installed correctly.

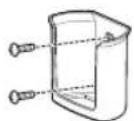
Installing the Remote Control Holder
To protect the remote control, install the holder where there is no direct sunlight.
1 Choose a safe and easily accessible location.
2 Fix the holder by fastening 2 screws firmly with a screwdriver.
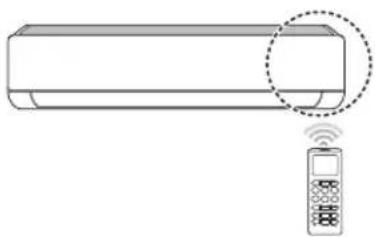
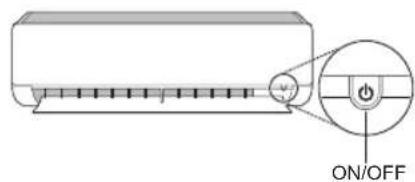
Operating Method
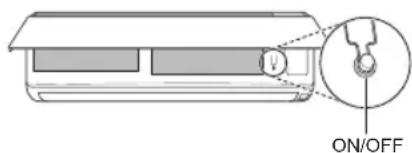
Point the remote control towards the signal receiver at the right side of the air conditioner to operate it.
natural_image
Line drawing of a modern air conditioner with a remote control unit and a circular annotation highlighting the portion of the device (no text or symbols present)NOTE
- The remote control may operate other electronic devices if it is directed towards them. Make sure to point the remote control towards the air conditioner signal receiver.
- For proper operation, use a soft cloth to clean the signal transmitter and receiver.
- In case of a function not provided in the product, no buzzer sound occurs from the product when a button for such function on the remote control is pressed except for Air
Flow Direction (SWING), Energy Display (kW [3·s]), Air Purification function (A).
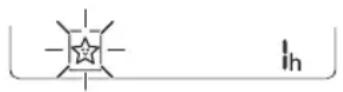
Setting the Current Time
1 Insert batteries.
- The icon below blinks at the bottom of the display screen.

2 Press or button to select the minutes.
3 Press SET/CANCEL button to finish.
NOTE
- The On/Off Timer is available after setting the current time.
Using the °C/°F Conversion Function (Optional)
This function changes unit between ^ C and ^ F
- Press and hold button about 5 seconds.
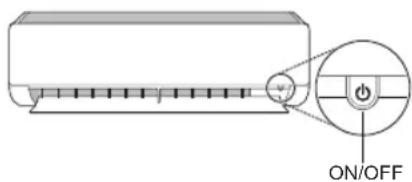
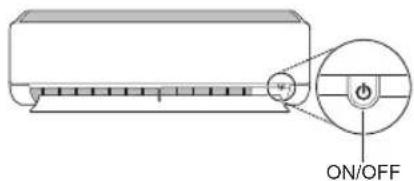
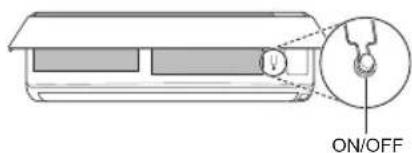
Operating the Air Conditioner without the Remote Control
You can use the ON/OFF button of the indoor unit to operate the air conditioner when the remote control is unavailable.
1 Open the front cover (Type2) or horizontal vane (Type1).
2 Press the ON/OFF button.
Type1
Type2
NOTE
- The stepping motor may be broken, if the horizontal vane opens rapidly.
• The fan speed is set to high. - The feature may be changed according to the type of model.
- The temperature cannot be altered when using this emergency ON/OFF button.
- For cooling & heating models, the temperature is set from 22 °C to 24 °C
Using Wireless Remote Control
You can operate the air conditioner more conveniently with the remote control.
| 2 | |
| 1 | |
| RESET |
NOTE
- * buttons may be changed according to the type of model.
- When connected to the Multi Outdoor unit, the Energy Display, Energy Control, Silent and Smart Diagnosis function may not be supported.
EN
![2 MODE FAN SPEED TEMP JET MODE RN (3 x) SWING SWING ROOM TEMP C—F [3 x] DIAGNOSIS (3 x) SET UP FUNC. SET CANCEL TIMER CANCEL RESET](/content/2026/03/514882/images/b8e30e333f472045f4bc53f34b9ae085e82cf2481950dd16f3b539be9ebeba11.jpg)
| 1Button | 2DisplayScreen | Description | Available Function | |
| Single Split | Multi | |||
| To turn on/off air conditioner automatically at desired time. | O | O | ||
| SET/CANCEL | - | To set/cancel the special functions and timer. | O | O |
| - | To cancel the timer settings. | O | O | |
| - To adjust time. O O | ||||
| *LIGHT OFF | - | To set the brightness of the display on the indoor unit. | O | O |
| ROOM TEMP | To display the room temperature. | O | O | |
| °C←°F[5 s] | °C°F | To change unit between °C and °F | O | O |
| *COMFORT AIR | To adjust the air flow to deflect wind. | O | O | |
| kW[3 s] | - | To set whether or not to display information regarding energy. | O | X |
| *ENERGY CTRL | To bring the effect of the power saving. | O | X | |
| DIAGNOSIS[5 s] | - | To conveniently check maintenance information of a product. | O | X |
EN
![2 MODE FAN SPEED TEMP JET MODE SWING ROOM TEMP C→F[3 x] DIAGNOSIS [5 x] SET UP FUNC. SET CANCEL TIMER CANCEL RESET](/content/2026/03/514882/images/ac18090f12389418984e6fba115694fc5d7dcdda3fad82ae1c81d8c196ce99b3.jpg)
| 1Button | 2DisplayScreen | Description | Available Function | |
| Single Split | Multi | |||
 | To purify the air by removing particles that enters the indoor unit. | O(Optional) | O(Optional) | |
| To reduce noise from outdoor units. | O | X | ||
| To remove moisture generated inside the indoor unit. | O | O | ||
| RESET - | To initialize the remote control settings. | O | O | |
NOTE
• Some functions may not be supported, depending on the model.
- * buttons may be changed according to the type of model.
- Press the SET/CANCEL button to operate the selected FUNC.
Restarting the Air Conditioner Automatically
When the air conditioner is turned on again after a power failure, this function restores the previous settings.
Disabling Auto Restart
1 Open the front cover (Type2) or horizontal vane (Type1).
2 Press the ON/OFF button and hold it for 6 seconds, then the unit will beep twice and the lamp will blink twice 4 times.
- To re-enable the function, press the ON/OFF button and hold it for 6 seconds. The unit will beep twice and the lamp will blink 4 times.
Type1
Type2

NOTE
- The feature may be changed according to the type of model.
- If you press and hold the ON/OFF button for 3 – 5 seconds, instead of 6 seconds, the unit will switch to the test operation. In the test operation, the unit blows out strong cooling air for 18 minutes and then returns to factory default settings.
Using the Mode Function
This function allows you to select the desired function.

flowchart
graph TD
    A[" Cooling Mode "] --> B[" Auto Changeover Mode / Auto Operation(AI) Mode "]
    B --> C[" Dehumidification Mode "]
    C --> D[" Heating Mode "]
    D --> E[" Fan Mode "]
Cooling Mode
1 Turn the appliance on.
2 Press MODE button repeatedly to select the Cooling Mode.
* is displayed on the display screen.

3 Press or button to set the desired temperature.
Auto Operation (Artificial Intelligence)
Multi Model
In this operation mode, the system is automatically operated by the electronic controls.
1 Turn the appliance on.
2 Press MODE button repeatedly to select the Auto Operation.
A is displayed on the display screen.
3 Press or button to set the desired temperature.
4 Press FAN SPEED button to adjust the fan speed.
Auto Changeover Mode
Single Split Model
This mode changes the mode automatically to maintain the set temperature at ±2 ^
1 Turn the appliance on.
2 Press MODE button repeatedly to select the Auto Changeover Mode.
A is displayed on the display screen.
3 Press or button to set the desired temperature.
4 Press FAN SPEED button to adjust the fan speed.
Dehumidification Mode
This mode removes excess moisture from a highly humid environment or during the rainy season, in order to prevent mildew from setting in. This mode adjusts the room temperature and the fan speed automatically to maintain the optimal level of humidity.
1 Turn the appliance on.
2 Press MODE button repeatedly to select the Dehumidification Mode.
is displayed on the display screen.
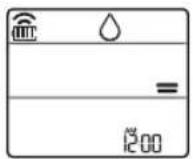
NOTE
- In this mode you cannot adjust the room temperature, it is adjusted automatically.
- The room temperature is not displayed on the display screen.
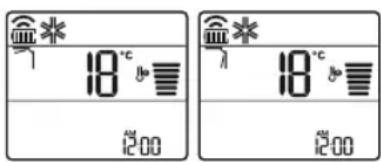
Heating Mode
1 Turn the appliance on.
2 Press MODE button repeatedly to select the Heating Mode.
is displayed on the display screen.
3 Press or button to set the desired temperature.
NOTE
will be displayed on the indoor unit when defrosting is operating.
• Furthermore, this indication will be displayed on the indoor unit:
- When preheating is operating.
- When the room temperature has been reached to the set temperature.
Fan Mode
This mode only circulates the indoor air without changing the room temperature.
1 Turn the appliance on.
2 Press MODE button repeatedly to select the Fan Mode.
is displayed on the display screen.
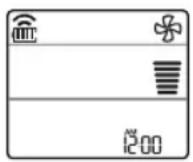
3 Press FAN SPEED button to adjust the fan speed.
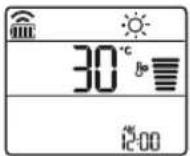
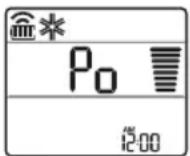
Using the Jet Mode Function Changing Room Temperature Quickly
This function allows you to cool indoor air quickly during the summer or warm it quickly during winter.
- The Jet Mode function is available with Cooling, Heating and Dehumidification Mode.
1 Turn the appliance on.
2 Press MODE button repeatedly to select the desired mode.
3 Press JET MODE button. P_0 is displayed on the display screen.
NOTE
- Jet Heating Mode is not available on some models.
- In Jet Cooling Mode, strong air blows out for 30 minutes.
• After 30 minutes later, setting temperature is maintaining 18 °C
If you want to change the temperature, Press
or button to set the desired temperature.
- In Jet Heating Mode, strong air blows out for 30 minutes.
• After 30 minutes later, setting temperature is maintaining 30 °C
If you want to change the temperature, Press
or button to set the desired temperature.
- This function may operate differently from the remote control display.
Using the Fan Speed Function
Adjusting the Fan Speed
- Press FAN SPEED button repeatedly to adjust the fan speed.
| Display Screen Speed | |
| [DYSZ] | High |
 | Medium - High |
| [0YXW] | Medium |
| [DSWW] | Medium - Low |
 | Low |
| - Natural Wind | |
NOTE
- The fan speed of Natural Wind adjusts automatically.
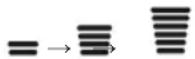
- The fan speed icons are displayed on some indoor units.

- Indoor unit display is displayed only 5 seconds and return to the setting temperature on some models.
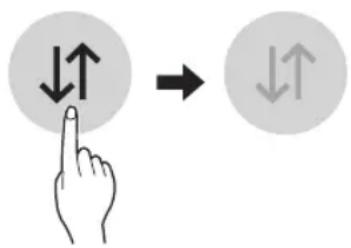
Using the Air Flow Direction Function
This function adjusts the direction of the air flow vertically (horizontally).
- PressSWING(SWING) button repeatedly and select the desired direction.
- Select(只) to adjust the direction of the air flow automatically.
NOTE
- Adjusting the air flow direction horizontally may not be supported, depending on the model.
- Adjusting the air deflector arbitrarily may cause product failure.
- If you restart the air conditioner, it starts to operate with the previously set direction of air flow, so the air deflector may not match the icon displayed on the remote control. When this occurs, press SWING or SWING button to adjust the direction of the air flow again.
- This function may operate differently from the remote control display.
Setting the On/Off Timer
This function sets the air conditioner to turn on/off automatically at desired time.
On/Off Timer can be set together.
Setting the On Timer
1 Press TIMER button repeatedly.
- The icon below blinks at the bottom of the display screen.
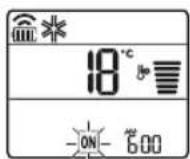
2 Press or button to select the minutes.
3 Press SET/CANCEL button to finish.
• After setting the timer, current time and ON icon are displayed on the display screen indicating that the desired time is set.
Canceling the On Timer
1 Press TIMER button repeatedly.
- The icon below blinks at the bottom of the display screen.

2 Press SET/CANCEL button to cancel the setting.
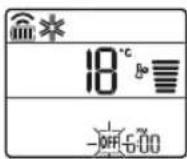
Setting the Off Timer
1 Press TIMER button repeatedly.
- The icon below blinks at the bottom of the display screen.
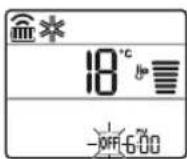
2 Press or button to select the minutes.
3 Press SET/CANCEL button to finish.
- After setting the timer, current time and OFF icon are displayed on the display screen indicating that the desired time is set.
NOTE
- This function is disabled when you set Simple Timer.
Canceling the Off Timer
1 Press TIMER button repeatedly.
- The icon below blinks at the bottom of the display screen.
2 Press SET/CANCEL button to cancel the setting.
Canceling the Timer Setting
- Press button to cancel all timer settings.
Using the Sleep Function (Optional)
This function turns off the air conditioner automatically when you go to sleep.
1 Turn the appliance on.
2 Press TIMER button repeatedly.
- The icon below blinks at the bottom of the display screen.
3 Press or button to select the hour (up to 7 hours).
4 Press SET/CANCEL button to finish.
is displayed on the display screen.
NOTE
is displayed on some indoor units.
- Indoor unit display is displayed from 1H to 7H which is displayed only 5 seconds and then return to the setting temperature.
- In the Cooling and Dehumidification Mode, the temperature increases by 1 °C after 30 minutes and additional 1 °C after another 30 minutes for a more comfortable sleep.
- The temperature increases up to 2 °C from the preset temperature.
- Although the remark for fan speed on the display screen may be changed, the fan speed is adjusted automatically.
Using the Simple Timer Function (Optional)
This function turns off the air conditioner automatically when you go to sleep.
1 Turn the appliance on.
2 Press TIMER button repeatedly.
- The icon below blinks at the bottom of the display screen.
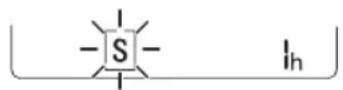
3 Press or button to select the hour (up to 7 hours).
4 Press SET/CANCEL button to finish.
S is displayed on the display screen.
NOTE
- This function is disabled when you set Off Timer.
Using the Energy Display Function (Optional)
This function displays the amount of electricity generated on the indoor display as the product operates.
Display the Current Energy Usage
1 Turn the appliance on.
2 Press kW[3s] button and hold it about 3 seconds.
- The instantaneous power consumption (88) is displayed for a while on some indoor units.
NOTE
- It is not displayed on the wireless remote control.
• The unit of the displayed value is kW. - If it is more than 99 kW, which is the range of expression, maintain it as 99 kW.
- Display wattage under 10 kW with 0.1 kW unit, and display one over 10 kW with 1 kW unit.
- The actual power may differ from the power displayed.
- When connected to the Multi Outdoor unit, this function may not be supported.
Using the Light Off Function (Optional)
Display Screen Brightness
You can set the brightness of the indoor unit display screen.
- Press LIGHT OFF button.
NOTE
- Turn on/off the Display screen.
Using the Comfort Air Function (Optional)
Comfort Vane Operation
This function conveniently sets the vane to a preset position to deflect the supply air away from blowing directly onto the occupants in the room.
1 Turn the appliance on.
2 Press COMFORT AIR button repeatedly and select the desired direction.

NOTE
-7 or Lis displayed on some indoor units.
- This function is disabled when you press MODE or JET MODE button.
- This function is disabled and auto swing of vertical direction is set up when you press

- When this function is off, the horizontal vane operates automatically depending on the set mode.
Using the Energy Control Function (Optional)
1 Turn the appliance on.
2 Press ENERGY CTRL button.
- Press ENERGY CTRL button repeatedly to select each step.
| 1 step 2 step 3 step | ||
NOTE
- 1 step: The power Input is decreased by 20% compared to rated power input.
80% is displayed on the display screen.
• 2 step : The power Input is decreased by 40% compared to rated power input.
60% is displayed on the display screen.
- 3 step (Optional): The power Input is decreased by 60% compared to rated power input.
40% is displayed on the display screen.
(1 step), (2 step) is displayed on some indoor units.
• This function is available with Cooling Mode.
- Capacity may decrease when Energy Control mode is selected.
- Desired temperature is displayed about 5 seconds if you press FAN SPEED, ⬆ or ⬇ button.
• Room temperature is displayed about 5 seconds if you press ROOM TEMP button.
- When connected to the Multi Outdoor unit, this function may not be supported.
Using Special Functions
1 Turn the appliance on.
2 Press FUNC button repeatedly to select the desired function.
3 Press SET/CANCEL button to finish.
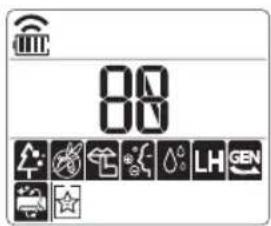
| Display Screen | Description |
 | To purify the air by removing particles that enters the indoor unit. |
| [ZBH] | To reduce noise from outdoor units. |
 | To remove moisture generated inside the indoor unit. |
NOTE
- Some functions may not be supported, depending on the model.
- Some functions may operate differently from the remote control display.
Canceling Special Functions
1 Press FUNC button repeatedly to select the desired function.
2 Press SET/CANCEL button to cancel the function.
Using the Air Purification Function
These functions supply clean and fresh air by ion particles and the filter.
| Function D | display Description | |
| Ionizer |  | Ion particles from lonizer sterilize the aerial bacteria and other harmful substances. |
| Plasma | It removes microscopic contaminants from the intake air completely to supply clean and fresh air. |
NOTE
- You can use this function without turning the air conditioner on.
- Both the plasma lamp and the cooling lamp light up while Smoke Away/Plasma is in operation on some models.
- Do not touch ionizer during operation.
- This function may operate differently from the remote control display.
Using the Silent Function
This function prevents potential claims by neighbors, reducing noise from outdoor units.

is displayed on the display screen.
NOTE
- This function is disabled when you press MODE or ENERGY CTRL or JET MODE button.
- This function is available with Cooling, Heating, Auto Changeover, Auto Operation Mode.
- When connected to the Multi Outdoor unit, this function may not be supported.
Using the Auto Clean Function
In the Cooling and Dehumidification Mode, moisture is generated inside the indoor unit. This function removes such moisture.

is displayed on the display screen.

NOTE
- Some functions cannot be used while the Auto Clean function is in operation.
- If you turn off the unit, the fan continues to run for 30 minutes and cleans the inside of the indoor unit.
Using LG SmartThinQ Application
Things to check before using LG SmartThinQ
- For appliances with the logo
1 Check the distance between the appliance and the wireless router (Wi-Fi network).
- If the distance between the appliance and the wireless router is too far, the signal strength becomes weak. It may take a long time to register or installation may fail.
2 Turn off the Mobile data or Cellular Data on your smartphone.
- For iPhones, turn data off by going to Settings → Cellular → Cellular Data.
3 Connect your smartphone to the wireless router.

NOTE
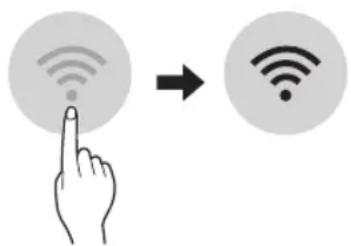
- To verify the Wi-Fi connection, check that Wi-Fi icon on the control panel is lit.
- The appliance supports 2.4 GHz Wi-Fi networks only. To check your network frequency, contact your Internet service provider or refer to your wireless router manual.
- LG SmartThinQ is not responsible for any network connection problems or any faults, malfunctions, or errors caused by network connection.
- If the appliance is having trouble connecting to the Wi-Fi network, it may be too far from the router. Purchase a Wi-Fi repeater (range extender) to improve the Wi-Fi signal strength.
- The Wi-Fi connection may not connect or may be interrupted because of the home network environment.
- The network connection may not work properly depending on the Internet service provider.
- The surrounding wireless environment can make the wireless network service run slowly.
- The appliance cannot be registered due to problems with the wireless signal transmission. Unplug the appliance and wait about a minute before trying again.
- If the firewall on your wireless router is enabled, disable the firewall or add an exception to it.
- The wireless network name (SSID) should be a combination of English letters and numbers. (Do not use special characters.)
- Smartphone user interface (UI) may vary depending on the mobile operating system (OS) and the manufacturer.
- If the security protocol of the router is set to WEP, you may fail to set up the network. Please change it to other security protocols (WPA2 is recommended) and register the product again.
Installing LG SmartThinQ
Search for the LG SmartThinQ application from the Google Play Store or Apple App Store on a smart phone. Follow instructions to download and install the application.
Wi-Fi Function
• For appliances with the logo
Communicate with the appliance from a smart phone using the convenient smart features.
Smart Diagnosis™
If you use the Smart Diagnosis function, you will be provided with the useful information such as a correct way of using the appliance based on the pattern of use.
Settings
Allows you to set various options on the appliance and in the application.
NOTE
- If you change your wireless router, Internet service provider, or password, delete the registered appliance from the LG SmartThinQ application and register it again.
- The application is subject to change for appliance improvement purposes without notice to users.
• Functions may vary by model.
Open Source Software Notice
Information
To obtain the source code under GPL, LGPL, MPL, and other open source licenses, that is contained in this product, please visit http://opensource.lge.com.
In addition to the source code, all referred license terms, warranty disclaimers and copyright notices are available for download.
LG Electronics will also provide open source code to you on CD-ROM for a charge covering the cost of performing such distribution (such as the cost of media, shipping, and handling) upon email request to opensource@lge.com. This offer is valid for a period of three years after our last shipment of this product. This offer is valid to anyone in receipt of this information.
EN
Smart Diagnosis™ Using a Smart Phone
Use this function if you need an accurate diagnosis by an LG Electronics customer information centre when the appliance malfunctions or fails.
Smart Diagnosis™ can not be activated unless the appliance is connected to power. If the appliance is unable to turn on, then troubleshooting must be done without using Smart Diagnosis™.
NOTE
- Be sure to keep ambient noise to a minimum or the phone may not correctly receive the buzzer beeps from the indoor unit.

WARNING
- Before cleaning or performing maintenance, disconnect the power supply and wait until the fan stops.
If the air conditioner will not be used for an extended period of time, dry the air conditioner to maintain it in best condition. Clean the product regularly to maintain optimal performance and to prevent possible breakdown.
- Dry the air conditioner in Fan mode for 3 to 4 hours and disconnect the power. There may be internal damage if moisture is left in its components.
- Before using the air conditioner again, dry the inner components of the air conditioner in Fan mode for 3 to 4 hours. This will help to remove the odor generated from moisture.
- The feature may be changed according to the type of model.
EN
| Type Description Interval | ||
| Air filter Clean with a vacuum or hand wash. 2 weeks | ||
| Ionizer (Optional) Use dry cotton bud to remove any dust. Every 6 months | ||
| Indoor unit | Clean the Indoor unit surface by using a soft, dry cloth. Regularly | |
| Have a professional clean the condensate drain pan. Once a year | ||
| Have a professional clean the condensate drain pipe. Every 4 months | ||
| Replace the remote control batteries. Once a year | ||
| Outdoor unit | Have a professional clean the heat exchanger coils and the panel vents. (Consult with technician.) | Once a year |
| Have a professional clean the fan. Once a year | ||
| Have a professional clean the condensate drain pan. Once a year | ||
| Have a professional verify that all the fan assembly is firmly tightened. | Once a year | |
| Clean the electric components with air. Once a year | ||
NOTE
- Never use water that is higher than 40^ when you clean the filters. It may cause deformation or discoloration.
- Never use volatile substances when you clean the filters. They may damage the surface of the product.
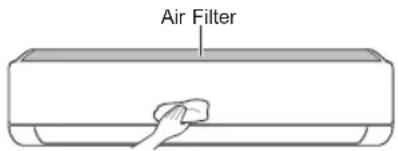
Clean the Air Filter
Clean the air filters once every 2 weeks, or more, if necessary.
NOTE
• The air filter can be broken when it is bent.
- When the air filter is not assembled correctly, dust and other substances can enter into the indoor unit.
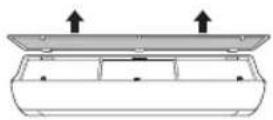
Type1
If you look at the indoor unit from above it, can assemble the top filter easily.
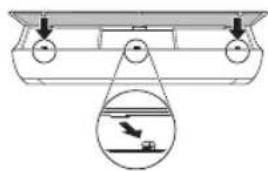
1 Turn off the power to the unit.
2 Hold the knobs of the air filter, lift it up slightly.

natural_image
Diagram showing two circular views of a container with arrows indicating direction (no text or symbols)3 Remove it from the indoor unit.

4 Clean the filter with a vacuum cleaner or with lukewarm water with neutral detergent.
5 Dry the filter in the shade.
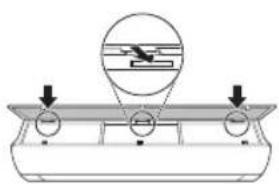
6 Insert the hooks of the air filter into the front cover.
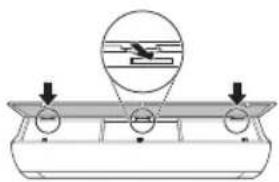
natural_image
Diagram of a mechanical setup with a lever and circular components, no text or symbols present7 Push down hooks to assemble the air filter.
natural_image
Diagram of a boat hull with a suspended platform and an inset showing a boat being lifted (no text or symbols)8 Check the side of the front cover for correct assembly of the air filter.
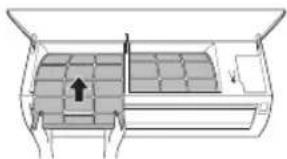
Type2
1 Turn off the power to the unit.
2 Open the front cover.
- Lift up both sides of the cover slightly.
3 Hold the knobs of the air filters, pull them down slightly and remove them from the indoor unit.
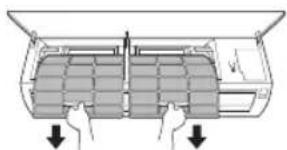
natural_image
Diagram of a car air conditioner unit with two hands inserting into the chamber (no text or labels)4 Clean the filters with a vacuum cleaner or with lukewarm water with neutral detergent.
5 Dry the filters in the shade.
6 Insert the hooks of the air filters into the front cover.
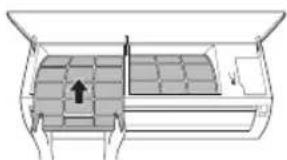
natural_image
Diagram of a vehicle interior showing seating arrangement and directional arrow (no text or symbols)7 Check the side of the front cover for correct assembly of the air filters.
Self-diagnosis Function
This product has a built-in self-diagnosis function. If an error occurs, the lamp of the indoor unit will blink in 2 second intervals. If this occurs, contact your local dealer or service center.
Before Calling for Service
Please check the following before you contact the service center. If the problem persists, contact your local service center.
| Problem Possible | Causes Corrective Action | |
| The air conditioner does not work normally. | Burning smell and strange sounds are coming from the unit. | Turn off the air conditioner, switch OFF, or disconnect the power supply, and contact the service center. |
| Water leaks from the indoor unit even when the humidity level is low. | ||
| The power cable is damaged or it is generating excessive heat. | ||
| A switch, a circuit breaker (safety, ground), or a fuse is not operated properly. | ||
| The unit generates an error code from its self-diagnosis. | ||
| The air conditioner does not work. | The air conditioner is unplugged. | Check whether the power cord is plugged into the outlet or the power isolators are switched on. |
| A fuse exploded, or the power supply is blocked. | Replace the fuse or check if the circle breaker has tripped. | |
| A power failure has occurred. | Turn off the air conditioner when a power failure occurs.When the power is restored, wait 3 minutes, and then turn on the air conditioner. | |
| The voltage is too high or too low. | Check if the circuit breaker has tripped. | |
| The air conditioner was turned off automatically at a preset time. | Turn the air conditioner on. | |
| The battery setting in the remote controller is incorrect. | Make sure that the batteries are inserted correctly in your remote controller.If the batteries are placed correctly, but the air conditioner still does not operate, replace the batteries and try again. |
EN
| Problem Possible Causes Corrective Action | ||
| The air conditioner does not emit cool air. | Air is not circulating properly. | Make sure that there are no curtains, blinds, or pieces of furniture blocking the front of the air conditioner. |
| The air filter is dirty. | Clean the air filter once every 2 weeks.See “Clean the Air Filter” for more information. | |
| The room temperature is too high. | In summer, cooling the indoor air fully may take some time. In this case, select the Jet Mode to cool the indoor air quickly. | |
| Cold air is escaping from the room. | Make sure that no cold air is escaping through the ventilation points in the room. | |
| The desired temperature is higher than the current temperature. | Set the desired temperature to a level lower than the current temperature. | |
| There is a heating source nearby. | Avoid using heat generators like electric ovens or gas burners while the air conditioner is in operation. | |
| Fan Mode is selected. | During Fan Mode, air blows from the air conditioner without cooling or heating the indoor air.Switch the operation mode to cooling operation. | |
| Outside temperature is too high. | The cooling effect may not be sufficient. | |
| The fan speed cannot be adjusted. | The Jet Mode, or Auto Operation Mode is selected. | In some operation modes, you cannot adjust the fan speed. Select an operation mode in which you can adjust the fan speed. |
| The temperature cannot be adjusted. | The Fan Mode or Jet Mode is selected. | In some operation modes, you cannot adjust the temperature. Select an operation mode in which you can adjust the temperature. |
| The air conditioner stops during operation. | The air conditioner is suddenly turned off. | The Timer Function may have timed out, which turns the unit off. Check the timer settings. |
| A power failure has occurred during operation. | Wait for the power to come back. If you have the Auto Restart function enabled, your unit will resume its last operation several minutes after power is restored. | |
EN
| Problem Possible | Causes Corrective Action | |
| The indoor unit is still operating even when the unit has been turned off. | The Auto Clean function is being operated. | Allow the Auto Clean function to continue since it removes any remaining moisture inside the indoor unit. If you do not want this feature, you can turn the unit off. |
| The air outlet on the indoor unit is discharging mist. | The cooled air from the air conditioner makes mist. | When the room temperature decreases, this phenomenon will disappear. |
| Water leaks from the outdoor unit. | In the heating operations, condensed water drops from the heat exchanger. | This symptom requires installing a drain hose under the base pan. Contact the installer. |
| There is noise or vibration. | A clicking sound can be heard when the unit starts or stops due to movement of the reversing valve.Creaking sound: The plastic parts of the indoor unit creak when they shrink or expand due to sudden temperature changes.Flowing or Blowing sound: This is the flow of refrigerant through the air conditioner. | These are normal symptoms. The noise will stop. |
| The indoor unit gives off an odor. | Odors (such as cigarette smoke) may be absorbed into the indoor unit and discharged with airflow. | If the smell does not disappear, you need to wash the filter. If this does not work, contact the service center to clean your heat exchanger. |
| The air conditioner does not emit warm air. | When Heating Mode starts, the vane is almost closed, and no air comes out, even though the outdoor unit is operating. | This symptom is normal. Please wait until the unit has generated enough warm air to blow through the indoor unit. |
| The outdoor unit is in Defrosting Mode. | In Heating Mode, ice/frost is built up on the coils when the outside temperature falls. This function removes a layer of frost on the coil, and it should finish in approximately 15 minutes. | |
| Outside temperature is too low. | The heating effect may not be sufficient. |
EN
| Problem Possible | Causes Corrective Action | |
| Your home appliance and smartphone is not connected to the Wi-Fi network. | The password for the Wi-Fi that you are trying to connect to is incorrect. | · Find the Wi-Fi network connected to your smartphone and remove it, then register your appliance on LG SmartThinQ. |
| Mobile data for your smartphone is turned on. | · Turn off the Mobile data of your smartphone and register the appliance using the Wi-Fi network. | |
| The wireless network name (SSID) is set incorrectly. | · The wireless network name (SSID) should be a combination of English letters and numbers. (Do not use special characters.) | |
| The router frequency is not 2.4 GHz. | · Only a 2.4 GHz router frequency is supported. Set the wireless router to 2.4 GHz and connect the appliance to the wireless router. To check the router frequency, check with your Internet service provider or the router manufacturer. | |
| The distance between the appliance and the router is too far. | · If the distance between the appliance and the router is too far, the signal may be weak and the connection may not be configured correctly. Move the location of the router so that it is closer to the appliance. |
NOTE
- Some functions may not be supported, depending on the model.
MANUEL DU PROPRIÉTAIRE
CLIMATISATION

natural_image
Line drawing of a rectangular air conditioner with a remote control unit and a dotted circle highlighting the portion of the device (no text or symbols present)REMARQUE
REMARQUE
REMARQUE
natural_image
Diagram showing two circular views of a container with liquid, no text or symbols presentnatural_image
Diagram of a mechanical setup with three circular components and an inset showing a piston or cylinder (no text or symbols)natural_image
Diagram of a boat hull with a suspended object and a small boat below, showing no text or symbols.natural_image
Diagram of a car air conditioner unit with two doors and downward arrows indicating airflow or cooling system (no text or symbols)natural_image
Diagram of a car air conditioner unit with airflow direction arrow (no text or labels)

natural_image
Illustration of a rectangular air conditioner with a remote control unit emitting signal waves (no text or symbols)ΣΗΜΕΙΩΣΗ
ΣΗΜΕΙΩΣΗ
natural_image
Diagram showing two circular insets with upward arrows pointing to a rectangular object, no text or symbols present.natural_image
Diagram of a mechanical or electrical component with three circular ports and an inset showing a lever mechanism (no text or symbols)natural_image
Diagram showing a suspended platform with a magnified inset of a boat on water (no text or symbols)natural_image
Diagram of a car air conditioner unit with two doors and arrows indicating airflow direction (no text or symbols)natural_image
Diagram of a car interior showing ventilation grilles and airflow path (no text or labels)SMART FUNCTIONS....27
PROBLEEMOPLOSSING....33


natural_image
Line drawing of a rectangular air conditioner with a remote control unit emitting signal waves (no text or symbols)OPMERKING
OPMERKING
natural_image
Diagram showing two circular views of a device with an upward arrow, no text or symbols presentnatural_image
Diagram of a boat hull with circular ports and an inset showing a boat navigating between them (no text or symbols)natural_image
Diagram of a boat hull with a pulley system and a magnified view of the hull (no text or symbols)natural_image
Diagram of a car air conditioner unit with two doors and downward arrows indicating airflow or cooling system (no text or symbols)natural_image
Diagram of a car air conditioner unit with internal compartments and a black arrow indicating airflow direction (no text or symbols)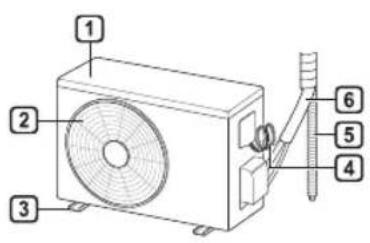
natural_image
Line drawing of a modern air conditioner with a remote control unit and a circular annotation highlighting the portion of the device (no text or symbols present)UWAGA
UWAGA
natural_image
Diagram showing two circular views of a container with arrows indicating direction (no text or symbols)natural_image
Diagram of a boat hull with circular ports and an inset showing a boat navigating between them (no text or symbols)natural_image
Diagram of a boat hull with a pulley system and an inset showing a boat on water (no text or symbols)natural_image
Diagram of a car air conditioner unit with two hands operating it, showing internal compartments and cooling fins (no text or labels)natural_image
Diagram of a car air conditioner unit with internal compartments and a black arrow indicating airflow direction (no text or symbols)
1 Légszűrő
2 Levegő belépés
natural_image
Line drawing of a rectangular air conditioner with a remote control unit and a circled detail (no text or symbols)MEGJEGYZÉS
MEGJEGYZÉS
MEGJEGYZÉS
natural_image
Diagram showing two circular views of a container with arrows indicating direction (no text or symbols)natural_image
Diagram of a boat hull with circular ports and an inset showing a boat navigating between them (no text or symbols)natural_image
Diagram showing a suspended object with arrows pointing downward, and an inset image of a boat on water (no text or symbols)natural_image
Diagram of a car air conditioner unit with hands operating it, showing internal compartments and cooling fins (no text or labels)natural_image
Diagram of a car air conditioner unit with internal grid layout and ventilation slots (no text or labels)
natural_image
Line drawing of a wall-mounted air conditioner with a remote control unit emitting signal waves (no text or symbols)ЗАБЕЛЕЖКА
ЗАБЕЛЕЖКА
ЗАБЕЛЕЖКА
natural_image
Diagram showing two circular insets with upward arrows pointing to a rectangular object, no text or symbols present.natural_image
Diagram of a boat hull with circular ports and an inset showing a boat navigating between them (no text or labels)natural_image
Diagram of a boat hull with a pulley system and an inset showing a boat on water (no text or symbols)natural_image
Diagram of a car air conditioner unit with two doors and downward arrows indicating airflow or cooling system (no text or symbols)natural_image
Diagram of an air conditioner unit with internal grid layout and directional arrow (no text or labels)VAŽNE SIGURNOSNE UPUTE 4
RAD 11
Napomene za rad....11
VAŽNE SIGURNOSNE UPUTE

UPOZORENJE

1 Filtar zraka
② Ulaz zraka
3 Prednji poklopac
4 Izlaz zraka
5 Skretač zraka (vodoravno krilo)
6 Skretač zraka (okomiti rešetkasti otvor)
⑦ Tipka za uključivanje/isključivanje
8 Zaslon
9 Prijamnik signala
natural_image
Line drawing of a rectangular air conditioner with a remote control unit emitting signal waves (no text or symbols)NAPOMENA
| Prikaz zaslona | Opis |
| [8+TW] | Za pročišćavanje zraka uklanjanjem čestica koje uđu u unutarnju jedinicu. |
| [YH40] | Za smanjivanje buke vanjskih jedinica. |
| [HOSW8] | Za uklanjanje vlage koja nastaje unutar unutarnje jedinice. |
NAPOMENA
- Neke funkcije možda nisu podržane ovisno o modelu.
- Nekim se funkcijama može upravljati drugačije preko prikaza daljinskog upravljača.
Poništavanje posebnih funkcija
1 Uzastopno pritišćite tipku FUNC kako biste odabrali željenu funkciju.
2 Pritisnite tipku SET/CANCEL za poništavanje funkcije.
Upotreba funkcije pročišćavanja zraka
Ovim se funkcijama dovodi čist i svjež zrak preko ionskih čestica i filtra.
3 Povežite svoj pametni telefon s bežičnim usmjerivačem.

NAPOMENA
natural_image
Diagram showing two circular views of a container with arrows indicating direction (no text or symbols)natural_image
Diagram of a mechanical setup with three circular components and an inset showing a piston or valve (no text or symbols)natural_image
Diagram of a boat hull with a pulley system and an inset showing a boat on water (no text or symbols)natural_image
Diagram of a car air conditioner unit with two hands operating it, showing internal compartments and cooling fins (no text or labels)4 Očistite filtar usisivačem ili mlakom vodom s neutralnim deterdžentom.
5 Osušite filtre u hladu.
6 Umetnite kuke filtara zraka u prednji poklopac.

natural_image
Diagram of an air conditioner unit with heat exchanger and fan (no text or labels)

natural_image
Line drawing of a rectangular air conditioner with a remote control unit emitting signal waves (no text or symbols)POZNÁMKA
POZNÁMKA
natural_image
Diagram showing two circular views of a device with arrows indicating direction (no text or symbols)natural_image
Simple line drawing of a boat hull with two circular ports and an inset showing a boat navigating between them (no text or symbols)natural_image
Diagram of a boat hull with a pulley system and an inset showing a boat being lowered into water (no text or symbols)natural_image
Diagram of a car air conditioner unit with hands operating it, showing internal compartments and cooling fins (no text or labels)natural_image
Diagram of a car air conditioner unit with internal compartments and ventilation slots (no text or labels)Olulised ohutusjuhised 4
KASUTAMINE....11
Olulised ohutusjuhised
OHT


natural_image
Line drawing of a rectangular air conditioner with a remote control unit emitting signal waves (no text or symbols)TÄHELEPANU
TÄHELEPANU
natural_image
Diagram showing two circular views of a container with arrows indicating direction (no text or symbols)natural_image
Diagram of a boat hull with circular components and an airplane flying above it (no text or symbols)7 Filtri paigaldamiseks lükake konksud allapoole.
natural_image
Diagram of a boat being lifted by a pulley system with an inset showing a boat on water (no text or symbols)natural_image
Diagram of a car air conditioner unit with hand placement arrows indicating cooling zone (no text or symbols)natural_image
Diagram of a car air conditioner unit showing airflow path and vent slots (no text or labels)

① Filtru tal-Arja
2 Dhul tal-Arja
3 Ghatu ta' Quddiem
4 Żbokk tal-Arja
5 Diflettur tal-Arja (Luver orizzontali)
6 Diflettur tal-Arja (Luver vertikali)
7 Buttuna On/Off
8 Skrin
9 Ricevitur tas-Sinjali
1 Ventijiet tad-Dhul tal-Arja
2 Ventijiet tal-Hrug tal-Arja
3 Pjanča ta' baži
4 Il-kejbil tal-provvista tal-elettriku
5 Drain Hose
6 Pajping għat-tkessiħ
① Temperatura mixtieqa / Temperatura tal-kamra
2 Tidwib tas-silg / Pre-tishin
3 Wi-Fi
4 Hin
5 Mixghul/mitfi
NOTA
Remote Control Bla Wajer
Meta Ddahhal il-Batteriji
Jekk l-iskrin tal-wiri tar-remote control jibda jiččara, ibdel il-batteriji. Daňhal batteriji AAA (1.5 V) qabel ma tuža r-remote control.
1 Nehhi l-ghatu tal-batteriji.
2 Daħħal il-batteriji l-ġodda u agħmel ĉert li t-terminals + u - tal-batteriji huma installati tajjeb.
Installazzjoni tal-Holder tar-Remote Control
Biex tipproteği r-remote control, installa l-holder fejn ma hemmx dawl tax-xemx dirett.
1 Agñžel post sigur u fejn tilñqu facilment.
natural_image
Line drawing of a rectangular air conditioner with a remote control unit and a dotted circle highlighting the portion of the device (no text or symbols present)NOTA
| 1Buttuna | 2Displejtal-lskrin | Deskrizzjoni | Funzjoni disponibbli | |
| maqsumsingolari | Multi | |||
| Sabiex tixghel/titfi l-kundizzjonatur tal-arja b'mod awtomatiku fil-hin mixtieq. | O | O | ||
| SET/CANCEL | - | Sabiex tikkonfigura/tikkancella l-funzjonijiet speçjali u t-timer. | O | O |
| - | Sabiex tikkancella s-settings tat-timer. | O | O | |
| - Sabiex tağğusta l-hin. O O | ||||
| *LIGHT OFF | - | Sabiex tikkonfigura l-luminožità tal-iskrin fuq l-unità ta' ğewwa. | O | O |
| ROOM TEMP | Sabiex turi t-temperatura tal-kamra. | O | O | |
| °C←°F[5 s] | °C°F | Sabiex tibdel il-unit bejn °C u °F | O | O |
| *COMFORT AIR | Sabiex tağğusta l-fluss tal-arja sabiex tibdel id-direzzjoni tar-riħ. | O | O | |
| kW[3 s] | - | Sabiex tikkonfigura jekkturix jew le l-informazzjoni rigward l-energija. | O | X |
| *ENERGY CTRL | Sabiex iğğib l-effett tal-iffrankar tal-energija. | O | X | |
| DIAGNOSIS[5 s] | - | Sabiex tićčekkja l-informazzjoni tal-manutenzjoni ta' prodott b'mod konvenjenti. | O | X |
MT
![2 MODE FAN SPEED TEMP JET MODE SWING ROOM TEMP C→F[3 x] DIAGNOSIS [5 x] SET UP FUNC. SET CANCEL TIMER CANCEL RESET](/content/2026/03/514882/images/8974f630532764eaa5d29d141218c1561c42c09f67c74d7de4b724cb66e191fb.jpg)
| 1Buttuna | 2Displejtal-lskrin | Deskrizzjoni | Funzjoni disponibbli | |
| maqsumsingolari | Multi | |||
| Sabiex tippurifika l-arjabilli tneñhi l-frak li jidhlufl-unità ta' ğewwa. | O(Fakultattiv) | O(Fakultattiv) | ||
| Sabiex tnaqqas il-hossmill-unitajiet ta' barra. | O | X | ||
| Sabiex tneñhi l-indewwaggenerata fl-unità ta' ğewwa. | O | O | ||
| RESET - | Sabiex tinizjalizzal-konfigurazzjoniettar-remote control. | O | O | |
NOTA
| pass 1 pass | 2 pass 3 | |
NOTA
• pass 1: Id-Dhul tal-energija jitnaqqas b'20 % meta mqabbel mad-dhul tal-energija kklassifikat.
3 Qabbad I-ismartphone mar-router wireless.

NOTA
- Biex tivverifika l-konnessjoni tal-Wi-Fi, iččekkja li l-icon Wi-Fi 📋 li hemm fuq il-panew tal-kontroll hija mixghula.
- Dan it-taghmir jiflāmi-Fi netwerk ta' 2.4GHz biss. Biex tiččekkja l-frekwenza tar-router, ikkuntattja l-fornitur tas-servizz tal-internet tieghek jew irreferi ghall-manwal tal-wireless router.
- LG SmartThinQ mhuwiesponsabbli ta' problemi, hsarat jew malfunzjonijiet fil-konnessjoni tan-netwerk, ikkawżati mill-konnessjoni tan-netwerk.
- Jekk I-apparat ikühbogħod mir-router dan jaf ma jkunx jista' jagħmel konnessjoni man-netwerk tal-Wi-Fi. Ixtri Wi-Fi repeater (range extender) biex ittejjeb is-saħħa tal-Wi-Fi.
- Il-konnessjoni tal-Wi-Fi tistagi interrotta jew ma taqbadx minhabba l-ambjent tan-netwerk tad-dar.
- II-konnessjoni tan-netwerk tista' ma taħdimx kif suppost minħabba l-fornitur tas-servizz tal-internet.
- L-ambjent tal-wireless tal-madwista' jikkawża lis-servizz tal-wireless netwerk jaħdem bil-mod.
- It-taghmir ma jistagi rregistrat minhabba problemi fit-trasmissjoni ta' qawwa tal-wireless. Skonnettja t-taghmir u stenna madwar minuta qabel terga tipprova.
- Jekk il-firewall firerouter wireless tieghek huwa attivat, skonnettja l-firewall jew aghmel ečcezzjoni għal dan.
- L-isem tan-netwerk tal-wirele(SSID) ghandu jkun kombinazzjoni ta' ittri Ingliži u numri. (Tužax karattri specjali)
- II-user interface (UI) tal-ismartphone tista' tvarja ghax din tiddependi fuq is-sistema operattiva (OS) tal-mobajl u l-manifattur.
- Jekk il-protokoll ta' sigurtà tar-router huwa stabbilit għal WEP, jista' ma jirnexxilekx tħaddem in-netwerk. Jekk jogħgbok ibdlu għal protokolli ta' sigurtà oħra (WPA2 huwa rakkomandat) u erga' rreġistra l-prodott.
natural_image
Diagram showing two circular views of a container with arrows indicating direction (no text or symbols)
4 Naddaf il-filtru b'vacuum cleaner jew b'ilma fietel b'detergent newtrali mieghu.
5 Nixxef il-filtru fid-dell.
natural_image
Diagram of a mechanical setup with three circular components and an inset showing a piston or valve (no text or symbols)natural_image
Diagram of a boat being lifted by a pulley system with an inset showing a boat on water (no text or symbols)natural_image
Diagram of a car air conditioner unit with two hands operating it, showing internal compartments and ventilation slots (no text or labels)4 Naddaf il-filtru b'vacuum cleaner jew b'ilma fietel b'detergent newtrali mieghu.
5 Nixxef il-filtri fid-dell.
natural_image
Diagram of a vehicle interior showing seating arrangement and directional arrow (no text or symbols)7 Iččekkja I-ğenb tal-ghatu ta' quddiem ghall-armar korrett tal-filtri tal-arja.
Funzjoni tal-Awto-Dijanjoži

natural_image
Line drawing of a rectangular air conditioner with a remote control unit and a dotted circle highlighting the portion of the device (no text or symbols present)NOTĂ
NOTĂ
NOTĂ
natural_image
Diagram showing two circular views of a container with arrows indicating direction (no text or symbols)natural_image
Diagram of a boat hull with circular ports and an inset showing a boat navigating between them (no text or symbols)natural_image
Diagram of a boat hull with a crane lifting a weight, showing an inset view of a boat being lifted (no text or symbols present)natural_image
Diagram of a car air conditioner unit with two hands operating it, showing internal compartments and cooling fins (no text or labels)natural_image
Diagram of a car air conditioner unit with internal compartments and a black arrow indicating airflow direction (no text or symbols)DÔLEŽITÉ BEZPEČNOSTNÉ POKYNY....4
PREVÁDZKA....11
DÔLEŽITÉ BEZPEČNOSTNÉ POKYNY

VAROVANIE


natural_image
Line drawing of a modern air conditioner with a remote control unit and a circular annotation highlighting the portion of the device (no text or symbols present)POZNÁMKA
POZNÁMKA
natural_image
Diagram showing two circular views of a container with arrows indicating direction (no text or symbols)natural_image
Diagram of a mechanical setup with three circular components and an inset showing a piston or sliding component (no text or symbols)natural_image
Diagram showing a suspended object with arrows pointing downward, and an inset image of a boat on water (no text or symbols)natural_image
Diagram of a car air conditioner unit with two hands operating it, showing internal compartments and ventilation duct (no text or labels)natural_image
Diagram of an air conditioner unit with internal compartments and a black arrow indicating airflow direction (no text or symbols)
Notranji ekran za prikazovanje

natural_image
Line drawing of a rectangular air conditioner with a remote control unit and a dotted circle highlighting the portion of the cylinder (no text or symbols)OPOMBA
2 Pritisnite gumb ON/OFF.
Tip 1
Tip 2
OPOMBA
SWING ali gumb SWING.
OPOMBA
natural_image
Diagram showing two circular views of a container with arrows indicating direction (no text or symbols)3 Odstranite filter iz notranje enote.
4 Očistite ga s sesalcem ali z mlačno vodo, pomešano z nevtralnim detergentom.
5 Filter posušite v senci.
natural_image
Diagram of a boat hull with circular components and an airplane flying above it (no text or symbols)natural_image
Diagram of a boat being lifted by a pulley system with an inset showing a boat on water (no text or symbols)natural_image
Diagram of a car air conditioner unit with two hands operating it, showing internal compartments and cooling fins (no text or labels)4 Očistite ga s sesalcem ali z mlačno vodo, pomešano z nevtralnim detergentom.
5 Filtra posušite v senci.
6 Vstavite kavlja zračnih filtrov v sprednji pokrov.
natural_image
Diagram of a car air conditioner unit with airflow direction indicated by arrows (no text or labels)7 Za pravilno sestavljanje zračnih filtrov preverite stranski del sprednjega pokrova.
ODPRAVLJANJE TEŽAV
SL
Funkcija samodiagnosticiranja
Ta izdelek ima vgrajeno funkcijo samodiagnosticiranja. Če se pojavi napaka, bo lučka notranje enote utripala v dvosekundnih intervalih. Če pride do tega, stopite v stik z lokalnim trgovcem ali servisom.
Preden pokličete servis
VEIDS: PIESTIPRINÃMS PIE SIENAS
Pýðing á upprunalegu kennsla
SATURA RĀDĪTĀJS

1 Gaisa filtrs
2 Gaisa ievade
3 Priekšējais vāks
4 Gaisa izvade
natural_image
Line drawing of a rectangular air conditioner with a remote control unit emitting signal waves (no text or symbols)PIEZIME
PIEZİME
PIEZİME
natural_image
Diagram showing two circular views of a container with arrows indicating direction (no text or symbols)natural_image
Diagram of a mechanical setup with a lever and circular components, no text or symbols presentnatural_image
Diagram of a boat hull with a pulley system and an inset showing a boat on water (no text or symbols)natural_image
Diagram of a car air conditioner unit with two hands operating it, showing internal compartments and cooling fins (no text or labels)natural_image
Diagram of a car air conditioner unit with airflow direction indicated by arrows (no text or labels)

natural_image
Line drawing of a modern air conditioner with a remote control unit and a circular annotation highlighting the portion of the device (no text or symbols present)PASTABA
PASTABA
natural_image
Diagram showing two circular views of a container with arrows indicating direction (no text or symbols)natural_image
Diagram of a mechanical setup with three circular components and an inset showing a piston or valve (no text or symbols)natural_image
Diagram of a boat hull with a suspended platform and a circular inset showing a boat on water (no text or symbols)natural_image
Diagram of a car air conditioner unit with two hands operating it, showing internal compartments and ventilation slots (no text or labels)natural_image
Diagram of an air conditioner unit with internal grid layout and directional arrow (no text or labels)LÁMHLEABHAR AN ÚINÉARA
AER- CHÓIRITHEOIR


1 Scagaire Aer
2 Iontógáil Aer
3 Clúdach Tósaigh
4 Asraon aer
5 Sraonaire aer (cothrománach)
6 Sraonaire aer (ingireach)
7 Cnaipe Air/As
8 Scáthlán
9 Glacadóir Comhartha
natural_image
Illustration of a rectangular air conditioner with a remote control unit emitting signal waves (no text or symbols)NOTE
NOTE
| Scáthlán Cur síos | |
| Chun mionsalachar a bhaint as an aer agus é a ghlanadh tríd an aonad laistigh. | |
| Chun torann a ísliú ón aonad amuigh. | |
| Chun tais ginithe taobh istigh den aonad laistigh a bhaint. | |
NOTE
3 Ceangail do ghuthán cliste leis an ródaire gan sreang.
NOTE
natural_image
Diagram showing two circular views of a container with arrows indicating direction (no text or symbols)3 Bain ón aonad laistigh é.

4 Glan an scagaire le glantóir folúis nó le huisce alabhog agus glantach neodrach.
5 Déan an scagaire a thriomú go nádúrtha gan sólás na gréine.
6 Cuir na húcáil an scagaire aer sa chlúdach tósaigh.
natural_image
Diagram of a mechanical setup with three circular components and an inset showing a circular component (no text or symbols)natural_image
Diagram of a mechanical or structural assembly with two circular components and an inset showing a bird flying above a platform (no text or symbols present)natural_image
Diagram of a car air conditioner unit with two hands holding the tray (no text or symbols visible)4 Glan an scagaire le glantóir folúis nó le huisce alabhog agus glantach neodrach.
natural_image
Diagram of a car air conditioner unit with internal compartments and ventilation slots (no text or labels)VAŽNA BEZBEDNOSNA UPUTSTVA 4
RAD 11
Napomene za rad....11
Delovi i funkcije....11
Bežični daljinski upravljač....12
Automatsko ponovno pokretanje klima uređaja....17
Korišćenje funkcije režima....17
Korišćenje funkcije brzog režima....20
VAŽNA BEZBEDNOSNA UPUTSTVA

UPOZORENJE


1 Filter za vazduh
2 Dovod vazduha
3 Prednji poklopac
4 Odvod vazduha
5 Usmerivač vazduha (horizontalna lopatica)
6 Usmerivač vazduha (vertikalni rešetkasti otvor)
7 Dugme za uključivanje/isključivanje
8 Ekran
9 Prijemnik signala
1 Ventili za dovod vazduha
② Ventili za odvod vazduha
3 Osnovna ploča
4 **non tradotto**
5 Odvodno crevo
6 Cevi za rashladno sredstvo
① Željena temperatura / temperatura prostorije
② Odmrzavanje / Предгревање
3 Wi-Fi
4 Tajmer
5 Uključivanje/isključivanje
NAPOMENA
- Broj i lokacija radnih lampica mogu da variraju u zavisnosti od modela klima uređaja.
natural_image
Line drawing of a rectangular air conditioner with a remote control unit emitting signal waves (no text or symbols)NAPOMENA
- Daljinskim upravljačem možete da upravljate i drugim elektronskim uređajima ako ih usmerite prema njima. Vodite računa da daljinski upravljač usmerite prema prijemniku signala na klima uređaju.
- Da bi uređaj ispravno radio, koristite mekanu tkaninu da očistite predajnik i prijemnik signala.
- U slučaju da proizvod ne poseduje neku funkciju, neće se aktivirati zvučni signal na proizvodu kada se pritisne dugme za tu funkciju na daljinskom upravljaču, osim u slučaju funkcija za smer protoka vazduha (SWING), prikaz energije (kW [3 s]), pročišćavanje vazduha ( ).
| 1Dugme | 2Ekran | Opis | dostupan Funkcija | |
| Jednog deljenje | Višestruki | |||
| Za automatsko uključivanje/isključivanje klima uređaja u željeno vreme. | O | O | ||
| SET/CANCEL | - | Za podešavanje/otkazivanje posebnih funkcija i tajmera. | O | O |
| - | Za otkazivanje postavki tajmera. | O | O | |
| - | Za podešavanje vremena. | O | O | |
| *LIGHT OFF | - | Za podešavanje osvetljenosti ekrana na unutrašnjoj jedinici. | O | O |
| ROOM TEMP | Za prikaz temperature u prostoriji. | O | O | |
| °C←°F[5 s] | Za promenu jedinice između °C i °F | O | O | |
| *COMFORT AIR | Za prilagođavanje protoka vazduha da bi se preusmerilo duvanje. | O | O | |
| kW[3 s] | - | Za podešavanje opcije da li će se prikazati informacije o energiji. | O | X |
| *ENERGY CTRL | Za aktiviranje uštede energije. | O | X | |
| DIAGNOSIS[5 s] | - | Za praktičnu proveru informacija o održavanju uređaja. | O | X |
SR
![2 MODE FAN SPEED TEMP JET MODE RW [3 x] SWING SWING ROOM TEMP C→F [3 x] DIAGNOSIS [3 x] SET UP FUNC. SET CANCEL TIMER CANCEL RESET](/content/2026/03/514882/images/0dd85e3056bc199b06964095d90a911f7fec89c5a0534789e7258ab9472a2aa1.jpg)
| 1Dugme | 2Ekran | Opis | dostupan Funkcija | |
| Jednog deljenje | Višestruki | |||
| Za pročišćavanje vazduha uklanjanjem čestica koje su ušle u unutrašnju jedinicu. | O (opciono) | O (opciono) | ||
| Za smanjenje buke koju proizvode spoljašnje jedinice. | O | X | ||
| Za uklanjanje vlage koja se stvara unutar unutrašnje jedinice. | O | O | ||
| RESET - | Za pokretanje postavki daljinskog upravljača. | O | O | |
NAPOMENA
NAPOMENA
- Da biste proverili Wi-Fi vezu, proverite da li je oznaka Wi-Fi veze osvetljena na kontrolnoj tabli.
- Uređaj podržava samo Wi-Fi mreže od 2,4 GHz. Da biste proverili mrežnu frekvenciju, obratite se internet provajderu ili pogledajte priručnik za bežični ruter.
- LG SmartThinQ ne snosi odgovornost za probleme sa povezivanjem na mrežu niti za bilo koje smetnje, kvarove ili greške izazvane povezivanjem na mrežu.
- Ako uređaj ne može da se poveže na Wi-Fi mrežu, možda je suviše daleko od rutera. Kupite pojačivač Wi-Fi signala (proširivač opsega) da biste pojačali Wi-Fi signal.
- Veza sa Wi-Fi mrežom možda neće biti uspostavljena ili će biti prekinuta zbog uslova u kojima funkcioniše kućna mreža.
- Povezivanje na mrežu možda neće funkcionisati ispravno zbog pružaoca internet usluga.
- Zbog okolnih bežičnih mreža možda će vaša bežična mreža biti spora.
- Uređaj se ne može da se registruje zbog problema s bežičnim prenosom signala. Isključite uređaj i sačekajte oko jednog minuta pre nego što pokušate ponovo.
- Ako je na bežičnom ruteru uključen zaštitni zid, isključite zaštitni zid ili dodajte izuzetak.
- Naziv bežične mreže (SSID) treba da se sastoji od kombinacije latiničnih slova i brojeva. (Nemojte da koristite posebne znakove)
- Korisnički interfejs pametnog telefona može da se razlikuje u zavisnosti od mobilnog operativnog sistema i proizvođača.
- Ako je sigurnosni protokol rutera podešen na WEP možda nećete moći da podesite mrežu. Molimo da promenite na druge sigurnosne protokole (preporučuje se WPA2) i ponovo registrujte proizvod.
Instalacija aplikacije LG SmartThinQ
Pretražite aplikaciju LG SmartThinQ u radnji Google Play Store & Apple App Store putem pametnog telefona.
Funkcija Wi-Fi
- Za uređaje sa logotipom
Mogućnost komunikacije sa uređajem putem pametnog telefona primenom odgovarajućih pametnih funkcija.
Smart Diagnosis™
Ako koristite funkciju Smart Diagnosis, dobićete korisne informacije kao što je ispravan način korišćenja uređaja na osnovu obrasca korišćenja.
Postavke
Omogućava vam da podesite razne opcije na uređaju i u aplikaciji.
NAPOMENA
- Ako zamenite bežični ruter, pružaoca internet usluga ili lozinku, obrišite registrovani uređaj iz aplikacije LG SmartThinQ i ponovo ga registrujte.
- Aplikacija je podložna promenama radi unapređenja rada uređaja i to bez prethodnog obaveštenja korisnika.
- Funkcije mogu varirati u zavisnosti od modela.
natural_image
Diagram showing two circular views of a container with arrows indicating direction (no text or symbols)natural_image
Diagram of a boat hull with circular ports and an inset showing a person in flight (no text or symbols)7 Gurnite kuke nadole da biste postavili filter za vazduh.
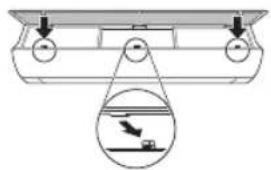
natural_image
Diagram of a boat hull with a pulley system and a magnified view of a boat on water (no text or symbols)8 Pogledajte bočnu stranu prednjeg poklopca da biste proverili da li je filter za vazduh ispravno montiran.
Tip2
1 Isključite napajanje i izvucite kabl iz struje.
2 Otvorite prednji poklopac.
• Podignite malo obe strane poklopca.
3 Držite drške filtera za vazduh, povucite ih lagano nadole i izvadite ih iz unutrašnje jedinice.
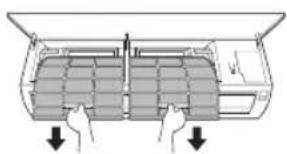
natural_image
Diagram of a car air conditioner unit with two hands operating it, showing internal compartments and cooling fins (no text or labels)4 Očistite filter usisivačem ili mlakom vodom sa neutralnim deterdžentom.
5 Osušite filtere u hladu.
6 Ubacite kuke filtera za vazduh u prednji poklopac.
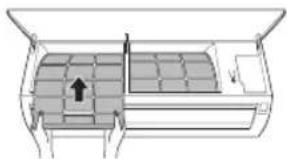
natural_image
Diagram of a car air conditioner unit with airflow direction arrow (no text or labels)7 Pogledajte bočnu stranu prednjeg poklopca da biste proverili da li su filteri za vazduh ispravno montirani.
REŠAVANJE PROBLEMA
SR
Funkcija samostalne dijagnoze

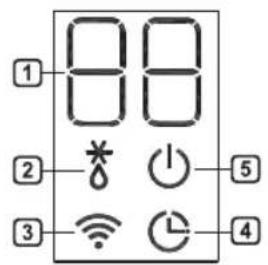
1 Филтер за воздух
2 Довод на воздух
3 Преден капак
4 Одвод на воздух
5 Воздушен дефлектор (хоризонтална перка)
6 Воздушен дефлектор (вертикално ребро)
7 Вклучи/Исклучи копче
8 Екран
9 Приемник на сигнал
natural_image
Line drawing of a rectangular air conditioner with a remote control unit emitting signal waves (no text or symbols)НАПОМЕНА
НАПОМЕНА
natural_image
Diagram showing two circular insets with upward arrows pointing to a rectangular object, no text or symbols present.natural_image
Diagram of a mechanical or electrical component with circular elements and an inset showing a cross-section (no text or symbols)natural_image
Diagram of a boat hull with a suspended platform and an inset showing a boat on water (no text or symbols)natural_image
Diagram of a car air conditioner unit with two hands operating it, showing internal compartments and cooling fins (no text or labels)natural_image
Diagram of a car air conditioner unit showing internal compartments and ventilation slots (no text or labels)

1 Filtri i ajrit
2 Konsumi i ajrit
3 Kapaku i përparmë
4 Shkarkuesi i ajrit
5 Deflektori i ajrit (fleta horizontale)
6 Deflektori i ajrit (fleta vertikale)
7 Butoni i Ndezjes/Fikjes
8 Ekrani
9 Marrësi i Sinjalit
natural_image
Line drawing of a rectangular air conditioner with a remote control unit and a circled detail (no text or symbols)SHËNIM
SHËNIM
SHËNIM
natural_image
Diagram showing two circular insets with upward arrows pointing to a curved surface, no text or symbols presentnatural_image
Diagram of a mechanical setup with two circular components and an inset showing a circular component (no text or symbols)natural_image
Diagram of a boat hull with a pulley system and an inset showing a boat on water (no text or symbols)natural_image
Diagram of a car air conditioner unit with two hands operating it, showing internal compartments and ventilation slots (no text or labels)natural_image
Diagram of a vehicle interior showing seating arrangement and airflow direction (no text or symbols)SIGURNOSNA UPUTSTVA....3
VAŽNA SIGURNOSNA UPUTSTVA 4
RAD 11
Napomene prilikom rada 11
VAŽNA SIGURNOSNA UPUTSTVA

UPOZORENJE
Da biste smanjili opasnost od eksplozije, požara, smrti, strujnog udara, povrede ili opekotina za osobe prilikom korištenja ovog proizvoda, pridržavajte se osnovnih mjera predostrožnosti, uključujući sljedeće:
Djecu u domaćinstvu
Ovaj uređaj nije namijenjen za upotrebu od strane osoba (uključujući djecu) sa smanjenim fizičkim, senzornim ili mentalnim sposobnostima, ili s nedostatkom iskustva i znanja, osim u slučaju da su te osobe pod stalnim nadzorom ili su instruirane po pitanju korištenja uređaja od strane osobe koja je odgovorna za njihovu sigurnost. Djeca trebaju biti pod nadzorom kako bi se osiguralo da se ne igraju s uređajem.

natural_image
Illustration of a horizontal air conditioner with a remote control unit emitting signal waves (no text or symbols)NAPOMENA
NAPOMENA
| Displej Opis | |
 | Za pročišćavanje zraka uklanjanjem čestica koje ulaze u unutrašnju jedinicu. |
| [Y800] | Za smanjenje buke vanjske jedinice. |
 | Za uklanjanje vlage koja se generira u unutrašnjosti unutrašnje jedinice. |
NAPOMENA
- Neke funkcije možda nisu podržane, ovisno o modelu.
- Neke funkcije mogu raditi različito sa displeja daljinskog upravljača.
Otkazivanje posebnih funkcija
1 Pritisnite tipku FUNC opetovano da odaberete željenu funkciju.
2 Pritisnite tipku SET/CANCEL da otkazete datu funkciju.
NAPOMENA
- Da biste provjerili Wi-Fi vezu, provjerite da li na upravljačkoj ploči svijetli oznaka Wi-Fi
- Ovaj uređaj podržava isključivo Wi-Fi mreže od 2,4 GHz. Da biste provjerili mrežnu frekvenciju, obratite se pružatelju internetskih usluga ili pogledajte uputstvo za upotrebu bežičnog usmjerivača.
- LG SmartThinQ nije odgovoran za bilo kakve probleme s mrežnim vezama ili bilo kakve smetnje, kvarove ili pogreške uzrokovane mrežnom vezom.
- Ako uređaj ima problema s povezivanjem na Wi-Fi mrežu, možda je previše udaljen od usmjerivača. Kupite ponavljač Wi-Fi signala (proširivač dometa) kako biste pojačali Wi-Fi signal.
- Povezivanje na Wi-Fi mrežu možda neće biti uspješno ili se veza može prekinuti zbog okruženja u kojem se nalazi kućna mreža.
- Mrežna veza možda neće raditi ispravno ovisno o pružatelju internetskih usluga.
- Okruženje bežične mreže može učiniti da bežična mreža bude spora.
- Uređaj se ne može registrirati zbog problema s prijenosom bežičnog signala. Odspojite uređaj i sačekajte oko minutu prije ponovnog pokušaja.
- Ako je na bežičnom usmjerivaču omogućen zaštitni zid, onemogućite ga ili dodajte izuzetak.
- Naziv bežične mreže (SSID) trebao bi biti kombinacija engleskih slova i brojeva. (Nemojte koristiti posebne znakove.)
- Korisnički interfejs pametnog telefona (UI) može se razlikovati ovisno o operativnom sistemu (OS) i proizvođaču.
- Ako je sigurnosni protokol usmjerivača postavljen na WEP, možda nećete moći postaviti mrežu. Podesite drugačije sigurnosne protokole (preporučujemo WPA2) i ponovno registrirajte uređaj.
Instalacija aplikacije LG SmartThinQ
Na pametnom telefonu potražite aplikaciju LG SmartThinQ u prodavnici Google Play ili prodavnici Apple App. Slijedite uputstvo za preuzimanje i instalirajte aplikaciju.
Wi-Fi funkcija
natural_image
Diagram showing two circular views of a device with an upward arrow, no text or symbols presentnatural_image
Diagram of a boat's side view showing a circular object above a row with two circular ports, and arrows pointing to the bottom (no text or symbols)7 Gurnite kukice prema dolje da biste sklopili zračni filter.
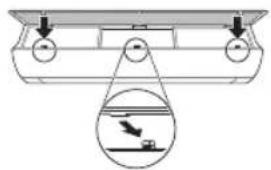
natural_image
Diagram of a boat hull with a suspended platform and an inset showing a boat on water (no text or symbols)natural_image
Diagram of a car air conditioner unit with hand placement arrows indicating cooling zone (no text or symbols)4 Očistite filtere pomoću usisivača ili mlakom vodom i neutralnim deterdžentom.
5 Osušite filtere u hladu.
6 Umetnite kukice zračnih filtera u prednji poklopac.