
DR260C - Drill BLACK & DECKER - Free user manual and instructions
Find the device manual for free DR260C BLACK & DECKER in PDF.

| Product Type | Cordless Drill |
| Brand | Black & Decker |
| Model | DR260C |
| Power Supply | 120 V~, 60 Hz, AC current |
| Chuck Type | Keyless |
| Chuck Capacity | 10 mm (3/8 in) |
| Steel Drilling Capacity | 10 mm |
| Soft Wood Drilling Capacity | 31.7 mm (1-1/4 in) |
| Hard Wood Drilling Capacity | 25.4 mm (1 in) |
| Main Functions | Variable speed, forward/reverse, continuous lock, integrated bit storage |
| Variable Speed | Yes, trigger-controlled |
| Reverse Switch | Yes, slide switch |
| Approximate Weight | 1.4 kg |
| Estimated Dimensions (L x W x H) | 25 x 6 x 20 cm |
| Care and Cleaning | Clean with mild soap and a damp cloth. Do not immerse. |
| Required Safety Equipment | Safety glasses, hearing protection, dust mask |
| Warranty | 2-year limited warranty (household use) |
| Repairability | Authorized Black & Decker repair centers |
| Included Accessories | Bit storage, user manual |
| General Information | Lightweight corded drill for drilling in wood, metal. Suitable for household tasks. |
Frequently Asked Questions - DR260C BLACK & DECKER
User questions about DR260C BLACK & DECKER
0 question about this device. Answer the ones you know or ask your own.
Ask a new question about this device
Download the instructions for your Drill in PDF format for free! Find your manual DR260C - BLACK & DECKER and take your electronic device back in hand. On this page are published all the documents necessary for the use of your device. DR260C by BLACK & DECKER.
USER MANUAL DR260C BLACK & DECKER
3/8 in. (10MM) and 1/2 in. (13MM) DRILLS
INSTRUCTION MANUAL
CATALOG NUMBER
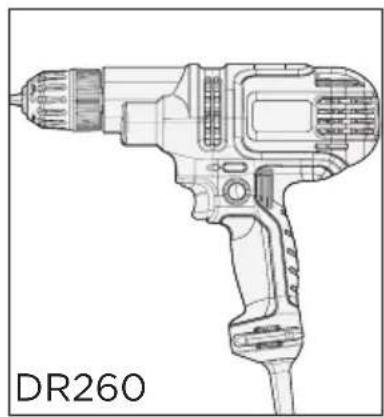
DR260
DR340
DR560
natural_image
Technical line drawing of a DR260 electric drill (no text or symbols on the diagram itself)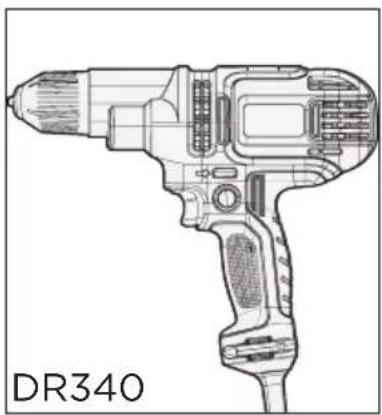
natural_image
Technical line drawing of a DR340 electric drill (no text or symbols on the diagram itself)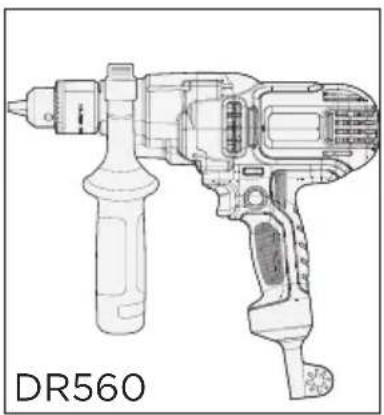
natural_image
Technical line drawing of a DR560 electric drill (no text or symbols on the diagram itself)Thank you for choosing BLACK+DECKER!
PLEASE READ BEFORE RETURNING THIS PRODUCT FOR ANY REASON.
If you have a question or experience a problem with your BLACK+DECKER purchase, go to http://www.blackanddecker.com/instantanswers If you can't find the answer or do not have access to the Internet, call 1-800-544-6986 from 8 a.m. to 5 p.m. EST Mon. - Fri. to speak with an agent. Please have the catalog number available when you call. SAVE THIS MANUAL FOR FUTURE REFERENCE.
VEA EL ESPANOL EN LA CONTRAPORTADA.
It is important for you to read and understand this manual. The information it contains relates to protecting YOUR SAFETY and PREVENTING PROBLEMS. The symbols below are used to help you recognize this information.
⚠️ DANGER: Indicates an imminently hazardous situation which, if not avoided, will result in death or serious injury.
⚠ WARNING: Indicates a potentially hazardous situation which, if not avoided, could result in death or serious injury.
⚠️ CAUTION: Indicates a potentially haz ard ous situation which, if not avoided, may result in minor or mod er ate injury.
NOTICE: Used without the safety alert symbol indicates potentially hazardous situation which, if not avoided, may result in property damage.
General Power Tool Safety Warnings
⚠ WARNING: Read all safety warnings and all instructions. Failure to follow the warnings and instructions may result in electric shock, fire and/or serious injury.
SAVE ALL WARNINGS AND INSTRUCTIONS FOR FUTURE REFERENCE The term “power tool” in the warnings refers to your mains-operated (corded) power tool or battery-operated (cordless) power tool.
SAVE THESE INSTRUCTIONS
1) WORK AREA SAFETY
a) Keep work area clean and well lit. Cluttered or dark areas invite accidents.
b) Do not operate power tools in explosive atmospheres, such as in the presence of flammable liquids, gases or dust. Power tools create sparks which may ignite the dust or fumes.
c) Keep children and bystanders away while operating a power tool. Distractions can cause you to lose control.
2) ELECTRICAL SAFETY
a) Power tool plugs must match the outlet. Never modify the plug in any way. Do not use any adapter plugs with earthed (grounded) power tools. Unmodified plugs and matching outlets will reduce risk of electric shock.
b) Avoid body contact with earthed or grounded surfaces such as pipes, radiators, ranges and refrigerators. There is an increased risk of electric shock if your body is earthed or grounded.
c) Do not expose power tools to rain or wet conditions. Water entering a power tool will increase the risk of electric shock.
d) Do not abuse the cord. Never use the cord for carrying, pulling or unplugging the power tool. Keep cord away from heat, oil, sharp edges or moving parts. Damaged or entangled cords increase the risk of electric shock.
e) When operating a power tool outdoors, use an extension cord suitable for outdoor use. Use of a cord suitable for outdoor use reduces the risk of electric shock.
f) If operating a power tool in a damp location is unavoidable, use a ground fault circuit interrupter (GFCI) protected supply. Use of a GFCI reduces the risk of electric shock.
3) PERSONAL SAFETY
a) Stay alert, watch what you are doing and use common sense when operating a power tool. Do not use a power tool while you are tired or under the influence of drugs, alcohol or medication. A moment of inattention while operating power tools may result in serious personal injury.
b) Use personal protective equipment. Always wear eye protection. Protective equipment such as dust mask, nonskid safety shoes, hard hat, or hearing protection used for appropriate conditions will reduce personal injuries.
c) Prevent unintentional starting. Ensure the switch is in the off position before connecting to power source and/or battery pack, picking up or carrying the tool. Carrying power tools with your finger on the switch or energizing power tools that have the switch on invites accidents.
d) Remove any adjusting key or wrench before turning the power tool on. A wrench or a key left attached to a rotating part of the power tool may result in personal injury.
e) Do not overreach. Keep proper footing and balance at all times. This enables better control of the power tool in unexpected situations.
f) Dress properly. Do not wear loose clothing or jewelry. Keep your hair, clothing and gloves away from moving parts. Loose clothes, jewelry or long hair can be caught in moving parts.
g) If devices are provided for the connection of dust extraction and collection facilities, ensure these are connected and properly used. Use of dust collection can reduce dust-related hazards.
4) POWER TOOL USE AND CARE
a) Do not force the power tool. Use the correct power tool for your application. The correct power tool will do the job better and safer at the rate for which it was designed.
b) Do not use the power tool if the switch does not turn it on and off. Any power tool that cannot be controlled with the switch is dangerous and must be repaired.
c) Disconnect the plug from the power source and/or the battery pack from the power tool before making any adjustments, changing accessories, or storing power tools. Such preventive safety measures reduce the risk of starting the power tool accidentally.
d) Store idle power tools out of the reach of children and do not allow persons unfamiliar with the power tool or these instructions to operate the power tool. Power tools are dangerous in the hands of untrained users.
e) Maintain power tools. Check for misalignment or binding of moving parts, breakage of parts and any other condition that may affect the power tool's operation. If damaged, have the power tool repaired before use. Many accidents are caused by poorly maintained power tools.
f) Keep cutting tools sharp and clean. Properly maintained cutting tools with sharp cutting edges are less likely to bind and are easier to control.
g) Use the power tool, accessories and tool bits, etc. in accordance with these instructions, taking into account the working conditions and the work to be performed. Use of the power tool for operations different from those intended could result in a hazardous situation.
5) SERVICE
a) Have your power tool serviced by a qualified repair person using only identical replacement parts. This will ensure that the safety of the power tool is maintained.
SPECIFIC SAFETY RULES
- Wear ear protectors when impact drilling. Exposure to noise can cause hearing loss.
- Use auxiliary handle(s), if supplied with the tool. Loss of control can cause personal injury.
- Hold power tool by insulated gripping surfaces, when performing an operation where the cutting accessory may contact hidden wiring or its own cord. Cutting accessory contacting a “live” wire may make exposed metal parts of the power tool “live” and could give the operator an electric shock.
- Use clamps or another practical way to secure and support the work piece to a stable platform. Holding the work by hand or against your body leaves it unstable and may lead to loss of control.
- Keep your hair, clothing, and gloves away from air vents. Air vents often cover moving parts in which these items can be caught.
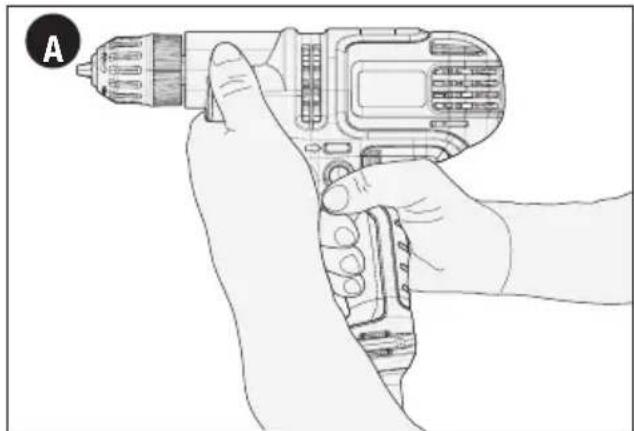
- Hold tool firmly with two hands (see figure A). Use auxiliary handle if provided. Loss of control can cause personal injury.
⚠ WARNING: Some dust created by power sanding, sawing, grinding, drilling, and other construction activities contains chemicals known to the State of California to cause cancer, birth defects or other reproductive harm. Some examples of these chemicals are:
- lead from lead-based paints,
- crystalline silica from bricks and cement and other masonry products, and
- arsenic and chromium from chemically-treated lumber.
Your risk from these exposures varies, depending on how often you do this type of work. To reduce your exposure to these chemicals: work in a well ventilated area, and work with approved safety equipment, such as those dust masks that are specially designed to filter out microscopic particles.
- Avoid prolonged contact with dust from power sanding, sawing, grinding, drilling, and other construction activities. Wear protective clothing and wash exposed areas with soap and water. Allowing dust to get into your mouth, eyes, or lay on the skin may promote absorption of harmful chemicals.
⚠ WARNING: Use of this tool can generate and/or disperse dust, which may cause serious and permanent respiratory or other injury. Always use NIOSH/OSHA approved respiratory protection appropriate for the dust exposure. Direct particles away from face and body.
⚠ WARNING: ALWAYS use safety glasses. Everyday eye glasses are NOT safety glasses. Also use face or dust mask if cutting operation is dusty.
ALWAYS WEAR CERTIFIED SAFETY EQUIPMENT:
• ANSI Z87.1 eye protection (CAN/CSA Z94.3)
• ANSI S12.6 (S3.19) hearing protection
• NIOSH/OSHA/MSHA respiratory protection
⚠ WARNING: Always wear proper personal hearing protection that conforms to ANSI S12.6 (S3.19) during use. Under some conditions and duration of use, noise from this product may contribute to hearing loss.
The label on your tool may include the following symbols.
V.....volts
Hz......hertz
min ......minutes
---or DC ...direct current
Class I Construction (grounded)
☐ ......Class II Construction (double insulated)
bpm ...... beats per minute
Read instruction manual before use
O Use proper hearing protection
A.....amperes
W......watts
\~ or AC......alternating current
n_0 ......no load speed
earthing terminal
⚠️ ......safety alert symbol
.../min or rpm...revolutions or reciprocation per minute
Use proper respiratory protection
Use proper eye protection
Extension Cords
When using an extension cord, be sure to use one heavy enough to carry the current your product will draw. An undersized cord will cause a drop in line voltage resulting in loss of power and overheating. The following table shows the correct size to use depending on cord length and nameplate ampere rating. If in doubt, use the next heavier gauge. The smaller the gauge number, the heavier the cord.
| Minimum Gauge for Cord Sets | |||||
| Volts | Total Length of Cord in Feet | ||||
| 120V | 0-25 | 26-50(0-7,6m) | 51-100(7,6-15,2m) | 101-150(15,2-30,4m) | (30,4-45,7m) |
| 240V | 0-50 | 51-100(0-15,2m) | 101-200(15,2-30,4m) | 201-300(30,4-60,9m) | (60,9-91,4m) |
| Ampere Rating | |||||
| More Than | Not more Than | American Wire Gauge | |||
| 0 | - | 6 | 18 | 16 | 16 |
| 6 | - | 10 | 18 | 16 | 14 |
| 10 | - | 12 | 16 | 16 | 14 |
| 12 | - | 16 | 14 | 12 | Not Recommended |
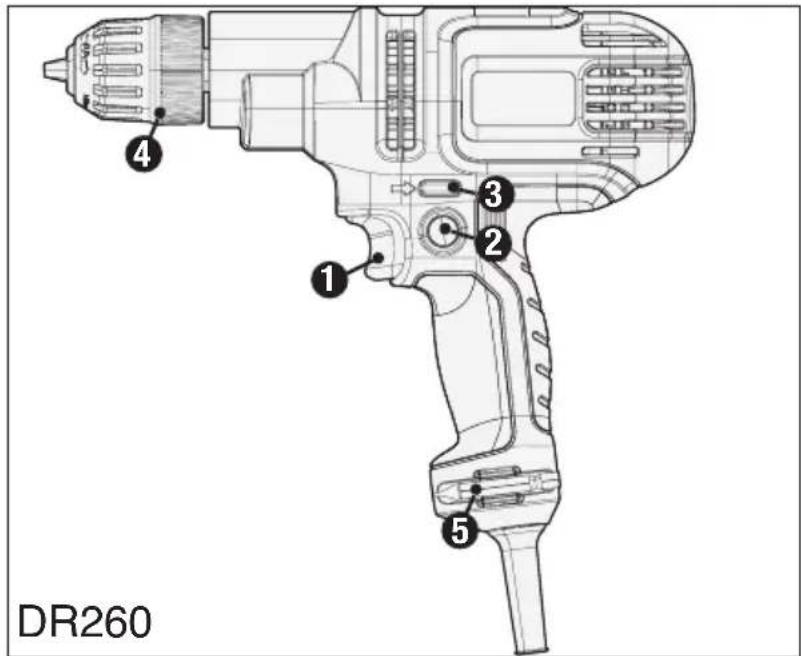
FUNCTIONAL DESCRIPTION
- Variable speed switch
- Lock-on button
- Forward/reverse slider
- Chuck
- Bit storage
- Chuck key (DR560)
- Chuck key holder (DR560)
- Side handle (DR560)
text_image
DR260 ① ② ③ ④ ⑤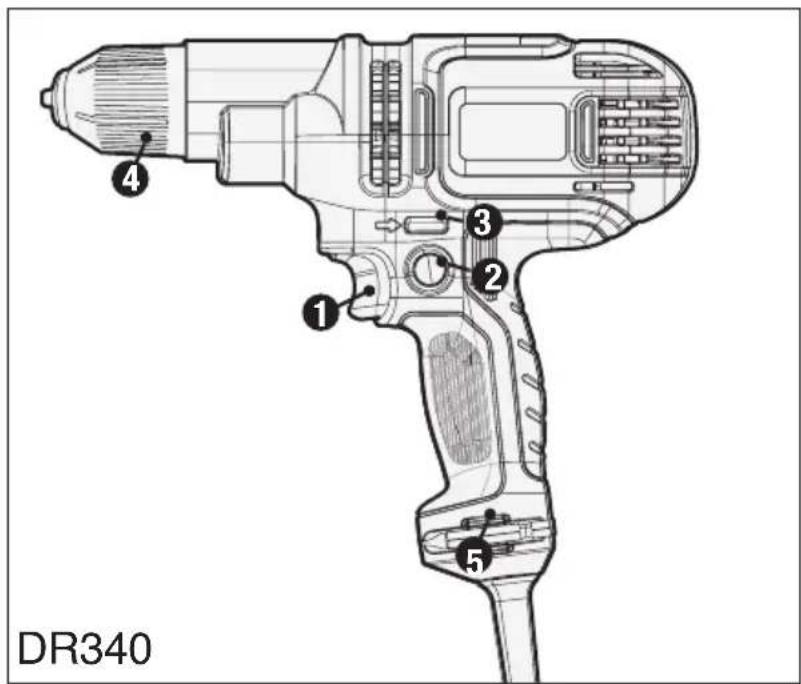
text_image
DR340 ① ② ③ ④ ⑤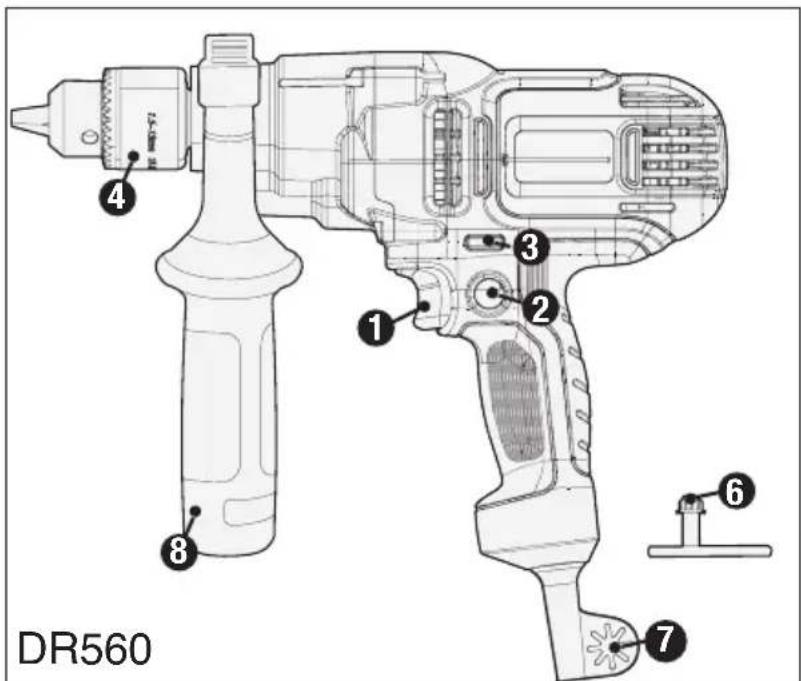
text_image
DR560 ① ② ③ ④ ⑥ ⑦ ⑧⚠ Safety Warnings and Instructions: Drills
⚠ WARNING: Shock hazard. When drilling or driving into walls, floors or wherever live electrical wires may be encountered, DO NOT TOUCH ANY METAL PARTS OF THE TOOL! Hold the tool only by the plastic handle(s) / housing to prevent shock.
- Do not lock the tool ON when drilling by hand. Refer to Operating Instructions-Switching On and Off.
- Hold drill firmly with both hands to control the twisting action of the drill (figure A). If your drill is equipped with a side handle, always use the side handle.
⚠ WARNING: Drill may stall (if overloaded or improperly used) causing a twist. Always expect the stall. Grip the drill firmly to control the twisting action and prevent loss of control which could cause personal injury. If a stall does occur, release the trigger immediately and determine the reason for the stall before re-starting.
• Always unplug the drill when attaching or removing accessories. When attaching accessories in the drill chuck, it is important to securely tighten the chuck using all three holes to prevent slippage. When using a keyless chuck, hand tighten firmly.
natural_image
Line drawing of a hand holding a handheld electric drill (no text or symbols)Motor
Be sure your power supply agrees with nameplate marking. 120 Volts AC only means your drill will operate on standard 60 Hz household power. Do not operate AC tools on DC. A rating of 120 volts AC/DC means that your tool will operate on standard 60 Hz AC or DC power. This information is printed on the nameplate. Lower voltage will cause loss of power and can result in over-heating. All BLACK+DECKER tools are factory-tested; if this tool does not operate, check the power supply.
Assembly
⚠ WARNING: To reduce the risk of injury, before assembly, make sure that the tool is switched off and unplugged.
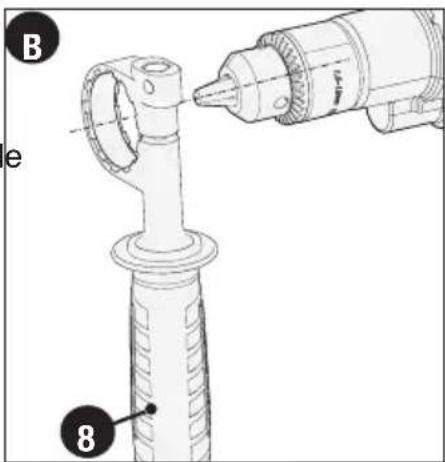
Attaching the side handle - DR560 (fig. B)
If your drill is equipped with a side handle, it must be installed properly to control the drill.
- Turn the grip counterclockwise until you can slide the side handle (8) onto the front of the tool as shown.
- Rotate the side handle into the desired position.
- Tighten the side handle by turning the grip clockwise.
Inserting a drill bit or other accessory (fig. C & D)
⚠ WARNING: Do not attempt to tighten drill bits (or any other accessory) by gripping the front part of the chuck and turning the tool on. Damage to the chuck and personal injury may occur when changing accessories.
⚠ WARNING: Always ensure the bit is secure before starting the tool. A loose bit may eject from tool causing possible personal injury.
Keyless two sleeve chuck (DR260) (fig. C)
- Open the chuck (4) by grasping the rear half (9) with one hand and use your other hand to rotate the front sleeve (10) counterclockwise as viewed from the chuck end.
- Insert the accessory shaft into the chuck to about 3/4in. (19 mm) depth, centered in the jaws.
- Tighten securely by holding the rear half of the chuck and rotating the front sleeve in the clockwise direction as viewed from the chuck end.
text_image
B e 8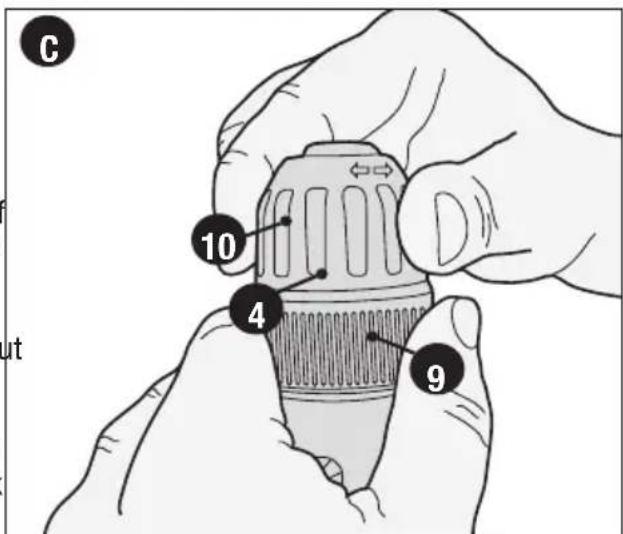
text_image
C 10 4 9 utKeyless single sleeve chuck (DR340)
This tool is equipped with a feature that automatically locks the spindle when the tool is not running. This feature is a normal condition which allows for tightening or loosening of the chuck with one hand while holding the drill with the other.
• To change accessories, loosen the chuck by rotating the sleeve counterclockwise as viewed from the chuck end.
- Insert the accessory shaft into the chuck to about 3/4in. (19 mm) depth, centered in the jaws.
- Tighten securely by rotating the sleeve in the clockwise direction as viewed from the chuck end.
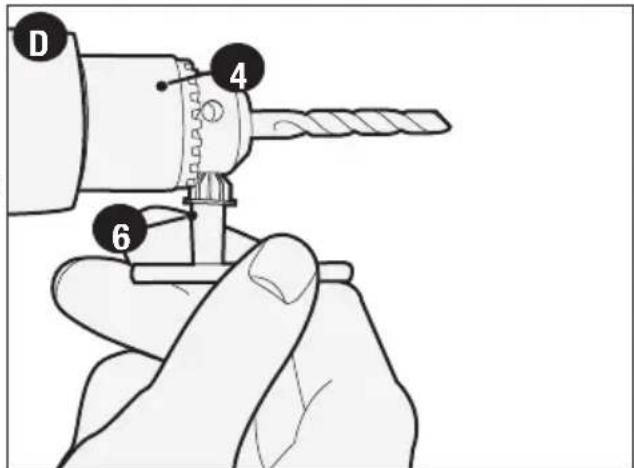
Chuck and key (DR560) (fig. D)
- Open the chuck (4) by turning the collar counterclockwise (when viewed from the chuck end).
- Insert the accessory shaft into the chuck to about 3/4 in. (19 mm) depth, centered in the jaws.
- Tighten chuck collar by hand. Place chuck key (6) into each of the three holes and securely tighten in a clockwise direction.
NOTE: Tighten chuck with all three holes to prevent slippage.
text_image
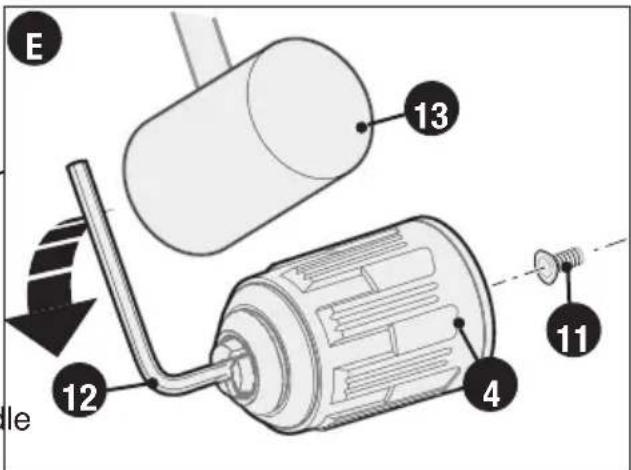
D 4 6Removing and attaching the chuck (fig. E) Keyless chuck (DR260, DR340)
- Open the chuck (4) as far as possible.
- Remove the chuck retaining screw (11), located in the chuck, by turning it clockwise using a screwdriver (lefthand thread).
- Tighten an allen key (12) of 1/4in. (6mm) or greater size (not supplied) into the chuck and strike it with a soft hammer (13) in a clockwise direction as shown.
- Remove the allen key.
- Remove the chuck by turning it counterclockwise.
• To attach the chuck, screw it onto the spindle and secure it with the chuck retaining screw.
text_image
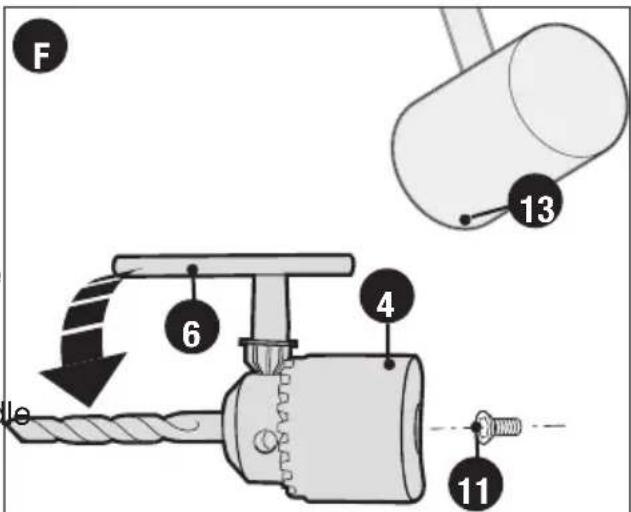
E 13 12 4 11 leKeyed chuck (DR560) (fig. F)
- Place chuck key (6) in any one of the three holes in the chuck (4).
• Using a soft hammer (13), strike the key in a clockwise direction. This will loosen the screw (11) inside the chuck.
- Open chuck jaws fully and remove the chuck retaining screw, located in the chuck, by turning it clockwise using a screwdriver (lefthand thread).
- Place key in chuck. Using a soft hammer (13), strike key sharply in a counterclockwise direction.
- Remove the chuck by turning it counterclockwise.
• To attach the chuck, screw it onto the spindle and secure it with the chuck retaining screw.
text_image
F 6 4 13 11Operating Instructions
⚠ WARNING: To reduce the risk of serious personal injury, read, understand and follow all safety warnings and instructions prior to using tool.
⚠ WARNING: It is important to support the work properly and to hold the drill firmly to prevent loss of control which could cause personal injury. If you have any questions on how to properly operate tool, call: 1-800-544-6986.
⚠ WARNING: Do not attempt to tighten drill bits (or any other accessory) by gripping the front part of the chuck and turning the tool on. Damage to the chuck and personal injury may occur when changing accessories.
⚠ WARNING: To reduce the risk of injury, always unplug drill from power supply before making any adjustments or changing accessories.
⚠ WARNING: To reduce the risk of injury, let the tool work at its own pace. Do not overload.
Selecting the direction of rotation
For drilling and for tightening screws, use forward (clockwise) rotation. For loosening screws or removing a jammed drill bit, use reverse (counterclockwise) rotation.
⚠ WARNING: Never change the direction of rotation while the motor is running.
Models DR260, DR340
- To select forward rotation, push the forward/reverse slider (3) to the right (when viewed from the chuck end).
- To select reverse rotation, push the forward/reverse slider (3) to the left (when viewed from the chuck end).
Model DR560
- To select forward rotation, push the forward/reverse slider (3) to the left (when viewed from the chuck end).
- To select reverse rotation, push the forward/reverse slider (3) to the right (when viewed from the chuck end).
Switching on and off
- To switch the tool on, press the variable speed switch (1). The tool speed depends on how far you press the switch.
- For continuous operation, press the lock-on button (2) and release the variable speed switch. This option is available only at full speed.
- To switch the tool off, release the variable speed switch. To switch the tool off when in continuous operation, press the variable speed switch once more and release it.
⚠ WARNING: The drill should only be locked ON when it is held stationary in a drill press stand or other means; NOT BY HAND! Never unplug the tool with the locking feature engaged. To do so will cause the tool to start immediately the next time it is plugged in.
Drilling
- Always unplug the drill when attaching or removing accessories. When attaching accessories in the drill chuck, it is important to securely tighten the chuck using all three holes to prevent slippage. When using a keyless chuck, hand tighten firmly.
• Use sharp drill bits only.
• Support and secure work properly, as instructed in the safety instructions.
• Use appropriate and required safety equipment, as instructed in the safety instructions.
- Secure and maintain work area, as instructed in the safety instructions.
- Plug in drill. Make sure switch turns drill on and off.
- Run the drill very slowly, using light pressure, until the hole is started enough to keep the drill bit from slipping out of it.
- Apply pressure in a straight line with the bit. Use enough pressure to keep the bit biting but not so much as to stall the motor or deflect the bit.
- Hold the drill firmly with both hands to control its twisting action (figure A).
• Use side handle if drill (DR560) is equipped with one.
• DO NOT CLICK THE TRIGGER OF A STALLED DRILL OFF AND ON IN AN ATTEMPT TO START IT. DAMAGE TO THE DRILL CAN RESULT.
- Minimize stalling on breakthrough by reducing pressure and slowly drilling through the last part of the hole.
- Keep the motor running while pulling the bit out of a drilled hole. This will help reduce jamming.
Drilling In Wood
Holes in wood can be made with the same twist drill bits used for metal or with spade bits.
These bits should be sharp and should be pulled out frequently when drilling to clear chips from the flutes.
Drilling In Metal
Use a cutting lubricant when drilling metals. The exceptions are cast iron and brass which should be drilled dry. The cutting lubricants that work best are sulfurized cutting oil or lard oil.
Troubleshooting
| Problem | Possible Cause | Possible Solution |
| Unit will not start. | Cord not plugged in. | Plug tool into a working outlet. |
| Forward/reverse slider not fully depressed in desired direction. the left or right. | Push slider completely to | |
| Circuit fuse is blown. | Replace circuit fuse. | |
| (If the product repeatedly causes the circuit fuse to blow, discontinue use immediately and have it serviced at a BLACK+DECKER service center or authorized servicer.) | ||
| Circuit breaker is tripped. | Reset circuit breaker. | |
| causes the circuit breaker | (If the product repeatedly to trip, discontinue use immediately and have it serviced at a BLACK+DECKER service center or authorized servicer.) | |
| Cord or switch is damaged. | Have cord or switch replaced at BLACK+DECKER Service Center or Authorized Servicer. | |
For assistance with your product, visit our website www.blackanddecker.com for the location of the service center nearest you or call the BLACK+DECKER help line at 1-800-544-6986.
MAINTENANCE
Use only mild soap and damp cloth to clean the tool. Never let any liquid get inside the tool; never immerse any part of the tool into a liquid.
IMPORTANT: To assure product SAFETY and RELIABILITY, repairs, maintenance and adjustment should be performed by authorized service centers or other qualified service personnel, always using identical replacement parts.
ACCESSORIES
Recommended accessories for use with your tool are available from your local dealer or authorized service center. If you need assistance regarding accessories, please call: 1-800-544-6986.
⚠ WARNING: The use of any accessory not recommended for use with this tool could be hazardous.
SERVICE INFORMATION
All BLACK+DECKER Service Centers are staffed with trained personnel to provide customers with efficient and reliable power tool service. Whether you need technical advice, repair, or genuine factory replacement parts, contact the BLACK+DECKER location nearest you. To find your local service location, call: 1-800-544-6986 or visit www.blackanddecker.com
TWO-YEAR LIMITED WARRANTY
Black & Decker (U.S.) Inc. warranties this product to be free from defects in material or workmanship for a period of two (2) years following the date of purchase, provided that the product is used in a home environment. This limited warranty does not cover failures due to abuse, accidental damage or when repairs have been made or attempted by anyone other than BLACK+DECKER and its Authorized Service Centers. A defective product meeting the warranty conditions set forth herein will be replaced or repaired at no charge in either of two ways:
The first, which will result in exchanges only, is to return the product to the retailer from whom it was purchased (provided that the store is a participating retailer). Returns should be made within the time period of the retailer's policy for exchanges. Proof of purchase may be required. Please check with the retailer for its specific return policy regarding time limits for returns or exchanges. The second option is to take or send the product (prepaid) to a BLACK+DECKER owned or authorized Service Center for repair or replacement at BLACK+DECKER's option. Proof of purchase may be required. BLACK+DECKER owned and authorized service centers are listed online at www.blackanddecker.com.
This warranty does not apply to accessories. This warranty gives you specific legal rights and you may have other rights which vary from state to state. Should you have any questions, contact the manager of your nearest BLACK+DECKER Service Center. This product is not intended for commercial use, and accordingly, such commercial use of this product will void this warranty. All other guarantees, express or implied, are hereby disclaimed.
FREE WARNING LABEL REPLACEMENT: If your warning labels become illegible or are missing, call 1-800-544-6986 for a free replacement.
LATIN AMERICA: This warranty does not apply to products sold in Latin America. For products sold in Latin America, check country specific warranty information contained in the packaging, call the local company or see the website for warranty information.
MAXIMUM RECOMMENDED CAPACITIES
| Cat. # | Type | Steel | Soft Wood | Hard Wood | Masonry | |
| DR260 | 3/8in. Drill | 3/8in.(10mm) Twist Bit | 1-1/4in.(31.7mm) 1in.(25.4mm) | N/A | ||
| DR340 | 3/8in. Drill | 3/8in.(10mm) Twist Bit | 1-1/4in.(31.7mm) 1in.(25.4mm) | N/A | ||
| DR560 | 1/2in. Drill | 1/2in.(13mm) Twist Bit | 1-1/2in.(38.1mm) 1-1/4in.(31.7mm) | N/A | ||
Imported by
Black & Decker (U.S.) Inc.,
701 E. Joppa Rd.
Towson, MD 21286 U.S.A.

text_image
BlackandDecker.com 1-800-544-6986BLACK+
DECKER
TM
PERCEUSES ET MARTEAUX PERFORATEURS 10 mm (3/8 po) 13 mm (1/2 po)
MODE D'EMPLOI
NUMERO DE CATALOGUE
DR260, DR340, DR560
natural_image
Line drawing of a hand holding a handheld electric drill (no text or symbols)text_image
C 10 4 9 inBlack & Decker Canada Inc.
100 Central Ave.
--- o DC....corriente directa
natural_image
Line drawing of a hand holding a handheld electric drill (no text or symbols)Date of purchase · Fecha de compra Invoice No. · No. de factura
Col. Fracc. Universidad
Chihuahua, Chihuahua
Tel. 01 614 413 64 04
Fernando González Armenta
Bolivia No. 605
Col. Felipe Carrillo Puerto
Cd. Madero, Tamaulipas
Tel. 01 833 221 34 50