
XR-1853MK2 - Car stereo SONY - Free user manual and instructions
Find the device manual for free XR-1853MK2 SONY in PDF.

| Product Type | Car stereo with cassette player |
| Brand and model | Sony XR-1853MK2 |
| Dimensions (W x H x D) | 188 x 58 x 170 mm (without protruding parts) |
| Mounting dimensions | 182 x 53 x 165 mm |
| Weight | Approximately 1.5 kg |
| Power supply | 12 V DC, car battery (negative ground) |
| Built-in amplifier | Max. power 20 W × 4 channels (4 ohms) |
| Tuner functions | FM (FM1: 65-74 MHz, FM2: 87.5-108 MHz), MW (522-1611 kHz), LW (153-281 kHz) |
| Station presets | Up to 24 stations (12 FM, 6 MW, 6 LW) |
| Search and scan | Automatic seek (SEEK), scan (SCAN), auto memory, memory scan |
| Cassette player | Auto-reverse, lockable fast forward/rewind, 4-track stereo, response 50-15000 Hz |
| Signal-to-noise ratio (player) | 50 dB |
| Wow and flutter | 0.2% (WRMS) |
| Speaker impedance | 4 to 8 ohms |
| Antenna output | Connector for external antenna |
| Tone control | ±12 dB at 10 kHz (treble) |
| Other controls | Balance (BAL), fader (FAD), volume/power (VOL), band (FM/MW/LW) |
| Maintenance | Clean the head and tape path every 2 weeks with a cleaning cassette |
| Fuse | Use a fuse of the specified rating (indicated on the fuse holder) |
| Anti-theft security | Remove the unit from the dashboard when leaving the vehicle |
| Supplied accessories | Mounting kit (1 set), user and installation manuals |
Frequently Asked Questions - XR-1853MK2 SONY
User questions about XR-1853MK2 SONY
0 question about this device. Answer the ones you know or ask your own.
Ask a new question about this device
Download the instructions for your Car stereo in PDF format for free! Find your manual XR-1853MK2 - SONY and take your electronic device back in hand. On this page are published all the documents necessary for the use of your device. XR-1853MK2 by SONY.
USER MANUAL XR-1853MK2 SONY
FM/MW/LW Cassette Car Stereo
XR-1853MK2
Operating Instructions
EN
Before operating the unit, please read this manual thoroughly and retain it for future reference.
PL
Instrukcja obs ugi
For installation and connections, see the supplied installation/ connections manual.
© 1996 by Sony Corporation
Features
General
- Built-in power amplifier (max. output: 20W × 4ch ) enables you to connect to 4-speaker systems.
Automatic loudness control automatically boosts high and low frequencies at low listening volumes for improved sound.
Cassette player section
- Auto-reverse cassette player provides continuous play of the cassette tape.
- Locking Fast-Forward and Rewind buttons let you easily move to any position on the tape.
Tuner section
- Up to 24 stations can be preset: 12 stations on FM, 6 stations on MW and 6 stations on LW.
- Seek tuning provides an easy way to find the station you want to listen to.
- Scan function scans each of the stations with the strongest signals for five seconds in order (page 5).
Automatic Memory function stores a total of 24 stations in memory quickly and easily (page 6). - Memory Scan function scans each preset station for five seconds in order (page 7).
Precautions
- If your car was parked in direct sunlight resulting in a considerable rise in temperature inside the car, allow the unit to cool off before operating it.
- If no power is being supplied to the unit, check the connections first. If everything is in order, check the fuse.
If you have any questions or problems concerning your unit that are not covered in this manual, please consult your nearest Sony dealer.
Notes on Cassettes
Cassette care
- Do not touch the tape surface of a cassette, as any dirt or dust will contaminate the heads.
- Keep cassettes away from equipment with built-in magnets such as speakers and amplifiers, as erasure or distortion on the recorded tape could occur.
- Do not expose cassettes to direct sunlight, extremely cold temperatures or moisture.
- When the tape is played back for a long period, the cassette shell may become warm because of the built-in power amplifier. However, this is not a sign of a malfunction.
Cassettes longer than 90 minutes
The use of cassettes longer than 90 minutes is not recommended except for long continuous play. The tapes used for these cassettes are very thin and tend to be stretched easily. Frequent playing and stopping of these tapes may cause them to be pulled into the cassette deck mechanism.
Removing the Unit
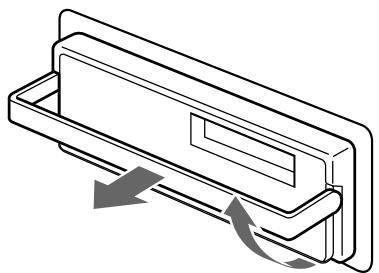
To prevent the unit from being stolen
When you leave your car, remove the unit from the bracket and take it away with you. Be sure to turn off the power of the unit before removing the unit, otherwise you may hear a noise.
Table of Contents
Cassette Player Operation
Listening to Tape Playback 4
Ejecting the Cassette 4
Fast-winding the Tape 4
Radio Reception
Tuning in a Station
Searching for the Stations Automatically Automatic Tuning 5
Tuning in by Adjusting the Frequency
— Manual Tuning 5
Scanning for the Station -Scan Function 5
Memorizing Stations
Memorizing Stations Automatically
— Automatic Memory Function 6
Memorizing Only the Desired Stations 6
Receiving the Memorized Stations 6
Checking What is Being Broadcast on the Preset Stations — Memory Scan Function .... 7
Maintenance 7
Button Locations 8
Specifications 9
Troubleshooting Guide 10
EN
Listening to Tape Playback
1 Turn on the unit by rotating the VOL control.

2 After inserting the cassette, playback will start automatically.
To change the tape direction,
press both the and the button at the same time.

Indication of Tape Transport Direction

The side facing up is being played.

The side facing down is being played.
Tape playback automatically changes direction at the end of the tape.
Note
Before turning off the unit, eject the tape to avoid tape damage.
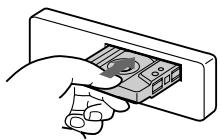
Ejecting the Cassette
Press the button to stop playback and eject the cassette.
Fast-winding the Tape
| Direction indicator | To advance | To rewind |
| ▲ | ||
| ▲ |
To resume playback, press the other fast-winding button until the locked button is released.
Tuning in a Station
Searching for the Stations Automatically
Automatic Tuning
1 Turn on the unit by rotating the VOL control.

2 Select the desired band.
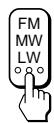
FM1 FM2 MW LW FM1
3 Press either side of the SEEK button to search for the station (automatic tuning).

For lower frequencies

For higher frequencies
The scanning stops when a station is received. Press either side of the button repeatedly until the desired station is received.
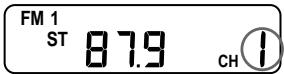
When an FM stereo program with a sufficient signal strength is tuned in,
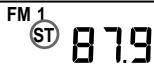
the "ST" indication will appear.
Tuning in by Adjusting the Frequency - Manual Tuning
1 Select the desired band.

2 Press and hold either side of the button.
Release the button when the desired station is received.

For lower frequencies

For higher frequencies
PREVENTING ACCIDENTS!
When tuning in during driving, use the automatic tuning or the preset number buttons instead of the manual tuning.
Scanning for the Stations
— Scan Function
1 Select the desired band.

2 Press the SCAN button.

The stations with the strongest signals will be scanned for five seconds each in order. Press the button again when the desired station is received.
Memorizing Stations
Memorizing Stations Automatically
Automatic Memory Function
This function selects from the currently received band six stations and memorizes them in order of their frequencies. If six strong stations cannot be found, it will search the band again looking for farther stations.
1 Select the desired band.

2 Use any tuning method to tune to a frequency slightly below that of the first station you want to memorize.
3 Press the M.SCAN/A.MEM button for more than two seconds.

Note
If a station you want to store has a weak signal or interference, it might not automatically be memorized.
Memorizing Only the Desired Stations
1 Select the desired band.

2 Tune in the station which you wish to store on the preset number button.
3 Keep the desired preset number button (1 to 6) pressed for about two seconds until the volume briefly mutes.
The number of the pressed preset number button now appears on the display window.
Up to 6 stations on each band (FM1, FM2, MW and LW) can be stored on the preset number buttons in order of your choice. Therefore, 12 stations can be memorized on FM. If you try to store another station on the same preset number button, the previously stored station will be erased.
Receiving the Memorized Stations
1 Select the desired band.

2 Press momentarily the preset number button on which the desired station is stored.
Note
If you press the preset number button for more than two seconds, the currently received station will be memorized. To receive the previously memorized station, make sure that the preset number button is pressed only momentarily.
Checking What is Being Broadcast on the Preset Stations — Memory Scan Function
1 Select the desired band.

2 Press the M.SCAN/A.MEM button momentarily.

The memorized stations will be scanned for five seconds each in order. (When the broadcast signal of a memorized station is too weak, it cannot be received.)
Note
Make sure that you press the M.SCAN/A.MEM button momentarily. If you press it for more than two seconds, the button will function as the A.MEM (automatic memory) button, and the memories of the currently activated preset number button and of the succeeding preset number buttons will be altered.
Maintenance
Fuse Replacement
When replacing the fuse, be sure to use one with the correct amperage which is stated on the fuse case. Never use a fuse whose amperage rating exceeds the one supplied to the unit, as this could cause a malfunction of the unit.
Warning
Use a fuse with the specified amperage. Use of a fuse with higher amperage may cause serious damage.
Cleaning the Head and the Tape Path
Prolonged use may contaminate the tape head and the tape path. Contamination causes sound drop-outs during playback.
Clean the tape head and the tape path every two weeks to enjoy optimum hi-fi stereo sound. Use a commercially available cleaning cassette.
Button Locations
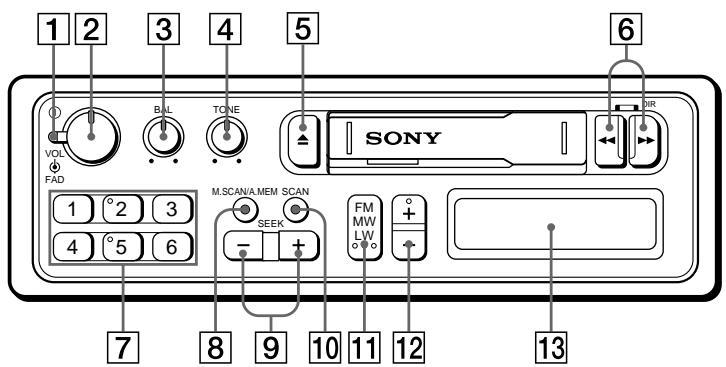
Refer to the pages in for details.
1 FAD (fader) control
Turn the outer knob to adjust the balance between front and rear speakers.

To decrease the front-speaker's volume
VOL (on/off, volume) control
Turn the inner knob to turn the unit on or off and to adjust the volume.
3 BAL (balance) control
Turn the knob to adjust the balance between right and left speakers.
4 TONE control
Turn the knob to the left for less treble.
5 (eject) button 4
6 (fast-winding)/DIR (tape transport direction change) 4
7 Preset number buttons 6
8 M.SCAN/A.MEM button 67
9 SEEK (automatic tuning) button 5
10 SCAN button 5
11 FM/MW/LW (band select) button 567
12 +/- button 5
13 Display window
Specifications
Cassette player section
Tape track 4-track 2-channel stereo
Wow and flutter 0.2% (WRMS)
Frequency response 50 - 15,000Hz
Signal-to-noise ratio 50 dB
Tuner section
FM
Tuning range FM1:65-74MHz
FM2:87.5-108MHz
Antenna terminal External antenna connector
Intermediate frequency 10.7 MHz
- Usable sensitivity 12 dB
Selectivity 65 dB at 400kHz
Signal-to-noise ratio 55 dB (stereo), 60 dB
(mono)
Harmonic distortion at 1kHz
1.5% (stereo), 1.0%
mono)
25 dB at 1 kHz
Separation
Frequency response
Capture ratio
9 dB
MW/LW
Tuning range MW:522-1,611 kHz
LW:153-281kHz
External antenna connector
Antenna terminal
Intermediate frequency
Sensitivity
MW: 35~ V
LW: 40~ V
Power amplifier section
Outputs
Speaker outputs
(sure seal connectors)
Speaker impedance
4-8 ohms
Maximum power output
20W× 4 (at 4 ohms)
General
Output lead Power antenna relay
control lead
Tone controls 12 dB at 10kHz
Power requirements 12 V DC car battery
(negative ground)
Dimensions Approx. 188× 58× 170mm
(w/h/d) not incl.
projecting parts and
controls
Mounting dimension Approx. 182× 53× 165mm
(w/h/d) not incl.
projecting parts and
controls
Mass Approx. 1.5kg
Supplied accessories Mounting hardware (1 set)
Design and specifications are subject to change without notice.
EN
Troubleshooting Guide
The following check will assist in the correction of most problems which you may encounter with your unit.
Before going through the check list below, refer to the connection and operating procedures.
| Problem | Cause/Solution |
| No sound | ·Adjust the volume with the VOL control. |
| Tape playback sound is distorted. | Contamination of the tape head. → Clean the head. |
| Preset tuning is not possible. | ·Memorize the correct frequency. ·The broadcast is too weak. |
| Automatic tuning is not possible. | The broadcast is too weak. → Use the manual tuning. |
If the above mentioned solutions do not help to improve the situation, consult your nearest Sony dealer.
Cechy indywidualne
OgUlne
Sony Corporation Printed in Hong Kong