RC572 - Remote control VINCENT - Free user manual and instructions
Find the device manual for free RC572 VINCENT in PDF.
User questions about RC572 VINCENT
0 question about this device. Answer the ones you know or ask your own.
Ask a new question about this device
Download the instructions for your Remote control in PDF format for free! Find your manual RC572 - VINCENT and take your electronic device back in hand. On this page are published all the documents necessary for the use of your device. RC572 by VINCENT.
USER MANUAL RC572 VINCENT
Instructions for use
english
natural_image
Illustration of a silver mobile phone with control buttons and app icons (no text or symbols)RC-572
text_image
PI HOME 1 Makro 2 Man0 Man0 Man0 Man0 Man0 Man0 Man0 Man0 Man0 Man0 Man0 Man0 Man0 Man0 Man0 Man0 Man0 Man0 Man0 Man0 Man0 Man0 Man0 Man0 Man0 Man0 Man0 Man0 Man0 Man0 Man0 Man0 Man0 Man0text_image
F Mend List B Ctrl+Lung Lampen MacArthur Speaker
text_image
F1 Bearball Fear and it Mats
text_image
PI HOME TV DVD LED PPT VR USB SPR SPT Makro V
text_image
Mand B Ctrl+Gang Lumen Macintosh Speaker
text_image
P1 Bearbelt Fear and I Erafo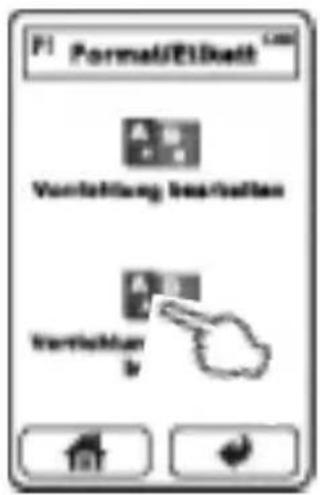
text_image
F1 Format/Ellkelt Vorflichtung insirkungen Variation
text_image
Verkaufungs- auf/Seidl team. 100 LED MOS PPT H2.5 L3.5 ORR SHT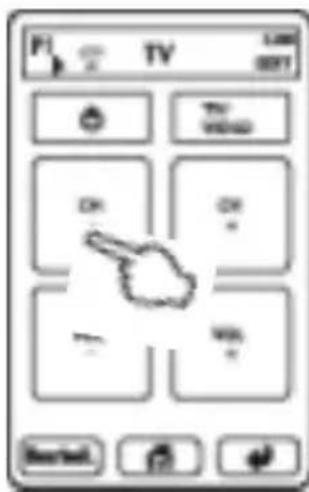
text_image
F TV 1:00 00:01 OK TVD WIND ON ON - WIN - Canceltext_image
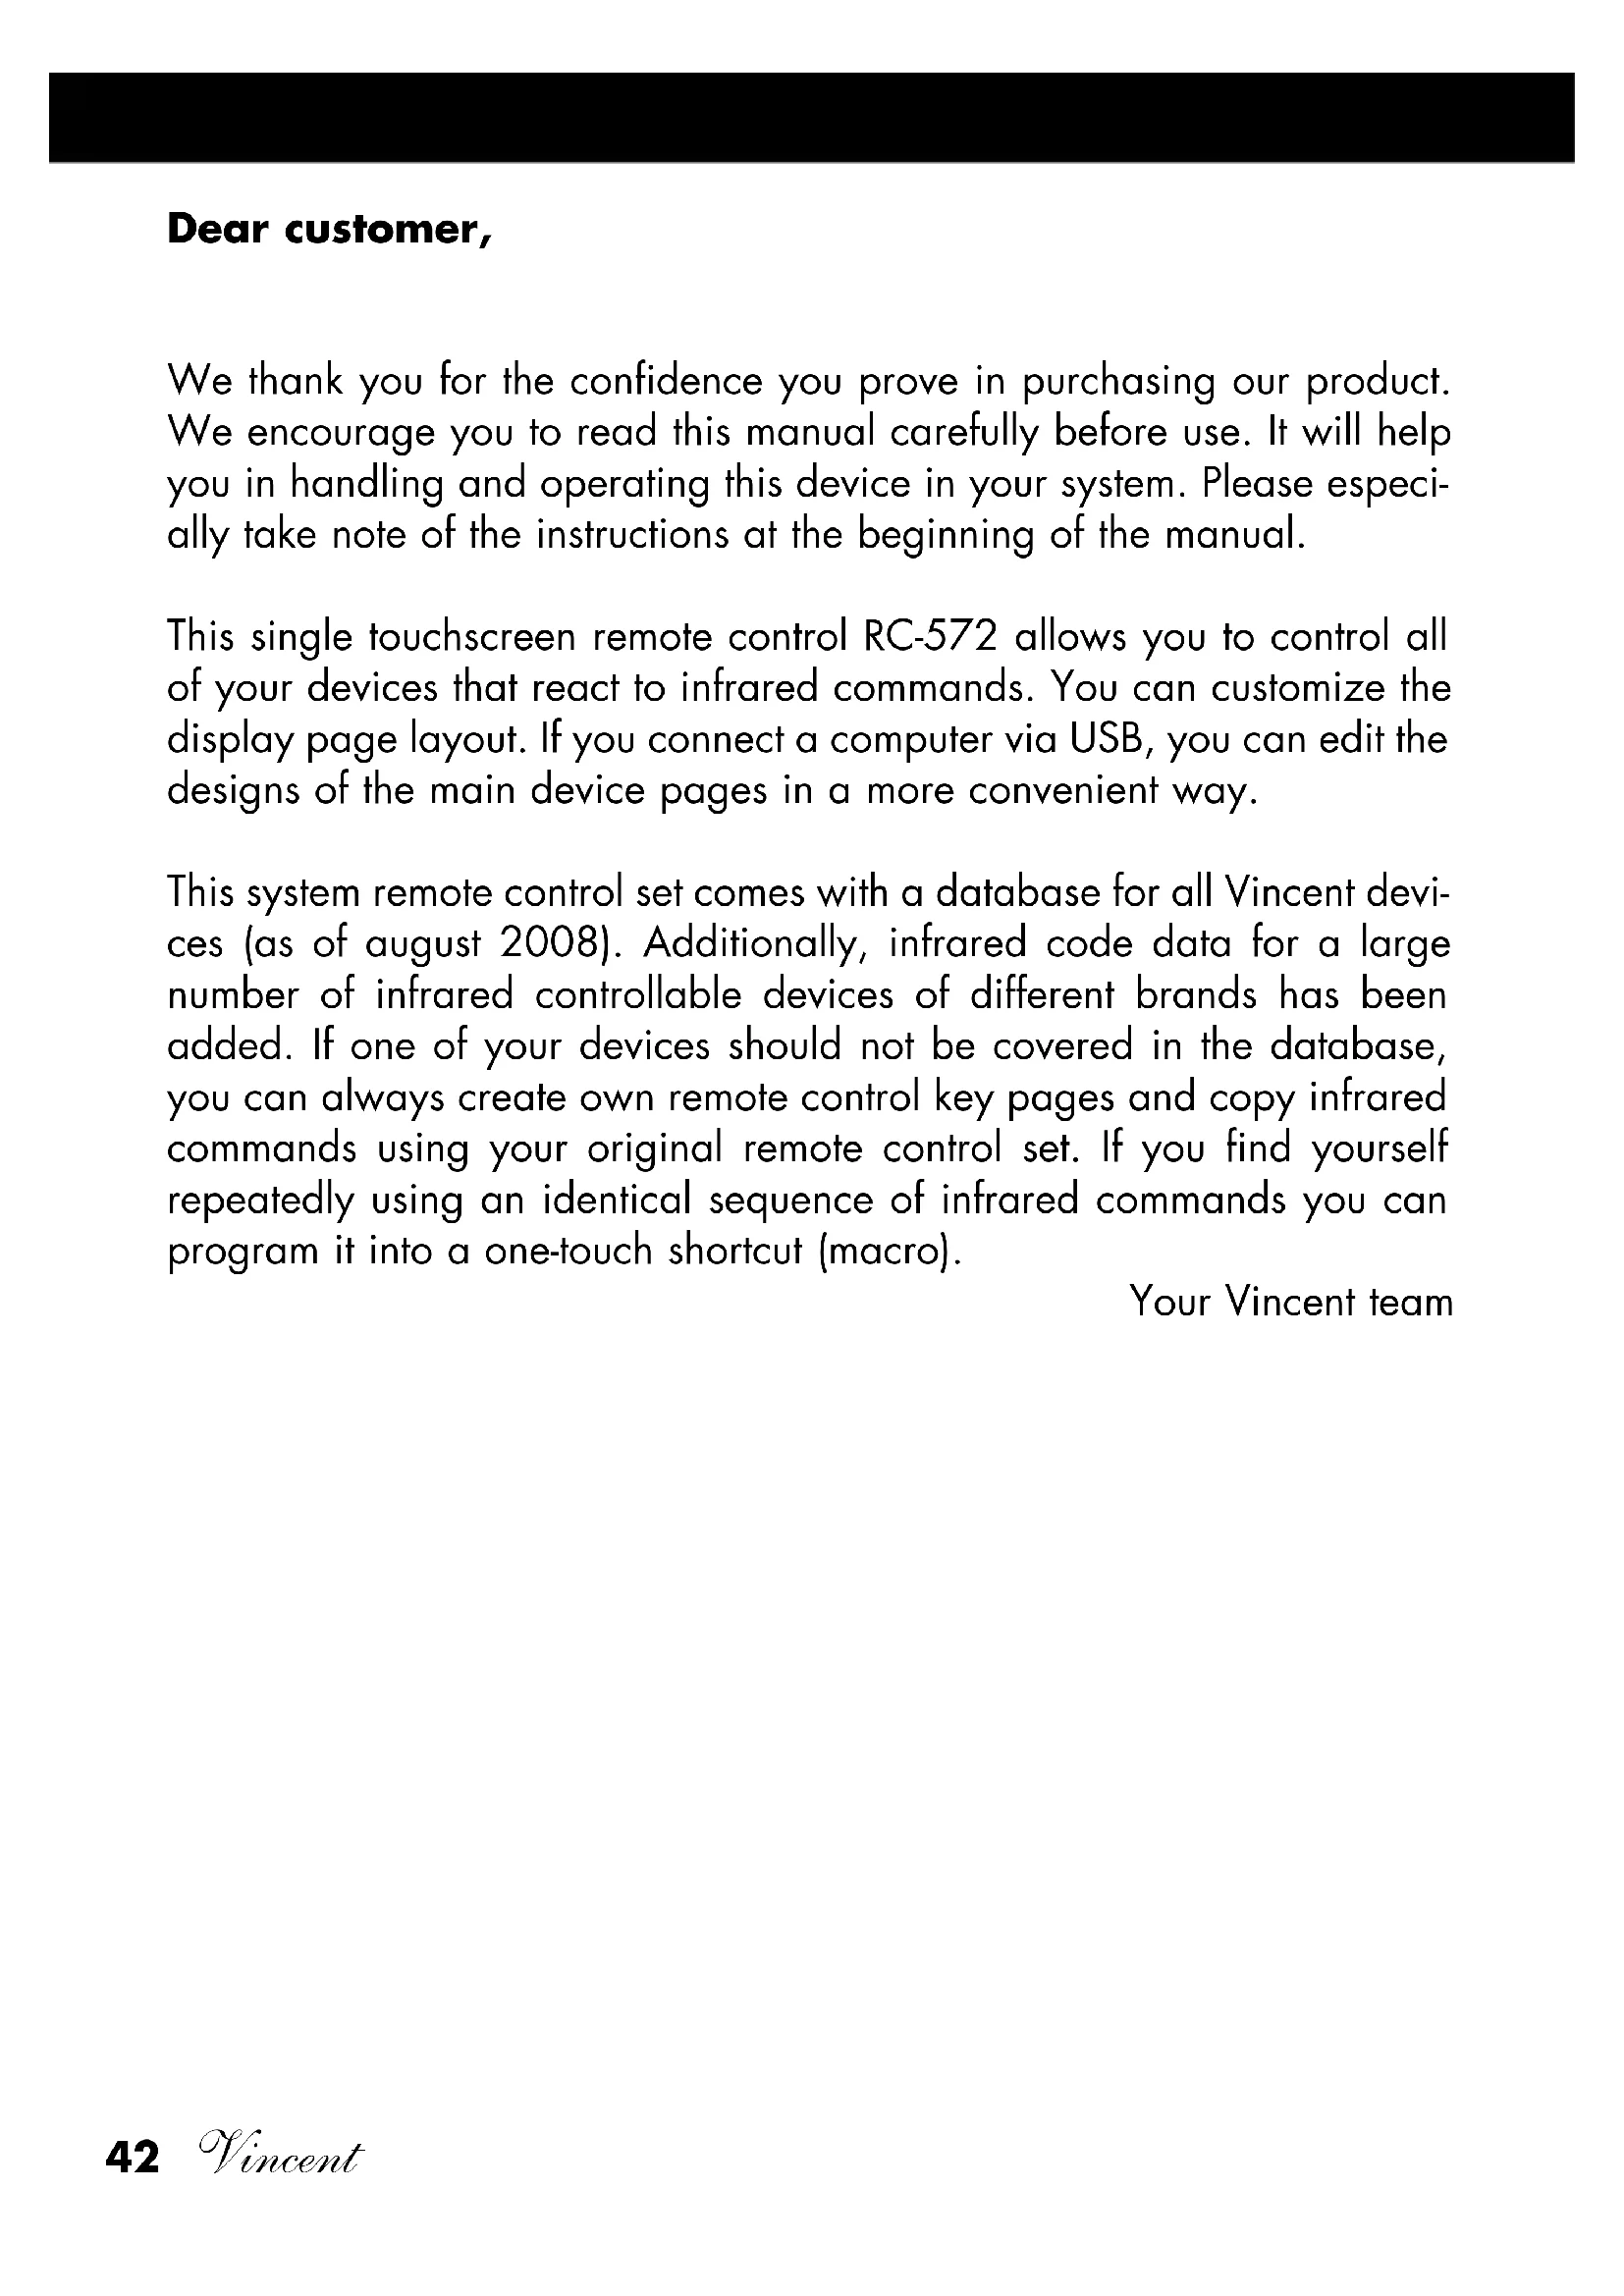
F1 HOME F1 Mand F1 Bachner Makro V Rearbach Elschelang Larmen Sachker C# N C P S S I D E B X I B J - B I J -We thank you for the confidence you prove in purchasing our product. We encourage you to read this manual carefully before use. It will help you in handling and operating this device in your system. Please especially take note of the instructions at the beginning of the manual.
This single touchscreen remote control RC-572 allows you to control all of your devices that react to infrared commands. You can customize the display page layout. If you connect a computer via USB, you can edit the designs of the main device pages in a more convenient way.
This system remote control set comes with a database for all Vincent devices (as of august 2008). Additionally, infrared code data for a large number of infrared controllable devices of different brands has been added. If one of your devices should not be covered in the database, you can always create own remote control key pages and copy infrared commands using your original remote control set. If you find yourself repeatedly using an identical sequence of infrared commands you can program it into a one-touch shortcut (macro).
Your Vincent team
Contents
Contents 43
Important instructions 44
Declarations 45
Included in delivery 45
Batteries 46
Parts description 47
Basic settings 49
Main page „HOME“ 55
Basic operation 57
Setting up the remote control for your devices 59
Copy original infrared functions to device keys and function keys 70
Create macros 76
Check memory status and firmware version 80
Calculator 81
Technical Specifications 81
IMPORTANT INSTRUCTIONS
Leave maintenance work to qualified professionals.
Take care that the device does not come in contact with liquids, moisture, rain or water vapour.
Never expose the appliance to high temperatures (direct sunshine) or strong vibration.
Cleaning
Clean the product in avoidance of abrasives, solvents, thinners, flammable chemicals, polishes and other cleaning products that leave stains.

Use of batteries
Please take special note of the instructions in the chapter "Batteries".

Old electronic equipment
This appliance is subject to the conditions set out in the European Directive 2002/96/EC. This is identified by the symbol of a crossed out waste bin on the appliance.

What this means for you as a con- sumer: All old electrical and elec- tronic equipment that is no longer used must be disposed of separa- tely from domestic waste using
places provided by the authorities. By doing so you can prevent damage to the environment and help to encourage manufacturers to produce more durable or reusable products. For further information about disposing your old appliance, please consult your local authority, waste disposal agency or the shop where you bought the product.
CE sign
This appliance complies with the current EU directives about attaining the CE mark and thus meets the requirements for electrical and electronic equipment (EMC regulations).

DECLARATIONS
Although the included software on the CD-ROM has been designed carefully, you use it at your own risk. Vincent is not liable for any damage or loss of data possibly caused by the use of it.
Vincent works continually to improve and develop its products. Therefore, the appearance and technical design of the appliance are subject to changes, as long as they are in the interest of progress. The content of these instructions is for information purposes only. It can be changed at any time without prior notice and does not constitute any obligation on the part of the trademark's owner. The latter assumes no responsibility or liability for errors or inaccuracies, which may be included in these operating instructions.
This document is a product of Sintron Vertriebs GmbH, 76473 Iffezheim and may not be copied or distributed partly or in full without express, written consent.
Vincent is a registered trademark of Sintron Vertriebs GmbH, 76473 Iffezheim.
INCLUDED IN DELIVERY
Please check the contents of the packaging, which should also contain the following accessories:
- 1 USB cable
• 3 AAA (LR3) batteries - 1 CD-ROM with the program "PC Link"
- this manual
BATTERIES
The battery status indicator in the top right corner of the display gives you an idea about the battery charge status. When the batteries are running low, this symbol flashes. The unit functions will be locked until fresh batteries are installed. Replace the batteries as soon as possible to ensure perfect performance. The remote control retains all data when batteries have run out or while you replace them.
Installing Batteries
- Open and remove the battery compartment cover by applying light pressure on the point labelled "OPEN" and sliding the cover in the arrow direction.
- If necessary, remove used up batteries and insert 3 AAA batteries matching the polarity as indicated on the bottom of the battery compartment.
- Close the battery compartment cover.

The batteries must be inserted correctly taking note of the polarity, which is marked in the inside of the battery compartment.
In order to make full use of the batteries' lifetime, do not mix new and used batteries. Make sure that you insert batteries of the same type. Some batteries are rechargeable, others are not however. Take note of the precautions and instructions that are included on all batteries. Remove the batteries if the remote control is not going to be used for a long time. Under no circumstances must batteries be short-circuited, taken apart or heated up.
For environmental reasons, used batteries should be disposed of in accordance with local environmental regulations and not put with domestic waste.
Use only AAA (LR3) size batteries.
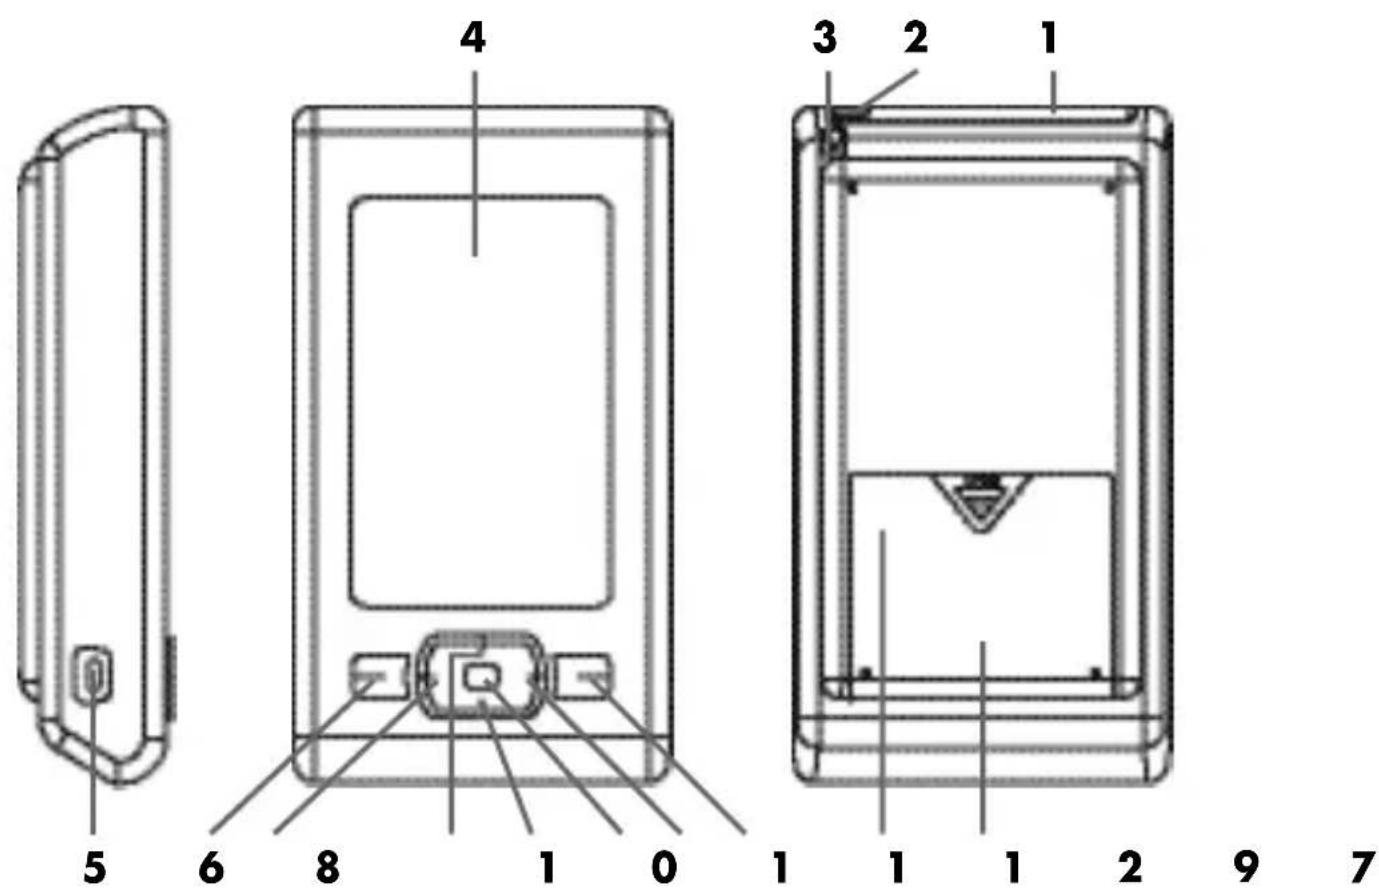
PARTS DESCRIPTION
Side View Front View Rear View
text_image
4 3 2 1 5 6 8 1 0 1 1 1 2 9 71. Infrared receiver and transmitter
One infrared receiver and one infrared transmitter diode are situated behind the shaded window.
2. Ambient light sensor
This sensor decides whether the backlight of the display should be switched on or not.
3. Stylus
The stylus gives your touchscreen commands more precision, especially with small keys.
4. Display with touchscreen
This LC display shows device key pages as well as the function keys of the device you want to control.
PARTS DESCRIPTION
At this port a PC can be connected and used to set up the remote control set.
6. Key "Previous page"
Go back to the previous page of either the device selection keys or the function keys.
7. Key "Next page"
Go to the next page of either the device selection keys or the function keys.
8. Key "Left"
For every infrared controllable device you can assign an individual function to this key.
9. Key "Right"
For every infrared controllable device you can assign an individual function to this key.
10. Key "Up"
For every infrared controllable device you can assign an individual function to this key.
11. Key "Down"
For every infrared controllable device you can assign an individual function to this key.
12. Key "Enter"
For every infrared controllable device you can assign an individual function to this key.
13. Battery Compartment
This housing contains the batteries and the Reset key (14).
14. Reset key (under the battery compartment lid)
With this key you can restart the remote control.
BASIC SETTINGS
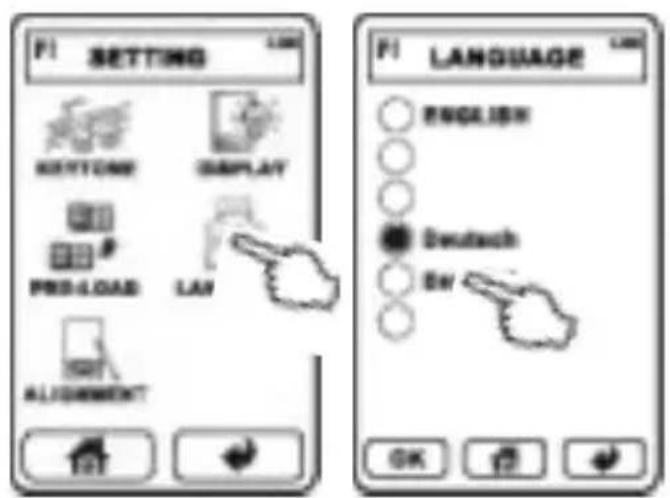
Set the display text language
Maybe you want to change the language of the display text. Among others, you can choose between English, German (Deutsch) and Spanish (Español).

text_image
PI HOME MACRO MENU EXIT EXIT LEADER CALCULATOR MEMORY-
On the HOME page (if this is not currently displayed, touch the house symbol) type MENU, then SETTING, followed by LANGUAGE.
-
Now choose one of the listed languages by touching its designation.
-
By choosing the key OK the setting takes effect.
-
Alternatively touch the key to return to the HOME page without any changes.
text_image
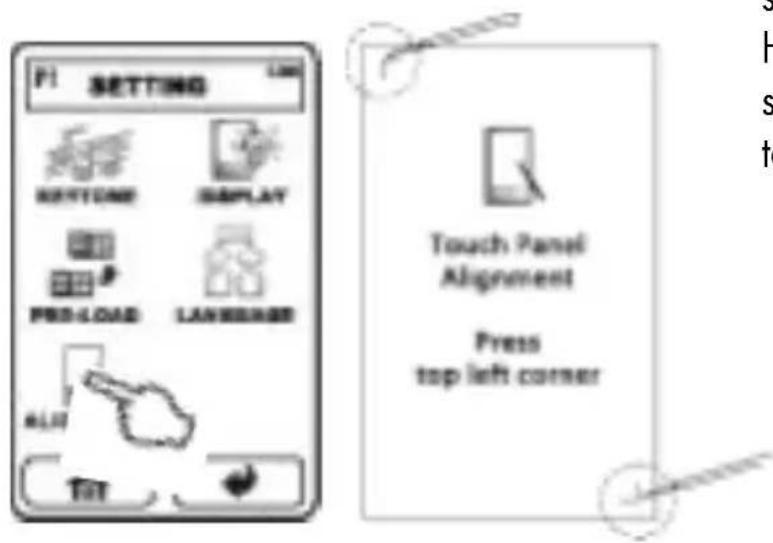
F1 SETTING BOTTOM DISPLAY PRO-LOAD LAY ALIGNMENT F1 LANGUAGE ENGLISH Deutsch BY OKCalibrate the touchscreen
You may see some variance in the responsiveness and accuracy of the touchscreen when using it in cold and hot environments. The setting described here is sometimes necessary at first use of the remote control and may be necessary again at a later time. You should calibrate the screen if
- a precise touch to one key area provokes no reaction
- an input is only accepted when actuated with unusual high pressure to the display
- the area next to a key must be pressed to execute its command.
In the following please use the provided stylus (3) and proceed as described:
text_image
HOME MACRO MENU- On the HOME page choose MENU and touch SETTING. On the SETTING page press ALIGNMENT.
- Follow the instructions on screen by touching the corner of the symbols "「and"".
- If no input is made, the display switches off and returns to the HOME page after several seconds without any changes taking effect.
text_image
PI SETTING BOTTOM DISPLAY PRO-LOAD LANGUAGE ALT TIT Touch Panel Alignment Press top left cornerRestore the pre-programming
At any time you can recover the device control functions for all devices this remote control comes pre-programmed with. All other devices that have been added by the user will not be deleted in the process.
text_image
PI HOME MACRO MENU FAXT ACCESS LADAMS DAGSICATOR MEMORY-
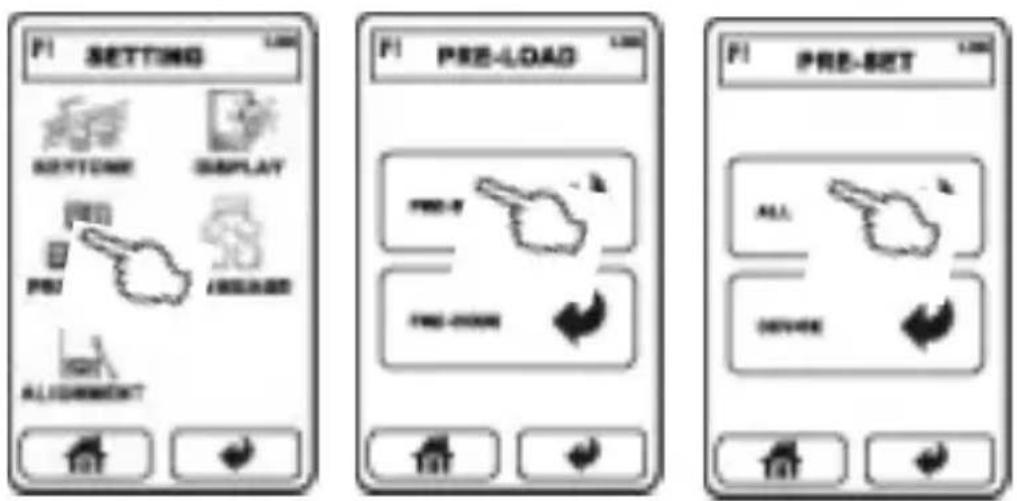
On the HOME page type the following key sequence MENU, SETTING, PRE-LOAD and PRE-SET.
-
Now choose ALL. In the display appears "Processing... Please wait for a few minutes". Anyway, a few seconds later the process of loading from the database should be finished.
text_image
F1 SETTING NEXTONE DISPLAY PRE PRE ALGORITHM PRE-LOAD PRE-LOAD PRE-BET ALL OFFICETo restore the exact factory pre-programming you have to delete all device keys on all HOME pages before executing the described actions (see section "Setting up the remote control for your devices").
Settings of the LC display
text_image
HOME MACRO MENU RIGHT RIGHT LOADN CALCULATIN MEMORY-
On the HOME page touch MENU, then SETTING, followed by DISPLAY.
-
Brightness: Keep the slider "INTENSITY" touched and move it to the right (increase brightness of the backlight) or the left (decrease brightness of the backlight). Release the slider when the desired setting has been reached.

text_image
F1 SETTING RIGHTS PRO-LOAD LANGS ALGORITHM F1 F1 DISPLAY LCD BACKLIGHT: INTENSITY ACTIVE IN DARK ROOM ACTIVE AT ANYTIME LED CONTRAST : SAVE-
Backlight behaviour: Touch one of the two areas in the middle of the screen to set the behaviour of the backlight. When Active at anytime is chosen, the backlight is always activated for some seconds after the display gets touched. The alternative option Active in dark room makes the display backlight available only for environments where the sensor (2) measures low light intensity.
-
Contrast: Keep the slider "LCD CONTRAST" touched and move it to the right (increase contrast of the display) or the left (decrease brightness of the display). Release the slider when the desired setting has been reached.
-
To save the setting finally press SAVE or return to the main page without changes using 🔒
Set the Touchpad key sound
text_image
PI HOME MACRO MENU 1 2-
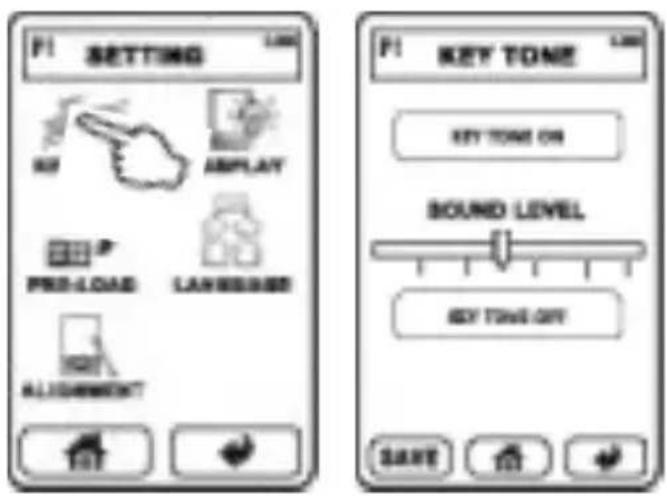
On the HOME page touch MENU, then SETTING, followed by KEYTONE.
-
Beep on/off: Touch the upper key KEYTONE ON, if you want every valid input to be confirmed with a beep. Otherwise touch the lower key KEYTONE OFF to make the remote control silent.
text_image
F1 SETTING KEY ASPLAY PRE-LOAD LANGUAGES ALIGNMENT F1 KEY TONE KEY TONE ON BOUND LEVEL KEY TONE OFF SAVE-
Volume of the beep: Keep the slider "SOUND LEVEL" touched and move it to the right (increase volume level of the beep) or the left (decrease volume level of the beep). Release the slider when the desired setting has been reached.
-
Confirm the settings with SAVE or use the key to return to the main page without settings.
Restart the remote control (Reset)
If the remote control set should completely stop reacting to touch commands (e.g. as an effect to unauthorized manipulation of the file structure via USB) you can restart the firmware of this unit.
- Open the battery compartment cover.
- Use a thin object (e.g. a paper clip) to press the key located deep inside the hole (14) near the marking RESET in the battery compartment. Please note that you can not use the stylus (3) for this purpose!
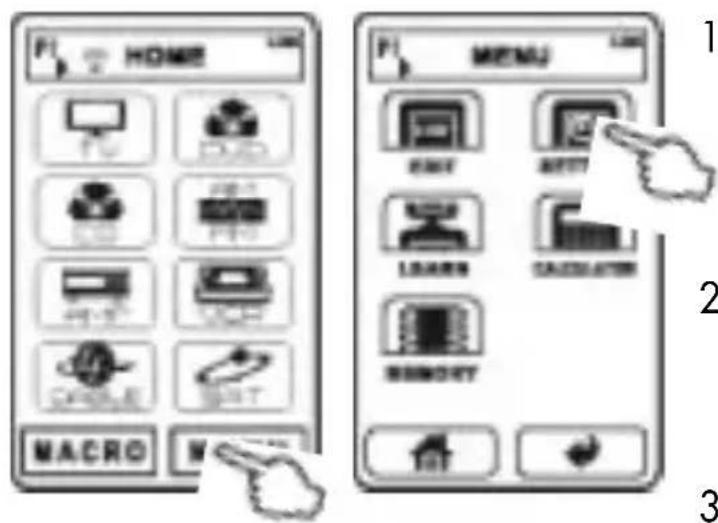
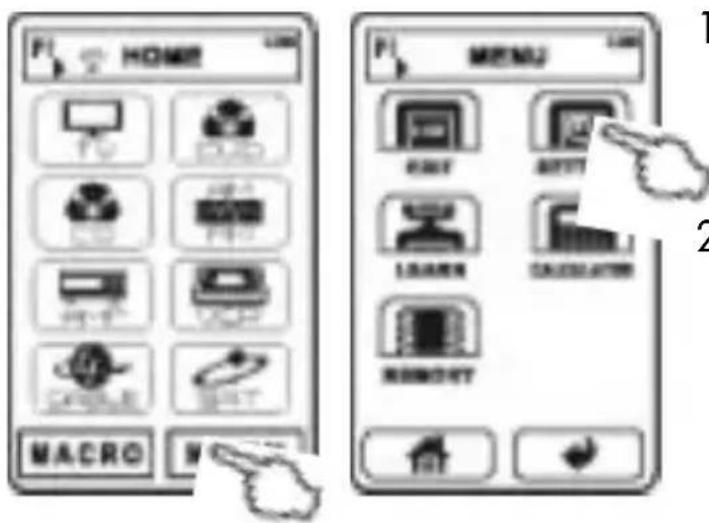
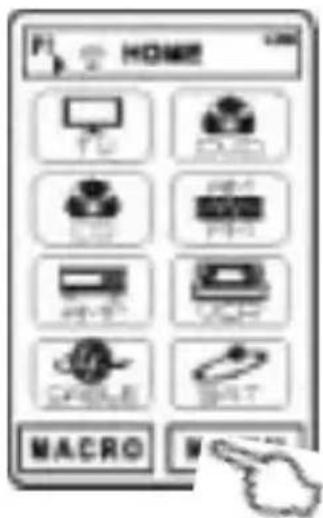
MAIN PAGE "HOME"
The heading title bar appears on almost all pages to show what (sub-)page you have entered. If for some seconds no input is given the display switches off and at the next touch to the display surface returns to the main HOME page.
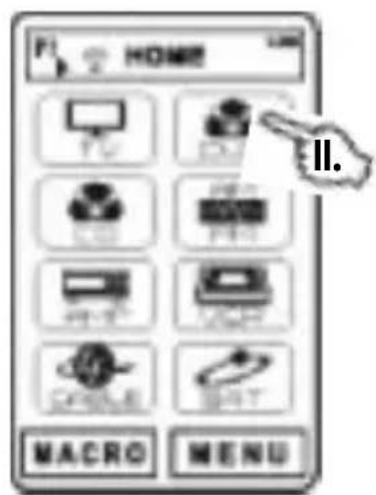
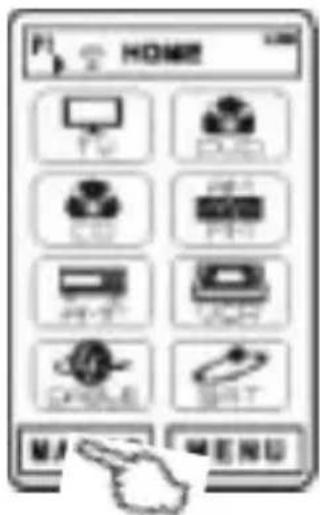
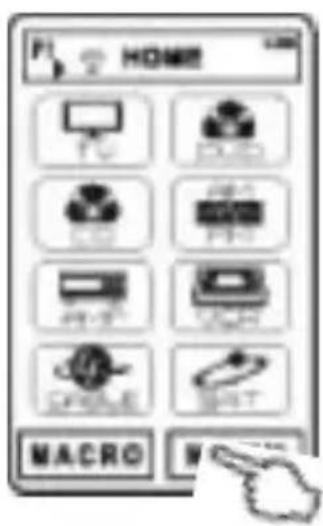
The HOME pages shows in its middle area the device keys, one key for the main MENU and one key for the MACRO list. On the first of the HOME pages up to 8 device keys can be displayed. All other device keys are located on the other pages. You can browse all HOME pages using the page selection keys (6)(7). In the title bar the device page number is displayed (P1, P2, ...).
The key MACRO provides access to the list of macros that have been programmed by the user before (see section "Create macros").
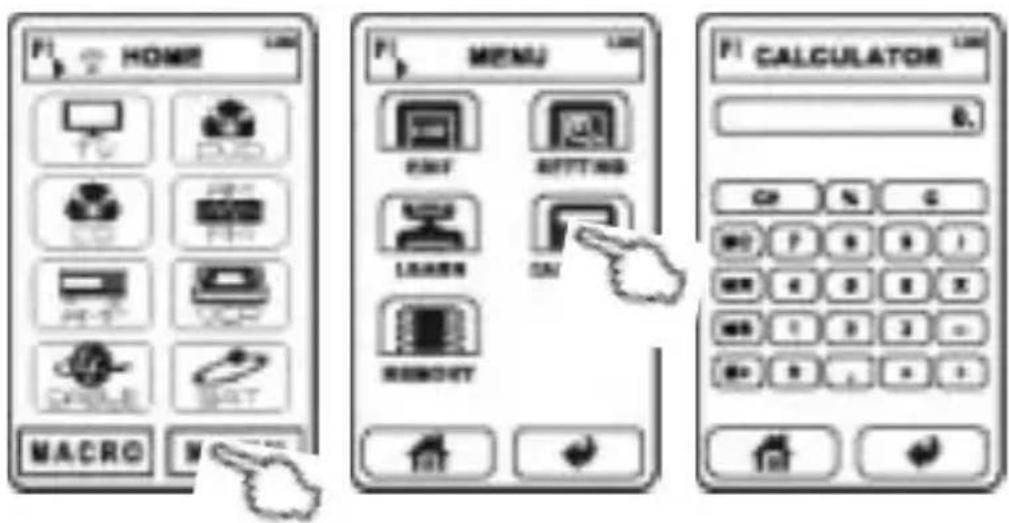
A touch to the key MENU presents the main menu where you can take all actions necessary to change global settings, edit macros, copy device infrared control functions or edit the function key page layout. A mathematical calculator and a memory status page are also available via this menu.
MAIN PAGE "HOME"

text_image
infrared transmitter symbol title of the page page number battery status indicator device keys (pre-setting: all Vincent devices) macro list main menu page arrow key pad page selection keys return to HOME page return to last displayed pageBASIC OPERATION
Point the front of the remote control directly at the front of the appliance, making sure there are no objects between the remote control and the appliance. The distance between the remote control and the appliance should not be more than 7 m, as the reliability of the remote control is affected beyond this range. Make sure that you do not point the remote control at an elevated angle to the appliance, as beyond an angle of ±30^ to the centre axis the appliance may not respond well to the remote control.
Function keys (example)
text_image
PI HOME II. MACRO MENU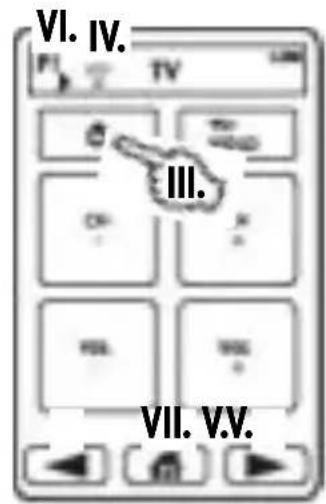
text_image
VI. IV. TV III. VII. V.V.
text_image
V.V.I. On the HOME page use the page selection keys (6)(7), if necessary. The page number is displayed in the title bar.
II. Choose a device key. If an infrared command has bee assigned to this key, the associated infrared signal is sent now.
III. Choose the function key (e.g. "on/off"), the corresponding infrared signal is transmitted.
IV. The infrared transmitter symbol appears in the title bar of the display.
Please note: If a function key has not been programmed with an infrared command yet, it is displayed in half tone (dim, greyed). A touch to this key then has no effect.
V. If the desired function key is located on one of the other function key pages, you can browse the pages using one of the page selection keys (6)(7).
VI. Again, the page number (P1, P2, ...). is displayed in the title bar.
VII. Press the HOME key to return to the device selection.
Macros (example)
text_image
HOME TV DVD LED PPT PCB VRB DAR SAR M MENU- On the HOME page chose MACRO. If not a single macro has been defined before, the list is empty (see section "Create macros").
- If necessary use the page selection keys (6)(7).
- On the macro page, touch the key of the desired macro. The programmed sequence of infrared commands is transmitted.
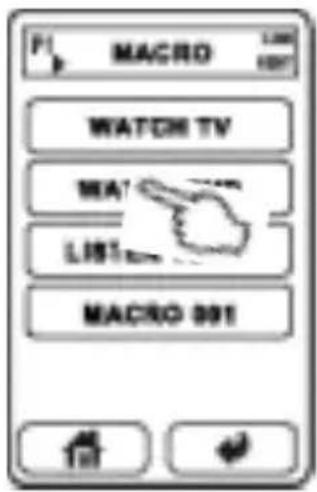
text_image
PI MACRO 1.000 1.007 WATCH TV MA! LIST MACRO 001SETTING UP THE REMOTE CONTROL FOR YOUR DEVICES
Delete all unused pre-programmed devices
text_image
P H000000 MACRO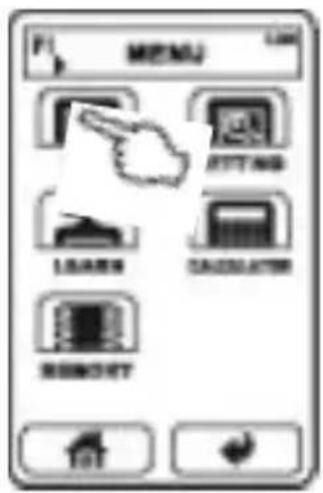
text_image
MENU LEAVES BEIJING DASSUATION REMOTE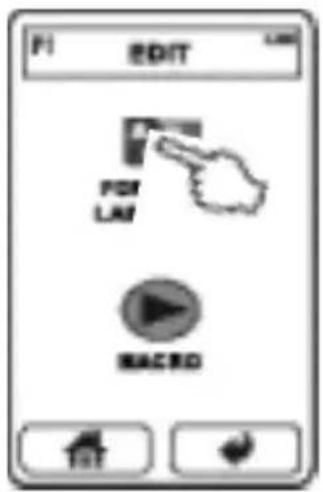
text_image
F1 EDIT FOR LAY MACRO F1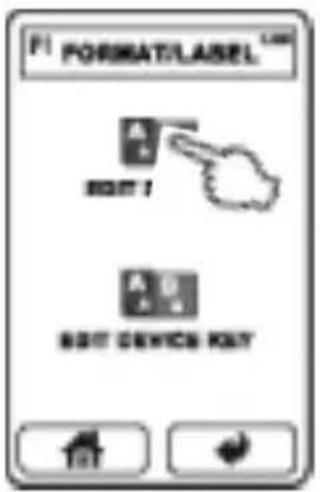
text_image
PI FORMAT/LASEL A E EDIT 1 A S EDIT DEVICE KEY HIT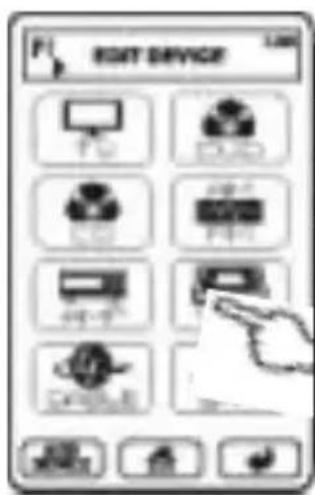
text_image
EXIT DEVICE PC DVD LED USB PPR 开关 DARTEL| COPY |
| RENAME |
| INSERT |
| APPEND |
| MOVE |
| DEL |
| EX |
Also possible with PC Link !
-
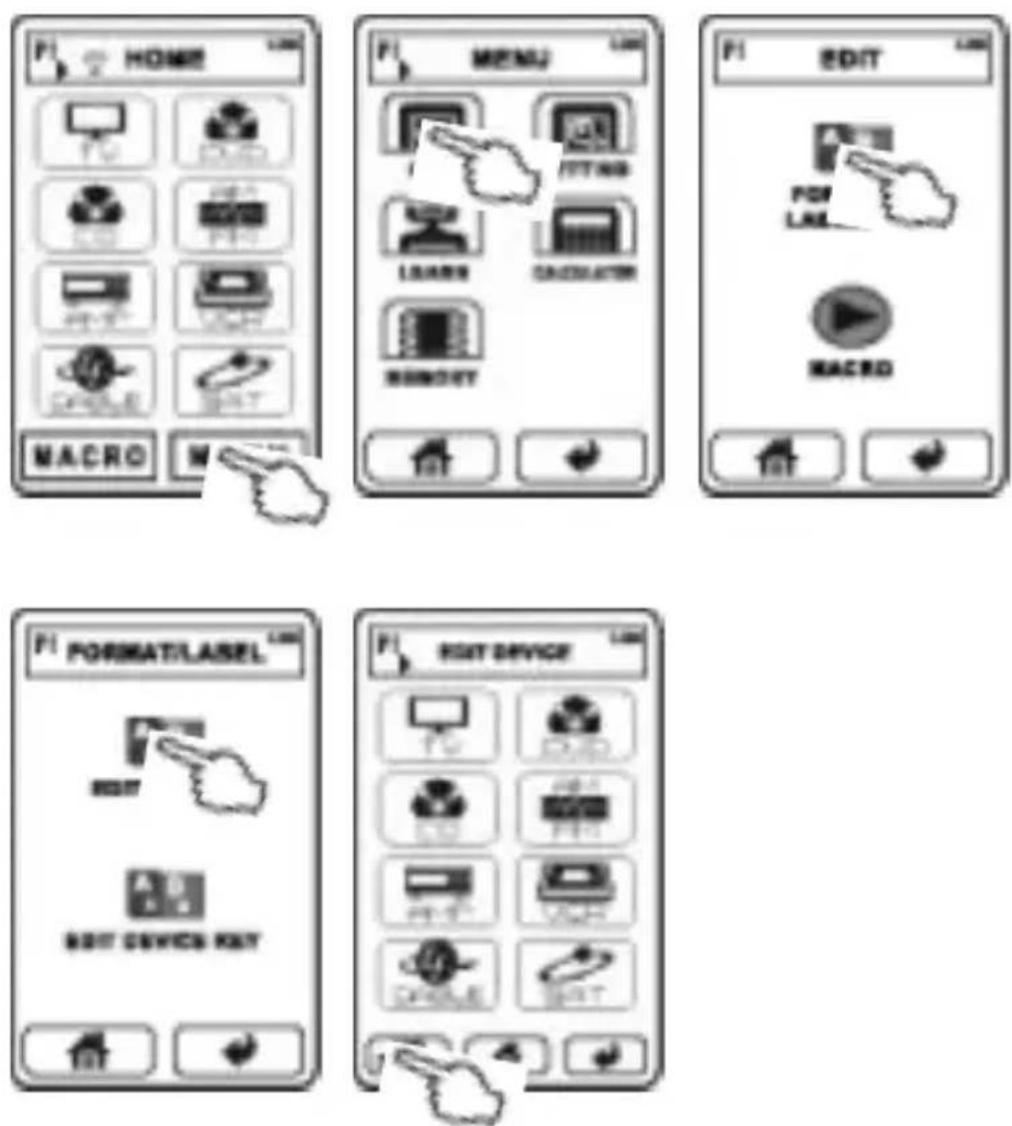
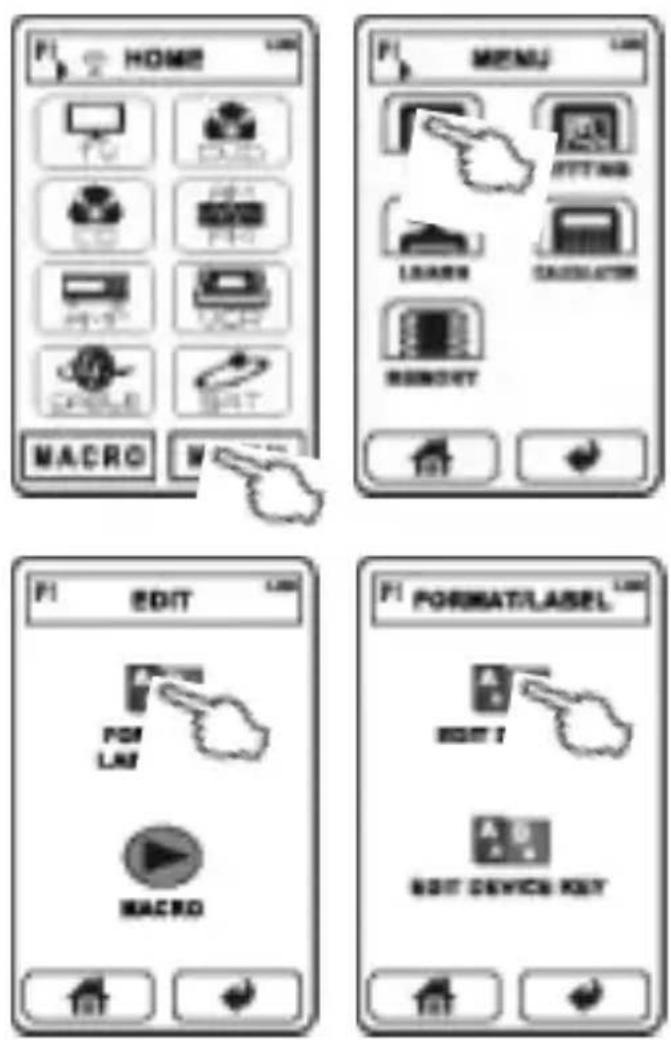
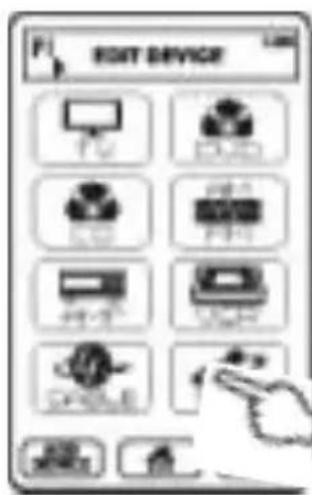
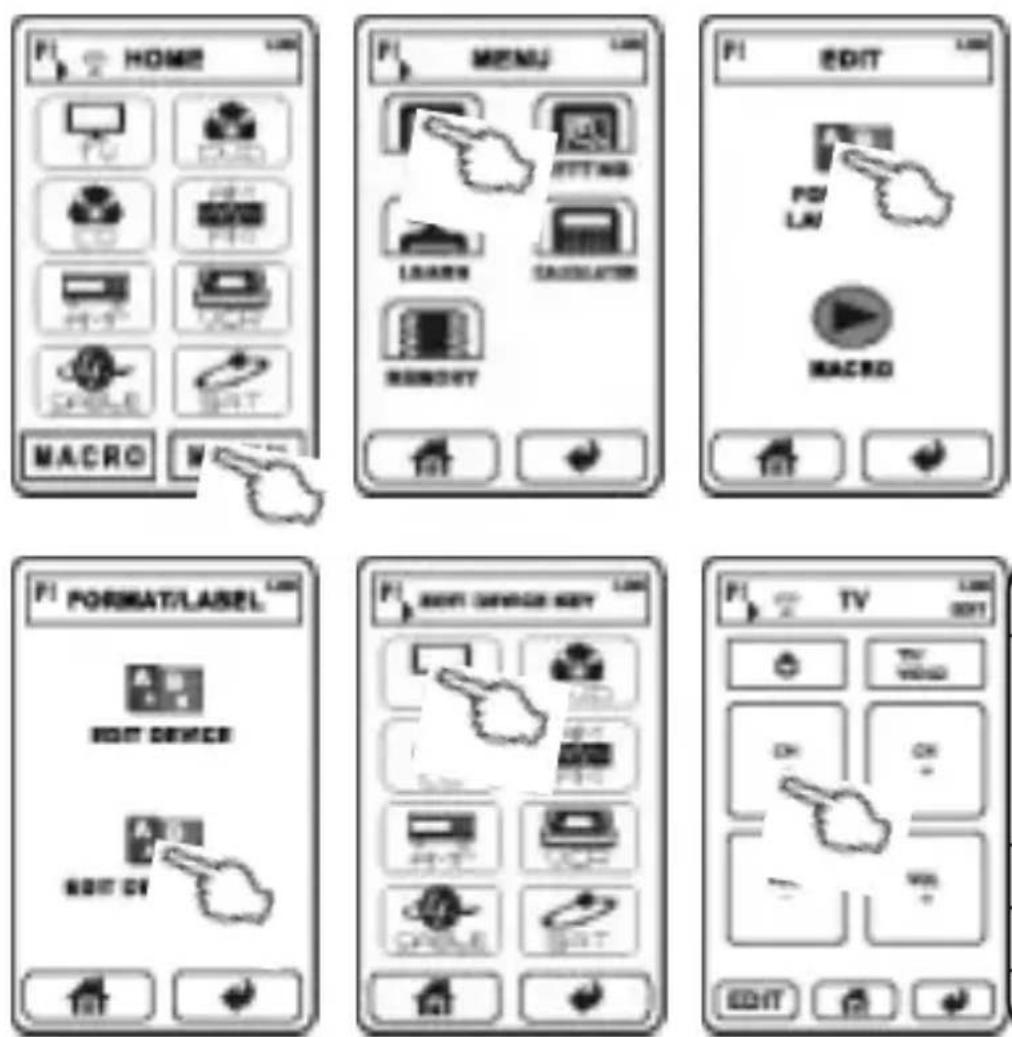
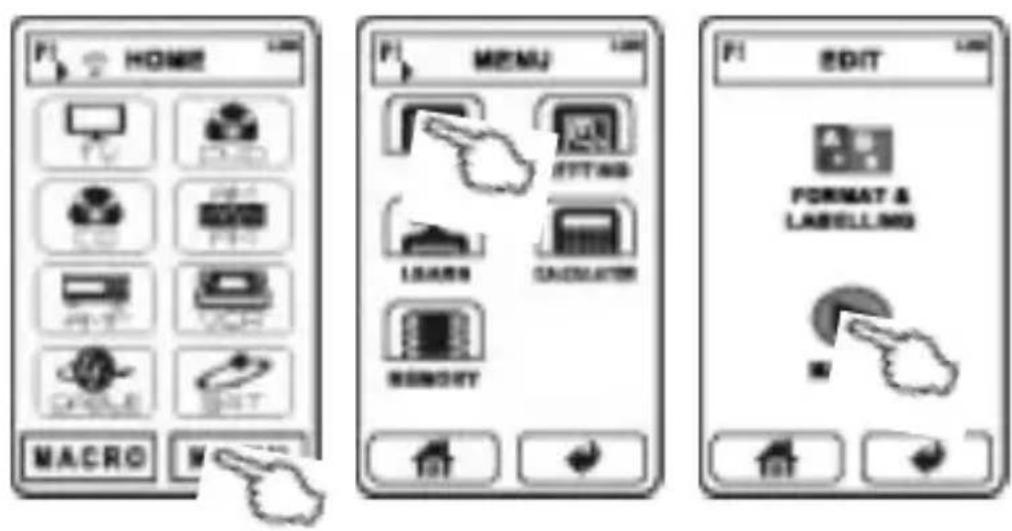
On the HOME page select MENU, the EDIT, followed by FORMAT & LABELLING. Now choose EDIT DEVICE.
-
Switch to the page that contains the desired device key using the page selection keys (6)(7).
-
Touch the desired device key. A pop-up menu opens offering additional commands. Choose DEL and confirm with YES. Should you accidentally have chosen the wrong device key, you can leave the pop-up menu pressing EXIT. When you use the remote control for the first time, it is programmed for all Vincent devices available until august 2008. To set up the remote control for your devices you only need to delete all device keys of devices you don't own and add new device keys for all non-Vincent devices.
-
Repeat steps (2) and (3) until all device keys that you don't want to use are deleted.
-
Return to the HOME page with the key
Add new device controls from the internal database
The most convenient way to add remote control functions for one of your devices to this remote controller is loading the corresponding data set from the database. All Vincent devices that had been released before August 2008 are supported. All devices that are not supported must be added manually and every function key must learn its command from the original remote control set. That will be described after the current section.
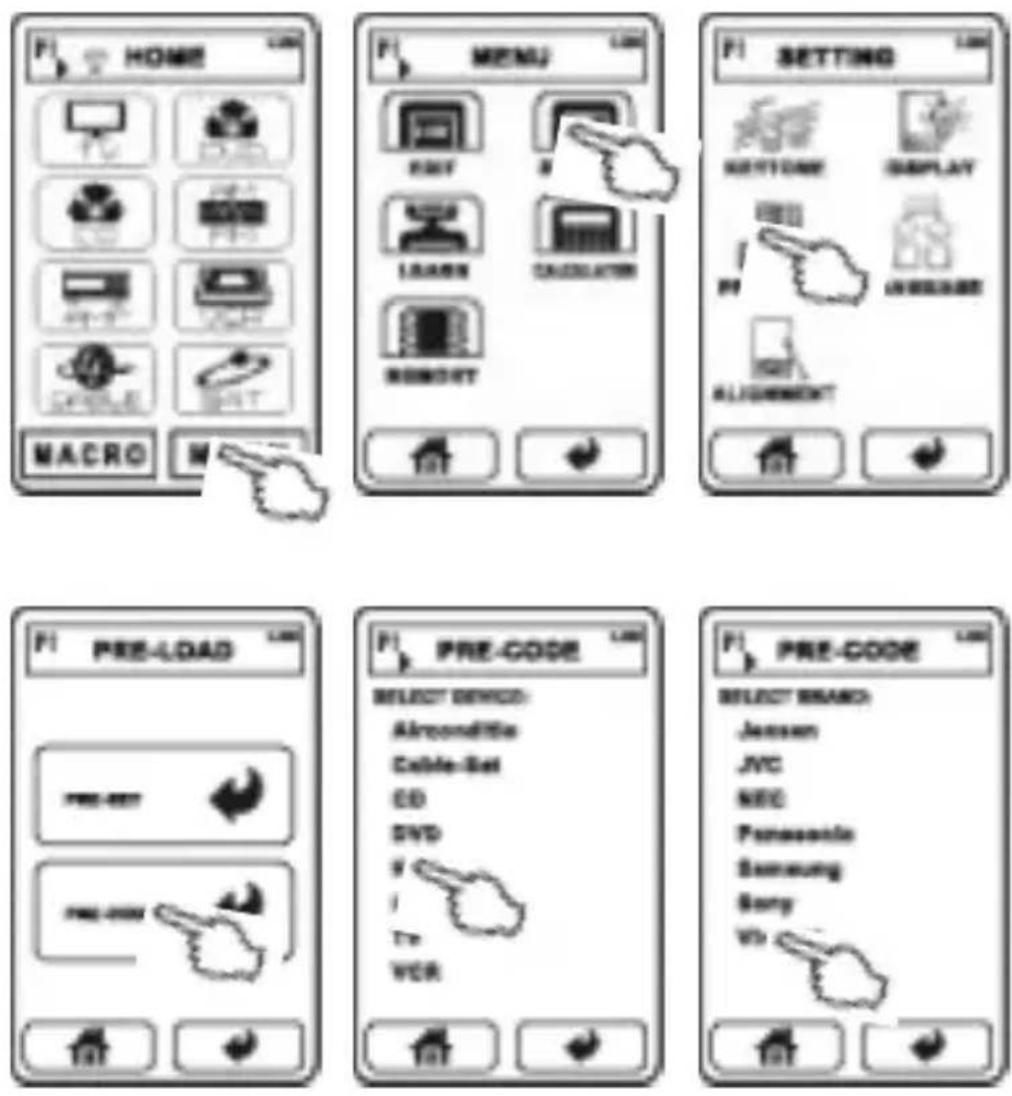
- On the HOME page, select MENU, then SETTING, followed by PRE-LOAD and PRE-CODE. Now you see the list of device categories.
- Choose the category of the device you are adding controls for (e.g. TV). For a Vincent device select "HIFI".
- From the following list, select the brand of your device (e.g. "Vincent").
Now you can see a certain number of code numbers or, in the case of Vincent devices, some device designations.
- Choose the appropriate designation in case of a Vincent device (note: SAVCX stands for SAVC1, SAVC2 etc.), otherwise select the first code number in the list (e.g. "016"). Now the first function
key page of this data set appears. For any non-Vincent device try some of the function keys on your device. If necessary, use the page selection keys (6)(7).
- If your device reacts properly to the infrared commands, confirm the selection with OK.
- If your device does not react to the infrared commands, press the key and choose the next code number. Once again, try some of the functions on your device. Repeat this until you found the correct code number or tested every one of them. The key returns to the main page. If your device does not react with any of the codes, you must add and program the controls manually with the help of the original remote control set.
Add and edit a new device key
Also possible with PC Link !
If your device is not supported in the database you have the option of creating the display pages yourself and of copying original remote commands to self defined function keys.
Add a new device key to the HOME page:
(A) You can create a new device key with an associated function key page. Each HOME page can carry up to 8 device keys.
a) In case you want the new device key to be appended to the existing ones: On the HOME page select MENU, then EDIT, followed by FORMAT & LABELLING and EDIT DEVICE. Now touch the key ADD DEVICE from the bottom row. One new device key is inserted to the first empty place on the HOME pages.
b) In case you want the new key to be inserted to a certain place: On the HOME page select MENU, then EDIT, followed by
FORMAT & LABELLING and EDIT DEVICE. Now touch one of the device keys neighbouring the desired position. Subsequently, either press INSERT (will insert directly before the current device key) or APPEND (will insert directly following the current device key). These actions are only possible if there is at least one empty place for a device key on the page. The function key pages of the new created device are empty. A touch on the key EXIT leaves the pop-up menu.
(B) You can spare yourself many steps, if you create a device by loading a similar one (of the same category, e.g. TV) from the database as described in the previous section, then edit the function key pages.
Clone, rename, move or delete a device key
text_image
EXIT DEVICE TV DVD LED USB 打印机 USB USB DINUS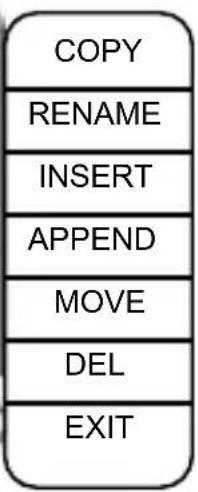
flowchart
graph TD
    A["COPY"] --> B["RENAME"]
    B --> C["INSERT"]
    C --> D["APPEND"]
    D --> E["MOVE"]
    E --> F["DEL"]
    F --> G["EXIT"]
On the HOME page select MENU, then EDIT, followed by FORMAT & LABELLING and EDIT DEVICE. If necessary use the page selection keys (6)(7) and touch the desired device key. A text menu opens offering the following options:
(A) Clone a device key:
The option COPY adds a new device key to the first empty place on all pages. That new key represents an exact copy of the selected device key (including the function key page properties and infrared commands).
(B) Rename a device key:
A touch to the option RENAME opens a page that shows on top the current device key name or the symbol. In the middle there is a keypad with letters and the numbers 0..9. Below there are some selection keys. The key deletes the last character. The key is used to start the second line. The keys SYMBOL and LETTER allow you to switch between the two keypads for basic characters and special characters. There is nor way to add German
umlauts. The key SMALL switches to small character size, the key LARGE switches to a bigger character size. The key Space is used to add a whitespace character. The key Cap (Caps, also: Shift) switches between capital letters and lower case letters. A maximum of 8 characters can be assigned in two rows (including the invisible NEWLINE character). The key SAVE ends the process.
(C) Add a device key:
INSERT places a new device key directly before the current device key (if there is at least one empty place on the page) and moves all other device keys in a corresponding way. APPEND adds a new device key as well but places it after the current one. You can quit the menu with the key EXIT.
(D) Move a device key:
The option MOVE makes arrow symbols appear on top. Use them to move the device key to a different, empty place on the same page and press OK to drop it there. The key EXIT returns to the device list without changes. If the
device key is to be moved to a different HOME page, use the page selection keys (6)(7) instead of the arrow keys.
(E) Delete a device key: If you select the entry DEL and confirm with YES, the current device key is removed from the list. You can abort this action and return to the device list by pressing NO.
(F) Leave the sub menu: EXIT has the effect of returning to the device list. You can edit one of the other device keys from there or return to the HOME pages using the key.
Edit the function key page
Also possible with PC Link!
| RENAME |
| KEYSIZE/SHAPE |
| MOVE |
| DEL |
| EXIT |
On the HOME page select MENU, then EDIT, followed by FORMAT & LABELLING and EDIT DEVICE KEY. Choose the device the function keys of which you want to edit. Now you have the following options:
(A) Delete a function key: On all function key pages (accessible through the page selection keys (6)(7)), touch every function key that you don't need, choose DEL from the pop-up menu and confirm with YES.
(B) Rename a function key: Touch the desired function kley. After you selected RENAME a page opens that shows on top the current function key name or a symbol. In the middle there is a keypad with letters and the numbers 0..9. Below there are some selection keys. The key deletes
the last character. The key is used to start the second line. The keys SYMBOL and LETTER allow you to switch between the two keypads for basic characters and special characters. There is nor way to add German umlauts. The key SMALL switches to small character size, the key LARGE switches to a bigger character size. The key Space is used to add a whitespace character. The key Cap (Caps, also: Shift) switches between capital letters and lower case letters. Depending on the size and shape of the key a defined maximum number of characters can be assigned over two lines. It is possible to exchange the text designation with a symbol by choosing the key SYMBOL, browsing with the page selection keys (6)(7) and choosing one of the symbols. The key SAVE ends the process.
(C) Move a function key: Touch the desired function key. If you select MOVE, arrow symbols appear. Use them to move the function key to a different, empty place on the same page and press OK to drop it there. Note that function keys must not touch each other or overlap. The key EXIT returns to the function key page without changes. If the func-
tion key is to be moved to a different page, use the page selection keys (6)(7) instead of the arrow keys.
(D) Change shape/size of a function key: Select the desired function key. When you touch the option KEY SIZE/SHAPE you have the choice between 3 different key shapes (circle/ellipse, rectangle, arrow key pad). Only the three of them are available. After you selected one you see a preview of the key area that you can resize now by touching the surrounding area (where the bottom right corner will be placed). In addition to that you can use the arrow keys on screen to move the key on the page. Use the page selection keys (6)(7) to move the key to another function key page. Press OK to save the design or EXIT to quit this action.
Edit the function key page
You obtain further options to edit the function key page after you do the following: on the HOME page select MENU, then EDIT, followed by FORMAT & LABELLING and EDIT DEVICE KEY. Select the device to which the desired function keys belong. From the bottom row select EDIT. Now you have the following choices:
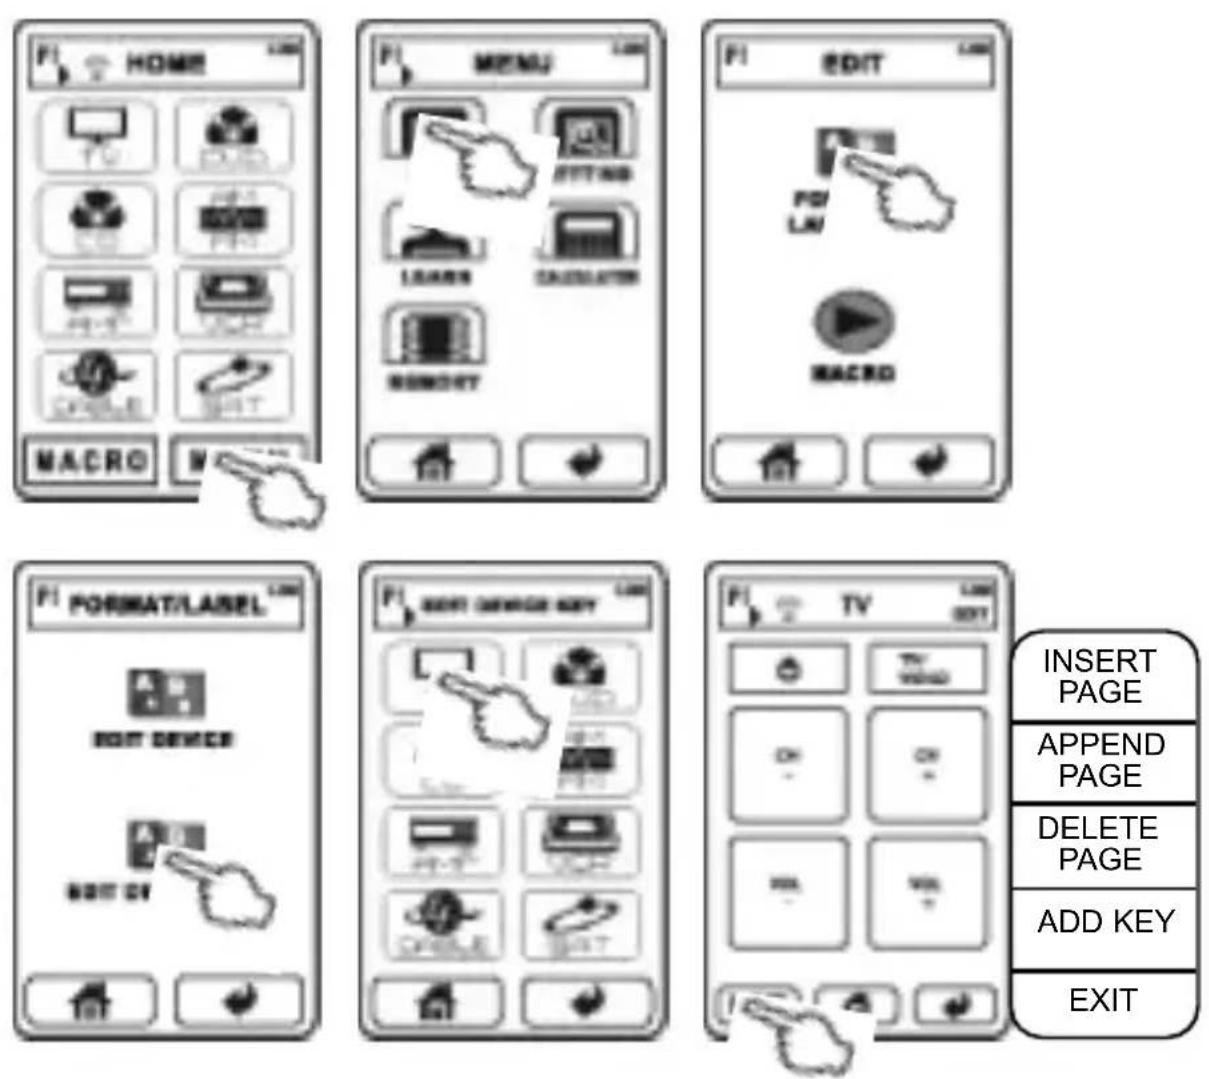
| INSERTPAGE |
| APPENDPAGE |
| DELETEPAGE |
| ADD KEY |
| EXIT |
(E) Add a function key: This is only possible on a page where there is enough free space for a new key. Touch the entry ADD KEY and choose from the available shapes (circle/ellipse, rectangle, arrow key pad). Now you see a preview of the new key that you can resize now by touching the surrounding area (where the bottom right corner will be placed). In addition to that you can use the arrow keys on screen to move the key on the page. Use the page selection keys (6)(7) to move the key to another function key page. Press OK to save the design or EXIT to quit this action.
(F) Add a new function key page: Use the page selection keys (6)(7) to go to one of the function key pages next to the position where you want to insert a new one. Now you can use INSERT PAGE
to add the new empty page before the currently visible page or APPEND PAGE to add it behind the currently visible page.
(G) Delete a function key page: Use the page selection keys (6)(7) to go to the function key page to delete. Touch the option DELETE PAGE and confirm with YES so that the current page is deleted. If you choose NO instead, the action is aborted.
COPY ORIGINAL INFRARED FUNCTIONS TO DEVICE KEYS AND FUNCTION KEYS
text_image
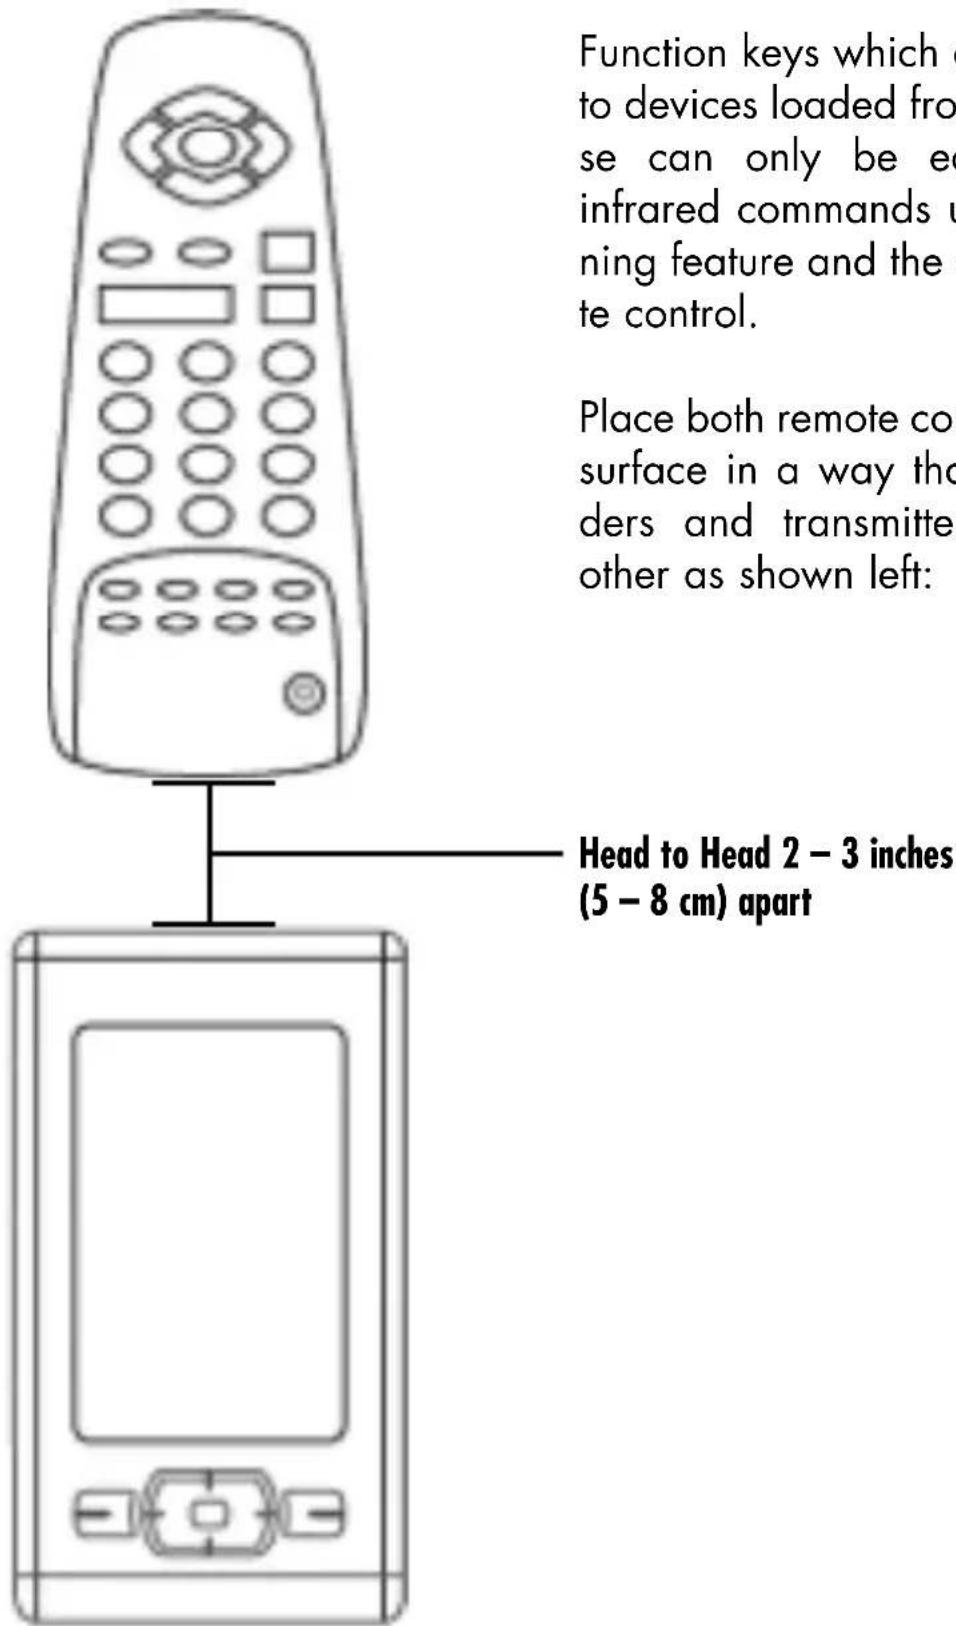
Function keys which to devices loaded from se can only be ex infrared commands u ning feature and the te control. Place both remote co surface in a way tho ders and transmitte other as shown left: Head to Head 2 - 3 inches (5 - 8 cm) apartFunction keys which do not belong to devices loaded from the database can only be equipped with infrared commands using the learning feature and the original remote control.
Place both remote controls on a flat surface in a way that remote senders and transmitters face each other as shown left:
Head to Head 2 - 3 inches (5 - 8 cm) apart
Copy an original infrared command to a device key
Even the device keys on the HOME page have the ability to learn an infrared command that is sent every time the key is pressed. It is not possible to delete this command later without deleting the key; you can only overwrite the old command in a new learning process.
text_image
PI HOME TV PC LED PP PC LED PC MACRO MACRO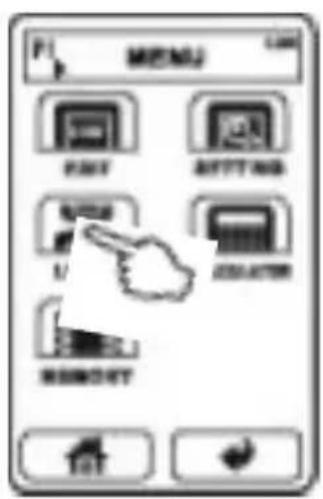
text_image
MENU Export Setting Import Exporter Remote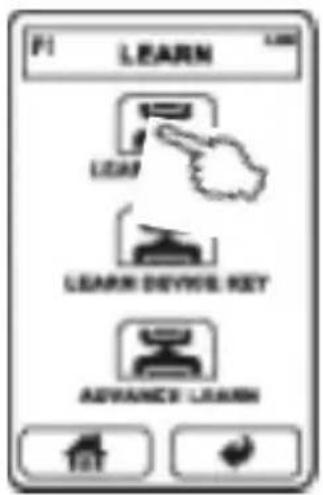
text_image
PI LEARN LEARN LEARN DEVICE KEY ADVANCE LEARN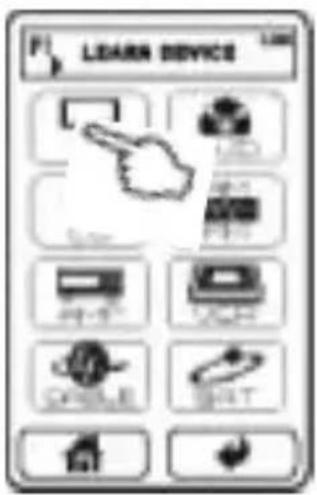
text_image
LEARN DEVICE LED USB FAT USB VAC DRINK BOOT
text_image
LEARNING...-
After a learning trial other device keys can be programmed in the same way, just touch the desired key.
-
On the HOME page select MENU, then LEARN, followed by LEARN DEVICE. Choose the device key that is supposed to receive the new function, if necessary use the page selection keys (6)(7).
-
The display reads "Learning..." and both remote controls should oppose each other. Hold down the original remote control key until the display reads "Learn OK!". If the signal is received erroneous, the display shows the text "LEARN ERROR" and the old infrared function (if any) of the device key will be kept. If no signal is received, the display reads "NO DATA" and the old infrared function (if any) of the device key will be kept. Check in both cases if the batteries of the original remote control are used up and if both controls are positioned face-to-face while learning.
Copy an original infrared command to a function key
Every function key can learn a (new) infrared function even in case the device was loaded from the database. Note that the “real” buttons below the display (8)(9)(10)(11)(12) can also learn commands but have no function as long as one of the HOME pages is visible.
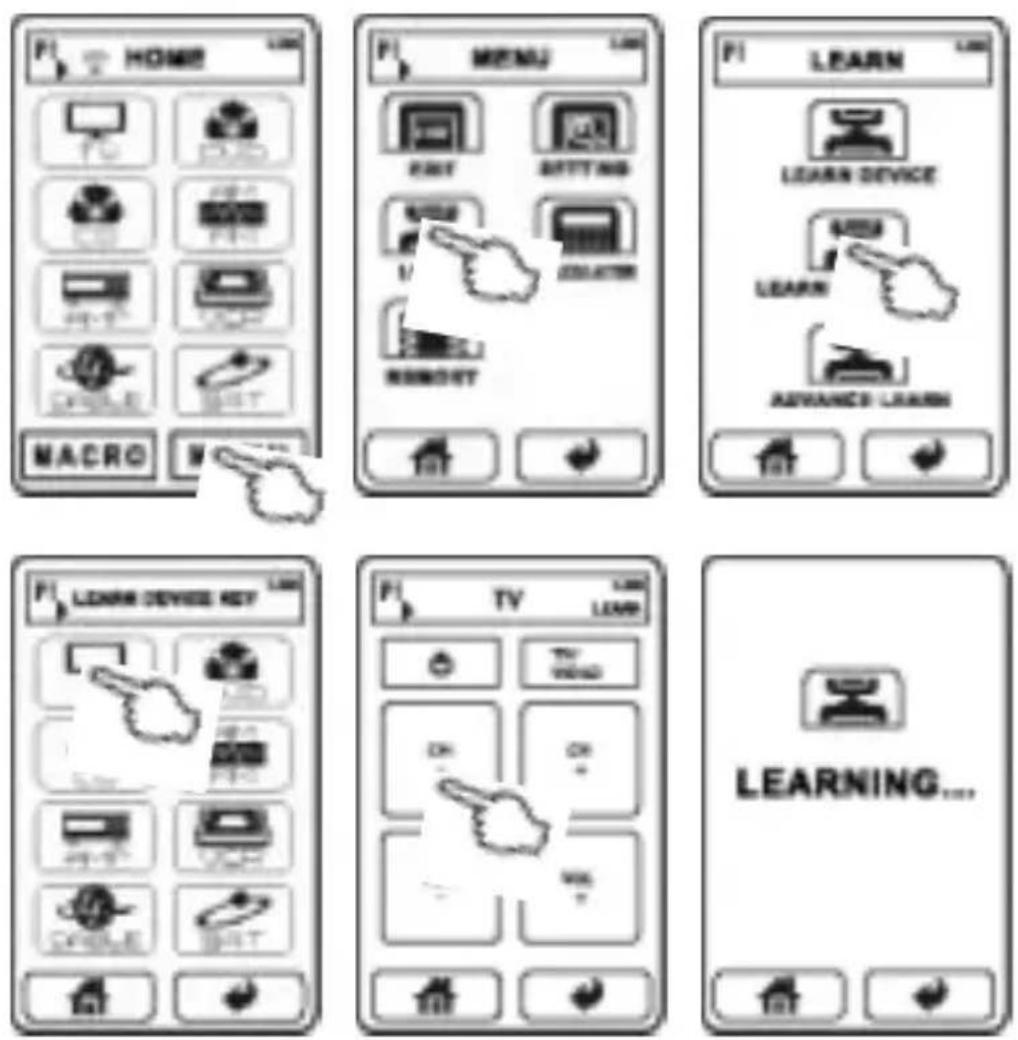
-
On the HOME page select MENU, then LEARN, followed by LEARN DEVICE KEY. Now press the device key to which the function key to be programmed belongs and select the desired function key.
-
The display now reads "Learning" and both remote controls should oppose each other. Hold down the original remote control key until the display reads "Learn OK!". If the signal is received erroneous, the display shows the text "LEARN ERROR" and the old infrared function (if any) of the function key will be kept. If no signal is received, the display
reads "NO DATA" and the old infrared function (if any) of the function key will be kept. Check in both cases if the batteries of the original remote control are used up and if both controls are positioned face-to-face while learning.
- After a learning trial other function keys can be programmed in the same way, just touch the desired key.
Copy cyclic changing infrared commands to a function key
Instead of programming one command to a function key you can make it learn up to five infrared functions of which it will send just the next in line every time the key is pressed. Some original remote controls have buttons that behave like this, but you can also define that cycle yourself. The difference compared to a macro is the fact that only one command is sent each time the key is touched. Even when a device has been loaded from the database you can make its function keys learn cyclic commands.
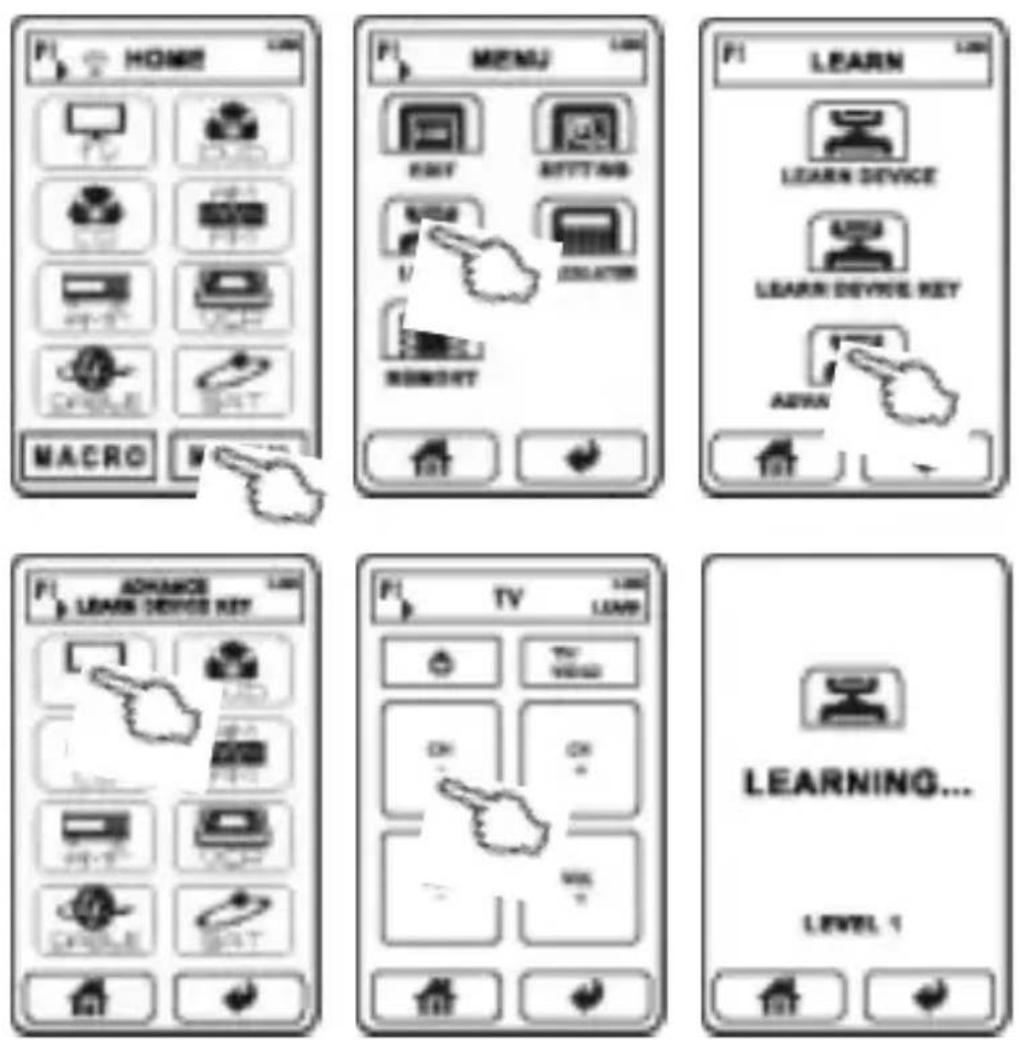
-
On the HOME page select MENU, then LEARN, followed by ADVANCE LEARN. Now choose the device to which the function key to be programmed belongs and touch the desired function key.
-
The display now reads "Learning" as well as "LEVEL 1" and both remote controls should oppose each other. Hold down the original remote control key for the first command until the display reads "Learn OK!". If the signal is received erroneous, the display shows the text "LEARN ERROR" and the old infrared function (if any) of the function key will be kept. If no signal is received, the display reads "NO DATA" and the old infrared function (if any) of the function key will be kept. Check in both cases if the batteries of the original remote control are used up and if both controls are positioned face-to-face while learning.
-
After the first command has been accepted you can add the second command by touching the function key again. The display
now reads "Learning" as well as "LEVEL 2" and again, both remote controls should oppose each other. Hold down the original remote control key for the second command until the display reads "Learn OK!".
-
Add more infrared functions as described in (3.). After 5 commands have been transferred successfully, every additional learning cycle overwrites the command next in the already programmed sequence starting with step 1.
-
You can now equip other function keys with a cyclic sequence of commands or return to the HOME page using the button
CREATE MACROS
A macro is a defined sequence of infrared commands that will be transmitted one after the other when the macro key is pressed. The commands may be originated from different devices. One example is a sequence that turns on the TV set, switches the TV to its A/V input, turns on the DVD player and starts DVD playback. Before a macro can be programmed please make sure that every designated function has a function key among the devices of the universal remote control.
Create and edit a macro key
text_image
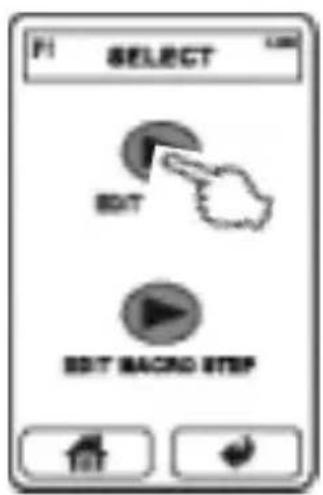
PI SELECT EDIT EDIT BACK STOP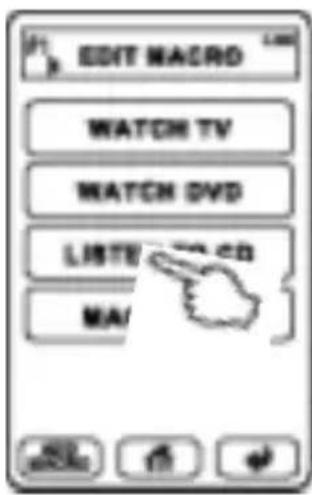
text_image
EDIT MACD WATCH TV WATCH DVD LISTV CD MA/| RENAME |
| INSERT |
| APPEND |
| MOVE |
| DEL |
| EXIT |
-
On the HOME page select MENU, then EDIT, followed by MACRO.
-
Now touch the key EDIT MACRO. The macro list is displayed (empty at first) and allows the following choice:
(A) To append a new macro key press ADD MACRO from the bottom line. If the list already has more than one page the new key is added on the last page.
(B) To edit one of the existing macro keys just touch it. A pop-up menu appears and gives you the following options:
a) Rename a macro key: Press RENAME and see on top the current name of the macro. In the middle there is a keypad with letters and the numbers 0..9. Below there are some selection keys. The key deletes the last character. The keys SYMBOL and LETTER allow you to switch between the two keypads for basic characters and special characters. There is no way to add German umlauts. The key SMALL switches to small character size, the key LARGE switches to a bigger character size. The key Space is used to add a whitespace character. The key Cap (Caps, also: Shift) switches between capital letters and lower case letters. The key SAVE ends the process.
b) Insert a macro key: The entry INSERT inserts a new key to the position of the selected
macro key and moves the selected and the following macros one step down the list. The key APPEND inserts the new key below the selected macro key and moves the keys following the selected macro one step down the list. All that is only possible if there is one empty place on the page.
c) Move a macro key: The option MOVE brings arrow keys on the display. Use these up/down keys to move the macro key to a different empty position on the page and drop it with OK. If the macro key is to be moved to another page use the page selection keys (6)(7). You can return to the macro list without changes touching EXIT.
d) Delete a macro key: Select DEL and confirm with YES to remove the selected macro from the list. The answer NO returns without changes to the macro list.
e) Exit without changes: Return to the macro list without changes by choosing the menu entry EXIT.
Define the infrared command sequence of a macro
text_image
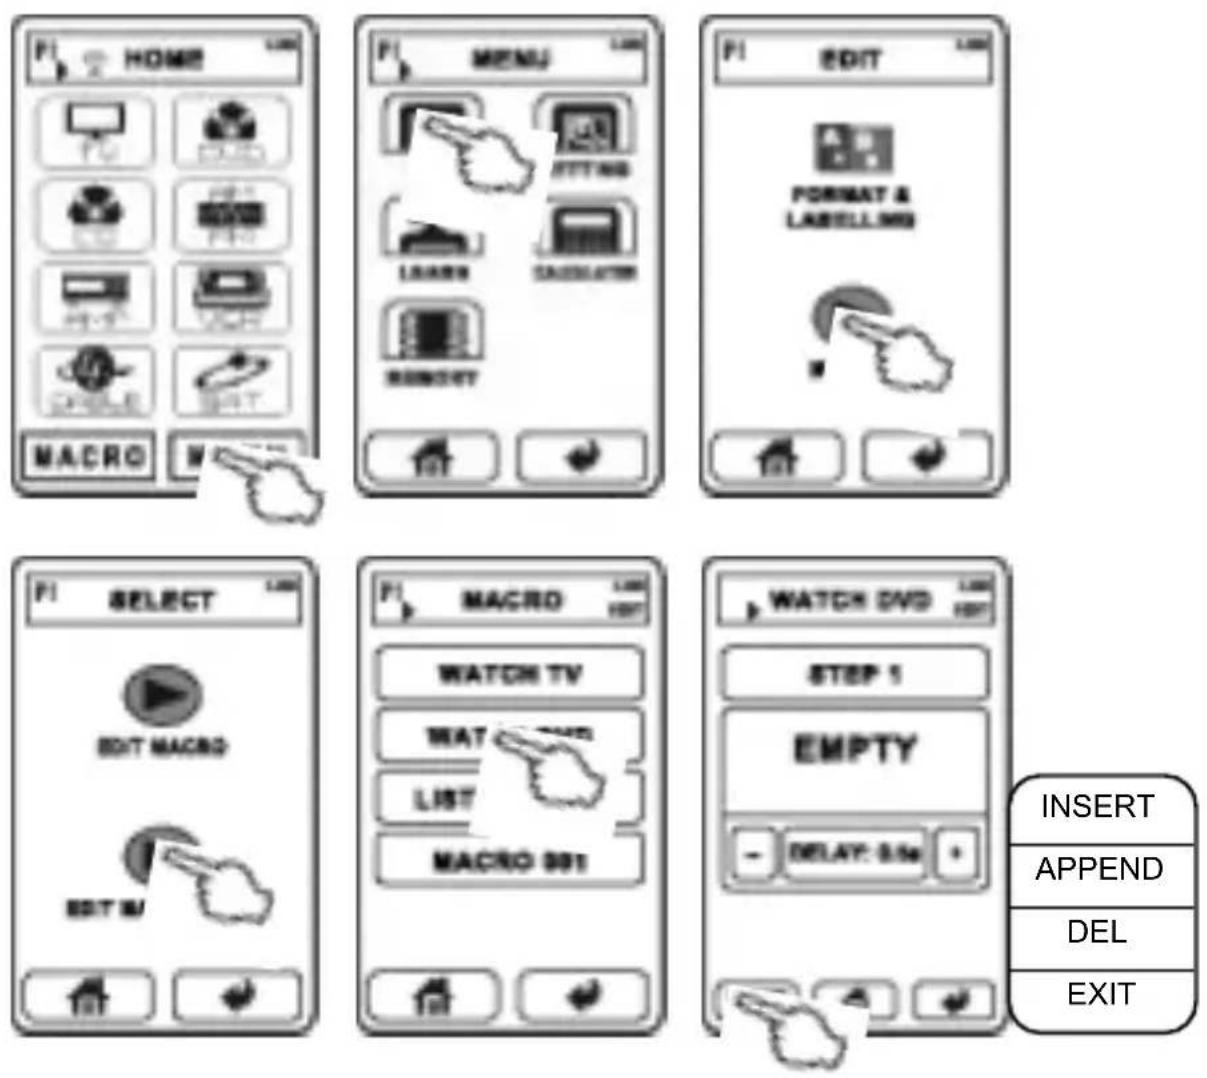
HOME MENU EDITING LABELS CAGGATOR MANOY EDIT EDIT FORMAT & LABELING SELECT MACRO WATCH TV WATCH TV LIST MACRO 801 WATCH DVD STEP 1 EMPTY - DELAY: 5.5m + INSERT APPEND DEL EXIT- On the HOME page select MENU, then EDIT, followed by MACRO.
- Now touch EDIT MACRO STEP. The macro list is displayed (empty at first). From this page you can add or modify the infrared functions of all listed macros. If the list is empty add a macro key as
described in the previous section. Now touch the desired macro key and look at the first infrared command page. The infrared commands are called "steps". Use the page selection keys (6)(7) to browse the steps if necessary (if more than one are available). Choose from the following actions:
(A) To assign a new infrared command to the macro step touch the big key in the middle of the display (named "EMPTY" at first). Now you can choose one function key of the universal remote control. The option DEVICE CODE is only needed in the rare case that the infrared command associated with the device key is to be used as macro step. Touch the key KEY CODE. Now select the device to which the desired function key belongs, followed by the function key. Back on the macro step page you can now adjust the delay that the remote control will respect before the next step command is transmitted. Choose a value between 0.5 s and 99.5 s and set it using the plus/minus keys.
(B) To add a new macro step, choose one of the step pages next to the desired place using the page selection keys (6)(7). Choose EDIT from the bottom row and in the menu press INSERT (the page is inserted before the current one) or APPEND (the page is inserted behind the current one). You can quit using the option EXIT.
(C) To delete a macro step choose it by using the page selection keys (6)(7), press EDIT and select DEL from the menu. Confirm with YES or exit the process selecting NO.
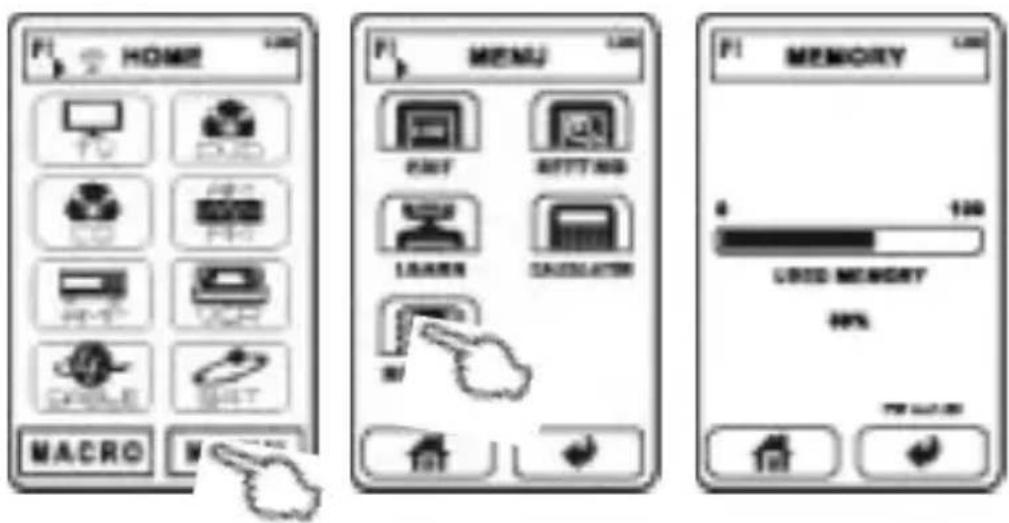
CHECK MEMORY STATUS AND FIRMWARE VERSION
It is only possible to add a new device page if there is unused memory left.
text_image
HOME MACRO MENU 800T BITTANG LAYER COLDUATOR MEMORY 4 100 USED MEMORY MOS-
On the HOME page select MENU, followed by MEMORY.
-
On the info page that you see now the percentage of the memory that is in use and the version number of the internal firmware is displayed. You can leave the page pressing the key
CALCULATOR
This universal remote control is equipped with a mathematical calculator for the four basic arithmetic operations and percent calculation.
text_image
HOME MENU CALCULATOR-
On the HOME page select MENU, followed by CALCULATOR.
-
Now you have the functions that are known to Calculators. To leave the Calculator page, press the key
TECHNICAL SPECIFICATIONS
Memory: 60MB
USB connector: miniUSB B socket
USB device class: mass storage
LC display with touchpad: monochrome
Dimensions: 72 x 130 x 30 mm
Weight (without batteries): 170 g
Batteries: 3x AAA (LR3)
Cher client,
text_image
PI SETTING SETTING BOTTOM DISPLAY PRO-LOAD LANGUAGES ALL TAT Touch Panel Alignment Press top left cornertext_image
PI PC PC PC PC PC PC MACRO MACRO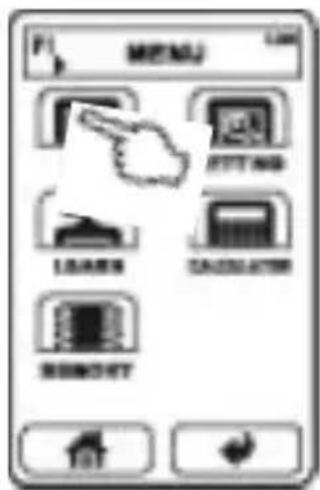
text_image
MENU LEAFS BEETING LOADS CANDUSTRY REMOFT
text_image
F1 EDIT FOR LAY MACRD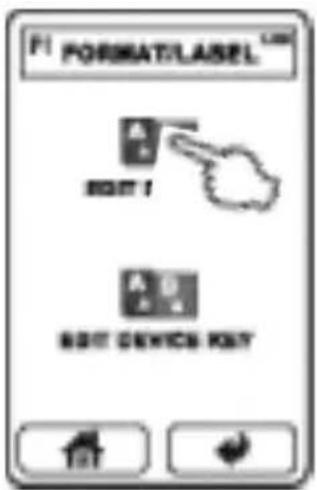
text_image
F:\ FORMAT/LASEL A B BOUT 1 A B BOUT DEVICE KEY
text_image
Exit Device TV DVD USB USB USB USB| COPY |
| RENAME |
| INSERT |
| APPEND |
| MOVE |
| DEL |
| EX |
text_image
F1 EDIT F1 FORMAT/LABEL F1 EDIT F1 EDIT MACRO FORMAT/LABEL F1 EDIT F1 EDIT DEVICE KEY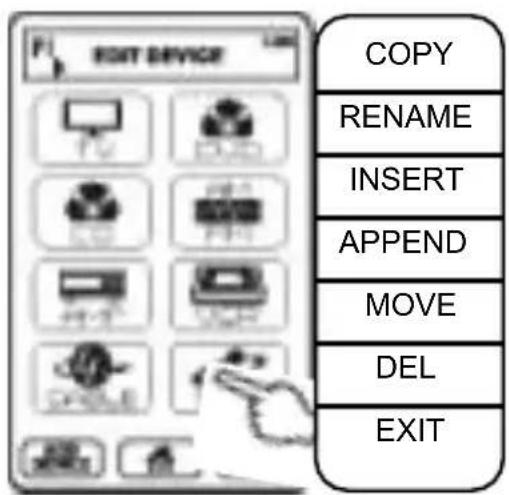
text_image
EXIT DEVICE COPY RENAME INSERT APPEND MOVE DEL EXITtext_image
PI EDIT FORMAT & LABELLING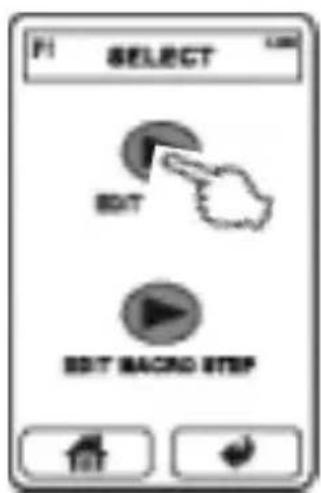
text_image
F1 SELECT EDIT EDIT BACK STOP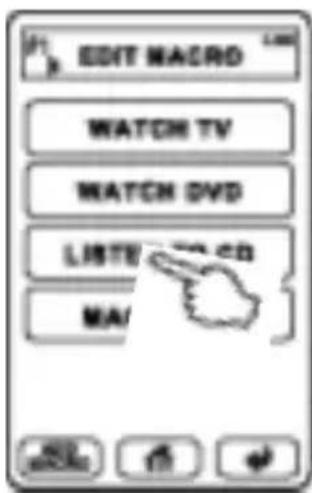
text_image
EDIT MACD WATCH TV WATCH DVD LISTV MA/| RENAME |
| INSERT |
| APPEND |
| MOVE |
| DEL |
| EXIT |
text_image
HOME MENU EDITING LABELS CAGGATOR MANOY EDIT EDIT FORMAT & LABELING SELECT MACRO WATCH TV WATCH TV LIST MACRO 801 WATCH DVD STEP 1 EMPTY - DELAY: 5.5m + INSERT APPEND DEL EXITnatural_image
Illustration of a silver mobile phone with multiple app icons on the screen (no text or symbols visible)Please keep the receipt, store it together with this manual. The receipt is your proof for the beginning of the warranty period. Note the serial number in the following box, you can read it from the rear side of the device.
www.sintron-audio.de
© September 2008
International Distributor: