USER MANUAL Orbit 960 myGEKOgear
- Please follow the set-up and usage instructions in the print material that came with this Dashboard Camera (dash cam) product.
- You should not set/install this dash cam at a place that would obstruct or reduce a driver's view; make sure your usage complies with pertinent vehicle codes of your state, province, territory or country.
- You should post the required notices of recordation to occupants inside the vehicle, if voices or other information/signal pertaining to in-vehicle activities will be recorded.
- You should not change the dash cam's setting or mode of operation or when the vehicle is in motion.
- The optional driving warning signals, including any visual or audible reminding signals, should not replace your decision-making and judgment that are needed for the proper operation of the vehicle.
- You should not leave the dash cam in a visible spot when no one is inside the vehicle, to avoid attracting break-ins to steal the unit, or other property.
- You should avoid extended exposure of the dash cam to direct sunlight or extreme temperatures (either high or low temperature) which tend to degrade or damage the unit and its normal functionality.
- You should examine, check and/or verify the dash cam at least every six (6) months, including the associated memory cards, to ensure the video reception and recording are working properly. For each use, you should verify that the dash cam unit, the visible lights and the audible sounds are working normally. If there are signs of non-operation or mal-function, you should immediately seek to replace the product and check to see if the product is covered under any applicable warranty.
- The dash cam unit may have additional functionality, such as transmission and recording of audible or GPS signal or other identification information. If you have privacy concerns about these functions, make sure you follow the instruction to disable these functions.
- You should use the dash cam unit in the way it is intended. You should not use the dash cam unit in a way that would be illegal or that tends to physically damage the unit or tends to cause danger to the safe operation of the vehicle or the occupants.
Attention Please!
【About Usage】
① If your vehicle still provides power to your cigarette 12-volt charger, please unplug the device when you turn off your vehicle and plan to have it parked for a long period of time to avoid draining the power from your vehicle's battery.
(2) The embedded super capacitor can help to save your recorded file even if the power is off.
(3) To avoid breaking down the files recorded, don't eject the Micro SD Card immediately after powering off.
(4) We suggest using the adapter provided.
⑤ To enable detecting and monitoring function, the power supplier must be enabled.
(1) Please use microSD card with the size / memory at least 16GB, Class 10 (up to 512GB).
2 Be sure to format microSD card before usage.
To format card, please press once and it will get to settings. Select "Format" and press
(3) The following information is the card capacity and recording time. (Reference only)
Product features may change without notice according to the region where it's purchased in.
Thank You!
Thank you for purchasing the Orbit 960 dash camera.
This user manual contains technical specifications and instructions for use, operate, and install. Please read this manual carefully before using.
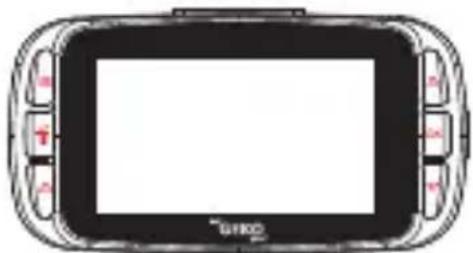
Product Overview
The Orbit 960 is an ultra high-definition dash cam recording in 4k resolution, along with GPS logging, Wi-Fi APP control. and the Sony Starvis sensor.
Package Content
Orbit 960 Dash Cam
USB Car Charger with Cable
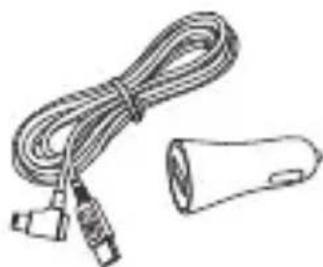
16GB microSD Card

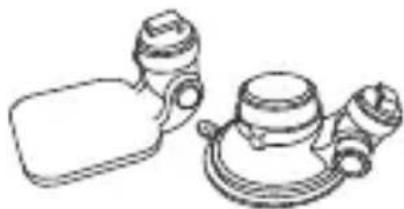
Windshield Suction Mount & Windshield 3M Sticker Mount
Quick User Guide

Product Features
Sleek and compact dash cam, 140-degree wide viewing angle, rotatable mount, and shooting in ultra high-definition resolution.
- 2.7-inch TFT LCD Display.
- Sony Starvis Imaging Sensor
- 8 Layered All Glass Lens, Focusing Range: 60CM to Infinity. Maintains crystal clear imaging, even in 75-degree temperature.
F1.8 aperture to enable excellent QR and sharpness of image.
Video Format: MP4
Built-in Microphone/ Speakers
- Battery Capacity: 3C 320mAh/3.7V Li-ion battery
- Compatible with TF(SDHC) memory card up to 512GB.
Automatic Screensaver (Wake up the screen by pressing any button on the panel).
- Loop Recording /Motion Detection
Recycle Recording: 1 Minute, 3 Minutes, 5 minutes.
- Image Resolution: 8M Pixels (3840 x 2160)
- Video Resolution: 3840 x 2160P30, 2560 x 1440P30, 1920 x 1080P60, 1920 x 1080P30
- Warning Voltage: Automatically power off and save videos under 3.65V, Recharge Reminder, Working Voltage: 3.7V
- The dash cam is automatically powered on, once your vehicle is started.
- Time-lapse powers off after it's disconnected with the car power.
- Instant Mute Function: By clicking the bottom right button, it will automatically mute the recording.
- The G-Sensor will detect drastic braking or a collision and will automatically lock onto emergency files.
- Parking Monitor: Collision or shaking will trigger the dash cam to start recording. Minimum power 0.6mw, additional power bank to support longer recordings.
Dash Cam Overview
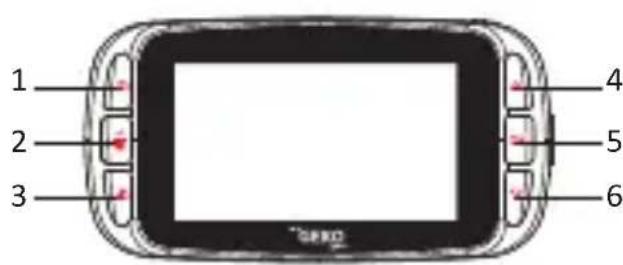

- Photograph Button
- Emergency Recording Button
- Up/ Screen Saver Button
- Down Button/ Instant Mute Button
- Suction Cup & 3M Stick Mounting Socket
-
Power Button
-
Return /Menu Button
-
Recording/ OK button
- Reset Button
- USB Power Cord Connection
- microSD Card Slot
Where to Install Your Dash Cam
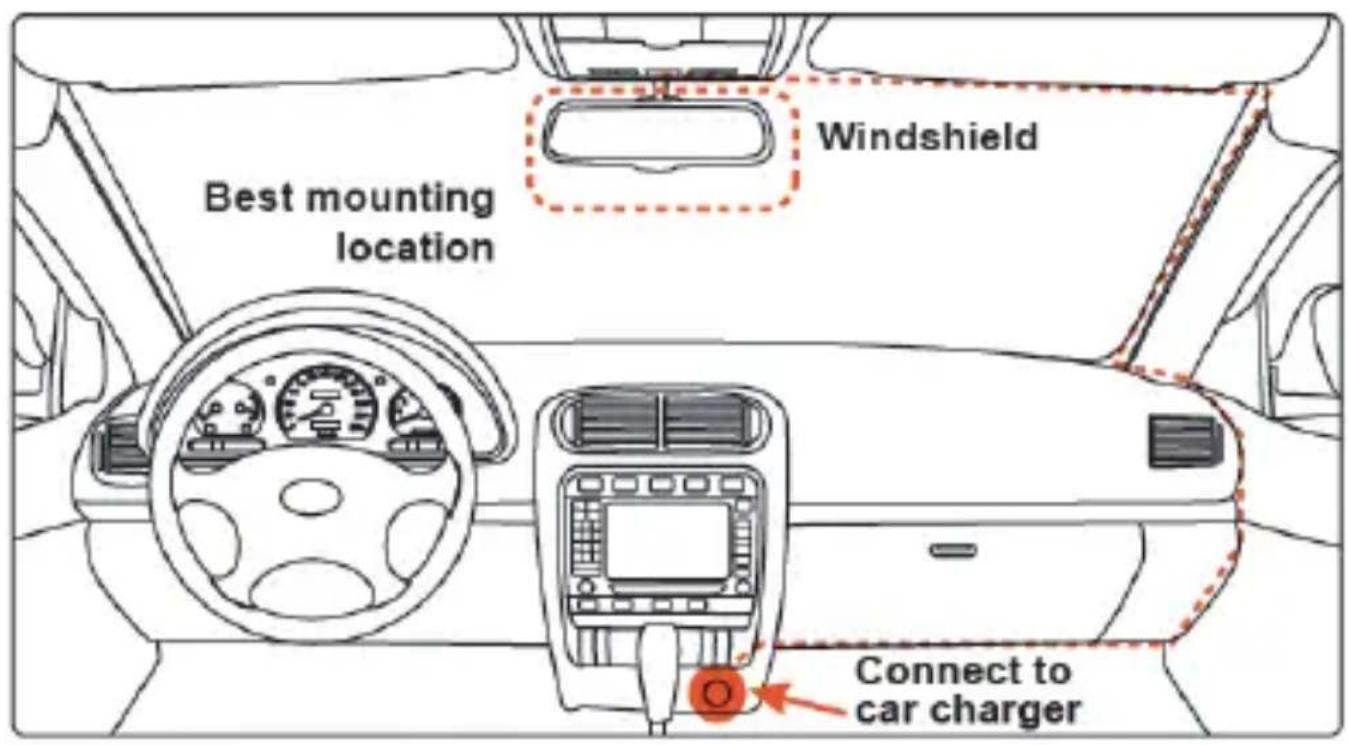

Caution: We are not responsible for any damage caused to, or caused by, the air bag due to incorrectly placing the device within the range of the safety bag area.
① To have a better view, try to install in the center of the windshield.
(2) Make sure the lens is located in a place where the windshield wiper can clean the window to ensure view is clear.
③ Make sure the device is not installed in a place where it will interfere with the safety bag.
(4) Make sure the device will not be obstructed by the windshield's sun control film (window tint).
⑤ Clean the area you desire to have the dash cam placed before sticking the device, and DO NOT move the device for a 24-hour period.
Power On
Insert the car charger cable into the car's cigarette lighter and the other end into the Micro-USB port on the device. Make sure to install the microSD Card into the microSD Card slot on device. After turning on, the system will start recording automatically. The LED light will turn flashing when recording mode has started. *Reminder: Please format microSD card before you start recording. Please refer to page 3 for instructions.
Power Off
Hold down the power button at least 5 seconds to turn off device. To avoid breaking down the last file recorded, do not eject the microSD Card immediately after powering off. If you need to turn it back on simply hold the power button for at least 3 seconds.
| Buttons | Functions |
| Recording Mode: Snapshot
Playback Mode: Delete |
| Recording Mode: Setting Menu
Preview Mode: Return to Previous Page
Playback Mode: Return to Previous Page |
| Recording Mode: Emergency Recording
Playback Mode: Fast Forward |
| Recording Mode: Screen Off
Preview Mode: Select Video/Photo
Playback Mode: Select Previous Video/Photo |
| Recording Mode: Pause/Start Video Recording
Preview Mode: Enter Playback Mode
Playback Mode: Pause/Play Video |
| Recording Mode: Off/On Audio Recording
Preview Mode: Select Video/Photo
Playback Mode: Select Next Video/Photo |
Battery Charge
- Connect to Car Cigarette Lighter: Connect car cigarette lighter power cable to USB interface of Orbit 960.
- USB charging: Connect Orbit 960 to computer USB port with USB cable
microSD Card Installation and Removal
- Look for the microSD card slot located on the right side of the dash cam.
- To insert the microSD card, make sure the back panel of the SD card (gold card reader side) is facing you.
- Slowly push card in and it will click in.
- To remove the SD card, please gently press on the SD card and it will simply pop out.

Caution!
- Please pay attention to the direction of the microSD card when inserting.
- If the device and microSD card is incompatible, please insert a different microSD card to try again. (Please refer to the compatible microSD card brands on www.mygekogear.com)
- Please use a high-speed microSD card (Class 10 or above).
To enter the menu, press the "Menu" button twice.
- APP Download
Scan the QR code to download the app.
- Resolution: 3840x2160P30, 2560x1440P30, 1920x1080P60, 1920x1080P30.
Choose the video resolution, the higher it is, the clearer the videos will be.
Set the time length of each video section for loop recording. If loop recording is disabled, recording will be stopped while memory space runs out
4.WDR:ON/OFF
The wide dynamic range function will automatically adjust the video to handle too bright or too dark situations.
- Sensitivity: OFF/ LOW/ MIDDLE/ HIGH
If any shaking or collision occurs while recording, the dash cam will automatically lock the video in recording. A lock icon will appear on the top right corner of the screen. After recording, the video will be protected from loop recorded over.
To set the screen saver time, the dash cam's LCD screen will turn off when it goes without a handle period.
- Key Tone: Off/On
Turn On/ Off Key Button Sound
- Volume: Off/60%/80%100%
To control the noise level of the key button sound.
-
Language: EN/ZH
-
Time Setup: DD/MM/YY
Set the date and time. Press Up/Down button to properly set your date, press OK to save your settings and then exit.
- OSD: Date Stamp, LOGO Stamp, GPS Location stamp, Speed Stamp.
Date, time, LOGO, GPS location and speed will be stamped at the right bottom corner of videos if it is enabled.
- Driving Safety:
A: Driver Fatigue Alarm--off/ 1 hour/ 2 hours/4 hours: This setting is to alert and remind the driver to take a rest from driving to promote safe driving habits.
B: Light Reminder—Off /On: The dash cam will make an alert sound to remind the driver to turn their headlights on.
- Record Mode: 1PFS/ Motion Detection/ Parking/ OFF
A:1FPS
B: Motion Detection--If any movement is detected by the lens, the dash cam will automatically start recording, and will stop recording when there is no movement detected.
C: Parking Monitor - This function is triggered by the G-sensor embedded in the dash cam. When parking mode is turned OFF, the G-sensor and CPU will not work. When parking mode is turned ON, the dash cam will switch to Parking Mode when the car is turned off.
- Wi-Fi: OFF/ ON
Open Wi-Fi function
- Format SD Card: OK/ Cancel
Format the Memory Card
- Format Warning: OFF, 15 days, 30 days, 60 days
To set the days to format the SD card, the dash cam will wipe the SD card data at the set time.
- Reset system: Cancel/ Confirm
Reset the unit to default settings
- About: Unit firmware version information
Recording:
When connected to a car charger, the device turns on and start recording automatically. The red icon will show on the screen. The flashing red icon indicates that the device is recording.
If you want to protect/lock the current recordings, please press the button and the icon will appear on the screen. To stop recording, press up button and the red dot disappears, indicating that the recording has stopped.)
Playback Mode:
1) If the dash cam is still recording (Indicated on the top left corner), press the "OK" button twice to stop recording.
2) Press the "Emergency Recording Button" twice.
3) Choose "Video", "Emergency Recording", or "Photo" to view and playback.
Videos Backup
- Connect the dash with PC through USB wire, the dash cam will be in mass storage mode. All videos are stored in Even and Normal folders of memory card. All locked videos are stored in Event folder, and others are stored in Normal folder
- PC Operation System: Windows 7/Windows 8/Windows 10/MAC
Note
- Improper operation will cause the device to be crash. If the dash cam crashes, press the reset button to reset the camera.
- Don't leave the camera in direct sunlight or where the temperature could go above 60 degrees Celsius or 140 degrees Fahrenheit for a long period of time.
Technical Specifications
| Display 2.7-inch TFT LCD monitor |
| Lens F 1.8 ,140 degree wide viewing angle and 7 layer all glass lens plus IR . TTL:21~22mm |
| Languages English /Chinese/French |
| Video Format | MP4 |
| Video Resolution | 3840 x 2160P30, 2560 x 1440P30, 2304 x 1296P30, 1 920 x 1080P30 |
| Motion Detection | ON/OFF |
| Audio Recording | ON/OFF |
| Image Resolution | 8M Pixels |
| Image Format | JPEG |
| Memory Card | Micro SD card up to 512GB |
| MIC/Speaker | Built In |
| Auto Power Off | OFF/1 Minute/3 Minutes/5 Minutes |
| USB Port USB 2.0 |
| Battery Capacity | 320mAh 3C |
| PC Operation System | Windows 7/Windows 8/Windows 10/MAC |
Need more information? Visit our website via www.mygekogear.com Feel free to contact our service team at service@mygekogear.com if you have any additional questions.
Please back up all important data stored in the microSD card. The data in the microSD card may be deleted during repair.
The customer service team does not back up your data. myGEKOgear is not responsible for any loss on data.
my GEKO gear
- Volume : Désactivé/60%/80%/100%

