
PowerLite Pro Z10005U - Video projector EPSON - Free user manual and instructions
Find the device manual for free PowerLite Pro Z10005U EPSON in PDF.

| Product type | Mounting frame for video projector (compatible with Epson PowerLite Pro Z10005U) |
| Brand | Epson |
| Frame model | ELPMB44 |
| Frame dimensions (W x H x D) | 674 x 363 x 770 mm (without feet) |
| Frame weight | Approximately 17.5 kg |
| Maximum load capacity | 32 kg (projector included) |
| Maximum backup projector weight | 15 kg |
| Chassis diameter | 30 mm |
| Horizontal tilt adjustment (dial) | ±2° |
| Horizontal tilt adjustment (feet) | ±3° |
| Horizontal rotation adjustment (dial) | ±5° |
| Vertical tilt adjustment (dial) | ±2° |
| Vertical tilt adjustment (feet) | ±3° |
| Main functions | Portrait mode projection, stacked projection (up to 2 projectors), backup projector support |
| Installation | By at least two qualified agents; screws provided (M6 bolts) |
| Safety | Do not suspend, do not step on, check screws regularly |
| Maintenance and cleaning | Clean with a soft cloth; do not use adhesive or lubricant on screws |
| Spare parts provided | Upper chassis, lower chassis, installation plates, bolts, nuts, stacking guides |
| Repairability | Contact an approved service center; do not disassemble yourself |
| General information | Manual in several languages (FR, DE, EN, ES, IT, JA, PT, ZH); 182 pages |
Frequently Asked Questions - PowerLite Pro Z10005U EPSON
User questions about PowerLite Pro Z10005U EPSON
0 question about this device. Answer the ones you know or ask your own.
Ask a new question about this device
Download the instructions for your Video projector in PDF format for free! Find your manual PowerLite Pro Z10005U - EPSON and take your electronic device back in hand. On this page are published all the documents necessary for the use of your device. PowerLite Pro Z10005U by EPSON.
USER MANUAL PowerLite Pro Z10005U EPSON
For your safety, read all the instructions in this guide before using this product. Incorrect handling that ignores instructions in this guide could damage this product or could result in personal injury or property damage. Keep this installation guide at hand for future reference.
Read the User's Guide and Safety Instructions for your projector and follow the instructions in these documents.
Safety indications
The documentation and this product use graphical symbols to show how to use this product safely.
The indications and their meaning are as follows. Make sure you understand them properly before reading the guide.
| Indication Explanation |
| Warning This symbol indicates information that, if ignored, could result in personal injury or even death due to incorrect handling. |
| Caution This symbol indicates information that, if ignored, could result in personal injury or physical damage due to incorrect handling. |
Explanation of Symbols
| Symbols Explanation | |
| ⊗ | Indicates actions that must not be performed. |
| ! | Indicates actions that should be performed. |
| Attention | Indicates contents that could cause damage or malfunction to this product or the projector. |
| Indicates related or useful information. | |
Safety Precautions for Installation
| Warning | |
| Follow the instructions in this guide when installing this product. If the instructions are not followed, this product may fall, resulting in personal injury or an accident. | ● |
| Do not install this product in an unstable location. Make sure the installation location is strong enough to support the weight of the projector and this product. | ○ |
| Do not use adhesives, lubricant, oil, and so on when securing the screws. If you use adhesives on the mount fixing points to prevent the screws from loosening, or if you use things such as lubricants or oils on the projector, the projector case may crack and cause the projector to fall, resulting in personal injury or property damage. | ● |
| This product is for portrait projection or stacked projection only. Do not attach any devices other than the projector. Otherwise this product may be damaged; if the projector falls, it could cause death or personal injury. | ● |
| This product should be installed by at least two qualified service personnel. When loosening screws during installation, be careful not to drop this product. If this product or the projector falls, it could cause death or personal injury. | ● |
| After making adjustments, make sure you tighten all of the screws. Otherwise, the product may fall and cause personal injury or property damage. | ● |
| Wear non-slip gloves when moving and installing. If this product falls, it could cause personal injury or property damage. | ● |
| Do not cover the projector's air intake vent or air exhaust vent. If either of the vents is covered, the internal temperature could rise and cause a fire. | ○ |
| Caution | |
| Do not install this product in a location subject to temperatures outside the pro-jector's operating range. This may cause malfunctions to occur. | Ø |
| Do not install the projector in a location where it may be subject to vibrations or shocks. | Ø |
| When securing the frame with bolts, make sure you do not catch your hand or finger between the bolts and the frame. | Ø |
| Do not stack more than three projectors in a stacked configuration. The frame could fall and cause an injury. | Ø |
Notes on Usage
| Warning | |
| Modifying and disassembling should only be performed by qualified service personnel except when explicitly stated in the User's Guide. Otherwise, malfunctions or accidents may occur. | ○ |
| Do not hang from this product. Also, do not hang any objects on this product except for the projector. If this product breaks and falls, it could cause death or personal injury. | ○ |
| Do not stand or sit on this product. Otherwise, the product could be damaged. | ○ |
| Periodically check that there are no damaged sections or loose screws. If any parts are damaged, stop using the product immediately. If this product or the projector falls, it could cause death or personal injury. | ○ |
| Caution | |
| Do not apply too much force when adjusting this product. Otherwise, the product may break and cause an injury. | ∅ |
| Do not place screws or feet within reach of small children. Children may swallow them by accident. If this happens, contact a doctor immediately. | ∅ |


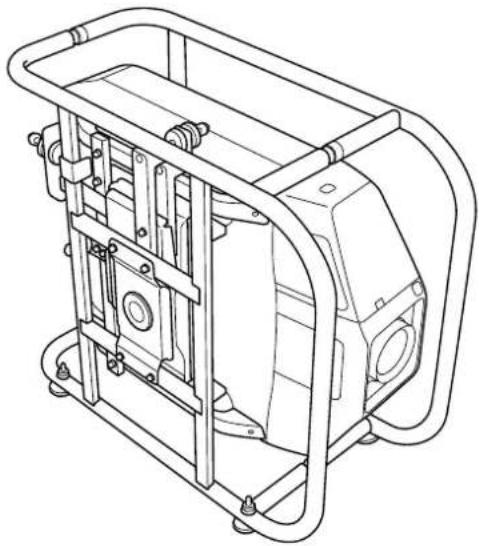
Product Features
| Portrait Projection |
| For projectors that support portrait projection, you can perform portrait projection by placing a projector in the frame, and then installing the frame vertically. |
| Stacked Projection |
| You can secure a projector to this product, and stack up to two projectors. |

Package Contents
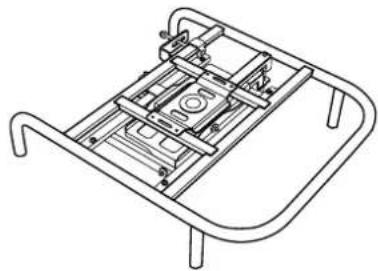
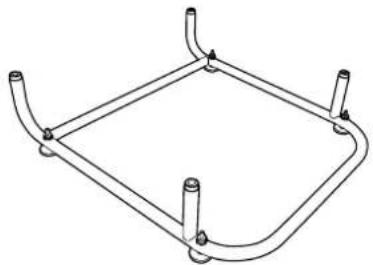
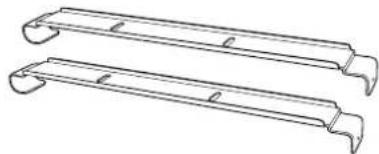
The following parts are supplied with this product. Make sure that all of the parts are supplied. If there is anything missing or if there are damaged parts, contact the store where you purchased the product. Top Frame (x1) Bottom Frame (x1) Projector Installation Plates (x2)
Screws for securing the Projector Installation Plates (x2)
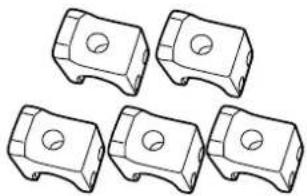
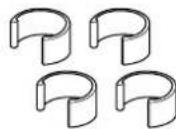
Stacking Guides (x5) Stoppers (x4)


| Shape Name | Number | Usage |
| M6 x 30 mm hexagon socket head cap bolt with washer/spring washer | 4 For attaching the projector | |
| M6 x 40 mm hexagon socket head cap bolt M6 hexagon nut | 10 For attaching the Stacking Guides |
Use the bolts or screws supplied with this product to install it as directed in this guide. Do not substitute these bolts with any other types.

- Gather the tools and parts you need before you begin installation.
- Dispose of this product in accordance with your local laws and regulations. Follow the disposal regulations of your workplace if they apply.

Attaching to the Projector
Attention
- Do not remove screws for parts that are not specified in this guide.
- Make sure the screws to secure the projector to this product, as well as the metal fittings to connect the top and bottom frames are secured.
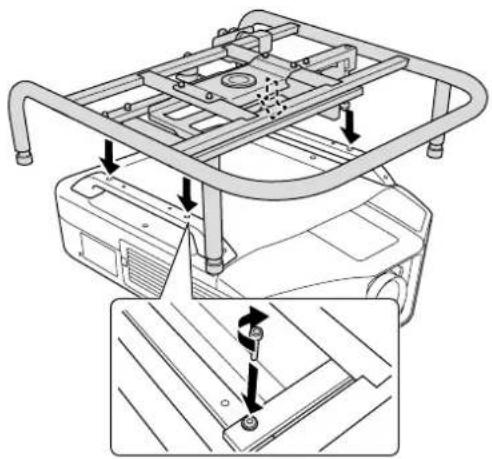
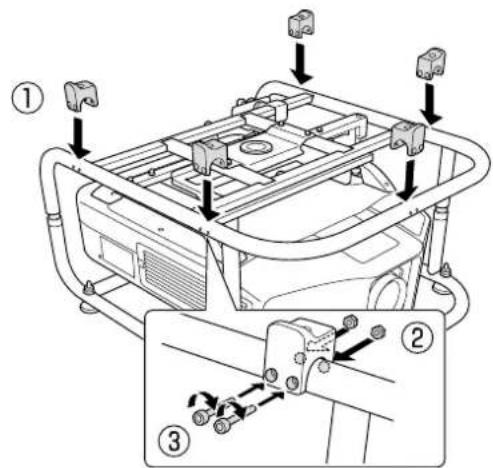
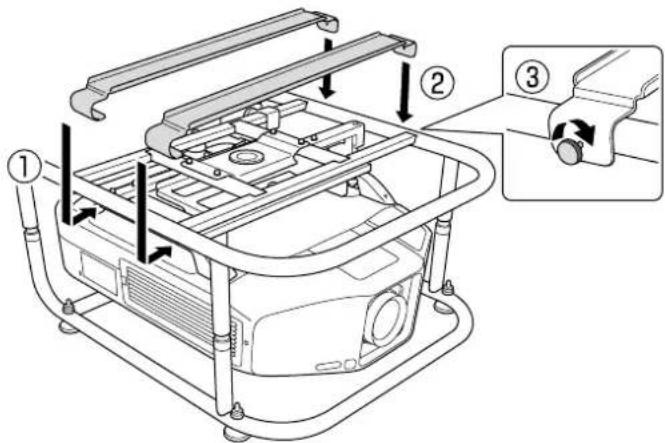
1
Attach the top frame to the projector.
Align the bolt holes on the top frame with the ceiling mount fixing points (four points).
Use a commercially available hexagon wrench to tighten the M6 x 30 mm bolts (with washers/spring washers) supplied, and then secure the frame.
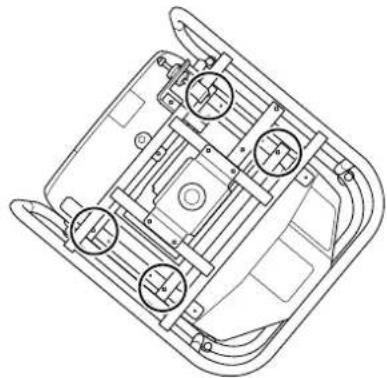
2
Attach the top frame to the bottom frame.
Align the Top Frame with the Bottom Frame, and rotate the metal fittings (four points) to secure them in place.
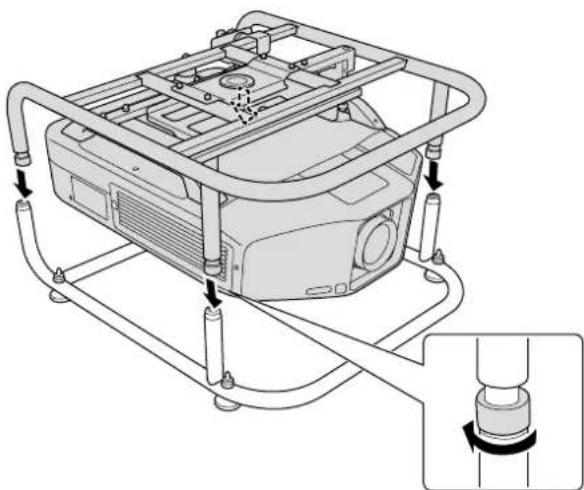

Attach the stoppers (four points).
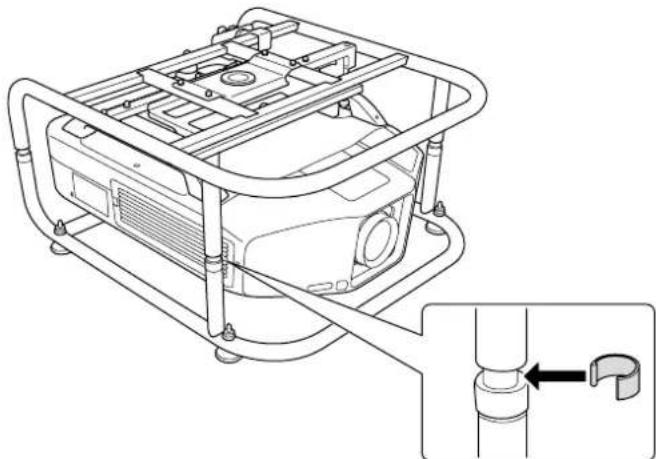

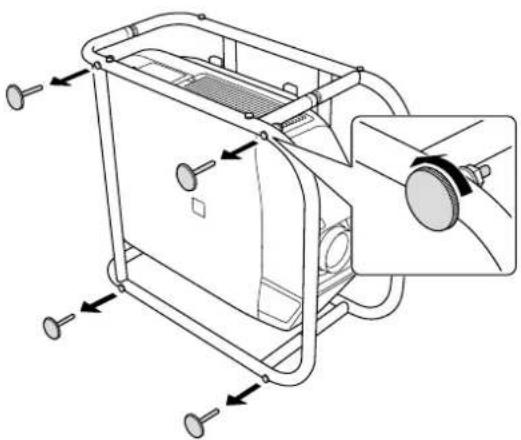
Remove the projector's feet.
See the User's Guide supplied with the projector for information on how to remove the feet.
Attention
- If the projector's feet are left attached, they could interfere with the frame during angle adjustment.
- Do not place the projector directly on the floor and so on while the projector's feet are removed.

Adjusting the Installation Angle
You can adjust the projector's angle using the three adjustment dials and the feet. Tilt the projector, or rotate horizontally to adjust the position of the projected ima
| Adjustable Range for the Adjustment Dial | Adjustable Range for the Feet | |
| Tilt adjustment | ±2° | ±3° |
| Horizontal adjustment | ±5° | |
| Vertical adjustment | ±2° | ±3° |

Make sure that the installation angle is within the specified range. See the User's Guide supplied with the projector for information on the angle of tilt.
Adjusting the Angle Using the Adjustment Dial
You can adjust the tilt (± 2^) and direction (horizontally ± 5^ , vertically ± 2^ ) of the set projector.
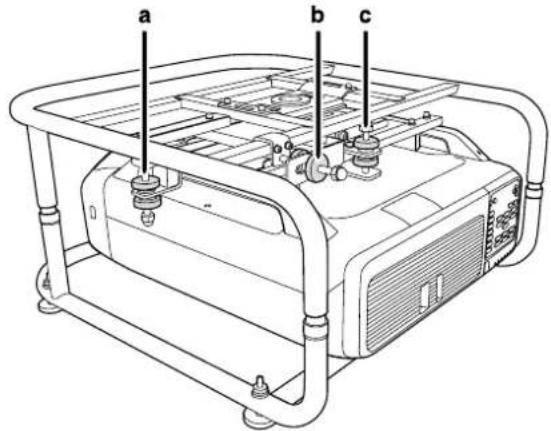
a: For adjusting the tilt
b: For adjusting the horizontal angle
c: For adjusting the vertical angle
| Caution |
| When rotating the adjustment dials, make sure you do not catch your hand or finger be-tween the dials. |
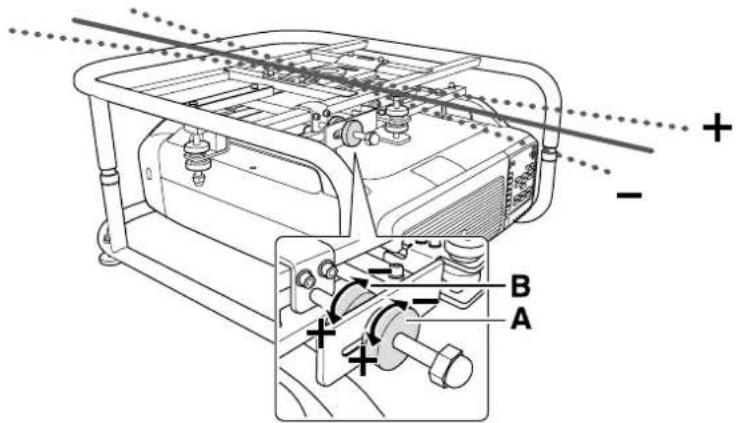
a: For adjusting the tilt
| Adjust to the + side | Rotate adjustment dial A in the + direction first, and then rotate adjustment dial B in the + direction to secure them in place. |
| Adjust to the - side | Rotate adjustment dial B in the - direction first, and then rotate adjustment dial A in the - direction to secure them in place. |

After making adjustments, make sure that adjustment dials A and B are not loose.
b: For adjusting the horizontal angle
| Adjust to the + side | Rotate adjustment dial A in the + direction first, and then rotate adjustment dial B in the + direction to secure them in place. |
| Adjust to the - side | Rotate adjustment dial B in the - direction first, and then rotate adjustment dial A in the - direction to secure them in place. |
After making adjustments, make sure that adjustment dials A and B are not loose.
c: For adjusting the vertical angle
| Adjust to the + side | Rotate adjustment dial B in the + direction first, and then rotate adjustment dial A in the + direction to secure them in place. |
| Adjust to the - side | Rotate adjustment dial A in the - direction first, and then rotate adjustment dial B in the - direction to secure them in place. |
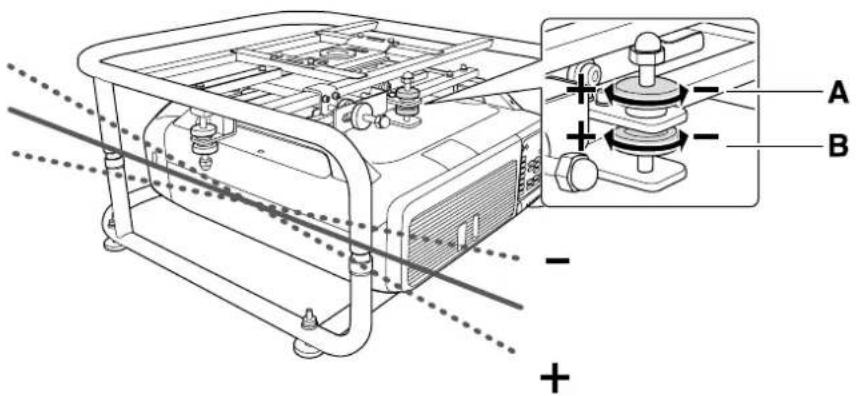
After making adjustments, make sure that adjustment dials A and B are not loose.
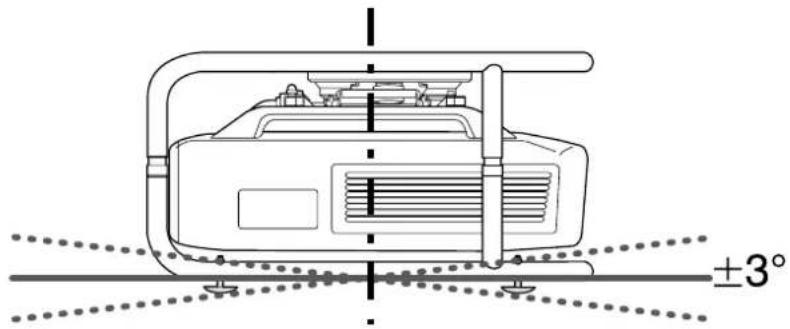
Adjusting the Angle Using the Feet
When the frame is placed on the floor, you can adjust the installation angle with the feet. You can adjust the tilt (horizontal ± 3^ ) and direction (vertically ± 3^ ) of the projector.
Adjusting the tilt: Use the left and right feet.
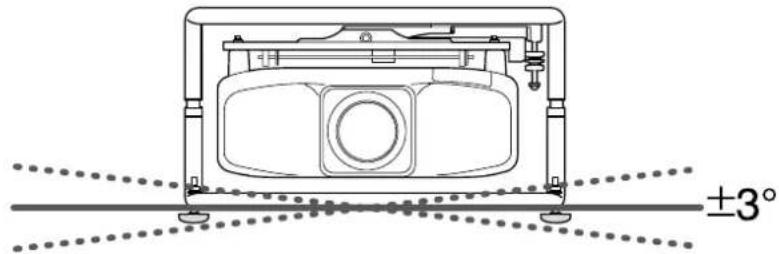
Adjusting the horizontal angle: Use the front and back feet.
Attention
The feet can be attached and removed. Note that the feet will detach if they are extended too far.


Portrait Projection
You can perform portrait projection by placing the projector in the frame, and then installing the frame vertically.

See the User's Guide supplied with the projector to check if your projector supports portrait projection.
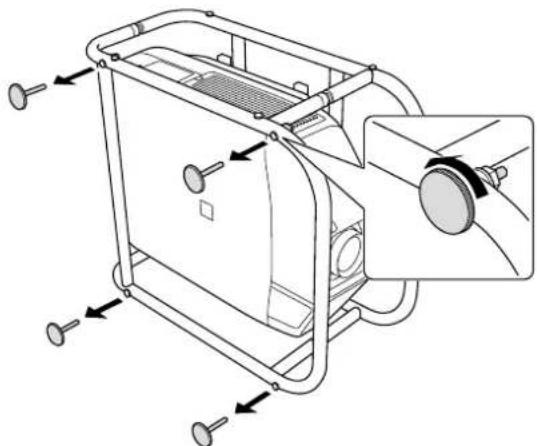
1
Remove the feet (four points) from the bottom frame.
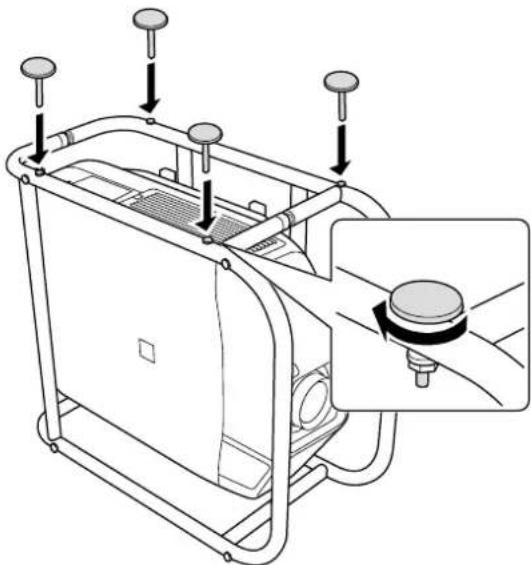
2
Attach the removed feet (four points) to the side of the frame.
There are screw holes on the side to which you can attach the feet. Make sure you do not attach them to the wrong side.
3
With the feet facing down, stand the frame vertically.


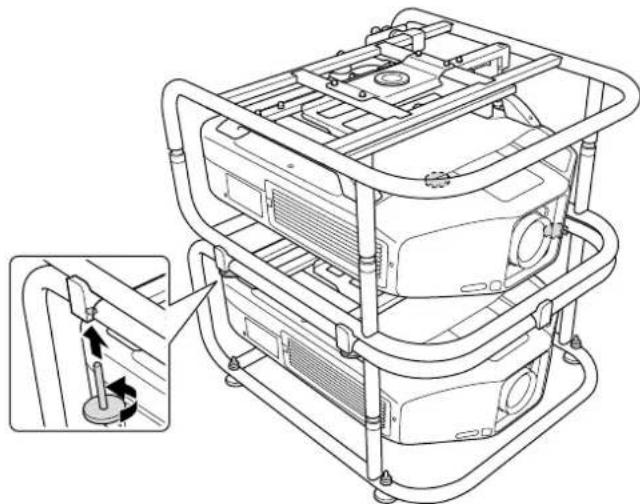
Stacking Two Projectors
You can stack up to two frames.
| Warning |
| When stacking two frames, do not suspend them from a ceiling and so on. If this product or the projector falls, it could cause death or personal injury. |
| Caution |
| Do not stack more than three frames for stacked projection. The frame could fall and cause an injury. |

Attach the stacking guides (five points) to the frame that will be at the bottom of the stack.
Use a commercially available hexagon wrench to tighten the M6 x 40 mm bolts (with hexagon nuts) supplied to secure the guides.
Use two bolts to secure each stacking guide.

Remove the four feet from the bottom frame that will be at the top of the stack.
Place the frame that will be at the top of the stack on the stacking guides, and secure it with the feet removed in step 2.
Use the feet to secure the four points on the left and right of the frame.

Installing the Backup Projector
By installing the projector installation plate, you can place a backup projector on the frame.

- This product can support a backup projector that weighs up to 15kg .
- You can stack two frames and place a backup projector on top.
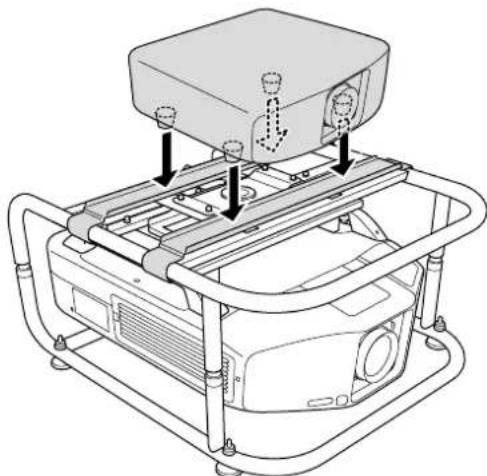
1
Align the holes on the projector installation plate with the screw holes of the top frame. Secure the projector installation plate with the screws supplied (two points).
2
Adjust the position of the projector installation plate, and then place the backup projector.
Align the position of the projector installation plate with the position of the backup projector's feet, and then place the backup projector.
Attention
Do not secure the projector installation plate with a fastening belt and so on. Otherwise the projector installation plate could be deformed.

Specifications
Projector Specifications
| Installation Direction Horizontally/Vertically | * Projectors can only be stacked horizontally. | |
| Adjustment An-gle | Horizontal Tilt Adjustment dial: ±2°, feet ±3°* You can adjust up to ±5°. | |
| Horizontal Rotation Adjustment | nt dial: ±5° | |
| Vertical Tilt Adjustment dial: ±2°, feet ±3°* You can adjust up to ±5°. | ||
| Maximum load capacity Approx. 32 kg | ||
| Maximum Weight for Backup Projector 15 kg | ||
| Frame Diameter 30 mm | ||
| External Dimensions 674 (W) x 363 (H) x 770 (D) mm (not including raised section) | ||
| Frame weight Approx. 17.5 kg | ||
External Dimensions
Values are just reference.
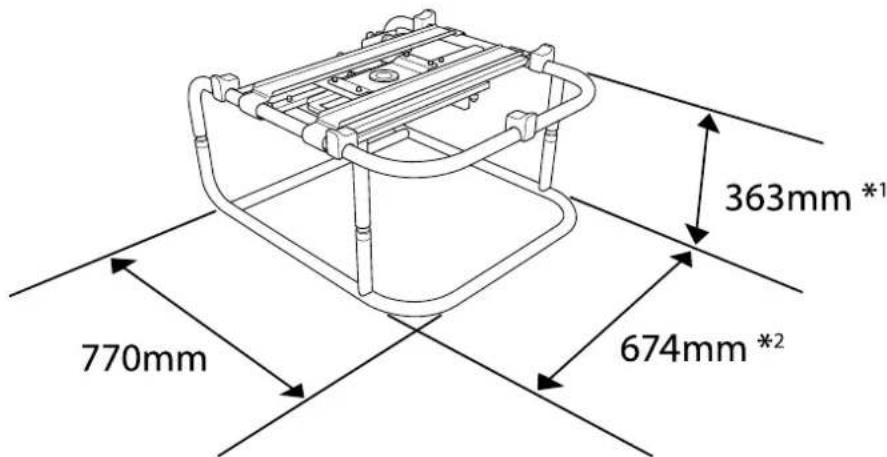
1: Value when the feet are removed. 381 mm when the feet are attached.
2: Value when the feet are removed. 695 mm when the feet are attached.


Trademarks and Copyrights
Other product names used herein are for identification purposes only and may be trademarks of their respective owners. Epson disclaims any and all rights in those marks.
© SEIKO EPSON CORPORATION 2014. All rights reserved.
Rahmen ELPMB44
Bedienungsanleitung


© SEIKO EPSON CORPORATION 2014. All rights reserved.
Chàssis ELPMB44
© SEIKO EPSON CORPORATION 2014. All rights reserved.
Telao ELPMB44
Manuale dell'utente


© SEIKO EPSON CORPORATION 2014. All rights reserved.
Armazon ELPMB44
Manual de usuario

© SEIKO EPSON CORPORATION 2014. All rights reserved.
Estrutura ELPMB44
Manual do Utilizador


© SEIKO EPSON CORPORATION 2014. All rights reserved.
框架 ELPMB44

使用说明书

安全使用须知
© SEIKO EPSON CORPORATION 2014. All rights reserved.
框架ELPMB44
使用說明書


安全使用須知
© SEIKO EPSON CORPORATION 2014. All rights reserved.
FLLEUMELPMB44
取掇說明書


安全上のご注意
© SEIKO EPSON CORPORATION 2014. All rights reserved.
EPSON
EXCEED YOUR VISION
Printed in China
XX.XX-.XX(XXX)