USER MANUAL HFREE 300 HYDRO HOOVER








INSTRUCTIONS FOR SAFE USE
GB
This appliance should only be used for domestic cleaning, as described in this user guide. Please ensure that this guide is fully understood before operating the appliance.
Always switch off and remove the charger from the socket before cleaning the appliance or any maintenance task.
This appliance can be used by children aged from 8 years and above and persons with reduced physical, sensory or mental capabilities or lack of experience and knowledge if they have been given supervision or instruction concerning use of the appliance in a safe way and understand the hazards involved. Children shall not play with the appliance. Cleaning and user maintenance shall not be made by children without supervision.
If the power cord is damaged stop using the appliance immediately. To avoid a safety hazard, an authorised Hoover service engineer must replace the power cord.
Keep hands, feet, loose clothing and hair away from rotating brushes. Use only the original charger supplied with the appliance.
Check that your supply voltage is the same as that stated on the charger.
This appliance is supplied with a double insulated battery charger which is only suitable for insertion in a 230V (UK 240V) socket outlet.
Plug the charger into a suitable socket outlet and connect the charger jack plug to the appliance.
Never touch the charger with wet hands.
Switch off the appliance before charging.
The battery pack LED light will illuminate RED during charging and will turn WHITE when fully charged.
Re-connect the appliance to the charger after use to recharge the battery.
Never charge the batteries in temperatures above 37°C or below 0°C.
It is normal for the charger to become warm to the touch when charging.
Do not unplug the charger by pulling on the power cord.
Unplug the charger in the event of prolonged absence (holidays, etc.). Recharge appliance again before use as batteries may self discharge over increased periods of storage.
If the appliance is to be disposed of, the batteries must first be removed. The appliance must be disconnected from the supply mains when removing the battery. Dispose of the batteries safely. Run the appliance until it stops because the batteries are fully discharged. Used batteries should be taken to a recycling station and not disposed of with household waste. To remove the batteries, please contact the Hoover Customer Centre or proceed according to the following instructions.
IMPORTANT: Always fully discharge the batteries before removal.
Run the cleaner until the batteries are completely empty.
Remove the charger jack plug from the appliance.
Press the battery pack release button to remove.
NOTE: Should you experience any difficulty in dismantling the unit or for more detailed information on treatment, recovery and recycling of this appliance, please contact your local city office or your household waste disposal service.
Use only attachments, consumables or spares recommended or supplied by Hoover.
STATIC ELECTRICITY: Some carpets can cause a small build up of static electricity. Any static discharge is not hazardous to health.
Do not use your appliance out of doors or on any wet surface or for wet pick up.
Do not pick up hard or sharp objects, matches, hot ashes, cigarette ends or other similar items. Do not spray with or pick up flammable liquids, cleaning fluids, aerosols or their vapours.
Do not run over the power cord when using your appliance or remove the plug by pulling on the power cord. Do not continue to use your appliance or charger if it appears faulty.
HOOVER SERVICE: To ensure the continued safe and efficient operation of this appliance we recommend that any servicing or repairs are only carried out by an authorised Hoover service engineer.
Do not use the appliance to clean animals or people.
Do not replace the batteries with non-rechargeable batteries.
The Environment:
This appliance is marked according to the European directive 2011/65/EC on Waste Electrical and Electronic Equipment (WEEE). By ensuring this product is disposed of correctly you will help prevent potential negative consequences for the environment and human health, which could otherwise be caused by inappropriate waste handling of this product. The symbol on the product indicates that this product may not be treated as household waste. Instead it shall be handed over to the applicable collection point for the recycling of electrical and electronic equipment. Disposal must be carried out in accordance with local environmental regulations for waste disposal.
For more detailed information about treatment, recovery and recycling of this product, please contact your local city office, your household waste disposal service or the shop where you purchased the product.

This product complies with the European Directives 2014/35/EU, 2014/30/EU and 2011/65/EU.
CANDY HOOVER GROUP S.r.l. Via Privata Eden Fumagalli, 20861 Brugherio (MB) Italy
PRODUCT COMPONENTS
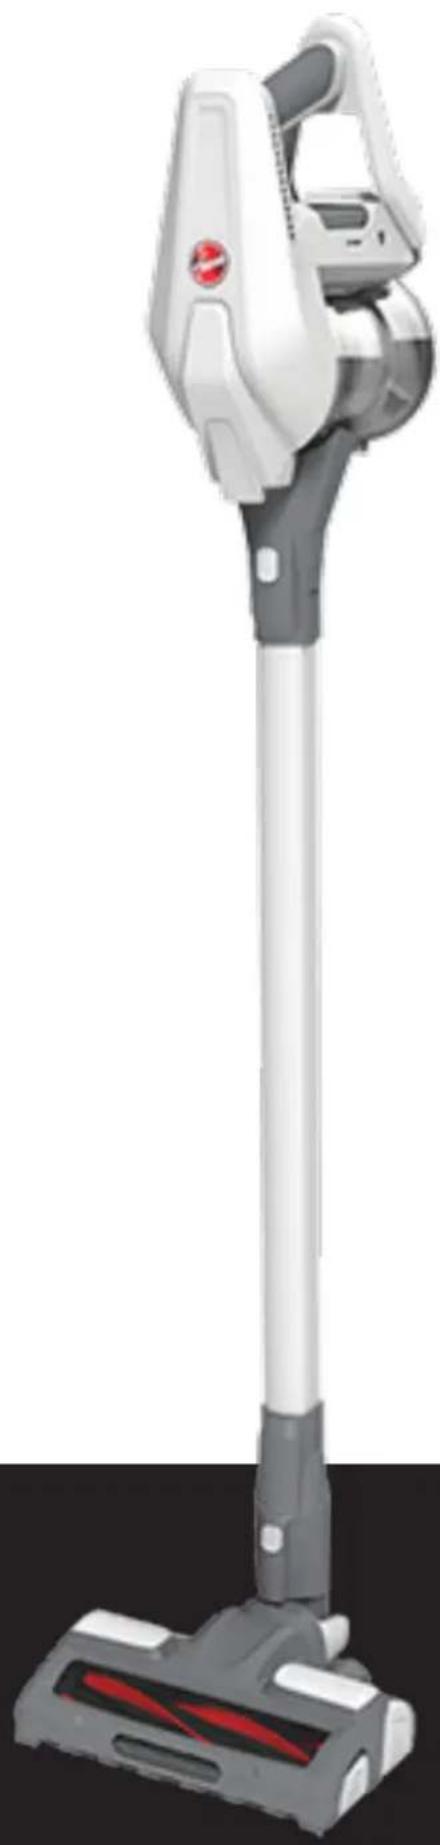
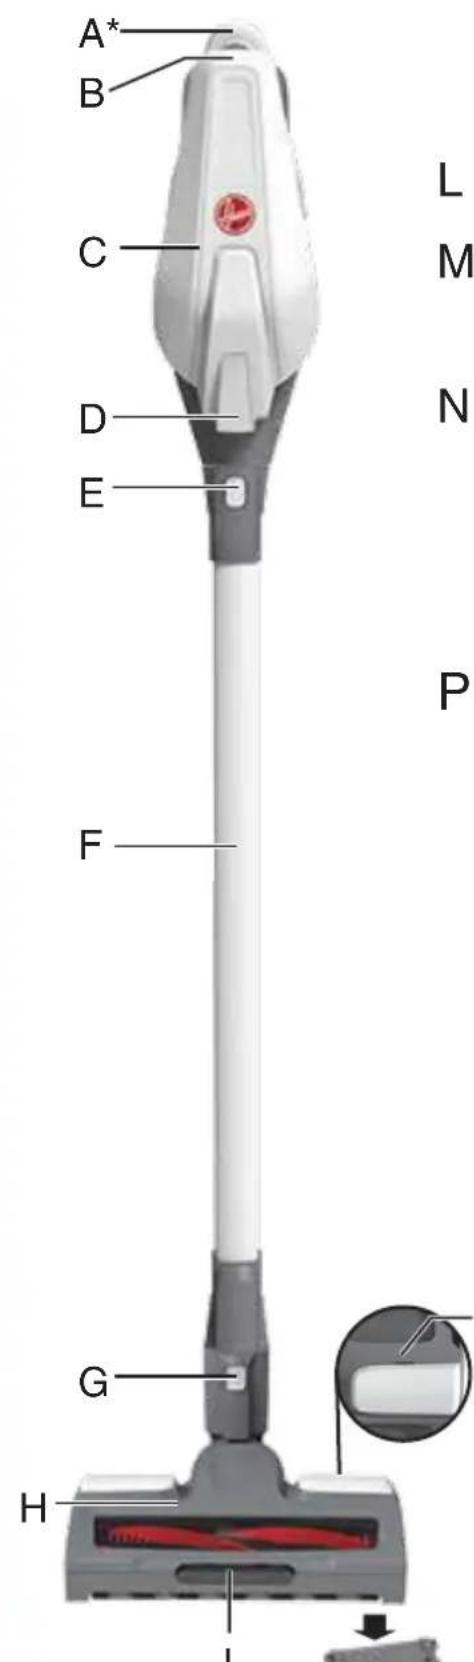
A. Wall Mount* B. Touch Power Regulation C. Main Body D. Auto LED Light E. Handheld Release Button F. Tube G. Nozzle Release Button H. Nozzle I. Nozzle Front LED Lights J. Brush Bar Status LED K. Switch ON/OFF L. Pre-Motor Filter M. Single Cyclone Vortex Finder N. Single Cyclone Filter O. Dust Cup P. Dust Cup Release Button Q. Dust Cup Assembly Release Button R. Battery Pack S. Battery Pack LED Light T. Battery Pack Charging Inlet U. Battery Pack Release Button
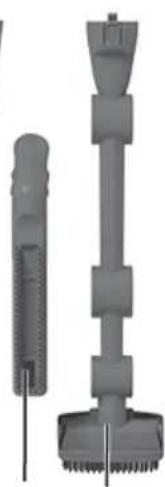
V. Charger W. Wall Mount Screws X. 2-in-1 Large Dusting and Furniture Tool Y. 2-in-1 Crevice and Dusting Tool Z. Mini-Turbo Nozzle AA. Accessory Adaptor AB. Radiator Tool* AC. Deep Cleaning Brush AD. Multi-Function Up-to-Top Tool AE. Long Flexible Crevice Tool AF. Accessory Bag AG. 360° Hydro Roller Release Flap AH. 360° Hydro Roller Sealing Cap AI. 360° Hydro Roller AJ. Removable Nozzle Rear Wiper Blade AK. Hybrid Care Roller Release Flap AL. Hybrid Care Roller AM. Nozzle Front Wiper AN. Nozzle Front Wiper Fixing Button AO. Concentrated Cleaning Detergent*
PREPARING YOUR CLEANER
- Assemble the tube to the nozzle until you hear it "click" into place. [1a]
- Assemble the main body unit to the tube until you hear it "click" into place. [1b]
- Fully charge the appliance battery by connecting the charger jack plug to the battery pack. Charging time is approximately 2.5 hours. It is also possible to charge the battery pack when released from the product. [2b] The battery pack LED light will illuminate RED during charging and will turn WHITE when fully charged. [6]
NOTE: To remove the nozzle, press the nozzle release button and pull away from the tube.
NOTE: Use only the charger supplied with your cleaner to recharge.
IMPORTANT: When charging the cleaner, the switch lever must be in the OFF position. You can charge the removable battery pack also when released from the product. It is normal for the charger to become warm to the touch when charging.
VACUUM AND INTEGRATED WASH FUNCTION
IMPORTANT: The integrated wash function should only be used on hard floors and parquet.
This cleaner has a Hybrid Care roller at the front of the nozzle and a 360° Hydro roller at the rear of the nozzle to allow vacuuming and washing of hard floors and parquet. [3]
- Detach the 360° Hydro roller release flap. It is positioned on the lateral side of the nozzle. [3a]
- Hold the 360° Hydro roller release flap and remove it. [3a]
- Remove the sealing cap and, using the sealing cap as a measuring cup, fill it with the provided concentrated detergent and pour it into the 360° Hydro roller. [3b, 3c]
- Fill the 360° Hydro roller with water, but do not fill it to the brim. [3d]
- Then re-fit the sealing cap. [3e]
- Pre-wet the 360° Hydro roller with lukewarm water until the body of the Hydro roller is soft and wet. Once completed, use your hands to remove the excess water from the 360° Hydro roller. [3f, 3g]
- Re-fit the 360° Hydro roller into the nozzle to its original position and close the release flap to the nozzle. [3h]
IMPORTANT: Do not use the 360° Hydro roller on carpets when it's wet. IMPORTANT: This is a dry DC stick, do not vacuum any water or liquids.
NOTE: It is possible to use alternative gentle cleaning detergents, but do not use disinfectant.
NOTE: It is recommended to wash the 360° Hydro nozzle, removing all debris with lukewarm water, before moving to clean another floor area or room.
NOTE: When you need to refill the water tank or the 360° Hydro roller is already dirty, it is recommended to wash it in lukewarm water with a gentle detergent by squeezing it.
IMPORTANT: It is recommended to wash the 360° Hydro roller after every use and to dry it in an upright position for at least 24 hours. [4]
IMPORTANT: Do not leave the wet 360° Hydro roller in the nozzle.
VACUUM FUNCTION
IMPORTANT: The vacuum function should only be used when the Hydro Roller is completely dry.
This cleaner has a Hybrid Care roller on the front side of the nozzle and allows pick up of dust and debris from hard floors, parquet and carpets.
Before using your product on carpet, remove the 360° Hydro roller from the nozzle, empty the contents and leave to dry for 24 hours before refitting.
Alternatively, if you do not want to wait, simply remove the wet 360° Hydro roller and vacuum your carpet.
USING YOUR CLEANER
USER INTERFACE
There are three working modes.
- STANDARD MODE: When you press the switch On/Off, the cleaner is ready to clean thoroughly with the main motorized nozzle or motorized mini turbo nozzle.
- TURBO MODE: Press the touch power regulation on the main body to fully power the product for hard cleaning tasks.
- AUTO MODE: When the main motorized nozzle or Mini-turbo nozzle are removed, the product will automatically adapt to the lowest power setting and turn on the Auto LED light.
If more power is required for a harder cleaning task, press the touch power regulation on the main body in order to rotate through the available power modes to suit your tasks.
BRUSH BAR STATUS
The brush bar status LED on the nozzle will stay illuminated white during all floor cleaning modes, and will turn red if the safety protection system is activated.
FRONT WIPER BLADE FIXING
GB
To obtain the best crevice and carpet performance, it is recommended to fix the front wiper blades vertically and do not turn them forward and backward during use:
- Detach the Hybrid Care roller release flap and remove it. [5a]
- Push down the nozzle front wiper fixing button. [5b]
- Re-fit the Hybrid Care roller in position. [5c]
BATTERY USAGE
When the battery is discharging in normal use, the battery pack LED is white. When the battery capacity is lower than 5%, the white LED light will begin to flash.
When this happens, you should stop cleaning and immediately recharge your battery. [2]
When charging the product, the switch on/off must be OFF.
It is also possible to charge the battery pack when released from the product.
The charging time of the product is 2.5 hours. When the battery is fully charged, the LED light on the battery will illuminate white. [6]
NOTE: It is normal for the charger to become warm to the touch when charging. Use only the charger supplied with your product.
SAFETY PROTECTION SYSTEM
To ensure the reliability of the product is not affected if used under arduous conditions, the product features two integrated safety protection systems.
NOTE: The safety protection system will activate in two conditions:
- If there are obstructions in the air inlet or in the tube, the cleaner will be protected and turn OFF, and the LED light on the battery pack unit turns red. If this happens, simply check if there are any obstructions in the tube or in the air inlet of the handheld. Remove it and switch ON again.
- If the agitator has a blockage or is locked, once actioned, the agitator will stop rotating and the WHITE LED light on the nozzle will turn RED. [21] If this happens, simply turn off your product and clear the agitator obstruction. To resume cleaning, press the switch on/off button and the product will start working again.
ACCESSORIES*
The above accessories can be fitted directly into the main body unit or the tube. [9]
NOTE: To remove the nozzle or main body unit from the tube, press the respective release button and pull apart.
The accessory adaptor* must be fitted when using these 2 accessories. [9]
NOTE: The mini-turbo nozzle is ideal for deep cleaning textile surfaces (i.e. sofas) and pet hair removal. Move it steadily backwards and forwards. After using, please remove hair / threads collected on the brush with scissors if necessary.
The long flexible crevice tool is ideal for cleaning in hard to reach areas, underneath furniture and in your car.
The radiator tool is ideal for cleaning inside and around cabinets, radiators and couches.
The deep cleaning brush is useful to clean in tight spaces without scratching surfaces, and inside your car.
The multi-function tool is designed to easily clean delicate surfaces without scratching and all areas that are hard to access or reach. The multi-function tool is made up of three key parts:
- Crevice tool: this is ideal for accessing tight spaces.
- Dusting brush is ideal for cleaning surfaces without damaging or scratching.
- Furniture Nozzle is ideal for cleaning surfaces like sofa.
ACCESSORY BAG*
Accessories can be stored in the accessory bag.
WALL MOUNT*
Hang the wall mount to the wall, using the two screws included in the product to hang product [10]
CLEANER MAINTENANCE
Emptying the Dust Cup
- Press the handheld release button and remove the tube. [1b]
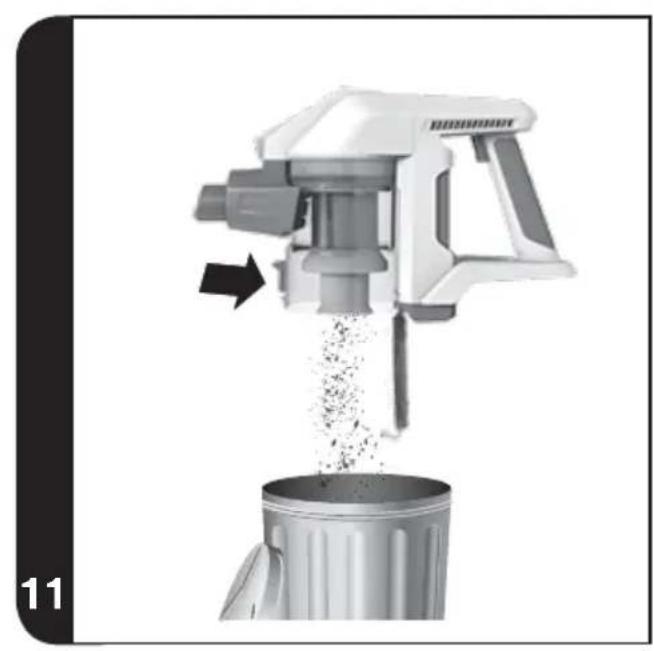
- Press the dust cup release button to release the bin flap and empty the contents. [11]
- Close the dust cup flap, you will hear a click when fully locked.
NOTE: It is recommended to empty the dust cup after each use or when dust is up to the max fill lines.
Cleaning the Dust Cup and Filter
- Press the handheld release button and remove the tube. [1b]
- Press the dust cup release button to release the dust cup and empty the contents. [11]
- Close the dust cup flap; you will hear a click when it is fully locked.
- Press the battery pack release button and remove the battery pack. [2b]
- Press the dust cup release button located on the rear side of the dust cup and turn it anticlockwise, pulling it away from the unit. [12]
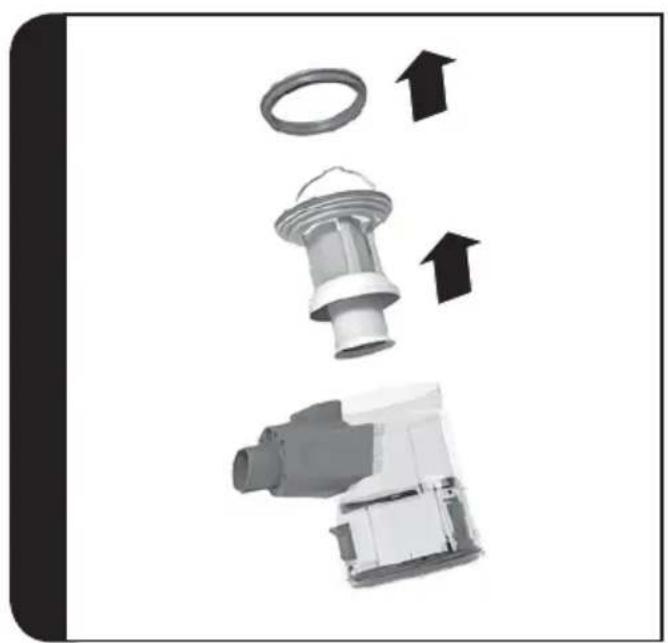
- Remove the pre-motor filter by pulling the support from the dust cup. [13]
- Remove the single cyclone system by pulling the metal ring from the dust cup. [13]
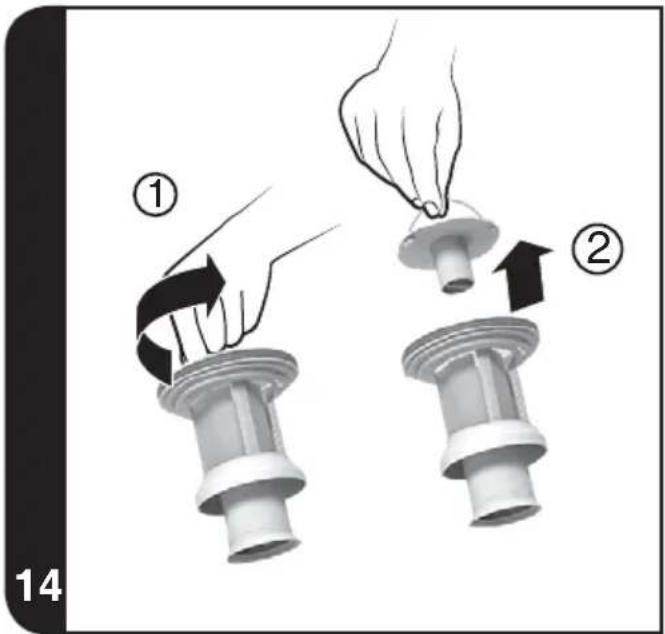
- Pull the single cyclone system and rotate the single cyclone vortex finder anticlockwise, then take it out. [14]
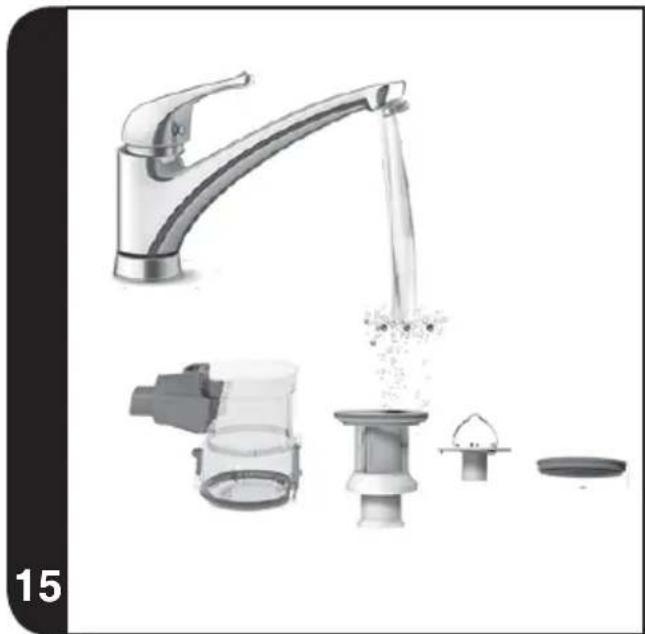
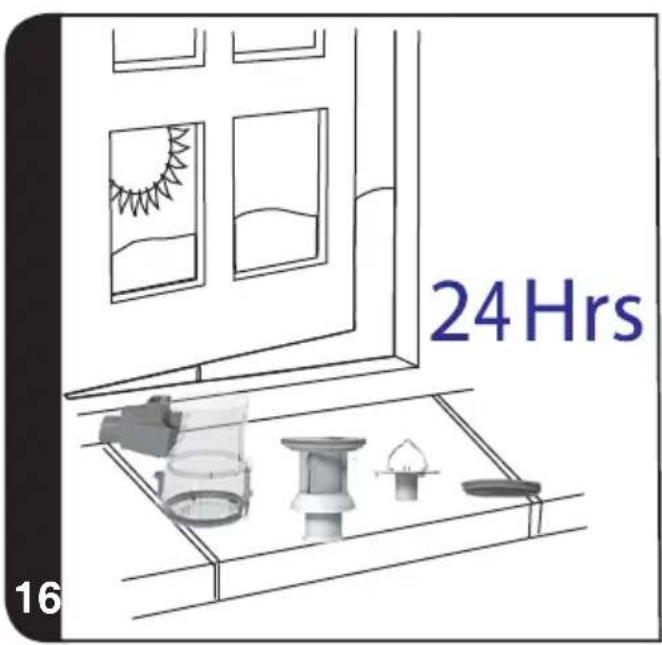
- Wash the filter and single cyclone system in lukewarm water and leave to dry for 24 hours. [15,16]
- Reassemble once completely dry and refit to the product. [17,18,19,20]
NOTE: Do not use hot water or detergents when cleaning the pre-motor filter. In the unlikely event that the pre-motor filter becomes damaged, fit a genuine Hoover replacement.
Do not use the product without the pre-motor filter fitted before assembling the dust cup to the main body.
IMPORTANT: For optimum performance, always keep your filter clean.
NOZZLE MAINTENANCE
Cleaning the 360° hydro roller, Hybrid Care roller, rear wiper blade, and front wiper blade.
IMPORTANT: Always switch off the cleaner before cleaning the 360° Hydro roller, Hybrid Care roller, rear wiper blade, and front wiper blade.
Cleaning the 360° Hydro roller
- Remove the nozzle from the tube. [22]
- Detach the 360° Hydro roller release flap. It is positioned on the lateral side of the nozzle. [4a]
- Remove the sealing cap and ensure the water tank is empty. [4b,4c]
- Wash the 360° Hydro roller and the sealing cap in lukewarm water with a gentle detergent by squeezing it, or wash it in a washing machine using a gentle cycle without the 360° Hydro roller release flap. [4d]
- Leave it to dry in an upright position for at least 24 hours. [4e]
- Re-fit the 360° Hydro roller on the nozzle to its starting position.
- Close the 360° Hydro roller release flap to the nozzle.
IMPORTANT: It is recommended to wash the 360° Hydro roller after every cleaning and to leave it to dry in an upright position for at least 24 hours.
IMPORTANT: Do not leave the wet 360° Hydro roller in the nozzle.
IMPORTANT: The vacuum function on carpets should only be used when the Hydro Roller is completely dry.
NOTE: If you prefer to wash it in the washing machine, it is recommended to use a gentle cycle below 40° and to remove the 360° Hydro roller release flap. [4d]
Cleaning the Hybrid Care roller
- Remove the nozzle from the tube. [22]
- Detach the Hybrid Care roller release flap. It is positioned on the lateral side of the nozzle. [23]
- Hold the Hybrid Care roller release flap and remove it from the nozzle.
- To clean the Hybrid Care roller, remove excess debris using scissors. [23]
- Re-fit the Hybrid Care roller. It can be fitted only in one direction. [23]
- Close the Hybrid Care roller release flap to the nozzle.
Cleaning the rear wiper blade:
- Remove the nozzle from the tube. [22]
- Push the end side release flap and remove the rear wiper blade. [24]
- Certain Models Only
- To clean the rear wiper blade, you can clean it with wet cloth.
- Re-fit the rear wiper blade in position.
Cleaning front wiper blade:
- Remove the nozzle from the tube. [22]
- Pull out the front wiper blade from slot. [24]
- To clean the front wiper blade, you can clean it with a wet cloth.
- Re-fit the front wiper blade in position.
Replacing the Batteries
This cleaner is fitted with a rechargeable lithium ion battery pack which is replaceable.
WARNING: Only use approved replacement parts for your cleaner. Using parts not validated by Hoover are dangerous and will invalidate your guarantee.
WARNING: Do not try to open the battery pack and repair it by yourself.
- Press the battery pack release button and pull the battery outside. [2b]
- Remove the old battery pack and replace with the new battery pack.
- Dispose of the batteries safely. Used batteries should be taken to a recycling station and not disposed of with household waste.
TROUBLESHOOTING
Should you have any problem with your cleaner, follow this simple check list before calling the Hoover Customer Service Centre:
A. Cleaner does not switch on
Check if the cleaner is charged.
Check if the battery pack is assembled in place.
B. Cleaner stops working
Check if there is an obstruction in the agitator, clear it and ensure the battery pack is removed. Once this is done simply press the switch ON/OFF, the product will restart again.
Empty the dust cup and wash the pre-motor filter and cyclone separator.
Remove nozzle and tube check for any blockages in the duct.
C. Loss of suction or no suction
Empty the dust cup and wash the pre-motor filter and Single Cyclone system.
Remove nozzle and tube check for any blockages in the duct.
D. Batteries cannot be charged
Contact Hoover customer service to arrange battery replacement.
If the problem persists, contact the Hoover customer service center.
This may be a result of very long storage periods (over half year).
HOOVER SPARES AND CONSUMABLES
Always replace parts with genuine Hoover spares. These are available from your local Hoover dealer or direct from Hoover.
When ordering parts always quote your model number.
YOUR GUARANTEE
The guarantee conditions for this appliance are as defined by our representative in the country in which it is sold.
Details regarding these conditions can be obtained from the dealer from whom the appliance was purchased.
The bill of sale or receipt must be produced when making any claim under the terms of this guarantee.
IMPORTANT: The battery in this cleaner is guaranteed for 6 months from the date of purchase. After 6 months the customer is liable for the cost of a new battery.
Subject to change without notice.
SAFETY INSTRUCTIONS FOR USE
FR
MAINTENANCE OF THE VACUUM CLEANER
Empty the dust container
CHARGING THE BATTERY
1. Assemble the hose until you hear the "click" of the latch. [1a] 2. Assemble the tube and the nozzle to the hose until they lock into place. [1b] 3. Charge the battery of the appliance by connecting the charger to the corresponding battery.
The charging time is approximately 2 hours. You can charge the battery even when the product is not in use. [2b]
The LED light of the battery lights up red during charging and turns green when it is fully charged.
The appliance is now ready for use.
Check if the appliance is charged.
Check if the battery is properly inserted into the appliance.
B. How to operate
Check if there is an error on the display, respond to it and confirm that the battery has been removed. If this does not work, press the ON/OFF button and the product will restart.
Clean the filter and rinse it under water, then dry it thoroughly.
Remove the filter and check the hose for any blockages.
C. Battery replacement
Clean the filter and rinse it under water, then dry it thoroughly.
Remove the filter and check the hose for any blockages.
D. Batteries are not charging
Contact the Hoover Technical Support Center to arrange for battery replacement.
If the problem persists, contact the Hoover Technical Support Center.
This product contains batteries that are non-replaceable (above 1.5V).
SPARE PARTS AND ACCESSORIES HOOVER
When replacement is necessary, use only genuine Hoover spare parts. Hoover spare parts are available from your local Hoover dealer or directly from Hoover.
When ordering, always quote the model number.
GUARANTEE
This appliance is intended for household use and similar applications such as farmhouses, and by guests in hotels, motels and other residential type environments.
For more information about the terms of guarantee, please contact the retailer from whom you purchased the appliance.
The purchase receipt or invoice is a valid prerequisite for the validity of the guarantee.
WARNING: This appliance contains a battery that is charged by the guarantee for 6 months from the date of purchase. After 6 months, the battery is charged at the cost of the user.
The manufacturer reserves the right to make changes without prior notice.
INSTRUCTIONS FOR SAFE USE
This appliance is intended for household use only, in accordance with the description given in this user manual. Use of this appliance in conditions other than household, or with functions other than those of a household appliance, such as commercial use, is excluded. Improper use of the appliance leads to a reduction in its service life and voids the manufacturer's warranty. The manufacturer is not responsible for damage, loss, or losses caused by use of the appliance other than as intended. Before using this household electrical appliance, make sure you understand this manual.
Before cleaning or servicing, always unplug the appliance from the outlet. This appliance is not intended for use by persons (including children) with reduced physical, sensory, or mental capabilities, or lack of experience or knowledge, unless they are supervised or instructed in the use of the appliance by a person responsible for their safety. Children should be supervised to ensure they do not play with the appliance. All packaging materials should be kept out of reach of children (risk of suffocation).
If the power cord is damaged, immediately disconnect the appliance. To avoid hazards, replacement of the cord must be carried out only by a specialist of an authorized service center of the manufacturer.
Do not touch rotating parts with hands, feet, or any part of the body, and do not insert loose clothing or hair.
Use only the original charging device included with the appliance.
Make sure the voltage of the power source matches the parameters of the charging device.
This Hoover appliance is supplied with a charging device with double insulation, which is suitable only for 230V (240V in the UK) outlets.
Insert the charging device into a suitable outlet and connect the charging device connector to the vacuum cleaner.
Do not touch the charging device with wet hands.
Turn off the device before charging.
The battery charge indicator will glow red during charging and turn white when the battery is fully charged.
After use, place the device on the charging station to recharge the battery.
Charging the battery is prohibited at temperatures above 37°C or below 0°C.
It is completely normal if the charging station becomes warm during charging.
Never disconnect the charging station by pulling the cord.
Disconnect the charging station during extended periods of non-use (e.g., vacation). Charge the vacuum again before use, as the battery may self-discharge during storage.
If disposal of the device is necessary, remove the battery from it. Before removing the battery, disconnect the device from the power supply. Follow safety regulations when disposing of the battery. Use the device until the battery is completely discharged. Used batteries must be taken to a special collection point and not thrown away with regular household waste. To remove the battery, contact an authorized service center or follow the instructions below.
WARNING! Before removing the battery from the vacuum, make sure it is completely discharged.
Press the battery release button to remove it.
NOTE: If any difficulties arise or if you need more detailed information on servicing, disposal, or recycling of this device, contact local authorities or your local household waste disposal service.
Use only accessories, consumables, or spare parts recommended by the manufacturer.
Static electricity: During carpet cleaning of certain types, static electricity may build up. Discharge of static electricity does not pose a health hazard. Do not use the device outdoors, on wet surfaces, or for collecting liquids.
Do not use the device to collect sharp objects, matches, hot ash, cigarette butts, or similar items. Do not spray or collect flammable liquids, cleaning agents, aerosols, or their vapors.
Do not carry the vacuum by the power cord and do not pull the cord to unplug it. Do not use the device or charging station if they are damaged.
Commissioning: To ensure long, safe and efficient operation of this household appliance, it is recommended that repairs be carried out only by an authorized service center of the manufacturer.
Do not use the appliance to clean live animals or people.
Do not use ordinary non-rechargeable batteries instead of
rechargeable batteries.
Environment:
The appliance is marked according to European Directive 2011/65/EC on waste electrical and electronic equipment (WEEE). By following the rules for disposal of this appliance, you will help prevent possible negative consequences for the environment and human health, which could be caused by improper disposal of this device. The symbol on this device indicates that it cannot be disposed of as household waste. It must be taken to an appropriate collection point for electrical and electronic equipment. Disposal must be carried out in accordance with local


rules for environmental protection and waste disposal. For more detailed information on handling and recycling of this device, contact your local authorities, the waste disposal service for household waste, or the store where you purchased the product.

This appliance complies with the requirements of European Directives 2014/35/EU, 2014/30/EU and 2011/65/EU.
CANDY HOOVER GROUP S.r.l. Via Privata Eden Fumagalli, 20861 Brugherio (MB) Italy
GET TO KNOW YOUR VACUUM CLEANER
A. Wall mounting bracket* B. Sensor power control C. Main unit D. Automatic light indicator E. Button to detach main unit F. Tube G. Button to detach main nozzle H. Main nozzle I. Light indicator on nozzle J. Status indicator K. On/Off button L. Pre-motor filter M. Cyclone separator unit N. Single cyclone filter O. Dust container P. Button to release dust container Q. Container latch R. Battery S. Battery charge indicator T. Charging socket U. Button to release battery V. Charger*
W. Crevice tool X. 2-in-1 nozzle for removing dust and cleaning upholstery Y. 2-in-1 nozzle Z. Mini brush AA. Nozzle adapter AB. Nozzle for radiators AC. Brush for delicate surfaces AD. Nozzle for cleaning high surfaces AE. Flexible hose for nozzles AF. Drying accessory* AG. Latch for detaching the roller for wet cleaning 360° Hydro AH. Sealing cap for the roller for wet cleaning 360° Hydro AI. Roller for wet cleaning 360° Hydro AJ. Removable brush for the nozzle AK. Latch for detaching the brush for combined cleaning AL. Brush for combined cleaning AM. Brush for crevices AN. Fastening button for the crevice brush AO. Concentrated cleaning agent*
PREPARING THE VACUUM CLEANER FOR USE
- Attach the nozzle to one side of the tube until it clicks. [1a]
- Insert the other side of the tube into the main unit until it clicks. [1b] 3. Fully charge the appliance by connecting the charger to the battery pack.
The charging time will be about 2 hours. You can also charge the battery separately by removing it from the vacuum cleaner. [2b]
The battery charge indicator light will glow red during charging and will turn white when fully charged. [6]
NOTE: To remove the nozzle, press the release button on the nozzle and pull it off the tube.
NOTE: For charging, use only the charging device supplied with the vacuum cleaner.
WARNING! When charging the vacuum cleaner, the power switch must be in the "OFF" position. You can also charge the battery separately by removing it from the vacuum cleaner.
It is perfectly normal if the charging device becomes warm during charging.
*Only on some models
COMBI FUNCTION: DRY AND WET CLEANING
WARNING! Wet cleaning can only be performed on hard floors and parquet.
This vacuum cleaner is equipped with a roller for combined cleaning: in the front part of the nozzle, there is a roller for wet cleaning, and in its rear part, a 360° roller, which allows the vacuum cleaner to wash hard floors and parquet at the same time. [3]
- Remove the 360° Hydro wet cleaning roller by releasing the latch. It is located on the side of the nozzle. [3a]
- Hold the latch and remove the 360° Hydro roller. [3a]
- Remove the sealing cap and, using it as a measuring cup, pour the concentrated cleaning solution into the 360° Hydro roller. [3b, 3c]
- Fill the 360° Hydro roller with water, not exceeding the edge. [3d]
- Then put the sealing cap back in place. [3e]
- Rinse the 360° Hydro roller with warm water until it becomes clean and damp. Then remove the remaining water from the 360° Hydro roller with your hands. [3f,3g]
- Install the 360° Hydro roller back into the nozzle in its original position and close the latch. [3h]
WARNING! Do not use the 360° Hydro roller for cleaning carpets if they are wet.
WARNING! This vacuum is intended for dry vacuuming - do not use it with water or liquids.
NOTE: You can use another mild cleaning agent, but you cannot use a solvent-based agent. NOTE: It is recommended to clean the 360° Hydro nozzle by removing debris and rinsing with warm water before starting to clean the next surface or room.
NOTE: If you need to add water, and the 360° Hydro roller for wet cleaning is already dirty, it is recommended to rinse it with warm water using a mild cleaning agent, periodically wringing it out.
WARNING! It is recommended to wash the 360° Hydro roller for wet cleaning after each use and dry it in a vertical position for at least 24 hours. [4]
WARNING! Do not leave the 360° Hydro roller wet in the nozzle.
DRY VACUUMING FUNCTION
WARNING! Dry vacuuming must be performed only with a completely dry 360° Hydro roller.
This vacuum is equipped with a roller for dry vacuuming within the nozzle, which allows you to collect dust and debris from hard floors, parquet, and carpets. [4f]
Before using the vacuum to clean carpets, remove the 360° Hydro roller for wet cleaning from the nozzle, then let the remaining liquid dry for 24 hours before reinstalling it. [4]
If you want to vacuum, simply remove the wet 360° Hydro roller and vacuum the carpet without it. [4a]
OPERATING THE VACUUM
USER INTERFACE
Install the nozzle directly on the vacuum cleaner body or on the hose. [9]
NOTE: To separate the nozzle from the vacuum cleaner body, press the corresponding release button and pull the parts in different directions.
RADIATOR CLEANING NOZZLE* / BRUSH FOR DEEP CLEANING
When using these two nozzles, it is necessary to install the adapter for nozzles*. [9]
NOTE: The turbo brush is ideal for cleaning textile surfaces (e.g., sofa) and removing pet hair. Move it slowly back and forth. After use, remove any hair or threads wrapped around the brush with scissors.
The length of the hose and the nozzle is ideal for cleaning hard-to-reach areas, including under furniture in the car.
The radiator tool is ideal for cleaning inside and around radiators, heaters, and radiators.
The brush for deep cleaning is useful for cleaning in narrow spaces without the risk of scratching surfaces, as well as for cleaning inside the car.
The multifunctional nozzle is designed for cleaning delicate surfaces without scratches, as well as for cleaning in hard-to-reach places. The multifunctional nozzle consists of three parts:
WARNING: Do not attempt to open the battery pack or repair it yourself.
- Press the battery pack release button and pull the battery upward. [2b]
- Replace the old battery pack with a new one.
- Follow safety rules when disposing of the battery pack. Used battery packs must be handed over to a recycling center; it is forbidden to throw batteries in with household waste.
C. TROUBLESHOOTING
Empty the dust container and clean the filter system.
Check the hose and pipe for any blockages.
The battery is not charging.
Contact the customer service center to arrange for battery replacement.
If the problem is not resolved, contact an authorized service center.
This may happen due to prolonged storage without use (more than six months).
SPARE PARTS AND CONSUMABLES
For replacement parts, use only original spare parts and consumables. They can be purchased from your local Hoover dealer and in the official online store shop.hoover.ru (except for spare parts).
When ordering spare parts, be sure to specify the model number of the vacuum cleaner.
WARRANTY TERMS
The warranty terms for this household electrical appliance are determined by our representative office in the country where this electrical appliance is sold.
You can get more detailed information about these terms from the seller or from the warranty certificate for this appliance.
In the event of situations covered by the manufacturer's warranty obligations, when contacting an authorized service organization, it is necessary to present a sales receipt or another document confirming the start of the warranty period stipulated by the warranty terms for this appliance.
ATTENTION! The manufacturer is not responsible for errors in this instruction that may occur during translation. The manufacturer reserves the right to make changes and modifications that it deems necessary for its products, while preserving the main characteristics.
All information presented in the instruction regarding the package contents, technical characteristics, functions, color combinations, etc. is for informational purposes only and under no circumstances is it a public offer. The manufacturer does not establish the terms of the purchase agreement; they must comply with the requirements of regional and/or national legislation of the countries where the goods are sold.
SAFETY INSTRUCTIONS
SAFETY INSTRUCTIONS FOR USE