SMPK2072 - Mp3 player SYLVANIA - Free user manual and instructions
Find the device manual for free SMPK2072 SYLVANIA in PDF.


| Product Type | MP3 Player |
| Brand | Sylvania |
| Model | SMPK2072 |
| Storage Capacity | 2 GB |
| Screen | 1.5-inch C-STN LCD |
| Supported Audio Formats | MP3, WMA |
| Supported Video Formats | AVI (XviD) |
| Supported Image Formats | JPEG |
| Maximum Image Resolution | 2048 x 2048 pixels |
| MP3 Bit Rate | 8-320 kbps |
| Signal-to-Noise Ratio | >90 dB |
| Connectivity | USB 2.0 |
| Power Supply | Built-in rechargeable lithium-ion battery |
| Battery Life | 8-10 hours (audio) / approximately 4 hours (AVI video) |
| Charging Time | Approximately 3 hours via USB |
| Dimensions (estimated) | 80 x 40 x 10 mm |
| Weight (estimated) | 30 g |
| Main Functions | MP3/WMA player, AVI video, JPEG viewer, voice recorder, e-book reader (TXT), radio (unspecified), file browser, repeat and equalizer functions |
| Care and Cleaning | Clean with a dry cloth; do not use chemical products |
| Safety | Avoid shocks, drops, extreme temperatures, dust, humidity, direct sunlight; do not listen at high volume for extended periods; do not disassemble |
| Compatible Operating Systems | Windows 98/SE, Me, 2000, XP, Vista |
| Package Contents | Player, stereo earphones, USB cable, user manual, CD with video converter |
Frequently Asked Questions - SMPK2072 SYLVANIA
User questions about SMPK2072 SYLVANIA
0 question about this device. Answer the ones you know or ask your own.
Ask a new question about this device
Download the instructions for your Mp3 player in PDF format for free! Find your manual SMPK2072 - SYLVANIA and take your electronic device back in hand. On this page are published all the documents necessary for the use of your device. SMPK2072 by SYLVANIA.
USER MANUAL SMPK2072 SYLVANIA
- Do not subject the device to severe impact or drop it from high position.
- Do not use the player in extreme hot or cold, dusty or damp field. Do not expose it to direct sunshine.
-
Excessive sound pressure from earphones and headphones can cause hearing loss.
-
At full power, the prolonged listening of the device can damage the ear of the use.
- Avoid using the player in strong magnetic field.
- Keep the device away from water or other liquids. In the event that water or other liquids enter the device, power off the product immediately, and clean the device.
- Do not use chemical solution to clean the device in order to avoid corrosion. Clean it with a dry cloth.
- We are not responsible for the damages or lost data caused by malfunction, misusing, repairing the device or battery replacement.
- Do not attempt to disassemble, repair or modify the product. This will
invalidate guarantee.
- The design of the player or actual display may be different from what is shown in this manual. It should be subject to the actual display or design.
1 Key Features
● MP3&WMA Player
● AVI Video player
- JPEG image viewer
- Folder Navigation
- Voice Recorder
● Removable Storage Device
● Built-in rechargeable lithium-ion battery
- Customized settings
2 System Requirements
● Hardware: IBM PC & Compatible PC, Notebook with USB interface
- Operating System: Windows98/SE, Windows Me, Windows2000/XP, Windows Vista
3 Package Content
- Main Unit
-
Stereo earphones
-
USB cable
- User Manual
- CD with video converter
4 Before Using
4.1 Connect to a PC and download audio files
This player is plug & play for WIN2000/XP/ME/Vista OS. But for Windows98/SE, you are required to install a driver before connection.
To connect it with PC for transferring files,
(1) Plug the larger end of the USB cable to the USB port of the PC, and plug the smaller end to the USB port of the player.
(2) When the “” icon appear at the right bottom of the PC screen, double
click "My Computer" on the desktop, you see a removable disk which indicates the player. Just use the removable disk as a regular local disk, copying files from or to it.
4.2 Removing the player from the PC safely
For Windows2000/XP/ME/Vista:
(1) Left click the icon at the right hand corner of the taskbar.
(2) Click the pop-up mini-window with message of "Stop the USB Mass Storage Device – Drive (X)".
(3) When you are prompted to remove the device, pull out the player.
For Win98/SE, please make sure the data transfer is completed before unplugging the MP3 player.
4.3 Charge the battery
The device has a built-in lithium-icon rechargeable battery. It is charged via USB connection. You are required to charge it when you use it for the first time. It takes about 3 hours to fully charge the battery. Connect the larger end of the USB cable to the USB interface of PC, and connect the other smaller end of the USB cable to the USB interface of this player. The device is connected to PC and being charged.
NOTICE: For maximum performance, lithium-ion batteries need to be used often. If you don't use the device often, be sure to recharge the battery at least once per month.
5 Keys Description
natural_image
Technical line drawing of a vertical cylindrical device with internal components and a labeled section (no text or symbols)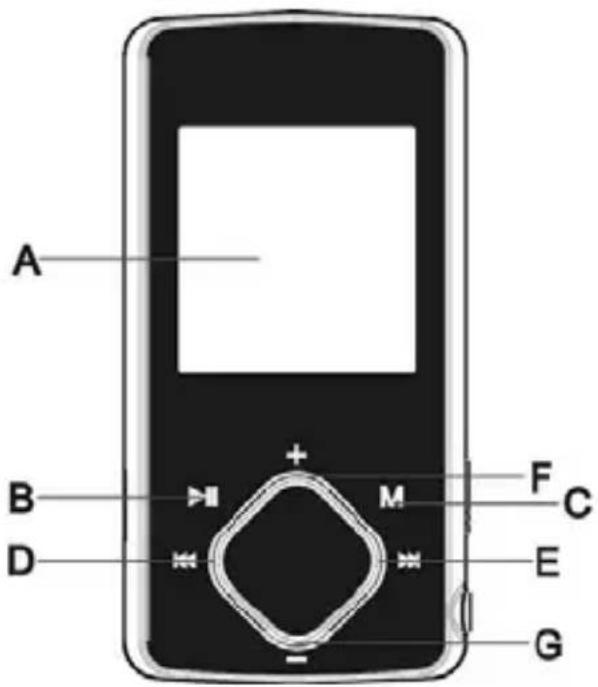
natural_image
Technical line drawing of a vertical cylindrical device with labeled ports (no text or symbols present)A. LCD Display
B. Play/Pause: Tum on or turn off the device. Also play or pause audios.
C. MENU: Hold for a while to enter the main menu. Briefly press to confirm selection confirm or enter the folder navigation mode.
D. Previous: Play the previous track. Also move up.
E. Next: Play the next track. Also move down.
F. VOL+: Turn up the volume.
G. VOL-: Tum down the volume.
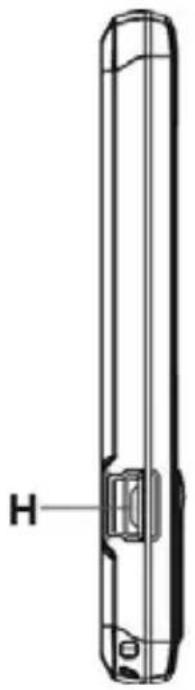
H. USB port
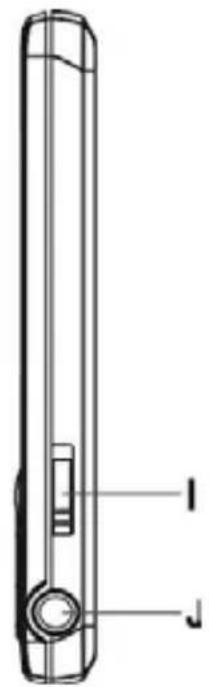
I. Power Switch: Turn on or turn off the power
J. Earphone Jack
6 Power On/Off
To power on,
(1) Slide the Power Switch to "ON" to turn on the power.
(2) Press and hold the PLAY/PAUSE button until you see prompt on the display.
To power off,
(1) Press and hold the PLAY/PAUSE button until you see prompt on the display.
(2) Slide the Power Switch to "OFF" to turn off the power. (Be sure to complete this step for saving battery charge.)
Note: This player has a power-saving feature which enables the device to power off automatically if it is idle for about 3 minutes.
7 Basic operation
| Function | Operation |
| Play/Pause | Press the PLAY/PAUSE button to play or pause. |
| Adjust Volume | Shortly press the VOL+/VOL- button to decrease or increase volume. |
| Previous Track | Shortly press the PREVIOUS button. |
| Next Track | Shortly press the NEXT button. |
| Fast Forward | Press and hold the NEXT button. |
| Rewind | Press and hold the PREVIOUS button. |
| A-B Repeat | To repeat a specified section of a track,(1) During playing, press and hold the VOL+ button to select the start point of the repeat.(2) Press and hold the VOL+ button again to select the stop point. The music section between the start point and the stop point is repeated.(3) To stop A-B repeat, press the VOL+ button. |
| Lock/Unlock buttons | To protect the buttons against being pressed accidentally or unlock buttons, hold down the MENU button and the VOL-together. |
8 Playing music
8.1 Enter the music mode
Press and hold the MENU button to display the main menu. Use the PREVIOUS/NEXT button to select "Music" menu, and press the MENU button to confirm selection. Now you are in the MUSIC mode, refer music playing to the basic operations.
8.2 Folder navigation
To navigate through folders:
(1) In the MUSIC mode, shortly press the MENU button to enter folder navigation mode.
(2) Press the PREVIOUS/NEXT button to select a folder or track, and press the MENU button to confirm selection, or press the PLAY/PAUSE button to return.
9 Playing videos
(1) Press and hold the MENU button to display the main menu.
(2) Use the PREVIOUS/NEXT button to select the "Video" menu, and press the MENU button to enter the video player mode.
(3) Press the PREVIOUS/NEXT button to search a video file that you want to play, and press the MENU button to play. For detail information about playing, see the "Basic Operation" section. (Note: During playing, you can shortly press the MENU button to enter folder navigation mode.)
Note: This player can only play AVI videos. For other formats, you need to use the converting tool included on the driver CD to convert them. For detail information about
the converter, see AVI Converter Quick User Guide on the CD.
10 Viewing photos
To view photos,
(1) Press and hold the MENU button to display the main menu.
(2) Select "Photo" and press the MENU button to confirm.
(3) Press the PREVIOUS/NEXT button to select a folder or image, and press the MENU to confirm.
(4) Select the photo that you want to display and press the MENU button to enlarge it to full screen.
(5) In the full screen mode, you can press the PREVIOUS/NEXT button to display the
previous or the next photo. Press the PLAY/PAUSE to start or stop an auto slide show. Press the MENU button to enter folder navigation mode.
Note: Some images may not be displayed. Try to use an image editor to convert them or save them as other files.
11 Reading E-book
11.1 Reading
(1) Press and hold the MENU button to display the main menu.
(2) Select "E-book" and press the MENU button to confirm.
(3) Press the PREVIOUS/NEXT button to select a .txt file, and press the MENU
button to open the selected file.
(4) Press the PREVIOUS/NEXT button to page up or page down manually, or press the PLAY/PAUSE button to page up or down automatically (by setting the time interval between 1 and 5 in Settings/Auto Slide show/Text).
(5) During reading, you can use the bookmark to mark the page for resuming reading later. For information about bookmark, see “Using bookmark” section.
11.2 Using bookmark
(1) Go to the page that you want to mark.
(2) Briefly press the VOL+ button to show up a “Save Bookmark” window for saving bookmark.
(3) Press the PREVIOUS/NEXT button to select a bookmark number and press the
MENU button to confirm. The bookmark is saved. It starts from the first line of current page.
(4) To read the page that you marked, shortly press the VOL- button to show up the "Load Bookmark" window. Press the PREVIOUS/NEXT button to select a bookmark and press the MENU button to confirm. You will be guided to that page.
Note: Some TXT file may not be read. This may because its format is not supported. Skip it or reload another file.
12 Browsing all files
To browse all files stored in the player,
(1) Press and hold the MENU button to display the main menu.
(2) Select "Navigation", and press the MENU button to enter the browser mode.
(3) Press PREVIOUS/NEXT button to select a file that you want to view, and press the MENU button to play or display it.
13 Voice Recording
- Record
(1) Press and hold the MENU button to display the main menu.
(2) Select "Record", and press the MENU button to enter the recorder mode.
(3) Shortly press the PLAY/PAUSE button to start recording. During recording, you can press the PLAY/PAUSE button to pause or resume recording.
(4) Shortly press the MENU button to stop and save recording. Press and hold the MENU button to return to the main menu.
- Play recordings
To play the recording,
(1) Select "Navigation" on the main menu to enter the folder navigate mode.
(2) Open the "VOICE" folder, and select the recording file that you want to play.
14 Deleting file
To delete a file,
(1) Select "Navigation" on the main menu to enter the folder navigate mode.
(2) Briefly press the VOL- button to display a dialogue box.
(3) Use the PREVIOUS/NEXT button to select "YES" and press the MENU button to confirm.
15 Customizing Settings
To customize the player settings:
(1) On the main menu, select the "Settings" item and press the MENU button to enter the system settings mode.
(2) Press the PREVIOUS/NEXT button to select setting item and press the MENU button to confirm or press the PLAY/PAUSE button to cancel/return.
| Music | Repeat | Once (Play current track once and mode then stop) |
| Repeat One (Repeat current track) | ||
| Folder (Play all audio files in the current folder and stop after playing) | ||
| Folder Rep. (Repeat all audio files in the current folder) | ||
| Normal (Play all audio files stored in |
Normal (Play all audio files stored in
| the player and stop after playing all) | ||
| Repeat All (Repeat all audio files stored in the player) | ||
| Intro (Play the first 10 seconds of every audio file) | ||
| Play mode | Order (Play audio files in order) | |
| Shuffle (Play audio files randomly) | ||
| Preset EQ | Normal, 3D, Rock, Pop, Classical, Bass, Jazz, User EQ | |
| User EQ set (User-definedequalizer setting) | (1) Press the PREVIOUS/NEXT button to switch EQ column.(2) Press the VOL+/VOL- button to adjust the value of the selected column.(3) Repeat pressing the NEXT button until the cursor is on the YES button, and then press the MENU button to confirm.(4) Go to the “Preset EQ” menu, and select “User EQ” to enable the equalizer setting. | |
| Record | REC Quality High | Quality, General Quality |
| REC Volume | +1、+2、+3、+4、+5 | |
| Auto Slide Show | Text Browse (Set interval between the previous and the next page when the device is in auto page up/down mode.) | |
| Photo Browse (Set interval between the previous and the next slide in auto slide show mode.) | ||
| Display | Backlight Time | 5 seconds, 10 seconds, 15 seconds, 20 seconds, 30 seconds, Always On. |
| Brightness (Set the brightness of the screen) | ||
| Backlight mode | NormalPower Save (Turn off the screen when there is no activity within a certain time) | |
| System | About - Information about the product | |
| Upgrade - Upgrade the firmware | ||
| Load Default - Restore the player to default setting | ||
| Sleep Timer(Set the continuous playing time before the player is turned off | Off, 10 minutes, 15minutes, 30 minutes, 60 minutes, 120 minutes | |
| automatically.) | ||
| Language( Select language in which the on-screen text is displayed) | English, Français, Spanish | |
16 Troubleshooting
| Problem | Possible | Cause | Solution |
| The LCD displays nothing when the device is started. | Battery is too low. Charge the battery. | ||
| an audio file. | The volume is too low. Adjust the volume. No sound when playing | ||
| Bad audio file. Delete or skip the file. | |||
| The player cannot be connected to the PC. | The USB interface is not supported by PC's motherboard. | Update or replace the PC's motherboard. | |
| The displayed time is changing constantly. | The bit rate of the MP3 file is changing during playback. | Try to use fixed bit rate to compress the MP3 file. | |
| The PC has error when The player is Do not disconnect the | |||
| you plug and unplug the player. | disconnected from the PC abruptly while transferring files. | player from the PC when transferring files. | |
| Total memory displayed on the player is not in accordance with the marked amount. | Part of memory is used to store programs and display characters. | ||
| Some of MP3 files cannot be played properly. | The MP3 file is compressed by a standard, such as MPEG I Layer 1 or Layer 2 thatthe player does not support. | 1. Delete the unsupported MP3 files.2. Use MPEG I Layer 3 standard to compressthe unsupported MP3 files. | |
| The video cannot be played. | The file format is not supported. | Make sure the video is in AVI format. If not, use the provided converting tool to convert it. | |
| The video data is corrupted | Skip it or reload another file | ||
| The photo cannot be displayed | The file format is not supportedThe image resolution is beyond limitation of the device. | Try to use an image editor to convert it or save it as another file.The device supports a maximum resolution of 2048 X 2048. Make sure resolution of the image does not excess this limitation. | |
| The TXT file cannot be read | The file format is not supported. | Skip it or reload another file. | |
17 Technical Specifications
| Item | Specification |
| Capacity | 2GB |
| Battery Type Rechargeable Lithium Battery | |
| Battery Life | 8 – 10 Hours(only for MP3) or About 4Hours(AVI VIDEO) |
| LCD Display 1.5-inch CSTN screen | |
| Earphone Power 5mW+5Mw | |
| Video Format AVI (XviD) | |
| Audio Format MP3, WMA | |
| Photo Format JPEG | |
| Image Resolution 2048 X 2048 (Max.) | |
| Bit Rate MP3: 8-320kbps; WMA: 64-384kbps | |
| SNR >90dB | |
| USB Port USB2.0 | |
| Operational Temperature | 0°C ~ +55°C |
| Storage Temperature | -20°C ~ +55°C |
| Operational Relative Humidity * | 20% ~ 90% (40°C) |
| Storage Relative Humidity | 20% ~ 93% (40°C) |
18 Notice
- Make sure all keys are enabled before operation. If they are locked, hold down the MENU and VOL- button to unlock them.
- Please charge the battery immediately when the display indicates low battery, or the device will be powered off automatically.
- Please disconnect the player from PC properly to avoid data loss.
- The transfer rate displayed on the PC may be different depending on the operating system. Exact transfer rate should be subject to the player's indication.

- Key Features
- System Requirements
- Package Content
- Before Using
- Connect to a PC and download audio files
- Removing the player from the PC safely
- Charge the battery
- Power On/Off
- Playing music
- Enter the music mode
- Folder navigation
- Playing videos
- Viewing photos
- Reading E-book
- Reading
- Using bookmark
- Browsing all files
- Voice Recording
- - Record
- - Play recordings
- Deleting file
- Customizing Settings
- Troubleshooting
- Notice
Brand : SYLVANIA
Model : SMPK2072
Category : Mp3 player