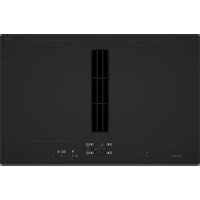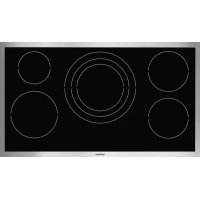
VI491610 - Cooker GAGGENAU - Free user manual and instructions
Find the device manual for free VI491610 GAGGENAU in PDF.



User questions about VI491610 GAGGENAU
0 question about this device. Answer the ones you know or ask your own.
Ask a new question about this device
Download the instructions for your Cooker in PDF format for free! Find your manual VI491610 - GAGGENAU and take your electronic device back in hand. On this page are published all the documents necessary for the use of your device. VI491610 by GAGGENAU.
USER MANUAL VI491610 GAGGENAU
Signal Words for Safety and Best Use 3
IMPORTANT SAFETY INSTRUCTIONS 4
Fire Safety 4
Cooking Safety 4
Burn Prevention 4
Child Safety 5
Cleaning Safety 5
Cookware Safety 5
Proper Installation and Maintenance 6
Electromagnetic interference 6
Cooling fan 7
State of California Proposition 65 Warnings 7
Causes of damage 8
Environmental protection 8
Tips for saving energy 8
Cooking by induction 8
Advantages of induction cooking 8
Proper cookware 8
Your new appliance 10
The induction cooktop 10
The control panel 10
Touch keys 10
Control knobs 11
Residual heat display 11
Cooking zones 11
Special accessories 11
Setting the cooktop 12
Setting heat level 12
Turning off appliance 12
Settings table 13
Booster function 14
Timer 14
Setting duration 14
After countdown of set time 15
Correcting duration 15
Canceling countdown 15
Safety lock 15
Overheating protection 15
Cleaning and Maintenance 16
Daily Cleaning 16
Cleaning guidelines 16
Cleaning charts 16
Maintenance 17
Troubleshooting 18
Normal operating noises of the cooktop 19
Customer service 19
Additional information on products, accessories, replacement parts and services can be found at www.gaggenau.com and in the online shop www.gaggenau-eshop.com
Signal Words for Safety and Best Use

WARNING
This indicates that death or serious injuries may occur as a result of non-observance of this warning.

CAUTION
This indicates that minor or moderate injuries may occur as a result of non-observance of this warning.
NOTICE: This indicates that damage to the appliance or property may occur as a result of non-compliance with this advisory.
Note: This alerts you to important information and/or tips.

IMPORTANT SAFETY INSTRUCTIONS
READ AND SAVE THESE INSTRUCTIONS
WARNING
When properly cared for, your new appliance has been designed to be safe and reliable. Read all instructions carefully before use. These precautions will reduce the risk of burns, electric shock, fire, and injury to persons. When using kitchen appliances, basic safety precautions must be followed, including those in the following pages.
Examine the appliance after unpacking it. In the event of transport damage, do not plug it in.
Fire Safety
Do not allow pans to boil dry. Do not allow aluminum foil, plastic, paper or cloth to come in contact with a hot surface element, burner or grate. Improper installation of these protective liners may result in a risk of electric shock, or fire.
If the cooktop is near a window, forced air vent or fan, be certain that flammable materials such as window coverings do not blow over or near the burners or elements. They could catch on fire.
Always have a working smoke detector near the kitchen.
Never leave the cooktop unattended when in use. Boilovers cause smoking and greasy spillovers may ignite.
WARNING
TO REDUCE THE RISK OF A GREASE FIRE:
a) Never leave surface units unattended at high settings. Boilovers cause smoking and greasy spillovers that may ignite. Heat oils slowly on low or medium settings.
b) Always turn hood ON when cooking at high heat or when flambeing food (i.e. Crepes Suzette, Cherries Jubilee, Peppercorn Beef Flambé).
c) Clean ventilating fans frequently. Grease should not be allowed to accumulate on fan or filter.
d) Use proper pan size. Always use cookware appropriate for the size of the surface element.
In the event that personal clothing or hair catches fire, drop and roll immediately to extinguish flames.
Have an appropriate fire extinguisher available, nearby, highly visible and easily accessible near the appliance.
Smother flames from food fires other than grease fires with baking soda. Never use water on cooking fires.
WARNING
TO REDUCE THE RISK OF INJURY TO PERSONS IN THE EVENT OF A GREASE FIRE, OBSERVE THE FOLLOWING:
a) SMOTHER FLAMES with a close-fitting lid, cookie sheet, or metal tray, then turn off the burner. BE CAREFUL TO PREVENT BURNS. If the flames do not go out immediately, EVACUATE AND CALL THE FIRE DEPARTMENT.
b) NEVER PICK UP A FLAMING PAN - You may be burned.
c) DO NOT USE WATER, including wet dishcloths or towels – a violent steam explosion will result.
d) Use an extinguisher ONLY if:
- You know you have a Class ABC extinguisher, and you already know how to operate it.
- The fire is small and contained in the area where it started.
- The fire department is being called.
- You can fight the fire with your back to an exit.
Whenever possible, do not operate the ventilation system during a cooktop fire. However, do not reach through fire to turn it off.
Cooking Safety
WARNING
Use this appliance only for its intended use as described in this manual. NEVER use this appliance as a space heater to heat or warm the room. Doing so may result in overheating the appliance. Never use the appliance for storage.
Burn Prevention
DO NOT TOUCH SURFACE UNITS OR AREAS NEAR UNITS - Surface units may be hot even though they are dark in color. Areas near surface units may become hot enough to cause burns. During and after use, do not touch, or let clothing, potholders, or other flammable materials contact surface units or areas

IMPORTANT SAFETY INSTRUCTIONS
READ AND SAVE THESE INSTRUCTIONS
near units until they have had sufficient time to cool. Among these areas are the cooktop and areas facing the cooktop.
Do not heat or warm unopened food containers. Build-up of pressure may cause the container to burst and cause injury.
Always use dry potholders. Moist or damp potholders on hot surfaces may result in burns from steam. Do not let potholder touch hot heating elements. Do not use a towel or other bulky cloth.
Always turn hood ON when cooking at high heat or when flambeing food (i.e. Crêpes Suzette, Cherries Jubilee, Peppercorn Beef Flambe).
Use high heat settings on the cooktop only when necessary. To avoid bubbling and splattering, heat oil slowly on no more than a low-medium setting. Hot oil is capable of causing extreme burns and injury.
Never move a pan of hot oil, especially a deep fat fryer. Wait until it is cool.
Secure all loose garments, etc. before beginning. Tie long hair so that it does not hang loose, and do not wear loose fitting clothing or hanging garments, such as ties, scarves, jewelry, or dangling sleeves.
WARNING
Risk of burns
If the appliance cover (VD) is fitted: do not close the appliance cover until the appliance has cooled down completely. Do not operate the appliance with the cover closed. Do not use the appliance cover for placing objects or for keeping things warm.
WARNING
Risk of burns
Metallic objects become hot very quickly on the cooktop. Never set down metallic objects, such as knives, forks, spoons and lids on the cooktop.
WARNING
Risk of burns
After each use, turn off the cooking zone using the control knob. Don't wait until the cooking zone automatically shuts off because there are no cooking vessels on it anymore.
Child Safety
When children become old enough to use the appliance, it is the legal responsibility of the parents or legal guardians to ensure that they are instructed in safe practices by qualified persons.
Do not allow anyone to climb, stand, lean, sit, or hang on any part of an appliance, especially a door, warming drawer, or storage drawer. This can damage the appliance, and the unit may tip over, potentially causing severe injury.
Do not allow children to use this appliance unless closely supervised by an adult. Children and pets should not be left alone or unattended in the area where the appliance is in use. They should never be allowed to play in its vicinity, whether or not the appliance is in use.
CAUTION
Items of interest to children should not be stored in an appliance, in cabinets above an appliance or on the backsplash. Children climbing on an appliance to reach items could be seriously injured.
Cleaning Safety
Do not clean the appliance while it is still hot. Some cleaners produce noxious fumes when applied to a hot surface. Wet clothes and sponges can cause burns from steam.
Do not use steam cleaners to clean the appliance.
Cookware Safety
Hold the handle of the pan when stirring or turning food. This helps prevent spills and movement of the pan.
Use Proper Pan Size.
The use of undersized cookware will expose a portion of the heating element or burner to direct contact and may result in ignition of clothing. Select cookware having flat bottoms large enough to cover the surface heating unit. This appliance is equipped with one or more surface units of different size. Proper relationship of cookware to heating element or burner will also improve efficiency.

IMPORTANT SAFETY INSTRUCTIONS
READ AND SAVE THESE INSTRUCTIONS
Cookware not approved for use with ceramic cooktops may break with sudden temperature changes. Use only pans that are appropriate for ceramic cooktops.
Always position handles of utensils inward so they do not extend over adjacent work areas, burners, or the edge of the cooktop. This reduces the risk of fires, spills and burns.
WARNING
RISK of injury
When cooking with a bain-marie, the cooktop and cooking vessel may crack due to overheating. The cooking vessel in the bain-marie must not come in direct contact with the bottom of the pot filled with water. Use only heat-resistant cookware.
WARNING
Danger of injury
Cookware may jump upward due to fluid trapped between the cookware bottom and cooking zone. Always keep cooking zone and cookware bottom dry.
Proper Installation and Maintenance
Have the installer show you the location of the circuit breaker or fuse. Mark it for easy reference.
This appliance must be properly installed and grounded by a qualified technician. Connect only to properly grounded outlet. Refer to Installation Instructions for details.
This appliance is intended for normal family household use only. It is not approved for outdoor use. See the Warranty. If you have any questions, contact the manufacturer.
Do not store or use corrosive chemicals, vapors, flammables or nonfood products in or near this appliance. It is specifically designed for use when heating or cooking food. The use of corrosive chemicals in heating or cleaning will damage the appliance and could result in injury.
Make sure reflector pans or drip bowls are in place - Absence of these bowls or pans during cooking may subject wiring or components underneath to damage.
WARNING
Failure to operate knobs properly may result in personal injury and damage to the appliance.
Do not operate this appliance if it is not working properly, or if it has been damaged. Contact an authorized servicer.
Do not cook on a broken cooktop. Cleaning solutions and spillovers may create a risk of electric shock.
Do not repair or replace any part of the appliance unless specifically recommended in this manual. Refer all servicing to a factory authorized service center.
To avoid electrical shock hazard, before servicing the appliance, switch power off at the service panel and lock the panel to prevent the power from being switched on accidentally.
Electromagnetic interference
WARNING
This induction cooktop generates and uses ISM frequency energy that heats cookware by using an electromagnetic field. It has been tested and complies with Part 18 of the FCC Rules for ISM equipment. This induction cooktop meets the FCC requirements to minimize interference with other devices in residential installation. Induction cooktops may cause interference with television or radio reception. If interference occurs, the user should try to correct the interference by:
- Relocating the receiving antenna of the radio or television.
- Increasing the distance between the cooktop and the receiver.
- Connecting the receiver into an outlet different than the receiver.
It is the user's responsibility to correct any interference.

IMPORTANT SAFETY INSTRUCTIONS
READ AND SAVE THESE INSTRUCTIONS
CAUTION
Persons with a pacemaker or similar medical device should exercise caution when standing near an induction cooktop while it is in use. Consult your doctor or the manufacturer of the pacemaker or similar medical device for additional information about its effects with electromagnetic fields from an induction cooktop.
Cooling fan
The cooktop is equipped with a cooling fan on its underside. Should the cooktop lie above a drawer, there must be no objects or paper in it. They may be sucked in and compromise the cooling of the appliance or damage the fan.
There must be a minimum distance of 34 " (20mm) between the content of the drawer and the fan input.
State of California Proposition 65 Warnings
WARNING
This product contains chemicals known to the State of California to cause cancer, birth defects or other reproductive harm.
Causes of damage
- Scratches on glass ceramic surface: Cookware with rough bottoms will scratch the glass ceramic surface.
Salt, sugar and sand: Salt, sugar or grains of sand will scratch the glass ceramic surface. Never use the cooktop as a working surface or for setting things down. - Overheated cookware: Avoid heating pots or pans that are empty.
- Hot cookware: Never set down hot pans and pots on the control panel or frame. This may cause damage.
- Hard and sharp objects: Hard or sharp objects falling on the cooktop may damage it.
- Boiled-over food: Sugar and products containing sugar may damage the cooktop. Immediately eliminate spills of these products with a glass scraper.
- Foils and plastics: Aluminum foil and plastic will melt on the hot cooking zones. Stove protective film isn't suitable for your cooktop.
● Unsuitable cleaning agent: Shimmering metallic discolorations on the glass ceramic surface result from the use of inappropriate cleaning agents and abrasion from cookware.
Environmental protection
Tips for saving energy
- Use pots and pans with flat bottoms. Uneven bottoms increase energy consumption.
- For small amounts, use a small pot. A large pot that isn't very full requires a lot of energy.
● Always cover pots with a lid that fits. When cooking without a lid, you need four times more energy. - Cook with little water. This saves energy. The vitamins and minerals in vegetables are preserved.
- Switch promptly back to a lower setting for cooking.
Cooking by induction
Advantages of induction cooking
Induction cooking represents a radical change from the traditional method of heating; the heat is generated directly in the pan. It therefore offers a number of advantages:
- Greater speed in cooking and frying; as the pan is heated directly.
- Energy is saved.
- Greater convenience in care and cleaning. Foods that have spilled on the cooktop surface do not burn as quickly.
- Heat and safety control; the cooktop supplies or cuts off power immediately when the controls are set. The induction cooktop stops supplying heat if the pan is removed without turning off the power first.
Proper cookware
Ferromagnetic pans
Only ferromagnetic pans are suitable for induction cooking, these can be made from:
- enamelled steel
cast iron - special stainless steel utensils for induction cooking
Check that the bases of your pans are attracted by a magnet to find out if they are suitable.
Other suitable cookware for induction
There are other types of cookware with a base not entirely ferromagnetic that are made for induction cooking use.
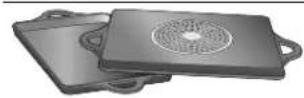
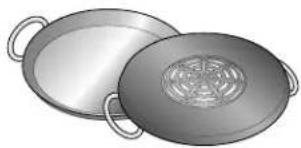
When using large cookware on a smaller ferromagnetic element, only the ferromagnetic element heats up, so heat might not be uniformly distributed.
natural_image
Illustration of two open cooking panes with handles and a decorative lid (no text or symbols)Cookware with aluminum on the base reduce the ferro-magnetic zone, so less heat may be supplied or problems with detection might occur.
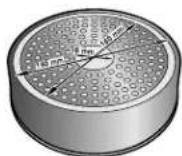
For good cooking results, the diameter of the cookware's ferromagnetic area should match the size of the element. If cookware is not detected on an element, try it on the next smaller element.
Unsuitable pans
Never use pans made of:
• thin normal steel
glass
- clay
copper
aluminum
No cooking vessel on the cooking position position or unsuitable size of cooking vessel
The cooking position indicator flashes for 90 seconds if no cooking vessel is placed on the selected cooking position, if the cooking vessel consists of an unsuitable material or does not have the right size.
The cooking position switches off automatically if a cooking vessel is not detected. The cooktop indicator continues to light up continuously and the illuminated ring behind the control knob flashes.
Empty pans or pans with a thin base
Do not heat up empty pans, or use pans with a thin base. The cooktop is equipped with an internal safety system. However, an empty pan may heat up so quickly that the "automatic switch off" function may not have time to react and the pan may reach very high temperatures. The pan base could melt and damage the cooktop glass. In this case, do not touch the pan and switch the cooktop off. If the cooktop fails to work after it has cooled down, please contact the technical service.
Pan detection
Each element has a minimum limit for detecting pans, which varies depending on the material of the pan you are using. You should therefore use the element that best matches the diameter of your pan.
Your new appliance
Here you will get to know your new appliance and obtain information about accessories.
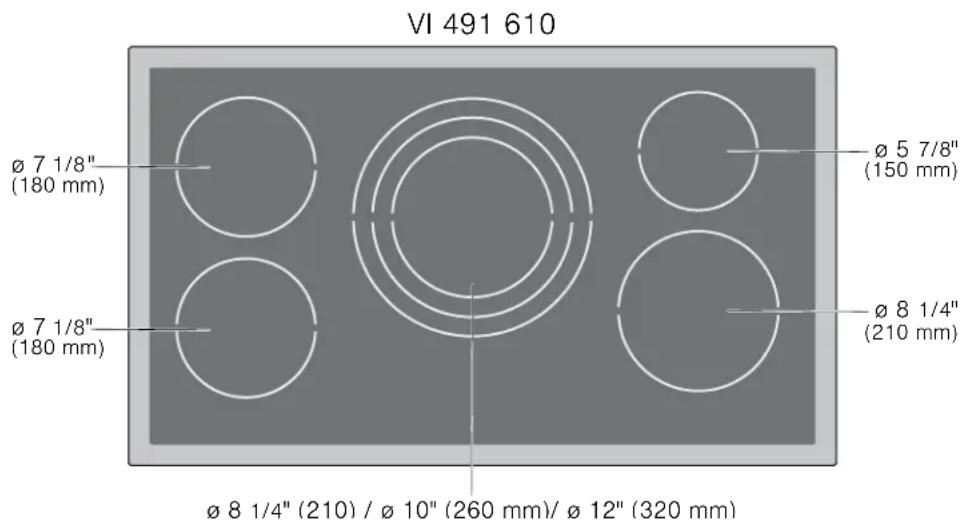
The induction cooktop
text_image
VI 491 610 Ø 7 1/8" (180 mm) Ø 5 7/8" (150 mm) Ø 7 1/8" (180 mm) Ø 8 1/4" (210 mm) Ø 8 1/4" (210) / Ø 10" (260 mm)/ Ø 12" (320 mm)The control panel
text_image
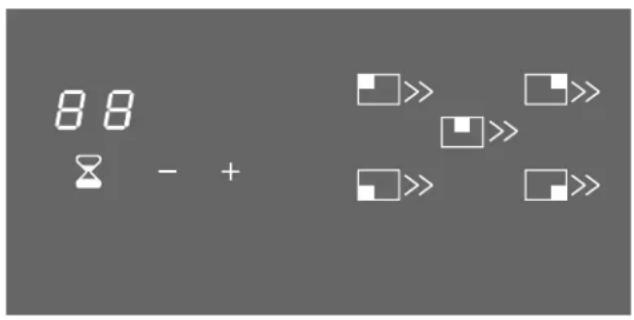
88 - + □ >> □ >> □ >> □ >>Notifications
■ Cooking zone display
Continuously lit up: Cooking zone is on and emitting heat
Blinking: No no cooking vessel detected.
Booster function
Continuously lit up: Booster function active.
Blinking: Booster function unavailable.
00 Timer and error display
Timer touch keys
Activate/confirm timer
+ Increase duration
- Decrease duration
Touch keys
When you touch a symbol, the respective function is activated.
Notes
- The settings remain unchanged if you touch several areas at the same time. This allows you to wipe up spilled food in the settings area.
- If several touch keys are used at the same time, a signal sounds. Eliminate any spilled food or objects from the control panel.
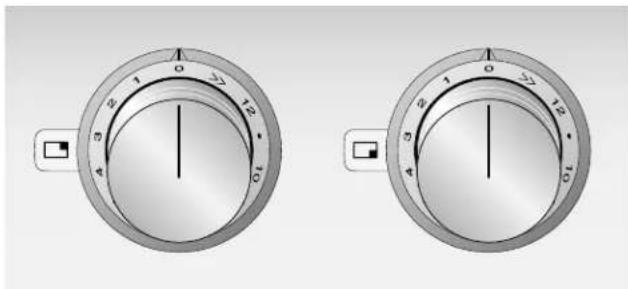
Control knobs
natural_image
Two identical circular gauges with dial indicators and a control knob, shown side by side (no text or symbols on the gauges themselves)You can choose between 12 heat levels and the booster function.
| 1 | l | o | w | e |
| 12 highest heat level | ||||
| >> Booster function | ||||
The control knobs have a light ring with various display options:
| Light ring is lit up continuously | The cooking zone is on and emitting heat. |
| Light ring blinks slowly | Residual heat display active. |
| Light ring blinks rapidly | There is a malfunction. Check the error display on the control panel. |
Residual heat display
The residual heat display indicates that a cooking zone is still hot.
Don't touch the cooking zone as long as the light ring around the control knob is still blinking, even if the cooking zone is already turned off.
Cooking zones
| ○ | simple cooking zone |
| Always use cookware of appropriate size | |
| ◎ | Three-ring cooking zone |
| The outer ring elements of the cooking zone are activated automatically when appropriately large cookware is placed on them. |
Only use cooking vessels suitable for induction cooking; see section ""Cooking with induction?
Special accessories
You can order the following accessories from your specialist retailer:
VA 420 000 Connection strip for combination with other Vario appliances in the 400 series for flush installation
VA 450 900 Appliance extension 90 cm for depth compensation for several Vario appliances
Use the accessories only as indicated. The manufacturer assumes no liability for incorrect usage of the accessories. h e a
Setting the cooktop
In this chapter you will learn how to adjust the cooking zones. In the setting chart you will find heat levels and cooking times for various dishes.
Setting heat level
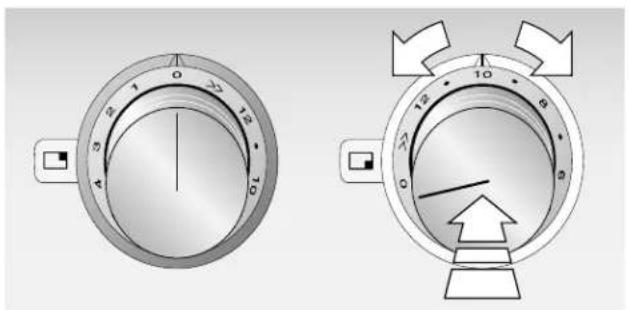
1 Push in control knob and turn to the desired heat level (1-12 and booster function). The corresponding cooktop display on the cooking zone blinks.
natural_image
Two identical circular gauges with numbered dial indicators, one showing a pointer and arrow, the other showing an upward arrow (no text or symbols)2 Place appropriate cookware on top within 90 seconds. If no pot is detected, the cooking zone is automatically turned off again. To reactivate the cooking zone, turn the control knob to 0 and reset the heat level.
3 When the cooking zone is heating up, the cooktop display and the light ring behind the control knob are lit up continuously.
Turning off appliance
To turn off the cooktop, turn all control knobs to the 0 position
The residual heat display in the control knob ring of a cooking zone that's too hot blinks slowly until the cooking zone has cooled down.
Settings table
The following table provides some examples. Cooking times may vary depending on the type of food, its weight and quality. Deviations are therefore possible.
Note: During cooking, stews or liquid meals such as soups, sauces or drinks can heat up too quickly unnoticed and overflow or spatter. For this reason we recommend that you stir continuously, gradually heating the food at a suitable power level.
| Cooking power Type of cooking Examples | ||
| 12 Pre-heating Water | ||
| Frying Meat | ||
| Heating Oils, Liquids | ||
| Boiling Soups, Sauces | ||
| 12-11 Blanching Vegetables | ||
| 10-7 Roasting Meat, Potatoes | ||
| 8-6 Roasting Fish | ||
| 8-7 Frying Dishes made from flour, Dishes made from eggs | ||
| Cooking uncovered | Liquids | |
| 7-6 Browning | Flour, Onions | |
| Toasting | Almonds, Breadcrumbs | |
| Frying Bacon | ||
| Reducing | Stock, Sauces | |
| 6-5 Slow cooking, uncovered | Potato balls, Vegetable soup, Meat soup, Poached eggs | |
| 5-4 Slow cooking, uncovered | Sausages heated in water | |
| 6-5 Steaming | Vegetables, Potatoes, Fish | |
| Light frying | Vegetables, Fruit, Fish | |
| Roasting Meat roll, Roast, Vegetables | ||
| 4-3 Roasting | Goulash | |
| 5-4 Cooking covered | Soups, Sauces | |
| 4-3 Defrosting | Deep-frozen products | |
| 4-3 Absorbing water | Rice, Dried beans | |
| Setting | Dishes made from eggs | |
| 2-1 Heating/Keeping warm | Soups, Stew, Vegetables in a sauce | |
| Melting | Butter, Chocolate | |
Booster function
This function will heat large amounts of water faster than at heat level 12. The boost function temporarily increases the maximum output of the selected cooking zone.
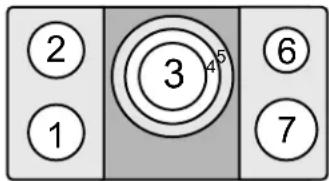
This function can be activated for all cooking zones only when the other cooking zone of the same group is activated (see figure).
text_image
2 1 3 4 6 7Turning on: Push in the control knob of the desired cooking zone and turn it to position >>. The >> symbol appears on the cooking zone display of the desired cooking zone. An acoustic signal indicates that the booster function has been activated.
Turning off: Turn control knob to any other heat level. The >> symbol goes out on the cooking zone display.
If the booster function is unavailable, it can't be selected. The >> symbol on the cooking zone display blinks for 2 seconds and then disappears.
Note: Under certain circumstances, the booster function turns off automatically to protect the cooktop's electronic components from overheating.
The booster function doesn't turn on automatically when it becomes available again. To turn it on manually, first set the control knob to any other heat level and then select the booster function again
Timer
Use the built-in timer like a kitchen timer. You can set the duration for up to 90 minutes.
Note: The timer doesn't serve to automatically turn off the cooking zone.
Setting duration
The timer is controlled using the touch keys on the cooktop. Each tap of a touch key is confirmed by an acoustic signal.
The timer is ready for use once at least one cooking zone is active.
1 To activate the ✕ touch key, turn on at least one cooking zone.
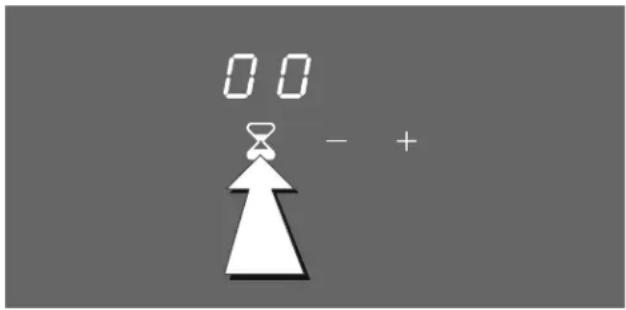
2 Tap the touch key. Notification 00 , and touch keys - and + are activated.
text_image
00 - +3 Set the desired duration by briefly touching the sensor keys - or +.
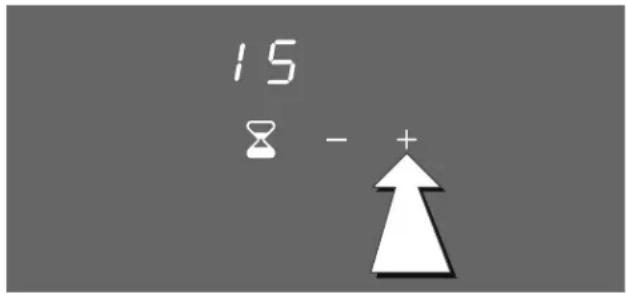
text_image
15 8 - +Tip:
Touch and hold the touch keys - or + to increase or decrease the set duration more rapidly.
Note: If after 15 seconds nothing is inputted, the timer will automatically turn off.
4 To confirm and start the timer, touch the ✕ touch key. If confirmation is not received within 15 seconds, the countdown starts automatically. A signal sounds and the duration begins to count down on the display.
The timer continues to run even after turning off the cooking zone until the set time has expired.
After countdown of set time
An acoustic signal indicates that the countdown of the set duration is complete. The display blinks slowly. Tap the touch key. The display goes out and the acoustic signal ceases.
The acoustic signal ceases automatically after three minutes. The 00 and notification continue to blink until the touch key is touched or a control knob is operated.
Correcting duration
1 Tap the ✕ touch key and re-adjust the duration.
2 Tap the X touch key again to start the countdown with the modified time.
Canceling countdown
Tap ✘ touch key, change duration to 00 and confirm.
Tip:
If you touch and hold the ⚫ touch key, the remaining time is deleted and 00 is displayed.
Safety lock
For your protection, the appliance has a safety shut-off feature. Depending on the set power level, heating is switched off after a certain time if nothing is operated during this time.
| Power level Switching off after | |
| 1 to 6 4 hours | |
| 7 3 hours | |
| 8 and 9 2 hours | |
| 10 to 12 and booster function | 1 hour |
An audible signal indicates when the duration has elapsed. The cooktop indicator continues to light up continuously. The illuminated ring behind the activated control knob flashes fast.
Turn the control knob to 0. You can then operate the appliance in the way to which you are accustomed.
Overheating protection
In the event of overheating, the appliance automatically regulates the output of the cooktop to protect the electronic components.
Slight overheating: The appliance reduces the heat level. Once the cooking zone has cooled down sufficiently, the selected heat level is automatically reactivated. A acoustic signal indicates that all heat levels are available again.
Severe overheating: The cooking zone is turned off automatically. An acoustic signal sounds. Error message Hor F4 appears on the timer display. The light ring behind the control knob is blinks rapidly.
- Remove the cookware from the cooking zone.
- If the error message goes out and a signal sounds, the cooking zone has cooled down sufficiently.
- Set control knob to 0. Then set the desired heat level as usual.
Cleaning and Maintenance
Daily Cleaning
Note: Recommended cleaners indicate a type of cleaner and do not constitute an endorsement of a specific brand.
Glass ceramic cooktop

CAUTION
Do not use any kind of cleaner on the glass while the surface is hot, use only the razor blade scraper. The resulting fumes can be hazardous to your health. Heating the cleaner can chemically attack and damage the surface.
Clean the surface when it is completely cool with the following exception: remove dry sugar, sugar syrup, tomato products and milk immediately with the razor blade scraper (see special care chart).
Wipe off spatters with a clean, damp sponge or a paper towel. Rinse and dry. Use white vinegar if smudge remains; rinse.
Apply a small amount of the glass ceramic cooktop cleaner. When dry, buff surface with a clean paper towel or cloth.
Stainless steel side trim
Use a cleaning pad for this piece. For moderate or heavy soil, use a powder cleaner such as BonAmi® or SoftScrub® (without bleach).
Wipe using a damp sponge or cloth, rinse and dry.
Control knob
Wipe with warm soapy cloth, rinse and dry.
Cleaning guidelines
When using a cleaner, use only a small amount; apply to a clean paper towel or cloth. Wipe on the surface and buff with a clean dry towel.
For best results, use cleaners such as glass ceramic cooktop cleaner, BonAmi®, Soft Scrub® (without bleach), and white vinegar.
Avoid these cleaners
- Glass cleaners which contain ammonia or chlorine bleach. These ingredients may damage or permanently stain the cooktop.
- Caustic cleaners - cleaners such as Easy Off® may stain the cooktop surface.
- Abrasive cleaners.
- Metal scouring pads and scrub sponges such as Scotch Brite® can scratch and/or leave metal marks.
- Soap-filled scouring pads such as SOS® can scratch the surface.
- Powdery cleaners containing chlorine bleach can permanently stain the cooktop.
- Flammable cleaners such as lighter fluid or WD-40.
Cleaning charts
Type of Soil Possible Solution
| Dry sugar, sugar syrup, milk or tomato spills. Melted plastic film or foil. All these items REQUIRE IMMEDIATE REMOVAL. Failure to remove these immediately can permanently damage the surface. | Remove these types of spills while the surface is hot using the razor blade scraper. Use a new, sharp razor in the scraper. Remove pan and turn off the element. Wearing an oven mitt, hold scraper at 30° angle, using care not to gouge or scratch the glass. Push soil off the heated area. After the surface has cooled, remove the residue and apply the glass ceramic cooktop cleaner. |

WARNING
Risk of injury
The blade is extremely sharp. Risk of cuts. Protect the blade when not in use. Replace the blade immediately when any imperfections are found. Follow manufacturer's instructions.
| Burned-on food soil, dark streaks, and specks | Soften by laying a damp paper towel or sponge on top of soil for 30 minutes. Use a plastic scrubber and glass ceramic cooktop cleaner or use the razor blade scraper. Rinse and dry. |
Greasy spatters Use a soapy sponge or cloth to remove grease; rinse thoroughly and dry. Apply glass ceramic cooktop cleaner.
| Type of Soil Possible Solution | |
| Metal marks: Iridescent stain | Pans with aluminum, copper or stainless steel bases may leave marks. Treat immediately after surface has cooled with glass ceramic cooktop cleaner. If this does not remove the marks, try a mild abrasive (Bon Ami®, Soft Scrub® without bleach) with a damp paper towel. Rinse and reapply glass ceramic cooktop cleaner. Failure to remove metal marks before the next heating makes removal very difficult. |
| Hard water spots:Hot cooking liquids dripped on surface | Minerals in some water can be transferred onto the surface and cause stains. Use undiluted white vinegar, rinse and dry. Recondition with glass ceramic cooktop cleaner. Remove boilovers and stains before using the cooktop again. |
| Surface scratches:Small scratches are common and do not affect cooking. They become smoother and less noticeable with daily use of the glass ceramic cooktop cleaner. | Apply glass ceramic cooktop cleaner before using to remove sand-like grains and grit such as salt and seasoning. Scratches can be reduced by using pans with bases that are smooth, clean, and dry before use. Use recommended glass ceramic cooktop cleaner daily.NOTICE: Avoid contact with surface by jewelry, wrist watches and metallic utensitis. These can scratch the surface. Do not stack kitchen utensils or dishware on the appliance. |
Maintenance
This appliance requires no maintenance other than daily cleaning. For best results, apply cooktop cleaning cream daily.
Troubleshooting
When a malfunction occurs, it is often caused by something small. Please take into account the following notes and tips before calling customer service.
In some cases an error message appears on the display of the timer. Also specify the error code, if applicable, in the customer service case. The following table lists possible causes and potential solutions.
Repairs
CAUTION
Repairs should only be done by a trained servicer. Improper repair of your appliance may result in risk of severe physical injury or death.
Malfunction Solution
| The cooktop is not working. Check the circuit breaker or fuse for the circuit the appliance is connected to. Check if the lights are working in any of the rooms to check for a power outage. | |
| The appliance is connected incorrectly. Make sure that the connecting cable is correctly fitted to the control console. | |
| The cooking zone display blinks and turns off. | The pan detection detects no cookware. Check whether the cookware is magnetic (use magnet).Check whether the cookware has a sufficiently large diameter. |
| The cooking zone has turned off.Light ring around the control knob is blinking rapidly. | The cooking zone control knob hasn't been moved for a long time. The safety lock has been activated. Turn control knob to 0. Turn cooking zone back on as usual.The appliance is too hot. Read error message on the control panel. |
| The cooking zone has turned off. | After a power failure, the appliance remains off for over 25 seconds for safety reasons. Turn control knob to 0. Turn cooking zone back on as usual. |
| The ring behind the control knob is blinking. | The appliance is too hot and a cooking zone has turned off.Remove the pot from the cooking zone. Turn the control knob to 0 and let the appliance cool down. If the ring is still blinking after turning it on again, turn off cooking zone and allow it to continue to cool. |
| Er and numbers/d and numbers/2 and numbers | The electronic system is malfunctioning.Disconnect power by turning off the circuit breaker or disconnecting the fuse for the circuit the appliance is connected to. Wait a few seconds and then turn the appliance back on. If the notification appears again, disconnect appliance from power by turning off the circuit breaker or disconnecting the fuse for the circuit the appliance is connected to. Call customer service. |
| FO/F9 The device has an internal malfunction.Disconnect appliance from power via house fuse or the circuit breaker in the fuse box. Wait a few seconds and then turn the appliance back on. If the notification appears again, disconnect appliance from power via house fuse. Call customer service. | |
| FY The control panel is too hot and the cooking zone has turned off.Remove the pot from the cooking zone. Turn all control knobs to 0.F4 goes out once the appliance has cooled down sufficiently. Then set a new heat level if desired. If the malfunction persists, call customer service. | |
| U1 The supply voltage is wrong. Contact your power company. | |
| U2/U3 | The cooktop is too hot and the cooking zone has turned off.Remove the pot from the cooking zone. Turn all control knobs to 0. The error message goes out once the cooktop has cooled down sufficiently. Then set a new heat level if desired. If the malfunction persists, call customer service. |
* Don't place hot cookware on the touch keys of the timer.
Normal operating noises of the cooktop
Induction technology is based on the creation of electromagnetic fields. They may generate heat directly on the bottom of the cookware. Pots and pans may cause a variety of noises or vibrations depending on the way they've been manufactured. These noises are described as follows:
Low humming (like a transformer)
This noise is produced when cooking at a high heat level. It is based on the amount of energy transferred from the cooktop to the cookware. The noise ceases or quiets down when the heat level is reduced.
Quiet whistling
This noise is produced when the cooking vessel is empty. It ceases once water or food is placed in the vessel.
Crackling
This noise occurs with cookware comprised of various materials layered one upon the other. It's caused by the vibrations of the surfaces where different materials meet. The noise occurs on the cookware and can vary depending on the amount and method of preparation of the food.
Loud whistling
This noise occurs with cookware comprised of different materials layered one upon the other, and when they are additionally used at maximum output and also on two cooking zones. The noise ceases or quiets down when the heat level is reduced.
Fan noises
For proper operation of the electronic system, it is necessary to regulate the temperature of the cooktop. For this purpose, the cooktop is equipped with a cooling fan, which is activated to reduce and regulate the temperature of the electronic system. The fan may also continue to run after the appliance is turned off if the detected temperature of the cooktop is still too hot after turning it off.
The noises described are a normal element of the described induction technology and shouldn't be regarded as defects.
Customer service
If your appliance needs repairs, our customer service is there for you. We work hard to help solve problems quickly and without unnecessary service calls, getting your appliance back up and running correctly in the least amount of time possible.
When you call, please indicate the product number (E-Nr.) and serial number (FD-Nr.) so that we can support you in a qualified manner. You will find the type plate with these numbers on the bottom of the appliance. To avoid having to search for a long time when you need it, you can enter your appliance data and the customer support telephone number here.
E-Nr. FD-Nr.
Customer Service
Please read the use and care instructions provided with your appliance. Failure to do so may result in an error in using the appliance. This could result in a service call that instead of fixing a mechanical issue is only needed for customer education. Such calls are not covered by the appliance warranty.
Please find the contact data of all countries in the enclosed customer service list.
To book an engineer visit and product advice
USA 877 442 4436 toll-free
CANADA 800 828 9165
You can rely on the manufacturer's expertise. Rest assured that the repair will be handled by trained service technicians who have the original replacement parts for your appliance.
Table des Matières
Touches sensitives 31
natural_image
Illustration of two open cooking panes with handles and a lid (no text or symbols)
natural_image
Two identical circular dial knobs with numbered ranges, shown side by side (no text or symbols visible)text_image
Diagram showing two circular gauges with numbered dial indicators and directional arrows indicating movement or change.text_image
Diagram showing two rotary dial gauges with numbered segments and directional arrows indicating rotation or movement.natural_image
Illustration of two open cooking panes with handles and a perforated lid (no text or symbols)
natural_image
Two identical circular dial knobs with numbered ranges and pointer positions, shown side by side (no text or symbols)text_image
Diagram showing two circular gauges with numbered dial indicators and directional arrows indicating rotation or movement.text_image
Diagram showing two rotary dial gauges with numbered segments and directional arrows indicating rotation or movement.1901 Main Street, Suite 600
Irvine, CA 92614
+1 877 4GAGGENAU
USA
www.gaggenau-usa.com