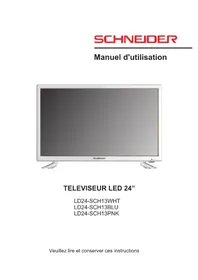
LD24SCH13BLU - TV SCHNEIDER - Free user manual and instructions
Find the device manual for free LD24SCH13BLU SCHNEIDER in PDF.


| Product type | LED TV |
| Brand | Schneider |
| Model | LD24SCH13BLU |
| Screen diagonal | 60 cm (24 inches) |
| Screen resolution | 1366 x 768 pixels |
| Energy class | A |
| Power consumption (on) | 25 W |
| Power consumption (standby) | < 0.5 W |
| Net weight | 2.30 kg |
| Power supply | 230 V ~ 50 Hz |
| TV reception | Digital and analog terrestrial |
| Connectors | HDMI, VGA, SCART, YPbPr, USB, CI, antenna input, coaxial audio output, headphone jack |
| USB playback formats | MP3, JPEG, BMP, TXT, MPEG1/2/4, AVI, MKV, MP4, VOB, TS |
| Special features | USB recording, Timeshift, Teletext, Parental control, Hotel mode |
| Audio power | 2 x 3 W (built-in speakers) |
| Operating temperature | 0 °C to 40 °C |
| Wall mount | VESA 100 x 100 mm (M4x8 mm screws, not included) |
| Included accessories | Remote control, user manual, stand |
| Warranty | 2 years (parts and labor) |
| Repairability | Spare parts available via customer service (ADMEA/LOGISAV) |
| Cleaning | Soft dry cloth; do not use abrasive products |
| Safety | Do not expose to moisture; turn off during storms; do not block ventilation |
Frequently Asked Questions - LD24SCH13BLU SCHNEIDER
User questions about LD24SCH13BLU SCHNEIDER
0 question about this device. Answer the ones you know or ask your own.
Ask a new question about this device
Download the instructions for your TV in PDF format for free! Find your manual LD24SCH13BLU - SCHNEIDER and take your electronic device back in hand. On this page are published all the documents necessary for the use of your device. LD24SCH13BLU by SCHNEIDER.
USER MANUAL LD24SCH13BLU SCHNEIDER
Important Safety Instructions. 35
Control Panel 38
Connecting Cables. 39
Remote Control. 41
Base Installation 43
Wall Mounting Instructions. 44
Operations
First Time Installation 45
Picture Menu. 47
Sound Menu. 48
Channel Menu. 49
Feature Menu. 53
Setup Menu. 62
Media Player. 63
For Reference
Troubleshooting 64
Specifications techniques :
m = 311 ;

Pour commencer, inserez un support mémoire (cle USB).
Important safety instructions

To reduce the risk of fire or electric shock, do not expose this product to water, rain or moisture. To prevent the risk of electric shock, do not remove the cover or back of this product. In case of product failure, only qualified personnel can repair. There are no user-serviceable parts inside.
CAUTION !
Dangerous tension inside the product! Do not open. Risk of electric shock! No parts can be repaired by the end-user. Only qualified personnel can repair and maintain this product.
If the electric cord is damaged, it must be replaced by the manufacturer or qualified after-sales personnel in order to avoid any danger.
The product must be installed in accordance with local laws.
Damaged batteries must be properly disposed. In order to protect the environment, please dispose the batteries properly, in accordance with local laws (information is available at your reseller). Remote control batteries (not included) shall not be exposed to excessive heat (e.g. from sun or fire).
Where to install the product
- Place the product on a straight, rigid and stable place. Do not place the product on a carpet.
- Do not place the product on top of another that may cause overheating (for example, a receiver or amplifier).
- Do not place anything underneath the product (for example, CDs or magazines).
Proper ventilation
- Place the product in a sufficiently aerated place to avoid overheating. Allow at least 10cm spacing at the back and top of the product, and 5cm spacing on both sides to prevent overheating.
- Do not place items such as newspapers, tablecloth, curtains, in front of the ventilating openings.
Do not expose the product to high temperatures, moisture, water and dust.
- The apparatus shall not be exposed to dripping or splashing. No object filled with liquids, such as vases, shall be placed on the apparatus.
- Do not place other items close to this product that may damage it (for example, objects containing water or lightened candles).
- No naked flame sources, such as lighted candles, should be placed on the apparatus.
Electric supply
- Please unplug the product in case of prolonged non-use.
- If the supply cable is damaged, it must be replaced by the manufacturer or qualified after-sales personnel to avoid any danger.
- This product must be connected to an electrical supply 230V 50Hz .
- The mains plug is used as the disconnect device, so the disconnect device shall remain readily operable.
WARNING
Never place a television set in an unstable location. A television set may fall, causing serious personal injury or death. Many injuries, particularly to children, can be avoided by taking simple precautions such as:
- Using cabinets or stands recommended by the manufacturer of the television set.
- Only using furniture that can safely support the television set.
- Ensuring the television set is not overhanging the edge of the supporting furniture.
- Not placing the television set on tall furniture (for example, cupboards or bookcases) without anchoring both the furniture and the television set to a suitable support.
- Not placing the television set on cloth or other materials that may be located between the television set and supporting furniture.
- Educating children about the dangers of climbing on furniture to reach the television set or its controls.
- In case this television set is to be relocated to a different location, please keep in mind and apply the above safety instructions.
Technical Specification:
Name: Television
Product Net Weight : 2.30Kg
Operation Temperature: 0^ 40^
TV Reception System:DVB-T
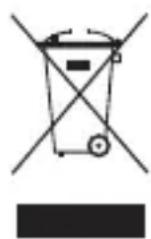
- This logo set on the product means that the recycling of this apparatus comes within the framework of the directive 2012/19/EU of July 4 2012, concerning the waste on electrical and electronic equipment (WEEE).
- The presence of dangerous substances in the electrical and electronic equipments can have potential consequences on the environment and human health in the cycle of reprocessing this product.
- Therefore, at the end of its lifetime, this product shall not be disposed with other non-recycled waste.
- As the end user, your role is of prime importance in the cycles of re-using, recycling, and other forms of valorization of this electrical and electronic equipment. Local authorities and resellers have set special procedures for the purpose of collecting and recycling this product.
- You have the obligation to use the selective waste collection systems put in place by your local authorities.
Auto Standby
In order to save energy, the electricity consumption of this product has been reduced in both operation mode and standby mode. Furthermore, if no operation is carried out for four consecutive hours, the unit will automatically enter standby mode. Simply press the Standby button on the remote control to switch the unit back to operation mode.
Product Introduction
Congratulations! Your have chosen the latest generation high definition television. Endowed with high display quality and light weight, it is power-saving and radiationless with high sensitivity television reception. The new generation television will bring you safe & comfortable brand new visual experience. Thank you for purchasing and using our products!
Accessories
User manual x1
Remote control x1
Control Panel
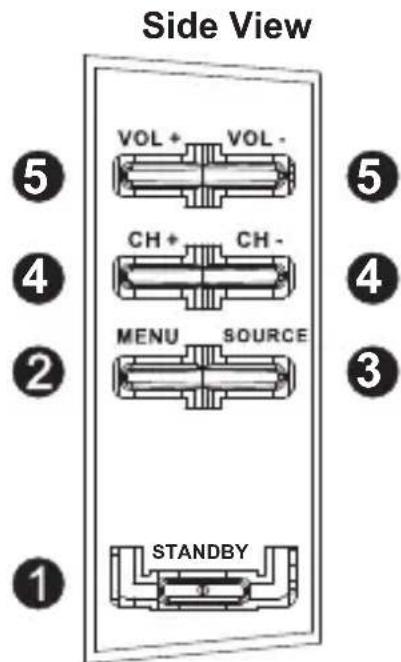
1.S tandby button : To turn the TV ON/OFF.
2.M enu button : To enter menu setting page.
3.Source button : To select the input source.
4. CH + / - button : To select next/previous channel or move up/down.
5. VOL +/- button : To increase/decrease the volume level or move left/right.
Antenna Connections
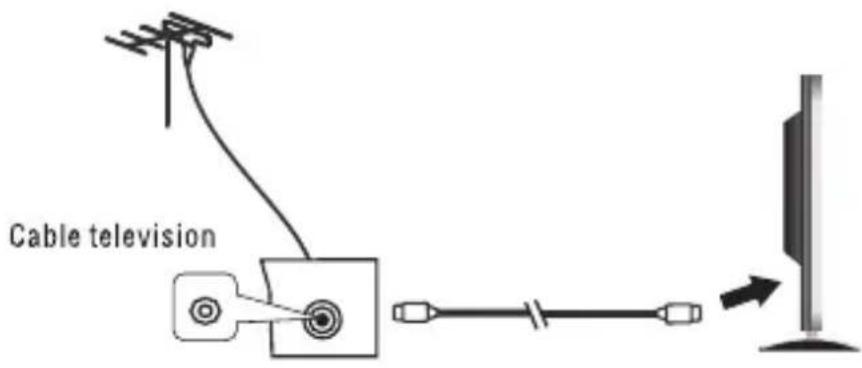
We recommend you use a 75Ω antenna cable so as to eliminate the disturbance caused by impedance mismatching. The antenna cable shall not be bundled together with the power cord.
Directly insert the 75Ω antenna cable plug into the antenna socket when applying cable television.
Note: The antenna should be checked periodically. If clear image is not available, shut down the power and then carefully check the antenna.
Power-on/Power-off
- The television is in standby state when no images arise and the red indicating lamp shines.
- Press the standby button again on the remote control for the television the indicating lamp becomes green, and then television image is available.
- Press the standby button on the remote controller or the television to enter into standby state.
Power -saving & protection mode
- In video or PC state, the television will enter into lower power sleep state (standby state) to conduct power saving and protection after several minutes with no signal inputs.
Connecting to multiple external devices
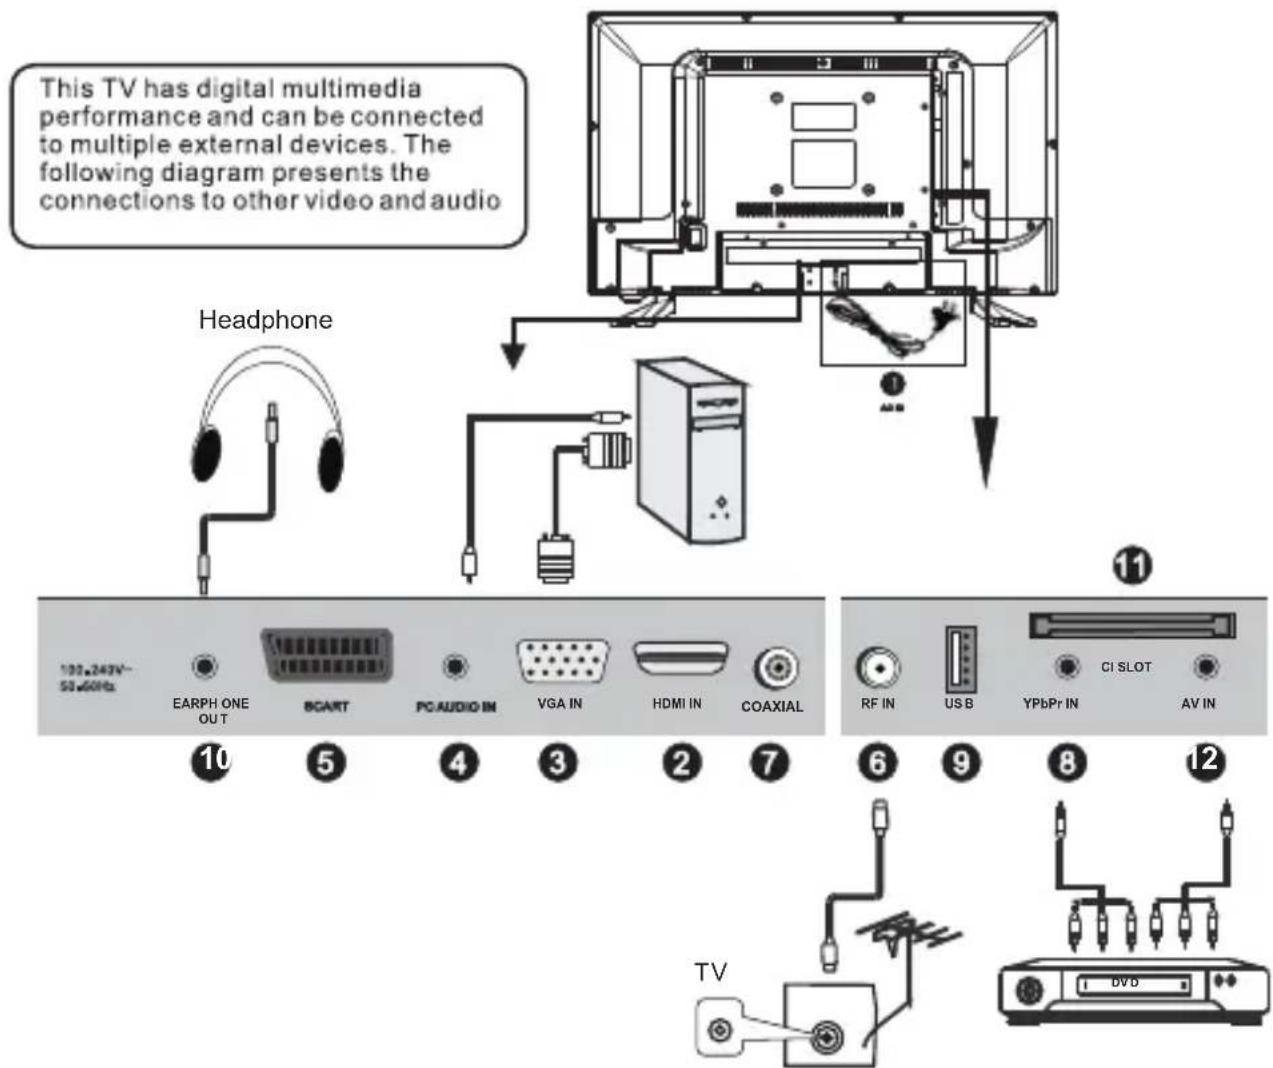
- AC IN
- HDMI IN : High-definition multimedia interface (Note: compatible video signal 480P/576P/720P/1080i/1080P)
3.VGA IN : connect with the D-sub 15 pin signal cable to your computer.
4.PCAUDIO IN:PCaudio input.
5.SCART INPUT
6.RF IN : Connect to external aerial.
7.COAXIAL output : Digital TV sound output.
8.YPbPr IN : Component input terminal.
9.USB IN : Access multi-media files stored in the USB device. (Note: compatible format includes: .dat, .vob, .ts, .mpg, .avi, .mkv, and .mp4 for video, .jpg and .bmp for photo, .mp3 for music.)
Note : USB port cannot be used to charge external devices.
10.EARPHONE OUTPUT
11.CI SLOT : Insert a CI (common interface) card.
12.AV INPUT: Connect to the left/right RCA video out connection of any vide resource.
Remote control
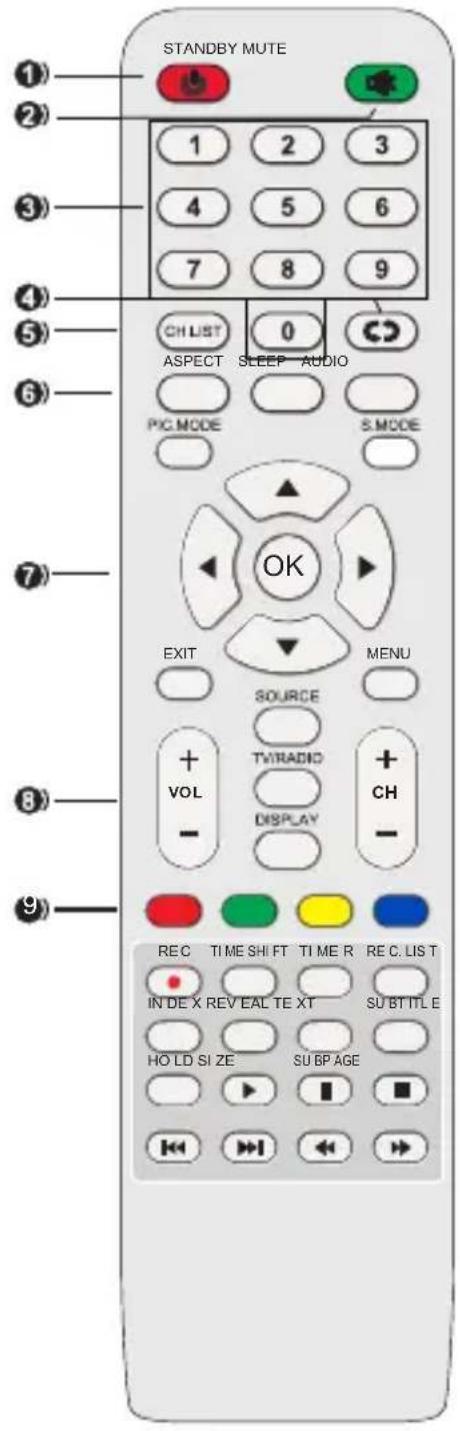
- STANDBY: To turn the TV ON/OFF
2.MUTE: Mute the sound.
-
0~9: Input the number information, such as channel number and so on.
-
RECALL: Recall the last program you watched.
-
CH.LIST : Display a list for available channels.
-
ASPECT: Select available screen mode.
SLEEP: Set desired sleep time.
AUDIO: Select available sound-track.
PIC.Mode:Switch the picture mode.
S.MODE:Switch the sound mode.
7.▲/▼/▲/▶: Navigation buttons
OK: Confirmselection.
EXIT:Exit the menu page.
MENU:Call out the main menu or return to previous menu.
- VOL + / - : Increase/decrease the volume level.
CH + / - : Play the next/previous program.
SOURCE:Select desired input source.
TV/RADIO: Switch the unit between TV and Radio.(Digital radio is not available in countries such as France.)
DISPLAY :Display the available program information.
- RED \GREEN \YELLOW \BLUE :available in teletext, DVB-T and TV
Notes:
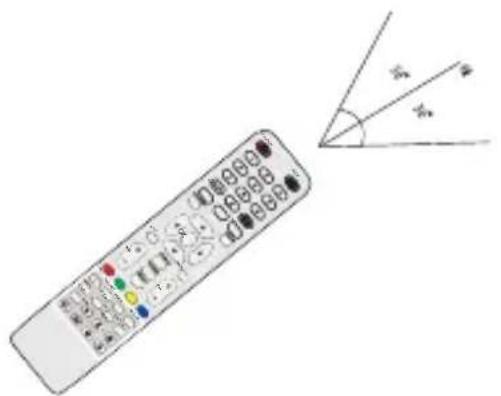
The remote control shall be applied in effective reception scope of the television. Make the remote control point towards the infrared receiver of the television and ensure that there are no obstacles. Its normal operation distance will be shortened in direct sunlight or lamplight.
Be careful to use the remote control .avoid falling off or being trampled or splashed with liquids.
Remote control
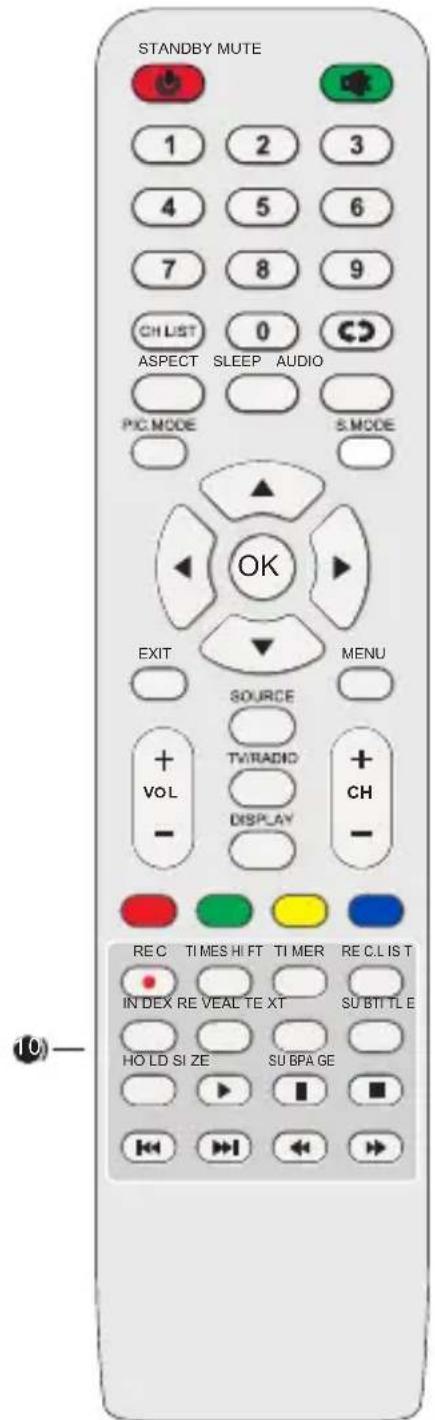
10. REC (for DTV mode only) :Start
RECORDING when watching available digital programs.
TIMESHIFT (for DTV mode only): Start Time-shift when watching available digital programs.
TIMER (for DTV mode only): Enter the menu of timer recording.
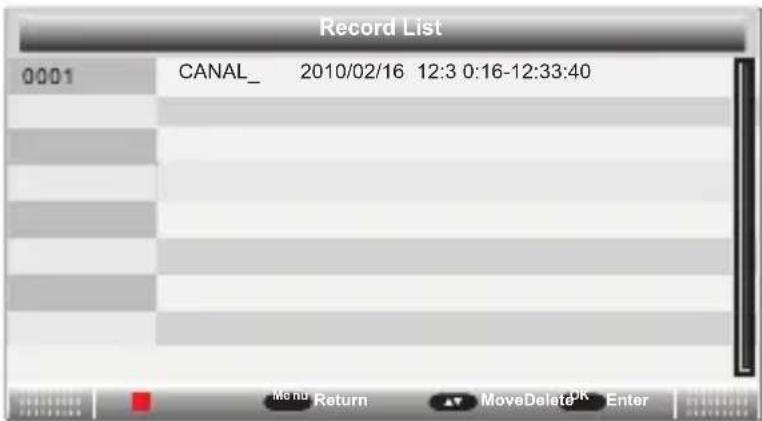
REC.LIST : display the list of recorded programs.
INDEX : Display the Teletext index.
REVEAL: Hide or display some characters in Teletext.
TEXT: Display available teletext..
SUBTITLE: Enable/disable subtitles in digital mode.
HOLD : Hold the Teletext;
SIZE:Switch Teletext size;
SUBPAGE:Enter Teletext sub-page;
: Start playback in USB\Media mode.
: Pause playback in USB\Media mode.
: Stop playing in USB\Media mode.
/ : Fast backward\forward in USB\Media mode.
: Play previous\next file in USB\Media mode.
Prepare the remote control Insert 2 AAA batteries in the remote control following the polarities signs (+ / -) as indicated. (Batteries are not provided)
Base Installation
- Mounting of the stand

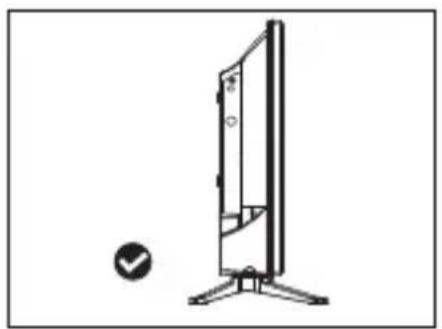


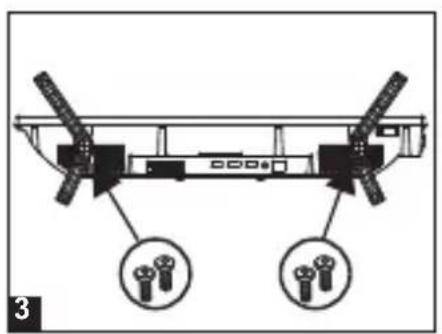
- Place the machine flat on a desktop (Caution: put a foam cushion under the machine to avoid it from scratching.)
- Align the screw holes on stand and TV bottom (Figure 2)
- Fix the stand and the screen with 4 screws (Figure 3)
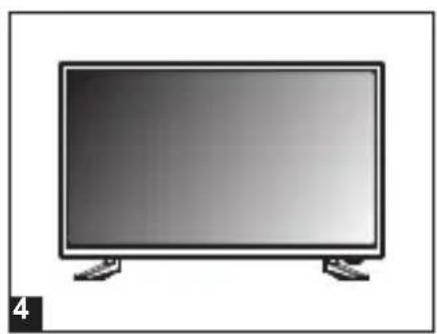
- The rendering after installed. (Figure 4)
Disassembly of the stand
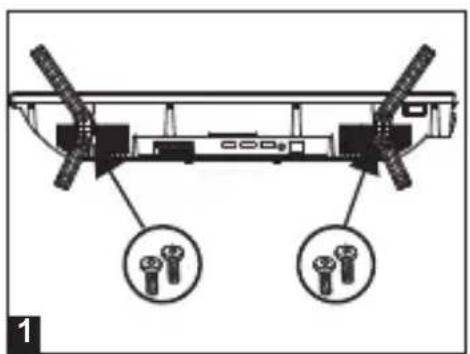

- Loose the screws between the machine and stand (Figure 1).
- Remove the 2 stands from the machine (Figure 2).
Wall Mounting Instructions
-
Use standard M4*8mm screws (4 pieces, not included) to mount this TV. Using different screws as specified will damage the wall mounting support and will be outside the scope of product guarantee.
-
Contact a professional technician for assistance when wall mounting your TV.
-
Do not wall mount the TV while TV is turned on.
Refer to the instruction of your wall mounting bracket.

First Time Installation
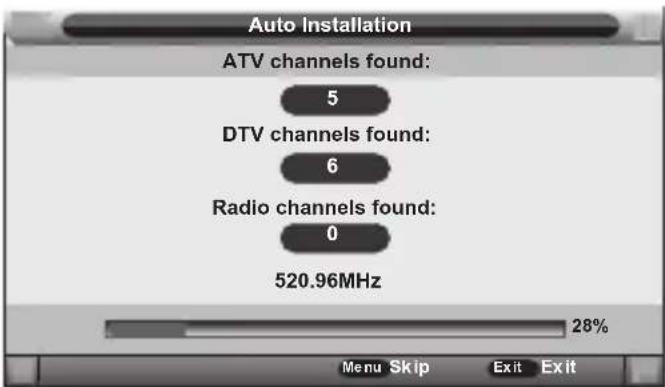
The first time you switch on the TV, you will be prompted to search channels.
Setup 1
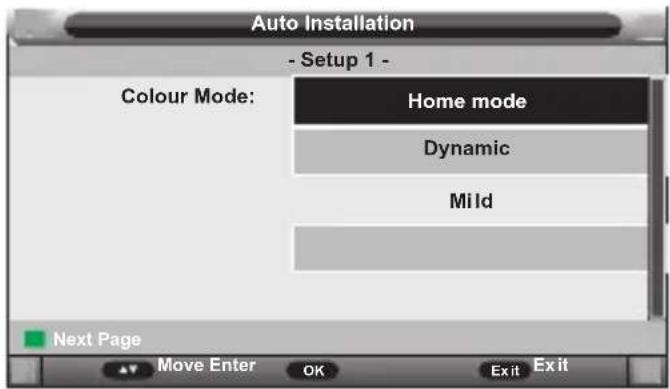
First, you will be prompted to choose the type of screen brightness. You may choose the "Home Mode" option for default setting. You may change the brightness value later on inside the settings menu.
Press OK button or Green button to enter setup 2 menu.
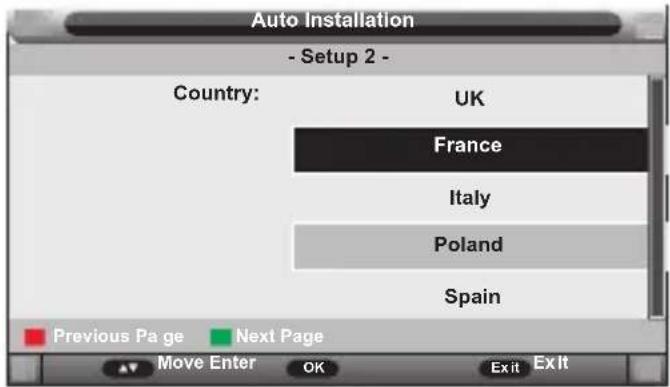
Setup 2
Press / button to select country.
Press RED button return to setup 1 menu.
Press OK button or GREEN button to enter setup 3 menu
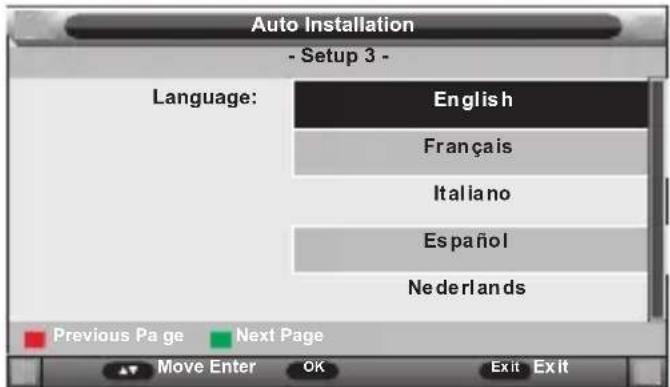
Setup 3
Press / button to select language.
Press RED button return to setup 2 menu.
Press OK button or GREEN button to enter setup 4 menu
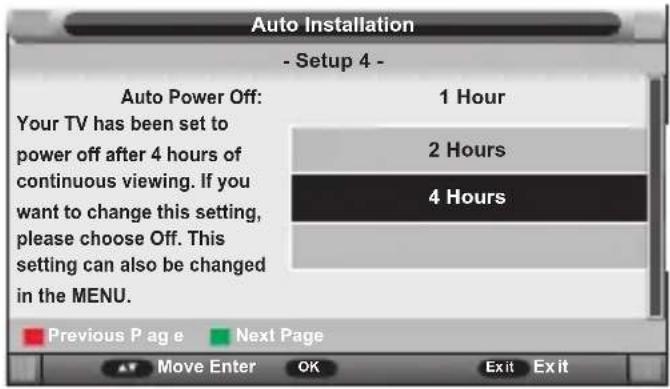
Setup 4
Press / button to select auto power off.
Press RED button return to setup 3 menu.
Press OK button or GREEN button to enter setup5 menu
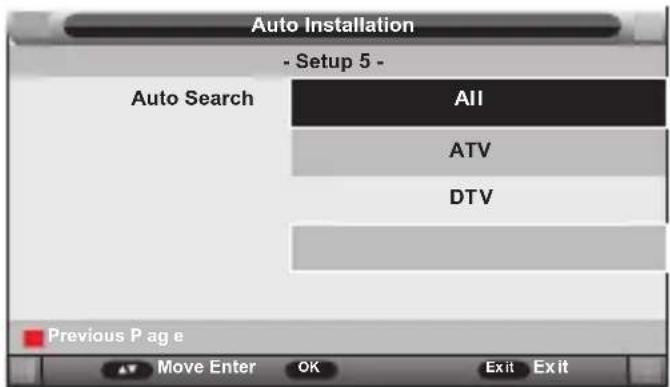
Press GREEN button to start auto search.
Input
Press STANDBY button to power on the TV, then press SOURCE button to select different input sources.
Press Source on the unit or remote control to select DVB-T input source.
Common procedure for initial settings
- Press MENU button on the remote control to display the main menu.
- Press /navigation button to select submenus.
- Press OK or navigation button to enter submenu page.
- Press Navigation button to select preferred option.
- Press navigation button to adjust the value.
- Press OK button to confirm selection.
- Press MENU button to return to previous menu page.
- Press EXIT button to exit menu page.
Picture Menu
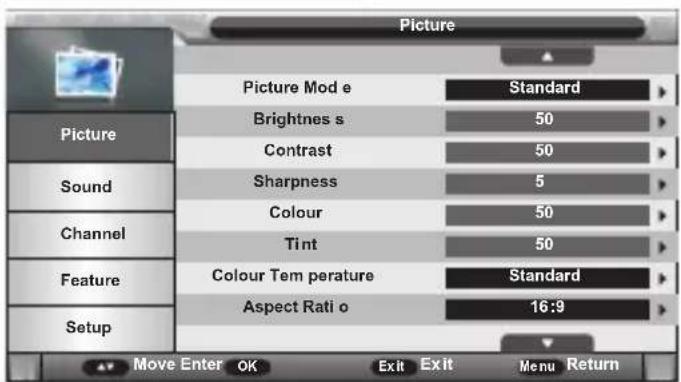
Picture Mode
Available options: User, Mild, Standard, Dynamic.
Brightness
The brightness value of picture can be adjusted from 0-100.
Contrast
The contrast value of picture can be adjusted from 0-100.
Sharpness
The sharpness value of picture can be adjusted from 0-10.
NOTE: The value of Brightness, Contrast, Color, and Sharpness is adjustable only in User picture mode.
Colour
The colour saturation value of picture can be adjusted from 0-100.
Tint
This item is used to adjust the tone of color in NTSC system from 0-100.
Colour Temperature
This item is used to adjust the optimum colour temperature for suitable viewing. Available options: Standard, Cold, Warm.
Aspect Ratio
This option allows to select the display mode among Panorama, 16:9, 4:3, Just Scan, Zoom1 and Zoom2.
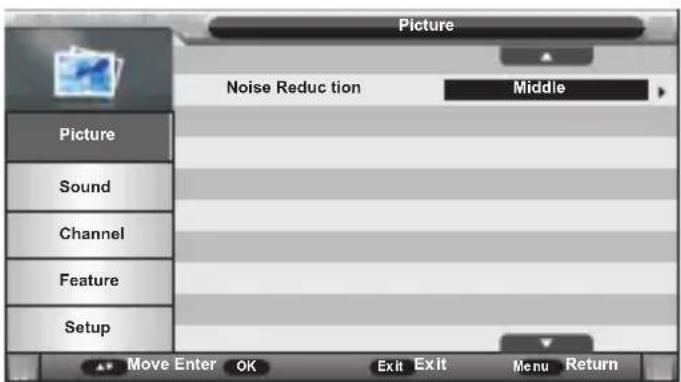
Noise Reduction
This item is used to eliminate the image noise to gain better image effect. Available options: Off, Low, Middle, High.
Sound Menu
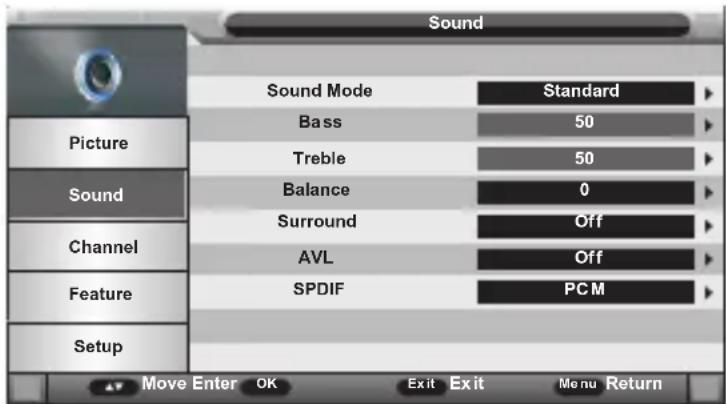
Sound Mode
Available options: Standard, Movie, Music, Speech, User.
Bass
This item is used to adjust the level of lower-pitched sounds from 0-100.
Treble
This item is used to adjust the level of higher-pitched sounds from 0-100. NOTE: The value of Bass and Treble is adjustable only in User sound mode.
Balance
This item is used to adjust the audio output between left and right speaker from -50 to 50.
Surround
Press the "▲/▼" button to select the "Surround" item, and then use "▶" button to turn the surround sound function on/off.
AVL
An automatic volume control (AVL) automatically adjusts the volume or loudness, set it "ON" for an ambient volume to make the audio signal better heard.
SPDIF
SPDIF mode allows you to adjust the coaxial audio outputs.
Channel Menu
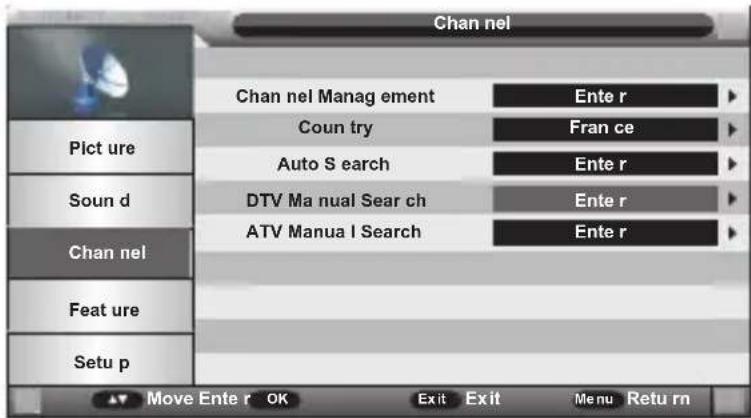
Channel Management
Press "▲/▼" button to select Channel Management, then press OK button or "▶" button to enter.
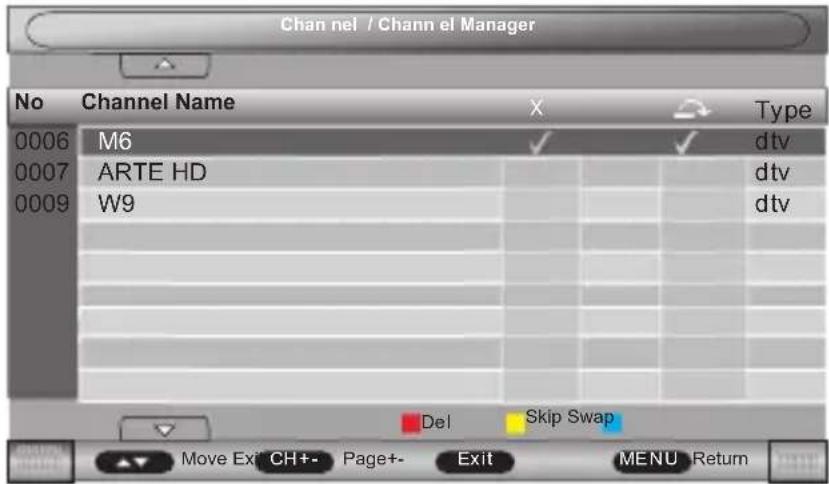
- Press "▲/▼" navigation button to select preferred program.
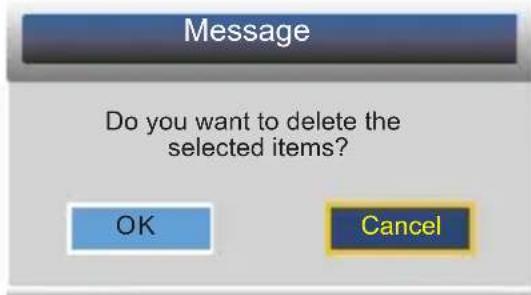
a) Press RED button on remote control and use number buttons to input the password. Then press RED button to add/remove a delete mark on highlighted program. After that, press OK button to enter a dialogue box. Select OK to delete it; select Cancel to cancel this operation.
b) Press YELLOW button on remote control to add/remove skip mark.
c) Press BLUE button on remote control to enter MOVE mode. Then use "▲/▼" navigation button to select preferred position and press OK button to move it.
Country
This item is used to choose the country.
Auto Search
Press / button to select Auto Search, then press OK button or button to enter.
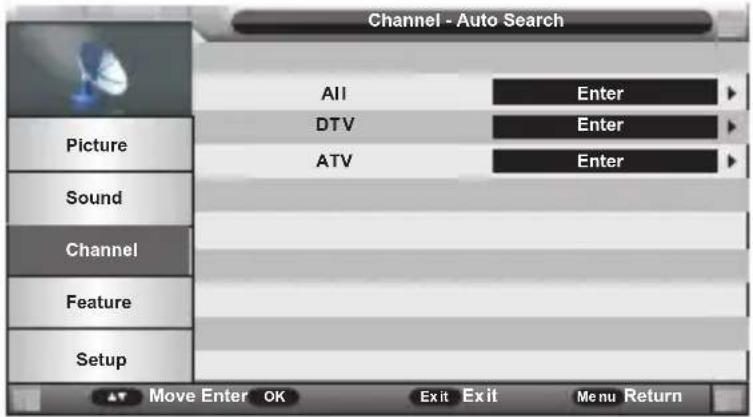
All Mode: Select "All" item to scan all digital channels carried by current signal mode firstly and then switch to scan all analog channels in selected country automatically. User can skip digital search to analog search directly by pressing "EXIT" key and can also stop auto-scanning directly by pressing "EXIT" during analog scanning.
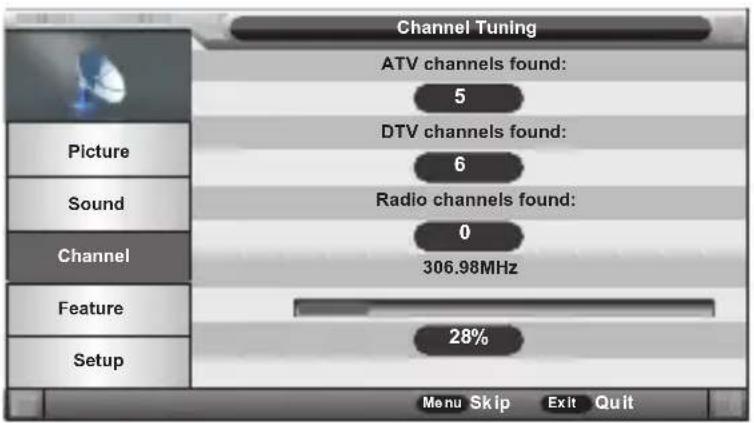
Digital Mode: Select "DTV" item to search all digital channels in selected country carried by current signal mode. User can stop searching directly by pressing "EXIT" key.
Analog Mode: Select "ATV" item to search all Analog channels in selected country carried by current signal mode. User can stop searching directly by pressing "EXIT" key.
DTV Manual Search
Press / button to select DTV Manual Search, then press OK button or button to enter.
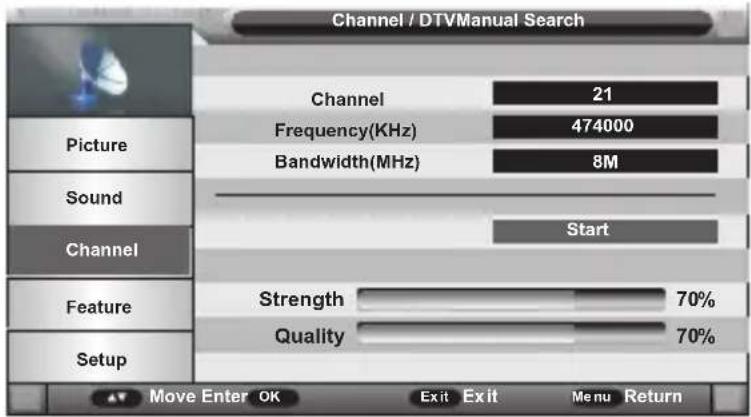
Channel
Press / button to select Channel.
Move the cursor to the start, Press OK button or button, the channel tuning menu will appear a few second.
ATV Manual Search
Press / button to select ATV Manual Search, then press OK button or button to enter.
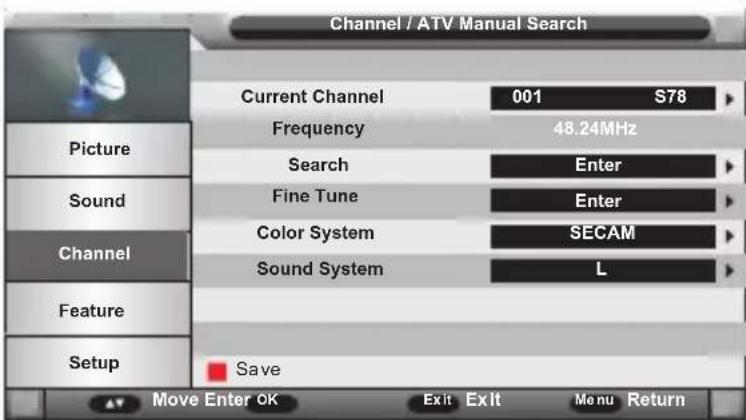
Current Channel
Press / button to select Current Channel then press button to select.
Search
Press / button to select Search, then press OK button or button to enter, the menu will appear as follows:
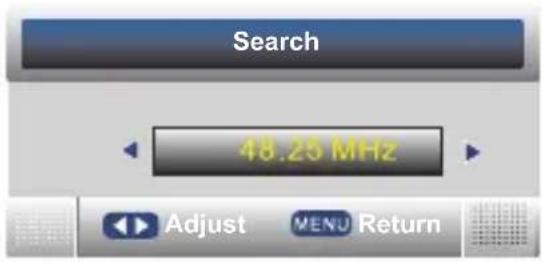
Press / button shortly to adjust program frequency, and press for a long time to begin search until the units found.
Press MENU button to return back to the previous menu.
Fine Tune
Press to fine tuning when the signal of the current channel is weak.
Colour System
Press / button to select Colour System, then press button to select Auto, PAL, SECAM.
Colour System
Press / button to select Colour System, then press button to select Auto, PAL, SECAM.
Sound System
Press / button to select Sound System, then press button to select BG, DK, L,L',I.
Feature Menu
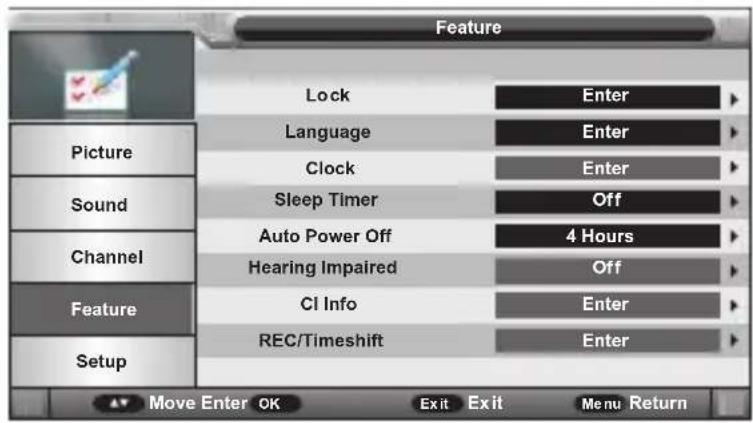
Lock
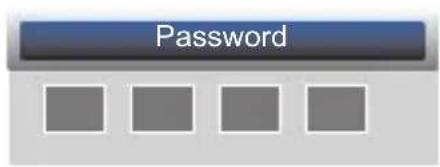
Press the / button to select the Lock item, and then use OK button or button to enter. Default password is 0000.
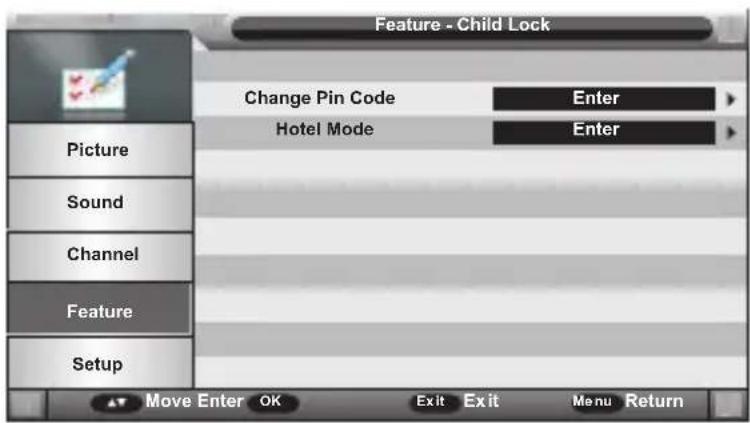
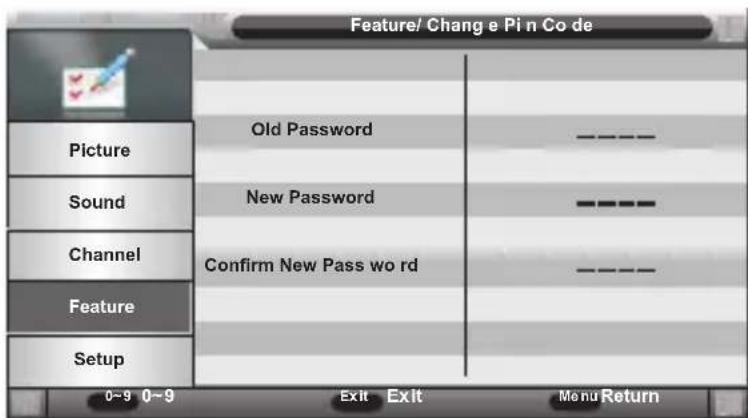
Change Pin Code
Press the / button to select the Change Pin Code item, and then use OK button or button to enter Change Password.
Hotel Mode
Hotel setting allows you to restrict access to some functions by means of password, so that end user cannot change the TV settings. In this menu you will be able to restrict access to such functions such as channel settings and volume control.
Language
Available options are: OSD Language, Preferred Subtitle, Preferred Audio, DTV Teletext Language, ATV Teletext Language. You can choose your preferred menu language, subtitle, audio and teletext language.
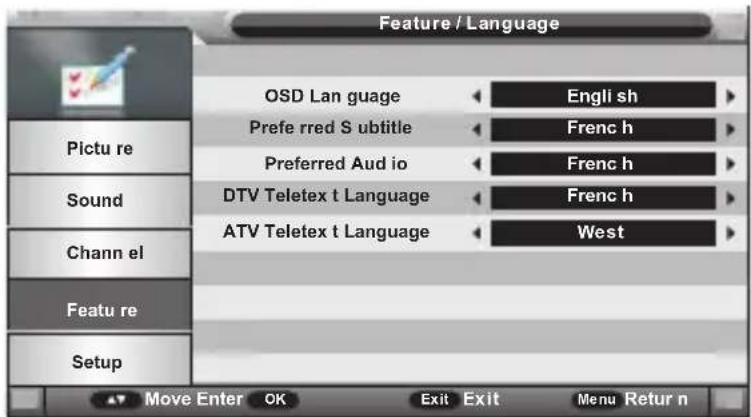
Clock
It is used to check out the current system time and set time zone/DST.
Sleep Timer
Press the / button to select the "Sleep Timer" item, and then use button to select sleep Time 10min, 20min, 30min, 60min, 90min, 120min, 180min, 240min or off.
Auto Power Off
In order to save energy, the electricity consumption of this product has been reduced in both operation mode and standby mode. Furthermore, if no operation is carried out for four consecutive hours, the unit will automatically enter standby mode. Simply press the Standby button on the remote control to switch the unit back to operation mode.
Hearing Impaired
This function helps the hearing impaired users enjoy the programs with the gestures and symbols on the screen while the signal is available.
CI Info
Ensure a CI card is inserted in the slot provided.
Press / button to select CI Info, then press OK button or button to enter.
Press OK button or button to enter.
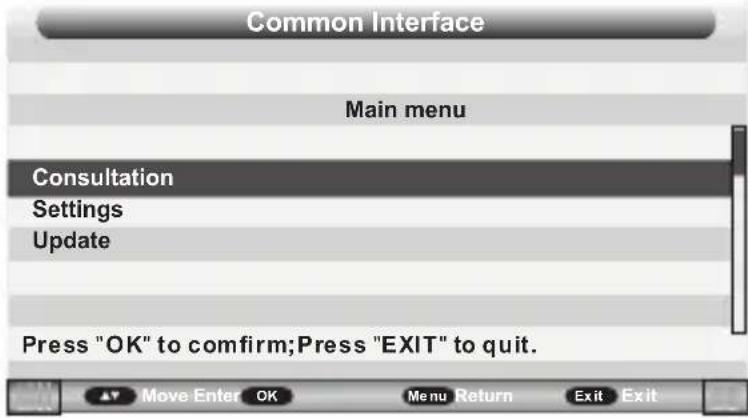
Notes:
- This is just an example for reference, different CI module will have different CI menu.
- Other menu and description are the same as that for TV source.
Recording Function
With this product you can easily record your favorite programs on your USB stick. This unit has two recording modes: immediate recording and scheduled recording (for use in case of absence).
Preparation for the first recording
When using a USB stick with this unit for the first time, you should first format it using this unit. Formatting your USB stick directly on the receiver improves compatibility of the device with the unit. More particularly, FAT file system will be converted into FAT 32. This helps improve recording quality and fluidity. Caution: formatting will deletes all the files on the USB device! You should create a backup of all the files you want to keep beforehand.
How to access "Format Disk"?
- Press the "MENU" button on the remote control to enter the OSD menu, then press /▼ button to select the "Feature" menu.
- Press the button to enter the "feature" menu setting, use / to choose "REC/Timeshift" setting as below:
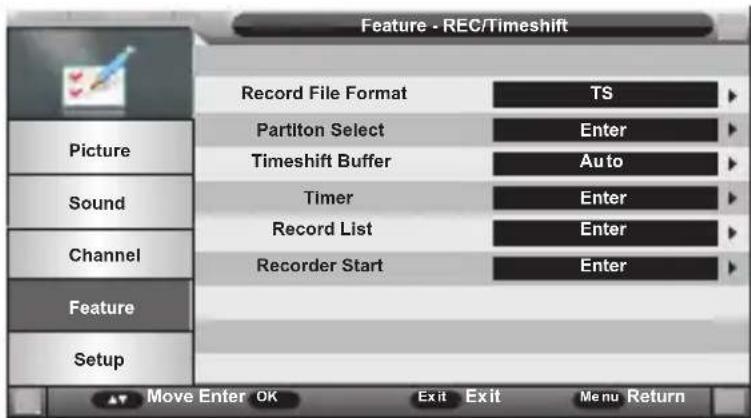
3. Choose "Partition Select"
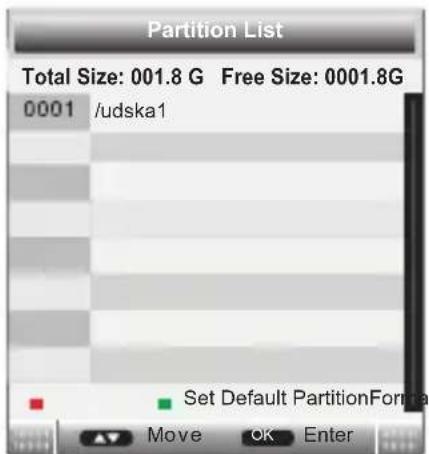
a) Format partition: Press RED button to format the focus partition. Before format, there is a prompted popup window to confirm; If format successfully there is a message "Format Success!", otherwise, there is a "Format Fail!".
b) Set default partition: Press GREEN button to set the focus partition as the default partition.
The recorders are stored in the default partition. It need to be reset if the default partition is full in recording progress.
Recording a program by using a USB
This unit allows you to record your favorite DVB-T programs in a simple and friendly way. You just need a USB key and insert it into the unit. The recording will be made on the key and you can view the recordings later from this unit or any other compatible multimedia devices.
Notes: Do not remove your USB stick while playback is in progress; otherwise the content of your USB drive could be damaged. Press the STOP button to stop playback and then remove your USB stick.
Immediate Recording
Insert a compatible USB device which has been previously formatted by the TV (please refer to previous section). Wait for about 5 seconds until the device is recognized. Simply press the REC button on the remote control in order to start immediate recording. Please note this function allows recording of DVB-T channels only, other sources such as analog TV will not be recorded.
If your device speed is not enough, there will be a dialog as follows:
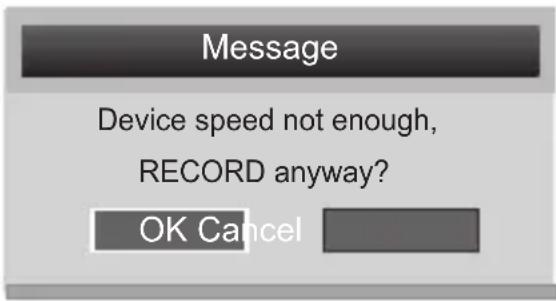
You'd better change a high speed device or select "OK" to continue. Select "OK" to start recording. You'll see the dialog:
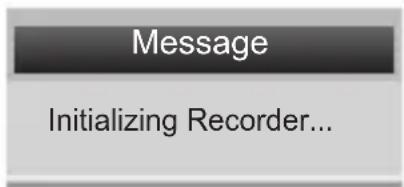
During recording, the icon REC is displayed on the left.
Press REC again to set the recording time.
Use numeric keys to enter values and direction keys to move from a field to another.
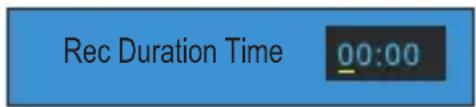
Press on the remote control to stop recording.
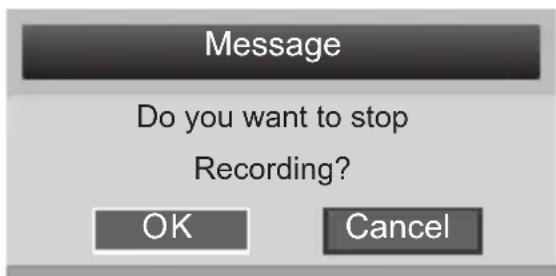
To stop recording choose "OK", to continue recording choose "Cancel".
Timer (Scheduled Recording)
The scheduled recording mode allows you to set the channel to be recorded, start time and duration.
You can also program one or more weekly recordings.
Press / button to select Timer, then press OK button or button to enter.
(Tips: You can press "TIMER" button on the remote control to enter.)
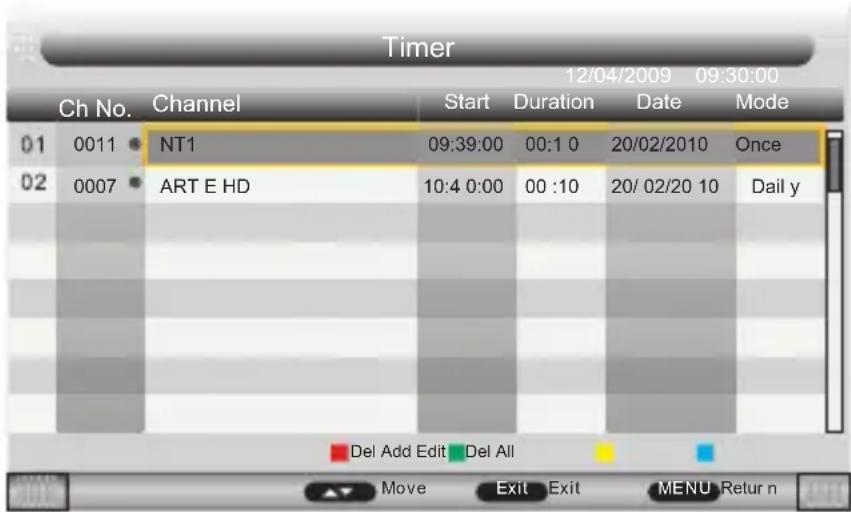
Press / button to select CH No, then press Red button to delete selected channel, the menu will appear as follows:
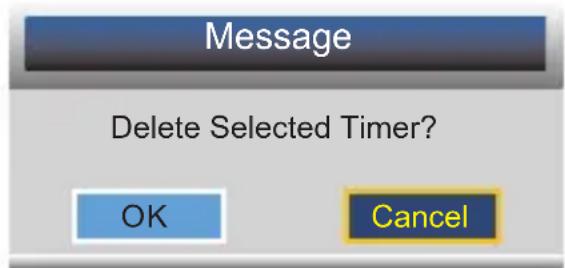
Return back to the previous menu if you select "Cancel" and press OK button. Select "OK" and press OK button to delete the selected program from the timer list.
Press Green button to delete all timers, the menu will appear as follows:
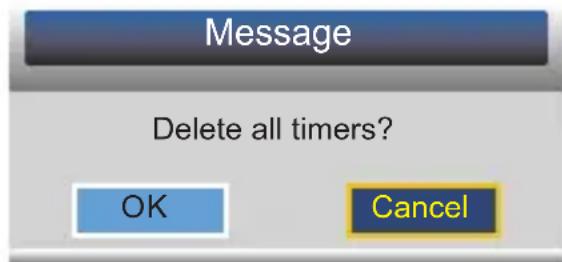
Return back to the previous menu if you select "Cancel" and press OK button. Select "OK" and press OK button to delete all timers.
Press / button to select channel that you want to edit,
Press Blue button to edit selected channel, the timer edit menu will appear.
Press Yellow button to add channel to the timer list, the menu will appear as follows:
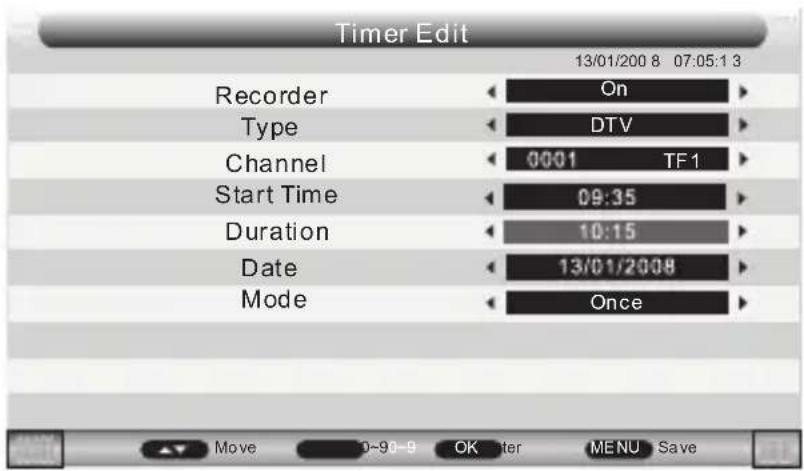
View recorded programs
- Press the MENU button on the remote control to enter the OSD menu, then press / button to select the Feature menu.
- Pess the▶ button to enter the Feature menu setting, use ▲/▼ to choose REC/Timeshift setting as below:
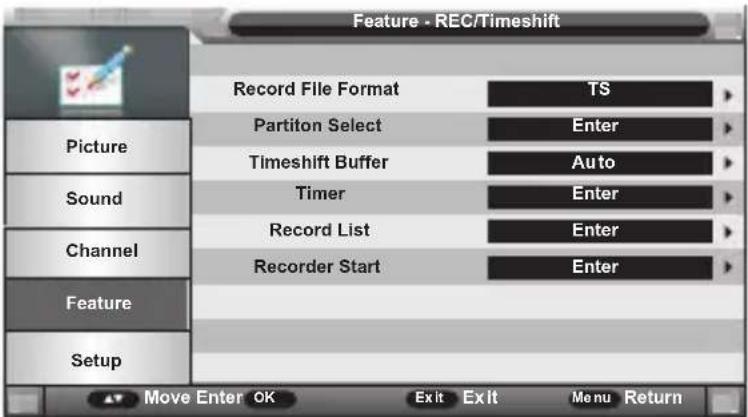
3. Choose "Recorded List"
Record List menu manages the Recorded programs, User can playback recorders in this menu.(Tips: You can press "REC.LIST" button on the remote control to enter.)
Notes on recording and USB functions
-
Information on the recording format: Recording is done in MPEG-TS format which allows recording in HD quality identical to the signal received. To play your recordings on another multimedia device, it may be necessary to install a compatible video codec.
-
If you want to record a film or a long program, use a memory stick of larger capacity (eg. 4GB). If you want to save several films, opt for external hard drives of large capacity.
-
The loading time of the USB device is too long: When you insert a USB support, the loading time can sometimes be a minute or more. This depends on the size of your support, the number of files on it and above all, the complexity of its directories. You can reduce loading time by avoiding the use of multiple subdirectories in your USB disk. Avoid such multiple-subdirectories like "Directory/Subdirectory/Sub-subdirectory/..." and store files in a single simple directory.
USB Device Recognition Problems
- After connecting your USB device to the unit, you may need to turn the device on before it can be detected.
- This unit does not support direct USB connection with computer. It is necessary for you to transfer your data/files on a USB stick or MP3 player.
- If you are using an external hard drive to be connected via USB, you must connect the hard drive simultaneously with a power source and with the unit. If you are using a portable video player with hard drive, you must make sure that the internal battery is fully charged.
- Verify that the file system of your USB device is properly formatted in FAT 32. USB media formatted in NTFS is not compatible with this unit. Please refer to the manual of your USB device to ensure that formatting is possible without altering its functionality.
- The USB device used may not be fully compatible with USB 2.0. In this case, try a different USB stick in order to identify the problem.
Recording Quality
- If your recording is shaky or choppy The data stream to be recorded is very important. Certain USB sticks, even some new USB 2.0 ones, do not allow sufficient data transfer rate. If this happens, try with a newer USB device or with an external hard drive. With external hard drives, data transfer rate is sufficiently high and this problem should be solved.
Time Shift Function
This TV presents a function called "Time Shift" which allows recording of TV program onto a digital storage medium (e.g. USB stick or external hard disc, not supplied). You may then watch the program at a later time that is more convenient to you. Want to put the television on pause? It is now possible with the "Time Shift" function, which records the TV program during your phone call or your coffee break. With "Time Shift", you will not miss anything anymore!
Note: This Function only works in DVB-T mode.
HOW TO USE THE SERVICE TIMESHIFT
1)Please insert a USB key into USB port before you activate TIMESHIFT function.
2) Press the button TIMESHIFT once, it will pop up below menu, choose "OK" to confirm Time Shift.

The broadcasting TV program is stopped and the image is frozen on screen. During this time, the TV program is being recorded and you can take a break.
3) Press button to resume the TV program from the point is was paused, and the recording will continue. During playback, you can:
- Press PAUSE button to pause the playback, press PLAY button to resume playback.
- Press or to scan backward or forward.
- If you want to stop the recording and playback, please press STOP button.
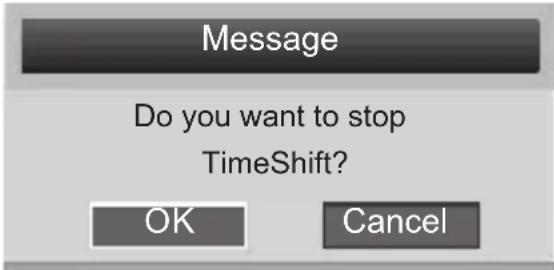
Note on Use of the Time Shift Function
The Time Shift function requires a high data transfer rate between the USB device and the unit. Indeed, a recording and a (deferred) playback simultaneously take place on the USB device. Certain USB sticks, even some new USB 2.0 devices, may lead to shaky image or choppy sound. If you encounter this problem, it is necessary to change the USB device. External hard drives, self-powered by mains, provide the highest transfer rates and allow you to use the Time Shift function optimally. In case of recording quality problems or playback problems such as choppy or blocked image, you may also try to format your USB device.
Setup Menu
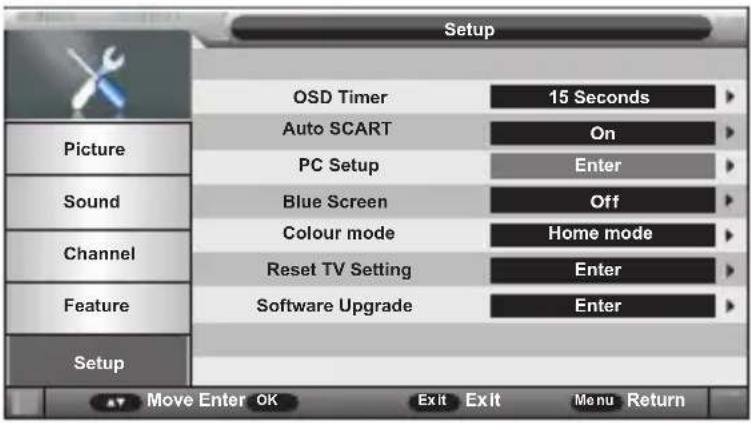
Menu Timer
Available Timer: 5 Seconds, 10 Seconds, 15 Seconds, 20 Seconds, 25 Seconds, 30 Seconds.
Auto Scart
This items allows you to view the programs by Scart automatically while Scart cable is connected.
Blue Screen
This item is used to set the blue background ON or OFF. The screen background will turn blue at very weak or no signal condition, if Blue is ON.
Colour Mode
This item allows you to change the screen brightness effect.
Reset TV Setting
This item is used to reset the unit to factory default settings.
The menu will appear as follows:
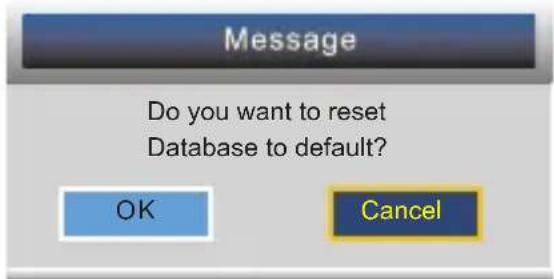
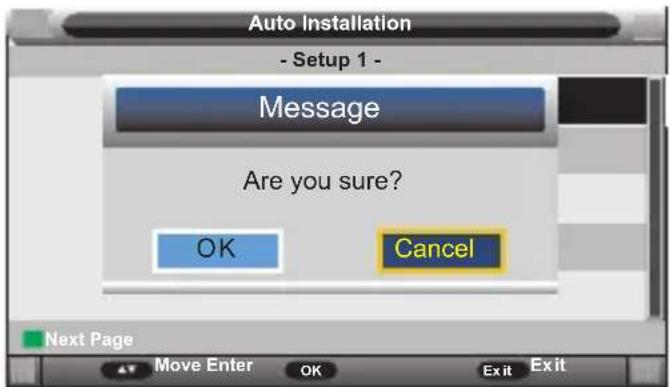
Return back to the previous menu if select "Canel" and press OK button. If select"OK" and press OK button, the resetting menu will appear a few second. Then the first time installation menu will appear.
Software Upgrade:
Update the software via the USB port. Making an update always involves some risks. Use only the update software provided by the manufacturer and adapted to this unit. The use of any other updates software not only makes the unit inoperable and irreparable but also voids the warranty.
Media Player
Before operating MEDIA menu, plug in USB device, then press SOURCE button to set the input source to Media.
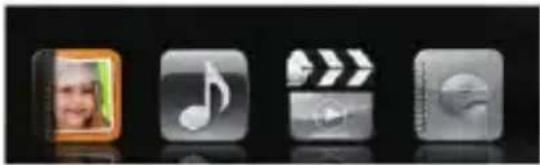
Press button to highlight your preferred submenu: Photo, Music, Movie and e-Book, press OK button to confirm.
Basic operation for photo, music and movie:
1) RED: Delete highlighted files.
2) GREEN: Add/remove all the files to play list
3) OK:Add/remove highlighted file from play list.
4) CH + / - Page up/down
5) Press button to start playing.
Remark: Depending on the capacity of the device, the reading can take more than 1 minute before launching the video.
The unit cannot read my USB device.
- Once you have plugged your device to the unit, you may need to switch on the USB device before it can operate.
- This unit does not support a direct USB connection with a computer. You need to use a USB device, a MP3 player or a PMP (Portable Multimedia Player with hard disk).
- If you are using a USB external hard disk: you need to connect your device simultaneously to an external power source and to the unit. If you are using a self-powered PMP, make sure that the battery is sufficiently loaded.
- Check that the files system of your USB device is formatted into the FAT 32 format. USB device formatted into NTFS are not compatible with this unit. Caution: if you attempt to modify your file system, formatting your device will erase all data.
Please refer to your USB device's instruction manual first.
- Warning: Connect your USB device directly to the USB port of the device.
Using an extension cable is not recommended and may cause interference and failure of data transfer.
The supported file format of media playing:
| VIDEO | AUDIO | PHOTO | E-book |
| *.MKV,*.MPG,*.DAT (MPEG1/MPEG2),*.TS max: 1080* 720*480*30 decoding NTSC | MP3(*.mp3) | JPEG(*.JPG) BMP | Txt(*.txt) |
| *.VOB (MPEG-2MP@ML) max: 1080* 720*480*30 decoding NTSC | |||
| *.AVI (MPEG-4),*.MP4 max: 1080* 720*480*30 decoding NTSC |
Troubleshooting
No image and voice
Possible causes:
Power cord, antenna or input devices are not connected;
The TV set is not powered on.
Solutions:
Check Power cord, antenna and input devices;
Press Power key on the remote control;
*Press Power key on the set to power it off for 5 seconds and then re-power it on.
No voice

Possible causes:
The volume is too low; Muted or cancelled;
Incorrect sound system.
Solutions:
Press Volume key to turn up the volume;
Press Mute key to cancel Mute mode.
Well connect vonation to the background sound;
*Change the sound system in the menu.
Snows and noises:
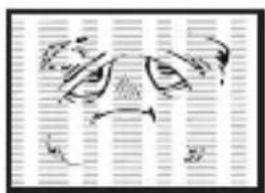

Possible causes:
The cable is damaged or gets loose;
Incorrect channel preset;
*Improper antenna positioning
Solutions:
Check whether the connection of the antenna cable, DVD and the cables is correct;
Reset channels or fine tune the channel;
*Adjust the direction of the antenna.
Achromatic colour
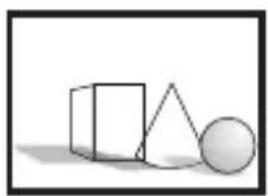
Possible causes:
*Incorrect Colour system settings;Low chroma level setting ;
*Improper antenna positioning
Solutions:
Change the colour system into the local system in the menu;
*Increase chroma level;
Adjust the direction of the antenna.
Remote control has no response:
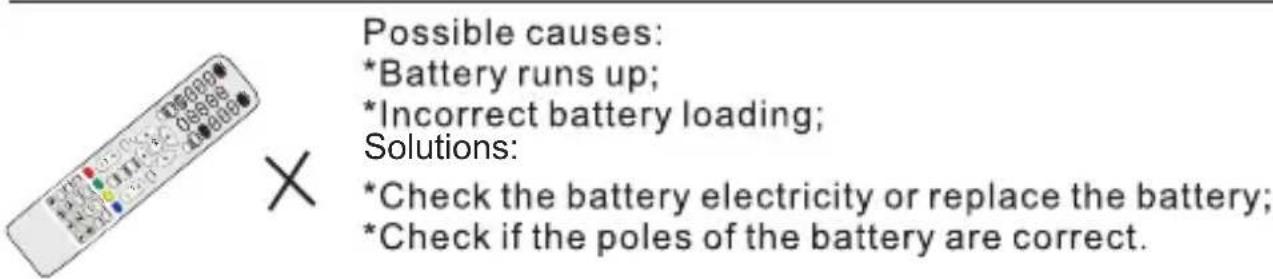
Note: To properly watch CANAL+ using this product, carry out DVB-T channel search when CANAL+ is unscrambled, from 12:30 p.m. to 1:30 p.m. and from 7:00 p.m. to 8:30 p.m.
Important Notice
The display of this television is made up of a large number of colour pixels. Although it has at least 99.999% of effective pixels, some black dots or bright spots (red, green or blue) may appear constantly on the screen. This is a characteristic of the screen (according to industrial standards), and is not a defect. Sometimes, the screen may include an unlit pixel, which will be seen as a blue, red, green or black dot. This does not affect the functioning of the product and should be considered normal.
Note on Defective Pixels
Your product has been manufactured with great care. Nevertheless, it is possible that some pixels remain constantly on or unlit. Please refer to the table below about the tolerance level for defective pixels on this product.
| Screen Size | Resolution | No. of Bright or Dark Sub-Pixels (Color Pixels) | No. of Bright or Dark Pixels (White or Black) | Continuous Line |
| 24 | 1366*768 | 5 | 2 | 0 |
Technical Data Sheet
Sheet of household television according to EU directive 1062/2010
| Trade mark | SCHNEIDER |
| Model no. | LD24-SCH13WHT/LD24-SCH13BLU LD24-SCH13PNK |
| Energy efficiency Class | A |
| Visible Screen Diagonal | 60 cm / 24inches |
| On mode Power consumption | 25W |
| Annual energy consumption | 36.5kWh per year |
| Power consumption in off mode | 0 W |
| Standby power consumption | <0.5 W |
| Screen Resolution (pixel) | 1366(H) X 768(V) |
Note:
- Energy efficiency class: A++ (most efficient) to E (least efficient)
- Annual energy consumption in kWh per year, based on the power consumption of the television operating 4 hours per day for 365 days. The actual energy consumption will depend on how the television is used.
The above value has been measured in accordance with standards under specified operating conditions. Result may vary according to operation time, contrast, brightness, operating mode....etc
SAV
ADMEA / LOGISAV
EN- We, ADMEA SA hereby declares that the LED TV of our model no. LD24-SCH13WHT, LD24SCH13BLU and LD24-SCH13PNK are in accordance with the rules of the Radio Equipment Directive (RED) (2014/53/EU). The CE logo must be affixed to the product. This product has been tested in compliance with the essential requirements of standards listed below, which are in force in the European Economic Area.
| Standards / Standards | Normes applicables / Test standards |
| Article 3.1aFR- Sécurité des personnes, sécurité électriqueEN- Personal safety, electrical safety | EN 60065:2014EN 62311:2008 |
| Articles 3.1bFR- compatibilité electromagnétique (EMC)EN- Electromagnetic Compatibility (EMC) | EN 55032:2015EN 55020:2007+A11:2011EN 55024 :2010+A1 :2015EN 61000-3-2:2014EN 61000-3-3:2013 |
| Articles 3.2FR- Efficacité du spectre audioEN- Effective use of the radio spectrum | EN 303 340 V1.1.2 |
Name:Ken WONG

- Operations
- For Reference
- Specifications techniques :
- Important safety instructions
- CAUTION !
- Where to install the product
- Proper ventilation
- Do not expose the product to high temperatures, moisture, water and dust.
- Electric supply
- WARNING
- Technical Specification:
- Auto Standby
- Product Introduction
- Accessories
- Control Panel
- Antenna Connections
- Power-on/Power-off
- Connecting to multiple external devices
- Remote control
- Notes:
- REC (for DTV mode only) :Start
- Base Installation
- - Mounting of the stand
- Disassembly of the stand
- Wall Mounting Instructions
- First Time Installation
- Setup 1
- Setup 2
- Setup 3
- Setup 4
- Input
- Common procedure for initial settings
- Picture Menu
- Picture Mode
- Brightness
- Contrast
- Sharpness
- Colour
- Tint
- Colour Temperature
- Aspect Ratio
- Noise Reduction
- Sound Menu
- Sound Mode
- Bass
- Treble
- Balance
- Surround
- AVL
- SPDIF
- Channel Menu
- Channel Management
- Country
- Auto Search
- DTV Manual Search
- Channel
- ATV Manual Search
- Current Channel
- Search
- Fine Tune
- Colour System
- Sound System
- Feature Menu
- Lock
- Change Pin Code
- Hotel Mode
- Language
- Clock
- Sleep Timer
- Auto Power Off
- Hearing Impaired
- CI Info
- Recording Function
- Preparation for the first recording
- How to access "Format Disk"?
- Choose "Partition Select"
- Recording a program by using a USB
- Immediate Recording
- Timer (Scheduled Recording)
- View recorded programs
- Choose "Recorded List"
- Notes on recording and USB functions
- USB Device Recognition Problems
- Recording Quality
- Time Shift Function
- HOW TO USE THE SERVICE TIMESHIFT
- Note on Use of the Time Shift Function
- Setup Menu
- Menu Timer
- Auto Scart
- Blue Screen
- Colour Mode
- Reset TV Setting
- Software Upgrade:
- Media Player
- Remark: Depending on the capacity of the device, the reading can take more than 1 minute before launching the video.
- The supported file format of media playing:
- Troubleshooting
- No image and voice
- Possible causes:
- No voice
- Snows and noises:
- Achromatic colour
- Important Notice
- Note on Defective Pixels
- Technical Data Sheet
- Note:
- SAV
Brand : SCHNEIDER
Model : LD24SCH13BLU
Category : TV