
Quickfix - Car seat X-Adventure - Free user manual and instructions
Find the device manual for free Quickfix X-Adventure in PDF.

| Product type | Child car seat |
| Brand | X-Adventure |
| Model | Quickfix |
| Weight groups | Group 0+ (0-13 kg), Group I (9-18 kg), Group II/III (15-36 kg) |
| Age range | From birth to approximately 12 years |
| Seat weight | Approximately 12 kg (estimated) |
| Dimensions (approx) | 60 x 45 x 60 cm (L x W x H, estimated) |
| Car attachment | ISOFIX + top tether or 3-point seat belt |
| Orientation | Rear-facing (group 0+), forward-facing (groups I, II, III) |
| Rotation | Yes, 360° rotating seat |
| Harness | Adjustable height 5-point harness |
| Headrest | Height-adjustable |
| Recline | Multiple positions, maximum recline in rear-facing |
| Safety standard | ECE R44/04, universal and semi-universal |
| Cover material | Washable fabric (follow care label) |
| Buckle cleaning | Soak in warm water with dish soap, rinse and dry |
| Maintenance | Removable and washable cover; cleanable buckle |
| Included accessories | ISOFIX connectors, insertion guides, infant cushion (0-9 kg) |
| Importer | Interchild B.V., Marisstraße 23, 3364 AZ Sliedrecht, Netherlands |
| Warranty | 2 years against manufacturing defects |
Frequently Asked Questions - Quickfix X-Adventure
User questions about Quickfix X-Adventure
0 question about this device. Answer the ones you know or ask your own.
Ask a new question about this device
Download the instructions for your Car seat in PDF format for free! Find your manual Quickfix - X-Adventure and take your electronic device back in hand. On this page are published all the documents necessary for the use of your device. Quickfix by X-Adventure.
USER MANUAL Quickfix X-Adventure
Please read this manual carefully before use
For using as Universal category (Group 0+, I, II, III)
NOTICE
This is a "Universal" child restraint. It is approved to Regulation No. 44, 04 series of amendments, for general use in vehicles and it will fit most, but not all, car seats.
A correct fit is likely if the vehicle manufacturer has declared in the vehicle handbook that the vehicle is capable of accepting a "Universal" child restraint for this age group.
This child restraint has been classified as "Universal" under more stringent conditions than those which applied to earlier designs which do not carry this notice.
If in doubt, consult either the child restraint manufacturer or the retailer.
For using as Semi-universal category (Group I, II, III) NOTICE
This Child Restraint is classified for "Semi-universal" use and is suitable for fixing into the seat positions of the following cars:
CAR
FRONT
REAR
(see car lists)
Outer Centre
No
Yes No
Seat positions in other cars may also be suitable to accept this child restraint. If indoubt, consult either the child restraint manufacturer or the retailer.
Only suitable if the approved vehicles are fitted with lap/3 point/static/with retractor safety-belts,approved to UN/ECE Regulation No.16 or other equivalent standards.
For using as Semi-universal ISOFIX child restraint system (Group 0+)
NOTICE
- This is an ISOFIX CHILD RESTRAINT SYSTEM. It is approved to Regulation No.44, 04 series of amendments for general use in vehicles fitted with ISOFIX anchorages systems.
- It will fit vehicles with positions approved as ISOFIX positions (as detailed in the vehicle handbook), depending on the category of the child seat and of the fixture.
- The mass group and the ISOFIX size class for which this device is intended is group 0+ D.
This Child Restraint is classified for "Semi-universal" use and is suitable for fixing into the seat positions of the following cars:
CAR
FRONT
REAR
Outer Centre (see car lists) No
able to accept this child restraint. If indoubt, for the retailer.
Yes No
CONTENTS
1.0ateintg/ 01-02
2. Components 03
3.Use in the vehicle 04
4.Preparatory works 05-10
4.1 Adjusting buckle
4.2 Adjusting harness
4.3 Adjusting headrest
4.4 Adjusting recline positions
4.5 Rotating seat
4.6 Adjusting ISOFIX
4.7 Adjusting Top tether
4.8 Remove and install harness
5.Installation 11-15
5.1 Group 0+ (0-13kg, born to approx.18 months) 11-12
5.2 Group I (9-18kg, approx. 9 months to 4 years) 13-14
(5.3 Group II III(15-36kg,approx. 3 years to 12 years) 14-15
6.Care and Maintenance 16
6.1 Care for the buckle
6.2 Cleaning
7. Customer service 17
Please read carefully before installing the child seat in the vehicle.
- This child safety seat is suitable for use as group 0+123 from born to approx. 12 years age/ 0-36kg
- Ensure that any lap strap is worn low down, so that the pelvis is firmly engaged, shall be stressed.
- The seat cover should not be replaced with any other than the one recommended by the manufacturer, because the cover constitutes an integral part of the restraint performance.
4.If position of the adult safety-belt buckle relative to the main load bearing contact points on the restraint is unsatisfactory. Please contact the child restraint manufacturer if in doubt about this point.
5.Not to use any load bearing contact points other than those described in the instructions and marked in the child restraint.
6. Please read the car manufacturer's handbook during the use of child restraint system with ISOFIX.
1.CONTENTS / WARNING
- Please read these instructions carefully, as incorrect installation could result in serious injury. If any injuries should occur as a result of incorrect installation, the manufacturer will accept no responsibility.
- This child seat is in accordance with the ECE R44/04 regulations and may be installed in the majority of vehicles equipped with approved points, such as ISOFIX points, in accordance with ECE regulation 16.
However, prior to purchase, the child seat should always be tested in your vehicle with the child seated, in order to ensure that the model meets your needs.
9.Never use the child safety seat without its cover. - Protect the child safety seat from direct sunlight, as the seat can get very hot and harm the child.
11.Child seats or accessories that are damaged or have been used incorrectly must be replaced. - Do not leave heavy objects inside the car, as these may injure the child in the event of an accident.
- Ensure that no part of the child seat is caught in the door of the vehicle or in a reclining seat. In addition, ensure that the safety seat is correctly installed and secured.
- Do not disassemble, modify, or add any piece to the child seat or harness, as this would seriously affect its basic functioning and the safety that the child seat provides.
- The safety seat must remain installed in the vehicle. Even if the child is not seated in the car seat. The child must never be left unattended while seated in the safety seat, not even outside the vehicle.
- Keep the safety seat away from corrosive products.
- The manufacturer guarantees the quality of its products, but not the quality of second-hand products or products belonging to other companies.
- Instruction illustrations are for informational purposes only. The child restraint system may contain small differences compared to the photographs or images in the instruction manual
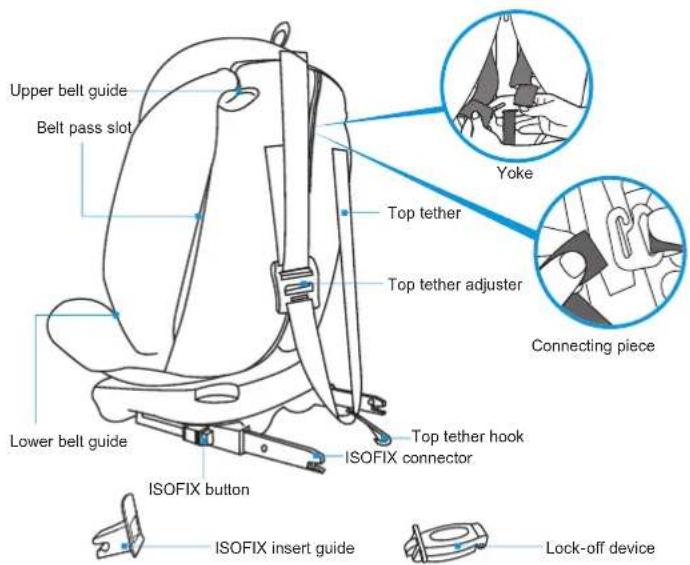
2.COMPORTENTS

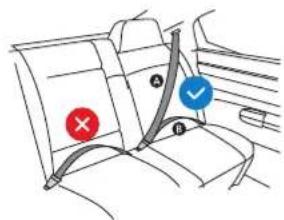
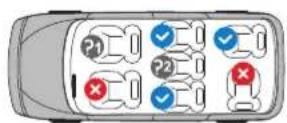
3. USE IN THE VEHICLE
4. PREPARATORY WORKS
Read vehicle handbook about approved ISOFIX positions.
Only suitable for use in the listed vehicles fitted with 3 point/with retractor safety-belts, approved to ECE Regulation No. 16 or other equivalent standards.
Install in forward seating positions, don't install in backward or lateral seating positions.
DO NOT place rear-facing child seat on front seat with active airbag, DEATH OR SERIOUS INJURY can occur.

Applicable

Not applicable

Shoulder

Lap belt
DO NOT place rear-facing child seat on front seat with active airbag. Only suitable when equipped 3 point belts.
4.1 Adjusting buckle
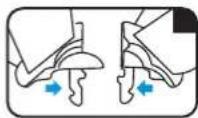
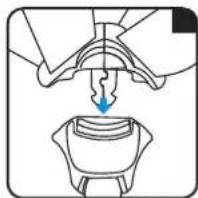
Open buckle
Press red button until buckle latches come out from the buckle.(fig.1)
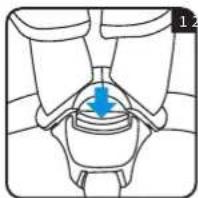
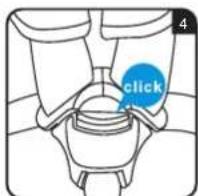
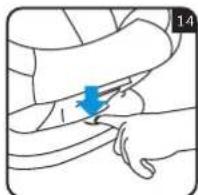
Lock buckle
Guide the two buckle latches together (fig.2), putting them into the harness buckle house (fig.3).Buckle locked when sounds click (fig.4).
Notice: buckle can not lock only by putting one latch.
4.2 Adjusting harness
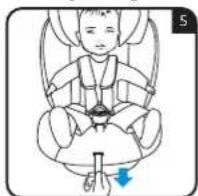
Tighten harness
Pull the adjuster strap until the harness lies flat and is close against your child's body (fig.5).
Notice: Make sure the space between the child and the shoulder harness is about the thickness of one hand.
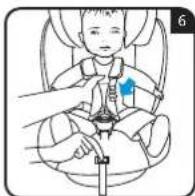
Loosen harness
Press the center adjuster and at the same time pull both shoulder belts forwards.(fig.6) Do not pull on the shoulder pads
4. PREPARATORY WORKS
4. PREPARATORY WORKS
4.3 Adjusting headrest
Important! A correctly adjusted headrest ensures optimal protection for your child in the safety seat.
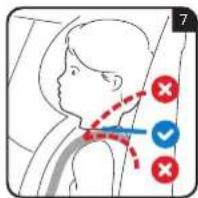
When installed by 5-point harness, the headrest must be adjusted so that the shoulder belts are at the same level as your child's shoulders.(fig.7)
CAUTION! The shoulder belts must not run behind the back of the child or at ear height or above the ears.
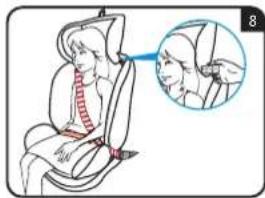
When installed by 3-point vehicle belt, The headrest must be adjusted so that there is a space two fingers wide between the headrest and your child's shoulders. Make sure the diagonal seat belt section is on child's shoulder but not on neck. (fig.8)
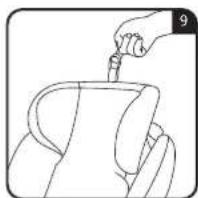
First loosen harness. Pull up the headrest height adjuster at the same time move headrest to shoulder height in accordance with the size of the child.(fig.9)
4.4 Adjusting recline positions
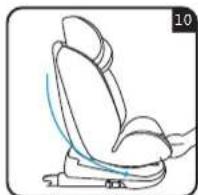
Pull Recline lever at the same time incline seat to intend position.(fig.10)
CAUTION! Adjust to most reclined position when installed rearward facing.
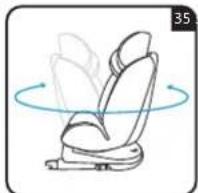
4.5 Rotating seat
Rearward facing Only for group 0+
Forward facing Only for group I II III
Lateral facing For child sit convenience. Forbidden to use when driving

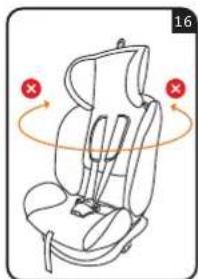
When seat rotates to intend direction, rotation button will bounce and make click sound. Then try to rotate seat to make sure seat is locked. (fig.16)
4. PREPARATORY WORKS
4. PREPARATORY WORKS
4.6 Adjusting ISOFIX

If your vehicle is not equipped with the ISOFIX insert guides as standard, clip the two insert guides which are included with the seat. with the cut-out facing upwards onto the two ISOFIX attachment points of your vehicle.
TIP: The ISOFIX attachment points are located between the surface and the backrest of the vehicle seat.
4.6.1 ISOFIX installation
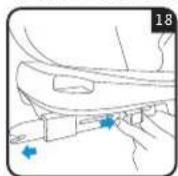

On both sides of the seat squeeze the ISOFIX button and pull out ISOFIX connectors in longest position.(fig.18,19)
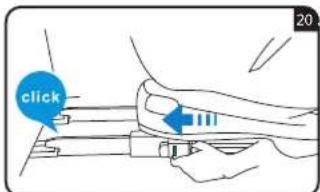
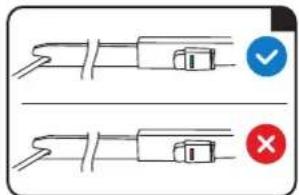
Slide the two ISOFIX connectors firmly into the insert guides until the ISOFIX connectors engage with a clicking noise on both sides. The ISOFIX button must turn green on both sides. (fig.20,21)
CAUTION! The ISOFIX connectors are only correctly engaged if both of the ISOFIX buttons are green
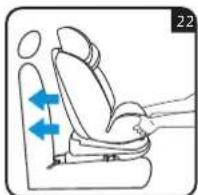
Push the child seat towards the backrest applying firm, even pressure on both sides. Shake the child safety seat to make sure it is safely attached and re-check the green safety buttons to make sure that both of them are completely green.(fig.22)
4.6.2 Remove ISOFIX
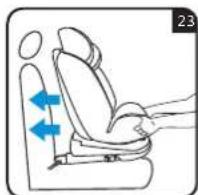
Push the child seat towards the backrest applying firm.(fig23)
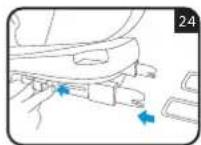
At the same time squeeze ISOFIX button and pull back ISOFIX connectors.(fig.24)
4.7 Adjusting Top tether
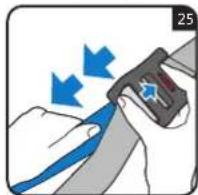
Take the top tether and if required, lengthen the belt by pressing the top tether brake button to release the strap, pulling to adjust as necessary.(fig25)
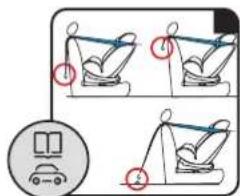
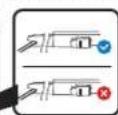
Attach the top tether hook to the top tether anchorage point which is recommended in the owner's manual of your car. (fig.26)Look for this symbol in your vehicle
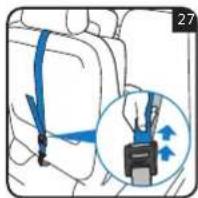
To tension the top tether, remove any slack by pulling on the free end of strap until it is suitably tightened. The top tether will be properly tightened when the tension indicator turns completely green. (fig.27)
4. PREPARATORY WORKS
5. INSTALLATION
4.8 Remove and install harness
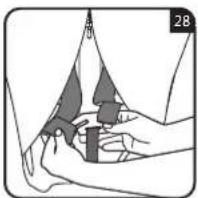
Unhook the shoulder belts on the back side of the child seat from the yoke.(fig.28)

Store the yoke in the bag of fabric cover. (fig.29)

Unhook the shoulder pad straps from the Connecting piece. (fig.30)
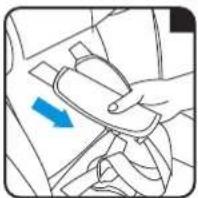
Pull out both the shoulder pads and the two shoulder belts from the slots.(fig.31)
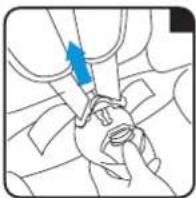
Open buckle. (fig.32)
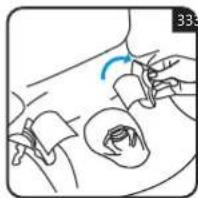
Roll the shoulder belts together and store them in the bag of fabric cover.(fig.33)
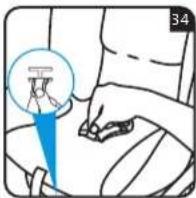
Grasp the metal plate from underneath and turn it into a vertical position. Push upwards and slide the metal plate through the slot. (fig.34)
Re-fitting the harness: Simply follow the steps in the opposite order. Make sure the belt is not twisted.
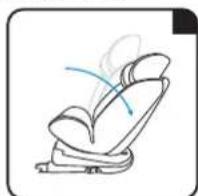
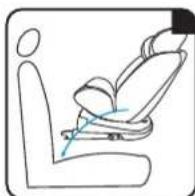
5.1 Group 0+ (0-13kg,born to approx.18 months) rearward facing DO NOT place rear-facing child seat on front seat with active airbag, DEATH OR SERIOUS INJURY can occur.
Rotate seat to rearward facing (see section 4.5), adjust seat in most reclined position (see section 4.4). Place seat in the direction facing opposite to the travel. (fig.35,36,37) Infant cushion is for child below 9kg.
5.1.1 Install use ISOFIX connectors and Top tether
(If your seat don't equipped ISOFIX or your car don't equipped ISOFIX anchorage, please see section 5.1.2 Install use 3-point belt).
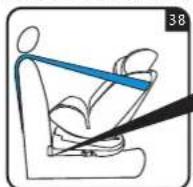
Install ISOFIX connectors (see section 4.6) (fig38)
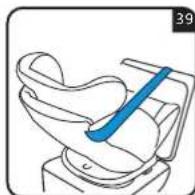
Guide top tether along both sides, then attach top tether hook to anchorage point. (see section 4.7) (fig.39)
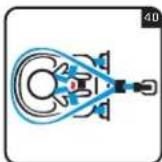
Have your child sit down in the child seat. Adjust headrest in proper height (see section 4.3), adjust harness and lock buckle (see section 4.1), and tighten harness. (see section 4.2) (fig.40)
For the safety of your child, before every journey in the car check :
- the child safety seat is engaged on both sides with the ISOFIX connectors in the ISOFIX attachment points and that both buttons are green;
-
the child safety seat is engaged on both sides with the ISOFIX connectors in the ISOFIX
-
the Top Tether is tightly tensioned over the backrest of the car seat and the tension
Indicator is green; - the straps of the child's safety seat are close to the body without constricting the child;
1 - the shoulder pads are at the same level as your child's shoulders
5. INSTALLATION
5. INSTALLATION
5.1.2 Install use 3-point belt
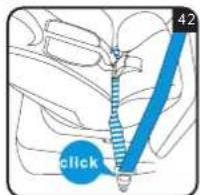
Guide vehicle lap belt through both lower belt guides, engage the buckle tongue in the vehicle seat belt buckle. (fig.42) Put infant cushion back.
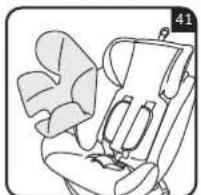
Open buckle then remove infant cushion. (fig.41)
Caution! The vehicle seat belt buckle must not be positioned in the lower belt guide.
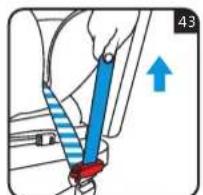
Pull the diagonal belt strongly to tighten (hold tension) and clamp the lock-off device on diagonal belt as close to vehicle seat belt buckle as possible. (fig.43)
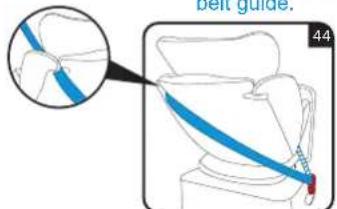
Guide the diagonal belt around seat back then through upper belt guide which in the same side of vehicle seat belt retractor. (fig.44)
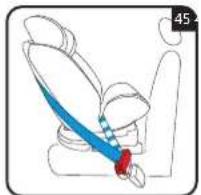
Shake the child safety seat to make sure it firmly installed in the vehicle. (fig.45)
Caution! Belt is not twisted, buckle is engaged.
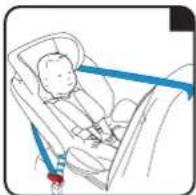
Have your child sit down in the child seat. Adjust headrest in proper height (see section 4.3), adjust harness and lock buckle (see section 4.1), and tighten harness. (see section 4.2) (fig.46)
For the safety of your child, before every journey In the car check :
- the child seal is firmly installed in the vehicle;
- the straps of the child safety seal are close to the body without constricting
the child;
the shoulder bells are correctly adjusted and the straps are not twisted
the shoulder pads are at the same level as your child's shoulders. - the buckle latches are engaged in the harness buckle;
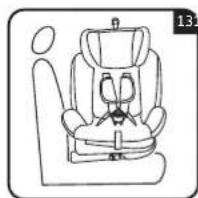
5.2 Group I (9-18kg, approx. 9 months to 4 years) forward facing IMPORTANT! DO NOT USE FORWARD FACING BEFORE THE CHILD'S WEIGHT EXCEEDS 9 KG.
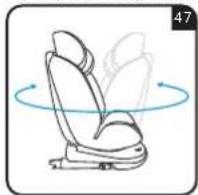
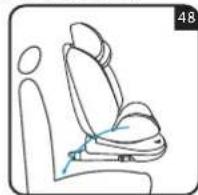
Rotate seat to forward facing (see section 4.5). Place seat in the direction facing to the travel. (fig.47,48)
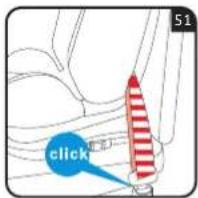
Engage the buckle tongue in the vehicle seat buckle this should make a click noise. (fig.51)
Caution! The vehicle seat belt buckle must not be positioned in the belt pass slot.
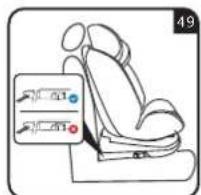
Install ISOFIX connectors
(see section 4.6) (fig.49)
(If your seat don't equipped
ISOFIX or your car don't
equipped ISOFIX anchorage, please install only use 3-point belt).
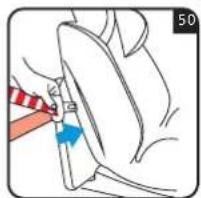
Pull the Vehicle belt out
and guide it pass
through the belt pass
slot of the child seat.
(fig.50) Make sure that
the belt is not twisted.
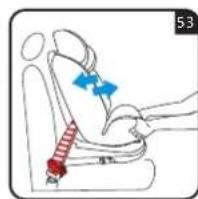
Shake the child safety seat to make sure it firmly installed in the vehicle. (fig.53)
Caution! Belt is not twisted, buckle is engaged.
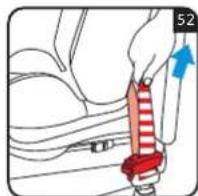
Pull the diagonal belt strongly to tighten (hold tension) and clamp the lock-off device on diagonal belt as close to vehicle seat belt buckle as possible. (fig.52)
5. INSTALLATION
5. INSTALLATION
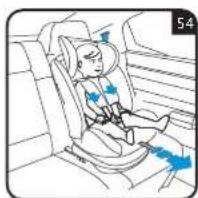
Have your child sit down in the child seat. Adjust headrest in proper height (see section 4.3), adjust harness and lock buckle (see section 4.1), and tighten harness. (see section 4.2) (fig.54)
For the safety of your child, before every journey in the car check :
- the child safety seal is engaged on both sides with the ISOFIX connectors in the ISOFIX attachment points and that both buttons are green;
- the child seat is firmly installed in the vehicle;
- the straps of the child safely seal are close to the body without constricting the child;
- the shoulder belts are correctly adjusted and the straps are not twisted;
- the shoulder pads are at the same level as your child's shoulders.
- the buckle latches are engaged in the harness buckle ,
For Group I installation, this seat also can use vehicle belt only, it has been tested and homologated also. If you want only use vehicle belt installation, just skip the ISOFIX connector relative content.
5.3 Group II III(15-36kg,approx. 3 years to 12 years) forward facing
Remove harness when use as group II,IIIsee section 4.8
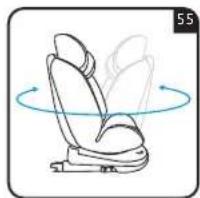
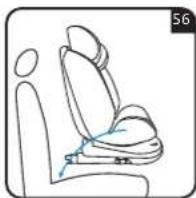
Rotate seat to forward facing (see section 4.5). Place seat in the direction facing to the travel. (fig55,56)
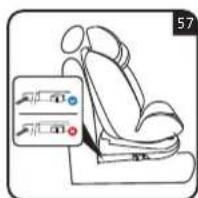
Install ISOFIX connectors (see section 4.6) (fig.57)
(If your seat don't equipped ISOFIX or your car don't equipped ISOFIX anchorage, please install only use 3-point belt).
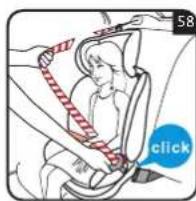
Have your child sit down in the child seat. Adjust headrest in proper height (see section 4.3). Pull out the vehicle seat belt and guide it in front of your child to the vehicle seat buckle. Engage the buckle tongue in the vehicle seat buckle. (fig.58)
Caution! The vehicle seat belt buckle must not be positioned in the lower belt guide

Place the diagonal seat belt section and lap belt section on the side of the vehicle seat belt buckle in the lower belt guide. (fig.59)
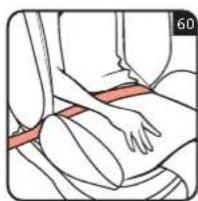
Place the lap belt section on the other side of the childseat in the lower belt guide.(fig.60)
Caution! The lap belt section must lie as low as possible over your child's hips on both sides
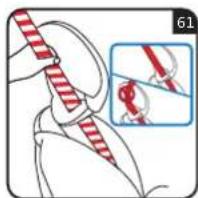
Guide the diagonal seat belt section into the belt and is not twisted. (fig.61)
For the safety of your child, before every journey in the car check :
- the child safety seat is engaged on both sides with the ISOFIX connectors in the ISOFIX attachment points and that both buttons are present:
- The child seal is firmly installed in the vehicle;
- the lap belt section runs through the lower belt guides on both sides;
- the diagonal seat belt section on the side of the vehicle seat belt buckle also
runs through the lower bell guide;
- the diagonal seat belt section runs through the belt holder of the headrest
- the buckle is engaged, belt is not twisted;
For Group II III Installation, this seat also can use vehicle belt only. It has been tested and homologated also. If you want only use vehicle belt installation, just skip the ISOFIX connector relative content.
6. CARE AND MAINTENANCE
7.CUSTOMER SERVICE
6.1 Care for the buckle
It is vital for the safety of your child that the harness buckle works correctly. Malfunctions of the harness buckle are usually caused by accumulations of dirt or foreign bodies.
Malfunctions are as follows:
- The buckle latches are ejected only slowly when the red release button is pressed.
- The buckle latches will no longer lock home (i.e. they are ejected again if you try to push them in).
The buckle latches engage without an audible click. - The buckle latches are difficult to insert (you feel resistance).
- The buckle only opens if extreme force is applied.
Remedy
wash out the harness buckle so that it functions properly once again: Cleaning the harness buckle
- Follow section 4.8 to Remove the harness buckle.
- Soak the harness buckle in warm water with washing-up liquid for at least an hour. Then rinse and dry it thoroughly.(fig.62)

6.2 Cleaning
The cover can be removed and washed. Please observe the instructions on the washing label of the cover.
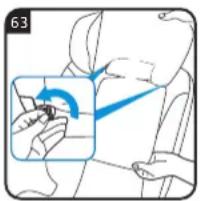
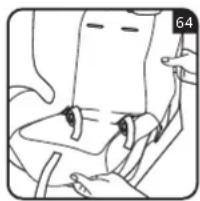
First remove harness see 4.8, then take of fabric cover. (fig,63.64) Re-fitting, simply follow the steps in the opposite order
7. Customer service
We guarantees its products against any manufacturer defect for a period of 2 years, start from the day of purchase.
- The warranty does not cover defects or failures caused by inappropriate use or non-compliance with the installation and maintenance safety standards described in the instruction guides provided with the products.
- The warranty shall be automatically considered void if the article acquired has been repaired or if an attempt has been made to repair it by an individual that is not authorized by our company.
Website:www.xadventure.eu
XADVENTURE
AUTOSTOEL GR. 0+, I, II, III (0-36KG)
QUICKFIX
Interchild B.V.
Marisstraat 23, 3364 AZ Siedrecht
LINKS RECHTS MIDDENK OF RECHTS
NEE
ACHTER
NEE
1. INHOUD / WAARSCHUWING
INHOU
1. INHOUD / WAARSCHUWING
- For using as Universal category (Group 0+, I, II, III)
- NOTICE
- For using as Semi-universal category (Group I, II, III) NOTICE
- For using as Semi-universal ISOFIX child restraint system (Group 0+)
- CONTENTS
- 1.CONTENTS / WARNING
- 2.COMPORTENTS
- USE IN THE VEHICLE
- PREPARATORY WORKS
- Adjusting buckle
- Open buckle
- Lock buckle
- Adjusting harness
- Tighten harness
- Loosen harness
- Adjusting headrest
- Adjusting recline positions
- Rotating seat
- Adjusting ISOFIX
- ISOFIX installation
- Remove ISOFIX
- Adjusting Top tether
- INSTALLATION
- Remove and install harness
- Install use 3-point belt
- Group I (9-18kg, approx. 9 months to 4 years) forward facing IMPORTANT! DO NOT USE FORWARD FACING BEFORE THE CHILD'S WEIGHT EXCEEDS 9 KG.
- Group II III(15-36kg,approx. 3 years to 12 years) forward facing
- CARE AND MAINTENANCE
- 7.CUSTOMER SERVICE
- Care for the buckle
- Remedy
- Cleaning
- Customer service
- XADVENTURE
- NEE
- ACHTER
- INHOUD / WAARSCHUWING
- INHOU
Brand : X-Adventure
Model : Quickfix
Category : Car seat