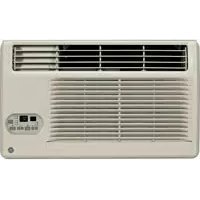
AJCM10ACG - Air Conditioning GE - Free user manual and instructions
Find the device manual for free AJCM10ACG GE in PDF.


| Product Type | Built-in wall air conditioner (Model J) |
| Model | AJCM10ACG |
| Brand | GE |
| Dimensions (sleeve) | Height 15 1/4 in (38.7 cm), Width 26 1/4 in (66.7 cm), Depth 16 in (40.6 cm) |
| Power supply | 115 V, 60 Hz, 15 A (or 230/208 V depending on model) |
| Operating modes | Cool, Heat (depending on model), Fan |
| Fan speeds | Low, Med, High (depending on model) |
| Remote control | Yes, with AAA batteries (1.5 V) |
| Timer | From 0.5 to 24 hours (on/off) |
| Air filter | Cleanable every 30 days, reminder after 250 hours |
| Vent control | Open/close for outside air exchange |
| Safety | Grounding via 3-prong plug, built-in GFCI |
| Warranty | 1 year parts and labor, 5 years sealed system (compressor, condenser, evaporator) |
| Spare parts | Filters, remote control, batteries (AAA) |
| After-sales service | Contact Gordon Williams Corp. at 1.888.209.0999 or www.electromagersge.ca |
Frequently Asked Questions - AJCM10ACG GE
User questions about AJCM10ACG GE
0 question about this device. Answer the ones you know or ask your own.
Ask a new question about this device
Download the instructions for your Air Conditioning in PDF format for free! Find your manual AJCM10ACG - GE and take your electronic device back in hand. On this page are published all the documents necessary for the use of your device. AJCM10ACG by GE.
USER MANUAL AJCM10ACG GE
About the Controls 4-9
Cool Models 4,5
Heat Models 6,7
Vent Control. 8
Care and Cleaning
Grille and Case 10
Outdoor Coils 10
FrontGrille 10
Air Filter 10-11
Long Term Storage 12
Installation Instructions
Before You Begin 12-13
Installing a J-Model in
an Existing Wall Case. 14
Through-the-Wall
Installation 15
Troubleshooting Tips 16
Normal Operating Sounds. 16
Consumer Support
Warranty 19
Consumer Support....... Black Cover
Owner's Manual and Installation Instructions
Cool Only: AJCM 08, 10 ACG
AJCM 10, 12 DCG
AJCQ06 LCG
AJCQ 08,10,12 ACG
AJCQ 09,10,12 DCG
Heat/Cool: AJEM 12 DCF
AJEQ06 LCF
AJEQ08 ACF
AJEQ 09,10,12 DCF
Espanol
For a Spanish version of this manual, visit our Website at GEAppliances.com.
For a French version of this manual, visit our Website at GEAppliances.com.
Write the model and serial
numbers here:
Model #
Serial #
Find these numbers on a label on the front of the base pan behind the front grille.
IMPORTANT SAFETY INFORMATION. READ ALL INSTRUCTIONS BEFORE USING.
SAFETY INFORMATION

This is the safety alert symbol. This symbol alerts you to potential hazards that can kill or hurt you and others. All safety messages will follow the safety alert symbol and the word "DANGER", "WARNING", or "CAUTION". These words are defined as:

DANGER

WARNING

CAUTION
Indicates a hazardous situation which, if not avoided, will result in death or serious injury.
Indicates a hazardous situation which, if not avoided, could result in death or serious injury.
Indicates a hazardous situation which, if not avoided, could result in minor or moderate injury.

WARNING
For your safety, the information in this manual must be followed to minimize the risk of fire or explosion, electric shock, or to prevent property damage, personal injury, or loss of life.
SAFETY PRECAUTIONS

WARNING
Risk of electric shock. Can cause injury or death. For your safety, the information in this manual must be followed to minimize the risk of fire, electric shock or personal injury.
Use this appliance only for its intended purpose as described in this Owner's Manual.
This air conditioner must be properly installed in accordance with the Installation Instructions before it is used.
Never unplug your air conditioner by pulling on the power cord. Always grip plug firmly and pull straight out from the receptacle.
Replace immediately all electric service cords that have become frayed or otherwise damaged. A damaged power supply cord must be replaced with a new power supply cord obtained from the manufacturer and not repaired. Do not use a cord that shows cracks or abrasion damage along its length or at either the plug or connector end.
Turn OFF and unplug your air conditioner before making any repairs or cleaning.
NOTE: We strongly recommend that any servicing be performed by a qualified individual.
For your safety...do not store or use combustible materials, gasoline or other flammable vapors or liquids in the vicinity of this or any other appliance.
All air conditioners contain refrigerants, which under federal law must be removed prior to product disposal. If you are getting rid of an old product with refrigerants, check with the company handling disposal about what to do.

WARNING
HOW TO CONNECT ELECTRICITY

WARNING
Risk of electric shock. Can
cause injury or death. This appliance must be properly grounded. Do not, under any circumstances, cut or remove the third (ground) prong from the power cord. For personal safety, this appliance must be properly grounded.
The power cord of this appliance is equipped with a 3-prong (grounding) plug which mates with a standard 3-prong (grounding) wall outlet to minimize the possibility of electric shock hazard from this appliance.
Have the wall outlet and circuit checked by a qualified electrician to make sure the outlet is properly grounded.
Power cord may include a current interrupter device. A test and reset button is provided on the plug case. The device should be tested on a periodic basis by first pressing the TEST button and then the RESET button. If the TEST button does not trip or if the RESET button will not stay engaged, discontinue use of the air conditioner and contact a qualified service technician.
USE OF EXTENSION CORDS

WARNING
RISK OF FIRE. Could cause
serious injury or death.
USE OF ADAPTER PLUGS

WARNING
Risk of electric shock. Can cause injury or death.
We strongly recommend against the use of an adapter plug.
If you must use an adapter, where local codes permit, a temporary connection may be made to a properly grounded 2-prong wall outlet by use of a UL-listed adapter available at most local hardware stores.
The larger slot in the adapter must be aligned with the larger slot in the wall outlet to provide proper polarity in the connection of the power cord.
Where a 2-prong wall outlet is encountered, it is your personal responsibility and obligation to have it replaced with a properly grounded 3-prong wall outlet.

WARNING
Risk of electric shock. Can cause injury or death.
The air conditioner should always be plugged into its own individual electrical outlet which has a voltage rating that matches the rating plate. This provides the best performance and also prevents overloading house wiring circuits which could cause a fire hazard from overheated wires.
See the Installation Instructions, Electrical Requirements section for specific electrical connection requirements.
DO NOT use an extension cord with this Built-in Air Conditioner.
DO NOT use surge protectors or multi-outlet adaptors with this Built-in Air Conditioner.
When disconnecting the power cord from the adapter, always hold the adapter in place with one hand while pulling the power cord plug with the other hand. If this is not done, the adapter ground terminal is very likely to break with repeated use.
If the adapter ground terminal breaks, DO NOT USE the air conditioner until a proper ground has been established.
Attaching the adapter ground terminal to a wall outlet cover screw does not ground the appliance unless the cover screw is metal, not insulated, and the wall outlet is grounded through the house wiring. You should have the circuit checked by a qualified electrician to make sure the outlet is properly grounded.
READ AND FOLLOW THIS SAFETY INFORMATION CAREFULLY.
SAVE THESE INSTRUCTIONS
About the controls on the air conditioner—Cool Only Models
Appearance may vary.
Air Conditioner Controls
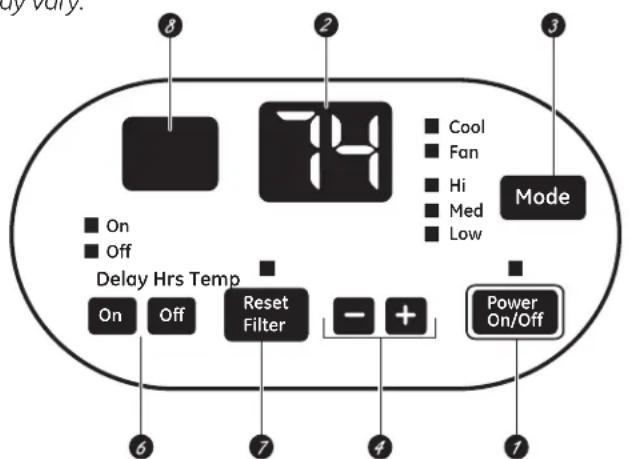
Lights beside the touch pads on the air conditioner control panel indicate the selected settings.
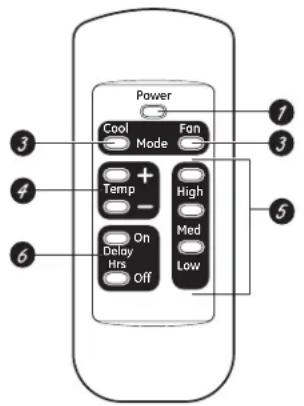
Remote Control
Controls
1. Power On/Off
Turns air conditioner on and off.
2. Display
Displays the temperature setting. Displays hours when setting the timer.
3. Mode
On the remote control, use to set the air conditioner to Cool or Fan mode.
On the air conditioner controls, use to set Cool or Fan mode at High, Med or Low fan speed. Indicator lights on the air conditioner controls will show the mode and fan speed selected.
4. Temp Increase +/Decrease - Pads
Use to set temperature when in COOL mode.
5. Fan Speeds
Use to set the fan speed at Low, Med or High.
6. Delay Hrs
On-When the air conditioner is off, it can be set to automatically turn on in half an hour to 24 hours at its previous setting. Each touch will set the time in half hours up to 10 and then in hours up to 24.
To cancel the Delay Timer, press the On pad until "CL" appears. Then wait until the display turns off.
Off-When the air conditioner is on, it can be set to automatically turn off in half an hour to 24 hours. Each touch will set the time in half hours up to 10 and then in hours up to 24.
To cancel the Delay Timer, press the Off pad until "CL" appears and wait for the set temperature to be displayed. The unit will now resume normal operation.
7. Reset Filter
LED will turn on when fan has accumulated 250 hours of run time as a reminder to clean filter. Press Reset Filter to turn off the LED and reset the accumulated run time.
8. Remote Control Signal Receiver
NOTE: When the air conditioner is turned on, it will automatically start in the setting last used.
Remote Control
To ensure proper operation, aim the remote control at the signal receiver on the air conditioner.
The remote control signal has a range of up to 21 feet.
Make sure nothing is between the air conditioner and the remote control that could block the signal.
Make sure batteries are fresh and installed correctly—see the Care and Cleaning section.
Cool Mode
Remote Control
- Press Cool pad.
- Press Low, Med or High pads to set desired fan speed.
- Press the Increase + / Decrease - pads to set the desired temperature 60^ to 85^ in 1^ increments.
Control Panel
- Press the Mode pad until the Cool indicator light is lit and the Low, Med or High indicator light is lit for the desired fan speed.
- Press the Increase +/Decrease - pads to set the desired temperature 60^ to 85^ in 1^ increments.
A thermostat is used to maintain the room temperature. The compressor will cycle on and off to keep the room at the set level of comfort. Set the thermostat at a lower number and the indoor air will become cooler.
Set the thermostat at a higher number and the indoor air will become warmer.
NOTE: If the air conditioner is off and is then turned on while set to Cool, it will take approximately 3 minutes for the compressor to start and cooling to begin.
Cooling Descriptions
For Normal Cooling—Select the Cool mode and High or Med fan with a middle set temperature.
For Maximum Cooling-Select the Cool mode and HIGH fan with a lower set temperature.
For Quietter and Nighttime Cooling—Select the Cool mode and Low fan with a middle set temperature.
NOTE: If you switch from a Cool setting to Off or to a fan setting, wait at least 3 minutes before switching back to a Cool setting.
FAN MODE
Use the Fan mode to provide air circulation and filtering without cooling. Since fan-only settings do not provide cooling, a temperature setting will not be displayed.
Remote Control
Press Fan pad. Press Low, Med or High pads to set desired fan speed.
Control Panel
Press the Mode pad until the Fan indicator light is lit and the Low, Med or High indicator light is lit for the desired fan speed.
About the controls on the air conditioner—Heat/Cool Models
Appearance may vary.
Air Conditioner Controls
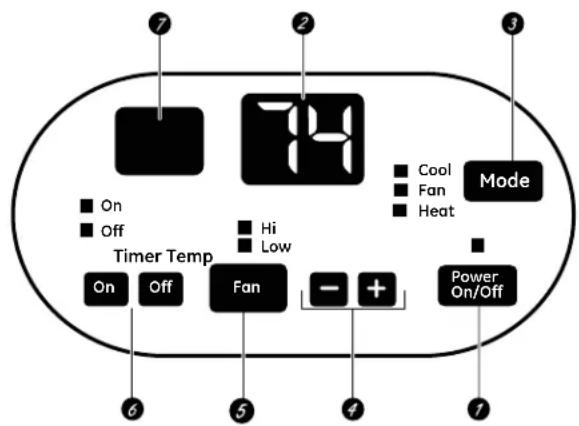
Lights beside the touch pads on the air conditioner control panel indicate the selected settings.
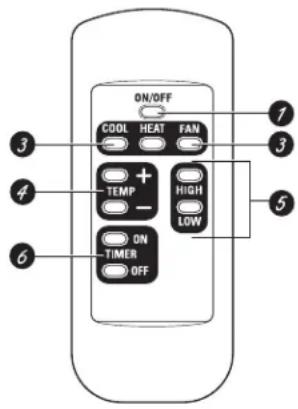
Remote Control
Controls
1. ON/OFF
Turns air conditioner on and off.
2. Display
Displays the temperature setting. Displays hours when setting the timer.
3. MODE
On the air conditioner controls, use to set COOL, HEAT or FAN mode. Indicator lights on the air conditioner controls will show the mode selected.
4. TEMP Increase +/Decrease - Pads
Use to set temperature when in COOL or HEAT mode.
5. FAN Speeds
Use to set the fan speed at LOW or HIGH. Indicator lights will show the speed selected.
6. TIMER
ON-When the air conditioner is off, it can be set to automatically turn on in half an hour to 24 hours at its previous setting. Each touch will set the time in half hours up to 10 and then in hours up to 24.
To cancel the On Timer, press the ON pad until "CL" appears. Then wait until the display turns off.
OFF-When the air conditioner is on, it can be set to automatically turn off in half an hour to 24 hours. Each touch will set the time in half hours up to 10 and then in hours up to 24.
To cancel the Off Timer, press the OFF pad until "CL" appears and wait for the set temperature to be displayed. The unit will now resume normal operation.
7. Remote Control Signal Receiver
NOTE: When the air conditioner is turned on, it will automatically start in the setting last used.
Remote Control
To ensure proper operation, aim the remote control at the signal receiver on the air conditioner.
The remote control signal has a range of up to 21 feet.
Make sure nothing is between the air conditioner and the remote control that could block the signal.
Make sure batteries are fresh and installed correctly—see the Care and Cleaning section.
COOL MODE
Remote Control
- Press COOL pad.
- Press LOW or HIGH pads to set desired fan speed.
- Press the INCREASE + / DECREASE - pads to set the desired temperature 60^ to 85^ in 1^ increments.
Control Panel
- Press the MODE pad until the COOL indicator light is lit.
- Press the FAN pad until HIGH or LOW indicator light is lit for desired fan speed.
- Press the INCREASE + / DECREASE - pads to set the desired temperature 60^ to 85^ in 1^ increments.
A thermostat is used to maintain the room temperature. The compressor will cycle on and off to keep the room at the set level of comfort. Set the thermostat at a lower number and the indoor air will become cooler.
Set the thermostat at a higher number and the indoor air will become warmer.
NOTE: If the air conditioner is off and is then turned on while set to COOL, it will take approximately 3 minutes for the compressor to start and cooling to begin.
Cooling Descriptions
For Normal Cooling—Select the COOL mode and HIGH fan with a middle set temperature.
For Maximum Cooling—Select the COOL mode and HIGH fan with a lower set temperature.
For Quietter and Nighttime Cooling-Select the COOL mode and LOW fan with a middle set temperature.
NOTE: There will be a 3-minute delay between setting changes such as COOL to OFF and back to COOL.
HEAT MODE
Remote Control
- Press HEAT pad.
- Press LOW or HIGH pads to set desired fan speed.
- Press the INCREASE + / DECREASE - pads to set the desired temperature 60^ to 85^ in 1^ increments.
Control Panel
- Press the MODE pad until the HEAT indicator light is lit.
- Press the FAN pad until HIGH or LOW indicator light is lit for desired fan speed.
- Press the INCREASE + / DECREASE - pads to set the desired temperature 60^ to 85^ in 1^ increments.
A thermostat is used to maintain the room temperature. The heater will cycle on and off to keep the room at the set level of comfort. Set the thermostat at a higher number and the indoor air will become warmer.
Set the thermostat at a lower number and the indoor air will become cooler.
NOTE: If the air conditioner is off and is then turned on while set to HEAT, it will take approximately 1 minute for the heater to start and heating to begin.
Heating Descriptions
For Normal Heating—Select the Heat mode and HIGH fan with a middle set temperature.
For Maximum Heating-Select the HEAT mode and HIGH fan with a higher set temperature.
For Quietter and Nighttime Heating-Select the HEAT mode and LOW fan with a middle set temperature.
FAN
Use the FAN to provide air circulation and filtering without cooling or heating. Since fan only settings do not provide cooling or heating, a temperature setting will not be displayed.
Remote Control
Press FAN pad. Press LOW or HIGH pads to set desired fan speed.
Control Panel
Press the MODE pad until the FAN indicator light is lit and the LOW or HIGH indicator light is lit for the desired fan speed.
About the controls on the air conditioner
Vent Control
The vent control is located behind the front grille on the right side of the air discharge area. When CLOSED, only the air inside the room will be circulated and conditioned. When OPEN, the vent allows outdoor fresh air exchange.
To open or close the vent:
- Remove the front grille.
- Remove the vent card screw.
- Remove vent card, turn it over and replace it by locating rear hole in card over locating pin inside air discharge and reattaching screw at front.
The unit leaves the factory set at the CLOSE position.
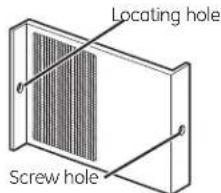
OPEN position (Mesh end toward back)
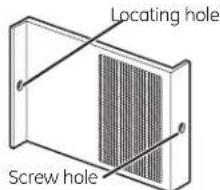
CLOSE position (Mesh end toward front)
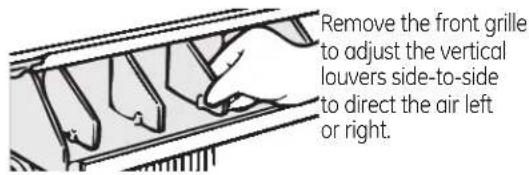
Air Direction
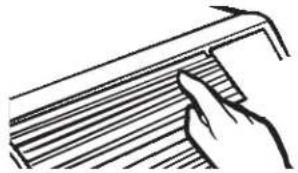
Horizontal louvers on the front grille let you control the air direction up and down.
Cool Only Models
Auxiliary Controls - Dip Switches (location varies by model)
The auxiliary dip switch controls are located behind the room cabinet—as shown in this figure.
The owner is responsible for checking switches and ensuring they are in the desired position.
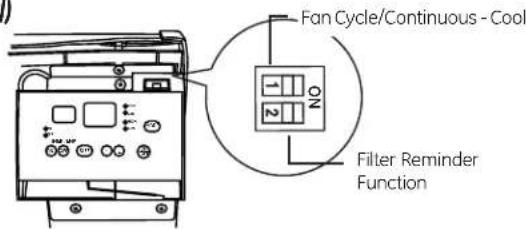
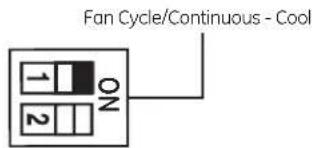
Fan Cycle/Continuous - Cool
When this switch is enabled (RIGHT), it allows the indoor fan to cycle on/off with the compressor. When this switch is disabled (LEFT), it allows the indoor fan to run continuously. The default setting is right (fan cycle).
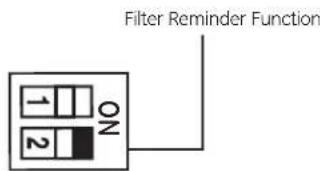
Filter Reminder Funtion
When this switch is enabled (RIGHT), an LED will light up the user interface after 250 of accumulated fan run time. It serves as a reminder to clean the filter. When this switch is disabled (LEFT), the function is disabled. The default setting is right (enabled).
Heat/Cool Models
Auxiliary Controls - Dip Switches (location varies by model)
The auxiliary dip switch controls are located behind the room cabinet—as shown in this figure.
The owner is responsible for checking switches and ensuring they are in the desired position.
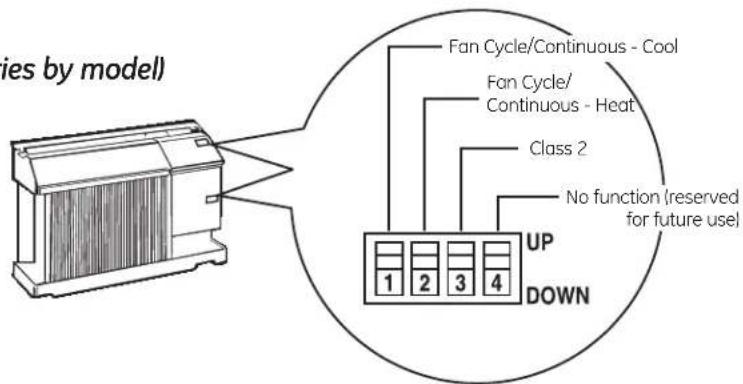
Fan Cycle/Continuous - Cool
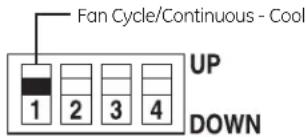
When this switch is enabled (UP), it allows the indoor fan to cycle on/off with the compressor. When this switch is disabled (DOWN), it allows the indoor fan to run continuously. The default setting is DOWN (continuous).
Fan Cycle/Continuous - Heat
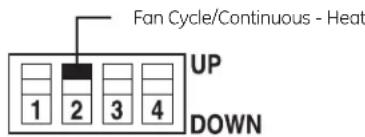
When this switch is enabled (UP), it allows the indoor fan to cycle on/off with the heater operation. When this switch is disabled (DOWN), it allows the indoor fan to run continuously. The default setting is UP (cyclic).
Class 2 - Remote Thermostat
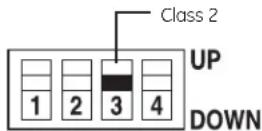
When this switch is enabled (UP), it allows the unit to operate with a Class 2 Remote Control Wall Thermostat. The unit controls are disabled. The default setting is DOWN (disabled).
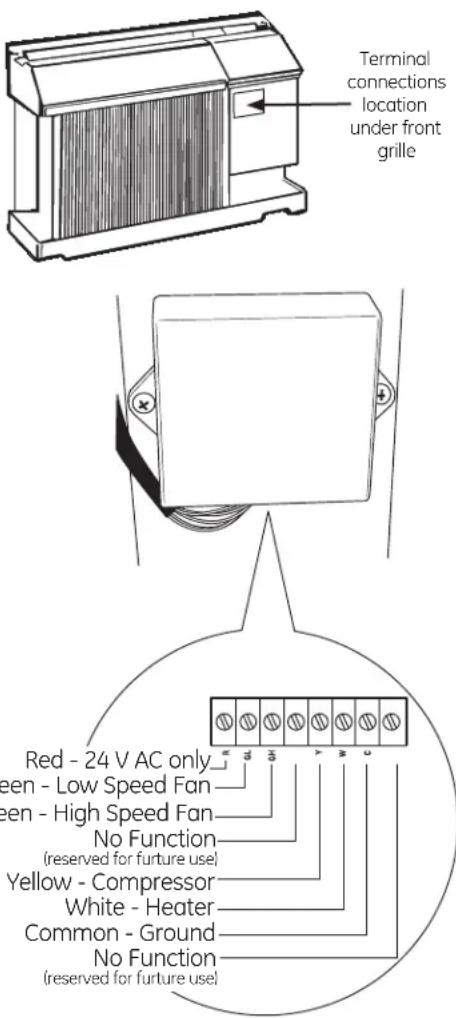
Terminal Connections Remote Thermostat - Class 2 (on some models)
The controls are located under a plastic cover behind the front grille.
- Remove the front grille. See the Front Grille section of Care and Cleaning.
- Remove the screws securing the plastic cover over the wiring connections. Set aside screws and plastic cover.
- To make wiring connections, insert the wires into the bottom of the terminals and tighten screws securely.
- After all desired connections have been made, replace the plastic cover and front grille.
The owner is responsible for making all connections and setting the appropriate dip switches.
When connected, the unit will be controlled by a remote thermostat.
NOTE: The number 3 dip switch must be in the enabled (UP) position to activate the remote thermostat. (See the installation instructions supplied with the remote thermostat.)
IMPORTANT:
The thermostat connections provide 24 V AC only.
If using a digital/electronic wall thermostat, ensure it is compatible with 24 VAC signal. See the Installation Instructions for the wall thermostat.
NOTICE:
Damage to a wall thermostat or to the electronics can result from improper connections. Special care must be used in connecting the wires. No line voltage connections should be made to any circuit. Isolate all wires in building from line voltage.
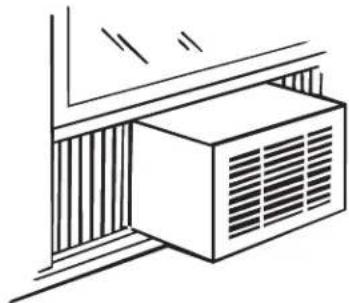
Care and cleaning of the air conditioner.
Grille and Case
Turn the air conditioner off and remove the plug from the wall outlet before cleaning.
To clean, use water and a mild detergent. Do not use bleach or abrasives.
Outdoor Coils
The coils on the outdoor side of the air conditioner should be checked regularly.
If they are clogged with dirt or soot they may be professionally steam cleaned, a service available through your GE service outlet.
FrontGrille
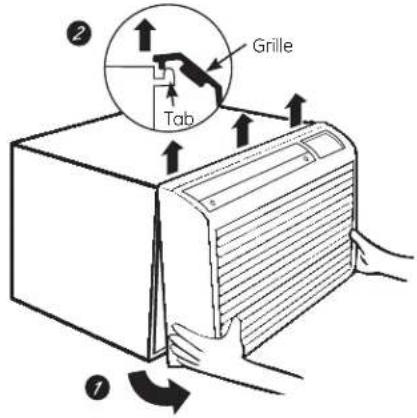
The front grille can be removed for more thorough cleaning and to locate the model and serial numbers on the front of the base pan.
To remove:
- Pull the filter out.
- Remove the two grille screws.
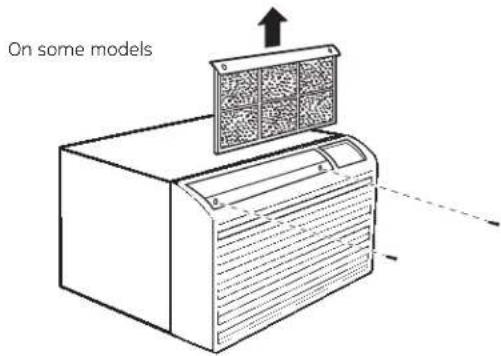
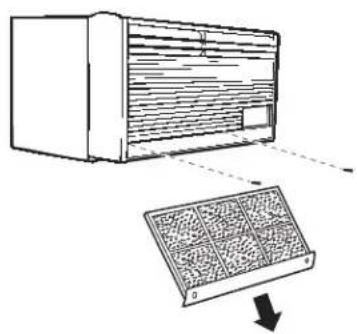
On some models
- Pull the grille out from the bottom and lift up from the tabs on the top of the case.
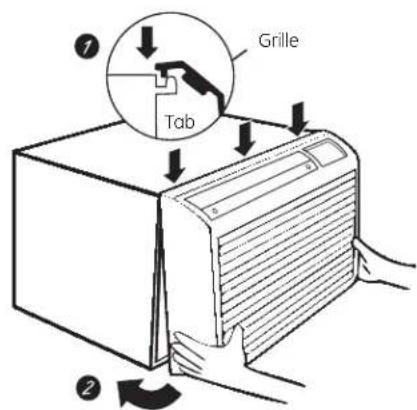
To replace:
Hook the tabs on the front grille even with the tabs on the case and snap into place.
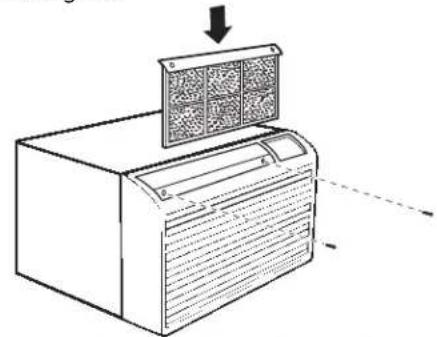
Replace the screws and filter.
To maintain optimum performance, clean the filter at least every 30 days.
Air Filter
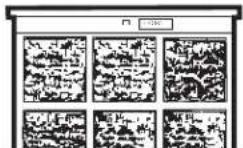
Dirty filter-Needs cleaning
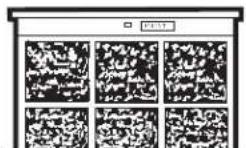
Clogged filter—Greatly reduces cooling, heating and airflow.
Turn the air conditioner off before cleaning.
The most important thing you can do to maintain the air conditioner is to clean the filter at least every 30 days. A clogged filter reduces cooling, heating and air flow.
Keeping the air filter clean will:
Decrease cost of operation.
Save energy.
Prevent clogged heat exchanger coils.
Reduce the risk of premature component failure.
To clean the air filters:
Vacuum off the heavy soil.
Run water through the filters.
Dry thoroughly before replacing.
To remove the air filter, on some models:
Carefully pull the tab forward, up and out.
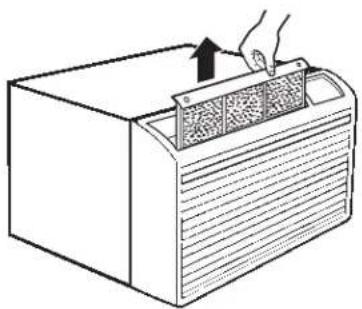
To remove the air filter, on other models:
Pull it down.
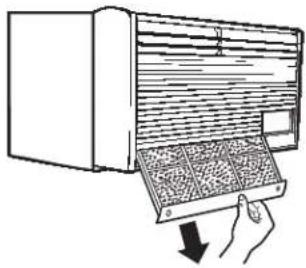
To replace the air filter:
Replace the clean filter by pushing it back into place.
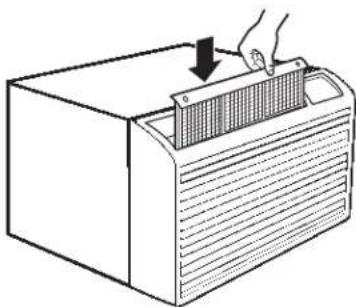
NOTICE: Do not operate the air conditioner without the filter in place. If a filter becomes torn or damaged it should be replaced immediately.
Operating without the filter in place or with a damaged filter will allow dirt and dust to reach the indoor coil and reduce the cooling, heating, airflow and efficiency of the unit.
Replacement filters are available from your salesperson, GE dealer, GE Service and Parts Center or authorized Customer Care® servicers.
Care and cleaning of the air conditioner.
How to Insert the Batteries in the Remote Control
- Remove the battery cover by sliding it according to the arrow direction.
- Insert new batteries making sure that the (+) and (-) of battery are installed correctly.
- Reattach the cover by sliding it back into position.
NOTES:
Use 2 AAA (1.5 volt) batteries. Do not use rechargeable batteries.
Remove the batteries from the remote control if the system is not going to be used for a long time.
- Do not mix old and new batteries. Do not mix alkaline, standard (carbon-zinc) or rechargeable (ni-cad, ni-mh, etc) batteries.
Long Term Storage
When the room air conditioner is not in use it is recommended that the unit be covered to eliminate drafts and limit energy loss.
Insulated covers that mount to the front of the unit, that are designed to eliminate drafts and energy loss are recommended. Approximate size of indoor cover should be 26 in 16 in. 7 in..
Unplug the unit before adding the cover. Follow cover manufacturer's installation instruction to install cover.
Cover should be removed prior to running the unit.
Installation Instructions
Air Conditioner

Questions? Call 800.GE.CARES (800.432.2737) or Visit our Website at: GEAppliances.com

BEFORE YOU BEGIN
Read these instructions completely and carefully.
- IMPORTANT - Save these instructions for local inspector's use.
- IMPORTANT - Observe all governing codes and ordinances.
Note to Installer - Be sure to leave these instructions with the Consumer.
Note to Consumer - Keep these instructions for future reference. - Skill level - Installation of this appliance requires basic mechanical skills.
Completion time - Approximately 1 hour - We recommend that two people install this product.
- Proper installation is the responsibility of the installer.
Product failure due to improper installation is not covered under the Warranty.
Air conditioner break-in period
NOTE - As with any mechanical device with moving parts, this unit will have a wear-in period. AFTER INSTALLATION, this unit should be operated for 48 hours to achieve optimum efficiency.

ELECTRICAL REQUIREMENTS

WARNING
Risk of electric shock. Can cause injury or death. This appliance must be properly grounded. Where a 2-prong wall outlet is encountered, it is your responsibility and obligation to have it replaced with a properly grounded 3-prong outlet.

Some models require a 115/120-volt a.c., 60-Hz grounded outlet protected with a 15-amp time delay fuse or circuit breaker.
The 3-prong grounding plug minimizes the possibility of electric shock hazard. If the wall outlet you plan to use is only a 2-prong outlet, it is your responsibility to have it replaced with a properly grounded 3-prong wall outlet.
Do not, under any circumstances, cut or remove the third (ground) prong from the power cord.
Do not change the plug on the power cord of this air conditioner.
Aluminum house wiring may present special problems—consult a qualified electrician.

Some models require 230/208-volt a.c., protected with a time delay fuse or circuit breaker. These models should be installed on their own single branch circuit for best performance and to prevent overloading house or apartment wiring circuits, which could cause a possible fire hazard from overheating wires.

IMPORTANT!
GE strongly recommends the removal of the old wall case and the installation of a new GE Wall Case. If you DO NOT use a GE Wall Case, you run the risk of poor performance or product failure. This is not covered under the terms of the GE warranty.
Read these instructions completely and carefully.
Power cord may include a current interrupter device.
A test and reset button is provided on the plug case.
The device should be tested on a periodic basis by first
pressing the TEST button and then the RESET button.
If the TEST button does not trip or if the RESET button
will not stay engaged, discontinue use of the air
conditioner and contact a qualified service technician.
TOOLS YOU MAY NEED

Phillips-head screwdriver
Adjustable Wrench
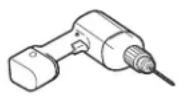
Drill

Pencil
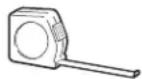
Ruler or Tape Measure

Level
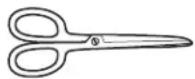
Scissors or knife
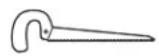
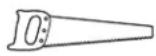
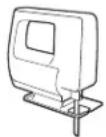
Hand or Saber Saw
GE KIT NUMBERS
| USE GE KIT NUMBER: FOR: DESCRIPTION: | ||
| RAB46A,46, 47A, 47, 48A, 48B & 48 not listed and replace. | Use these kits for all GE models and other brands | Standard wall case for "J" model chassis. RAG13 stamped aluminum exterior grille included. Remove the existing case |
| RAK65A1 | All GE Models Kit for window installation. | |
| RAK690 | RAB36, 37, 38, 46, 47 or 48 (J-Chassis) | If you attach a custom architectural outdoor grille, use this kit to ensure proper airflow. |
| RAG13 | RAB36, 37, 38, 46, 47 or 48 (J-Chassis) | Standard aluminum exterior grille (included with RAB46, 47, 48, RAB46A, 47A, 48A, and 48B wall cases). |
| RAG14E | RAB36, 37, 38, 46, 47 or 48 (J-Chassis) | Architectural louvered exterior grille. |
ADA Compliance
| Operation by Remote Control | A Remote Control device is shipped with GE Built-In Air Conditioners. When operated by Remote Control GE Built-in ACs meet all federal ADA compliance requirements. |
| Operation at Control Panel | GE Built In Air Conditioners intended to be operated at the control panel meet federal ADA compliance requirements when installed so that the controls are more than 15" from ground and less than 48" from the ground. |
| Operation by Thermostat | GE Air Conditioners intended to be operated via a wall thermostat meet federal ADA compliance requirements when used in conjunction with an ADA compliant wall thermostat mounted more than 15" and less than 48" from the ground. |
INSTALLING A J-MODEL IN AN EXISTING WALL CASE
Read these instructions completely and carefully.
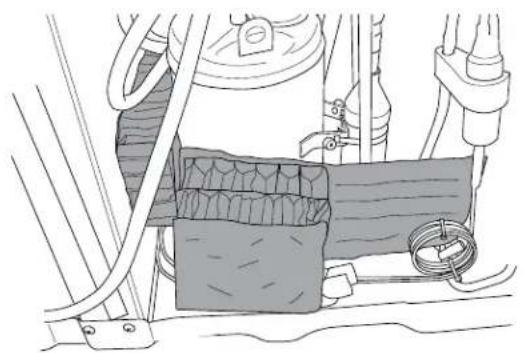
1REMOVE ALL SHIPPING MATERIAL (IF PRESENT) INSIDE AIR CONDITIONER NEXT TO COMPRESSOR
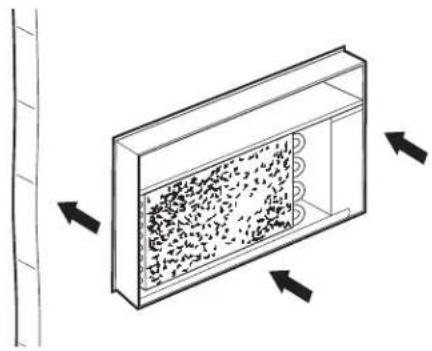
3 CAREFULLY SLIDE AIR CONDITIONER INTO CASE
Make sure that the tubing on the unit does not touch the wall case and that the case installation is secure.
2REMOVE THE FILTER AND FRONT GRILLE
Remove the two screws behind the filter then remove the front grille.
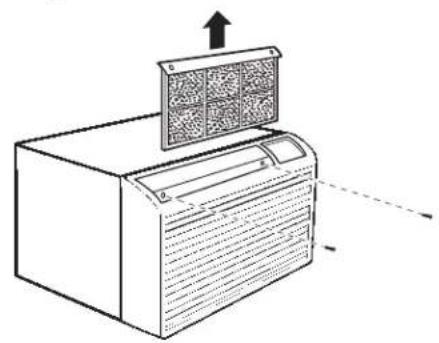
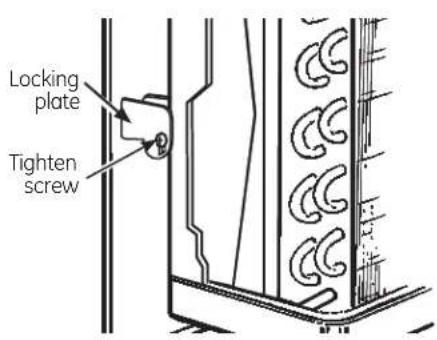
4 REINSTALL LOCKING PLATE WITH TAB BEHIND WALL CASE FLANGE. TIGHTEN SCREW
5 An opening for the power cord is on the bottom of the front grille.
INSTALLING THROUGH THE WALL
Read these instructions completely and carefully.

PREPARE OPENING IN WALL
Make certain a wall receptacle is available close to the hole location or make arrangements to install a receptacle.
The cord length for the 115-volt models is 72^ to the right and 47^ to the left.
For the 230/208-volt models the cord length is 65^ to the right and 39^ to the left.
| MINIMUM FINISHED OPENING DIMENSIONS* | CASE DIMENSIONS | |||
| Height | Width | Height | Width | Depth |
| 18" | 26 1/4" | 15 3/4" | 26 1/6" | 16" |
- Dimensions may need to be increased to fit unique situations in the field if using case angles.

SUPPORT REQUIREMENTS FOR AIR CONDITIONER
Mortar between the case and the brick wall around the case may be undercut at about 45^ for improved caulking.
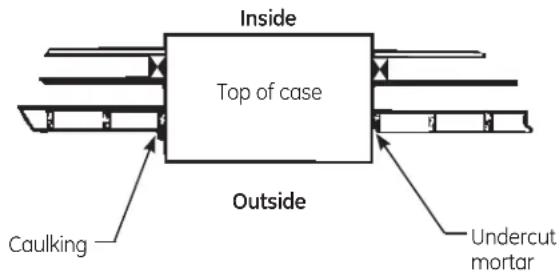

SUPPORT REQUIREMENTS FOR AIR CONDITIONER
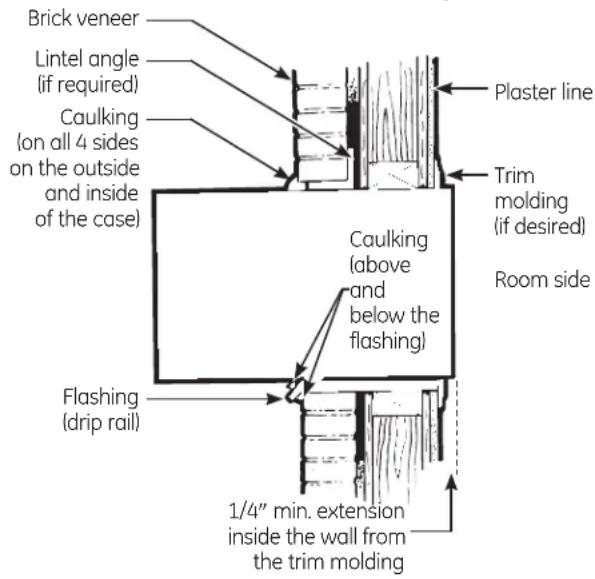
The air conditioner wall case may be installed with 1/4'' min. extension out from the inside wall or with 1/4'' min. extension out from the outside wall. The finished sides of the opening should be structural wall members.
Lintel - Use a lintel in brick veneer and brick and block types of wall to support the bricks or blocks above the opening. Do not allow the wall case to be used in lieu of a lintel.
Flashing - Install flashing (drip rail) as shown to prevent water from dripping inside the wall and down the outside of the building.
Before you call for service...
Troubleshooting Tips: Save time and money! Review the chart below first and you may not need to call for service.
| Problem Possible Causes What To Do | ||
| Air conditioner does not start | The air conditioner is unplugged. | ·Make sure the air conditioner plug is pushed completely into the outlet. |
| breaker is tripped. the fuse or reset the breaker. | The fuse is blown/circuit or reset the breaker. | ·Check the house fuse/circuit breaker box and replace |
| power is restored, wait 3 minutes to restart the air conditioner to prevent tripping of the compressor overload. | Power failure. | ·If power failure occurs, turn the air conditioner OFF. When |
| of the air conditioner and contact a qualified service | The current interrupter device is tripped. | ·Press the RESET button located on the power cord plug. ·If the RESET button will not stay engaged, discontinue use technician. |
| Air conditioner does not cool or heat (some models) as it should | Airflow is restricted. the front of the air conditioner. | ·Make sure there are no curtains, blinds or furniture blocking |
| The temp control may not be set correctly. | ·In COOL mode or HEAT mode (some models), press the DECREASE - pad. | |
| The air filter is dirty. | ·Clean the filter at least every 30 days. See the Operating Instructions section. | |
| to allow time for the room to cool down. | The room may have been hot. | ·When the air conditioner is first turned on, you need |
| ·Make sure the air conditioner's vent is in the closed position. | Cold air is escaping. | ·Check for open furnace registers and cold air returns. |
| Cooling coils have iced up. | ·See "Air conditioner freezing up" below. | |
| Air conditioner freezing up | Ice blocks the airflow and stops the air conditioner from cooling the room. | ·Set the controls at HIGH FAN or HIGH COOL and set the thermostat to a higher temperature to allow the ice to melt. ·Check filter for cleanliness. |
| The remote control is not working | The batteries are inserted incorrectly. | ·Check the position of the batteries. They should be inserted correctly. |
| The batteries may be dead. | ·Replace the batteries. | |
| Water drips outside | Hot, humid weather. | ·This is normal. |
| Water drips indoors | The air conditioner is not tilted to the outside. | ·For proper water disposal, make sure the air conditioner case is level or slants slightly from the case front to the rear. |
| Water collects in base pan | Moisture removed from air and drains into base pan. | ·This is normal for a short period in areas with little humidity; normal for a longer period in very humid areas. |
Normal Operating Sounds
You may hear a pinging noise caused by water being picked up and thrown against the condenser on rainy days or when the humidity is high. This design feature helps remove moisture and improve efficiency.
You may hear the thermostat click when the compressor cycles on and off.
Water will collect in the base pan during high humidity or on rainy days. The water may overflow and drip from the outdoor side of the unit.
The fan may run even when the compressor does not.
Notes.
Air Conditioner Warranty.
All warranty service provided by our Factory Service Centers, or an authorized Customer Care technician. To schedule service, on-line visit us at GEAppliances.com, or call 800.GE.CARES (800.432.2737). For service in Canada, contact Gordon Williams Corp. at 1.888.209.0999. Please have serial number and model number avail ble when calling for service.
Staple your receipt here. Proof of the original purchase date is needed to obtain service under the warranty.
For The Period Of: GE Will Replace:
One Year
From the date of the original purchase ar
Any part of the air conditioner which fails due to a defect in materials or workmanship. During this limited one-year warranty, GE will also provide, free of charge, all labor-rated service to replace the defective part.
Five Years
From the date of the original purchase
Any part of the sealed refrigerating system (the compressor, condenser, evaporator and all connecting tubing) which fails due to a defect in materials or workmanship. During this four-year limited additional warranty, GE will also provide, free of charge,
all labor and related service to replace the defective part.
What GE Will Not Cover:
Service trips to your home to teach you how to use the product.
Improper installation, delivery or maintenance. If you have an installation problem, or if the air conditioner is of improper cooling capacity for the intended use, contact your dealer or installer. You are responsible for providing adequate electrical connecting facilities.
Failure of the product resulting from modifications to the product or due to unreasonable use including failure to provide reasonable and necessary maintenance.
In commercial locations labor necessary to move the unit to a location where it is accessible for service by an individual technician.
Replacement of house fuses or resetting of circuit breakers.
Failure due to corrosion on models not corrosion-protected.
Damage to the product caused by improper power supply voltage, accident, fire, floods or acts of God.
- Incidental or consequential damage caused by possible defects with this air conditioner.
Damage caused after delivery.
Product not accessible to provide required service.
EXCLUSION OF IMPLIED WARRANTY--Your sole and exclusive remedy is product repair as provided in this Limited Warranty. Any implied warranties, including the implied warranties of merchantability or fitness for a particular purpose, are limited to one year or the shortest period allowed by law.
This warranty is extended to the original purchaser and any succeeding owner for products purchased for home use within the USA and Canada. If the product is located in an area where service by a GE Authorized Servicer is not available, you may be responsible for a trip charge or you may be required to bring the product to an Authorized GE Service location for service. In Alaska, the warranty excludes the cost of shipping or service calls to your home.
Some states do not allow the exclusion or limitation of incidental or consequential damages. This warranty gives you specific legal rights, and you may also have other rights which vary from state to state. To know what your legal rights are, consult your local or state consumer affairs office or your state's Attorney General.
Warrantor: General Electric Company. Louisville, KY 40225
Consumer Support.
GE Appliances Website
GEAppliances.com
Have a question or need assistance with your appliance? Try the GE Appliances Website 24 hours a day, any day of the year! For greater convenience and faster service, you can now download Owner's Manuals, order parts or even schedule service on-line.
Schedule Service GEAppliances.com
Expert GE repair service is only one step away from your door. Get on-line and schedule your service at your convenience any day of the year! Or call 800.GE.CARES (800.432.2737) during normal business hours.
Real Life Design Studio GEAppliances.com
GE supports the Universal Design concept—products, services and environments that can be used by people of all ages, sizes and capabilities. We recognize the need to design for a wide range of physical and mental abilities and impairments. For details of GE's Universal Design applications, including kitchen design ideas for people with disabilities, check out our Website today. For the hearing impaired, please call 800.TDD. GEAC (800.833.4322).
Extended Warranties GEAppliances.com
Purchase a GE extended warranty and learn about special discounts that are available while your warranty is still in effect. You can purchase it on-line anytime, or call 800.626.2224 during normal business hours. GE Consumer Home Services will still be there after your warranty expires.
Parts and Accessories GEAppliancesparts.com
Individuals qualified to service their own appliances can have parts or accessories sent directly to their homes (VISA, MasterCard and Discover cards are accepted). Order on-line today, 24 hours every day or by phone at 800.626.2002 during normal business hours.
Instructions contained in this manual cover procedures to be performed by any user. Other servicing generally should be referred to qualified service personnel. Caution must be exercised, since improper servicing may cause unsafe operation.

Contact Us GEAppliances.com
If you are not satisfied with the service you receive from GE, contact us on our Website with all the details including your phone number, or write to: General Manager, Customer Relations
GE Appliances, Appliance Park
Louisville, KY 40225
Register Your Appliance GEAppliances.com
Register your new appliance on-line-at your convenience! Timely product registration will allow for enhanced communication and prompt service under the terms of your warranty, should the need arise.
You may also mail in the pre-printed registration card included in the packing material.
Conditionneur d'air
1. Power On/Off (marche/arret)
4. Temp Increase +/Decrease - Pads
Instructions concerning la climatisation
MODE VENTILATEUR (FAN)
4. TEMP Increase +/Decrease - Pads
Instructions concerning la climatisation
Instructions concerning le chauffage
Garant: General Electric Company. Louisville, KY 40225
Site Web apparreils electromenagers GE www.electromenagersge.ca
General Manager, Customer Relations
GE Appliances, Appliance Park
Louisville, KY 40225
Registre su electrodoméstico GEAppliances.com
- Care and Cleaning
- Installation Instructions
- Troubleshooting Tips 16
- Consumer Support
- Owner's Manual and Installation Instructions
- Espanol
- IMPORTANT SAFETY INFORMATION. READ ALL INSTRUCTIONS BEFORE USING.
- SAFETY INFORMATION
- WARNING
- SAFETY PRECAUTIONS
- HOW TO CONNECT ELECTRICITY
- USE OF EXTENSION CORDS
- USE OF ADAPTER PLUGS
- SAVE THESE INSTRUCTIONS
- About the controls on the air conditioner—Cool Only Models
- Controls
- Power On/Off
- Display
- Mode
- Temp Increase +/Decrease - Pads
- Fan Speeds
- Delay Hrs
- Reset Filter
- Remote Control Signal Receiver
- Remote Control
- Cool Mode
- Control Panel
- Cooling Descriptions
- FAN MODE
- About the controls on the air conditioner—Heat/Cool Models
- ON/OFF
- TIMER
- Remote Control Signal Receiver
- HEAT MODE
- Heating Descriptions
- FAN
- About the controls on the air conditioner
- Vent Control
- Air Direction
- Cool Only Models
- Auxiliary Controls - Dip Switches (location varies by model)
- Fan Cycle/Continuous - Cool
- Filter Reminder Funtion
- Heat/Cool Models
- Fan Cycle/Continuous - Heat
- Class 2 - Remote Thermostat
- Terminal Connections Remote Thermostat - Class 2 (on some models)
- IMPORTANT:
- NOTICE:
- Care and cleaning of the air conditioner.
- Grille and Case
- Outdoor Coils
- FrontGrille
- To remove:
- To replace:
- Air Filter
- Turn the air conditioner off before cleaning.
- Keeping the air filter clean will:
- To clean the air filters:
- To remove the air filter, on some models:
- To remove the air filter, on other models:
- To replace the air filter:
- NOTICE: Do not operate the air conditioner without the filter in place. If a filter becomes torn or damaged it should be replaced immediately.
- How to Insert the Batteries in the Remote Control
- NOTES:
- Long Term Storage
- Air Conditioner
- BEFORE YOU BEGIN
- Air conditioner break-in period
- ELECTRICAL REQUIREMENTS
- IMPORTANT!
- TOOLS YOU MAY NEED
- GE KIT NUMBERS
- ADA Compliance
- INSTALLING A J-MODEL IN AN EXISTING WALL CASE
- INSTALLING THROUGH THE WALL
- PREPARE OPENING IN WALL
- SUPPORT REQUIREMENTS FOR AIR CONDITIONER
- Before you call for service...
- Normal Operating Sounds
- Notes.
- Air Conditioner Warranty.
- For The Period Of: GE Will Replace:
- One Year
- Five Years
- What GE Will Not Cover:
- Consumer Support.
- GE Appliances Website
- GEAppliances.com
- Schedule Service GEAppliances.com
- Real Life Design Studio GEAppliances.com
- Extended Warranties GEAppliances.com
- Parts and Accessories GEAppliancesparts.com
- Contact Us GEAppliances.com
- Register Your Appliance GEAppliances.com
- Conditionneur d'air
- Power On/Off (marche/arret)
- Instructions concerning la climatisation
- MODE VENTILATEUR (FAN)
- Instructions concerning le chauffage
- Site Web apparreils electromenagers GE www.electromenagersge.ca
- Registre su electrodoméstico GEAppliances.com
Brand : GE
Model : AJCM10ACG
Category : Air Conditioning