
SAZ1 - Pregnant SONY - Free user manual and instructions
Find the device manual for free SAZ1 SONY in PDF.
User questions about SAZ1 SONY
0 question about this device. Answer the ones you know or ask your own.
Ask a new question about this device
Download the instructions for your Pregnant in PDF format for free! Find your manual SAZ1 - SONY and take your electronic device back in hand. On this page are published all the documents necessary for the use of your device. SAZ1 by SONY.
USER MANUAL SAZ1 SONY
Operating Instructions
The model and serial numbers are located on the back of the Speaker System. Record the serial number in the space provided below. Refer to these numbers whenever you call upon your Sony dealer regarding this product.
Model No. SA-Z1
Serial No.
WARNING
To reduce the risk of fire or electric shock, do not expose this Speaker System to rain or moisture.
The Speaker System is not disconnected from the mains as long as the Speaker System is connected to the AC outlet, even if the Speaker System itself has been turned off.
To reduce the risk of fire, do not cover the ventilation opening of the Speaker System with newspapers, tablecloths, curtains, etc. Do not expose the Speaker System to naked flame sources (for example, lighted candles).
To reduce the risk of fire or electric shock, do not expose this Speaker System to dripping or splashing, and do not place objects filled with liquids, such as vases, on the Speaker System.
As the main plug is used to disconnect the Speaker System from the mains, connect the Speaker System to an easily accessible AC outlet. Should you notice an abnormality in the Speaker System, disconnect the main plug from the AC outlet immediately.
Do not install the Speaker System in a confined space, such as a bookcase or built-in cabinet.
CAUTION
Risk of explosion if the battery is replaced by an incorrect type. Do not expose batteries or appliances with battery-installed to excessive heat, such as sunshine and fire.
For the customers in the U.S.A.
NOTE:
This Speaker System has been tested and found to comply with the limits for a Class B digital device, pursuant to Part 15 of the FCC Rules. These limits are designed to provide reasonable protection against harmful interference in a residential installation. This Speaker System generates, uses and can radiate radio frequency energy and, if not installed and used in accordance with the instructions, may cause harmful interference to radio communications. However, there is no guarantee that interference will not occur in a particular installation. If this Speaker System does cause harmful interference to radio or television reception, which can be determined by turning the Speaker System off and on, the user is encouraged to try to correct the interference by one or more of the following measures:
- Reorient or relocate the receiving antenna.
- Increase the separation between the Speaker System and receiver.
- Connect the Speaker System into an outlet on a circuit different from that to which the receiver is connected.
- Consult the dealer or an experienced radio/TV technician for help.
Properly shielded and grounded cables and connectors must be used for connection to host computers and/or peripherals in order to meet FCC emission limits.
If you have any questions about this Speaker System:
Visit: www.sony.com/support
Contact: Sony Customer Information Service
Center at 1-800-222-SONY (7669)
Write: Sony Customer Information Service Center 12451 Gateway Blvd., Fort Myers, FL 33913
Supplier's Declaration of Conformity
Trade Name:SONY
Model No.: SA-Z1
Responsible Party: Sony Electronics Inc.
Address: 16535 Via Esprillo, San Diego, CA 92127 USA
Telephone No.: 858-942-2230
This device complies with Part 15 of the FCC Rules. Operation is subject to the following two conditions: (1) This device may not cause harmful interference, and (2) this device must accept any interference received, including interference that may cause undesired operation.
CAUTION
You are cautioned that any changes or modifications not expressly approved in this manual could void your authority to operate this Speaker System.
For the customers in Canada
Properly shielded and grounded cables and connectors must be used for connection to host computers and/or peripherals.
Precautions
On safety
- Should any solid object or liquid fall into the cabinet, unplug the unit and have it checked by qualified personnel before operating it any further.
- Do not climb on the unit, as you may fall down and injure yourself, or the unit damage may result.
On power sources
- Before operating the Speaker System, check that the operating voltage is identical with your local power supply. The operating voltage is indicated on the nameplate on the bottom of the unit.
- The Speaker System is not disconnected from the AC power source (mains) as long as it is connected to the wall outlet, even if the unit itself has been turned off.
- If you are not going to use the speakers for a long time, be sure to disconnect the speakers from the wall outlet. To disconnect the AC power cord (mains lead), grasp the plug itself; never pull the cord.
- The AC power cord (mains lead) must be changed only at a qualified service shop.
On placement
-
Place the Speaker System in a location with adequate ventilation to prevent heat buildup and prolong the life of the Speaker System.
-
Do not place the Speaker System near heat sources, or in a place subject to direct sunlight, excessive dust, or mechanical shock.
- Do not place anything on top of the Speaker System that might cause malfunctions.
- Use caution when placing the Speaker System on surfaces that have been specially treated (with wax, oil, polish, etc.) as staining or discoloration of the surface may result.
Do not place this product close to medical devices
- This product (including accessories) has magnet(s) which may interfere with pacemakers, programmable shunt valves for hydrocephalus treatment, or other medical devices. Do not place this product close to persons who use such medical devices. Consult your doctor before using this product if you use any such medical device.
On operation
- Before connecting other equipment, be sure to turn off and unplug the speakers.
On cleaning
- Clean these speakers with a soft cloth slightly moistened with a mild detergent solution. Do not use any type of abrasive pads, scouring powder, or solvents, such as thinner, benzine, or alcohol.
Precautions on heat buildup
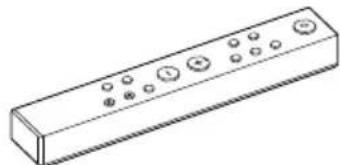
- Although the speakers heat up during operation, it is not a malfunction. If you continuously use the speakers at a high volume, the temperature of the top, sides, and bottom of the cabinet, as well as the heat sink (especially the area ① illustrated below), rises. To avoid burning yourself, do not touch the cabinet.

Also, do not install the Speaker System in a confined space. To prevent heat from building up inside the speakers, use them in a well-ventilated area.
Table of Contents
What's in the Box 6
Input Devices that Connect to the Speakers 8
Guide to Parts and Controls 10
Speaker A 10
Speaker B 12
Main Structure 13
Remote Control 14
Getting Started
Setting up the Speakers 16
Connection 1: Connecting the Left and Right Speakers. 18
Connection 2: Connecting the Input Devices. 19
Connecting a Digital Media Player 19
Connecting a Computer 19
Connecting a WALKMAN 20
Connecting a Smartphone 20
Connecting a Device with a Digital Optical Output Jack. 21
Connecting a Device with a Stereo Mini Audio Output Jack.....21
Connecting a Device with Balanced (XLR) Audio Output Jacks ... 22
Connecting a Device That Has Unbalanced (RCA) Audio Output Jacks 22
Connection 3: Connecting the AC Power Cords (Mains Leads) ....23
Playback
Listening to the Music Source from a Walkman, Smartphone, or AV Device 24
Listening to the Music Source from Your Computer. 25
Preparing the Computer 25
Playing the Music from the Computer 28
Operating the Sound Tuning Function 29
DSEE HX 29
DSD Remastering 30
D.A. Hybrid amplifier analog assist (D.A. ASSIST) 31
Assist woofer motion (A.WF MOTION) 31
Assist woofer frequency range (A.WF FREQ RANGE) 32
Assist tweeteter time alignment (A.TW TIME ALI). 32
Using the Various Functions
Changing the Display Window 33
Operating the Menu 34
Menu List. 36
Specifications and Technical Explanations
About the Speakers' Signal Processing 37
Signal Processing Methodology 37
8x Oversampling Digital Filter 37
DSEE HX 39
DSD Remastering 39
About D.A. Hybrid Amplifier 40
About Aging 41
Troubleshooting 42
General. 42
Sound 44
USB-B 45
Specifications 46
On Copyrights 47
Index 48
US
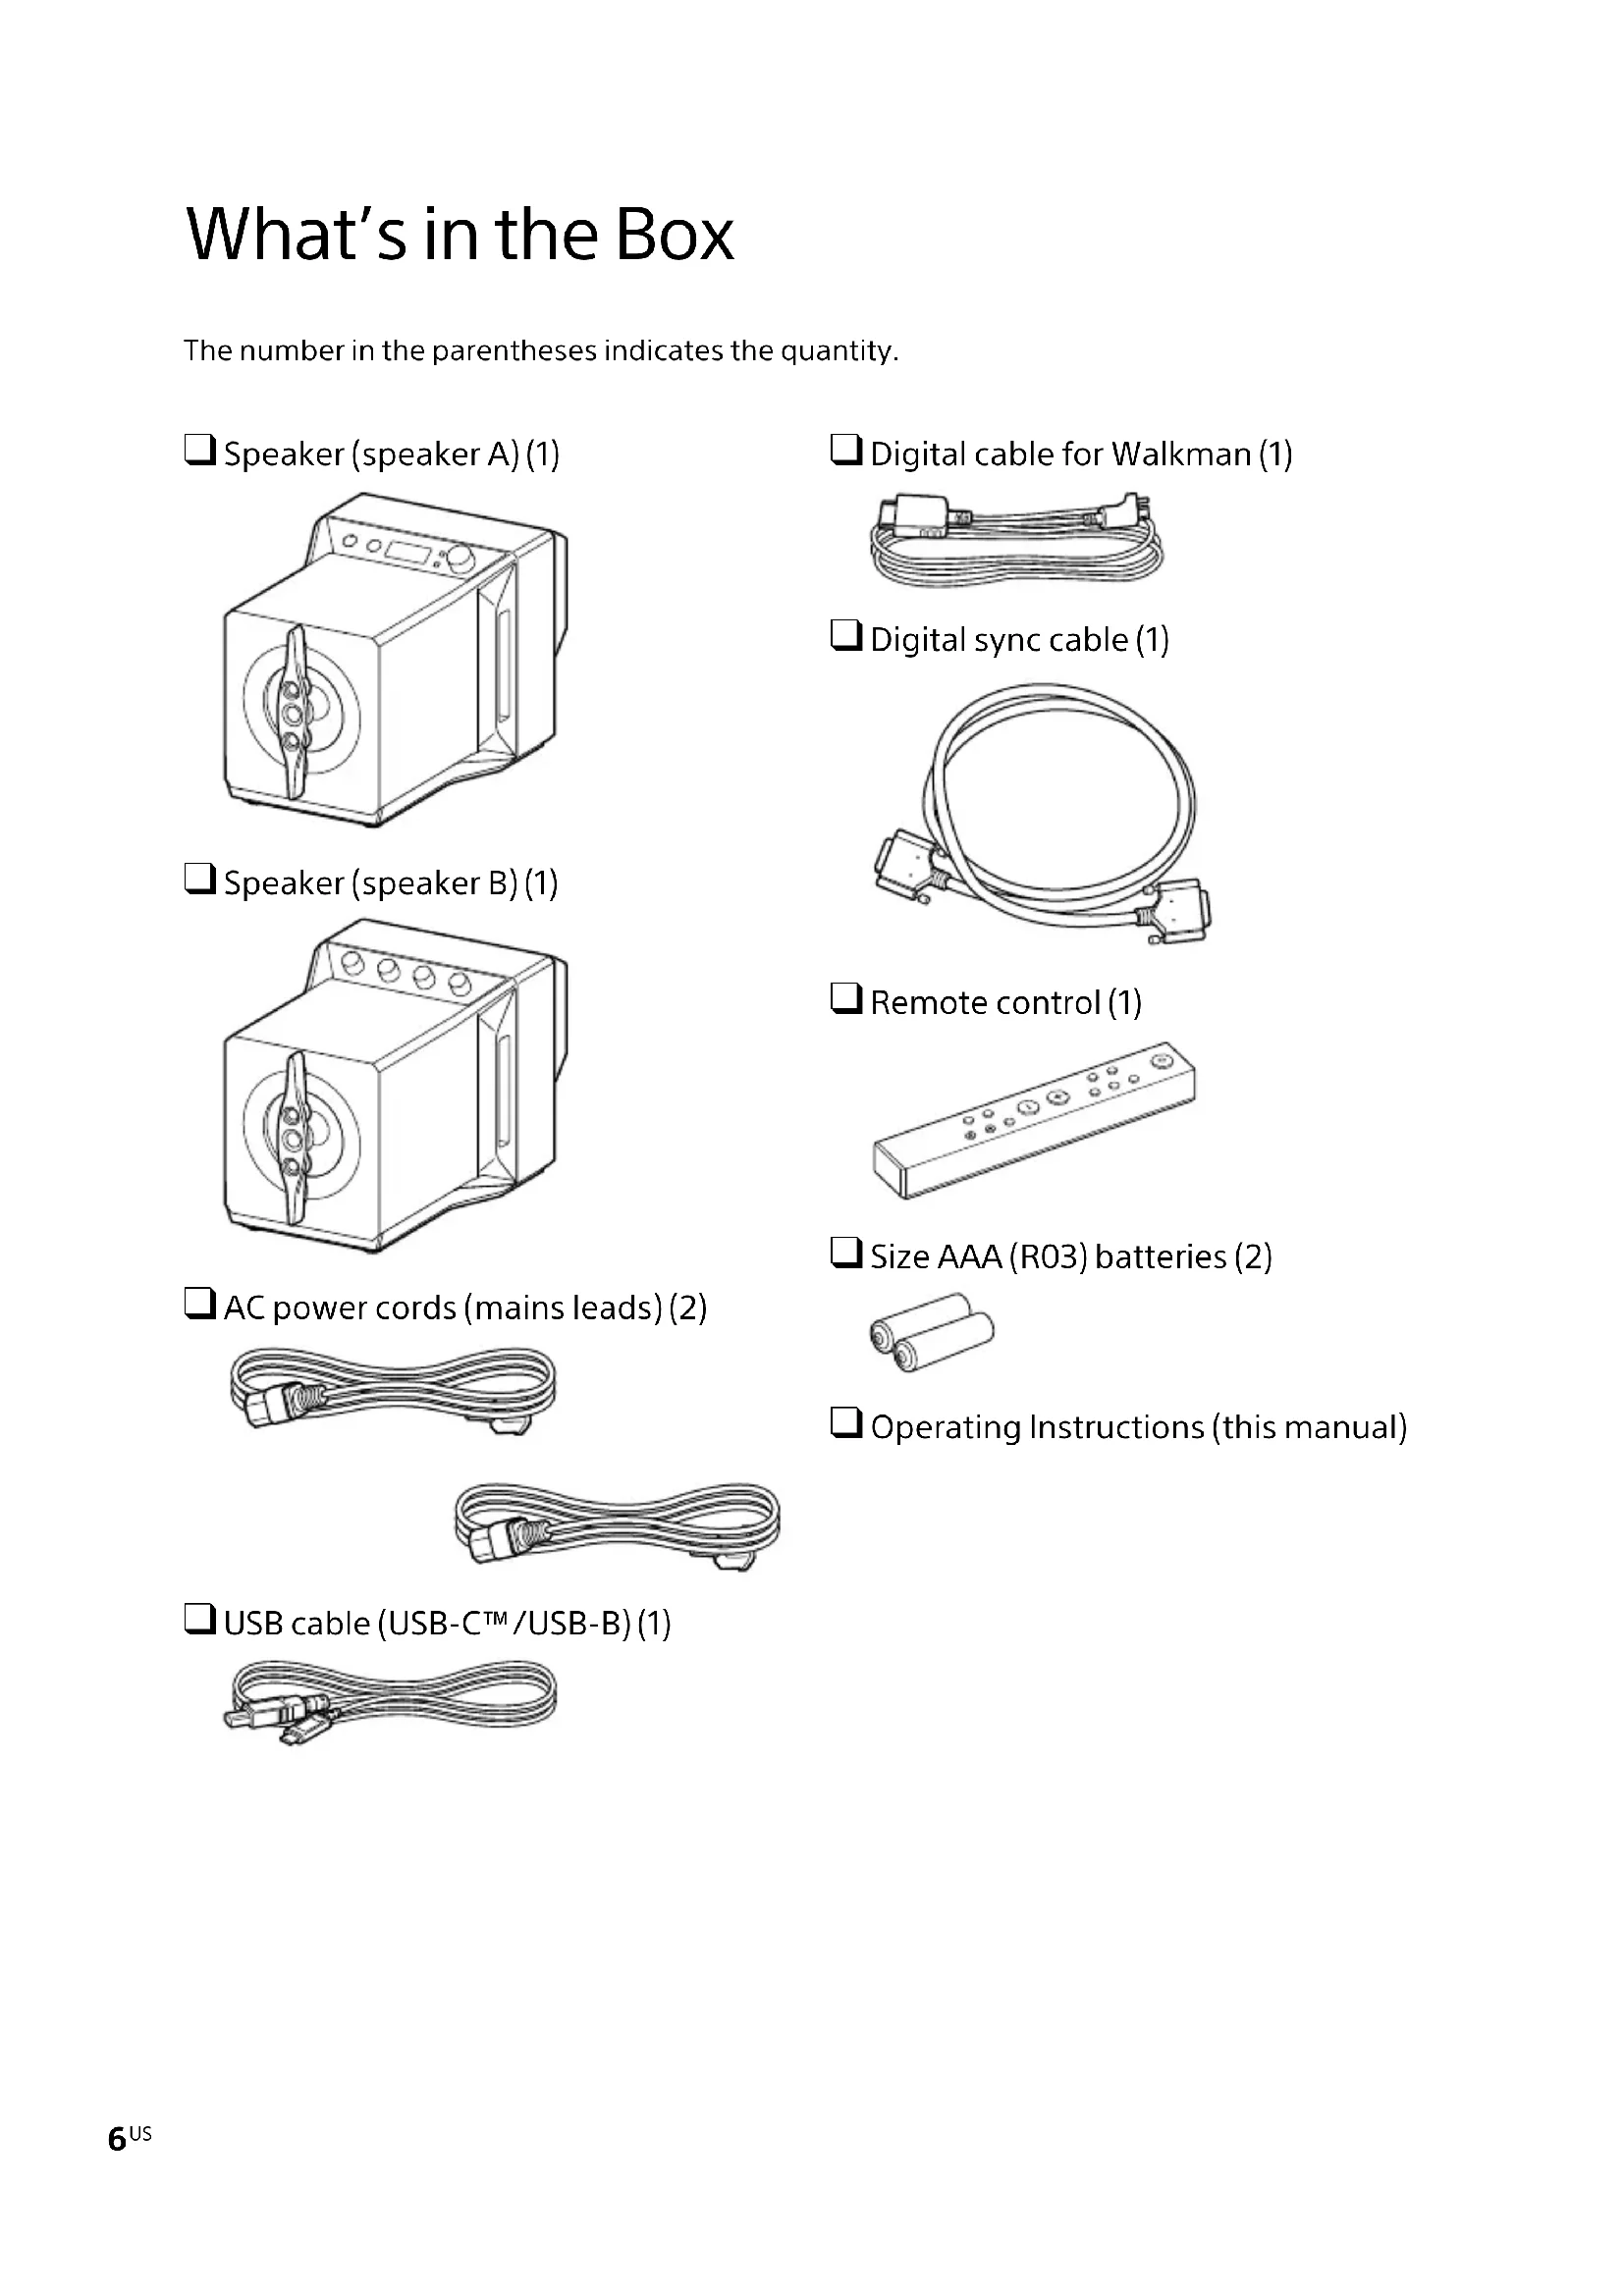
What's in the Box
The number in the parentheses indicates the quantity.
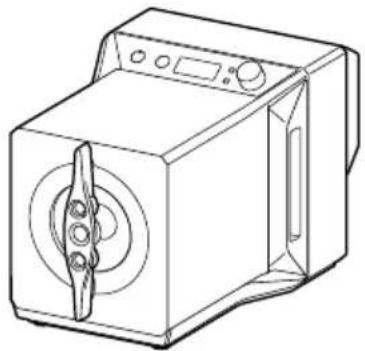
Speaker (speaker A) (1)
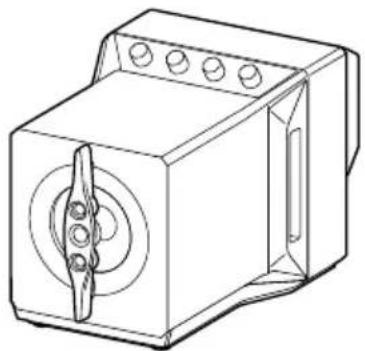
Speaker (speaker B) (1)
AC power cords (mains leads) (2)


USB cable (USB-CTM/USB-B) (1)

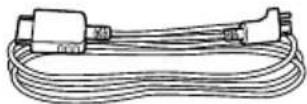
Digital cable for Walkman (1)
Digital sync cable (1)

Remote control (1)
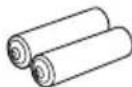
Size AAA (R03) batteries (2)
□ Operating Instructions (this manual)
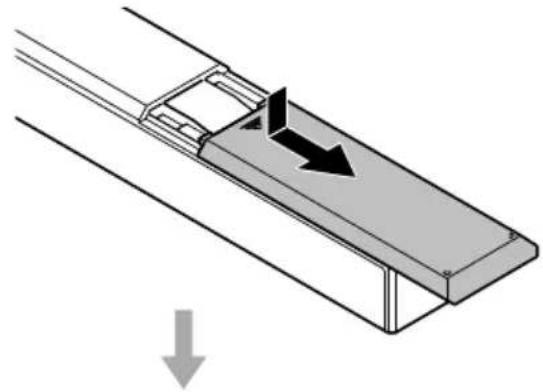
Inserting the batteries
Insert the supplied size AAA (R03) batteries.
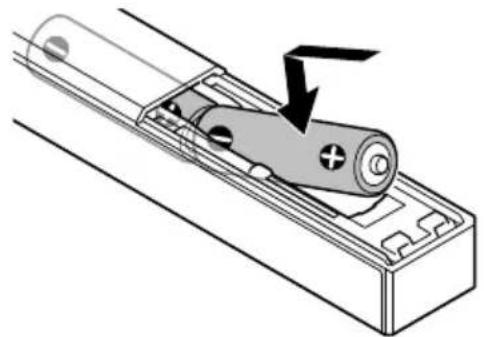
Notes
- Do not leave the remote control somewhere extremely hot or humid.
- Do not use a new battery and an old one together.
- Do not mix different kinds of batteries.
If you do not intend to use the remote control for an extended period of time, remove the batteries to avoid possible damage from battery leakage and corrosion.
Input Devices that Connect to the Speakers
Speaker A has the following jacks and ports that allow you to connect a variety of input devices, such as mobile and home audio devices, to enjoy the high-resolution and sense of being on a vast stage in your own personal space. For details about connections, see "Connecting the Input Devices" (pages 19 to 22).
USB-B
Digital media player (page 19) Walkman (page 20)
DMP-Z1,etc.
Computer (page 19) Smartphone (page 20)

You must install a USB driver to connect to a computer. (page 25)
WALKMAN
If you want to charge your Walkman when it is connected, set [WM CHARGE] to on. (page 36)
OPTICALSTEREO MINI
CD player, portable audio player, etc. (page 21)

Portable audio player, etc. with line out capability (page 21)

US
Guide to Parts and Controls
Speaker A
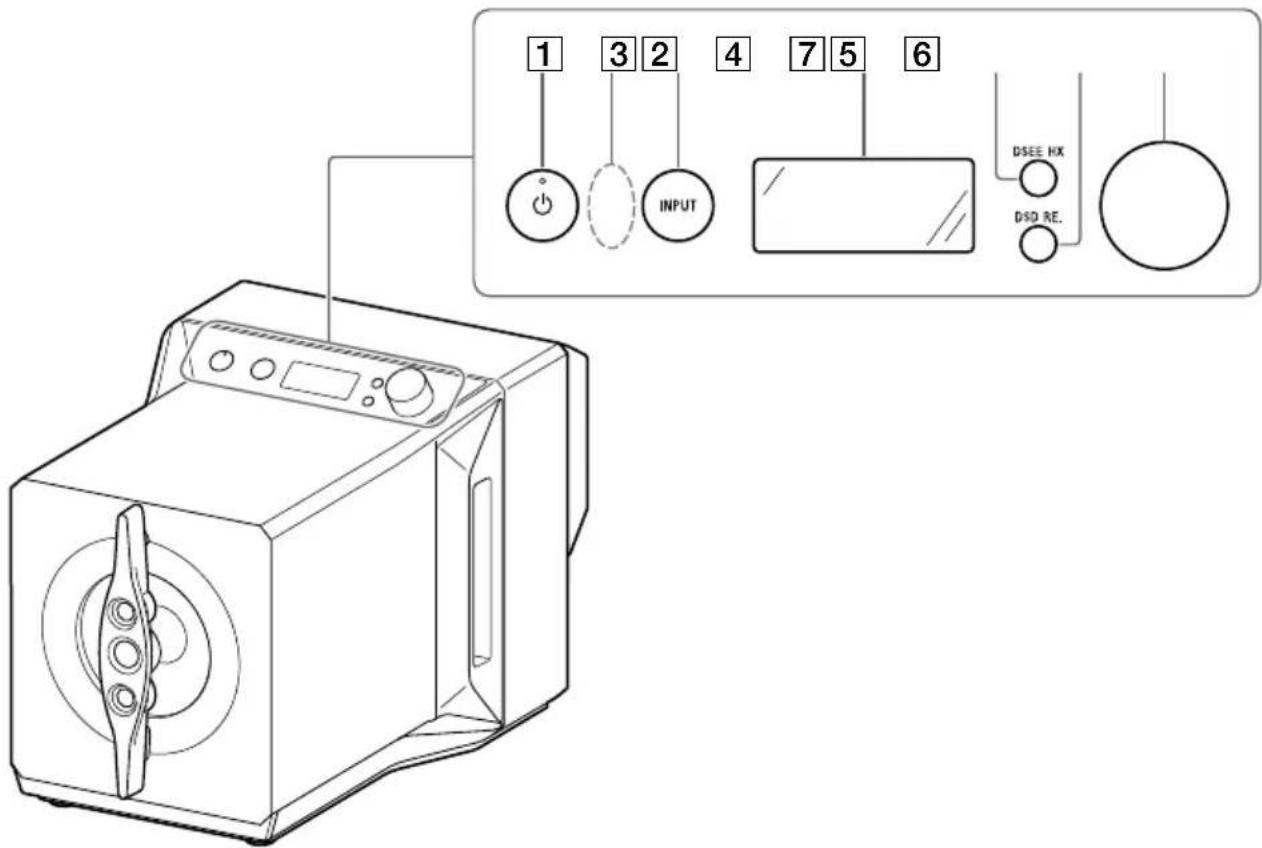
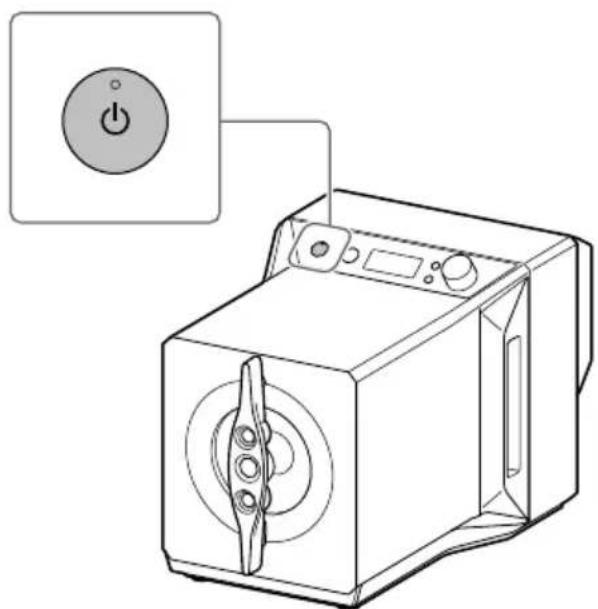
1 (power) button*, (power) indicator
Turns the Speaker System on/off. The indicator flashes slowly while the Speaker System is starting up, and lights when the power is turned on.
Remote control sensor
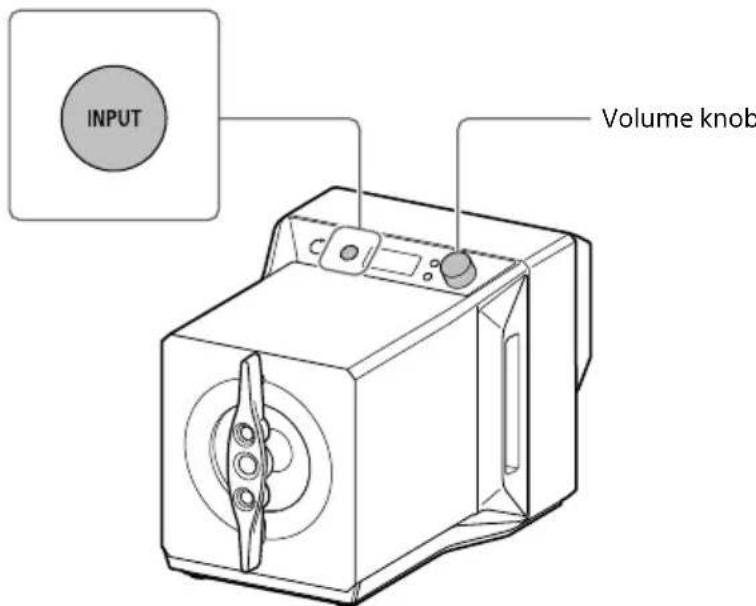
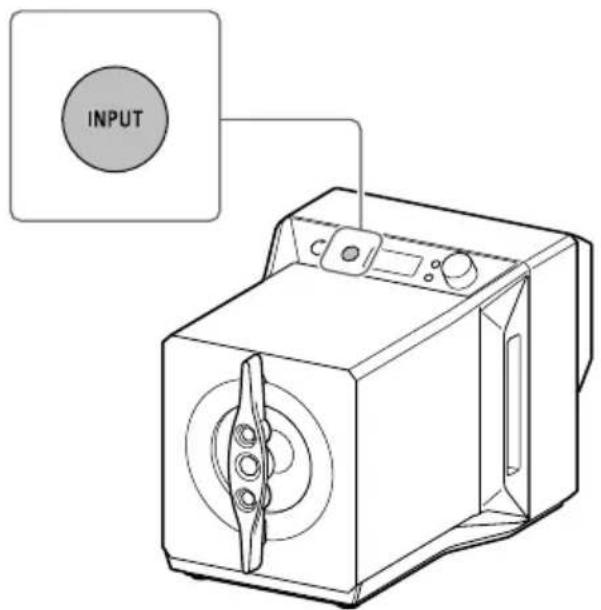
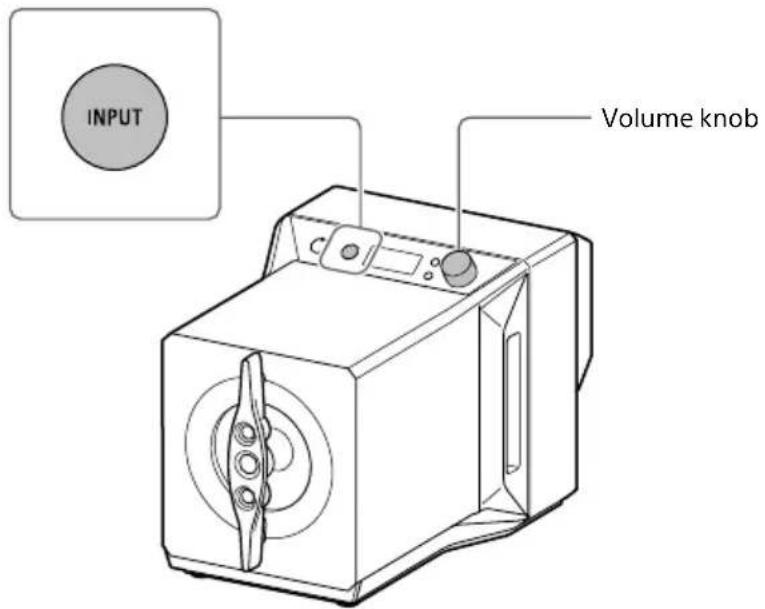
3 INPUT button* Press this button repeatedly to select the input jack/port connected to the device of the sound source. The selected input jack/port name appears in the display window (page 24).
4 Display window Shows the input name, input signal format, menu items, etc. (page 33).
DSEE HX button, DSEE HX indicator Turns the DSEE HX function on/off. The DSEE HX indicator lights while the DSEE HX function is processing. For details about the DSEE HX function, see "Operating the Sound Tuning Function" (page 29).
DSD RE. button, DSD RE. indicator Turns the DSD Remastering function on/off. The DSD RE. indicator lights while the DSD Remastering function is processing. For details about the DSD Remastering function, see "Operating the Sound Tuning Function" (page 29).
Volume knob* Adjusts the volume level. The adjusted volume is maintained by each input.
Back
US
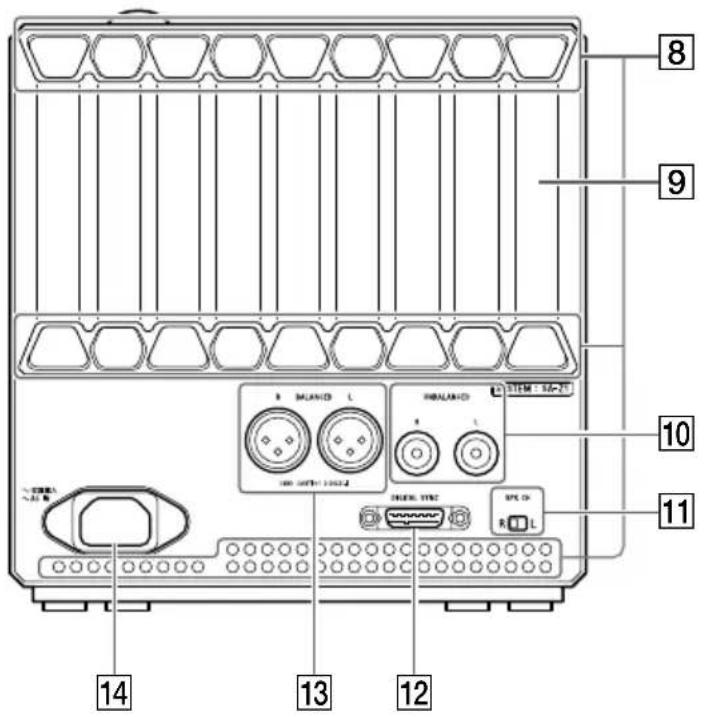
8 Ventilation hole
12 DIGITAL SYNC jack (page 18)
Heat sink
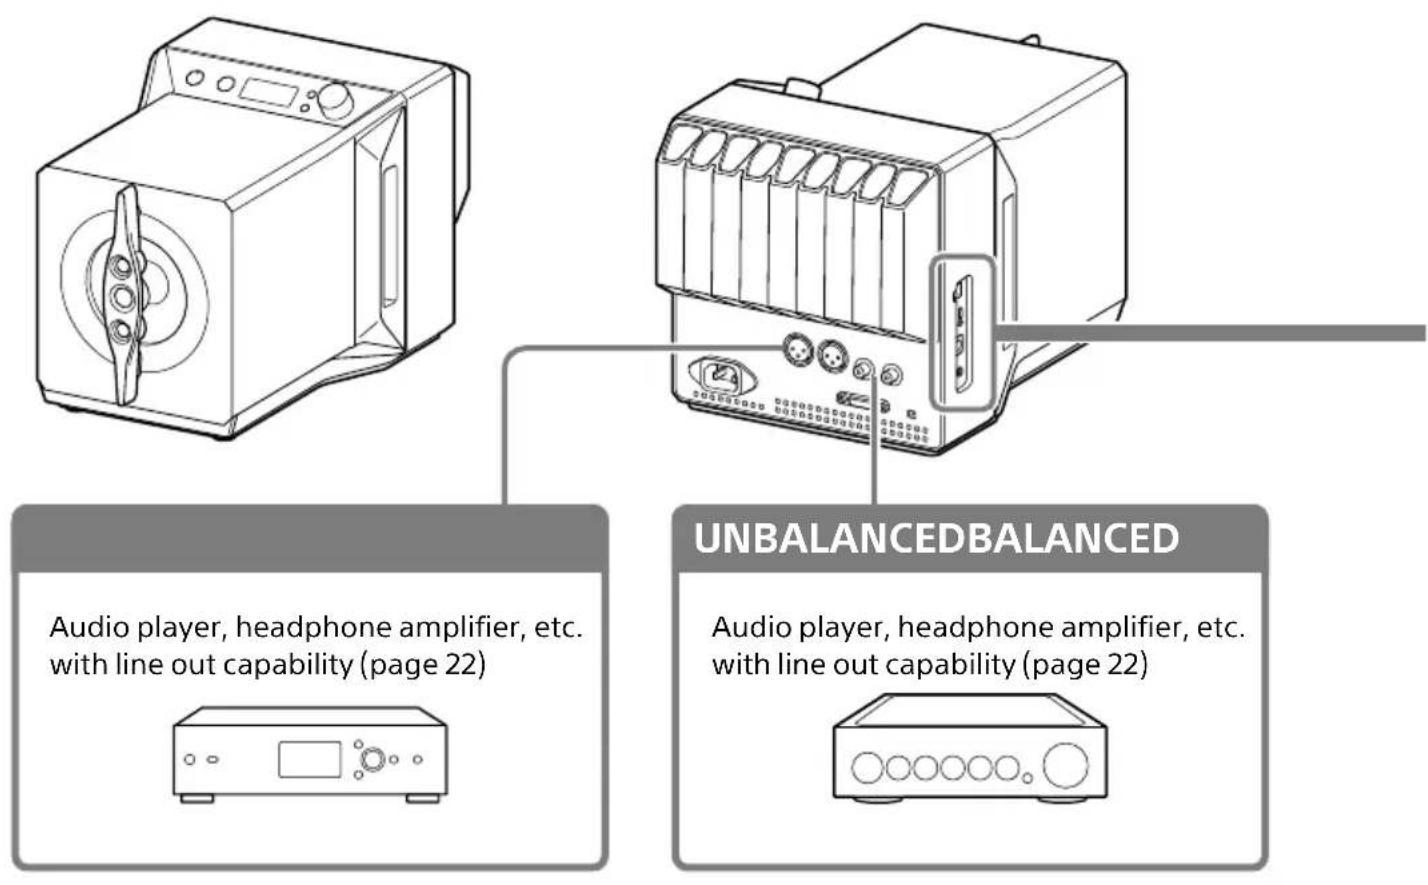
13 BALANCED L/R jacks (page 22)
10 UNBALANCED L/R jacks (page 22)
14 AC IN jack (page 23)
11 SPK CH (speaker channel) switch (page 16)
Left side
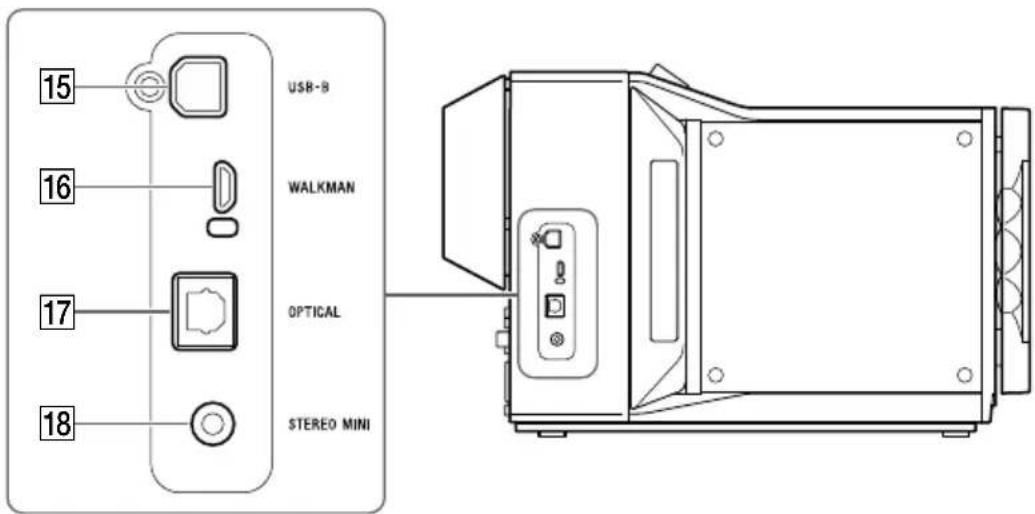
15 USB-B port (page 19)
Note
You must install a USB driver to connect a computer to the USB-B port. (page 25)
16 WALKMAN port (page 20)
This port is for connecting to a Walkman or Xperia™.
If you want to charge your Walkman when it is connected, set [WM CHARGE] to on (page 36).
The factory default is set to off.
17 OPTICAL jack (page 21)
STEREO MINI jack (page 21)
Speaker B
Back
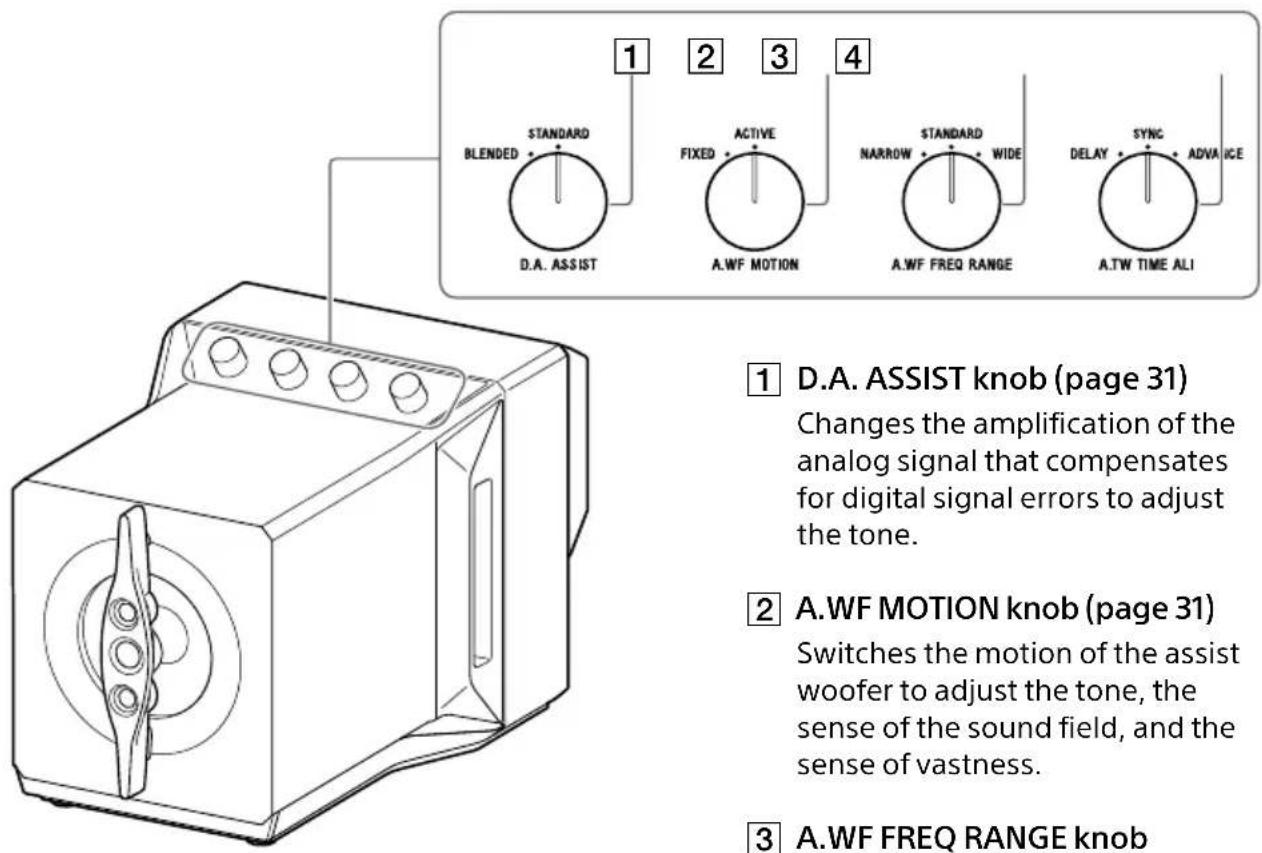
1 D.A. ASSIST knob (page 31)
Changes the amplification of the analog signal that compensates for digital signal errors to adjust the tone.
2 A.WF MOTION knob (page 31)
Switches the motion of the assist woofer to adjust the tone, the sense of the sound field, and the sense of vastness.
3 A.WF FREQ RANGE knob (page 32)
Changes the assist woofer's frequency band to adjust the tone and the fullness of low frequency sounds.
4 A.TW TIME ALI knob (page 32)
Switches the time alignment of the tweeters to the main woofer to adjust the tone.
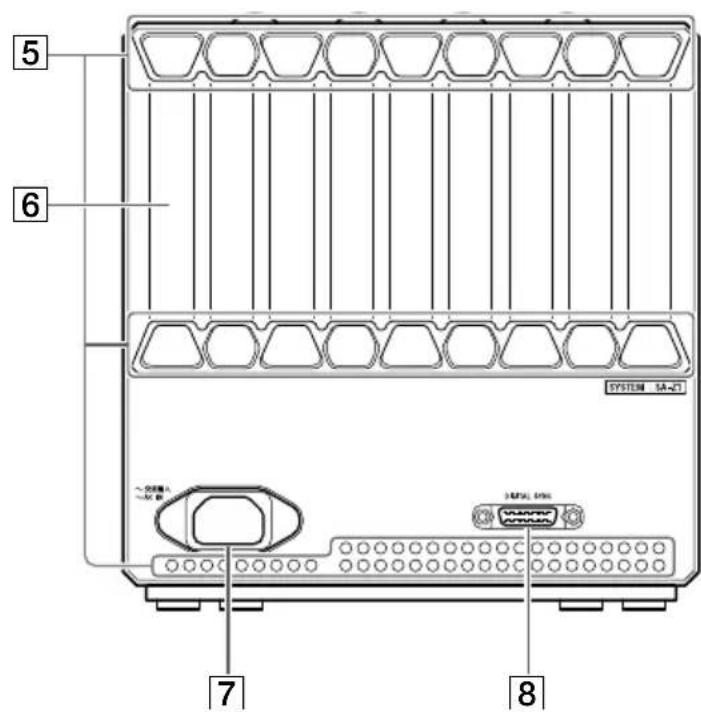
5 Ventilation hole
6 Heat sink
7 AC IN jack (page 23)
8 DIGITAL SYNC jack (page 18)
Main Structure
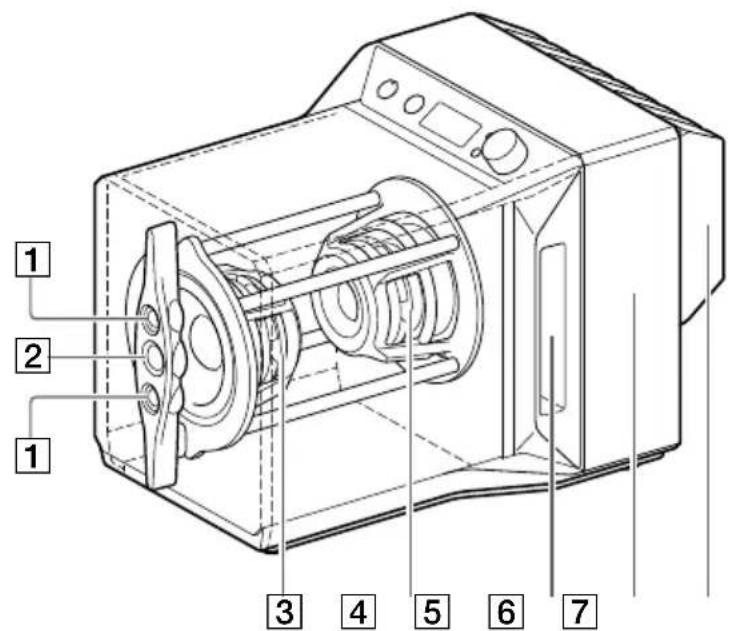
Assist tweeteter (page 32)
Sound path
2 Main tweeter (page 32)
6 Amplifier
3 Main woofer (page 31)
Heat sink
4 Assist woofer (page 31)
Remote Control
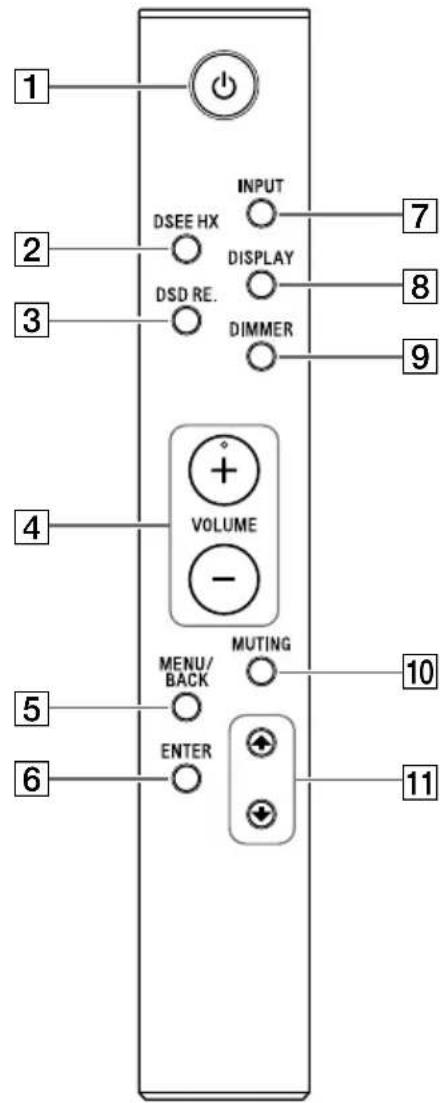
1 (power) button*
Turns the Speaker System on/off.
DSEE HX button*
Turns the DSEE HX function on/off. The DSEE HX indicator for speaker A lights while the DSEE HX function is processing. For details about the DSEE HX function, see "Operating the Sound Tuning Function" (page 29).
DSD RE. button*
Turns the DSD Remastering function on/off. The DSD RE. indicator for speaker A lights while the DSD Remastering function is processing. For details about the DSD Remastering function, see "Operating the Sound Tuning Function" (page 29).
4 VOLUME + / - buttons
Adjust the volume level. The adjusted volume is maintained by each input.
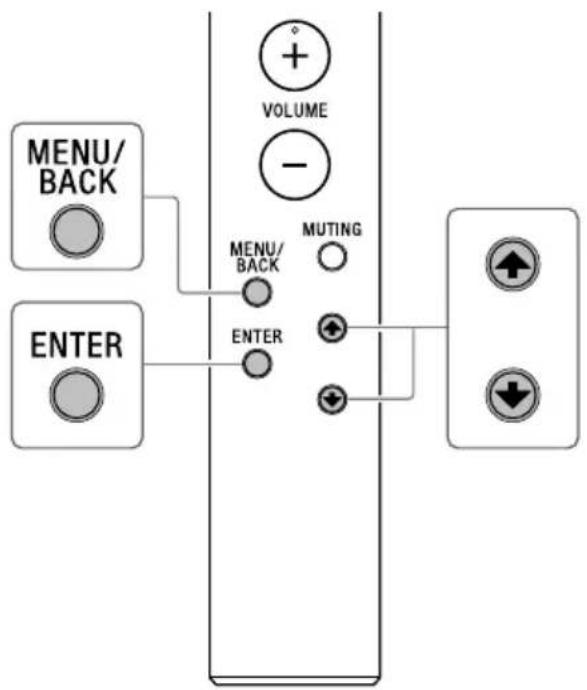
5 MENU/BACK button
Shows the menu in the display window. When this button is pressed while the menu is shown, the display returns to the playback display.
6 ENTER button
Enters the setting items and selected content.
7 INPUT button*
Press this button repeatedly to select the input jack/port connected to the device of the sound source. The selected input jack/port name appears in the display window (page 24).
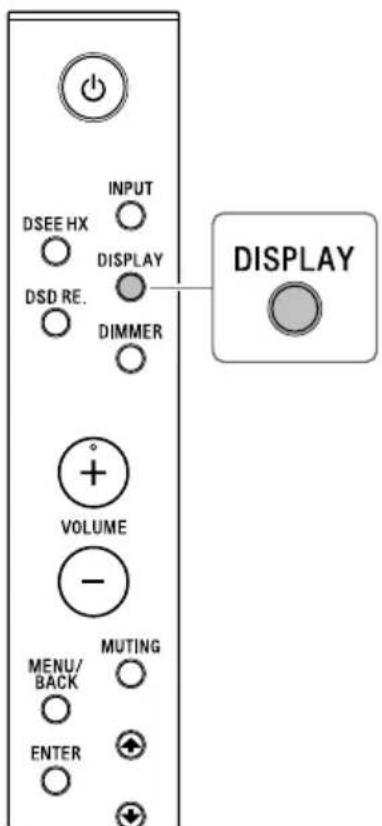
8 DISPLAY button
Changes the display window's display while music is being played. You can select the normal playback display [NORMAL] or input/output signal display [FORMAT]. For details about the display while music is being played, see "Changing the Display Window" (page 33).
DIMMER button
Adjusts the brightness of the display window and the power indicator. Each time you press the button, the brightness of the display window changes as follows:
BRIGHT DARK DISPLAY OFF BRIGHT ...
If you operate the speakers or the remote control's buttons while the display is off, the display window and power indicator appear in the DARK brightness level.
10 MUTING button
Turns off the sound temporarily. While muting is on, [MUTING] is displayed in the display window. To cancel muting, press this button again or increase the volume level with the volume knob on the speaker or with VOLUME + on the remote control.
11 ↑/↓ buttons
While the menu is shown, select the item that you want to set.
- Can also be operated using the buttons on speaker A.
Setting up the Speakers
The quality of the sound is affected by the environment in which the speakers are installed. Consider the following when installing the speakers. We also recommend adjusting the speakers to their optimal positions while playing back music to which you are used to listening.
- Place the speakers so that their backs are to a wall.
- Place the speakers level on a sturdy desk or similar surface.
- Place the speakers so that the conditions (material of the mounting surface, distance from the wall, etc.) for the left and right speakers are the same.
Standard speaker position
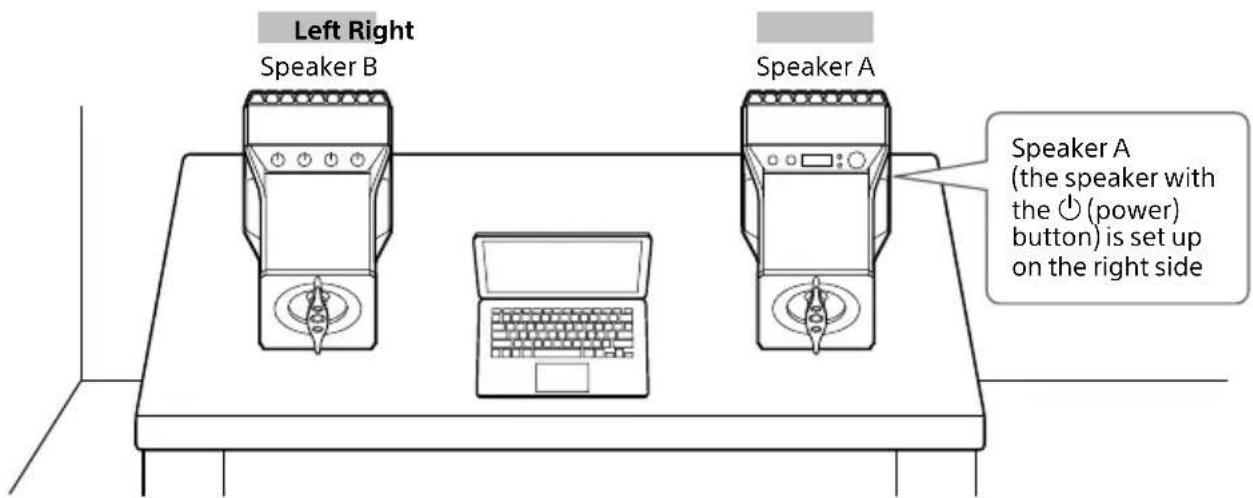
When setting up speaker A and speaker B in opposite positions
If you want to place both speakers to the right of the audio device, such as when the audio device to be connected cannot be moved, you can switch the left and right speakers (place speaker A on the left) to use them. In this case, set the SPK CH switch on the back of speaker A to "L".

To enjoy superior sound
- Position the speakers at an equal distance (A) from the listening position.

- The distance between the wall and the speakers changes how you hear the bass. Place the speakers so that the distance (B) from a wall to each speaker is 10cm (4 inches), as a guideline, and so that the distance is the same from side to side. The closer the speakers are from a wall, the more bass you can hear.
- The angle (C) of each speaker also changes how you hear sound. We recommend that the angle for each speaker to be 10^ , as a guideline, in a range between 0^ and 20^ . The smaller the angle is, the greater the sense of being on a vast stage is. The larger the angle is, the sharper the sound image is.
Note
Do not place magnetic cards on or near the speakers.
Connection 1: Connecting the Left and Right Speakers
Use the digital sync cable (supplied) to connect the DIGITAL SYNC jack on the back of speaker A to the back of speaker B.
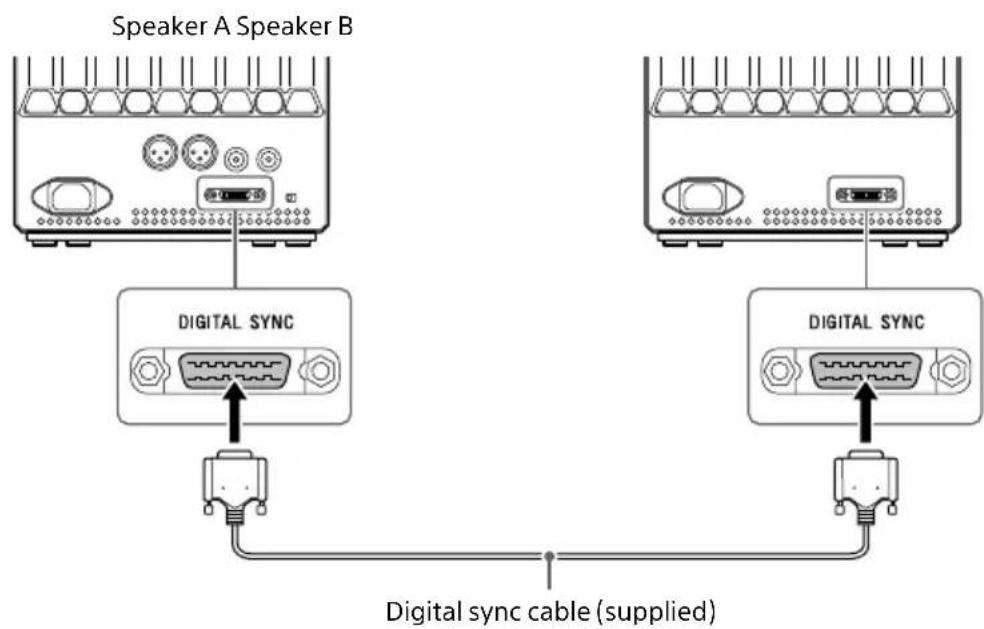
Tip
For details about the speaker setup, see "Setting up the Speakers" (page 16).
Connection 2: Connecting the Input Devices
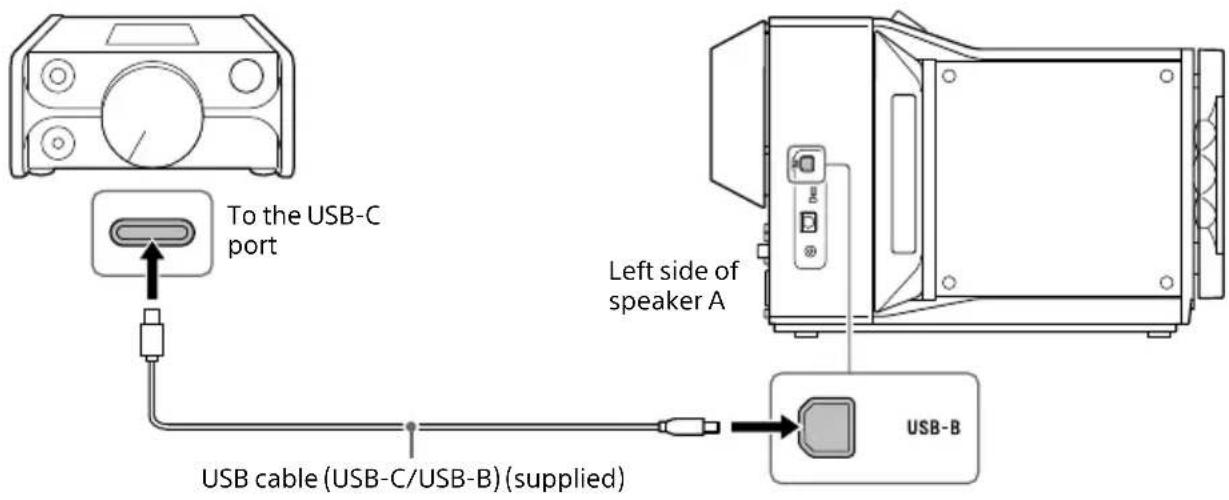
Connecting a Digital Media Player
Connect a digital media player (DMP-Z1, etc.) to the USB-B port of speaker A.
US
Connecting a Computer
Connect your computer to the USB-B port of speaker A.
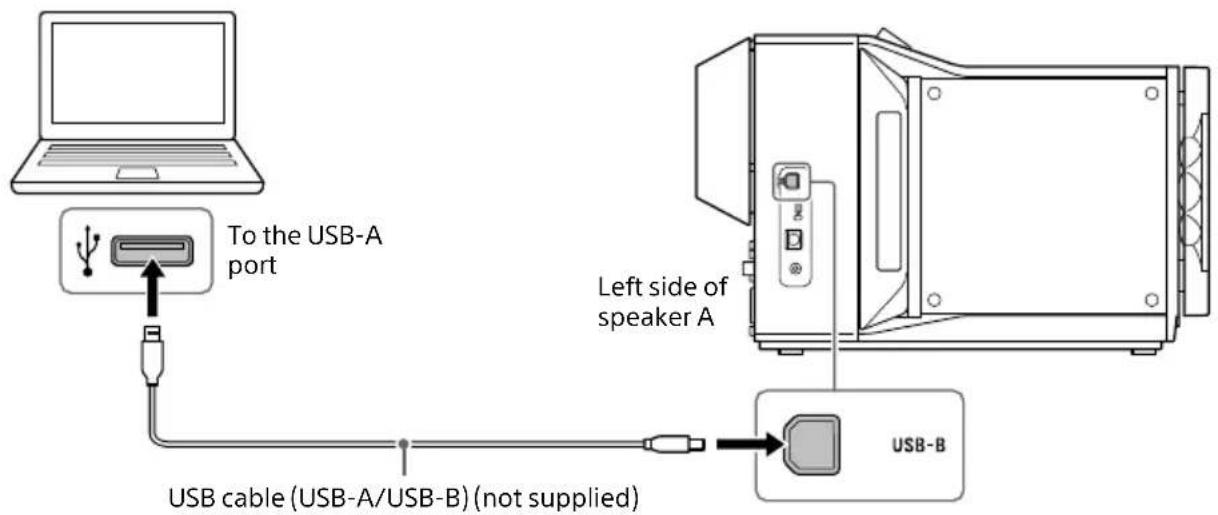
Tip
- To listen to the music on your computer, you must install "Hi-Res Audio Player" and the driver for the USB port on the computer. For details, see "Preparing the Computer" (page 25).
- If you are using a computer with a USB-C port that supports digital output, see "Connecting a Digital Media Player" (page 19).
Connecting a WALKMAN®
Connect a Walkman that is compatible with digital output to the WALKMAN port of speaker A.
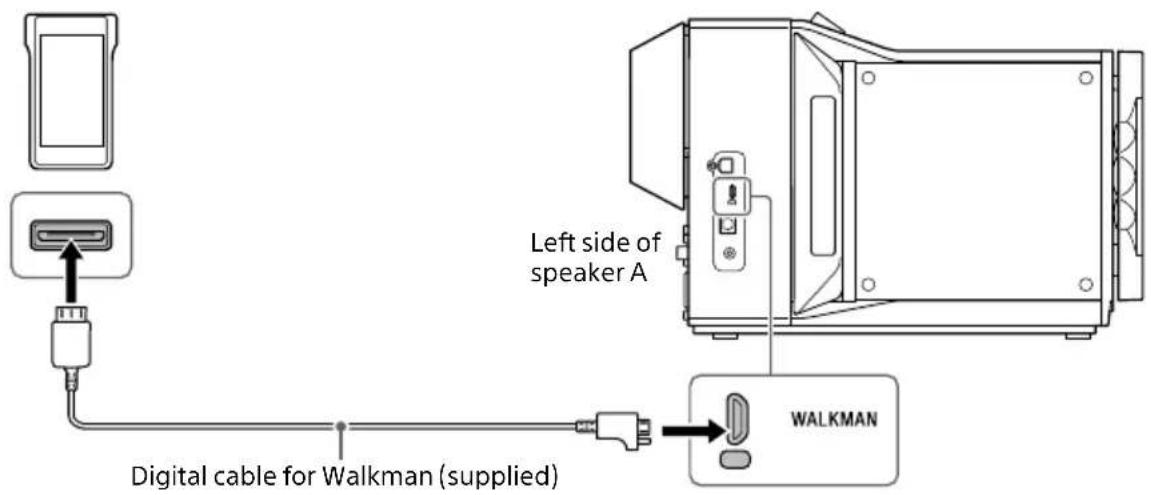
Tip
- If you are using the digital cable for Walkman (supplied), you can set whether to charge your Walkman during playback. For details, see "Menu List" (page 36).
- If you are using a Walkman with a USB-C port that supports digital output, see "Connecting a Digital Media Player" (page 19).
Connecting a Smartphone
Connect a smartphone (Xperia) to the WALKMAN port of speaker A. If needed, use a USB adaptor (not supplied) for the smartphone you are using.
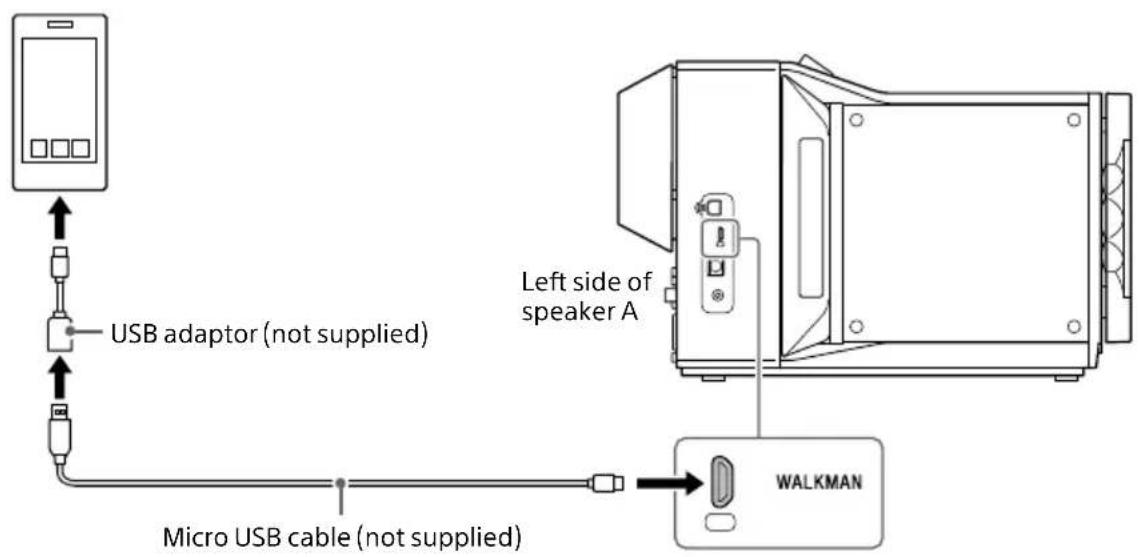
Tip
If you are using a smartphone with a USB-C port that supports digital output, see "Connecting a Digital Media Player" (page 19).
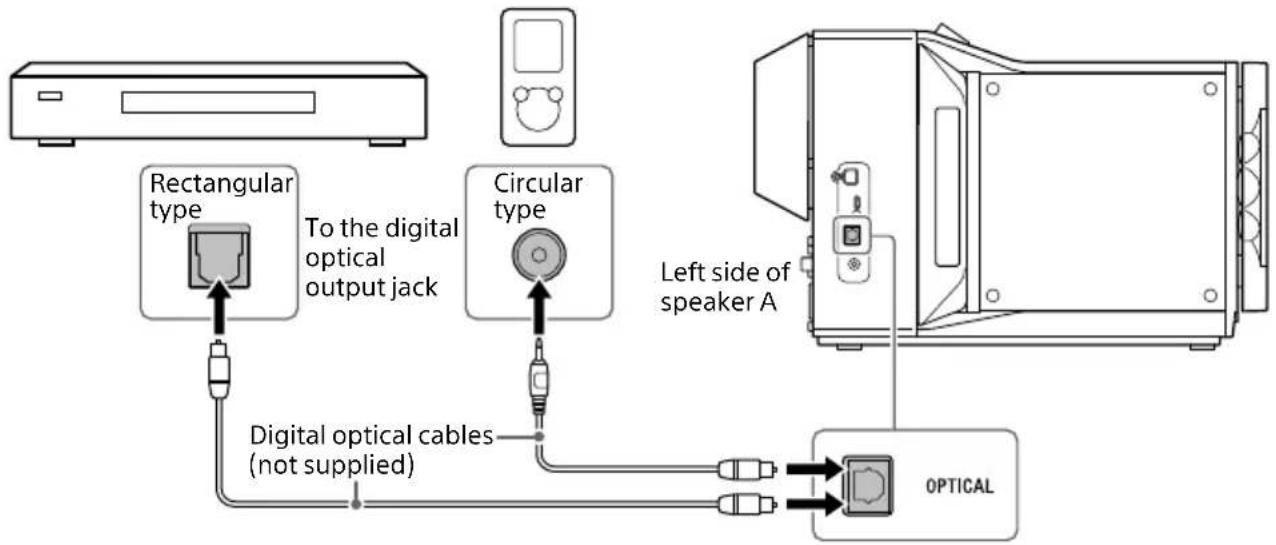
Connecting a Device with a Digital Optical Output Jack
Connect a device that has a digital optical output jack, such as a CD player or a portable audio player, to the OPTICAL jack of speaker A. Use a digital optical cable (not supplied) with a connector that matches the shape of your device's jack.
US
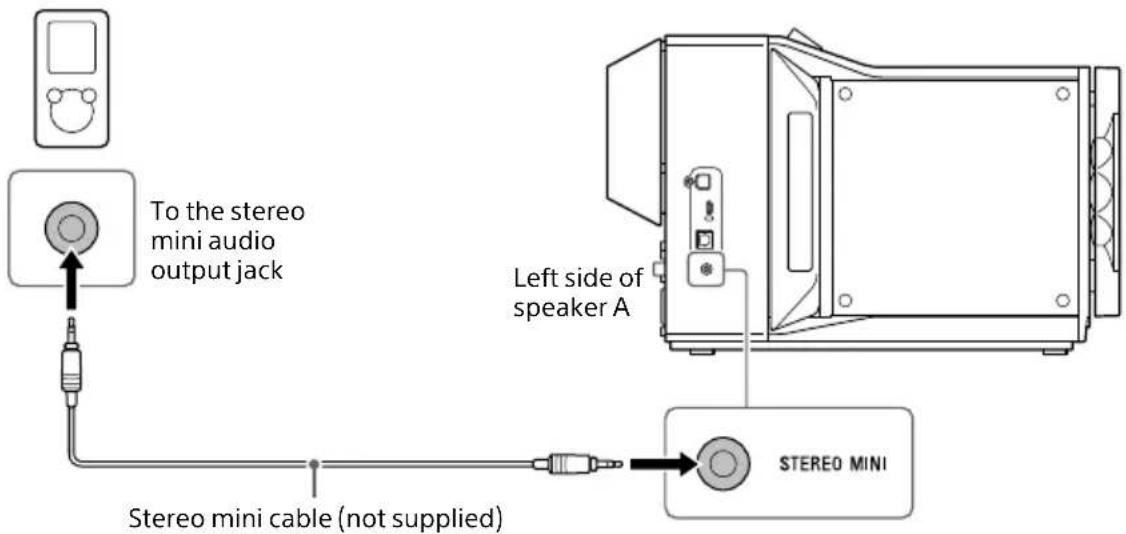
Connecting a Device with a Stereo Mini Audio Output Jack
Connect a device with a stereo mini audio output jack, such as a digital audio player with line out capability, to the STEREO MINI jack of speaker A.
Connecting a Device with Balanced (XLR) Audio Output Jacks
Connect a device that has balanced (XLR) audio output jacks, such as an audio player or a headphone amplifier with line out capability, to the BALANCED jacks of speaker A.
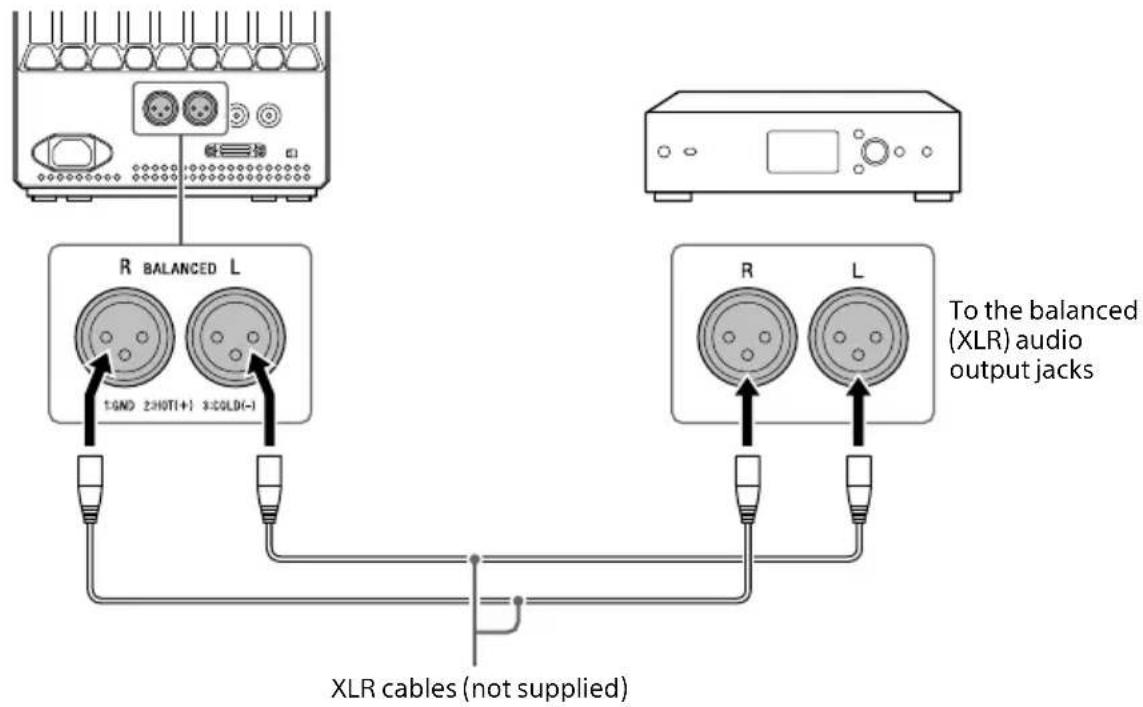
Note
Check that the pin arrangement for the balanced (XLR) audio output jacks of the input device is the same as that of the speaker (1: GND, 2: HOT (+), 3: COLD (-)).
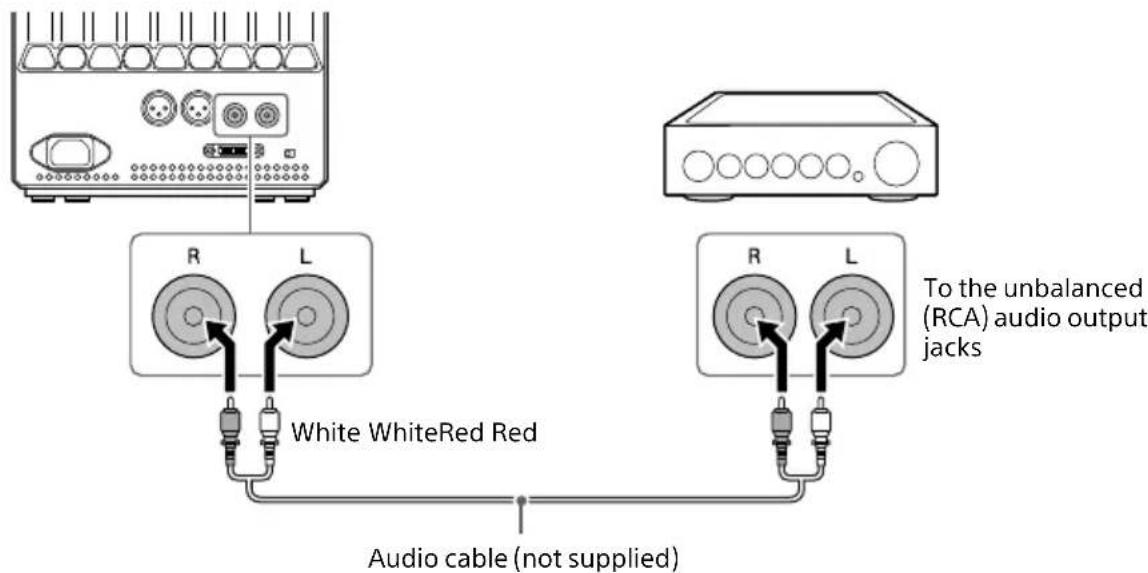
Connecting a Device That Has Unbalanced (RCA) Audio Output Jacks
Connect a device that has unbalanced (RCA) audio output jacks, such as an audio player or a headphone amplifier with line out capability, to the UNBALANCED jacks of speaker A.
Connection 3: Connecting the AC Power Cords (Mains Leads)
1 Connect the supplied AC power cords (mains leads) to both speakers' AC IN jacks and then into the wall outlets.
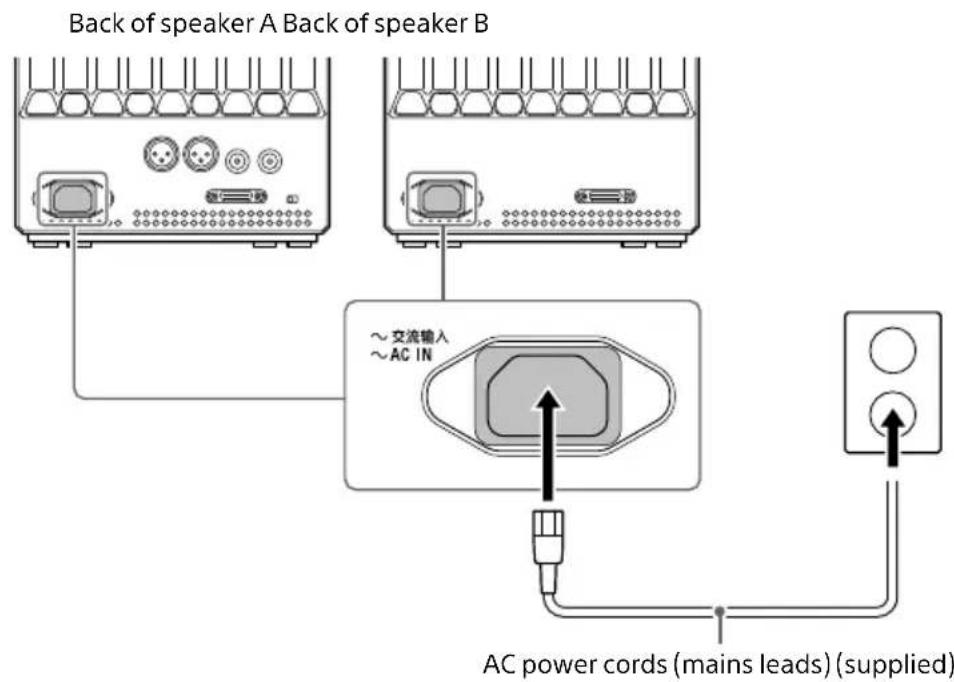
2 Press the (power) button to turn on the Speaker System.
US
Listening to the Music Source from a Walkman, Smartphone, or AV Device
For details about supported formats, see "Specifications" (page 46).
1 Make the connections required for playback (pages 18 to 23).
2 Press the INPUT button repeatedly to display the name of the input jack/port to which the input device that you want to play back is connected in the display window.
Input device and how it appears in the display window
[USB-B]: Device connected via the USB-B port
[WM]: Device connected via the WALKMAN port
[OPT]: Device connected via the OPTICAL jack
[BAL]: Device connected via the BALANCED jacks
[UNBAL]: Device connected via the UNBALANCED jacks
[ST MINI]: Device connected via the STEREO MINI jack
3 Play the device for the sound source.
4 Turn the volume knob to adjust the volume level.
If [OVER] appears in the display window, the Speaker System is in protect mode. Lower the volume to enjoy sound.
Listening to the Music Source from Your Computer
Preparing the Computer
To install the driver for the USB port
1 Do the required connections (page 19) and turn on the power to the Speaker System (page 23).
2 Install the driver for the USB port.
(1) Press the INPUT button repeatedly to select [USB-B].
② Turn the computer on and install the driver for the speaker's USB port.
How the driver is installed differs depending on the OS of the connected computer.
Windows
When the Speaker System is detected by a computer connected to the internet, the driver for the USB port (Sony Amplifier Driver) is installed automatically on the computer.
Note
Be sure to install the driver for the USB port (Sony Amplifier Driver). If you do not install it, the Speaker System will not operate correctly.
Mac
Driver installation is not required.
US
Tip
If the driver (Sony Amplifier Driver) is not installed for Windows, visit the website from the URL below. In the website, input "SA-Z1" in the search window, download the driver for the USB port, then install it.
For customers in Europe: https://www.sony.eu/support/
For customers in the U.S.A. and Canada: https://www.sony.com/am/support
For customers in China: https://service.sony.com.cn/
For customers in other regions: https://www.sony-asia.com/support
To install the "Hi-Res Audio Player" software
1 Install "Hi-Res Audio Player" on the computer.
Visit the website from the URL below. In the website, input "SA-Z1" in the search window, download "Hi-Res Audio Player," then install it. For procedures of installation and operation, refer to the same URL.
For customers in Europe: https://www.sony.eu/support/
For customers in the U.S.A. and Canada: https://www.sony.com/am/support
For customers in China: https://service.sony.com.cn/
For customers in other regions: https://www.sony-asia.com/support
2 Start "Hi-Res Audio Player" that is installed on the computer.
3 Select [Configure] - [Device] from the tool bar of "Hi-Res Audio Player," and then set [Device] to [Sony Amplifier Driver].
Note
Update "Hi-Res Audio Player" to its latest version. The Speaker System is not detected by the computer if it does not have the latest version of "Hi-Res Audio Player".
Features of Hi-Res Audio Player
"Hi-Res Audio Player" is an audio player software that allows you to enjoy playing back high-quality audio files with simple operation.
- Easy playback of high-resolution audio files
You can play back high-resolution audio files, such as DSD files, purchased in music distribution sites, etc., by connecting the device to your computer, and making simple software settings.
- Playlist function
You can create playlists to listen to tracks you like in the order you want by dragging and dropping music files to "Hi-Res Audio Player." The playlists created can be saved and edited.
- Playing music with higher audio quality
By storing audio data in your computer's memory before playback, you can reduce the load on the computer's CPU and play back music files with a stable audio quality. Select [Configure] - [Device] from the tool bar of "Hi-Res Audio Player," and then set [Audio Data Handling] to [Expand to RAM (Needs More Memory)].
Supported formats
Hi-Res Audio Player supports the following audio file formats.
- DSF (.dsf): 2.8 MHz/5.6 MHz/11.2 MHz/22.4 MHz
- DSDIFF (.dff): 2.8 MHz/5.6 MHz/11.2 MHz/22.4 MHz
PCM (.wav/.aiff/.aif): 44.1 kHz - 768 kHz, 16 bit -32 bit - FLAC (.flac): 44.1 kHz - 384 kHz, 16 bit - 32 bit
ALAC (.m4a): 44.1 kHz - 384 kHz, 16 bit - 32 bit - MP3 (.mp3): 32 kbps - 320 kbps
To use "Sony | Music Center for PC" as playback software
1 Go to the following URL to download "Sony | Music Center for PC" and install it on your computer.
For installation procedures and software operations, refer to the same URL.
http://www.sony.net/smc4pc/
2 Do the software's settings for audio output.
Set the audio output for "Sony | Music Center for PC" to [Sony Amplifier Driver] for [ASIO].
Note
Some formats supported by the Speaker System may be unable to play back in "Sony | Music Center for PC."
Playing the Music from the Computer
Play back music with "Hi-Res Audio Player" software that is installed on the computer.
1 Press the INPUT button repeatedly to select [USB-B].
[USB-B] appears in the display window.
2 Start "Hi-Res Audio Player" on the computer and play back the music.
For details about the "Hi-Res Audio Player", see page 26.
3 Turn the volume knob to adjust the volume level.
If [OVER] appears in the display window, the Speaker System is in protect mode. Lower the volume to enjoy sound.
Operating the Sound Tuning Function
By utilizing the buttons and knobs on the speakers, you can enjoy music while fine-tuning the tone and feel of the audio to your liking without the signal degrading.
The default settings are underlined.
DSEE HX

Speaker A
| Appears on display window | Function |
| DSEE HX ON | Upscales compressed- or CD-quality sound sources to a high-resolution sound source that has high-resolution equivalent information. While the DSEE HX function is processing, the indicator to the left of the button lights. |
| DSEE HX OFF | Playback is done in the quality of the sound source. |
| DSEE HX N/A | If the input is switched to [BAL], [UNBAL], or [ST MINI], the DSEE HX function does not work. |
The indicator to the left of the button flashes during operation.
You can also turn the DSEE HX function on and off with the DSEE HX button on the remote control.
For details about the DSEE HX function, see "DSEE HX" (page 39).
DSD Remastering
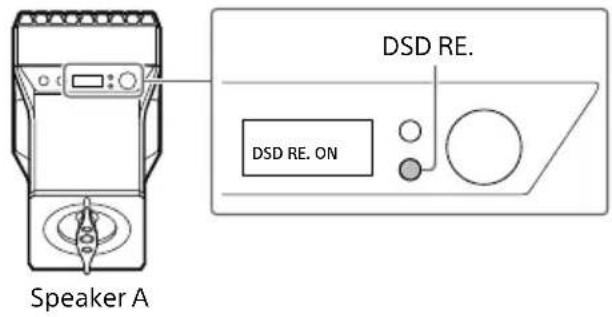
| Appears on display window | Function |
| DSD RE. ON | Converts all PCM signals to 11.2 MHz or 12.2 MHz DSD signals without compromising the amount of information of the original data. While the DSD RE. function is processing, the indicator to the left of the button lights. |
| DSD RE. OFF | Playback is done in the quality of the sound source. |
| DSD RE. N/A | If the input is switched to [BAL], [UNBAL], or [ST MINI], the DSD Remastering function does not work. |
The indicator to the left of the button flashes during operation.
You can also turn the DSD Remastering function on and off with the DSD RE. button on the remote control.
For details about the DSD Remastering function, see "DSD Remastering" (page 39).

US
D.A. Hybrid amplifier analog assist (D.A. ASSIST)
This function adjusts the tone by using the analog circuit to change the amount of error corrections for the digital signal.
STANDARD: Since the analog signal is used only to compensate for digital signal errors, the speakers are essentially full digital amplifiers.
BLENDED: Since the analog signal is used to compensate for errors, as well as for amplification, and is mixed with the digital signal, you can enjoy soft sounds, just like analog audio.
Assist woofer motion (A.WF MOTION)
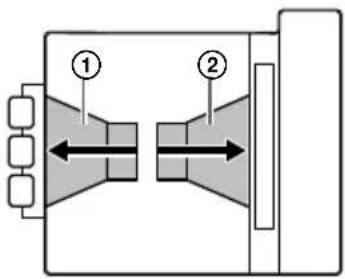
This function adjusts the tone, the sense of the sound field, and the sense of vastness by switching the motion of the assist woofer (②), which is set up facing the opposite direction of the main woofer (①).
ACTIVE: Since the main woofer and the assist woofer operate in opposite directions (shown by the arrows) and low frequencies are emitted from the sound path to both sides, the speakers reproduce the sense of a wide sound field and the sense of expansion.
FIXED: Reproduces a clear bass by fixing the assist woofer's operation.
Assist woofer frequency range (A.WF FREQ RANGE)
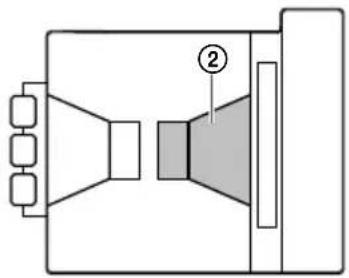
This function adjusts the tone and fullness of low frequencies by widening or narrowing the frequency band of the assist woofer (2) from the standard set frequency values.
NARROW: Reproduces a tight bass.
STANDARD: Reproduces the bass of the actual speakers.
WIDE: Augments the range of the bass.
Assist tweeter time alignment (A.TW TIME ALI)
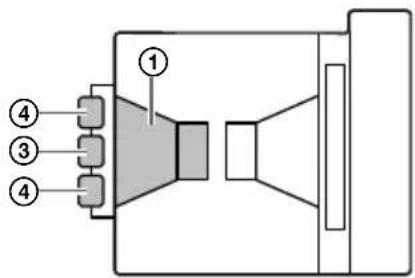
This function adjusts the tone by switching the time alignment of the tweeters (③, ④) in relation to the main woofer (①).
DELAY: Reproduces soft tones by delaying the output of the sound from the assist tweeters (4) relative to the main woofer.
SYNC: Demonstrates the performance of the actual speakers by synchronizing the timing of the main woofer with that of the main (③) and assist tweeters (④).
ADVANCE: Emphasizes the contours of clear sound by advancing the output of the sound from the assist tweeters (4) relative to the main woofer.
Changing the Display Window
You can change the items shown in the display window during playback by pressing the DISPLAY button on the remote control.
1 Press the DISPLAY button on the remote control.
The display window switches to either the normal playback display or input/output signal display.
Normal playback display [NORMAL]
![SONY SAZ1 - Normal playback display [NORMAL] - 1](/content/2026/03/503865/images/c10e56825a7092ee37b1439c05a0fc0d3bf6f467c8a64e6970336d910a880832.jpg)
Input jack/port name
2 Volume level
If the Speaker System is in protect mode, [OVER] appears on the upper right of the display window.
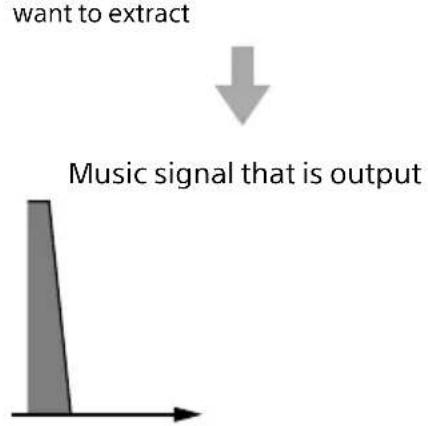
Input/output signal display [FORMAT]
![SONY SAZ1 - Input/output signal display [FORMAT] - 1](/content/2026/03/503865/images/76739597f4b27ab82bf713ca09e8c2baf88f66982216a6964eeaf2b5d76b1207.jpg)
3 Format of the input signal
4 Sampling frequency of the input signal
5 Bit depth of the input signal Depending on the input signal, this may not appear correctly.
6 Format of the output signal*
Sampling frequency of the output signal*
8 Bit depth of the output signal* Depending on the input signal, this appears as 8 fs/32 bit due to processing the 8x oversampling digital filter (page 37).
- The output signal shown indicates the processing signal at the time it is output to the S-Master HX Processing Block (page 37).
Operating the Menu
You can do various settings in the menu shown in the display window.
1 Press the MENU/BACK button on the remote control.
The menu appears in the display window.
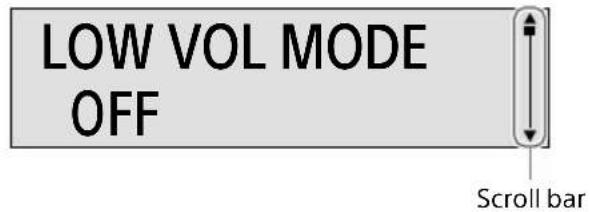
2 Press the / buttons on the remote control to select the menu item you want, and then press the ENTER button.
Setting valuesSetting items LOW VOL MODE OFF or▼ appears on the left of the setting value, then you can select the setting value.
For details about items you can set, see "Menu List" (page 36).
3 Press the / buttons to select the setting value, and then press the ENTER button.
The selected value is reflected and the display returns to the playback display (page 33).
Tip
Settings that were changed are preserved, even if you return by pressing the MENU/BACK button during a menu operation.
To reset the settings to the factory defaults
Reset the INPUT settings, volume, and the settings for the menu items to the factory defaults.
1 Press the MENU/BACK button on the remote control.
The menu appears in the display window.
2 Press the / buttons to select [RESET], and then press the ENTER button.
3 Press the / buttons to select [START], and then press the ENTER button.
[RESET] appears in the display window, and then the settings are reset to the factory defaults.
Tip
You can also press the (power) button on speaker A to reset the settings to the factory defaults.
Press the button to place the Speaker System in standby, and then press and hold the button for at least 7 seconds.
[RESET] appears in the display window, and then the settings are reset to the factory defaults.
Menu List
This is a list of setting values and items that can be set on the menu.
The default settings are underlined.
Setting items Setting values
[LOW VOL MODE]
Optimizes the characteristics of the bass and treble. Playback can be done with a balanced sound that is close to the original sound, even if the volume is adjusted to a low level.
[LR BALANCE]
Adjust the output balance of the left and right speakers.
Adjust within the following range.
[L-3.00dB]-[CENTER]-[R-3.00dB]
(0.25 dB decrements)
[WM CHARGE]
Set whether to start charging your Walkman automatically when it is connected to speaker A's WALKMAN port.
You must connect the Walkman using the digital cable for Walkman (supplied).
If the Speaker System is not on, the Walkman cannot charge.
[AUTO STANDBY]
Set whether to turn off the power automatically when the Speaker System is silent and have been inactive for about 20 minutes.
[VERSION]
Check the version of the Speaker System.
- [UCOM-A]: Shows the system version for speaker A.
- [USBDSP]: Shows the version of the interface software for USB-B and WALKMAN input.
- [UCOM-B]: Shows the system version for speaker B.
[RESET]
You can reset the input, volume, and menu settings to the factory defaults.
- [START]: Resets the settings to the factory defaults.
- [CANCEL]: Cancels the operation.
About the Speakers' Signal Processing
Signal Processing Methodology
A high-precision arithmetic algorithm that was independently developed is used for the input signal to generate an audio pulse signal that drives the output stage.
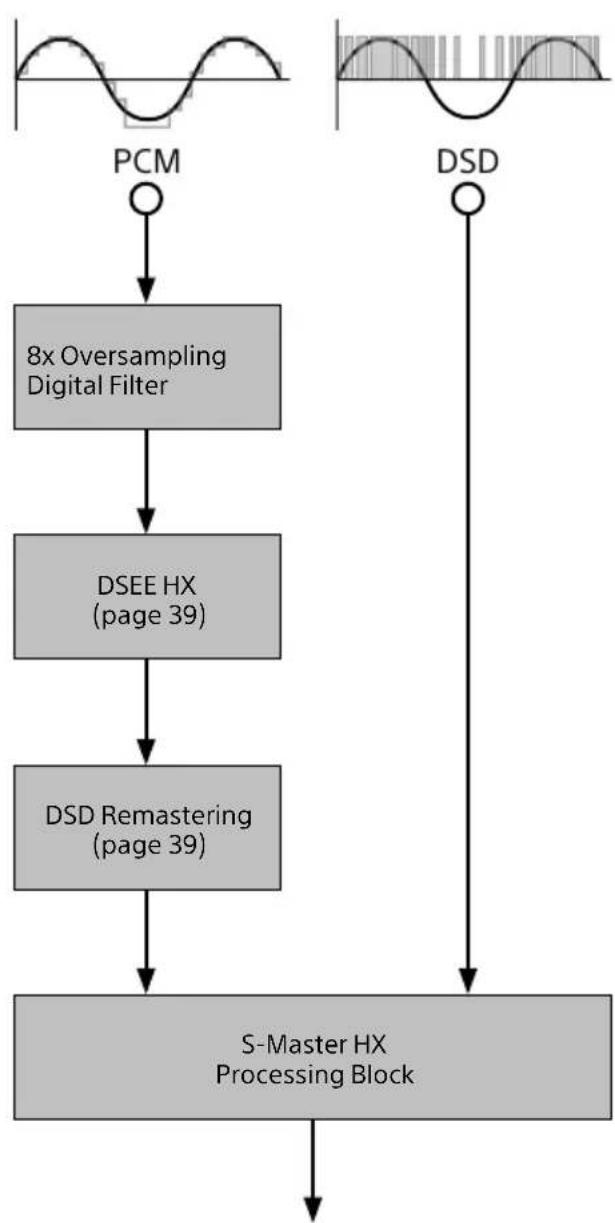
8x Oversampling Digital Filter
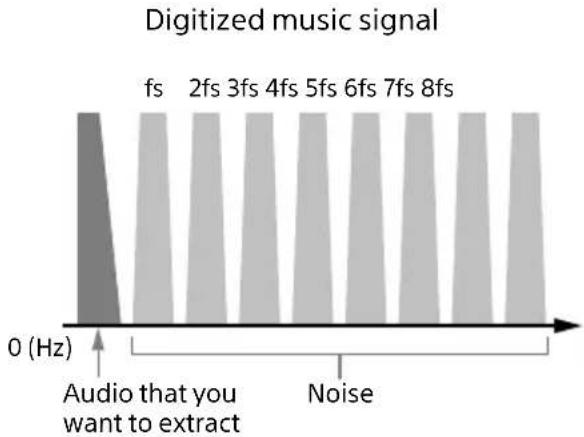
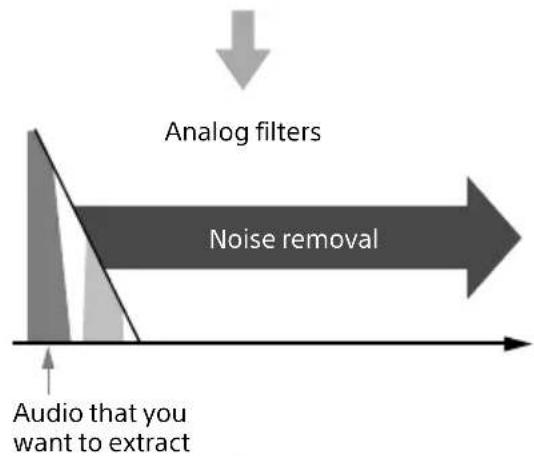
The oversampling digital filter processes the PCM sound source up to 8 times*. The process removes the excess noise and not the audio, so the original audio remains unaltered.
- Converted by 8x at 44.1/48 kHz, 4x at 88.2/96 kHz, and 2x at 176.4/192 kHz
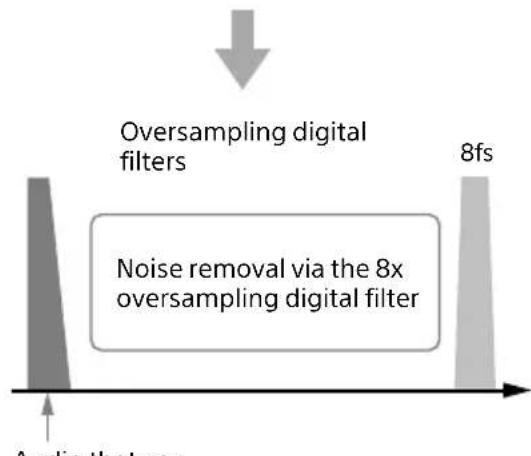
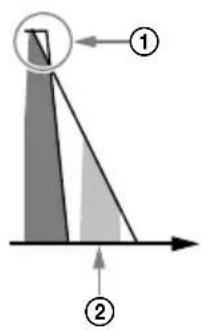
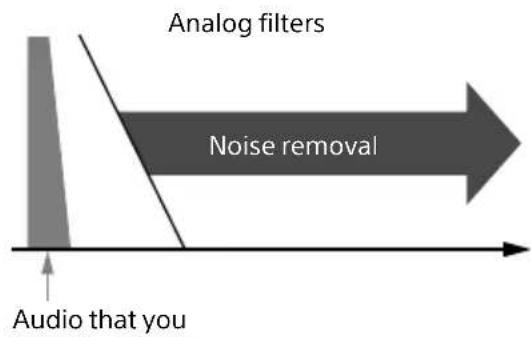
In music signals that have been digitalized in a form called PCM signals, noise is included for each fs, in addition to the original audio. Although the noise must be removed for accurate DA conversion, if you use just the analog filter, it may damage the original audio (1) page 38 and some noise may not be removed (2) page 38). The 8x oversampling digital filter can do batch conversions of music signals to 8 fs (sampling frequency) / 32 bit (bit rate), without affecting the original audio, and remove this noise via digital computations.
US
Using analog filters to remove noise
Using oversampling digital filters and analog filters to remove noise


DSEE HX
In addition to supplementing the high-range sounds of music files, the sampling frequency and bit rate are raised above the original values to convert to a CD (44.1 kHz/16 bit) resolution or higher. Suitable processes are carried out by supplementing processes using AI (artificial intelligence) technology to automatically distinguish the type of song. In addition, calculating signal processing in a 40 bit floating-point and converting it to a 32 bit fixed-point via the noise shaping process allows for bit extensions and high-precision frequency extensions, which far surpass the normal 32 bit precision.
The DSEE HX function works with the following signals.
| Input signal DSEE HX | |||
| Format | Sampling frequency | Bit depth | Processing |
| PCM | 32 kHz, 44.1 kHz, 48 kHz | 16 | ○ |
| 24 | ○ | ||
| 32 | ○ | ||
| 88.2 kHz, 96 kHz | 16 | ○ | |
| 24 | ○ | ||
| 32 | - | ||
| 176.4 kHz, 192 kHz | 16 | ○ | |
| 24 | ○ | ||
| 32 | - | ||
| 352.8 kHz, 384 kHz | 16 | ○ | |
| 24 | ○ | ||
| 32 | - | ||
| 705.6 kHz, 768 kHz | 16 | - | |
| 24 - | |||
| 32 | - | ||
| DSD | 2.8 MHz, 5.6 MHz, 11.2 MHz, 22.4 MHz | 1 | - |
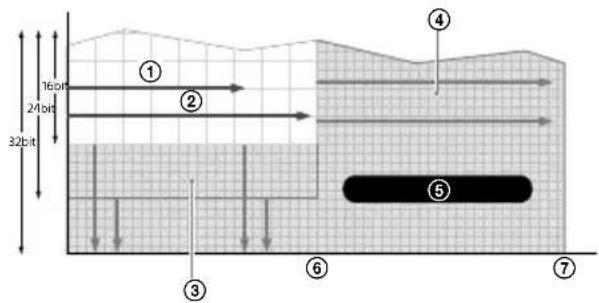
① MP3 sound quality
② CD sound quality
③ Reproduces even finer sounds
④ Reproduces even higher sounds
⑤ Sound quality equivalent to High-Resolution Audio
⑥ Sampling frequency at 44.1kHz / 48kHz
Sampling frequency at 352.8 kHz/384 kHz
DSD Remastering
All PCM signals that are input are converted to DSD signals of 11.2 MHz or 12.2 MHz. The DSD remastering engine developed by Sony converts the PCM signals to DSD signals without losing the amount of information in the original data.

About D.A. Hybrid Amplifier
A newly developed D.A. hybrid amplifier is built into the speakers. A GaN device that is capable of high-speed switching was installed to the final stage of the power amp in order to achieve high-precision amplification for frequencies up to 100kHz . Furthermore, the GaN device, combined with D.A. hybrid technology that was developed with the headphone amplifier, TA-ZH1ES, enables an unprecedented coexistence of the superior audio characteristics of a full digital system.
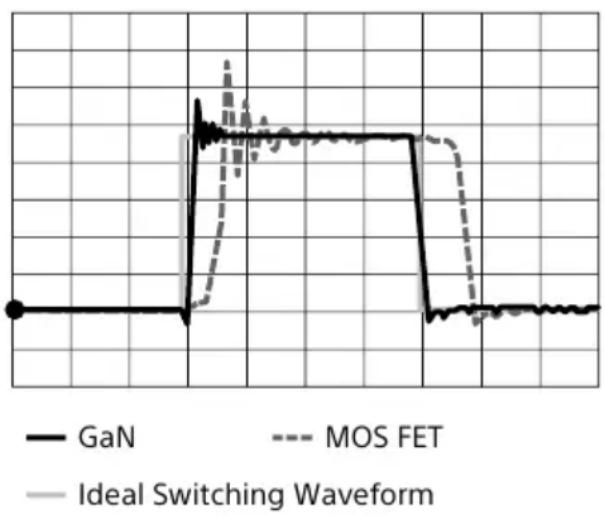
Use of new device, GaN, in power switching (power amplifier circuit)
The next-generation switching element, GaN, has been introduced (a total of 8 elements for 4 pairs per channel). GaN devices have no stored charge and are capable of high-speed switching—a max of 10 times the conventional Si-MOSFET. The PWM signals for Sony's high-precision S-Master can be switched faithfully at a high-speed, without any loss, and achieve the 100kHz playback with these speakers.
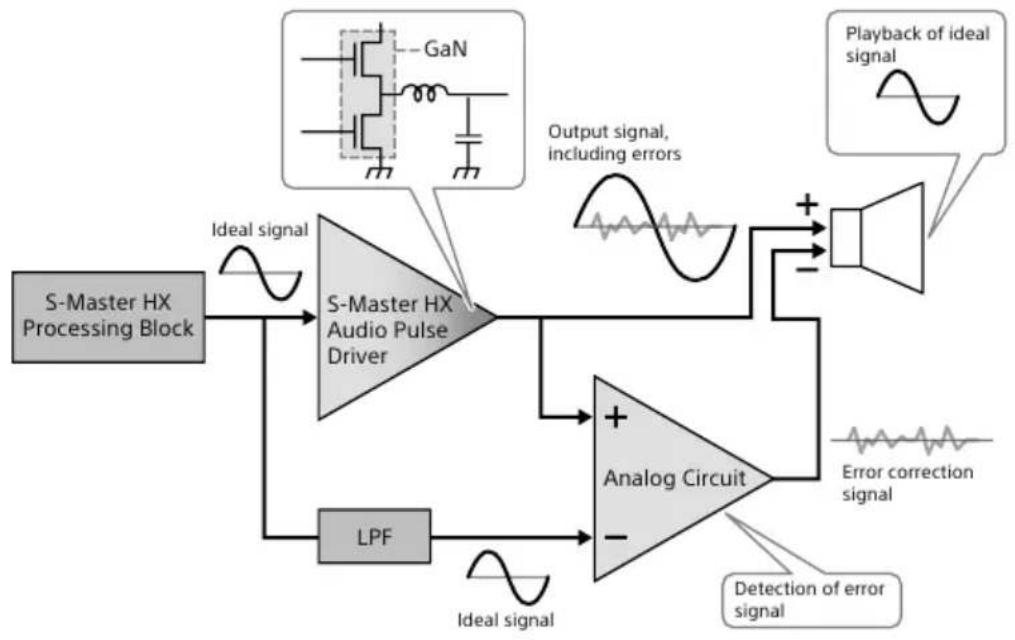
Operating principles of the D.A. hybrid amplifier
The D.A. hybrid amplifier increases the reproduction of the high-resolution sound source to the extreme. It keeps the high-information quantity and high-resolution sound quality of the full digital amp, S-Master HX. Signal correction, which uses the analog circuit, further reduces large distortions and digital noise during output. The signal for the speaker terminal (plus side) that is output from the audio pulse driver of the full digital amp, S-Master HX, produces some errors due to phenomena such as load fluctuations. The ideal signal generated through a precise low pass filter from the processor of the S-Master HX is subtracted from the signal, including the errors, and only the errors are extracted and amplified by the analog power amp. Errors are canceled by inputting the errors found by the analog circuit into the speaker terminal (minus side) and the speaker terminal (plus side), which includes the errors. Only the ideal signal comes out of the speakers.
Usually, an analog power amp is used to amplify only the errors; however, with the speaker's D.A. ASSIST knob (page 31) set to BLENDED, the signal is added to the analog amp and amplified. By limiting the output from the digital amp, you can enjoy a tone from the features of both the digital amp and the analog amp combined.
US
About Aging
The characteristics of the driver and electric parts, mounted on the speakers, are stabilized by aging, which can unlock the speakers' optimal natural performance. Age the speakers by playing back audio for about 10 hours at the volume at which you usually listen to audio.
Troubleshooting
If your speakers are not working properly, first do these inspections before you consider requesting repair. Should any problem persist, consult your nearest Sony dealer.
General
The power does not turn on.
- Plug in the supplied AC power cords (mains leads) firmly when you are plugging it into the speaker's AC IN jack.
Even when the power is turned on, the power indicator continues to flash and there is no sound.
- The speakers are malfunctioning. Unplug the AC power cords (mains leads) and consult your nearest Sony dealer.
Operations cannot be done with the remote control.
- Point the remote control at the speaker's remote control sensor (page 10).
- Remove any obstacles between the remote control and the speakers.
- Replace the batteries in the remote control with new ones (page 7).
The DSEE HX indicator does not light even though the DSEE HX function is on.
- The DSEE HX function does not work depending on the input signal. If the input signal is not supported, the indicator will not light, even if the DSEE HX function is turned on. For details about supported input signals, see page 39.
- Because analog input signals from the BALANCED jacks, UNBALANCED jacks, and STEREO MINI jack are processed using the DSD format during digital conversion, the DSEE HX function does not work.
The DSD RE. indicator does not light even though the DSD Remastering function is on.
- If the input signal is DSD, the DSD Remastering function does not work. Also, because analog input signals from the BALANCED jacks, UNBALANCED jacks, and STEREO MINI jack are processed using the DSD format during digital conversion, the DSD Remastering function does not work.
The Speaker System turns off automatically.
- If the menu setting item [AUTO STANDBY] is set to ON, the Speaker System turns off automatically if the Speaker System is silent and inactive for about 20 minutes. [AUTO STANDBY] appears on the display window 1 minute before the Speaker System turns off.
- Unplug both speakers' AC power cords (mains leads). Wait a little while, and then reconnect the power cords, turn the Speaker System on again. If the problem persists, consult your nearest Sony dealer or our customer support.
The Auto-standby function does not work.
- Check that the menu item [AUTO STANDBY] is set to ON.
- When switching the input to the computer connected to the speakers to listen to the sound source, the AUTO STANDBY function may not work properly because, depending on the computer's settings, the computer's operation sounds may play.
The Walkman cannot be charged.
Check the following to see if the speakers are the cause.
- Make sure that the Speaker System is turned on (page 23).
- Check whether a digital cable for Walkman is being used to connect speaker A to the Walkman.
- Check whether [WM CHARGE] on the menu is set to ON.
[PROTECT TEMPERATURE] appears in the display window.
- This appears if the internal temperature of the speakers rises abnormally. Check that the speakers' ventilation openings are not covered and wait for a while. Press the (power) button to restore the Speaker System.
[PROTECT WM CHARGE] appears in the display window.
- This appears if the digital cable for Walkman that is connected to the WALKMAN port is carrying an abnormal current. Unplug the digital cable for Walkman, and then press the (power) button to restore the Speaker System.
[PROTECT AMPLIFIER] appears in the display window.
- The speakers are malfunctioning. Unplug the AC power cords (mains leads) and consult your nearest Sony dealer.
[PROTECT CLK ERROR] appears in the display window.
- Turn off the Speaker System. After unplugging the AC power cords (mains leads) for speaker A and speaker B, firmly plug in the digital sync cable. If the problem persists, the speakers are malfunctioning. Unplug the AC power cords (mains leads) and consult your nearest Sony dealer.
[ERROR NO LINK Lch] or [ERROR NO LINK Rch] appears in the display window.
- Turn off the Speaker System. After unplugging the AC power cords (mains leads) for speaker A and speaker B, firmly plug in the digital sync cable.
- Turn off the Speaker System, and then firmly plug in the AC power cord (mains lead) for speaker B.
[OVER] appears in the display window.
- The Speaker System is in protect mode. We recommend lowering the volume in such cases. When you lower the volume, the display turns off.
Nothing appears in the display window.
- Press the DIMMER button on the remote control to adjust the brightness. (page 15)
Sound
No sound is output from the speakers.
Check the following to see if the speakers are the cause.
- Check the volume level, or cancel muting (page 14).
- Check if the proper input jack is selected.
- Check if the Speaker System and connected devices are on.
- Check if the Speaker System supports the input audio format. For details about supported formats, see "Specifications" (page 46).
Check the following to see if the computer you are using is the cause.
- When connecting the computer (Windows) to the speaker's USB-B port, check if the dedicated driver is installed on the computer you are using (page 25).
- Check if the volume level of the OS or playback software is set correctly or if it is set to the muting status.
- If multiple playback software is running, sound may not be output. Only start the playback software that you want to use for playback.
- Change the settings for your OS and your playback software.
Multi-channel sources (files) cannot be played.
- The Speaker System supports only 2-channel audio sources (files).
Noise and crackling are generated.
Noise and crackling may be generated when using the computer in the following ways.
- Multiple playback software ("Hi-Res Audio Player", "Sony | Music Center for PC" or other third-party playback software) is running, and are being used alternately.
- When connecting the computer (Windows) to the speaker's USB-B port, check if the dedicated driver is installed on the computer you are using (page 25).
Audio is interrupted.
- Stop any other software that is running during playback. The problem may improve by decreasing the computer's processes.
- When connecting the computer (Windows) to the speaker's USB-B port, check if the dedicated driver is installed on the computer you are using (page 25).
USB-B
The USB device is not detected.
- Turn off the Speaker System and remove the USB device. Next, turn on the Speaker System, and then connect the USB device again.
- The USB device may not be working properly. Refer to its operating instructions to resolve the problem.
- When connecting the computer (Windows) to the speaker's USB-B port, check if the dedicated driver is installed on the computer you are using (page 25).
The driver for the USB port cannot be installed correctly to the computer.
- If the latest update for Windows has not been applied to the computer you are using (Windows), the driver for the USB port may not be able be installed correctly. Install the latest update from Windows Update in the Start menu.
Sound is output from the connected computer's speaker.
- If you are using a Windows computer, check if the dedicated driver is installed (page 25).
- Change the settings for your OS and your playback software.
Specifications
System specifications
Playback frequency band
51 Hz - 100 kHz (-10 dB)
Amplifier section
U.S. models:
POWER OUTPUT AND TOTAL HARMONIC
DISTORTION:
(FTC)
Main Woofer (Speaker A + Speaker B):
With 6 ohms loads, both channels driven, from 40 - 20,000 Hz; rated
24 W per channel minimum RMS power, with no more than 1% total harmonic distortion from 250 mW to rated output.
Canadian models:
POWER OUTPUT (rated)
Main Woofer (Speaker A + Speaker B): 24 W +
24 W (at 6 ohms, 1 kHz, 1% THD)
U.S. models and Canadian models:
POWER OUTPUT (reference)
Main tweeter block:
Speaker A: 18 W (6 Ω, 5 kHz, 10%)
Speaker B: 18 W (6 Ω, 5 kHz, 10%)
Assist tweeter block:
Speaker A: 18 W (6 Ω, 5 kHz, 10%)
Speaker B: 18 W (6 Ω, 5 kHz, 10%)
Main woofer block:
Speaker A: 35 W (6 Ω, 100 Hz, 10%)
Speaker B: 35 W (6 Ω, 100 Hz, 10%)
Assist woofer block:
Speaker A: 35 W (6 Ω, 100 Hz, 10%)
Speaker B: 35 W (6 Ω, 100 Hz, 10%)
Total harmonic distortion
0.03% (1 kHz, 10 W)
Frequency characteristics
10 Hz-100 kHz (-3 dB)
Playing frequency range
10 Hz-200 kHz
S/N ratio (A network)
100 dB
Input section
USB-B section
Supported formats
PCM 2ch: 44.1/48/88.2/96/176.4/192/352.8/
384/705.6/768 kHz (16/24/32 bit)
DSD 2ch: 2.8/5.6/11.2/22.4 MHz (1 bit)
WALKMAN port section
Supported formats
PCM 2ch: 44.1/48/88.2/96/176.4/192/352.8/
384 kHz (16/24/32 bit)
DSD 2ch: 2.8/5.6/11.2 MHz (1 bit)
OPTICAL input jack section
Supported formats
PCM 2ch: 32/44.1/48/88.2/96 kHz (16/24 bit)
STEREO MINI (analog audio) jack section
Maximum input voltage 2 Vrms
Input impedance 50k
UNBALANCED (analog audio) jack section
Maximum input voltage 2 Vrms
Input impedance 50k
BALANCED (analog audio) jack section
Maximum input voltage 2 Vrms
Input impedance 50k /50k
Speakers section
System
Acoustic suspension, 2-way 5 speaker system
Speakers used
Main tweeter: 19 mm (3/4 in),
soft dome type
Assist tweeteter: 14 mm (9/16 in),
soft dome type × 2
Main woofer: 100mm (4 in), cone type
Assist woofer: 100mm (4 in), cone type
General
Power requirements
120 V AC, 50 Hz/60 Hz
Power consumption
Speaker A: 60 W
Speaker B: 50 W
When in standby:
Speaker A: 0.5 W or less
Speaker B: 0.5 W or less
Dimensions (approx.) (w / h / d)
Speaker A: 199mm× 207mm× 326mm
(7 7/8 in × 8 1/4 in × 12 7/8 in)
(Including projecting parts)
Speaker B: 199mm× 205mm× 326mm
(7 7/8 in × 8 1/8 in × 12 7/8 in)
(Including projecting parts)
Mass (approx.)
Speaker A: 10.5 kg (23 lb 2 2/5 oz)
Speaker B: 10.5 kg (23 lb 2 2/5 oz)
Design and specifications are subject to change without notice.
On Copyrights
- WALKMAN® and WALKMAN® logo are registered trademarks of Sony Corporation.
Xperia is a trademark or a registered trademark of Sony Corporation. - Macintosh and Mac OS are trademarks of Apple Inc., registered in the U.S. and other countries.
- Windows, the Windows logo, and Windows Media are either registered trademarks or trademarks of Microsoft Corporation in the United States and/or other countries.
- This product is protected by certain intellectual property rights of Microsoft Corporation. Use or distribution of such technology outside of this product is prohibited without a license from Microsoft or an authorized Microsoft subsidiary.
- USB Type-C™ and USB-C™ are trademarks of USB Implementers Forum.
- The system names and product names indicated in this manual are generally the trademarks or registered trademarks of the manufacturer.
In this manual, ^TM and ^ marks are not specified.
Index
Numeral
8x Oversampling Digital Filter 37
A
Aging 41
Assist tweeteter 32
Assist woofer 31, 32
A.TW TIME ALI 32
AUTO STANDBY 36
A.WF FREQ RANGE 32
A.WF MOTION 31
B
Battery 7
C
Computer 19,25
D
D.A. ASSIST 31
D.A. Hybrid 40
Digital Audio Player 21
Digital Media Player 19
DIMMER 15
Display 24,33
Driver 25
Driver for the USB port 25
DSD Remastering 30, 39
DSEEHX 29,39
H
Heat sink 3
Hi-Res Audio Player 26
1
Input device 8, 19
L
LOW VOL MODE 36
LRBALANCE 36
M
Mac 25
Menu list 36
0
OVER 24,28,33,44
R
Remote Control 14
RESET 35, 36
S
Signal Processing 37
Smartphone 20, 24
Specifications 46
T
Tweeter 32
V
VERSION 36
Volume level 24, 28
W
Walkman 20, 24
Windows 25
WM CHARGE 36
Woofer 31, 32
Responsible : Sony Electronics Inc.
Adresse: 16535 Via Esprillo, San Diego, CA 92127 E.-U.
No de telephone : 858-942-2230
Cable digital sync (1)
Télécommande (1)

Piles AAA (R03) (2)

Section port WALKMAN
Formats pris en charge
PCM 2ch : 44,1/48/88,2/96/176,4/192/352,8 /384 kHz (16/24/32 bit)
DSD 2ch : 2,8/5,6/11,2 MHz (1 bit)
Section pris OPTICAL input
Formats pris en charge
PCM 2ch : 32/44,1/48/88,2/96 kHz (16/24 bit)
Section prise STEREO MINI (son analogue)
DSD Remastering (Rematriage DSD)...33,42
DSEE HX 32,42
H
Hi-Res Audio Player 29
