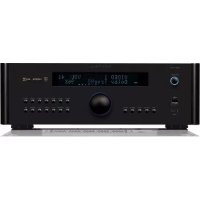
RSP1576 - Receiver ROTEL - Free user manual and instructions
Find the device manual for free RSP1576 ROTEL in PDF.



| Product Type | Surround Sound Receiver / Processor |
| Brand | Rotel |
| Model | RSP-1576 |
| Dimensions (W x H x D) | 431 x 144 x 348 mm |
| Net Weight | 8.8 kg |
| Power Supply | 120 V / 60 Hz (US) or 230 V / 50 Hz (CE) |
| Power Consumption | 60 W (operating), 0.5 W (standby) |
| Supported Audio Formats | Dolby Atmos, Dolby TrueHD, DTS:X, DTS-HD Master Audio, LPCM up to 24-bit / 192 kHz |
| Video Inputs | 7 HDMI inputs (including 1 front) HDCP 2.2, HDMI 2.0a compliant |
| Video Outputs | 2 HDMI outputs HDCP 2.2, HDMI 2.0a (including 1 with ARC/OSD) |
| Analog Audio Inputs | Phono MM, CD, AUX, Balanced XLR, Multi 7.1 |
| Digital Audio Inputs | 3 coaxial, 3 optical, PC-USB (USB Audio Class 1.0/2.0) |
| Wireless Connectivity | Bluetooth aptX |
| Preamp Outputs | 14 RCA outputs (Front, Center, Surround, Center Back, Height 1/2, Subwoofer 1/2) |
| Special Features | ARC (Audio Return Channel), Multilingual OSD, Speaker Management (Small/Large), 10-band PEQ, Lip Sync |
| Additional Connectors | RS232, RJ45 network, 12V Trigger (3 outputs), IR IN/OUT, Rotel Link |
| Safety | Overvoltage protection, grounding, recommended ventilation (10 cm around) |
| Supplied Accessories | RR-CX100 remote control, power cord, USB cable, installation CD (driver) |
| Certifications | Dolby, DTS, HDCP 2.2, RoHS, WEEE |
| Maintenance and Cleaning | Clean with a dry cloth. Do not use liquid products. |
| Spare Parts and Repairability | No user-serviceable parts. Contact an authorized technician. |
Frequently Asked Questions - RSP1576 ROTEL
User questions about RSP1576 ROTEL
0 question about this device. Answer the ones you know or ask your own.
Ask a new question about this device
Download the instructions for your Receiver in PDF format for free! Find your manual RSP1576 - ROTEL and take your electronic device back in hand. On this page are published all the documents necessary for the use of your device. RSP1576 by ROTEL.
USER MANUAL RSP1576 ROTEL
natural_image
Pure electrical circuit lines without any symbolsROTEL®
RSP-1576
Surround Sound Processor
Surround sound-processor
Processore Surround
Surroundprocessor
Important Safety Instructions 4
Figure 1: Control and Connections 5
Figure 2: Remote Control 6
Figure 3: Amplifier And Subwoofer 7
Figure 4: Digital Audio and PC-USB Connections 8
Figure 5: Blu-Ray and Video Player Connections 8
Figure 6: Front USB Connections 9
Figure 7: CD Player Connections 9
Figure 8: Tuner Connections 10
Figure 9: Front HDMI Connections 10
Figure 10: Rear HDMI Connections 11
On-Screen Menus 12
About Rotel....13
Getting Started 13
Video Features 13
Audio Features 13
Surround Features 13
Other Features 13
Unpacking 13
Placement 13
Overview of Connections 14
HDMI Inputs and Outputs....14
Rear HDMI IN 1—6 Video Inputs 16 14
Front HDMI IN 14
HDMI Monitor Outputs 15 14
Audio Inputs and Outputs....14
PHONO Input 14
TUNER Input 29 14
CD Input 14
AUX Input 20 15
BALANCED Input 20 15
MULTI Input 15
PREAMP Output 31 15
DIGITAL Inputs 14 15
PC-USB Input 17 15
Front USB Input 15
Other Connections 15
AC Input 15
Master Power Switch 25 15
12V TRIGGER Output [20] 15
REM IN Jack 21 16
IR OUT Jacks 22 16
Rotel Link 23 16
Rear USB Power Port 25 16
RS232 Connector 16
NETWORK Connector 16
Making Connections....16
Connecting an External Amplifier 16
Connecting a Subwoofer 16
Connecting a DVD, Blu-ray, Cable, Satellite, Game Console and HDTV Tuner 16
Connecting a Blu-ray or DVD Player 17
Connecting a Display 17
Connecting a CD Player or XLR Source 17
Connecting a Tuner 17
Connecting an iPod/iPhone 17
Front Panel Overview 17
Front Panel Display 17
IR Remote Sensor 2 17
Remote Control Overview 18
Overview of Buttons and Controls 18
STANDBY □ and Power ON/OFF Buttons Ⓐ 18
VOLUME Knob and VOLUME UP/DOWN Buttons 12① 18
DISPLAY (DISP) Button 10⑧ 18
SETUP Button ⑧ 18
Navigation and ENTER Buttons ① 18
MUTE Button 11⑤ 18
Input Buttons 4 13 M 18
SUR+ Buttons 9⑧ 18
Playback Control buttons ① 18
DIM Button ① 18
SUB, CTR, REAR Buttons ⑧ 18
MEM Button ⑧ 18
LIGHT Button ⑨ 18
ASSISTIVE LIGHT © 18
Automatic Surround Modes....18
Manually Selecting Surround Modes 19
Digital Audio 19
Analog Stereo 19
Basic Operation....19
Selecting Inputs 19
USB/iPod Operation 20
iPod/iPhone Connection 20
Playback Control Buttons ① 20
Bluetooth....20
Bluetooth Connection 20
Rear PC-USB 20
Rear PC-USB Connection 20
Setup 20
Menu Basics....20
Navigation Buttons 20
Main Menu 20
Configuring Inputs 20
Input Setup 21
Multi Input Setup 22
Configuring Audio....22
Audio Configuration 22
Configuring Speakers and Audio 22
Speaker Configuration 22
Advanced Speaker Setup 23
Subwoofer Setup 24
Speaker Level Setup 24
Speaker and Delay/Distance Setup 25
Miscellaneous Settings 25
System Setup 25
Video Setup 26
PEQ Configuration 27
Troubleshooting 27
Specifications....28
CAUTION
RISK OF ELECTRIC SHOCK DO NOT OPEN

WARNING : SHOCK HAZARD-DO NOT OPEN AVIS: RISQUE DE CHOC ÉLECTRIQUE-NE PAS OUVRIR
This symbol is to alert the user to the presence of uninsulated dangerous voltages inside the product's enclosure that may constitute a risk of electric shock.

This symbol is to alert the user to important operating and maintenance (service) instructions in this manual and literature accompanying the product.
APPLICABLE FOR USA, CANADA OR WHERE APPROVED FOR THE USAGE
CAUTION: TO PREVENT ELECTRIC SHOCK, MATCH WIDE BLADE OF PLUG TO WIDE SLOT. INSERT FULLY.
ATTENTION: POUR EVITER LES CHOCS ELECTRIQUES, INTRODUIRE LA LAME LA PLUS LARGE DE LA FICHE DANS LA BORNE CORRESPONDANTE DE LA PRISE ET POUSSER JUSQU AU FOND.

Rotel products are designed to comply with international directives on the Restriction of Hazardous Substances (RoHS) in electrical and electronic equipment and the disposal of Waste Electrical and Electronic Equipment (WEEE). The crossed wheelie bin symbol indicates compliance and that the products must be appropriately recycled or processed in accordance with these directives.
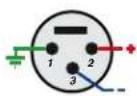
Pin Assignments
Balanced Audio (3 pole XLR):
Pin 1: Ground / Screen
Pin 2: In phase / +ve / Hot
Pin 3: Out of phase / -ve / Cold

Important Safety Instructions FCC Information
Notice
The RS232 connection should be handled by authorized persons only.
WARNING: There are no user serviceable parts inside. Refer all servicing to qualified service personnel.
WARNING: To reduce the risk of fire or electric shock, do not expose the unit to moisture or water. Do not expose the unit to dripping or splashing. Do not place objects filled with liquids, such as vases, on the unit. Do not allow foreign objects to get into the enclosure. If the unit is exposed to moisture, or a foreign object gets into the enclosure, immediately disconnect the power cord from the wall. Take the unit to a qualified service person for inspection and necessary repairs.
Read these instructions.
Keep these instructions.
Heed all warnings.
Follow all instructions.
Do not use this apparatus near water.
Clean only with dry cloth.
Do not block any ventilation openings. Install in accordance with the manufacturer's instructions.
Do not install near any heat sources such as radiators, heat registers, stoves, or other apparatus (including amplifiers) that produce heat.
Do not defeat the safety purpose of the polarized or grounding-type plug. A polarized plug has two blades with one wider than the other. A grounding type plug has two blades and a third grounding prong. The wide blade or the third prong are provided for your safety. If the provided plug does not fit into your outlet, consult an electrician for replacement of the obsolete outlet.
Protect the power cord from being walked on or pinched particularly at plugs, convenience receptacles, and the point where they exit from the apparatus.
Only use attachments/accessories specified by the manufacturer.
Use only with the cart, stand, tripod, bracket, or table specified by the manufacturer, or sold with the apparatus. When a cart is used, use caution when moving the cart/apparatus combination to avoid injury from tip-over.

Unplug this apparatus during lightning storms or when unused for long periods of time.
Refer all servicing to qualified service personnel. Servicing is required when the apparatus has been damaged in any way, such as power-supply cord or plug is damaged, liquid has been spilled or objects have fallen into the apparatus, the apparatus has been exposed to rain or moisture, does not operate normally, or has been dropped.
The apparatus should be used in non tropical climate.
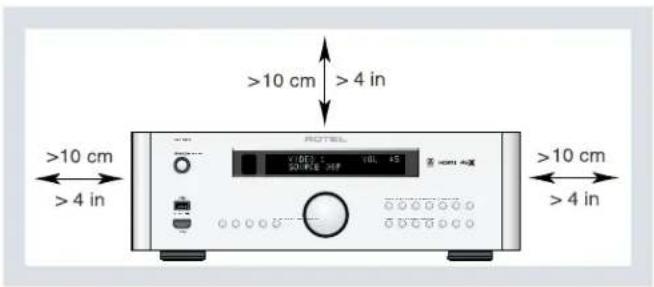
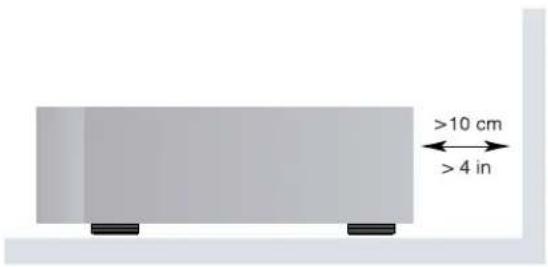
You must allow a minimum 10 cm or 4 inches of unobstructed clearance around the unit.
WARNING: The rear panel power cord connector is the mains power disconnect device. The device must be located in an open area that allows access to the cord connector.
The unit must be connected to a power supply only of the type and voltage specified on the rear panel. (USA: 120 V/60Hz, EC: 230V/50Hz)
Connect the component to the power outlet only with the supplied power supply cable or an exact equivalent. Do not modify the supplied cable. Do not use extension cords.
The mains plug is the disconnect of the unit. In order to completely disconnect the unit from the supply mains, remove the main plug from the unit and the AC power outlet. This is the only way to completely remove mains power from the unit.
The main plug is used as the main disconnect device and should remain ready accessible.
The batteries in remote control shall not be exposed to excessive heat such as sunshine, fire or the like. Batteries should be recycled or disposed as per state and local guidelines.
WARNING: The master power switch is located on the rear panel. The unit must allow unobstructed access to the main power switch.
This equipment has been tested and found to comply with the limits for a Class B digital device, pursuant to Part 15 of the FCC Rules. These limits are designed to provide reasonable protection against harmful interference in a residential installation. This equipment generates, uses and can radiate radio frequency energy and, if not installed and used in accordance with the instruction, may cause harmful interference to radio communications.
However, there is no guarantee that interference will not occur in a particular installation. If this equipment does cause harmful interference to radio or television reception, which can be determined by turning the equipment off and on, the user is encouraged to try to correct the interference by one or more of the following measures:
- Reorient or relocate the receiving antenna.(TV, radio, etc.).
- Increase the separation between the equipment and receiver.
- Connect the equipment to an outlet on circuit different from that to which the receiver is connected.
- Consult the dealer or an experienced radio/TV technician for additional help.
Caution
This device complies with part 15 of the FCC Rules. Operation is subject to the following to conditions: (1) This device may not cause harmful interference, and (2) this device must accept any interference received, including interference that may cause undesired operation.
NOTE: This equipment has been tested and found to comply with the limits for a Class B digital device, pursuant to Part 15 of the FCC Rules. These limits are designed to provide reasonable protection against interference in a residential installation. This equipment generates and can radiate radio frequency energy and, if not installed and used in accordance with the instructions, may cause interference to radio or TV communications. There is no guarantee that interference will not occur in a particular installation. If this equipment does cause interference to radio or television reception, which can be determined by turning the equipment off and on, try to correct the interference by one or more of the following measures:
- Reorient or relocate the receiving antenna.
- Increase the separation between the unit and the television tuner.
- Connect the unit to an AC power outlet on a different electrical circuit.
- Consult your authorized Rotel retailer for assistance.
Figure 1: Control and Connections Commandes et Connexions Bedienelemente und Anschlüsse Controles y Conexiones
Bedieningselementen en aansluitingen
Controlli e connessioni
Kontroller och anslutningar
Organы управления и соединения
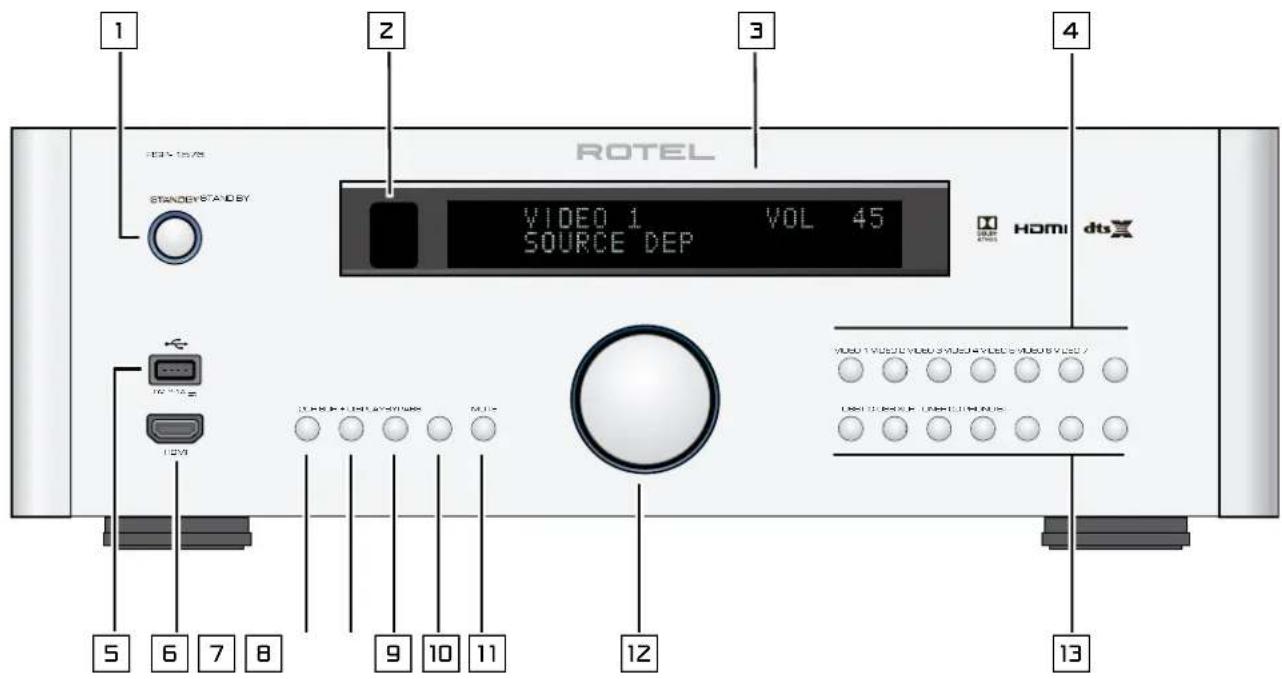
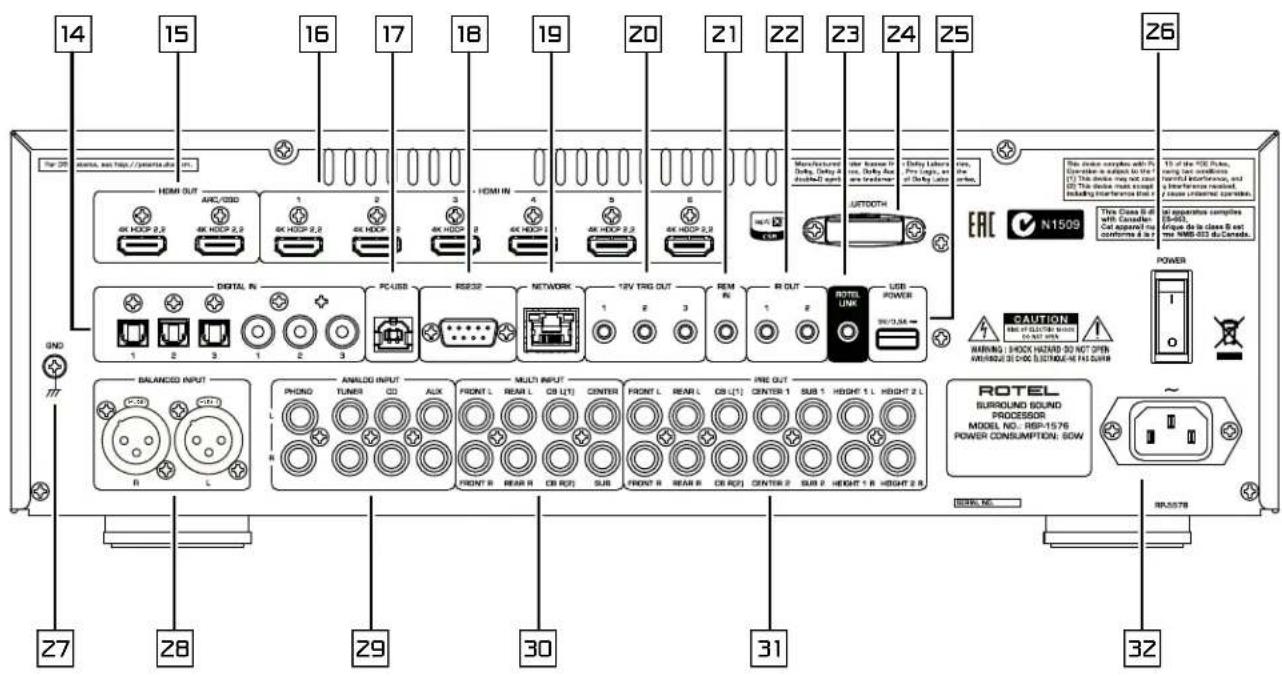
Figure 2: Remote Control
Télécommande
Fernbedienung
Mando a Distancia
Afstandsbediening
Telecomando
Fjärrkontroll
Пульт дистанционного управления
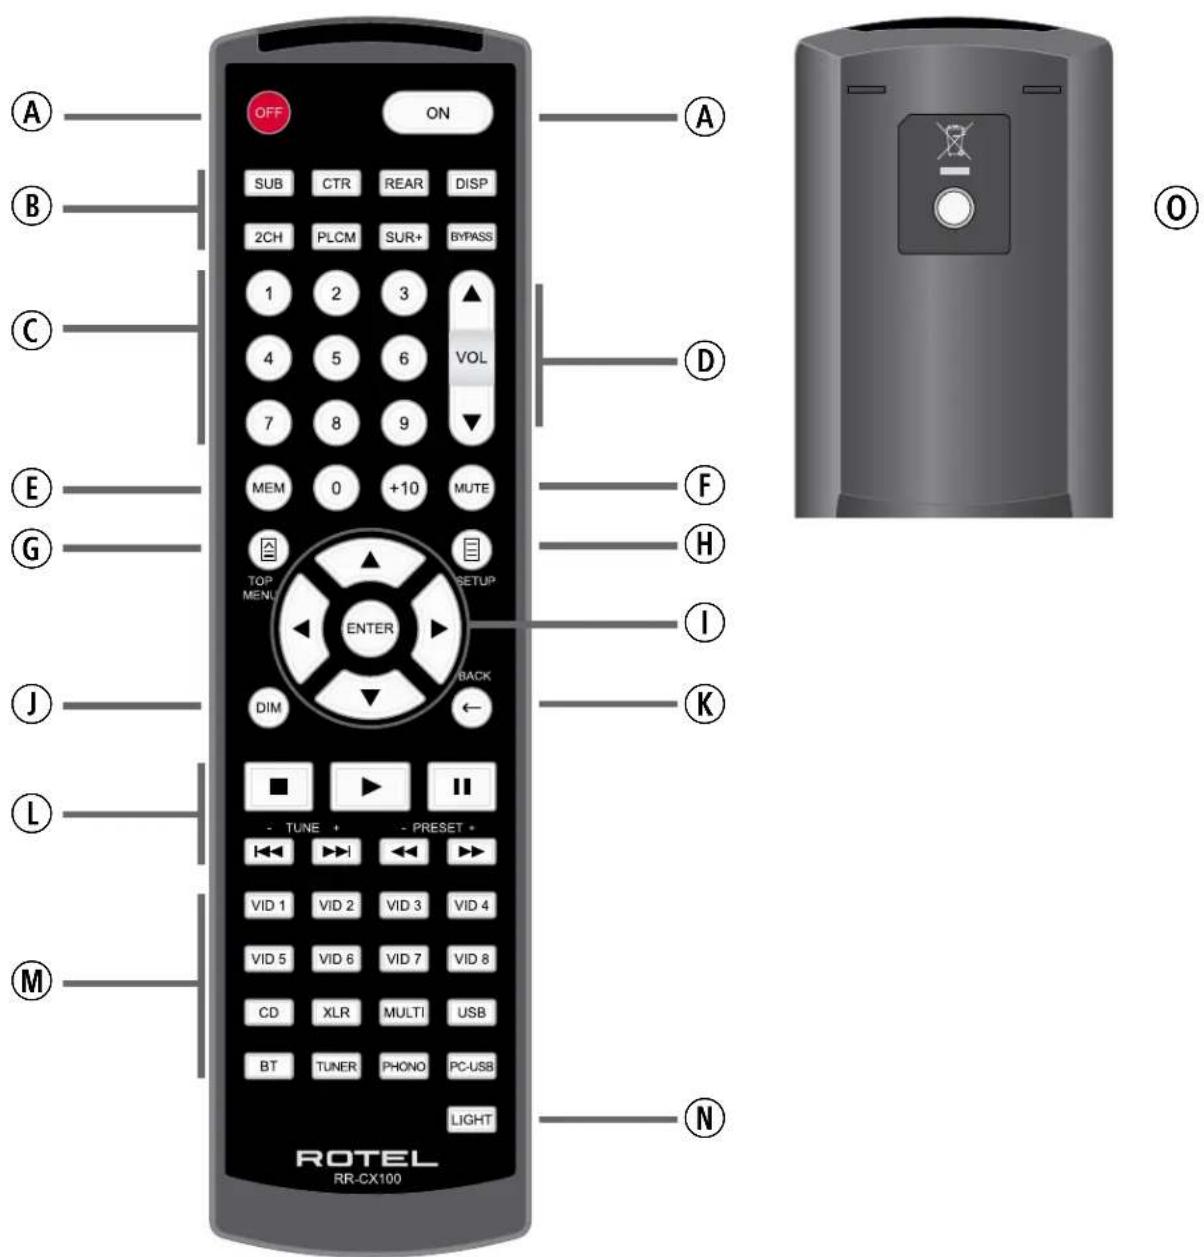
Figure 3: Amplifier And Subwoofer
Amplificateurs et caissons de graves
Verstärker und Subwoofer
Amplificador y Subwoofer
Versterker en subwoofer
Collegamento di amplificatori e subwoofer
Förstärkare och subbas
Усилитель и сабвуфер
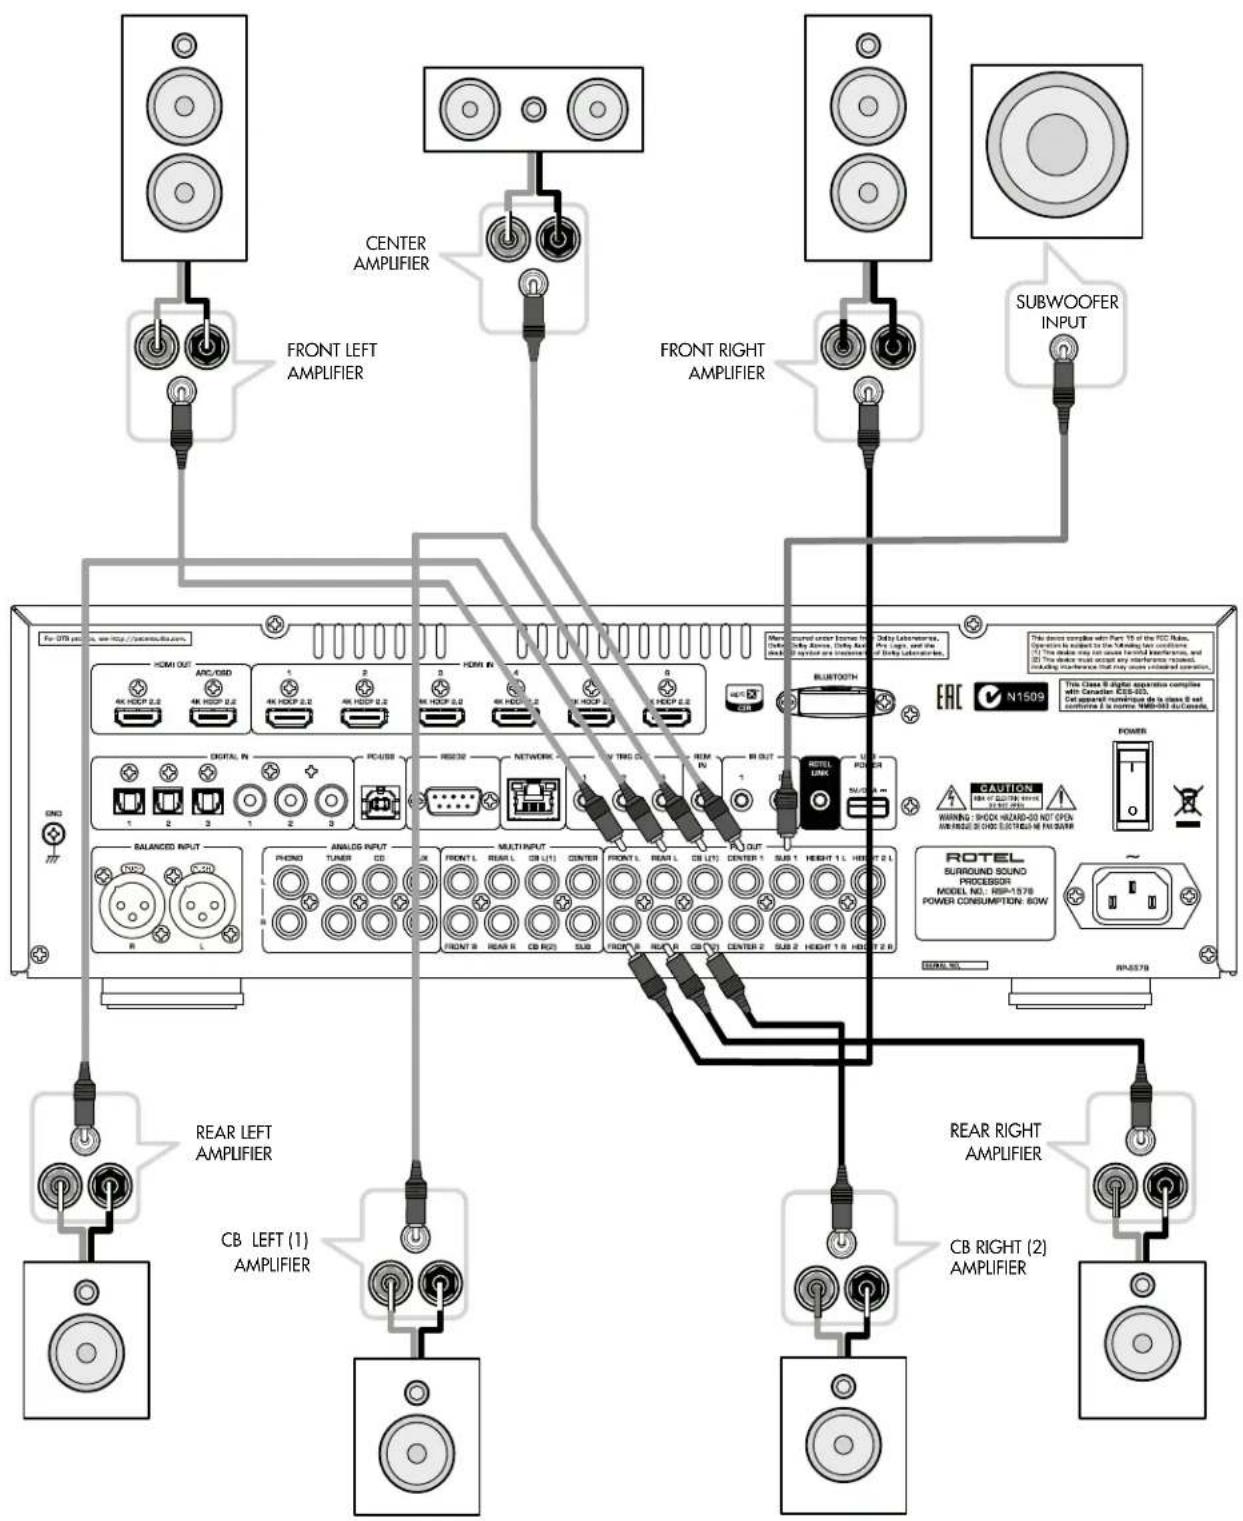
Figure 4: Digital Audio and PC-USB Connections Connexions audio numériques et PC-USB Digitale Audio und PC-USB verbindungen Conexiones Digitales de Audio y PC-USB
Digitale audio- en PC-USB-aansluitingen
Collegamenti audio digitale e PC-USB
Digitala ljud- och PC-USB-anslutningar
Подсоединения цифрового аудио и PC-USB
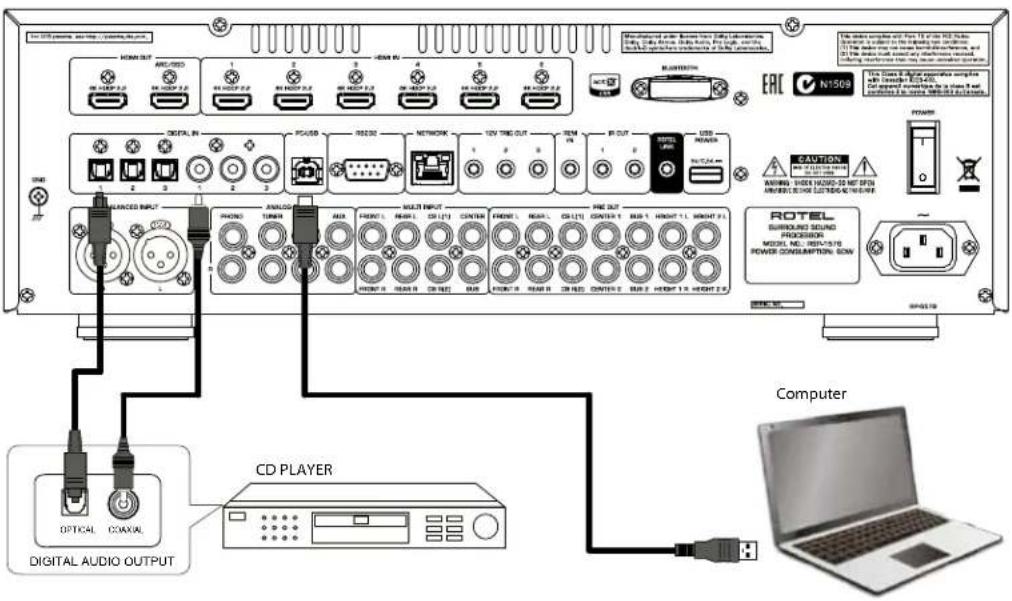
Figure 5: Blu-Ray and Video Player Connections
Connexions à un lecteur Blu-Ray ou Vidéo
Anschlussdiagramm für Blu-Ray- und Video-Player
Conexiones para Reproductor de Video o Blu-Ray
Aansluitingen voor een Blu-Ray of Video-speler
Collegamento di lettori Blu-Ray o Video
Blu-Ray- eller Video-spelare
Подключения Blu-Ray или Видео проигрывателя
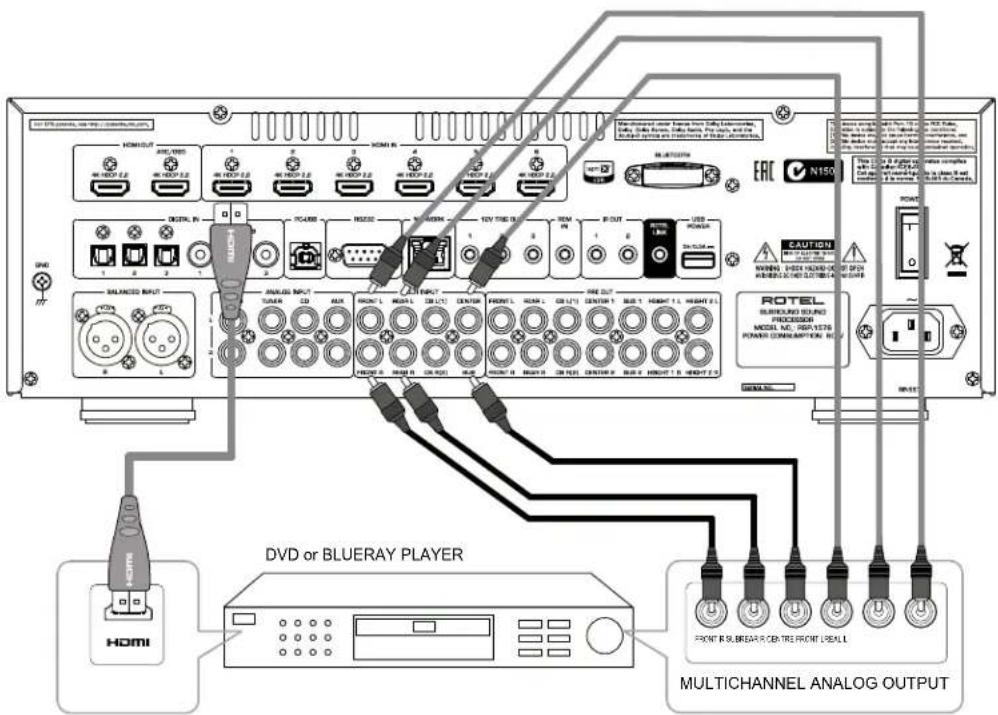
Figure 6: Front USB Connections
Connexions USB en face avant
Frontseitiger USB-Anschluss
Conexiones USB del Panel Frontal
USB-aansluiting op het voorpaneel
Ingresso USB frontale
USB-anslutning på fronten
Подключение USB-nakopitelей к фронтальному порту
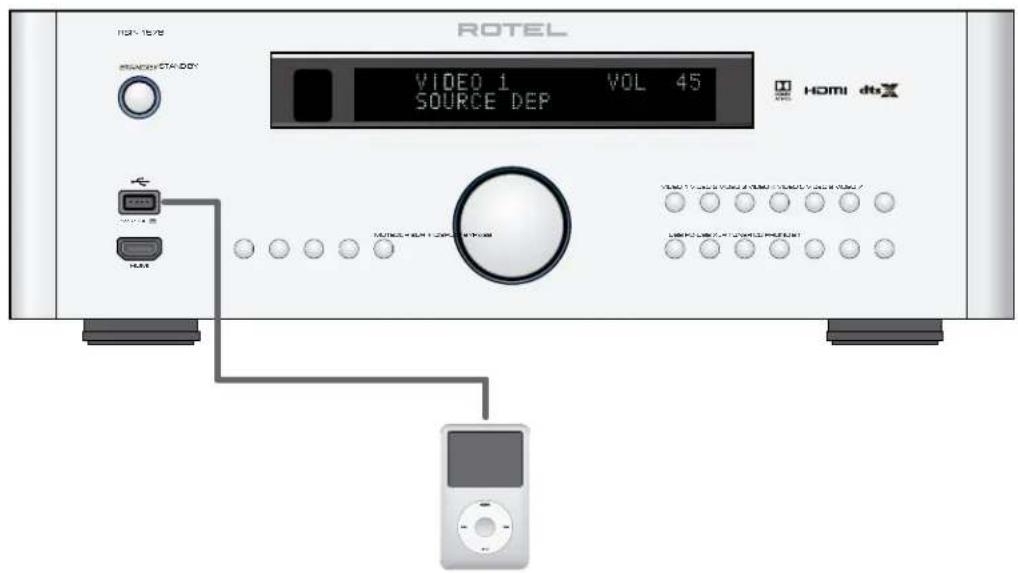
Figure 7: CD Player Connections
Connexions à un lecteur de CD
Anschlussdiagramm für einen CD-Spieler
Conexiones para Reproductor de CD
Cd-speleraansluitingen
Collegamento di un lettore CD
CD-spelare
Подключения CD-плеera
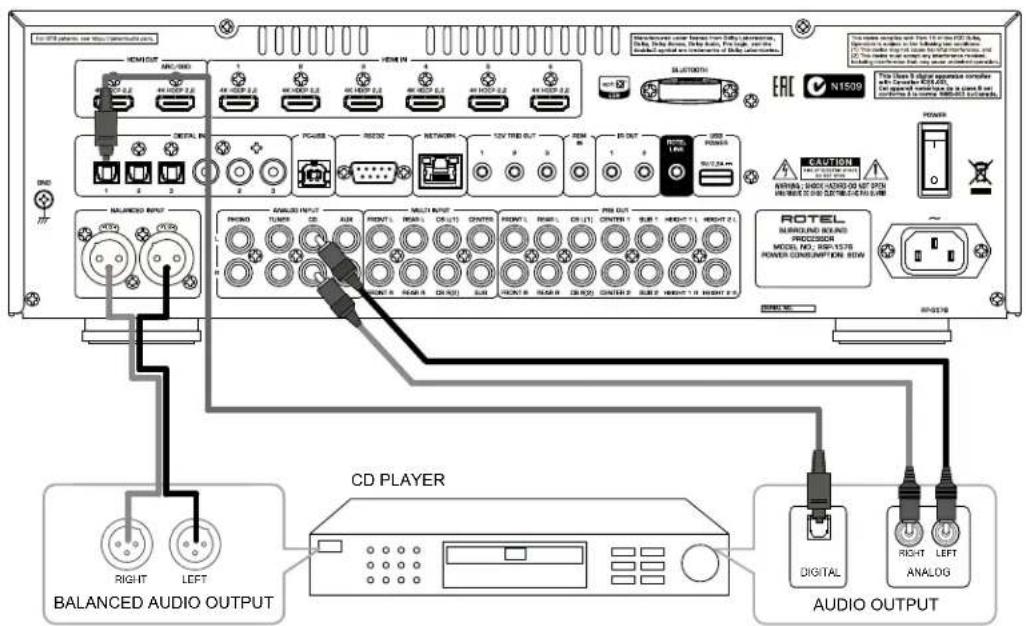
Figure 8: TunerConnections
On-Screen Menus
Our story began over 50 years ago. Over the decades, we have received hundreds of awards for our products and satisfied hundreds of thousands of people who take their entertainment seriously-like you!
Rotel was founded by a family whose passionate interest in music led them to manufacture high-fidelity components of uncompromising quality. Through the years, that passion has remained undiminished and the family goal of providing exceptional value for audiophiles and music lovers, regardless of their budget, is shared by all Rotel employees.
Rotel's engineers work as a close team, listening to, and fine tuning, each new product until it reaches their exacting musical standards. They are free to choose components from around the world in order to make that product the best they can. You are likely to find capacitors from the United Kingdom and Germany, semiconductors from Japan or the United States, while toroidal power transformers are manufactured in Rotel's own factory.
We all have concerns about our environment. And, as more and more electronics are produced it is especially important for a manufacturer to do all it can to engineer products that have a minimum impact on the environment.
At Rotel, we are proud to do our part. We have reduced the lead content in our products by using special lead-free ROHS solder and components. Our engineers continually strive to improve power supply efficiency without compromise to quality. When in standby mode Rotel products use minimal power to meet global Standby Power Consumption requirements.
The Rotel factory is also doing their part to help the environment through constant improvements to product assembly methods for a cleaner and greener manufacturing processes.
All of us at Rotel thank you for buying this product. We are sure it will bring you many years of enjoyment.

Manufactured under license from Dolby Laboratories. Dolby, Pro Logic, and the double-D symbol are registered trademarks of Dolby Laboratories.

For DTS patents, see http://patents.dts.com. Manufactured under license from DTS Licensing Limited. DTS, the Symbol, DTS in combination with the Symbol, DTS:X, and the DTS:X logo are registered trademarks or trademarks of DTS, Inc. in the United States and/or other countries. © DTS, Inc. All Rights Reserved.
Getting Started
Thank you for purchasing the Rotel RSP-1576 Surround Sound Processor. The unit is a full-featured audio/video control center for analog and digital source components. It features digital processing for a wide range of formats including Dolby® Surround, Dolby® ATMOS and DTS® source material.
Video Features.
• HDMI switching for digital video signals up to 4K.
- Accepts HDMI video input: 480i, 480p/576p, 720p, 1080i, 1080p, 1080p 24Hz, 4K.
- Outputs HDMI video (480i, 480p/576p, 720p, 1080i, 1080p, 1080p 24Hz, 4K) compatible with common HDMI displays and projectors.
Audio Features
- Rotel's Balanced Design Concept combines advanced circuit board layout, comprehensive parts evaluation, and extensive listening tests for superior sound and reliability.
- Analog bypass mode for pure 2 channel stereo with no digital processing.
- Digital and analog inputs including Coax, Optical, RCA and Balanced XLR.
- 7.1 Multi-Channel input from compatible source components.
Surround Features
- Automatic Dolby ^ and DTS surround decoding of all popular formats up to 7.1.4 channels.
- Surround modes for playback of multi channel audio on 2 channel and 3 channel systems.
- Audio Return Channel (ARC) allowing the audio from the TV to be processed by the RSP-1576 via HDMI.
Other Features
- User friendly ON-SCREEN DISPLAY (OSD) menu system with programmable labels for all inputs.
- Multi language support in OSD setup.
- Upgradable software to accommodate future updates through the rear Internet connection or front USB port.
- Assignable 12V trigger outputs for remote turn-on of power amplifier(s) and other components.
Unpacking
Remove the unit carefully from its packaging. Find the remote control and other accessories. Save the box as it will protect the product if you move or need to return it for maintenance.
Placement
Place the unit on a solid, level surface away from sunlight, heat, moisture, or vibration. Make sure that the shelf can support the weight of the unit.
Place the unit close to the other components in your system and, if possible, on its own shelf or with the optionally included rack ears. This will make initial connection, and subsequent system changes easier.
The unit can generate heat during normal operation. Do not block ventilation openings. Allow a minimum of 10 cm or 4 inches of unobstructed space around the unit. If installed in a cabinet, make sure that there is adequate ventilation.
Do not stack other components or objects on top of the unit. Do not let any liquid fall into the cabinet.
Overview of Connections
NOTE: Do NOT plug any system component into an AC source until all connections have been properly made.
Source components within the system can be connected to the unit's inputs with either a pair of standard RCA cables or balanced XLR cables for analog audio, or digitally, via HDMI, coax or optical.
Outputs of the RSP-1576 are sent to the power amplifier(s) with standard RCA cables from the preamp audio outputs. The video signal from the RSP-1576 is sent to the monitor using the HDMI connections.
In addition, the processor has MULTI INPUT connections for use with a source component that does its own surround decoding, remote IR receiver inputs, 12V trigger outputs.
NOTE: The S/PDIF digital audio interface standard specifies a 75 ohm impedance and all good digital cables adhere to this requirement. Do NOT substitute conventional audio interconnect cables for digital signals. Standard audio interconnects will pass these signals, but their limited bandwidth reduce performance.
When using analog audio connections ensure the Left and Right signals are attached to the proper RCA jacks. All RCA-type connections on this product follow these standard color codes:
Left channel audio: white RCA jack Right channel audio: red RCA jack
NOTE: Each source input must be properly configured using the INPUT SETUP menu of the OSD menu system. We recommend going to this menu after connecting each source to configure it as desired. See Input Setup in the Setup section for more information.
HDMI Inputs and Outputs
These connections are used for connecting video signals to and from the unit. See the Making Connections section for specific instructions for each type of component on page 16.
Rear HDMI IN 1—6 Video Inputs 16
HDMI inputs provide digital video connections for use with components that have HDMI outputs. HDMI connections carry video signals in multiple formats including 3D, 1080p/24Hz, and 4K. The implementation of HDMI supports audio signals, or a separate audio connection from an HDMI component. All HDMI inputs support 4K UHD HDCP 2.2 as labeled on the rear panel.
Front HDMI IN 6
The Video 7 input is located on the front panel for easier access. Use this HDMI connection for portable sources or devices that would not be permanently connected.
HDMI Monitor Outputs 15
The two HDMI outputs of the RSP-1576 can send High Definition video signals to two display devices in parallel. The HDMI outputs can send video signals to a high-definition TV 2D (480p/576p, 720p, 1080i, 1080p or 4K) and 3D (up to 1080p/24Hz). Both HDMI output will support 4K UHD HDCP 2.2 as labeled on the rear panel.
There are two HDMI outputs on the rear panel sending out the same video signal. Only one of the two will send the On Screen Menu to your TV.
Of the two HDMI Outputs, only one HDMI output supports ARC (Audio Return Channel) and is labeled "ARC/OSD" above the HDMI connector. Please refer to the INPUT SETUP menu section of this manual for more details on page 21.
Your TV may have more than one HDMI input. Not all HDMI inputs support ARC. Please use the ARC enabled HDMI input of your TV to use the ARC function on this product. ARC compatible inputs should be labeled with "ARC" next to the HDMI input connector.
Additional information for HDMI video outputs:
- All HDMI attached devices must be HDCP compatible to ensure proper display of the HDMI video signal.
• Audio received over HDMI will be processed by this product and sent out via the RCA terminal outputs.
- When using both HDMI outputs simultaneously, both HDMI outputs will be set to the same resolution. This resolution will be the lower resolution of any attached monitor.
Audio Inputs and Outputs
This Rotel processor provides both analog and digital audio connections.
PHONO Input 29
A Left/Right pair of RCA analog audio inputs for connecting a phono player with a moving magnet cartridge. If the turntable has a "ground" wire, connect it to the screw terminal labeled "GND" to the left of the Digital inputs.
TUNER Input 29
A Left/Right pair of RCA analog audio inputs for connecting a tuner.
CD Input 29
A Left/Right pair of RCA analog audio inputs for connecting a CD player. By default the CD source is set to CD analog RCA input, but this can be changed to XLR, Coax 1-3 or Optical 1-3 in the input setup menu.
AUX Input 29
A Left/Right pair of RCA analog audio inputs for connecting a audio playback device with an analog audio output.
BALANCED Input 28
A Left/Right pair of Balanced XLR audio inputs for connecting a source component with Balanced XLR audio outputs.
MULTI Input 30
A set of RCA inputs accepting up to 7.1 channels of analog signals from a source component capable of decoding multi channel audio. These inputs support FRONT L & R, CENTER, SUB, REAR L & R, and CENTER BACK L[1] & R[2].
These inputs bypass all digital processing in the RSP-1576 and are routed directly to the volume control and outputs.
PREAMP Output 31
A group of fourteen RCA analog audio outputs sends the RSP-1576's line level output signals to external amplifiers and powered subwoofers. These output levels are variable and adjusted by the RSP-1576's volume control. The fourteen connectors provide output for: FRONT L & R, REAR L & R, CENTER BACK L[1] & R[2], CENTER 1 & 2, SUBWOOFER 1 & 2, HEIGHT 1 L & R and HEIGHT 2 L & R.
DIGITAL Inputs 14
The RSP-1576 accepts digital inputs from source components such as CD players, satellite TV tuners, and DVD players. The DSP in the RSP-1576 detects the sampling rate of the incoming signal and automatically adjusts. Sampling rates up to 192kHz are supported.
NOTE: Digital inputs support both 2 Channel Stereo and Multi Channel audio signals. When using the digital input with a Multi Channel audio signal the processor DSP will decode the incoming audio stream including Dolby or DTS.
There are six digital audio inputs on the rear panel, three coaxial and three optical. These digital inputs can be assigned to any of the VIDEO 1 - 7 input sources using the INPUT SETUP menu during the setup process. For example, you can assign the COAXIAL 1 digital input connector to the VIDEO 1 source and the OPTICAL 2 digital input to the VIDEO 3 source. By default, the source of the audio for inputs Video 1 - 7 is set to HDMI Audio.
By default the CD source is set to CD analog RCA input, but this can be changed to XLR, Coax 1-3 or Optical 1-3 in the input setup menu.
PC-USB Input 17
See Figure 4
Connect this input using the supplied USB cable to the USB socket of your computer.
The RSP-1576 supports both USB Audio Class 1.0 and USB Audio Class 2.0 modes. Windows computers do not require installation of a driver for USB Audio Class 1.0 and support playback of audio up to 96kHz sampling rates.
The Factory Default setting is USB Audio Class 2.0. To take advantage of USB Audio Class 2.0 audio playback supporting up to 192kHz sampling rates you will need to install the Windows driver supplied on the CD included with the RSP-1576.
You can switch the RSP-1576 to USB Audio Class 1.0 playback mode with the following:
- Press SETUP on the remote control to enter MAIN MENU and use Up/Down buttons to select the INPUT SETUP menu then press ENTER.
- Use Left/Right buttons to select "PC-USB" as INPUT SOURCE and select "USB Audio 1.0" as AUDIO INPUT.
- Power cycle the RSP-1576 and reboot your PC after changing the USB Audio mode to ensure both units are properly configured.
Many audio playback applications do not support 192kHz sampling rate. Please confirm your audio player supports 192kHz audio and you have 192kHz audio files to properly playback this sample rate. Also, you may need to configure the audio driver in your PC to output 192kHz or your computer may "down sample" to a lower audio sample rate. For more information please refer to your audio player or operating system information.
NOTE: Upon successful installation of the driver, you may need to select the ROTEL audio driver from the audio/speaker setup of your computer.
Front USB Input 5
See Figure 6
This connection will accept Apple devices such as iPod, iPad and iPhone. While connected, the iPod and iPhone displays remain active allowing search and play functions.
Other Connections
AC Input 32
Your Rotel processor is configured at the factory for the proper AC line voltage in the country where you purchased it (USA: 120 volts/60 Hz AC or CE: 230 volts/50 Hz AC). The AC line configuration is noted on a decal on the back of your unit. Plug the supplied cord into the AC INPUT receptacle on the back of the unit.
Master Power Switch 26
The large rocker switch on the rear panel is a master power switch. When it is in the OFF position, power to the unit is completely off. When it is in the ON position, the front panel STANDBY and remote control ON/OFF buttons can be used to activate the unit or put it into standby mode.
12V TRIGGER Output 20
Many Rotel amplifiers offer the option of turning them on and off using a 12 volt trigger. These three connections provide this 12 volt trigger signal from the processor. When the unit is activated, a 12 volt DC signal is sent from these jacks to the amplifiers to automatically turn them on. When the processor is put in STANDBY mode, the trigger signal is removed and the amplifiers automatically turn off.
To use the automatic trigger turn on feature, connect one of the RSP-1576's 12V TRIG OUT jacks to the 12 volt trigger input of a Rotel amplifier, using only the black 3.5 mm trigger cable included with this unit or a Rotel amplifier. Do not use any other cable for trigger connection. The +12V DC signal appears at the "tip" of the connector.
The 12V Trigger outputs are configured to turn on in various combinations only when specific input sources are activated. See the INPUT SETUP menus in the Setup section of this manual for details on page 21.
REM IN Jack 21
This 3.5 mm mini-jack receives command codes from third-party IR remote receiver. These remote IR inputs can be used when the RSP-1576 front IR receiver cannot be reached by a sending remote control.
Consult your authorized Rotel dealer for more information on the REM IN jack.
The IR signals from the REM IN jack can be relayed to other source components using external IR emitters or hard-wired connections from the IR OUT jacks. See the following section for additional information.
IR OUT Jacks 22
The IR OUT 1 & 2 jacks send IR signals received at the REM IN jack to an infrared blaster or emitter placed in front of a source component's IR sensor. In addition, the IR OUT can be hard-wired to other Rotel products with a REM IN jack.
These outputs allow IR signals to be "relayed" through the RSP-1576 either directly to the IR receiver on the front panel or via the REM IN jack on the rear panel. This function provides easy control of other source components when their IR inputs are not accessible such as when they are installed in a rack system or in a cabinet.
See your authorized Rotel dealer for more information on IR emitters and repeater systems.
Rotel Link 23
Rotel Link is not used for RSP-1576.
Rear USB Power Port 25
The rear USB port provides 5V for charging or powering USB devices including streaming music players. This port does not allow playback of audio.
The port can be configured to remain powered even when the RSP-1576 is in standby mode through the front panel setup menu (See the Power Mode under the Power Option menu on page 26).
The Power Mode "Quick" option allows the attached streaming source to remain powered for use with the Signal Sense function for automatic power on/off control of the RSP-1576.
NOTE: When configured to provide continuous power to the rear panel USB port the RSP-1576 will consume additional power even when in standby mode.
RS232 Connector 18
The RSP-1576 can be controlled via RS232 for integration with automation systems. The RS232 connector accepts a standard straight DB-9 Male-to-Female cable.
NETWORK Connector 19
The Network socket accepts standard RJ-45, CAT-5 cables. The network connection is not required for normal operation of this unit. This connection is for software updates or control from an automation system only.
For additional information on the connections, cabling, software, and operating codes for automation system control or software updates, contact your authorized Rotel dealer.
Making Connections
Connecting an External Amplifier
See Figure 3
The RSP-1576 has preamp RCA outputs for connections to external power amplifiers to drive up to 12 speakers in configurations from 5.1 to 7.1.4. In addition, there are two subwoofer outputs.
To connect amplifiers, connect an audio cable from each output jack to the input of the amplifier channel that will power the corresponding speaker. For example, connect the FRONT L output to the amplifier channel driving the front left speaker. There are two CENTER RCA jacks; use either jack for a single center channel, or both if you have two center channels. In six or seven channel systems, make one or two additional connections for Center Back channel(s). These jacks are labeled CB L[1] and CB R[2]. Use CB L[1] for a single center back channel. Ceiling or Overhead speakers should be connected to the Height 1 and Height 2 jacks.
For preamp output connection information see Audio Configuration options in the RSP-1576 Setup Menu on page 22.
After you have connected the preamp outputs, you need to configure the RSP-1576 for the size and style of speakers in your system and calibrate the relative volume levels of the speakers. See the Speaker Level Setup section of this manual on page 24.
Connecting a Subwoofer
See Figure 3
To connect a powered subwoofer, connect a standard RCA audio cable from the jacks labeled SUB 1/SUB 2 to the input on the subwoofer's power amp. Both SUB outputs provide the same signal. Use either connection for a single subwoofer. Use both connections to connect two subwoofers.
After you have connected the subwoofer, you need to configure the unit to use the subwoofer and calibrate the relative volume level of the subwoofer. See the Speaker Level Setup section of this manual on page 24.
Connecting a DVD, Blu-ray, Cable, Satellite, Game Console and HDTV Tuner
See Figure 5 and 9
Source devices including Blu-ray, DVD, satellite, cable, etc. should be attached to the RSP-1576 using HDMI. Connect an HDMI cable from the output of the source to one of the HDMI inputs on the processor.
Digital audio connection: Depending on the setup of your system, you can also use the audio digital connections and assign them to the HDMI video inputs.
Connect the digital output of the source to any of the DIGITAL IN OPTICAL 1–3 or DIGITAL IN COAXIAL 1–3 inputs on the processor. An HDMI cable carries both digital video and digital audio signals; therefore, in most cases no separate digital audio connection needs to be made.
Use the INPUT SETUP screen to assign the audio digital input to the HDMI video input source used above.
Connecting a Blu-ray or DVD Player
See Figure 5
In some cases DVD, SACD, and other external multichannel processors are connected to the processor by sending decoded analog audio signals using RCA cables. A player with HDMI outputs can send digital signals directly to the processor for decoding.
Analog Connections: To connect a Blu-ray or DVD player (or any device that decodes multi-channel audio) with analog connections, use audio RCA cables to connect the outputs of the player to the RCA jacks labeled MULTI INPUT on the RSP-1576. Make sure that you observe proper channel consistency, i.e. connect the right front channel to the FRONT R input, etc.
Depending on your system configuration, make six connections (FRONT L & R, REAR L & R, CENTER, and SUBWOOFER), seven connections (adding a CENTER BACK connection), or eight connections (adding two CENTER BACK connections).
The MULTI inputs are analog bypass inputs, passing signals directly to the Volume Control and preamp outputs, bypassing all of the digital processing.
HDMI digital connection: If the player has HDMI outputs, simply connect an HDMI cable from the output of the player to one of the HDMI inputs on the processor. This cable sends the video signal from the player along with a digital audio signal. Using HDMI for audio and video allows the multichannel decoding to be handled by the processor.
Connecting a Display
See Figure 10
Connect one of the HDMI outputs of the RSP-1576 to the HDMI input of your TV or projector. The RSP-1576 has two HDMI outputs. Only one HDMI output will display the OSD and is ARC enabled. This output is labeled on the rear panel with ARC/OSD.
Connecting a CD Player or XLR Source
See Figure 7
Digital audio connection: Connect the digital output of the CD player to the Optical or Coax digital inputs on the RSP-1576. Use the INPUT SETUP menu to assign the audio input to the CD (the default is CD).
Analogue audio connections:
Option 1: Connect the left and right analog outputs from the CD player to the AUDIO IN jacks labeled CD (left and right). This option uses the CD player's D/A converter. Depending on the selected DSP mode this connection method may require the analog signal to be converted to a digital signal for processing.
Option 2: If your CD Player (or another source) has XLR output connectors, you can use the XLR inputs on the RSP-1576 for this connection. Connect the left and right XLR outputs from the source to the jacks labeled BALANCED INPUT (left and right). This option uses the CD player's D/A converter. Depending on the selected DSP mode this connection method may require the analog signal to be converted to a digital signal for processing.
Although there are typically no video connections for a CD Player, the RSP-1576 can assign another video input to the CD or XLR input. The Video choices are HDMI 1-7 (Front), Last Video Source, or Off. HDMI 1 video input is assigned to CD and XLR as the default setting.
Connecting a Tuner
See Figure 8
Digital audio connection: If using an HD Radio or other digital tuner, connect the digital output of the tuner to the Optical or Coax digital inputs on the RSP-1576. Use the INPUT SETUP menu to assign the audio input to the TUNER source (the default is TUNER analog input jacks).
Analog audio connection:
Option 1: If using an analog tuner, connect the left and right analog outputs from the tuner to the pair of analog input jacks labeled TUNER on the RSP-1576. Make sure that you connect the right channel to the R input jack and the left channel to the L input jack.
Option 2: If your Tuner has XLR output connectors, you can use the XLR inputs on the RSP-1576 for this connection. Connect the left and right XLR outputs from the source to the jacks labeled BALANCED INPUT (left and right).
Although there are typically no video connections for a Tuner, the RSP-1576 can assign another video input to the Tuner input. The Video choices are HDMI 1 - 7 (Front), Last Video Source, or Off. HDMI 1 video input is assigned to the Tuner input as a default setting.
Connecting an iPod/iPhone
See Figure 6
Connect the iPod/iPhone to the front USB socket.
NOTE: The audio inputs CD, PHONO, XLR, MULTI, USB, PC-USB, BLUETOOTH, and TUNER are set to HDMI 1 video input as the factory default. Video input can be changed to HDMI 1-7 (Front), Last Video Source, or Off.
Front Panel Overview
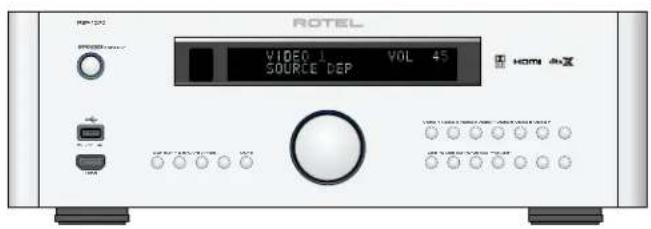
The following is a brief overview of the controls and features on the front panel of the unit. Details concerning the use of these controls are provided in subsequent sections of this manual describing various tasks.
Front Panel Display 3
The Display on the front panel shows the volume, DSP mode, source selected and type of audio mode the unit is receiving or processing.
IR Remote Sensor z
This sensor receives IR signals from the remote control. Do not block this sensor.
NOTE: The remainder of the buttons and controls on the front panel are described in the Overview of Buttons and Controls section.
Remote Control Overview
The RSP-1576 is supplied with an easy to use remote control RR-CX100. The RR-CX100 can be configured to use IR codeset 1 or IR codeset 2 in case the unit is conflicting with other Rotel models. Push and hold the TUNER button and 1 (or TUNER and 2 for codeset 2) at the same time and hold for approximately 5 seconds until the backlights on the remote control blink on then off then release both buttons. This sets the remote control to use codeset 1 (or codeset 2 if TUNER and 2 are held). The System menu in the OSD includes a configuration option to set the processor to either codeset 1 or codeset 2. The factory default for the remote and processor is codeset 1.
The RR-CX100 can also control an attached Rotel CD player. The CD player functions include Play, Stop, Pause, Track Forward, Track Back, Fast Forward, Fast Reverse. To activate these functions press the CD button on the remote. If the CD is attached to the XLR source input, these functions can be activated by pressing the XLR button. To change the CD player functions to operate after pressing the XLR button press and hold the XLR and 1 button for 5 seconds until the backlight LEDs blink twice times then release. To disable XLR sending the CD control functions press and hold the XLR and 0 button for 5 seconds until the backlight blinks.
The transport buttons will only operate for CD control after the CD or XLR button is pressed on the remote. If a different input is selected from the remote these buttons will no longer send the CD transport IR commands.
Overview of Buttons and Controls
This section provides a basic overview of the buttons and controls on the front panel and the remote control. Detailed instructions on the use of these buttons are provided in the more complete operating instructions in the following sections.
STANDBY □ and Power ON/OFF Buttons Ⓐ
The front-panel STANDBY button and the remote control ON/OFF button activate or deactivate the unit. The rear panel master POWER switch must be on the ON position for the remote standby function to operate.
VOLUME Knob and VOLUME UP/DOWN Buttons 12①
The VOLUME UP/DOWN buttons on the remote and the large rotary control on the front panel provide the master VOLUME control, adjusting the output level of all channels simultaneously including mute and volume level 1 to 96.
DISPLAY (DISP) Button 10 B
Push this button to toggle through device status on the VFD and TV.
SETUP Button Ⓗ
Navigating and ENTER Buttons ①
The SETUP button displays the OSD setup screen on the HDMI OSD enabled output. Push the SETUP button again to deactivate this menu. Use the navigation buttons Up/Down/Left/Right and ENTER on the remote control to access the various menus.
MUTE Button 11⑤
Push the MUTE button once to turn the sound off. An indication appears in the front panel and on-screen display. Press the button again to restore the previous volume level.
Input Buttons 4 13 M
The input source can be changed by pressing the desired source input buttons on the front panel or remote control.
SUR+ Buttons 9⑧
The SUR+ buttons on the remote control or front panel will display surround mode information of currently selected source. The default DSP mode can be configured in the Setup menu for each source. Press the SUR+ button repeatedly to toggle through the available DSP modes.
DSP processing options vary depending on the selected source input type. Not all DSP options are available in analog or digital input modes.
Other buttons on the remote can directly access specific DSP modes.
2CH: Changes the audio mode to STEREO, DOWN MIX.
BYPASS: Bypass all DSP processing.
PLCM: Selects Dolby ATMOS surround mode.
Playback Control buttons Ⓛ
These buttons provide basic control functions for iPod AUDIO playback. The control buttons can also control Rotel CD players. For more information how to configure CD controls see the REMOTE CONTROL OVERVIEW section of the manual. Supported functions include Play, Stop, Pause, Next Track, Previous Track.
DIM Button ①
Use this button to dim the front panel display.
Adjustment made using the ① button is temporary only and not saved after power off.
SUB, CTR, REAR Buttons Ⓑ
These buttons can access the speaker setting and adjust the output level for speakers in the system. Use the Up and Down arrow buttons on the remote control to change values. This is only a temporary change. To make permanent adjustments, please access the SPEAKER LEVEL SETUP menu from the OSD.
MEM Button E
This button does not operate with the RSP-1576 and is used only to control a Rotel tuner product for preset memory control.
LIGHT Button Ⓝ
Pushing this button turns on the back light of the remote control for easy operation in dimly lit rooms.
ASSISTIVE LIGHT ©
Push and hold on the LIGHT Button Ⓞ for 3 seconds to turn on the assistive light. This light can be used to help locate objects in a dimly lit room such as a home theatre surrounding. The light will remain illuminated as long as the button is held.
Automatic Surround Modes
Decoding of digital sources connected is generally automatic with detection triggered by a "flag" embedded in the digital recording telling the processor what decoding format to use. For example, when a Dolby or DTS surround signal is detected, the processor activates the proper decoding.
The processor will recognize a digital signal with Dolby Surround encoding and activate Dolby® decoding. Additionally, you can configure a default surround mode for each input using the INPUT SETUP menu (see the Setup section of this manual). Combined with the auto-detection of Dolby Digital and DTS, this default surround setting makes operation of the processor's surround modes totally automatic.
For stereo inputs such as CD and Tuner, you could select BYPASS or STEREO mode as the default for 2-channel playback or a DSP mode if you prefer to hear music sources in surround sound.
NOTE: A digital signal coming into the processor will be recognized and properly decoded. However, on a Blu-ray with multiple soundtracks, you may need to configure the player for the desired signal and encoding type. For example, you may need to use the player's menu system to select the desired Dolby Digital or DTS soundtrack.
Manually Selecting Surround Modes
For users who prefer a more active role in setting surround modes, buttons on the remote and the front panel provide manual selection of surround modes that are not automatically detected or, in some cases, to override an automatic setting.
Manual settings available from the front panel and/or the remote control should be used when you want to play:
- Standard 2-channel stereo (Left/Right speakers, and depending upon speaker settings also subwoofer) with no surround processing.
- Down mixed 2-channel playback of Dolby Digital 5.1 or DTS recordings.
- Dolby 3-channel stereo (Left/Right/center) of 2-channel recordings.
- 5-channel stereo, 7-channel, 9-channel or 11-channel from 2-channel recordings.
- Other modes may be available depending on the system configuration and active source material.
- PCM 2-channel (non 96kHz) digital signals can be overridden to Dolby 3-Stereo, 5CH Stereo, 7CH Stereo, 9CH, and 11CH and Stereo as well as Dolby Atmos and DTS Neural:x.
To change the surround mode press the SUR+ button on the remote control or front panel to toggle through the available options. The 2CH button on the remote control will create a down mix of any multichannel signal to 2 channel stereo mode.
NOTE: Not all surround modes are available for all surround source formats. The input source signal will determine the available surround options that can be selected.
Digital Audio
You can play these recordings in BYPASS, 2-CH Stereo, Dolby 3-Stereo, 5-CH Stereo, 7-CH Stereo, 9CH Stereo, 11CH Stereo, Dolby ATMOS Surround and Dolby Neural:X modes.
All of the bass management settings (speaker size, subwoofer, and crossover) are in effect with digital stereo inputs unless BYPASS mode is selected.
To change the surround mode press the SUR+ button on the remote control or front panel control to toggle through the available surround options. The 2CH button on the remote control will create a down mix of any multichannel signal to 2 channel stereo mode.
NOTE: Not all surround modes are available for all surround source formats. The input source signal will determine the available surround options that can be selected.
Analog Stereo
This type of recording includes any conventional stereo signals from the processor's analog inputs, including analog audio from CD players, FM tuners, etc.
Analog stereo inputs require a choice about how the signal is routed through the processor. One option is the ANALOG BYPASS mode. In this mode, the stereo signal is routed directly to the volume control and the outputs. This mode is pure 2-channel stereo, bypassing all of the digital circuitry. None of the bass management features, speaker level settings, EQ settings, or delay settings is active. There is no subwoofer output. A full-range signal is sent directly to the front left and right speakers.
Alternatively, a DSP mode can be enabled, this converts the analog inputs to digital signals, passing them through the digital processors in the RSP-1576. This option allows all of the features to be active including bass management settings, crossovers, subwoofer outputs, EQ settings, etc. There are several DSP modes available including: 2-CH Stereo, Dolby 3-Stereo, 5-CH Stereo, 7-CH Stereo, 9CH and 11CH Stereo, Dolby ATMOS Surround and Dolby Neural:X modes.
To change the surround mode press the SUR+ button on the remote control or front panel control to toggle through the available surround options.
NOTE: Not all surround modes are available for all surround source formats. The input source signal will determine the available surround options that can be selected.
Basic Operation
This section covers the basic operating controls of the RSP-1576 and the remote control.
Selecting Inputs
You can select any of the source inputs for listening and/or watching: VIDEO 1-7, CD, PHONO, XLR, MULTI INPUT, USB, PC-USB, BLUETOOTH or TUNER.
The source inputs can be customized using the INPUT SETUP menu to assign which HDMI input to use as the video source. Video 1-7 inputs can also be configured to accept any analog and digital audio sources. The default of audio source is set to HDMI Audio.
When you have configured the source input, you can use Input buttons to select the desired inputs:
- Press the Input buttons on the front panel 4 13 to switch to the selected source input i.e. CD, Tuner, Video 1 etc...
- Press the source input button on the remote control Ⓜ to select the desired source.
USB/iPod Operation
iPod/iPhone Connection 5
- An iPod/iPhone can be connected using the proper USB cable to the USB front socket of the RSP-1576.
- The iPod/iPhone will stream a digital music signal to the unit. Music selection and playback control are available using the iPod/iPhone.
- The iPod/iPhone screen will remain active while connected to the unit.
Playback Control Buttons Ⓛ
Transport controls are available from the remote control during playback including play, stop/pause, next track, previous track.
Bluetooth
Bluetooth Connection
The Bluetooth feature allows you to stream music wireless from your Bluetooth enabled device, i.e. mobile phones. Select the BLUETOOTH (BT) input on the RSP-1576. From your device (mobile phones etc.) activate Bluetooth and allow it to search for other Bluetooth devices. Select "Rotel Bluetooth" and connect to it. Once connected you can start streaming music to the RSP-1576.
NOTE: The RSP-1576 Bluetooth is APTX compatible. This enables you to stream music at lossless CD quality.
NOTE: Some Bluetooth devices may require you to establish connection again with the RSP-1576 if the unit was powered off. If this occurs, please go through the above steps to re-connect.
Rear PC-USB
Rear PC-USB Connection
The rear USB socket labeled PC-USB accepts a type B USB plug. This input accepts PCM audio signals sent from your computer up to 24 bits/192kHz resolution.
Setup
The Rotel RSP-1576 features two types of information displays to help operate the system. The first consists of simple status displays that appear on the TV screen whenever primary settings (Volume, Input, etc.) are changed.
A more comprehensive ON-SCREEN DISPLAY (OSD) menu system is available at any time by pressing the SETUP Ⓗ button on the remote. These OSD menus guide you through the configuration and setup of the RSP-1576. The settings made in the configuration process are memorized as default settings and need not be made again for normal operation of the unit.
The OSD menus can be configured to display several different languages. The default English version of all main menus are shown at the front of this manual. If your language is available, those menus will be shown in the instructions. If you would like to change from the default English language before proceeding, go to the instructions for the SYSTEM SETUP menu later in this manual. From this menu, you can change the language display.
Menu Basics
Navigation Buttons
The following remote control buttons are used to navigate the OSD menu system:
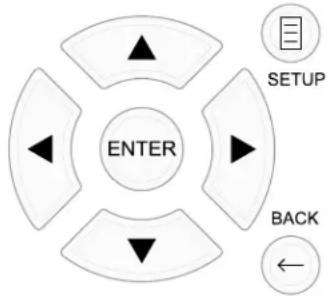
flowchart
graph TD
    A["ENTER"] --> B["SETUP"]
    A --> C["BACK"]
    A --> D["Arrow Left"]
    A --> E["Arrow Right"]
    A --> F["Arrow Down"]
SETUP button: Press to display the MAIN MENU. If a menu is already visible, push this button to close the OSD and return to normal operation.
Up/Down buttons: Press to move up and down in the lists of menu items that appear on the OSD screens.
Left/Right buttons: Press to change the current settings for a selected menu item on OSD screens.
ENTER button: Press ENTER to confirm a setting.
BACK Button: Press BACK to go back to the previous menu.
Main Menu
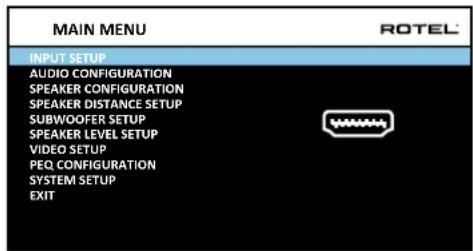
The MAIN MENU provides access to OSD screens for various configuration options. MAIN MENU is reached by pressing the SETUP Ⓗ button on the remote. To select the desired menu, move the highlight using the Up/Down arrow buttons and press the ENTER button on the remote control. Press the SETUP button again or select "EXIT" on the OSD to end setup and return to normal operation.
Configuring Inputs
A key step in setting up the unit, is to configure each source input using the INPUT SETUP screens. Configuring the inputs allows you to set defaults for a number of settings including the type of input connector, the desired surround mode, custom labels that appear in the displays when a source is selected, and many more. The following OSD menus are used to configure the inputs.
Input Setup
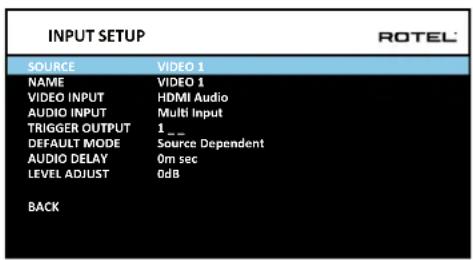
The INPUT SETUP menu configures the source inputs and is accessed from the MAIN menu. The screen provides the following options, selected by placing the highlight on the desired line using the Up/Down arrow buttons:
SOURCE: Changing this input allows you to select a specific input for configuring (CD, TUNER, VIDEO 1–7, USB, PC-USB, XLR, PHONO, MULTI INPUT and BLUETOOTH).
NAME: The name of the source can be customized. For example VIDEO1 can be named "TV" for easier reference. The default NAME is the same as the SOURCE. Place the highlight on this option and press ENTER on the remote control, it will then take you to the SOURCE NAME EDIT sub menu.
- Press the Left/Right arrow buttons on the remote control to change the first letter, scrolling through the list of available characters.
- Press the ENTER button on the remote control to confirm that letter and move to the next position.
- Repeat steps 1 and 2 until all eight characters have been completed. The final press of the ENTER button saves the new name. Or select the "←" button on the screen to confirm if you have less than eight characters to enter.
VIDEO INPUT: Selects the video source to be displayed on the TV monitor. Assign the input to a source component you have connected by selecting from HDMI 1–6 and HDMI Front. For audio only sources (such as a CD player), you would typically specify OFF so that no video is displayed. The video source can also be set to "Last Video Source" so when switching to the specified Video input the previous Video source is not changed. This feature is useful if you want to change only the audio and keep watching whatever was the last displayed video source.
AUDIO INPUT: Assigns a physical input connection for the source displayed in the first line of the menu. Options include Optical 1–3, Coax 1–3, HDMI Audio, Tuner, Multi Input, XLR, Phono, CD, Bluetooth, PC-USB, USB, ARC, AUX or Off.
NOTE: Optical, Coaxial, CD and XLR inputs can be assigned to the CD input source or Video 1-7. Audio input is not available to the XLR, PHONO, MULTI INPUT, BLUETOOTH or USB input source.
When selecting the input source for "PC-USB", AUDIO INPUT can be changed to "USB Audio 1.0" or "USB Audio 2.0". USB Audio Class 2.0 may require installation of the PC driver. For more information please see PC-USB section in this manual.
TRIGGER OUTPUT: The RSP-1576 has three 12V trigger outputs (labeled 1 – 3) that supply a 12V DC signal to turn on other components as needed. This menu item turns on specific 12V trigger outputs whenever the indicated input source is selected. For example, configure the VIDEO 1 input to turn on the 12V trigger for your DVD player. Any combination of trigger outputs can be programmed for each source.
- Place the highlight on the option "TRIGGER OUTPUT" and press the ENTER button on the remote control.
- Press the Up/Down arrow buttons on the remote control to change the first position from blank to 1 (activating TRIGGER 1 for that source) and use the Left/Right arrow buttons to move to the next position.
- Repeat until all three positions are set as desired. The final press of the ENTER button confirms the selection.
NOTE: The 12V trigger output 1 is defaulted to be turned on for all input sources. You can turn it off by following the steps as above.
DEFAULT MODE: The DEFAULT MODE setting allows you to set a default audio mode for each source input. The default setting will be used unless the source material triggers automatic decoding of a particular type or unless the default setting is temporarily overridden by the front panel or remote surround mode buttons.
Options for the default surround modes are: Stereo, Dolby 3 Stereo, 5 channel Stereo, 7 channel Stereo, 9 channel Stereo, 11 channel Stereo, Dolby ATMOS Surround, DTS Neural:X, Analog Bypass (for analog input only) and Source Dependant.
NOTE: Most types of digital discs or source material are generally detected automatically and the proper decoding activated with no action or setting required.
Since Dolby and DTS sources are detected and decoded automatically, the default setting typically tells the unit how to process a 2-channel stereo signal. For example, you might have your CD input default to 2-channel stereo, DVD and game console inputs default to Dolby processing for surround material, and TUNER input default to 5 Channel Stereo mode.
In some cases, the default setting can be manually overridden by the 2CH, BYPASS and SUR+ button on the remote control or front panel, or PLCM button on the remote control. See the Manually Selecting Surround Modes section of this manual for more information on which settings can be overridden.
AUDIO DELAY: Also known as "lip-sync" delay, this setting delays the audio signal for an input by the specified amount to match the video input. This feature can be useful when the video signal is delayed more than the audio signal.
The range of available settings is from 0 ms to 500 ms, in 10 ms steps. The setting is individually stored for each input and is the default Audio Delay each time that input is selected.
LEVEL ADJUST: Use this feature to set the volume level lower than the other inputs. This feature is useful for sources that are consistently higher in volume than other sources in the system.
Valid settings include: 0 to -6 dB, in 0.5 dB steps.
FIXED VOLUME: Configures a Fixed Volume level for a specified input. To enable this feature, select the desired fixed volume level for USB, PC-USB, Bluetooth, Coax 1 or Optical 1. When enabled and the input with a Fixed Volume is selected, the Volume level will immediately be set to the specified level. Fixed volume: Variable is factory default.
Valid settings include: Variable, 1 - 96.
NOTE: The Volume knob on the front panel and Volume +/- buttons on the IR remote are disabled when the volume is Fixed. To disable this feature set the Fixed Volume level to "Variable".
Press the SETUP button on the remote control to exit the menu and return to normal operation.
Multi Input Setup
| INPUT SETUP | ROTEL | |
| SOURCE | MULTI INPUT | |
| NAME | M-INPUT | |
| VIDEO INPUT | HDMI1 | |
| TRIGGER OUTPUT | 1__ | |
| LEVEL ADJUST | 0dB | |
| BACK | ||
When the MULTI INPUT source is selected on the INPUT SETUP menu, the available options change to reflect the fact that these inputs are direct analog inputs and bypass the unit's digital processing. The AUDIO INPUT, DEFAULT MODE and AUDIO DELAY options are not available since these functions are processed digitally and not available to the MULTI INPUT source.
Configuring Audio
Audio Configuration
| AUDIO CONFIGURATION | ROTEL | |
| CONFIGURATION | 7.1.4 | |
| FRONT | Front | |
| CENTER | Center | |
| SUBWOOFER | Subwoofer | |
| SURROUND | Surround | |
| CENTER BACK | Center Back | |
| HEIGHT 1 | Overhead Front | |
| HEIGHT 2 | Overhead Rear | |
| BACK | ||
The AUDIO CONFIGURATION menu configures the preamplifier RCA outputs. The screen provides options from 5.1 to 7.1.4 and an option for 5.1 with Bi-Amplification. After selecting the desired configuration, the preamplifier RCA output audio signal connections are displayed for up to 12 channels.
Configuring Speakers and Audio
This section of the setup process covers items concerning audio reproduction such as the number of speakers, bass management including subwoofer crossovers, establishing equal output levels for all channels, delay settings, and parametric EQ.
Understanding Speaker Configuration
Home theater systems vary in the number of speakers and the bass capabilities of those speakers. This processor offers surround modes tailored to systems with various numbers of speakers and bass management features which send bass information to the speaker(s) best able to handle it – subwoofers and/or large speakers. For optimum performance, you must tell the processor the number of speakers in your system and how bass should be distributed among them.
The following configuration instructions refer to LARGE and SMALL speakers, referring more to their desired bass configuration than their physical size. Specifically, use the LARGE setting for speakers that you want to play deep bass signals. Use the SMALL designation for speakers that would benefit from having their bass sent to more capable speakers. The bass management system redirects bass information away from all SMALL speakers and sends it to the LARGE speakers and/or the SUBWOOFER. It may be useful to think of LARGE as "full-range" and SMALL as "high-pass filtered."
- Five LARGE speakers and subwoofer: This system requires no bass redirection. All five speakers play the normal bass recorded in their respective channels. The subwoofer plays the normal channel bass. Meanwhile the normal bass places higher demands on the capabilities of the other speakers and the amplifiers driving them.
- LARGE front, center, surround speakers, no subwoofer: The normal bass from the front, center, and surround channels is played in its respective speakers.
- All SMALL speakers and subwoofer: The normal bass from all channels is redirected to the subwoofer. The subwoofer handles ALL of the bass in the system. This configuration provides several benefits: deep bass is played by the speaker most suited to do so, the main speakers may play louder with less distortion, and the need for amplifier power is reduced. This configuration should be used with bookshelf-size or smaller main speakers. It should also be considered in some cases with floorstanding front speakers. This configuration is advantageous when driving the system with moderate power amplifiers.
- LARGE front speakers, SMALL other speakers, and a subwoofer: The normal bass from the SMALL center and surround speakers is redirected to the LARGE front speakers and the subwoofer. The LARGE front speakers play their own normal bass plus the redirected bass from the SMALL speakers. The subwoofer plays the redirected bass from all of the other channels. This might be an appropriate configuration with a pair of very capable front speakers. A potential disadvantage with mixed LARGE and SMALL configurations is that the bass response may not be as consistent from channel to channel as it might be with the all SMALL configuration.
Speaker Configuration
| SPEAKER CONFIGURATION | ROTEL | |
| FRONT | Large | |
| CENTER | Small | |
| SURROUND | Small | |
| SUBWOOFER | Yes | |
| CENTER BACK | None | |
| OVERHEAD FRONT | None | |
| OVERHEAD REAR | None | |
| ADVANCED SETUP | ||
| BACK | ||
The SPEAKER CONFIGURATION menu is used to configure the RSP-1576 for use with your specific loudspeakers and to determine the bass management configuration as described in the previous overview. The menu is accessed from the MAIN menu. The Audio Configuration will determine which speakers are displayed in the Speaker Configuration menu.
The following speaker options are available:
FRONT SPEAKERS (Small/Large): Use the "Large" setting to have the front speakers play low bass (full-range). Use the "Small" setting to redirect normal bass away from these speakers to a subwoofer (high-pass filtered).
CENTER SPEAKER(S) (Large/Small/None): Select the "Large" setting (not available with SMALL front speakers) to have the center speaker play low bass (full-range). Select the "Small" setting if your center channel speaker has limited low frequency capability, or if you prefer that the bass be sent to the subwoofer (high-pass). Select the "None" setting if your system does not have a center channel speaker (the surround modes will automatically divide all center channel information equally between the two front speakers, creating a phantom center channel).
SURROUND SPEAKERS (Large/Small/None): Select the "Large" setting (not available with SMALL front speakers) to have the surround speakers play low bass (full-range). If your rear speakers have limited bass capability or if you would prefer that the bass go to a subwoofer, select the "Small" setting (high-pass). If your system has no rear surround speakers, select the "None" setting (surround channels are added to the front speakers so none of the recording is lost).
SUBWOOFER (Yes/Max/No): The "Yes" setting is the standard setting if your system has a subwoofer. If your system does not have a subwoofer, select "No". Select the "Max" setting for maximum bass output with normal bass being duplicated by both the subwoofer and any LARGE speaker in the system.
CENTER BACK (1Large/1Small/2Large/2Small/None): Some systems have one or two additional center back surround speakers. Select the "Large" setting (not available with SMALL front and surround speakers) to have your center back speaker(s) play low bass. Use "1Large" if you have one center back speaker (6.1) or "2Large" (7.1) if you have two center back speakers (7.1). If your center back speakers have limited bass capability or if you would prefer that the bass go to a subwoofer, use the "Small" setting ("1Small" for one speaker, "2Small" for two speakers). If your system has no center back speakers, select the "None" setting.
OVERHEAD FRONT (Large/Small/None): Select the "Large" setting (not available with SMALL front and surround speakers) to have your overhead front speakers play low bass. If you would prefer that the bass go to a subwoofer, use the "Small" setting.
OVERHEAD REAR (Large/Small/None): Select the "Large" setting (not available with SMALL front, top front and surround speakers) to have your overhead rear speakers play low bass. If you would prefer that the bass go to a subwoofer, use the "Small" setting.
ADVANCED: Speaker configuration is generally a global setting for all surround modes and need only be done once. However, for special circumstances, the processor provides the option of setting the speaker configuration independently for each surround mode. Select the ADVANCED SETUP line on the menu and press ENTER to go to the ADVANCED SPEAKER SETUP menu described in the following section.
To change a setting on the SPEAKER CONFIGURATION menu, place the highlight on the desired line using the Up/Down arrow buttons and use the Left/Right arrow buttons to toggle through the available settings. To return to the MAIN menu, select "BACK" on the OSD and press the ENTER button, or press the BACK button. Press the SETUP button, or select "EXIT" on the OSD to exit setup and return to normal operation.
Advanced Speaker Setup
| ADVANCED SPEAKER SETUP | ROTEL | |
| SPEAKER | Front | |
| CROSSOVER | 100Hz | |
| DOLBY | Default | |
| DTS | Default | |
| STEREO | Default | |
| BACK | ||
In most cases, the standard speaker configuration described above is a global setting and can be used for all surround modes. However, the processor provides the capability to customize these settings for three different modes: Dolby, DTS, and Stereo. In addition, the ADVANCED SPEAKER SETUP allows you to select a customized high-pass crossover frequency for the front, center, surround, surround back speakers.
NOTE: In most systems, the default settings on this menu will provide the most predictable results and most users will not need to change any settings. You should fully understand bass management and have a specific reason for needing a custom configuration before changing these settings. Otherwise, skip to the following topic, SUBWOOFER SETUP.
The available settings on the ADVANCED SPEAKER SETUP menu are as follows:
SPEAKER (Front/Center/Surround/Center back/Overhead Front/Overhead Rear/Subwoofer): Select the set of speakers to be configured with custom settings.
CROSSOVER (40Hz/50Hz/60Hz/70Hz/80Hz/90Hz/100Hz/120Hz/150Hz/200Hz/OFF): This setting for the high-pass and low-pass crossover point is only active for SMALL speakers settings and the subwoofer. When you first access the ADVANCED SPEAKER SETUP menu, the current crossover point will be shown on this line which is set to "100Hz" as the factory default. Change the value of this line only if you want the current speaker to have a different crossover point. This setting ONLY affects redirected bass.
NOTE: The "OFF" setting (available only for the subwoofer) sends a full-range signal to your subwoofer so that you can use its built-in low-pass filter.
NOTE: When a speaker is set to "Large" on the SPEAKER CONFIGURATION menu or on this menu, the crossover setting has no effect since, by definition, a LARGE speaker plays full-range with no bass redirection to the subwoofer and no crossover. In addition, the CROSSOVER setting is not available for the MULTI INPUT.
DOLBY (Default/Large/Small/None): Sets the current speaker (shown in the first line) to Large, Small, or None, overriding the setting from the SPEAKER SETUP menu. If you want to use the speaker size setting set in the SPEAKER
SETUP menu, select "Default". The "None" setting is not available for FRONT speakers.
DTS (Default/Large/Small/None): The same options described for Dolby above, except these settings ONLY take effect with DTS decoding.
STEREO (Default/Large/Small/None): The same options described for Dolby above, except these settings ONLY take effect in STEREO surround mode.
For the subwoofer, the above selections for DOLBY, DTS, and STEREO become "Yes/No/Default". They will be set to "Default" if the front speakers are set to "Default", and they would be set to "Yes" if the front speakers are set to "Small".
NOTE: When the front speakers are set to use the default settings on the ADVANCED SPEAKER SETUP menu, the specific "Large/Small/None" settings of DOLBY, DTS or STEREO are not available for the other speakers. These speakers will use the default settings.
Subwoofer Setup
| SUBWOOFER SETUP | ROTEL | |
| DOLBY | 0dB | |
| DTS | 0dB | |
| STEREO | 0dB | |
| MULTI LPCM | 0dB | |
| MULTI INPUT | 0dB | |
| BACK | ||
These five lines allow you to override the subwoofer level setting as determined in the Speaker Level Setup menu (see next section) for each specific surround mode.
DOLBY
DTS
STEREO
MULTI LPCM
MULTI INPUT
Use the Up/Down arrow buttons to move to the specific surround mode and use the Left/Right arrow buttons to adjust the subwoofer level for the current surround mode. The options are a range of adjustments from -9 dB to +9 dB and MAX (+10 dB). A setting of 0 dB means that the specified surround mode will use the master subwoofer level. Any other setting is an offset to the master setting. For example, an adjustment of -2 dB for a particular surround mode means that the subwoofer level will be 2 dB quieter than the master subwoofer level when that surround mode is selected. Use these subwoofer level settings to adjust the relative bass output of various surround modes. Changing the master subwoofer level will increase or decrease the level for all surround modes.
We recommend starting with the settings for all surround modes at the default 0 dB setting during the speaker level calibration of the system and for a period of familiarization after that. As you listen to a variety of source material over time, you may notice that certain surround modes consistently produce too much or too little bass from the subwoofer. If so, then use these menu settings to customize each surround mode. In general, if the master subwoofer level is set properly (i.e. not too loud), individual settings for each surround mode should not be necessary.
To return to the main menu select "BACK" on the OSD or push the BACK button on the remote control.
Speaker Level Setup
NOTE: If you have configured your system to use two center back speakers, there will be an additional line in the menu, giving you the ability to independently adjust the CENTER BACK LEFT and CENTER BACK RIGHT speakers.
This menu uses filtered pink noise test tones to set equal volume levels for all speakers (FRONT LEFT, CENTER, FRONT RIGHT, SURROUND RIGHT, CENTER BACK RIGHT, CENTER BACK LEFT, OVERHEAD FRONT RIGHT, OVERHEAD REAR RIGHT, OVERHEAD REAR LEFT, OVERHEAD FRONT LEFT, SURROUND LEFT and SUBWOOFER) to ensure proper surround sound reproduction. Setting the output levels using the test procedure provides the most accurate adjustment so that digital surround sound material will be reproduced as it was intended and is a critical step in calibrating the system. The Audio Configuration will determine which speakers are displayed in the Speaker Level Setup menu.
When you enter the SPEAKER LEVEL SETUP menu, you will hear a test tone coming from the highlighted speaker. Highlight different speakers by moving the cursor to the desired line using the Up/Down arrow buttons. The test tone will shift accordingly to the selected speaker.
Seated in the normal listening location, shift the test tone to the various speakers. Using the one speaker as a reference, listen for any speakers that are noticeably louder or quieter. If so, adjust that speaker's levels up or down (in 0.5 dB increments) using the Left/Right arrow buttons. Continue switching among the speakers and adjusting until all speakers are the same volume.
To return to the MAIN menu, select "BACK" on the OSD or press the BACK button. Press the SETUP button or select "EXIT" on the OSD to exit setup and return to normal operation.
Calibration with an SPL meter:
Calibrating the system with an SPL (Sound Pressure Level) meter, rather than by ear, provides more precise results and improves the system's performance significantly. Inexpensive SPL meters are widely available and the procedure is quick and easy.
Both Dolby and DTS specify a standard calibration level for all theaters to ensure that soundtracks can be played at the volume level intended by the director of the film. This reference level should result in spoken dialog played at a realistic level for normal speech with the loudest peaks in any single channel at about 105 dB. The RSP-1576's test tones are generated at a precise level (-30 dBFs) relative to the loudest possible digitally recorded sound. At the Dolby or DTS reference level, these test tones should produce a 75 dB reading on an SPL meter.
Set the meter to its 70 dB dial setting with SLOW response and C-weighting, held away from your body at your listening position (mounting the SPL meter on a camera tripod makes this easier). You can point the SPL meter at each speaker as it is being measured; however, positioning the meter in a fixed position pointing at the ceiling is easier and probably produces more consistent results.
Increase the master volume control on the unit until the meter reads 75 dB (+5 dB on the meter scale) when playing the test tone through one of the front speakers. Then, use the individual channel adjustments on the SPEAKER LEVEL SETUP menu to adjust each of the individual speakers, including the subwoofer, to the same 75 dB on the SPL meter.
NOTE: Due to meter weighting curves and room effects, the actual level of the subwoofer may be slightly higher than you measure. To compensate, Dolby suggests setting the subwoofer several dB lower when calibrating with an SPL meter (i.e. set the subwoofer to read 72 dB on the meter instead of 75 dB). Ultimately, the proper subwoofer level must be determined by personal taste and some listeners prefer to set it above 75 dB for film soundtracks. Exaggerated bass effects come at the expense of proper blending with the main speakers and place stress on the subwoofer and its amplifier. If you can localize bass from the subwoofer, the subwoofer level may be too high. Music can be useful for fine-tuning the subwoofer level as excessive bass is readily apparent. The proper setting will generally work well for music and movie soundtracks.
Remember the setting of the master volume control used during this calibration. To play a Dolby Digital or DTS soundtrack at the reference volume level, simply return to that volume setting. Note that most home theater listeners find this setting to be excessively loud. Let your own ears be the judge for deciding how loud to playback movie soundtracks and adjust the master volume control accordingly. Regardless of your listening levels, using an SPL meter to calibrate equal levels for all speakers in the system is recommended.
Speaker and Delay/Distance Setup
| SPEAKER DISTANCE SETUP | ROTEL | ||
| FRONT LEFT | 10.00 FT | 3.05M | |
| CENTER | 10.00 FT | 3.05M | |
| FRONT RIGHT | 10.00 FT | 3.05M | |
| SURROUND RIGHT | 10.00 FT | 3.05M | |
| CENTER BACK RIGHT | 10.00 FT | 3.05M | |
| OVERHEAD FRONT RIGHT | 10.00 FT | 3.05M | |
| OVERHEAD REAR RIGHT | 10.00 FT | 3.05M | |
| OVERHEAD REAR LEFT | 10.00 FT | 3.05M | |
| OVERHEAD FRONT LEFT | 10.00 FT | 3.05M | |
| CENTER BACK LEFT | 10.00 FT | 3.05M | |
| SURROUND LEFT | 10.00 FT | 3.05M | |
| SUBWOOFER | 10.00 FT | 3.05M | |
| BACK | |||
The SPEAKER DISTANCE SETUP menu, which is reached from the MAIN menu, allows you to set the delay for individual speakers. This ensures that the sound from each speaker arrives simultaneously at the listening position, even when the speakers are not all placed at equal distances from the listener. Increase the delay to speakers located closer to the seating area and decrease the delay to speakers located farther from the seating area. The Audio Configuration will determine which speakers are displayed in the Speaker Distance Setup menu.
This Rotel processor makes setting the delay time for each speaker very easy. Simply measure the distance (in feet or meters) from your seating position to each speaker in your system. Set the measured distance in the line for each speaker. The menu provides a line for each speaker configured in your system and gives a range of settings up to 33 feet (10.06 meters)
in 0.25 foot (0.075 m) increments with each increment equivalent to an additional delay of 0.25 ms.
To change a setting, place the highlight on the desired line using the Up/Down arrow buttons and use the Left/Right arrow buttons to increase or decrease the delay. To return to the MAIN menu, press the BACK button or select "BACK" on the OSD. Press the SETUP button or select "EXIT" on the OSD to exit setup and return to normal operation.
Miscellaneous Settings
System Setup
| SYSTEM SETUP | ROTEL | |
| LANGUAGE | English | |
| IR REMOTE CODESET | Codeset 1 | |
| PEQ FUNCTION | Disable | |
| DISPLAY | HDMI And VFD | |
| POWER OPTION | ||
| NETWORK CONFIGURATION | ||
| SOFTWARE INFORMATION | ||
| RESTORE FACTORY DEFAULT | ||
| BACK | ||
This SYSTEM SETUP menu, reached from the MAIN menu, provides access to several miscellaneous settings as follows:
LANGUAGE: Selects a language for the On Screen Display.
IR REMOTE CODESET: The RSP-1576 has two IR codesets and can be changed in the event there is a conflict of IR codes with other Rotel products.
NOTE: After changing the IR REMOTE CODESET the remote must also be changed to continue using the remote control. Push and hold the TUNER button and 1 (or TUNER and 2 for codeset 2) at the same time and hold for approximately 5 seconds until the backlights on the remote control blink on then off then release both buttons. This sets the remote control to use codeset 1 (or codeset 2 if TUNER and 2 are held).
PEQ FUNCTION: Turns the PEQ function On or Off.
DISPLAY: Sets the information shown on the main HDMI OSD and front VFD display. Settings are "Off", "HDMI Only", "VFD Only" or "HDMI And VFD".
POWER OPTION: Access to configuration of Off Timer, Max Power On Volume, Power Mode and Signal Sense Input.
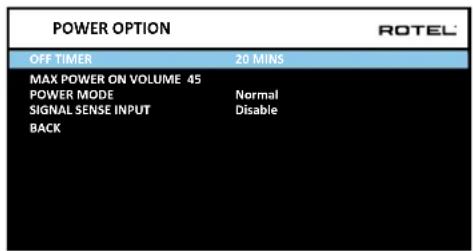
OFF TIMER: Set the amount of time the units stays powered on when there is no audio signal. The RSP-1576 will automatically go to standby mode if audio is not detected for the specified timer period. Default: 20 MINS.
Valid settings include: Disable, 20 MINS, 1 Hour, 2 Hours, 4 Hours.
MAX POWER ON VOLUME: Specifies the maximum volume level to be used each time the unit powered on. Valid settings include: 20 - 70. Default: 45.
POWER MODE: Enables the rear panel USB power port to remain powered at all times. The power consumption is higher in Quick Power mode. To enable continuous power to the rear USB power port select the Quick option.
Valid settings include: Normal, Quick.
NOTE: When the POWER MODE is configured to Quick, the RSP-1576 will consume additional power in standby mode.
SIGNAL SENSE INPUT: Checks if a digital audio signal is present on the configured Signal Sense Input. When this input is selected as the active listening source, the RSP-1576 monitors the digital data stream to determine if there is audio. If there is no audio detected for 10 minutes, the RSP-1576 will enter Signal Sense Standby Mode. When in Signal Sense Standby Mode and the RSP-1576 detects audio on Signal Sense Input, the unit will automatically power on. To disable this function, select the DISABLE option which is the factory default setting.
NOTE: The Signal Sense function is not available if Standby Video Source is enabled.
NOTE: When the RSP-1576 enters standby mode via the remote control, the Signal Sense function will not operate until the unit detects the audio has stopped for the minimum 10 minute time-out period. This prevents the unit from immediately powering back on if there is still active audio playing.
NOTE: When the SIGNAL SENSE INPUT function is activated, the RSP-1576 will consume additional power in signal sense standby mode.
NETWORK CONFIGURATION: Sets the network configuration for the unit. In most systems, set the IP ADDRESS MODE to DHCP. This setting will allow your router to assign an IP address to the RSP-1576 automatically. If your network uses fixed IP addresses, set the IP ADDRESS MODE to Static. A fixed or STATIC IP address requires manually entering the IP Address, Subnet Mask, Gateway, and DNS in the IP ADDRESS CONFIGURATION sub menu.
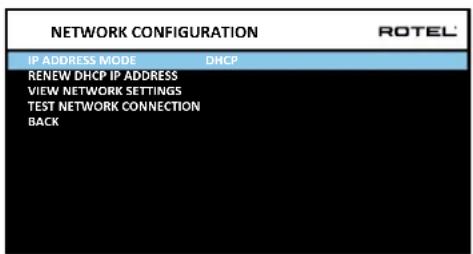
SOFTWARE INFORMATION: Displays the current software installed in the unit. It shows the MAIN, DSP and STANDBY software versions. There is also an option to check for software updates. This feature lets the unit search for software updates on the Internet. The network needs to be properly configured. Alternatively, you can load the software through the front USB socket. For more information on the software update process please contact your authorized Rotel dealer.
RESTORE FACTORY DEFAULT: This option sets the unit back to the original setting as when it left the factory. All user settings will be erased.
NOTE: Use caution when resetting the RSP-1576 to factory defaults as all user configured options will be erased and reset to original factory settings.
Video Setup
| VIDEO SETUP | ROTEL | |
| STANDRY VIDEO SOURCE | Disable | |
| FAST AUDIO SYNC | Disable | |
| OSD FORMAT | 480P | |
| BACK | ||
The VIDEO SETUP menu provides configuration of the HDMI outputs. See the HDMI INPUTS & OUTPUTS section of this manual for details on HDMI connections.
STANDBY VIDEO SOURCE: Options are "Disable", "HDMI 1-6", "HDMI Front", or "Last". This allows the selected HDMI source input to pass-through the RSP-1576 while in standby mode. Audio and video are passed directly to the attached TV or display.
NOTE: When the Standby Video Source is enabled the RSP-1576 will consume additional power when in standby mode.
NOTE: Signal Sense power control is disabled with STANDBY VIDEO SOURCE is enabled.
FAST AUDIO SYNC: This function allows the HDMI audio to sync more quickly with the RSP-1576. Only 1 input can be selected for this function.
NOTE: Some source devices do not provide the timing requirements to allow this function to work properly and could result in static noise before the audio is heard.
OSD FORMAT: The HDMI On Screen Display output resolution can be changed from 480p to 576p. The default value is 480p.
Press the BACK button or select "BACK" on the OSD to exit the VIDEO SETUP Menu and return to the main menu.
PEQ Configuration
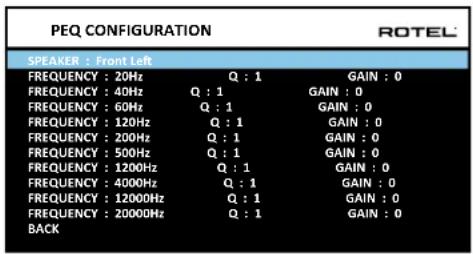
The PEQ CONFIGURATION menu allows you to enter EQ values for 10 bands as shown. PEQ setup requires advanced knowledge and equipment for measuring the frequency response of the room and performance of the speakers. To properly configure the EQ you should be familiar with the tools and equipment needed. Typically these settings are only changed by professional installers to ensure optimal performance of the RSP-1576.
Use the navigation buttons to highlight the frequency: Push the ENTER button on the remote control to access and make changes. Use the Up/Down arrow buttons to change the value. Use the Left/Right arrow buttons to move to the next section on the line. Press ENTER again to confirm settings and allow navigation to the next PEQ BAND. The Audio Configuration will determine which speakers are available for configuration in the PEQ Configuration menu.
FREQUENCY: There are 10 bands available and the frequency can be changed between 10 - 24kHz as below.
BAND 1 Freq: 10Hz - 40Hz, 1Hz Step Default 20Hz
BAND 2 Freq: 20Hz - 44Hz, 1Hz Step Default 40Hz
BAND 3 Freq: 45Hz - 89Hz, 1Hz Step Default 60Hz
BAND 4 Freq: 90Hz - 180Hz, 10Hz Step Default 120Hz
BAND 5 Freq: 190Hz - 350Hz, 10Hz Step Default 200Hz
BAND 6 Freq: 360Hz - 690Hz, 10Hz Step Default 500Hz
BAND 7 Freq: 700Hz - 1900Hz, 100Hz Step Default 1.2kHz
BAND 8 Freq: 2kHz - 7.78kHz, 100Hz Step Default 4kHz
BAND 9 Freq: 8kHz - 20kHz, 100Hz Step Default 12kHz
BAND 10 Freq: 8kHz - 24kHz, 100Hz Step Default 20kHz
Q: The Q value can be adjusted between 1 to 10.
GAIN: The gain can be set between -12 to +2.
To exit this menu press the BACK button or select "BACK" on the OSD then press the SETUP button to return to normal operations.
NOTE: Q in EQ value relates to the bandwidth of the filter. The higher the value, the narrower the bandwidth.
Troubleshooting
Most difficulties in audio systems are the result of incorrect connections, or improper control settings. If you encounter problems, isolate the problem area, check the control settings, determine the cause of the fault and make the necessary changes. If you are unable to get sound from the unit, refer to the suggestions for the following conditions:
The unit does not turn on
• Make sure the power cord is plugged into the rear panel and a AC outlet.
• Make sure the rear panel POWER switch is in the ON position.
No sound from any input
• Make sure that MUTING is off and VOLUME is turned up.
• Make sure source inputs are connected and configured correctly.
No sound from digital sources
- Make sure that digital input connector is assigned to the proper source input and that the source input is configured to use the digital input rather than an analog input.
- Check the configuration of the digital input source player to ensure that the digital output is activated.
No sound from some speakers
• Check all power amp and speaker connections.
- Check Speaker Configuration settings in the Setup menus.
No Video Output
- Make sure that the TV monitor is connected properly and check the input assignments.
- Check the source input and TV output resolution are compatible. A 4K source can only be sent to a 4K monitor.
• HDMI cables must be 5 meters or less in length.
• If watching 3D sources, make sure the display is 3D enabled.
Video and Audio do not match.
- Check that the proper video source is selected for each input.
• Check that the group delay (lip-sync) setting is not mis-adjusted.
Clicking or popping sounds when switching inputs
- The unit uses relay switching to preserve maximum sound quality. The mechanical clicking of the relays is normal.
- Switching between HDMI sources may cause delays as HDMI two way communications "handshake" must be established between the source and display. The time required for the handshake varies depending on the attached equipment.
Controls do not operate
• Make sure that fresh batteries are installed in the remote.
- Make sure that the IR sensor on the front panel is not blocked. Aim the remote control at the sensor.
- Make sure the sensor is not receiving strong IR light (sunlight, halogen lighting, etc.).
- Unplug the unit from the AC outlet, wait 30 seconds, and plug it back to reset.
- Confirm the IR Codeset set in the remote control and RSP-1576 are matched to either Codeset 1 or Codeset 2.
"Made for iPod," and "Made for iPhone," means that an electronic accessory has been designed to connect specifically to iPod or iPhone, respectively, and has been certified by the developer to meet Apple performance standards. Apple is not responsible for the operation of this device or its compliance with safety and regulatory standards. Please note that the use of this accessory with iPod, or iPhone may affect wireless performance.
iPhone, iPod, iPod classic, iPod nano, and iPod touch are trademarks of Apple Inc., registered in the U.S. and other countries.
Specifications
Audio
Total Harmonic Distortion 0.0006% (Analog Bypass) 0.003% (Digital Input)
Intermodulation Distortion (60 Hz : 7 kHz, 4:1) < 0.005%
Frequency Response
Phono Input 20 Hz - 20k Hz, ± 0.5 dB Analog Bypass 10 Hz - 100k Hz, ± 1 dB Digital Input 20 Hz - 20k Hz, ± 0.5 dB
Signal to Noise Ratio (A-weighted)
Analog Bypass 112 dB Digital Input 112 dB
Input Sensitivity/Impedance
Phono Level 3.5 mV / 47k ohms Line Level 270 mV / 100k ohms Balance Level 500 mV / 100k ohms
Preamp Output Level
Line Level 1.0 V
Channel Separation (at 10k Hz) >75 dB
Digital Audio LPCM (up to 192kHz, 24-bit)
Dolby Dolby Dolby ® Surround, ® TrueHD, ® ATMOS,
DTS-HD Master Audio, DTS X
Video
Input Resolutions 480i/576i, 480p/576p, 720p, 1080i, 1080p, 1080p 24Hz, 3D, 4K, UHD, 4K 60Hz, 4K HDR10
Output Resolution 480i/576i, 480p/576p, 720p 1080i, 1080p, 1080p 24Hz, 3D, 4K, UHD, 4K 60Hz, 4K HDR10
Color Space Support sRGB, YCbCr 4:2:2, YCbCr 4:4:4 Deep Color Support 24-bit, 30-bit, 36-bit HDMI Inputs/Outputs 7 inputs supporting HDCP 2.2, HDMI2.0a 2 outputs supporting HDCP 2.2, HDMI2.0a
Audio Return Channel
General
Power Consumption 60 watts < 0.5 watt (standby)
Power Requirements (AC) 120 volts, 60Hz 230 volts, 50Hz
BTU 114 BTU/h
Dimension (W x H x D) 431 x 144 x 348 mm 17 x 5 ^2/3 x 13 ^5/7 in Front Panel Height 3U / 132.6 mm / 5 ^1/_4 in
Weight 8.8 kg / 19.4 lbs
All specifications are accurate at the time of printing.
Rotel reserves the right to make improvements without notice.
Rotel and the Rotel Hifi logo are registered trademarks of The Rotel Co., Ltd. Tokyo, Japan.
Made for


Sommaire
Bouton Configuration (Setup) ⑧ 38
Touche ASSISTIVE LIGHT © 38
Modes surround automatiques .... 38

For DTS patents, see http://patents.dts.com. Manufactured under license from DTS Licensing Limited. DTS, the Symbol, DTS in combination with the Symbol, DTS:X, and the DTS:X logo are registered trademarks or trademarks of DTS, Inc. in the United States and/or other countries. © DTS, Inc. All Rights Reserved.
Mise en route
Bouton Configuration (Setup) Ⓗ
flowchart
graph TD
    A["ENTER"] --> B["SETUP"]
    A --> C["BACK"]
    B --> D["Arrow pointing up"]
    C --> E["Arrow pointing down"]
    D --> F["Arrow pointing left"]
    E --> G["Arrow pointing right"]
Surround-Features 53
Sonstige Features 53

For DTS patents, see http://patents.dts.com. Manufactured under license from DTS Licensing Limited. DTS, the Symbol, DTS in combination with the Symbol, DTS:X, and the DTS:X logo are registered trademarks or trademarks of DTS, Inc. in the United States and/or other countries. © DTS, Inc. All Rights Reserved.
Zu dieser Anleitung
DTS-HD Master Audio, DTS X
Video
Eingangsauflösungen 480i/576i, 480 P/576 P, 720 P, 1.080i, 1.080 P, 1.080 P 24 Hz, 3D, 4K, UHD, 4K 60Hz, 4K HDR10
Ausgangsauflösungen 480i/576i, 480 P/576 P, 720 P 1.080i, 1.080 P, 1.080 P 24 Hz, 3D, 4K, UHD, 4K 60Hz, 4K HDR10
Audio Return Channel (ARC)
Allgemeines
Ajustes Varios (Miscellaneous) 90

For DTS patents, see http://patents.dts.com. Manufactured under license from DTS Licensing Limited. DTS, the Symbol, DTS in combination with the Symbol, DTS:X, and the DTS:X logo are registered trademarks or trademarks of DTS, Inc. in the United States and/or other countries. © DTS, Inc. All Rights Reserved.
Para Empezar
Ajustes Varios (Miscellaneous)
480i/576i, 480p/576p, 720p,
1080i, 1080p, 1080p/24 Hz, 3D, UHD, 4K, 4K 60Hz y 4K HDR10
480i/576i, 480p/576p, 720p, 1080i, 1080p, 1080p/24 Hz, 3D, UHD y 4K, 4K 60Hz y 4K HDR10
sRGB, YCbCr 4:2:2 e YCbCr 4:4:4 24 bits, 30 bits y 36 bits
7 entradas compatibles HDCP 2.2, HDMI2.0a 2 salidas compatibles HDCP 2.2, HDMI2.0a
Canal de Retorno de Audio (ARC)
Generales
Knoppen SUB, CTR, REAR ⑧ 104
MEM-knop © 104
LIGHT-knop Ⓝ 104
Specifications....115
CAUTION
RISK OF ELECTRIC SHOCK DO NOT OPEN

WARNING : SHOCK HAZARD-DO NOT OPEN AVIS: RISQUE DE CHOC ÉLECTRIQUE-NE PAS OUVRIR

For DTS patents, see http://patents.dts.com. Manufactured under license from DTS Licensing Limited. DTS, the Symbol, DTS in combination with the Symbol, DTS:X, and the DTS:X logo are registered trademarks or trademarks of DTS, Inc. in the United States and/or other countries. © DTS, Inc. All Rights Reserved.
Aan de slag
Knoppen SUB, CTR, REAR Ⓑ
Resoluties ingangen 480i/576i, 480p/576p, 720p, 1080i, 1080p, 1080p 24Hz, 3D, 4K, UHD, 4K 60Hz, 4K HDR10
Resoluties uitgangen 480i/576i, 480p/576p, 720p 1080i, 1080p, 1080p 24Hz, 3D, 4K, UHD, 4K 60Hz, 4K HDR10
Ondersteuning kleurenruimte sRGB, YCbCr 4:2:2, YCbCr 4:4:4 Ondersteuning van diepe kleuren 24-bits, 30-bits, 36-bits HDMI-ingangen/vuitgangen 7 ingangen die HDCP 2.2, HDMI2.0a 2 uitgangen die HDCP 2.2, HDMI2.0a Audio Return Channel
Algemeen

For DTS patents, see http://patents.dts.com. Manufactured under license from DTS Licensing Limited. DTS, the Symbol, DTS in combination with the Symbol, DTS:X, and the DTS:X logo are registered trademarks or trademarks of DTS, Inc. in the United States and/or other countries. © DTS, Inc. All Rights Reserved.
Per cominciare
Tasti SUB, CTR, REAR Ⓑ
flowchart
graph TD
    A["ENTER"] --> B["SETUP"]
    A --> C["BACK"]
    B --> D["Arrow pointing up to top"]
    C --> E["Arrow pointing down to bottom"]
    D --> F["Arrow pointing left to bottom"]
    E --> G["Arrow pointing right to bottom"]
DTS-HD Master Audio, DTS X
Video
SUB, CTR, REAR ⑧ 145
MEM © 145
LIGHT ① 145

For DTS patents, see http://patents.dts.com. Manufactured under license from DTS Licensing Limited. DTS, the Symbol, DTS in combination with the Symbol, DTS:X, and the DTS:X logo are registered trademarks or trademarks of DTS, Inc. in the United States and/or other countries. © DTS, Inc. All Rights Reserved.
Introduktion
BYPASS: Kopplar ur all DSP-processing.
DTS-HD Master Audio, DTS X
Video
Upplösning, insignal 480i/576i, 480p/576p, 720p, 1080i, 1080p, 1080p 24Hz, 3D, 4K, UHD, 4K 60Hz, 4K HDR10
Upplösning, utsignal 480i/576i, 480p/576p, 720p 1080i, 1080p, 1080p 24Hz, 3D, 4K, UHD, 4K 60Hz, 4K HDR10
Speaker and Delay/Distance Setup 173
Различные настройки – Miscellaneous Settings.... 173

For DTS patents, see http://patents.dts.com. Manufactured under license from DTS Licensing Limited. DTS, the Symbol, DTS in combination with the Symbol, DTS:X, and the DTS:X logo are registered trademarks or trademarks of DTS, Inc. in the United States and/or other countries. © DTS, Inc. All Rights Reserved.
Первые шаги
24-bit, 30-bit, 36-bit
2-11-4, Nakane, Meguro-ku,
Tokyo, 152-0031
Japan
Rotel of America
54 Concord Street
North Reading, MA 01864-2699
USA
Phone: +1 978-664-3820
Fax: +1 978-664-4109
Rotel Europe
Dale Road
Worthing, West Sussex BN11 2BH
England
Phone: +44 (0)1903 221 763
- RSP-1576
- Important Safety Instructions 4
- About Rotel....13
- Getting Started 13
- Overview of Connections 14
- HDMI Inputs and Outputs....14
- Audio Inputs and Outputs....14
- Other Connections 15
- Making Connections....16
- Front Panel Overview 17
- Remote Control Overview 18
- Overview of Buttons and Controls 18
- Automatic Surround Modes....18
- Manually Selecting Surround Modes 19
- Basic Operation....19
- USB/iPod Operation 20
- Bluetooth....20
- Rear PC-USB 20
- Setup 20
- Menu Basics....20
- Configuring Inputs 20
- Configuring Audio....22
- Configuring Speakers and Audio 22
- Miscellaneous Settings 25
- Troubleshooting 27
- Specifications....28
- CAUTION
- APPLICABLE FOR USA, CANADA OR WHERE APPROVED FOR THE USAGE
- Important Safety Instructions FCC Information
- Notice
- close uninstalled connections.
- Getting Started
- Video Features.
- Audio Features
- Surround Features
- Other Features
- Unpacking
- Placement
- Overview of Connections
- HDMI Inputs and Outputs
- Rear HDMI IN 1—6 Video Inputs 16
- Front HDMI IN 6
- HDMI Monitor Outputs 15
- Audio Inputs and Outputs
- PHONO Input 29
- TUNER Input 29
- CD Input 29
- AUX Input 29
- BALANCED Input 28
- MULTI Input 30
- PREAMP Output 31
- DIGITAL Inputs 14
- PC-USB Input 17
- See Figure 4
- Front USB Input 5
- See Figure 6
- Other Connections
- AC Input 32
- Master Power Switch 26
- 12V TRIGGER Output 20
- REM IN Jack 21
- IR OUT Jacks 22
- Rotel Link 23
- Rear USB Power Port 25
- RS232 Connector 18
- NETWORK Connector 19
- Making Connections
- Connecting an External Amplifier
- Connecting a Subwoofer
- Connecting a DVD, Blu-ray, Cable, Satellite, Game Console and HDTV Tuner
- Connecting a Blu-ray or DVD Player
- Connecting a Display
- Connecting a CD Player or XLR Source
- Analogue audio connections:
- Connecting a Tuner
- Analog audio connection:
- Connecting an iPod/iPhone
- Front Panel Overview
- Front Panel Display 3
- IR Remote Sensor z
- Remote Control Overview
- Overview of Buttons and Controls
- STANDBY □ and Power ON/OFF Buttons Ⓐ
- VOLUME Knob and VOLUME UP/DOWN Buttons 12①
- DISPLAY (DISP) Button 10 B
- SETUP Button Ⓗ
- Navigating and ENTER Buttons ①
- MUTE Button 11⑤
- Input Buttons 4 13 M
- SUR+ Buttons 9⑧
- Playback Control buttons Ⓛ
- DIM Button ①
- SUB, CTR, REAR Buttons Ⓑ
- MEM Button E
- LIGHT Button Ⓝ
- ASSISTIVE LIGHT ©
- Automatic Surround Modes
- Manually Selecting Surround Modes
- Digital Audio
- Analog Stereo
- Basic Operation
- Selecting Inputs
- USB/iPod Operation
- iPod/iPhone Connection 5
- Bluetooth
- Bluetooth Connection
- Rear PC-USB
- Rear PC-USB Connection
- Setup
- Menu Basics
- Navigation Buttons
- Main Menu
- Configuring Inputs
- Input Setup
- Multi Input Setup
- Configuring Audio
- Audio Configuration
- Configuring Speakers and Audio
- Understanding Speaker Configuration
- Speaker Configuration
- Advanced Speaker Setup
- Subwoofer Setup
- DOLBY
- Speaker Level Setup
- Calibration with an SPL meter:
- Speaker and Delay/Distance Setup
- Miscellaneous Settings
- System Setup
- Video Setup
- PEQ Configuration
- Troubleshooting
- The unit does not turn on
- No sound from any input
- No sound from digital sources
- No sound from some speakers
- No Video Output
- Video and Audio do not match.
- Clicking or popping sounds when switching inputs
- Controls do not operate
- Specifications
- Audio
- Frequency Response
- Signal to Noise Ratio (A-weighted)
- Input Sensitivity/Impedance
- Preamp Output Level
- Video
- General
- Sommaire
- Mise en route
- Bouton Configuration (Setup) Ⓗ
- Zu dieser Anleitung
- Allgemeines
- Para Empezar
- Ajustes Varios (Miscellaneous)
- Generales
- Aan de slag
- Knoppen SUB, CTR, REAR Ⓑ
- Algemeen
- Per cominciare
- Tasti SUB, CTR, REAR Ⓑ
- Introduktion
- Первые шаги
- Rotel of America
- Rotel Europe
Brand : ROTEL
Model : RSP1576
Category : Receiver