
WR400 - Radio MIDLAND - Free user manual and instructions
Find the device manual for free WR400 MIDLAND in PDF.
| Product Type | Weather radio with AM/FM receiver and NOAA alerts |
| Brand and Model | Midland WR400 |
| Power Supply | 9V DC power adapter (included) or 4 AA batteries (not included) |
| Power Consumption | Approx. 5 W in normal operation |
| Frequency Bands | AM 520-1710 kHz, FM 87.5-108 MHz, NOAA Weather 162.400-162.550 MHz (7 channels) |
| Main Functions | Weather alerts (voice, siren, display), dual alarm, snooze, SAME (Specific Area Message Encoding), AM/FM radio with 4 presets per band |
| Display | Backlit LCD screen with brightness adjustment (10 levels) |
| Connectivity | External antenna jack (F-type), 3.5 mm audio output (headphones) |
| Dimensions (approx.) | 200 x 130 x 150 mm (L x H x D) |
| Weight (approx.) | 600 g (without batteries) |
| Available Languages | French, English, Spanish (selectable at first startup) |
| Warranty | 1 year (United States and Canada), parts and labor |
| Spare parts and repairability | External antenna available as an option. Repair by authorized center (out of warranty, fee applies) |
| Care and cleaning | Wipe with a soft, dry cloth. Do not use liquid or abrasive products. |
| Safety | Do not expose to water or moisture. Use only the included power adapter. |
Frequently Asked Questions - WR400 MIDLAND
User questions about WR400 MIDLAND
0 question about this device. Answer the ones you know or ask your own.
Ask a new question about this device
Download the instructions for your Radio in PDF format for free! Find your manual WR400 - MIDLAND and take your electronic device back in hand. On this page are published all the documents necessary for the use of your device. WR400 by MIDLAND.
USER MANUAL WR400 MIDLAND
Quick Start Instructions
- Pull out the antenna and extend it to its full length.
- Insert 4 AA batteries (not included).
- Plug the AC adapter into the POWER jack on the back of the radio and the other end into a standard wall outlet.
- When powered on for the first time the weather radio will go into the setup mode.
To SET LANGUAGE press ENTER. Choose your language by pressing or , then ENTER.
To SET LOCATION press ENTER. Press or until SINGLE is displayed, the press ENTER. Press ENTER again to set 01 location.
- Press or to choose your country, then press ENTER.
- Press or to choose your state or province, then press ENTER.
-
Press or to choose you county or area, then press ENTER.
-
To SET TIME press ENTER. The display will show SETTING HOUR. Press or to set the hour. Push button to toggle to setting the minutes, then press ENTER.
To SET CHANNEL press ENTER. Press or until desired broadcast is selected, then press ENTER.
To set volume use the VOLUME wheel on the side on the radio. -
Press the WEATHER/HAZARD button to listen to the weather radio.
Weather Channel Frequencies
| Channel Number | Frequency (MHz) |
| 1 162.400 | |
| 2 162.425 | |
| 3 162.450 | |
| 4 162.475 | |
| 5 162.500 | |
| 6 162.525 | |
| 7 162.550 |
To get the S.A.M.E. code for your area, call 1-888-697-7263 or visit https://www.nws.noaa.gov/nwr/coverage/county_ coverage.html.
For Canada call 1-877-789-7733 or visit https://www.canada.ca/en/environment-climate-change/services/weatherradio/specific-area-message-encoding/forcase-regions.html.
Table of Contents
Weather Channel Frequencies.. 1
S.A.M.E (Specific Area Message Encoding) Codes 1
Getting to Know your Weather Radio 3
WR400 Features 3
Icons on Display 3
Accessory Jacks 3
Setting the Time 4
Setting the Alarm 4
Choosing the Alarm Type. 4
Setting the Weather Channel 4
Turning the Weather Radio On and Off 4
Setting your Location 5
Manually Entering a S.A.M.E County Code 5
Choosing an Alert Type. 6
1. Selectable Alert Option 6
Testing the Alert Siren. 6
Reviewing Alerts. 6
Test Signals Broadcast by the NWS. 7
No Reception Warning. 7
AM/FM Radio 7
Turning the AM/FM Radio On and Off 7
Tuning the AM/FM Radio 7
Setting the AM/FM Preset Stations. 8
Button Beeps 8
Backlight Dimmer. 8
Troubleshooting 9
Limited Warranty 10
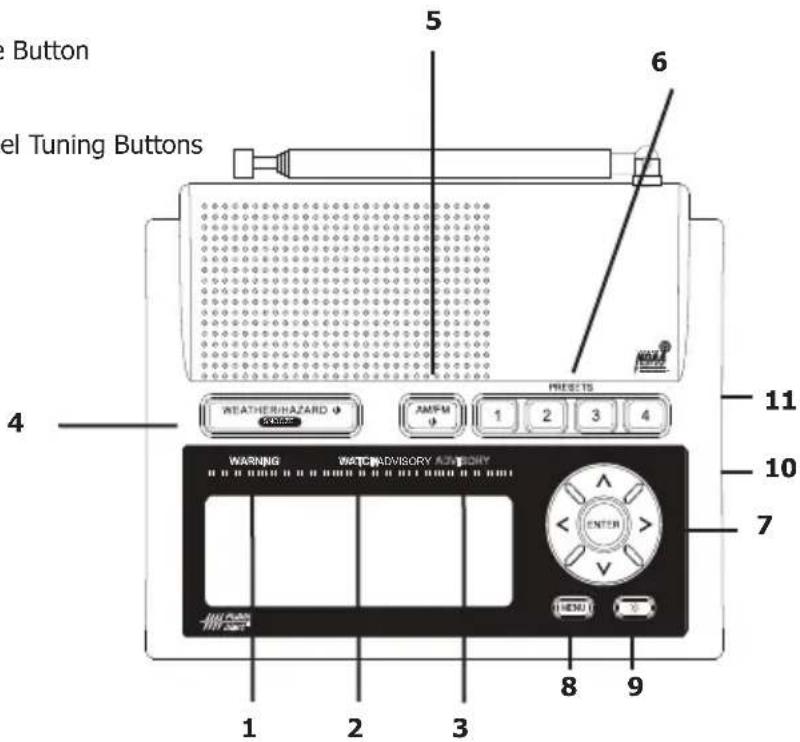
Getting to Know your Weather Radio
WR400 Features:
- Warning Light
- Watch Light
- Advisory Light
- Weather/Hazard and Snooze Button
- AM/FM and Power Button
- Radio Preset Buttons
- Menu Navigation and Channel Tuning Buttons
- Menu Button
- LCD Backlight Button
- Volume Wheel
- Alarm Switch
Icons on the Display

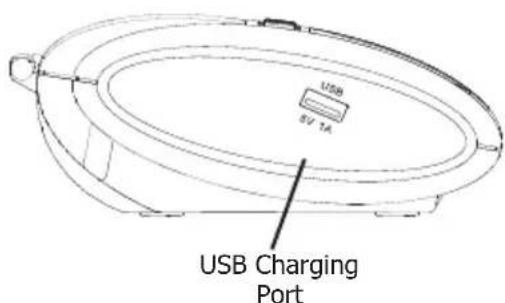
Accesory Jacks
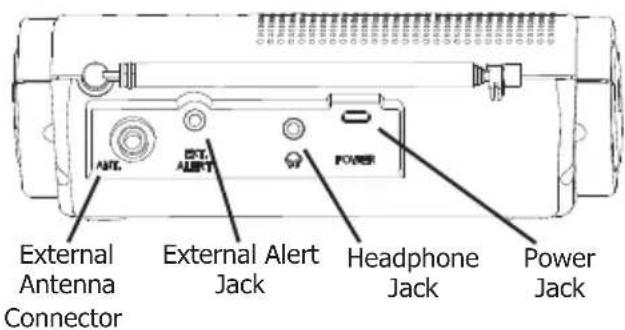
Back
Left Side
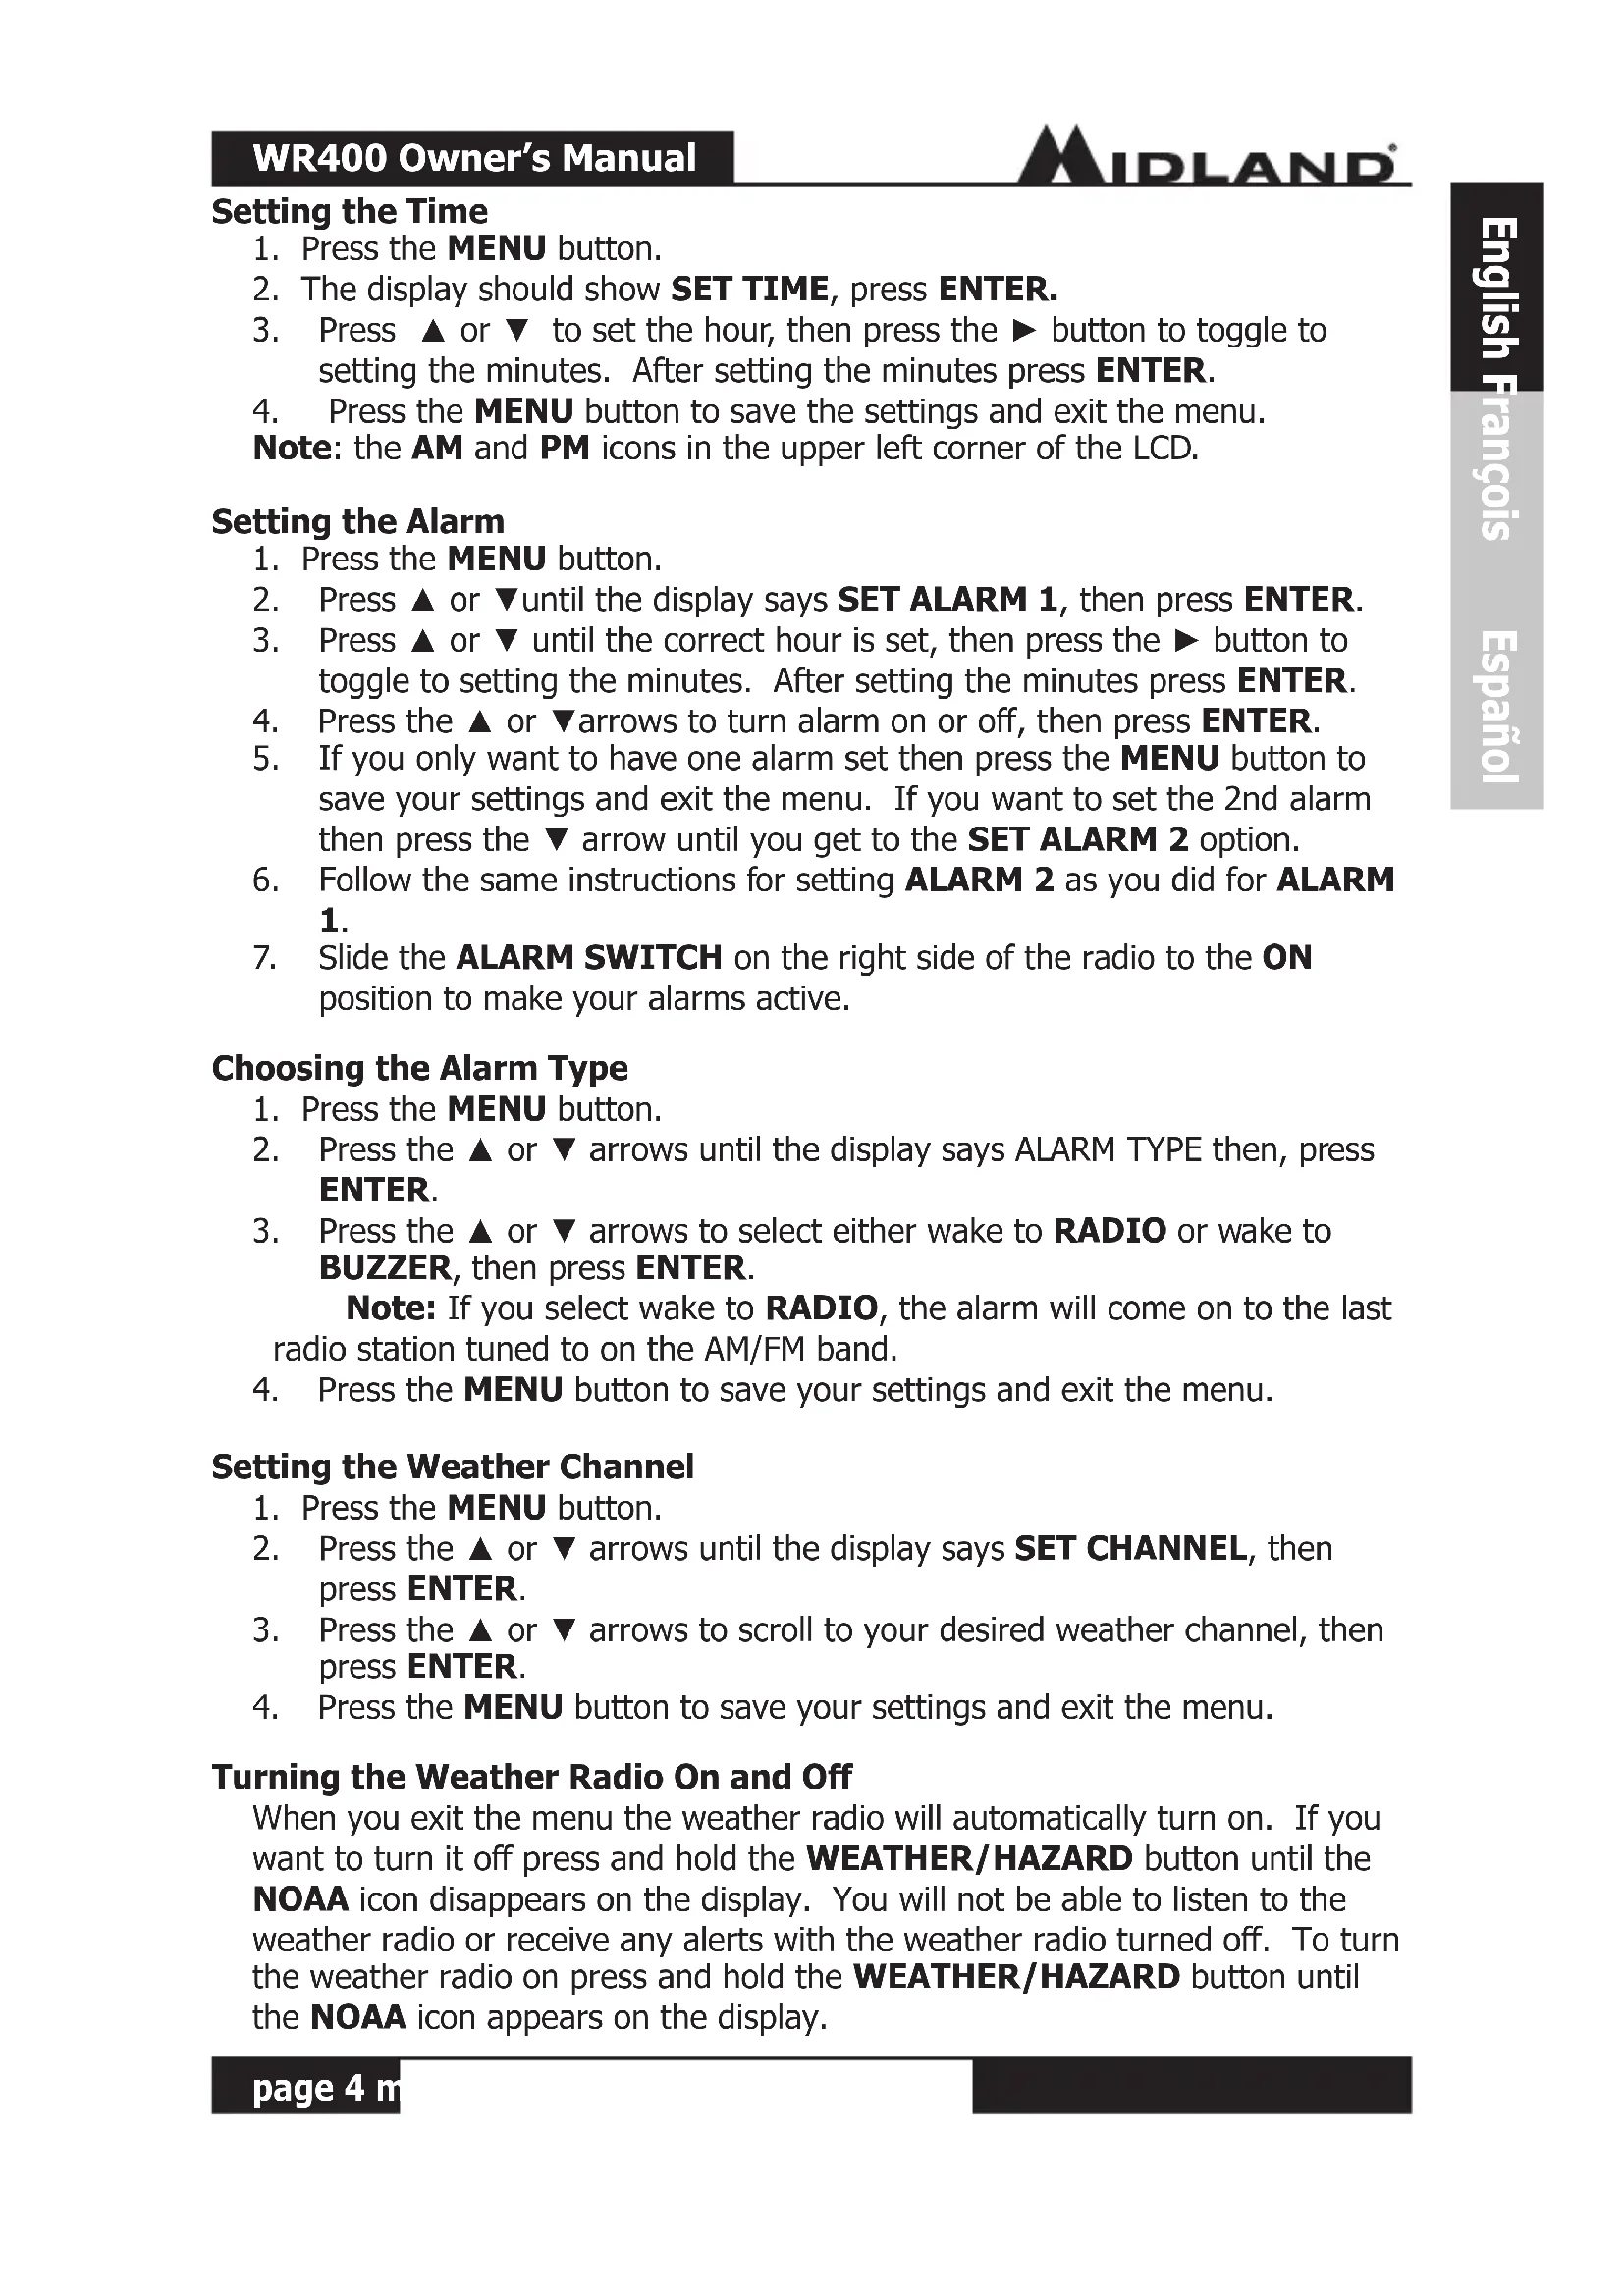
Setting the Time
- Press the MENU button.
- The display should show SET TIME, press ENTER.
- Press or to set the hour, then press the button to toggle to setting the minutes. After setting the minutes press ENTER.
- Press the MENU button to save the settings and exit the menu.
Note: the AM and PM icons in the upper left corner of the LCD.
Setting the Alarm
- Press the MENU button.
- Press or until the display says SET ALARM 1, then press ENTER.
- Press or until the correct hour is set, then press the button to toggle to setting the minutes. After setting the minutes press ENTER.
- Press the or arrows to turn alarm on or off, then press ENTER.
- If you only want to have one alarm set then press the MENU button to save your settings and exit the menu. If you want to set the 2nd alarm then press the arrow until you get to the SET ALARM 2 option.
- Follow the same instructions for setting ALARM 2 as you did for ALARM 1.
- Slide the ALARM SWITCH on the right side of the radio to the ON position to make your alarms active.
Choosing the Alarm Type
- Press the MENU button.
- Press the or arrows until the display says ALARM TYPE then, press ENTER.
- Press the or arrows to select either wake to RADIO or wake to BUZZER, then press ENTER.
Note: If you select wake to RADIO, the alarm will come on to the last radio station tuned to on the AM/FM band.
- Press the MENU button to save your settings and exit the menu.
Setting the Weather Channel
- Press the MENU button.
- Press the or arrows until the display says SET CHANNEL, then press ENTER.
- Press the or arrows to scroll to your desired weather channel, then press ENTER.
- Press the MENU button to save your settings and exit the menu.
Turning the Weather Radio On and Off
When you exit the menu the weather radio will automatically turn on. If you want to turn it off press and hold the WEATHER/HAZARD button until the NOAA icon disappears on the display. You will not be able to listen to the weather radio or receive any alerts with the weather radio turned off. To turn the weather radio on press and hold the WEATHER/HAZARD button until the NOAA icon appears on the display.
Setting Your Location
- Press the MENU button.
- Press the or arrows until the display says SET LOCATION, then press ENTER.
- You now have the option of choosing between ANY, MULTIPLE, and SINGLE using the or arrows, then press ENTER.
- If ANY is selected your radio will receive all weather alerts and you will be unable to select a specific county. Press the MENU button to save your settings and exit the menu.
- If MULTIPLE or SINGLE were selected then you will be asked to input your specific location and the display will show 01 EMPTY. Press ENTER to input your country. Press the or arrows to scroll to your selection then press ENTER. You will now be asked for your state. Press the or arrows to scroll to your selection then press ENTER. You will now have a list of counties to choose from. Press the or arrows to scroll to your selection then press ENTER. If you selected SINGLE for your location press the MENU button to save your settings and exit the menu.
- If you selected MULTIPLE for your location you will be taken to the next county entry 02 EMPTY. Press the ENTER button. You now have the option of selecting NEARBY. This gives you the option of having the radio automatically populate your selected county entry with the next closest county code. If you want to manually enter your county, press the or arrows to select your country and repeat the steps necessary for selecting your county, the press MENU.
Manually Entering a S.A.M.E. County Code
- Press the MENU button.
- Press the or arrows until the display says SET LOCATION, then press ENTER.
- You now have the option of choosing between ANY, MULTIPLE, and SINGLE. If you want to program a single county code then select SINGLE. If you want to program multiple county codes then select MULTIPLE. If ANY is selected as your location your radio will receive all weather alerts and you will be unable to program a specific county code. Press or until you have reached your selection then press ENTER.
- Press and you will now be able to input your 6 digit S.A.M.E. code. Press or to change the digit that is flashing on the screen. Press to go to the next digit to the right, then press ENTER.
- If you selected SINGLE for your location press the MENU button 3 times to save your settings and exit the menu. If you selected MULTIPLE for your location you can now enter more S.A.M.E. codes.
- Press the arrow to go to the next county code programming location and press the arrow. Repeat the steps for programming your 6 digit S.A.M.E code.
- When you are done manually entering your S.A.M.E. county codes press the MENU button 4 times to save your settings and exit the menu.
Choosing an Alert Type
- Press the MENU button.
- Press the or arrows until the display says ALERT TYPE, then press ENTER.
- You now have the option of choosing between VOICE, TONE, and DISPLAY. VOICE will sound an alert for 8 seconds followed by the weather broadcast. TONE will sound an alert siren. DISPLAY will scroll alert text on the display and no audible alert siren will be heard.
- Press the or arrows to make you selection then press ENTER.
- Press the MENU button to save your settings and exit the MENU.
Selectable Alert Option
- Press the MENU button.
- Press the or arrows until the display says SET EVENTS. Press the ENTER button.
- You now have the option of choosing between ALL ON, ALL OFF, or ALL DEFAULT, or EDIT EVENTS. ALL ON will set all events to on, and ALL OFF will set all events to off except for the ones with an asterisk next to them in the Selectable Alert Reference Chart.
- To edit individual events press the or arrows until the display says EDIT EVENTS and press the ENTER button. Scroll through the events and press the ENTER button when you reach the event you want to edit. You can select either ON or OFF then press ENTER.
- Press the MENU button twice to save your settings and exit the menu.
*For a complete list of selectable alerts, please visit our website at www.midlandusa.com.
**Not all alerts are selectable. Non-selectable alerts do not appear on display screen.
Testing the Alert Siren
- To test the alert function to ensure it is working, press the MENU button.
- Press the or arrows until the display says ALERT TEST. Press the ENTER button. The alert siren will sound.
- Press the ENTER button again to silence the alert siren.
- Press the MENU button to exit the menu.
Reviewing Alerts
The WR400 weather radio can store up to 10 different alerts in its memory. If the radio receives a new alert while a previous alert is still in effect, it automatically displays the new alert message. To review past alerts that are still in effect, press the arrow to scroll through them. The AM/FM radio must be off to review alerts. If you are in AM/FM mode, press and hold the AM/FM button for 1 second to turn it off or press the WEATHER/HAZARD button to switch to the weather band. You can now review alerts in memory.
Test Signals Broadcast by NWS
All National Weather Service stations periodically transmit test signals. You can find out when your local NWS station broadcasts test signals by calling the NOAA National Weather Service Forecast Office. During the weekly test signal, the local NWS station will give a list of counties covered by their transmitter. The NWS test signal allows everyone with weather radio receivers to verify the operation of their equipment.
The following test signals may be sent by the NWS during testing:
REQUIRED WEEKLY TEST, REQUIRED MONTHLY TEST, SYSTEM DEMO, and NATIONAL PERIODIC TEST.
No Reception Warning
If no alerts are received for 10 days, the display will flash CHECK
RECEPTION every 30 seconds. If this happens, check your channel settings and county codes for setting errors. If you receive a clear signal from the NWS, try using the ALL county code setting to receive all alerts for all counties.
Note: If you have trouble finding reception, please move your radio closer to a window and away
from fluorescent lighting.
AM/FM Radio
There is an AM/FM radio built into the WR400 that you can listen to without interrupting the weather radio functions. If an alert is received, the WR400 automatically switches from the AM/FM radio to the weather radio alert.
Turning the AM/FM Radio On and Off
To turn the AM/FM radio on, press the AM/FM button. If you are listening to the weather band, you must first mute the weather band by pressing the WEATHER/HAZARD button. To turn the AM/FM radio off, press and hold the AM/FM button for 1 second. Pressing the AM/FM button while already in AM/FM mode will toggle between the AM and FM bands.
Tuning the AM/FM Radio
To tune the AM/FM radio you can manually tune the stations by pressing either the or arrows. Pressing and holding the or arrows will quickly scroll through stations until you release the button. To scan automatically to the next station that has a strong signal, press the or arrow.
Setting the AM/FM Preset Stations
You can program 4 AM and 4 FM radio stations into the radio's preset memory. To program a preset station, do the following:
- Turn the AM/FM radio on and use the tuning buttons to find your desired station.
- Press and hold the preset button you want to program for 1 second. If beeps are enabled, the radio will beep confirming the station has been saved to the desired preset. There will also be an indicator on the display that corresponds with the preset setting; "P1," "P2," "P3," or "P4."
Button Beeps
- To turn the button beeps off press the MENU button.
- Press the or arrows until the display says BUTTON BEEPS, then press ENTER.
- You now have the option of turning the button beeps either or . If you want to disable the button beeps select OFF then press the ENTER button.
- Press the MENU button to save your settings and exit the menu.
Backlight Dimmer
The backlight brightness on the WR400 can be adjusted in the menu from levels 1 to 10 with 10 being the brightest.
- To adjust the backlight dimmer setting press the MENU button.
- Press the or arrows until the display says BACKLIGHT. Press the ENTER button.
- You now have the option of selecting between backlight levels 1 to 10. Scroll to your selection using the or arrows then press the ENTER button.
- Press the MENU button to save your settings and exit the menu. Now when you press the backlight dimmer button, the LCD backlight will dim to your chosen brightness setting.
Troubleshooting
| Problem Suggestion | |
| No power | Make sure the AC Power Adapter is securely plugged into both the DC jack on the back of the weather radio and into the wall outlet. Make sure batteries are installed in case AC power fails. |
| No sound Check | VOLUME control to ensure volume is turned up to an audible level. |
| No weather broadcast when you press WEATHER/ SNOOZE button | Ensure that the telescoping antenna is up and fully extended. If you are using an external antenna, ensure that it is connected properly. Ensure that the radio is set to the NWS weather channel in use in your area. Contact NWS to ensure they are presently broadcasting. If in a metal structure, make sure you are close to a window. If in a weak signal area, you will need an external antenna. |
| The radio is not responding properly to NWS weather alert broadcasts | Check to see that you have programmed in the correct S.A.M.E. County Code(s). Check with the NWS that the tower is broadcasting. |
FCC Statement
This device complies with part 15 of the FCC Rules. Operation is subject to the following two conditions: (1) This device may not cause harmful interference, (2) this device must accept any interference recieved, including interference that may cause undesired operation.
NOTE: CHANGES OR MODIFICATIONS NOT EXPRESSLY APPROVED BY THE PARTY RESPONSIBLE FOR COMPLIANCE COULD VOID THE USER'S AUTHORITY TO OPERATE THE EQUIPMENT.
This device contains lincence-exempt transmitter(s)/reciever(s) that comply with Innovation, Science and Economic Development Canada's licence-exempt RSS(s). Operation is subject to the following two conditions: (1) This device may not cause interference, (2) This device must accept any interference, including interference that may cause undesired operation of the device.
LIMITED WARRANTY (United States and Canada)
Subject to the exclusions set forth below, Midland Radio Corporation will repair or replace, at its option without charge, any Midland Weather Alert Radio transceiver which fails due to a defect in material or workmanship within One Year following the initial consumer purchase.
This warranty does not apply to water damage, battery leak, abuse or misuse of unauthorized accessories, unauthorized sevice or modification or altered products. Accessories have a 90 day warranty from date of purchase, including any antennas, chargers, or earphones.
This warranty does not include the cost of labor for removal or re-installation of the product in a vehicle or other mounting.
ANY IMPLIED WARRANTYES, INCLUDING, WITHOUT LIMITATION THE IMPLIED WARRANTYES OF MERCHANTABILITY AND FITNESS FOR A PARTICULAR PURPOSE, SHALL BE LIMITED AS SET FORTH HEREIN AND TO THE DURATION OF THE LIMITED WARRANTY, OTHERWISE THE REPAIR OR REPLACEMENT AS PROVIDED UNDER THIS EXPRESS LIMITED WARRANTY IS THE EXCLUSIVE REMEDY OF THE CONSUMER AND IS PROVIDED IN LIEU OF ALL OTHER WARRANTYES, EXPRESS OR IMplied. IN NO EVENT SHALL MIDLAND BE LIABLE, WHETHER IN CONTRACT OR TORT (INCLUDING BUT NOT LIMITED TO NEGLIGENCE, GROSS NEGLIGENCE, BODILY INJURY, PROPERTY DAMAGE AND DEATH) FOR DAMAGES IN EXCESS OF THE PURCHASE PRICE OF THE PRODUCT OR ACCESSORY, OR FOR ANY INDIRECT, INCIDENTAL, SPECIAL OR CONSEQUENTIAL DAMAGES OF ANY KIND, OR LOSS OF REVENUE OR PROFITS, LOSS OF BUSINESS, LOSS OF INFORMATION OR DATA OR OTHER FINANCIAL LOSS ARISING OUT OF OR IN CONNECTION WITH THE ABILITIES OR INABILITY TO USE THE PRODUCTS OR ACCESSORIES TO THE FULL EXTENT THESE DAMAGES MAY BE DISCLAIMED BY LAW.
For Product Purchased in the USA:
Performance of any obligation under this warranty may be obtained by returning the warranted product, prepaid freight, along with proof of purchase to:
Midland Radio Corporation
Warranty Service Department
5900 Parretta Drive
Kansas City, MO 64120
This warranty gives you specific legal rights, and you may also have other rights, which vary from state to state.
Note: The above warranty applies only to merchandise purchased in the United States of America or any of the territories or possessions thereof, or from a U.S. Military exchange.
For Product Purchased in Canada:
Performance of any obligation under this warranty may be obtained by returning the warranted product, along with proof of purchase, to your place of purchase in Canada.
This warranty gives you specified legal rights. Additional warranty rights may be provided by law in some within Canada.
Service:
If you have a problem which you believe requires service, please first check the FAQ section on our website, check your Owner's Manual, or call and speak with a service technician. Many problems can be remedied without returning the unit for service. If necessary, return as follows:
- Pack the unit in its original box and packing. Then pack the original box in a suitable shipping carton. Caution: Improper packing may result in damage during shipment.
- Include the following:
a. Full description of any problems
b. Daytime telephone number, name & address
- For warranty service include a photocopy of the bill of sale from an authorized dealer or other proof of purchase showing the date of sale.
- You do not need to return accessory items (AC/DC Adapter, Batteries, and Owners Guide) unless they might be directly related to the problem.
- Repairs not covered by warranty or units that are over ONE year old are subject to a repair fee. Please call for a quote on repair service cost at 816-241-8500. Send only cashier's check, money order, Master Card or Visa card number.
Midland Radio Corporation
5900 Parretta Drive
Kansas City, Missouri 64120
Phone: (816) 241-8500
E-mail: mail@midlandradio.com
Website: midlandusa.com
Warranty Service Department
5900 Parretta Drive
Kansas City, MO 64120
Kansas City, Missouri 64120
Telephone: (816) 241-8500
Courriel: mail@midlandradio.com
WR400 Owner's Manual
Warranty Service Department
5900 Parretta Drive
Kansas City, MO 64120
Kansas City, Missouri 64120
Telefono: (816) 241-8500
Correo electrónico: mail@midlandradio.com
Sizio web: midlandusa.com
- Quick Start Instructions
- Weather Channel Frequencies
- Table of Contents
- Getting to Know your Weather Radio
- WR400 Features:
- Icons on the Display
- Accesory Jacks
- Setting the Time
- Setting the Alarm
- Choosing the Alarm Type
- Setting the Weather Channel
- Turning the Weather Radio On and Off
- Setting Your Location
- Manually Entering a S.A.M.E. County Code
- Choosing an Alert Type
- Selectable Alert Option
- Testing the Alert Siren
- Reviewing Alerts
- Test Signals Broadcast by NWS
- No Reception Warning
- AM/FM Radio
- Turning the AM/FM Radio On and Off
- Tuning the AM/FM Radio
- Setting the AM/FM Preset Stations
- Button Beeps
- Backlight Dimmer
- Troubleshooting
- FCC Statement
- LIMITED WARRANTY (United States and Canada)
- For Product Purchased in the USA:
- Midland Radio Corporation
- For Product Purchased in Canada:
- Service:
- Warranty Service Department
- Parretta Drive
- Kansas City, MO 64120
- WR400 Owner's Manual
Brand : MIDLAND
Model : WR400
Category : Radio