
Navis ARB51 - Speaker ELAC - Free user manual and instructions
Find the device manual for free Navis ARB51 ELAC in PDF.
User questions about Navis ARB51 ELAC
0 question about this device. Answer the ones you know or ask your own.
Ask a new question about this device
Download the instructions for your Speaker in PDF format for free! Find your manual Navis ARB51 - ELAC and take your electronic device back in hand. On this page are published all the documents necessary for the use of your device. Navis ARB51 by ELAC.
USER MANUAL Navis ARB51 ELAC
natural_image
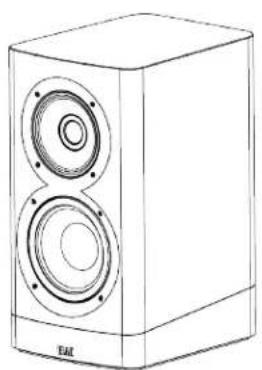
Line drawing of two different speaker models: a smaller one and a tall multi-tiered tower (no text or symbols present)- Please read and follow these safety instructions.
- Keep them safe for future reference.
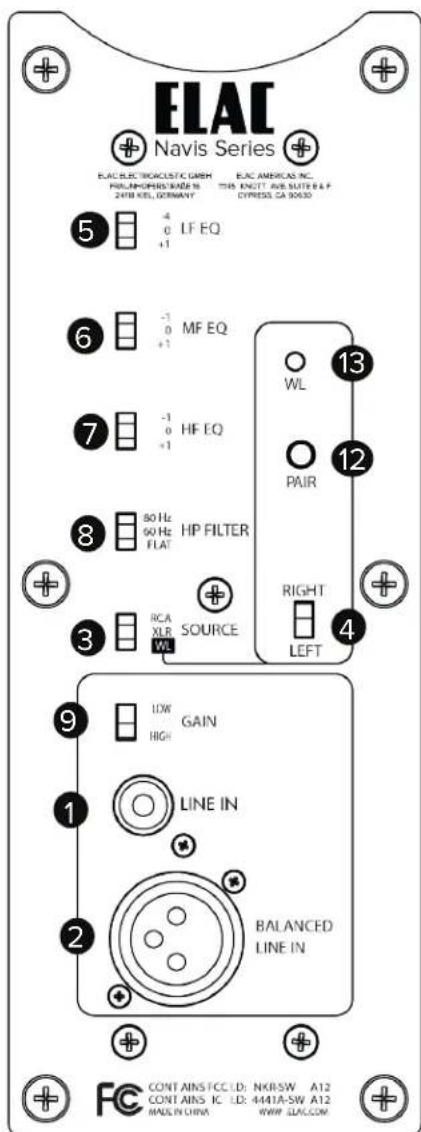
- Observe all warnings on the speaker and in the manual. Please check the speaker for damage before use. The speaker must be in perfect working condition. Damaged parts may lead to personal injury.
2. Use only as directed
- Connect the speaker(s) according to the instructions in the manual.
- Many ELAC speakers are equipped with spikes and/or anti-slip feet. They are explicitly provided for levelling the speaker. For levelling on an uneven floor, unscrew the spikes or anti-slip feet by 2-3 turns of thread. The speaker should always be in perfect vertical alignment: the stability of the speaker must not be compromised by using spikes or anti-slip feet as the speaker may tip-over.
3. Location
• Install the speakers on a level surface only
- When choosing the location of these speakers do not place them in locations that are:
• In direct sunlight
- Very humid
- Prone to vibrations
• Exceptionally hot or cold
- Near CRT Televisions (the speakers are not magnetically shielded and may cause color issues with a CRT based TV)
- Close to magnetic cards (Since the speakers are not magnetically shielded placing magnetic cards such as credit cards or commuter cards may cause them to fail).
WARNING! Please ensure the product is perfectly stable to avoid injury from tip-over. Please note, that stability can be increased by using spikes on carpeted surfaces. However, the mounting of spikes must be carried out carefully due to their very sharp ends which may cause injuries. The stability on slippery floors can be increased by using Velcro fastening tape or double-sided adhesive tape. Do not install the speaker near any heat sources such as radiators, heating valves, stoves, or other apparatus (including amplifiers) that produce heat, or in areas where there is a risk of explosion.
- Do not block any ventilation openings. Install in accordance with the instructions.
- Do not install the speaker in a closed rack or in a closed cupboard.
- Do not put burning candles on or near the speaker.
- Do not install the speaker near transformers because electromagnetic stray fields can cause hum noise on woofers.
- In combination with certain materials / lacquers / material surfaces, anti-slip feet or spike washers may cause colored imprints on the surfaces.
4. Overload
- Extreme overload of the device due to very high volume may cause damage to individual components. Because of the possible danger, you should never leave loudspeakers under extreme overload conditions unattended.
5. Service
DANGER! Do not open the cabinet because the components and conductors may carry current! Servicing to be carried out by qualified service personnel only.
- Servicing is required when the loudspeaker has been damaged in any way, such as damage to the power supply cord or the plug, or when liquid has been spilled or objects have fallen onto the loudspeaker, the speaker has been exposed to rain or moisture, does not operate normally, or has been dropped. To reduce the risk of electric shock, do not open the loudspeaker. Servicing should be carried out by qualified service personnel only.


6. Cleaning
NOTE: Clean only with soft, smooth cloth or with dust brush. Do not use scouring agents, alcohol, benzene, furniture polish or other agents for cleaning! Modern furniture is often coated with multiple varnishes and plastics which can be treated with chemical agents. Some of these agents contain substances which degrade or soften the rubber feet. Therefore we advise that you place an anti-slip mat underneath the loudspeaker(s).
7. Volume
CAUTION! Continuous high volume may cause severe damage to your hearing. Please listen responsibly.
8. Disposal
The packaging is made from recyclable materials. Dispose of this in an environmentally friendly manner. At end of life do not dispose of the speaker(s) with standard household waste. The speaker must be recycled in accordance with local legislation. Ask your local government for further information on recycling as the device contains valuable raw materials. Disable the speaker(s) before disposal.
9. Compliance Information for the Wireless Transmitter
The term “IC:” before the radio certification number only signifies that Industry Canada technical specifications were met. This equipment complies with FCC and IC radiation exposure limits set forth for an uncontrolled environment. This equipment should be installed and operated with minimum distance 20cm between the radiator and your body. This transmitter must not be co-located or operating in conjunction with any other antenna or transmitter.
Operation is subject to the following two conditions: (1) this device may not cause interference, and (2) this device must accept any interference, including interference that may cause undesired operation of the device.
To reduce potential radio interference to other users, the antenna type and its gain should be so chosen that the equivalent isotopically radiated power is not more than that permitted for successful communication.
Philosophy
Thank you for purchasing this ELAC product.
Since the time we started (1926), ELAC has always striven to achieve the very best.
Your new ELAC speakers are built to the highest standards using high-quality components that are carefully constructed to deliver the best-in-class sound quality. They are developed by a passionate group of individuals whose sole purpose is to bring a new dimension of sound quality into your home. Enjoy!
Before Use
Avoid damage to the speakers and other components:
- Carefully unbox the speakers to avoid physically damaging your speakers.
- Ensure your equipment is turned off before connecting speakers.
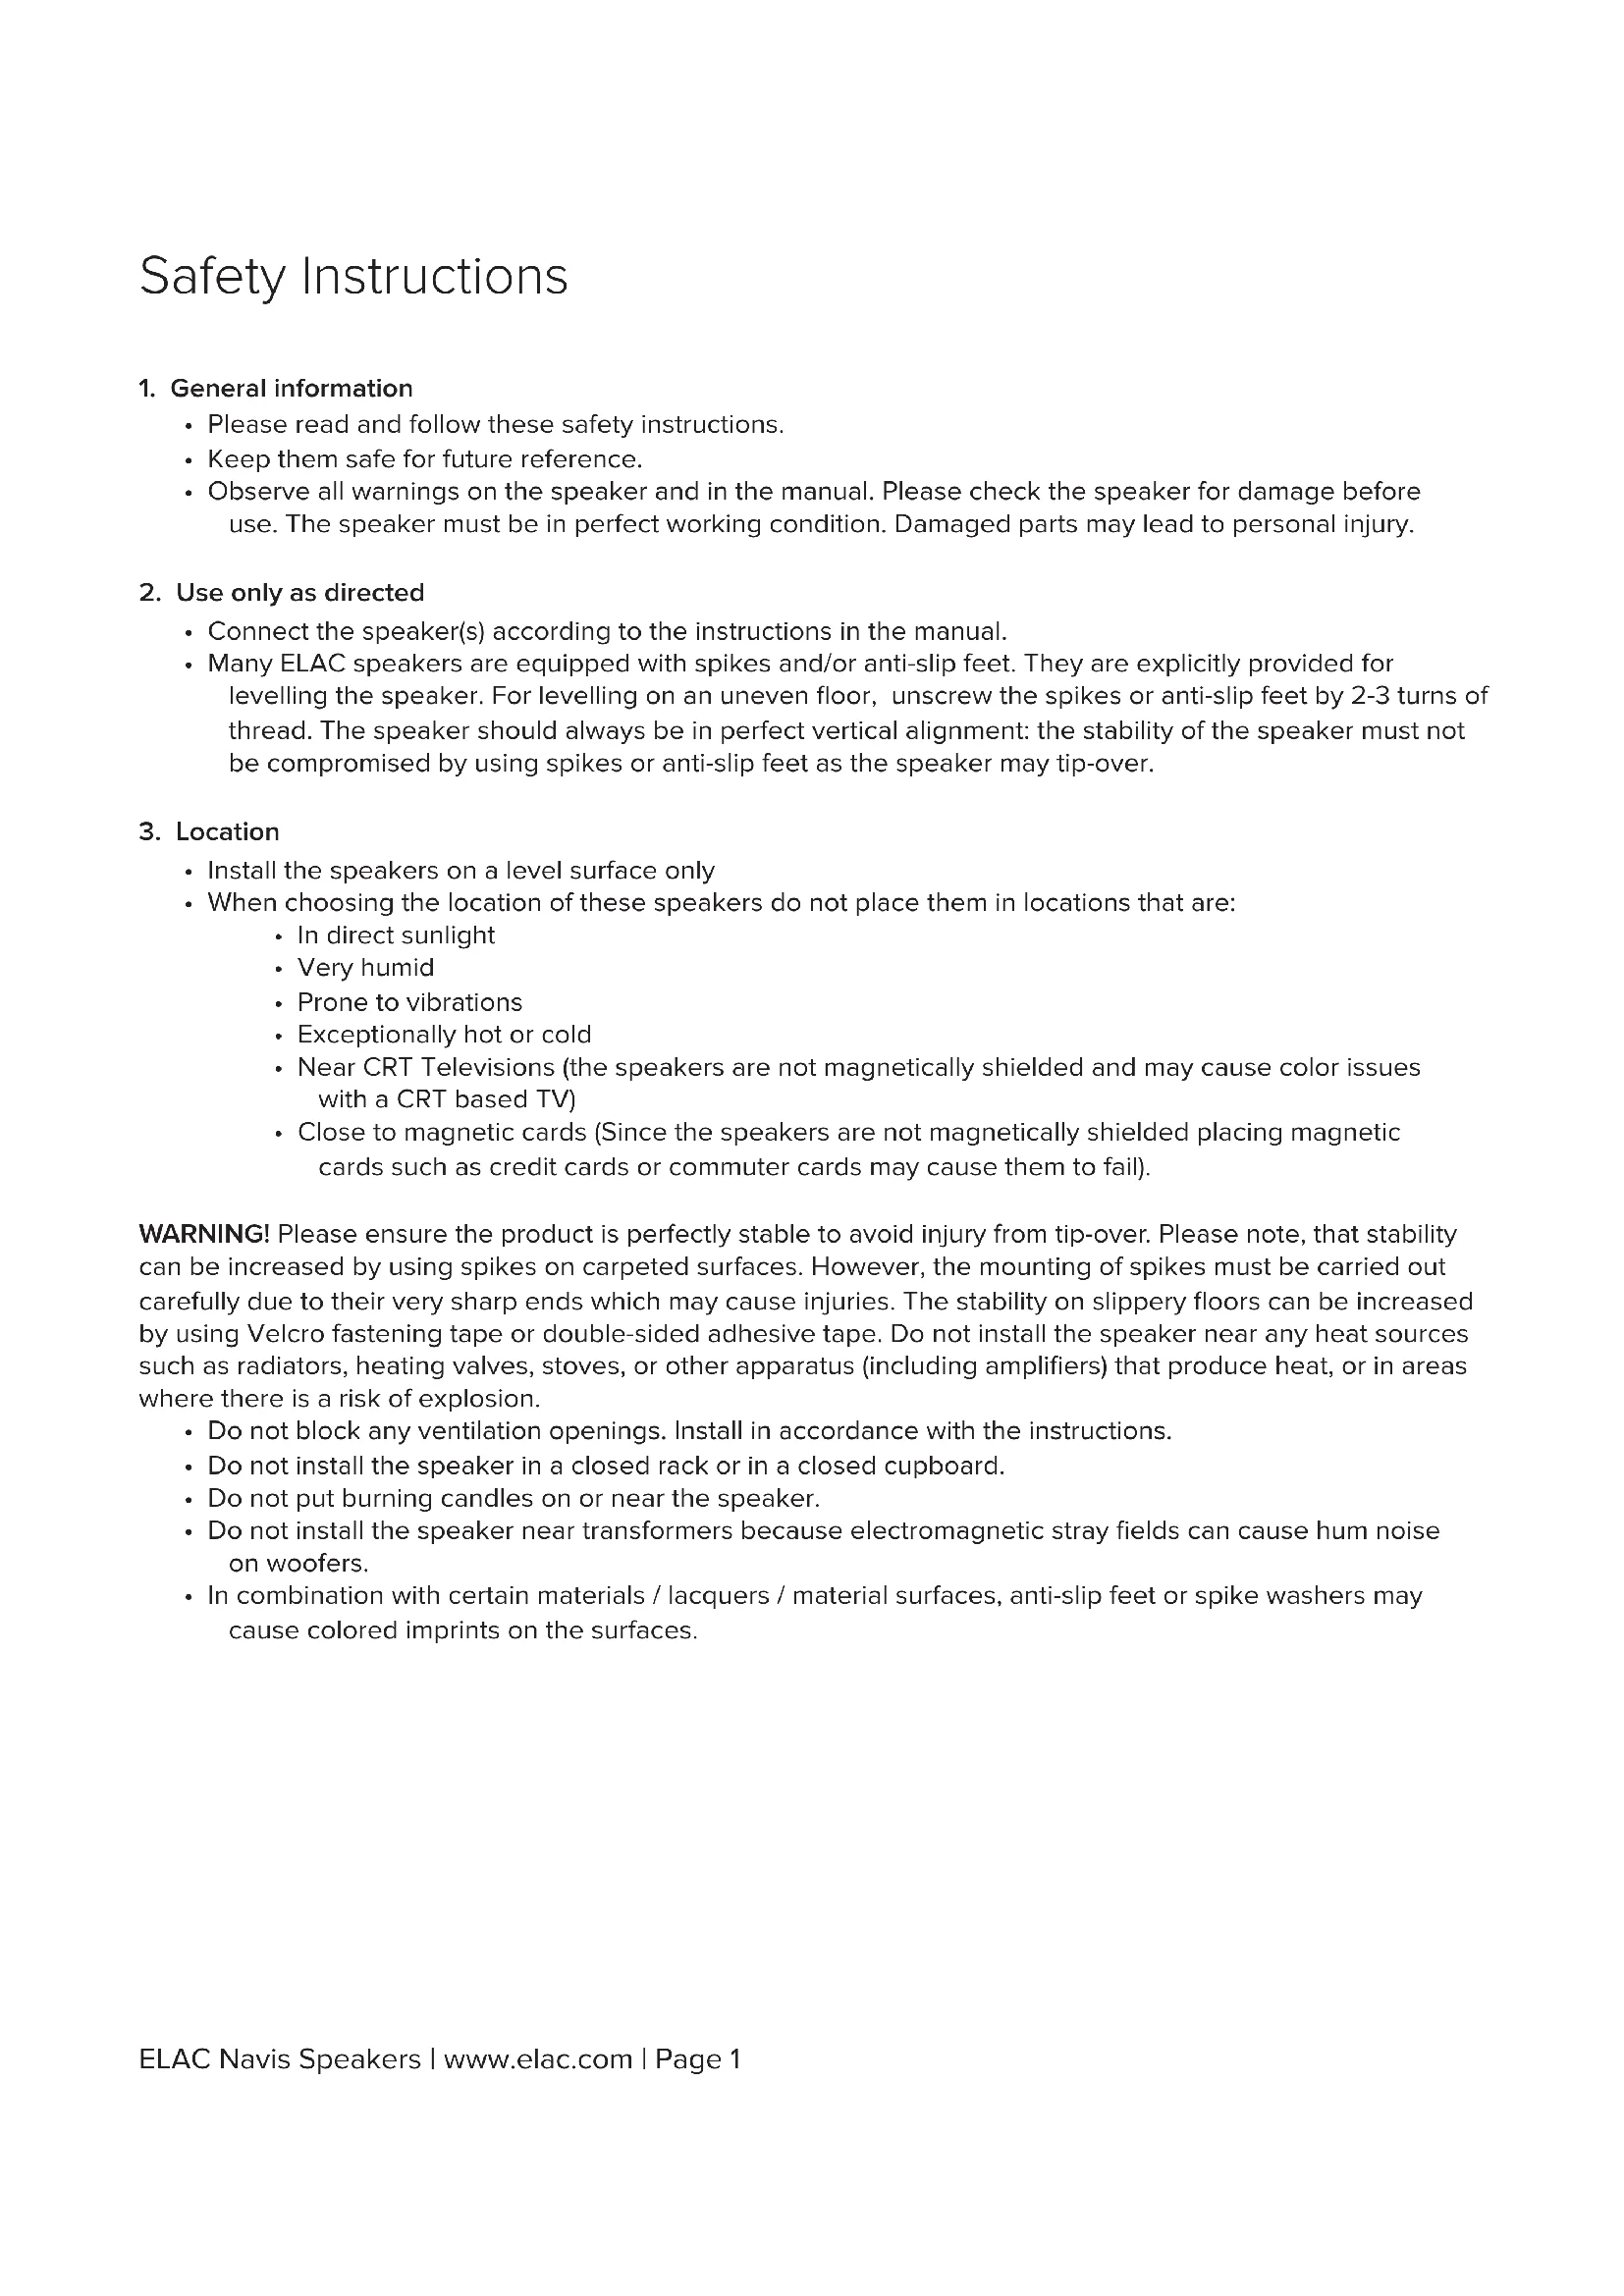
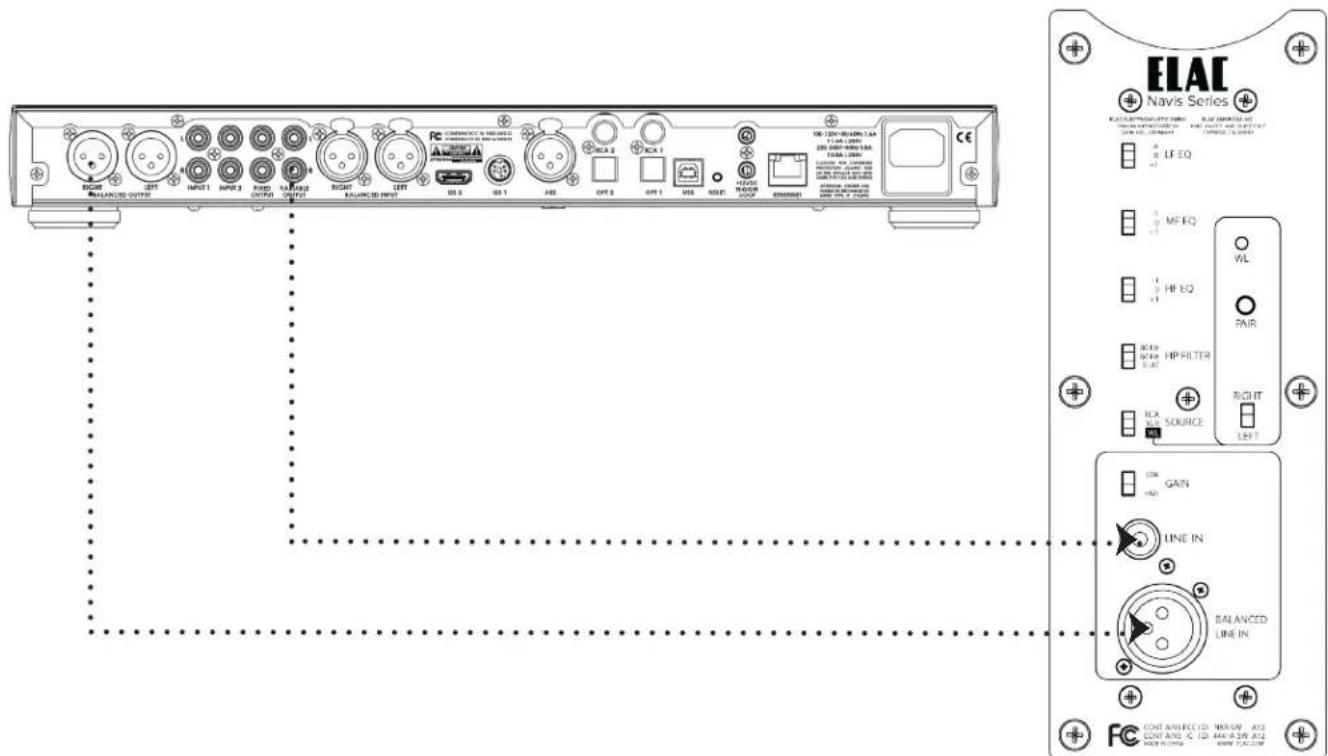
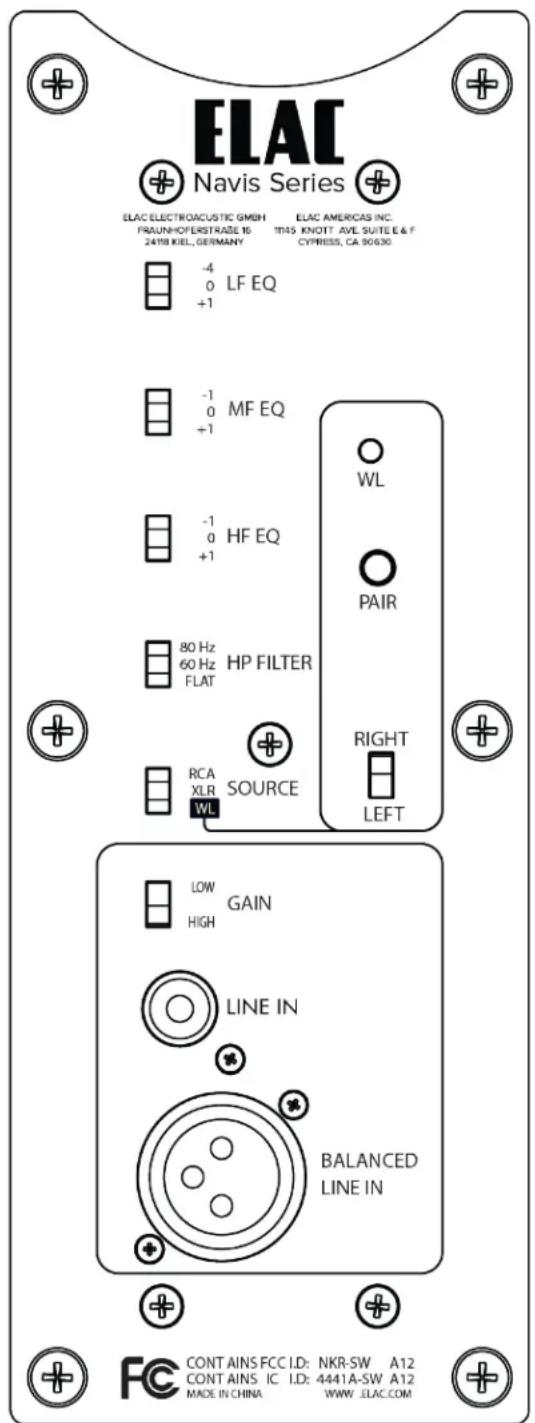
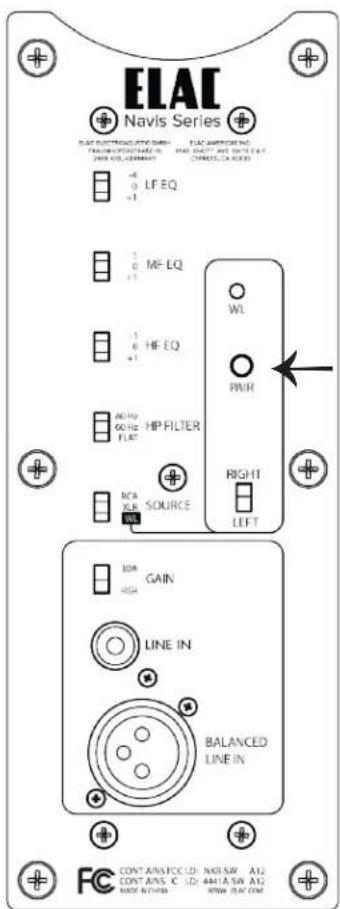
Controls and Indicators
-
RCA Input — This connection is used to connect the speaker to your pre-amp/AV receiver with RCA connections
-
XLR Inputs — This connection is used when your pre-amplifier features XLR balanced outputs.
-
Input Switch—Allows for selection of the RCA, XLR, or Wireless Input
-
Left/Right Switch— This switch determines if the speaker is the left of right speaker when the wireless input is being used.
-
LF EQ Switch—This switch allows you to tailor the low frequency output to your liking. (See page 8 for more details)
-
MF EQ Switch—This switch allows you to tailor the mid-range output to your liking. (See page 8 for more details)
-
HF EQ Switch—This switch allows you to tailor the high-frequency output to your liking. (See page 8 for more details)
-
HP Filter — This switch applies a High Pass filter to the speaker. This would be used in conjunction with a subwoofer. (See page 8 for more details)
-
Gain Adjustment—This switch allows you to adjust the input left gain of the speaker. (See page 8 for more details)
-
AC Inlet — This inlet is a standard IEC power jack. Use the supplied power cord to connect the speaker to an available AC outlet.
-
Primary Power Switch—This switch is used to turn on/off primary power to the speaker
-
Pair Button — This button is used when pairing the speakers with an AirX ^4 transmitter
-
Wireless LED—The light is used during the pairing process with an AirX ^2 transmitter
-
Voltage Selector—This switch is used for selecting the correct AC Voltage for your country.
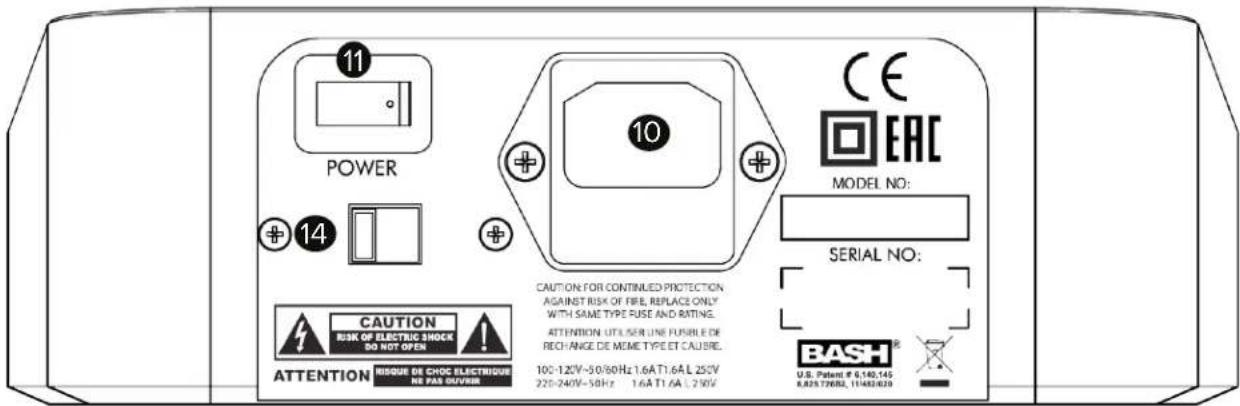
Installing the base and spikes (AF-51 Only)
Using the included outrigger plate provides a wider support base for the speaker cabinet and should be installed. The included spikes improve stability on uneven surfaces and thickly carpeted floors. Please use caution when dealing with the spikes as they are sharp.
IMPORTANT: When using these spikes on hard surfaces such as wood or tile floors be sure to use the provided floor discs to protect your floor from damage.
1 IMPORTANT: In order to prevent scratching or damage to the cabinet, turn the speaker upside down onto a soft surface while you attach the outrigger plate and spikes. We highly recommend a second person help with this process. Also, please use caution when picking up and moving the steel outrigger plate. It is very HEAVY! Do not leave the speaker upside down
2 Attach the spike mounts and spikes and to the bottom steel plate as shown in the diagram to the right. Please be careful when picking on the steel outrigger plate. It is heavy.
3 Place the steel outrigger plate on the bottom of the speaker and attach it using the four supplied machine screws as shown in the diagram to the right. Please exercise caution. These items are heavy.
4 Now carefully turn the speaker back upright. We suggest using a second person for this process. Please be careful of the spikes. They are sharp. Please use the floor discs if you have hardwood or tile floors.
5 Once the speaker has been moved to the final location, rotate the spike until the speaker is level.
natural_image
Line drawing of a tall speaker tower with three circular speakers and supporting base devices (no text or symbols)Connecting the Speakers
The Navis speakers can be connected three different ways Wired RCA Unbalanced, Wired XLR Balanced, or Wireless (AirX ^2 ). CAUTION—THE NAVIS SPEAKERS DO NOT HAVE A VOLUME CONTROL. IF CONNECTED DIRECTLY TO A FIXED OUTPUT SOURCE THE VOLUME WILL BE AT MAXIMUM LEVEL AND MAY DAMAGE THE SPEAKERS AND YOUR HEARING. ONLY USE WITH VARIABLE OUTPUT SOURCES!!!
Connecting the Navis Speakers using wired (RCA or XLR) connections
- Using an RCA or XLR interconnect cable, connect the variable pre-outputs from your pre-amplifier to the RCA/XLR input on each speaker.
- Select the RCA or XLR input using the source switch on the rear of the each speaker.
Making Adjustments
The Navis speakers provide several adjustments to tailor the sound to your specific environment or taste. Use the below guide to aid it setting up. Please note these settings should always be set the same on both speakers (Except for the Left/Right switch when using the wireless input).
Low Frequency EQ (LF EQ)—This adjustment allows you to decrease or increase the low frequency output of the Navis speaker to best match into your room. +1db can be used if you like a little more bass or if your room is bass light. -4db should be used if you choose to place the speakers closer to the room boundaries.
Mid Frequency EQ (MF EQ)—This adjustment allows you to decrease or increase the mid frequency output of the Navis speaker to best match into your room. +1db can be used to increase detail or vocal projection, the -1db position can be used to offset a room with “Bright” acoustics.
High Frequency EQ (HF EQ)—This adjustment allows you to decrease or increase the high frequency output of the Navis speaker to best match into your room. +1db can be used to offset a heavy soft furnished room or add an extra sense of “air”. The -1db setting can be used to tame aggressive recordings or to offset a “hard” sounding room.
High Pass Filter (HP Filter) - This adjustment allows the addition of a subwoofer to your Navis speaker system. It provides a choice cutoff filters to allow optimum match with your subwoofers capabilities. This setting should be set to "FLAT" when no subwoofer is being used.
Gain Adjustment (GAIN) - This adjustment allows you to match the input sensitivity of the speaker to the gain of your system. If when setting your volume level you cannot turn the system up loud enough use the HIGH setting, if alternatively you find that the speaker is too loud at a moderate volume control setting then use the LOW setting.
AirX ^2 Wireless Pairing
Pairing the Navis Speakers with am AirX ^2 wireless transmitter is very simple. Please follow the below steps to complete the process.
- Press and hold the Wireless Pair button on the Navis speakers until the LED begins to flash rapidly (Around 2 times per second).
- Press and hold the Wireless Pair button on the back of the AirX ^2 wireless transmitter until the wireless pair LED on the Navis Speakers stops flashing and goes off (No LED means the speaker is wirelessly paired.)
- Repeat with additional speakers/subwoofers (Up to 3 units)

Wireless Pair Button Discovery Connect
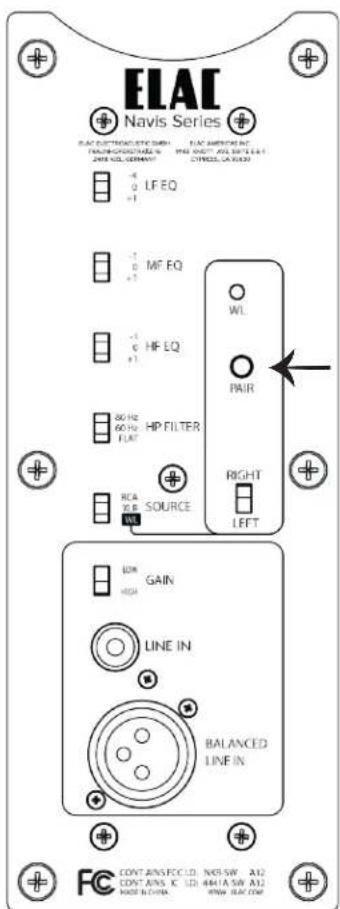
Wireless Pair Button Navis Speakers
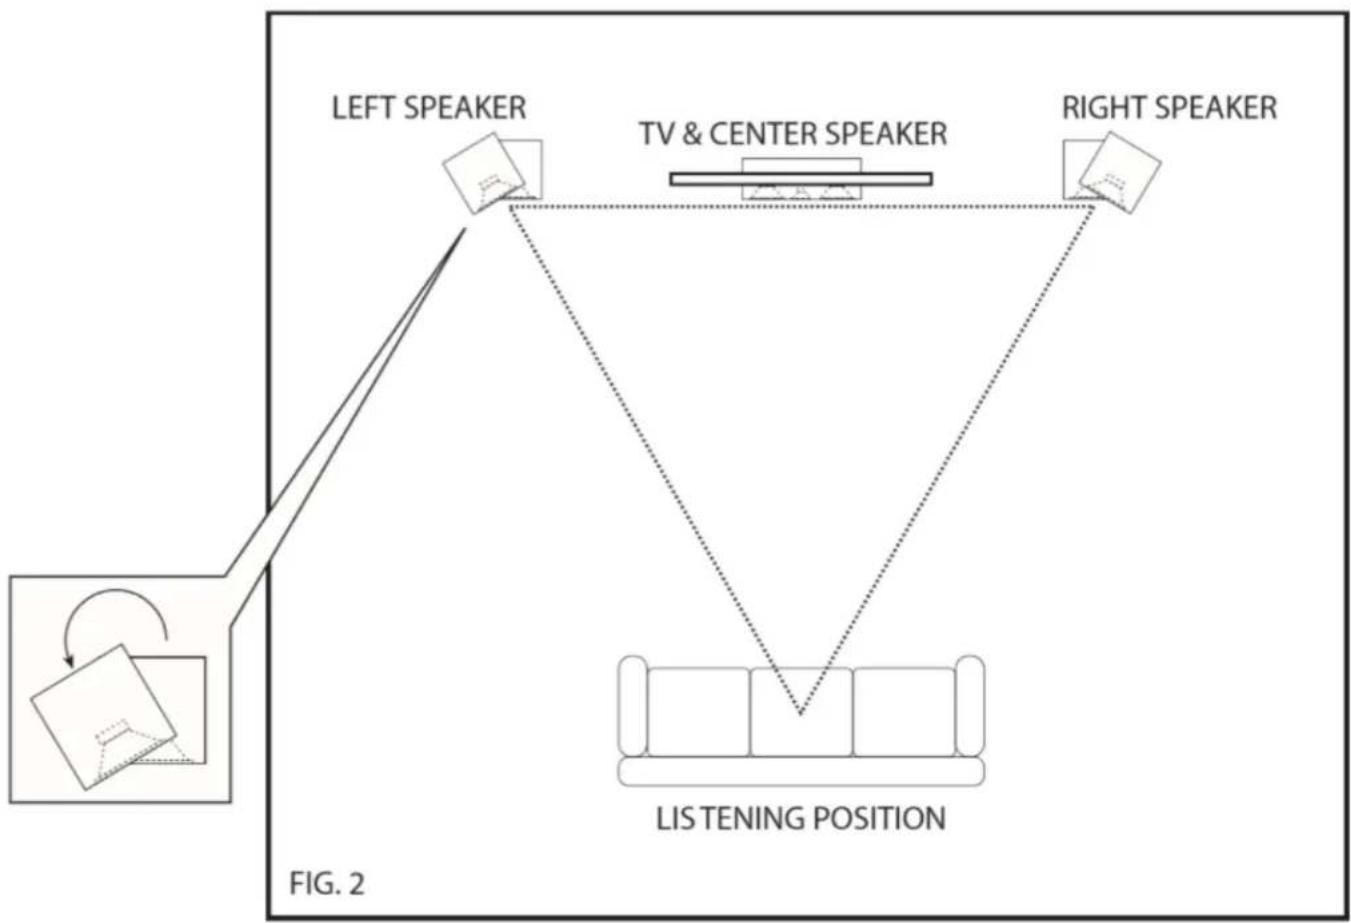
Speaker Placement
Achieve maximum performance and optimal sound quality from your ELAC Navis speakers with proper speaker placement and set-up. While not all rooms are the same, use the following guidelines to configure the speakers for your particular room. There are no “exact” rules or boundaries in setting up your speakers but the following suggestions will help optimize your desired results. Remember the best sound set-up is what sounds best for you so don’t be afraid to experiment and make adjustments to the placement and directivity of the speakers.
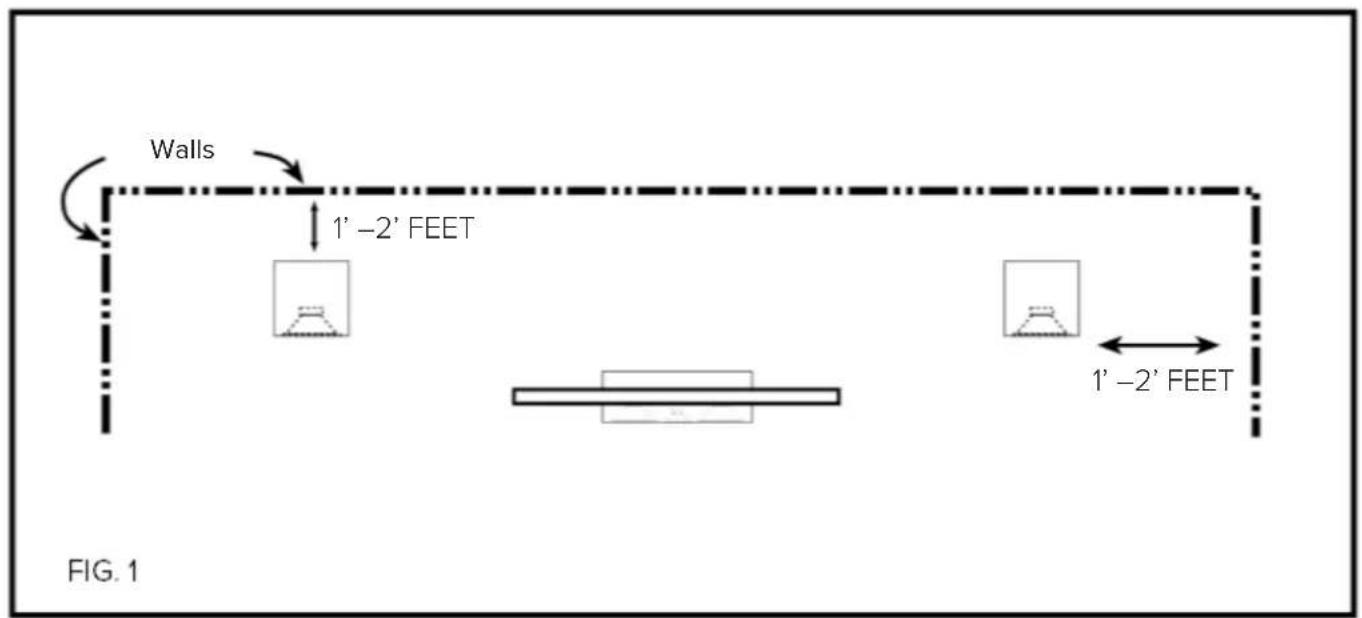
Place the speakers approximately one to two feet away (fig. 1) from boundaries such as wall(s) and especially corners. Close proximity to a side or rear wall will enhance bass performance (output), but being too close (particularly to a corner) may result in bass that is unnatural. If a corner location is unavoidable, try to position the loudspeaker so that the distance to the rear wall is not equal to the distance to the side wall.
Stereo Setup
- For the best results and the most realistic stereo image and lifelike sound, place the speakers so that an equilateral triangle (fig. 2) is created between the speakers and your favorite listening position. This set up creates the optimum imaging performance.
- If you find that your Navis left and right speakers are too far apart, angle (toe in) them towards the listening position to gain a more focused central image.
flowchart
graph TD
    A["LEFT SPEAKER"] --> B["TV & CENTER SPEAKER"]
    B --> C["LISTENING POSITION"]
    C --> D["RIGHT SPEAKER"]
    style A fill:#f9f,stroke:#333
    style B fill:#ccf,stroke:#333
    style C fill:#cfc,stroke:#333
    style D fill:#fcc,stroke:#333
2-CHANNEL STEREO SETUP
SPECIFICATIONS
| Specs ARB51 ARF51 | ||
| Speaker type: 3-Way Powered 3-Way Powered | ||
| Tweeter: 1" Soft Dome Concentrically Mounted 1" Soft Dome Concentrically Mounted | ||
| Midrange 4" Aluminum 4" Aluminum | ||
| Woofer: 5-1/4" Aluminum 3 x 5-1/4" Aluminum | ||
| Frequency Response 44Hz - 28kHz 43Hz - 28kHz | ||
| Crossover Frequency 2.2kHz / 260Hz 2.2kHz / 260Hz | ||
| Total Amplifier Power | 300 Watts Total | 300 Watts Total |
| Bass Amplifier | 160 Watt Bash Amplifier | 160 Watt Bash Amplifier |
| Midrange Amplifier | 100 Watt Bash Amplifier | 100 Watt Bash Amplifier |
| Tweeter Amplifier | 40 Watt Class AB Amplifier | 40 Watt Class AB Amplifier |
| Inputs | RCA / XLR / AirX ^2 Wireless | RCA / XLR / AirX ^2 Wireless |
| Cabinet finishes: | Gloss Black, Gloss White, Gloss Ebony Emara | Gloss Black, Gloss White, Gloss Ebony Emara |
| Height: 13.58" | 40.35" | |
| Width: | 7.44" | 7.44" |
| Depth: | 9.45" | 9.45" |
| Net weight (each): | 35.7lbs | 46.3lbs |
ELAC Americas Inc.
North America Limited Liability Warranty
Powered Speakers
ELAC Americas Inc. warrants to the original purchaser that this product be free from defects and or workmanship for a period of 3 (Three) years on the cabinet and speaker driver and 1 (One) year on the amplifier from the original date of purchase. During this time period, repair or replacement of parts will be free of charge to the original owner (See below limitations). Shipping to and return from the repair center will be the responsibility of the original purchaser.
Limitations
- Warranty begins on the date of original purchase from an authorized ELAC Americas Inc. dealer.
- Product is warranted only if used in home applications. Commercial use of this product is not warranted.
- Product that has been modified or altered in anyway will not be warranted.
- Product that has been abused or subjected to faulty equipment will not be warranted.
- Products with defaced or removed serial numbers will not be warranted.
If service is required
In the event that service is required, please contact ELAC America at 714-252-8843 or at customerservice@elac.us to arrange for service or replacement. You will be responsible to provide proof of purchase (Copy or original sales receipt). Shipping to and from our repair center will be the responsibility of the original purchaser.
Warranty Outside of North America
This warranty applies to products purchased and used in the United States and Canada. For warranty claims outside of North America please contact the local dealer/distributor in the country of purchase.
ELAC
Navis™ Series
natural_image
Line drawing of a two-tiered speaker with two speakers and two circular tops (no text or symbols)
natural_image
Line drawing of a tall multi-tiered speaker tower with three speakers and mounting base (no text or symbols)ARB-51 ENCEINTES D'ÉTAGÈRES AMPLIFIÉES ARF-51 ENCEINTES COLONNES AMPLIFIÉES
CONSIGNES D'UTILISATION
ELAC
The life of sound.
natural_image
Line drawing of a tall speaker tower with three circular speakers and supporting base components (no text or symbols)natural_image
Line drawing of a two-tiered speaker with two speakers and a top panel, labeled 'BAT' at the base (no text or symbols on the device itself)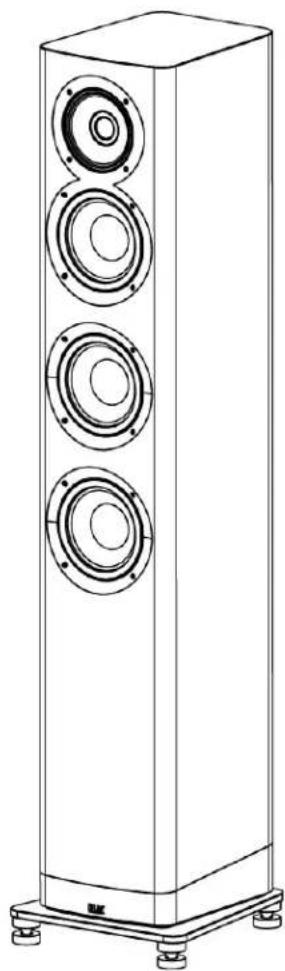
natural_image
Line drawing of a tall multi-tiered speaker tower with three speakers and mounting base (no text or symbols)ARB-51 AKTIVER REGALLAUTSPRECHER
ARF-51 AKTIVER STANDLAUTSPRECHER
BEDIENUNGSANLEITUNG
natural_image
Line drawing of a multi-tiered speaker tower with multiple speakers and mounting base (no text or symbols)Wireless Pair Button Discovery Connect
Wireless Pair Button Navis Speakers
2-CHANNEL STEREO SETUP