
CI365TFS - Cooker WOLF - Free user manual and instructions
Find the device manual for free CI365TFS WOLF in PDF.
| Product Type | Induction Cooktop |
| Brand | Wolf |
| Model | CI365TFS |
| Width | 91.4 cm (36 in) |
| Power Supply | 240 V, 60 Hz, 50 A |
| Number of Burners | 5 Induction Burners |
| Front Left/Right Burners | 11 in (279 mm) 2600 W / 3700 W Boost |
| Rear Left/Right Burners | 8 in (203 mm) 2100 W / 3000 W Boost |
| Center Burner | 8 in (203 mm) 2100 W / 3000 W Boost |
| Bridge Function | Yes (front-back, side, all bridges) |
| Boost Mode | Yes, up to 15 minutes |
| Timer | Yes, up to 99 minutes |
| Control Panel Lock | Yes, manual and automatic (10 min) |
| Hot Surface Indicator | Yes (LED indicator) |
| Automatic Safety Shutoff | Yes (2h on high, 6h on medium, 8h on simmer) |
| Pan Detection | Yes (shuts off after 30 s if no compatible pan) |
| Surface Material | Ceramic Glass |
| Recommended Cleaning | Non-abrasive ceramic glass cleaner, scraper for residue |
| Warranty | 2 years full, 5 years limited on select components |
Frequently Asked Questions - CI365TFS WOLF
User questions about CI365TFS WOLF
0 question about this device. Answer the ones you know or ask your own.
Ask a new question about this device
Download the instructions for your Cooker in PDF format for free! Find your manual CI365TFS - WOLF and take your electronic device back in hand. On this page are published all the documents necessary for the use of your device. CI365TFS by WOLF.
USER MANUAL CI365TFS WOLF
INDUCTION | ELECTRIC COOKTOP
USE AND CARE GUIDE
CLEANING, MAINTENANCE, AND MORE

natural_image
Abstract white flame-like shape on red background (no text or symbols)WOLF
Contents
4SafetyPrecautions
6 Induction Cooktop Features
7 Electric Cooktop Features
8 Cooktop Operation
17 CareRecommendations
18 Troubleshooting
19 Wolf Warranty
Customer Care
The model and serial number are printed on the enclosed product registration card. Both numbers are also listed on the product rating plate. Refer to pages 6–7 for rating plate location. For warranty purposes, you will also need the date of installation and name of your authorized Wolf dealer. Record this information below for future reference.
SERVICE INFORMATION
| Model Number |
| Serial Number |
| Date of Installation |
| Certified Service Name |
| Certified Service Number |
| Authorized Dealer |
| Dealer Number |
If your product ever needs attention, be sure to use a Wolf Factory Certified Service provider recommended by our customer care center, or select one from our list of providers available at wolfappliance.com/locator. All Factory Certified Service providers are carefully selected and thoroughly trained by us.
Important Note
To ensure this product is installed and operated as safely and efficiently as possible, take note of the following types of highlighted information throughout this guide:
IMPORTANT NOTE highlights information that is especially important.
CAUTION indicates a situation where minor injury or product damage may occur if instructions are not followed.
WARNING states a hazard that may cause serious injury or death if precautions are not followed.
IMPORTANT NOTE: Throughout this guide, dimensions in parentheses are millimeters unless otherwise specified.
IMPORTANT INSTRUCTIONS
IMPORTANT NOTE: Read all safety instructions before using this appliance.
- Read this use & care guide carefully before using your new cooktop to reduce the risk of fire, electric shock or injury to persons.
- Ensure proper installation and servicing. This appliance must be properly installed and grounded by a qualified technician. Have the installer show you the location of the circuit breaker or fuse so that you know where to turn off power.
- Warranty service must be performed by Wolf Factory Certified Service.
- Before performing any service, disconnect the power supply to the cooktop by switching off the circuit breaker or removing the fuse.
IMPORTANT NOTE: Performance may be compromised if the electrical supply is less than 240 volts.
GENERAL SAFETY PRECAUTIONS
- Wear proper apparel. Never let loose clothing or other flammable materials come in contact with the elements while in operation. Fabric may ignite and result in personal injury.
- Use only dry pot holders when removing pans from the cooktop. Wet or damp pot holders on hot surfaces may result in burns from steam. Do not let pot holders touch hot heating elements.
- Select cookware of the proper size, material and construction for the particular type of cooking being done. This unit is equipped with heating elements of different size. Refer to element rating on pages 6–7.
- Always turn pan handles inward so they do not extend over adjacent work areas, heating elements or edges of cooktop to reduce the risk of burns, ignition of flammable materials and spillage due to unintentional contact with pan. Do not turn handles toward the room, where they may be bumped or easily hit.
- Never heat an empty pan. It may damage the cooktop or cookware and overheat the unit.
- Do not heat cookware with water droplets on the outside of the pan. The droplets may begin to boil and splatter. Cookware should always be dry.
- Do not use aluminum foil on the surface of the cooktop.
- Never use the cooktop to warm or heat a room.
IMPORTANT INSTRUCTIONS
GENERAL SAFETY PRECAUTIONS
- When using the cooktop, do not touch the glass surface directly above or adjacent to the heating elements or induction zones. The glass surface may become hot enough to cause burns.
- Do not leave children alone or unattended in the area where the cooktop is in use. Never allow children to sit or stand on the appliance. Do not let children play with the cooktop.
- Do not store items of interest to children above or at the back of the cooktop, as they could climb on the appliance to reach items and be injured.
- Do not repair or replace any part of the appliance unless it is specifically recommended in literature you received. All service should be referred to Wolf Factory Certified Service.
- Do not use water on grease fires. Smother the flame or use a dry chemical or foam-type extinguisher.
- Never leave the cooktop unattended when using high heat settings. Boilovers and greasy spillovers may smoke or ignite.
- Do not operate the cooktop if the glass-ceramic surface is broken or severely pitted. Call Wolf Factory Certified Service to repair the cooktop.
-
Do not store flammable materials near hot components or let grease or other flammable substances accumulate on the cooktop.
-
Do not clean the cooktop while it is still hot. If using a damp sponge or cloth, wait until the cooktop has cooled sufficiently to prevent steam burns. Also, some cleaners give off noxious fumes when applied to hot surfaces. Refer to care recommendations on page 17.
- Do not use a griddle, open roaster or fish poacher across two heating elements unless the bridge element is turned on. This type of use without the bridge element turned on could damage or crack the glass. Refer to bridge element on page 13.
- Do not block the cooling fan exhaust or intake vents. The cooling fan automatically turns on to cool internal parts. It may continue to run even after the cooktop has been turned off.
WARNING
PROPOSITION 65 FOR CALIFORNIA RESIDENTS
Cancer and Reproductive Harm—www.P65Warnings.ca.gov
Induction Cooktop Features
FEATURES
| 1 | Product Rating Plate (bottom of cooktop) |
| 2 | Control Panel |
| 3 | Induction Element |
| 4 | Bridge Element |
| 5 | Timer |
| 6 | Control Panel Lock |
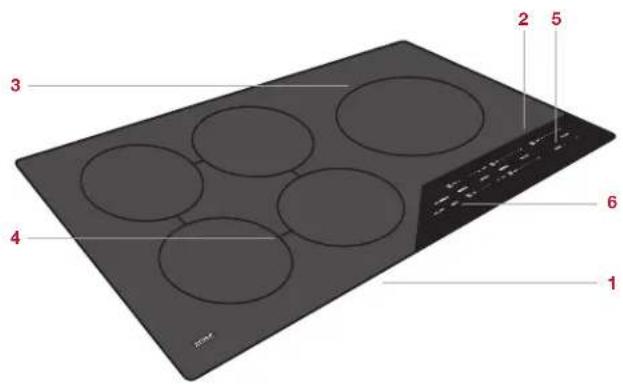
36" Induction Cooktop (CI365C shown)
INDUCTION COOKTOP
In induction cooking, the electricity flows through a coil to produce a magnetic field under the glass-ceramic surface. When an induction-compatible pan is placed on the cooktop, currents are induced in the pan and instant heat is generated. Cookware made of magnetic materials, such as cast iron or magnetic stainless steel is required for induction cooking.
ELEMENT RATING
15" INDUCTION COOKTOP W
81/2" (216) 2300 | 3150 boost
6" (152) 1400
24" INDUCTION COOKTOP W
11" (279) 2600 | 3150 boost
8" (203) 2100 | 3000 boost
8" (203) 2100
30" INDUCTION COOKTOP W
11" (279) 2600 | 3150 boost
8" (203) 2100 | 3000 boost
8" (203) 2100
6" (152) 1400
36" INDUCTION COOKTOP W
11" (279) 2600 | 3700 boost
(2) 8" (203) 2100 | 3000 boost
(2) 8" (203) 2100
Electric Cooktop Features
FEATURES
| 1 | Product Rating Plate (bottom of cooktop) |
| 2 | Control Panel |
| 3 | Single Element |
| 4 | Dual-Zone Element |
| 5 | Triple-Zone Element |
| 6 | Bridge Element |
| 7 | Timer |
| 8 | Control Panel Lock |
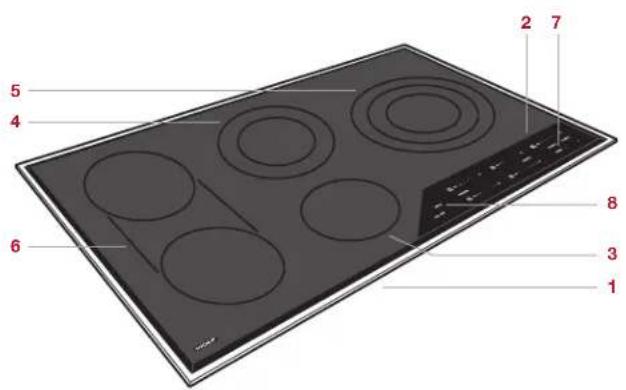
36" Electric Cooktop (CE365T shown)
ELECTRIC COOKTOP
Wolf electric cooktops operate by using high-frequency pulsation, cycling the heating elements between zero power and full power. As the heat is increased on the control panel, the element will stay at full power for longer periods and have shorter periods of zero power.
ELEMENT RATING
| 15" ELECTRIC COOKTOP W8" (203) Dual 700 | 2200 5^1/2 " (140) Single 1200 |
| 30" ELECTRIC COOKTOP W 10^1/2 " (267) Triple 1050 | 1950 | 2700(2) 5^1/2 " (140) Singles 1200 6^1/2 " (165) Single with Oval 2400 |
| 36" ELECTRIC COOKTOP W 10^1/2 " (267) Triple 1050 | 1950 | 27008" (203) Dual 700 | 2200 5^1/2 " (140) Single 1200(2) 7" (178) Singles with Bridge 4400 |
Getting Started
We know you are eager to start cooking, but before you do, please take some time to read this use & care guide. Whether you are an occasional cook or an expert chef, it will be to your benefit to familiarize yourself with the safety practices, features, operation and care recommendations of your Wolf induction or electric cooktop.
To ensure all residual oil from the manufacturing process has been removed, clean the cooktop thoroughly with hot water and a mild detergent prior to use. Rinse and dry with a soft cloth. Refer to care recommendations on page 17.
Cooktop Operation
CONTROL PANEL
The control panel features illuminated touch controls that are invisible when the cooktop is off. A power level indicator for each control displays the heat setting from SIM (MLT) to HI. Each control is positioned to the corresponding heating element. Refer to the illustration below.
Indicators on the control panel will illuminate to indicate specific cooktop operation. Some indicators are unique to either induction or electric cooktops. Refer to the charts on the following page.
CAUTION
Do not place hot cookware directly over the control panel.
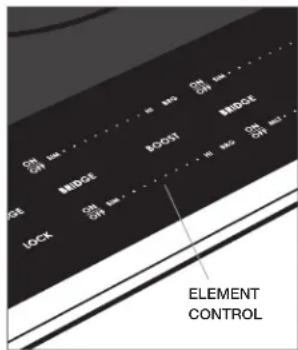
Touch controls
Cooktop Operation
CONTROL PANEL INDICATORS
INDUCTION COOKTOP
| Control Panel Lock | |
| Element(s) On | |
| Hot Surface | |
| Timer Set | |
| Boost Mode | |
| Front-to-Back Bridge | |
| Side-to-Side Bridge (36" model only) | |
| All Bridge (36" model only) |
ELECTRIC COOKTOP
| Control Panel Lock | |
| Element(s) On | |
| Hot Surface | |
| Timer Set | |
| Zone 2 | |
| Zone 3 | |
| Oval Element (30" model only) | |
| Bridge (36" model only) |
CONTROL PANEL LOCK
The control panel lock feature prevents unwanted cooktop operation. Touch and hold LOCK for three seconds to lock and unlock the control panel. 📋 will illuminate when the control panel is locked.
The control panel will automatically lock after 10 minutes of inactivity. This automatic lock feature can be disabled through the extended options menu. Refer to page 16.
When the cooktop is powered up for the first time and after a power outage, the cooktop will default to lock mode.
Cooktop Operation
POWER LEVEL INDICATOR
When an element is activated, a power level indicator will illuminate above the corresponding control indicating the level of heat. The lowest heat is represented by the small flame, varying levels of heat by additional indicators (dots), and the highest heat by all indicators including the large flame. Refer to the chart and illustration below.

Power level indicator
SETTING POWER LEVEL USES
| Melt 1 (small flame) indicator | Melting butter, holding chocolate and sauces. |
| Simmer 2–6 indicators Simmering sauces and steaming rice. | |
| Medium 6–7 indicators Making French toast and pancakes, heating milk, cream sauces, soups and gravies. | |
| Medium High 7-8 indicators Sauteing, browning and frying. | |
| High 8–10 (large flame) indicators | Boiling water, searing meat and canning. |
Cooktop Operation
SINGLE ELEMENT AND INNER ZONE
Setting controls:
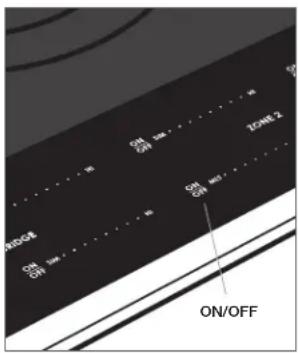
1 To activate a heating element, touch ON/OFF for the desired single element on the control panel. Power level indicator will flash and all indicators for that zone will flash. Refer to the illustration below.
2 To complete the activation, touch HI for highest heat, SIM (MLT) for lowest heat, BOOST (induction) to activate boost mode, or touch desired power level indicator.
3 To change heat setting while the element is on, touch or slide to desired power level.
4 To turn element off, touch ON/OFF.
IMPORTANT NOTE: For induction cooktops only, if no cookware or an incompatible pan is placed on an induction element after activation, the control will flash for 30 seconds, then the element will turn off automatically.
Element activation
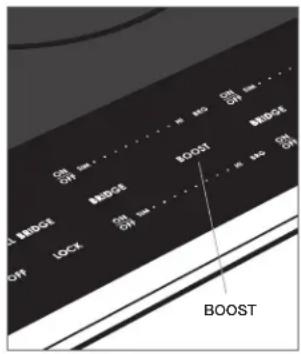
BOOST MODE (INDUCTION)
For induction cooktops, boost mode boosts power on one element by diverting power from an adjacent element. If the adjacent element is on high, the power output will be reduced. The reduction in power will be displayed on the power level indicator of the adjacent element. Refer to the illustration below. 🔊️ will illuminate when an element is in boost mode.
Boost mode will deactivate automatically after approximately 15 minutes of continuous operation and can be reactivated if desired.
Boost mode
Cooktop Operation
DUAL-ZONE OR OVAL ELEMENT (ELECTRIC)
Setting controls:
1 To activate dual-zone or oval element, touch ON/OFF on the control panel. Power level indicator will flash and all indicators for that zone will flash.
2 Set desired heat level for inner zone as described on page 11. Outer zones cannot be turned on independently of inner zone.
3 Touch ZONE 2 or OVAL. Outer zone will be set to the same heat setting as inner zone. ② or Ⓢ will illuminate to indicate outer zone is on. Refer to the illustration below.
4 Change heat setting for the entire dual-zone or oval element the same as for a single element. Both zones maintain the same heat setting.
5 To turn outer zone off, touch ZONE 2 or OVAL. To turn the entire element off, touch ON/OFF.
Dual-zone element activation
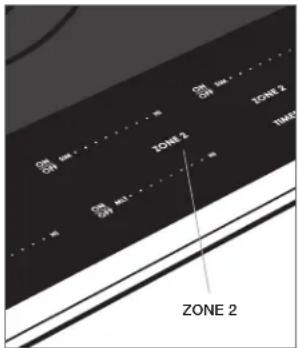
TRIPLE-ZONE ELEMENT (ELECTRIC)
Setting controls:
1 To activate triple-zone element, touch ON/OFF on the control panel. Power level indicator will flash and all indicators for that zone will flash.
2 Set desired heat level for inner zone as described on page 11. Outer zones cannot be turned on independently of inner zone.
3 Touch ZONE 2. Middle zone will be set to the same heat setting as inner zone. ② will illuminate to indicate middle zone is on.
4 Touch ZONE 3. Outer zone will be set to the same heat setting as inner and middle zones. ③ will illuminate to indicate outer zone is on. Refer to the illustration below.
5 Change heat setting for the entire triple-zone element the same as for a single element. All three zones maintain the same heat setting.
6 To turn outer zone off, touch ZONE 3. To turn middle zone off, touch ZONE 2. To turn the entire element off, touch ON/OFF.

Triple-zone element activation
Cooktop Operation
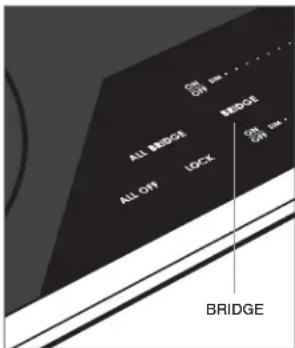
BRIDGE ELEMENT (INDUCTION)
Setting controls:
1 To activate bridge, select desired power level on one of the single elements.
2 Touch BRIDGE between corresponding element controls to bridge elements front to back, BRG to bridge elements side to side, or ALL BRIDGE to bridge all elements. 8, or will illuminate respectively.
3 To change power level, adjust the power level on any active bridged element.
4 To turn off, touch ON/OFF on any active bridged element.
For 36" induction cooktops, ALL BRIDGE should be used for cookware larger than 12" (305) in diameter. For smaller cookware, use the right rear element.
BRIDGE ELEMENT (ELECTRIC)
Setting controls:
1 To activate bridge, select desired power level on one of the single elements.
2TouchBRIDGE. will illuminate.
3 To change power level, adjust the power level on either active bridged element.
4 To turn off, touch ON/OFF on either active bridged element.
Bridge element activation
Cooktop Operation
GRIDDLE USE
The bridge element provides an oblong heating area for use with a griddle, open roaster or fish poacher.
To preheat a griddle, set the bridge element power level to high for five minutes, then reduce for cooking.
CAUTION
A griddle, open roaster or fish poacher should not be used when the bridge element is off or with any other combination of heating elements.
TIMER
The timer can be set in one-minute increments up to 99 minutes. Once a time is set, Ⓛ will illuminate on the control panel and the countdown is visible on the timer display. The timer is independent from the cooktop. Refer to the illustration below.
Setting timer:
1TouchTIMER.
2 Touch and hold + or – until desired time is shown in the timer display. Timer will begin the countdown in minutes.
3 Timer will chime with one minute left and completes the countdown in seconds.
4 When complete, timer will chime and continue to chime until TIMER is touched.
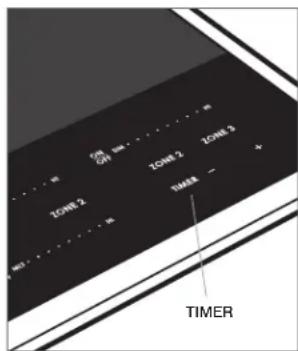
Timer controls
COOKTOP OPERATION
Cooktop Operation
HOT SURFACE INDICATOR

will illuminate on the control panel and may remain ninated even when the cooktop is off.
ALL OFF
When one or more heating elements are on, will illuminate on the control panel. To turn off all elements at the same time, touch ALL OFF.
Cooktop Operation
EXTENDED OPTIONS
The extended options feature allows the user to set preferences for volume, tone, control panel lock and Sabbath feature.
Setting adjustment:
1 While unit is off and unlocked, touch and hold ALL OFF for five seconds.
2 Power level 1 on the rear element control will be displayed and 'VO' will appear on the timer display.
Touch SIM (MLT) or HI on the front element control to adjust volume.
3 Touch + on the timer control to adjust tone. Power level 2 on the rear element control will be displayed and 'Fr' will appear on the timer display.
Touch SIM (MLT) or HI on the front element control to adjust tone.
4 Touch + on the timer control to adjust automatic control panel lock. Power level 3 on the rear element control will be displayed and 'Lo' will appear on the timer display.
Touch SIM (MLT) or HI on the front element control to turn automatic lock feature off or on respectively.
5 Touch + on the timer control to enter Sabbath mode (electric cooktop only). Power level 4 on the rear element control will be displayed. Touch HI on the front element control to initiate Sabbath feature. 'SA' will appear on the timer display.
Touch SIM (MLT) on the front element control to activate or deactivate the feature.
6 Touch ALL OFF at any time while in extended options to confirm settings and return cooktop to idle.
Sabbath
(ELECTRIC COOKTOP)
This appliance is certified by Star-K to meet strict religious regulations in conjunction with specific instructions found on www.star-k.org.
Care Recommendations
CLEANING
| Stainless steel | Use a nonabrasive stainless steel cleaner and apply with a soft lint-free cloth. To bring out the natural luster, lightly wipe surface with a water-dampened microfiber cloth followed by a dry polishing chamois. Always follow the grain of stainless steel. |
| Control panel | Use a spray degreaser to remove fingerprints and food soil. Spray on a cloth before wiping panel. IMPORTANT NOTE: Do not spray cleaners directly on the control panel. |
| Glass-ceramic surface | Allow to cool. Use a spray degreaser to remove fingerprints and a non-abrasive Ceran® cooktop cleaner for food soil. Do not allow any item that could melt to come in contact with the glass-ceramic surface when hot. If this occurs, use the razor blade scraper provided with the cooktop to remove. |
Troubleshooting
OPERATION
Cooktop does not operate.
- Verify power is on.
- Verify electrical power to cooktop and home circuit breaker is on.
- Cooktop is in lock mode. Touch and hold LOCK for three seconds to unlock control panel.
- Cooktop will automatically turn off after 2 hours of continual use (high), 6 hours (medium) and 8 hours (simmer), except in Sabbath mode.
Cooktop temperature issue.
- Contact Wolf customer care at 800-222-7820 for recommendations.
SERVICE
- Maintain the quality built into your product by contacting Wolf Factory Certified Service. For the name of the nearest Wolf Factory Certified Service, check the contact & support section of our website, wolfappliance.com or call Wolf customer care at 800-222-7820.
- When contacting service, you will need the model and serial number of your product. Both numbers are listed on the product rating plate. Refer to pages 6–7 for rating plate location.
- For warranty purposes, you will also need the date of installation and name of your authorized Wolf dealer. This information should be recorded on page 3 of this guide.
Wolf Appliance Residential Limited Warranty
FOR RESIDENTIAL USE
FULL TWO YEAR WARRANTY\*
For two years from the date of original installation, this Wolf Appliance product warranty covers all parts and labor to repair or replace, under normal residential use, any part of the product that proves to be defective in materials or workmanship. All service provided by Wolf Appliance under the above warranty must be performed by Wolf factory certified service, unless otherwise specified by Wolf Appliance, Inc. Service will be provided during normal business hours.
LIMITED FIVE YEAR WARRANTY
For five years from the date of original installation, Wolf Appliance will repair or replace the following parts that prove to be defective in materials or workmanship: gas burners (excludes appearance), electric heating elements, blower motors (ventilation hoods), electronic control boards, magnetron tubes and induction generators. If the owner uses Wolf factory certified service, the service provider will repair or replace these parts with the owner paying for all other costs, including labor. If the owner uses non-certified service, the owner must contact Wolf Appliance, Inc. (using the information below) to receive repaired or replacement parts. Wolf Appliance will not reimburse the owner for parts purchased from non-certified service or other sources.
TERMS APPLICABLE TO EACH WARRANTY
The warranty applies only to products installed for normal residential use. The warranty applies only to products installed in any one of the fifty states of the United States, the District of Columbia or the ten provinces of Canada. This warranty does not cover any parts or labor to correct any defect caused by negligence, accident or improper use, maintenance, installation, service or repair.
THE REMEDIES DESCRIBED ABOVE FOR EACH WARRANTY ARE THE ONLY ONES THAT WOLF APPLIANCE, INC. WILL PROVIDE, EITHER UNDER THIS WARRANTY OR UNDER ANY WARRANTY ARISING BY OPERATION OF LAW. WOLF APPLIANCE, INC. WILL NOT BE RESPONSIBLE FOR ANY CONSEQUENTIAL OR INCIDENTAL DAMAGES ARISING FROM THE BREACH OF THIS WARRANTY OR ANY OTHER WARRANTY, WHETHER EXPRESS, IMPLIED OR STATUTORY.
Some states do not allow the exclusion or limitation of incidental or consequential damages, so the above limitation or exclusion may not apply to you. This warranty gives you specific legal rights and you may also have other legal rights that vary from state to state.
To receive parts and/or service and the name of Wolf factory certified service nearest you, contact Wolf Appliance, Inc., P.O. Box 44848, Madison, WI 53744; check the contact & support section of our website, wolfappliance.com, email us at customerservice@subzero.com or call 800-222-7820.
*Stainless steel (doors, panels, handles, product frames and interior surfaces) are covered by a limited 60-day parts and labor warranty for cosmetic defects.
*Replacement filters for ventilation hood recirculating kits are not covered by the product warranty.
WOLF
Contenido
Controles táctiles
Mode suralimentation
WOLF APPLIANCE, INC. P.O. BOX 44848 MADISON, WI 53744 WOLFAPPLIANCE.COM 800.222.7820
824292 REV-E 2/2018
