
CG152TFSLP - Cooker WOLF - Free user manual and instructions
Find the device manual for free CG152TFSLP WOLF in PDF.
| Product type | Gas cooktop |
| Brand | Wolf |
| Model | CG152TFSLP |
| Width | 15 in (381 mm) |
| Depth | Approximately 21 in (533 mm) |
| Number of burners | 2 |
| Burner type | Gas burners with electronic ignition |
| Medium burner power | 12,000 BTU (3.5 kW) |
| Small burner power | 9,200 BTU (2.7 kW) |
| Power supply | Natural gas or propane (convertible) + 120 V for ignition |
| Ignition | Electronic with clicking; manual ignition possible in case of power failure |
| Simmer function | Yes (Simmer setting with secondary flame level) |
| Surface material | Stainless steel |
| Grilles | Removable steel grates (manual cleaning) |
| Controls | Control knobs (backlit on transitional models) |
| Religious certification | Star-K certified for Shabbat |
| Warranty | 2 years full (parts and labor); 5 years limited on burners, etc. |
| Safety | Flame detection (automatic shutoff if extinguished) |
| Recommended cleaning | Non-abrasive stainless steel cleaner; grates washed with hot water and mild detergent |
| Common troubleshooting | Check power supply, burner caps, igniter, and dry after spillage |
Frequently Asked Questions - CG152TFSLP WOLF
User questions about CG152TFSLP WOLF
0 question about this device. Answer the ones you know or ask your own.
Ask a new question about this device
Download the instructions for your Cooker in PDF format for free! Find your manual CG152TFSLP - WOLF and take your electronic device back in hand. On this page are published all the documents necessary for the use of your device. CG152TFSLP by WOLF.
USER MANUAL CG152TFSLP WOLF
natural_image
Abstract white flame-like shape on red background (no text or symbols)WOLF
GAS COOKTOP
Contents
4SafetyPrecautions
6 Gas Cooktop Features
7CooktopOperation
9CareRecommendations
10 Troubleshooting
11 WolfWarranty
Customer Care
The model and serial number are printed on the enclosed product registration card. Both numbers are also listed on the product rating plate. Refer to page 6 for rating plate location. For warranty purposes, you will also need the date of installation and name of your authorized Wolf dealer. Record this information below for future reference.
SERVICE INFORMATION
| Model Number |
| Serial Number |
| Date of Installation |
| Certified Service Name |
| Certified Service Number |
| Authorized Dealer |
| Dealer Number |
If your product ever needs attention, be sure to use a Wolf Factory Certified Service provider recommended by our customer care center, or select one from our list of providers available at wolfappliance.com/locator. All Factory Certified Service providers are carefully selected and thoroughly trained by us.
Important Note
To ensure this product is installed and operated as safely and efficiently as possible, take note of the following types of highlighted information throughout this guide:
IMPORTANT NOTE highlights information that is especially important.
CAUTION indicates a situation where minor injury or product damage may occur if instructions are not followed.
WARNING states a hazard that may cause serious injury or death if precautions are not followed.
IMPORTANT NOTE: Throughout this guide, dimensions in parentheses are millimeters unless otherwise specified.
IMPORTANT INSTRUCTIONS
WARNING
If the information in this guide is not followed exactly, a fire or explosion may result, causing property damage, personal injury or death.
Do not store or use gasoline or other flammable vapors and liquids in the vicinity of this or any other appliance.
WHAT TO DO IF YOU SMELL GAS:
- Do not try to light any appliance.
- Do not touch any electrical switch.
- Do not use any phone in your building.
- Immediately call your gas supplier from a neighbor's phone. Follow the gas supplier's instructions.
- If you cannot reach your gas supplier, call the fire department.
This appli ance must be properly installed and serviced by a qualified installer, service agency or gas supplier and grounded by a qualified technician.
GENERAL SAFETY PRECAUTIONS
- Read this guide carefully before using this appliance to reduce risk of fire, electric shock or injury.
- Before performing service, shut off gas supply by closing the gas shut-off valve and shut off electricity to this appliance.
- Keep appliance area clear and free from combustible material.
- For safety when cooking, set burner controls so flame does not extend beyond the bottom of pan.
- Wear proper apparel. Loose-fitting or hanging garments should never be worn while using this appliance.
- Use extreme caution when moving a grease kettle or disposing of hot grease.
- Always use dry pot holders when removing pans from this appliance. Wet or damp pot holders can cause steam burns. Do not use a towel or bulky cloth in place of pot holders.
- Clean only those parts listed in this guide.
- Do not repair or replace any part of this appliance unless specifically recommended in literature accompanying this appliance.
- Do not obstruct the flow of air to ensure proper combustion and ventilation.
- IMPORTANT: Do not install a ventilation system that blows air downward toward this gas cooking appliance. This type of ventilation system may cause ignition and combustion problems with this gas cooking appliance resulting in personal injury or unintended operation.
IMPORTANT INSTRUCTIONS
GENERAL SAFETY PRECAUTIONS
- Do not use aluminum foil to line any part of this appliance.
- Never use this appliance to warm or heat the room.
- When using this appliance, do not touch grates, burner caps, burner bases or any other parts in proximity to the flame. These components may be hot enough to cause burns.
- Do not leave children alone or unattended in the area where this appliance is in use. Never allow children to sit or stand on the appliance.
- Do not store items of interest to children above or at the back of this appliance, as they could climb on the appliance to reach items and be injured.
- Do not use water on grease fires. Smother the flame or use a dry chemical or foam-type extinguisher.
- Never leave this appliance unattended when in use. Boilovers and greasy spills may smoke or ignite.
- Do not heat unopened food containers, such as baby food jars and cans. Pressure build-up may cause the container to burst and cause injury.
- Do not store flammable materials near burners or let grease or other flammable substances accumulate on this appliance.
WARNING
PROPOSITION 65 FOR CALIFORNIA RESIDENTS
Cancer and Reproductive Harm—www.P65Warnings.ca.gov
COMMONWEALTH OF MASSACHUSETTS
- Installations and repairs must be performed by a qualified or licensed contractor, plumber or gas fitter, qualified or licensed by the state, province or region where this appliance is being installed.
- Use only gas shut-off valves approved for use within the state, province or region where this appliance is being installed.
- A flexible gas connector, when used, must not exceed 3' (.9 m).
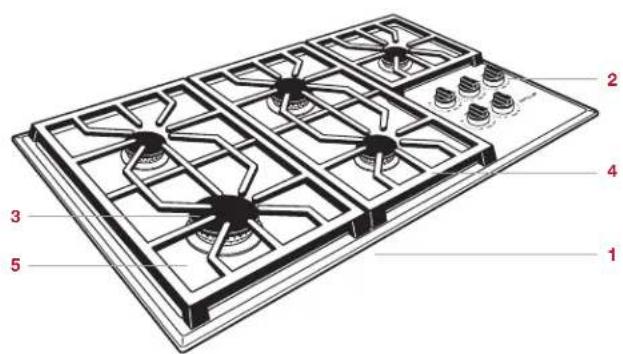
Gas Cooktop Features
FEATURES
| 1 | Product Rating Plate (bottom of cooktop) |
| 2 | Control Panel |
| 3 | Surface Burner (large) |
| 4 | Burner Grate |
| 5 | Burner Pan |

30" gas cooktop (transitional model)
36" gas cooktop (professional model)
BURNER RATING
| 15" GAS COOKTOP BTU (KW)Medium 12,000 (3.5)Small 9,200 (2.7) | |
| 24" GAS COOKTOP BTU | (KW) |
| Large 18,000 (5.3)Medium 12,000 (3.5)Small 9,200 (2.7) | |
| 30" GAS COOKTOP BTU | (KW) |
| Large 18,000 (5.3)Medium 12,000 (3.5)(2) Small 9,200 (2.7) | |
| 36" TRANSITIONAL | PROFESSIONAL BTU | (KW) |
| Large 18,000 (5.3)Medium 12,000 (3.5)(3) Small 9,200 (2.7) | |
| 36" CONTEMPORARY BTU | (KW) |
| Large 20,000 (5.9)(2) Medium 12,000 (3.5)(2) Small 9,200 (2.7) | |
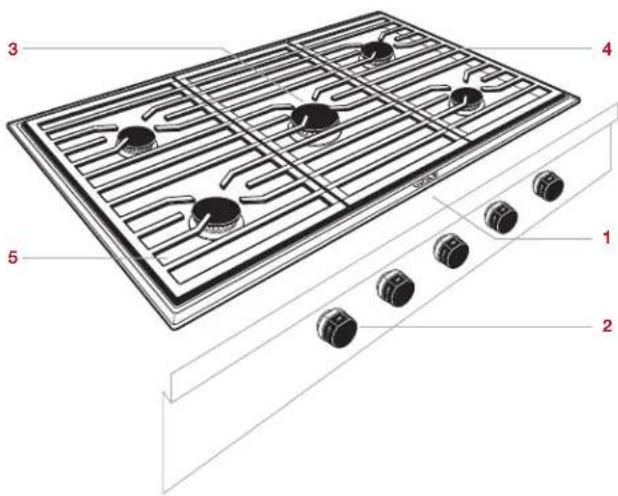
36" gas cooktop (contemporary model)
Getting Started
We know you are eager to start cooking, but before you do, please take some time to read this use and care guide. Whether you are an occasional cook or an expert chef, it will be to your benefit to familiarize yourself with the safety practices, features, operation and care recommendations of your Wolf gas cooktop.
- To ensure all residual oil from the manufacturing process has been removed, clean the cooktop thoroughly with hot water and a mild detergent prior to use. Rinse and dry with a soft cloth. Refer to care recommendations on page 9.
- Verify surface burner components are assembled correctly.
Sabbath
This appliance is certified by Star-K to meet strict religious regulations in conjunction with specific instructions found on www.star-k.org.
Cooktop Operation
SURFACE BURNERS
To light a burner, push and turn the corresponding control knob counterclockwise to HI. The igniter will begin to click until burner is lit. Once lit, continue to turn the knob counterclockwise to the desired setting.
To select a simmer setting, turn the control knob to the detent at the lowest setting. Push and continue to turn counterclockwise. The flame will transition to the second tier on the burner cap. Continue to turn the knob to the desired simmer setting.
During a power outage, surface burners can be lit manually. Turn the control knob to HI, then light using a multi-purpose lighter.
CAUTION
Never leave pans on a high setting unattended. Be careful when cooking food in fat or grease; it can become hot enough to ignite.
CAUTION
Do not use pans that extend beyond the cooktop frame. Heat may be trapped beneath the pan causing damage.
CONTROL KNOBS
For 15" and 36" models, the control knobs are positioned to correspond with the surface burners they regulate. For 24" and 30" models, a diagram on the control panel above each knob indicates which burner it regulates. For the contemporary model, a diagram on each knob bezel indicates which burner it regulates.
For transitional models, the backlit controls are invisible when the cooktop is off.
BURNER GRATES
For 24" models, the grates must be positioned correctly to ensure proper burner performance. The grates have an indicator on the bottom of the front edge. Position the grates with the indicator toward the front of the cooktop. Refer to the illustration below.
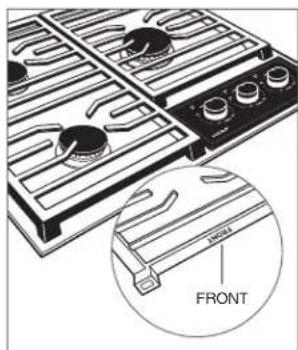
Grate placement (24" model)
Care Recommendations
CLEANING
| Stainless steel | Use a nonabrasive stainless steel cleaner and apply with a soft lint-free cloth. To bring out the natural luster, lightly wipe surface with a water-dampened microfiber cloth followed by a dry polishing chamois. Always follow the grain of stainless steel. |
| Burner grates | Remove and place on a flat surface near the sink. Clean with hot water and mild detergent or paste of baking soda and water. Do not immerse in water. Towel dry. |
| Surface burners | Allow to cool. Use mild detergent or spray degreaser to clean. Rinse with water and towel dry. |
| Control knobs | Using a damp cloth, wipe with mild detergent or spray degreaser; rinse and dry. Do not place in dishwasher. |
Troubleshooting
OPERATION
Cooktop does not operate.
- Verify power is on.
- Verify electrical power to cooktop and home circuit breaker is on.
Erratic flame, poor ignition or no ignition.
- Verify burner caps are positioned properly.
• Clean burner and igniter properly. - If water spilled over recently, let area dry completely. Use hair dryer, if desired.
- If burner cap secures to burner head, verify it is tightly fastened.
- Push in knob, then release. Verify knob springs back.
SERVICE
- Maintain the quality built into your product by contacting Wolf Factory Certified Service. For the name of the nearest Wolf Factory Certified Service, check the contact & support section of our website, wolfappliance.com or call Wolf customer care at 800-222-7820.
- When contacting service, you will need the model and serial number of your product. Both numbers are listed on the product rating plate. Refer to page 6 for rating plate location.
- For warranty purposes, you will also need the date of installation and name of your authorized Wolf dealer. This information should be recorded on page 3 of this guide.
Wolf Appliance Residential Limited Warranty
FOR RESIDENTIAL USE
FULL TWO YEAR WARRANTY\*
For two years from the date of original installation, this Wolf Appliance product warranty covers all parts and labor to repair or replace, under normal residential use, any part of the product that proves to be defective in materials or workmanship. All service provided by Wolf Appliance under the above warranty must be performed by Wolf factory certified service, unless otherwise specified by Wolf Appliance, Inc. Service will be provided during normal business hours.
LIMITED FIVE YEAR WARRANTY
For five years from the date of original installation, Wolf Appliance will repair or replace the following parts that prove to be defective in materials or workmanship: gas burners (excludes appearance), electric heating elements, blower motors (ventilation hoods), electronic control boards, magnetron tubes and induction generators. If the owner uses Wolf factory certified service, the service provider will repair or replace these parts with the owner paying for all other costs, including labor. If the owner uses non-certified service, the owner must contact Wolf Appliance, Inc. (using the information below) to receive repaired or replacement parts. Wolf Appliance will not reimburse the owner for parts purchased from non-certified service or other sources.
TERMS APPLICABLE TO EACH WARRANTY
The warranty applies only to products installed for normal residential use. The warranty applies only to products installed in any one of the fifty states of the United States, the District of Columbia or the ten provinces of Canada. This warranty does not cover any parts or labor to correct any defect caused by negligence, accident or improper use, maintenance, installation, service or repair.
THE REMEDIES DESCRIBED ABOVE FOR EACH WARRANTY ARE THE ONLY ONES THAT WOLF APPLIANCE, INC. WILL PROVIDE, EITHER UNDER THIS WARRANTY OR UNDER ANY WARRANTY ARISING BY OPERATION OF LAW. WOLF APPLIANCE, INC. WILL NOT BE RESPONSIBLE FOR ANY CONSEQUENTIAL OR INCIDENTAL DAMAGES ARISING FROM THE BREACH OF THIS WARRANTY OR ANY OTHER WARRANTY, WHETHER EXPRESS, IMPLIED OR STATUTORY.
Some states do not allow the exclusion or limitation of incidental or consequential damages, so the above limitation or exclusion may not apply to you. This warranty gives you specific legal rights and you may also have other legal rights that vary from state to state.
To receive parts and/or service and the name of Wolf factory certified service nearest you, contact Wolf Appliance, Inc., P.O. Box 44848, Madison, WI 53744; check the contact & support section of our website, wolfappliance.com, email us at customerservice@subzero.com or call 800-222-7820.
*Stainless steel (doors, panels, handles, product frames and interior surfaces) are covered by a limited 60-day parts and labor warranty for cosmetic defects.
*Replacement filters for ventilation hood recirculating kits are not covered by the product warranty.
WOLF
Contenido
www.P65Warnings.ca.gov
MANCOMUNIDAD DE MASSACHUSETTS
WOLF APPLIANCE, INC. P.O. BOX 44848 MADISON, WI 53744 WOLFAPPLIANCE.COM 800.222.7820
9017007 REV-B 2/2018
