
TLWA1201 - Access Point TP-LINK - Free user manual and instructions
Find the device manual for free TLWA1201 TP-LINK in PDF.
| Product Type | Wireless Access Point |
| Brand | TP-Link |
| Model | TL-WA1201 |
| Operating Modes | Access Point, Wi-Fi Repeater, Client, Multi-SSID |
| Frequency Bands | 2.4 GHz and 5 GHz simultaneous |
| Max Wi-Fi Speed | Up to 300 Mbps (2.4 GHz) + 867 Mbps (5 GHz) |
| Network Ports | 1 Ethernet port 10/100/1000 Mbps |
| Power Supply | Passive PoE injector included (30 m max) or 5 V/1 A power adapter |
| Power Consumption | Approximately 5 W |
| Dimensions (W x D x H) | 120 x 80 x 25 mm |
| Weight | Approximately 200 g |
| Wireless Security | WEP, WPA/WPA2-PSK, WPA/WPA2-Enterprise |
| Configuration | Via web interface http://tplinkap.net or http://192.168.0.254 |
| Factory Reset | Press and hold the Reset button until the LED flashes |
| Operating Conditions | Temperature: 0 °C to 40 °C, humidity: 10% to 90% non-condensing |
| Care and Cleaning | Unplug before cleaning, use a dry cloth, avoid chemicals |
| Warranty | 3-year limited |
| Certifications | CE, RoHS |
Frequently Asked Questions - TLWA1201 TP-LINK
User questions about TLWA1201 TP-LINK
0 question about this device. Answer the ones you know or ask your own.
Ask a new question about this device
Download the instructions for your Access Point in PDF format for free! Find your manual TLWA1201 - TP-LINK and take your electronic device back in hand. On this page are published all the documents necessary for the use of your device. TLWA1201 by TP-LINK.
USER MANUAL TLWA1201 TP-LINK
TP-Link Technologies Co. Ltd, South Building(floors 1,3,4,5) and 28Floors 1-4), Central Science
& Technology Park, Shenzhen Hoan, Shenzhen, China TB Link Deutschland GmbH, Barch, Borgh, Straße 9, 65719 Hofheim am Tarry, Germany
TR Link UK Limited Unit 2 & 3 Executive (142-144) Cardiff Board Rendings RG1 FWH
TP-Link Srl, Italy
TP-Link Italia S.r.l.
VinaGebatti 3/020063Corporea su Nauviing (M)
Bittiment Equatsur, 16-18 avenue Morane
Saunier, 78140 Velizy-Villacoublay, France
TP-Link Bigi Teknologijen Tic. Ltd. Sti Senfali Meykil Barberps Cad. Soyiesi Sokak, No:15/2
TP-Link IBERIA S.L. Calle Quinterpavides 17, 3°E, 28050 Madrid, Spain
TP-Link Netherlands B.V. Archimedesbaan 18,3439 ME Nieuwgein
TP-Link (Nordic) AB Forumvagen 14, Plan 13, 131 53 Nocka, Sweden
TP-Link Hellas Ltd. Marathonodromou 77, Marousi 151 24, Greece
NWS. TP-Link Portugal, Unipesanal, Lda. Avenida da Liberdade, n°245, 7°E 1250-143 Lisboa, Portugal
Specifications are subject to change without notice.
Tn t t their respective holders.
No part of the specifications may be reproduced in any form or by any means or used to make any
derivative such as translation, transformation, or adaptation without permission from TP-Link Technologies Co., Ltd. Copyright © 2019 TP-Link Technologies Co., Ltd. All rights reserved.
www.tp-link.com

For technical support, the user guide and other information, please visit https://www.tb-link.com/support, or simply scan the QR code.
7106308540REV200


tp-link
Quick Installation Guide
Wireless Access Point
Images are for demonstration only.
CONTENTS
01 / Deutsch
06 / English
11 / Espanol
16 / Eλληνικα
21 / François
26 / Italiano
31 / Portugues
36 / Suomi
41 /Nederlandsls
46 / Svenska
51 / Norsk
56 / Dansk
Note: TL-WA901N is used for demonstration in this installation guide.
Before You Start
Which mode do you need? Please refer to the table to choose a proper mode.
| Scenarios Operating Modes | |
| You want to convert your wired (Ethernet) network to a wireless network. Access Point Mode (Default Mode) | |
| You are in a Wi-Fi dead-zone or a place with weak wireless signal. You want to have a greater effective range of the wireless signal throughout your home or office. | Range Extender Mode |
| You have a wired device with an Ethernet port and no wireless capability, for example, a Smart TV, Media Player, or game console. You want to connect it to the Internet wirelessly. | Client Mode |
| You want your devices connected to different wireless networks and isolated by VLANs. | Multi-SSID Mode |
Connect the AP Device
- Connect the AP device according to steps in the diagram.
- Turn on the power, wait until the Power ( ) and Wireless ( LEDs are lit and stable, and use the default SSID and Password printed on the product label to join the AP device's Wi-Fi network. Note: For a dual-band AP device, both the 2.4GHz and 5GHz Wireless ( LEDs should be lit and stable.
English
- Access Point Mode (Default) Transforms your existing wired network to a wireless one.

Note: You can enjoy internet surfing now. For your wireless network security, it is recommended to change the default SSID (network name) and the password of your Wi-Fi network. To do so, refer to Configure the AP Device.
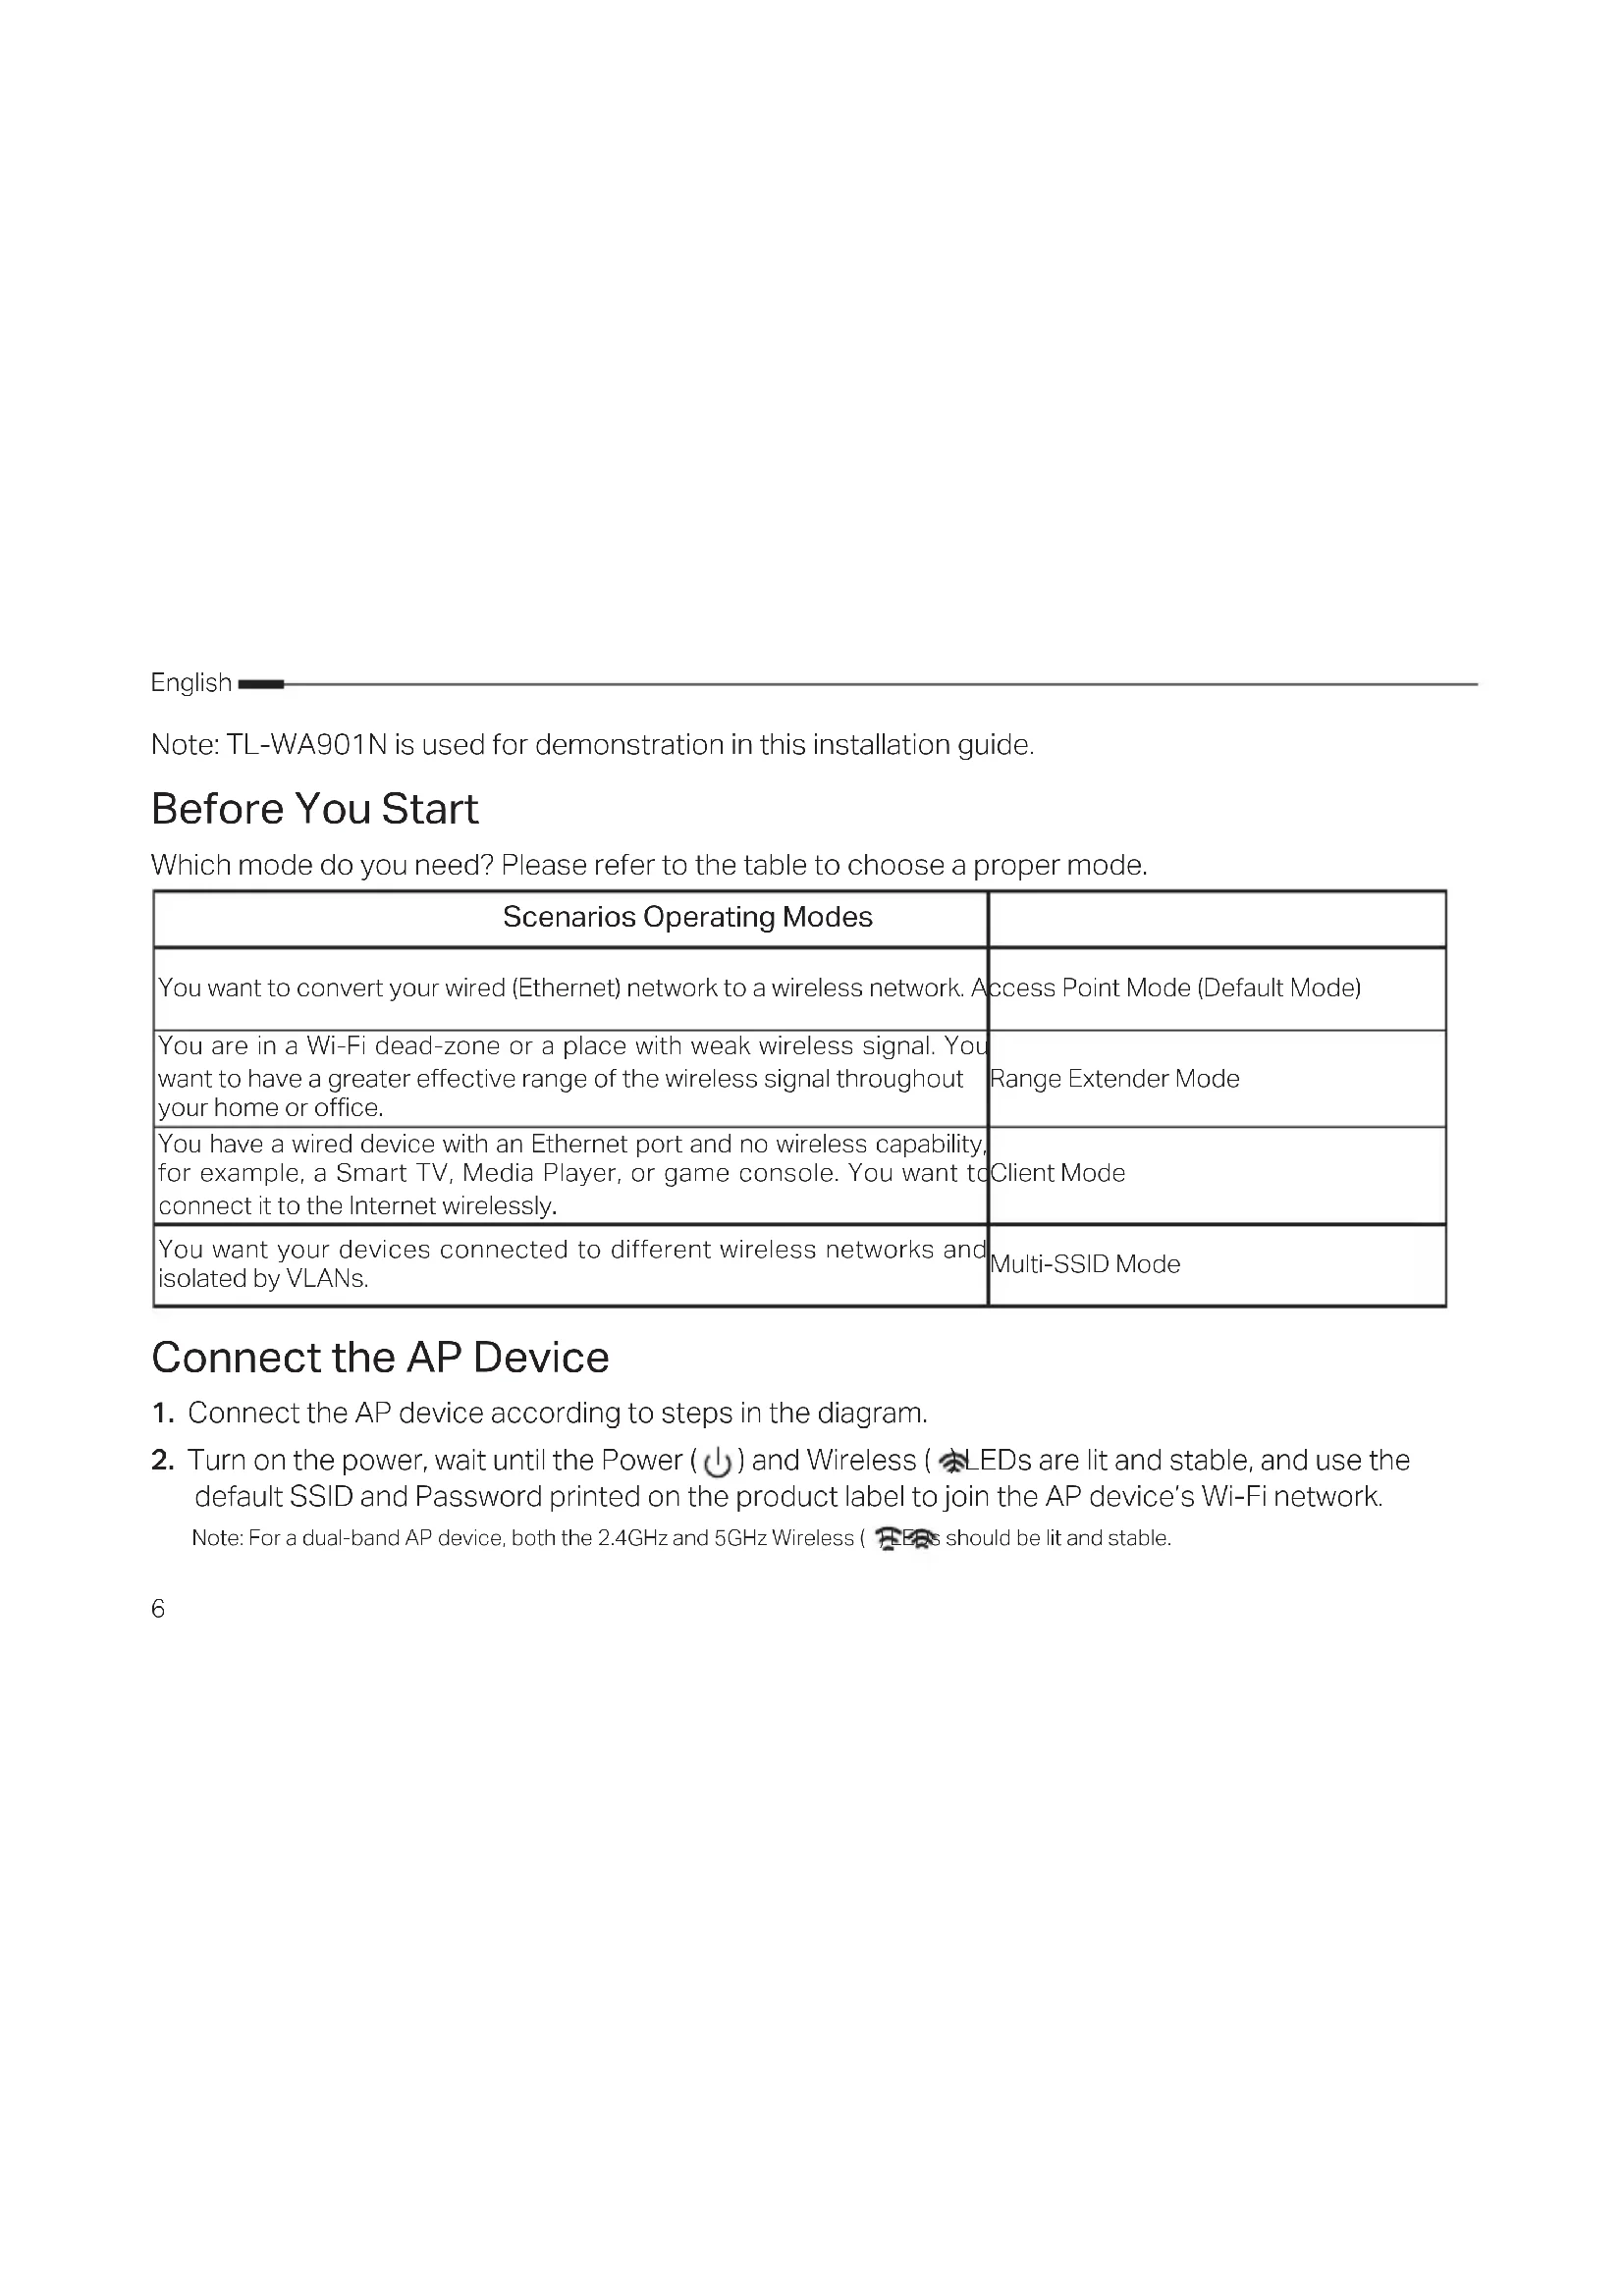
- Range Extender Mode Extends the range of an existing Wi-Fi network.
English
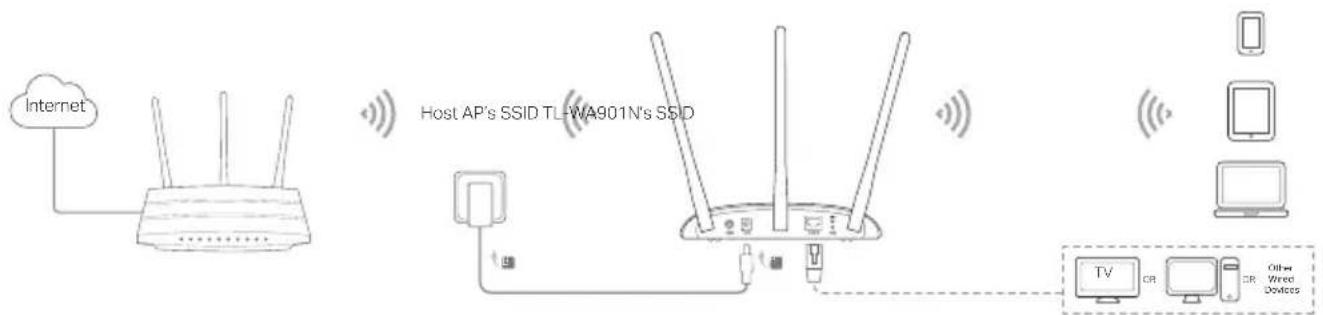
- Client Mode Connects your wired devices to a wireless network.
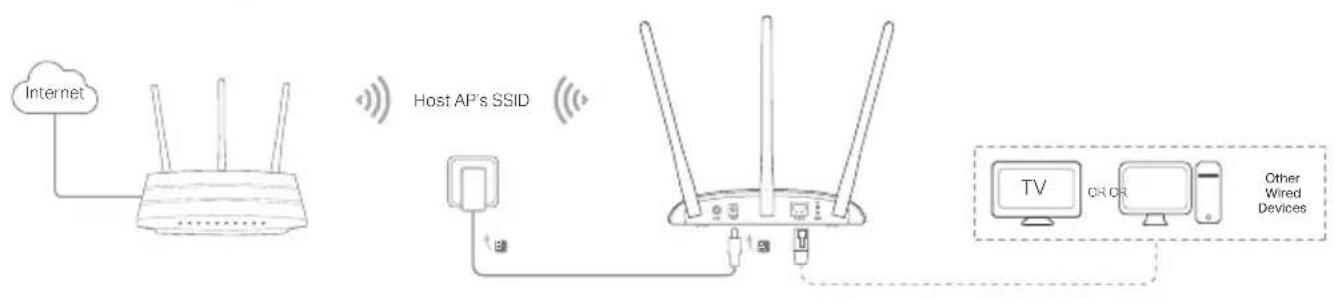
Multi-SSID Mode Creates multiple wireless networks to provide different security and VLAN groups.
__________
Configure the AP Device
- Launch a web browser and enter http://tplinkap.net. Create a password to log in.
- Click Quick Setup, select your corresponding mode and click Next. Follow the step-by-step instructions to complete the configuration.
- Now, reconnect your devices to the AP device.
Note: In Client mode, only the wired connected devices can enjoy the internet surfing. In Multi-SSID mode, connect your wireless devices to the different Wi-Fi networks to be isolated by VLANs.
Power on via PoE Injector
Power the device with the included passive PoE injector when the device is located far from a power outlet. Note: The passive PoE injector supports a cable length up to 30 meters due to the environment.

English
Frequently Asked Questions (FAQ)
Q1. How do I restore the AP device to its factory default settings?
With the device powered on, use a pin to press and hold the RESET button until the Power LED starts blinking, then release the button.
Note: Upon resetting, all previous configurations will be cleared, and the AP device will reset to the default Access Point Mode.
Q2. What can I do if the login window does not appear?
- Change the computer's static IP address to obtain an IP address automatically.
- Verify if http://tplinkap.net or http://192.168.0.254 is correctly entered in the web browser.
- Use another web browser and try again.
- Reboot your AP device and try again.
Power off your host AP and enter http://tplinkap.net into the web browser to try again.
Q3. How do I recover the AP device's web management password or retrieve my Wi-Fi password?
If you forget the password required to access the AP device's web management page, you must restore the AP device to its factory default settings.
- If you forget your Wi-Fi password, but are able to access the AP device's management interface, connect a computer or mobile device to the AP device via wired or wireless. Log in and go to Wireless > Wireless Security to retrieve or reset your Wi-Fi password.
Q4. What can I do if my wireless is not stable?
It may be caused by too much interference, you can try the following methods:
- Set your wireless channel to a different one.
- Move the AP device to a new location away from Bluetooth devices and other household electronics, such as cordless phone, microwave, and baby monitor and more, to minimize signal interference.
Configure the AP Device
- Keep the device away from water, fire, humidity or hot environments.
-
Do not attempt to disassemble, repair, or modify the device.
-
Do not use damaged charger or USB cable to charge the device.
- Do not use any other chargers than those recommended.
- Do not use the device where wireless devices are not allowed.
- Adapter shall be installed near the equipment and shall be easily accessible.
Please read and follow the above safety information when operating the device. We cannot guarantee that no accidents or damage will occur due to improper use of the device. Please use this product with care and operate at your own risk.
TP-Link Three Years Limited Product Warranty
For TP-Link Branded Products Only.
THIS WARRANTY GIVES YOU SPECIFIC LEGAL RIGHTS, AND YOU MAY HAVE OTHER RIGHTS THAT VARY FROM STATE TO STATE (OR BY COUNTRY OR PROVINCE).
TO THE EXTENT ALLOWED BY LOCAL LAW, THIS WARRANTY AND THE REMEDIES SET FORTH ARE EXCLUSIVE AND IN LIEU OF ALL OTHER WARRANTYES, REMEDIES AND CONDITIONS.
TP-Link warrants the TP-Link branded hardware product contained in the original packaging against defects in materials and workmanship when used normally in according with TP-Link's guidelines for a period of THREE YEARS form the date of original retail purchase by the end-user purchaser.
Espanol
TP-Link hereby declares that the device is in compliance with the essential requirements and other relevant provisions of directives 2014/53/EU, 2009/125/EC and 2011/65/EU and (EU)2015/863.
The original EU declaration of conformity may be found at http://www.tp-link.com/en/ce
Eλνικό

- Quick Installation Guide
- CONTENTS
- Before You Start
- Connect the AP Device
- English
- __________
- Configure the AP Device
- Power on via PoE Injector
- Frequently Asked Questions (FAQ)
- Q1. How do I restore the AP device to its factory default settings?
- Q2. What can I do if the login window does not appear?
- Q3. How do I recover the AP device's web management password or retrieve my Wi-Fi password?
- Q4. What can I do if my wireless is not stable?
- TP-Link Three Years Limited Product Warranty
- Espanol
- Eλνικό
Brand : TP-LINK
Model : TLWA1201
Category : Access Point