USER MANUAL ESRW31 PANASONIC
Operating Instructions
(Household) Rechargeable Shaver
ES-RW33
ES-RW31
| English | 2 | Português | 44 | Česky 86 | |
| Deutsch | 9 | Svenska | 51 | Slovensky 93 | |
| Français | 16 | Dansk | 58 | Magyar 100 | |
| Italiano | 23 | Norsk | 65 | Română 107 | |
| Español | 30 | Suomi | 72 | Türkçe 114 | |
| Nederlands | 37 | Polski | 79 | | |

natural_image
Two black Panasonic electric shaver designs, shown from different angles (no text or symbols visible)
Thank you for purchasing this Panasonic product.
Before operating this unit, please read these instructions completely and save them for future use.
Warning

- The following symbol indicates that a specific detachable power supply unit is required for connecting the electrical appliance to the supply mains. The type reference of power supply unit is marked near the symbol.

Important
▶ Before use
Treat yourself to wet lather shaves for at least three weeks and notice the difference. Your Panasonic WET/DRY shaver requires a little time to get used to because your skin and beard need about a month to adjust to any new shaving method.
▶ Using the shaver
Caution - The outer foil is very thin and can be damaged if not used correctly. Check that the foil is not damaged before using the shaver. Do not use the shaver if the foil etc. is damaged as you will cut your skin.
The appliance may not operate in an ambient temperature lower than approximately 0 °C.
▶ Charging the shaver
Charge the appliance correctly according to these Operating Instructions. (See page 5 "Charging".)
This appliance contains battery that is only replaceable by skilled persons. Please contact an authorized service centre for the details of repair.
Plug in the adaptor into a household outlet where there is no moisture and handle it with dry hands. The shaver may become warm during use and charging. However, this is not a malfunction. Do not charge the shaver where it will be exposed to direct sunlight or other heat sources.
Adequate ambient temperature for charging is 0-35 °C.
▶ Cleaning the shaver
Warning - Remove the shaver from the AC adaptor before cleaning it to prevent electric shock.
If you clean the shaver with water, do not use salt water or hot water. Do not soak the shaver in water for a long period of time. Wipe it with a cloth dampened with soapy water. Do not use thinner, benzine or alcohol.
▶ Storing the shaver
Remove the shaver from the AC adaptor when storing it. Keep these operating instructions in a safe place.
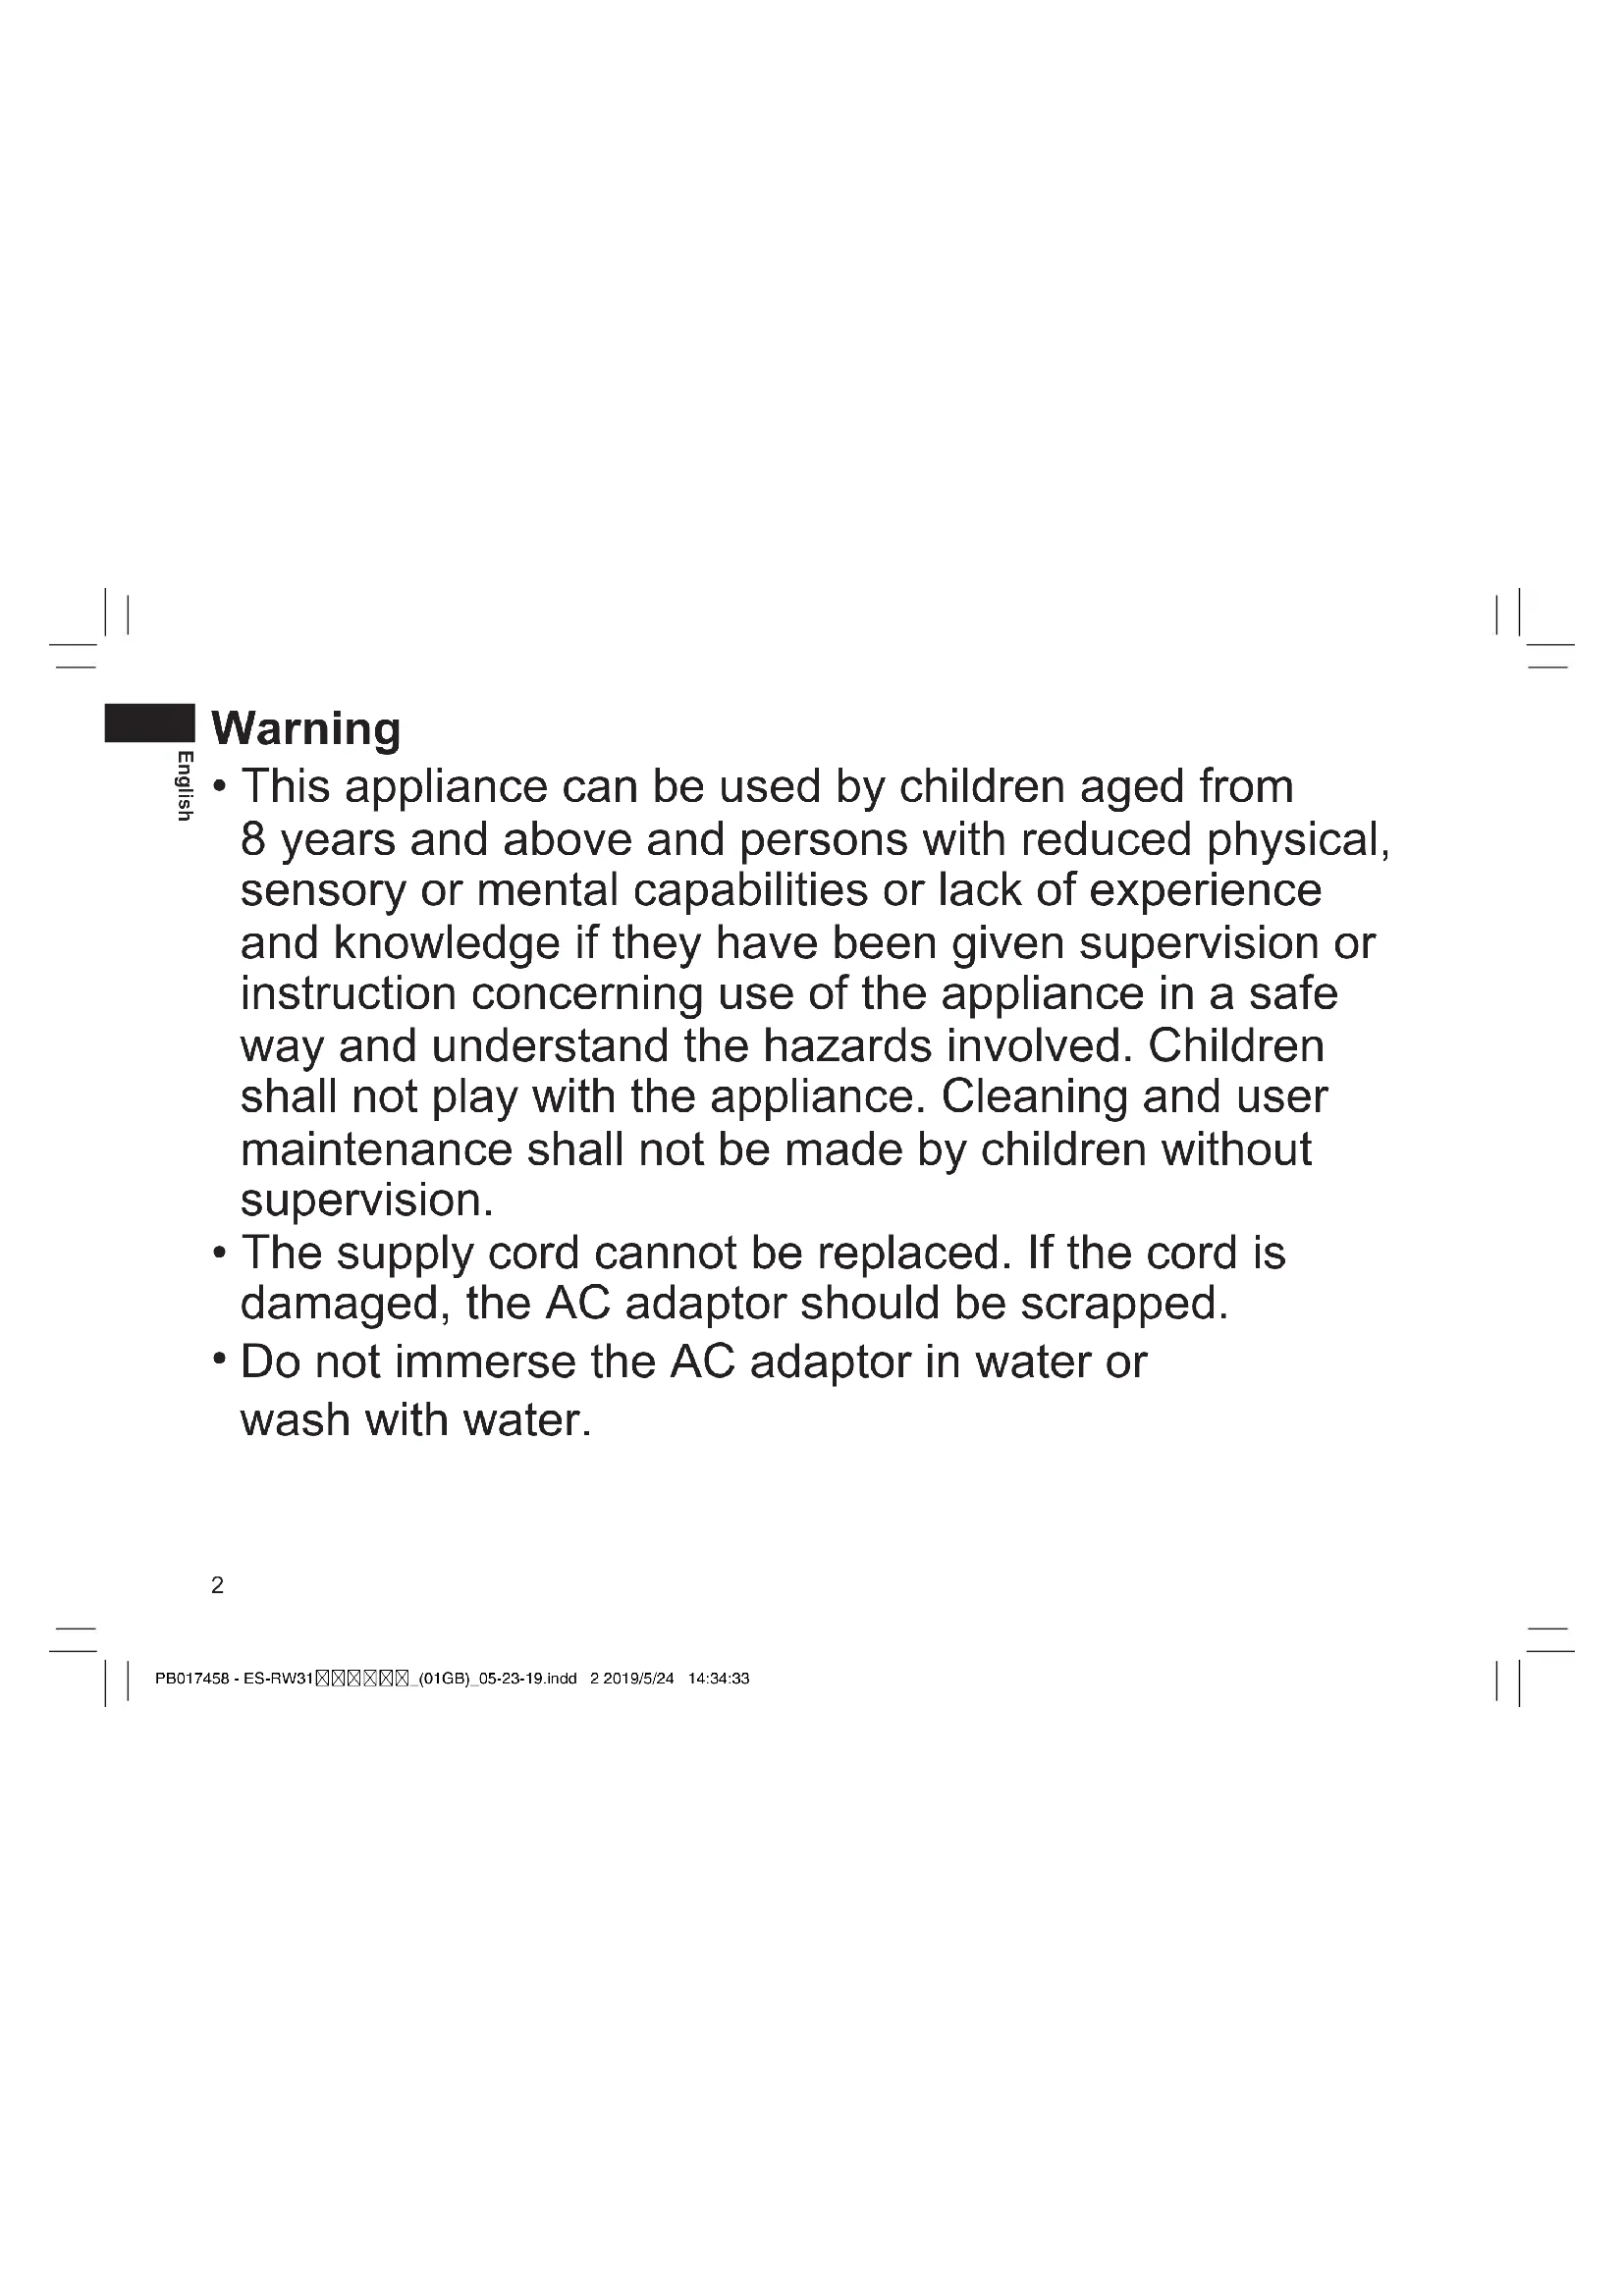
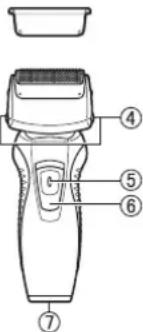
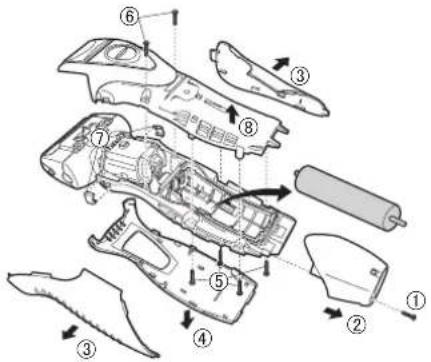
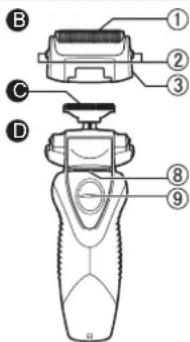
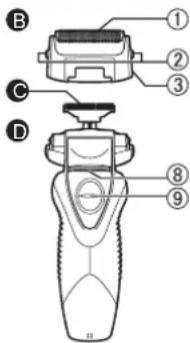
Parts identification
A
E

F
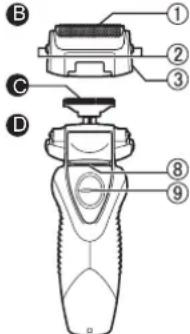
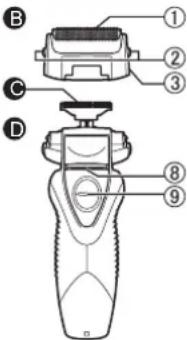
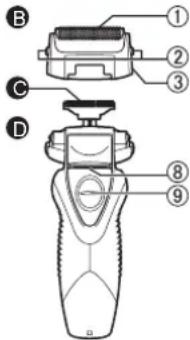
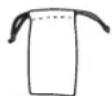
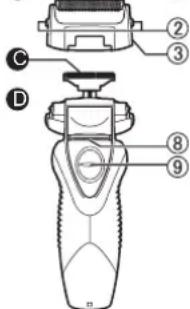
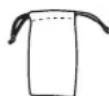
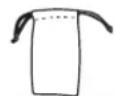
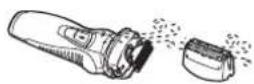
A Protective cap
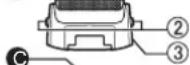
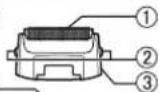
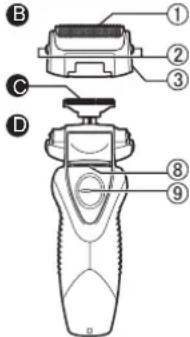
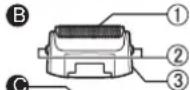
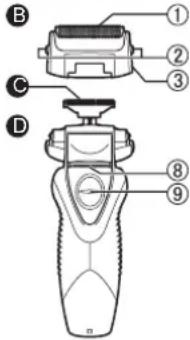
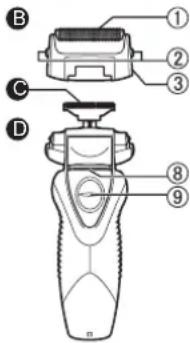
B Outer foil section
① System outer foil
② System outer foil release buttons
③ Foil frame
© Inner blades
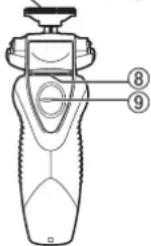
D Main body
④ Foil frame release buttons
⑤ Switch lock button
⑥ Power switch (0/1)
⑦ Appliance socket
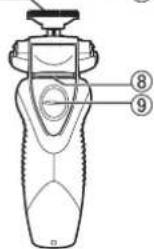
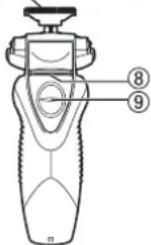
⑧ Trimmer
⑨ Trimmer handle
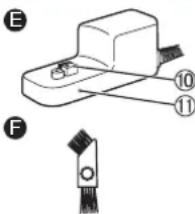
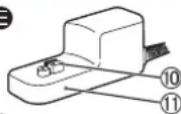
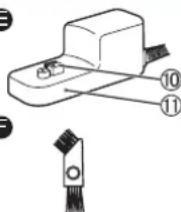
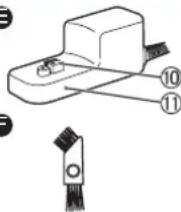
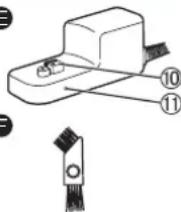
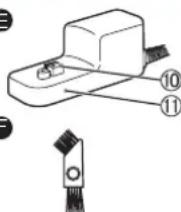
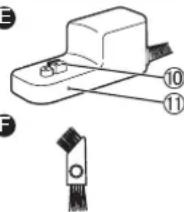
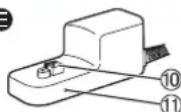
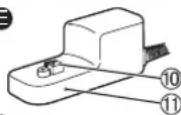
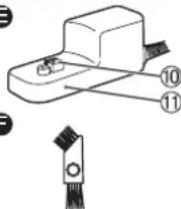
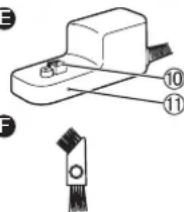
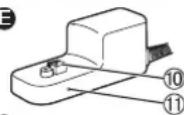
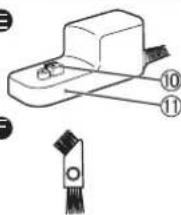
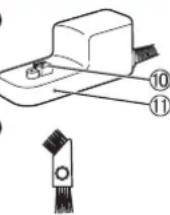
E AC adaptor (RE7-67)
⑩ Charging plug
⑪ Charge indicator lamp
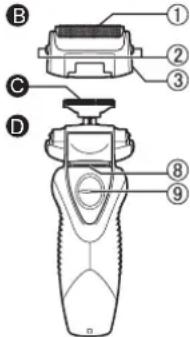
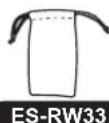
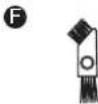
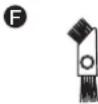
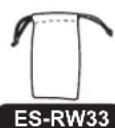
Accessories
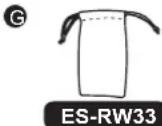
F Cleaning brush
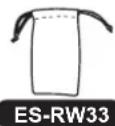
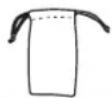
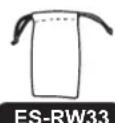
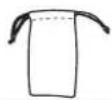
G Travel pouch ES-RW33
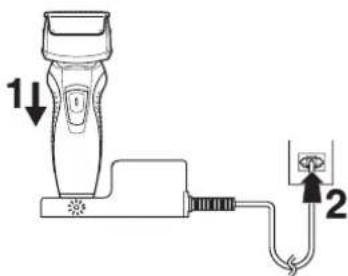
Charging
Perform the following steps to charge the shaver if it seems to lose the speed.
The charging time differs depending on the rated voltage. (See page 8.)
- A full charge supplies enough power for approximately 30 minutes of use. (ES-RW33)
A full charge supplies enough power for approximately 21 minutes of use. (ES-RW31)
(Based on dry using at 20 °C-30 °C.)
The operating time may differ depending on the frequency of use and the operating method.
1 Turn off the shaver and insert it in the AC adaptor as illustrated.
2 Plug in the adaptor into a household outlet.
- The charge indicator lamp glows and stays on until the shaver is removed from the AC adaptor.
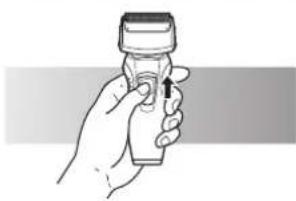
Using the shaver
natural_image
Hand holding a small cylindrical object with a black cap and arrow, against a plain background (no text or symbols)
1 Depress the switch lock button and slide the power switch (0/1) upwards.

2 Hold the shaver as illustrated above and shave.
- Start out shaving by applying gentle pressure to your face. Stretch your skin with your free hand and move the shaver back and forth in the direction of your beard. You may gently increase the amount of pressure as your skin becomes accustomed to this shaver. Applying excessive pressure does not provide a closer shave.
▶ Using the trimmer
Slide the trimmer handle up. Place at a right angle to your skin and move downwards to trim your sideburns.
Cleaning
3
5,6
natural_image
Illustration of hands using a spray gun to spray liquid onto a pipe (no text or symbols)
8

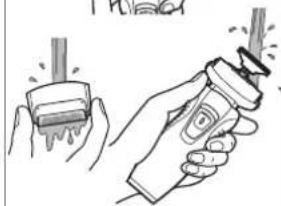
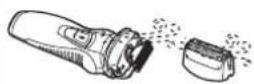
- Remove the shaver from the AC adaptor.
- Apply some hand soap and some water to the outer foil.
- Turn the shaver on.
- Turn the shaver off after 10-20 seconds.
- Remove the outer foil section and turn the shaver on.
- Clean the shaver and the outer foil section with running water.
- Wipe off any drops of water with a dry cloth.
- Dry the outer foil section and the shaver completely.
- Attach the outer foil section to the shaver.
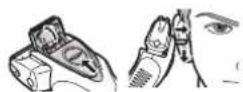
Replacing the outer foil and the inner blades
System outer foil Once every year
Inner blade Once every two years
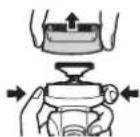
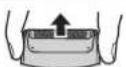
- Press the system outer foil release buttons and lift the system outer foil upwards as illustrated.
- Insert the system outer foil by pushing it downwards until it clicks.
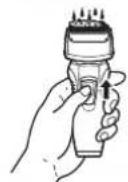
▶ Replacing the inner blades
1
- Press the foil frame release buttons and lift the outer foil section upwards as illustrated.
- Remove the inner blades one at a time as illustrated.
- Do not touch the edges (metal parts) of the inner blades to prevent injury to your hand.
- Insert the inner blades one at a time until they click as illustrated.
Cleaning with the brush
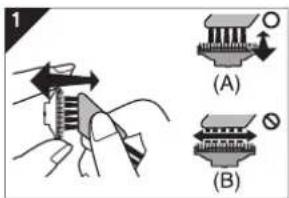
- Clean the inner blades using the short brush by moving it in direction (A).
Clean the outer foil, the shaver body and the trimmer using the long brush.
- Do not move the short brush in direction (B) as it will damage the inner blades and affect their sharpness.
- Do not use the short brush to clean the outer foil.
Removing the built-in rechargeable battery
Remove the built-in rechargeable battery before disposing of the shaver. The battery is to be disposed of safely. Please make sure that the battery is disposed of at an officially designated location if there is one. Do not dismantle or replace the battery so that you can use the shaver again. This could cause fire or an electric shock. Replace it at an authorized service centre.
- Remove the shaver from the AC adaptor when removing the battery.
- Press the power switch to turn on the power and then keep the power on until the battery is completely discharged.
- Perform steps ① to ⑧ and lift the battery, and then remove it.
• Take care not to short-circuit the positive and negative terminals of the removed battery, and insulate the terminals by applying tape to them.
For environmental protection and recycling of materials
This shaver contains a Nickel-Metal Hydride battery.
Please make sure that the battery is disposed of at an officially assigned location, if there is one in your country.
Specifications
| Power source See the name plate on the product. |
| Motor voltage 1.2 V --- |
| Charging time | ES-RW33 | 230 V~ Approx. 11 hours |
| 220 V~ Approx. 12 hours |
| ES-RW31 | 230 V~ Approx. 7 hours |
| 220 V~ Approx. 8 hours |
| Airborne Acoustical Noise | In shaving mode: 59 (dB (A) re 1 pW) In trimmer mode: 63 (dB (A) re 1 pW) |
This product is intended for household use only.
Disposal of Old Equipment and Batteries Only for European Union and countries with recycling systems
These symbols on the products, packaging, and/or accompanying documents mean that used electrical and electronic products and batteries must not be mixed with general household waste.
For proper treatment, recovery and recycling of old products and used batteries, please take them to applicable collection points in accordance with your national legislation.
By disposing of them correctly, you will help to save valuable resources and prevent any potential negative effects on human health and the environment.
For more information about collection and recycling, please contact your local authority.
Penalties may be applicable for incorrect disposal of this waste, in accordance with national legislation.
Note for the battery symbol (bottom symbol)
This symbol might be used in combination with a chemical symbol. In this case it complies with the requirement set by the Directive for the chemical involved.
Warnung

A Schutzkappe
B Scherkopf
natural_image
Hand holding a small cylindrical object with a black cap and arrow, against a plain background (no text or symbols)
natural_image
Illustration of hands using a spray gun to lift a stick (no text or symbols present)
8

B
D
E
F

G
ES-RW33
natural_image
Hand holding a small cylindrical object with a black cap and arrow, against a plain background (no text or symbols)
natural_image
Illustration of two hands using a spray gun to apply liquid, no text or symbols present
8

B

E
F
G

ES-RW33
natural_image
Hand holding a small object with a black arrow pointing upward (no text or symbols visible)
natural_image
Illustration of two hands using a tool to interact with a brush (no text or symbols present)
8

B
E
F
A Tapa protectora
natural_image
Hand holding a small cylindrical object with a black cap and arrow indicator (no text or symbols)
natural_image
Illustration of hands using a tool to apply spray or spray onto a surface, with no visible text or symbols.
8

E
F
F
F
F
F
F
F
F
F
Opladen
natural_image
Hand holding a small cylindrical object with a black cap and arrow indicating direction (no text or symbols)
natural_image
Illustration of two hands using a handheld tool to interact with a brush (no text or symbols present)
8

B
D
E

F

G

ES-RW33
A Tampa protectora
B Parte externa
natural_image
Hand holding a small cylindrical object with a black cap and arrow indicator (no text or symbols)
natural_image
Illustration of hands using a spray gun to brush or brush (no text or symbols present)
8
E
F
F
G
A Skyddshuv
B Ytterbladsdel
① Ytterbladsenhet
② Spärrknappar för ytterbladsenhet
③ Bladram
© Innerblad
D Huvudenhet
natural_image
Hand holding a small cylindrical object with a black cap and arrow, against a plain background (no text or symbols)

natural_image
Illustration of two hands using a tool to interact, showing motion and vibration effects (no text or symbols)
8

B
E
F
G
natural_image
Hand holding a small cylindrical object with a black cap and arrow, against a plain background (no text or symbols)
natural_image
Illustration of two hands using a spray gun to apply liquid, showing the brush and spray nozzle (no text or symbols present)
8


E
F

G
ES-RW33
A Beskyttelsesdeksel
B Ytterfolie
① Systemets ytre folie
② Utløserknapper for systemets ytre folie
③ Folieramme
© Innerblader
D Hoveddel
④ Utløserknapper for folieramme
⑤ Låsebryterknap
⑥ Strømbryter (0/1)
⑦ Pluggmottak
⑧ Trimmer
⑨ Trimmerhåndtak
E Vekselstrømadapter (RE7-67)
⑩ Ladekontakt
⑪ Indikatorlampe for lader
Tilbehør
F Rensebørste
© Reiseveske
ES-RW33
Lading
natural_image
Hand holding a small cylindrical object with a black cap and arrow, no visible text or symbols

natural_image
Illustration of hands using a spray gun to spray liquid onto a cylindrical object (no text or symbols present)
8

- Ta barbermaskinen ut av vekselstrømsadapteren.
- Påfør litt håndsåpe og vann på ytterfolien.
- Slå barbermaskinen på.
- Slå barbermaskinen av etter 10–20 sekunder.
- Ta av ytterfolien, og slå barbermaskinen på.
- Rengjør barbermaskinen og ytterfolien med rennende vann.
- Tørk av eventuelle vanndråper med en tørr klut.
- Tørk ytterfolien og barbermaskinen godt.
- Sett ytterfolien på barbermaskinen.
D
E
F

G
ES-RW33
A Suojus
B Teräverkko-osa
natural_image
Hand holding a small cylindrical object with a black cap and arrow indicating direction (no text or symbols)
natural_image
Illustration of hands using a spray gun to spray liquid onto a pipe (no text or symbols)
8

B
E
F
G
ES-RW33
A Nakładka ochronna
natural_image
Hand holding a small cylindrical object with a black cap and arrow indicating direction (no text or symbols)
natural_image
Illustration of hands using a handheld tool to interact with a spray bottle (no text or symbols present)
8

Polski
E

G
ES-RW33
A Ochranný kryt
natural_image
Hand holding a small cylindrical object with a black cap and arrow indicator (no text or symbols)
natural_image
Illustration of hands using a spray gun to spray liquid onto a pipe (no text or symbols)
8
E
F
F

G
A Ochranný kryt
B Čast's vonkajšou fóliou
natural_image
Hand holding a small cylindrical object with a black cap and arrow, against a plain background (no text or symbols)
1 Stlačte tlačidlo spínača uzamknutia a vypínač posuňte 0/1 dohora.

natural_image
Illustration of hands using a handheld tool to interact with a brush (no text or symbols present)
8

- Holiaci strojček vyberte z napájacieho adaptéra.
- Na vonkajšiu fóliu naneste mydlo a trochu vody.
- Zapnite holiaci strojček.
- Po 10 až 20 sekundách vypnite holiaci strojček.
- Odoberte časť s vonkajšou fóliou a holiaci strojček zapnite.
- Holiaci strojček a čast's vonkajšou fóliou vyčistite pod tečúcou vodou.
- Utrite zvyšné kvapky vody suchou tkaninou.
- Čast's vonkajšou fóliou a holiaci strojček nechajte dôkladne vyschnút.
- Na holiaci strojček nasadte čast's vonkajšou fóliou.

E
F

G

ES-RW33
A Védősapka
B Külső szita rész
natural_image
Hand holding a small cylindrical object with a black cap and arrow indicating direction (no text or symbols)
natural_image
Illustration of two hands using a spray gun to remove or spray liquid from a pipe (no text or symbols present)
8


E
G
ES-RW33
natural_image
Hand holding a small cylindrical object with a black cap and arrow, against a plain background (no text or symbols)
natural_image
Illustration of hands using a handheld tool to interact with a spray bottle (no text or symbols present)
8

E
G
A Koruyucu kapak
B Dis elek
① Dis Elek
natural_image
Hand holding a small cylindrical object with a black cap and arrow, against a plain background (no text or symbols)
natural_image
Illustration of hands using a spray gun to spray liquid onto a pipe (no text or symbols)
8

33, Wanbao North Street, Wanbao Industry Zone, Zhongcun, Panyu District, Guangzhou City, Guangdong Province, China
YETKILI TEMSILCI
Ithalatçı Firma:
Tesan İletişim A.Ş.
© EN, GE, FR, IT, SP, DU, PT, SW, DA, NW, FI, PL, CZ, SK, HU, RO, TK
ES9700RW332503 Y0619-10920