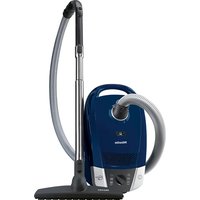
Blizzard CX1 Electro+ PowerLine - Vacuum without a bag MIELE - Free user manual and instructions
Find the device manual for free Blizzard CX1 Electro+ PowerLine MIELE in PDF.
| Brand | Miele |
| Model | Blizzard CX1 Electro+ PowerLine |
| Product type | Bagless vacuum cleaner |
| Usage | Household for dry floors: carpets, rugs, hard floors |
| Power supply | 120 V, 60 Hz, 15 A fuse |
| Power cord length | Approx. 6.5 m (21 ft) |
| Suction power | 5 adjustable levels via rotary selector |
| Filtration technology | Fine dust filter with ComfortClean self-cleaning |
| Reservoir capacity | Dust container + fine dust container |
| Included accessories | Power brush, telescopic tube, crevice nozzle, upholstery nozzle, dusting brush |
| Main functions | ComfortClean self-cleaning, automatic shut-off on overheating, saturation indicator |
| Safety | Anti-static metal strip, child safety, automatic shut-off |
| Maintenance | Empty container, clean pre-filter, filter grille, fine dust filter (dry 24h) |
| Spare parts | Brush rollers, fine dust filter, pre-filter, original Miele accessories |
| Warranty | 1 year parts and labor, 7 years Vortex motor (Canada) |
| Country of manufacture | Germany (Miele & Cie. KG) |
Frequently Asked Questions - Blizzard CX1 Electro+ PowerLine MIELE
User questions about Blizzard CX1 Electro+ PowerLine MIELE
0 question about this device. Answer the ones you know or ask your own.
Ask a new question about this device
Download the instructions for your Vacuum without a bag in PDF format for free! Find your manual Blizzard CX1 Electro+ PowerLine - MIELE and take your electronic device back in hand. On this page are published all the documents necessary for the use of your device. Blizzard CX1 Electro+ PowerLine by MIELE.
USER MANUAL Blizzard CX1 Electro+ PowerLine MIELE
en Operating Instructions Canister Vacuum Cleaner
IMPORTANT SAFETY INSTRUCTIONS 4
Appliance description 10
Caring for the environment 12
References to illustrations 13
Electrobrush operating instructions. 13
Preparing for use 13
Use 15
Parking, transport and storage 16
Maintenance 17
- Emptying the dust container 17
Cleaning the dust container 17
1 Cleaning the filter frame 17
1 Cleaning the fine dust filter. 18
Starting the ComfortClean self-cleaning function manually 18
When to change the thread catchers? 18
How to replace the thread lifters 18
- Cleaning the roller on the AllTeQ floorhead 183
Cleaning and care 19
Frequently Asked Questions 20
Frequently asked questions 21
1 Cleaning the pre-filter 21
Cleaning the fine dust filter manually 21
Technical Service 21
Contact in case of fault 21
Warranty 22
Optional accessories 22
Limited Warranty - Vacuum Cleaners USA 24
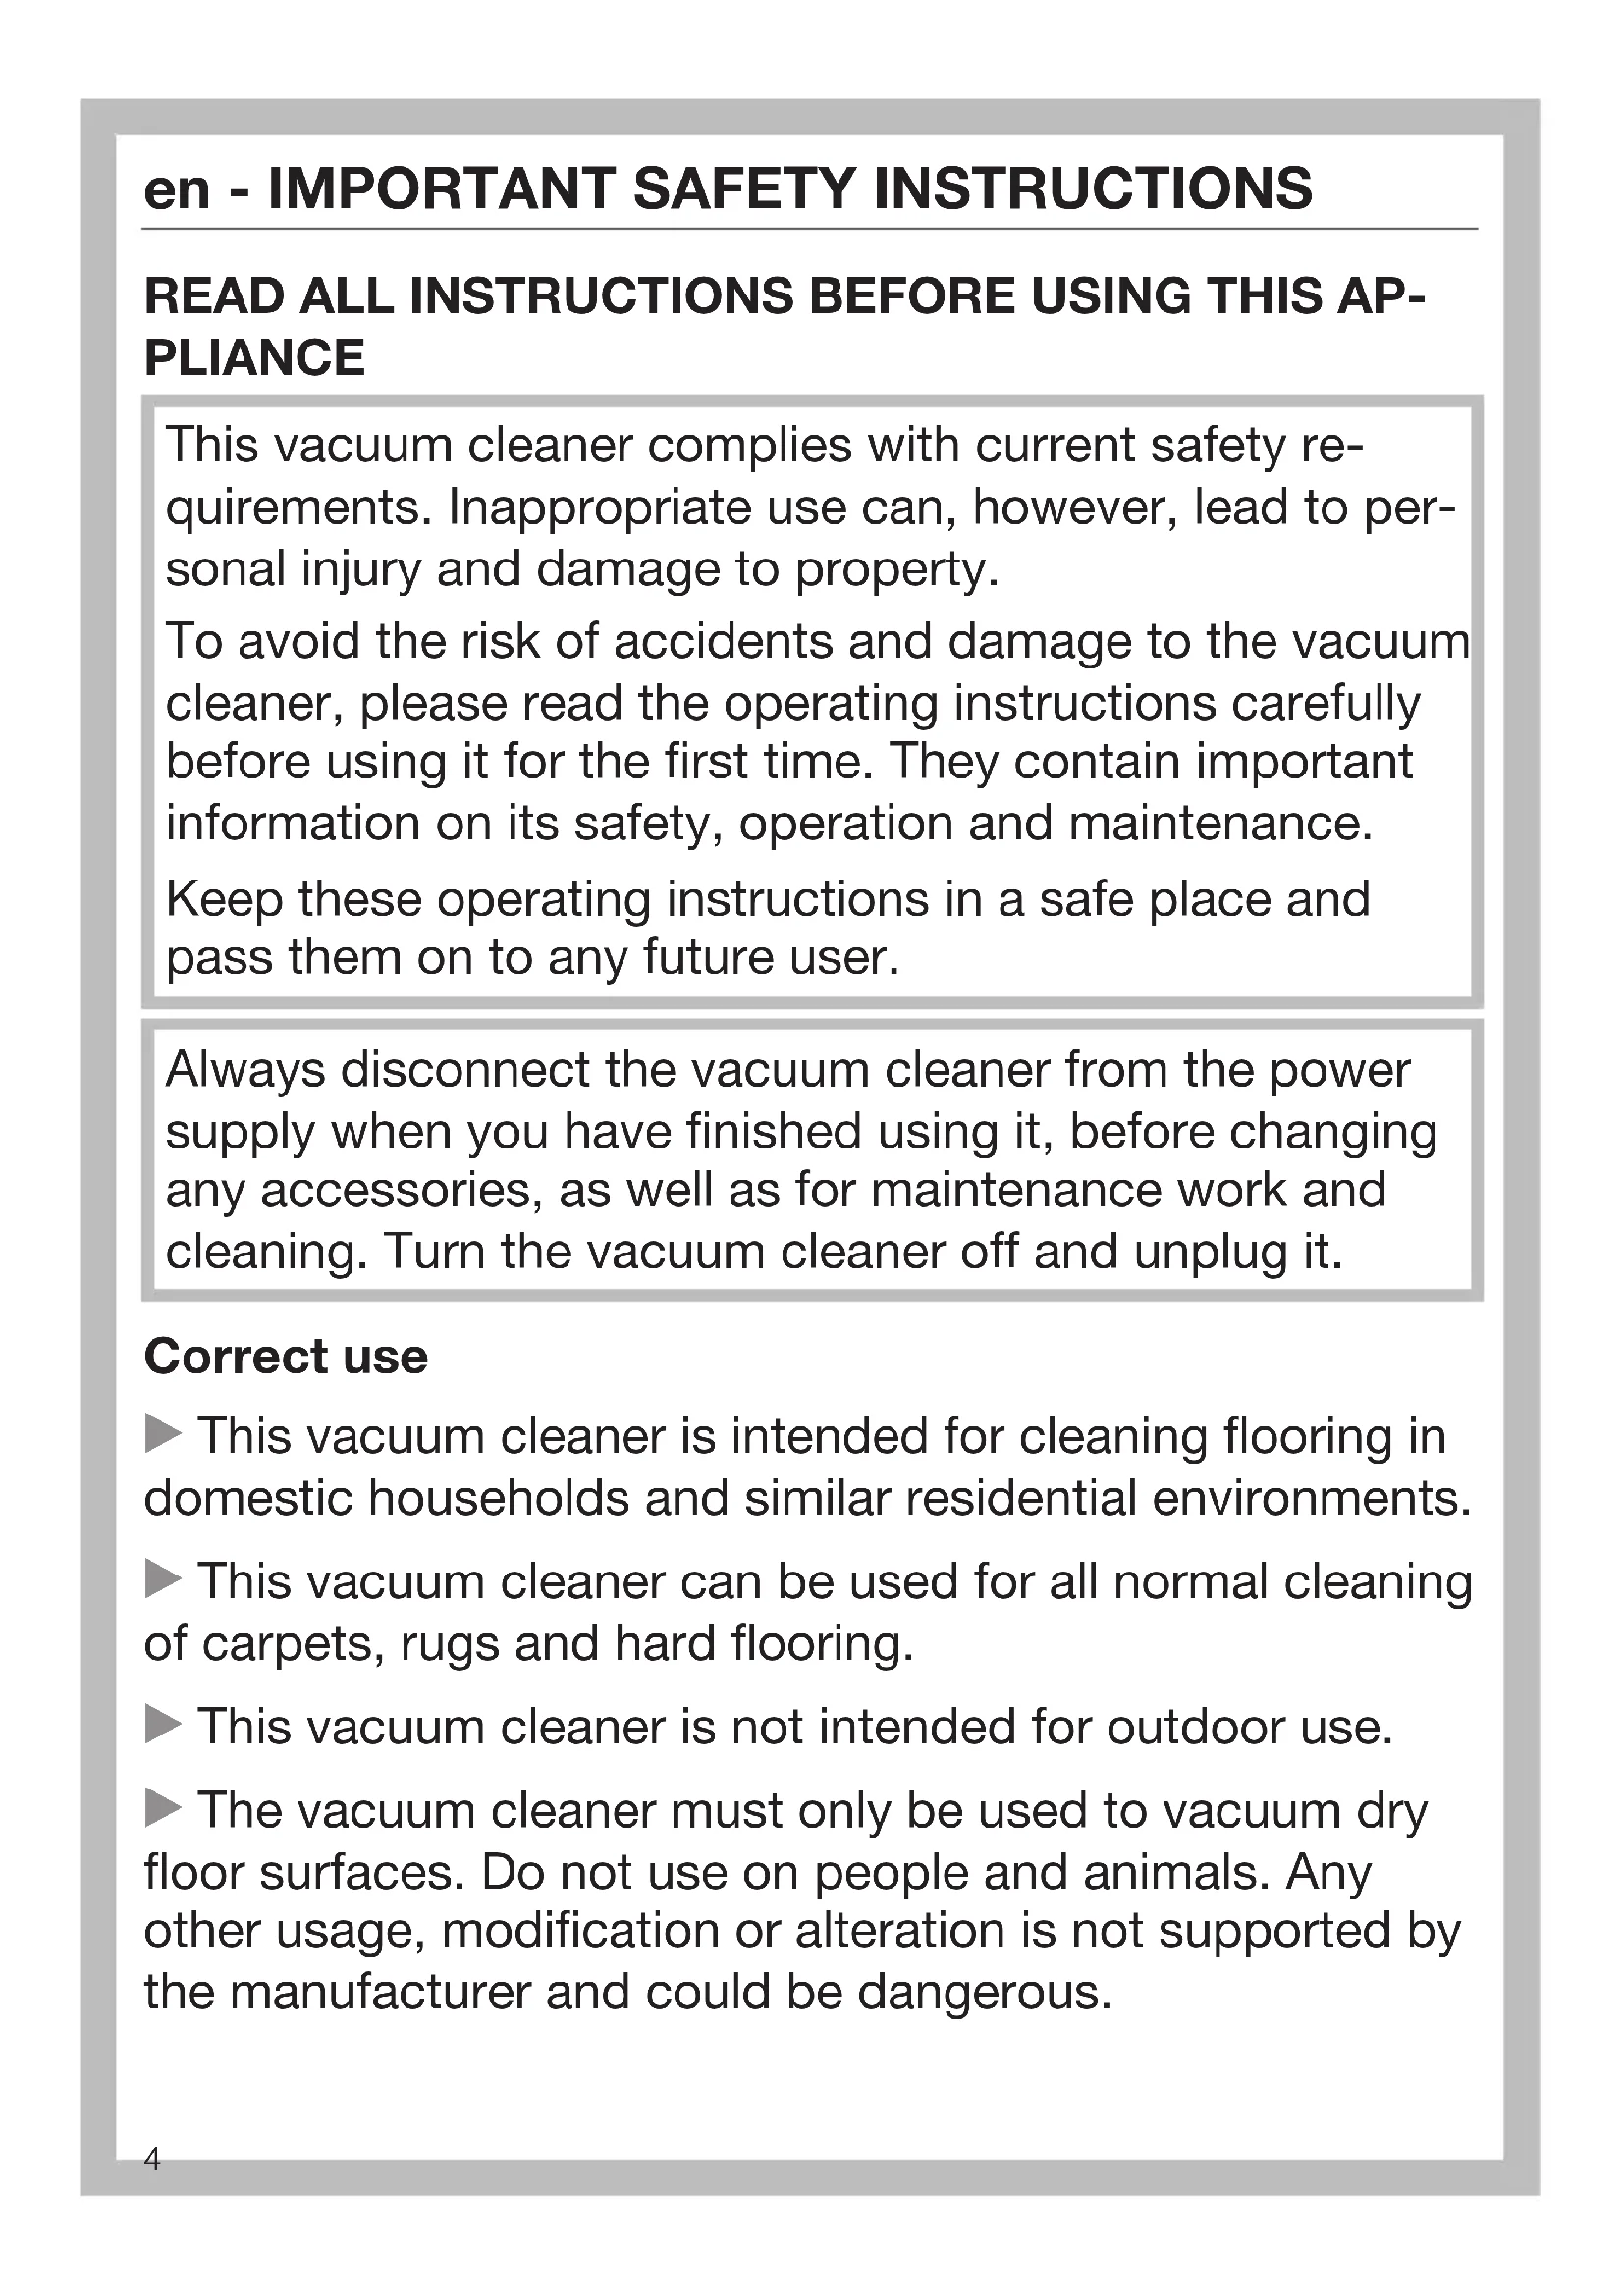
en - IMPORTANT SAFETY INSTRUCTIONS
READ ALL INSTRUCTIONS BEFORE USING THIS APPLIANCE
This vacuum cleaner complies with current safety requirements. Inappropriate use can, however, lead to personal injury and damage to property.
To avoid the risk of accidents and damage to the vacuum cleaner, please read the operating instructions carefully before using it for the first time. They contain important information on its safety, operation and maintenance.
Keep these operating instructions in a safe place and pass them on to any future user.
Always disconnect the vacuum cleaner from the power supply when you have finished using it, before changing any accessories, as well as for maintenance work and cleaning. Turn the vacuum cleaner off and unplug it.
Correct use
This vacuum cleaner is intended for cleaning flooring in domestic households and similar residential environments.
This vacuum cleaner can be used for all normal cleaning of carpets, rugs and hard flooring.
This vacuum cleaner is not intended for outdoor use.
The vacuum cleaner must only be used to vacuum dry floor surfaces. Do not use on people and animals. Any other usage, modification or alteration is not supported by the manufacturer and could be dangerous.
en - IMPORTANT SAFETY INSTRUCTIONS
Persons which lack physical, sensory or mental abilities or experience with the machine should not use it without supervision or instruction by a responsible person.
Safety with children
Danger of suffocation! Ensure that any plastic wrappings, bags, etc. are disposed of safely and kept out of the reach of children.
Do not allow the vacuum cleaner to be used as a toy. Close attention is necessary when used near children.
WARNING
To reduce the risk of fire, electric shock or injury:
- Check the voltage rating of the vacuum cleaner before connecting the power cord to an electrical outlet. Your power source should correspond with the voltage rating plate located on the underside of the vacuum. Use only household AC outlets. Never use DC power sources. If you are not sure of your home's voltage supply, consult a qualified electrician. Connecting the vacuum cleaner to a higher voltage than indicated in these instructions may result in damage to the vacuum cleaner or injury.
To reduce the risk of electric shock, this appliance has a polarized plug (one blade is wider than the other.) This plug will fit in a polarized outlet only one way. If the plug does not fit fully in the outlet, reverse the plug. If it still does not fit, contact a qualified electrician to install the proper outlet. Do not alter the plug in any way.
en - IMPORTANT SAFETY INSTRUCTIONS
Technical safety
Before using the vacuum cleaner and its accessories, check for any visible signs of damage. Do not use a damaged appliance.
Ensure that the connection data on the data plate of the vacuum cleaner (voltage and frequency) match the household power supply. Without modifications, the vacuum cleaner is suited for 50Hz or 60Hz .
The electrical outlet must be fitted with a 15 A fuse.
Reliable and safe operation of this vacuum cleaner can only be assured if it has been connected to the electricity supply.
The socket on the vacuum cleaner must only be used for the Miele Electrobrushes listed in these operating instructions.
The Miele Powerbrush is a motor driven accessory for use only with Miele vacuum cleaners. For safety reasons, the vacuum cleaner must not be used with an Powerbrush produced by another manufacturer.
Repairs must only be performed by an authorized service agent in accordance with national and local safety regulations. Unauthorized repairs could cause injury or machine damage. Otherwise the warranty will be void.
en - IMPORTANT SAFETY INSTRUCTIONS
Do not pull or carry the vacuum cleaner by the power cord, and be careful not to damage the cord when withdrawing the plug from the socket. Keep the cord away from sharp edges and do not let it get pinched, for example, under a door. Avoid running the vacuum cleaner over the cord. This could damage the cord, plug or socket. The appliance must not be used if any of these have suffered damage.
Do not use the vacuum cleaner if the power cord is damaged. If the power cord is damaged it must be replaced together with the cord reel. For safety reasons this must only be done by Miele Technical Service or a Miele authorized service technician.
- When vacuuming, in particular fine dust, e.g. sawdust, sand, plaster, flour, talcum powder etc., electrostatic charges build up naturally. Under certain conditions these charges will be released. To avoid the unpleasant effects of these discharges, a metal inlay has been incorporated into the underside of the handle. Please make sure that you keep your hand in constant contact with this metal strip during vacuuming.
Repairs should only be carried out by a Miele-authorized service technician. Repairs and other work by unqualified persons can cause considerable danger to users.
Defective components should be replaced by Miele original parts only. Only with these parts can the manufacturer guarantee the safety of the appliance.
en - IMPORTANT SAFETY INSTRUCTIONS
Cleaning
Do not let the vacuum cleaner, the Electrobrush, the telescopic wand and the suction hose get wet.
The Electrobrush, telescopic wand and suction hose contain electrical wires. The plug connectors must not come into contact with water - damp cleaning of these items is therefore not permitted.
Clean only with a dry cloth or slightly damp cloth when disconnected from the power supply. Exception:
- Dust container / fine dust container: only clean these parts with water and a small amount of liquid dish soap, then dry carefully.
- Fine dust filter: do not clean the inside of the fine dust filter. Rinse the outside under running cold water. Do not use soap. Do not use any sharp or pointed objects and do not brush the fine dust filter. After cleaning, leave the fine dust filter to dry for a minimum of 24 hours before placing it back in the fine dust container.
- Pre-filter / filter frame: clean these parts under running cold water. Do not use soap. Do not use any sharp or pointed objects. Dry these parts carefully after cleaning.
Proper use
- Do not use the vacuum cleaner without the dust container, pre-filter, fine dust container and fine dust filter fitted.
en - IMPORTANT SAFETY INSTRUCTIONS
Do not vacuum up anything which has been burning or smoking, e.g., cigarettes, ashes or hot ash, whether glowing or apparently extinguished.
- Do not use the vacuum cleaner to vacuum up any water, liquid or damp dirt. Wait until any freshly cleaned or shampooed rugs or carpets are completely dry before attempting to vacuum.
- Do not use the vacuum cleaner to vacuum toner dust. Toner, such as that used in printers and photocopiers, can conduct electricity.
- Do not vacuum up any flammable or combustible liquids or gases and do not vacuum in areas where such substances are stored.
Do not vacuum at head height and do not let the suction get anywhere near a person's head.
Accessories
To avoid the risk of injury when vacuuming with a Miele Powerbrush or Turbobrush, do not touch the rotating roller brush.
It is not advisable to vacuum directly with the handle, i.e., without an accessory attached, as the rim could get damaged and you could hurt yourself on sharp edges.
Only use accessories with the "ORIGINAL Miele" logo on them. Otherwise the manufacturer cannot guarantee the safety of the product.
SAVE THESE INSTRUCTIONS
en - Appliance description
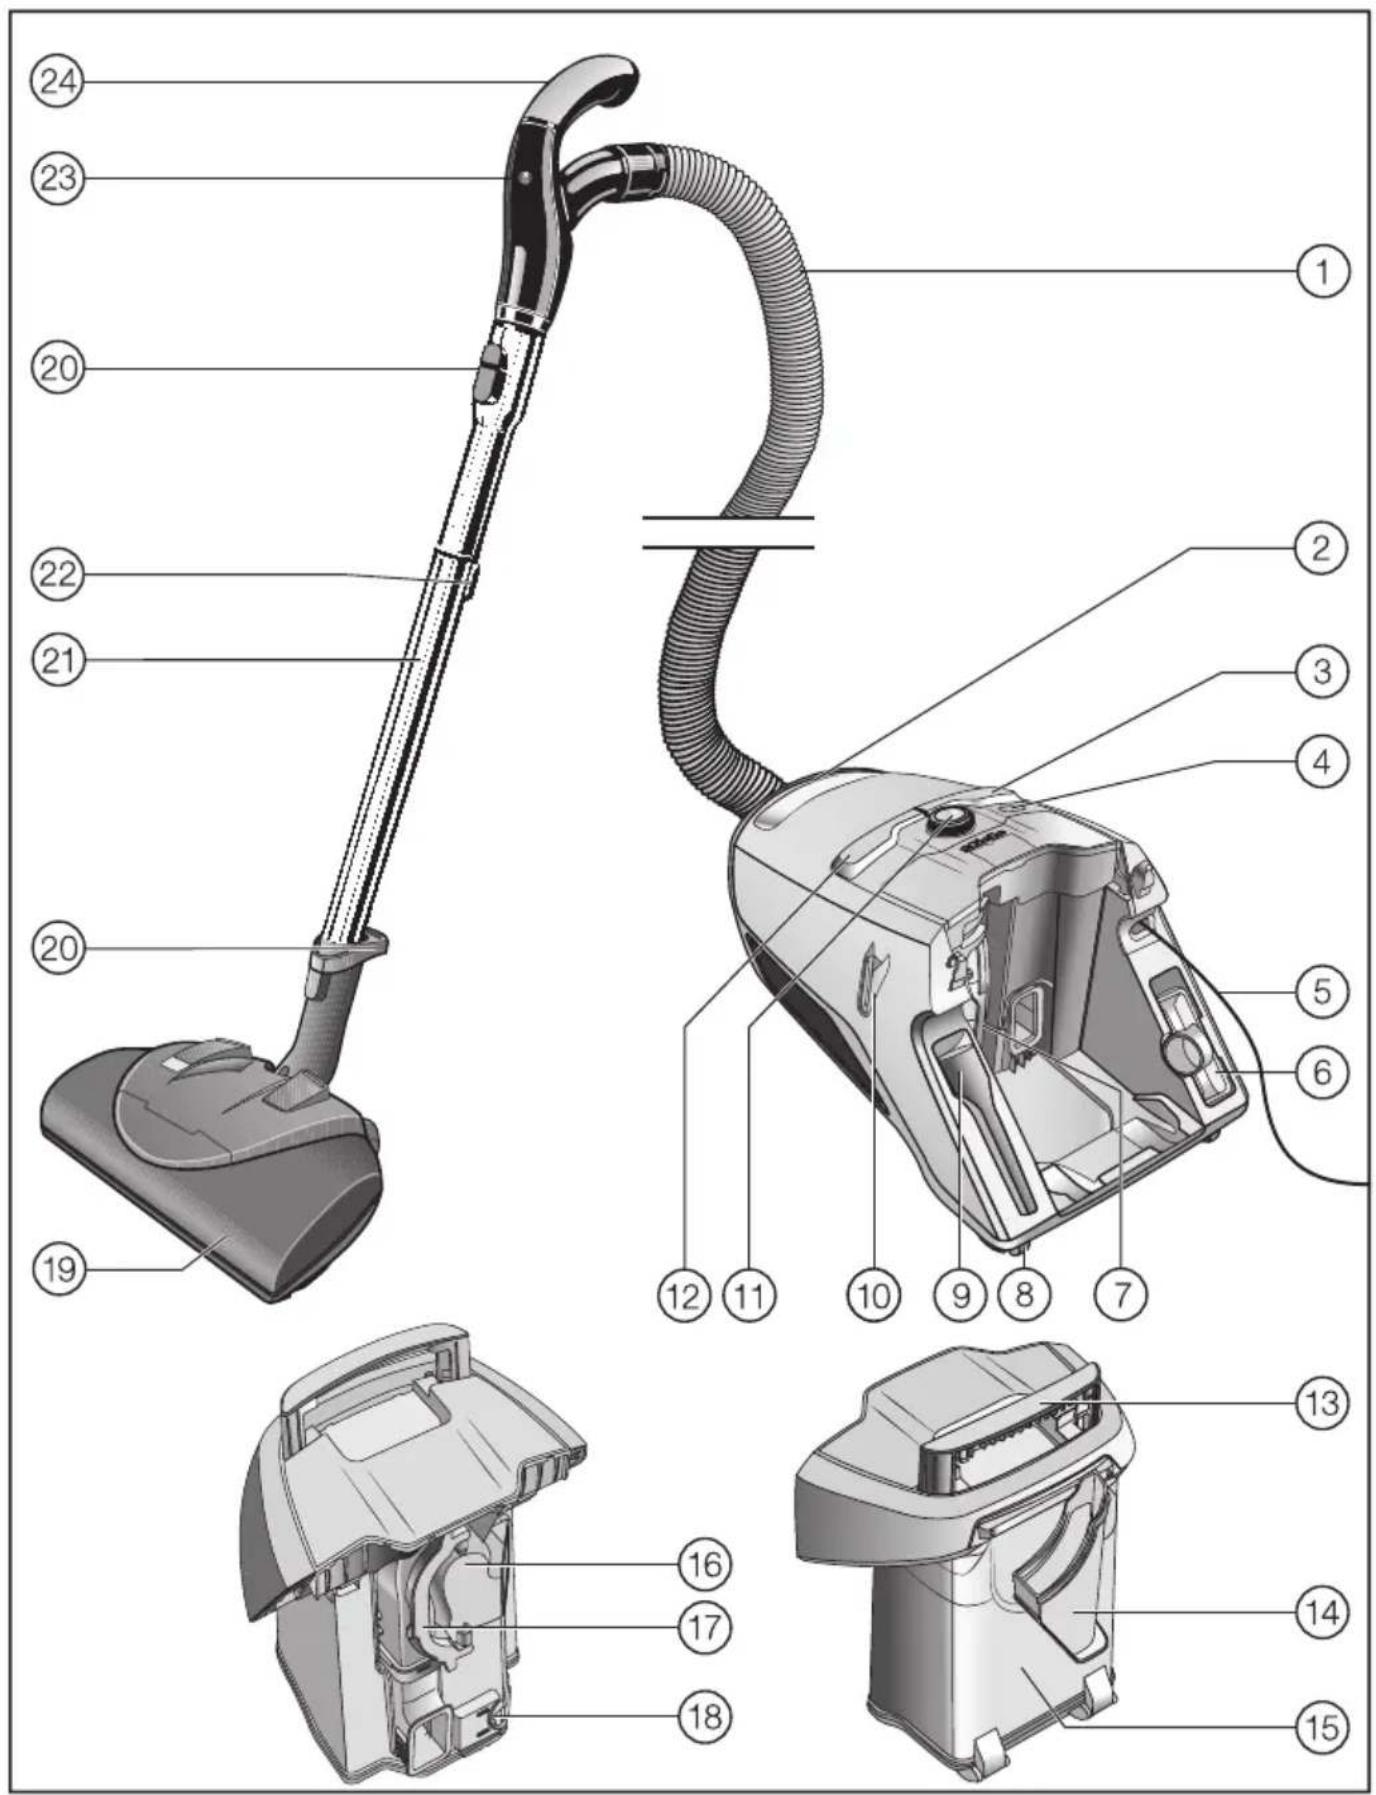
① SES 121 Suction hose
② Vacuum cleaner carrying handle
③ Foot switch for cable rewind
④ ComfortClean button
⑤ Power cord
⑥ Upholstery nozzle
⑦ Fine dust container with fine dust filter
⑧ Wheels
⑨ Crevice nozzle
Park system for pauses during vacuuming
① Suction power selector
⑫ On/off ① foot switch
Dust container carrying handle
⑭ Filter frame
Dust container
16 Pre-filter
① Pre-filter handle
Dust container release mechanism
^19 Electrobrush (either SEB 217 / EB02, SEB 228 / EB03 or SEB 236 / EB01, depending on model)
20 Release buttons
21 SET 220 telescopic wand
22 Telescopic suction wand release button
23 Electrobrush On/Off button
② Comfort handle
Underneath - Park system for storage (not shown)
Disposal of the packing material
The cardboard box and packing materials protect the appliance during shipping. They have been designed to be biodegradable and recyclable.
Ensure that any plastic wrappings, bags, etc. are disposed of safely and kept out of the reach of children. Danger of suffocation!
Disposal of your old appliance
Before disposing of your old appliance, remove the fine dust filter and dispose of it with your household waste.
Electrical and electronic appliances contain valuable materials. They also contain certain substances, compounds and components which are essential for the proper functioning and safe use of the equipment. Handling these materials improperly by disposing of them in your household waste can be harmful to your health and the environment. Therefore, please do not dispose of your old appliance with your regular household waste.
Instead, use the official collection and disposal points provided by local authorities, dealers or Miele, in order to dispose of and recycle electrical and electronic appliances. You are legally responsible for deleting any personal data on the old appliance you wish to dispose of. Please ensure that your old appliance is kept away from children until removal.
References to illustrations
The illustrations referred to in the text are shown on the fold-out pages at the end of these Operating Instructions.
Electrobrush operating instructions
Your vacuum cleaner is equipped with an Electrobrush as standard. Please read the separate operating instructions supplied with the Electrobrush before using it for the first time.
Preparing for use
Attaching the suction hose (Fig. 01)
Insert the hose connector into the suction socket on the vacuum cleaner until it clicks into position.
Disconnecting the suction hose (Fig. 02)
Press the release buttons at the side of the hose connector, and lift the hose from the socket.
Connect the Comfort handle to the telescopic wand (Fig. 03)
Insert the Comfort handle into the telescopic wand until it clicks into position.
Press the release button to separate the individual sections from each other.
Adjusting the telescopic wand (Fig. 04)
One part of the telescopic wand is fitted inside the other so that the tube can be adjusted to suit your preferred height
for comfortable vacuuming, the maximum height, however, is until the end stop.
Press the release button and adjust the telescopic wand to the desired height.
Connecting the telescopic wand to the Electrobrush (Fig. 05)
Insert the telescopic wand into the Electrobrush until it clicks into position.
Using the Electrobrush
Please observe the flooring manufacturer's cleaning and care instructions.
Depending on the model, your vacuum cleaner will be fitted as standard with one of the following Electrobrushes.
-
Electrobrush SEB 217
-
Electrobrush SEB 228
-
Electrobrush SEB 236
The Electrobrush is particularly suitable for the intensive vacuuming of carpets which are subject to hard wear.
Please note that the Electrobrush should not be used to vacuum deep-pile rugs and carpets or valuable hand-knotted rugs and carpets, e.g., Persian and oriental rugs, etc. or long piled rugs and carpets. There is a risk of the threads being pulled out.
Do not use the Electrobrush SEB
217 Electro to clean highly variable or uneven floors. The base plate might come into contact with the floor and cause damage.
For further information on use and maintenance please refer to the separate instructions supplied with the Electrobrush.
Connecting the telescopic wand to the floorhead/floorbrush (Fig. 06)
(included as standard depending on model)
Push the telescopic wand into the suction nozzle and turn it clockwise or counter-clockwise until it clicks into position.
To detach these parts from each other, press the release button and pull the telescopic wand out of the suction nozzle, twisting it slightly as you do so.
Using the reversible floorhead (Fig. 07)
(included as standard depending on model)
Please be sure to observe the flooring manufacturer's cleaning and care instructions.
The floorhead can be used for vacuumcleaning carpets and rugs. It is especially suitable for cleaning hard flooring which is not susceptible to scratching.
Adjusting the floor head (Fig. 07)
Vacuum carpets and rugs with the brush retracted:
Press the foot switch
Clean hard flooring which is not susceptible to scratching, and flooring with gaps or deep crevices in it with the brush protruding:
Press the foot switch
Using the accessories supplied (Fig. 08)
① Crevice nozzle
For cleaning in folds, crevices or corners.
② Upholstery nozzle
For cleaning upholstery, mattresses, cushions, curtains, covers, etc.
Dusting brush with natural bristles, included in loose form
For cleaning base boards as well as ornate, carved and particularly sensitive objects. The head can be swiveled to adjust to the best angle.
The crevice nozzle and the upholstery nozzle are located in holders at the rear of the vacuum cleaner.
Reversible floorhead (Fig. 09)
(included as standard depending on model)
For general use and also for vacuuming the stairs.
For safety reasons when vacuuming stairs, it is best to start at the bottom of the stairs and move upwards.
Floorbrush Parquet Twister with swiveling head (SBB 300-3)
(included as standard depending on model)
This brush is suitable for a variety of hard floor surfaces and has a swivel joint enabling it to get into awkward corners.
Floorbrush Parquet Twister XL with swiveling head (SBB 400-3)
(included as standard depending on model)
With natural bristles for quickly vacu- uming smooth hard floors and small gaps.
Use
Power cord
Unwind the cord completely to aid the vacuum in dissipating heat. Do not pull or carry by the cord, use the cord as a handle, close a door on the cord, or pull the cord around sharp edges or corners. Do not run the appliance over the cord. Keep the cord away from heated surfaces. Do not unplug by pulling the cord. To unplug grasp the plug, not the cord. This appliance is equipped with a power cord reel. Hold the plug when rewinding onto cord reel. Do not allow plug to whip when rewinding.
Unwind the power cord (Fig. 10)
Pull the power cord out to the required length (max. cord length approx. 21 ft / 6.5 m).
Insert the plug into the electrical socket.
If vacuuming for longer than 30 minutes, the power cord must be pulled out all the way. Otherwise there is a danger of overheating and damage.
Rewinding the power cord (Fig. 11)
Unplug the power cord from the socket.
Step on the cord rewind foot switch.
The power cord will then retract itself into the vacuum cleaner.
If you do not want the cord to retract completely into the vacuum cleaner you can deactivate this function. To do this, take hold of the end of the cord while rewinding it and give it a short pull when you want the rewinding to end.
Turning the vacuum cleaner on and off (Fig. 12)
Press the On/Off foot control ①.
Selecting the suction power
The suction power can be adjusted to suit the type of flooring being cleaned. Reducing the power lowers the amount of effort required to maneuver the floor brush.
The vacuum cleaner has symbols on the controls which indicate the type of use the settings are suitable for.
Curtains, lightweight fabric
Deep pile carpets, rugs and runners
Low pile carpet and rugs
Hard flooring and heavily soiled carpets and rugs (also for cleaning upholstery and mattresses with the upholstery nozzle)
If the suction seems too high when using the Electrobrush/floorhead, reduce the suction until the Electrobrush/ floorhead is easier to maneuver.
Rotary dial (Fig. 13)
Turn the rotary selector to the suction power setting you require.
During vacuuming
- When vacuuming, pull the vacuum cleaner behind you on its wheels. You can stand it upright for vacuuming stairs and curtains, etc.
When vacuuming, in particular fine dust, e.g. dust, sand, plaster, flour, etc., electrostatic charges build up naturally. Under certain conditions these charges will be released. To avoid the unpleasant effects of these discharges, a metal inlay has been incorporated into the underside of the handle. Please make sure that you keep your hand in constant contact with this metal strip during vacuuming (Fig. 14).
If a large amount of dust is vacuumed at once, the ComfortClean self-cleaning function should be started manually either during a vacuuming pause or
straight away. This enables the vacuum cleaner to achieve the very best cleaning performance again straight away (see "Maintenance - Starting the ComfortClean self-cleaning function manually").
Switching the Powerbrush on and off (Fig. 15)
To use the Electrobrush, it has to be switched on additionally to the vacuum cleaner.
To do this, press the On/Off button on the Comfort handle.
This means that you can switch the Electrobrush off during vacuuming and the vacuum cleaner will continue to operate using suction only, e.g. when moving from vacuuming a fitted carpet to a high quality rug, for example.
Parking, transport and storage
Park system for pauses during vacuuming (Fig. 16)
(cannot be used with the Electrobrush SEB 236)
The park system allows you to conveniently park the suction wand and floorhead during pauses.
Slot the floorhead into the parking attachment on the vacuum cleaner.
If your vacuum cleaner is on a sloping surface, e.g., a ramp, retract the telescopic suction wand fully.
Park system for storage (Fig. 17)
Always disconnect the vacuum cleaner from the power supply when you have finished using it. Remove the plug from the socket.
Stand the vacuum cleaner upright.
It is a good idea to retract the telescopic suction wand fully.
Slot the floorhead downwards into one of the parking attachments on either side of the vacuum cleaner (the parking attachments cannot be used with Electrobrushes SEB 228 and SEB 236).
This makes the vacuum cleaner easier to carry or store.
For safety reasons, do not lift the vacuum cleaner using the dust container carrying handle.
Maintenance
Always switch off the vacuum cleaner for maintenance work and unplug the power cord from the wall socket.
Emptying the dust container (Figs. 18 - 23)
Empty the dust container before the dust has reached the max marking on the dust container.
Pull the dust container handle upward.
Remove the dust container upward.
The contents of the dust container can be disposed of with the normal household trash, providing it contains general household dust only.
Hold the dust container close to the bin so that as little dust billows out as possible.
Press the yellow release button on the bottom of the dust container.
The flap will open and the dust will fall out.
Close the flap so that it clicks audibly.
Insert the dust container down into the vacuum cleaner so that it audibly clicks into place.
Push the handle down.
Cleaning the dust container
Clean the dust container as required.
Clean the dust container using water and liquid dish soap.
Dry the dust container carefully.
Cleaning the filter frame (Figs. 24 + 25)
A removable filter frame is located in the dust container. This should be cleaned if it is obviously dirty.
Place the emptied and open dust container on its front.
Release the filter frame and remove it.
Empty the filter frame and rinse it under cold running water.
Do not use detergent!
Do not use any sharp or pointed objects!
Dry the filter frame carefully!
Place the dry filter frame in the dust container so that it audibly clicks into place.
Cleaning the fine dust filter
The fine dust filter is equipped with a self-cleaning function. When a specified degree of soiling is reached, the vacuum cleaner switches off automatically for approx. 20 seconds and carries out a cleaning process. You will hear this process running.
The ComfortClean button on the vacuum cleaner lights up yellow.
Starting the ComfortClean self-cleaning function manually (Fig. 26)
If a large amount of dust has been vacuumed at once, the ComfortClean self-cleaning function should be started manually either during a vacuuming pause or immediately afterward. This enables the vacuum cleaner to achieve the very best cleaning performance again right away.
- With the vacuum cleaner switched on, press the ComfortClean button for at least two seconds.
The vacuum cleaner is switched off automatically for approx. 20 seconds and a cleaning process is carried out which results in operational noise.
The ComfortClean button on the vacuum cleaner lights up yellow.
The vacuum cleaner will then switch back on automatically and will operate with the previously selected setting.
We also recommend emptying and cleaning the fine dust container once or twice a year (see "Fault resolution - Cleaning the fine dust filter manually").
When to change the thread catchers?
(only possible for models with a reversible floorhead included as standard)
The thread catchers on the suction inlet of the reversible floorhead can be replaced. Check them from time to time and replace them if the pile has worn down.
How to replace the thread lifters (Fig. 27)
Use a suitable screwdriver to remove the thread lifters from the slots.
Fit new thread lifters.
Cleaning the roller on the AllTeQ floorhead (Fig. 28)
depending on model)
Clean the roller on the floorhead if required.
(1) Release the bearing (with bayonet fitting) using a coin.
② Press the bearing out, and remove.
③ Remove the roller.
- Remove any threads and hair, replace the roller and refit the bearing, locking it back into position.
Replacement parts are available from your Miele dealer or through Miele Technical Service.
Cleaning and care
Always switch off the vacuum cleaner before cleaning it and unplug the power chord from the wall socket.
Vacuum cleaner and accessories
The vacuum cleaner and all plastic accessories can be cleaned with a proprietary cleaner suitable for use on plastic.
Follow the special cleaning instructions for the dust container and filter frame in "Maintenance" and for the fine dust filter, the pre-filter and the fine dust container in "Frequently asked questions".
Do not use abrasive cleaning agents, glass cleaning agents, all-purpose cleaners or oil-based conditioning agents!
Do not let the vacuum cleaner get wet. If moisture gets into the appliance, there is a risk of electric shock.
Frequently Asked Questions
With the help of the following guide minor faults in the performance of the machine, some of which may result from incorrect operation, can be remedied without contacting the Service Department. Time and money will be saved because a service call will not be needed.
This guide may help you to find the reason for the fault, and how to correct it.
| Problem Possible cause | and solution |
| The vacuum cleaner turns off automatically. | A temperature limiter switches the vacuum cleaner off automatically when it gets too hot. This can occur when the airways are blocked by bulky objects. ■ Turn the vacuum cleaner off immediately using the On/Off foot switch ①, and unplug it. After removing the cause, wait for approximately 20 - 30 minutes to allow the vacuum cleaner to cool down. It can then be turned on again. |
| The ComfortClean but-ton lights up in yellow. | The vacuum cleaner carries out an automatic cleaning process which you can hear running. ■ Wait for approx. 20 seconds until this cleaning process has finished. |
| The ComfortClean but-ton lights up in red. The vacuum cleaner switches itself to the lowest power setting. | The dust container is full. ■ Empty the dust container. |
| The pre-filter is dirty. ■ Clean the pre-filter (see "Frequently asked questions - Cleaning the pre-filter"). | |
| The fine dust filter is dirty. ■ Clean the fine dust filter at the next available opportunity (see "Frequently asked questions - Cleaning the fine dust filter manually"). | |
| Cleaning power is re-duced. | The pre-filter is dirty. ■ Clean the pre-filter (see "Frequently asked questions - Cleaning the pre-filter"). |
| The fine dust container is full. ■ Empty and clean the fine dust container at the next available opportunity (see "Frequently asked questions - Cleaning the fine dust filter manually"). |
Frequently asked questions
Always switch off the vacuum cleaner before attempting to rectify a fault and unplug it.
Cleaning the pre-filter (Figs. 29 + 30)
The pre-filter is located at the rear of the vacuum cleaner.
This should be cleaned if it is obviously dirty.
Remove the dust container.
- Release the handle of the pre-filter and remove the pre-filter.
Rinse the pre-filter under cold running water.
Do not use detergent!
Do not use any sharp or pointed objects!
Dry the pre-filter carefully!
Replace the dry filter in the dust container and lock the handle.
Reinsert the dust container in the vacuum cleaner.
Cleaning the fine dust filter manually (Figs. 31 - 36)
Allow a drying time of 24 hours.
Remove the dust container.
- Release the fine dust container in the direction of the arrow and remove it.
Run a little water into the opening at the top of the fine dust container.
Gently shake the fine dust container back and forth.
This will rinse out the dust.
- Shake the water out of the opening.
- Release the top so that the marking is pointing to the symbol.
- Carefully lift the fine dust filter up and out of the fine dust container.
Clean the outside of the fine dust filter under cold running water.
Do not clean the inside of the fine dust filter!
Do not use detergent!
Do not use any sharp or pointed objects and do not brush the fine dust filter!
After cleaning, allow the fine dust filter to dry for a minimum of 24 hours!
Clean the fine dust container with water and mild detergent.
Dry the fine dust container carefully.
Insert the dry fine dust filter into the dry fine dust container so that the marking is pointing to the symbol.
Lock the top into place so that the marking is pointing to the symbol.
Reinsert the fine dust container in the vacuum cleaner and lock it into place.
Reinsert the dust container in the vacuum cleaner.
Technical Service
Contact in case of fault
In the event of a fault which you cannot remedy yourself, please contact your Miele dealer or Miele Technical Service.
Contact information for Miele Technical Service can be found at the end of this document.
Warranty
For more information about warranty conditions, please contact Miele Technical Service.
Optional accessories
Please be sure to observe your flooring manufacturer's cleaning and care instructions.
Only use genuine accessories with the "ORIGINAL Miele" logo on them. This will ensure that the suction power of the vacuum cleaner is optimally maintained, and the best possible cleaning result can be achieved.
Please note that faults and damage caused by use of accessories which do not bear the "ORIGINAL Miele" logo are not covered by the vacuum cleaner guarantee.
Purchasing accessories
Original Miele accessories are available from the Miele Web store, Miele and your Miele dealer.
Ordering the correct accessories
Original Miele accessories are identified by the "ORIGINAL Miele" logo on the packaging.

Certain models are supplied as standard with one or more of the following accessories.
Floor tools / Brushes
AllergoTeQ floorhead (SBDH 285-3)
This floor brush is suitable for daily hygienic cleaning of all floor surfaces. The level of cleanliness of the floor shows in a color "traffic light" display when vacuuming.
TurboTeQ Turbobrush (STB 305-3)
This brush is ideal for cleaning short-pile carpet.
Floor brush Parquet Twister with swiveling head (SBB 300-3)
This brush is suitable for a variety of hard floor surfaces and has a swivel joint enabling it to get into awkward corners.
Parquet Twister floorbrush with swiveling head (SBB 300-3)
With natural bristle for vacuuming smooth hard floors and small gaps.
Floorbrush Parquet Twister XL with swiveling head (SBB 400-3)
With natural bristles for quickly vacu-uming smooth hard floors and small gaps.
Other accessories
MicroSet accessory case (SMC 20)
This set is specially designed for cleaning small objects and difficult to reach areas (such as PC keyboards, stereo equipment, intricately carved furniture and ornaments, models, etc).
Turbo XS hand turbo brush (STB 20)
For vacuuming upholstery, mattresses or car seats, etc.
Universal brush (SUB 20)
For dusting books, shelves, etc.
Radiator brush (SHB 30)
For dusting radiators, narrow shelves and crevices.
Mattress tool (SMD 10)
For vacuuming upholstery, mattresses, cushions, curtains, covers, etc.
Crevice nozzle, 12^ (300 mm) (SFD 10)
Extra long crevice nozzle for cleaning in folds, crevices and corners.
Crevice nozzle, 22^ (560 mm) (SFD 20)
Flexible crevice nozzle for vacuuming hard to reach places.
Upholstery nozzle, 7 1/2" (190 mm) (SPD 10)
Extra wide upholstery nozzle for cleaning upholstered furniture, mattresses and pillows.
Limited Warranty - Vacuum Cleaners USA
What This Warranty Covers And For What Period The Coverage Extends
Miele, Inc. (hereinafter "Miele") warrants to the original purchaser of this product, living in the United States of America, who purchased their vacuum from a Miele Authorized Distributor or Dealer:
a. That this product, including all of its Miele authorized parts is free of defects in material and workmanship.
b. That this product, if found to be defective within the stated warranty period, will be repaired free of charge to the consumer (both parts and labor) by an authorized Miele service agent.
c. The warranty period for all vacuum cleaners, except those models specified below and the Scout RX1, and all accessories, excluding vacuum cleaner motors, power head motors, and vacuum cleaner casings (body), is one (1) year from the date of purchase.
d. The warranty period of the Scout RX1 is two (2) years from the date of purchase for the complete vacuum, except for the battery, which will be warranted for one (1) year from the date of purchase.
e. The warranty period for the following specified models is five (5) years from the date of purchase.
| Model Model Model | |||
| Complete C3 HomeCare Complete C3 Brilliant Compact C1 HomeCare Classic | C1 HomeCare (HEPA) | ||
| Complete C3 HomeCare+ Dynamic U1 HomeCare Compact C2 Homecare | |||
f. The warranty period for vacuum motors, power head motors, and the structural integrity of all vacuum cleaner casings (bodies), except for those models specified above and the Scout RX1, is seven (7) years from the date of purchase against defects in material and workmanship.
g. The warranty period for vacuum motors, power head motors, and the structural integrity of all vacuum cleaner casings (bodies), for those models specified above, is ten(10) years from the date of purchase against defects in material and workmanship.
Commercial Use
Vacuum cleaners other than the Scout RX1 used for commercial purposes, except for their motors, will be warranted for a period of six (6) months from the date of purchase. The motors of commercially used upright vacuums will be warranted for one (1) year and the motors of all other commercially used vacuum cleaners, except for the Scout RX1 will be warranted for two (2) years. There is no warranty for the Scout RX1 used for commercial purposes. Thereafter this Limited Warranty shall be null and void.
This warranty only applies while the product remains within the United States, and shall be null and void in any other US territories, possessions, or foreign countries.
What is not covered by this Warranty
This warranty does not cover damage or defects caused by or resulting from repairs, service or alterations to the product or any of its parts or accessories which have been performed by service centers or repairmen not authorized by Miele, or damage or defects caused by negligence, accident, abuse, misuse, improper or abnormal usage or maintenance of the product, its parts or accessories. Ordinary wear and tear or cosmetic damage (scuffs, scratches, gouges, dents, etc.) shall not be considered a defect in materials or workmanship.
Exclusion of Other Warranties
Except for the limited warranty provided herein, Miele disclaims any and all other express warranties with respect to the product. Any warranty of merchantability or fitness for a particular purpose is limited in its duration to the term of the limited warranty provided herein. Some states do not allow limitations on how long an implied warranty lasts, so the above limitation may not apply to you.
Limitation of Liability for Special, Incidental or Consequential Damages
Miele will assume no liability, or other obligation with respect to any personal injury or property damage resulting from the use of a vacuum cleaner, or its accessories, replacement parts, etc., which has not been purchased from, or serviced by an Authorized Miele Dealer. Any purchaser who obtains a vacuum cleaner, accessories, replacement parts, etc., from someone other than an Authorized Miele dealer proceeds at their own risk.
Miele specifically disclaims any and all liability, whether directly or by way of indemnity, for special incidental, consequential or other damages, whether based on breach of contract, tort, strict or product liability, or any other legal theory.
Some states do not allow the exclusion or limitation of incidental or consequential damages, so the above limitation may not apply to you.
Special State Laws
This Limited Warranty gives you specific legal rights; you may have other rights, which vary, from state to state.
Service
For service under this Limited Warranty, or for information you may need about the product, please contact Miele at the US address listed on the back of this booklet, or visit us at www.mieleusa.com.
Authorized Miele Dealers
For service under this Limited Warranty, or to find an Authorized Miele Dealer in your area, please visit us at www. mieleusa.com.
Effective Date: February 1, 2017
©2017 Miele, Inc.
INSTRUCTIONS IMPORTANTES DE SECURITE 26
Description de l'ordinateil 34
Limited Warranty - Vacuums Canada 48
Garantie restreinte - Aspirateurs Canada 50
INSTRUCTIONS IMPORTANTES DE SECURITE
LISEZ ATTENTIVEMENT TOUTES LES INSTRUCTIONS AVANT D'UTILISER L'APPAREIL
Commander lesbons accessoires
Limited Warranty - Vacuums Canada
The following warranty conditions are valid in Canada only.
Miele Limited, (hereinafter "Miele") warrants to the original purchaser that this product, including all of its Miele authorized parts and accessories, is free of defects in material and workmanship.
1. Duration of Warranty
This warranty is valid during the following time periods:
a) Domestic appliances in normal, non-commercial, household use:
One (1) year. Parts and labour.
- RemoteVision® Modules: Please refer to Miele's "Limited Warranty - RemoteVision® Module - Canada".
Additional 5 and 10 Year Limited Warranty on Sealed Refrigeration Systems: The Warranty for the Sealed Refrigeration System includes all original compressors, condensers, evaporators, driers, the original refrigerant and the original connecting tubing.
- Five (5) Year Warranty - If a claim regarding a defect in material or workmanship relating to the Sealed Refrigeration Systems used in Miele Refrigerators, Wine Coolers, and Freezers is received by Miele within five (5) years from the date of purchase, then any warranted failures of the Sealed Refrigeration System shall be repaired at no cost to you (including parts & labour).
- Ten (10) Year Warranty - If a claim of such a defect is received at any time during the period starting from the sixth (6th) year and ending on the last day of the tenth (10th) year after the date of purchase, this Warranty shall cover the replacement or repair of all parts of the Sealed Refrigeration System covered by the Warranty that is found to be defective in material or workmanship but shall not include labour. Upon request, such labour shall be provided by Miele and at the customary charge to the Miele Customer.
b) Domestic appliances in commercial use:
- Six (6) months, for parts and labour.
c) Vacuums in normal, non-commercial, household use:
- One (1) year, upright and canister vacuums. Parts and labour.
- Two (2) years, motor for S170 - S189 upright units. Parts and labour.
- Seven (7) years, Vortex™ motor for canister and upright units, except S170 - S189 upright units for which the motor warranty is two (2) years. Parts and labour.
d) Vacuums in commercial use:
- Six (6) months, for products used commercially. Parts and labour.
- One (1) year for motor for canister and upright models. Parts and labour.
e) Commercial appliances.
One (1) year. Parts and labour.
2. Commencement Date
Warranty coverage begins on the date of purchase. If a product under warranty is replaced by Miele, the original warranty period is not extended but continues from the date of original purchase.
3. Warranty Preconditions
3.1 Miele assumes warranty responsibility subject to the following preconditions having been fulfilled:
a) You are the original purchaser and did not obtain the product through resale;
b) The product was purchased from Miele or an authorized Miele dealer in Canada;
c) If applicable, the product was installed by a person designated by Miele as qualified to do so and in accordance with applicable installation instructions; and
d) The product is located in Canada.
3.2 Warranty claims will only be honoured provided that any failure to conform to this warranty is reported in writing and the product is returned together with proof of purchase date to Miele or to a Miele authorized dealer, as applicable, within the time period stated in Section 1 above.
4. Extent of Warranty
In the event of defect in material or workmanship occurring within the time period stated in I. above, Miele will repair, or at its option replace, within a reasonable period of time, the product or any Miele authorized part or accessory discovered to be defective in workmanship or materials. Defective products and parts become the property of Miele upon replacement.
5. Exclusions
Warranty coverage excludes any product, including its parts and accessories, that:
a) was not installed according to Miele's installation instruction;
b) was damaged by negligence, accident, abuse, misuse, improper or abnormal usage, maintenance or transportation; c) contains non-authentic Miele accessories or replacement parts, including filters, dust bags and other non-Miele products; and
d) was repaired, serviced, altered or modified by someone other than a Miele authorized service centre or technician
6. Ordinary Wear and Tear
Ordinary wear and tear shall not be considered a defect in workmanship or materials.
7. Limitation of Liability
7.1 Unless you purchase extended warranty coverage from Miele prior to the expiry of this warranty, this warranty is the sole warranty offered by Miele to you. Miele disclaims any and all other warranties to the fullest extent permitted by law, whether express or implied, including any warranty of merchantability or fitness for a particular except as provided herein.
7.2 Your sole remedies under this warranty are those described herein. Unless otherwise stated, Miele's liability for actual damage from any cause whatsoever is limited to the amount paid by you for the product. Miele disclaims any and all liability and consequential or other damage whether based on breach of contract, tort (including negligence), product liability or any other legal theory. In no event will either party be responsible for any lost profits or savings, incidental damage or other economic damages.
8. Special Provincial laws
This warranty gives the purchaser specific legal rights. The purchaser may also have other rights which may vary from Province to Province in Canada. Some provinces do not allow limitation or exclusion of implied warranties, therefore, certain limitations and exclusions may not apply.
9. Customer Care
9.1 For service under this warranty or for further information please contact Miele at: Miele Limited Toll free: 1-800-565-6435
161 Four Valley Drive
Vaughan, Ontario
Canada L4K 4V8
E-mail: customercare@miele.ca
9.2 Service may require that the appliance be removed and taken, by authorized Miele personnel, to an authorized Miele Service Centre. If service is requested by you in a remote geographical area, as determined by Miele in its sole discretion from time to time, you will, at Miele's option, be responsible for either:
a) the travel expenses incurred by Miele to attend your premises; or
b) the cost of removal and shipment of the appliance from your premises to the nearest authorized Miele Service Centre.
Miele Limited
Headquarter and Showroom
161 Four Valley Drive
Vaughan, ON L4K 4V8
Canada
Phone: 800-643-5381
905-660-9936
Fax: 905-535-2290
www.miele.ca
customercare@miele.ca
professional@miele.ca (commercial enquiries)
MieleCare National Service
Phone: 800-565-6435
905-532-2272
Fax: 905-532-2292
customercare@miele.ca (general and technical enquiries)
Garantie restreinte - Aspirateurs Canada
161, Four Valley Drive
Telephone: (800)-643-5381
(905)-660-9936
Télécopieur: (905)-535-2290
www.miele.ca
customercare@miele.ca
professional@miele.ca (questions commerciales)
Miele Service Center
German Center
Av. Santa Fe # 170
Lomas de Santa Fe
C.P. 01210 Mexico, D.F.
Col. Polanco Chapultepec
Delg. Miguel Hidalgo
C.P. 11560 Mexico, D.F.
Miele Service Center
German Center
Av. Santa Fe # 170
Lomas de Santa Fe
C.P. 01210 Mexico, D.F.
National Headquarters
9 Independence Way
Princeton, NJ 08540
Phone: 800-843-7231
Fax: 609-419-4298
www.mieleusa.com
Technical Service & Support
Phone: 800-999-1360
Fax: 888-586-8056
TechnicalService@mieleusa.com
Canada
Importer
Miele Limited
Headquarters and Miele Centre
161 Four Valley Drive
Vaughan, ON L4K 4V8
www.miele.ca
Customer Care Centre
Phone: 800-565-6435
905-532-2272
customercare@miele.ca
International Headquarters
Miele & Cie. KG