
MOTR13D3S - Microwave Oven Avanti - Free user manual and instructions
Find the device manual for free MOTR13D3S Avanti in PDF.

User questions about MOTR13D3S Avanti
0 question about this device. Answer the ones you know or ask your own.
Ask a new question about this device
Download the instructions for your Microwave Oven in PDF format for free! Find your manual MOTR13D3S - Avanti and take your electronic device back in hand. On this page are published all the documents necessary for the use of your device. MOTR13D3S by Avanti.
USER MANUAL MOTR13D3S Avanti
Avanti has a policy of continuous improvement on its products and reserves the right to change materials and specifications without notice.
Avanti Products LLC
P.O. Box 520604 - Miami, Florida 33152
www.avantiproducts.com
TABLE OF CONTENTS
MICROWAVE SAFETY 2
INSTALLATION REQUIREMENTS 3
Tools and Parts 3
Location Requirements 4
Electrical Requirements 5
INSTALLATION INSTRUCTIONS 6
Step 1 - Unpack Microwave Oven 6
Step 2 - Locate Wall Studs 7
Step 3 - Align Rear Wall Template and Mark Wall 7
Step 4 - Drill Holes for Mounting Microwave Oven 9
Step 5 - Determine Ventilation Method 10
Step 6 - Install Microwave Oven 11
Step 7 - Complete Installation 25
Your safety and the safety of others are very important.
We have provided many important safety messages in this manual and on your appliance. Always read and obey all safety messages.

This is the safety alert symbol.
This symbol alerts you to potential hazards that can kill or hurt you and others. All safety messages will follow the safety alert symbol and either the word "DANGER," "WARNING" or "CAUTION."
These words mean:
DANGER
An imminently hazardous situation. You could be killed or seriously injured if you don't immediately follow instructions.
WARNING
A potentially hazardous situation which, if not avoided, could result in death or serious bodily injury.
CAUTION
A potentially hazardous situation which, if not avoided, may result in moderate or minor injury.
All safety messages will tell you what the potential hazard is, tell you how to reduce the chance of injury, and tell you what can happen if the instructions are not followed.
IMPORTANT SAFETY INSTRUCTIONS
IMPORTANT: To reduce the risk of fire, electrical shock, injury to persons, or damage when using the microwave oven, follow basic precautions, including the following:
- Read all of the instructions before using this appliance.
- This appliance must be properly installed and located in accordance with the installation instructions before it is used.
- The microwave oven must be properly grounded. Connect only to properly grounded outlet. See "GROUNDING INSTRUCTIONS" found in this installation guide.
- Consult a qualified electrician or serviceman if the grounding instructions are not completely understood, or if doubt exists as to whether the microwave oven is properly grounded.
- Do not remove ground prong.
- Do not use an adapter.
- Do not use an extension cord.
IMPORTANT SAFETY INSTRUCTIONS
- Disconnect electrical power at the fuse box or circuit breaker box before installing.
- The mounting surface must be capable of supporting the cabinet load, in addition to the added weight of this 63-85 pound (28.5-38.5 kg) product, plus additional oven loads of up to 50 pounds (22.7 kg) or a total weight of 113-135 pounds (51.3-61.2 kg).
- This product cannot be installed in cabinet arrangements such as an island or a peninsula. It must be mounted to BOTH a top cabinet AND a wall.
- Use two or more people to move and install microwave oven.
READ AND SAVE THESE INSTRUCTIONS
INSTALLATION REQUIREMENTS
TOOLS AND PARTS
Gather the required tools and parts before starting installation. Read and follow the instructions provided with any tools listed here.
TOOLS NEEDED
Phillips Screwdriver
- Pencil
- Tape Measure or Ruler
Carpenter's Square
- Tin Snips (for cutting damper, if required)
- Scissors
- Cordless Electric Drill
3/16", 1/2" and 5/8" Drill Bits
Reciprocating Saw, Hole Saw or Keyhole Saw
Stud Finder
- Hammer
Carpenter's Level
Duct Tape
- Masking Tape
Safety Gloves and Goggles
PARTS SUPPLIED
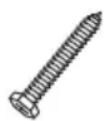
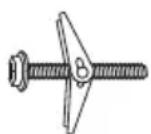
Wood Screws (1/4" × 2") Toggle Bolts and wing nuts (3/16" × 3")
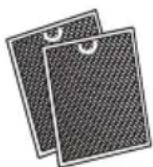
Grease Filters (packed separately)
PARTSNEEDED
- M6-1.00 Self-aligning Machine Screw (2) - of the length needed to go through the cabinet bottom, filler block (if needed for recessed bottom cabinets), and into the top of the microwave.
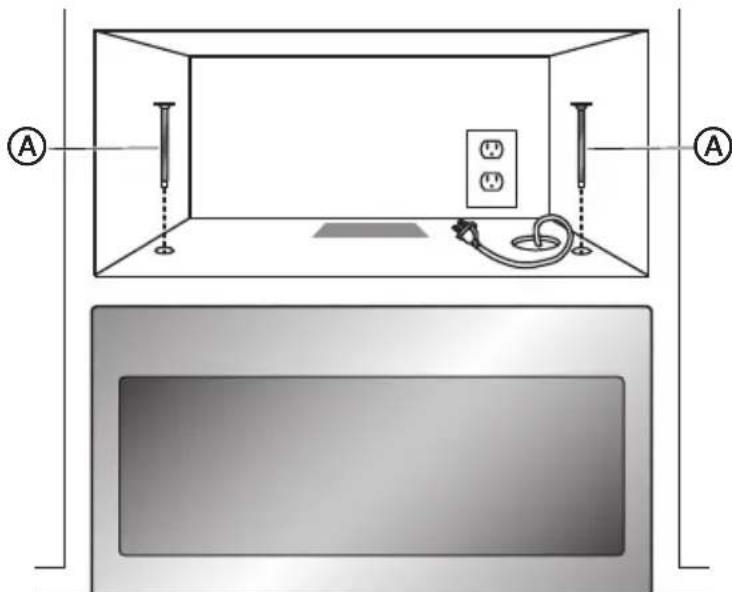
LOCATION REQUIREMENTS
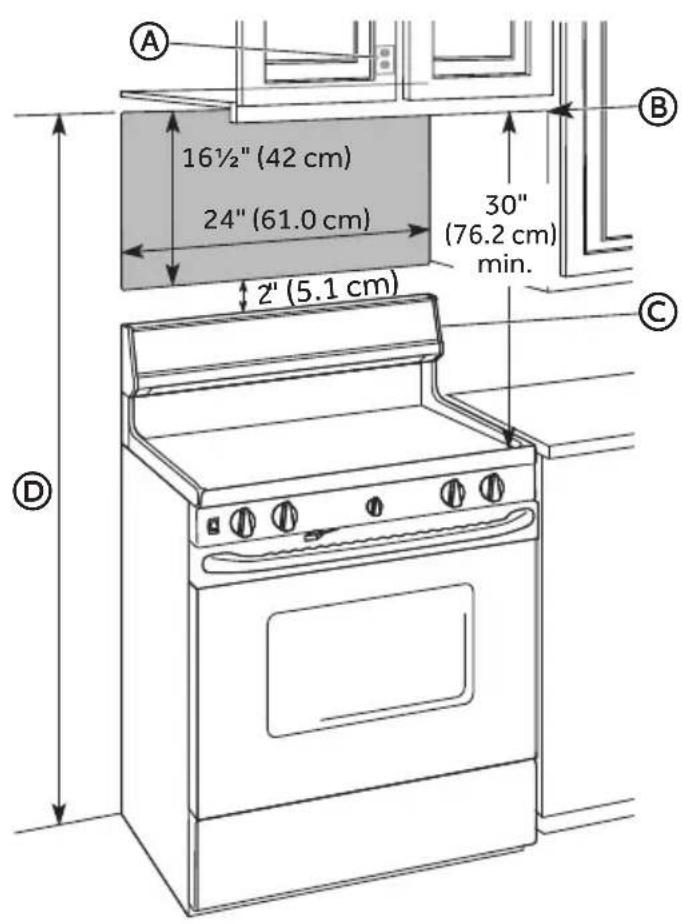
A Grounded 3 Prong Outlet
B Bottom edge of cabinet needs to be 30^ (76.2cm) or more from the cooking surface.
C Backsplash
D 66^ (167.6cm) or more from the floor to the top of the microwave
- The space between the cabinets on each side of the range must be at least 24" (61 cm) wide and free of obstructions.
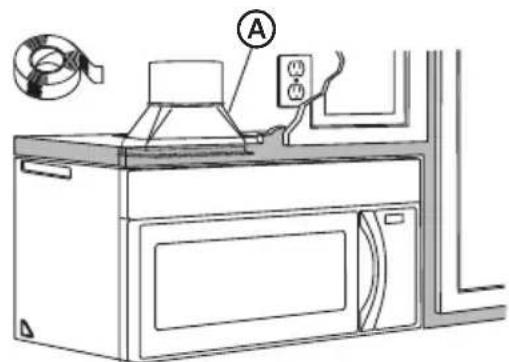
- Grounded electrical outlet inside overhead cabinet. See "Electrical Requirements" section.
- If you are going to vent the microwave oven to the outside, see "Install Microwave Oven" for exhaust and duct preparation.
- When installing the microwave oven beneath smooth, flat cabinets, follow the instructions on the Top Cabinet template for power cord clearance.
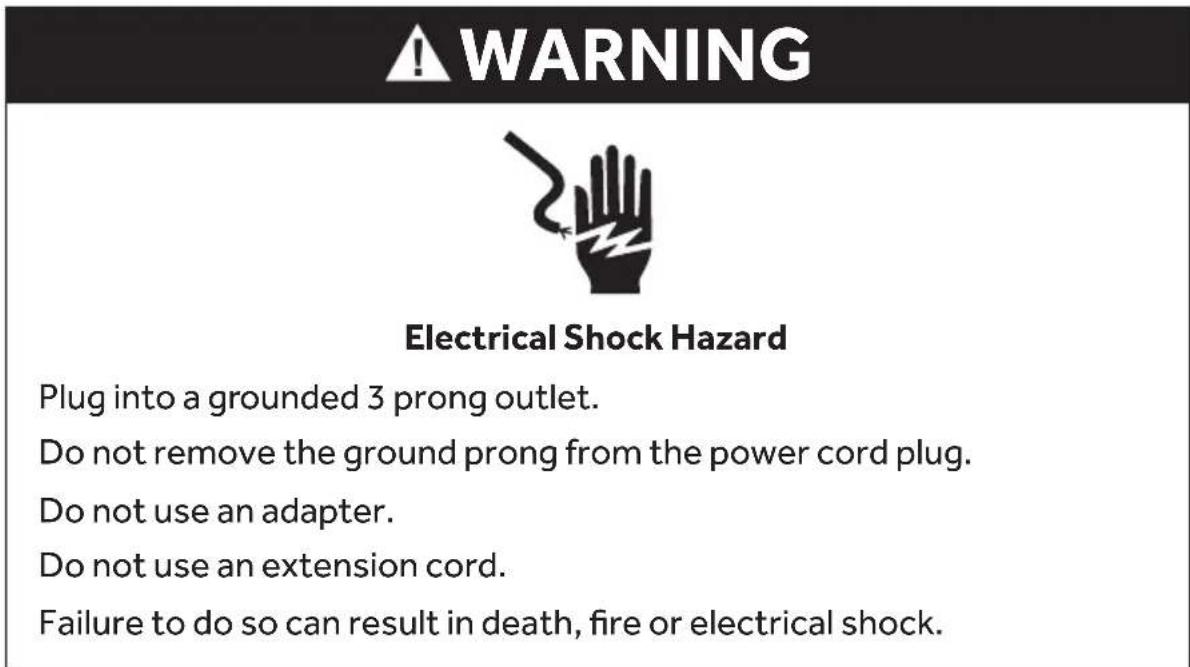
WARNING
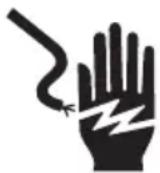
Electrical Shock Hazard
Plug into a grounded 3 prong outlet.
Do not remove the ground prong from the power cord plug.
Do not use an adapter.
Do not use an extension cord.
Failure to do so can result in death, fire or electrical shock.
Observe all governing codes and ordinances.
Product rating is 120 volts AC, 60 Hertz and 1500 watts. This product must be connected to a supply circuit of the proper voltage and frequency.
The power supply cord and plug should be brought to a separate 15 to 20 ampere branch circuit single grounded outlet.
The outlet box should be located in the cabinet above the microwave oven.
The outlet box and supply circuit should be installed by a qualified electrician and conform to the National Electrical Code or the prevailing local code.
GROUNDING INSTRUCTIONS
For a grounded, cord-connected microwave:
The microwave oven must be grounded. In the event of an electrical short circuit, grounding reduces the risk of electric shock by providing an escape wire for the electric current. The microwave oven is equipped with a cord having a grounding wire with a grounding plug. The plug must be plugged into an outlet that is properly installed and grounded.
WARNING: Improper use of the grounding plug can result in a risk of electric shock. Consult a qualified electrician or serviceman if the grounding instructions are not completely understood, or if doubt exists as to whether the microwave oven is properly grounded.
Do not use an extension cord. If the power supply cord is too short, have a qualified electrician or serviceman install an outlet near the microwave oven.
READ AND SAVE THESE INSTRUCTIONS
WARNING

Electrical Shock Hazard
Disconnect electrical power at the fuse box or circuit breaker box before installing microwave.
Failure to do so can result in death or electrical shock.
Excessive Weight Hazard
Use two or more people to move and install microwave oven.
Failure to do so can result in back or other injury.
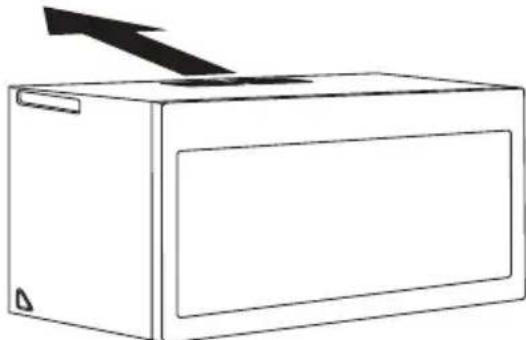
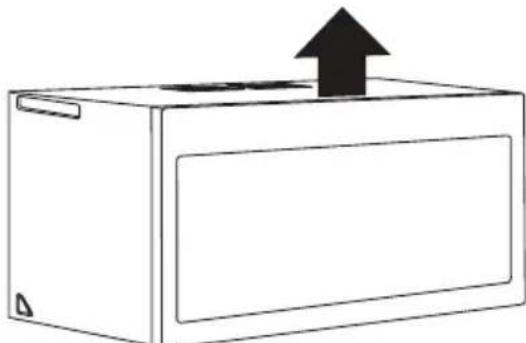
- Using two or more people move the microwave close to the installation site.
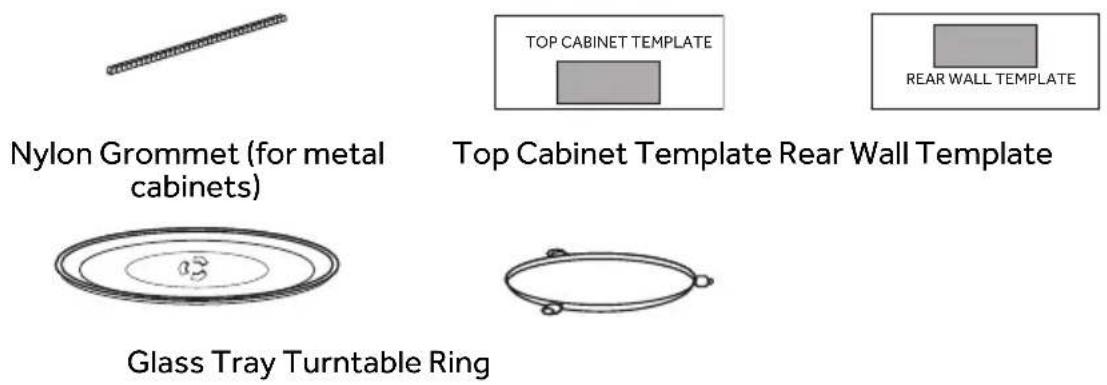
- Open the four flaps on the carton top. From the top of the microwave, remove the foam packing that contains the turntable and turntable ring.
NOTE: Do not remove the foam packing from the front of the oven.
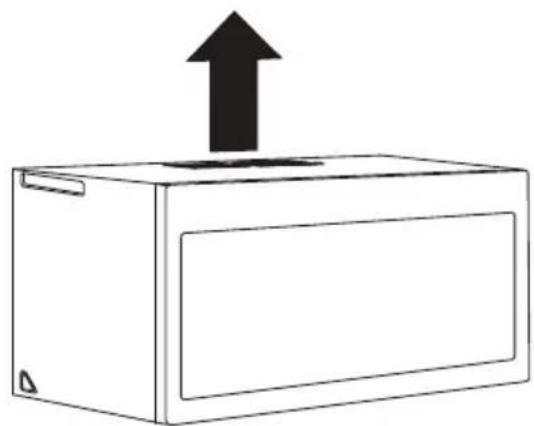
- Open the top of the plastic bag. Using two people, lift the microwave out of the carton and gently set it front down on the foam packing. Remove the grease filters and User Manual from the carton.
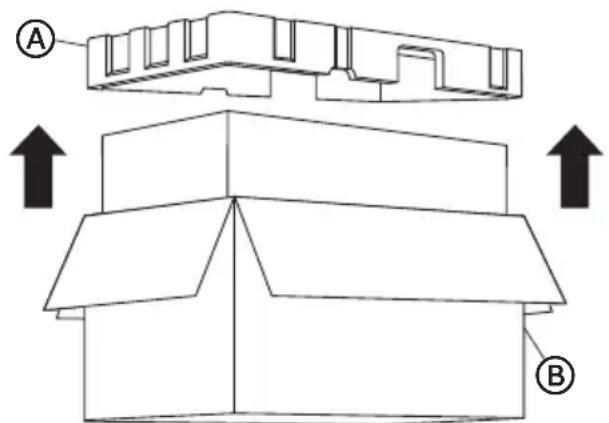
Foam Packing
Carton
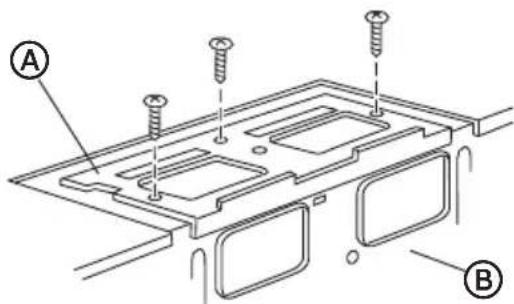
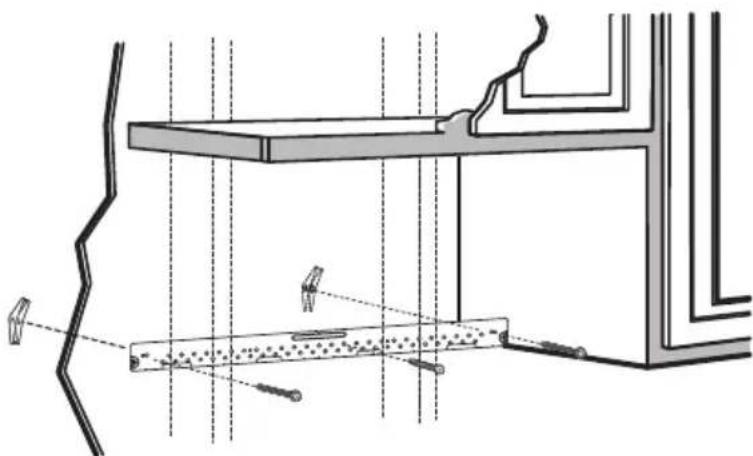
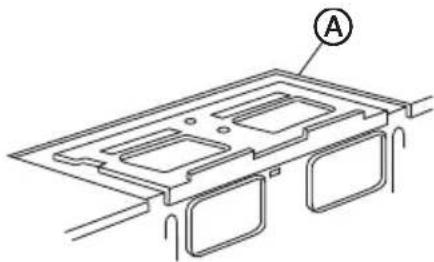
- Locate and remove the two screws attaching the mounting plate to the back of the oven, and then remove the mounting plate.
NOTE: The mounting plate will be used as the wall template and to mount the microwave oven onto the wall.
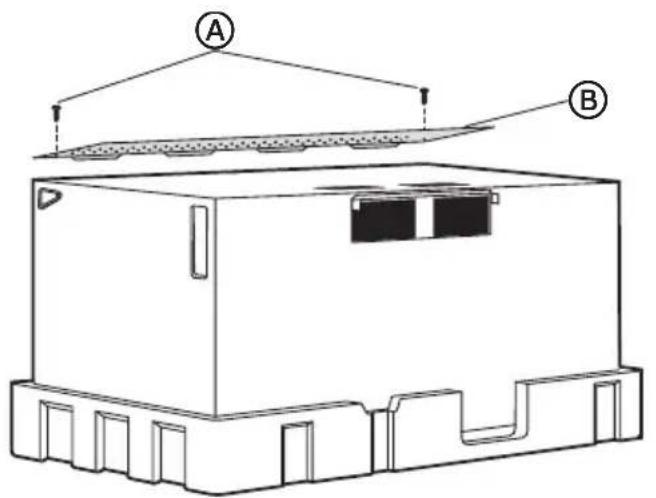
A Screws
B Mounting Plate (Wall Template)
- Replace the two screws into the holes from which they were removed.
IMPORTANT: The microwave must be installed to at least one wall stud, preferably two wall studs. If there is no wall stud within the cabinet opening, do not install the microwave oven.
- Find the studs using one of the following methods:
Stud finder - a magnetic device that locates nails.
OR
Using a hammer, tap lightly across the mounting surface while listening for a solid sound. A solid sound indicates a stud location.
- After locating the stud(s), find the center by probing the wall with a small nail to find the edges of the stud. Then place a mark halfway between the edges. The center of any adjacent studs should be 16" (40.6 cm) or 24" (61 cm) from this mark.
- Mark the center of the adjacent stud, and then draw a vertical plumb line down the center of each stud.
STEP 3 - ALIGN REAR WALL TEMPLATE AND MARK WALL
Overhead cabinet styles vary. Follow the instructions that apply to the cabinet style in your home.
IMPORTANT: Disconnect power to electrical outlet.
STYLE 1 - FLAT-Bottom CABINET
IMPORTANT: The microwave must be level. Use a carpenter's level to make sure the cabinet bottom is level.
- Draw a vertical line on the wall at the center of the 24" (61 cm) wide opening.
- Place the Mounting Plate/Rear Wall Template onto the wall so that the centerline of the template is aligned with the center line, and the top of the template is touching the bottom of the cabinet. Tape the template in this position.

STYLE 2 - FRAMED, RECESSED CABINET
IMPORTANT: The microwave must be level. Use a carpenter's level to make sure the cabinet bottom is level.
- Draw a vertical line on the wall at the center of the 24" (61 cm) wide opening.
- Place the Mounting Plate/Rear Wall Template onto the wall so that the centerline of the template is aligned with the center line, and the top of the template is touching the bottom of the cabinet. Tape the template in this position.

STYLE 3 - RECESSED CABINET WITH FRONT OVERHANG OR DECORATIVE TRIM
IMPORTANT:
- The microwave must be level. Use a carpenter's level to make sure the cabinet bottom is level.
- If a decorative cabinet trim is interfering with the installation and leveling of the microwave oven, remove the decorative trim.
-
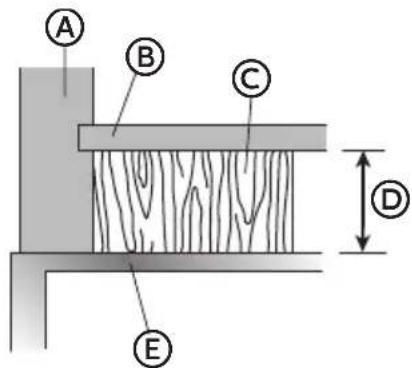
If the cabinets have a front overhang, but no back or side overhang, to keep the microwave level, place the mounting plate so that the distance from the top of the mounting plate to the cabinet bottom is equal to the distance from the bottom of the front overhang to the bottom of the cabinet.
-
Measure the inside depth of the front overhang.
- Draw a horizontal line on the back wall that is the same distance below the cabinet bottom as the depth of the front overhang.
A Center Line
B Draw a line on the back wall equal to the depth of the front overhang
- Draw a vertical line on the wall at the center of the 24" (61 cm) wide opening.
- Place the Mounting Plate/Rear Wall Template onto the wall so that the centerline of the template is aligned with the center line, and the top of the template is the same distance below the cabinet bottom as the depth of the front overhang. Tape the template in this position.
STEP 4 - DRILL HOLES FOR MOUNTING MICROWAVE OVEN
IMPORTANT: At LEAST one wood screw mounted firmly in a stud must be used to support the weight of the microwave.
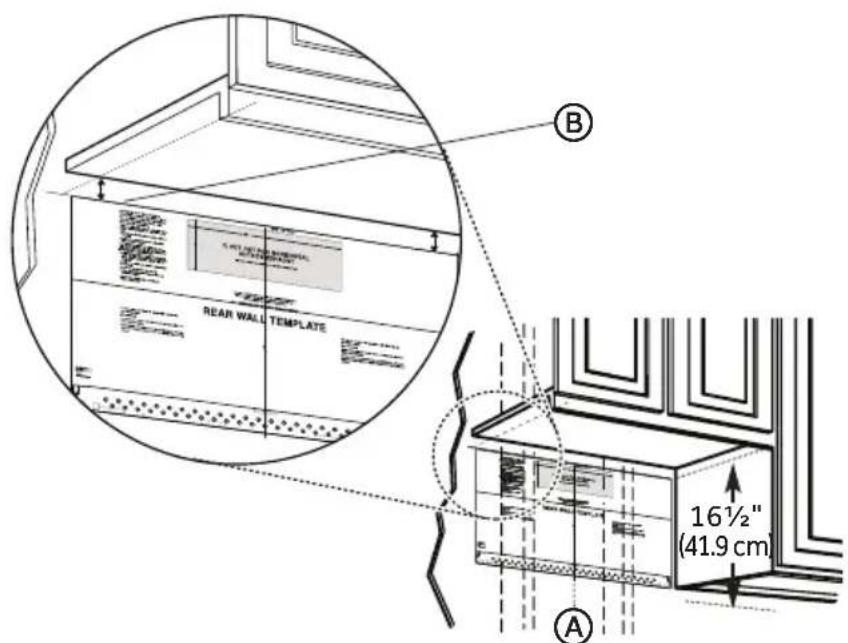
- Draw a horizontal line on the wall marking the bottom of the Rear Wall Template.
- Locate holes A and B inside the Mounting Plate Area indicated on the rear wall template.
- Place the mounting plate on top of the rear wall template centered in the Mounting Plate Area so that the holes on the mounting plate align with the holes on the template.
- Mark the wall through holes A and B.
IMPORTANT: If neither Hole A nor Hole B aligns with a stud, locate a stud within the mounting plate area and mark a third hole that aligns with the stud.
- Remove the mounting plate and set it aside. Drill holes in the marked locations.
NOTE: A wood screw must be used when installing into a wood stud.
- Drill a 5 / 8 hole to use a toggle bolt
-
Drill a 3 / 16 hole to use a wood screw.
-
DO NOT INSTALL THE MOUNTING PLATE AT THIS TIME.
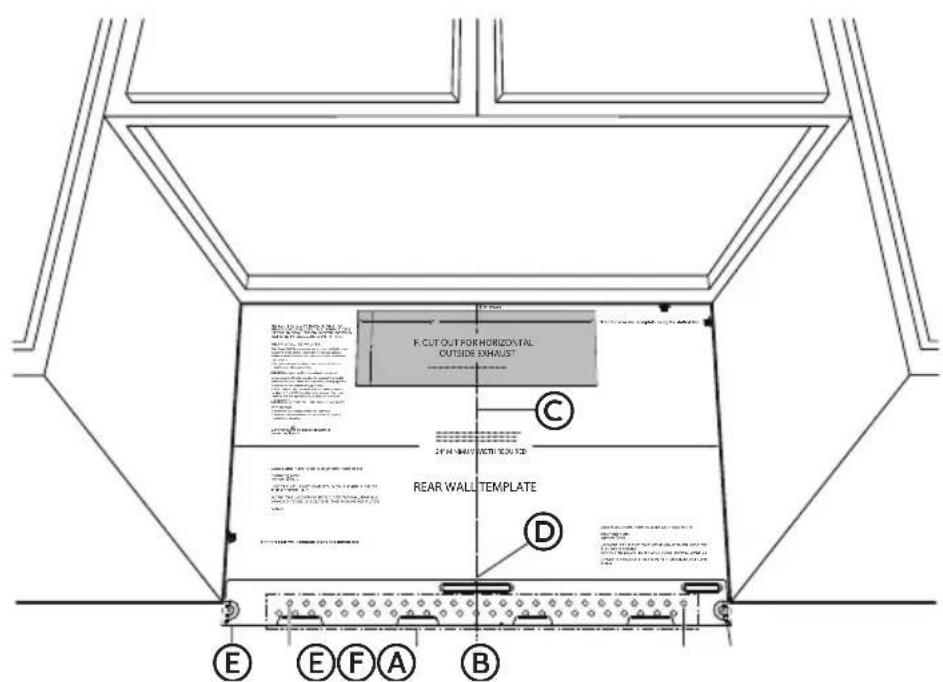
A Hole A
B Hole B
C Draw a Vertical Line on Wall marking Center of Top Cabinet
Centerline notches
E Draw a horizontal line on wall marking the bottom of Rear Wall Template.
F Mounting Plate Area
STEP 5 - DETERMINE VENTILATION METHOD
IMPORTANT: This microwave oven is shipped assembled for a Recirculating Ventilation Installation; however, it is designed to adapt to the following methods of ventilation. Select the ventilation method required for your installation and follow the instructions specific to your method:
Method A - Outside Top Exhaust (Vertical Duct)
Method B - Outside Back Exhaust (Horizontal Duct)
Method C - Recirculating (Non-Vented, Ductless)
STEP 6 - INSTALL MICROWAVE OVEN
Install the microwave oven following the instructions specific to your method of ventilation: Method A - Outside Top Exhaust, Method B - Outside Back Exhaust, Method C - Non-Vented (Recirculating)
METHOD A - OUTSIDE TOP EXHAUST
IMPORTANT:
- Make sure the screws for the blower motor and blower plate are securely tightened when they are reinstalled. This will help avoid excessive vibration.
- Make sure the motor wiring has been properly routed and secured, and that the wires are not pinched.
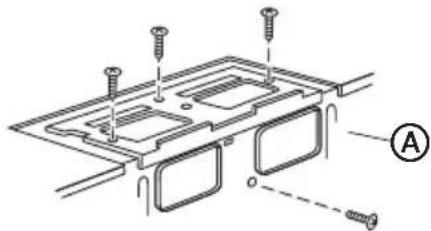
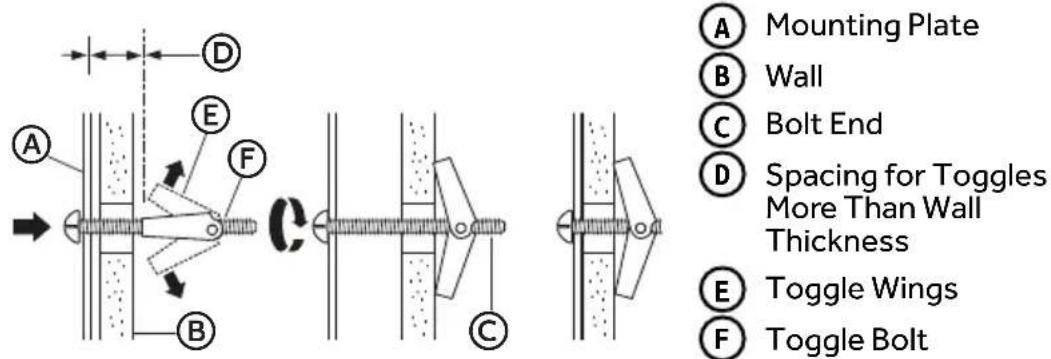
INSTALL MOUNTING PLATE
NOTE: At least one wood screw must be used to attach the plate to a wall stud.
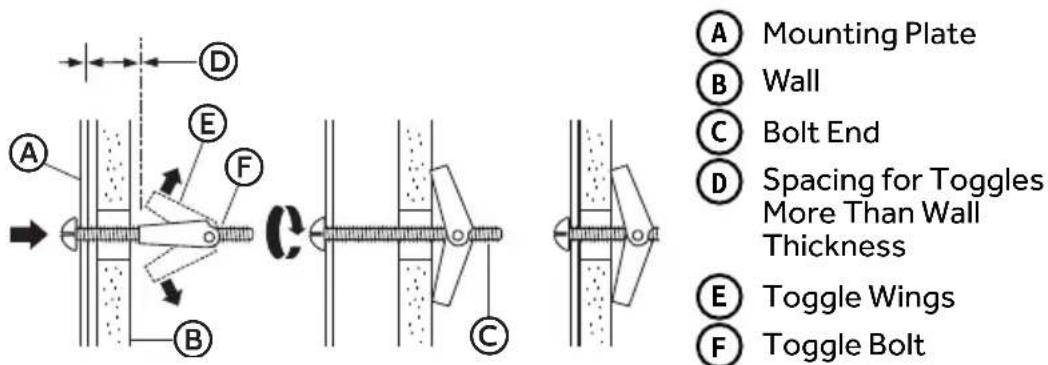
- Remove the toggle wings from the bolts.
- Insert the bolts into the mounting plate through the holes designated to go into drywall and reattach the toggle wings onto each bolt.
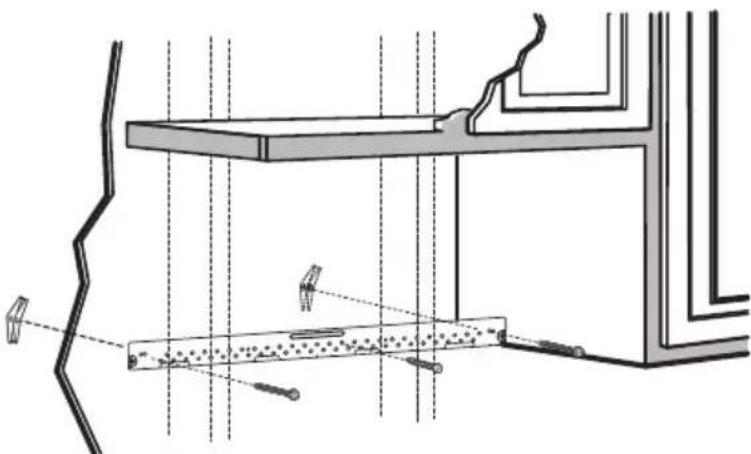
- Place the mounting plate against the wall and insert the toggle wings into the holes in the wall to mount the plate.
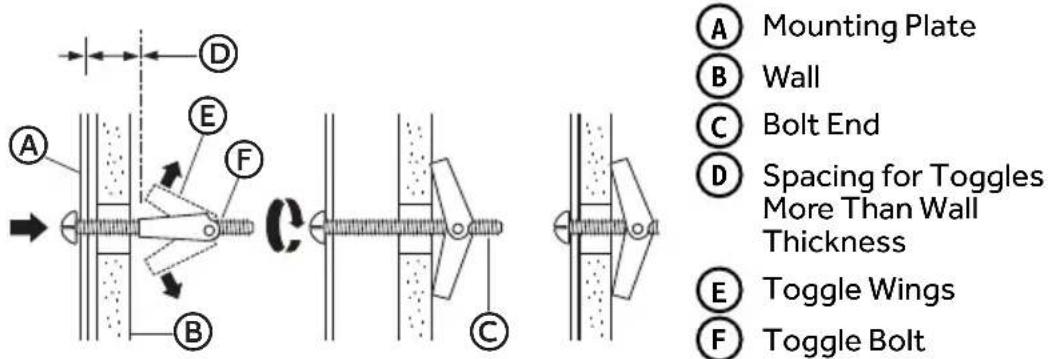
- Press the mounting plate flush against the wall. Make sure the mounting plate touches the bottom of the horizontal line and that the plate is centered under the cabinet.
NOTE: Avoid pinching fingers between the back of the mounting plate and the wall.
- Tighten all bolts.
NOTE: Pull the plate away from the wall to help tighten the bolts.
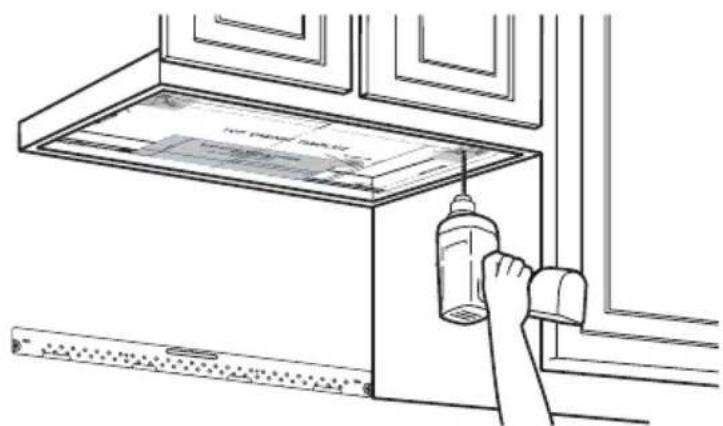
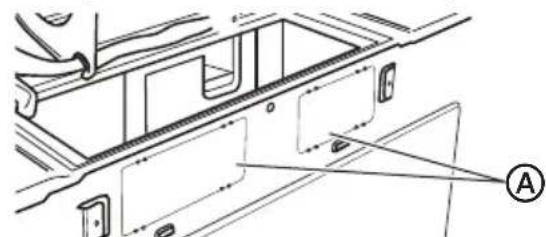
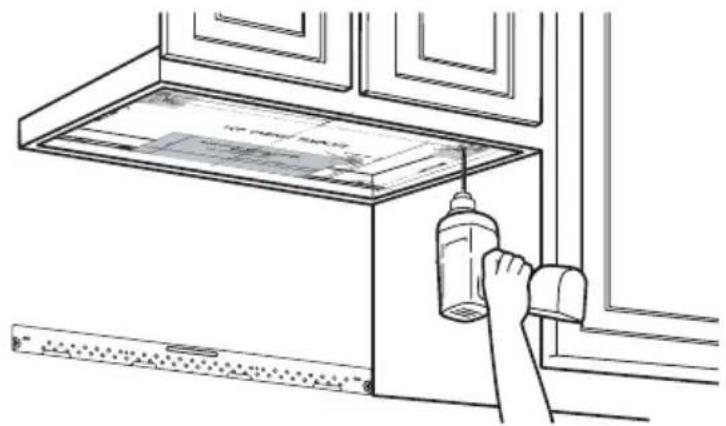
PREPARE OVERHEAD CABINET
-
Read the instructions on the Top Cabinet template, and then tape the template underneath the overhead cabinet.
-
Drill the holes following the instructions on the template.
-
Drill holes for the top support screws.
- Drill a hole large enough for the power cord to fit through.
- Drill a cutout large enough for the exhaust adapter.
ADAPT BLOWER FOR OUTSIDE TOP EXHAUST
- Place the microwave in an upright position.
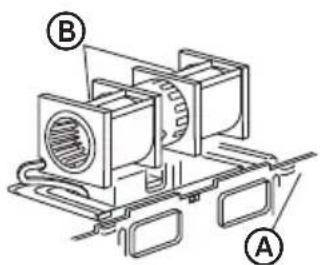
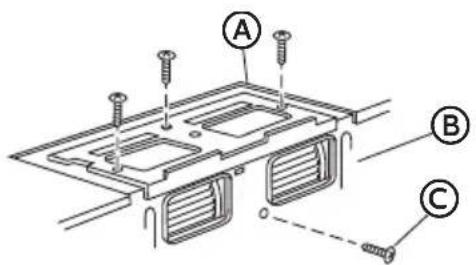
- Remove and save the three screws fastening the exhaust plate to the microwave.
- Remove and save the screw fastening the blower motor to the microwave.
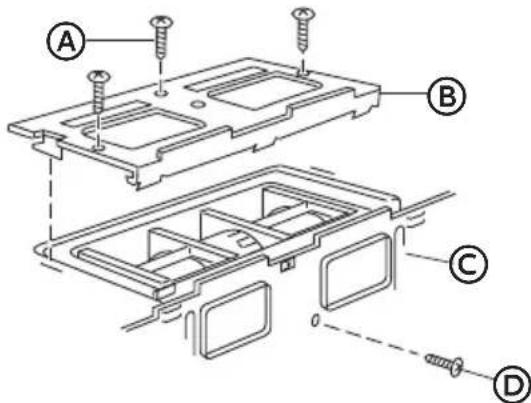
A
Exhaust Plate Screw (3)
B
Exhaust Plate
C
Back of Microwave
D
Blower Motor Screw
A
End A
B
End B
C
Back of Microwave
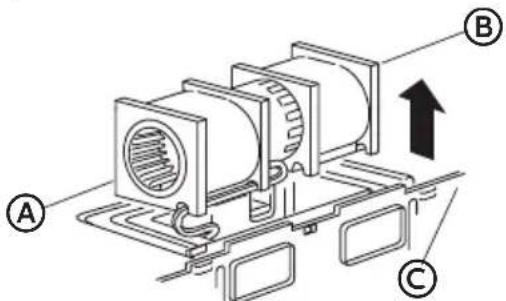
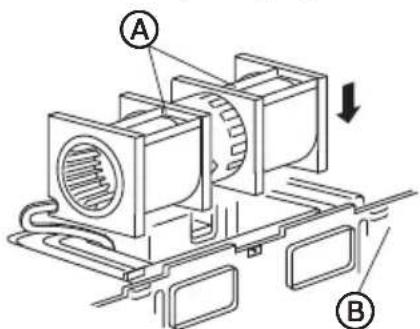
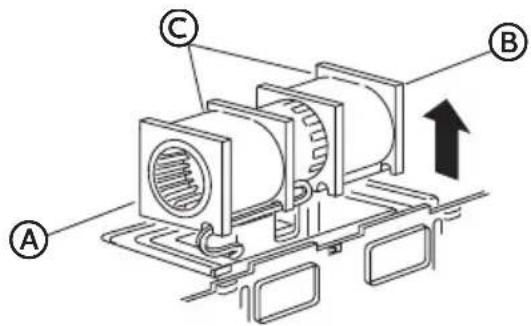
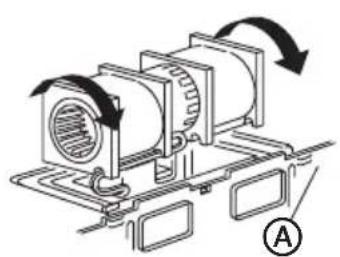
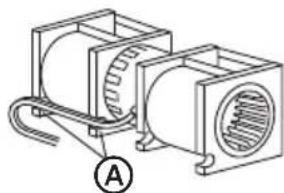
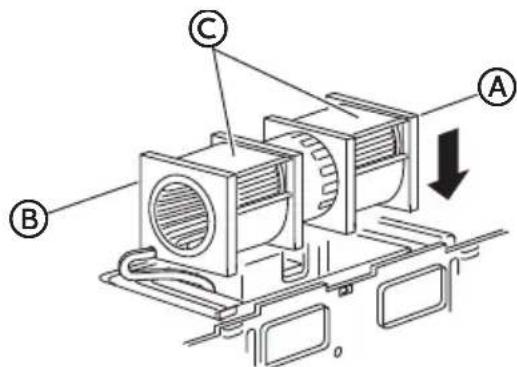
- Roll the blower unit 90^ so that fan blade openings are facing out the top of the microwave.
Before Rotation After Rotation

A
Back of Microwave
B
Fan Blade Openings
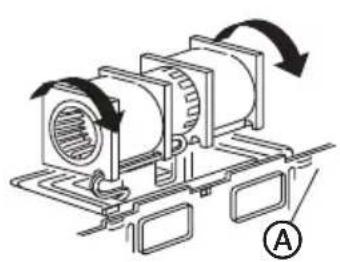
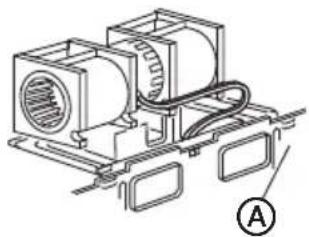
- Place the blower unit back into the microwave.
- Using the blower motor screw removed earlier, secure blower unit to microwave. Completely tighten the screw.
A
AFTER: Fan Blade Openings Facing Top
B
Back of Microwave
- Using the three blower plate screws removed earlier, reinstall the blower plate. Completely tighten the screws.

Back of Microwave
Excessive Weight Hazard
Use two or more people to move and install microwave oven.
Failure to do so can result in back or other injury.
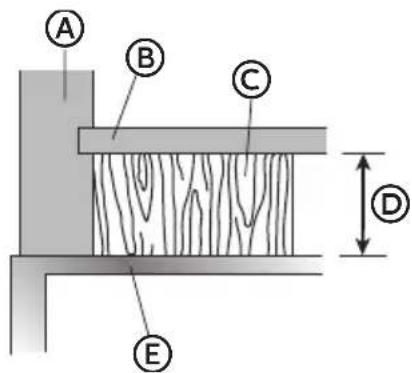
NOTE: If the cabinet front hangs below the bottom cabinet shelf it is recommended that you use filler blocks to avoid damaging the case by over tightening the screws.
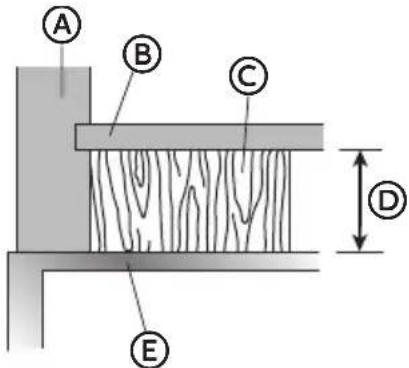
A Cabinet Front
B Cabinet Bottom
C Filler Block
Equivalent to Depth of Cabinet Recess
E Microwave Oven Top
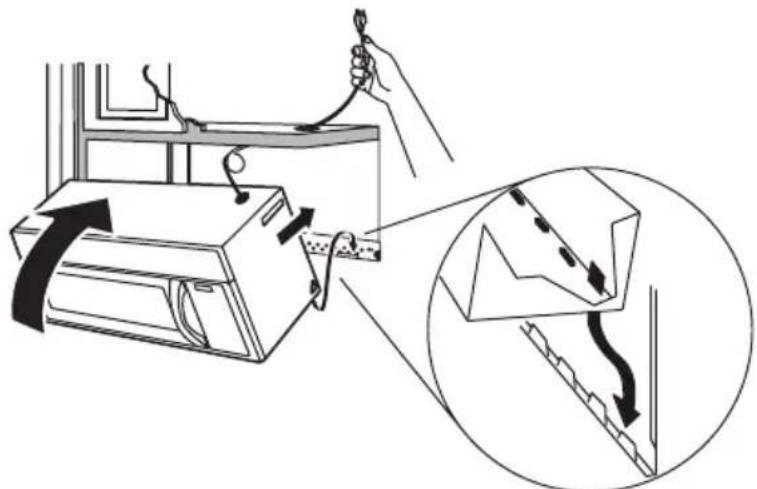
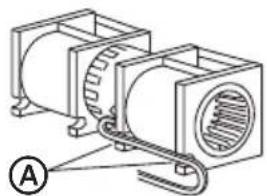
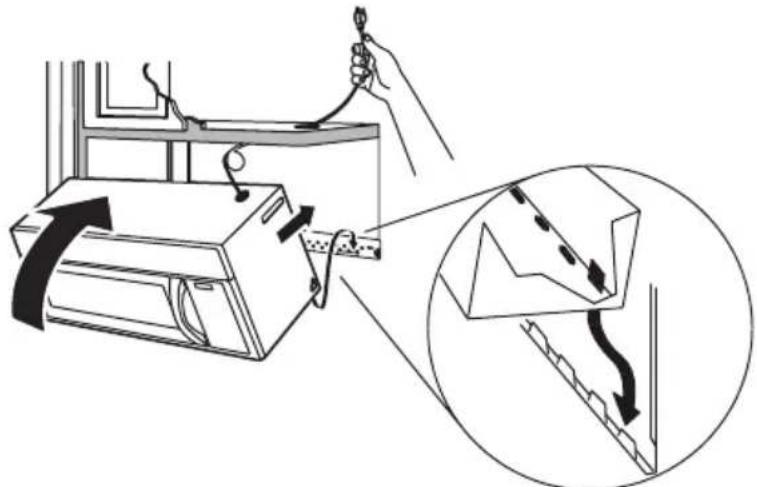
- Thread the power cord through the hole in the bottom of the overhead cabinet. Keep the power cord tight while mounting the oven.
NOTE: If the overhead cabinet is metal, use the nylon grommet around the power cord hole to avoid cutting the power cord.
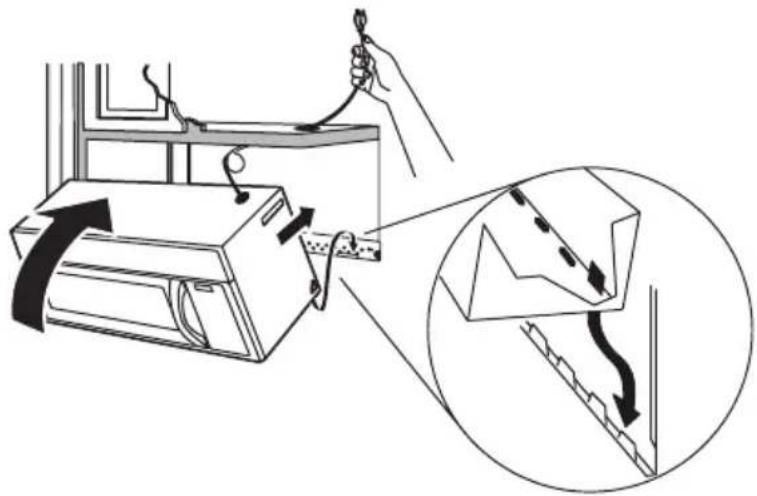
- Using two or more people, lift the microwave, tilt it forward, and hook slots at back bottom edge onto four lower tabs of mounting plate.
- Rotate microwave so that the top is up against cabinet bottom.
NOTE: Keep the power cord tight, and do not pinch the cord, especially when mounting flush to bottom of cabinet.
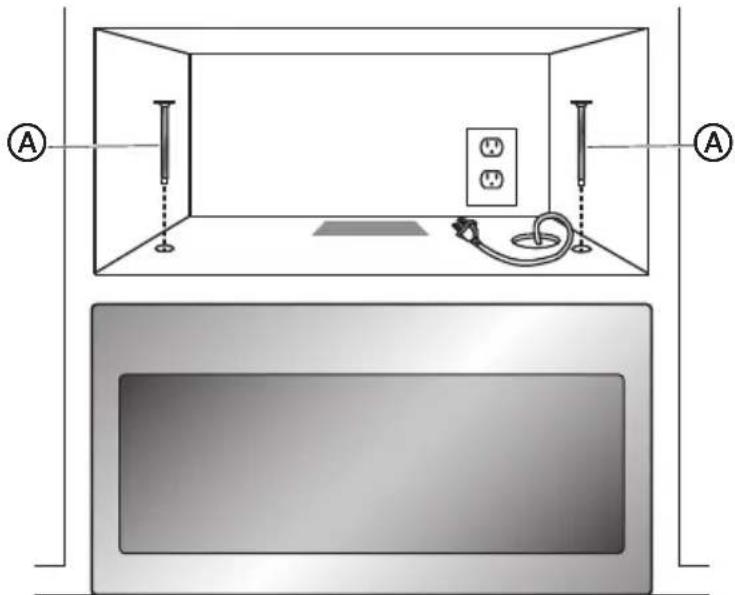
- Insert the two mounting screws through the holes in the overhead cabinet and into the holes in the top of the microwave oven. Turn each screw until it is completely tightened.
- Holding the microwave oven flush against the back wall and the overhead cabinet, tighten the two screws completely.
CONNECT DUCTWORK
- Extend the house exhaust duct down, and then connect the exhaust duct to a range hood boot adapter (not supplied).
- Seal exhaust duct joints using furnace duct tape for high temperature applications.
A
Adapter
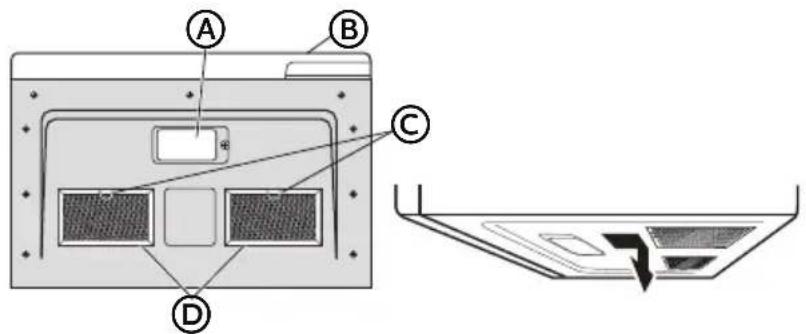
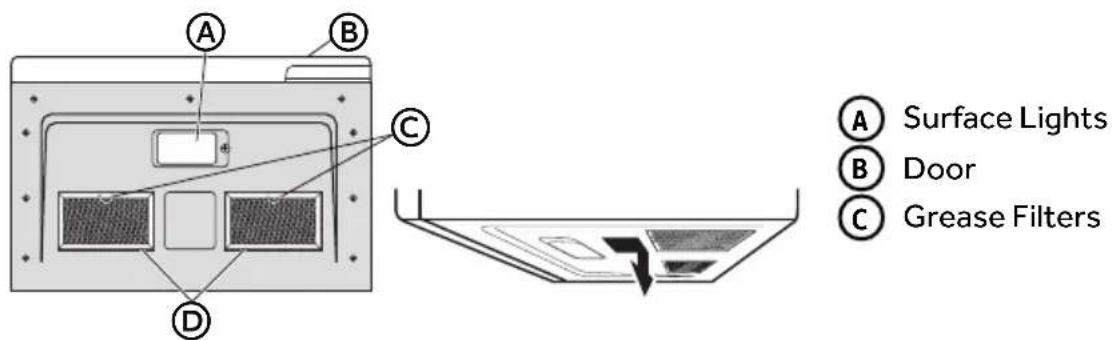
INSTALL GREASE FILTERS
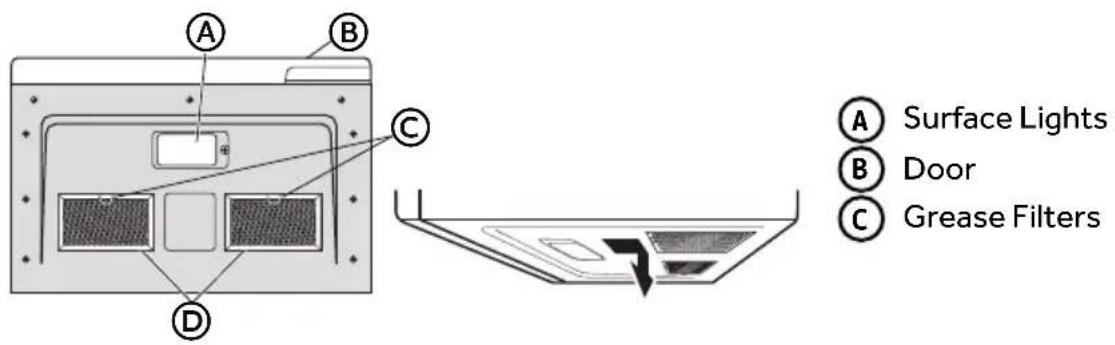
Grease filters are located on the underside of microwave oven. For installation instructions, see the User Manual packed with the microwave.
METHOD B - OUTSIDE BACK EXHAUST (HORIZONTAL DUCT)
IMPORTANT:
- Make sure the screws for the blower motor and blower plate are securely tightened when they are reinstalled. This will help avoid excessive vibration.
- Make sure the motor wiring has been properly routed and secured, and that the wires are not pinched.
CREATE REAR WALL EXHAUST OPENING
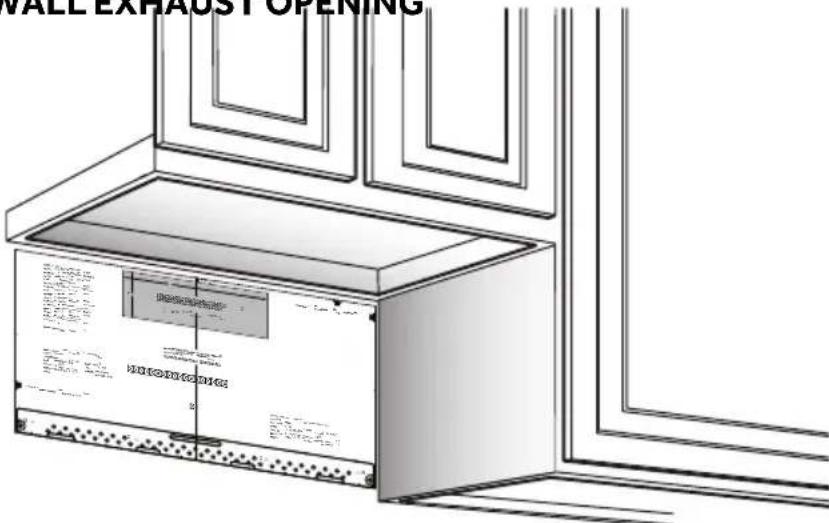
- Read the instructions on the Mounting Plate/Rear Wall template.
- Tape the Mounting Plate/Template to the rear wall, aligning it with the holes previously drilled for holes A and B in the mounting plate.
- Cut the opening, following the instructions on the Rear Wall template.
REMOVE THE BLOWER PLATE
- Remove and save the screw(s) fastening the blower plate to the microwave.
- Lift off the blower plate.
A Exhaust Plate B Back of Microwave
INSTALL MOUNTING PLATE
NOTE: At least one wood screw must be used to attach the plate to a wall stud.
- Remove the toggle wings from the bolts.
- Insert the bolts into the mounting plate through the holes designated to go into drywall and reattach the toggle wings onto each bolt.

- Place the mounting plate against the wall and insert the toggle wings into the holes in the wall to mount the plate.
- Press the mounting plate flush against the wall. Make sure the mounting plate touches the bottom of the horizontal line and that the plate is centered under the cabinet.
NOTE: Avoid pinching fingers between the back of the mounting plate and the wall.
- Tighten all bolts.
NOTE: Pull the plate away from the wall to help tighten the bolts.
PREPARE OVERHEAD CABINET
- Read the instructions on the Top Cabinet template, and then tape the template underneath the overhead cabinet.
-
Drill the holes following the instructions on the template.
-
Drill holes for the top support screws.
- Drill a hole large enough for the power cord to fit through.
- Drill a cutout large enough for the exhaust adapter.

ADAPT BLOWER FOR OUTSIDE REAR EXHAUST
- Remo ve and save the screw fastening the blower motor to the microwave.

A Exhaust Plate Screw (3)
B Exhaust Plate
Back of Microwave
D Blower Motor Screw
- Car efully pull out the blower unit. The wires will extend far enough to allow you to adjust the blower unit.
A End A
B End B
Before: Fan Blade Openings Facing Forward
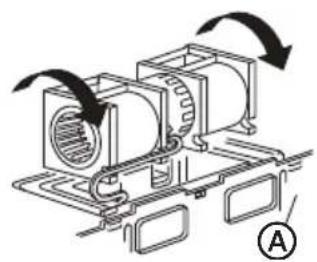
- Roll the blower unit 90^
Before Rotation After Rotation
A Back of Microwave B Fan Blade Openings
- Rotate blower unit counterclockwise 180^ .
Before Rotation After Rotation

A Back of Microwave
- Gently remove the wires from the grooves. Reroute the wires through grooves on other side of the blower unit.
Before Rerouting After Rerouting
A Grooves
- Roll the blower unit 90^ so that fan blade openings are facing out the back of the microwave.
Before Rolling After Rolling
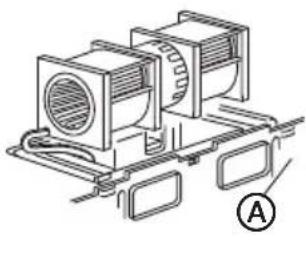
Back of Microwave
- Using tin snips, remove the knockout plates in the back of the unit.
A Knockout Plates
- Place the blower unit back into the microwave.
IMPORTANT:
Make sure the wires are not pinched and that they are properly secured.
- The blower unit exhaust openings should match exhaust openings on the rear of the microwave oven.
A End A
B End B
After: Fan Blade Openings Facing Back
- Using the blower motor screw removed earlier, secure blower unit to microwave. Completely tighten the screw.
- Using the three blower plate screws removed earlier, reinstall the blower plate. Completely tighten the screws.
A Exhaust Plate
B Back of Microwave
Blower Motor Screw
Excessive Weight Hazard
Use two or more people to move and install microwave oven. Failure to do so can result in back or other injury.
NOTE: If the cabinet front hangs below the bottom cabinet shelf it is recommended that you use filler blocks to avoid damaging the case by over tightening the screws.
A Cabinet Front
B Cabinet Bottom
C Filler Block
Equivalent to Depth of Cabinet Recess
E Microwave Oven Top
- Thread the power cord through the hole in the bottom of the overhead cabinet. Keep the power cord tight while mounting the oven.
NOTE: If the overhead cabinet is metal, use the nylon grommet around the power cord hole to avoid cutting the power cord.
-
Using two or more people, lift the microwave, tilt it forward, and hook slots at back bottom edge onto four lower tabs of mounting plate.
-
Rotate microwave so that the top is up against cabinet bottom.
NOTE: Keep the power cord tight, and do not pinch the cord, especially when mounting flush to bottom of cabinet.
- Insert the two mounting screws through the holes in the overhead cabinet and into the holes in the top of the microwave oven. Turn each screw until it is completely tightened.

- Holding the microwave oven flush against the back wall and the overhead cabinet, tighten the two screws completely.
INSTALL GREASE FILTERS
Grease filters are located on the underside of microwave oven. For installation instructions, see the User Manual packed with the microwave.
METHOD C - RECIRCULATING (NON-VENTED, DUCTLESS)
IMPORTANT:
- Make sure the screws for the blower motor and blower plate are securely tightened when they are reinstalled. This will help avoid excessive vibration.
- Make sure the motor wiring has been properly routed and secured, and that the wires are not pinched.
INSTALL MOUNTING PLATE
NOTE: At least one wood screw must be used to attach the plate to a wall stud.
- Remove the toggle wings from the bolts.
- Insert the bolts into the mounting plate through the holes designated to go into drywall and reattach the toggle wings onto each bolt.
- Place the mounting plate against the wall and insert the toggle wings into the holes in the wall to mount the plate.
- Press the mounting plate flush against the wall. Make sure the mounting plate touches the bottom of the horizontal line and that the plate is centered under the cabinet.
NOTE: Avoid pinching fingers between the back of the mounting plate and the wall.
- Tighten all bolts.
NOTE: Pull the plate away from the wall to help tighten the bolts.
PREPARE OVERHEAD CABINET
-
Read the instructions on the Top Cabinet template, and then tape the template underneath the overhead cabinet.
-
Drill the holes following the instructions on the template.
-
Drill holes for the top support screws.
- Drill a hole large enough for the power cord to fit through.
- Drill a cutout large enough for the exhaust adapter.
CHECK THE BLOWER PLATE
- Place the microwave in an upright position.
- Make sure the blower plate is installed correctly on the microwave oven.

Exhaust Plate
Excessive Weight Hazard
Use two or more people to move and install microwave oven. Failure to do so can result in back or other injury.
NOTE: If the cabinet front hangs below the bottom cabinet shelf it is recommended that you use filler blocks to avoid damaging the case by over tightening the screws.
A Cabinet Front
B Cabinet Bottom
C Filler Block
Equivalent to Depth of Cabinet Recess
E Microwave Oven Top
- Thread the power cord through the hole in the bottom of the overhead cabinet. Keep the power cord tight while mounting the oven.
NOTE: If the overhead cabinet is metal, use the nylon grommet around the power cord hole to avoid cutting the power cord.
- Using two or more people, lift the microwave, tilt it forward, and hook slots at back bottom edge onto four lower tabs of mounting plate.
- Rotate microwave so that the top is up against cabinet bottom.
NOTE: Keep the power cord tight, and do not pinch the cord, especially when mounting flush to bottom of cabinet.
- Insert the two mounting screws through the holes in the overhead cabinet and into the holes in the top of the microwave oven. Turn each screw until it is completely tightened.
- Holding the microwave oven flush against the back wall and the overhead cabinet, tighten the two screws completely.
INSTALL GREASE FILTERS
Grease filters are located on the underside of microwave oven. For installation instructions, see the User Manual packed with the microwave.
STEP7-COMPLETE INSTALLATION
-
Plug into a grounded 3 prong outlet.
-
Reconnect power.
-
Check the operation of microwave oven by placing 1 cup (250 mL) of water on the turntable, and programming a cook time of 1 minute at 100% power. Test vent fan and exhaust by operating the vent fan.
-
If the microwave oven does not operate:
-
Check that a household fuse has not blown, or that a circuit breaker has not tripped. Replace the fuse or reset the circuit breaker. If the problem continues, call an electrician.
- Check that the power supply cord is plugged into a grounded 3 prong outlet.
-
See the User Manual for troubleshooting information.
-
Installation is now complete.
TABLE DES MATIÈRES
SECURITE DE FOUR A MICRO-ONDES 28
EXIGENCES D'INSTALLATION 29
MÉTHODE C - RECYCLAGE (SANS ÉVACUATION NI CONDUIT)
IMPORTANT:


- TABLE OF CONTENTS
- MICROWAVE SAFETY 2
- INSTALLATION REQUIREMENTS 3
- INSTALLATION INSTRUCTIONS 6
- Your safety and the safety of others are very important.
- DANGER
- WARNING
- CAUTION
- IMPORTANT SAFETY INSTRUCTIONS
- READ AND SAVE THESE INSTRUCTIONS
- INSTALLATION REQUIREMENTS
- TOOLS AND PARTS
- TOOLS NEEDED
- PARTS SUPPLIED
- PARTSNEEDED
- LOCATION REQUIREMENTS
- Electrical Shock Hazard
- GROUNDING INSTRUCTIONS
- For a grounded, cord-connected microwave:
- Excessive Weight Hazard
- STEP 3 - ALIGN REAR WALL TEMPLATE AND MARK WALL
- STYLE 1 - FLAT-Bottom CABINET
- STYLE 2 - FRAMED, RECESSED CABINET
- STYLE 3 - RECESSED CABINET WITH FRONT OVERHANG OR DECORATIVE TRIM
- IMPORTANT:
- STEP 4 - DRILL HOLES FOR MOUNTING MICROWAVE OVEN
- STEP 5 - DETERMINE VENTILATION METHOD
- Method B - Outside Back Exhaust (Horizontal Duct)
- Method C - Recirculating (Non-Vented, Ductless)
- STEP 6 - INSTALL MICROWAVE OVEN
- METHOD A - OUTSIDE TOP EXHAUST
- INSTALL MOUNTING PLATE
- PREPARE OVERHEAD CABINET
- ADAPT BLOWER FOR OUTSIDE TOP EXHAUST
- CONNECT DUCTWORK
- INSTALL GREASE FILTERS
- CREATE REAR WALL EXHAUST OPENING
- REMOVE THE BLOWER PLATE
- ADAPT BLOWER FOR OUTSIDE REAR EXHAUST
- CHECK THE BLOWER PLATE
- STEP7-COMPLETE INSTALLATION
- TABLE DES MATIÈRES
- SECURITE DE FOUR A MICRO-ONDES 28
- EXIGENCES D'INSTALLATION 29
- MÉTHODE C - RECYCLAGE (SANS ÉVACUATION NI CONDUIT)
Brand : Avanti
Model : MOTR13D3S
Category : Microwave Oven