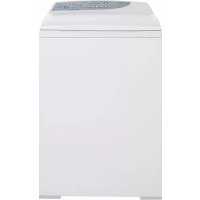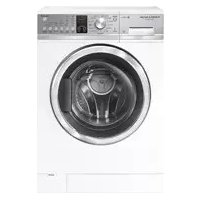
WH2424P1 - Washing machine Fisher & Paykel - Free user manual and instructions
Find the device manual for free WH2424P1 Fisher & Paykel in PDF.


User questions about WH2424P1 Fisher & Paykel
0 question about this device. Answer the ones you know or ask your own.
Ask a new question about this device
Download the instructions for your Washing machine in PDF format for free! Find your manual WH2424P1 - Fisher & Paykel and take your electronic device back in hand. On this page are published all the documents necessary for the use of your device. WH2424P1 by Fisher & Paykel.
USER MANUAL WH2424P1 Fisher & Paykel
INSTALLATION INSTRUCTIONS USER GUIDE
INSTRUCTIONS D'INSTALLATION GUIDE D'UTILISATION
Safety and warnings 4
Installation instructions 7
Before you do your first wash 17
Getting started 18
Washer controls 22
Safety features 23
Sorting and loading 24
Detergent and fabric softener 26
Wash cycles 30
Wash cycle options 32
Customizing wash cycles 36
Caring for your washer 37
Before you call for service 40
Fault codes 42
Troubleshooting
43
Limited warranty
49
IMPORTANT!
SAVE THESE INSTRUCTIONS
The models shown in this User guide may not be available in all markets and are subject to change at any time. For current details about model and specification availability in your country, please go to our website www.fisherpaykel.com or contact your local Fisher & Paykel dealer.
Registration
Register your product with us so we can provide you with the best service possible.
To register your product visit our website: www.fisherpaykel.com
Welcome
Thank you for buying a Fisher & Paykel clothes washer. We are proud of this washer and trust it will serve you well for many years.
At Fisher & Paykel we aim to provide innovative products that are simple to use, ergonomic and kind to the environment. Your washer has numerous wash cycles and options so you can perform every wash task with ease and the knowledge your clothes are receiving the best possible care.
Please take the time to read these instructions carefully before you begin using your machine.
Following the advice in this User guide will ensure you get the performance you expect from your machine and that you get the best possible wash results. Keep these instructions for future reference.
We hope you enjoy your new washer. We have certainly enjoyed designing it for you.
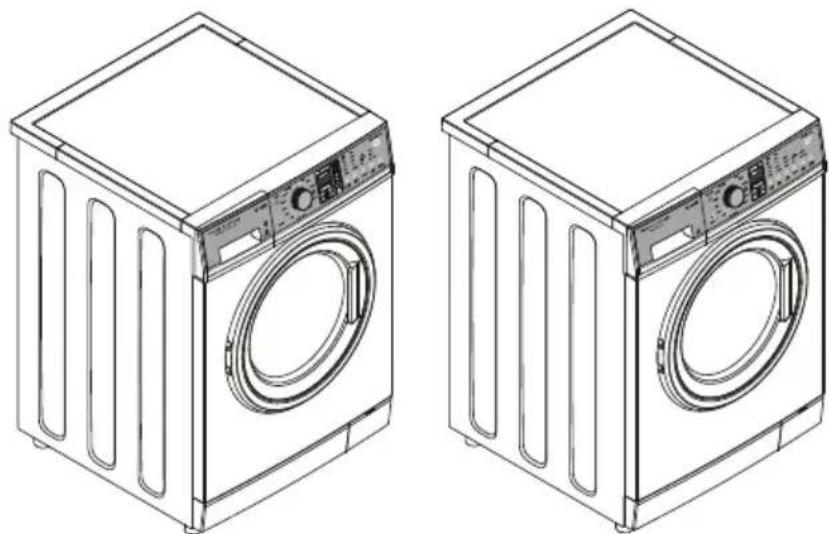
Front loading washer models
Read all safety information before using
Many washers are located near a gas dryer or a water heater in the home.
WARNING!

Risk of Fire Hazard
- For your safety the information in this manual must be followed to minimize the risk of fire or explosion or to prevent property damage, personal injury or loss of life.
- Do not store or use gasoline or other flammable vapors and liquids in the vicinity of this or any other appliance.
- Installation and service must be performed by a qualified installer, service agency or the gas supplier.
What to do if you smell gas
DO NOT try to light any appliance.
DO NOT touch an electrical switch; do not use any phone in your building.
- Clear the room, building or area of all occupants.
- Immediately call your gas supplier from your neighbor's phone.
Follow the gas supplier's instructions.
If you cannot reach your gas supplier, call the fire department.
Water heater safety
Under certain conditions Hydrogen gas may be produced in a water heater that has not been used for two weeks or more.
HYDROGEN GAS CAN BE EXPLOSIVE UNDER THESE CIRCUMSTANCES.
If the hot water has not been used for two weeks or more, prevent the possibility of damage or injury by turning on all hot water faucets and allowing them to run for several minutes before using any electrical appliance which is connected to the hot water system. This will allow any hydrogen gas to escape. Since the gas is flammable, do not smoke or use an open flame or appliance during this process.
SAVE THESE INSTRUCTIONS
WARNING!

Risk of Fire, Electric Shock and Injury to Persons Hazards
- Follow the safety precautions outlined in this User guide.
- Failure to do so can result in death, electric shock, fire or injury to persons.
IMPORTANT SAFETY INSTRUCTIONS
WARNING! When using your clothes washer, follow basic precautions, including the following:
- Read all instructions before using the appliance.
- DO NOT wash or dry articles that have been previously cleaned in, washed in, soaked in or spotted with gasoline, dry-cleaning solvents, or other flammable or explosive substances, as they give off vapors that could ignite or explode.
- DO NOT add gasoline, dry-cleaning solvents, or other flammable or explosive substances to the wash water. These substances give off vapors that could ignite or explode.
- Under certain conditions, hydrogen gas may be produced in a hot-water system that has not been used for 2 weeks or more. HYDROGEN GAS IS EXPLOSIVE. If the hot water system has not been used for such a period, before using a washing machine, turn on all hot-water faucets and let the water flow from each for several minutes. This will release any accumulated hydrogen gas. As the gas is flammable, DO NOT smoke or use an open flame during this time.
- DO NOT allow children to play on or in this appliance. Close supervision of children is necessary when this appliance is used near children. Before the washer is removed from service or discarded, remove the door. Failure to follow these instructions may result in death or injury to persons.
- DO NOT reach into the appliance if the tub or agitator is moving to prevent accidental entanglement.
DO NOT install or store this appliance where it will be exposed to the weather. - DO NOT tamper with controls, repair or replace any part of the appliance or attempt any servicing unless specifically recommended in this User guide or in published user repair instructions that you understand and have skills to carry out.
- DO NOT operate this appliance if it is damaged, malfunctioning, partially disassembled, or has missing or broken parts including a damaged cord or plug.
- Unplug the appliance or turn off the circuit breaker before servicing. Pressing the Power button DOES NOT disconnect power.
- Refer to the 'Electrical connection' section located in the installation instructions for grounding instructions.
SAVE THESE INSTRUCTIONS
- Use this appliance only for its intended purpose as described in this User guide.
- Connect to a properly rated, protected and sized power supply circuit to avoid electrical overload.
- Connect to adequate plumbing and drain facilities as described in the Installation Instructions.
- When disconnecting the appliance pull by the plug rather than the cord or junction of cord to avoid damage to the cord or junction of the cord and plug.
- Make sure that the cord is located so that it will not be stepped on, tripped over or otherwise subject to damage or stress.
- Keep all laundry aids (such as detergents, bleach, fabric softener, etc.) out of the reach of children, preferably in a locked cabinet. Observe all warnings on container labels to avoid personal injury.
- Keep the area around/underneath your appliance free from the accumulation of combustible materials, such as lint, paper, rags, chemicals, etc.
- Keep the floor around your appliance clean and dry to reduce the possibility of slipping.
- Before unloading or adding clothes, press and wait until the washer has completely stopped before opening the door.
- Do not leave washer door open during the cycle. The washer will not function. To start close door and press
- The laundry process can reduce the flame retardancy of fabrics. To avoid such a result, the garment manufacturer's care instructions should be followed very carefully.
- Do not mix chlorine bleach with ammonia or acid such as vinegar and/or rust remover. Mixing can produce a toxic gas which may cause death.
- Never climb on or stand on the washer top.
- Do not wash fiberglass articles in your washer. Skin irritation could result from the remaining particles that may be picked up by clothing during subsequent washer use.
- Do not touch the glass part of the door during a cycle as the door can become hot.
SAVE THESE INSTRUCTIONS
Product dimensions
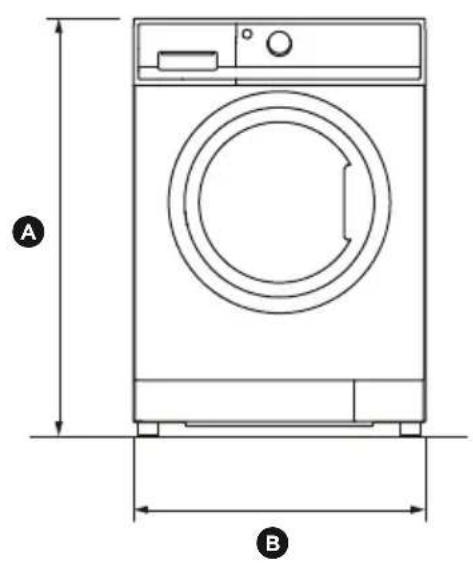
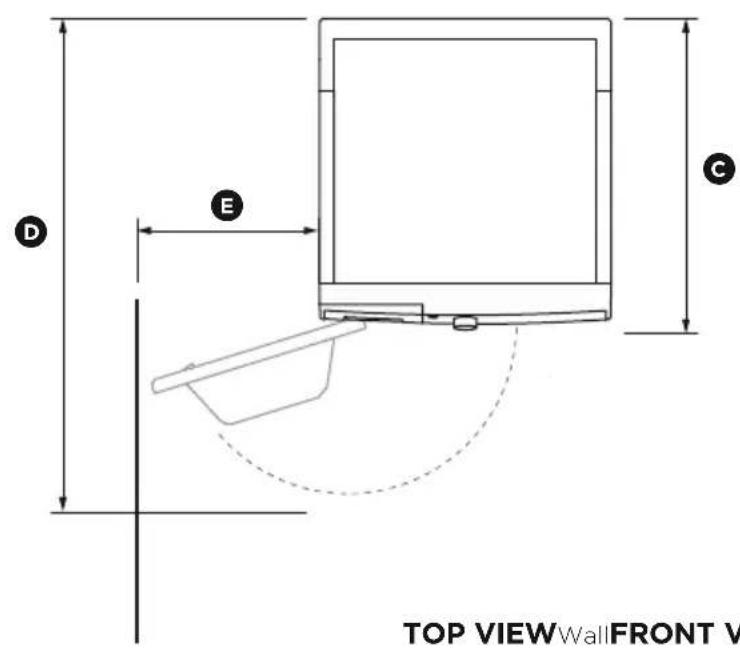
WH2424F WH2424P
| PRODUCT DIMENSIONS inches (mm) | |
| A | Overall height of product 33 1/2" (850) |
| B | Overall width of product 23 5/8" (600) |
| C | Overall depth of product (including dial and door when closed) 25 5/8" (645) |
| D | Depth of door open 42" (1065) |
| E | Minimum door clearance to adjacent wall 13" (330) |
| Standpipe height min. 31 1/2" - 47 1/4" | |
| CAPACITY | |
| 2.4 cu ft | |
Note: the exact height of your washer is dependent on how far the feet are extended from the base of the machine. The space where you install your washer needs to be at least 1 3/5" (40mm) wider and 3/4" (20mm) deeper than its dimensions.
- Electrical supply: 2 wire plus ground, 120V, single phase, 60Hz, alternating current.
- Inlet water static pressure: Max. (120psi), Min. 10psi.
- Inlet water flow rate at faucet: Min. 1 1/2 gallons/min (6 liters/min).
Accessories
Please check you received the following accessories with your Fisher & Paykel washer. You will find them inside the drum or attached to the packaging.
- 2 × Inlet hoses
1xDrain hose guide - 1 x Installation instructions and User guide
- 1x Wrench
- 1 × Installation leaflet (attached to the top of the washer)
Unpacking
WARNING!
Recycle or destroy the carton and plastic bags after the washer is unpacked. Make materials inaccessible to children. Children might use them for play. Cartons covered with rugs, bedspreads or plastic sheets can become airtight chambers causing suffocation.
To ensure the best performance from your new washer please follow the instructions below.
Removing the packaging:
① Remove the outer packaging. Note: a small amount of water may be seen inside the packaging and inside the washer. This is the result of factory testing and is normal.
② Tilt the machine backwards and 'walk' it off the base one foot at a time. Not doing so may cause damage to your floor and washer.
③ Remove all packaging and accessories from inside the drum. Note: DO NOT remove the screw or clip holding the hose.
Removing the transit bolts
The clothes washer is fitted with 4 transit bolts at the rear to avoid damage during transportation.
IMPORTANT!
The 4 transit bolts MUST be removed prior to operation of the machine. Failure to remove these will result in damage to the machine.
To remove the bolts:
① Use a wrench or socket to unscrew and remove all four transit bolts at the back of the washer (A).
② Pull the black rubber grommets to remove the bolt, grommet and black plastic spacers from the machine. Keep the transit bolts in case they are required for future transit of the machine. Never transport the machine without the transit bolts properly fixed in place.
③ Cover the bolt holes with the white plastic covers which are attached to the machine and located near each hole (B). Push to clip into place.
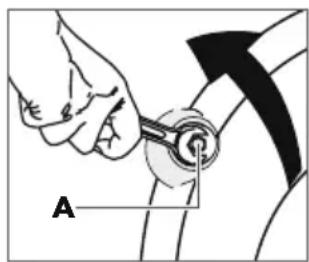
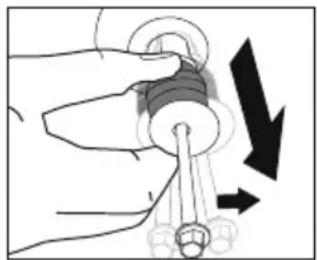
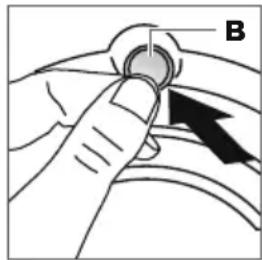
Removing the transit safety bolts
Location
IMPORTANT!
Install the machine on a solid and level floor surface ensuring it has at least 3/4 ” (20mm) clearance on each side. The washer must not be installed on any textured floor coverings (eg carpet, rugs).
DO NOT install the washer:
① In an area exposed to dripping water or outside weather conditions. The ambient temperature should never be below 60^ (15.6°C) for proper washer operation.
In an area where it will come in contact with curtains or drapes.
③ On carpet. The floor MUST be a hard surface with a maximum slope of 1/2 per foot (1.27cm per 30cm). To make sure the washer does not vibrate or move, you may have to reinforce the floor.
Note: if floor is in poor condition, use 3/4" (20mm) impregnated plywood sheet solidly attached to existing floor covering.
IMPORTANT!
Minimum installation clearances
- When installed in alcove: Sides, Rear, Top = 1" (2.54cm)
- When installed in closet: Sides, Rear, Top = 1" (2.54cm), Front = 1" (2.54cm)
- Consideration must be given to provide adequate clearance for installation and service.
- Closet doors must be louvered or otherwise ventilated and have at least 60 square inches (387.1cm^2) of open area. If the closet contains both a washer and a dryer, doors must contain a minimum of 120 square inches (774.2cm^2) of open area.
Note: this machine must not be installed and operated on a plinth.
INSTALLATION INSTRUCTIONS
Installing the washer
① Run some water from the hot and cold faucets to flush the water lines and remove particles that might clog the water valve screens.
② Remove the inlet hoses from the plastic bag. Remove black rubber washers from bag and insert into hose fitting before connecting to unit.
90^ elbow end - Carefully connect the inlet hose marked HOT to the outside "H" outlet of the water valve. Tighten by hand; then tighten another 2/3 turn with pliers. Carefully connect the other inlet hose to the inside "C" outlet of the water valve. Tighten by hand; then tighten another 2/3 turn with pliers. Do not cross-thread or overtighten these connections.
④ Connect the inlet hose ends to the HOT and COLD water faucets tightly by hand; then tighten another 2/3 turn with pliers. Turn the water on and check for leaks.
Carefully move the washer to its final location. Gently rock the washer into position. It is important not to damage the rubber leveling legs when moving your washer to its final location. Damaged legs can increase washer vibration. It may be helpful to spray window cleaner on the floor to help move your washer into its final position.
Note:
- To reduce vibration, ensure that all four rubber leveling legs are firmly touching the floor. Push and pull on the back right and then back left of your washer.
- Do not use the dispenser drawer or door to lift the washer.
If you are installing into a drain pan, you can use a 24-inch-long 2 × 4 to lever the washer into place.
With the washer in its final position, place a level on top of the washer (if the washer is installed under a counter, the washer should not be able to rock). Adjust the front leveling legs up or down to ensure the washer is resting solidly. Turn the locknuts on each leg up toward the base of the washer and snug with a wrench.
Note: keep the leg extension at a minimum to prevent excessive vibration. The farther out the legs are extended, the more the washer will vibrate.
If the floor is not level or is damaged, you may have to extend the rear leveling legs.
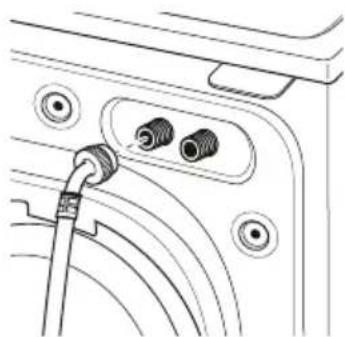
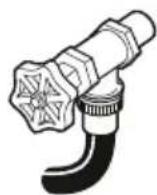
Inlet hoses
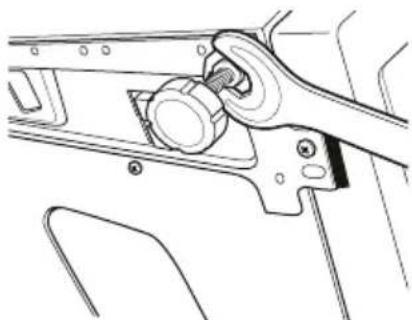
Locking the feet
⑦ Attach U-shaped hose guide to the end of the drain hose. Place the hose in a standpipe.
Note: if the drain hose is placed in a standpipe without forming a U shape, a siphoning action could occur. There must be an air gap around the drain hose. A snug hose fit can also cause a siphoning action.
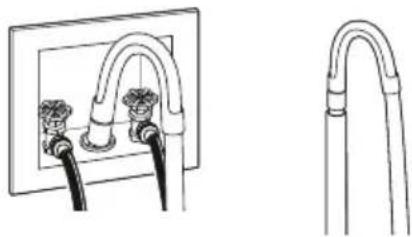
Installing the drain hose
Note: do not place drain hose deeper than 7" (177.8mm) into the drain. The suggested depth is 4 - 7" (101.6 - 177.8mm). Deeper than 7" (177.8mm) can cause a siphoning action.
Plug the power cord into a grounded outlet.
Note: check to be sure the power is off at the circuit breaker/fuse box before plugging the power cord into an outlet.
⑨ Turn on the power at the circuit breaker/fuse box.
Read the rest of this User guide. It contains valuable and helpful information that will save you time and money.
Before starting the washer, check to make sure:
- Main power is turned on.
The washer is plugged in.
The water faucets are turned on.
The unit is level and all four leveling legs are firmly on the floor. - The shipping support hardware is removed and saved.
- The drain hose is properly tied up.
- There are no leaks at the faucet, drain line or washer.
12 Run the washer through a complete cycle. Check for water leaks and proper operation.
If your washer does not operate, please review the 'Troubleshooting' section before calling for service.
Place these instructions in a location near the washer for future reference.
IMPORTANT!
- The hot water temperature should not exceed 149^ ( 65^ ) and the cold water temperature not exceed 95^ ( 35^ ). Temperatures above these may cause the machine to fault or cause damage to the machine.
- New hose sets provided with the washer should be used to connect the washer to the water mains.
Old hose sets should not be re-used.
We recommend the inlet hose(s) are changed every 5 years. WARNING: Failure to do so may result in a flood and damage to property.
INSTALLATION INSTRUCTIONS
If you have an uncontrolled water heating source (eg a wet back or solar heating system) you should fit a tempering valve. This will ensure the hot water temperature remains within safe limits.
Contact your registered plumber to select and install the tempering valve.
IMPORTANT!
This appliance must be installed in accordance with the installation instructions before use.
- Provide accessibility to the plug or incorporate a switch in the fixed wiring in accordance with the wiring rules to allow disconnection of the appliance from the supply after installation.
Water supply requirements
Hot and cold water faucets MUST be installed within 42" (107cm) of your washer's water inlet. The faucets MUST be 3/4'' (1.9cm) garden hose-type so inlet hoses can be connected. Water pressure MUST be between 10 and 120 pounds per square inch. Your water department can advise you of your water pressure. The hot water temperature should be set to deliver water at 120^ to 140^ F ( 48^ - 60^ C) to provide proper Automatic Temperature Control (ATC) performance.
Draining
Drain hose placement in a stand pipe or tub:
① To guide the drain hose over the tub or standpipe the hose guide must be fitted to the drain hose. The height of the standpipe or tub should be between 3112'' - 4714'' (800 - 1200mm).
② Secure the hose guide so it cannot become dislodged from the standpipe or tub.
IMPORTANT!
- If the drain hose is placed on the ground or if the standpipe or tub is less than 3112 (800mm) high, the washing machine will continuously drain while being filled (siphon).
- Regularly check that your standpipe or tub is free from lint or other obstructions, which may affect how your machine works or may cause flooding.
Attaching drain hose to spigot:
① Guide drain hose through hose guide
② Secure hose guide to back wall of cupboard using a screw. The height of the drain hose should be between 19 7/8'' - 311/2'' (500 - 800mm) from ground level.
③ Attach drain hose to spigot and secure using a hose clamp ensuring the blanking insert is cleared from spigot.
④ Check for leaks.
- The drain hose should be checked from time to time and replaced if any damage (eg wear, cuts, bulges, kinks, leaks, etc) is found. Do not bend the drain hose sharply, as this may cause it to split.
- In multi-storey apartments or any upper floor, the machine should be installed on a floor equipped with a drain.
- Draining must comply with local by-laws.
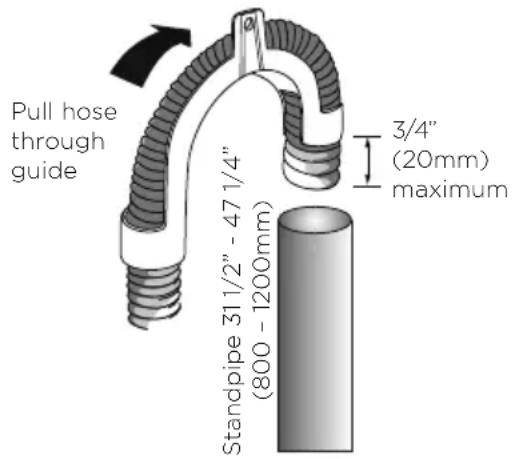
Fitting the drain hose guide
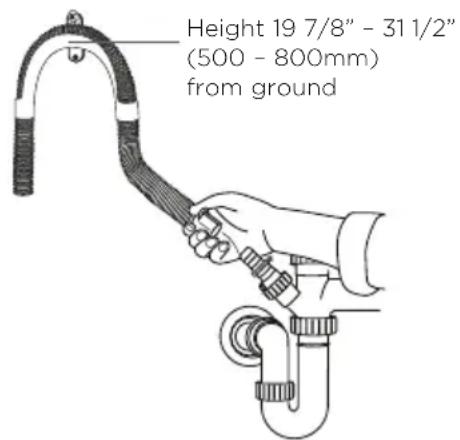
Attaching drain hose to spigot
Mobile home installation:
Installation must conform to Standard for Mobile Homes, ANSI A119.1 and National Mobile Home Construction and Safety Standards Act of 1974 (PL93-383).
Electrical connection
WARNING!

Electric Shock Hazard
Plug into a grounded 3-prong outlet
DO NOT remove ground prong.
DO NOT use an adapter.
DO NOT use an extension cord.
- Failure to follow these instructions can result in death, fire or electrical shock.
Circuit - Individual, properly polarized and grounded 15 or 20 amp circuit breaker or time-delay fuse.
Power supply - 2 wire plus ground, 120 Volt, single phase, 60Hz , alternating current.
Outlet receptacle - Properly grounded 3-prong receptacle to be located so the power cord is accessible when the washer is in an installed position. If a 2-prong receptacle is present, it is the owner's responsibility to have a licensed electrician replace it with a properly grounded 3-prong grounding type receptacle.
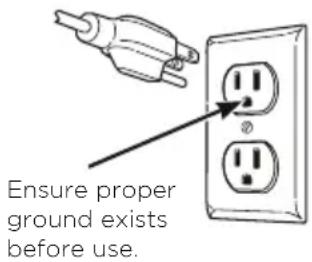
Grounding instructions
This appliance must be grounded. In the event of malfunction or breakdown, grounding will reduce the risk of electric shock by providing a path of least resistance for electric current. This appliance is equipped with a cord having an equipment-grounding conductor and a grounding plug. The plug must be plugged into an appropriate outlet that is properly installed and grounded in accordance with all local codes and ordinances.
WARNING!
Improper connection of the equipment-grounding conductor can result in a risk of electric shock. Check with a qualified electrician or serviceman if you are in doubt as to whether the appliance is properly grounded.
Do not modify the plug provided with the appliance - if it will not fit the outlet, have a proper outlet installed by a qualified electrician
Washer must be electrically grounded in accordance with local codes and ordinances, or in the absence of local codes, with latest edition of the NATIONAL ELECTRICAL CODE, ANSI/NFPA NO. 70 or CANADIAN ELECTRICAL CODE, CSA C22.1. Check with a licensed electrician if you are not sure that the washer is properly grounded.
(1) Uncoil the power cord, remove and discard the plastic pin cover and plug into a wall socket.
② Connect the appliance to an earthed outlet protected by a fuse of suitable capacity.
- Check the power cord for damage and make sure it is not deformed or twisted when installing the washer.
Always remove the power cord from a socket by the plug, not by the cord.
IMPORTANT!
- If you are using an extension cord or a portable electrical outlet device (eg multi-socket outlet box), ensure that it is positioned so that it does not come into contact with water or moisture. FAILURE TO DO SO MAY RESULT IN DEATH OR ELECTRICAL SHOCK.
- Do not touch or operate the machine with wet hands or with bare-feet.
- A damaged power cord must be replaced by a Fisher & Paykel trained and supported service technician, in order to avoid a hazard. The appliance must not be operated until it is repaired, as there is risk of electric shock.
- Do not operate this machine if it has been damaged during transport. Contact your Fisher & Paykel dealer or Fisher & Paykel trained and supported service technician.
SPARE PARTS
Contact Customer Care 1.888.936.7872 or go on line to www.fisherpaykel.com/customercare for spare parts information.
Drain Hose Extension
Part No. 425627P
Not suitable for attaching to a spigot).
Completing the installation
Installation test cycle
IMPORTANT!
Do this before you wash any items in your washer. This is to check that your washer is installed correctly and that it is functioning correctly prior to use.
① Turn your washer on by pressing the 'POWER' button.
② Select the 'Quick' cycle. Ensure the drum is empty and the door closed.
③ Touch the button. The machine will start to fill.
- Observe the machine for any problems (eg leaking from the hose(s), excess noise or vibrations).
- The washer will beep and display any faults on the screen if there are any problems. Refer to 'Before you call for Service' section at the back of this book.
④ Wait until you see water in the bottom of the drum.
⑤ Touch to stop the cycle, then press 'POWER' to turn the machine off.
Press 'POWER' again, select the 'Spin' cycle and touch
- Check the drain hose is firmly secured to the standpipe or tub, or spigot.
- Observe that the machine pumps out the water, and spins.
IMPORTANT!
If there are any problems, you must address these before proceeding with normal use. The washer will automatically turn off at the end of the cycle if there are no problems.
Before you start, it is a good idea to go through the following checklist:
1 Have the packaging and transit bolts been removed?
② Is the drain hose threaded through the 'U bend' (with no more than 3/4 (20mm) extended) and hooked into your standpipe or tub, or attached to a spigot?
③ Is the hot hose connected to the hot valve (color-coded orange, if present)? Is the cold hose connected to the cold valve (color-coded white)? Have the faucets been turned on?
④ Is the machine correctly leveled, feet are locked and cabinet corners clear of the floor and walls?
⑤ Has the power cord been connected to an appropriate power supply and the power turned on?
Have you performed the installation test cycle?
⑦ We recommend you complete your first cycle with a half-load amount of detergent and without a load in order to remove any residues remaining in the machine from the manufacturing process.
IMPORTANT!
You must ensure all 4 transit bolts have been removed from your washer before you start using it. If the transit bolts are not removed, they will damage your washer and YOUR LIMITED WARRANTY WILL BE COMPROMISED.
WARNING!
To reduce the risk of fire, electric shock, or injury to persons, read the IMPORTANT SAFETY INSTRUCTIONS before operating this appliance.
WH2424F model
- Sort your washing carefully. Separate white/light colors from dark colors. Wash new, highly colored and dark colored items separately to prevent dye transfer. Refer to the 'Sorting and loading' section.
- Load your clothes individually into the wash drum. Close the door.
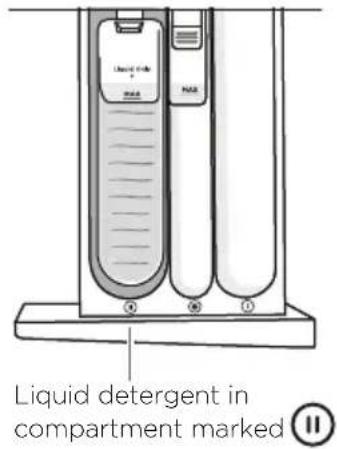
- Use 'HE' or 'High Efficiency' liquid, powder or pods. Place liquid detergent into the correct compartment in the dispenser drawer marked if you wish to use powdered detergent you MUST remove the liquid detergent insert by firmly grasping and twisting the left hand side of the internal compartment and pulling upwards. If you are using detergent pods place them at the back of the drum before you load your clothing. For more information on detergent refer to the 'Detergent and fabric softener' section.
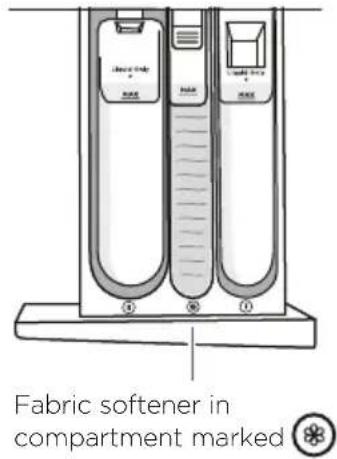
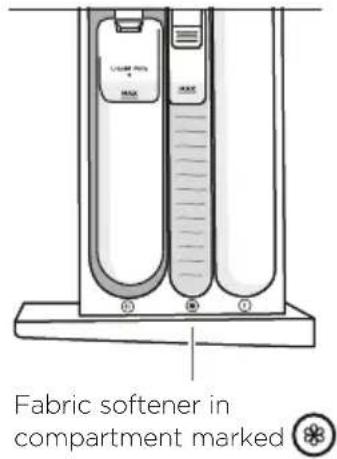
- If you wish to use fabric softener, place it in the compartment marked with a For more information on fabric softener refer to the 'Detergent and fabric softener' section.
IMPORTANT!
Fabric softener should not be used if you have selected the 'Quick' cycle.
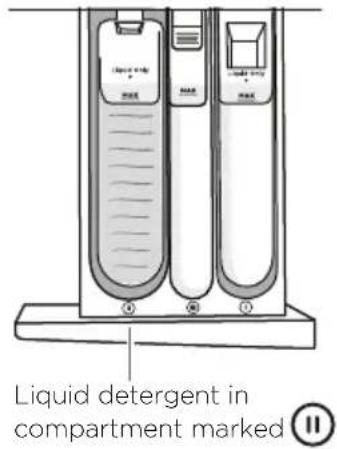
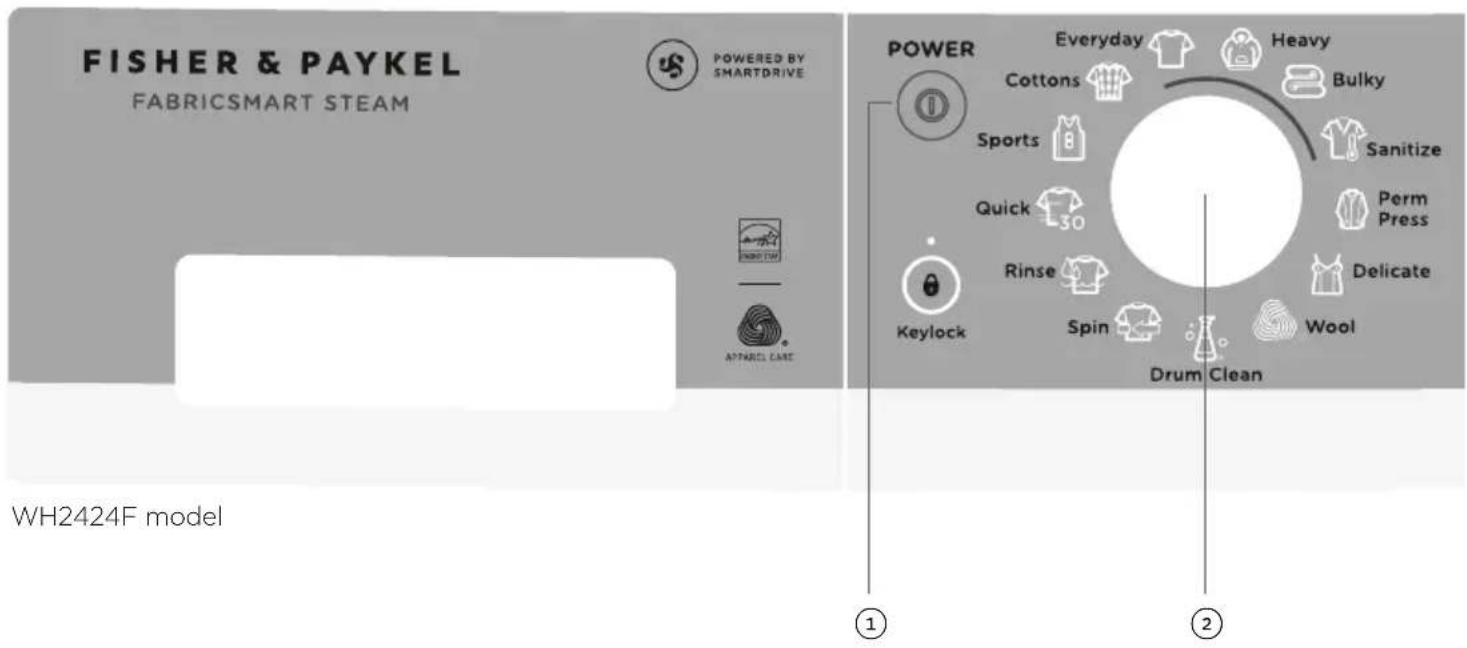
① Press 'POWER' to activate your washer.
② Select your wash cycle by turning the SmartTouch™ Control Dial.
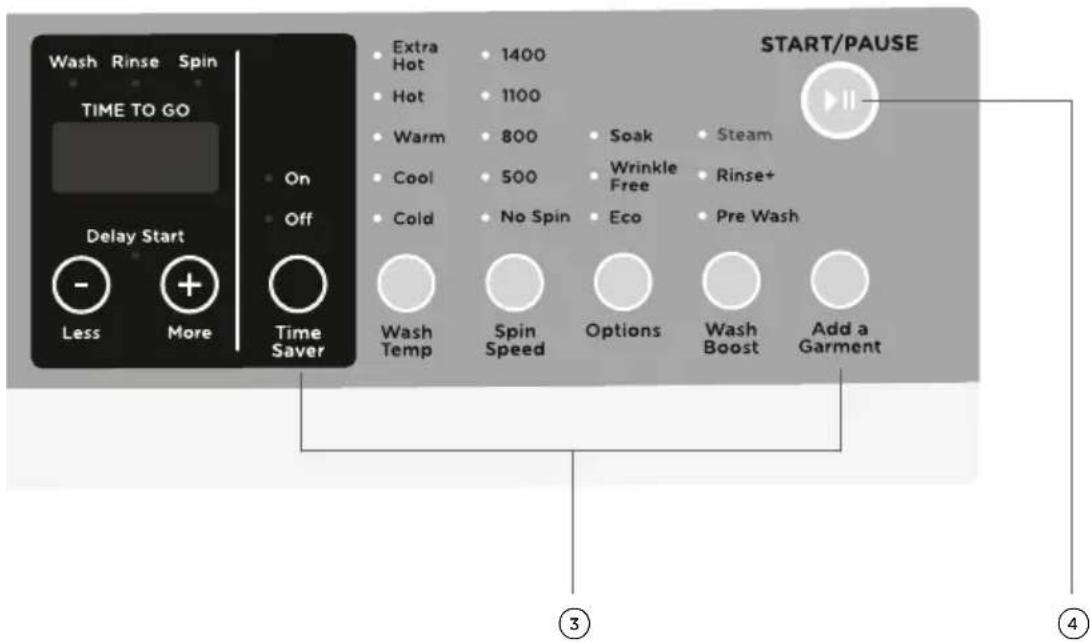
③ Choose your wash options, if you wish to select options different from the default options for the cycle.
④ Touch to start the cycle.
If you make an invalid selection the washer will beep to alert you.
- When the cycle finishes, your washer will perform end of cycle beeps and then turn off automatically.
- If you wish to stop your washer at any point during a cycle simply touch to pause the cycle. There may be a slight delay while the drum comes to a stop, then the door will unlock. Under certain conditions however the door will remain locked for safety reasons (refer to the 'Safety features' section).
- If you wish to cancel or change the wash cycle once a cycle has started, simply touch the button then select the new cycle. Touch restart the washer.
IMPORTANT!
- For the best fabric and color care, remove your clothes as soon as the cycle has finished.
- Failure to follow the advice in this guide may result in damage to your garments and your expectations of wash performance may not be met.
WARNING!
To reduce the risk of fire, electric shock, or injury to persons, read the IMPORTANT SAFETY INSTRUCTIONS before operating this appliance.
WH2424P model
- Sort your washing carefully. Separate white/light colors from dark colors. Wash new, highly colored and dark colored items separately to prevent dye transfer. Refer to the 'Sorting and loading' section.
- Load your clothes individually into the wash drum. Close the door.
- Use 'HE' or 'High Efficiency' liquid, powder or pods. Place liquid detergent into the correct compartment in the dispenser drawer marked if you wish to use powdered detergent you MUST remove the liquid detergent insert by firmly grasping and twisting the left hand side of the internal compartment and pulling upwards. If you are using detergent pods place them at the back of the drum before you load your clothing. For more information on detergent refer to the 'Detergent and fabric softener' section.
If you wish to use fabric softener, place it in the compartment marked with a *For more information on fabric softener refer to the Detergent and fabric softener' section.
IMPORTANT!
Fabric softener should not be used if you have selected the 'Quick' cycle.
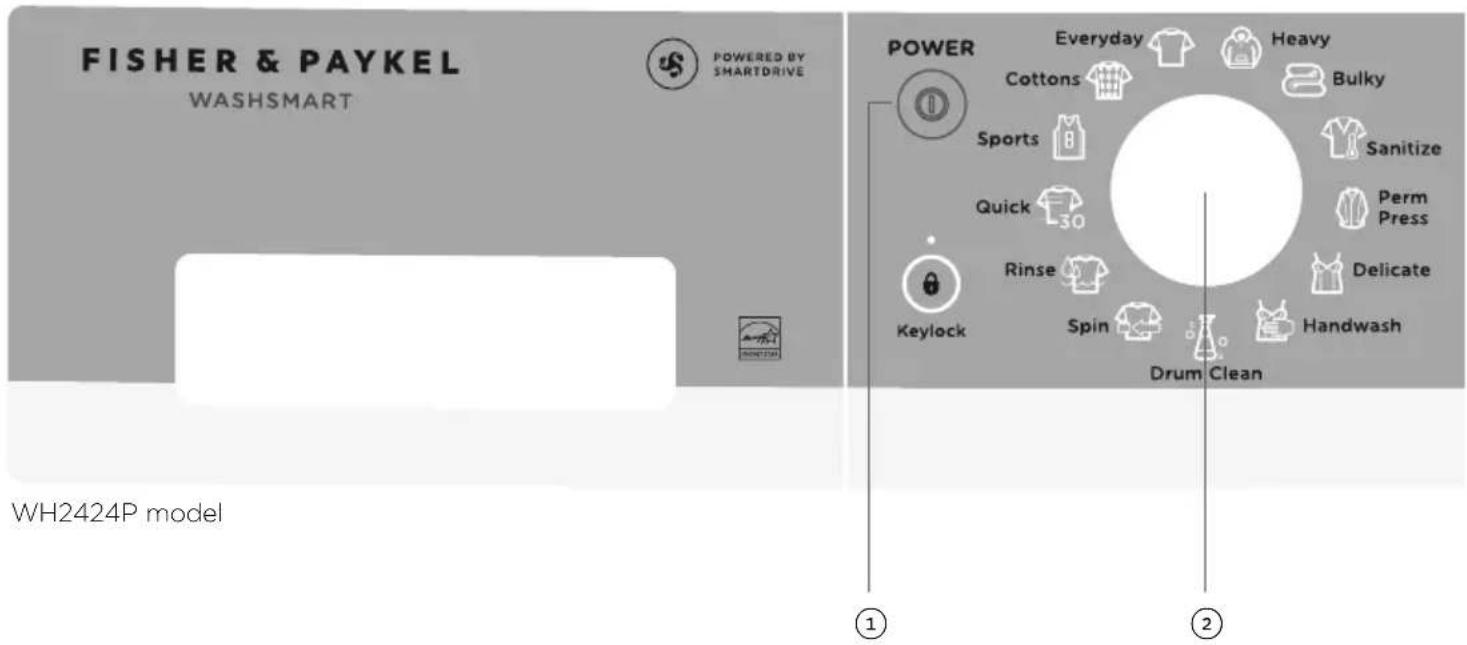
① Press 'POWER' to activate your washer.
② Select your wash cycle by turning the SmartTouch™ Control Dial.
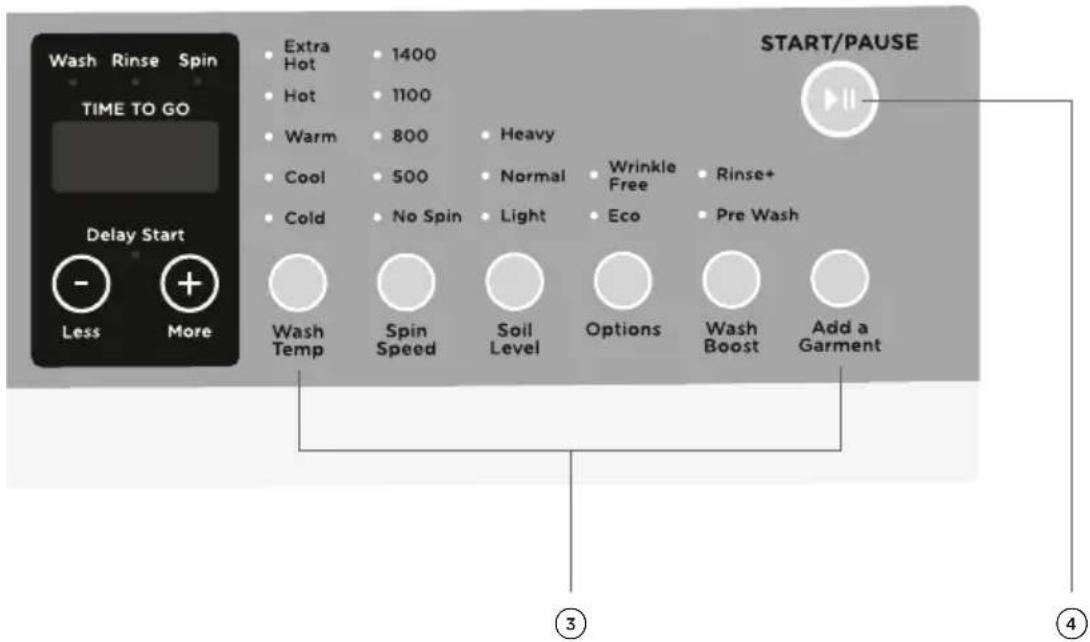
③ Choose your wash options, if you wish to select options different from the default options for the cycle.
④ Touch to start the cycle.
If you make an invalid selection the washer will beep to alert you.
- When the cycle finishes, your washer will perform end of cycle beeps and then turn off automatically.
- If you wish to stop your washer at any point during a cycle simply touch to pause the cycle. There may be a slight delay while the drum comes to a stop, then the door will unlock. Under certain conditions however the door will remain locked for safety reasons (refer to the 'Safety features' section).
- If you wish to cancel or change the wash cycle once a cycle has started, simply touch the button then select the new cycle. Touch restart the washer.
IMPORTANT!
- For the best fabric and color care, remove your clothes as soon as the cycle has finished.
- Failure to follow the advice in this guide may result in damage to your garments and your expectations of wash performance may not be met.
SmartTouch™ Control Dial
The SmartTouch™ Control Dial provides easy and efficient wash cycle selection. As you rotate the dial, the icon of the wash cycle selected will be illuminated, along with the default settings for that cycle on the right side of the control panel.
SmartTouchTM buttons
The smooth, easy clean buttons enable easy selection of options with lights clearly showing the selections you are making.
Digital display screen
The digital display screen provides feedback on how long the wash cycle has to go. If you have programmed a 'Delay Start', the time remaining until the cycle will start will be displayed here, along with any messages to help you with the overall running of your washer (eg user warnings).
Time to go
Your washer displays approximately how many minutes the cycle you are running has remaining, so that you can tell at a glance when your washing will be finished.
Please be aware that a number of factors can influence the overall cycle time, eg the water flow rate, water pressure, whether hot water is being used from the faucet or the water is heated by the internal heater, load size, cycle and option selections. Therefore cycle times will vary. Unexpected events in a wash cycle (eg out of balance, oversudsing) can lengthen the cycle time.
Progress lights
The progress lights indicate what part of the cycle the washer is currently on (wash, rinse or spin). All three lights are on at the beginning of the cycle. The light for the current part of the cycle flashes, and each one goes out when that part of the cycle is complete.
Keylock mode
Keylock can be used to lock the buttons on your washer. This will avoid accidental button pushes. For more detail please refer to the 'Wash cycle options' section.
Drum light (WH2424F model only)
Your machine has a drum light to help assist you when loading and unloading your washing machine. When you press 'POWER', the LED light in the drum will turn on, after 2 minutes it will automatically turn off. At the end of the cycle, the drum light will turn on again for 5 minutes to help facilitate unloading.
Door lock
The door of your washer will lock once you touch until the machine beeps at the end of the cycle, ensuring safety for you and your family while your machine is operating.
To unlock the door during the cycle:
- You can open the door to add or remove items during the wash simply by touching the button. Note: the door will remain locked until the drum is stationary, if the temperature inside the washer is above 60^ and/or the water level is above the bottom of the door seal (a warning will be displayed in these circumstances, refer to 'Before you call for service').
- Simply touch, the machine will pause and the door will automatically unlock if the conditions inside the washer are safe. The button and time to go will flash on the screen while the washer is paused. Open the door and remove or add garments. Close the door and touch to resume the cycle.
Add a Garment
The 'Add a Garment' function can be used to interrupt the cycle to add or remove a garment at any time during the wash part of the cycle (as long as the wash temperature selected is lower than 'Hot' temperature). Water in the machine will be drained to a level where the door can be opened, if necessary. Refer to 'Wash cycle options' for more
information.
Opening the door during a power failure
If there is a power failure during a wash cycle your washer will stop and the door will remain locked. You can unlock the washer door to remove your clothes by opening the pump filter cover at the bottom right of your washer. Simply place a coin or key in the slot and tilt it upwards to lever the cover open, then pull the door release tab.
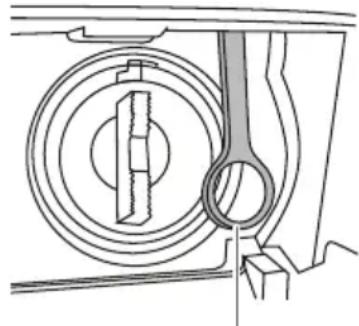
Door release tab
Manual door opening mechanism
IMPORTANT!
Do not attempt to do this if the water level in the washer is above the level of the door.
When power is restored you will need to restart your machine by simply pressing 'POWER'. The washer will remember where it was stopped and continue from this point to finish the cycle.
Your washer also has the following protective measures:
- Flood protection - turns off valves and turns pump on if a flood condition is detected.
- Out-of-balance protection - stops and redistributes the load if an unbalanced load condition is sensed, and/or slows the spin speed to compensate.
- Excess suds protection - pauses to allow suds to break down before continuing the cycle.
When preparing your wash load there are some important things to consider:
Sorting
Sort items according to color, fabric type, and soil type. Wash fine, delicate fabrics separately from thick, heavy fabrics. Always separate colored items from whites, especially when they are new. Color run could be an issue if you wash items at higher temperatures. Some soils, like mud and blood are best washed in cold water. Oily soils (eg some foods and marks on shirt collars) are best washed in warm water. The following are recommendations for what cycles and settings you may wish to wash different items on, and suggestions for special wash requirements.
| ITEMS/WASH REQUIREMENTS | SUGGESTED CYCLE AND OPTIONS* | SUGGESTED TEMPERATURE |
| Towels Everyday, 1400 or 1100 rpm spin Cool or Warm | ||
| Sheets, pillowcases Everyday, 1400 or 1100 rpm spin Cool or Warm | ||
| Bulky items - comforters, duvets, sleeping bags | Bulky Cool or Warm | |
| Shirts, pants, other creasables Perm Press, 800 rpm Cool or Warm | ||
| Woollens, silks Wool, Handwash, | 500 rpm Cool or Warm | |
| Delicates, fine fabrics Delicate, Wool or Handwash Cool | ||
| Jeans Everyday or Heavy Cold or Cool | ||
| Highly colored items | Everyday | Cold or Cool |
| Whites, cotton items | Cottons, 1400 or 1100 rpm spin | Warm or Hot |
| Sportswear, running gear | Sports | Warm |
| Have sensitive skin or require extra rinsing? | Sanitize, Rinse+, 1400 or 1100 rpm spin | Extra Hot |
| Asthma/allergies | Sanitize, Rinse+ | Extra Hot |
| Lightly soiled items | Quick or TimeSaver | Cool |
| Muddy, sandy or linty items | Everyday, Pre Wash and Rinse+ | Cold |
| Smelly washer | Drum Clean | Extra Hot |
- Cycles and spin speeds available will depend on your washer model.
Before you load
- Check pockets for items that could damage your clothes or get caught in the washer.
- Close zippers, hooks and eyes, and other fastenings (ie fasten the opening of comforter), and remove loose bra wires. All these can damage both your washer and your clothes.
- Place delicate items, such as lingerie, in a mesh laundry bag before placing in the machine.
- Pre-treat any stains, taking care not to spray pre-treaters on your washer as they can cause damage to the plastic surfaces.
Loading
Your washer will be more efficient when washing larger loads, so try to collect enough items to loosely fill the drum when the items are dry.
IMPORTANT!
- Do not overload your washing machine beyond its rated capacity.
- Please do not under any circumstances wash an electric blanket in your washer unless the care label specifically states it is safe to do so.
- Do not wash curtains in this washer, as sunlight makes them brittle and they may disintegrate during washing.
Detergent type
Your washer requires low sudcing detergent to prevent oversudsing problems. Low sudcing detergent comes in powder, liquid or pod form and is labelled 'High Efficiency' or 'HE'.
Using top loading detergent in your front loader washer may lead to excessive suds formation, which will lengthen the cycle time as the machine waits for the suds to dissolve.
IMPORTANT!
Do not use chlorine based bleaches in the washer as damage to the machine and clothing may result. Wash boosters and additives based on oxygen or containing sodium per carbonate may be used by adding to the detergent in the dispenser as required. Follow manufacturer's instructions for the correct dosage.
Where do I put my detergent?
Liquid detergent
Add to the main wash compartment on the left side of the dispenser compartment marked with a (A). As the machine fills, water is flushed into this compartment and is mixed with the detergent, the detergent solution is then delivered into the drum. There may be a small volume of water left in the liquid detergent dispenser at the end of the cycle. This is normal.
Powdered detergent
If you wish to use powdered detergent, the liquid detergent compartment MUST be removed from the dispenser drawer. To do this firmly grasp and twist the left hand side of the internal compartment and pull upwards (B). To replace the liquid detergent compartment slide it back into the drawer marked (C). Press down in the middle until it clicks (D).
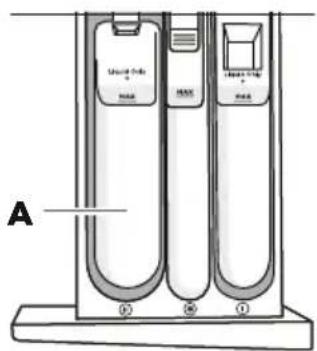
Detergent dispenser compartment
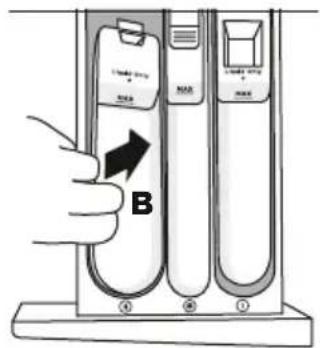
Removing the liquid detergent compartment
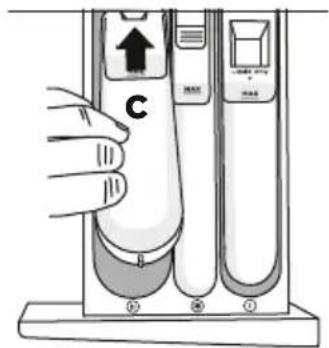
Replacing the liquid detergent compartment
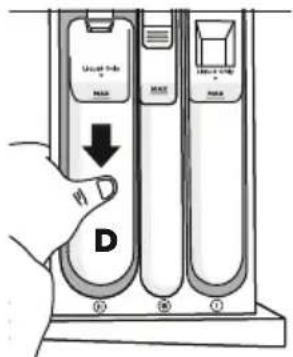
Clicking in the liquid detergent compartment
WH2424F model shown, dispenser compartments in WH2424P models will differ.
IMPORTANT!
- If using liquid detergent ensure the liquid detergent compartment is installed.
- If using powder ensure the liquid detergent compartment has been removed.
- Make sure the detergent drawer is completely closed before starting the cycle.
Pods
Detergent pods are a 'no mess' alternative to powdered or liquid detergent. Pod type detergent or wash boosters must be placed at the back of the drum prior to loading your clothes. This will ensure they are activated quickly in the wash. Do not place pods in the detergent dispenser drawer or on top of your clothes.
Pre wash
WH2424F model
Liquid detergent
If you wish to use the 'Pre Wash' option, liquid detergent is added to the pre wash compartment marked (A). When you select 'Pre Wash', water is flushed into the pre wash compartment at the start of the cycle and mixed with the detergent, the detergent solution is then delivered into the drum. There may be a small amount of water left in the pre wash compartment at the end of the cycle. This is normal.
Powdered detergent
If you wish to use powdered detergent, the liquid pre wash compartment MUST be removed from the dispenser drawer. To do this firmly grasp and twist the left hand side of the internal compartment and pull upwards (B). To replace the liquid pre wash compartment slide it back into the drawer marked (C). Press down in the middle until it clicks (D).
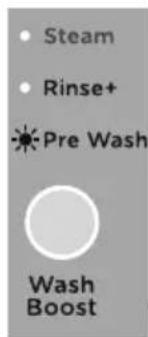
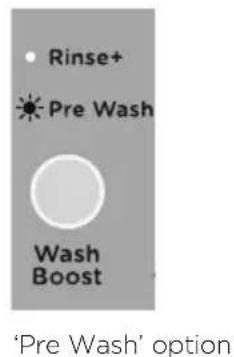
'Pre Wash' option

Pre Wash detergent dispenser compartment
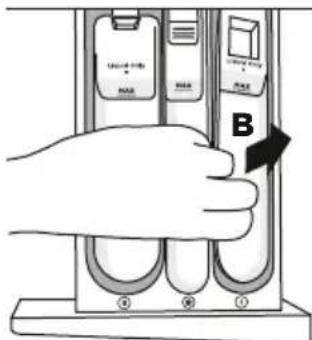
Removing the Pre Wash liquid detergent compartment

Replacing the Pre Wash liquid detergent compartment
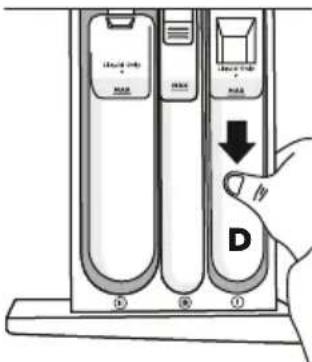
Clicking in the Pre Wash liquid detergent compartment
WH2424P model
If you wish to use the 'Pre Wash' option, liquid or powdered detergent only must be placed in the pre wash detergent compartment on the right side of the drawer, marked with a ① When you select 'Pre Wash', the pre wash compartment is flushed at the start of the cycle. For more information refer to 'Wash cycle options'.
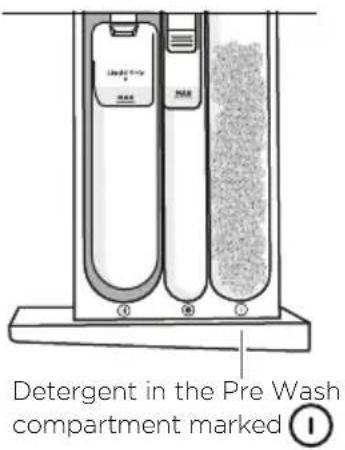
IMPORTANT!
Make sure the detergent dispenser drawer is completely closed before starting the cycle.
How much detergent?
The correct detergent dosage varies depending on the amount of soil in your load, the size of the load and the water quality, so getting the correct dose takes some trial and error. Use the instructions stated on the detergent package as a guide, then alter the dosage according to the results.
If you overdose, you will get over foaming issues, but if you under-dose you will get poor performance and over time your washer will start to smell as scum builds up inside it.
Detergent advice
If your washer smells you are probably not using enough detergent for the soil level in your loads. Run a 'Drum Clean' cycle and either buy a better quality detergent or use a higher dose. If you are using an 'Eco' detergent, alternate the use of this with a mainstream detergent. We recommend running your 'Drum Clean' cycle with a drum cleaning powder, follow the manufacturers instructions for the correct dosage of detergent. If symptoms persist, contact a service company to clean the bowl.
② Add the detergent BEFORE starting the cycle, close the dispenser and do not open it while the cycle is running.
If you find foam leaking from your washer, check you are using a 'HE' or 'High Efficiency' type detergent and check the quantity you are using against the detergent manufacturers recommendation. You may need to reduce the amount you are using.
Fabric softener
Add fabric softener to the middle compartment of the dispenser marked with a The washer will automatically flush the fabric softener during the rinse part of the cycle.
If you wish to use fabric softener we recommend to:
① Use it sparingly. Measure it carefully and do not use more than 0.85 ounces (25ml or 1/2 cap), some thicker varieties may need diluting.
② Clean your dispenser regularly.
③ Clean your machine regularly using the 'Drum Clean' cycle.
Complete wash cycles at a wash temperature of 'Warm' or above at regular intervals (eg every 5th wash) as washing in cold water increases the chance of scrub occurring (see below).
Note: if you fill beyond the MAX mark, the fabric softener will be dispensed into the bowl prematurely and contribute to scrud.
Scrub
Scrub is the name of the waxy build-up that can occur within any washer when fabric softener comes in contact with detergent. This build-up is not brought about by a fault in the machine. If scrub is allowed to build up in the machine it can result in stains on clothes and an unpleasant smell in your washer.
If you wash a particularly dirty load, we recommend putting the washer through a 'Rinse' cycle once the cycle has finished and the load has been removed, to clean out any remnants from that cycle.

WH2424F model
Your washer has a number of wash cycles to suit your laundering needs. Selecting the most appropriate cycle for each particular wash load will help ensure you get the best wash result.
| CYCLE DESIGNED FOR DESCRIPTION | MAX. LOADSIZE | DEFAULTWASHTEMP. | MAX.WASHTEMP. | DEFAULTSPINSPEED(rpm) | MAX.SPINSPEED(rpm) | ||
| Cottons Normally soiled everyday cotton loads, eg whites. | A comprehensive cycle specifically designed for cottons. | 17.6lbs(8kg) | Warm Extra Hot 1400 1400 | ||||
| Everyday Normally or lightly soiled everyday items eg towels, sheets, sweatshirts, t-shirts. | A faster cycle designed for mixed loads with normal soiling. | 17.6lbs(8kg) | Warm Extra Hot 1400 1400 | ||||
| Heavy Heavy soiled durable garments eg tea towels, rugby shorts. | A stronger, hotter wash for more durable items. | 17.6lbs(8kg) | Hot Extra Hot 1400 1400 | ||||
| Delicate Delicate, lightly soiled items, eg tops, blouses. | Gentler wash with more water to look after delicate items. | 8.8lbs(4kg) | Warm Hot 500 800 | ||||
| PermPress | Minimizing creasing eg shirts, trousers. | Less spinning with 'Wrinkle Free' option to help minimize the need for ironing. | 8.8lbs(4kg) | Warm Hot 800 800 | |||
| Bulky | Washing bulky items. | A warm, gentle wash and slow spin for special care of bulky items. | 8.8lbs(4kg) | Hot Extra Hot 800 800 | |||
| Sanitize** | Asthma sufferers and people with skin sensitivities. | Hot wash to kill dust mites and extra rinses to remove all traces of detergent. | 17.6lbs(8kg) | ExtraHot | Extra Hot 1400 1400 | ||
| Wool* | Machine washable woollen items. | Extra gentle wash action that complies with Woolmark Apparel Care criteria. | 4.4lbs(2kg) | Warm | Warm | 800 800 | |
| Quick | Lightly soiled garments. A quick cycle for lightly soiled loads. | 8.8lbs(4kg) | Warm Hot 800 | 1400 | |||
| Sports Cotton/synthetic sports clothing. | A cycle tailored to washing sports type clothing. | 8.8lbs(4kg) | Warm | Warm | 1100 | 1400 | |
| Rinse | Items that require rinsing only. | Two rinses followed by a spin. | 17.6lbs(8kg) | Cold | Cold | 1400 1400 | |
| Spin | Spinning wet items. | Spin only. | 17.6lbs(8kg) | N/A | N/A | 1400 1400 | |
| DrumClean | Maintaining the cleanliness of your washer. | A hot cycle to remove any residues inside the washer. | - | ExtraHot | Extra Hot | 1100 | 1100 |
- Woolmark Apparel Care
The wool wash cycle of this machine has been approved by The Woolmark Company for the washing of machine washable wool products provided that the products are washed according to the instructions on the garment label and those issued by the manufacturer of these washing machines M1528.
** Note: the Sanitize cycle water temperatures CANNOT be changed. The Sanitize cycle is certified by NSF International, an independent third party testing and certification organization.
The Sanitize certification verifies that the cycle reduced 99.9% of bacteria typically found in residential laundry and that no significant contamination is transferred to subsequent washer loads. Only the Sanitize cycle has been designed to meet the requirements of NSF Protocol P172 for sanitizing effectiveness.
WOOLMARK APPAREL CARE


WH2424P model
Your washer has a number of wash cycles to suit your laundering needs. Selecting the most appropriate cycle for each particular wash load will help ensure you get the best wash result.
| CYCLE DESIGNED FOR DESCRIPTION | MAX. LOADSIZE | DEFAULTWASHTEMP. | MAX.WASHTEMP. | DEFAULTSPINSPEED(rpm) | MAX.SPINSPEED(rpm) | ||
| Cottons Normally soiled everyday cotton loads, eg whites. | A comprehensive cycle specifically designed for cottons. | 17.6lbs(8kg) | Warm Extra Hot 1400 1400 | ||||
| Everyday Normally or lightly soiled everyday items eg towels, sheets, sweatshirts, t-shirts. | A faster cycle designed for mixed loads with normal soiling. | 17.6lbs(8kg) | Warm Extra Hot 1400 1400 | ||||
| Heavy Heavy soiled durable garments eg tea towels, rugby shorts. | A stronger, hotter wash for more durable items. | 17.6lbs(8kg) | Hot Extra Hot 1400 1400 | ||||
| Delicate Delicate, lightly soiled items, eg tops, blouses. | Gentler wash with more water to look after delicate items. | 8.8lbs(4kg) | Warm Hot 500 800 | ||||
| PermPress | Minimizing creasing eg shirts, trousers. | Less spinning with ‘Wrinkle Free’ option to help minimize the need for ironing. | 8.8lbs(4kg) | Warm Hot 800 800 | |||
| Bulky | Washing bulky items. | A warm, gentle wash and slow spin for special care of bulky items. | 8.8lbs(4kg) | Hot Extra Hot 800 800 | |||
| Sanitize Asthma sufferers and people with skin sensitivities. | Hot wash to kill dust mites and extra rinses to remove all traces of detergent. | 17.6lbs(8kg) | ExtraHot | Extra Hot 1400 1400 | |||
| Handwash | Very delicate lightly soiled garments, eg woolens. | Very gentle wash action for extra special items. | 4.4lbs(2kg) | Cool | Warm | 500 800 | |
| Quick | Lightly soiled garments. | A quick cycle for lightly soiled loads. | 8.8lbs(4kg) | Warm Hot 800 | 1400 | ||
| Sports Cotton/synthetic sports clothing. | A cycle tailored to washing sports type clothing. | 8.8lbs(4kg) | Warm | Warm | 1100 | 1400 | |
| Rinse | Items that require rinsing only. | Two rinses followed by a spin. | 17.6lbs(8kg) | Cold | Cold | 1400 1400 | |
| Spin | Spinning wet items. | Spin only. | 17.6lbs(8kg) | N/A | N/A | 1400 1400 | |
| DrumClean | Maintaining the cleanliness of your washer. | A hot cycle to remove any residues inside the washer. | - | ExtraHot | Extra Hot | 1100 | 1100 |
All wash cycles default to the recommended options for that cycle based on the average expected load to be washed. You can vary the options (eg 'Wash Temp', 'Spin Speed') to create your desired cycle. Note: some options are not available on some cycles, for clothes care reasons, or because the option is not appropriate for the cycle.
To change a wash option or options you have selected after a cycle has started, touch and select your new setting, then touch again to resume the cycle with the new setting or settings. Note: some options may not be available for selection under certain conditions and after particular stages of the cycle have passed.
Wash Temp
Your washer offers five wash temperatures:
Cold Cool Warm Hot Extra Hot
- Simply touch the 'Wash Temp' button to increase or decrease the wash temperature.
- The washer will fill with both hot and cold water (if possible) to achieve the selected wash temperature.
- Some temperatures are not available on some cycles as a safeguard for your clothes (eg 'Extra Hot' on the 'Delicate' cycle).
IMPORTANT!
When 'Extra Hot' temperature is selected, the door glass will become hot. Do not touch the glass part of the door. Keep children away from the washer.
Time Saver (WH2424F model only)
Your washer offers a 'Time Saver' feature that when selected adjusts the cycle programming, by combining special temperature profiling and a unique tumble sequence. The result - excellent wash performance combined with time savings.
This option can be selected on the 'Everyday', 'Cottons', 'Heavy', 'Perm Press', 'Sanitize', 'Sports' and 'Quick 30' cycles.
Please be aware that a number of factors can influence the amount of time saved on a cycle, including the load size, cycle chosen, water flow rate and load distribution during spin.
Spin Speed
- Your washer offers four spin speeds: 500 rpm, 800 rpm, 1100 rpm and 1400 rpm, plus an additional 'No Spin' option.
- Simply increase or decrease the spin speed by touching the 'Spin Speed' button.
- Selecting 'No Spin' will end the cycle after the rinse, allowing you to remove items you wish to drip dry. Note: the washer will complete the default wash and rinse spins for the cycle; only the final spin will not be completed. If you have removed the items you wish to drip dry and there are items remaining that you would like to proceed to spin, press 'POWER' and select the 'Spin' cycle. If necessary, modify the spin speed to best care for your load (ie spin delicate items at 500 rpm for best garment care).
Soil Level (WH2424P model only)
The 'Soil Level' option lets you adjust the wash to suit the amount of soil in your load. For example, select 'Heavy' for dirty clothes; for items that are only lightly soiled, select 'Light'. This adjusts the wash time accordingly to give the load the right amount of agitation to remove the soil.
Wash Boost
Pre Wash
For extra dirty loads you can perform a 'Pre Wash'. Your washer will start the wash with a short wash in cool water to remove excess soil. After this the machine will drain and then fill at the selected temperature for the main wash.
Simply touch the 'Wash Boost' button and select 'Pre Wash' when choosing your wash options. Note: 'Pre Wash' cannot be selected after a wash cycle has been started, ie if you touch and try to select 'Pre Wash' it will be unavailable. 'Pre Wash' must be selected at the start of the cycle.
If you use the 'Pre Wash' option, liquid or powdered detergent needs to be placed in the correct detergent compartment. The pre wash compartment is on the right hand side of the drawer, marked! When you select 'Pre Wash', the compartment is flushed at the start of the cycle.
The detergent for the main wash can either be a powder or a liquid. Place this in the compartment marked if using liquid, ensure the internal compartment is installed.
Rinse+
If you have a particularly dirty load, or you have sensitive skin and wish to give your clothes an extra rinse, select 'Rinse+ from the 'Wash Boost' options. Your load will undergo an extra rinse to get rid of any residual detergent or soil in the items.
Note: 'Rinse+' will not be available if the 'Eco' option has been selected.
Steam (WH2424F model only)
The Steam option adds steam to the wash to actively loosen fibers to improve soil removal. Use the steam option if you have a particularly heavily soiled load. This option is available on the 'Everyday', 'Heavy', 'Bulky' and 'Sanitize' cycles only.
Only use with colorfast loads.
Note: the 'Steam' option cannot be selected after a wash cycle has been started, ie if you touch and try to select 'Steam' it will be unavailable. 'Steam' must be selected at the start of the cycle.
IMPORTANT!
Do not touch the door when the steam option is selected. The door will get hot during the steam phase of the cycle. Ensure no children play around the washer.
Options
Soak (WH2424F model only)
A soak option is available on selected wash cycles. When this option is chosen the machine will add a one hour soak sequence, which combines periods of tumbling with soaking to help lift stubborn stains.
If 'Soak' and 'Time Saver' are selected in the same cycle, the soak duration will be reduced to 30 minutes.
'Soak' is not available on the 'Wool', 'Drum Clean', 'Quick', 'Rinse' or 'Spin' Cycles.
Wrinkle Free
We recommend you remove the clothes from the washer immediately after the completion of the cycle to minimize wrinkling and creasing of items and to prevent dye run. However, if you will not be present at the end of the cycle you can select 'Wrinkle Free'.
When 'Wrinkle Free' is selected, the washer will tumble the clothes once every 15 minutes for up to 12 hours after the cycle has finished. The 'Wrinkle Free' light and button will flash, and the washer will beep at regular intervals to remind you to remove your load. To remove the load during this phase, simply press the button.
Eco
Use the 'Eco' option to save water and energy. Selecting 'Eco' will reduce the wash temperature slightly and alter the wash and rinse programming.
Note: this option will not be available if 'Rinse +' has been selected.
- If you wish to, you can select both the 'Pre Wash' and 'Rinse+' 'Wash Boost' options to perform on the same cycle. Likewise, you can select 'Eco' and 'Wrinkle Free' to perform on the same cycle. Touch the appropriate button until both options are selected. Repeat to deselect an option.
- For clothes care and performance reasons not all options may be available on some cycles.
Add a Garment
The 'Add a Garment' option enables you to add or remove items during the wash stage of the cycle, under certain conditions. Once the 'Add a Garment' button is touched, the button and time to go will flash. Wait until you hear the door unlock. Open the door and add or remove items. Close the door and touch to restart the cycle. The 'Add a Garment' button will only operate during the wash part of the cycle and when the temperature selected is lower than 'Hot' temperature. 'Add a Garment' can be used when the total wash volume has been reached, as your washer will drain the water to a lower level if necessary, so the door can be opened.
Keylock
This option enables you to deactivate the buttons on the display panel, except for the 'Power' and 'Keylock' buttons. This prevents accidental button presses.
To turn Keylock mode ON or OFF when the washer is powered on:
- Touch and hold the button for 2 seconds.
Note: when activated, the light above the button is illuminated. F#llbel OC displayed on the display panel.
If Keylock mode is activated and the machine is powered off:
- To turn your washer on, press the 'POWER' button, then touch and hold the button for two seconds. Select your wash cycle, options and then touch to start the cycle.
- To turn the washer off at anytime when keylock is activated simply press the 'POWER' button.
Delay Start
The 'Delay Start' option enables you to delay the start of the wash cycle from between 5 minutes and 12 hours. Times you can select are 5 min, 15 min, 30 min, 1 hour, then hourly up to 12 hours. This can be useful to time your washing to finish when you arrive home from work, or to start once you have finished in the shower. Some stain removers also require you to spray them on then leave for several minutes, before washing. Your washer will wait for the selected time then start without you having to wait or remember to start your machine.
To program a 'Delay Start' time, simply touch the 'More' button to increase the delay time and 'Less' button to decrease the time or turn 'Delay Start' off. Touch confirm your selection and start the countdown. Once started, the time will count down on the digital display screen in 1 minute increments, the 'Delay Start' light will flash and the light will stop flashing and turn on solid.
Note: if you hold the 'More' button down, the time displayed on the screen will increase after every half a second (more convenient than touching the button repetitively).
To remove a 'Delay Start' time once it is counting down, simply touch then touch the 'Less' button to decrease the time to zero. Touch start the cycle immediately.
Note: we suggest that you avoid using 'Delay Start' for damp, non-colorfast items as this may cause dye run to occur.
After using your washer a few times you may discover there are some wash options you prefer for some cycles.
You can program your washer to remember the wash options you prefer for each wash cycle. For instance, you may want to set the 'Perm Press' cycle to cold wash temperature or set the 'Everyday' cycle so it gives you Rinse+ every cycle.
To customize a cycle:
① Press 'POWER' to turn the machine on.
② Turn the dial to select the cycle you wish to customize.
③ Touch and hold any of the wash option buttons for 3 seconds. The cycle icon will flash on and off to indicate that the product is in cycle adjustment mode. The display will show SET.
④ Select the wash options you prefer by touching the relevant option button.
⑤ Touch to save the selected settings.
Your washer will automatically remember your changes for all future washes you do on this cycle.
Factory Reset
You can reset your washer to the default settings it left the factory with:
① Turn the dial to select 'Spin'.
② Touch and hold the 'Delay Start' 'More' + the 'Delay Start' 'Less' and 'Options' buttons together for 3 seconds dE F will appear on the screen and the machine will beep.
③ Your washer will now be reset to the default settings.
When you have finished using your washer
- Unplug the machine from the power socket.
- Wipe around the door and in the rubber gasket to remove any remaining water and foreign matter.
- Turn off the faucets to prevent the chance of flooding should a hose burst.
Cleaning your washer
Before you start cleaning your washer, ensure that it is disconnected from the power (ie unplug the machine from the power socket).
Cleaning the control panel and outer surfaces of the washer
Use a soft damp cloth to wipe all surfaces, then wipe dry. Avoid using chemical or scouring cleaners, as these will damage the paint and plastic surfaces of your washer.
Cleaning the detergent dispenser drawer
Wipe out the detergent dispenser drawer with a damp cloth. Clean it regularly, especially if you use fabric softener. To remove the drawer, pull it open, push down on the tab in the fabric softener compartment and pull out. Rinse it out under warm water and replace.
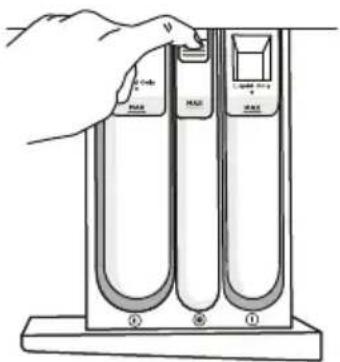
WH2424F model
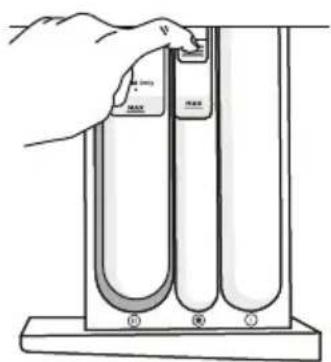
WH2424P model
Removing the dispenser drawer for cleaning
Cleaning the inside of your washer
It is important that you regularly clean the inside of your machine using the 'Drum Clean' cycle. After 100 cycles a con will flash every time you turn your washer on to remind you to do this. If your washer starts to smell this is a sign that you should complete a 'Drum Clean' cycle. We recommend that you do not have any items in the washer when you run this cycle.

'Drum Clean' cycle
Cleaning steps
① Add detergent directly into the main wash detergent compartment of the dispenser drawer marked ②. The suggested amount of detergent is bar 3 marked on the scoop of a good quality detergent or use a drum cleaning product specifically designed for front loading washing machines (follow manufactures instructions).
(2) Press 'POWER' to turn your machine on and select the 'Drum Clean' cycle.
③ Touch to start the cycle (refer to the 'Wash cycles' section).
Cleaning the drum and the door
Use a soft damp cloth to wipe the door, cleaning any water marks or residue off it.
- Wipe the rubber seal around the door. Remove any items or lint accumulating in the bottom of the seal catchment and wipe out any accumulated water. If this is not cleaned out, unpleasant odors will develop.
- If the drum has any residual dirt or lint stuck to it, remove this and wipe the drum clean. Do not leave any metal objects in the drum as these may rust and cause staining.
- The WH2424F model also has a self cleaning door flush that directs a portion of the rinse water over the door during various stages of the cycle to help to clean lint and insolubles from the inside of the door and surrounding parts. We still recommend that you manually clean it with a soft cloth periodically as per the instructions above.
Cleaning the pump filter
The pump has a filter to trap foreign objects that enter the washer along with clothing. The pump filter can be accessed from the front of the washer.
To clean the filter:
This should be cleaned out approximately once a month.
① Turn the power off and unplug the machine.
Use a coin to open the filter cover. Place the edge of the coin into the slot and tilt upwards while levering the cover open.
Unhook the pump outlet hose and pull it out (about 150mm). Remove the plug and allow any water (approximately 250ml) to drain into a shallow dish.
④ After the draining process is complete, replace the plug into the hose and refit the hose back into the housing.
⑤ Remove the filter by turning anti-clockwise. Clean and rinse under a faucet. Check the pump filter cavity for any further obstruction.
Replace the filter by turning clockwise until the white mark on the filter is in line with the white line on the pump housing.
⑦ Make sure the propeller is freely moving at the back of the filter cavity; remove any foreign objects.
(8) Close the filter cover.
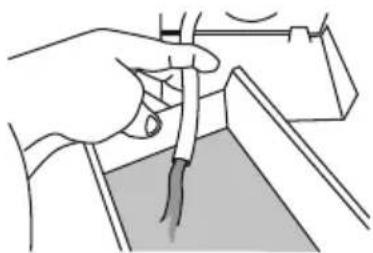
Drain residual water
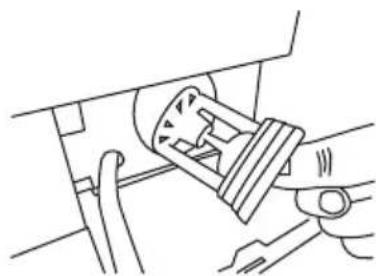
Replacing filter
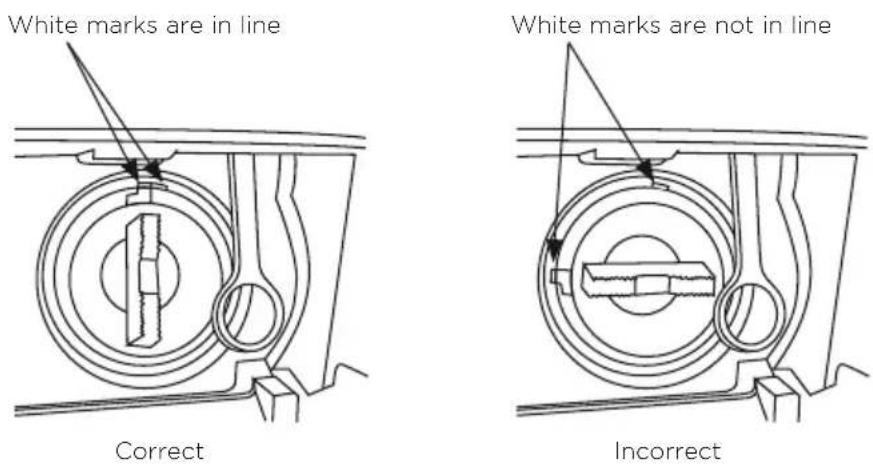
White mark on filter must be in line with white line on pump housing
Cleaning the hose(s)
Each hose has a filter in it, preventing any solid contaminants in the water entering your washing machine. Occasionally you should disconnect the water inlet hose(s) where they connect to the faucet(s). Check these for any build up of dirt and wash this out.
Diaper sanitizers/bleach
Diaper sanitizers and bleach are very corrosive to metal surfaces. DO NOT tip the contents of a diaper bucket into your machine. Rinse and wring items out thoroughly before placing them in the machine.
Moving your washer
If you need to move your washer a considerable distance (eg moving house), remember to replace the transit bolts before moving it. These will protect internal components of the washer from damage.
To replace the transit bolts, pull out the bolt-hole covers in the back of the machine. Push the transit bolt rubber grommets and plastic spaces into the hole left and tighten it with the wrench provided with the product.
Make sure any water in the washer is drained out. This can be done by cleaning out the pump filter (refer to 'Caring for your washer' section 'Cleaning the pump filter').
IMPORTANT!
- Leave the door to your washer open when it is not in use to allow the washer to dry out, otherwise it will develop unpleasant odors. When leaving the door open like this, it is extremely important that children and pets are kept away from the washer so they cannot be accidentally trapped inside it.
- Aside from the detergent dispenser, water hose(s), and the pump filter, no other parts are designed to be removed from the machine for cleaning. Do not attempt to remove any other part of the machine.
User warnings
Your washer is capable of diagnosing a number of its own problems. In most cases, your washer will sound a continuous series of beeps and display a code when it has a problem that you can correct yourself. All control panel lights will turn off and the code will be displayed to inform you what the problem is. To stop the beeps, press any button on the control panel. Do not try to continue washing once you stop the noise. You must address the problem the washer is alerting you to.
Check this chart before you call for service.
| PROBLEM DISPLAYED AS WHAT TO DO | |
| Keylock is activated | KEY LOC |
| Pump filter is blocked | CLr FLER |
| Water is not getting to the machine | no ETRP |
| out OF BRL | |
| PROBLEM DISPLAYED AS WHAT TO DO | ||
| Too many suds | SUD LOC | Machine will stop and flash while waiting for suds to dissipate. The machine will not beep during this time. When the suds have dissipated, the machine will automatically restart. |
| Check you are using a suitable detergent. | ||
| Check you are not overdosing the detergent. | ||
| Check the standpipe height for the drain does not exceed 47 1/5" (1200mm). | ||
| Door is locked | door locked | The temperature in the drum is over 140°F (60°C) therefore it is not safe to open the door. Wait until the temperature drops below 140°F (60°C). |
| Check the water level in the drum. If the level is above the bottom of the door seal, the door cannot be opened. Use the 'Add a Garment' button if you wish to add or remove items. | ||
| If the drum is still moving, wait for it to stop before attempting to open the door. | ||
| Door is open | door OPEN | Close the door fully and touch ➔ ➔ |
| Try opening and closing the door again. | ||
| Reposition the load, make sure the load is correctly in the drum and that protruding items are not stopping the door from closing. | ||
When a continuous series of beeps is sounded, all the lights turn off on the control panel and a number appears on the display, a fault has occurred. The washer will automatically enter this mode if a fault occurs. The fault code will be displayed as Err followed by a number on the digital display. To stop the sound, touch any button and perform the following steps:
① Turn your machine off at the power point.
② Wait one minute and turn it back on.
③ Check your machine is correctly leveled (refer to page 10).
④ Remove your wash load.
⑤ Perform a 'Rinse' cycle.
⑥ If the fault re-occurs repeat steps ① and ②.
If the machine still will not work you will be required to call a Fisher & Paykel trained and supported service technician to arrange service (refer to the 'Limited warranty' section). Record the fault code number displayed and the serial number of your washer (located on the rear of the machine, and/or above the drum opening when the door is open) before calling. The fault code will indicate to the Repairer what the problem could potentially be.
If a fault code is being displayed, you can still turn your washer off by pressing 'POWER'.
The following is a list of problems you may encounter when using this appliance and some suggestions that may help to correct the problem. If you still have problems, please contact your Fisher & Paykel trained and supported service technician.
Solving operating problems
| PROBLEM POSSIBLE | CAUSES WHAT TO DO | |
| Washer not turning on | Power not switched on at the wall. | Switch the power on at the wall. Then press ‘POWER’. |
| Household power supply not working. | Try plugging in another electrical appliance. | |
| Keylock may be activated. Touch and hold the ‘Keylock’ button for 2 seconds (refer to page 35). | ||
| Touching ➔II does not start the fill | Washer door not closed properly. | Open and reclose door. |
| The washer is waiting for a command from you. | If ➔II is flashing then the washer is waiting for a command from you. | |
| The washer has detected a fault. | Check if a code is being displayed on the panel (refer to pages 40 - 42). | |
| Hot and cold faucets not turned on. | Check that both hot and cold faucets are turned on. | |
| Hot and cold faucets not connected to the corresponding valve on the machine. | Check the cold faucet is connected to the cold valve on the machine and the hot faucet is connected to the hot valve (if present). | |
| Blocked hose filters. Check the faucet end of the inlet hose(s) for blockages. | ||
| Inlet hose leaking, twisted or damaged. | Check the inlet hose for leaks or damage. Check that the inlet hose is not twisted. | |
| Faulty water supply. Check faucets that aren’t connected to the machine are working. | ||
| Delay start maybe set. Refer to page 35. | ||
| Washer stops working mid cycle | The washer has detected a fault. | Refer to pages 40 - 42. |
| Power or water failure. Check the power and/or water is working correctly. | ||
| Washer has been paused. | Touch the ➔II button to continue. | |
| Too many suds. Washer is waiting for suds to dissolve before continuing the cycle. | ||
Solving operating problems
| PROBLEM POSSIBLE CAUSES WHAT TO DO | ||
| Washer drains while filling | Drain hose too low. Ensure the height of the drain hose is at least 31 1/2" (800mm) from the floor level (refer to page 13). | |
| Drain hose sitting in water. Clear the drain. | ||
| Washer is not draining | Drain hose blocked. Clear the drain hose. | |
| Pump filter blocked. Clear the pump filter (refer to page 38). | ||
| Drain hose higher than 47 1/5" (1200mm) above floor level. | Lower the level of the drain hose (refer to page 13). | |
| Filling continuously | Drain hose not connected to standpipe or tub. | Connect drain hose correctly (refer to page 13). |
| Machine siphoning. Ensure standpipe or tub is at least 31 1/2" (800mm) from the floor level. | ||
| Poor rinsing Incorrect detergent used. Use low sudsing, front loader detergent only (refer to page 26). | ||
| Too much detergent used. Ensure the correct dose of detergent is used for the load size and soil level (refer to page 28). | ||
| Not spinning properly | Load has gone out of balance. | Open door and redistribute load, then restart the washer. |
| Machine is not level. Ensure machine is correctly leveled (refer to page 10). | ||
| Suds build up. Check the amount of detergent used, reduce if necessary. | ||
| Too many soap suds | Incorrect type of detergent used. | Use low sudsing, front loader detergent only (refer to page 26). |
| Too much detergent used. Ensure the correct dose of detergent is used for the load size and soil level (refer to page 28). | ||
Solving operating problems
| PROBLEM POSSIBLE | CAUSES WHAT TO DO | |
| Small puddle of water from under the machine | Inlet hose or drain hose leaking. | Check inlet hose(s) and the drain hose are correctly attached and not damaged. |
| Lots of suds. Suds may have leaked and then dissolved. | ||
| Detergent dispenser blocked. | Clean detergent dispenser drawer (refer to page 37). | |
| Detergent dispenser drawer not fully closed. | Close detergent dispenser drawer fully and ensure it remains closed during the cycle. | |
| Damage to door seal. Check seal inside door for damage. If it sustains any damage it will need to be replaced. | ||
| Cycle time longer than usual/Inaccurate time reading/ Adjustment of time remaining during cycle | Wash time is approximate. Wash time may be influenced by a number of factors (refer to page 22). | |
| Low water pressure or flow rate. | Ensure that inlet hose filters are not blocked. | |
| Out of balance or oversudsing. | Recovery from out of balance or oversudsing will extend cycle time (refer to pages 40 - 41). | |
| Washing a large load. Be aware that it will take longer for the machine to fill. | ||
| Selecting various options. Be aware that some options will extend cycle time. | ||
| Detergent or fabric softener remaining in detergent dispenser at the end of the cycle | Detergent drawer not properly closed or was opened part way through the cycle. | Ensure the detergent dispenser drawer is fully closed at the start of the cycle and remains closed throughout the cycle. |
| Dirty or blocked detergent dispenser. | Clean the detergent dispenser (refer to page 37). | |
| Liquid sitting at the 'Max' level at the end of the cycle indicates a blockage. | Clean the fabric softener dispenser (refer to page 37). | |
| Dispenser over loaded with detergent. | Clean out remaining detergent and refer to page 28 for dosing information. | |
Solving operating problems
| PROBLEM POSSIBLE | CAUSES WHAT TO DO | |
| Washing very wet at the end of the cycle | Cycle selected not appropriate. | Particularly short or delicate cycles have shorter spins which can result in wetter washing at the end of the cycle. |
| Incorrect spin speed for load selected. | Select a faster spin speed. | |
| An out of balance load has occurred. | The washer compensates for the out of balance by using a lower spin speed, to reduce noise and potential damage to itself. | |
| Vibrating | Transit bolts left in place. | Ensure transit bolts are removed prior to use of the machine (refer to page 9). |
| Washer may not be level. Ensure washer is installed on an appropriate surface and leveled correctly (refer to page 10). | ||
| Load is out of balance. Wash | an average sized load rather than a smaller load or a single item. Washing one item at a time is not recommended as it is difficult for the washer to balance a single item during spin. | |
Solving wash problems
| PROBLEM POSSIBLE CAUSES WHAT TO DO | ||
| Creasing Washer overloaded. Do not overload washer. | ||
| Incorrect cycle for load type. | Use the 'Perm Press' or 'Delicate' cycle for creasable items. | |
| Spin speed too fast. Select a slower spin speed. | ||
| Wet clothes left in washer or laundry basket. | Laundry left sitting wet is more likely to crease. If not removing clothes from washer immediately at end of cycle, select the 'Wrinkle Free' option. Do not leave wet washing sitting in a washing basket. | |
| Wash temperature too hot for load type. | Select a lower wash temperature. Check items care label for correct care. | |
| Items not sorted correctly. | Sort load so that items of similar weight are washed together (refer to page 24). | |
| Poor soil Removal | Incorrect wash cycle selected. | Select a wash cycle that is appropriate for the amount of dirt (refer to pages 30 - 31). |
| Insufficient detergent. Ensure the correct dose of detergent is used for the load size and soil level (refer to page 28). | ||
| Washer overloaded. Ensure the washer is not overloaded in terms of its capacity or the cycle selected (refer to pages 30 - 31). | ||
| Load was particularly dirty. | Select 'Pre Wash' and/or 'Steam' for particularly dirty loads (refer to page 33). | |
| Items not sorted correctly. | Wash heavily and lightly soiled garments separately. | |
| Washer dirty from previous wash. | After washing particularly dirty clothing, we recommend putting the washer through a 'Rinse' cycle after the load has been removed, to wash away any remnants of dirt and to prevent it contaminating future washes. | |
| Incorrect wash temperature selected in relation to the type of soil. | Select a wash temperature suitable for the type of soil, eg warm for greasy soils, cold for muddy soils. Increasing the wash temperature generally improves soil removal and overall wash performance. | |
Solving wash problems
| PROBLEM POSSIBLE | CAUSES WHAT TO DO | |
| Dye transfer Colored | items not washed separately from white/light colored items. | Remember to separate whites and colors. |
| New or non-colorfast items not washed separately. | Wash non-colorfast items separately and select 'Cold' wash temperature. | |
| Wet items have been left sitting for too long. | Remove items from washer as soon as the cycle is finished, or if items are not to be removed from the washer immediately select 'Wrinkle Free'. | |
| Wash temperature. Consider the wash temperature you select for your colored items. Lower the temperature if you are concerned. | ||
| Black or grey marks on clothes | Correct amount of detergent. | Ensure the correct dose of detergent is used for the load size and soil level (refer to page 28). |
| Washer needs to be cleaned. | Empty the machine and complete a 'Drum Clean' cycle (refer to page 37). | |
| Tangling Items not sorted correctly. Separate larger items from smaller items. | ||
| Washer loaded incorrectly. Load items loosely and individually into the washer (ie not folded). | ||
| Incorrect cycle for load type selected. | Use the 'Perm Press' cycle to wash shirts. | |
| Washer overloaded in terms of its capacity or the cycle selected. | Try washing average to smaller load sizes. | |
| Delicate items. Wash pantyhose, bras and any other delicate items prone to tangling in a mesh laundry bag. | ||
Contact a Fisher & Paykel trained and supported service technician if a problem persists.
When you purchase any new Fisher & Paykel FabricSmart™ or WashSmart™ clothes washer product for personal or consumer use you automatically receive a two year limited warranty covering parts and labor for servicing within the 48 mainland United States, Hawaii, Alaska, Washington DC and Canada. You also receive an additional eight year parts only limited warranty on the direct drive motor part only. This additional eight year limited warranty commences on the day following the expiry of the two year limited warranty and excludes the motor controller and labor. Products for use in Canada must be purchased through the Canadian distribution channel to ensure regulatory compliance.
Fisher & Paykel undertakes to:
Repair or at its option replace without cost, with limited exceptions described herein, to the owner either for material or labor any part of the product, the serial number of which appears on the product, which is found to be defective. In Alaska only, neither the two year limited warranty nor the additional eight year direct drive motor part only limited warranty include the cost of transport of your product and you must pay to ship the product to the service shop or the service technician's travel to your home. If the product is installed in a motor vehicle, boat or similar mobile facility, you receive the same two year limited warranty, and, if your product qualifies, additional eight year direct drive motor part only limited warranty (excluding the motor controller and labor) but you must bring the vehicle, boat or mobile facility containing the product to the service shop at your expense or pay the service technician's travel to the location of the product. For any product covered by the additional eight year direct drive motor part only limited warranty, Fisher & Paykel will also repair (as to parts) or, at its option, replace any direct drive motor (but not the motor controller) which is found to be defective within eight years following the expiry of the two year limited warranty. You will be responsible for any labour costs. If we are unable to repair a defective part of the product after a reasonable number of attempts, at our option we may replace the part or the product, or we may provide you a full refund of the purchase price of the product (not including installation or other charges).
These limited warranties extend to the original purchaser and any succeeding owner of the product during the term of the warranty for products purchased for ordinary single-family home use.
All service under the above limited warranties shall be provided by Fisher & Paykel or its Authorized Service Agent during normal business hours.
How long do these limited warranties last?
Our liability under the two year limited warranty expires TWO YEARS from the date of purchase of the product by the first consumer. The additional direct drive motor part only limited warranty expires eight years after the expiration of the two year limited warranty.
Our liability under any implied warranties, including the implied warranty of merchantability (an unwritten warranty that the product is fit for ordinary use) also expires TWO YEARS (or such longer period as required by applicable law) from the date of purchase of the product by the first consumer. Some States do not allow limitations on how long an implied warranty lasts, so this limit on implied warranties may not apply to you. Fisher & Paykel will honor any warranty required by the law of the particular country or state in which the product is sold.
These limited warranties do not cover:
Service calls that are not related to any defect in the product. The cost of a service call will be charged if the problem is not found to be a defect of the product. For example:
① Correcting faulty installation of the product.
② Instructing you how to use the product.
③ Replacing house fuses, resetting circuit breakers, correcting house wiring or plumbing, or replacing light bulbs.
④ Correcting fault(s) caused by the user.
⑤ Changing the set-up of the product.
Unauthorized modifications of the product.
⑦ Noise or vibration that is considered normal, for example, drain/fan sounds or user warning beeps.
⑧ Correcting damage caused by pests, for example, rats, cockroaches, etc.
Defects caused by factors other than:
(1) Normal domestic use or
② Use in accordance with the product's User guide.
Defects to the product caused by accident, neglect, misuse, fire, flood or 'act of God'.
The cost of repairs carried out by non-authorized repairers or the cost of correcting such unauthorized repairs.
E Travel fees and associated charges incurred when the product is installed in a location with limited or restricted access (eg airplane flights, ferry charges, isolated geographic areas).
F Normal recommended maintenance as set forth in the product's User guide.
⑥ Damage (including water damage) caused by faulty installation, plumbing or wiring.
If you have an installation problem contact your dealer or installer. You are responsible for providing adequate electrical, exhausting and other connection facilities.
We may not be responsible for consequential or incidental damages (the cost of repairing or replacing other property damaged if the product is defective or any of your expenses caused if the product is defective). Some States do not allow the exclusion or limitation of incidental or consequential damages, so the above limitation or exclusion may not apply to you..
How to get service
Please read your User guide. If you then have any questions about operating the product, need the name of your local Fisher & Paykel Authorized Service Agent, or believe the product is defective and wish service under this limited warranty, please contact your dealer or call us at:
USA and Canada
TOLL FREE 1.888.9.FNP.USA (1.888.936.7872)
or use the link at: www.fisherpaykel.com/locator/servicer/
You may be required to provide reasonable proof of the date of purchase of the product before the product will be serviced under this limited warranty.
Commercial use
If you are using the product in a commercial setting (any use other than a single family dwelling), we agree to repair or replace, without cost to you for parts only, any defective parts, the serial number of which appears on the product. Our liability for these repairs expires ONE YEAR from the date of original purchase.
At our option we may replace the part or the product, or we may provide you a full refund of the purchase price of the product (not including installation or other charges). All service under this limited warranty shall be provided by Fisher & Paykel or its Authorized Service Agent during normal business hours.
No other warranties
This limited warranty is the complete and exclusive agreement between you and Fisher & Paykel regarding any defect in the product. None of our employees (or our Authorized Service Agents) are authorized to make any addition or modification to this limited warranty.
Warrantor: Fisher & Paykel Appliances, Inc.
If you need further help concerning this limited warranty, please call us at above number, or write to:
Fisher & Paykel Appliances, Inc.
695 Town Center Drive, Suite 180
Costa Mesa
CA 92626
This limited warranty gives you specific legal rights, and you may also have other rights which vary from state to state.
Complete and keep for safe reference:
Model
Serial No.
Purchase Date
Purchaser
Dealer
City
State
Zip
Country
Introduction 57
Fisher & Paykel Appliances, Inc.
695 Town Center Drive, Suite 180
Costa Mesa
CA 92626
Fisher & Paykel Appliances 2017. All rights reserved.
The product specifications in this booklet apply to the specific products and models described at the date of issue. Under our policy of continuous product improvement, these specifications may change at any time. You should therefore check with your dealer to ensure this booklet correctly describes the product currently available.