EcoSmart WA42T26GW1 - Washing machine Fisher & Paykel - Free user manual and instructions
Find the device manual for free EcoSmart WA42T26GW1 Fisher & Paykel in PDF.


User questions about EcoSmart WA42T26GW1 Fisher & Paykel
0 question about this device. Answer the ones you know or ask your own.
Ask a new question about this device
Download the instructions for your Washing machine in PDF format for free! Find your manual EcoSmart WA42T26GW1 - Fisher & Paykel and take your electronic device back in hand. On this page are published all the documents necessary for the use of your device. EcoSmart WA42T26GW1 by Fisher & Paykel.
USER MANUAL EcoSmart WA42T26GW1 Fisher & Paykel
Installation instructions and User guide
Electric Shock Hazard
Read and follow the IMPORTANT SAFETY INSTRUCTIONS outlined in this User Guide before operating this appliance, pages 9 – 11.
Failure to do so can result in death, electric shock, fire or injury to persons.
Please note: To obtain maximum efficiency, your Ecosmart™ washer has the ability to learn and adapt to the local environment. This may take several wash cycles, therefore maximum energy efficiency may not be achieved until a number of wash cycles have been completed.
This usually takes about 5 cycles.
English Page 2 – 37
Français Page 39 – 68

CHANGE FOR THE BETTER WITH ENERGY STAR
As an ENERGY STAR® Partner Fisher & Paykel Limited has determined that this product meets ENERGY STAR® guidelines for energy efficiency.
Installation instructions 3
Important safety instructions 9
How to get started 12
About your Ecosmart ^™ 14
How Ecosmart™ works 14
Lid Lock 15
Wash cycles and options 16
The wash progress lights, The wash cycles 16
Wash options, Softener/Bleach rinse, Soak 17
Time saver, Water levels 18
Spin hold, Delay start, Clothes care safeguards 19
Customizing the wash cycles, Favorite cycle 20
Washing bulky items, Washing woollens 21
Cold water washing 21
Before you wash 22
Sorting and Loading 22
Bleach, Fabric softener, Scrud 23
Changing pre-set options 24
Option adjustment mode 24
Out of balance recovery routine 26
Auto water fill level 26
End of cycle beeps 27
Default rinse option 27
Volume of water used in the rinse (REGULAR cycle) 27
Controlled cold 27
Caring for your Ecosmart ^™ 28
Care and cleaning 28
Products that might damage your Ecosmart™ clothes washer 29
Ecosmart ^™ sounds and beeps 29
Automatic lint system 29
If your Ecosmart ^™ beeps for help 30
Operating problems 32
Wash problems 34
Limited warranty 35
Important!
SAVE THESE INSTRUCTIONS
The models shown in this User Guide may not be available in all markets and are subject to change at any time. For current details about model and specification availability in your country, please visit our local website listed on the back cover or contact your local Fisher & Paykel dealer.
Congratulations on purchasing a new Fisher & Paykel washing machine. We are very proud of our washers and trust they will serve you well for many years.
At Fisher & Paykel we aim to provide innovative products that are simple to use, ergonomic and energy efficient. Thousands of tonnes of washing and 75 years of laundry experience have been programmed into your washing machine to help give you the best possible performance.
We hope you enjoy your new washing machine, we have certainly enjoyed designing it.
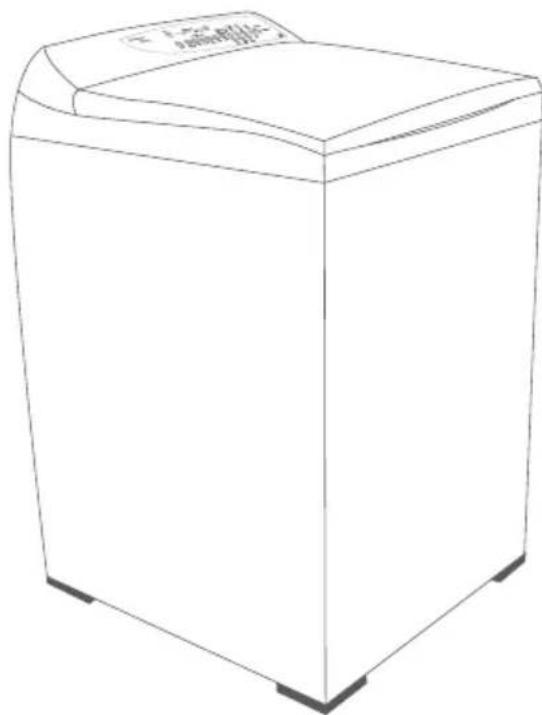
natural_image
Line drawing of a single washing machine with no text or symbols on the bodyFig.1 Ecosmart™ clothes washer
Important!
It is important that the User Guide should be retained with the appliance for future reference. Should the appliance be sold or transferred to another owner, always ensure that the User Guide is left with the appliance in order that the new owner can familiarize themselves with the appliance and the relevant warnings.
Before you begin – read these instructions completely and carefully.
WARNING!

Electric Shock Hazard
Read and follow the IMPORTANT SAFETY INSTRUCTIONS outlined in this User Guide before operating this appliance, pages 9 – 11.
Failure to do so can result in death, electric shock, fire or injury to persons.
Important!
Observe all governing codes and ordinances.
Installation requirements
Location
Your washer must be installed on firm flooring to minimize vibration during spin cycles. Concrete flooring is best, but wood base is sufficient providing the floor support meets FHA standards.
Your washer should not be installed on rugs or exposed to the weather.
Plumbing
Water temperature
Your cold water should not exceed 95^ F ( 35^ C) or your hot water exceed 150^ F ( 65^ C).
Temperatures above this may damage your washer.
Shut off valves
Both hot and cold shut-off valves (faucets) should be available in the laundry area.
Drain
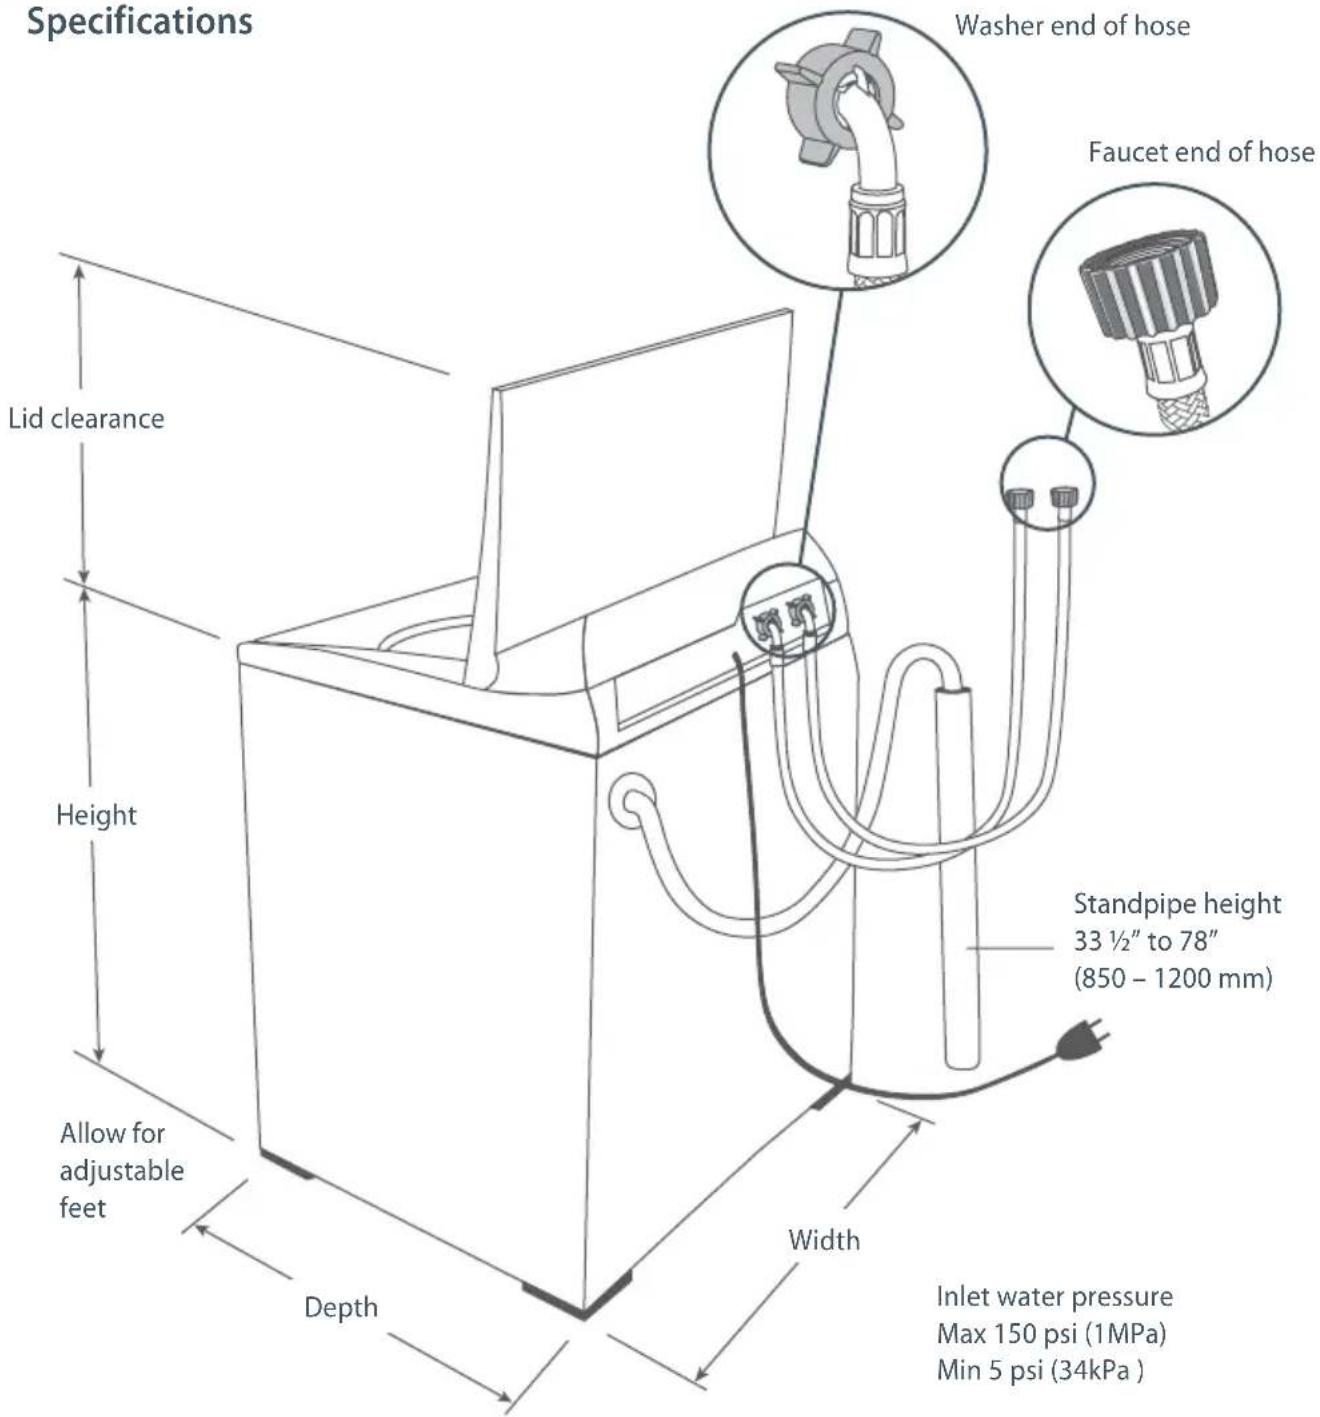
Water may be drained into a standpipe or set tub. The standpipe must be 112 " (38 mm) minimum interior diameter and must be open to the atmosphere.
Electrical
This appliance must be supplied with 110V – 120 V, 60 Hz electrical supply and connected to an individual, properly grounded branch circuit, protected by a 15 or 20 amp circuit breaker or time delay fuse.
text_image
Specifications Lid clearance Height Allow for adjustable feet Depth Width Washer end of hose Faucet end of hose Standpipe height 33 ½" to 78" (850 - 1200 mm) Inlet water pressure Max 150 psi (1MPa) Min 5 psi (34kPa)Fig.2 Washer dimensions and connections
Dimensions
| Model All models | |
| Depth 25 12 " (650 mm) | |
| Width 25 12 " (650 mm) | |
| Height to top of console 40" – 41 34 " (1020 – 1060 mm) | |
| Height lid open 55" – 56 34 " (1400 – 1440 mm) | |
Removing the packaging
To ensure the best performance from your new washer, please follow the instructions below.
Removing the bottom packer
1 Remove outer packaging.
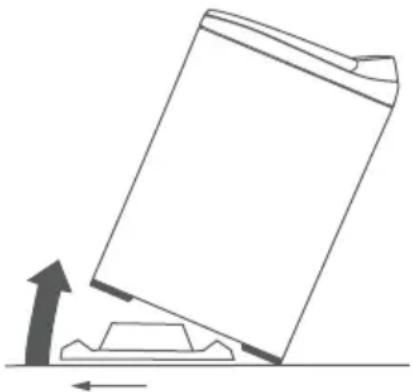
2 Tilt the machine backwards and walk the machine off the bottom packer one foot at a time. The bottom packer can now be removed by pulling it out the front.
Caution!
Operating the washer when the tub packer is in place can result in damage to the washer.
Removing basket packer and accessories
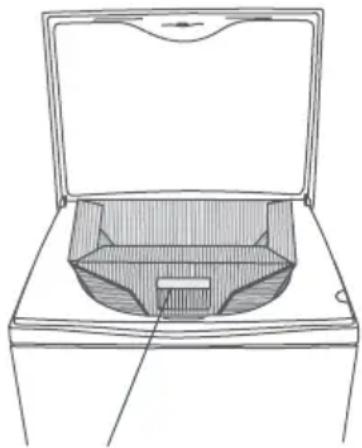
3 Lift the lid and remove cardboard tub packer from the top of the washer basket.
4 Remove hoses, accessories and installation pack.
5 Keep the bottom packer and tub packer in case they are required for future transit.
In your washer you will find:
■ 4 rubber inserts for the leveling feet.
■ 1 drain hose guide.
■ 2 inlet hoses.
Drain hose
1 Carefully pull the drain hose out from the back of the washer by pulling the exposed part of the hose downwards and then out.
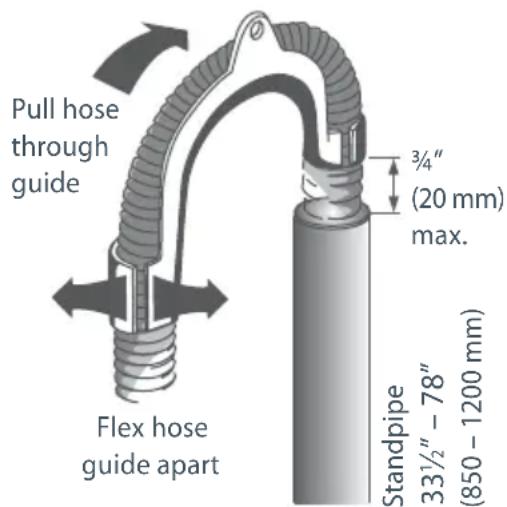
2 The hose guide is used to guide the drain hose over the tub or standpipe. It MUST be fitted to the drain hose.
To prevent siphoning:
The drain hose should not extend more than 34 " (20 mm) from the end of the guide.
The height of the standpipe or set tub/sink should be between 33 ^1/2 " to 78" (850 - 1200 mm).
If necessary, the drain hose can be trimmed to length.
3 Place the drain hose in the laundry tub or standpipe.
natural_image
Simple line drawing of a tilted rectangular object with an upward arrow and base, no text or symbols present.Fig.3 Tilt washer backwards to remove packer
natural_image
Line drawing of a box with an open lid and internal compartments (no text or symbols)Tub packer
Fig.4 Remove tub packer
text_image
Pull hose through guide 3/4" (20 mm) max. Flex hose guide apart Standpipe 33½" - 78" (850 - 1200 mm)Fig.5 Fitting the drain hose guide
Important!
In multi-storey apartments or any upper floor installation, the machine should be installed on a drained floor.
- Check that the tub or standpipe is free from lint or other obstructions before operating the washer.
In basement installation do not exceed a standpipe height of 96" (2438 mm).
Inlet hoses
1 Install hoses with the straight end (with filters) fitted to the faucets (Fig.6).
2 Install elbow ends onto washing machine (Fig.6).
Inlet valves are marked on the back of the machine
H=Hot C=Cold
3 Ensure the hot is connected to the hot, and the cold is connected to the cold.
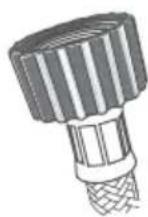
Faucet end of hose
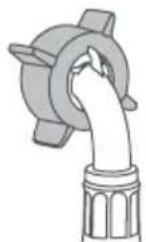
Washer end of hose
Fig.6 Inlet hose ends
Note: if there is a cold water supply only, an inlet valve cap (available from Fisher & Paykel) MUST be connected to the hot valve. The cap prevents water leaking from the hot valve. However, we recommend this product is connected to both hot and cold water.
Leveling the washer
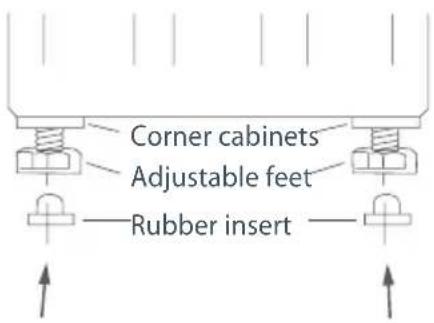
1 Unscrew the feet so the machine is NOT sitting on the corner cabinets, then fit the rubber leveling inserts (Fig.7).
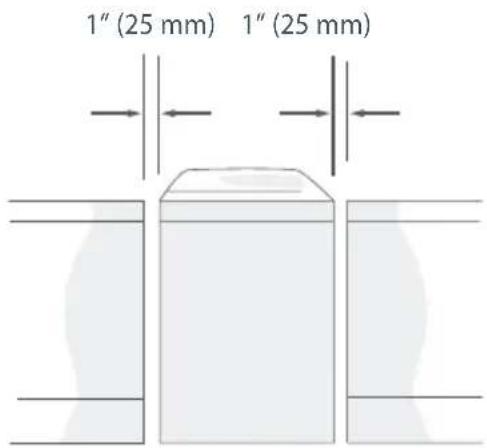
2 Move the washer into its final position. We suggest a minimum clearance of 1" (25 mm) on each side for ease of installation (Fig.8).
3 It is IMPORTANT to level the washer to ensure proper performance during spin.
Adjust the feet by unscrewing/screwing to make sure the washer is level and cannot rock.
4 Use the walls and adjacent counter tops as a sight guide to check to see if washer appears level. Readjust the feet if necessary.
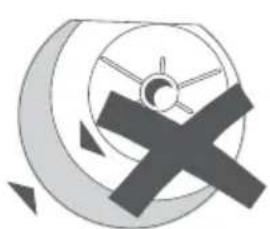
5 Open the lid and check the washer basket to see that it sits slightly forward of centre (Fig.9).
text_image
Corner cabinets Adjustable feet Rubber insertFig.7 Adjusting leveling feet
text_image
1" (25 mm) 1" (25 mm)Fig.8 Minimum clearance
natural_image
Pure mechanical diagram showing a circular component with a cross mark and directional arrows, no text or symbols present.Incorrect adjustment

natural_image
Abstract geometric design with concentric circles and a diagonal arrow, no text or symbols present.Correct adjustment
Fig.9 To check leveling look down on the wash basket
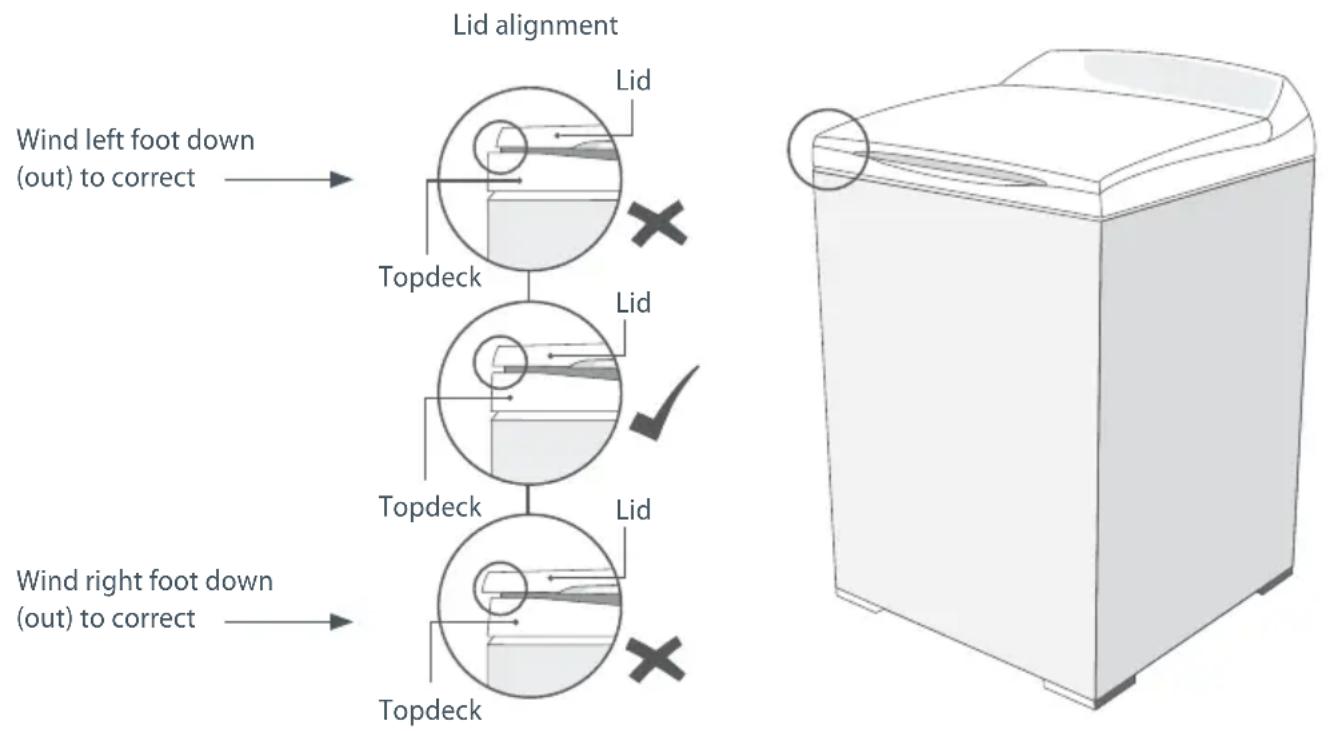
6 Close the lid. Visually check that the lid and topdeck are aligned. If not aligned, adjust the feet again until the lid and topdeck match (Fig.10).
7 Turn on water and check hose connections for leaks. Check that there are no kinks in the hoses.
Important!
Check all connections for leaks after turning faucets on, and again after 24 hours.
8 Uncoil the power cord, remove and discard the plastic pin cover and plug into wall socket.
text_image
Lid alignment Wind left foot down (out) to correct Topdeck Lid Lid Topdeck Lid Topdeck Lid Wind right foot down (out) to correctFig.10 To assess leveling check lid alignment
Operation
1 Check for leaks, noise, vibration, correct water temperatures and proper operation in spin. Check that the lid locks during spin.
2 Turn hot and cold water faucets off when washer is not in use.
Special instructions
The washer may give warning signals when low water pressure, or drain problems are encountered. See "If your Ecosmart™ beeps for help" (page 30).
If further help is needed concerning this appliance, refer to 'Service', page 37.
Special requirements for alcove or closet installation
The minimum ventilation clearance between the washer and adjacent walls or other surfaces is:
1" (25 mm) minimum either side and front. 3" (75 mm) minimum rear.
Consideration must be given to providing adequate clearance for installation and servicing.
The minimum vertical space required from floor to overhead shelves, cabinets, ceilings, etc is 59" (1500 mm).
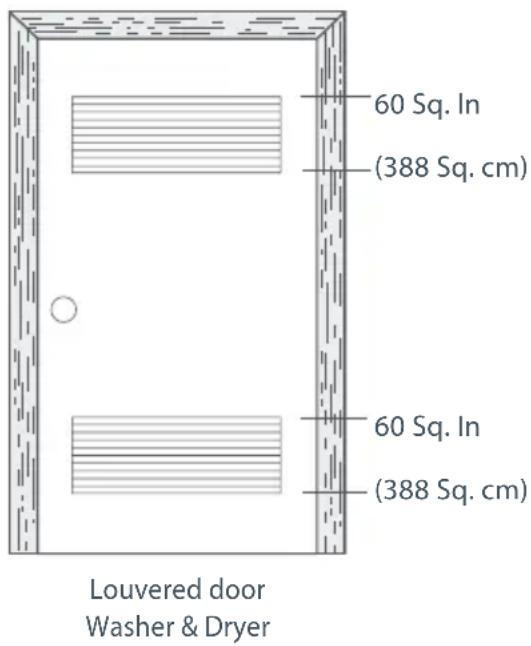
Closet doors must be louvered or otherwise ventilated and have at least 60 square inches open area for a washer only, or if the closet contains both a washer and dryer, doors must contain at least 120 square inches of open area equally distributed.
text_image
60 Sq. In (388 Sq. cm) 60 Sq. In (388 Sq. cm) Louvered door Washer & DryerFig.11 Minimum ventilation clearance
Caution!
Do not install this appliance in a closet with a solid door.
Mobile home installation
Installation must conform to the STANDARD FOR MOBILE HOMES, ANSI A119.1 and NATIONAL MOBILE HOME CONSTRUCTION & SAFETY STANDARDS ACT OF 1974 (PL93-383).
Grounding instructions
This appliance must be grounded. In the event of malfunction or break down, grounding will reduce the risk of electric shock by providing a path of least resistance for electric current. This appliance is equipped with a cord that has an equipment-grounding conductor and a grounding plug. The plug must be plugged into an appropriate outlet that is properly installed and grounded in accordance with all local codes and ordinances.
WARNING!
Improper connection of an equipment-grounding conductor can result in a risk of electric shock. Check with a qualified electrician or serviceman if you are in doubt as to whether the appliance is properly grounded.
Do not modify the plug provided with the appliance – if it will not fit the outlet, have a proper outlet installed by a qualified electrician.
Specification subject to change without notice.
Read all Safety Information before using
Many washers are located near a gas dryer or a water heater in the home.
WARNING!

Fire Hazard
For your safety the information in this manual must be followed to minimize the risk of fire or explosion or to prevent property damage, personal injury or loss of life.
Do not store or use gasoline or other flammable vapors and liquids in the vicinity of this or any other appliance.
Installation and service must be performed by a qualified installer, service agency or the gas supplier.
What to do if you smell gas
■ DO NOT try to light any appliance.
■ DO NOT touch an electrical switch; do not use any phone in your building.
- Clear the room, building or area of all occupants.
Immediately call your gas supplier from your neighbor's phone. Follow the gas supplier's instructions.
If you cannot reach your gas supplier, call the fire department.
Water heater safety
■ Under certain conditions hydrogen gas may be produced in a water heater that has not been used for two weeks or more.
Hydrogen gas can be explosive under these circumstances.
If the hot water has not been used for two weeks or more, prevent the possibility of damage or injury by turning on all hot water faucets and allowing them to run for several minutes before using any electrical appliance which is connected to the hot water system. This will allow any hydrogen gas to escape. Since the gas is flammable, do not smoke or use an open flame or appliance during this process.
WARNING!

Electric Shock Hazard
Follow the safety precautions outlined in this User Guide.
Failure to do so can result in death, electric shock, fire or injury to persons.
Safety precautions
- Read all instructions before using the appliance.
■ Use this appliance only for its intended purpose as described in this User Guide.
This washer must be properly installed and located in accordance with the Installation Instructions before it is used.
■ Properly ground to conform with all governing codes and ordinances. Follow details in the Installation Instructions. - Do not install or store washer where it will be exposed to temperatures below freezing or exposed to the weather.
■ Connect to a properly rated, protected and sized power supply circuit to avoid electrical overload.
■ Connect to adequate plumbing and drain facilities as described in the Installation Instructions. - Turn off water faucets when the washer is not in use to relieve pressure on hoses and valves and to minimize leakages if a hose or valve should break or rupture.
- Do not repair or replace any part of the appliance or attempt any servicing unless specifically recommended in this User Guide or in published user repair instructions that you understand, and have skills to carry out.
- When disconnecting the appliance pull by the plug rather than the cord or junction of cord to avoid damage to the cord or junction of the cord and plug.
■ Make sure that the cord is located so that it will not be stepped on, tripped over or otherwise subject to damage or stress. - Keep all laundry aids (such as detergents, bleach, fabric softener, etc) out of the reach of children, preferably in a locked cabinet. Observe all warnings on container labels to avoid personal injury.
■ Do not tamper with the controls. - Keep the area around/underneath your appliance free from the accumulation of combustible materials, such as lint, paper, rags, chemicals, etc.
- Keep the floor around your appliance clean and dry to reduce the possibility of slipping.
■ Never reach into the washer if the tub or agitator is moving.
Before loading, unloading or adding clothes, press START/PAUSE and wait until the machine has completely stopped before opening the lid. - Close supervision is necessary if this appliance is used by or near children. Do not allow children to play inside, or on, or with this appliance or any discarded appliance.
-
Dispose of discarded appliances and shipping/packing materials properly. Before discarding a washer, or removing from service, remove the washer lid.
Do not leave the washer lid up during the cycle. The machine will not function. To start, close lid and press START/PAUSE. -
Do not wash or dry articles that have been cleaned in, washed in, soaked in, or spotted with combustible or explosive substances (such as wax, oil, paint, gasoline, degreasers, dry-cleaning solvents, kerosene, etc) which may ignite or explode. Do not add these substances to the wash water. Do not use these substances around your washer and/or dryer during operation, as they give off vapors that could ignite or explode.
The laundry process can reduce the flame retardancy of fabrics. To avoid such a result, the garment manufacturer's care instructions should be followed very carefully. - Do not mix chlorine bleach with ammonia or acid such as vinegar and/or rust remover. Mixing can produce a toxic gas which may cause death.
■ Never climb on or stand on the washer top or lid. - Do not wash fiberglass articles in your washer. Skin irritation could result from the remaining particles that may be picked up by clothing during subsequent washer use.
- To minimize the possibility of electric shock, unplug this appliance from the power supply or disconnect the washer at the household distribution panel by removing the fuse or switching off the circuit breaker before attempting any maintenance or cleaning.
Note: Pressing the POWER button does NOT disconnect the appliance from the power supply, even though the lights are out. - Do not operate this appliance if it is damaged, malfunctioning, partially disassembled or has missing or broken parts, including a damaged cord or plug.
- Do not operate this appliance if the lid has been incorrectly fitted.
If you are using an extension cord or a portable electrical outlet device (eg multi-socket outlet box), ensure that it is positioned so that it does not come into contact with water or moisture. - Do not wash a total textile load (dry weight) of more than 17.6 lb (8 kg) in this washer.
SAVE THESE INSTRUCTIONS
■ Place load evenly around the agitator.
Note: don't wrap large items such as sheets around the agitator.
■ Remove the fabric softener dispenser.
A. Detergent
■ Follow the instructions on the detergent package.
■ Use the mark on the agitator, nearest to the top of the clothes, as a guide to the correct amount of detergent to use.
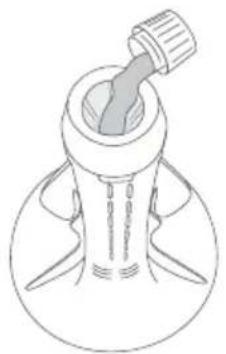
■ Pour the detergent down the center of the agitator stem.
- Replace the fabric softener dispenser, as this stops articles falling down the center of the agitator.

natural_image
Illustration of a medical procedure showing two steps: initial insertion and injection into a patient's ear canal (no text or labels)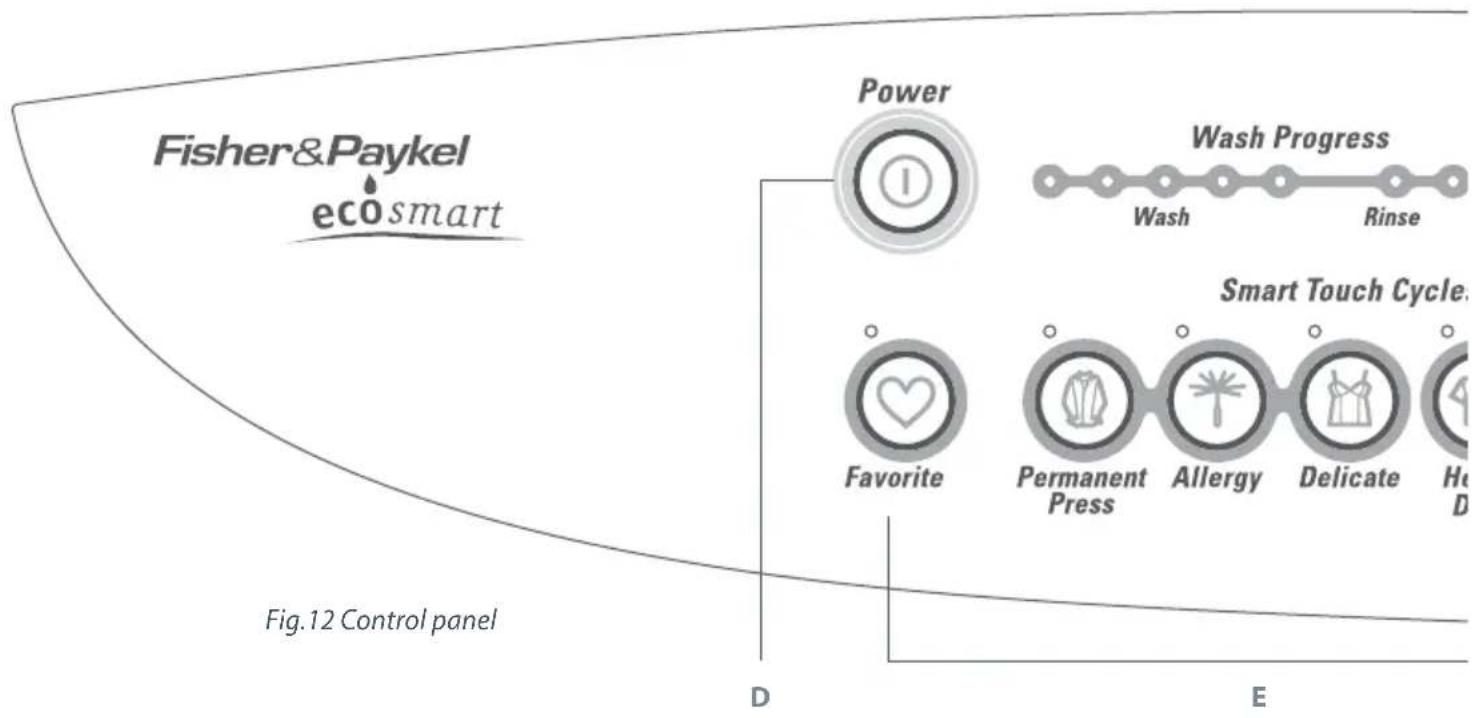
flowchart
graph TD
    A["Fisher&Paykel eco smart"] --> B["Power"]
    B --> C["Wash Progress"]
    C --> D["Rinse"]
    D --> E["Smart Touch Cycle"]
    E --> F["Permanent Press"]
    E --> G["Allergy"]
    E --> H["Delicate"]
    E --> I["Help"]
    style A fill:#f9f,stroke:#333
    style B fill:#ccf,stroke:#333
    style C fill:#cfc,stroke:#333
    style D fill:#fcc,stroke:#333
    style E fill:#cff,stroke:#333
    style F fill:#ffc,stroke:#333
    style G fill:#ffc,stroke:#333
    style H fill:#ffc,stroke:#333
    style I fill:#ffc,stroke:#333
B. Bleach
If you wish to use bleach:
■ Use half the recommended dose of bleach.
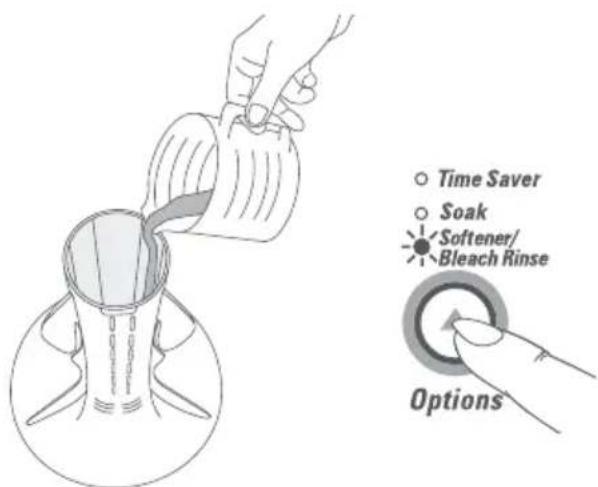
- Dilute bleach and pour carefully down the inner surface of the agitator stem, in-line with the fins (refer to Bleach page 23).
- Select the SOFTENER/BLEACH RINSE option. This will ensure that any residual bleach is well cleared out of your washer.
text_image
Time Saver Soak Softener/ Bleach Rinse OptionsC. Fabric softener
If you wish to use fabric softener, place it in the dispenser on the top of the agitator.
- Select the SOFTENER/BLEACH RINSE option so that the softener will be dispensed correctly into the final rinse (refer to 'Fabric softener' page 17 and 23).
D. Power
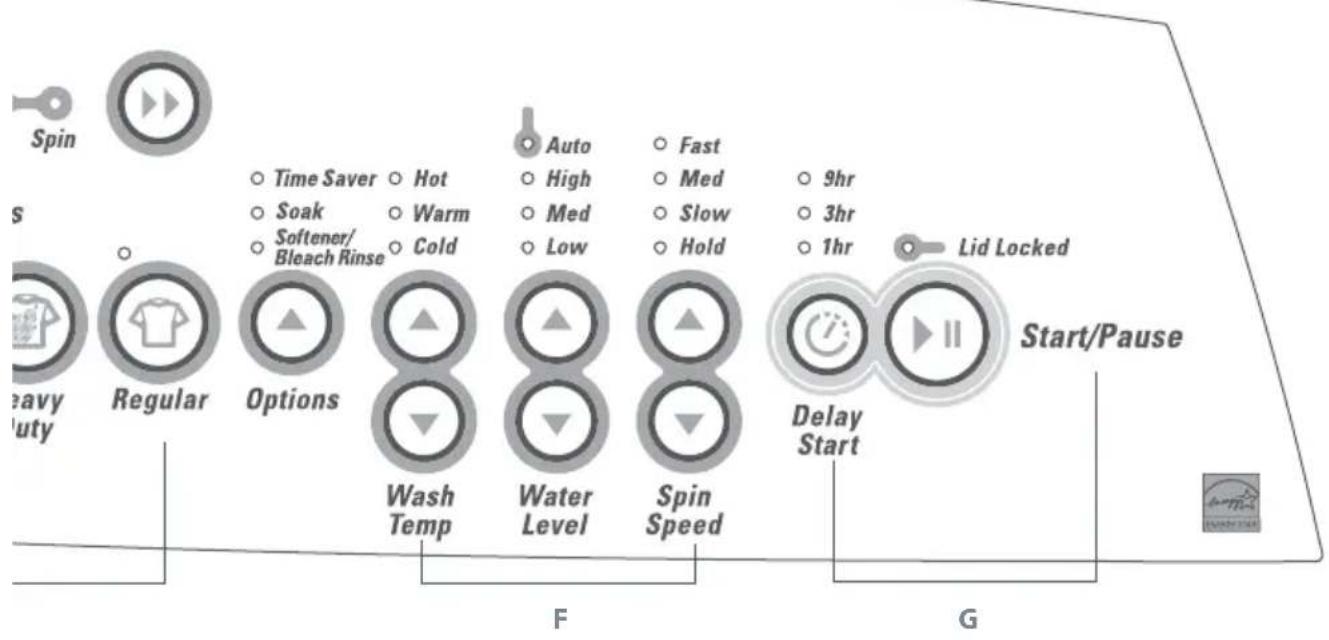
■ Turn your Ecosmart™ on by pressing the POWER button.
E. Wash cycle
- Close the lid and press your chosen wash cycle.
natural_image
Line drawing of a mechanical component with a central shaft and flange (no text or symbols)○ Time Saver
○ Soak
Softener/Bleach Rinse

Power
flowchart
graph TD
    A["Spin"] --> B["Regular"]
    B --> C["Options"]
    C --> D["Wash Temp"]
    D --> E["Water Level"]
    E --> F["Spin Speed"]
    F --> G["Delay Start"]
    G --> H["Lid Locked"]
    H --> I["Start/Pause"]

    style A fill:#f9f,stroke:#333
    style B fill:#f9f,stroke:#333
    style C fill:#ccf,stroke:#333
    style D fill:#cfc,stroke:#333
    style E fill:#cfc,stroke:#333
    style F fill:#cfc,stroke:#333
    style G fill:#fcc,stroke:#333
    style H fill:#fcc,stroke:#333
    style I fill:#fff,stroke:#333

    subgraph Category F
        J["Time Saver"] & K["Soak"] & L["Softener/Bleach Rinse"] & M["Hot"] & N["Warm"] & O["Cold"] & P["Auto"] & Q["High"] & R["Med"] & S["Slow"] & T["Low"] & U["Hold"] & V["9hr"] & W["3hr"] & X["1hr"] & Y["Lid Locked"]
    end

    subgraph Category G
        Z["Start/Pause"]
        AA["Lid Locked"]
    end
F. Wash options
- Select the wash temperature and other wash options (refer to pages 16 – 21).
G. Start
■ Press START/PAUSE to start the machine.
If you wish to stop your Ecosmart™
Press START/PAUSE.
- Wait until the machine has fully stopped, and the lid lock light is off, before opening the lid.
Important
For best fabric and color care remove your clothes as soon as the cycle has finished.
How Ecosmart™ works
The Fisher & Paykel Ecosmart's '2 in 1' wash system gives you the best of both worlds. Using a combination of front loader and top loader wash systems, the Ecosmart™ gives exceptional wash results, and, at the same time, taking better care of your clothes than a conventional top load washer.
Phase 1 – Eco Active™ wash
Front loader type wash
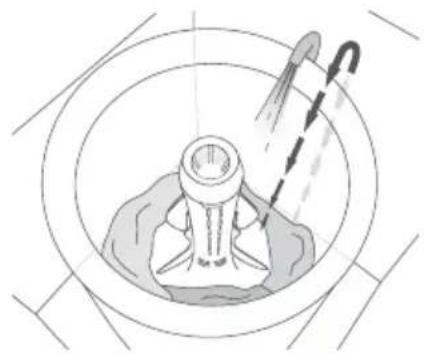
The Ecosmart™ fills the bowl, at the selected temperature, with just enough water so that the clothes are 100% saturated.
This small amount of sudsy water is circulated through the clothes, up the specially designed portal and back onto the clothes in a waterfall effect.
The chemical action provided by a small amount of water, combined with detergent, rapidly targets soil and stains at fiber level, boosting soil removal and accelerating the wash process.
Phase 2 – Top loader type wash
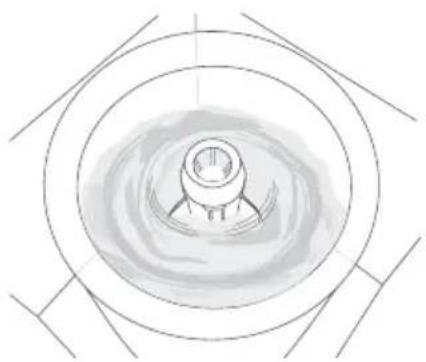
After 4 minutes, your Ecosmart ^™ will fill with just enough cooler water to suspend the soil in solution. Agitation will then begin, moving soil away from the clothes. Because of its head-start, the wash requires less agitation than a conventional top loader wash.
natural_image
Diagram of a medical procedure showing a catheter inserted into a patient's neck, with no visible text or labels.Fig.13 Phase 1 of wash system
natural_image
Top-down schematic of a circular mechanical component with concentric rings and central hub (no text or symbols)Fig.14 Phase 2 of wash system
Unique Fisher & Paykel spray rinse

natural_image
Six diagrams showing a beaker with liquid and a conical container, illustrating fluid flow or particle movement (no text or symbols)Spray Spin Spray Spin Spray Spin
Fig.15 Spray rinse
Lid Lock
Your Ecosmart ^™ has a lid lock. This ensures the lid cannot be opened during the cycle, providing added safety for you and your family.
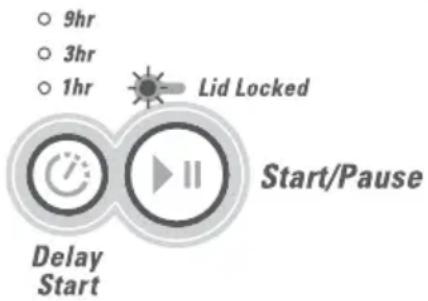
The LID LOCK light (above the START/PAUSE button) comes on when the lid is locked to tell you when you cannot open the lid.
text_image
9hr 3hr 1hr Lid Locked Start/Pause Delay StartFig.16 LID LOCK activated
If the LID LOCK light is flashing the lid lock is in the process of locking or unlocking (ie while the machine coasts down or START/PAUSE has been pressed). During this stage the lid still cannot be lifted.
If the lid is left open, the machine will be unable to lock the lid and the cycle will be halted. The machine will beep and the LID LOCK light will flash until the lid is closed and the START/PAUSE button is pressed.
Important
Do not put anything down the slot in the top deck of your machine.
Do not try to disable the lid lock.
The wash progress lights
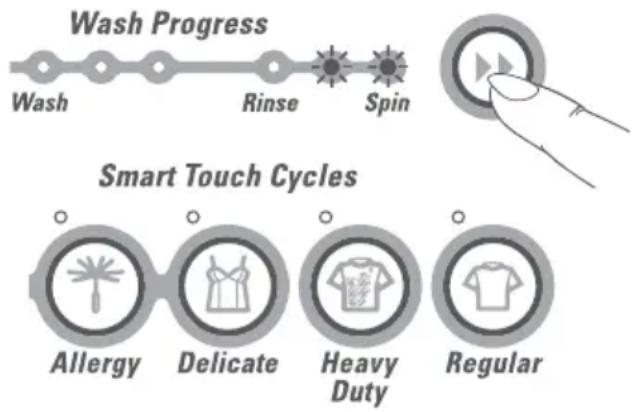
The wash progress lights show all the tasks your Ecosmart™ will complete during the wash cycle. As each task is completed a light goes out, so you can tell at a glance how far the cycle has to go.
Advancing the wash cycle
To shorten the wash time, to rinse and spin only, or to spin only:
1 Select the wash cycle.
2 Press ADVANCE repeatedly until only the required number of lights remain on.
3 Press START/PAUSE.
Note: the wash consists of two parts. The first amber light is essential for all washes except PERMANENT PRESS, therefore, you can only advance through the green lights, not the amber.
flowchart
graph LR
    A["Wash Progress"] --> B["Wash"]
    B --> C["Rinse"]
    C --> D["Spin"]
    D --> E["Smart Touch Cycles"]
    E --> F["Allergy"]
    E --> G["Delicate"]
    E --> H["Heavy Duty"]
    E --> I["Regular"]
Fig.17 Wash progress lights
| HEAVY DUTY REGULAR DELICATE ALLERGY | PERMANENT PRESS | ||||
| Eco Active Wash* 4 min 4 min 4 min | 4 min - | ||||
| Agitate time* 12 min | 9 min 6 min 9 min 9 min | ||||
| Wash action | HEAVY DUTY | REGULAR | DELICATE | REGULAR | REGULAR |
| Wash temp | WARM | WARM | WARM/COLD | HOT | WARM/COLD |
| Rinse | Spray rinse + cold deep rinse | Spray rinse + cold deep rinse | Spray rinse + cold deep rinse | 2 cold deep rinses | Spray rinse + cold deep rinse |
| Spin speed | FAST | FAST | SLOW | FAST | SLOW |
| Spin time | 6 min 6 min 4 min 6 min 2 min | ||||
* Does not include fill times.
The wash cycles
| HEAVY DUTY | For heavily soiled and heavy duty fabrics. |
| REGULAR | For medium to lightly soiled cottons, linens, work and play clothes. |
| DELICATE | For lingerie and special-care fabrics with light soil. |
| ALLERGY | Specially designed for asthma sufferers and people with sensitive skin. |
| PERMANENT PRESS | A more traditional wash for synthetics, blends, and/or delicate fabrics with normal soil and clothes which wrinkle easily. |
Note: condensation may form on the outside of the washer when using the ALLERGY cycle in cold weather. This is due to the hot water wash temperature and cold outside temperature, and is normal.
Wash options
When you press POWER to turn on your Ecosmart™, it will automatically select a:
■ REGULAR wash cycle
■ WARM wash temperature
AUTO water level
FAST spin speed
Each of these wash options can be altered to suit your wash needs. The following pages explain each of the wash options and how to use them.
In the following diagrams:
(*) = light is on () = light is off

text_image
Time Saver Soak Softener/ Bleach Rinse Hot Warm Cold Options Wash Temp Auto High Med Low Fast Med Slow Hold Water Level Spin SpeedNote: two lights are used to indicate warm/hot and warm/cold wash temperatures.
Fig.18 Selecting wash option
To select wash options
1 Select wash cycle.
2 Use the up or down arrows, or the options button, to select the wash options you want to use.
3 Press START/PAUSE.
Softener/Bleach rinse
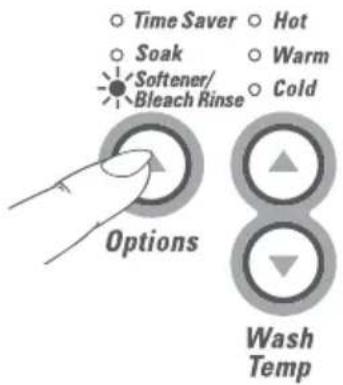
Use the SOFTENER/BLEACH RINSE option:
■ If you use liquid fabric softener.
If you use bleach.
This option changes the rinse to include a spray and deep rinse, so that the fabric softener/bleach will be dispensed correctly, and the machine sump will be thoroughly cleaned of bleach at the end of the cycle.
Note: we recommend the use of softener dryer sheets because liquid fabric softener has been known to cause an unpleasant build-up inside washing machines (refer to 'Scrud' page 23).
In addition, some wash loads are better washed using a cycle with a deep rinse. For instance, garments that have a lot of sand or sawdust in them, or garments where the color still runs. For these loads select the SOFTENER/BLEACH RINSE option, as this will change the rinse to include a deep rinse.
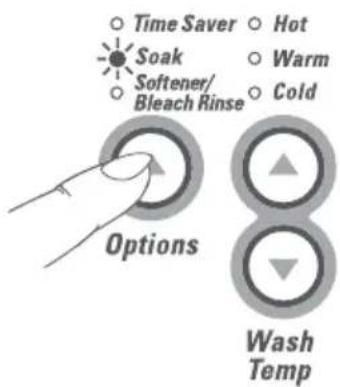
Soak
When you select SOAK your Ecosmart™ will stop at the end of wash and soak for 2 hours before completing the rinse and spin. During soak your washer will agitate for a few seconds every minute.
text_image
Time Saver Soak Softener/ Bleach Rinse Hot Warm Cold Options Wash TempFig.19 Selecting the SOFTENER/ BLEACH RINSE option
text_image
Time Saver Soak Softener/ Bleach Rinse Hot Warm Cold Options Wash TempFig.20 Selecting the SOAK option
Time saver
TIME SAVER allows you to shorten the wash cycle for lightly soiled clothes. Selecting this option reduces the wash and spin times.
Time saver can be turned on or off at any time during the cycle.
Water levels
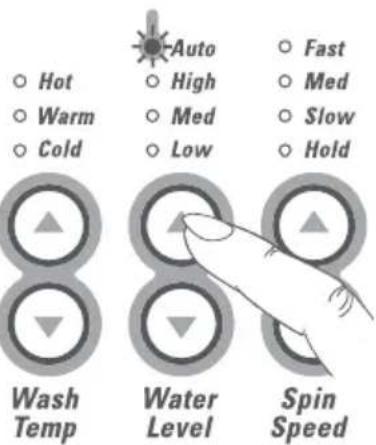
Auto water level
Your Ecosmart™ can automatically select the appropriate water level for the load.
1 Place your clothes in the machine and press POWER.
2 Select wash cycle (select AUTO water level if not automatically selected).
3 Press START/PAUSE.
During fill the machine will pause occasionally to sense the water level. The machine will check if the water level is correct by using a series of two different agitate strokes (this may take over a minute). If it detects that the water level is not enough, it will fill with more water and re-check the level.
- When washing an unusual load (eg large bulky garments, pillows), we recommend you manually select the water level and select the DELICATE cycle.
■ Manually select the water level if there is already water in the machine.
For a large bulky load or large single item (eg comforter) push the load down after the first fill.
Manual water level selection
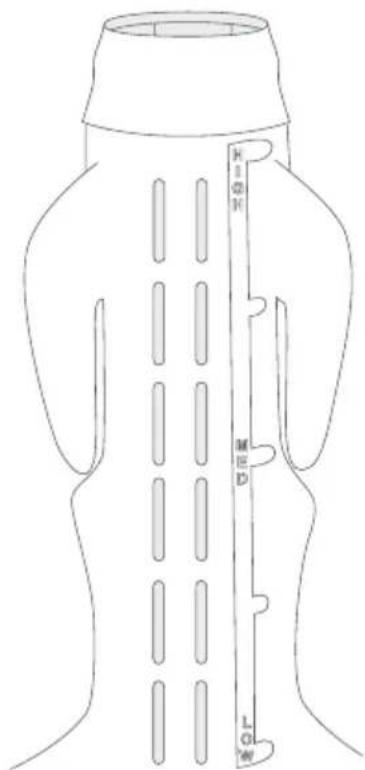
The agitator has five levels marked on its stem that can be used to help you select the correct water levels. Select the correct water level by using the mark nearest to the top of the clothes.
The levels marked on the agitator do not correspond exactly to the level of water. They indicate the level of dry clothes suitable for the water level.
- Your Ecosmart™ may occasionally add water during agitation. This is to maintain the water level due to the release of air trapped in the garments.
- Out of balance loads, tangling or splashover can be caused by selecting a water level that is too high.

Time Saver
○ Hot
○ Soak
○ Warm
Softener/
○ Cold


Fig.21 Selecting the TIME SAVER option
Wash Temp
text_image
Hot Warm Cold Auto High Med Low Fast Med Slow Hold Wash Temp Water Level Spin SpeedFig.22 Selecting the AUTO water level
text_image
H H1 H2 M M D T QFig.23 Water level guide on agitator
Spin hold
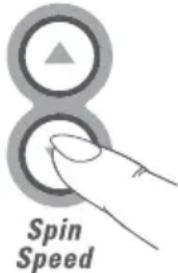
Use the SPIN HOLD option to:
■ Remove drip dry garments from a mixed load before the wash goes into spin.
- Minimize wrinkling that is caused when clothes are left sitting in the machine at the end of the cycle.
When SPIN HOLD is selected, your Ecosmart ^™ will pause at the end of rinse, beep and the spin light will flash to tell you that it is waiting for another instruction. Press START/PAUSE to begin the spin.
Delay start
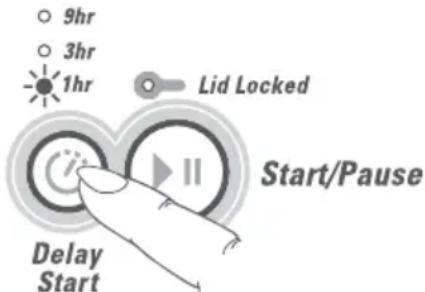
DELAY START will delay the start of the wash cycle for 1, 3 or 9 hours.
Press DELAY START once for a delay of 1 hour. Press again for 3 hours, a third time for 9 hours (and again to return to normal).
- Once you press DELAY START your Ecosmart™ will begin the delay period, you do not have to press START/PAUSE.
- Be careful if using DELAY START for non-colorfast clothes as dyes may run if the clothes are damp.
- Your Ecosmart™ will not beep at the end of the cycle if DELAY START is selected.

○ Slow
Hold
text_image
Spin SpeedFig.24 Selecting the SPIN HOLD option
text_image
9hr 3hr 1hr Lid Locked Start/Pause Delay StartFig.25 Selecting 1 hour DELAY START option
Clothes care safeguards
To avoid accidentally damaging your clothes, there are a few options that your Ecosmart™ will not accept. For example, you cannot select a hot wash on the DELICATE cycle.
Customizing the wash cycles
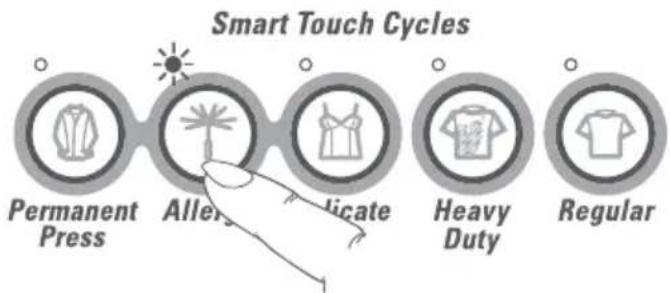
You can program your Ecosmart™ to remember the wash options you prefer for each wash cycle. For instance, you may want to set the REGULAR cycle to cold wash or set HEAVY DUTY to include a soak.
To customize a cycle
1 Press the POWER button.
2 Press selected WASH CYCLE button. Hold down for 4 seconds. You will hear two quick beeps and the wash cycle light will flash.
3 Select your wash options (eg cold wash, soak).
4 Press the WASH CYCLE button again to store your customized cycle.
When you are customizing a wash cycle, you can shorten or lengthen the agitation time.
- To shorten the agitation time, press ADVANCE to reduce the number of green lights.
- To increase the agitation time keep pressing ADVANCE until all the green lights are on. (On HEAVY DUTY you can only decrease the wash time.)
flowchart
graph LR
    A["Permanent Press"] --> B["Allery"]
    B --> C["Indicate"]
    C --> D["Heavy Duty"]
    D --> E["Regular"]
Fig.26 Customizing a wash cycle

flowchart
graph LR
    A["Wash"] --> B["Rinse"]
    B --> C["Spin"]
Fig.27 Customizing the wash progress
Note: unlike the FAVORITE cycle, you cannot customize a wash cycle to start at the rinse or spin stage.
Favorite cycle
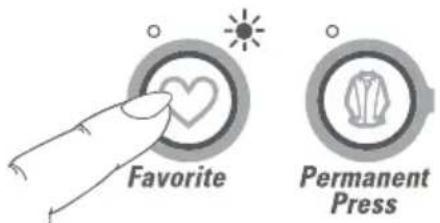
FAVORITE cycle lets you design your own wash cycle. FAVORITE can be any wash cycle with any of its wash options, and it can start from any point in the cycle.
To set your favorite cycle
1 Press the POWER button.
2 Press the FAVORITE cycle button. Hold down for 4 seconds until you hear two quick beeps and the FAVORITE light flashes.
3 Select your favorite cycle (eg REGULAR or DELICATE).
4 Select the wash options (eg SOAK, TIME SAVER). Use ADVANCE if you want part of a cycle (eg SPIN ONLY).
5 Press FAVORITE again to store your favorite cycle.
text_image
Favorite Permanent PressFig.28 The FAVORITE cycle
Note: your Ecosmart™ will remember your FAVORITE cycle, or any other cycle that has been customized, even when unplugged from the wall. It is not possible to program a delayed start into the FAVORITE cycle.
Washing bulky items
Make sure there is enough room in the machine for items to move when being washed. Forcing large items into the machine may result in them being damaged during washing.
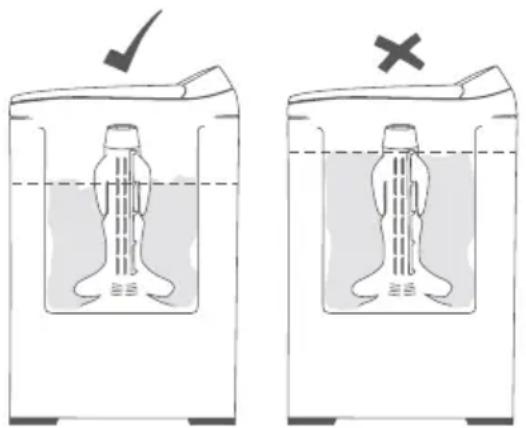
Some items float up during the wash (eg comforters and pillows). If they sit too high they may touch stationary parts of the machine during agitate or spin. To minimize the chance of this happening, bulky items should be pushed down below the water level after fill and pushed to sit below the medium high water level mark on the agitator before spinning. Select the correct water level manually. Select a SLOW spin.
natural_image
Two identical diagrams showing a container with liquid and a bottle inside, one marked with a checkmark (no text or symbols)Fig.29 Bulky items should sit below the medium high water level mark
Important!
To prevent an out of balance load we recommend washing these items on the DELICATE cycle. If you wish to re-spin the load at a faster speed make sure the load is sitting below the medium high mark before spinning.
Washing woollens
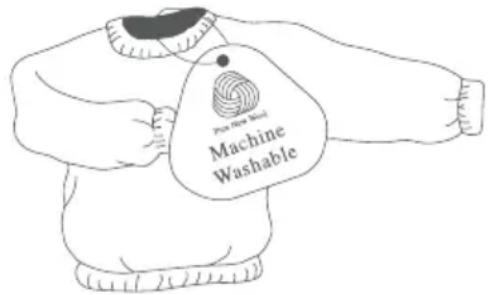
Some products carrying a MACHINE WASHABLE care claim. The fibers of these woollens have been treated to prevent felting when they are machine washed. Most handknitted garments are not made of machine washable wool and we recommend that you hand wash them.
text_image
Purs new hair! Machine Washable- Check the care label.
■ Use a wool detergent.
■ Use the DELICATE cycle and set to WARM temperature. - Hand washed woollens may be spun in your Ecosmart™.
■ To dry woollens lay them flat on a towel and pat into shape. Dry out of direct sunlight. - Some wool underlays and sheepskin products can be washed in a washing machine but may produce excessive amounts of lint that may cause pump blockages.
Cold water washing
If you always use cold water, we recommend that you run a warm Permanent Press wash at regular intervals, eg every 5th wash.
Important!
Please do not, under any circumstances, attempt to wash an electric blanket in your Ecosmart™ washer.
- Washing curtains in your Ecosmart™ washer is not recommended. Sunlight makes them brittle and they may disintegrate during washing.
Sorting
To get the best wash results sort your clothes before washing.
Color
Sort white fabrics from colored fabrics.
Care labels
The care label will tell you about the fabric of the garment and how it should be washed.
Soil
Sort clothes according to the type and amount of soil. Some soils suit warmer washes (eg oily soils) while others are best washed in cold water (eg mud, blood).
Lint
Wash lint givers and lint collectors separately. Where possible, turn lint collectors inside out.
Loading
Check pockets
Loose items can damage both your clothes washer and your clothes.
Close zippers, hooks and eyes
This is to make sure that these items do not snag on other clothes.
Mend any torn garments or loose buttons
Tears or holes may become larger during washing. Remove any loose bra wires as they can damage your washing machine and/or dryer.
Put very delicate items in a mesh laundry bag
This is a good idea for lingerie items, to provide them with extra protection, and helps prevent tangling with other items.
Pretreat any stains
Use a suitable surface to apply treatments, eg stain removers. Please do not use the lid, as damage may occur.
Make sure the water level suits the load size
Ensure that the load does not extend above the fabric softener dispenser as splashing may occur.
For a balanced load:
■ A mixture of small and large items will wash the best.
■ Place clothes evenly around the agitator.
- Do not wrap large items, such as sheets, around the agitator.
| Hand wash | |
| Do not bleach | |
| Do not tumble dry | |
| Medium iron | |
| Dryclean |
| Lint givers Lint collectors |
| Terry cloth Synthetics |
| Chenille Corduroy |
| Towels Polyester cottons |
| Socks |
Bleach
Check clothing care labels for special instructions.
Liquid bleach:
1 Use half the recommended dose of bleach and dilute with water.
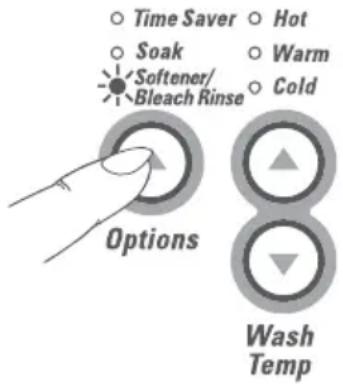
2 Remove the fabric softener dispenser and pour down the inside edge of the agitator stem, in line with the fins. Select the SOFTENER/BLEACH RINSE button. This changes the rinse to ensure thorough removal of any bleach residue.
3 Add detergent and replace the fabric softener dispenser.
4 For best results, add liquid bleach after the first amber wash light is no longer visible.
text_image
Time Saver Soak Softener/ Bleach Rinse Hot Warm Cold Options Wash TempFig.30 Selecting SOFTENER/ BLEACH RINSE option
Powdered bleach:
Pour half the recommended dose of powdered bleach into the agitator with your detergent.
Note: never pour undiluted, liquid chlorine bleach directly onto clothes, into the wash tub, or straight down the center of the agitator. Irreversible damage to your clothing may occur.
Fabric softener
The fabric softener goes into the dispenser on the top of the agitator. The ring on the dispenser cup is a guide for the amount of fabric softener to add for a full load. Smaller loads require less fabric softener.
Softener rinse
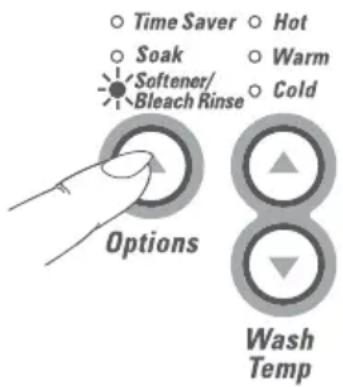
If you wish to use fabric softener when using the REGULAR or HEAVY DUTY cycles you must select the SOFTENER/BLEACH RINSE option. This changes the rinse option to include a deep rinse so the fabric softener will be dispensed correctly.
text_image
Time Saver Soak Softener/ Bleach Rinse Hot Warm Cold Options Wash TempFig.31 Selecting SOFTENER/ BLEACH RINSE option
Scrud
Scrud is the name given to the waxy build-up that can occur within any washer when fabric softener comes into contact with detergent. This build-up is not brought about by a fault in the machine. If scrud is allowed to build-up in the machine it can result in stains on your clothes or an unpleasant smell in your washer.
If you wish to use fabric softener we recommend:
■ Using fabric softener sparingly.
■ When filling the dispenser, do not splash or overfill.
■ Clean the dispenser as soon as the cycle is finished (refer page 28).
■ Clean your machine regularly (refer page 28).
- Cold water washing increases the chance of the build-up occurring.
We recommend that a warm PERMANENT PRESS wash be used at regular intervals, eg every 5th wash should be warm.
Fabric softener of a thinner consistency is less likely to leave residue on the dispenser and contribute to a build-up.
natural_image
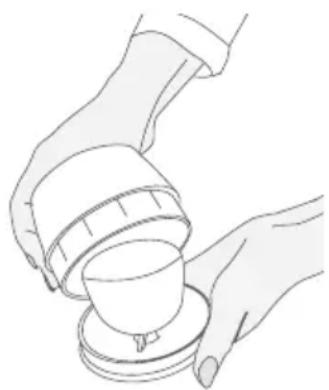
Line drawing of two hands pouring a cup into a lid (no text or symbols)Fig.32 Push cup through dispenser with thumb to remove
Option adjustment mode
After using your Ecosmart™ you may want to fine tune some of the options to suit your wash needs.
You can change the following pre-set options:
■ The default rinse option.
■ The amount of water used in the SPRAY RINSE.
■ The number of beeps at the end of the cycle.
■ The out of balance recovery routine.
■ The fill level selected by auto water level.
■ The controlled cold option.
To make these changes it is necessary to enter the "Option Adjustment Mode".
To enter option adjustment mode
1 Plug the machine in, but do not press POWER.
Press START/PAUSE and hold down, then press POWER.
2 You will hear three quick beeps and the machine will show an unusual pattern of lights. In this mode the lights are used to indicate the different options available. The diagram on page 25 shows how the lights relate to the options you can change. Pages 26 – 27 explain the different options in more detail.
3 Use the buttons on the panel to make your changes to the pre-set options.
4 Press POWER to return to normal mode.
5 Your Ecosmart™ will automatically remember your changes.
6 To make further changes, repeat the above steps.
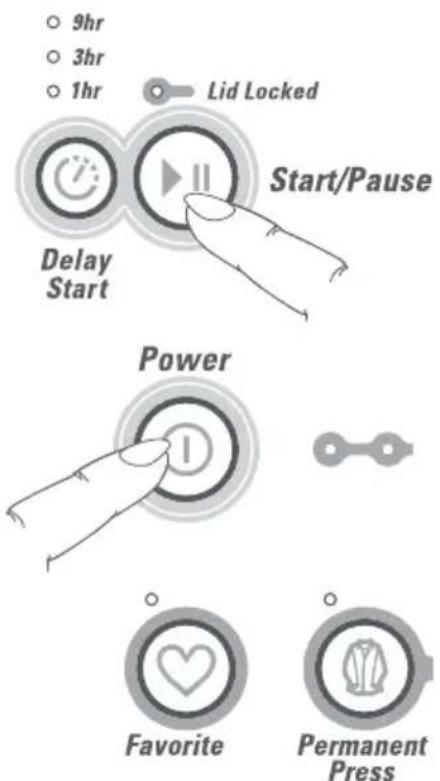
text_image
9hr 3hr 1hr Lid Locked Start/Pause Delay Start Power Favorite Permanent PressFig.33 Entering Option Adjustment mode
1 Press START/PAUSE and hold down. Press POWER.
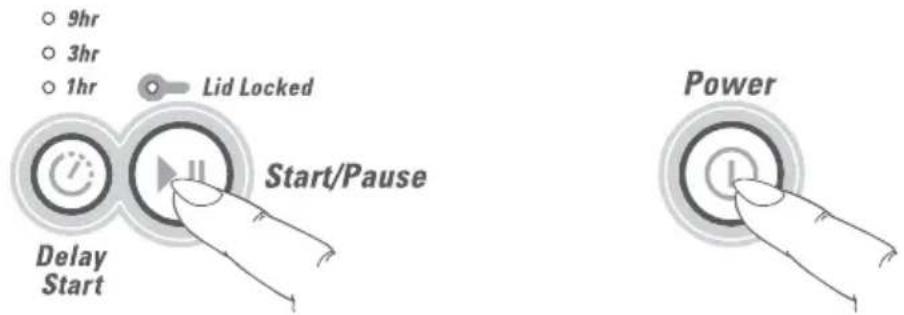
text_image
9hr 3hr 1hr Lid Locked Start/Pause Delay Start PowerFig.34 Entering Option Adjustment mode
2 The diagram below shows how the lights relate to the options you can change. It also shows which lights will be on when you first enter the Option Adjustment Mode.
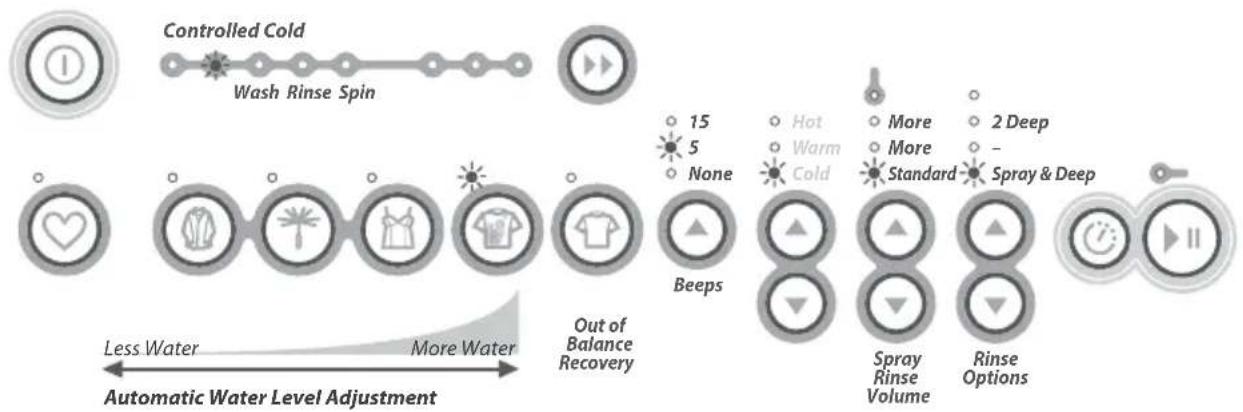
flowchart
graph LR
    A["Controlled Cold"] --> B["Wash Rinse Spin"]
    B --> C["Beeps"]
    C --> D["Spray Rinse Volume"]
    C --> E["Rinse Options"]
    D --> F["More"]
    D --> G["2 Deep"]
    D --> H["More"]
    D --> I["Standard"]
    E --> J["Spray & Deep"]
    style A fill:#f9f,stroke:#333
    style B fill:#ccf,stroke:#333
    style C fill:#cfc,stroke:#333
    style D fill:#fcc,stroke:#333
    style E fill:#cff,stroke:#333
    style F fill:#ffc,stroke:#333
    style G fill:#ffc,stroke:#333
    style H fill:#ffc,stroke:#333
    style I fill:#ffc,stroke:#333
Fig.35 Option adjustment
3 Use the buttons on the panel to change the pre-set options.
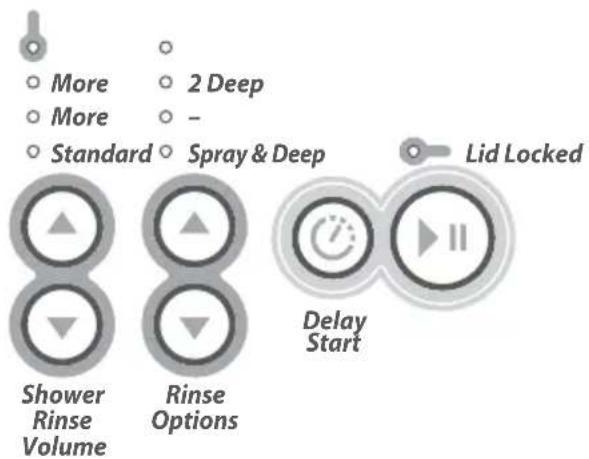
text_image
More More Standard 2 Deep - Spray & Deep Shower Rinse Options Lid Locked Delay StartFig.36 Option adjustment selection
Out of balance recovery routine
When your Ecosmart ^™ is spinning it can sense if the wash load is out of balance and will stop and re-try spinning up to 3 times. If the machine still senses an unbalanced load there are two options the machine offers.
Automatic recovery option:
Your Ecosmart™ will try to automatically correct the out of balance load. It will fill with water and agitate to redistribute the load before trying to spin up again.
Out of balance recovery options
Regular
Light on = automatic recovery
Light off = machine stops
Machine stops option:
Your Ecosmart™ will stop, giving a short burst of beeps every five seconds and the RINSE or SPIN light will flash. You must redistribute the load more evenly yourself (use this option if you wish to conserve water.)
1 Enter the Option Adjustment Mode.
2 Use the REGULAR button to select the Out of Balance Recovery Option you prefer.
3 Press POWER to store your selection.
Auto water fill level
If you are not satisfied with the level that your Ecosmart™ fills to on AUTO water level, you can alter the fill level that AUTO will select. If you feel there is too much water, you can decrease the fill level that will be selected.
1 Enter the Option Adjustment Mode.
2 Use the CYCLE buttons to decrease the amount of water selected.
3 Press POWER to store your selection.
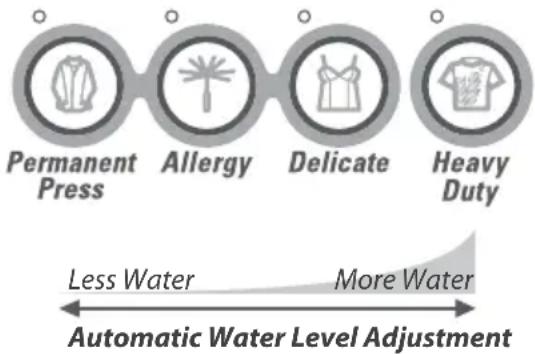
Smart Touch Cycles
flowchart
graph LR
    A["Permanent Press"] --> B["Allergy"]
    B --> C["Delicate"]
    C --> D["Heavy Duty"]
    style A fill:#f9f,stroke:#333
    style B fill:#f9f,stroke:#333
    style C fill:#f9f,stroke:#333
    style D fill:#f9f,stroke:#333
    note1["Less Water"] --> A
    note2["More Water"] --> D
    subgraph Automatic Water Level Adjustment
        direction LR
        A <--> B
        B <--> C
        C <--> D
    end
Fig.37 Adjusting the water level
Note: HEAVY DUTY (the default setting) provides the ideal water fill level. If you wish to change it, we recommend changing one setting at a time until you reach the preferred level.
End of cycle beeps
The beeps signaling the end of the cycle can be increased or decreased.
1 Enter the Option Adjustment Mode.
2 Use the WASH OPTION button to select the number of beeps you prefer.
3 Press POWER to store your selection.
Default rinse option
The normal rinse on the REGULAR and HEAVY DUTY cycles is a SPRAY RINSE. When you select SOFTENER/ BLEACH RINSE on these cycles the rinse changes to the default rinse. The default rinse is the rinse option used on the DELICATE and PERMANENT PRESS cycles. The default rinse is a SPRAY RINSE followed by a DEEP RINSE. However, you can change the default rinse to two deep rinses (as is used on the ALLERGY cycle).
| Number of beeps | |
| Light on | |
| TIME SAVER = 15 beeps | |
| SOAK = 5 beeps | |
| SOFTENER/ = no beeps | |
| BLEACH RINSE |
| Rinse optionLight on 1st rinse 2nd rinse | ||
| MED spin deep | rinse | deep |
| rinse | ||
| SLOW spin -- | ||
| HOLD spray | rinse | deep |
| rinse | ||
1 Enter the Option Adjustment Mode.
2 Use the SPIN SPEED buttons to select the rinse option you prefer.
3 Press POWER to store your selection.
Volume of water used in the spray rinse (REGULAR cycle)
You can increase or decrease the volume of water added during the rinse on the REGULAR cycle.
1 Enter the Option Adjustment Mode.
2 Use the WATER LEVEL buttons to select the volume of water you wish to be used in the spray rinse.
3 Press POWER to store your selection.
Controlled cold
Ecosmart ^™ is designed for installations that have both hot and cold water. To ensure optimum performance even in very cold weather, the cold water temperature is controlled to 60°F (15.6°C). However, if for some reason you do not have hot water available you may need to change to uncontrolled cold in very cold weather.
| Spray rinse volume |
| Light on |
| HIGH = more water |
| MED = more water |
| LOW = FACTORY SETTING |
| Controlled cold options | |
| Light color | |
| Green | = controlled cold |
| Amber | = uncontrolled cold |
Ecosmart™ leaves the factory with the CONTROLLED COLD Option set. You can change this by entering the Option Adjustment mode and by pressing the ADVANCE button once.
Care and cleaning
When you have finished
■ Turn off the faucets to prevent any chance of flooding should a hose burst.
■ Unplug the machine from the wall socket.
Cleaning your Ecosmart™
■ Clean with a soft damp cloth and wipe dry.
Do not use chemical or scouring cleaners as they can damage the paint and plastic surfaces.
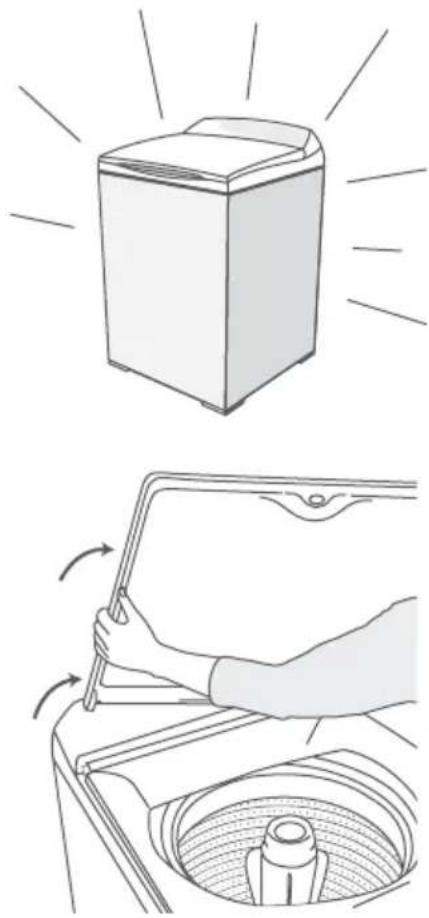
- You can remove the lid for cleaning. Open the lid fully, hold one side with one hand and gently tap the other side with an upward motion.
■ To replace the lid, hold the lid vertically and align both hinges before pushing down firmly.
- To remove the agitator for cleaning, unscrew the nut down the center of the agitator by turning counter-clockwise.
CAUTION!
The agitator must be fully pushed on to the shaft when refitting. Tighten the plastic nut firmly by hand. Ensure the agitator is not loose.
Cleaning the fabric softener dispenser
When using fabric softener, rinse your dispenser at the end of each wash, using warm soapy water.
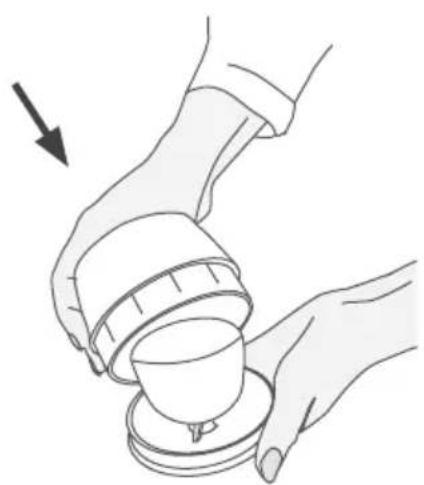
- Separate the cup from the dispenser body by pushing downwards on the base of the cup.
Cleaning the inside of your Ecosmart™
You can program a hot wash through the FAVORITE cycle to thoroughly clean your machine.
1 Press POWER button.
2 Press and hold the FAVORITE cycle button until you hear two quick beeps and the FAVORITE light flashes.
3 Select the PERMANENT PRESS cycle.
4 Select a hot wash.
5 Press FAVORITE again to store the selection.
6 The Ecosmart™ will then fill with hot water and do a hot wash. It's a good idea to clean the machine using this cycle without clothes and two cups of powered detergent, every few months.
natural_image
Illustration showing a washing machine and a hand cleaning a circular basin (no text or symbols)Fig.38 Removing the lid
natural_image
Illustration of hands holding a cup with a lid, no text or symbols presentFig.39 Push cup through dispenser with thumb
Products that might damage your Ecosmart™ clothes washer
■ Concentrated bleaches, diaper sanitizers and hydrocarbon solvents (eg gasoline and paint thinners) can cause damage to the paintwork and components of your clothes washer. Do not wash or dry garments stained with these solvents as they are flammable.
- Do not use pre-treatment sprays or liquids on or near your clothes washer as they can damage your machine's control panel and other surfaces.
- Use of dyes in your clothes washer may cause staining of the plastic components. The dye will not damage the machine but we suggest you thoroughly clean your clothes washer afterwards. We do not recommend the use of dye strippers in your clothes washer.
Ecosmart™ sounds and beeps
Your Ecosmart™ will make sounds that you will not have heard from other clothes washers.
During drain you will hear the pump of your machine turn on and off quickly about every 10 seconds. This is part of your Ecosmart's automatic lint removal system.
■ While draining your machine may give several low thuds. Your machine is checking that the water has drained before spinning.
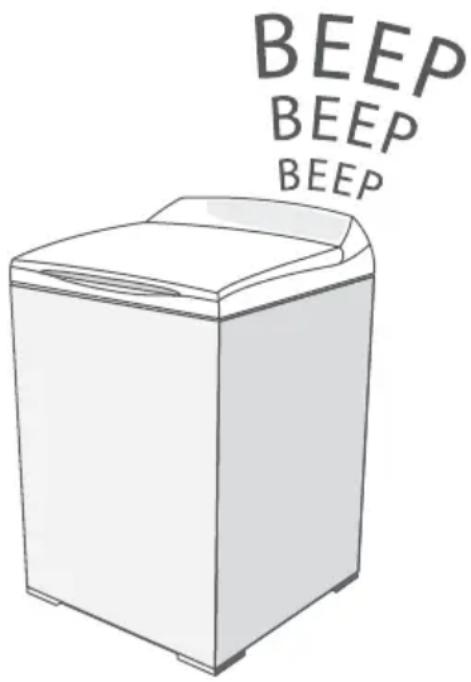
- Your Ecosmart™ will beep at the end of the cycle or if you have used SPIN HOLD or SOAK.
If your machine is beeping continuously or giving a musical series of beeps refer to page 30.
text_image
BEEP BEEP BEEPAutomatic lint system
Your Ecosmart™ has a self cleaning lint system. It automatically separates the lint from the wash water, trapping the lint between the inner tub and outer tub and flushes it out at the end of the wash.
Before you call for service
Please read the following pages before calling for service.
You can correct many of your machine's problems using the checklists on the following pages.
Your machine is capable of diagnosing its own problems. If it has a problem it will beep and display a message telling you what is wrong.
Musical series of beeps\* every 5 seconds and...
* The beeps are the same sound your washer makes when you plug your machine in.
| HOT water temperature light is flashing. |
| Hot faucet has not been turned on. |
| Inlet hose filters may be blocked. |
| Hot water supply is not hot enough to maintain the wash temperature you have selected. Select a lower wash temperature. |
| Inlet hoses connected the wrong way around. |
| COLD water temperature light is flashing. |
| Cold faucet has not been turned on. |
| Inlet hose filters may be blocked. |
| Inlet hoses connected the wrong way around. |
| Cold water temperature exceeds recommended limits. |
| HOT and COLD water temperature lights are flashing. |
| The faucets have not been turned on. |
| Inlet hose filters may be blocked. |
| The drain hose is too low and the water is siphoning out of the machine. |
| The flow rate of the supply water is too slow. |
| HIGH water level light is flashing. |
| The machine is overloaded and can not agitate. Ensure the machine is stationary. Remove items until the remaining ones can move more freely. |
| Select a higher water level. |
| First RINSE light or SPIN light is flashing. |
| The machine has a suds build-up. Too much detergent may have been used for the amount of soil in the load. Wait for suds to dissolve. Rinse clothes using a deep rinse. |
First RINSE or SPIN light is flashing as well as the SPIN SPEED light.
Wash load is out of balance. Ensure the machine is stationary. Manually redistribute the load. Check machine is level. Ensure the machine's feet have been unscrewed and the rubber leveling inserts have been fitted so the machine sits on its feet and not on the corner cabinets. Refer to 'Installation Instructions' pages 6 – 7.
Lid Lock light is flashing.
Make sure the lid is closed.
Press START/PAUSE (refer to page 15).
Single beep every second and...
The pattern of lights is unfamiliar.
1 Unplug machine from the wall. Wait 60 seconds, plug back in and operate machine.
2 If the fault re-occurs repeat step 1.
If the problem persists refer to the service contacts below. Before calling for help please locate the serial number of your washer. This is located on the back top left corner.
Service
For your local Fisher & Paykel Authorized Service Agent please call:
USA and Canada
TOLL FREE 1.888.9.FNP.USA (1.888.936.7872)
or use the link at: www.fisherpaykel.com
Note: proof of purchase is required for any warranty claim. For your records we suggest you attach your proof of purchase here.
Pressing POWER does not turn the machine on.
Is the power switched on?
Unplug machine from the wall. Wait 60 seconds, plug back in and operate the machine.
Could your household power supply be at fault? Try plugging in another electrical appliance.
Pressing START/PAUSE does not start the fill.
Are both hot and cold faucets turned on?
Are the inlet hose filters blocked?
Is DELAY START on?
Is the lid up?
FILLING continuously.
Check that the machine is not siphoning.
Check the black hose guide is installed.
NOT SPINNING properly.
Is the load out of balance? (Refer to pages 21 and 26).
Check the machine is level and does not rock.
It may have suds build-up (refer spin light flashing, page 30).
SPIN SPEED sounds slower than it should.
The clothes are unevenly distributed in the wash tub, your Ecosmart ^™ has compensated by lowering the spin speed.
Machine is continually going OUT OF BALANCE.
Check the feet are unscrewed and the rubber inserts are fitted so the machine is level and does not rock.
Too much water for load (refer to page 18).
Too much or too little water when filling on AUTO WATER LEVEL.
It may still be in the process of sensing the water level (refer to page 18).
Some loads do not suit Auto water level (eg pillows, bedding, large bulky items). Manually select the water level.
Refer to pages 24 to 26 to adjust the Auto fill level.
NOISES.
Banging – the load is out of balance (refer pages 21 and 26).
Other noises – refer page 29.
SMALL PUDDLE of water coming from under the machine.
The water level is too high for the amount of clothes. This has caused excessive splashing. Use a lower water level.
If this is happening when the water level is being automatically selected, adjust the auto water level down from HEAVY DUTY to DELICATE setting (refer to page 26).
Large bulky garments (eg pillows, comforters) can cause splashing. Wash on DELICATE cycle.
If the problem persists refer to the service contacts on page 37. Before calling for help please locate the serial number of your washer. This is located on the back top left corner.
WRINKLING.
Overloading the washer or dryer.
Choose a PERMANENT PRESS or DELICATE cycle as these cycles have been designed to minimize wrinkles.
Try selecting a slower spin speed.
Do not leave wet clothes to sit in the washer or laundry basket.
POOR SOIL REMOVAL.
Not enough detergent for load size or amount of soil.
White clothes are better washed separately. Separate light and heavily soiled items, as clothes can pick up soil from dirty wash water.
Select the wash temperature according to soil type. For example, blood and mud are better washed in cold water, while oily soils wash better in warmer water.
Overloading the washer.
Loads made up of articles of varying sizes will wash better (eg full loads of sheets may not wash as well).
Hard water requires more detergent than soft water.
LINTING.
Wash lint givers (eg towels, flannel sheets) separately from lint collectors (eg synthetic fabrics).
Overloading the washer.
Not enough detergent to hold the lint in suspension.
Overdrying in a dryer can cause a build-up of static electricity in synthetic fabrics and cause them to attract lint.
RESIDUE DETERGENT.
Overloading the washer.
Some detergents need to be pre-dissolved, check the detergent instructions.
Cold ambient temperatures, cold washes or short agitation times may not let the detergent dissolve properly. Try pre-dissolving the detergent.
BLACK MARKS on clothes.
A build-up caused by the interaction of fabric softener and detergent can flake off and mark clothes (refer to 'Scrud' page 23).
Insufficient detergent, for the amount of soil on the clothes, can result in black marks on clothes.
DYE TRANSFER.
Wash and dry non-colorfast clothes separately.
Non-colorfast clothes left sitting in a washer or laundry basket can transfer dye to other clothes.
TANGLING.
Washing with too much water (ie underloading) can cause the clothes to tangle around one another.
Do not load the washer by wrapping clothes around the agitator.
When you purchase any new Fisher & Paykel whiteware product for personal or consumer use you automatically receive a one year limited warranty covering parts and labor for servicing within the 48 mainland United States, Hawaii, Washington DC and Canada. In Alaska the limited warranty is the same except that you must pay to ship the product to the service shop or the service technician's travel to your home. Products for use in Canada must be purchased through the Canadian distribution channel to ensure regulatory compliance.
If the product is installed in a motor vehicle, boat or similar mobile facility, you receive the same one year limited warranty, but you must bring the vehicle, boat or mobile facility containing the product to the service shop at your expense or pay the service technician's travel to the location of the product.
Fisher & Paykel undertakes to:
Repair without cost to the owner either for material or labor any part of the product, the serial number of which appears on the product, which is found to be defective. In Alaska, you must pay to ship the product to the service shop or for the service technician's travel to your home. If the product is installed in a motor vehicle, boat or similar mobile facility, you must bring it to the service shop at your expense or pay for the service technician's travel to the location of the product. If we are unable to repair a defective part of the product after a reasonable number of attempts, at our option we may replace the part or the product, or we may provide you a full refund of the purchase price of the product (not including installation or other charges).
This warranty extends to the original purchaser and any succeeding owner of the product for products purchased for ordinary single-family home use.
All service under this limited warranty shall be provided by Fisher & Paykel or its Authorized Service Agent during normal business hours.
How long does this limited warranty last?
Our liability under this limited warranty expires ONE YEAR from the date of purchase of the product by the first consumer.
Our liability under any implied warranties, including the implied warranty of merchantability (an unwritten warranty that the product is fit for ordinary use) also expires ONE YEAR (or such longer period as required by applicable law) from the date of purchase of the product by the first consumer. Some States do not allow limitations on how long an implied warranty lasts, so this limit on implied warranties may not apply to you.
This warranty does not cover:
A Service calls that are not related to any defect in the product. The cost of a service call will be charged if the problem is not found to be a defect of the product. For example:
- Correcting faulty installation of the product.
- Instructing you how to use the product.
- Replacing house fuses, resetting circuit breakers, correcting house wiring or plumbing, or replacing light bulbs.
- Correcting fault(s) caused by the user.
- Changing the set-up of the product.
- Unauthorized modifications of the product.
- Noise or vibration that is considered normal, for example, drain/fan sounds, refrigeration noises or user warning beeps.
- Correcting damage caused by pests, for example, rats, cockroaches, etc.
B Defects caused by factors other than:
- Normal domestic use or
- Use in accordance with the product's User Guide.
c Defects to the product caused by accident, neglect, misuse, fire, flood or Act of God.
D The cost of repairs carried out by non-authorized repairers or the cost of correcting such unauthorized repairs.
E Travel fees and associated charges incurred when the product is installed in a location with limited or restricted access (eg airplane flights, ferry charges, isolated geographic areas).
F Normal recommended maintenance as set forth in the product's User Guide.
If you have an installation problem contact your dealer or installer. You are responsible for providing adequate electrical, exhausting and other connection facilities.
We are not responsible for consequential or incidental damages (the cost of repairing or replacing other property damaged if the product is defective or any of your expenses caused if the product is defective). Some States do not allow the exclusion or limitation of incidental or consequential damages, so the above limitation or exclusion may not apply to you.
How to get service
Please read your User Guide. If you then have any questions about operating the product, need the name of your local Fisher & Paykel Authorized Service Agent, or believe the product is defective and wish service under this limited warranty, please contact your dealer or call us at:
USA and Canada
TOLL FREE 1.888.9.FNP.USA (1.888.936.7872)
or use the link at: www.fisherpaykel.com
You may be required to provide reasonable proof of the date of purchase of the product before the product will be serviced under this limited warranty.
Commercial use
If you are using the product in a commercial setting (any use other than a single family dwelling), we agree to repair or replace, without cost to you for parts only, any defective parts, the serial number of which appears on the product. Our liability for these repairs expires ONE YEAR from the date of original purchase.
At our option we may replace the part or the product, or we may provide you a full refund of the purchase price of the product (not including installation or other charges). All service under this limited warranty shall be provided by Fisher & Paykel or its Authorized Service Agent during normal business hours.
No other warranties
This limited warranty is the complete and exclusive agreement between you and Fisher & Paykel regarding any defect in the product. None of our employees (or our Authorized Service Agents) are authorized to make any addition or modification to this limited warranty.
Warrantor: Fisher & Paykel Appliances, Inc.
If you need further help concerning this limited warranty, please call us at above number, or write to:
Fisher & Paykel Appliances, Inc.
5900 Skylab Road
Huntington Beach
CA 92647
This limited warranty gives you specific legal rights, and you may also have other rights which vary from state to state.
natural_image
Simple line drawing of a tilted rectangular object with an upward arrow and base, no text or symbols present.text_image
1po (25mm) 1po (25mm)natural_image
Pure mechanical diagram showing a gear and cross symbol without any text or labelsAjustement incorrect

natural_image
Abstract diagram with concentric circles and a diagonal arrow, no text or symbols presentnatural_image
Illustration of a mechanical assembly with a hand holding a tool, showing two stages of a component being inserted (no text or symbols present)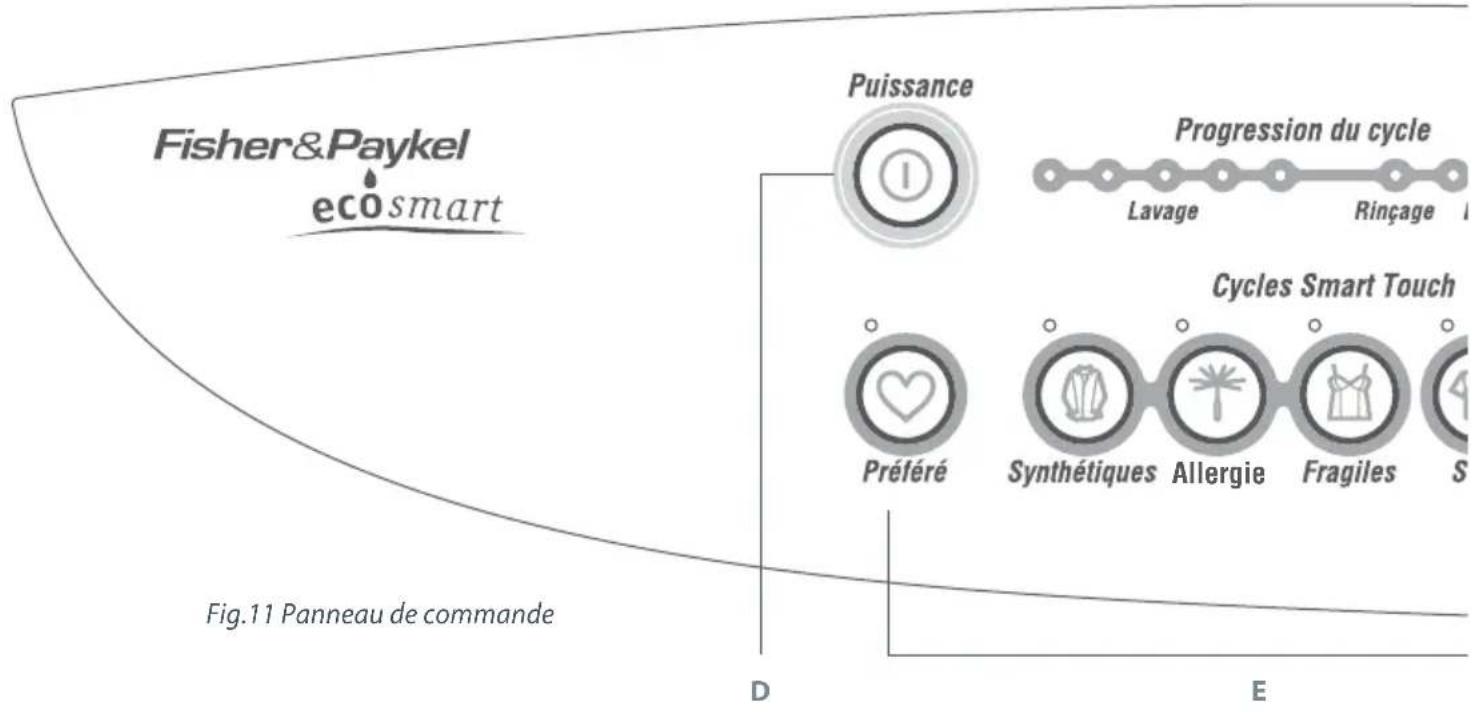
flowchart
graph TD
    A["Fisher&Paykel eco smart"] --> B["Progression du cycle"]
    B --> C["Cycles Smart Touch"]
    C --> D["Préféré"]
    C --> E["Synthétiques"]
    C --> F["Allergie"]
    C --> G["Fragiles"]
    C --> H["S"]
    style A fill:#f9f,stroke:#333
    style B fill:#ccf,stroke:#333
    style C fill:#cfc,stroke:#333
    style D fill:#fcc,stroke:#333
    style E fill:#cff,stroke:#333
    style F fill:#ffc,stroke:#333
    style G fill:#cfc,stroke:#333
    style H fill:#fcc,stroke:#333
B. Eau de javel
natural_image
Line drawing of a mechanical component with a central shaft and flange (no text or symbols)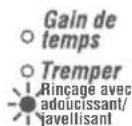

text_image
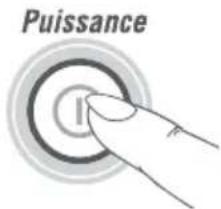
Puissance
text_image
M H D L Wnatural_image
Line drawing of hands pouring liquid into a cup (no text or symbols)natural_image
Illustration showing a washing machine and its cleaning process with a hand holding a tool (no text or symbols)natural_image
Illustration of hands holding a cup and a lid, with an arrow pointing to the cup (no text or symbols)Fisher & Paykel Appliances, Inc
5900 Skylab Road
Huntington Beach
CA 92647
Copyright © Fisher & Paykel 2010. All rights reserved.
The product specifications in this booklet apply to the specific products and models described at the date of issue. Under our policy of continuous product improvement, these specifications may change at any time. You should therefore check with your Dealer to ensure this booklet correctly describes the product currently available.