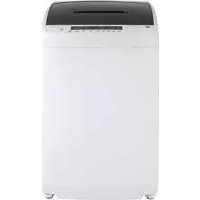
GNW128PSMWW - Washing machine GE - Free user manual and instructions
Find the device manual for free GNW128PSMWW GE in PDF.


| Product Type | Washing Machine |
| Brand | GE |
| Model | GNW128PSMWW |
| Power Supply | 120 V, 60 Hz, single-phase, 15/20 A, 3-prong grounded outlet |
| Wash Programs | Normal, Casual, Delicates, Speed Wash, Jeans, Heavy Duty, Towels, Whites (AutoClean) |
| Available Options | Extra Spin, Pre-Soak, Extra Rinse, Deep Fill, Deep Rinse, Delay Wash, Control Lock, Process (Soak/Wash/Rinse/Spin) |
| Settings | Temperature (cold to very hot), Soil Level (light to heavy), Spin Speed, Buzzer |
| Recommended Detergent Type | High Efficiency (HE) liquid or powder |
| Dispensers | 3 compartments: detergent (left), fabric softener (right), bleach (front left corner) |
| Technology | Infusor, automatic load detection, reversing motor |
| Monthly Maintenance | Clean Washer cycle (with bleach) and lint filter cleaning |
| Semi-annual Maintenance | Clean water inlet screens |
| Safety | Lid lock (will not start if open), mandatory grounding, imbalance shut-off |
| Replacement Parts | Water hoses (PM14X10002 or PM14X10005), drain hose extension (WH49X316), floor tray (PM7X1) |
| Warranty | 1 year parts and labor (Canada) |
| Required Water Pressure | 1.4 to 8.4 kgf/cm² (20 to 120 psi) |
| Drain Height | 76 cm to 2.44 m (30 in to 8 ft) from base |
| Minimum Clearances (Closet) | Sides: 2.54 cm (1 in), front: 5 cm (2 in), rear: 10.16 cm (4 in), top: 22.86 cm (9 in) |
Frequently Asked Questions - GNW128PSMWW GE
User questions about GNW128PSMWW GE
0 question about this device. Answer the ones you know or ask your own.
Ask a new question about this device
Download the instructions for your Washing machine in PDF format for free! Find your manual GNW128PSMWW - GE and take your electronic device back in hand. On this page are published all the documents necessary for the use of your device. GNW128PSMWW by GE.
USER MANUAL GNW128PSMWW GE
SAFETY INSTRUCTIONS....4
USING THE WASHER
Getting Started 6
Loading 10
CARE AND CLEANING ....11
INSTALLATION
INSTRUCTIONS....13
TROUBLESHOOTING TIPS .....18
CONSUMER SUPPORT
Warranty 23
Consumer Support 24
OWNER'S MANUAL & INSTALLATION INSTRUCTIONS
GNW128P
GNW128S
ENGLISH/FRANÇAIS/ ESPAÑOL
Write the model and serial numbers here:
Model # ____
Serial # ____
You can find them on a label on the top of the washer.
THANK YOU FOR MAKING GE APPLIANCES A PART OF YOUR HOME.
Whether you grew up with GE Appliances, or this is your first, we're happy to have you in the family.
We take pride in the craftsmanship, innovation and design that goes into every GE Appliances product, and we think you will too. Among other things, registration of your appliance ensures that we can deliver important product information and warranty details when you need them.
Register your GE appliance now online. Helpful websites and phone numbers are available in the Consumer Support section of this Owner's Manual. You may also mail in the pre-printed registration card included in the packing material.

GE APPLIANCES
IMPORTANT SAFETY INFORMATION READ ALL INSTRUCTIONS BEFORE USING THE APPLIANCE
WARNING
To reduce the risk of death, fire, explosion, electric shock, or injury to persons when using your appliance, follow basic precautions, including the following:
- Read all instructions before using the appliance.
■ Follow all fabric care instructions and warnings to prevent melting of garments or damage to the appliance.
■ DO NOT wash or dry articles that have been previously cleaned in, washed in, soaked in or spotted with gasoline, dry-cleaning solvents, or other flammable or explosive substances, as they give off vapors that could ignite or explode.
■ DO NOT add gasoline, dry-cleaning solvents, or other flammable or explosive substances to the wash water. These substances give off vapors that could ignite or explode.
■ Under certain conditions, hydrogen gas may be produced in a hot-water system that has not been used for 2 weeks or more. HYDROGEN GAS IS EXPLOSIVE. If the hot water system has not been used for such a period, before using a washing machine, turn on all hot-water faucets and let the water flow from each for several minutes. This will release any accumulated hydrogen gas. As the gas is flammable, DO NOT smoke or use an open flame during this time.
■ DO NOT allow children to play on or in this appliance. Close supervision of children is necessary when this appliance is used near children. Before the washer is removed from service or discarded, remove the door or lid. Failure to follow these instructions may result in death or injury to persons.
■ DO NOT reach into the appliance if the tub or agitator is moving to prevent accidental entanglement.
■ For waterproof, water-resistant and bulky items, only use the Delicates cycle. DO NOT use other cycles for these items. Using other cycles can cause excessive vibration and may result in injury or damage to the washer, walls, or floor. DO NOT mix waterproof and non-waterproof items.
■ DO NOT install or store this appliance where it will be exposed to the weather.
■ DO NOT tamper with controls, repair or replace any part of this appliance or attempt any servicing unless specifically recommended in the user maintenance instructions or in published user repair instructions that you understand and have the skills to carry out.
■ DO NOT climb or stand on this unit.
■ DO NOT operate this appliance if it is damaged, malfunctioning, partially disassembled, or has missing or broken parts including a damaged cord or plug.
■ Unplug the appliance or turn off the circuit breaker before servicing. Pressing the Power button DOES NOT disconnect power.
■ See "ELECTRICAL REQUIREMENTS" located in the Installation Instructions for grounding instructions.
READ AND SAVE THESE INSTRUCTIONS
IMPORTANT SAFETY INFORMATION READ ALL INSTRUCTIONS BEFORE USING THE APPLIANCE
PROPER INSTALLATION
This washer must be properly installed and located in accordance with the Installation Instructions before it is used.
- Ensure that the hot water hose is connected to the "H" valve and the cold water hose is connected to the "C" valve.
■ Install or store where it will not be exposed to temperatures below freezing or exposed to the weather, which could cause permanent damage and invalidate the warranty.
■ Properly ground washer to conform with all governing codes and ordinances. Follow details in the Installation Instructions.
■ Ensure washer is properly leveled and washer legs are adjusted such that unit is stable.
■ Optional drain hose extension recommended for discharging heights from 60" - 96".
■ GE Appliances strongly recommends the use of factory specified parts. A list of factory hoses available for purchase are listed. These hoses are manufactured and tested to meet GE Appliances specifications.
■ GE Appliances strongly recommends the use of new water supply hoses. Hoses degrade over time and need to be replaced every 5 years to reduce the risk of hose failures and water damage.
WHEN NOT IN USE
■ Turn off water faucets to minimize leakage if a break or rupture should occur. Check the condition of the fill hoses; GE Appliances recommends changing the hoses every 5 years.
PARTS AND ACCESSORIES
Order on-line at GEApplianceparts.com today, 24 hours a day or by phone at 800.626.2002 during normal business hours. In Canada, visit your local GE Appliances parts distributor or call 800.661.1616.
Part Number Accessory
PM14X10002 4 ft rubber water supply hoses Or
PM14X10005 4 ft braided water supply hoses
WH49X316 Drain hose extension
PM7X1 Washer Floor Tray
READ AND SAVE THESE INSTRUCTIONS
WARNING
To reduce the risk of fire, electric shock, or injury to persons, read the IMPORTANT SAFETY INSTRUCTIONS before operating this appliance.
Throughout this manual, features and appearance may vary from your model.
Step 1
IMPORTANT: See the dispenser section in this manual.
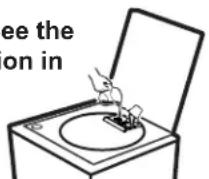
- Add fabric softener to the fabric softener dispenser.
- Add the manufacturer's recommended amount of detergent. GE Appliances recommends the use of High Efficiency detergents such as in your energy efficient washer. Place detergent pods in the bottom of the wash basket before adding clothes.
Step 2
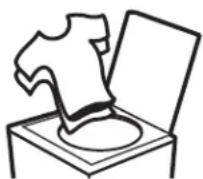
- Loosely add items around Infusor. Overloading may negatively impact wash performance. See page 10 for suggested loading examples.
- Close lid. NOTE: The washer will not start with lid open.
Step 3
- Select wash cycle.
- Select wash options, including Deep Rinse option when using fabric softener.
- Select options.
Step 4
- Press Start.
flowchart
graph TD
    A["Power"] --> B["Start / Pause"]
    B --> C["Process"]
    C --> D["J"]
    C --> E["B"]
    D --> F["Cycle"]
    E --> G["Signal"]
    F --> H["Options"]
    G --> I["Delay Wash"]
    H --> J["Water Soil"]
    I --> K["Lovel SpinTemp"]
    J --> L["Extra Noise"]
    K --> M["Pre Soak"]
    L --> N["Extra Rinse"]
    M --> O["Time Remaining"]
    N --> P["Deep Fill"]
    O --> Q["Deep Rinse"]
    P --> R["Normal"]
    Q --> S["Speed Wash"]
    R --> T["Soak"]
    S --> U["Whites"]
    T --> V["Delicates"]
    U --> W["Wash"]
    V --> X["Heavy Duty"]
    W --> Y["Casuals"]
    X --> Z["Rinse"]
    Y --> AA["Jeans"]
    Z --> AB["Spir"]

Power
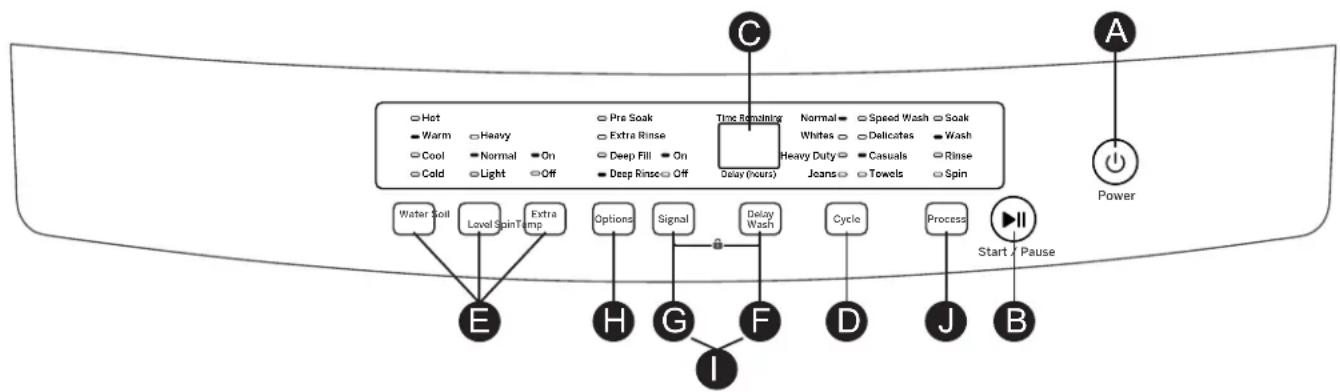
Press Power to "wake up" the display. If the display is active, press Power to put the washer into idle mode. NOTE: Pressing Power does not disconnect the appliance from the power supply.

Start/Pause
Press Start to begin the cycle. If the washer is running, pressing it once will pause the washer.

Display
The display shows the approximate time remaining until the end of the cycle. NOTE: The cycle time is affected by how long it takes the washer to fill. This depends on the water pressure in your home. The size of the load being washed also significantly impacts cycle time, with larger loads taking longer.

Cycle
Press the Cycle button to select the desired cycle.
The chart below will help you match the items to be washed with the best wash cycle settings. For optimal performance, select the cycle that most closely matches the items being washed.
| Items to Wash Cycle | Wash Temp Soil | Level | Default Option | Cycle Details | |
| Cycle for normal, regular, or typical use for washing up to a full load of normally soiled cotton clothing. | Normal W | Warm Normal None | Cycle for normal, regular, or typical use for washing up to a full load of normally soiled cotton clothing. Choose the Heavy soil level selection and Warm or Hot water temperature selection as appropriate for your clothes load for a higher degree of cleaning. | ||
| Casual clothes, lightly soiled office wear. | Casuals | Warm Normal | None Wash | cycle tailored | to care for casual clothes and office wear items. |
| Lingerie and special care fabrics with light soil.Water-resistant, bedding and bulky items, such as large coats, mattress pads, and bath mats. | Delicates | Cool Normal | None Wash | cycle tailored | to delicate fabrics.It is recommended to place small or ultra delicate items in mesh bags before washing. |
| Small loads of lightly soiled items that are needed in a hurry. Examples include one casual wear outfit or 3 soccer uniforms. | Speed Wash | Warm | Light | None | Expedited wash period, and time saving rinse to clean small lightly soiled loads in the fastest time possible. |
| Jeans with medium to light soil. | Jeans | Warm | Normal | None | For heavily soiled work jeans, use the Heavy Duty cycle. |
| Sturdy fabrics with heavy to medium soil. | Heavy Duty | Warm | Heavy | Pre- Soak In | corporates pre- soak and extended wash periods to effectively clean heavily to medium soiled sturdy fabrics. |
| Towels Sheets | Towels | Warm | Normal | Extra Rinse | Cycle designed for washing towels or sheets. It is recommended that towels and sheets be washed separately for best care and washing performance. For waterproof bed covers use Delicates cycle. |
| Whites and household linens | Whites | Hot | Normal | Extra Rinse | Cycle tailored to clean and brighten your whites. |
| Cleaning the basket of residue and odor. No clothes to be washed using this cycle. | Whites | Hot | Normal | Deep Fill (You need to select) | Recommended use of at least once per month. Never load laundry when using this cycle; laundry may become damaged or contaminated. Cycle incorporates a hot deep wash. |
CAUTION
Failure to follow these instructions may result in injury or property damage.
For Waterproof, Water-Resistant, or Bulky Items:
- Only use the Delicates cycle.
- Using other cycles can cause excessive vibration and may result in injury or damage to the washer, walls, or floor.
- Do not mix waterproof and non-waterproof items.
- Read the Owner's Manual for wash cycle details.
Getting started

Settings
Individual settings for agitation (Soil), water temperature (Temp), and spin (Extra Spin) can be set from the minimum (lowest in column) to maximum (highest in column). In general, the higher up the column, the more washer energy will be used. NOTE: Extra Spin typically reduces dryer time/energy usage (i.e. reduces total energy when using both a washer and a dryer).

Delay Wash
Press Delay Wash to choose the number of hours you want to delay the start of the cycle, and then press Start/Pause. The washer will count down and start automatically at the correct time.

Signal
To turn the signal sounds on/off, press Signal.

Cycle Options
Extra Spin
Set this option to increase the spin time of the cycle.
Pre-Soak
Select the Pre-Soak feature to add a soak step following the fill portion of the cycle.
Extra Rinse
When you use extra detergent or bleach to clean heavily soiled clothes, use the Extra Rinse option to better remove additional residues.
Deep Fill
Select the Deep Fill feature for loads where extra water is needed. The Deep Fill feature is recommended for special case loads only, not for typical use. NOTE: This option is not allowed for some cycles.
Deep Rinse
Set this option to provide a deep rinse or when using fabric softener.

Control Lock
Use the control lock before or during a cycle to prevent any selections from being made.
To lock/unlock the washer controls, press and hold the Signal and Delay Wash buttons for 3 seconds.

Process
Choose the wash processes to include in the cycle. Press Process until all the processes you want to include are lit. More than one process can be selected.
Soak
Select to set a soak process only. Washer basket will fill, soak, and drain.
Wash
Select to set a wash process only. Washer basket will fill, wash, and drain.
Rinse
Select to set a rinse process only. Washer basket will rinse and spin.
Spin
Select to set a spin process only. Washer basket will spin.
Consumer Help Indicator
| Your washer is equipped with Consumer Help Indicator (CHI). CHI is our way to communicate a simple remedy for some situations that you can perform without the need to call for service. The chart below describes the helpful messages you may notice on your display when you return to start another load. These messages will provide simple remedies you can quickly perform. | |
| Spin light blinking | If an out-of-balance condition is detected by the washer, the Spin light will blink during the remaining portion of the cycle and will stay illuminated for a short time after cycle completion. When this occurs, the washer is taking actions to correct the out-of-balance condition and complete the cycle normally. In some cases, the washer may not be able to balance the load and spin up to full speed. If you notice the load is more wet than normal at the end of the cycle, redistribute the load evenly in the wash basket and run a Spin cycle. To run a Spin cycle, select the Normal cycle and press the Process button until only the Spin light is on. |
| Check your house water supply. Did you forget to turn on one or both supply valves after installation or coming back from vacation? | |
| Indicates the lid is open. Close the lid. | |
| Indicates the laundry load is unbalanced. Reposition laundry evenly in basket, and ensure washer is level. | |
| Indicates water has reached a critical level. Turn off water and power to the washer and call service. | |
Detergent Dispenser
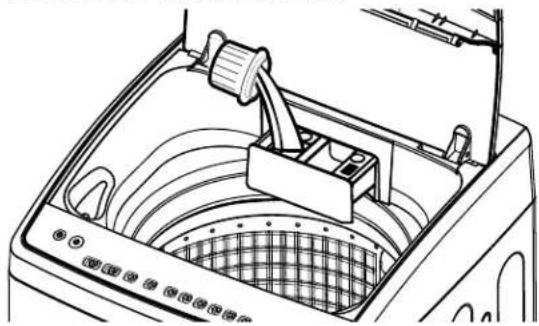
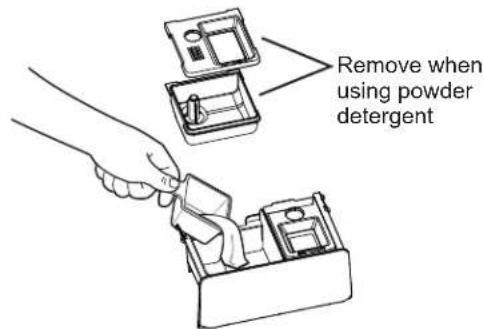
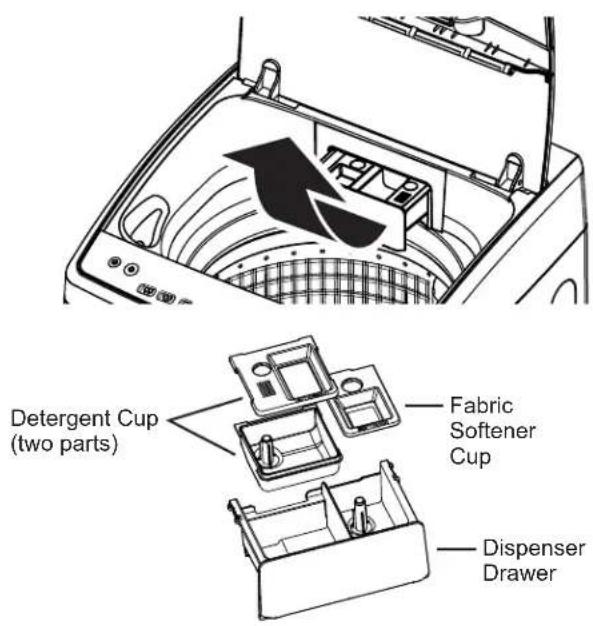
HE detergent should be added to the left side of the dispenser drawer.
For liquid detergent, leave cup in drawer.
For powder detergent, remove left cup (two parts) from drawer.
Follow the detergent manufacturer's recommendations for the correct amount of detergent, based on load size, taking care to add detergent to the left compartment. Do not overfill or dilute detergent as this can result in additive being dispensed prematurely in the wash cycle. Your option selections will determine when detergent is automatically dispensed at its optimal time in the wash cycle. For optimal performance, especially when selecting cooler temperature and in cold weather climates, place powdered HE detergent directly in the wash basket before adding clothes.
NOTE: Single-dose laundry packets should not be added to the dispenser drawer, as they will not dispense properly. Put packets in bottom of wash basket.
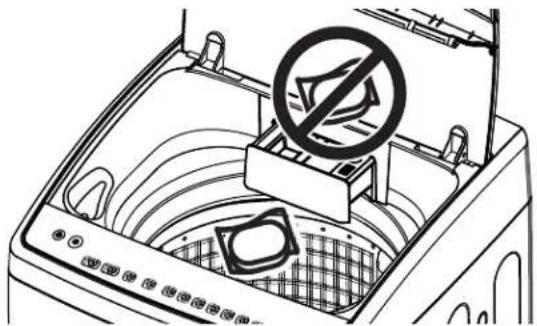
For liquid detergent, leave cup in drawer, and pour into left cup/compartment.
natural_image
Line drawing of a washing machine interior showing internal components and fan structure (no text or symbols)For powder detergent, remove left cup (two parts) from drawer, and pour into left compartment.
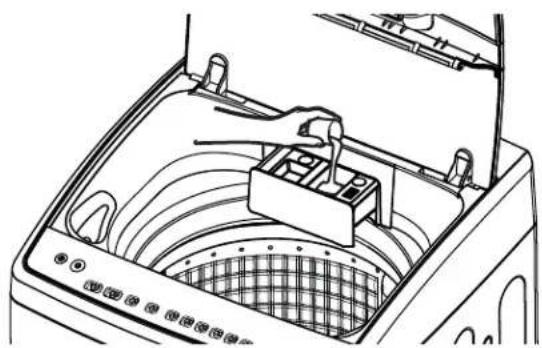
Liquid Fabric Softener/Conditioner Dispenser
Deep Rinse should be selected when using fabric softener.
Liquid fabric softener/conditioner should be added to the right side of the dispenser drawer. Follow the liquid fabric softener/conditioner manufacturer's recommendations for the correct amount of softener/conditioner, based on load size, taking care to add softener/conditioner to the right compartment. Do not overfill or dilute softener/conditioner as this can result in additive being dispensed prematurely in the wash cycle. Your option selections will determine when liquid fabric softener/conditioner is automatically dispensed at its optimal time in the rinse cycle.
NOTE: Fabric softener crystals should NOT be added to the dispenser drawer, as they will not dispense properly.
natural_image
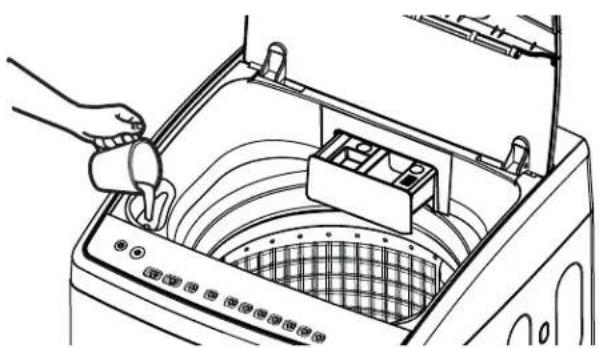
Line drawing of a washing machine interior showing the drain and front panel (no text or symbols)Liquid Bleach Dispenser
Liquid chlorine bleach should be added through the bleach dispenser in the front left corner. Follow bleach manufacturer's recommendations for the correct amount of liquid chlorine bleach based on load size, taking care to not apply or spill it directly on clothing.
NOTE: Do not use liquid chlorine bleach and laundry pretreatments such as an Oxi product in the same wash load.
natural_image
Line drawing of a hand pouring liquid into a washing machine (no text or symbols)Loading
Always follow fabric manufacturer's care label when laundering.
Automatic Load Sensing
This determines the correct agitate profile, agitate duration and amount of water suited to the size and type of load placed in the washer. The washer will not start the wash cycle or fill with water if the lid is open. When the lid is closed the machine is able to begin filling with water in order to sense the load size.
NOTE: Automatic load sensing initiates pulses of the motor at the beginning of the cycle. This is normal operation.
NOTE: This is a high efficiency washing machine. This system requires less water while providing effective cleaning action. You may notice that the water level is lower than on your previous washer. This is normal for a high efficiency washer.
Pretreatment
Place laundry pretreatments, such as an Oxi product, directly in the bottom of the wash basket before loading clothes. NOTE: Do not use liquid chlorine bleach and laundry pretreatments such as an Oxi product in the same wash load.
Proper Use of Detergent
Using too little or too much detergent is a common cause of laundry problems.
Use less detergent if you have soft water, a smaller load or a lightly soiled load.
For spots, apply pre-treatment to items as recommended on the product label. Application should be made in the basket to prevent overspray which may cause the coloring on the lid or graphics to fade.
Place detergent pods in the bottom of the wash basket before adding clothes.
GE Appliances recommends the use of High Efficiency detergents such as in your energy efficient washer. HE detergents are formulated to work with low water wash and rinse systems. HE detergents reduce the oversudsing problems commonly associated with regular detergents.
When using high efficiency or concentrated detergents, consult the product label to determine amount required for optimum performance. Excessive detergent will negatively impact wash performance.
Sorting Wash Loads
Sort by color (whites, lights, colors), soil level, fabric type (sturdy cottons, easy care, delicates) and whether the fabric produces lint (terry cloth, chenille) or collects lint (velveteen, corduroy). Wash lint producers such as cotton towels and socks separate from lint collectors including synthetic garments and dress pants.
WARNING

- Fire Hazard
DO NOT wash fabrics soiled with flammable liquids or cleaning solvents.
No washer can completely remove oil.
DO NOT wash or dry anything that has been soaked in or spotted with any type of oil (including cooking oils).
DO NOT reach into the washer until all moving parts have stopped.
Doing so can result in death, explosion, fire or amputation.
Loading the Washer
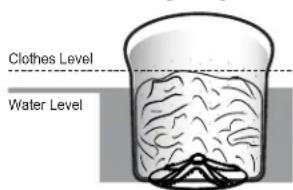
Load dry items loosely in the washer basket. For best results, load items evenly and loosely around the outside of the basket, filling in towards the center on larger loads. To add items after washer has started, press Start/Pause. Lift the lid and submerge additional items around the outside of the basket. Close the lid and press Start to resume.
■ Do not place large items such as sheets, blankets and towels across the Infusor. Load them around the outside of the basket.
■ Do not put lawn or sofa cushions into the washer as they are too big to move. Remove outer covers and ONLY wash them.
Average Small Load
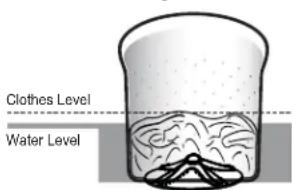
Average Medium Load
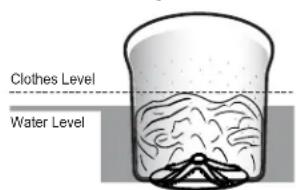
Average Large Load
WARNING

Electrical Shock Hazard
- Disconnect power supply before servicing.
- Replace all parts and panels before operating.
- Failure to do so can result in death or electrical shock.
WARNING
Shock Hazard
Certain internal parts are intentionally not grounded and may present a risk of electric shock only during servicing. Service personnel – DO NOT contact the following parts while the appliance is energized: Electrical Valve, Drain Pump, NTC, Motor Control Unit.
Exterior of the Washer
Immediately wipe off any spills with a damp cloth.
Interior of the Washer
To clean the interior of the washer, select the Whites cycle and Deep Fill option on the control panel. A basket clean cycle should be performed, at a minimum, once per month. This cycle will use more water, in addition to bleach, to control the rate at which soils and detergents may accumulate in your washer.
NOTE: Read the instructions below completely before starting the basket clean cycle.
-
Remove any garments or objects from the washer and ensure the washer basket is empty.
-
Open the washer lid and pour 1/2 cup or 125 ml of liquid bleach or other washing machine cleaner into the basket.
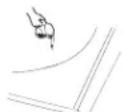
- Close the lid, select the Whites cycle, and the Deep Fill option. Push the Start button.
- When the basket clean cycle is working, the display will show the estimated cycle time remaining. Do not interrupt the cycle.
If interrupted, be sure to run a complete basket clean cycle before using the washer.
IMPORTANT:
■ Run this cycle with 1/2 cup (125 ml) of bleach once a month.
■ After the completion of a basket clean cycle, the interior of your washer may have a bleach smell.
Lint Filter
Clean EVERY MONTH to remove any items that may have been caught in the filter.
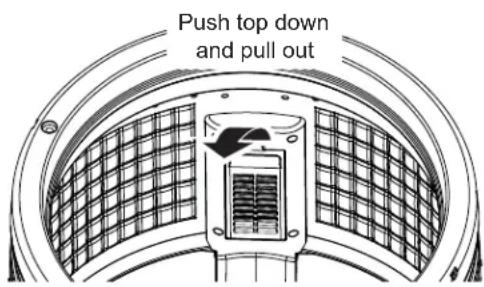
- Remove the blue lint filters from the side of the basket by unclipping.
- Open the filter, gently remove lint, rinse filter in warm water, and close.
- Replace by snapping filter back into its location in the washer basket.
Care and Cleaning
Dispenser Drawer
After some period of use, a small amount of detergent or softener residue may be present in the dispenser drawer. The drawer can easily be removed for cleaning. To remove the drawer, pull it out until the drawer stops and then lift up on the front of the drawer. The drawer can then be removed from the dispenser box. Wash the drawer in warm, soapy water using a mild detergent. Rinse drawer with warm water. If cups are removed for cleaning, be sure to push cups fully back into place after cleaning.
The dispenser drawer and cups are not dishwasher safe. The dispenser box is not removable, but it can be wiped clean using a damp cloth if necessary. Do not attempt to remove the dispenser box for cleaning.
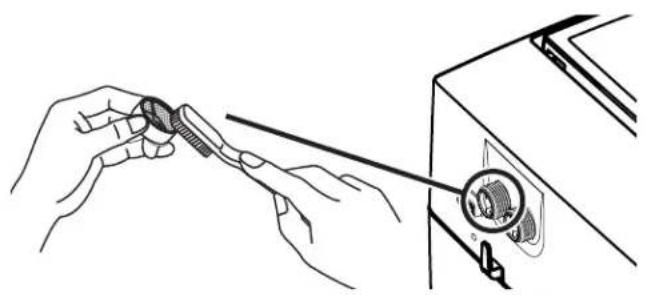
Inlet Water Valve Screen(s)
If the flow of entering water into the washer is slow, the inlet water valve screen(s) may be clogged.
Check and clean inlet valve screens EVERY SIX MONTHS.
- Turn off water valve(s).
- Disconnect water hose(s) from the back of the washer.
- Remove the screen(s), clean with a brush and replace.
- Replace the hose(s).
- Turn water valves on.
- Check for leaks, tighten if necessary.
natural_image
Line drawing of hands using a tool to adjust or install a device component (no text or symbols visible)Water Supply Hoses
Hoses connecting washer to faucet should be replaced every 5 years.
Long Vacations
Be sure water supply is shut off at faucets. Drain all water from hoses and water filter pump area if weather will be below freezing.
Moving and Storage
Ask the service technician to remove water from drain pump and hoses. Do not store the washer where it will be exposed to the weather.
Installation Instructions
Washer
If you have any questions, call GE Appliances at 800.GE.CARES
(800.432.2737) or visit our Website at: GEAppliances.com
In Canada, call 800.561.3344 or visit www.GEAppliances.ca
BEFORE YOU BEGIN
Read these instructions completely and carefully.
- IMPORTANT — Save these instructions for local inspector's use.
- IMPORTANT — Observe all governing codes and ordinances.
- Note to Installer – Be sure to leave these instructions with the Consumer.
- Note to Consumer – Keep these instructions for future reference.
- Skill level – Installation of this appliance requires basic mechanical and electrical skills.
• Completion time – 1-3 hours - Proper installation is the responsibility of the installer.
- Product failure due to improper installation is not covered under the Warranty.
PARTS SUPPLIED
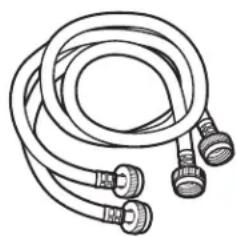
□Water Hoses (2) (Stationary models only)
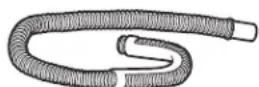
□ Uni-couple ^® Hose (Portable models only)
natural_image
Illustration of a coiled hose with multiple connectors (no text or symbols)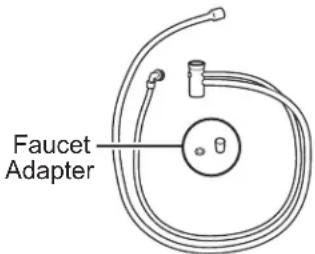
□Drain Hose
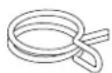
□ Clamp
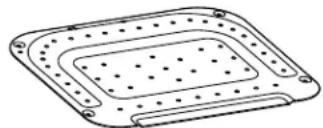
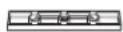
□Base Cover Kit
natural_image
Technical line drawing of a rectangular electronic component with internal perforated structure (no text or symbols)□ Owner's Reference Guide

TOOLS REQUIRED FOR WASHER INSTALLATION
□ Pliers
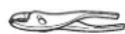
□ Level
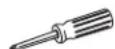
□ Phillips-Head Screwdriver
PARTS REQUIRED (Sold separately)
□ Drain Hose Extension (For discharge heights from 60" - 96"
GE Appliances Parts and Accessories
Order on-line at GEApplianceparts.com today, 24 hours a day or by phone at 800.626.2002 during normal business hours.
Part Number Accessory
PM14X10002 4 ft Rubber Water Supply Hoses Or
PM14X10005 4 ft Braided Metal Water Supply Hoses WH1X2267 Rubber Washer (1) and Screen (1)
WH49X316 Drain Hose Extension (For discharge heights from 60" - 96")
NOTE: We strongly recommend the use of new water supply hoses. Hoses degrade over time and need to be replaced every 5 years to reduce the risk of hose failures and water damage.
UNPACK THE WASHER
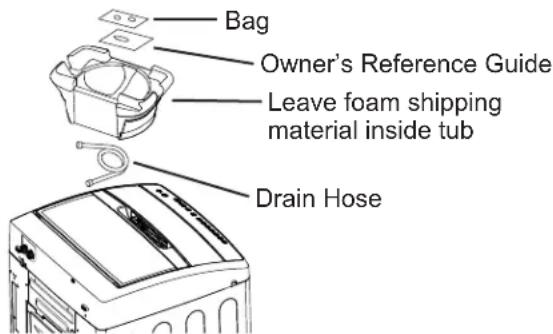
After the machine is in the home, remove outside packing material/carton from washer.
Remove bag, drain hose and Owner's Reference Guide from tub.
NOTE: Leave foam shipping material inside tub opening to hold tub in place during the rest of installation.
- In an area exposed to dripping water or outside weather conditions. The ambient temperature should never be below 60^ F ( 15.6^ C) for proper washer operation.
- In an area where it will come in contact with curtains or drapes.
- On carpet. The floor MUST be a hard surface with a maximum slope of 1/2" per foot (1.27 cm per 30 cm). To make sure the washer does not vibrate or move, you may have to reinforce the floor.
NOTE: If floor is in poor condition, use 3/4" impregnated plywood sheet solidly attached to existing floor covering.
IMPORTANT: Minimum Installation Clearances
- Alcove or Closet
- If your washer is approved for installation in an alcove or closet, there will be a label on the back of the machine describing requirements.
- Minimum clearance between washer and adjacent walls or other surfaces: 1" either side, 2" front, 4" rear, 9" top.
- Closet doors must be louvered or otherwise ventilated and have at least 60 square inches of open area. If the closet contains both a washer and a dryer, doors must contain a minimum of 120 square inches of open area.
NOTE: The clearances stated on this label are minimums. Consideration must be given to providing adequate clearances for installing and servicing.
WATER SUPPLY REQUIREMENTS
WATER SUPPLY LINES - Purge Hot and Cold water supply lines for 30 seconds prior to installation of hoses and washing machine. Ensure inlet hose screens are also clean and free of debris.
WATER PRESSURE - Must be 20 psi minimum to 120 psi maximum.
WATER TEMPERATURE - Household water heater should be set to deliver water at 120^ to 150^ F ( 50^ to 66^ C) TO THE WASHER when hot wash is selected.
SHUTOFF VALVES - Both hot and cold shutoff valves (faucets) should be supplied.
DRAIN - Water should be drained into standpipe (drain hose) or sink (uni-coupler drain connection). Discharge height MUST NOT BE LESS THAN 30 INCHES, and no more than 8 feet above the base of the washer. Standpipe must be 1-1/2 inches minimum inside diameter and must be open to atmosphere.
① REMOVE BOTTOM PACKAGING
Remove bottom packaging from unit by placing foot on side of base, holding handles on side of washer, and lifting up.
WARNING

- Electrical Shock Hazard
- Disconnect power supply before servicing.
- Replace all parts and panels before operating.
- Failure to do so can result in death or electrical shock.
⚠ WARNING - Shock Hazard
Certain internal parts are intentionally not grounded and may present a risk of electric shock only during servicing.
Service personnel – DO NOT contact the following parts while the appliance is energized: Electrical Valve, Drain Pump, NTC, Motor Control Unit.
② INSTALL BASE COVER
WARNING

- Entanglement Hazard
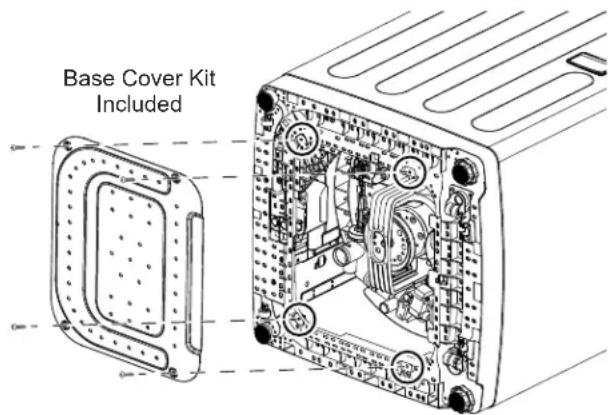
• Install base cover underneath unit by sliding cover in place and attaching screws before operating.
- Failure to do so can result in serious injury.
② INSTALL BASE COVER (Cont.)
If you did not receive a base cover with your purchase, call 800.626.8774 to receive one at no cost. (In Canada, call 800.561.3344.) For installation instructions of the cover, visit: www.GEAppliances.com. (In Canada, www.GEAppliances.ca.)
Remove metal base from top foam packaging and install it on the bottom of the washer. Lay the washer on its side to install the base cover.
Install base cover underneath unit by sliding cover in place and attaching screws before operating.
Water and drain connections for Stationary Model (GNW128S) and for Portable Model (GNW128P) with two faucet connections only.
NOTE: If you have Portable Model (GNW128P), and will use with one faucet connection, then skip to Step 7.
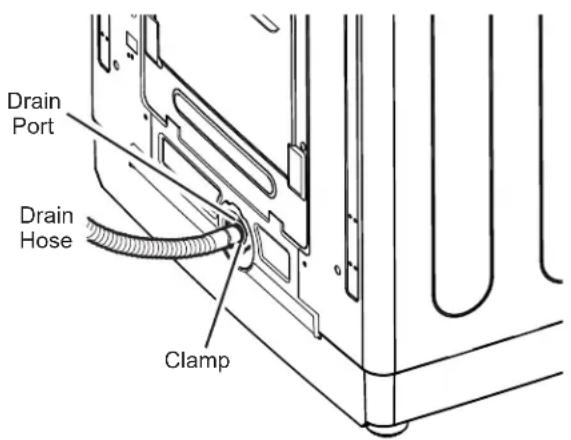
③ CONNECT DRAIN HOSE TO WASHER
Connect drain hose to drain port on back of washer. Open clamp with pliers and slide onto hose end. Holding clamp open, push hose end onto drain port until fully seated.
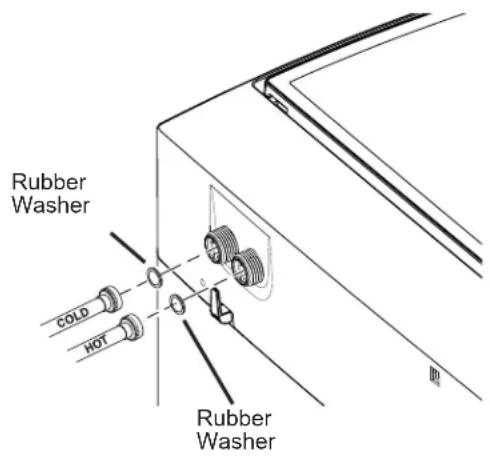
4 CONNECT WATER HOSES TO WASHER
Unplug electrical cord before installing water hoses. I not installed, install rubber washer in one end of hot water hose. Thread hot water hose onto red connection (right side). Hand tighten and use pliers to tighten hoses between 1/8 and 1/4 turn beyond hand-tight.
If not installed, install rubber washer in one end of cold water hose. Thread cold water hose onto blue connection (left side). Hand tighten and use pliers to tighten hoses between 1/8 and 1/4 turn beyond hand-tight.
Move washer as close to final location as leaving room for you to make water, drain, and electrical connections to your home.
5 CONNECT WATER HOSES TO OUTLET VALVES
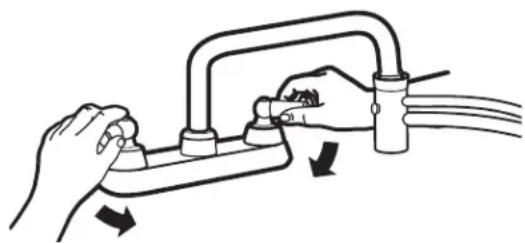
Determine which is HOT water line before attaching water hoses to faucets. Traditionally, HOT faucet is on left. (If screen washers are not installed) With protruding part of screen toward you, install strainer screen/rubber washer into each of the free ends of two water hoses.
Connect hot water hose to hot water outlet valve of your home. Hand tighten and use pliers to tighten hoses between 1/4 and 1/2 turn beyond hand-tight. Open hot water valve.
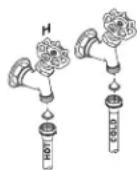
Connect cold water hose to cold water outlet valve of your home. Hand tighten and use pliers to tighten hoses between 1/4 and 1/2 to hand-tight. Open cold water valve.
Check for leaks and drips at the hose couplings. Tighten as necessary.
6 CONNECT TO DRAIN
Attach the drain hose to the drain outlet on the rear of the washer near the washer base. End furthest from the U-bracket should be attached to washer. Install the clamp on the drain hose and tighten to prevent leakage of water.
NOTE: If longer drain hose is required, order drain hose extension kit, GE Appliances part number WH49X316.
Connect additional drain hose (contained in kit) to original hose with hose clamp (contained in kit).
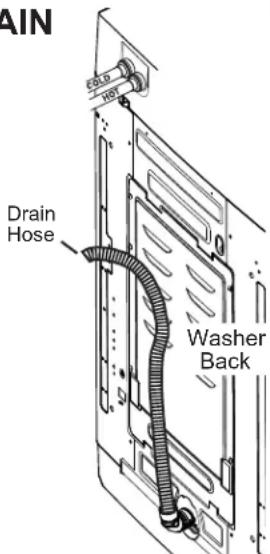
Insert remaining end of drain hose (shorter distance from U-bracket) into drain pipe or sink.
IMPORTANT: There should be a minimum of 30" from the drain hose insertion point to the base of the unit.
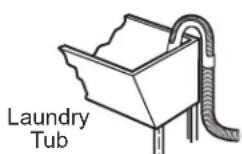
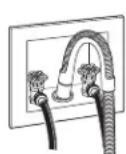
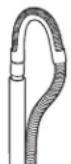
NOTE: Placing the drain hose too far down the drain pipe can cause a siphoning action. No more than 5" of hose should be in the drain pipe. There must be an air gap around the drain hose. A snug fit can also cause a siphoning action.
Installation Instructions
Water and drain connections for Portable Model (GNW128P) using one faucet connection only.
NOTE: If have Stationary Model (GNW128S) or Portable Model (GNW128P), and will use with two faucet connections, then follow the connection instructions on the previous page and skip this one faucet connection section.
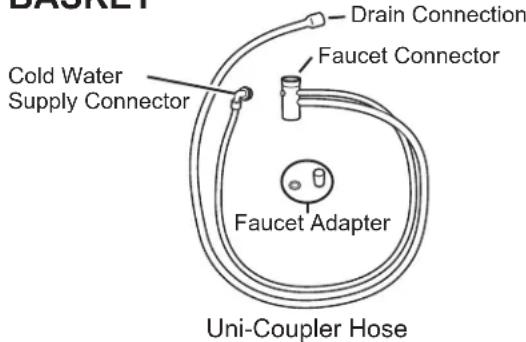
7 REMOVE THE UNI-COUPLE® HOSE FROM INSIDE THE WASHER BASKET
10 TIGHTEN CONNECTOR
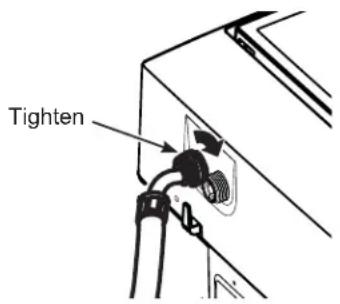
8 CONNECT TO WATER LINE
Attach the hose connector to the faucet adapter by pulling down on the locking collar while lifting up on the connector until it snaps into place. Make sure the water filter provided is in place.
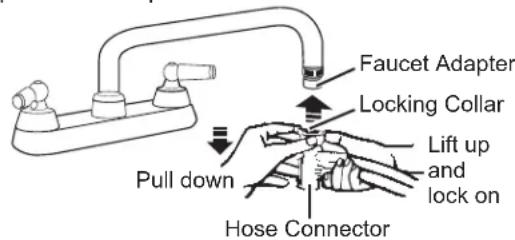
11 CONNECT DRAIN HOSE
Attach the drain connection side of the uni-couple hose to the rear of the washer. Install the clamp on the drain connection and tighten to prevent leakage of water.
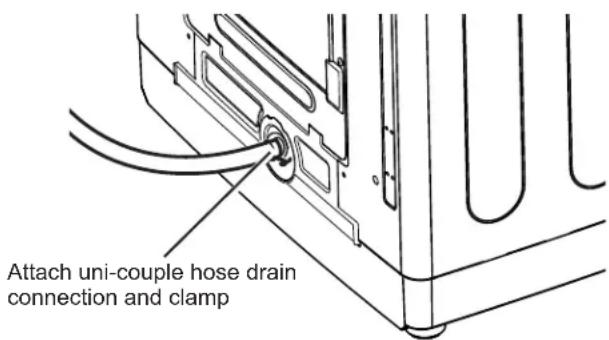
9 CONNECT TO VALVE INLET
Unplug electrical cord before installing water hose. If not installed, install rubber washer in one end of cold water hose. Thread cold water hose onto BLUE connection (left side).
NOTE: Only the cold valve will be connected for this installation. Hot valve should NOT be connected.
Hand tighten and use pliers to tighten hoses between 1/8 and 1/4 turn beyond hand tight.
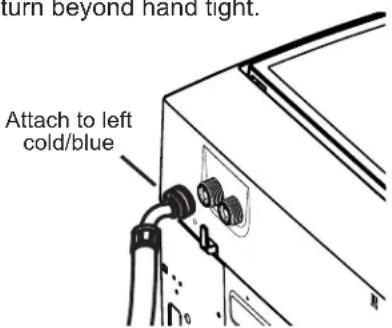
12 SET THE WASHER CONTROLS
Make sure that the Water Temp setting on the washer control panel is set to Cold since only the cold inlet is connected.
13 SLOWLY TURN ON THE WATER FAUCET ALL THE WAY TO THE DESIRED WASH TEMPERATURE
natural_image
Illustration of hands using a tool to adjust or install a mechanical component, with arrows indicating motion (no text or symbols)ELECTRICAL REQUIREMENTS
WARNING

- Electrical Shock Hazard
Plug into a grounded 3-prong outlet.
DO NOT remove ground prong.
DO NOT use an adapter.
DO NOT use an extension cord.
Failure to follow these instructions can result in death, fire or electrical shock.
CIRCUIT – Individual, properly polarized and grounded 15 or 20 amp circuit breaker or time-delay fuse.
POWER SUPPLY - 2 wire plus ground, 120 Volt, single phase, 60 Hz, alternating current.
Outlet Receptacle – Properly grounded 3-prong
receptacle to be located so the power cord is accessible when the washer is in an installed position. If a 2-prong receptacle is present, it is the owner's responsibility to have a licensed electrician replace it with a properly grounded 3-prong grounding type receptacle.
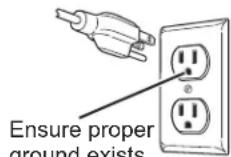
Ensure proper ground exists before use.
Washer must be electrically grounded in accordance with local codes and ordinances, or in the absence of local codes, with latest edition of the NATIONAL ELECTRICAL CODE, ANSI/NFPA NO. 70 or CANADIAN ELECTRICAL CODE, CSA C22.1. Check with a licensed electrician if you are not sure that the washer is properly grounded.
14 CONNECT POWER AND INSTALL
Insert plug of electrical cord into a 115V, 15- or 20-amp wall receptacle. Level
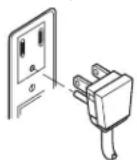
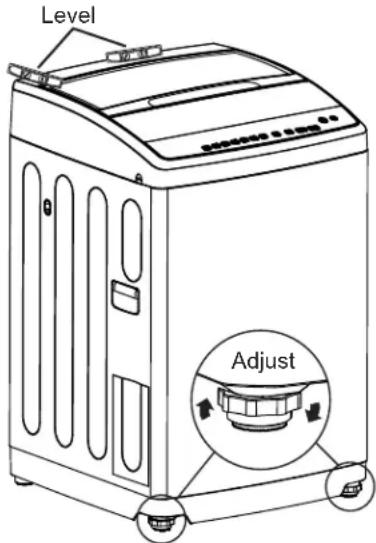
Move washer into final position. Place level on flat top side edges of washer.
Adjust leveling legs until washer is level left-to-right and front-to-back. Remove level.
Open tub lid. Remove and discard tub shipping material
(see UNPACK THE WASHER section).
Remove plastic protector film from the lid.
GROUNDING INSTRUCTIONS
This appliance must be grounded. In the event of malfunction or breakdown, grounding will reduce the risk of electric shock by providing a path of least resistance for electric current. This appliance is equipped with a cord having an equipment-grounding conductor and a grounding plug. The plug must be plugged into an appropriate outlet that is properly installed and grounded in accordance with all local codes and ordinances.
WARNING
Improper connection of the equipment-grounding conductor can result in a
risk of electrical shock. Check with a qualified electrician, or service representative or personnel, if you are in doubt as to whether the appliance is properly grounded.
DO NOT modify the plug on the power supply cord. If it will not fit the outlet, have a proper outlet installed by a qualified electrician.
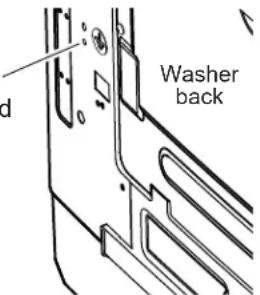
If required by local codes, an external 18 gauge or larger copper ground wire (not provided) may be added. Attach to washer cabinet with a #10-16 x1/2" sheet metal screw (available at any hardware store) to rear of washer as illustrated.
Attach ground wire and ground screw (obtain locally)
Mobile Home Installation:
Installation must conform to Standard for Mobile Homes, ANSI A119.1 and National Mobile Home Construction and Safety Standards Act of 1974 (PL93-383).
FINAL CHECKLIST
Before starting the washer, check to make sure:
□ Main power is turned on.
☐ The washer is plugged in.
☐ The water faucets are turned on.
☐ The unit is level and leveling legs are firmly on the floor.
☐ The shipping foam is removed.
☐ The drain hose is properly tied up.
☐ There are no leaks at the faucet, drain line or washer.
Run the washer through a complete cycle.
☐ Check for water leaks and proper operation.
☐ Place these instructions in a location near the washer for future reference.
Troubleshooting Tips... Before you call for service
| Problem Possible Causes What To Do | ||
| Small amount of water remaining in dispenser (on some models) at end of cycle | Normal dispenser operation | It is normal for a small amount of water to remain in dispenser after the cycle. To empty water from dispenser drawer, remove drawer and dump water into washer basket or sink. Empty dispenser prior to putting detergent into dispenser for next cycle. |
| Water level seems low | This is normal Water may not cover the top level of the clothes. This is normal for this high efficiency washer. | |
| Low water flow Water | valve screens are stopped up | Turn off the water source and remove the water connection hoses from the upper back of the washer and the house water faucets. Clean both the hose screens (if so equipped) and the screens in the machine using a brush or a toothpick. Reconnect the hoses and turn the water back on. Check to ensure there are no leaks at the connections. |
| Water siphoning out of washer | Drain standpipe is too low or hose too far into standpipe | The drain hose must exceed 30" height at some point between the washer back and the drain pipe. Use anti-siphon clip. See the Installation Instructions. |
| Too many suds Soft | water Try less detergent. | |
| Too much detergent | Measure your detergent carefully. Use less soap if you have soft water, a smaller load or a lightly soiled load. | |
| Type of detergent | Switch to High Efficiency detergent such as he. | |
| Water leaks Type of detergent | Switch to High Efficiency detergent such as he. | |
| Using too much detergent in washer | ||
| Fill hoses or drain hose is improperly connected | ||
| Household drain clogged Check household plumbing. You may need to call a plumber. | ||
| Drain hose rubs on wall Make sure drain hose does not make contact with the wall. May cause excessive wear on the hose. | ||
| Constant water pressure to fill hoses at water source Tighten hoses at the faucets. Check condition of the fill hoses; they should be replaced every 5 years. | ||
| Water temperature seems incorrect | Cooler water temperatures provide improved energy efficiency | New laundry detergents have been formulated to work with cooler water temperatures without affecting wash performance. |
| Water supply is turned off or improperly connected | Turn both hot and cold faucets fully on and make sure hoses are connected to the correct faucets. NOTE: Cold water valve inlet is blue. Hot water valve inlet is red. | |
| Water valve screens are stopped up | Turn off the water source and remove the water connection hoses from the upper back of the washer and the water faucets. Clean both the hose screens (if so equipped) and the screens in the machine using a brush or a toothpick. Reconnect the hoses and turn the water back on. Check to ensure there are no leaks at the connections. | |
| Cool/Cold Water when selecting Hot | This is normal. The washer senses water temperature (on some models) and optimizes for best results. Cold water is added periodically when hot is selected. | |
| House water heater is not set properly | Make sure house water heater is delivering water at 120°F-140°F (48°C-60°C). | |
| Water pumped out before cycle is complete | Water was left in unit for 24 hours with lid closed or 15 minutes with lid open | Previous cycle has been cancelled. Close lid, select new cycle, and start machine. |
| Water won't drain | Drain hose is kinked or improperly connected | Straighten drain hose and make sure washer is not sitting on it. Top of drain outlet should be less than 8 ft (2.44 m) above floor. |
| Washer spins and pauses at the beginning of cycles | This is normal | The washer is sensing the load. |
Troubleshooting Tips... Before you call for service
| Problem Possible Causes What To Do | ||
| Washer pauses during wash cycle | The Soak Option was chosen | This is normal. The washer alternates between agitate and soak during these cycles to get your clothes cleaner with less wear. |
| This is normal | Many cycles incorporate as series of soaks within the agitation period to get your clothes clean with less wear. | |
| Residual powder in dispenser or clogging of dispensers | Wash water too cold or low home water pressure | Select a warmer wash temperature if possible to improve dissolving of detergent or use liquid detergent. Make sure siphon caps are free of debris and fully pressed into position. Remove and clean tray if clogging occurs. |
| Laundry additives dispensing too soon | Overfilling of dispensers | Do not overfill or add water to dispenser. Select Deep Rinse option when using fabric softener. |
| Washer pauses during spin cycle | This is normal The washer may pause during the spin cycle to remove soapy water more efficiently. | |
| Washer won't operate | Washer is unplugged Make sure cord is plugged securely into a working outlet. | |
| Water supply is turned off | Turn both hot and cold faucets fully on. | |
| Lid is open-safety feature prevents agitation and spinning when lid is up | Close lid and press Start. | |
| Circuit breaker/fuse is tripped/blown | Check house circuit breakers/fuses. Replace fuses or reset breaker. Washer should have a separate outlet. | |
| Electronics need to be reset | Unplug washer, wait 2 minutes, plug back in and press Start if display is active or press Power if unit is in idle (display blank) mode. | |
| Start was not pressed Press Start. | ||
| Detergent packets not dissolving | Laundry detergent packet placed in dispenser | Laundry detergent packets should not be used in the dispensers. They should only be added directly to the wash basket following the manufacturer's directions. |
| Unexplained time and/or settings changes | Changing options This is normal. Several options will change other options to maximize washer performance. | |
| Colored spots Incorrect use of fabric softener | Check fabric softener package for instructions and follow directions for using dispenser.Make sure you have selected the Deep Rinse option.Pretreat stain and rewash using Speed Wash cycle before drying. | |
| Grayed or yellowed clothes | Detergent amount Be sure to follow detergent manufacturer's directions. | |
| Hard water Use a water conditioner or install a water softener. | ||
| Water is not hot enough | Make sure water heater is delivering water at 120^ - 140^ ( 48^ - 60^ ). | |
| Washer is overloaded | Loosely load clothes no higher than the top row of holes in the washer basket. For best results, load items around the outside of the basket. | |
| Dye transfer Sort clothes by color. If fabric label states wash separately, unstable dyes may be indicated. | ||
| Lint or residue on clothes | Clothes are air or line dried | If you do not dry your clothes with a clothes dryer, your clothes may retain more lint. |
| Incorrect sorting | Separate lint producers from lint collectors. | |
| Washing too long | Wash small loads for a shorter time using Light Soil setting. | |
| Detergent not dissolving | Rewash, next time: Try a liquid detergent; Use warmer water temperature. | |
| Overloading Loosely load clothes in the washer basket. For best results, load items around the outside of the basket. | ||
| Incorrect use of fabric softener | Check fabric softener package for instructions and follow directions for using dispenser.Make sure you have selected the Deep Rinse option. | |
Troubleshooting Tips... Before you call for service
| Problem Possible Causes What To Do | ||
| Clothes too wet | Incorrect cycle selected | Make sure the cycle selected matches the load you are washing. Some fabrics will feel wetter when rinsed with cold water. |
| Wash load out of balance | Redistribute load in washer and run through Spin cycle. | |
| Blinking Spin light or Spin light on at end of cycle | Out of balance condition has been detected | Allow cycle to continue and finish. If load is wet at the end of the cycle, even out load and run a Spin cycle. |
| Pilling Result of normal wear on poly-cotton blends and fuzzy fabrics | While this is not caused by the washer, you can slow the pilling process by washing garments inside out. | |
| Snags, holes, tears, rips or excessive wear | Pins, snaps, hooks, sharp buttons, belt buckles, zippers and sharp objects left in pockets | Fasten snaps, hooks, buttons and zippers. Remove loose items like pins, objects in pockets and sharp buttons. Turn knits (which snag easily) inside out. |
| Undiluted chlorine bleach | Check bleach package instructions for proper amount. Never add undiluted bleach to wash or allow clothes to come in contact with undiluted bleach. | |
| Chemicals like hair bleach or dye, permanent wave solution | Rinse items that may have chemicals on them before washing. Use Speed Wash cycle with Extra Rinse option. | |
| Wrinkling Incorrect wash and dry cycles | Match Cycle selection to the type of fabric you are washing (especially for easy care loads). | |
| Improper sorting Avoid mixing heavy items (like jeans) with light items (like blouses). Try a fabric softener. | ||
| Overloading Loosely load clothes in the washer basket. | ||
| Repeated washing in water that is too hot | ||
| Sounds Possible Causes Reason | ||
| “Clicking” Shifter mechanism is engaging or disengaging | The drive system will engage at the start of agitate and disengage when agitate is complete. This occurs multiple times during the wash. | |
| Back and forth “swoosh” | Electric motor reversing direction | This sound is the motor rotating back and forth to clean your laundry. |
| “Clicking” behind Control during fill | Automatic Temperature Control Valve | Two valves mix cold and hot water. The “clicking” is when either valve turns on or off to raise or lower the fill water temperature. |
| Water flow changes during fill | Automatic Temperature Control Valve | Two valves mix cold and hot water. The “clicking” is when either valve turns on or off to raise or lower the fill water temperature. |
| Motor sounds during spin | Motor ramping up/down during spin cycle | The motor will speed up incrementally during the spin cycle. When spin is complete, it will coast until it stops. |
| “Humming” | Water drain pump | The drain pump will make a humming sound when pumping out water after agitation stops and continue until spin is complete. |
| Drive motor | The drive motor will make a “humming” sound during the wash and spin phases of the cycle. | |
| “Gurgling” | Water drain pump | When the pump starts drawing in air, It starts to gurgle. The washer should then begin spinning and the sound will continue until it is done spinning. |
| Water “swishing” | Washing process | Water swishing while the unit is agitating is normal, especially with smaller loads. |
| Washer rocking/moving and/or “knocking/tapping” | Washer leveling legs uneven | To level the washer, adjust the leveling legs by rotating the individual leg in the proper direction for up or down. |
| “Squeaking” sound | Washer not level and rubbing on cabinet | To level the washer, adjust the leveling legs by rotating the individual leg in the proper direction for up or down. |
GE Appliances Washer Warranty
GEAppliances.com
All warranty service is provided by our Factory Service Centers, or an authorized Customer Care® technician. To schedule service online, visit us at www.geappliances.com/service_and_support/, or call GE Appliances at 800.GE.CARES (800.432.2737). Please have your serial number and your model number available when calling for service.
Servicing your appliance may require the use of the onboard data port for diagnostics. This gives a GE Appliances factory service technician the ability to quickly diagnose any issues with your appliance and helps GE Appliances improve its products by providing GE Appliances with information on your appliance. If you do not want your appliance data to be sent to GE Appliances, please advise your technician not to submit the data to GE Appliances at the time of service.
| For the period of We will replace | |
| One yearFrom the dateof the originalpurchase | Any factory specified part of the washer which fails due to a defect in materials or workmanship. During this limited one-year warranty, we will also provide, free of charge, all labor and related service to replace the defective part. |
What is not covered:
■ Service trips to your home to teach you how to use the product.
■ Improper installation, delivery or maintenance.
■ Failure of the product if it is abused, misused, or used for other than the intended purpose or used commercially.
■ Replacement of house fuses or resetting of circuit breakers.
■ Products which are not defective or broken, or which are working as described in the Owner's Manual.
■ Damage to the product caused by accident, fire, floods or acts of God.
■ Incidental or consequential damage caused by possible defects with this appliance.
■ Defects or damage due to operation in freezing temperatures.
■ Damage caused after delivery.
■ Product not accessible to provide required service.
EXCLUSION OF IMPLIED WARRANTIES
Your sole and exclusive remedy is product repair as provided in this Limited Warranty. Any implied warranties, including the implied warranties of merchantability or fitness for a particular purpose, are limited to one year or the shortest period allowed by law.
In the United States:
This warranty is extended to the original purchaser and any succeeding owner for products purchased for home use within the USA. If the product is located in an area where service by a GE Appliances Authorized Servicer is not available, you may be responsible for a trip charge or you may be required to bring the product to an Authorized GE Appliances Service location for service. In Alaska, the warranty excludes the cost of shipping or service calls to your home.
Some states do not allow the exclusion or limitation of incidental or consequential damages. This warranty gives you specific legal rights, and you may also have other rights which vary from state to state. To know what your legal rights are, consult your local or state consumer affairs office or your state's Attorney General.
Warrantor: GE Appliances, a Haier company
In Canada:
This warranty is extended to the original purchaser and any succeeding owner for products purchased in Canada for home use within Canada. If the product is located in an area where service by a GE Appliances Authorized Servicer is not available, you may be responsible for a trip charge or you may be required to bring the product to an Authorized GE Appliances Service location.
Some provinces do not allow the exclusion or limitation of incidental or consequential damages. This warranty gives you specific legal rights, and you may also have other rights which vary from province to province. To know what your legal rights are, consult your local or provincial consumer affairs office.
Warrantor: MC Commercial Inc., Burlington, ON, L7R 5B6
Extended Warranties: Purchase a GE Appliances extended warranty and learn about special discounts that are available while your warranty is still in effect. You can purchase it online anytime at
www.geappliances.com/service_and_support/shop-for-extended-service-plans.htm
or call 800.626.2224 during normal business hours. GE Appliances Service will still be there after your warranty expires.
Consumer Support
GE Appliances Website
Have a question or need assistance with your appliance? Try the GE Appliances Website 24 hours a day, any day of the year! You can also shop for more great GE Appliances products and take advantage of all our on-line support services designed for your convenience. In the US: GEAppliances.com
Register Your Appliance
Register your new appliance on-line at your convenience! Timely product registration will allow for enhanced communication and prompt service under the terms of your warranty, should the need arise. You may also mail in the pre-printed registration card included in the packing material. In the US: GEAppliances.com/register
Schedule Service
Expert GE Appliances repair service is only one step away from your door. Get on-line and schedule your service at your convenience any day of the year. In the US: GEAppliances.com/ge/service-and-support/service.htm or call 800.432.2737 during normal business hours.
Extended Warranties
Purchase a GE Appliances extended warranty and learn about special discounts that are available while your warranty is still in effect. You can purchase it on-line anytime. GE Appliances Services will still be there after your warranty expires. In the US: GEAppliances.com/ge/service-and-support/shop-for-extended-service-plans.htm or call 800.626.2224 during normal business hours.
Parts and Accessories
Individuals qualified to service their own appliances can have parts or accessories sent directly to their homes (VISA, MasterCard and Discover cards are accepted). Order on-line today 24 hours every day. In the US: GEApplianceparts.com or by phone at 877.959.8688 during normal business hours.
Instructions contained in this manual cover procedures to be performed by any user. Other servicing generally should be referred to qualified service personnel. Caution must be exercised, since improper servicing may cause unsafe operation.
Contact Us
If you are not satisfied with the service you receive from GE Appliances, contact us on our Website with all the details including your phone number, or write to:
In the US: General Manager, Customer Relations | GE Appliances, Appliance Park | Louisville, KY 40225 GEAppliances.com/ge/service-and-support/contact.htm
SE S E U E S E A L
MESURES DE SÉCURITÉ .... 4
UTILISATION DE LA LAVEUSE
INSTALLATION APPROPRIÉE
Power (Alimentation)
natural_image
Line drawing of a washing machine interior showing internal components and ventilation duct (no text or symbols)natural_image
Technical line drawing of a washing machine interior showing handle, vent, and grille (no text or symbols)natural_image
Line drawing of a hand pouring liquid into a washing machine (no text or symbols)Chargement
natural_image
Interior view of a washing machine showing the lid and vent (no text or symbols visible)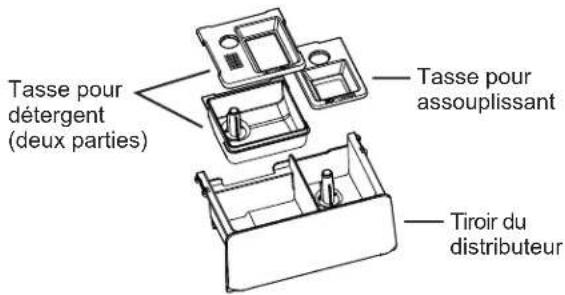
natural_image
Line drawing of hands using a tool to adjust or install a component, showing a magnified view of the handle (no text or symbols present)6 RACCORDEMENT AU DRAIN
Garant : MC Commercial Inc., Burlington, ON, L7R 5B6
Au Canada : Prodsupport.mabe.ca/crm/Products/ProductRegistration.aspx
Au Canada : GEAppliances.ca/en/support/service-request ou composez le 800.561.3344
Prolongation de garantie
Au Canada : GEAppliances.ca/en/support/purchase-extended-warranty ou composez le 800.290.9029
GEAppliances.ca/en/products/parts-filters-accessories ou composer le 1.800.661.1616.
GEAppliances.com/ge/service-and-support/contact.htm
Au Canada : Director, Consumer Relations, MC COMMERCIAL INC. | Suite 310, 1 Factory Lane | Moncton, N.B. E1C 9M3 GEAppliances.ca/en/contact-us
LAVADORAS
INSTRUCCIONES DE
SEGURIDAD 4
USAR LA LAVADORA
Puesta en Marcha 6
Carga 10
CUIDADO Y LIMPIEZA....11
INSTRUCCIONES DE
INSTALACIÓN ....13
natural_image
Line drawing of a washing machine interior showing internal components and ventilation duct (no text or symbols)natural_image
Line drawing of a washing machine interior showing the door, vent, and base panel (no text or symbols)natural_image
Line drawing of a hand pouring liquid into a washing machine (no text or symbols)Carga
natural_image
Technical line drawing of a mechanical component with grid pattern and central air vent (no text or symbols)Cuidado y limpieza
Cajón Dispensador
natural_image
Line drawing of hands using a tool to adjust or install a component, no text or symbols presentwww.geappliances.com/service_and_support/shop-for-extended-service-plans.htm
GEAppliances.com/ge/service-and-support/contact.htm


- SAFETY INSTRUCTIONS....4
- USING THE WASHER
- CARE AND CLEANING ....11
- INSTALLATION
- TROUBLESHOOTING TIPS .....18
- CONSUMER SUPPORT
- OWNER'S MANUAL & INSTALLATION INSTRUCTIONS
- ENGLISH/FRANÇAIS/ ESPAÑOL
- THANK YOU FOR MAKING GE APPLIANCES A PART OF YOUR HOME.
- IMPORTANT SAFETY INFORMATION READ ALL INSTRUCTIONS BEFORE USING THE APPLIANCE
- WARNING
- READ AND SAVE THESE INSTRUCTIONS
- PROPER INSTALLATION
- WHEN NOT IN USE
- PARTS AND ACCESSORIES
- Part Number Accessory
- Step 1
- Step 2
- Step 3
- Step 4
- Power
- Start/Pause
- Display
- Cycle
- CAUTION
- For Waterproof, Water-Resistant, or Bulky Items:
- Getting started
- Settings
- Delay Wash
- Signal
- Cycle Options
- Extra Spin
- Pre-Soak
- Extra Rinse
- Deep Fill
- Deep Rinse
- Control Lock
- Process
- Soak
- Wash
- Rinse
- Spin
- Consumer Help Indicator
- Detergent Dispenser
- Liquid Fabric Softener/Conditioner Dispenser
- Liquid Bleach Dispenser
- Loading
- Automatic Load Sensing
- Pretreatment
- Proper Use of Detergent
- Sorting Wash Loads
- - Fire Hazard
- Loading the Washer
- Electrical Shock Hazard
- Shock Hazard
- Exterior of the Washer
- Interior of the Washer
- IMPORTANT:
- Lint Filter
- Care and Cleaning
- Dispenser Drawer
- Inlet Water Valve Screen(s)
- Water Supply Hoses
- Long Vacations
- Moving and Storage
- Installation Instructions
- Washer
- BEFORE YOU BEGIN
- PARTS SUPPLIED
- TOOLS REQUIRED FOR WASHER INSTALLATION
- PARTS REQUIRED (Sold separately)
- GE Appliances Parts and Accessories
- UNPACK THE WASHER
- IMPORTANT: Minimum Installation Clearances
- - Alcove or Closet
- WATER SUPPLY REQUIREMENTS
- ① REMOVE BOTTOM PACKAGING
- - Electrical Shock Hazard
- ⚠ WARNING - Shock Hazard
- ② INSTALL BASE COVER
- - Entanglement Hazard
- ② INSTALL BASE COVER (Cont.)
- Water and drain connections for Stationary Model (GNW128S) and for Portable Model (GNW128P) with two faucet connections only.
- ③ CONNECT DRAIN HOSE TO WASHER
- CONNECT WATER HOSES TO WASHER
- CONNECT WATER HOSES TO OUTLET VALVES
- CONNECT TO DRAIN
- ELECTRICAL REQUIREMENTS
- CONNECT POWER AND INSTALL
- GROUNDING INSTRUCTIONS
- FINAL CHECKLIST
- GE Appliances Washer Warranty
- GEAppliances.com
- What is not covered:
- EXCLUSION OF IMPLIED WARRANTIES
- In the United States:
- In Canada:
- GE Appliances Website
- Register Your Appliance
- Schedule Service
- Extended Warranties
- Contact Us
- SE S E U E S E A L
- UTILISATION DE LA LAVEUSE
- INSTALLATION APPROPRIÉE
- Power (Alimentation)
- Chargement
- RACCORDEMENT AU DRAIN
- Prolongation de garantie
- LAVADORAS
- INSTRUCCIONES DE
- USAR LA LAVADORA
- Carga
- Cuidado y limpieza
- Cajón Dispensador
Brand : GE
Model : GNW128PSMWW
Category : Washing machine