
RS1884FLJ1 - Fridge Fisher & Paykel - Free user manual and instructions
Find the device manual for free RS1884FLJ1 Fisher & Paykel in PDF.

| Brand | Fisher & Paykel |
| Model | RS1884FLJ1 |
| Product type | Integrated refrigerator-freezer (column) |
| Technology | ActiveSmart™ |
| Storage modes (refrigerator) | Pantry (12 °C), Fridge (3 °C), Chill (-0,5 °C) |
| Storage modes (freezer) | Soft Freeze (-9 °C), Freezer (-18 °C), Deep Freeze (-25 °C) |
| Special functions | Max Cool, Fast Freeze, Bottle Chill, Ice, Ice Boost |
| Control panel | Digital with automatic lock, Sabbath mode |
| Alarms | Door open, mute, Bottle Chill alarm |
| Ice maker | Automatic, adjustable production, water filter |
| Water filter | Replaceable cartridge every 6 months |
| Interior lighting | LED, evenly distributed |
| Trim material | Aluminium |
| Refrigerator compartments | Adjustable bottle holders, dairy compartment, humidity-controlled bins, tempered glass shelves |
| Freezer compartments | Tempered glass shelves, self-closing bins, removable ice bin |
| Power supply | 220-240 V, 50 Hz |
| Cleaning | Mild detergent and warm water, do not use abrasive products |
| Safety | Refrigerant R600a, important safety instructions |
| Installation | Integrated, mandatory fixing |
Frequently Asked Questions - RS1884FLJ1 Fisher & Paykel
User questions about RS1884FLJ1 Fisher & Paykel
0 question about this device. Answer the ones you know or ask your own.
Ask a new question about this device
Download the instructions for your Fridge in PDF format for free! Find your manual RS1884FLJ1 - Fisher & Paykel and take your electronic device back in hand. On this page are published all the documents necessary for the use of your device. RS1884FLJ1 by Fisher & Paykel.
USER MANUAL RS1884FLJ1 Fisher & Paykel
RS2484S & RS3084S models
COLONNES ENCASTRABLES
Modèles RS1884FJ, RS2484FJ, RS3084FJ,
RS2484S et RS3084S
USERGUIDE
GUIDE D'UTILISATION
USCA
English Page 1-24
François
Introduction 3
Safety and warnings 4
Storage features 8
Refrigerator 8
Freezer 9
ActiveSmart™ special features 10
Control panel—Refrigerator 10
Control panel—Freezer 11
Variable temperature zones 12
Max Cool 13
Fast Freeze 13
Bottle Chill 13
Ice 13
Ice Boost 13
Operating instructions 14
Cleaning care 17
Food care 19
User warnings and sounds 20
Troubleshooting 21
Service & Warranty 24
IMPORTANT!
SAVE THESE INSTRUCTIONS
The models shown in this User guide may not be available in all markets and are subject to change at any time. For current details about model and specification availability in your country, go to our website fisherpaykel.com or contact your local Fisher & Paykel dealer.
Registration
Register your product with us so we can provide you with the best service possible.
To register your product visit our website: fisherpaykel.com
Welcome to the family of Fisher & Paykel appliances. Our team has spent thousands of hours designing, engineering and testing this Integrated Column to ensure you get the perfect product for your home. For more information on your product please visit fisherpaykel.com or contact our Customer Care team.

WARNING!

Electric Shock Hazard
Read and follow the safety and warnings outlined in this user guide before operating this appliance.
Failure to do so can result in death, electric shock, fire or injury to persons.

WARNING!
R600a
This appliance contains flammable refrigerant isobutane (R600a).
Use this appliance only for the intended purpose as described in the user guide.
IMPORTANT SAFETY INSTRUCTIONS
WARNING!
When using this appliance always exercise basic safety precautions including the following:
Children should be supervised to ensure that they do not play with the appliance.
- Cleaning and user maintenance shall not be undertaken by children without supervision.
- This appliance can be used by children aged from 8 years and above and persons with reduced physical, sensory or mental capabilities or lack of experience and knowledge if they have been given supervision or instruction concerning use of the appliance in a safe way and understand the hazards involved.
- The manufacturer's installation instructions for product and cabinetry ventilation must be followed when installing the appliance.
- To avoid hazard due to instability of the appliance, it must be fixed in accordance with installation instructions.
- Keep ventilation openings, in the appliance enclosure or the built-in structure, clear of obstruction.
- Do not use mechanical devices or other means to accelerate the defrosting process, other than those recommended by the manufacturer.
- Do not damage the refrigerant circuit.
- In case of damage to the refrigerant circuit, ventilate the area by opening all windows. - Do not operate electrical equipment or any other equipment that may produce arcs, sparks or flames in the area. Contact your Fisher & Paykel trained and supported service technician immediately to arrange for the appliance to be repaired.
- It is hazardous for anyone other than a Fisher & Paykel trained and supported service person to service this appliance.
Electrical
- This appliance must be installed in accordance with the installation instructions before use.
- To allow disconnection of the appliance from the supply after installation, incorporate a switch in the fixed wiring in accordance with the local wiring rules.
- If the power supply cord is damaged, it must only be replaced by your Fisher & Paykel trained and supported service technician.
- WARNING: Do not use electrical appliances inside the food storage compartments of the appliance, unless they are of the type recommended by the manufacturer.
IMPORTANT!
- Your appliance is designed to operate for many years without the need for service checks. However, if your appliance is malfunctioning, have it attended to by your Fisher & Paykel trained and supported service technician as soon as possible.
- If you suspect that the product is not getting cold — items such as ice cream are melting—remove all perishable food and store in another appliance or cooler to prevent spoilage. Immediately call for a service technician.
Cleaning
- Use only soap based cleaning products.
- Avoid using anti-bacterial cleaning products on either the interior or exterior of the cabinet as they may cause rusting of metal components and cracking of plastic components.
Disposal
Extreme care must be taken when disposing of your old appliance to avoid hazards:
- The flammable refrigerant gas must be safely removed by a qualified service technician.
- The thermal insulation foam in this appliance may contain flammable insulation blowing gases, any exposed foam may be highly flammable and must be carefully treated during disposal.
-
DANGER: The doors and panels should be removed and the shelves left in place so that children may not easily climb inside.
-
Consult your local energy authority or local codes as to the best way to dispose of your old appliance.
Storing food and drinks
- Do not store explosive substances such as aerosol cans with a flammable propellant in this appliance.
- Never store volatile or flammable materials in your appliance as they may explode.
- Never freeze liquids in glass containers. Liquid expands during freezing, which may cause the container to explode.
- Never freeze carbonated drinks. They may explode.
Water filter
IMPORTANT!
- The water connection to your ice & water refrigerator must be installed by an qualified plumber or Fisher & Paykel trained and supported service technician and comply with all state and local laws.
- Installation and use MUST comply with all state and local plumbing codes. Check with your local public works department for plumbing codes. You must follow their guidelines as you install the water filtration system.
- To avoid serious illness or death, only connect your water filter to safe drinking water.
- The water filter cartridge needs to be changed when the replacement indicator icon illuminates. This will happen every 6 months.
- If the water filtration system has been allowed to freeze, replace filter cartridge. Failure to replace the disposable filter at recommended intervals may lead to reduced filter performance and failure of the filter, causing property damage from water leakage or flooding.
- In cases of excessively reduced filter life - we recommend that you consult a local plumber or your water supplier for advice on suitable filtration requirements for the water supplied to your home.
-
Filter replacement is the consumer's responsibility and will not be covered by the warranty except in the case of faulty parts or materials within the filter cartridge.
-
If the water has not created ice for some time or ice has an unpleasant taste or odor dispose of ice and refer to 'Automatic ice' for flushing instructions. If unpleasant taste or odor persists, you may wish to fit a new filter cartridge.
- Use new tubing supplied with the refrigerator. DO NOT reuse old tubing from old water and ice connections.
- Your water filtration system can withstand up to 120psi (827kPa) of water pressure. Ensure the supplied pressure reducing valve is installed before installing the water filtration system. DO NOT install if water pressure exceeds 120psi (827kPa).
To reduce the risk associated with property damage due to water leakage or flooding:
- DO NOT install systems in areas where ambient temperatures may go above 100^ (38^) or drop below 33^ (0.6^) .
- DO NOT install on hot water supply lines. The maximum operating water temperature of this filter system is 100^ ( 38^ ).
- DO NOT install where water hammer conditions may occur. If water hammer conditions exist, you must install a water hammer arrester.
WARNING!
To reduce the risk associated with choking:
- DO NOT allow children under 3 years of age to have access to small parts during the installation of the water filter.
Ice making
IMPORTANT!
- Avoid contact with the moving parts of the ice maker ejector mechanism, and do not place your fingers on the automatic ice- making mechanism while the appliance is in operation.
- Do not use ice cubes that may have become discolored, usually with a green-blue color. If such discoloration is noted, discard the ice cubes and contact your Fisher & Paykel trained and supported service technician.
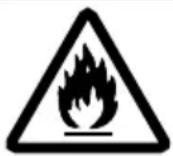
Refrigerator
Easy-clean design with evenly distributed lighting and aluminum trims.
REFRIGERATOR COMPONENTS
| Bottle racks Adjustable and removable bottle racks. | |
| Dairy compartment | Dividers to allow organization of food items. A lid to prevent tainting of dairy items from the rest of the upper compartment. |
| Humidity controlled compartments | These compartments help to provide a humid microclimate to extend the storage times of fruit and vegetables. |
| Shelving | Selectable shelf heights. Heat treated safety glass. Adjustable door shelves with dividers. |
| Soft close bins Soft close | bins ensure bins close quietly and properly. Adjustable bin dividers. Mats. |
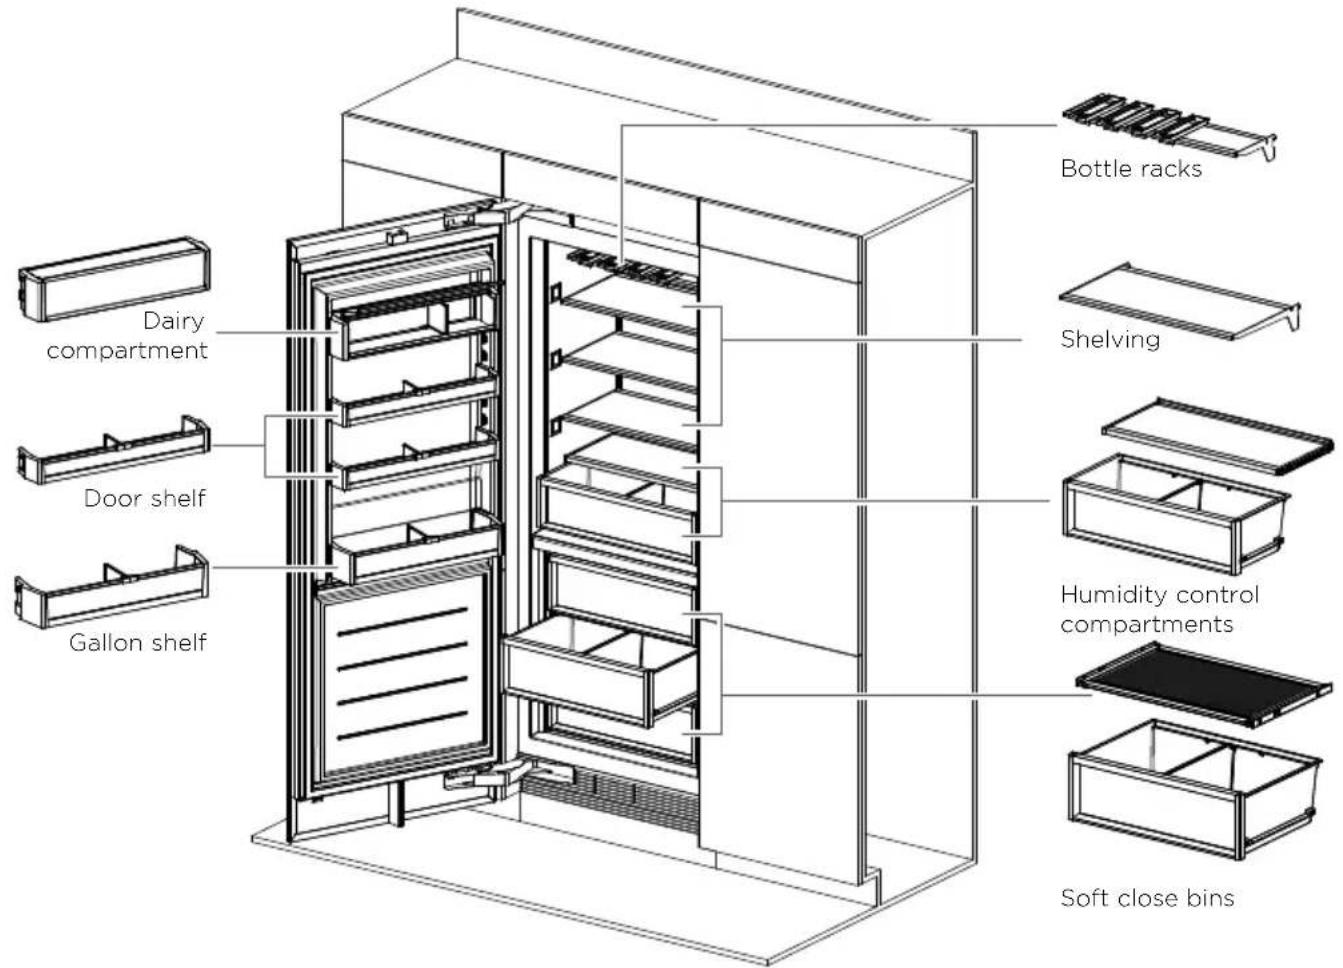
Freezer
Easy-clean design with evenly distributed lighting and aluminum trims.
FREEZER COMPONENTS
| Shelving | · Selectable shelf heights. · Heat treated safety glass. · Adjustable door shelf dividers. |
| Ice maker | · Adjustable production speeds. · Removable ice container. · Hygienic ice scoop. |
| Self close bins Freezer bins self close to ensure all bins close properly. · Adjustable bin dividers. | |
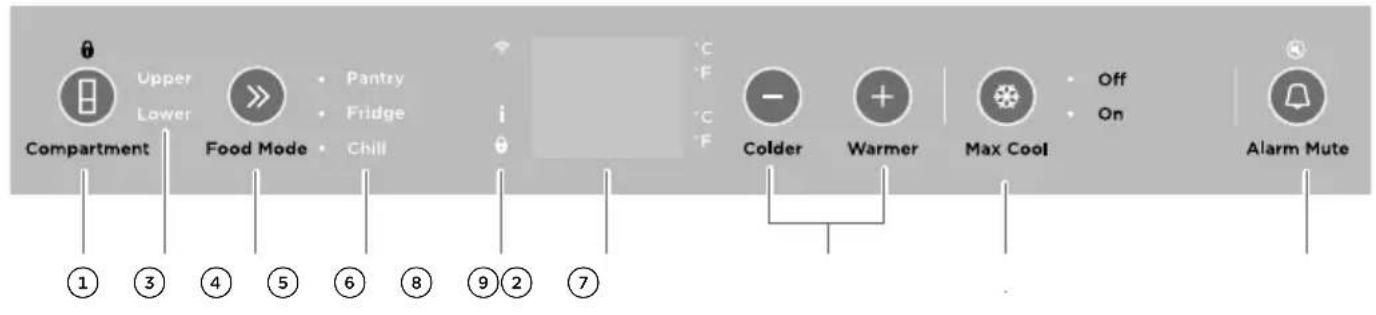
Control panel—Refrigerator
| ① | Compartment Allows you to unlock the control panel and enable compartment selection. Press 4 seconds to activate your appliance for the first time. The control panel will automatically lock when inactive for more than 10 seconds or when the door is closed. To unlock, press for 2 seconds. | |
| ② | Compartment lights | Lights illuminate to show which compartment is selected. |
| ③ | Food Mode Allows you to select the food mode for the selected compartment. | |
| ④ | Food Mode lights | Lights illuminate to show which food mode is selected. |
| ⑤ | WiFi Not available on this product. | |
| Sabbath Mode | I Illuminates to indicate that Sabbath mode is activated. | |
| Key lock | II Illuminates to indicate that the keys on the control panel are locked. When the door is closed the display is automatically locked. | |
| ⑥ | Digital display | Displays the set temperature of the compartments. To change between Celsius and Fahrenheit on the display: • Press + and » together for 4 seconds. |
| ⑦ | Colder Warmer | Allows you to adjust the temperature of the selected compartment. |
| ⑧ | Max Cool | Boosts the cooling speed of your refrigerator by dropping the refrigerator to its coldest temperature for a set time, dependent on the food mode in use. |
| ⑨ | Alarm Mute | This button has a dual function—it allows you to deactivate door alarms for 20 minutes and/or mute key tones on the control panel. |
Control panel-Frezer
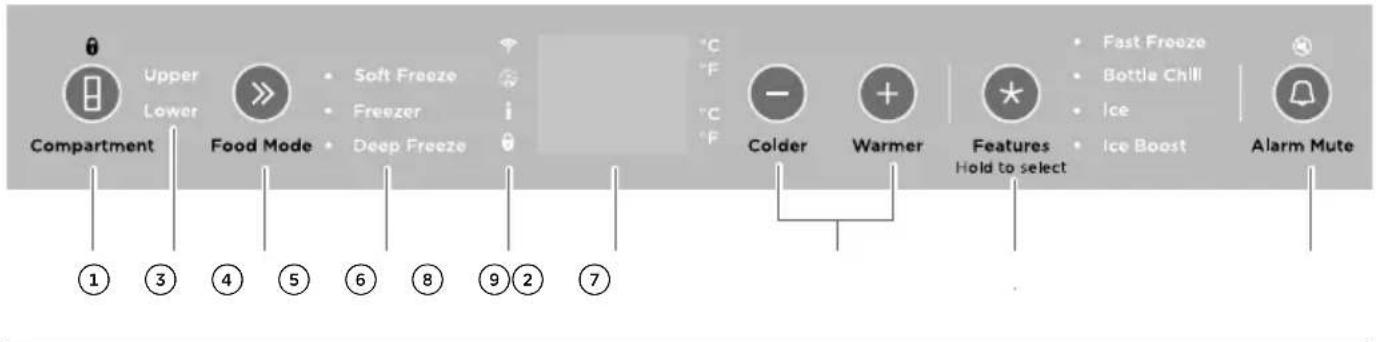
① Compartment Allows you to unlock the control panel and enable compartment selection. Press 4 seconds to activate your appliance for the first time. The control panel will automatically lock when inactive for more than 10 seconds or when the door is closed. To unlock, press for 2 seconds.
^2 Compartment Lights illuminate to show which compartment is selected.
③ Food Mode Allows you to select the food mode for the selected compartment.
(4) Food Mode Lights illuminate to show which food mode is selected.
⑤ WiFi Not available on this product.
Filter Illuminates to indicate that water filter replacement is required.
Sabbath Mode I Illuminates to indicate that Sabbath mode is activated.
Key lock 0 Illuminates to indicate that the keys on the control panel are locked. When the door is closed the display is automatically locked.
Digital display Displays the set temperature of the compartments.
To change between Celsius and Fahrenheit on the display:
Press + and together for 4 seconds.
Colder Allows you to adjust the temperature of the selected compartment.
Features Allows you to scroll and select features:
Fast Freeze
- Bottle Chill
Ice
Ice Boost
Refer to 'Special Features' for details on these features.
Alarm Mute This button has a dual function—it allows you to deactivate door alarms for 20 minutes and/or mute key tones on the control panel.
Variable temperature zones
Separate food modes, in both fridge and freezer, allow you adjust the temperature independently for optimal storage.
| REFRIGERATOR FOOD MODES TYPES OF FOOD TO STORE | |
| Pantry (12°C/54°F) | ‘Pantry’ mode provides a cool, dark place for a wide variety of foods that perish quickly or may spoil at room temperature, but are too sensitive to be stored at normal refrigerator temperatures. |
| Fridge (3°C/37°F) | The ideal mode for fresh, everyday foods. This mode offers a higher relative humidity than many other refrigerators allowing fresh foods such as fruits and vegetables, meats and cheeses to stay fresher for longer. |
| Chill (-0.5°C/31°F) | ‘Chill’ mode is an extension of ‘Fridge’ mode, providing the perfect storage zone for highly perishable food to ensure they retain their vital freshness and quality. These items will last slightly longer here compared with storage at ‘Fridge’ mode. Note: Ensure these highly perishable items are consumed within their recommended storage times. |
| FREEZER FOOD MODES TYPES OF FOOD TO STORE | |
| Soft Freeze (-9°C/16°F) | ‘Soft Freeze’ mode is an extension of your refrigerator, extending the shelf life of perishable items while maintaining the quality. ‘Soft Freeze’ mode allows easy portioning of food and the ability to heat, cook or serve foods straight from the compartment without waiting for it to thaw. |
| Freezer (-18°C/-1°F) | ‘Freezer’ mode is for general frozen food items that require storage between 1-12 months. |
| Deep Freeze (-25°C/-13°F) | ‘Deep Freeze’ mode is for frozen food items that may need to be stored for longer periods. ‘Deep Freeze’ extends the shelf life of general frozen items by up to 6 months longer than that of ‘Freezer’ mode. |
Note: Not all combinations of food modes are available in all compartments. If a food mode is not available, it will not be selectable on the control panel.

Max Cool
Boosts the cooling speed of your refrigerator by dropping the refrigerator to its coldest temperature for a set time, dependent on the food mode in use. We recommend using 'Max Cool' or 'Fast Freeze' when you are adding food items to your appliance, such as after grocery shopping. This feature will ensure the food is chilled/frozen within the shortest period of time, locking in the freshness and extending the shelf life of your food.
Fast Freeze
Boosts the freezing speed by dropping the freezer to its coldest temperature for a set time dependent on the food mode in use. Offered on 'Soft Freeze' and 'Freezer' modes.
Bottle Chill
This feature allows you to rapidly chill your beverage for a set time depending on your chosen food mode.
Ice*
Turns on your automatic ice. This feature is only available in the lower compartment.
Ice Boost*
Increases ice production by up to 30% and deactivates automatically after 24 hours.
>> Selecting the Food Mode
- Select the desired compartment.
- Press to scroll through the available modes. The light next to the name of the 'Food Mode' will illuminate as you scroll to indicate which mode is selected.
Adjusting the temperature
Each 'Food Mode' will automatically default to the recommended temperature setting. Once you have selected the compartment and required 'Food Mode', the temperature can be adjusted as desired.
To increase the temperature of your selected 'Food Mode', press+
To decrease the temperature of your selected 'Food Mode', press
\* Selecting Features
Pressing will scroll through the available 'Features' for the compartment and mode you have selected. A blinking light indicates the current position when scrolling through the list.
To activate/deactivate a feature:
- Select the feature from the list, by scrolling through and stopping at the feature you wish to use.
Press for 2 seconds.
Bottle Chill
An alarm will sound, 'Bottle Chill' will flash and will illuminate after the elapsed time to remind you to remove your beverage.
To silence the alarm:
Pressonce.
- The time taken to chill depends on the size of your beverage. If your beverage is not cold enough after the set time, return it to the compartment and reset the 'Bottle Chill' feature.
Automatic ice maker (freeze only)
Before turning on your automatic ice maker, the water filter must be installed (refer to your installation guide) and flushed to remove any impurities or trapped air in the filter system.
① Turn your Ice maker on, refer to 'Selecting Features'.
② Press the , - and + together for 4 seconds then close the doors. The ice tray will empty the water into the bin below. The ice tray will only empty after the doors are closed.
Repeat step② to remove dust in the ice tray collected during manufacture and transport.
④ Empty the water, dry the bin and return it correctly.
Once your ice maker is turned on the first bin of ice may be discolored, this is not harmful and normal during the flushing process. Discard the first full bin of ice made. Your ice maker is now ready for use.
- The performance of your water filter will increase with use, reaching optimum performance after four to five full bins of ice.
Turn the ice maker off if:
There is no water supply for several hours.
- You are removing the ice storage bin for a period of time.
- You are going on holiday/vacation.

Water filter
The water supplied to your appliance for ice making is filtered to remove impurities through a filter located the bottom front of your appliance. Replace your filter cartridge every 6 months.
- There is a replacement indicator icon on the control panel which will appear when the filter needs replacing.
- Replacement filter cartridges can be purchased online from fisherpaykel.com or by calling Fisher & Paykel Customer Care. Details of the replacement filter cartridge are labelled on the cartridge. Instructions on how to install your replacement water filter are provided with the filter.
To reset the filter indicator:
Press and together for 4 seconds.
The on the control panel will turn off when reset.

Alarm mute
To activate, press once.
The light above will illuminate to indicate the appliance is muted.
- If the doors are left open for 5 minutes or more, the compartment light turns off and normal door alarms are suspended.
- 'Alarm Mute' will deactivate after 20 minutes.
To deactivate manually, press again.
Closing the door also deactivates the 'Alarm Mute'.
Sabbath mode
When activated—the display, all alarms and lights are deactivated for 80 hours.
To activate Sabbath mode, press, and together for 4 seconds.
The icon on the control panel will illuminate.
To deactivate manually, press , and together for 4 seconds.
Note: If you turn off your appliance while in Sabbath mode, it will resume automatically once the appliance is switched on again.
Key mute
Key mute allows you to silence all button presses.
To activate key mute, press for 2 seconds, a single confirmation beep will be heard.
- Once key mute is activated, all key sounds are silenced.
- Door alarms and the 'Bottle Chill' alarm are still operational.
To deactivate, press for 2 seconds, a single confirmation beep will be heard.
Key Lock
'Key Lock' allows you to disable the buttons on the control panel. This is useful when cleaning your appliance.
To activate 'Key Lock', press for 2 seconds.
Theicon on the control panel will illuminate.
To deactivate, press for 2 seconds.
Theicon will not illuminate.
Door alarms
If the door is left open, the alarm will beep after 60 seconds.
If the door remains open, subsequent beeps will sound every 30 seconds for 5 minutes.
- If the door remains open for 5 minutes or longer, an alarm will sound continuously and the interior compartment light(s) will turn off.
Exterior cleaning
Toe kick grilles and filter
Your Integrated Column is fitted with a toe kick grille to protect the internal working components. We recommend cleaning the grille and filter in conjunction with changing your water filter cartridge (every 6 months).
The condenser coils of your Integrated Column require periodic cleaning by a Fisher & Paykel trained service technician.
- To maximize operating efficiency, keep ventilation openings clear of obstructions by regularly vacuuming the flooring in front of your appliance.
- More frequent cleaning may be necessary for dusty homes or those with pets shedding hair.
Interior cleaning
Do not use harsh chemicals, abrasives, ammonia, chlorine, bleach, concentrated detergents, solvents or abrasive scouring pads on any part of your appliance. Some of these chemicals may damage your appliance.
Clean all surfaces with a mild liquid detergent dissolved in warm water and a soft cloth. Rinse with clean water and dry with a clean, lint-free cloth.
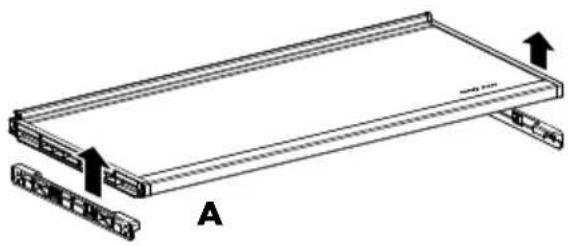
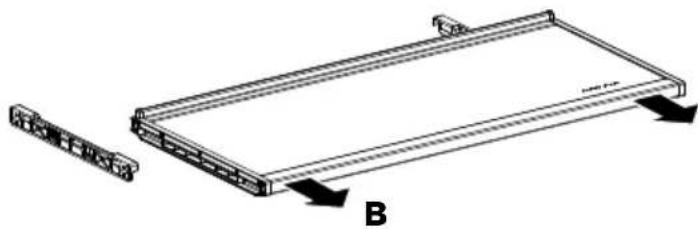
Humidity control lids (refrigerator only)
Upper compartment:
① To remove, hold both sides of the shelf and lift straight up to unclip from the runners (A).
② Pull the shelf towards you (B).
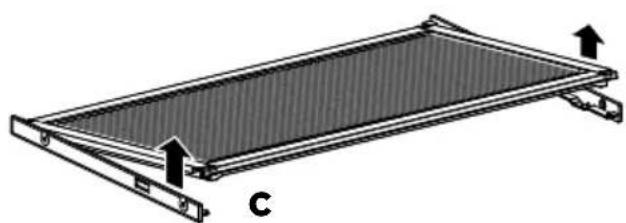
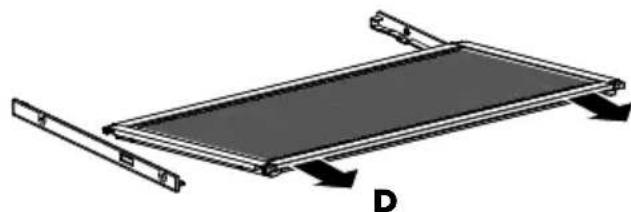
Lower compartment:
① To remove, lift the front edge of the shelf up (C).
② Pull the shelf towards you to unclip from the runners (D).
Cantilever glass shelves
① To remove, hold the front and back edge of the shelf firmly.
② Push the shelf up vertically to dislodge from back support lugs.
③ Pull the shelf towards you.
Bin
① To remove a bin, extend the bin on its runners (A), and empty the bin.
② Push the securing tabs on both sides of the bin corners, then push the bin firmly upwards to dislodge from the runners (B).
(3) Pull the bin towards you to remove. Push both runners back into the appliance.
(4) To return the bin, extend the runners and place the bin on top of the runners.
⑤ Push the bin slowly onto the securing tabs until you feel it clip onto the runners. Ensure the bin tabs are clipped securely onto the runners before use.

IMPORTANT!
The runners are pre-lubricated to help open and close the bins. They do not need to be lubricated again. Do not remove the grease from the runners to maintain its smooth function. Do not immerse the runners in water.
Holiday/vacation (freeze only)
Before leaving:
- Turn the ice maker to OFF on the control panel.
- Shut off the water supply to the appliance.
On return:
- Turn on the ice maker. Discard the first full bin of ice.
For best food care
- Store only high-quality, fresh food in your appliance.
- Store perishable foods in the appliance immediately after purchase. Storing at room temperature increases the rate of deterioration and can allow harmful microbial growth.
-
Foods such as meat, poultry and seafood should be well wrapped or sealed in suitable packaging to prevent dehydration, color deterioration, loss of flavor, and transfer of odor.
-
We recommend storing these foods on the bottom shelf of your appliance or in one of the bins to prevent potential spills and cross-contamination with other foods.
-
Ensure hot foods and beverages are cooled sufficiently before placing them into the appliance. Hot items may cause other foods to warm to unsafe temperatures. It may also cause sealed items to sweat/condensate—which is undesirable.
- Beverages are best stored standing upright in the door shelves or on the bottle racks provided.
- Ensure raw and cooked foods are stored separately to avoid cross-contamination.
- Consume food items within the recommended storage times. Discard foods that show sign of spoilage.
- Keep door openings to a minimum to maintain optimum storage temperatures inside your appliance.
- We recommend using 'Max Cool' or 'Fast Freeze' when you are adding food items to your appliance, such as after grocery shopping. This feature will ensure the food is chilled/frozen within the shortest period of time, locking in the freshness and extending the shelf life of your food.
Items stored in your refrigerator
- Dairy items such as butter and cheeses should be stored in the covered door shelf to minimize any transfer of odor or odor absorption from other foods.
- Eggs should be stored in their carton to avoid absorption of strong odors through their porous shell structure.
Items stored in your freezer
We recommended cooling carbonated beverages only when the 'Bottle Chill' function is active.
- Do not store carbonated drinks without this function in the freezer.
Failure to remove beverages could lead to freezing liquid and the likelihood of bottle/can explosion.
- Ensure air is removed from packaging to avoid large formation of ice crystals and prevent freezer burn.
To maintain freshness and quality, we recommend defrosting foods in the refrigerator.
Ensure partially or fully defrosted foods are never re-frozen—cook immediately.
Faults
-
In the unlikely event a fault occurs, 4 rapid beeps will be heard and the fault will be displayed on the control panel.
-
Record the fault code displayed on the control panel and contact a Fisher & Paykel trained and supported service technician in order to repair the fault. You can do this by going online to fisherpaykel.com or by contacting our Customer Care Center.
Normal appliance sounds
Integrated Columns has been designed to have excellent energy ratings and cooling performance. As a result, it can produce sounds somewhat different to your old appliance.
Normal operational sounds include:
- Low frequency ticking sound. This is the valve that controls cooling to each compartment. This noise will only last for a few seconds at a time.
- Fan air flow sound. Integrated Columns has fans which change speed depending on demand. During cooling periods, such as after frequent door openings, fans circulate the cold air in the appliance producing some air flow sound. This is quite normal.
- Cracking or popping sounds. This may occur when the automatic defrost function is operating.
- Running water sound. This is the liquid refrigerant in the system and can be heard as a boiling or gurgling noise.
- An audible hissing sound after closing the freezer door. This is due to the pressure difference between the warm air that has entered the cabinet and suddenly cooled, and the outside air pressure.
-
Humming sounds. This is the compressor running and is quite normal.
Ice maker sounds: -
Motor operation (low humming).
- Running water as the ice maker and/or water tank fills.
- Water valve opening and closing (hissing sound).
- Ice being loosened from the ice moulding tray (cracking).
-
Ice dropping into bin (clunking).
-
Other sounds may be heard for the following reasons:
-
Floor uneven or weak.
- Bottles or jars rattling on shelves.
If there is a problem with your appliance, please check the following points before contacting your local Fisher & Paykel trained and supported service technician or the Customer Care Center.
Product parts and accessories can be purchased through the Fisher & Paykel Customer Care Center, or online at fisherpaykel.com (this service is available to selected markets only).
| PROBLEM POSSIBLE CAUSES WHAT TO DO | |||
| Appliance does not operate | No electricity at power outlet. | Check that the plug is correctly connected and power switched on. | |
| Check another appliance at the same outlet. | |||
| Check house fuse. | |||
| Light not working | Light not functioning. The lighting cannot be serviced by the user. Contact your Fisher & Paykel dealer or trained and supported service technician. | ||
| Appliance not working. Check appliance is turned on at the wall or at the isolating switch. | |||
| Light and display not working | Product in Sabbath mode. | Press ☑, and ☐ together for 4 seconds. | |
| Storage compartments too warm | Temperature setting not correct. | See ‘ActiveSmart™ special features’ section of this User guide. | |
| Frequent door openings. Minimize door openings to allow temperature to stabilize. | |||
| Large amount of food has been recently added. | Select ‘Max Cool’ or ‘Fast Freeze’ features to assist in lowering the temperature quickly. | ||
| Food freezing in the refrigerator | Temperature setting is too cold. | Increase the temperature setting. See ‘ActiveSmart™ special features’ section of your user guide. | |
| Food placed directly in front of air outlets. | Move chill sensitive foods away from the air outlets. | ||
| Unfamiliar noises | Cabinet not stable or level. | See Installation guide supplied with this appliance. | |
| Freezer is defrosting. This is normal. | |||
| Ice maker sounds | Normal ice maker operation. | See ‘User warnings and sounds’ section. | |
| Food Mode is not available | Not all combinations of food modes are available in all compartments. | Try to select the desired Food Mode in a different compartment. | |
| PROBLEM POSSIBLE CAUSES WHAT TO DO | |||
| When the appliance door is opened 4 rapid beeps sound and a code is displayed on the control panel | Record the code on the control panel and contact Customer Care Center. | ||
| Water in the vegetable bins | Condensation is formed by the water produced by fruit and vegetables. | A small amount of condensation is beneficial for fruit and vegetable storage. | |
| Wipe out water with a cloth. | |||
| Exterior of cabinet is warm | Note: This is normal. | ||
| Condensation on outside of appliance | Not unusual during periods of high humidity. | Wipe dry. | |
| Condensation/ice inside compartment | Frequent or long door openings. | Minimize door openings. | |
| Door gasket leaking. Check and clean door gasket seal. | |||
| Not unusual during periods of high humidity. | Wipe dry. | ||
| Door not closing tightly. Arrange items in the compartment so door can close tightly. | |||
| Doors not aligned. Call a service technician. | |||
| Bin does not slide in and out evenly | Packaging trapped. Check to ensure no food or packaging is trapped behind the tray/bin. | ||
| Door not closing An obstruction is blocking door closing. | Move obstruction. | ||
| Appliance not installed correctly. | Refer to your Installation guide supplied with this appliance to ensure your appliance has been installed correctly. | ||
| Freezer door will not open | The door has been recently opened. | Wait 30 seconds and try again. | |
| Small or large ice cubes | Water line is kinked/squashed. | Check the external water line is not kinked/squashed. If it is not kinked/squashed contact Customer Care to arrange a technician to check the internal water line. | |
| Frozen food items are soft or melting | Remove items and place in another freezer or cooler and call Customer Care immediately. | ||
| PROBLEM POSSIBLE | CAUSES WHAT TO DO | ||
| Automatic ice maker does not work | Ice maker has not been turned on. | Switch on ice maker, see 'Automatic ice maker (freezer only)' section. | |
| Water supply turned off or not connected. | Connect the water supply. | ||
| Freezer compartment not working. | Contact Customer Care Center. | ||
| Water pressure too low. Check water pressure. | |||
| Water line kinked/squashed. Check water line for kinks/squashing. | |||
| Filter is clogged. Water filter may need replacing. | |||
| Ice cubes sticking in ice bin. Remove ice storage bin, loosen cubes and remove clumped ice. Replace ice storage bin. | |||
| The food mode is set to 'Soft Freeze'. | Change the food mode from 'Soft Freeze'. | ||
| Ice cubes taste tainted | Unsealed packages may be transmitting odor/taste. | Discard ice cubes and clean ice storage bin. See 'Interior cleaning' section. | |
| Wrap or cover strong smelling foods. | |||
| Poor taste from incoming water. | Replace filter cartridge product parts and accessories can be purchased through our Customer Care Center. | ||
| Slow ice cube freezing | Door may have been left ajar. | Close door. | |
| Freezer compartment set too warm. | Turn temperature to a colder setting. See 'Operating instructions' section. | ||
| Wet ice/ice clumping | Low water pressure. Check water pressure. | ||
| Filter is blocked. Replace filter | cartridge, see 'Water filter' section. | ||
| Long freezer door openings. | Gently tap ice to unstick or, if large clumps occur, empty ice bin and make new ice. | ||
| High ambient temperature. | |||
| Ice bin left out of freezer compartment for a length of time. | |||
| Ice will stick together over time. | |||
| Ice is discolored Water filter has not been flushed. | Refer to your installation guide supplied with your appliance for details on how to flush your water filter. | ||
For details of your manufacturer's warranty and contacts for servicing, refer to your separate service and warranty book provided with your appliance.
This product has been designed for use in a normal domestic (residential environment). This product is not designed for any commercial use. Any commercial use by the customer will affect this products manufacturer's warranty.
Complete and keep safe for reference:
Model
Serial No.
Purchase Date
Purchaser
Dealer
City
State
Zip
Country
Introduction 29
Fisher & Paykel Appliances 2019. All rights reserved.
The product specifications in this booklet apply to the specific products and models described at the date of issue. Under our policy of continuous product improvement, these specifications may change at any time. You should therefore check with your Dealer to ensure this booklet correctly describes the product currently available.