
JVW5301FJDS - Range hood GE - Free user manual and instructions
Find the device manual for free JVW5301FJDS GE in PDF.
| Product Type | Ceramic Electric Cooktop |
| Brand | GE |
| Model | JVW5301FJDS |
| Appliance Dimensions (W x D x H) | 55 cm x 44 cm x 5.7 cm |
| Cutout Required (W x D) | 50.5 cm x 40.5 cm |
| Estimated Weight | 12 kg |
| Power Supply | 208/240 V, 60 Hz, dedicated circuit |
| Number of Heating Elements | 4 (including one dual) |
| Element Type | Radiant under ceramic glass |
| Controls | Rotary knobs with Off, Hi, Lo, Simmer positions |
| Indicators | On and Hot Surface |
| Surface Material | Ceramic glass |
| Recommended Cleaning | Specific ceramic glass cleaner and anti-scratch sponge |
| Safety | Hot surface indicator, temperature limiter, mandatory grounding |
| Warranty | 1 year parts and labor |
| Included Accessories | Foam strips, mounting brackets, screws |
| Recommended Uses | Home cooking with flat-bottom utensils |
| Cookware Compatibility | Stainless steel, thick aluminum, copper, enameled cast iron |
Frequently Asked Questions - JVW5301FJDS GE
User questions about JVW5301FJDS GE
0 question about this device. Answer the ones you know or ask your own.
Ask a new question about this device
Download the instructions for your Range hood in PDF format for free! Find your manual JVW5301FJDS - GE and take your electronic device back in hand. On this page are published all the documents necessary for the use of your device. JVW5301FJDS by GE.
USER MANUAL JVW5301FJDS GE
SAFETY INFORMATION......3
USING THE COOKTOP
Cooktop Features 5
Radiant Glass Cooktop 6
Surface Elements 6
Cookware 7
Home Canning Tips 8
CARE AND CLEANING
INSTALLATION INSTRUCTIONS
Safety 11
Pre-Installation Checklist 13
Preparing the Opening ..... 14
Installing the Cooktop 15
Electrical Connections ..... 16
Checklists....17
TROUBLESHOOTING TIPS ..... 18
LIMITED WARRANTY 22
ACCESSORIES 23
CONSUMER SUPPORT .... 24
OWNER'S MANUAL AND INSTALLATION INSTRUCTIONS
JP3021
ENGLISH/FRANÇAIS/ESPAÑOL
Write the model and serial numbers here:
Model # ____
Serial # ____
You can find them on a label under the cooktop.
THANK YOU FOR MAKING GE APPLIANCES A PART OF YOUR HOME.
Whether you grew up with GE Appliances, or this is your first, we're happy to have you in the family.
We take pride in the craftsmanship, innovation and design that goes into every GE Appliances product, and we think you will too. Among other things, registration of your appliance ensures that we can deliver important product information and warranty details when you need them.
Register your GE appliance now online. Helpful websites and phone numbers are available in the Consumer Support section of this Owner's Manual. You may also mail in the pre-printed registration card included in the packing material.

GE APPLIANCES
IMPORTANT SAFETY INFORMATION READ ALL INSTRUCTIONS BEFORE USING THE APPLIANCE
▲WARNING
Read all safety instructions before using the product. Failure to follow these instructions may result in fire, electrical shock, serious injury or death.
WARNING
GENERAL SAFETY INSTRUCTIONS
- Use this cooktop only for its intended purpose as described in this Owner's Manual.
■ Be sure your cooktop is properly installed and grounded by a qualified installer in accordance with the provided installation instructions. - Do not attempt to repair or replace any part of your cooktop unless it is specifically recommended in this manual. All other servicing should be performed by a qualified technician.
■ Before performing any service, unplug the cooktop or disconnect the power supply at the household distribution panel by removing the fuse or switching off the circuit breaker.
■ Do not leave children alone—children should not be left alone or unattended in an area where the cooktop is in use. They should never be allowed to climb, sit or stand on any part of the cooktop.
Do not store items of interest to the cooktop—children climbing on the items could be seriously injured.
CAUTION
■ Use only dry pot holders—moist or damp pot holders on hot surfaces may result in burns from steam. Do not let pot holders touch hot surface units or heating elements. Do not use a towel or other bulky cloth in place of pot holders.
■ Never use your cooktop for warming or heating the room.
- Do not touch surface elements. These surfaces may be hot enough to burn even though they are dark in color. During and after use, do not touch, or let clothing or other flammable materials contact the surface elements or areas nearby the surface elements; allow sufficient time for cooling first.
■ Potentially hot surfaces include the cooktop and areas facing the cooktop.
■ Do not heat unopened food containers. Pressure could build up and the container could burst, causing an injury.
- Cook meat and poultry thoroughly—meat to at least an internal temperature of 160°F and poultry to at least an internal temperature of 180°F. Cooking to these temperatures usually protects against foodborne illness.
WARNING
KEEP FLAMMABLE MATERIALS AWAY FROM THE COOKTOP
Failure to do so may result in fire or personal injury.
■ Do not store or use flammable materials near the cooktop, including paper, plastic, pot holders, linens, wall coverings, curtains, drapes and gasoline or other flammable vapors and liquids.
■ Never wear loose-fitting or hanging garments while using the cooktop. These garments may ignite if they contact hot surfaces causing severe burns.
- Do not let cooking grease or other flammable materials accumulate in or near the cooktop. Grease on the cooktop may ignite.
READ AND SAVE THESE INSTRUCTIONS
IMPORTANT SAFETY INFORMATION READ ALL INSTRUCTIONS BEFORE USING THE APPLIANCE
WARNING
COOKTOP SAFETY INSTRUCTIONS
In the event of a fire, do not use water or grease on fires. Never pick up a flaming pan. Turn the controls off. Smother a flaming pan on a surface unit by covering the pan completely with a well-fitted lid, cookie sheet or flat tray. Use a multi-purpose dry chemical or a foam-type fire extinguisher.
■ Never leave the surface units unattended at medium or high heat settings. Boilovers cause smoking and greasy spillovers that may catch on fire.
■ Never leave oil unattended while frying. If allowed to heat beyond its smoking point, oil may ignite resulting in fire that may spread to surrounding cabinets. Use a deep fat thermometer whenever possible to monitor oil temperature.
■ To avoid spillover and fire, use a minimum amount of oil when shallow pan-frying and avoid cooking frozen foods with excessive amounts of ice.
■ Use the proper pan size - select cookware having flat bottoms large enough to cover the surface heating element. The use of undersized cookware will expose a portion of the surface unit to direct contact and may result in ignition of clothing. Proper relationship of cookware to surface unit will also improve efficiency.
■ To minimize the possibility of burns, ignition of flammable materials and spillage, the handle of a container should be turned toward the center of the range without extending over nearby surface units.
WARNING
RADIANT COOKTOP SAFETY INSTRUCTIONS
■ Only certain types of glass, glass/ceramic, earthenware or other glazed containers are suitable for cooktop service; others may break because of the sudden change in temperature.
■ Use care when touching the cooktop. The glass surface of the cooktop will retain heat after the controls have been turned off.
■ Do not cook on a broken cooktop. If the glass cooktop should break, cleaning solutions and spillovers may penetrate the broken cooktop and create a risk of electric shock. Contact a qualified technician immediately.
■ Avoid scratching the glass cooktop. The cooktop can be scratched with items such as knives, sharp instruments, rings or other jewelry, and rivets on clothing.
- Do not place or store items that can melt or catch fire on the glass cooktop, even when it is not being used. If the cooktop is inadvertently turned on, they may ignite. Heat from the cooktop or oven vent after it is turned off may cause them to ignite also.
■ Use ceramic cooktop cleaner and non-scratch cleaning pad to clean the cooktop. Wait until the cooktop cools and the indicator light goes out before cleaning. A wet sponge or cloth on a hot surface can cause steam burns. Some cleaners can produce noxious fumes if applied to a hot surface. Read and follow all instructions and warnings on the cleaning cream label. NOTE: Sugary spills are an exception. They should be scraped off while still hot using an oven mitt and a scraper. See the Cleaning the Glass Cooktop section for detailed instructions.
How to Remove Protective Shipping Film and Packaging Tape
Carefully grasp a corner of the protective shipping film with your fingers and slowly peel it from the appliance surface. Do not use any sharp items to remove the film. Remove all of the film before using the appliance for the first time.
To assure no damage is done to the finish of the product, the safest way to remove the adhesive from packaging tape on new appliances is an application of a household liquid dishwashing detergent. Apply with a soft cloth and allow to soak.
NOTE: The adhesive must be removed from all parts. It cannot be removed if it is baked on.
READ AND SAVE THESE INSTRUCTIONS
Throughout this manual, features and appearance may vary from your model.
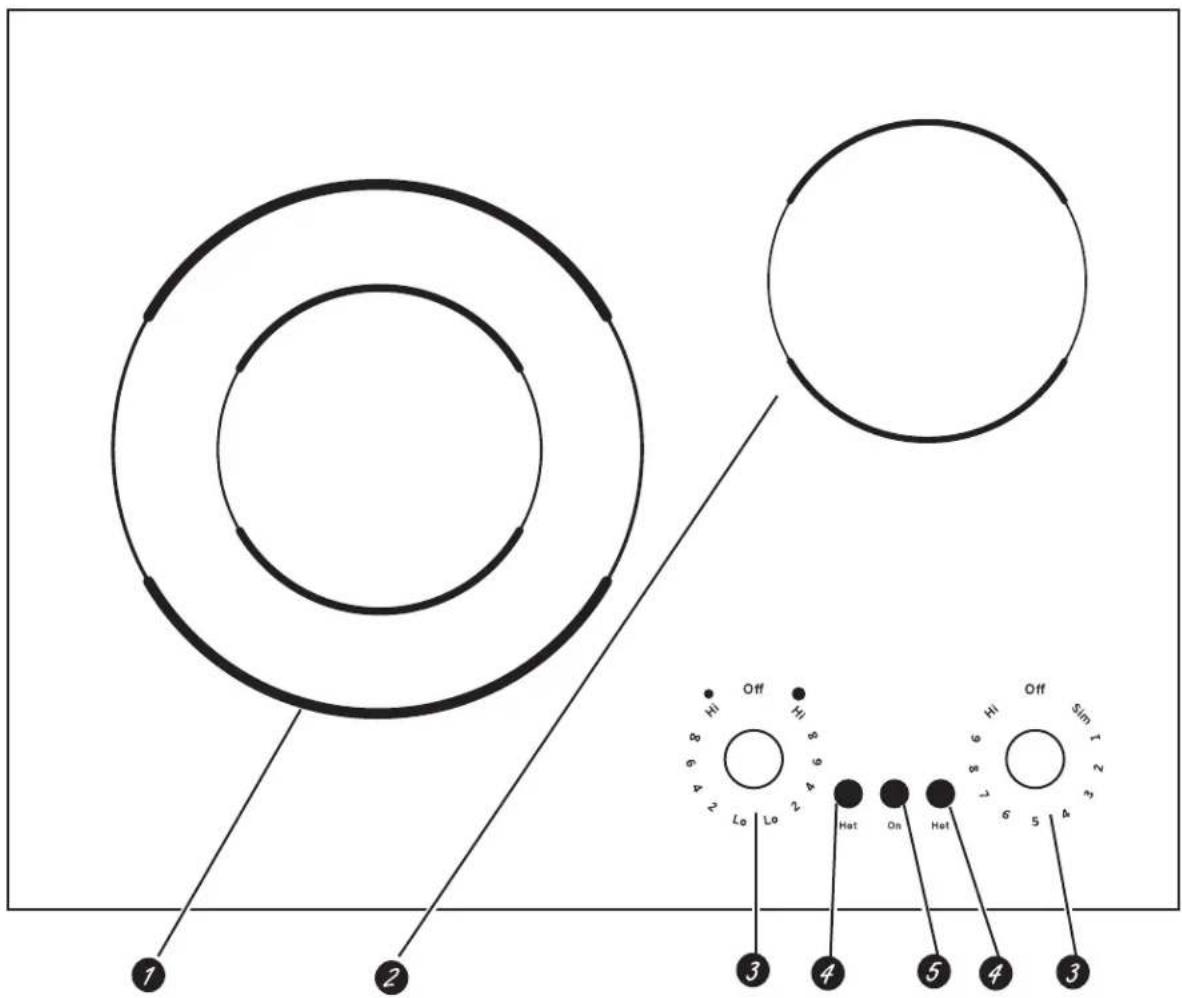
| Feature Index (Features and appearances may vary.) | Explained on page | |
| 1 | Dual Surface Element 6, 7 | |
| 2 | Single Surface Element 6, 7 | |
| 3 | Surface Element Control Knobs 6, 7 | |
| 4 | Hot Surface Indicator Light 6, 7 | |
| 5 | "On" Indicator Light 6, 7 | |
Radiant Glass Cooktop
Throughout this manual, features and appearance may vary from your model.
The radiant cooktop features heating units beneath a smooth glass surface.
NOTE: A slight odor is normal when a new cooktop is used for the first time. It is caused by the heating of new parts and insulating materials and will disappear in a short time.
NOTE: On models with light-colored glass cooktops, it is normal for the cooking zones to change color when hot or cooling down. This is temporary and will disappear as glass cools to room temperature.
The surface element will cycle on and off to maintain your selected control setting.
It is safe to place hot cookware (from the oven or surface) on the glass cooktop when the surface is cool.
Even after the surface elements are turned off, the glass cooktop retains enough heat to continue cooking. To avoid overcooking, remove pans from the surface elements when the food is cooked.
Avoid placing utensils that could become hot or plastics that could melt on the surface element until it has cooled completely.
■ Water stains (mineral deposits) are removable using the cleaning cream or full strength white vinegar.
■ Use of window cleaner may leave an iridescent film on the cooktop. The cleaning cream will remove this discoloration.
- Don't store heavy items above the cooktop. If they drop onto the cooktop, they can cause damage.
■ Do not use the surface as a cutting board.
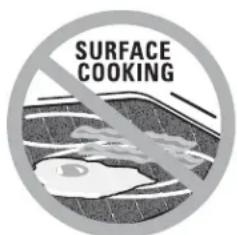
Never cook directly on the glass. Always use cookware.

Always place the pan in the center of the surface unit you are cooking on.
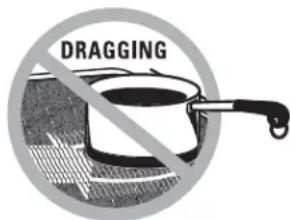
Do not slide cookware across the cooktop because it can scratch the glass—the glass is scratch-resistant, not scratch proof.
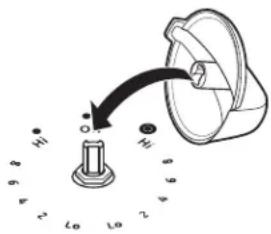
Surface Elements
How to Set
Push the knob down and turn in either direction to the setting you want. When the control is in any position other than Off, it may be rotated without pushing it down.
At Off, Hi, Lo and Simmer,
the control clicks into position.
You may hear slight clicking sounds during cooking, indicating the control is keeping the power level you set.
The controls for the radiant surface elements can be set anywhere between Lo or Simmer and Hi for an unlimited number of heat settings. With the infinite switch, the element cycles on and off to maintain your selected control setting.
The On indicator light will glow when any surface element is on.

natural_image
Illustration of a hand pressing down on a computer mouse (no text or symbols)A Hot Surface indicator light will glow when any radiant element is turned on and will remain on until the surface is cooled to approximately 150^ F.
NOTE:
■ It comes on when the element is hot to the touch.
■ It stays on even after the element is turned off.
■ It glows brightly until the element is cooled to approximately 150^ F.
■ Be sure you turn the control knob to Off when you finish cooking.
Dual Surface Element (on some models)
The left front surface element has 2 cooking sizes to select from so you can match the size of the element to the size of the cookware you are using.
To use the large surface element, turn the SELECTOR knob to ●. Push down and turn the control knob to the desired setting. The element will heat the entire area contained by the larger circle.
To use the small surface element, turn the SELECTOR knob to ●Push in and turn control knob to the desired setting. The element will only heat the area inside the smaller circle.
Surface Elements Cycle On and Off
Surface elements will cycle on and off to maintain the temperature you have selected.
All radiant surface elements have a temperature limiter that protects the glass cooktop from getting too hot.
The temperature limiter may cycle the elements off while cooking if:
■ The pan boils dry.
■ The pan bottom is not flat.
■ The pan is off-center.
■ There is no pan on the element.
Cookware for Radiant Glass Cooktop
The following information will help you choose cookware which will give good performance on glass cooktops.
NOTE: Follow all cookware manufacturer's recommendations when using any type of cookware on the ceramic cooktop.
Stainless Steel:
recommended
Aluminum:
heavy weight recommended
Good conductivity. Aluminum residues sometimes appear as scratches on the cooktop but can be removed if cleaned immediately. Because of its low melting point, thin weight aluminum should not be used.
Copper:
recommended
Copper Bottom:
usable, but not recommended Copper may leave residues which can appear as scratches. The residues can be removed, as long as the cooktop is cleaned immediately. However, do not let these pots boil dry. Overheated metal can bond to glass cooktops. An overheated copper bottom pot will leave a residue that will permanently stain the cooktop if not removed immediately.
Porcelain Enamel-Covered Cast Iron:
recommended
As long as the cookware is covered completely with porcelain enamel, this cookware is recommended. Caution is recommended for cast-iron cookware that is not completely covered with smooth porcelain enamel, since it may scratch the glass ceramic cooktop.
Glass-ceramic:
usable, but not recommended Poor performance. May scratch the surface.
Stoneware:
usable, but not recommended Poor performance. May scratch the surface.
Use pans that match the diameter of the surface element. Cooking performance will not be as good if the cookware is either smaller or larger than the surface element.

natural_image
Simple line drawing of a hand holding a ruler above a blank rectangular object (no text or symbols)Check pans for flat bottoms by using a straight edge.
Pans with rounded, curved, ridged or warped bottoms are not recommended.
For Best Results
■ Place only dry pans on the surface elements. Do not place lids on the surface elements, particularly wet lids. Wet pans and lids may stick to the surface when cool.
■ Do not use woks that have support rings. This type of wok will not heat on glass surface elements.
■ We recommend that you use only a flat-bottomed wok. They are available at your local retail store. The bottom of the wok should have the same diameter as the surface element to ensure proper contact.
■ Some special cooking procedures require specific cookware such as pressure cookers or deep-fat fryers. All cookware must have flat bottoms and be the correct size.
natural_image
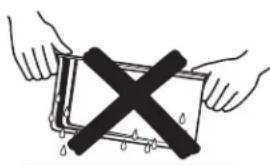
Illustration of two hands holding a rectangular object with a black X symbol, no text or symbols presentDo not place wet pans on the glass cooktop.
natural_image
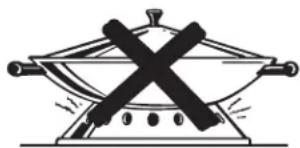
Simple line drawing of a pan with crossed black lines indicating resistance or explosion (no text or symbols)Do not use woks with support rings on the glass cooktop.

Use flat-bottomed woks on the glass cooktop.
Pots that extend beyond 1" of the surface element's circle are not recommended for most surface cooking. However, when canning with water-bath or pressure canner, larger-diameter pots may be used. This is because boiling water temperatures (even under pressure) are not harmful to the cooktop surfaces surrounding the surface elements.
HOWEVER, DO NOT USE LARGE-DIAMETER CANNERS OR OTHER LARGE-DIAMETER POTS FOR
Right!

Wrong!
Note: Flat-bottomed canners are required for glass cooktops.
FRYING OR BOILING FOODS OTHER THAN WATER. Most syrup or sauce mixtures—and all types of frying—cook at temperatures much higher than boiling water. Such temperatures could eventually harm the glass cooktop surfaces.
- Be sure the canner fits over the center of the surface element. If your cooktop or its location does not allow the canner to be centered on the surface element, use smaller-diameter pots for good canning results.
-
Flat-bottomed canners must be used. Do not use canners with flanged or rippled bottoms (often found in enamelware) because they don't make enough contact with the surface elements and take a long time to boil water.
-
When canning, use recipes and procedures from reputable sources. Reliable recipes and procedures are available from the manufacturer of your canner; manufacturers of glass jars for canning, such as Ball and Kerr brand; and the United States Department of Agriculture Extension Service.
- Remember that canning is a process that generates large amounts of steam. To avoid burns from steam or heat, be careful when canning.
NOTE: If your house has low voltage, canning may take longer than expected, even though directions have been carefully followed. The process time will be shortened by:
(1) using a pressure canner, and
(2) starting with HOT tap water for fastest heating of large quantities of water.
CAUTION
■ Safe canning requires that harmful microorganisms are destroyed and that the jars are sealed completely. When canning foods in a water-bath canner, a gentle but steady boil must be maintained for the required time. When canning foods in a pressure canner, the pressure must be maintained for the required time.
■ After you have adjusted the controls, it is very important to make sure the prescribed boil or pressure levels are maintained for the required time.
■ Since you must make sure to process the canning jars for the prescribed time, with no interruption in processing time, do not can on any cooktop surface element if your canner is not flat.
Cleaning the Glass Cooktop
Control Knobs
The control knobs may be removed for easier cleaning. Make sure the knobs are in the Off positions and pull them straight off the stems for cleaning.
The knobs can be washed with soap and water. Do not remove chrome accent skirt (on some models). Make sure the insides of the knobs are dry before replacing.
Replace the knobs in the Off position to ensure proper placement.
Normal Daily Use Cleaning
ONLY use ceramic cooktop cleaner on the glass cooktop. Other creams may not be as effective.
To maintain and protect the surface of your glass cooktop, follow these steps:
- Before using the cooktop for the first time, clean it with ceramic cooktop cleaner. This helps protect the top and makes cleanup easier.
- Regular use of a ceramic cooktop cleaner will help keep the cooktop looking new.
-
Shake the cleaning cream well. Apply a few drops of ceramic cooktop cleaner directly to the cooktop.
-
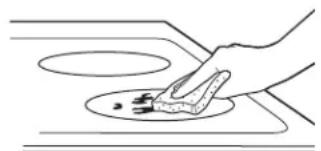
Use a paper towel or non-scratch cleaning pad for ceramic cooktops to clean the entire cooktop surface.
- Use a dry cloth or paper towel to remove all cleaning residue. No need to rinse.
NOTE: It is very important that you DO NOT heat the cooktop until it has been cleaned thoroughly.
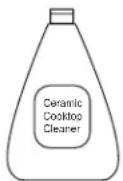
Clean your cooktop after each spill. Use ceramic cooktop cleaner.
Burned-On Residue
NOTE: DAMAGE to your glass surface may occur if you use scrub pads other than those recommended.
- Allow the cooktop to cool.
- Spread a few drops of ceramic cooktop cleaner on the entire burned residue area.
- Using the included non-scratch cleaning pad for ceramic cooktops, rub the residue area, applying pressure as needed.
-
If any residue remains, repeat the steps listed above as needed.
-
For additional protection, after all residue has been removed, polish the entire surface with ceramic cooktop cleaner and a paper towel.
natural_image
Simple line drawing of a hand pressing down on a circular object (no text or symbols)Use a non-scratch cleaning pad for ceramic cooktops.
Heavy, Burned-On Residue
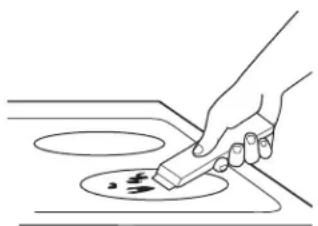
- Allow the cooktop to cool.
- Use a single-edge razor blade scraper at approximately a 45^ angle against the glass surface and scrape the soil. It will be necessary to apply pressure to the razor scraper in order to remove the residue.
- After scraping with the razor scraper, spread a few drops of ceramic cooktop cleaner on the entire burned residue area. Use the cleaning pad to remove any remaining residue.
- For additional protection, after all residue has been removed, polish the entire surface with ceramic cooktop cleaner and a paper towel.
natural_image
Line drawing of a hand using a power tool to clean or store floor tiles (no text or symbols)The ceramic cooktop scraper and all recommended supplies are available through our Parts Center. See instructions under "Assistance / Accessories" section.
NOTE: Do not use a dull or nicked blade.
Cleaning the Glass Cooktop
Metal Marks and Scratches
- Be careful not to slide pots and pans across your cooktop. It will leave metal markings on the cooktop surface.
NOTE: Carefully check the bottom of pans for roughness that would scratch the cooktop
These marks are removable using a ceramic cooktop cleaner with a non-scratch cleaning pad for ceramic cooktops.
- If pots with a thin overlay of aluminum or copper are allowed to boil dry, the overlay may leave black discoloration on the cooktop.
This should be removed immediately before heating again or the discoloration may be permanent.
Damage from Sugary Spills and Melted Plastic
Special care should be taken when removing hot substances to avoid permanent damage of the glass surface. Sugary spillovers (such as jellies, fudge, candy, syrups) or melted plastics can cause pitting of the surface of your cooktop (not covered by the warranty) unless the spill is removed while still hot. Special care should be taken when removing hot substances.
Be sure to use a new, sharp razor scraper.
Do not use a dull or nicked blade.
- Turn off all surface units. Remove hot pans.
-
Wearing an oven mitt:
a. Use a single-edge razor blade scraper to move the spill to a cool area on the cooktop.
b. Remove the spill with paper towels. -
Any remaining spillover should be left until the surface of the cooktop has cooled.
- Don't use the surface units again until all of the residue has been completely removed.
NOTE: If pitting or indentation in the glass surface has already occurred, the cooktop glass will have to be replaced. In this case, service will be necessary.
Installation Instructions
21" Electric Cooktop
JP3021
If you have questions, call GE Appliances at 800.GE.CARES (800.432.2737)
or visit our website at: GEAppliances.com
BEFORE YOU BEGIN
Read these instructions completely and carefully.
- IMPORTANT — Save these instructions for local inspector's use.
- IMPORTANT — Observe all governing codes and ordinances.
- Note to Installer – Be sure to leave these instructions with the Consumer.
- Note to Consumer – Keep these instructions for future reference.
- Product failure due to improper installation is not covered under the Warranty.
WARNING
This appliance must be properly
grounded.
- ATTENTION INSTALLER
— ALL COOKTOPS MUST BE HARD WIRED (DIRECT WIRED) INTO AN APPROVED JUNCTION BOX. A "PLUG AND RECEPTACLE" IS NOT PERMITTED ON THESE PRODUCTS. - Proper installation is the responsibility of the installer and product failure due to improper installation is NOT covered under warranty.
PARTS INCLUDED
Foam Tape
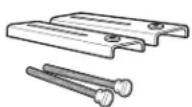
(2) Hold-Down Brackets
(2) 3" Screws
MATERIALS YOU WILL NEED
Junction Box
Wire Nuts
TOOLS YOU WILL NEED

Pencil
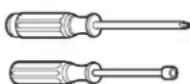
Phillips-Head Screwdriver or 1/4" Nut Driver
Saber Saw
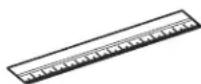
Ruler or Straightedge

1/8" Drill Bit & Electric or Hand Drill

Safety Glasses
FOR YOUR SAFETY
- For Personal Safety, remove house fuse or open circuit breaker before beginning installation. Failure to do so could result in serious injury or death.
- Be sure your cooktop is installed properly by a qualified installer or service technician.
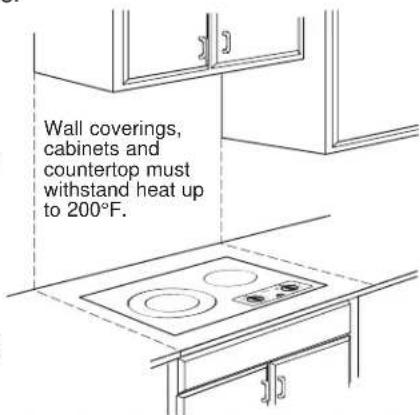
- To eliminate the risk of burns or fire due to reaching over heated surface elements, cabinet storage located above the surface units should be avoided. If cabinet storage space is to be provided, the risk can be reduced by installing a range hood that projects horizontally a minimum of 5" beyond the bottom of the cabinets. Cabinet installation above the cooktop may be no deeper than 13".
- Make sure the cabinets and wall coverings around the cooktop can withstand the temperatures (up to 200°F) generated by the cooktop.
- The cooktop should be easy to reach and lighted with natural light during the day.
- Always disconnect the electrical service to the cooktop before repairing or servicing the cooktop. This can be done by disconnecting the fuse or circuit breaker. Failure to do this could result in a dangerous or fatal shock. Know where your main disconnect switch is located. If you do not know, have your electrician show you.
ELECTRICAL REQUIREMENTS
This appliance must be supplied with the proper voltage and frequency, and connected to an individual, properly grounded branch circuit, protected by a circuit breaker or a time delay fuse as noted on name plate.
We recommend you have the electrical wiring and hookup of your cooktop connected by a qualified electrician. After installation, have the electrician show you where your main cooktop disconnect is located.
Wiring must conform to National Electrical Code. You can get a copy of the National Electrical Code, ANSI/NFPA No. 70-Latest Edition, by writing:
National Fire Protection Association
Batterymarch Park
Quincy, MA 02269
In Canada, wiring must conform to the Canadian Electrical Code (CEC).
The cooktop conduit wiring is approved for copper wire connection only, and if you have aluminum house wiring, you must use special UL approved connectors for joining copper to aluminum. In Canada, you must use special CSA approved connectors for joining copper to aluminum.
You must use a two-wire, three conductor 208/240 VAC, 60 Hertz electrical system. A white (neutral) wire is not needed for this unit. The cooktop must be installed in a circuit that does not exceed 125 VAC nominal to ground.
Refer to the name plate on your cooktop for the KW rating for your cooktop.
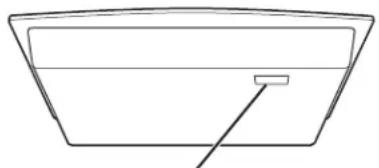
natural_image
Simple line drawing of a rectangular container with a handle and internal structure (no text or symbols)Name plate location
| KW Rating 240v | KW Rating 208V | Recommended Circuit Size (Dedicated) |
| ≤4.8KW ≤4.1 | KW 20 Amp | |
| 4.9 KW - 7.2 KW | 4.2 KW - 6.2 KW 30 Amp | |
| 7.3 KW - 9.6 KW | 6.3 KW - 8.3 KW 40 Amp | |
| 9.7 KW - 12.0 KW | 8.4 KW - 10.4 KW | 50 Amp |
PRE-INSTALLATION CHECKLIST
WARNING
The electrical power to the line must be shut off while being made. Failure to do so serious injury or death.
A When preparing cooktop opening, make sure the inside of the cabinet and the cooktop do not interfere with each other. (See section on preparing the opening.)
B Remove packaging materials and literature package from the cooktop before beginning installation.
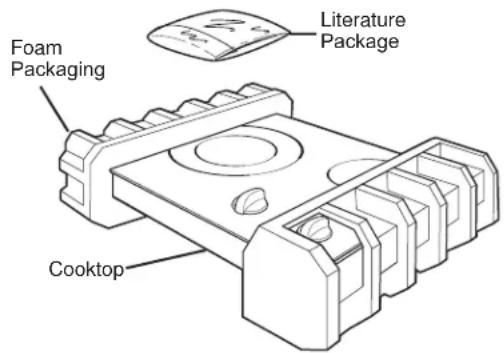
C Remove Installation Instructions from literature pack and read them carefully before you begin.
Be sure to place all literature, Owner's Manual, Installations, etc. in a safe place for future reference.

D Make sure you have all the tools and materials you need before starting the installation of the cooktop.
E Your home must provide the adequate electrical service needed to safely and properly use your cooktop. (Refer to section on electrical requirements.)
F When installing your cooktop in your home, make sure all local codes and ordinances are followed exactly as stated.
G Make sure the wall coverings, countertop and cabinets around the cooktop can withstand heat (up to 200^ F) generated by the cooktop.
PREPARING THE OPENING
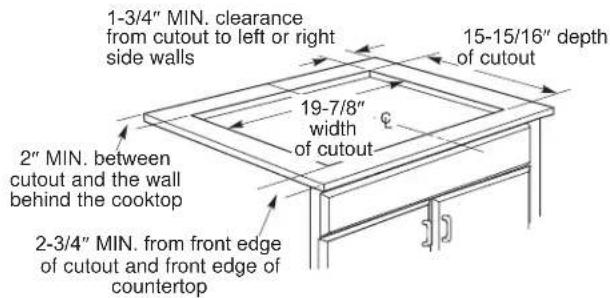
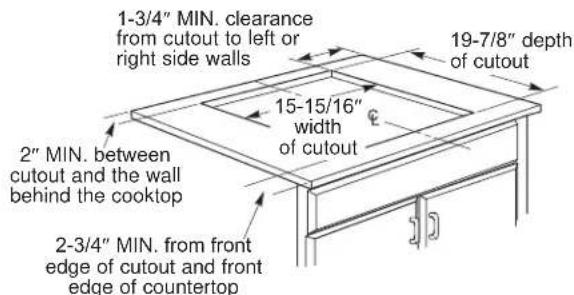
1 The following MINIMUM clearance dimensions must be maintained.
13" MAX. depth of unprotected overhead cabinets
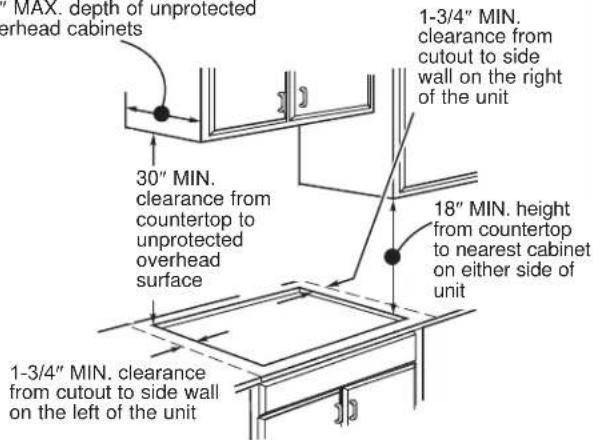
If a 30" clearance between the cooking surface and overhead combustible materials or metal cabinets cannot be maintained, a minimum clearance of 24" is required and the underside of the cabinets above the cooktop must be protected with not less than 1/4" insulating millboard covered with sheet metal not less than 0.0122" thick.
2 Overall Cooktop Dimensions

3 One and one-half inches (1-1/2") minimum vertical clearance between the cooktop bottom and any combustible surfaces.

4 Optional Installations Dimensions And Clearances
To ensure accuracy, it is best to make a template when cutting the opening in he counter.
Horizonta Installation With Controls at the Front
In this installation, the cooktop must be installed with the control knobs toward the front edge.
VERTICAL INSTALLATION MUST BE ORIENTED WITH CONTROLS ON THE LEFT SIDE
To eliminate the risk of burns by reaching over a heated surface, the cooktop must be installed with the controls on the left side.
In this installation, countertops must be at least 25" deep. Observe all minimum clearances at the front, rear and sides.
Make sure the wall coverings, countertop and cabinets around the cooktop can withstand heat (up to 200°F) generated by the cooktop.
INSTALLING THE COOKTOP
1 Installing the Junction Box
Install an approved junction box where it will be easily reached through the front of the cabinet where the cooktop will be located. The cooktop conduit is 4' long.
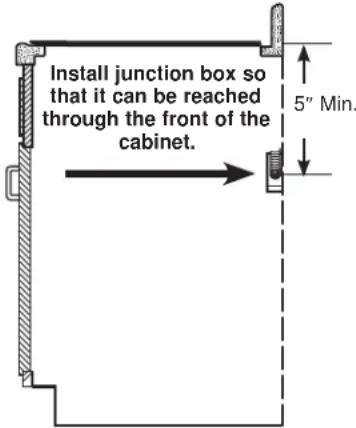
IMPORTANT: The junction box must be located where it will allow considerable slack in the conduit for serviceability.
2 Protect Surface Of Cooktop
Place a towel or tablecloth onto the countertop. Lay the cooktop upside down onto the protected surface.
Cloth under Cooktop
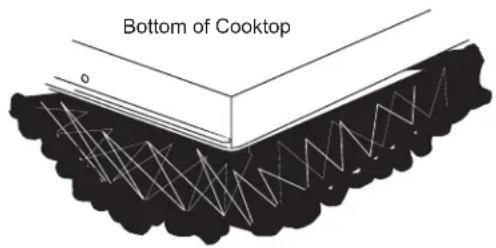
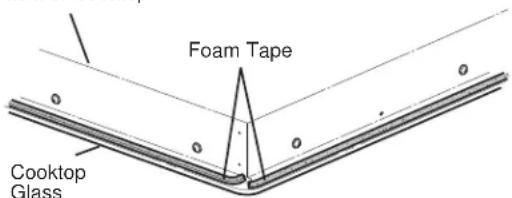
3 Attach Foam Tape
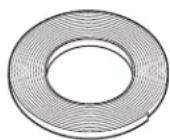
Apply the foam tape around the outer edge of the glass. Do not overlap the foam tape.
Bottom of Cooktop
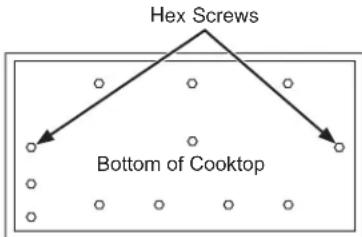
4 Locate Mounting Parts
On the underside of the cooktop, you will find the hex screws that are noted in the diagram below. Remove and use these hex screws to mount the brackets at these two locations. Do
not over-tighten the screws. Turn bracket inward to avoid interference when dropping the cooktop into the countertop.
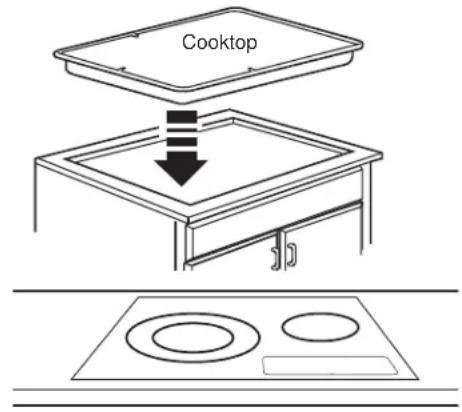
5 Insert Cooktop into Cutout
Insert the cooktop centered into the cutout opening. Make sure the front edge of the countertop is parallel to the cooktop. Make final check that all required clearances are met.
6 Attach Hold-Down Brackets to Cabinet
Open the cabinet door. Install the second screw through the bracket and tighten. Then tighten the first screw. Install the 3" screw until it touches the bottom of the countertop.
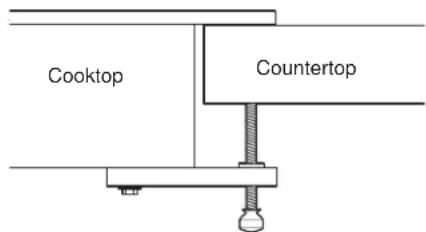
IMPORTANT: Turn the 3" screw until it touches the bottom of the countertop. Do not overtighten.
INSTALLATION—ELECTRICAL CONNECTIONS
A When making the wire connections, use the entire length of conduit provided. The conduit must not be shortened.
B With the cooktop in place, open the front of the cabinet door.
C Insert the wires from the conduit through the opening of the junction box.
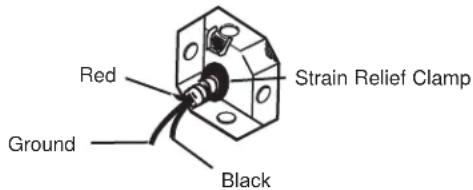
D Connect the red and black leads from the cooktop conduit to the corresponding leads in the junction box.
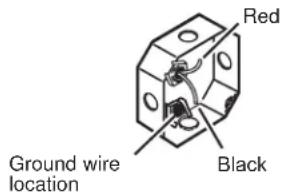
E Once the connections are made, secure wires together using wire nuts.
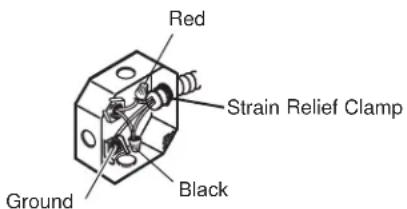
GROUNDING INSTRUCTIONS:
The bare ground wire in the conduit is connected to the cooktop frame. Effective January 1, 1996, the National Electrical Code will not permit grounding through neutral. If used in new construction after January 1, 1996 or in a mobile home, recreational vehicle or if local codes do not permit grounding through the neutral white lead, attach the appliance grounding lead (green or copper) to the residence grounding conductor (green or bare copper) in accordance with local codes. When connecting to a 3 conductor branch circuit, if local codes permit, connect the bare ground connector lead of the cooktop to the branch circuit neutral (gray or white in color).
IMPORTANT: If the cooktop is being installed into a blind counter (one with no cabinet opening below), wire connections must be made before putting the cooktop into the cutout opening.
CHECKLISTS
1 PRE-TEST CHECKLIST
A Remove all protective film, if present, and any stickers.
B Check to be sure that all wiring is secure and not pinched or in contact with moving parts.
C Check level of appliance.
D Check that the cooktop is properly grounded.
A Remove all items from the top of the cooktop surface.
B Turn on the power to the cooktop. Verify that all surface burners operate properly.
C Check that the circuit breaker is not tripped nor the house fuse blown.
D Check that conduit is securely connected to the junction box.
E See troubleshooting list.
NOTE TO ELECTRICIAN:
The power leads supplied with this appliance are UL recognized for connections to larger gauge household wiring. The insulation of these leads is rated at temperatures much higher than the temperature rating of household wiring.
The current carrying capacity of a conductor is governed by the wire gauge and also the temperature rating of the insulation around the wire.
NOTE: ALUMINUM WIRING
WARNING
- IMPROPER CONNECTION OF ALUMINUM HOUSE WIRING TO THE COPPER LEADS CAN RESULT IN A SERIOUS PROBLEM.
- Splice copper wires to aluminum wiring using special connectors designed and UL approved for joining copper to aluminum and follow the manufacturer's recommended connector procedure closely.
NOTE: Wire used, location and enclosure of splices, etc., must conform to good wiring practice and local codes.
Troubleshooting Tips ... Before you call for service
Save time and money! Review the charts on the following pages first and you may not need to call for service. If an error occurs in the control operation, a fault code will flash in the display. Record the error code and call for service.
| Problem Possible Cause | What To Do | |
| Surface elements will not maintain a rolling boil or cooking is slow | Improper cookware being used. Use pans that are absolutely flat and match the diameter of the surface unit selected. | |
| Surface elements do not work properly | A fuse in your home may be blown or the circuit breaker tripped | Replace the fuse or reset the circuit breaker. |
| Cooktop controls improperly set. Check to be sure the correct control is set for the surface element you are using. | ||
| Tiny scratches on metal marks or abrasions on radiant cooktop glass surface | Incorrect cleaning methods being used. Use recommended cleaning procedures. See the Cleaning the glass cooktop section. | |
| Cookware with rough bottoms being used or coarse particles (salt or sand) were between the cookware and the surface of the cooktop. Cookware has been slid across the cooktop surface. | To avoid scratches, use the recommended cleaning procedures. Make sure bottoms of cookware are clean before use, and use cookware with smooth bottoms. | |
| Areas of discoloration or dark streaks on the cooktop | Improper cookware being used Marks from aluminum and copper pans as well as mineral deposits from water or food can be removed with the cleaning cream. | |
| Hot surface on a model with a light-colored cooktop. | This is normal. The surface may appear discolored when it is hot. This is temporary and will disappear as the glass cools. | |
| Food spillovers not cleaned before next use. | See the Cleaning the glass cooktop section. | |
| Incorrect cleaning methods Use recommended cleaning procedures. | ||
| Plastic melted to the surface | Hot cooktop came into contact with plastic placed on the hot cooktop. | See the Glass surface – potential for permanent damage section in the Cleaning the glass cooktop section. |
| Pitting (or indentation) of the cooktop | Hot sugar mixture spilled on the cooktop. Call a qualified technician for replacement. | |
| Frequent cycling off and on of surface elements | Improper cookware being used Use only flat cookware to minimize cycling. See Surface elements cycle on and off section. | |
| Control knob will not turn | Cooktop controls improperly set. | When the knob is in the Off position, it must be pushed in before it can be turned. When the knob is in any other position, it can be turned without being pushed in. |
GE Appliances Electric Cooktop Limited Warranty
GEAppliances.com
All warranty service is provided by our Factory Service Centers, or an authorized Customer Care® technician. To schedule service online, visit us at GEAppliances.com/service, or call GE Appliances at 800.GE.CARES (800.432.2737). Please have your serial number and your model number available when calling for service.
In Canada, 800.561.3344 or visit GEAppliances.ca/en/support/service-request.
Servicing your appliance may require the use of the onboard data port for diagnostics. This gives a GE Appliances factory service technician the ability to quickly diagnose any issues with your appliance and helps GE Appliances improve its products by providing GE Appliances with information on your appliance. If you do not want your appliance data to be sent to GE Appliances, please advise your technician not to submit the data to GE Appliances at the time of service.
| For the period of GE | Appliances will replace |
| One yearFrom the date of the original purchase | Any part of the cooktop which fails due to a defect in materials or workmanship. During this limited one-year warranty, GE Appliances will provide, free of charge, all labor and in-home service to replace the defective part. |
What GE Appliances will not cover:
■ Service trips to your home to teach you how to use the product.
■ Improper installation, delivery or maintenance.
■ Failure of the product if it is abused, misused, modified or used for other than the intended purpose or used commercially.
■ Damage to the glass cooktop caused by use of cleaners other than the recommended cleaning creams and pads.
■ Damage to the glass cooktop caused by hardened spills of sugary materials or melted plastic that are
not cleaned according to the directions in the Owner's Manual.
■ Replacement of house fuses or resetting of circuit breakers.
■ Damage to the product caused by accident, fire, floods or acts of God.
■ Incidental or consequential damage caused by possible defects with this appliance.
■ Damage caused after delivery.
■ Product not accessible to provide required service.
EXCLUSION OF IMPLIED WARRANTIES
Your sole and exclusive remedy is product repair as provided in this Limited Warranty. Any implied warranties, including the implied warranties of merchantability or fitness for a particular purpose, are limited to one year or the shortest period allowed by law.
This limited warranty is extended to the original purchaser and any succeeding owner for products purchased for home use within the USA. If the product is located in an area where service by a GE Appliances Authorized Servicer is not available, you may be responsible for a trip charge or you may be required to bring the product to an Authorized GE Appliances Service location for service. In Alaska, the limited warranty excludes the cost of shipping or service calls to your home.
Some states do not allow the exclusion or limitation of incidental or consequential damages. This limited warranty gives you specific legal rights, and you may also have other rights which vary from state to state. To know what your legal rights are, consult your local or state consumer affairs office or your state's Attorney General.
In Canada: This warranty is extended to the original purchaser and any succeeding owner for products purchased in Canada for home use within Canada. If the product is located in an area where service by a GE Authorized Servicer is not available, you may be responsible for a trip charge or you may be required to bring the product to an Authorized GE Service location. Some provinces do not allow the exclusion or limitation of incidental or consequential damages. This warranty gives you specific legal rights, and you may also have other rights which vary from province to province. To know what your legal rights are, consult your local or provincial consumer affairs office.
Warrantor: GE Appliances, a Haier company
Louisville, KY 40225 Burlington, ON, L7R 5B6
Warrantor in Canada: MC Commercial
Extended Warranties: Purchase a GE Appliances extended warranty and learn about special discounts that are available while your warranty is still in effect. You can purchase it online anytime at
GEAppliances.com/extended-warranty
or call 800.626.2224 during normal business hours. GE Appliances Service will still be there after your warranty expires. In Canada: contact your local extended warranty provider.
Looking For Something More?
GE Appliances offers a variety of accessories to improve your cooking and maintenance experiences!
Refer to the Consumer Support page for phone numbers and website information.
The following products and more are available:
Parts
Non-scratch Cleaner and Polisher
NOTE: Go to GEAppliances.com to view recommended cleaners.
Consumer Support
GE Appliances Website
Have a question or need assistance with your appliance? Try the GE Appliances Website 24 hours a day, any day of the year! You can also shop for more great GE Appliances products and take advantage of all our on-line support services designed for your convenience. In the US: GEAppliances.com In Canada: GEAppliances.ca
Register Your Appliance
Register your new appliance on-line at your convenience! Timely product registration will allow for enhanced communication and prompt service under the terms of your warranty, should the need arise. You may also mail in the pre-printed registration card included in the packing material.
In the US: GEAppliances.com/register
In Canada: Prodsupport.mabe.ca/crm/Products/ProductRegistration.aspx
Schedule Service
Expert GE Appliances repair service is only one step away from your door. Get on-line and schedule your service at your convenience any day of the year. In the US: GEAppliances.com/service or call 800.432.2737 during normal business hours.
In Canada: GEAppliances.ca/en/support/service-request or call 800.561.3344
Extended Warranties
Purchase a GE Appliances extended warranty and learn about special discounts that are available while your warranty is still in effect. You can purchase it on-line anytime. GE Appliances Services will still be there after your warranty expires. In the US: GEAppliances.com/extended-warranty
or call 800.626.2224 during normal business hours.
In Canada: GEAppliances.ca/en/support/purchase-extended-warranty or call 800.290.9029
Remote Connectivity
For assistance with wireless network connectivity (for models with remote enable), visit our website at GEAppliances.com/connect or call 800.220.6899 in the US only.
Parts and Accessories
Individuals qualified to service their own appliances can have parts or accessories sent directly to their homes (VISA, MasterCard and Discover cards are accepted). Order on-line today 24 hours every day.
In the US: GEApplianceparts.com/contact or by phone at 877.959.8688 during normal business hours.
Instructions contained in this manual cover procedures to be performed by any user. Other servicing generally should be referred to qualified service personnel. Caution must be exercised, since improper servicing may cause unsafe operation.
Customers in Canada should consult the yellow pages for the nearest Mabe service center, visit our website at GEAppliances.ca/en/products/parts-filters-accessories or call 800.661.1616.
Contact Us
If you are not satisfied with the service you receive from GE Appliances, contact us on our Website with all the details including your phone number, or write to:
In the US: General Manager, Customer Relations | GE Appliances, Appliance Park | Louisville, KY 40225
GEAppliances.com/ge/service-and-support/contact.htm
In Canada: Director, Consumer Relations, Mabe Canada Inc. | Suite 310, 1 Factory Lane | Moncton, N.B. E1C 9M3
GEAppliances.ca/en/contact-us
Radiante TABLE DE CUISSON
natural_image
Illustration of a hand pressing down on a surface with a downward arrow (no text or symbols)natural_image
Simple line drawing of a hand using a ruler to press a rectangular object (no text or symbols)natural_image
Illustration of two hands holding a rectangular object with a black X symbol, no text or symbols presentnatural_image
Simple line drawing of a pan with two crossed x-marks (no text or symbols)
Wrong!
Note: Flat-bottomed canners are required for glass cooktops.
Nettoyage normal quotidien
ONLY use ceramic cooktop cleaner on the glass cooktop. Other creams may not be as effective.
natural_image
Line drawing of a hand pressing down on a circular object with small dots, no text or symbols presentnatural_image
Line drawing of a hand using a power tool to clean or store floor tiles (no text or symbols)National Fire Protection Association
Batterymarch Park
natural_image
Simple line drawing of a rectangular container with a handle and internal structure (no text or symbols)| KW Rating 240v | KW Rating 208V | Recommended Circuit Size (Dedicated) |
| ≤4.8KW ≤4.1 | KW 20 Amp | |
| 4.9 KW - 7.2 KW 4 | .2 KW - 6.2 KW 30 | Amp |
| 7.3 KW - 9.6 KW 6 | .3 KW - 8.3 KW 40 | Amp |
| 9.7 KW - 12.0 KW | 8.4 KW - 10.4 KW | 50 Amp |
LISTE DE VÉRIFICATION AVANT MONTAGE
AVERTISSEMENT
natural_image
Simple line drawing of a three-cylinder placed on a flat surface (no text or symbols)Garant : GE Appliances, a Haier company
Louisville, KY 40225 Burlington, ON, L7R 5B6
GEAppliances.com/extended-warranty
Au Canada : Prodsupport.mabe.ca/crm/Products/ProductRegistration.aspx
Au Canada : GEAppliances.ca/en/support/service-request ou composez le 800.561.3344
Prolongation de garantie
Au Canada : GEAppliances.ca/en/support/purchase-extended-warranty ou composez le 800.290.9029
GEAppliances.com/contact
Au Canada : Director, Consumer Relations, Mabe Canada Inc. | Suite 310, 1 Factory Lane | Moncton, N.B. E1C 9M3 GEAppliances.ca/en/contact-us
OWNER'S MANUAL AND INSTALLATION INSTRUCTIONS
JP3021
ENGLISH/FRANÇAIS/ESPAÑOL
GRACIAS POR HACER QUE GE APPLIANCES SEA PARTE DE SU HOGAR.
natural_image
Illustration of a hand pressing down on a computer mouse (no text or symbols)natural_image
Simple line drawing of a hand holding a ruler above a blank rectangular object (no text or symbols)natural_image
Illustration of two hands holding a rectangular object with a black X symbol crossed out, no text or symbols present.natural_image
Simple line drawing of a pan with two crossed x-shaped legs, no text or symbols present.natural_image
Line drawing of a hand using a tool to clean or store items on a surface (no text or symbols)natural_image
Line drawing of a hand using a power tool to clean or store floor tiles (no text or symbols)natural_image
Simple line drawing of a rectangular container with a handle and internal structure (no text or symbols)| KW Rating 240v | KW Rating 208V | Recommended Circuit Size (Dedicated) |
| ≤4.8KW ≤4.1 | KW 20 Amp | |
| 4.9 KW - 7.2 KW | 4.2 KW - 6.2 KW | 30 Amp |
| 7.3 KW - 9.6 KW | 6.3 KW - 8.3 KW | 40 Amp |
| 9.7 KW - 12.0 KW | 8.4 KW - 10.4 KW | 50 Amp |
A Retire toda la película protectora, si la hay, y las calcomanías.
B Check to be sure that all wiring is secure and not pinched or in contact with moving parts.
C Check level of appliance.
D Check that the cooktop is properly grounded.
A Remove all items from the top of the cooktop surface.
B Turn on the power to the cooktop. Verify that all surface burners operate properly.
C Check that the circuit breaker is not tripped nor the house fuse blown.
D Check that conduit is securely connected to the junction box.
E See troubleshooting list.
NOTE TO ELECTRICIAN:
The power leads supplied with this appliance are UL recognized for connections to larger gauge household wiring. The insulation of these leads is rated at temperatures much higher than the temperature rating of household wiring.
The current carrying capacity of a conductor is governed by the wire gauge and also the temperature rating of the insulation around the wire.
NOTE: ALUMINUM WIRING
WARNING
- IMPROPER CONNECTION OF ALUMINUM HOUSE WIRING TO THE COPPER LEADS CAN RESULT IN A SERIOUS PROBLEM.
- Splice copper wires to aluminum wiring using special connectors designed and UL approved for joining copper to aluminum and follow the manufacturer's recommended connector procedure closely.
NOTE: Wire used, location and enclosure of splices, etc., must conform to good wiring practice and local codes.
Louisville, KY 40225 Burlington, ON, L7R 5B6
GEAppliances.com/extended-warranty
GEAppliances.com/contact
En Canadá: Director, Consumer Relations, Mabe Canada Inc. | Suite 310, 1 Factory Lane | Moncton, N.B. E1C 9M3 GEAppliances.ca/en/contact-us
- SAFETY INFORMATION......3
- USING THE COOKTOP
- CARE AND CLEANING
- INSTALLATION INSTRUCTIONS
- TROUBLESHOOTING TIPS ..... 18
- LIMITED WARRANTY 22
- ACCESSORIES 23
- CONSUMER SUPPORT .... 24
- OWNER'S MANUAL AND INSTALLATION INSTRUCTIONS
- THANK YOU FOR MAKING GE APPLIANCES A PART OF YOUR HOME.
- IMPORTANT SAFETY INFORMATION READ ALL INSTRUCTIONS BEFORE USING THE APPLIANCE
- ▲WARNING
- WARNING
- GENERAL SAFETY INSTRUCTIONS
- CAUTION
- KEEP FLAMMABLE MATERIALS AWAY FROM THE COOKTOP
- READ AND SAVE THESE INSTRUCTIONS
- COOKTOP SAFETY INSTRUCTIONS
- RADIANT COOKTOP SAFETY INSTRUCTIONS
- How to Remove Protective Shipping Film and Packaging Tape
- Radiant Glass Cooktop
- Surface Elements
- How to Set
- NOTE:
- Dual Surface Element (on some models)
- Surface Elements Cycle On and Off
- Cookware for Radiant Glass Cooktop
- Stainless Steel:
- Aluminum:
- Copper:
- Copper Bottom:
- Porcelain Enamel-Covered Cast Iron:
- Glass-ceramic:
- Stoneware:
- For Best Results
- Cleaning the Glass Cooktop
- Control Knobs
- Normal Daily Use Cleaning
- Burned-On Residue
- Heavy, Burned-On Residue
- Metal Marks and Scratches
- Damage from Sugary Spills and Melted Plastic
- 21" Electric Cooktop
- BEFORE YOU BEGIN
- FOR YOUR SAFETY
- ELECTRICAL REQUIREMENTS
- PRE-INSTALLATION CHECKLIST
- PREPARING THE OPENING
- INSTALLING THE COOKTOP
- Installing the Junction Box
- Protect Surface Of Cooktop
- Attach Foam Tape
- Locate Mounting Parts
- Insert Cooktop into Cutout
- Attach Hold-Down Brackets to Cabinet
- INSTALLATION—ELECTRICAL CONNECTIONS
- GROUNDING INSTRUCTIONS:
- CHECKLISTS
- PRE-TEST CHECKLIST
- NOTE TO ELECTRICIAN:
- Troubleshooting Tips ... Before you call for service
- GE Appliances Electric Cooktop Limited Warranty
- GEAppliances.com
- What GE Appliances will not cover:
- EXCLUSION OF IMPLIED WARRANTIES
- GEAppliances.com/extended-warranty
- Looking For Something More?
- Parts
- Consumer Support
- GE Appliances Website
- Register Your Appliance
- Schedule Service
- Extended Warranties
- Remote Connectivity
- Parts and Accessories
- Contact Us
- Radiante TABLE DE CUISSON
- Nettoyage normal quotidien
- LISTE DE VÉRIFICATION AVANT MONTAGE
- AVERTISSEMENT
- Prolongation de garantie
- GEAppliances.com/contact
- GRACIAS POR HACER QUE GE APPLIANCES SEA PARTE DE SU HOGAR.
Brand : GE
Model : JVW5301FJDS
Category : Range hood