
TVDR4804FAW - Cooker VIKING - Free user manual and instructions
Find the device manual for free TVDR4804FAW VIKING in PDF.

| Product type | Range |
| Brand | Viking |
| Model | TVDR4804FAW |
| Width | 48 in (122 cm) |
| Fuel type | Natural gas or propane (convertible) |
| Number of surface burners | 4 burners + 1 French top |
| Burner power | From 7,700 BTU (2.5 kW) to 18,500 BTU (6.0 kW) depending on burner |
| French top | Dedicated burner, power 13,000 BTU (4.0 kW) in LP |
| LP conversion kit included | Yes, ref. LPKTVDR |
| Safety | Flame detection, instructions in case of gas odor |
| Cleaning | Removable grates and burner caps, clean with soapy water |
| Approximate dimensions (W x D x H) | 48 x 27 x 36 in (122 x 69 x 91 cm) |
| Approximate weight | 200 lb (90 kg) |
| Warranty | Refer to the manual or Viking website |
| Repairability | Spare parts available, maintenance by qualified professional |
| General information | Made in USA, technical support at 1-888-845-4641 |
Frequently Asked Questions - TVDR4804FAW VIKING
User questions about TVDR4804FAW VIKING
0 question about this device. Answer the ones you know or ask your own.
Ask a new question about this device
Download the instructions for your Cooker in PDF format for free! Find your manual TVDR4804FAW - VIKING and take your electronic device back in hand. On this page are published all the documents necessary for the use of your device. TVDR4804FAW by VIKING.
USER MANUAL TVDR4804FAW VIKING
| Description Part Number/Size Quantity | ||
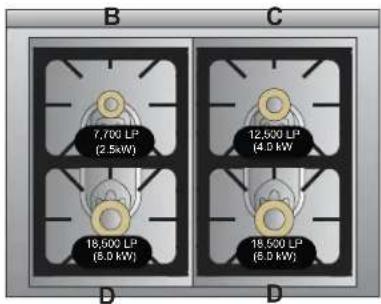
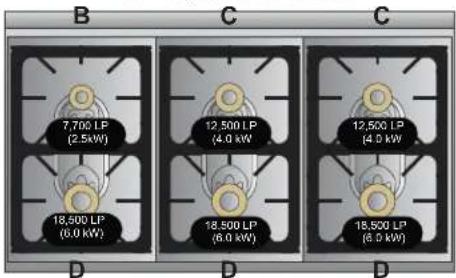
| Rear Surface Burner (B) #78 1 | ||
| Rear Surface Burners (C) #105 2 | ||
| Front Surface Burner (D) #120 3 | ||
| Frenchtop Burner (F) #90 1 | ||
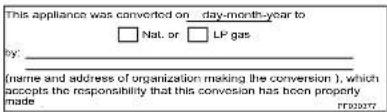
| Conversion label PF030377 1 | ||
| LPKTVDR Conversion Instructions 056242-000 1 | ||
NOTE: Depending on the model being converted, some of the orifices may not be used.
IMPORTANT - Please Read and Follow!
WARNING

FIRE/EXPLOSION HAZARD
If the information in this
guide is not followed exactly, a fire or explosion may result causing property damage, personal injury or death.
WHAT TO DO IF YOU SMELL GAS:
- DO NOT try to light any appliance.
•DO NOT touch any electrical switch.
•DO NOT use any phone in your building. - Immediately call your gas supplier from a neighbor's phone. Follow the gas supplier's instructions.
- If you cannot reach your gas supplier, call the fire department.
Installation and service must be performed by a qualified installer, service agency, or the gas supplier.
CAUTION

Be sure the electric power is turned off at the breaker box while the unit is being converted.
CAUTION

Before placing the appliance into operation, always check for gas leaks with a soapy water or other acceptable method.
DO NOT use an open fl ame to check for leaks.
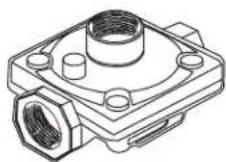
Regulator Conversion
- Remove hex nut from top of regulator.
•Unsnap plastic plunger from hex nut. - Reverse plunger and reinstall onto hex nut by pressing firmly.
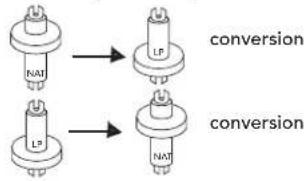
NOTE: Plunger is marked "NAT" or "LP".
Converted fuel type will be shown on the lower portion of plunger.

Natural Orientation
LP Orientation
Apply sideways finger pressure to remove pin from cap.
- Reinstall hex nut onto regulator in configuration desired.
Orifi ce Locations
36" W /4 Surface Burners
36" W /2 Surface Burners/Griddle

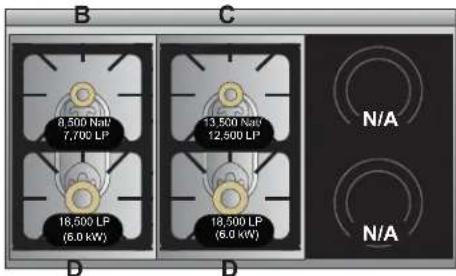
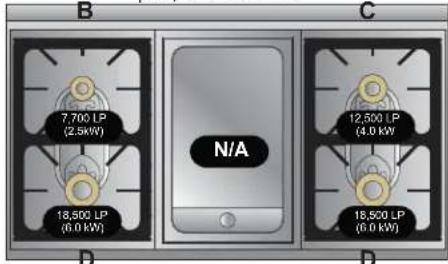
48" W /6 Surface Burners
48" W /4 Surface Burners/Griddle
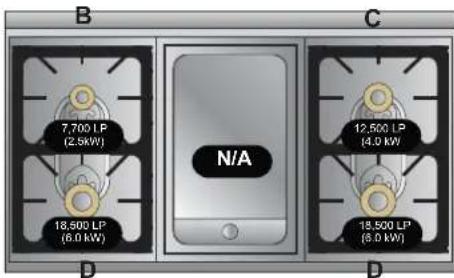
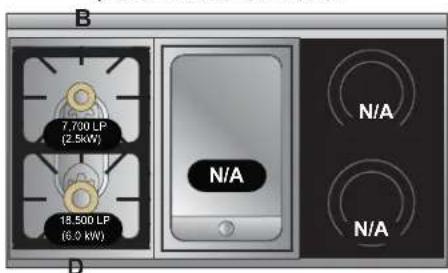
48" W /2 Surface Burners/Griddle/Induction
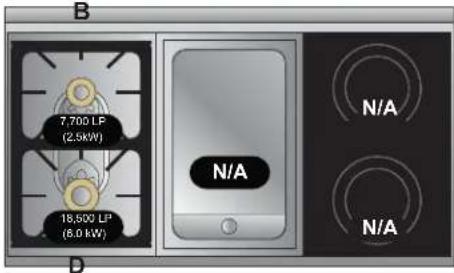
48" W /4 Surface Burners/French Top
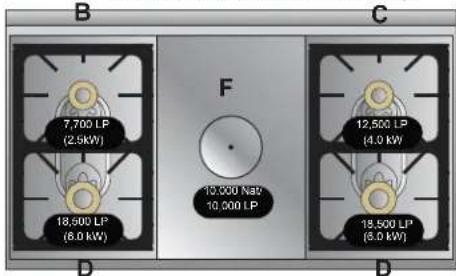
48" W /4 Surface Burners/Induction
Surface Burner Conversion
Remove grates, surface burner caps and frenchtop (if applicable)
Surface Burner Conversion
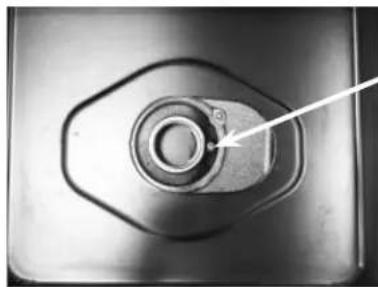
-Locate appropriate orifi ce
-Remove screw (Item #1) fl at-head screwdriver.
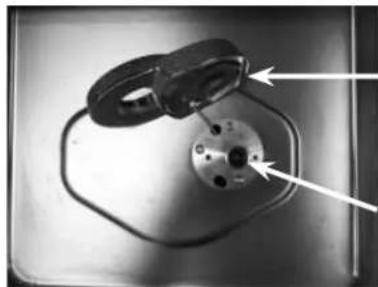
- Lay the burner fl ange to side - do not disconnect the igniter wire. (Item #2).
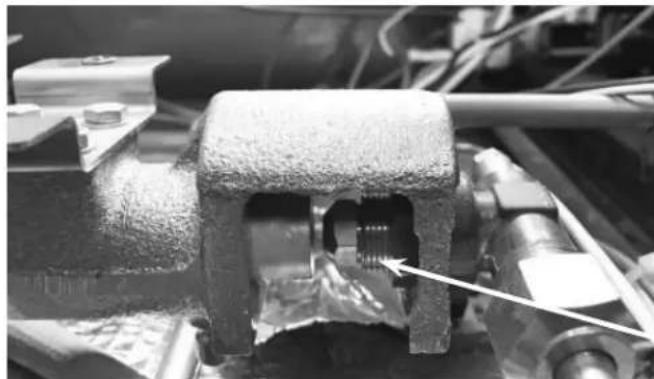
-Use a nut driver to remove orifi ce (Item #3).
-Replace with correct orifi ce - refer to next page.
Tech tip: Tape can be applied to the inside of the socket to assist in the removal of the surface burner orifices. This can prevent the orifices from falling into the range during removal.
- After replacing the orifice, replace Item#2 burner fl ange.
-Reinstall screw and reverse procedure to reassemble.
NOTE: For proper placement of the burner head, rotate until burner head seats into groove.
natural_image
Close-up of a mechanical component with a circular bore and hexagonal base, no visible text or symbolsItem #1
natural_image
Close-up of a mechanical component with a circular base and flange, showing internal features and arrows pointing to features (no text or symbols visible)Item #2
Item #3
Frenchtop Burner Conversion
-Remove frenchtop plate.
-Remove screws around burner.
-Remove screws holding burner box.
-Slide burner box forward and lift out.
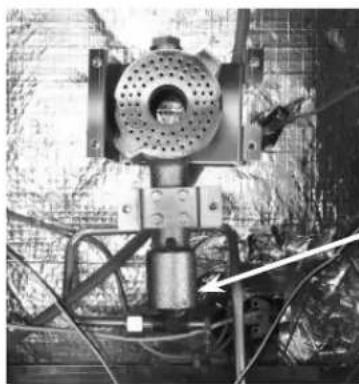
-Orifi ce is located under orifi ce bracket, attached to tubing.
-Use a nut driver to remove orifi ce.
Tech tip: Tape can be applied to the inside of the socket to assist in the removal of the surface burner orifices. This can prevent the orifices from falling into the range during removal.
- After replacing the orifice, reinstall burner box and frenchtop plate
natural_image
Mechanical testing setup with a perforated cylindrical component mounted on a metal frame, surrounded by wires and wiring (no visible text or symbols)Orifi ce bracket
natural_image
Close-up of a mechanical component with a highlighted internal section and an arrow pointing to it (no visible text or symbols)Orifi ce
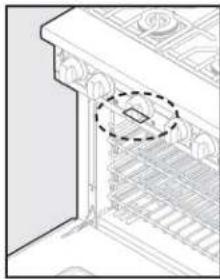
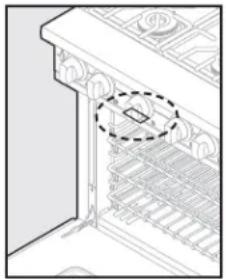
Rating Label Location
When the LP/Propane conversion is complete, complete the enclosed conversion label and place it next to the rating label.
The rating label is located under the control panel.
natural_image
Diagram of a kitchen appliance interior showing a door, shelves, and decorative panel (no text or symbols)48 po W /2 Brûleurs de surface/ plaque chauffante/Induction
36 po W /2 Brûleurs de surface/ plaque chauffante

48 po W /4 Brûleurs de surface/
plaque chauffante
Surface Burner Conversion
natural_image
Mechanical testing setup with a perforated circular component mounted on a metal frame, surrounded by wires and components (no visible text or symbols)natural_image
Close-up of a mechanical component with a highlighted internal section and an arrow pointing to it (no visible text or symbols)l'orifi ce
natural_image
Architectural detail drawing of a cabinet or elevator shaft with decorative patterns and a dashed oval highlighting a section (no text or symbols)Viking Range, LLC
111 Front Street
Greenwood, Mississippi 38930 USA
(662) 455-1200
For product information, call 1-888-(845-4641)
or visit our web site at vikingrange.com in the U.S. or brigade.ca in Canada.