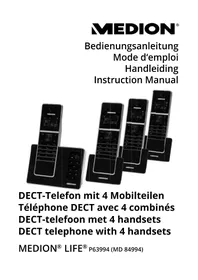
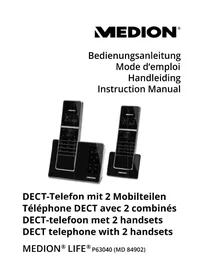
LIFE P63994 (MD 84994) - Cordless phone MEDION - Free user manual and instructions
Find the device manual for free LIFE P63994 (MD 84994) MEDION in PDF.



| Product type | DECT/GAP cordless telephone |
| Brand | Medion |
| Model | LIFE P63994 (MD 84994) |
| Number of handsets included | 4 |
| Charger dimensions | 85 x 65 x 63 mm |
| Power supply | Power adapter S004LV0600045, 100-240 V~, 50/60 Hz, output 6 V |
| Battery type | Rechargeable NiMH AAA 1.2 V, 500 mAh (x2 per handset) |
| Talk time | Approximately 10 hours |
| Standby time | Approximately 100 hours |
| Charging time | Approximately 16 hours |
| Outdoor range | Approximately 300 m |
| Indoor range | Approximately 50 m |
| Phonebook | Up to 50 entries with name and number |
| Call list | Up to 20 entries |
| Dialed numbers list | Up to 10 entries |
| Integrated answering machine | Yes, total recording capacity of 15 minutes |
| Features | Hands-free, intercom, conference, key lock, ECO/ECO+ modes |
| Compatibility | GAP-compatible DECT bases |
| Display | Screen with status icons (charge, signal, messages, etc.) |
| Cleaning | Soft dry cloth, avoid solvents |
| Safety instructions | Use only the supplied adapters, do not repair yourself, keep out of reach of children |
| Spare parts / repairability | Specific power adapter (S004LV0600045), standard AAA NiMH batteries, repair by Medion customer service |
| General information | Manual available in PDF at notice-facile.com, Medion after-sales service |
Frequently Asked Questions - LIFE P63994 (MD 84994) MEDION
User questions about LIFE P63994 (MD 84994) MEDION
0 question about this device. Answer the ones you know or ask your own.
Ask a new question about this device
Download the instructions for your Cordless phone in PDF format for free! Find your manual LIFE P63994 (MD 84994) - MEDION and take your electronic device back in hand. On this page are published all the documents necessary for the use of your device. LIFE P63994 (MD 84994) by MEDION.
USER MANUAL LIFE P63994 (MD 84994) MEDION
Display 34, 35, 36, 37
Displayanzeige 24
DSL. 68
E
Eco+ 49
Eco Mode 49
Einstellung
Netzadapter ... 13, 15, 30, 72
Dimensions (I x H x P)
Base Env. 140 × 95 × 80 mm
Combé Env. 54 × 170 × 18 mm
Batteries Charger.104
Insérer 104
Branchement Base 103
C
- Package contents 2
- About these instructions 226 FR
2.1. Warning symbols and key words used in these instructions 226
NL
- Proper use
- Safety instructions EN
4.1. People not permitted to use this device .230
4.2. Explosion hazard areas 230
4.3. Mains adapter 23
4.4. Setting up the device safely 231
4.5. Ensure accessibility of the mains power socket 232
4.6. Thunderstorms / non-use 233
4.7. Handling the rechargeable batteries safely. 234
4.8. Never carry out repairs yourself 236
- Compatibility with other base stations.....237
5.1. Base stations from Medion 237
5.2. Base stations from other manufacturers .237
- Overview of the device 238
6.1. Handset 238
6.2. Base station 24
6.3. Charger 246
- Using the device for the first time 247
7.1. Connecting the base station/charging station to the mains 247
7.2. Connecting the base station to the telephone network 247
7.3. Inserting batteries 248
7.4. Charging the rechargeable batteries for the handset in the base station/charging station 248
8. Navigating in the menu 250
9. Basic functions 250
9.1. Switching the handset on and off 250
9.2. Key lock 251
9.3. Searching for handsets 251
9.4. Calling 251
9.5. Answering the telephone 252
9.6. Switching off the ring tone 252
9.7. Functions during the call 253
10. Internal calls 254
10.1. Toggling 254
10.2. Conference call facility 255
11. Redialling 255
11.1. Selecting from the radial list 255
11.2. Transferring numbers to the phone book 256
11.3. Deleting a number 256
11.4. Deleting the entire redial list 257
12. Caller list 257
12.1. Selecting numbers from the call list 257
12.2. Transferring numbers to the phone book 258
12.3. Call details 258
12.4.Type of call 258
13. Phone book 259
13.1.Adding an entry 259
13.2. Changing an entry 260
13.3.Viewing an entry 260
13.4. Delete 260
13.5. Delete all 261
13.6.Assigned memory spaces 261
13.7. Dialling from the phone book 261
14. Setting the base station 262
14.1. Ring tone 262
14.2. Ring tone volume 262
14.3. Deregistering a handset from the base station 262
14.4. Changing the dialling mode 263
14.5. Flash time 263
14.6.Eco mode 264
14.7. Setting the transmission power 264
14.8.Eco Plus 264
15. Entering settings on the handset 265
15.1. Setting the ring tone 265
15.2. Setting the advisory tones 266
15.3. Setting the language 266
15.4. Renaming a handset 266
15.5. Setting the date and time 267
16. Registering handsets 268
17. Resetting the handset to the factory settings .... 269
18. Answering machine 270
18.1. Switching the answering machine on and off 270
18.2. Incoming messages 271
18.3. Playing back messages 271
18.4. Deleting messages 272
18.5. Recording a reminder 272
18.6. Setting the answering machine 273
18.7. Recording a greeting message 273
18.8. Playing back a recorded greeting message 274
18.9. Setting the ring delay 274
18.10. Recording time for incoming messages ..275
18.11. Listening in to messages 276
18.12. Remote enquiry 276
18.13. Changing the remote enquiry PIN 276
18.14. Playing back messages from a different telephone extension 277
- Troubleshooting 279
- Cleaning 282
- Disposal 283
- Technical data 284
- Declaration of conformity 285
- Legal notice 286
- Index 287
1. Package contents
When unpacking, ensure that the following parts are included:
- 4 handsets
- Base station
- 4 chargers
- 4 mains adapters (S004LV0600045)
- Telephone cable
- 500 mAh NiMH batteries (8 x AAA)
- Operating instructions, warranty card
2. About these instructions

Please be sure to read these operating instructions carefully and follow all instructions given. The instructions will help you to operate the device reliably and help
increase its service life. Always store these instructions near the device. Keep these operating instructions so that you can pass them on with the device if you sell it.
2.1. Warning symbols and key words used in these instructions

DANGER!
Warning: immediate mortal danger!
WARNING!
Warning of possible risk of fatal injury and/or serious irreversible injuries!
WARNING!
Danger of possible minor or moderate injuries!

CAUTION!
Please follow the guidelines to avoid property damage!

PLEASE NOTE!
Additional information on using the device!

PLEASE NOTE!
Please follow the guidelines in the operating instructions!

WARNING!
Warning of risk of electric shock!
Bullet point/information on operating steps and results
Tasks to be performed
3. Proper use
The device is designed for telephoning within the national telephone network. The telephone is designed for operation with an analogue telephone connection in the following countries:
United Kingdom
Germany
Austria
France
Netherlands
- Belgium
The device is intended for private use only and not for industrial/commercial use (meaning use in shops, offices and other commercial areas; in agricultural estates; or by customers in hotels, motels and other places of accommodation is not permitted). Please note that we shall not be liable in cases of improper use:
-
Do not modify the device without our consent and do not use any auxiliary equipment which we have not approved or supplied.
-
Use only spare parts and accessories which we have supplied or approved.
-
Heed all the information in these operating instructions, especially the safety information. Any other use is deemed improper and can cause personal injury or damage to the device.
-
Do not use the device in areas where there is a risk of explosion. These areas include e.g. tank farms, fuel storage depots, or areas in which solvents are processed. It is also not permitted to use this device in areas where the air is polluted with fine particles (e.g. flour dust or sawdust).
-
Do not expose the device to any extreme conditions. The following should be avoided:
-
High humidity or moisture
- Extremely high or low temperatures
- Direct sunlight
- Open fire
4. Safety instructions
4.1. People not permitted to use this device
- This machine is not intended for use by people (including children) with reduced physical, sensory or mental abilities or for those without experience and/or knowledge, unless they are supervised by a person responsible for their safety or they have been instructed in its use.
- Supervise children to ensure that they do not play with this device.
- Keep the device and its accessories out of reach of children.
4.2. Explosion hazard areas

WARNING
There is a risk of explosion when operating the device in a potentially explosive atmosphere! Never use the handset in a potentially hazardous environment, e.g. in a paint shop or in the vicinity of a gas leak.
4.3. Mains adapter
- Use only the supplied mains adapters S004LV0600045.
- The mains adapter may only be used in dry, indoor areas.
4.4. Setting up the device safely
If the device has been moved from a cold room to a warm room, wait a while before connecting the mains adapter.
Condensation can develop which could damage the devices.
The devices can be plugged in and operated safely as soon as they reach room temperature.
- Place the base station/charging station on a stable, level surface.
- Make sure the base station/charging station cannot fall down.
- Do not place the base station/charging station and/or handset near heat sources (e.g. radiators) that could affect them.
- Do not expose the devices to direct sunlight.
- Contact with moisture, water and
splashes must be avoided.
- The devices are not suitable for use in rooms that are very humid (e.g. bathroom).
- The devices can be operated within an environmental temperature range of 10irc C to 30irc C .
- Do not place the base station/charging station close to other electrical equipment (e.g. a television or microwave oven).
- Do not place the base station/charging station close to any open flames (e.g. burning candles).
4.5. Ensure accessibility of the mains power socket

WARNING!
There is a risk of electric shock due to live parts.
Therefore, follow the instructions below:
- Only connect the mains adapter to an easily accessible and correctly installed safety socket (100–240 V ~ 50/60 Hz) that
is close to the place where you have set up the device. Always keep the safety socket free of obstructions so that the mains adapter can be pulled out easily.
- When disconnecting the mains adapters from the safety sockets, always pull on the mains plug rather than on the cable. Do not kink or crush the mains cable.
- If the mains adapter, mains cable or devices are damaged or if liquids or foreign bodies enter a device, remove the mains adapter immediately from the socket.
- Never put the handset back in the base station without the battery cover.
- To avoid the risk of tripping, please avoid using extension cables.
4.6. Thunderstorms / non-use
-
Pull the mains adapter from the safety socket and the telephone cable from the base station if you will be away for a long period of time or if there is a thunderstorm.
-
If not using the devices for a long period of time, always remove the rechargeable batteries from the handsets to prevent leakage. Leaking batteries can damage the handsets.
4.7. Handlingtherechargeable batteries safely
You require the supplied NiMH rechargeable batteries for the handsets.

WARNING
Batteries may contain combustible materials. If not handled correctly, batteries can leak, become very hot, ignite or even explode, which could damage your device and/or your health.
Please follow the safety advice below closely:
- Keep batteries away from children. Consult a doctor immediately if a battery is swallowed.
-
Do not throw rechargeable batteries into a fire, do not short-circuit them and do not dismantle them.
-
Please note the polarity (+/-) when inserting the batteries.
- Remove the batteries if the device will not be used for long periods.
- Remove defective batteries from the device immediately! There is an increased risk of leakage!
- Never expose the batteries to excessive heat such as direct sunlight, fire or similar. There is an increased risk of leakage.
- In the event of leakage, remove the batteries from the device immediately. Clean the contacts before inserting new batteries. There is a risk of skin irritations from battery acid!
- If battery acid has leaked out, under no circumstances allow it to come into contact with the skin, eyes and mucous membranes! Leaked battery fluid can cause skin irritations. If the acid does come into contact with skin, immediately rinse the affected areas with plenty of clear water and consult a doctor immediately.
4.8. Never carry out repairs yourself

WARNING!
There is a risk of electric shock due to live parts. Therefore, follow the instructions below:
- Never try to open and/or repair the devices yourself.
- In the event of a fault, please contact the Medion Service Centre or an approved repair specialist.
- The mains cable on the mains adapter cannot be replaced. If the mains cable is damaged, the mains adapter must be scrapped and replaced with a mains adapter of the same type in order to avoid hazards. In such cases please contact the Medion Service Centre.
5. Compatibility with other base stations
5.1. Base stations from Medion
The supplied handsets work with the following commercially available GAP-compatible DECT base stations: e.g. MD 83321, MD 83640, MD 83642, MD 83672, MD 83674, MD 84902, MD 84900, MD 84058, and many more.
5.2. Base stations from other manufacturers
The functions described in these instructions may only be available to a limited extent in some circumstances if you are not using an identical DECT base station or if you use a base station from another manufacturer.
6. Overview of the device
6.1. Handset
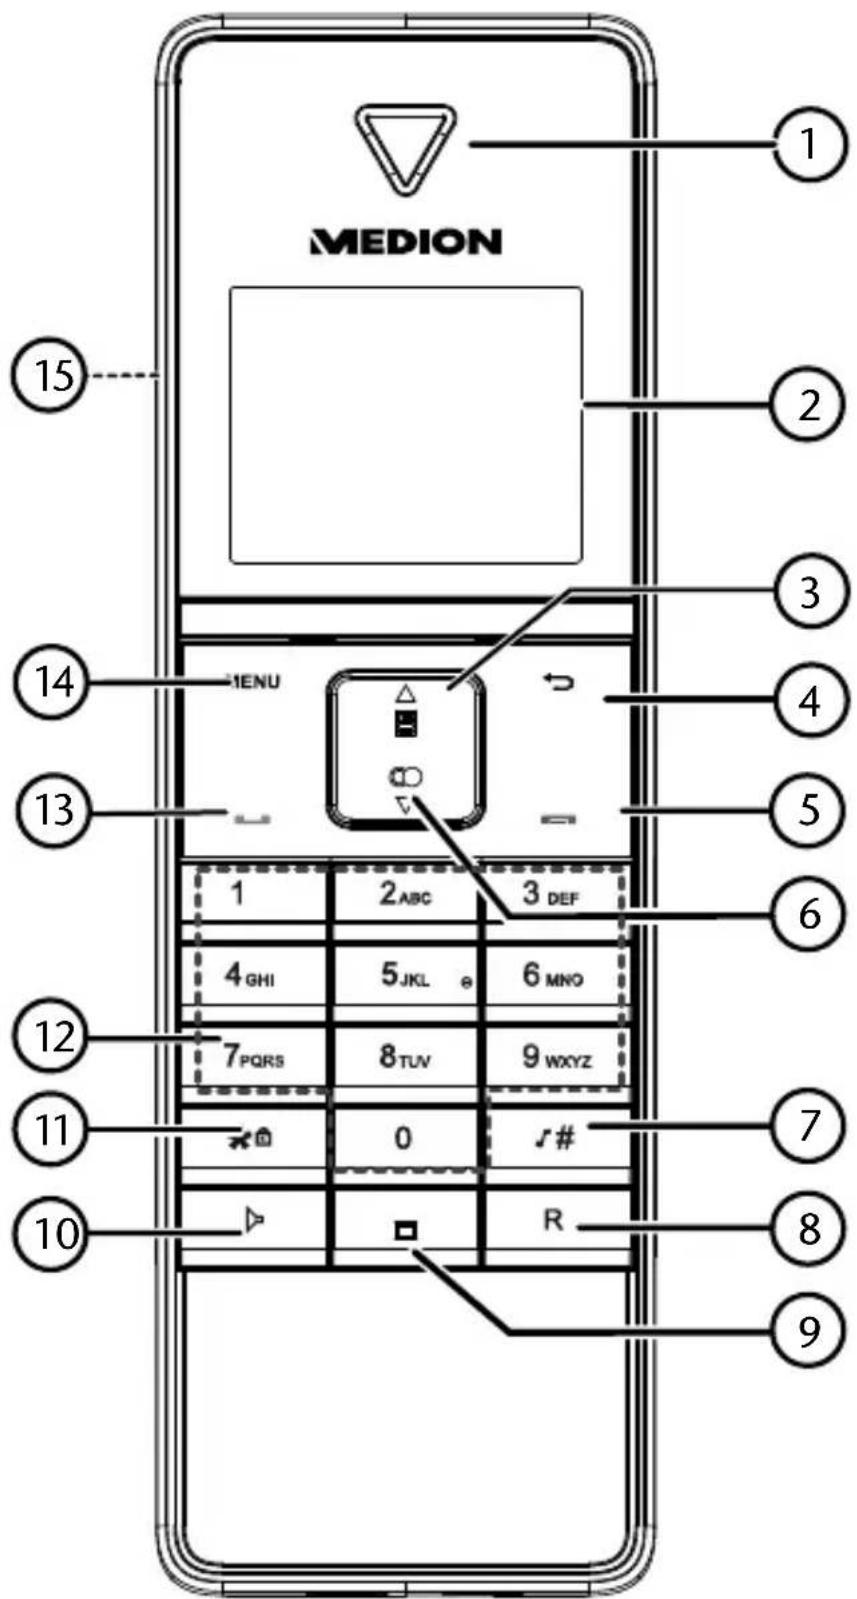
1) Speaker
2) Display
3)
Press

- In sleep mode: open call list.
- In menu mode: navigate up in menus.
- During a call: increase the volume.
- While the handset is ringing: increase the volume of the ring tone.
4)
Press

- In sleep mode: make an internal call.
- In main menu: back to the standby screen.
- In submenu: open previous menu.
- Editing/selection mode: delete characters / numbers.
- During a call: switch microphone to mute.
- While the handset is ringing: switch off the ring tone.
5) Pre-tall key: end call; switch off handset
6)

- In sleep mode: open radial list.
- In menus: navigate down in menus.
- During a call: decrease the volume.
- While the handset is ringing: decrease the volume of the ring tone.
7)
Press#
- Enter # character
- Press and hold down in sleep mode: switch ring
tone on/off.
- In the call list: check the caller's number.
8) R key: recall key
9) Microphone
10) Hands-free key
11) Press
- Enter * character
- Press and hold down in sleep mode: switch key lock on/off.
- During a call (pulse operation): change dialling mode.
12) Number keys 0 to 9: enter numbers and letters
Numbers 2, 4, 5, 6: keys for controlling the answering machine
13) Pr t± t talk key: accept call; dial the
selected number
14) Press MENU key:
-In sleep mode: open main menu.
- In submenu: confirm selection.
15) Loudspeaker (on the rear, not illustrated)
6.1.1. Display on the handset
| Symbol Meaning | |
| Symbol is permanently displayed during a call. Symbol flashes to indicate an incoming call. | |
| Symbol is displayed for new messages on the answering machine or for a missed call. | |
| Ring tone is disabled. | |
| Symbol is displayed when there is a new message. | |
| Hands-free function is active. | |
| Strength of reception signal (the more bars, the stronger the signal). | |
| Symbol flashes when the battery charge level is low. ▶Handset is charged. | |
| Symbol is permanently displayed when the batteries are fully charged. Symbol flashes when the battery is being charged. Internal bars flash when the batteries are in the end phase of the charging process. | |
| Key lock is active | |
| Symbol is displayed when the answering machine is switched on. | |
6.1.2. Available characters
| Key | Adding characters* | Adding numbers** | |||||
| x 2x 3x | 4x 5x | 6x | |||||
| 1 | - | 1 | 1 | ||||
| 2 | B | C | 2 | 2 | |||
| 3 | E | F | 3 | 3 | |||
| 4 | H | I | 4 | 4 | |||
| 5 | K | L | 5 | 5 | |||
| 6 | M | N | O | 6 | 6 | ||
| 7 | Q | R | S | 7 | 7 | ||
| 8 | U | V | 8 | 8 | |||
| 9 | W | X | Y | Z | 9 | 9 | |
| 0 | * | ? | / | \ | ( | ) | * |
| # | Adding characters* | Adding numbers ** | DE FR | ||||||
| ' | , | - | . | & | # | ||||
- (for phone book entries, handset names)
** (when entering the date/time, phone numbers)
6.2. Base station
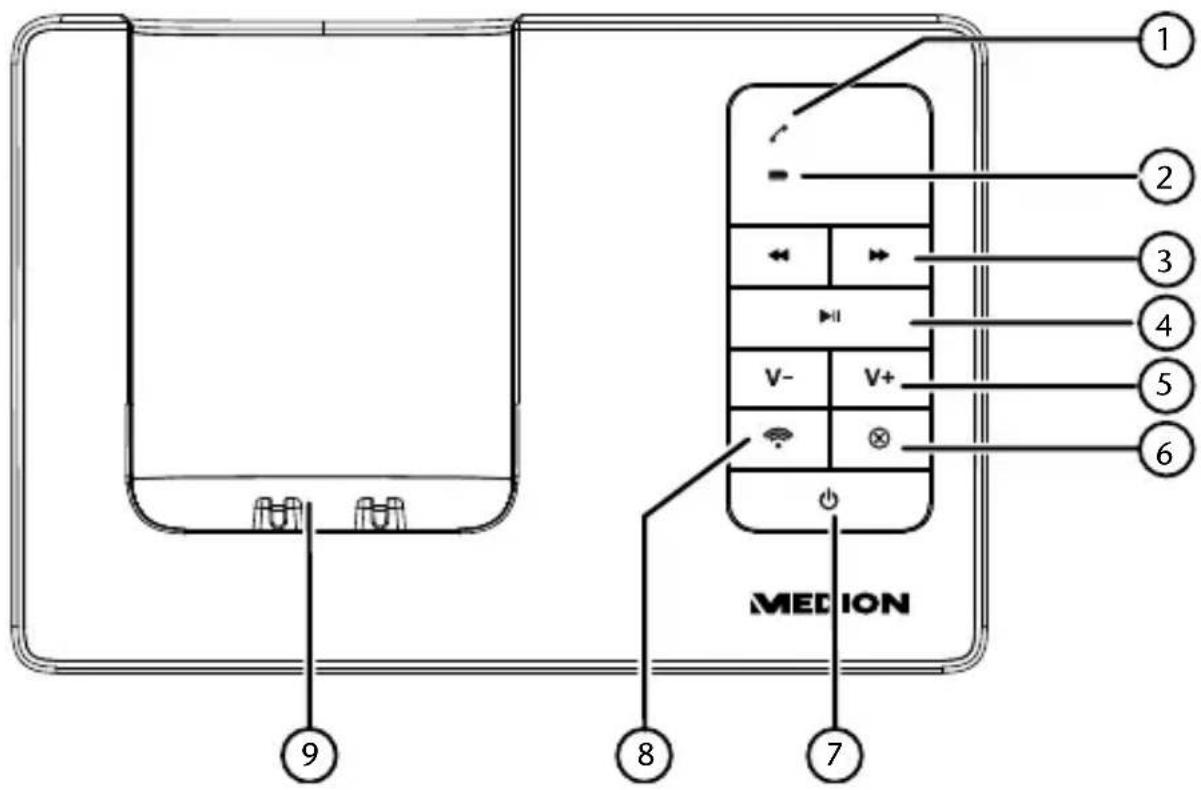
1) LED flashes: Incoming call or base station is in registration mode; LED is permanently lit: device is ready for use
2) is li dset charging
3) Go to previous message/ Go to next message
4) Start/stop playback of messages
5) V - /V + Increase/decrease volume for base station
6) Deleted
7) Switch answering machine on/off
8) Paging key: page handset/register handset
9) Charger cradle
6.2.1. Rear
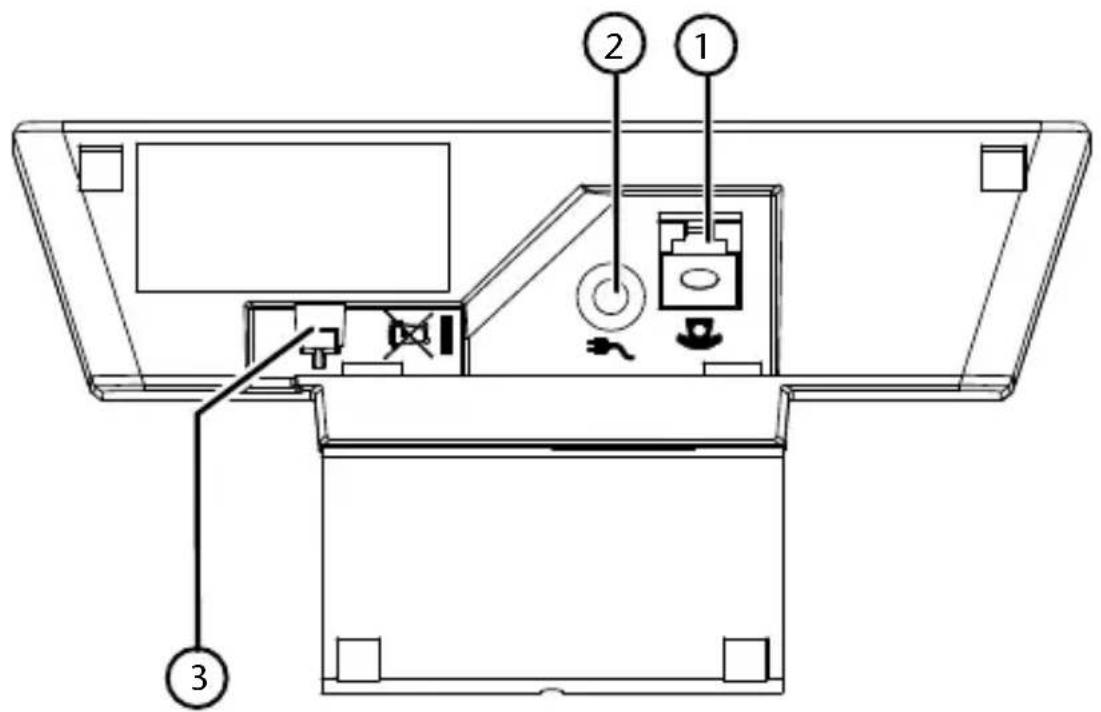
1) Connection for telephone cable (Western jack RJ11)
2) Connection for mains adapter lead
3) Cable holder for mains adapter lead
6.3. Charger
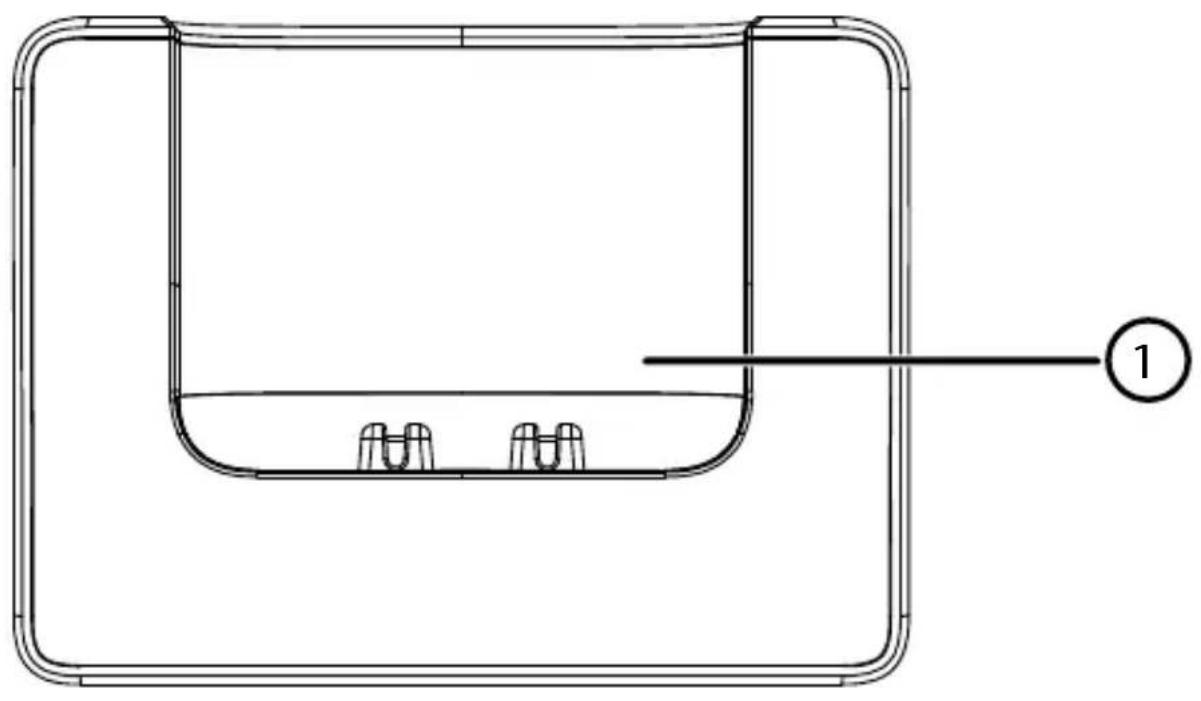
1) Charger cradle
6.3.1. Rear
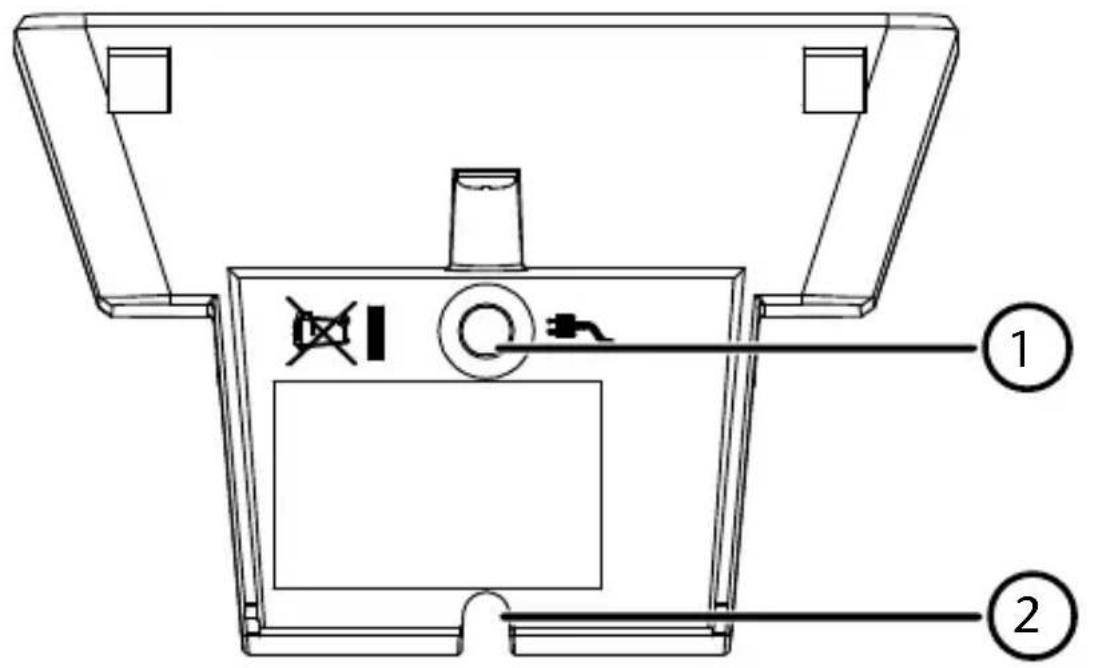
1) Connection for mains adapter lead
2) Cable feed for the mains adapter cable
7. Using the device for the first time
Remove all film from the device.
7.1. Connecting the base station/ charging station to the mains
Insert the jack plug on the supplied mains adapter S004LV0600045 into the socket on the rear of the base station or charging station.
The sockets are labelled with a plug symbol.
7.2. Connecting the base station to the telephone network
Insert the transparent mains plug on the telephone cable into the socket on the base station marked with a telephone symbol
Plug the mains plug on the mains adapter into a mains socket.
Insert the plug on the other end of the telephone cable into the telephone wall socket.
7.3. Inserting batteries
The handsets each come supplied with two nickel metal hydride rechargeable batteries "AAA" 500 mAh.

NOTE!
Only use nickel metal hydride rechargeable batteries of the supplied type (NiMh; 1.2 V; 500 mAh) in the handset.
The device warranty will expire if you insert any other type of rechargeable battery or non-rechargeable batteries. This could damage the handset.
Slide down the battery cover on the back of the handset.
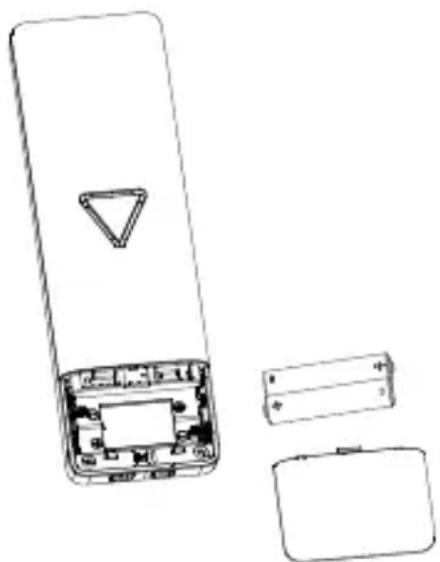
Insert the two rechargeable batteries into the battery compartment, paying attention
to the polarity (+ / -) (with the negative end against the springs).
Slide the cover back onto the battery compartment.
7.4. Charging the rechargeable batteries for the handset in the base station/charging station
- Place the handset in the charging cradle of the base station or charging station. A beep indicates that the handset has been correctly placed in the cradle. The animated battery charging symbol shows the charging process on the handset display.

NOTE!
The charging time is approx. 16 hours.
Do not interrupt the charging process, otherwise the capacity of the batteries could be permanently reduced.

NOTE!
The handset can be left permanently in the charging cradle. This ensures maximum charging.
A fully charged battery will last for 10 hours of calls or 100 hours of standby operation. The battery will then have to be recharged after that time.
When the battery charge level is low, the symbol will be shown on the display and an acoustic signal will sound during a call.
8. Navigating in the menu
Press the MENU key to open the main menu.
You can move within the menu on the handset using the following keys:

Scroll upwards;

Scroll downwards;
MENU
Confirm selection

Go back one step in the menu
The back key on the handset enables you to go back one step from any location.
9. Basic functions
9.1. Switching the handset on and off
You can switch off the handset if it is not in the base station.
To switch off the handset, keep the call key
(red) pressed down for a few seconds.
To switch the handset back on, press the call key
red) down. After a short moment, the standard display reappears on the screen.
You can also switch the handset back on by placing it back in the charging station or base station.
9.2. Key lock
To prevent accidental dialling, you can activate the key lock. This is not possible during a call.
Hold down the key until pears on the display on the handset.
To deactivate the key lock, hold down the key until
on the display disappears.
9.3. Searching for handsets
If you want to page the handset from the base station or search for the handset ( paging), press the paging key on the base station until you hear a signal tone.
- Stop the paging signal with the call key or press the paging key again.
9.4. Calling
9.4.1. Dialling a number
Pick up the handset and press the talk key.
- Enter the telephone number with the keypad. The telephone number can have up to 24 numbers.
If you have entered an incorrect number, you can delete the number by pressing the back key.
CALLING and the telephone number appear on the display.
9.4.2. Hanging up
Press the call key) to end the call or place the handset back in the base station or charging station.
The call time will appear on the display for a few seconds.

NOTE!
If you make a call with a nearly discharged battery, you will hear a double warning tone every minute during the call.
End the call, place the handset in the base station and let the battery charge.
9.5. Answering the telephone
The assigned ring tone will sound in the event of an incoming call and the call LED will start to flash.
Pick up the handset to accept the call.
If the handset is not in the base station, press the talk key (green).
9.5.1. Caller identity function
You can see the telephone number of a caller on the display (if you have requested the CLIP function from your telephone provider and if the caller also has a telephone connection with CLIP function and has not suppressed his telephone number).
If a caller has been saved in the phone book, the name of the caller is shown.
9.6. Switching off the ring tone
Hold down the #hash key until the symbol appears on the display.
No ring tone will sound when a call is now received; it will only be indicated on the display.
To switch the ring tone back on again, hold down the #hash key until the symbol on the display disappears.
9.7. Functions during the call
9.7.1. Changing the earpiece volume
In order to change the volume during a call, proceed as follows:
Press the Δ or keys during a call to decrease or increase the earpiece volume.
The volume level is shown on the display. Five levels are possible.
When the call is ended, the level that was set will be applied.
9.7.2. Hands-free mode
Press the key during the call. The loudspeaker is switched on and the symbol will be shown on the display. You can put the earpiece or handset down and yet still hear the caller.
Press the key again to deactivate the loudspeaker again.
9.7.3. Switching to mute
Press the key during a call to switch the telephone to mute.
MUTED appears on the display. The microphone is
switched off and the person on the other end of the line cannot hear you.
Press the key again to switch on the microphone again.
10. Internal calls
You can transfer a call internally or conduct a 3-way conference call with one external party and two internal parties. However, the prerequisite is that at least two handsets have been registered with the base station. In order to make an internal call, proceed as follows:
Press the key.
Use the keys to select the desired handset or all registered handsets and confirm with the MENU key.
CALLING HS appears on the display.
10.1. Toggling
You can transfer a call to a second handset that is registered to the base station.
Press the MENU key during the call.
Use the keys to select the INTERCOM menu and confirm with the MENU key.
Use the keys to select the desired handset and confirm with the MENU key.
The second handset will ring.
Accept the call on the second handset and hang up on the first handset.
The call is now transferred to the second handset.
10.2. Conference call facility
You can conduct a conference call with one external party and two internal parties.
Press the MENU key during the call.
Use the keys to select the INTERCOM menu and confirm with the MENU key.
Use the keys to select the desired handset.
The second handset will ring.
Accept the call on the second handset and hold down the key on the first handset for 1 second.
CALL SHARE now appears on the handset display.
The conference call can be ended at any time from a handset.
Press th key on the handset to end the conference call.
11. Redialling
11.1. Selecting from the radial list
The last 10 numbers dialled are saved.
If you have saved a name in the phone book, the number and the corresponding name are shown on the display. The last telephone number dialled or the corresponding name will be displayed first.
In order to call the last number dialled from the handset, press the key.
Use the keys to scroll through the last numbers dialled and press the talk key oca the desired number.
11.2. Transferring numbers to the phone book
You can save a number from the radial list in the phone book.
Use the keys to select the desired number from the radial list.
Press the MENU key.
- ADD TO PB appears on the display. Confirm by pressing the MENU key.

NOTE!
If the name already exists, the message
NAME EXISTED will appear on the display and it will not be possible to save it.
NAME appears on the display. Enter the name using the number keys. Confirm by pressing the MENU key.
If necessary, edit the telephone number using the number keys. Confirm by pressing the MENU key.
MELODY 1 appears on the display. Use the keys to select one of 10 melodies for the ring tone. Confirm by pressing the MENU key.
11.3. Deleting a number
Use the keys to select the desired number from the radial list.
Press the MENU key.
- ADD TO PB appears on the display. Use the keys to select the option DELETE. Confirm the query CONFIRM? with the MENU key.
11.4. Deleting the entire redial list
Use the keys to select a number from the radial list.
Press the MENU key.
- ADD TO PB appears on the display. Use the keys to select the option DELETE ALL. Confirm the query CONFIRM? with the MENU key.
The radial list is now EMPTY.
12. Caller list
The prerequisites for a call being entered in the caller list are that:
- the answering machine does not answer the call.
- the caller's telephone has the CLIP service feature activated (i.e. the caller's number can be seen on the display).
12.1. Selecting numbers from the calllist
Up to 20 calls can be saved in the call list. In order to open the call list, press the key.
Use the keys to scroll through the entries in the call list and press the talk key to fill the desired entry.
If there were no calls, EMPTY will appear on the display.
12.2. Transferring numbers to the phone book
You can save a number from the call list in the phone book.
Use the keys to select the desired number from the call list.
Press the MENU key.
- ADD TO PB appears on the display. Confirm by pressing the MENU key.

NOTE!
If the name already exists, the message
NAME EXISTED will appear on the display and it will not be possible to save it.
NAME appears on the display. Enter the name using the number keys. Confirm by pressing the MENU key.
If necessary, edit the telephone number using the number keys. Confirm by pressing the MENU key.
MELODY 1 appears on the display. Use the keys to select one of 10 melodies for the ring tone. Confirm by pressing the MENU key.
12.3. Call details
You can view the details for an incoming call.
Use the keys to select the desired number from the call list.
The date and time of the incoming call is displayed.
12.4. Type of call
You can select whether only unanswered calls or all incoming calls are saved.
Use the keys to select the desired number from the call list.
Press the MENU key and then use the keys to select the option CATEGORY.
Use the keys to select ALL CALLS orMissed CALLS
Confirm by pressing the MENU key.
13. Phone book
The phone book can hold up to 50 entries. The entries are sorted alphabetically. You can allocate a specific ring tone (1 of 10 different melodies) to each entry. There are a maximum of 24 characters available for the telephone number and 12 characters for the name.
Press the MENU key and then use the keys to select the option PHONEBOOK. Confirm by pressing the MENU key.
The phone book opens and the first entry is displayed.
13.1. Adding an entry
Adding an additional entry to the phone book.
Press the MENU key in the phone book to open the submenu.
- Confirm the option ADD with MENU to add a new phone book entry.
Name appears on the display.
Enter the name using the number/letter keys. You can enter a blank space with the number 1.
Confirm by pressing the MENU key.
NUMBER appears on the display.
Enter the telephone number with the keypad.
Confirm by pressing the MENU key.
MEODY 1 appears on the display.
Use the keys to select a melody for the caller's
ring tone.
Confirm by pressing the MENU key.
The entry is now saved.
13.2.Changinanentry
You can change a phone book entry here.
- Select a phone book entry and confirm the selection with MENU.
Use the keys to select EDIT and confirm the selection with MENU.
You can now enter information in the same way as when the entry was first added – see the previous section
"Adding an entry".
13.3. Viewing an entry
Check entries in the phone book.
- Select a phone book entry and confirm the selection with MENU.
Use the keys to select VIEW and confirm the selection with MENU.
You can view the telephone number and the ring tone melody for the person without changing it.
13.4/Delete
Deleting a phone book entry.
Select a phone book entry.
Press the MENU key.
Use the keys to select DELETE and confirm the
selection with MENU. The selected entry is deleted.
13.5. Delete all
Deleting all phone book entries.
Open the phone book.
Press the MENU key.
Use the keys to select DELETE ALL and confirm the selection with MENU.
- Confirm the query CONFIRM? with the MENU key.
If desired, you can cancel the deleting process using the back key.
All entries in the phone book are deleted.
13.6. Assigned memory spaces
Display the memory status of the phone book.
Open the phone book.
Press the MENU key.
Use the keys to select TB STATUS and confirm the selection with MENU.
You can now see how many memory spaces have been assigned in the phone book (e.g. 12/50 USED).
13.7. Dialling from the phone book
Press the MENU key.
Use the keys to select PHONEBOOK and confirm the selection with MENU.
The phone book opens and the first number is displayed.
Use the keys to scroll to the desired telephone number.
Now press the key to call the selected entry.
14. Setting the base station
Press the MENU key and then use the keys to select the option BS SETTINGS. Confirm by pressing the MENU key.
The settings menu for the base station opens.
14.1. Ring tone
You can select from 5 melodies for the ring tone on the base station.
Use the keys to select BS RINGER.
MELODY 1 appears on the display.
Use the keys to select one of 5 melodies for the ring tone.
Confirm by pressing the MENU key.
14.2. Ring tone volume
You can choose between 5 volume levels.
Use the keys to select RING VOLUME.
VOLUME 1 appears on the display.
Use the keys to select one of the 5 volume levels.
Confirm by pressing the MENU key.
14.3. Deregistering a handset from the base station
To deregister a handset, proceed as follows:
Use the keys to select DELETE HS.
PIN?--- appears on the display.
Enter the four-digit PIN (the factory setting is 0000).
Confirm by pressing the MENU key.
A list of the registered handsets will appear on the display.
Use the keys to select the desired handset and confirm your selection with the MENU key.
14.4. Changing the dialling mode
You can adapt your telephone to the dialling mode of your network provider under DIAL MODE. You can choose between tone dialling and pulse dialling. The factory setting is TONE. This is the most commonly used dialling mode nowadays.
Pulse dialling may be necessary for some older telephone systems.
Ask your network provider which dialling mode is required for your connection.
Confirm the setting DIAL MODE with MENU.
Use the keys to select the required dialling mode: TONE (DTMF) or PULSE.
Confirm by pressing the MENU key.
14.5. Flash time
You can adapt your telephone to the specifications of your network provider or your PABX under FLASH TIME. You can set the flash time to the following stages: long, medium or short.
Confirm the setting FLASH TIME with MENU.
Use the keys to select the required flash time: SHORT, MEDIUM or LONG.
Confirm by pressing the MENU key.
14.6. Eco mode
You can switch the Eco mode function on or off under ECO MODE.
This function enables low-radiation operation during a call. The reduction in radiation will depend on the distance of the handset from the base.
How to switch the function on or off:
Confirm the setting ECO MODE with MENU.
Use the keys to select ON or OFF.
Confirm by pressing the MENU key.
14.7. Setting the transmission power
The transmission power of the base station can be adjusted under ECO RANGE.
HALF RANGE: low transmission power
FULL RANGE: high transmission power
The transmission power setting "HALF RANGE" reduces the transmission range between the base station and the registered handsets. Check the reception display on the handset to see whether the transmission power is sufficient and adjust it where necessary.
How to switch the function on or off:
Confirm the setting ECO RANGE with MENU.
Use the keys to select HALF RANGE or FULL RANGE.
Confirm by pressing the MENU key.
14.8. Eco Plus
The ECO PLUS function completely disables the
telephone's transmitting power when in standby mode. ECO+ is only possible when the handset is inserted in the base station.
How to switch the function on or off:
Confirm the setting ECO PLUS with MENU.
Use the keys to select ON or OFF.
Confirm by pressing the MENU key.
15. Entering settings on the handset
Press the MENU key and then use the keys to select the option HS SETTINGS. Confirm by pressing the MENU key.
The settings menu for the handset opens.
15.1. Setting the ring tone
You can select from between 10 different melodies for incoming internal and external calls. Proceed as follows.
- Confirm the setting RING SETUP with MENU.
Use the keys to select EXT. RING or INT. RING.
Confirm by pressing the MENU key.
MELODY 1 appears on the display.
Use the keys to select one of 10 melodies for the ring tone.
Confirm by pressing the MENU key.
15.1.1. Setting the ring tone volume
Proceed as follows to set the volume of the ring tone:
Confirm the setting RING SETUP with MENU.
Use the keys to select RING VOLUME.
Use the keys to select VOLUME 1, 2, 3, 4, 5, 6 or VOLUME OFF.
Confirm by pressing the MENU key.
15.2. Setting the advisory tones
You can switch the key and status signal tones on or off under TONE SETUP.
How to switch the functions on or off:
Confirm the setting TONE SETUP with MENU.
Use the keys to select KEY TONE, BATTERY TONE or OUT OF RANGE.
Confirm by pressing the MENU key.
Use the keys to select ON or OFF.
Confirm by pressing the MENU key.
15.3. Setting the language
Set the desired language here.
Confirm the option LANGUAGE with MENU.
Use the keys to select DEUTsCH,
ENGLISH, NEDERLANDS, FRANÇAIS (for
Belgium/Netherlands) OR DEUTsCH, ENGLISH, TURKCE (for Germany/Austria/UK).
Confirm by pressing the MENU key.
15.4.Renamingahandset
Giving a handset a different name.
- Confirm the setting HANDSET NAME with MENU.
Enter the name using the number/letter keys. You can enter a blank space with the number 1.
Confirm by pressing the MENU key.
15.5. Setting the date and time
Enter the current date and time in order to be able to see e.g. the time at which calls or messages were received.
Confirm the setting DATE & TIME with MENU.
DATE FORMAT appears on the display.
Use the keys to select DD-MM-YY (Day-Month-Year) or MM-DD-YY (Month-Day-Year).
Confirm by pressing the MENU key.
TIME FORMAT appears on the display.
Use the keys to select 12 HR or 24 HR.
Confirm by pressing the MENU key.
Enter the current time with the number keys under SET TIME.
Confirm by pressing the MENU key.
Enter the current year with the number keys under SET YEAR.
Confirm by pressing the MENU key.
Enter the current date with the number keys under SET DATE.
Confirm by pressing the MENU key.
The date and time have now been set.
16. Registeringhandsets
Your handsets are already registered with the base station. You can register up to five handsets with the base station. For handsets of the same type, proceed as follows:
Press the paging key for approx. 5 seconds on the base station until you hear a signal tone.
Press the MENU key and then use the keys to select the option REGISTRATION. Confirm by pressing the MENU key.
PIN?--- appears on the display.
Enter your four-digit PIN (the factory setting is 0000).
Confirm by pressing the MENU key.
PLEASE WAIT flashes on the display.
The handsets are named chronologically e.g. Handset 1, Handset 2, etc.
17. Resetting the handset to the factorysettings
To reset the handset to the factory settings, proceed as follows:
Press the MENU key and then use the keys to select the option DEFAULT. Confirm by pressing the MENU key.
PIN?--- appears on the display.
Enter your four-digit PIN (the factory setting is 0000).
Confirm by pressing the MENU key.
- Confirm the query CONFIRM? with the MENU key.
The handset has now been reset to the factory settings. Personal settings and the call and radial lists have been deleted. However, the phone book is retained.
18. Answering machine
You can record incoming calls or record a voice memo using the answering machine. Messages lasting up to 15 minutes can be recorded in total.
You can control the answering machine with the base station, a handset or from an external connection.

NOTE!
In order to be able to use all of the additional functions on the answering machine, you need to set the date and time.
18.1. Switching the answering machine on and off
18.1.1. On the base station
To switch the answering machine on the base station on or off, press the On/Off key on the base station.
18.1.2. Via the menu on the handset
To switch the answering machine on or off with the handset, proceed as follows:
Press the MENU key and then use the keys to select the option ANS. MACHINE. Confirm by pressing the MENU key.
Use the keys to select TAM ON/OFF.
Confirm by pressing the MENU key.
Use the keys to select ON or OFF.
Confirm by pressing the MENU key.
When the answering machine is switched on, the display shows the symbol.
18.2. Incoming messages
In the factory settings, the switching on mode for the answering machine is set as follows:
- the answering machine switches on after the fourth ring for the first call.
- the answering machine then switches on after the first ring for subsequent calls.
Once new messages have been received, the symbol flashes on the handset and the number of new unread messages flashes on the base station.
18.3. Playing back messages
All messages on the answering machine are played back. The latest messages or memos will be played back first, followed by the older (already played back) messages unless you stop the playback process.
Once new messages have been played back, the symbol on the handset and the number of messages shown on the base station stop flashing.
18.3.1. On the base station
Press to listen to messages and memos.
Press again to stop playback.
Press to listen to the previous message again. Messages can be skipped by pressing the keys multiple times.
Press▶▶ to listen to the next message. Messages can be skipped by pressing the keys multiple times.
18.3.2. Via the menu on the handset
Use the keys to select PLAYBACK.
Confirm by pressing the MENU key.
The message will be played back over the loudspeaker.
18.4. Deleting messages
It is only possible to delete those messages that have already been played back.
18.4.1. On the base station
Press the key to delete a message. Press and hold down the key to delete all messages.
18.4.2. Via the menu on the handset
Use the keys to select DEL ALL OLD.
Confirm by pressing the MENU key.
- Confirm the query CONFIRM? with the MENU key.
The messages are deleted and the display shows EMPTY.
18.5. Recording a reminder
You can record a reminder (voice memo). This function is available even if the answering machine is switched off.
Use the keys to select MEMO.
Confirm by pressing the MENU key.
A signal tone will sound and the recording begins.
RECORD appears on the display.
Speak into the handset microphone at normal speaking volume.
Once you have recorded your voice memo, press the MENU key to save the memo.
Your memo will now be played back. PLAYING MSG appears on the display.
The number of memos will be shown on the flashing
display on the base station.
18.6. Setting the answering machine
Use the keys to select TAM SETTINGS.
Confirm by pressing the MENU key.
18.6.1. Answering mode
In the factory settings, two recorded greeting messages are activated:
- A greeting message for when the answering machine is switched on:
(ANS & REC: the caller can then leave a message on the answering machine);
- A greeting message for when the answering machine is switched off (ANSWER ONLY: the caller is requested to call again).
Proceed as follows to select the answering mode:
Use the keys to select ANSWER MODE.
Confirm by pressing the MENU key.
Use the keys to select ANS & REC or ANSWER ONLY.
Confirm by pressing the MENU key.
18.7. Recording a greeting message
You can record you own personal greeting message. If you delete your personal greeting message, the default greeting message will automatically be restored.
Use the keys to select OGM SETTINGS.
Confirm by pressing the MENU key.
Use the keys to select ANS & REC or ANSWER ONLY.
Confirm by pressing the MENU key.
Use the keys to select RECORD PRESS.
Confirm by pressing the MENU key.
RECORD appears on the display.
End the recording with the MENU key. The greeting message will be played back and PLAYING OGM will appear on the display.
18.8. Playing back a recorded greeting message
In order to check or listen to the greeting message, proceed as follows:
Use the keys to select OGM SETTINGS.
Confirm by pressing the MENU key.
Use the keys to select ANS & REC or ANSWER ONLY.
Confirm by pressing the MENU key.
Use the keys to select PLAYBACK
Confirm by pressing the MENU key.
The greeting message will be played back and PLAYING OGM appears on the display. will appear on the display.
You can delete your personal greeting message by pressing the key while the greeting message is being played back.
18.9. Setting the ring delay
You can set the number of ringing signals after which the answering machine is activated. The following are possible: 2, 4, 6 and 8 rings or economy mode.
Use the keys to select ANSWER DELAY.
Confirm by pressing the MENU key.
Use the keys to select 2, 4, 6, 8 RINGS or TIME Saver and confirm with the MENU key.
Economy mode to save connection fees
In economy mode, you can avoid connection fees when playing back your answering machine from an external telephone. In economy mode, the answering machine switches on after four ringing signals for the FIRST caller.
For every subsequent call, the answering machine switches on after the first ringing signal.
If you want to enquire remotely whether new messages are available, call your phone from an external telephone.
- If new messages have been recorded, the answering machine will switch on after the first ringing signal.
- If you hear a second ringing signal, then this means that no new messages have been recorded for you. In this case, hang up immediately. Otherwise, the answering machine will switch on after the fourth ringing signal.
18.10. Recording time for incoming messages
Set the maximum length of the recording time for incoming messages.
You can set how long the message on the answering machine may be. The default value is 120 seconds.
Use the keys to select RECORD TIME.
Confirm by pressing the MENU key.
Select 60S, 120S, 180S or UNLIMITED and confirm with the MENU key.
UNLIMITED means a maximum recording time of 15 minutes.
18.11. Listening in to messages
You can set whether you want to listen in to the incoming messages via the hands-free facility.
Use the keys to select BS SCREENING.
Confirm by pressing the MENU key.
Use the keys to select ON or OFF.
Confirm by pressing the MENU key.
18.12. Remote enquiry
You can listen to messages via an external telephone using the remote enquiry function. The remote enquiry function is activated in the factory settings with the default PIN number 0000.
Use the keys to select REMOTE ACC..
Confirm by pressing the MENU key.
Use the keys to select ON or OFF.
Confirm by pressing the MENU key.
18.13. Changing the remote enquiry PIN
The PIN is a password and is used to prevent strangers from using the remote enquiry of your answering machine. If the remote enquiry function is switched on, you must first enter the old PIN and then you can change it.

NOTE!
This PIN is not identical with the system PIN.
Use the keys to select the entry CHANGE PIN.
Confirm by pressing the MENU key.
OLD PIN:--- appears on the display.
Enter your four-digit PIN (the factory setting is 0000).
NEW PIN:--- appears on the display.
Enter your new four-digit PIN.
CONFIRM?--- appears on the display.
Enter your new four-digit PIN again.
Confirm by pressing the MENU key.
18.14. Playing back messages from a different telephone extension
- Call your telephone number and press the star key * on the telephone during the greeting message.
- Enter your remote enquiry PIN now with the keypad. The number keys on the telephone can also serve as the control keys for the answering machine.
Below is a list of which keys can be used to send which commands to the answering machine.
| Key Function | Function during playback | |
| 2 | No function | Delete current message |
| 4 | No function | Repeat message; return to previous message |
| 5 | Play back message Stop playback | |
| Key Function | Function during playback | |
| 6 | No function | Go to the next message |
| 7 | Switch on answering machine | No function |
| 9 | Switch off answering machine | No function |
| * | Enter 4-digit PIN | |
If you do not make any entries for 15 seconds the connection will be broken off automatically.
19. Troubleshooting
If the device malfunctions, please check first if you can eliminate the error yourself with the help of the following overview.
Never try to repair the devices yourself. Contact our Service Centre or other qualified personnel if a repair is necessary.
Error Solution
For all problems
Check if the mains and telephone cables are plugged in correctly.
- Check the telephone at a different telephone socket.
- Check the battery indicator to see if the batteries are charged.
- Check whether the handset is correctly registered.
- Check whether the handset is within the range of the base station.
- Check whether the handset is switched on.
- Check whether the batteries are charged and inserted with correct polarity.
The display on the handset is blank.
No dialling tone
Check whether the base station is correctly connected.
- Check whether the handset is switched on, charged, correctly registered and within the range of the base station.
Error Solution The display on the handset shows Range!
No ring tone on handset or base station
-- appears in the base station display. The caller cannot understand you
- Check whether the base station is correctly connected.
- Check whether the handset is within the range of the base station.
- Check whether the handset is registered with the desired base station.
- Check whether the batteries are charged and inserted with the correct polarity.
- Check whether the base station is correctly connected.
- Check whether the volume of the ring tone has been switched off.
- Check whether the handset is within the range of the base station.
- Check whether the batteries are charged and inserted with the correct polarity.
- The answering machine is switched off.
- Check whether the microphone is switched on and if muting is switched off.
Error Solution You cannot be called
There is interference with other devices
- Press the green call key and check for a dialling tone and for whether the home symbol appears on the display.
- Check whether another telephone works on the telephone socket or if your telephone works on a different telephone socket.
- Check whether the base station is located directly next to another electrical device (e.g. other telephone, modem or fax machine, television or microwave oven). Set up the telephone in a different location.
- If you are using a high-speed Internet service over the telephone line, you must install a DSL filter between the telephone's base station and the mains telephone socket. The filter prevents noise and caller ID problems that could be caused by the DSL connection. Please contact your DSL service provider to receive further information on the DSL filter.
20. Cleaning
Before cleaning the device, disconnect the supplied mains adapter from the mains safety socket. Use a dry, soft cloth for cleaning.
Avoid the use of chemical solutions and cleaning products because these may damage the surface and/or markings of the devices.
21. Disposal

Packaging
Your device has been packaged to protect it against transportation damage. The packaging is made of environmentally friendly which can be recycled.

Device
Old devices should not be disposed of with the normal household rubbish.
In accordance with Directive 2012/19/EU, the device must be properly disposed of at the
end of its service life.
This involves separating the materials in the device for the purpose of recycling and avoiding any impact on the environment.
Take old appliances to a collection point for electrical scrap or a recycling centre.
Contact your local waste disposal company or your local authority for more information on this subject.

Batteries
Batteries must be properly disposed of. Retailers who stock batteries and local authority collection points have appropriate
disposal containers for this purpose. You can contact your local waste disposal company or municipal authorities for further information.
22. Technical data
Handset
Standard
DECT/GAP
Range approx. 300m range outside,
approx. 50m range inside buildings
Suitable for analogue telephone connections in Germany, Austria, France, Netherlands, Belgium, United Kingdom.
Batteries for the handsets
Manufacturer: GP Batteries International Ltd., China
Type HR 03/AAA NiMH 1.2 V, 500 mAh
Charging time for handset batteries approx. 16 hours if completely discharged
Standby operation approx. 100 hours
Talk time approx. 10 hours
Mains adapter
Manufacturer: TenPao,
Model number S004LV0600045
Input AC 100-240 V, 50/60 Hz, 150 mA

Output


450 mA
Dimensions (WxHxD)
Base station: approx. 140 × 95 × 80 mm
Handset: approx. 54 × 170 × 18 mm
Charging station: 85 × 65 × 63 mm
Subject to technical modifications!
23. Declaration of conformity
C€0168 MEDION AG hereby declares that the DECT telephone MD 84994 conforms to the fundamental requirements
and other regulations of the relevant directive R&TTE 1999/5/EC.
The supplied mains adapter satisfies the requirements and relevant regulations of the Ecodesign Directive 2009/125/EC (Commission Regulation 278/2009).
The Ecodesign Directive 2009/125/EC (Commission Regulation 1275/2008) does not apply to DECT telephones. The intended use must comprise the permanent reception and transmission of data.
Full declarations of conformity are available at www.medion.com/conformity.
24. Legal notice
Copyright © 2015
All rights reserved.
This operating manual is protected by copyright.
Mechanical, electronic and any other form of reproduction is prohibited without the written permission of the manufacturer
Copyright is owned by the company:
Medion AG
Am Zehnhof 77
45307 Essen
Germany
The operating manual can be reordered via the service hotline and is available for download via the service portal at www.medion.com/gb/service/start/.
You can also scan the QR code above and download the operating manual onto your mobile device via the service portal.

25. Index
A
Acoustic signals 266
Answer delay 274
Answering machine.....244, 270, 273, 278
Answer message Playback 274
Recording 273
Answer mode 273
B
Base station ...231, 233, 244
Batteries
Charging 248
Inserting. 248
Safety instructions.....234
Battery. 234, 249
Output. 249
C
Call details 258
Caller identity function 252
Caller list 257
Calling. 251
Call list 257
Characters available. 242
Cleaning. 282
Compatibility 237
Conference call facility .255
Connection
Base station. 247
D
Date 267
Declaration of conformity .. 285
Dialling mode 263
Display ...241, 250, 251, 252, 253
Disposal. 283
DSL. 281
E
Earpiece volume 253
Eco+ 264
Eco mode 264
F
Factory settings 269
Faults. 279
Flash time 263
H
Handset
Log in 268
Log out 262
Rename 266
Reset. 269
Search 251
Setting. 265
Hands-free function ....253
Hang up 252
1
Internal calls 254
Item
Add 259
Amend. 260
Delete. 260
View. 260
K
Key lock 251
L
Language 266
Log in
Handset. 268
M
Mains adapter ...... 231, 232, 247, 285
Menu
Navigation. 250
Message
Delete. 272
Listen. 271
Listening in 276
Record. 272
Remotely listen 277
Mute. 253
N
Name
Handset. 266
Number
Amend. 256, 260
Delete. 256, 260
Save 256,258
0
Overview of the device 238
P
Package contents 225
Paging. 251
Phone book ...259, 260, 261
Memory status 261
Polarity 248
Proper use 228
R
Recall key 240
Recording time 275
Redial 255
Remote enquiry 276
Remote enquiry PIN ....276
Repairs. 236
Ring tone
Base station. 262
Handset. 265
Ring tone volume
Base station. 262
Handset. 265
s
Safety instructions .........230
Setting
Answering machine ..273
Base station. 262
Handset. 265
Set-up location 231
Switching on/off
Answering machine ..270
Handset. 250
Ring tone 252
T
Technical data 284
Time 267
Toggling. 254
Transmission output ....264
U
Using the device for the first time 247
W
Western jack 245

- E
- Dimensions (I x H x P)
- C
- Navigating in the menu 250
- Basic functions 250
- Internal calls 254
- Redialling 255
- Caller list 257
- Phone book 259
- Setting the base station 262
- Entering settings on the handset 265
- Registering handsets 268
- Resetting the handset to the factory settings .... 269
- Answering machine 270
- Package contents
- About these instructions
- Warning symbols and key words used in these instructions
- PLEASE NOTE!
- WARNING!
- Warning of risk of electric shock!
- Proper use
- Safety instructions
- People not permitted to use this device
- Explosion hazard areas
- WARNING
- Mains adapter
- Setting up the device safely
- Ensure accessibility of the mains power socket
- Thunderstorms / non-use
- Handlingtherechargeable batteries safely
- Never carry out repairs yourself
- There is a risk of electric shock due to live parts. Therefore, follow the instructions below:
- Compatibility with other base stations
- Base stations from Medion
- Base stations from other manufacturers
- Overview of the device
- Handset
- Display on the handset
- Available characters
- Base station
- Rear
- Charger
- Rear
- Using the device for the first time
- Connecting the base station/ charging station to the mains
- Connecting the base station to the telephone network
- Inserting batteries
- NOTE!
- Charging the rechargeable batteries for the handset in the base station/charging station
- Navigating in the menu
- MENU
- Basic functions
- Switching the handset on and off
- Key lock
- Searching for handsets
- Calling
- Dialling a number
- Hanging up
- Answering the telephone
- Caller identity function
- Switching off the ring tone
- Functions during the call
- Changing the earpiece volume
- Hands-free mode
- Switching to mute
- Internal calls
- Toggling
- Conference call facility
- Redialling
- Selecting from the radial list
- Transferring numbers to the phone book
- Deleting a number
- Deleting the entire redial list
- Caller list
- Selecting numbers from the calllist
- Transferring numbers to the phone book
- Call details
- Type of call
- Phone book
- Adding an entry
- 13.2.Changinanentry
- Viewing an entry
- 13.4/Delete
- Delete all
- Assigned memory spaces
- Dialling from the phone book
- Setting the base station
- Ring tone
- Ring tone volume
- Deregistering a handset from the base station
- Changing the dialling mode
- Flash time
- Eco mode
- Setting the transmission power
- Eco Plus
- Entering settings on the handset
- Setting the ring tone
- Setting the ring tone volume
- Setting the advisory tones
- Setting the language
- 15.4.Renamingahandset
- Setting the date and time
- Registeringhandsets
- Resetting the handset to the factorysettings
- Answering machine
- Switching the answering machine on and off
- On the base station
- Via the menu on the handset
- Incoming messages
- Playing back messages
- On the base station
- Via the menu on the handset
- Deleting messages
- On the base station
- Via the menu on the handset
- Recording a reminder
- Setting the answering machine
- Answering mode
- Recording a greeting message
- Playing back a recorded greeting message
- Setting the ring delay
- Economy mode to save connection fees
- Recording time for incoming messages
- Listening in to messages
- Remote enquiry
- Changing the remote enquiry PIN
- Playing back messages from a different telephone extension
- Troubleshooting
- Error Solution
- For all problems
- The display on the handset is blank.
- No dialling tone
- Error Solution The display on the handset shows Range!
- No ring tone on handset or base station
- Error Solution You cannot be called
- There is interference with other devices
- Cleaning
- Disposal
- Packaging
- Device
- Batteries
- Technical data
- Handset
- Batteries for the handsets
- Mains adapter
- Dimensions (WxHxD)
- Declaration of conformity
- Legal notice
- Index
- A
- B
- D
- F
- H
- 1
- K
- L
- M
- N
- 0
- P
- R
- s
- T
- U
- W
Brand : MEDION
Model : LIFE P63994 (MD 84994)
Category : Cordless phone