FX4555 DL - Lamp Dörr - Free user manual and instructions
Find the device manual for free FX4555 DL Dörr in PDF.
User questions about FX4555 DL Dörr
0 question about this device. Answer the ones you know or ask your own.
Ask a new question about this device
Download the instructions for your Lamp in PDF format for free! Find your manual FX4555 DL - Dörr and take your electronic device back in hand. On this page are published all the documents necessary for the use of your device. FX4555 DL by Dörr.
USER MANUAL FX4555 DL Dörr
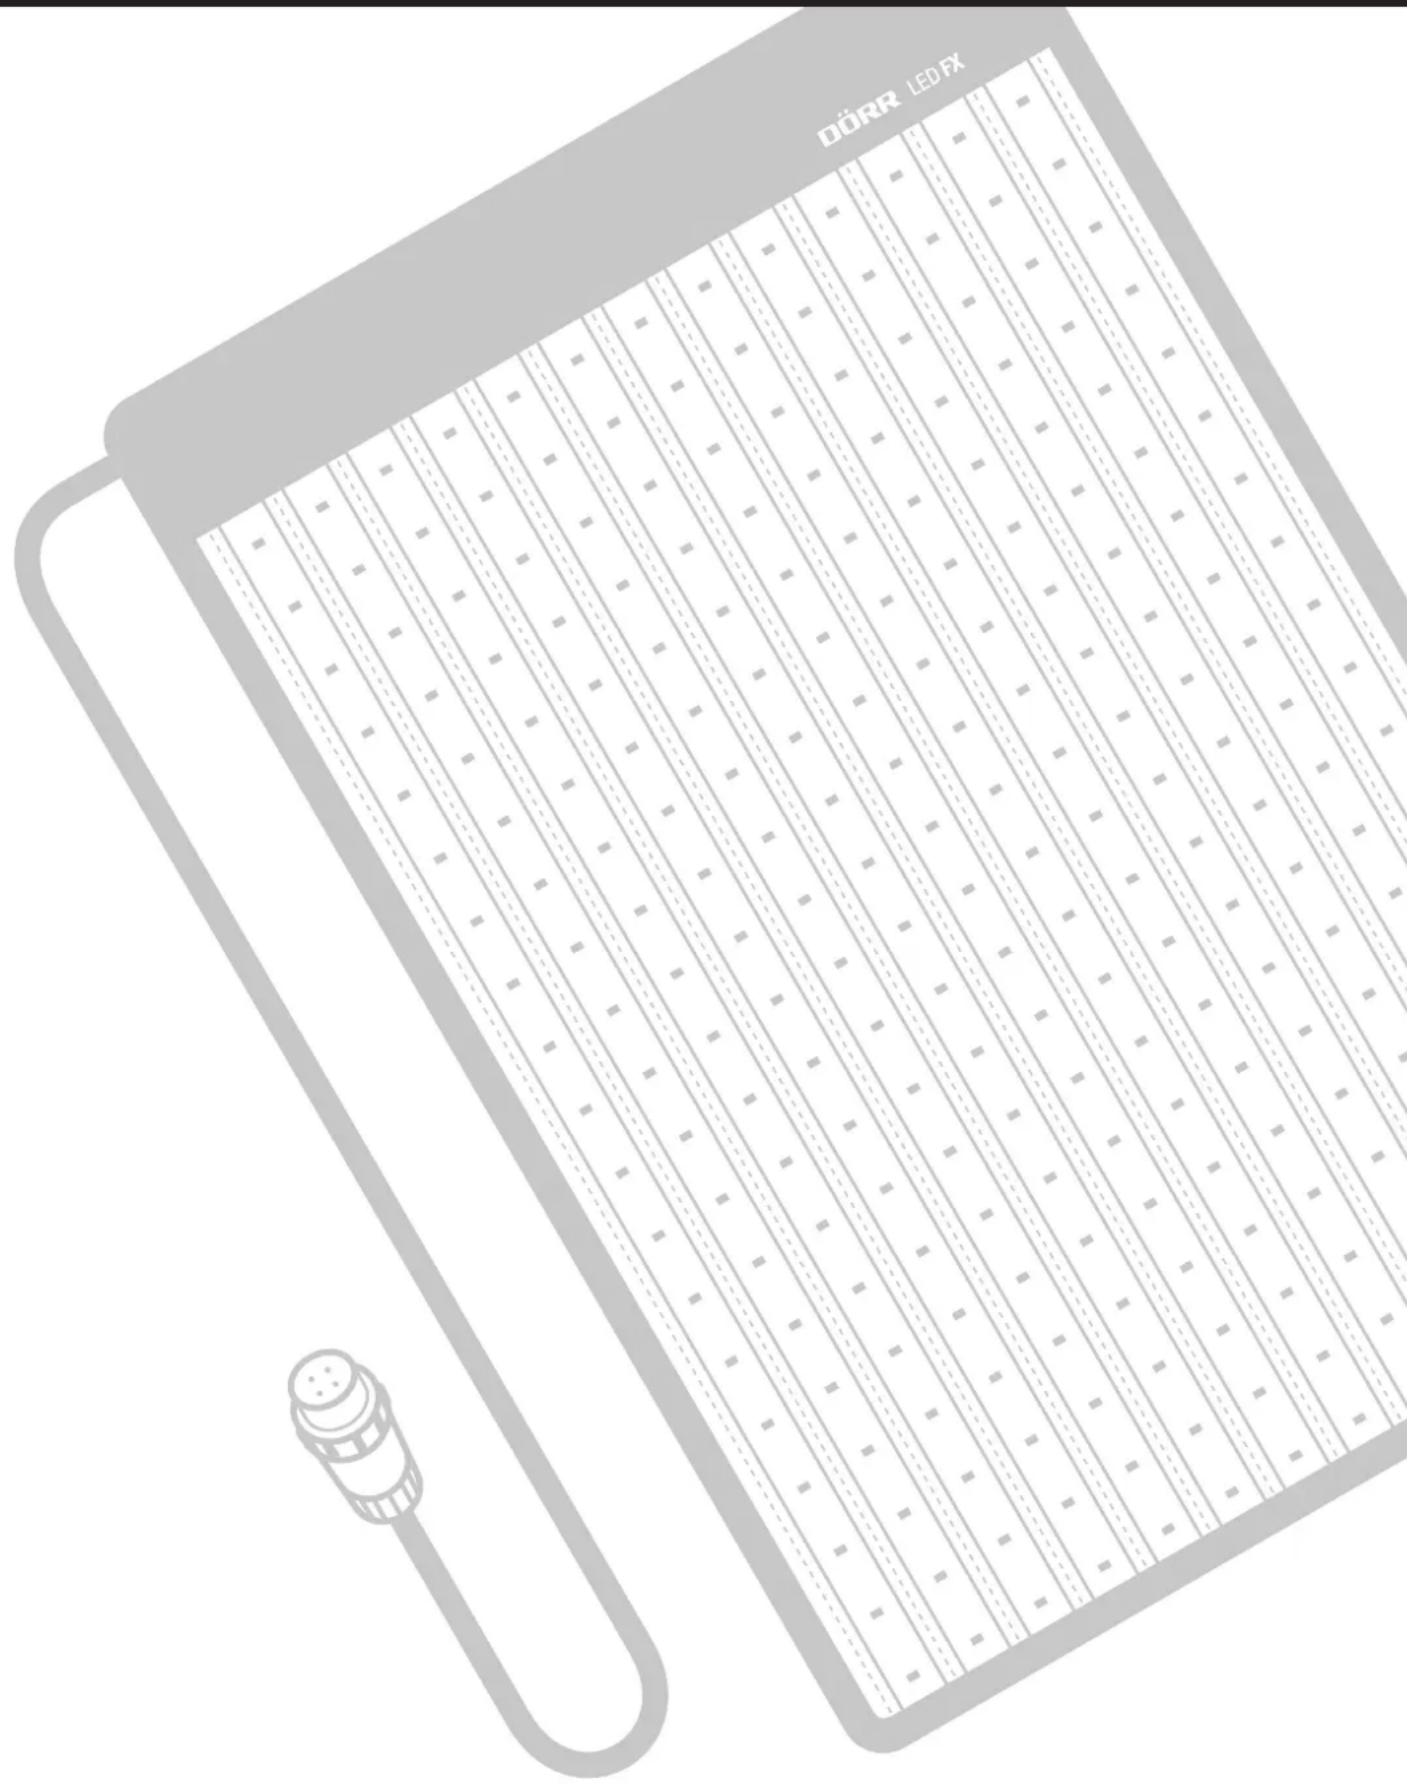
LED FLEX PANEL DAYLIGHT FX-3040 DL
FX-3040 DL FX-4555 DL
GB INSTRUCTION MANUAL LED Light Panel
FR NOTICE D'UTILISATION Panneau LED fl exible
ES MANUAL DE INSTRUCCIONES Panel LED fl exible
IT MANUALE D'ISTRUZIONI Pannello a Luci LED
text_image
DÖRR LEDX
[Non-Text]
[Non-Text]
[Non-Text]
[Non-Text]
[Non-Text]
[Non-Text]
[Non-Text]
[Non-Text]
[Non-Text]
[Non-Text]
[Non-Text]
[Non-Text]
[Non-Text]
[Non-Text]
[Non-Text]
[Non-Text]
[Non-Text]
[Non-Text]
[Non-Text]
[Non-Text]
[Non-Text]
[Non-Text]
[Non-Text]
[Non-Text]
[Non-Text]
[Non-Text]
[Non-Text]
[Non-Text]
[Non-Text]
[Non-Text]
[Non-Text]
[Non-Text]
[Non-Text]
[Non-Text]
[Non-Text]
[Non-Text]
[Non-Text]
[Non-Text]
[Non-Text]
[Non-Text]
[Non-Text]
[Non-Text]
[Non-Text]
[Non-Text]
[Non-Text]
[Non-Text]
[Non-Text]
The Ground Truth image displays a single, solid horizontal line. According to Rule 2 (UNDERSCORE & LINE RULES), if the GT contains lines used for stylistic emphasis or as background elements (like ruled paper), the OCR result must ignore them. The line in the GT is clearly a stylistic or background line, not a placeholder for text. Therefore, the OCR should not have output any underscores. Outputting `____` constitutes an error under Rule 2, as it hallucinates placeholder symbols where none are semantically intended. No punctuation mismatch or formatting transformation applies here because the content is purely symbolic and not textual.
The Ground Truth image displays a single, solid horizontal line. According to Rule 2 (UNDERSCORE & LINE RULES), this is a stylistic or background line, not a placeholder underscore. Therefore, the OCR result must ignore it and output nothing or only meaningful text. The provided OCR content is "____", which consists of four underscores. This is an incorrect interpretation of the line as a placeholder, violating the rule that stylistic lines must be ignored. The OCR has hallucinated placeholder underscores where none should exist in the GT. Hence, the OCR result is inconsistent with the Ground Truth.
[Non-Text]
LED Flex Panel FX-3040 DL / FX-4555 DL Daylight
LED Leuchtmatte
text_image
Technical diagram of an electrical device with labeled components and wiring connections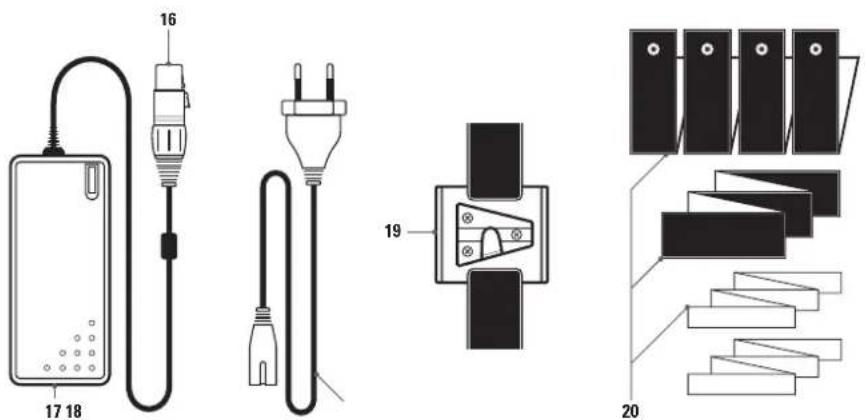
text_image
Diagram showing electrical components and staircase layout with numbered partsX-Rahmen
natural_image
Pure diagram of a rectangular device with diagonal X-bracing and central vertical axis, mounted on a tripod (no text or symbols)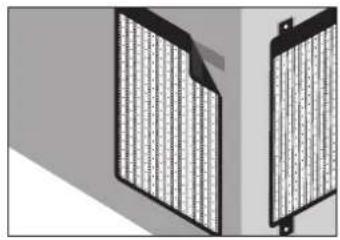
natural_image
Two identical black rectangular panels with vertical striped patterns, placed side by side on a gray background (no text or symbols visible)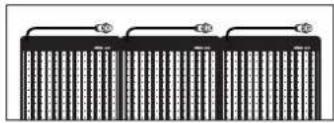
natural_image
Pure electrical circuit lines without any symbolsnatural_image
Pure electrical circuit lines without any symbolsnatural_image
Pure electrical connector diagram without any text or symbols
natural_image
Pure diagram of a cylindrical device with internal components and wiring, no text or symbols presentTipp
natural_image
Diagram of a device with a cylindrical component and a rectangular housing, showing internal structure (no text or symbols)THANK YOU for choosing this DÖRR quality product.
Please read the instruction manual and safety hints carefully before fi rst use. Keep this instruction manual together with the device for future use. If other people use this device, make this instruction manual available. This instruction manual is part of the device and must be supplied with the device in case of sale.
DÖRR is not liable for damages caused by improper use or the failure to observe the instruction manual and safety hints.
01 | ⚠ SAFETY HINTS
- Only for the illumination for photographic purposes. Not suited for permanent room lightning.
- Only operate with the supplied power supply and the original cables. Do not use an extension cord. Alternatively, the light panel can be operated with a suitable V-Mount Li-Ion battery (optional).
- Ensure sufficient ventilation during operation. After use, please switch the device off.
• Make sure to turn off the device at main switch before disconnecting from power.
• LED Bulbs cannot be replaced. - Protect the device from rain, moisture, direct sunlight and extreme temperatures.
- Do not operate or touch the device with wet hands.
- Do not apply pressure to the light panel and do not place heavy objects on it.
- Protect the LED surface from sharp objects. Do not use the light panel if it is damaged. In this case a qualified electrician should inspect the device before you use it again.
- Do not attempt to repair the device by yourself. Risk of electric shock! When service or repair is required, contact qualified service personnel.
- Do not use the device nearby mobile phones and devices that generate strong electromagnetic fields (e.g. electric engines).
• People with physical or cognitive disabilities should use the device with supervision.
• People with cardiac pacemakers, defibrillators or any other electrical implants should maintain a minimum distance of 15 to 20 cm, as the device generates magnetic fields. - This device is not a toy. To prevent accidents and suffocation keep the device, the accessories and the packing materials away from children and pets.
- Protect the device against dirt. Never use aggressive cleansing agents or benzine to clean the device. We recommend a soft, slightly damp microfiber cloth to clean the outer parts of the device. Make sure to take off the device from power before cleaning!
• Store the device in a dust-free, dry and cool place. - If the device is defective or without any further use, dispose of the device according to the Waste Electrical and Electronic Equipment Directive WEEE. For further information, please contact your local authorities.
02 | PRODUCT DESCRIPTION
The DÖRR LED FX Flex Panels are equipped with the latest LED technology and are fully flexible in their application. The LED Flex Panels ensure a bright illumination even in hard to reach areas or in the smallest spaces. With a height of only 10mm, they can be folded or rolled up and are easy to transport. Well suited for portrait, product and video shootings.
03 | FEATURES
• Colour temperature 5600 K (daylight)
• Fully flexible and ultra-flat
• Environmentally friendly, long-lasting LEDs
- Low energy consumption
• Brightness variably adjustable with dimmer
• Operation with supplied power supply or V-mount Li-Ion battery (optionally from DÖRR)
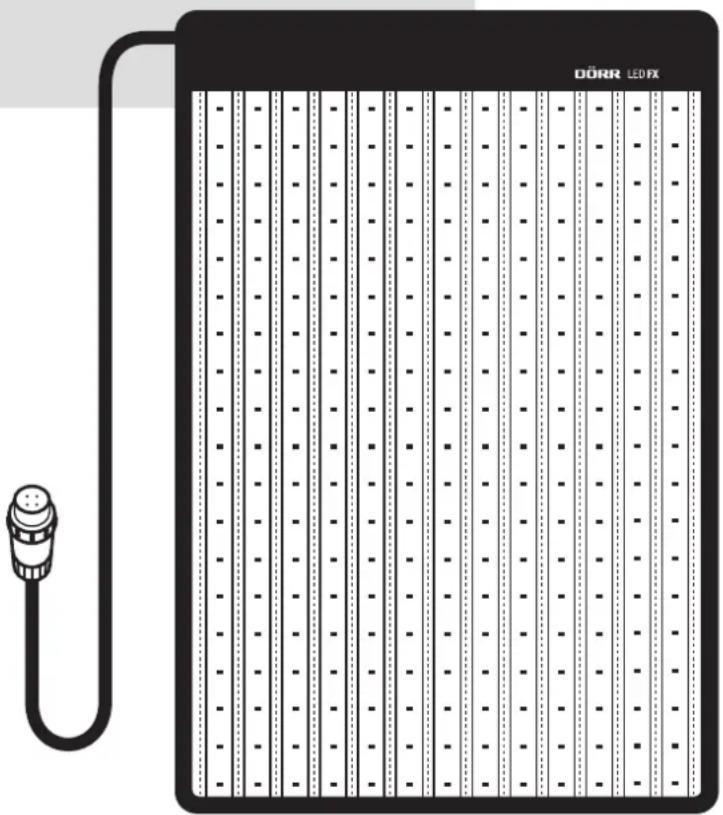
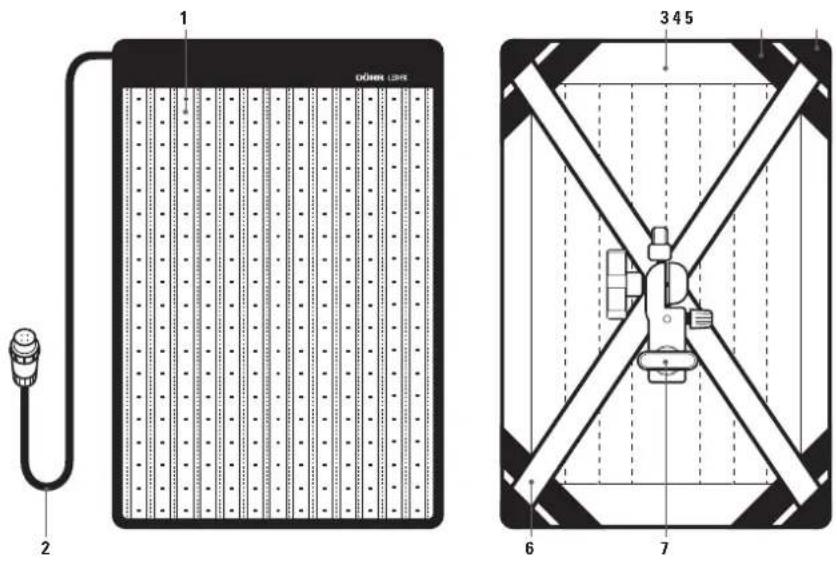
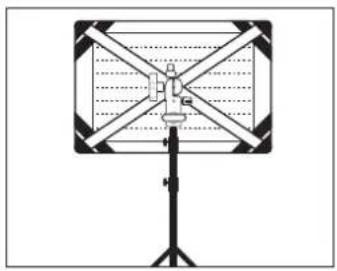
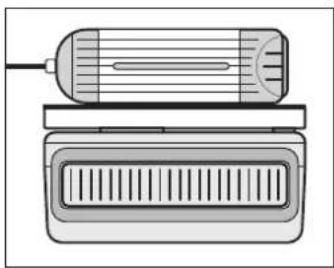
04 | NOMENCLATURE
04.1 LED Flex Panel
1 LED illuminated area
2 Connection cable (to control unit)
3 Velcro border
4 Elastic strips
5 Fastening corners
6 X-Frame
7 Light stand adapter (inclinable)
04.2 Control Unit
| 8 Main switch |
| POSITION I = OPERATION WITH V-MOUNT |
| LI-ION BATTERY |
| POSITION II = OPERATION WITH POWER SUPPLY |
| POSITION 0 = OFF |
9 Socket for power supply
10 Brightness control knob/Dimmer
11 Connection cable (to LED Flex Panel cable)
12 Suspension cord
13 V-mount
14 Release button V-mount
15 Battery contacts +/-
04.3 Power Supply
16 Connection cable (to control unit) with release button
17 Socket for power cable
18 Power cable
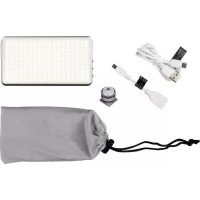
04.4 Accessories included
19 Velcro strap with V-mount adapter
20 Velcro mounting straps
text_image
1 2 3 4 5 6 7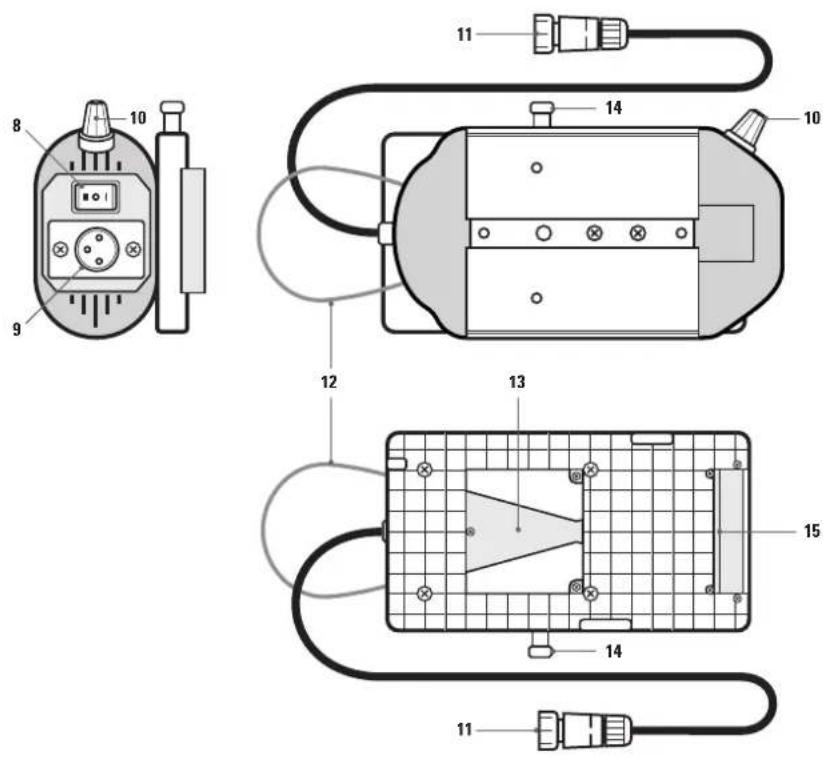
text_image
Technical diagram of an electrical device with labeled components and wiring connections
text_image
16 17 18 19 20X-Frame
Unfold the X-frame (6) and insert the rods into the fastening corners (5). With the light stand adapter (7) the LED Flex Panel can be mounted horizontally or vertically onto a light stand (optional) and it is inclinable.
Velcro mounting straps
With the various Velcro straps (20), the LED Flex Panel can be attached to the wall, to the ceiling etc. or you can connect several LED Flex Panels with each other.
natural_image
Pure diagram of a rectangular device with diagonal X-bracing and a vertical support structure (no text or symbols)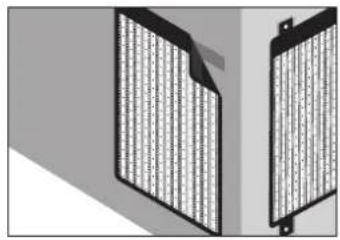
natural_image
Two identical black rectangular panels with vertical striped patterns, placed side by side on a gray background (no text or symbols visible)
natural_image
Three identical rectangular blocks with vertical lines and horizontal connectors, no text or symbols visible.06 | OPERATION
CAUTION
Before connecting or disconnecting cable connections, make sure that the control unit is switched off (main switch (8) on position 0 = off).
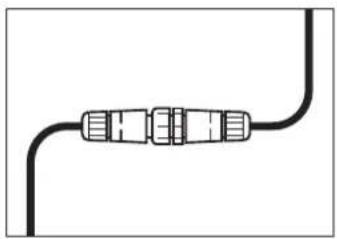
06.1 Power connection
Plug the connection cable of the LED Flex Panel (2) into the connection cable of the control unit (11). Pay attention to the pins and holes. Screw the blue cap down. To disconnect the cable connection, unscrew the blue cap first!
natural_image
Pure electrical circuit lines without any symbols06.2 Operation with power supply
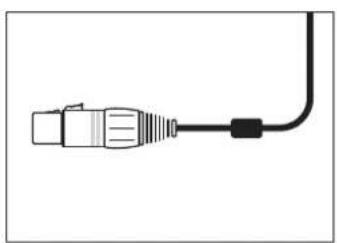
- Plug the connection cable (16) of the power supply into the power socket (9) of the control unit, until the plug audibly clicks into place. Pay attention to the pins and holes. To disconnect the plug, always press the release button!
- Plug the power cable (18) into the power cable socket (17) and connect the power supply to a socket outlet.
- Turn on the LED Flex Panel with the main switch (8) at the control unit: Main switch (8) position II = Operation with power supply
natural_image
Pure electrical connector diagram without any text or symbols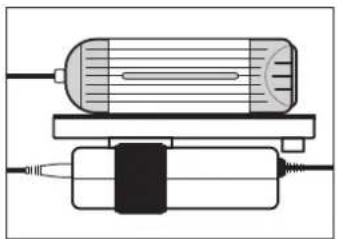
natural_image
Pure diagram of a cylindrical device with internal components and wiring, no text or symbols presentHint
With the suspension cord (12) or with the supplied Velcro strap with V-mount adapter (19) you can attach the control unit e.g. to a light stand (optional) or fi x the power supply to the control unit. Just slide the V-mount adapter (19) into the V-mount (13). Use the Velcro straps to hold the control unit or to fi x the power supply. To remove the V-mount adapter, press the release button (14).
06.3 Operation with V-mount battery (optional)
V-mount Li-Ion batteries are optionally available from DÖRR. See capture 10 | OPTIONAL ACCESSORIES.
CAUTION
Before operating with V-mount battery, make sure that the control unit is switched off (main switch (8) on position 0 = off) and then disconnect the power supply from the control unit. To disconnect the plug, always press the release button!
natural_image
Diagram of a device with a cylindrical component and a rectangular housing, showing internal structure (no text or symbols)- Slide the V-mount battery into the V-mount (13) until the battery clicks into place. Pay attention to the battery contacts +/- (15).
- Turn on the LED Flex Panel with the main switch (8) at the control unit: Main switch (8) position I = Operation with V-mount battery
- Before removing the V-mount battery, turn the control unit off (main switch (8) on position 0). Press the release button (14) and slide out the battery.
06.4 Dimming
By turning the brightness control knob (10) the brightness can be dimmed in steps.
CAUTION
After use please turn off the LED fl ex panel (main switch 8 = position 0).
07 | CLEANING AND STORAGE
Never use aggressive cleansing agents or benzine to clean the device. We recommend a soft, slightly damp microfiber cloth to clean the outer parts of the device and the LED surface. Make sure to take off the device from power before cleaning! Store the device in a dust-free, dry and cool place. This device is not a toy – keep it out of reach of children. Keep away from pets.
08 | SPECIFICATIONS
| Model FX-3040 DL FX-4555 DLItem No. 373620 373625 | ||
| Number of LEDs 280/white 504/white | ||
| Colour temperature | 5600 K | |
| Power | 34 W | 62 W |
| Beam angle | 10 - 360° | |
| Colour rendering index (CRI) | 95 R * | |
| Illuminance | 0,5 m: 3680 Lux | 0,5 m: 6940 Lux |
| 1,0 m: 1230 Lux | 1,0 m: 2470 Lux | |
| Operating voltage | DC 15 V 5A | |
| Operation with | Power supply AC 100 ~ 240 V 50/60 Hz (included)or V-mount Li-Ion battery (optional) | |
| Dimensions | approx. 315 x 450 x 10mm | approx. 460 x 600 x 10mm |
| Dimensions illuminated area | approx. 300 x 395 mm | approx. 445 x 545 mm |
| Weight LED panel | approx. 288 g | approx. 440 g |
| Weight control unit | approx. 500 g | |
| Weight power supply incl. power cable | approx. 395 g | |
09 | CONTENT
1x LED Flex Panel
1x Control unit with V-mount battery mounting plate
1x Power supply
1x Power cable
1x X-Frame
1x Velcro strap with V-mount adapter
1x Velcro mounting straps
10 | OPTIONAL DÖRR ACCESSORIES
Special accessories for DÖRR LED FX Flex Panels available in stores
Description Item No.
DÖRR Softbox for FX-3040 DL/BC 373630
DÖRR Softbox for FX-4555 DL/BC 373631
DÖRR Flag Panel Diff usor for FX-3040 DL/BC 373632
DÖRR Flag Panel Diff usor for FX-4555 DL/BC 373633
DÖRR Compact V-Mount Li-Ion Battery CVL-65 14.8V, 65Wh 980715
DÖRR Compact V-Mount Li-Ion Battery CVL-98 14.8V, 98Wh 980716
11 | MOUNTING OF THE OPTIONAL ACCESSORIES
DÖRR Softbox (optional)
The DÖRR Flex Panel Softbox provides soft and diff use light.
The softbox is simply fixed to the Velcro border of the LED Flex panel (3). The supplied diff user cover is placed over the front of the softbox
DÖRR Flag Panel Diff user [optional]
The metal flag panel frame is ideal for fi Iming. Attach the LED Flex Panel to the Flag Panel using the elastic strips (4) and mount the Flag Panel e.g. onto a camera slider.
The DÖRR Flag Panel comes with a fabric cover so the fl ag panel can also be used as a diff usor.
![Dörr FX4555 DL - DÖRR Flag Panel Diff user [optional] - 1](/content/2026/03/499732/images/ae51992e3d7910529bc8c4976f7d331187614bf6ebd506dab75421479333a002.jpg)
text_image
DÖRR![Dörr FX4555 DL - DÖRR Flag Panel Diff user [optional] - 2](/content/2026/03/499732/images/730b6492b787c23cb456e954beddba9a837b7e6652c7ff93d99151e14b329350.jpg)
natural_image
Diagram of a rectangular device with vertical stripes and a star-shaped connection point (no text or symbols)![Dörr FX4555 DL - DÖRR Flag Panel Diff user [optional] - 3](/content/2026/03/499732/images/b876861af548bdce4863ffcdb37c2301ffdb305ea155635c757b2a9027c0f358.jpg)
natural_image
Simple diagram of a rectangular object with a vertical line and a small protrusion at the bottom (no text or symbols)12 | DISPOSAL, CE MARKING, EU DECLARATION OF CONFORMITY
DISPOSAL OF BATTERIES/ACCUMULATORS
Batteries are marked with the symbol of a crossed out bin. This symbol indicates that empty batteries or accumulators which can no longer be charged, should not be disposed of with household waste. Waste batteries may contain harmful substances that can cause damage to health and to the environment. Please use the return and collection systems available in your country for the disposal of the waste batteries.

WEEE INFORMATION
The Waste Electrical and Electronic Equipment Directive (WEEE Directive) is the European community directive on waste electrical and electronic equipment, which became European law in February 2003. The main purpose of this directive is to prevent electronic waste. Recycling and other forms of waste recovery should be encouraged to reduce waste. The symbol (trash can) on the product and on the packing means that used electrical and electronic products should not be disposed of with general household waste. It is your responsibility to dispose of all your electronic or electrical waste at designated collection points. Disposing of this product correctly will help to save valuable resources and it is a significant contribution to protect our environment as well as human health. For more information about the correct disposal of electrical and electronic equipment, recycling and collection points please contact your local authorities, waste management companies, your retailer or the manufacturer of this device.
ROHS CONFORMITY
This product is compliant with the European directive 2011/65/EU of June 08, 2011 for the restriction of use of certain hazardous substances in electrical and electronic equipment (RoHS) and its amendments.

CE MARKING
The CE marking complies with the European directives.
text_image
Technical diagram of an electrical device with labeled components and wiring connections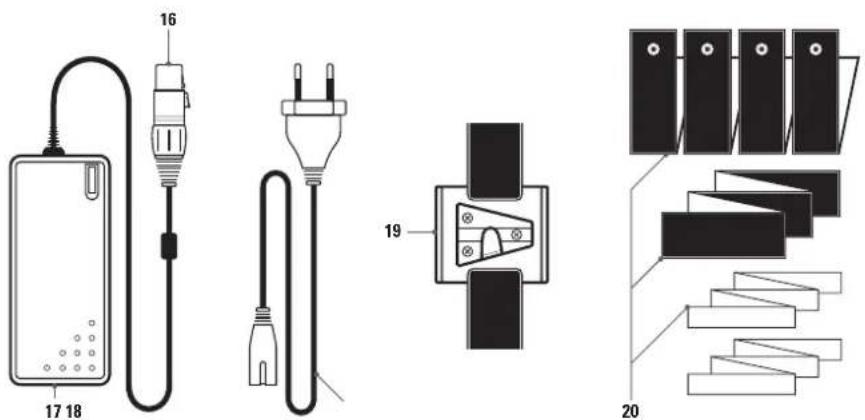
text_image
16 17 18 19 2005 | MONTAGE
Cadre X
natural_image
Diagram of a rectangular device with diagonal X-bracing and a vertical support structure (no text or symbols)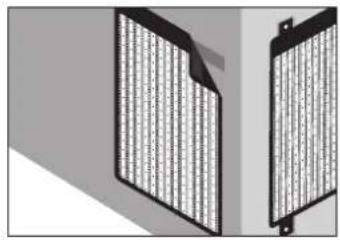
natural_image
Two identical black rectangular panels with vertical grid patterns, placed side by side on a gray background (no text or symbols visible)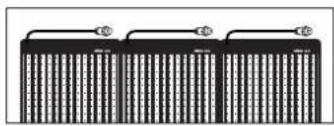
natural_image
Pure electrical circuit lines without any symbols06 | MISE EN SERVICE/UTILISATION
ATTENTION
natural_image
Pure electrical circuit lines without any symbolsnatural_image
Pure electrical connector diagram without any text or symbols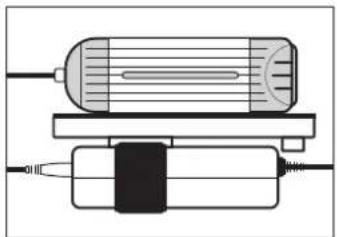
natural_image
Pure diagram of a cylindrical device with internal components and wiring, no text or symbols presentNote
natural_image
Technical illustration of a cylindrical device with internal components and a rectangular housing (no text or symbols)MARQUAGE CONFORMITÉ EUROPÉENNE CE
text_image
Technical diagram of an electrical device with labeled components and wiring connections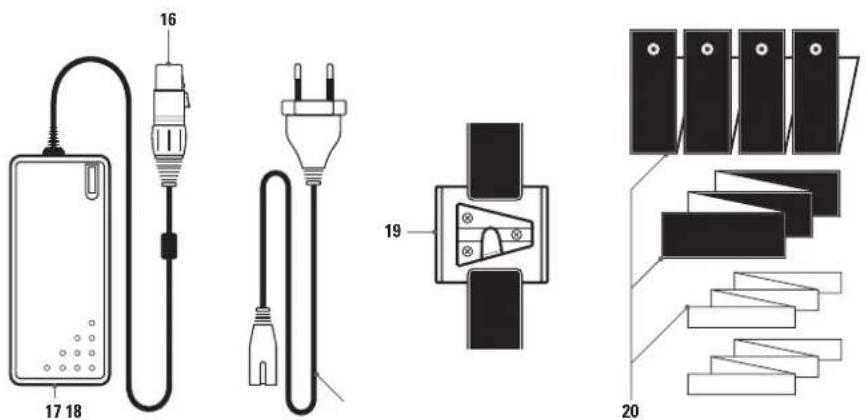
text_image
16 17 18 19 20Marco X
natural_image
Diagram of a rectangular device with diagonal X-bracing and a vertical support structure (no text or symbols)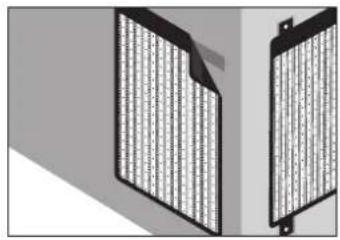
natural_image
Two identical black rectangular panels with vertical grid patterns, placed side by side on a gray background (no text or symbols visible)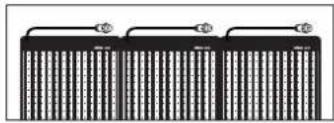
natural_image
Pure electrical circuit lines without any symbolsnatural_image
Pure electrical circuit lines without any symbolsnatural_image
Pure electrical connector diagram without any text or symbols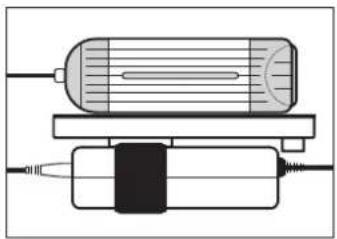
natural_image
Pure diagram of a cylindrical device with internal components and wiring, no text or symbols presentNote
natural_image
Diagram of a cylindrical device with internal channels and a rectangular housing (no text or symbols)text_image
Technical diagram of an electrical device with labeled components and wiring connections
text_image
16 17 18 19 2005 | MONTAGGIO
Cornice X-Frame
natural_image
Diagram of a rectangular device with diagonal X-bracing and a vertical support structure (no text or symbols)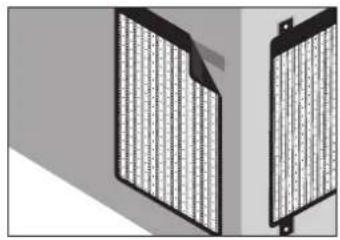
natural_image
Two identical black rectangular panels with vertical grid patterns, placed side by side on a gray background (no text or symbols visible)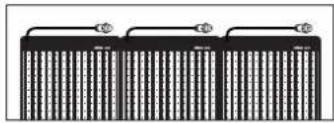
natural_image
Pure electrical circuit lines without any symbols06 | UTILIZZO
ATTENZIONE
natural_image
Pure electrical circuit lines without any symbolsnatural_image
Pure diagram of a cylindrical device with internal components and wiring, no text or symbols presentnatural_image
Technical illustration of a mechanical device with internal components (no text or symbols)natural_image
Diagram of a camera setup with a DÖRR label and mounted sensor (no text or symbols beyond the label)
natural_image
Diagram of a rectangular device with vertical stripes and a star-shaped connection point (no text or symbols)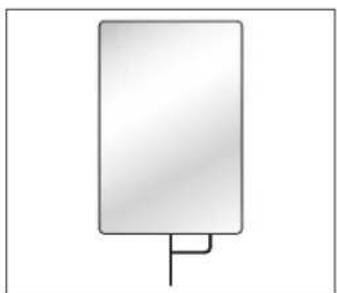
natural_image
Simple diagram of a rectangular object with a vertical line and a small protrusion at the bottom (no text or symbols)12 | SMALTIMENTO, MARCHIO CE, DICHIARAZIONE EU DI CONFORMITÀ
SMALTIMENTO DI BATTERIE/ACCUMULATORI

[Non-Text]
[Non-Text]
[Non-Text]
[Non-Text]
[Non-Text]
[Non-Text]
[Non-Text]
[Non-Text]
[Non-Text]
[Non-Text]
[Non-Text]
[Non-Text]
[Non-Text]
[Non-Text]
[Non-Text]
[Non-Text]
[Non-Text]
[Non-Text]
[Non-Text]
[Non-Text]
[Non-Text]
[Non-Text]
[Non-Text]
[Non-Text]
[Non-Text]
[Non-Text]
[Non-Text]
[Non-Text]
[Non-Text]
[Non-Text]
[Non-Text]
[Non-Text]
[Non-Text]
[Non-Text]
[Non-Text]
[Non-Text]
[Non-Text]
[Non-Text]
[Non-Text]
[Non-Text]
[Non-Text]
[Non-Text]
[Non-Text]
[Non-Text]
[Non-Text]
[Non-Text]
[Non-Text]
The Ground Truth image displays a single, solid horizontal line. According to Rule 2 (UNDERSCORE & LINE RULES), if the GT contains lines used for stylistic emphasis or as background elements (like a ruled line), the OCR result must ignore them. The line in the GT is clearly a stylistic or background line, not a placeholder for text. Therefore, the OCR should not have output any underscores. Outputting `____` constitutes an error under Rule 2, as it hallucinates placeholder symbols where none are semantically intended. Hence, the OCR result is inconsistent with the Ground Truth.
The Ground Truth image displays a single, solid horizontal line. According to Rule 2 (UNDERSCORE & LINE RULES), this is a stylistic or background line, not a placeholder underscore. Therefore, the OCR result must ignore it and output nothing or only meaningful text. The provided OCR content is "____", which consists of four underscores. This is an incorrect interpretation of the line as a placeholder, violating the rule that stylistic lines must be ignored. The OCR has hallucinated underscores where none should exist based on the GT's visual context. Hence, the OCR result is inconsistent with the Ground Truth.
[Non-Text]
DÖRR