
HIM 506 EK.A IX - Oven INDESIT - Free user manual and instructions
Find the device manual for free HIM 506 EK.A IX INDESIT in PDF.
| Product type | Built-in oven with hob |
| Brand | Indesit |
| Model | HIM 506 EK.A IX |
| Dimensions (W x H x D) | 43.5 x 32 x 40 cm |
| Oven volume | 56 L |
| Power supply | 230 V / 400 V 3N ~ 50/60 Hz |
| Maximum absorbed power | 9450 W |
| Cooking programs | Traditional, Multi-cooking, Top heat, Grill, Gratin |
| Hob type | Ceramic glass with radiant burners (traditional or expandable) |
| Number of burners | 4 (depending on version) |
| Oven lighting | Bulb 25 W, E14 base |
| Oven door | Removable for cleaning |
| Cleaning | Manual, do not use steam cleaner |
| Safety | Residual heat indicators (on some models), child lock not specified |
| Repairability index | Not available |
Frequently Asked Questions - HIM 506 EK.A IX INDESIT
User questions about HIM 506 EK.A IX INDESIT
0 question about this device. Answer the ones you know or ask your own.
Ask a new question about this device
Download the instructions for your Oven in PDF format for free! Find your manual HIM 506 EK.A IX - INDESIT and take your electronic device back in hand. On this page are published all the documents necessary for the use of your device. HIM 506 EK.A IX by INDESIT.
USER MANUAL HIM 506 EK.A IX INDESIT
Electrical connections
DEGR
Deutsch, 34 EAnvika, 45
RS
Pycckn,56
Data plate
Description of the appliance, 5
Overall view
Control panel
HIM 50 EK.A
HIM 50 EK.A IX
Start-up and use, 6
Starting the oven
Using the cooking timer
Cooking modes, 7-8
Cooking modes
Practical cooking advice
Cooking advice table
Hob, 9
Type of hob
Switching on the glass ceramic hob
Practical advice on using the glass ceramic hob
Precautions and tips, 10
General safety
Disposal
Respecting and conserving the environment
Maintenance and care, 11
Switching the appliance off
Cleaning the appliance
Cleaning the oven door
Replacing the light bulb
Assistance
GB
Before placing your new appliance into operation please read these operating instructions carefully. They contain important information for safe use, for installation and for care of the appliance.
Please keep these operating instructions for future reference. Pass them on to possible new owners of the appliance.
Positioning
! Keep packaging material out of the reach of children. It can become a choking or suffocation hazard (see Precautions and tips).
The appliance must be installed by a qualified person in compliance with the instructions provided. Incorrect installation may cause harm to persons, animals or may damage property.
Fitting the appliance
Use the appropriate cabinet to ensure that the appliance functions properly.
The panels adjacent to the oven must be made of heat-resistant material.
Cabinets with a veneer exterior must be assembled with glues which can withstand temperatures of up to 100^
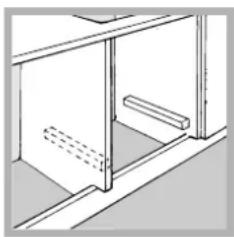
- To install the oven under the counter (see diagram) and in a kitchen unit, the cabinet must have the following dimensions:
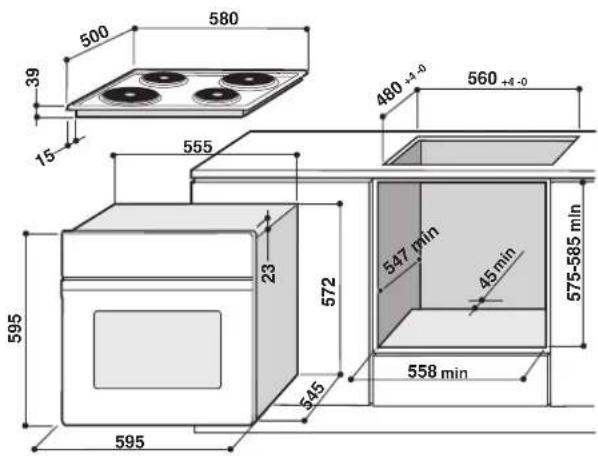
The appliance must not come into contact with electrical parts once it has been installed. The consumption indications on the data plate have been calculated for this type of installation.
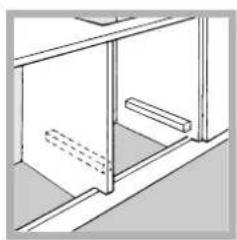
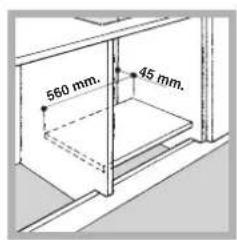
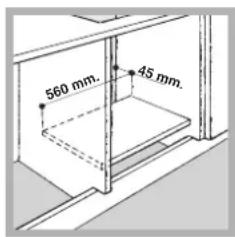
Ventilation
To ensure good ventilation, the back panel of the cabinet must be removed. It is advisable to install the oven so that it rests on two strips of wood, or on a completely flat surface with an opening of at least 45 × 560 mm (see diagrams).
Centring and fastening
Secure the appliance to the cabinet by opening the oven door and putting 4 screws into the 4 holes of the outer frame.
All parts which ensure the safe operation of the appliance must not be removable without the aid of a tool.
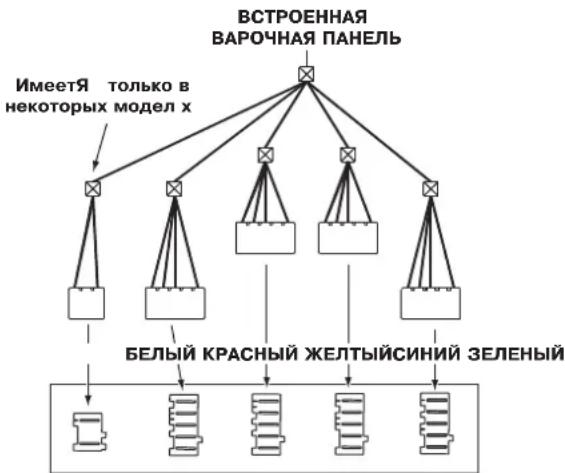
Electrical connections
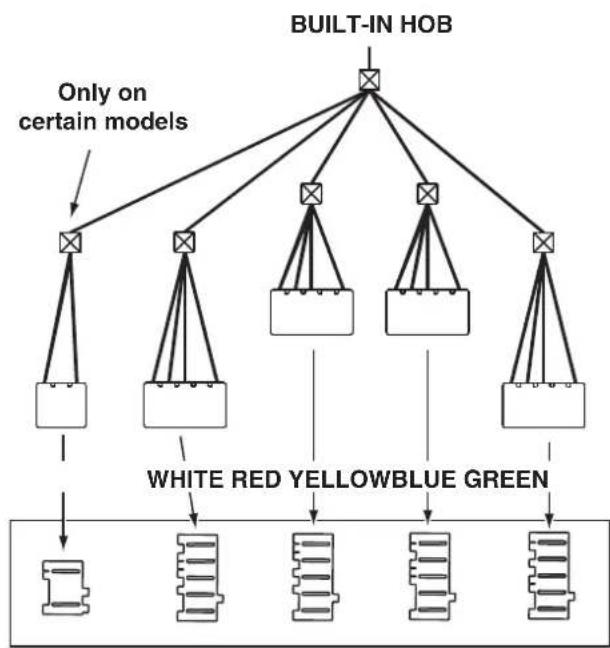
The cooker must be connected to the mains electricity supply. It is designed to operate with alternating current at the voltage and frequency indicated on the data plate (see the following page). The hob is connected to the cooker using a special connector.
BUILT-IN COOKER
Replace the metal protection after performing all the necessary hob connections. If the hob is removed from its position, the red cap which was originally protecting the red connector must be replaced.
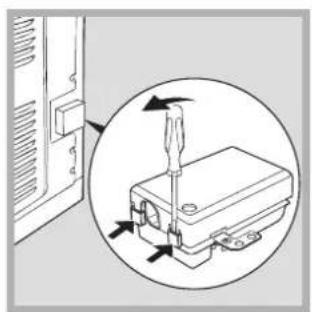
Fitting the power supply cable
-
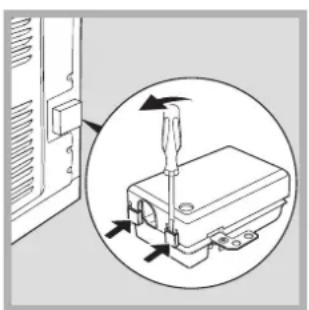
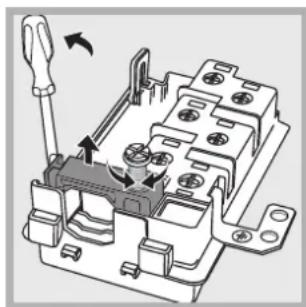
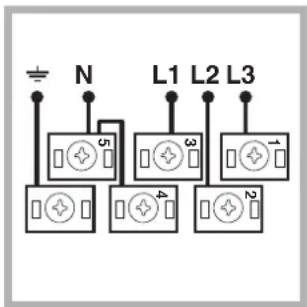
Open the terminal board by inserting a screwdriver into the side tabs of the cover. Use the screwdriver as a lever by pushing it down to open the cover (see diagram).
-
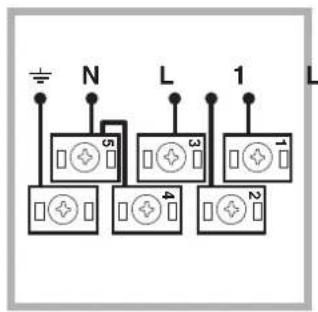
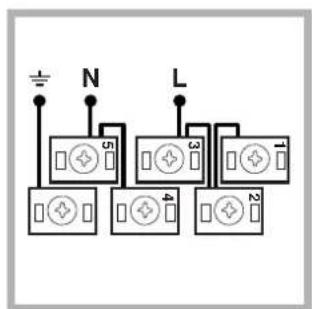
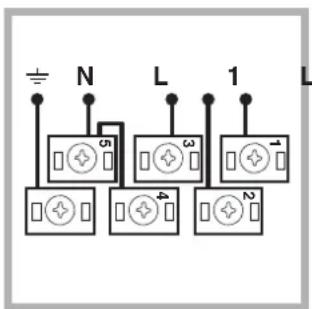
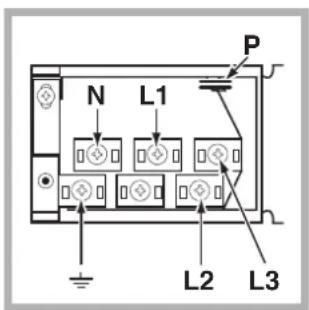
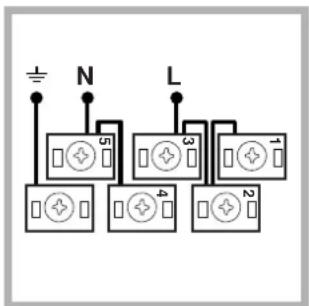
Install the power supply cable by loosening the cable clamp screw and the wire contact screws L-N- 1± . Connect the wires to the corresponding terminals: the Blue wire to the terminal marked (N), the Brown wire to the terminal marked (L) and the Yellow Green wire to the terminal marked 1±
The terminal board is designed for a 400V three-phase connection (see diagrams below).
400V 3N~H05RR-F
5x2.5 CEI-UNEL 35363
3 L 2
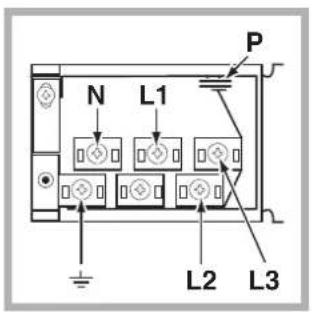
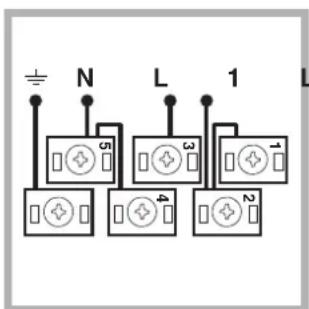
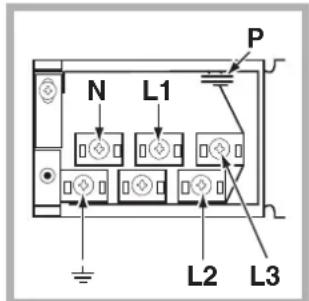
If the electrical system has other characteristics (see diagrams below), carry out the electrical connection using the connection supports provided in the box P.
230V ~H05RR-F 3x4 CEI-UNEL 35363
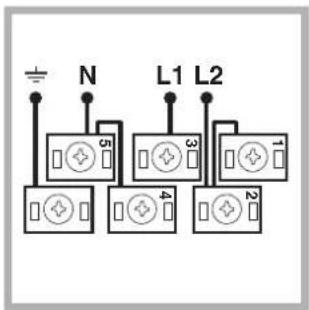
400V 2N~H05RR-F 4x4 CEI-UNEL 35363
- Secure the power supply cable by fastening the clamp screw.
- Close the cover of the terminal board.
Connecting the supply cable to the mains
Install a standardised plug corresponding to the load indicated on the data plate (see side).
The appliance must be directly connected to the mains using an omnipolar circuit-breaker with a minimum contact opening of 3mm installed between the appliance and the mains, suitable for the load indicated and complying with current electrical regulations (the earthing wire must not be interrupted by the circuit-breaker). The supply cable must not come into contact with surfaces with temperatures higher than 50^ .
The installer must ensure that the correct electrical connection has been made and that it is compliant with safety regulations.
Before connecting to the power supply, make sure that:
The appliance is earthed and the plug is compliant with the law.
- The socket can withstand the maximum power of the appliance, which is indicated on the data plate (see below).
The voltage must be in the range between the values indicated on the data plate (see below).
- The socket is compatible with the plug of the appliance. If the socket is incompatible with the plug, ask an authorised technician to replace it. Do not use extension cords or multiple sockets.
! Once the appliance has been installed, the power supply cable and the electrical socket must be easily accessible.
The cable must not be bent or compressed.
The cable must be checked regularly and replaced by authorised technicians only (see Assistance).
! The manufacturer declines any liability should these safety measures not be observed.
| DATA PLATE | |
| Dimensions | width 43.5 cm height 32 cm depth 40 cm |
| Volume It. 56 | |
| Electrical connections | voltage: 230V/400V~ 3N 50/60Hz maximum power absorbed 9450W |
| ENERGY LABEL | Directive 2002/40/EC on the label of electric ovens. Standard EN 50304 Energy consumption for Forced convection heating mode: Multi-cooking Declared energy consumption for Natural convection Class heating mode: Convection |
| CE | This appliance conforms to the following European Economic Community directives: - 2006/95/EEC of 12/12/06 (Low Voltage) and subsequent amendments; - 2004/108/EEC of 15/12/04 (Electromagnetic Compatibility) and subsequent amendments; - 93/68/EEC of 22/07/93 and subsequent amendments. - 2002/96/EC and subsequent amendments. |
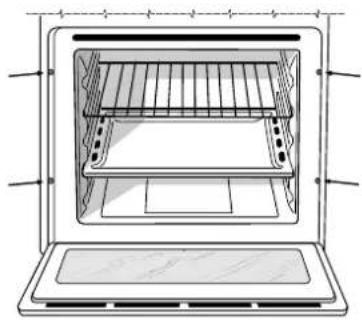
Overall view
Control panel
GB
! The first time you use your appliance, heat the empty oven with its door closed at its maximum temperature for at least half an hour. Ensure that the room is well ventilated before switching the oven off and opening the oven door. The appliance may produce a slightly unpleasant odour caused by the burning away of protective substances used during the manufacturing process.
Starting the oven
- Select the desired cooking mode by turning the SELECTOR knob.
- Select the desired temperature with the THERMOSTAT knob. See the Cooking advice table for cooking modes and the suggested cooking temperatures (see Cooking Modes).
- When preheating is finished, the THERMOSTAT indicator light will stay on: place the food in the oven.
- You may do the following during cooking:
- change the cooking mode by turning the SELECTOR knob.
- change the temperature by turning the THERMOSTAT knob.
- stop cooking by turning the SELECTOR knob to the "0" position.
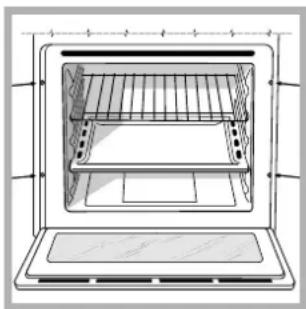
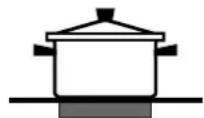
! Never put objects directly on the oven bottom to avoid damaging the enamel coating.
! Always place cookware on the rack(s) provided.
Cooling ventilation
In order to cool down the external temperature of the oven, some models are fitted with a cooling fan that blows out air between the control panel and the oven door.
Once the cooking has been completed, the cooling fan remains on until the oven has cooled down sufficiently.
Oven light
It goes on when selecting with the SELECTOR knob. It stays on when a cooking mode is selected.
Cooking modes
! A temperature value can be set for all cooking modes between 60^ and Max, except for
- GRILL (recommended: set only to MAX power level);
- GRATIN (recommended: do not exceed 200^ ).

CONVECTION OVEN mode
Both the top and bottom heating elements will come on. With this traditional cooking mode, it is best to use one cooking rack only; if more than one rack is used, the heat will be distributed unevenly.

MULTI-COOKING mode
All the heating elements (top and bottom), as well as the fan, will come on. Since the heat remains constant throughout the oven, the air cooks and browns food uniformly. A maximum of two racks may be used at the same time.

TOP OVEN mode
The top heating element comes on. This mode can be used to brown food at the end of cooking.

GRILL mode
The top heating element comes on. The extremely high and direct temperature of the grill makes it possible to brown the surface of meats and roasts while locking in the juices to keep them tender. The grill is also highly recommended for dishes that require a high temperature on the surface: such as beef steaks, veal, rib steak, filets, hamburgers etc... Some grilling examples are included in the "Practical Cooking Advice" paragraph. Always cook in this mode with the oven door closed.

GRATIN mode
The top heating element, as well as the fan, will come on. This combination of features increases the effectiveness of the unidirectional thermal radiation of the heating elements through forced circulation of the air throughout the oven. This helps prevent food from burning on the surface, allowing the heat to penetrate right into the food. Always cook in this mode with the oven door closed.
Practical cooking advice
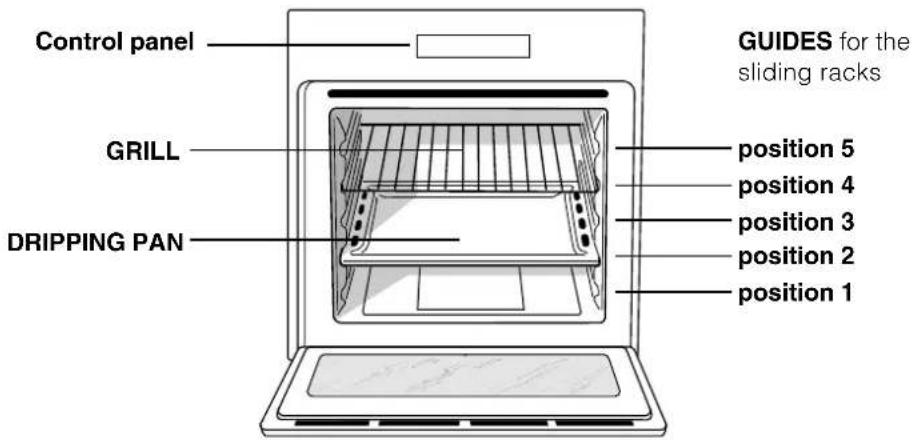
! Do not place racks in position 1 and 5 during fan-assisted cooking. Excessive direct heat can burn temperature sensitive foods.
! In the GRILL and GRATIN cooking modes, place the dripping pan in position 1 to collect cooking residues (fat and/or grease).
MULTI-COOKING
- Use position 2 and 4, placing the food that requires more heat on 2.
- Place the dripping pan on the bottom and the rack on top.
GRILL
- Insert the rack in position 3 or 4. Place the food in the centre of the rack.
- We recommend that you set the maximum power level. The top heating element is regulated by a thermostat and may not always be on.
PIZZA
- For best results when cooking pizza, use the MULTI-COOKING mode.
- Use a light aluminium pizza pan. Place it on the rack provided. For a crispy crust, do not use the dripping pan (prevents crust from forming by extending cooking time).
- If the pizza has a lot of toppings, we recommend adding the mozzarella cheese on top of the pizza halfway through the cooking process.
Cooking advice table
| Cooking modes | Foods | Weight (in kg) | Rack position | Pre-heating time (min) | Recommended temperature | Cooking time (minutes) |
| Convection Oven | Duck | 1 | 3 | 15 | 200 | 65-75 |
| Roast veal or beef | 1 | 3 | 15 | 200 | 70-75 | |
| Pork roast | 1 | 3 | 15 | 200 | 70-80 | |
| Biscuits (short pastry) | - | 3 | 15 | 180 | 15-20 | |
| Tarts | 1 | 3 | 15 | 180 | 30-35 | |
| Multi-cooking | Pizza (on 2 racks) | 1 | 2 and 4 | 15 | 230 | 15-20 |
| Lasagne | 1 | 3 | 10 | 180 | 30-35 | |
| Lamb | 1 | 2 | 10 | 180 | 40-45 | |
| Roast chicken + potatoes | 1+1 | 2 and 4 | 15 | 200 | 60-70 | |
| Mackerel | 1 | 2 | 10 | 180 | 30-35 | |
| Plum cake | 1 | 2 | 10 | 170 | 40-50 | |
| Cream puffs (on 2 racks) | 0.5 | 2 and 4 | 10 | 190 | 20-25 | |
| Biscuits (on 2 racks) | 0.5 | 2 and 4 | 10 | 180 | 10-15 | |
| Sponge cake (on 1 rack) | 0.5 | 2 | 10 | 170 | 15-20 | |
| Sponge cake (on 2 racks) | 1 | 2 and 4 | 10 | 170 | 20-25 | |
| Savoury pies | 1.5 | 3 | 15 | 200 | 25-30 | |
| Top oven | Browning food to perfect cooking | 3/4 15 220 - | ||||
| Grill | Soles and cuttlefish | 1 | 4 | 5 | Max | 8-10 |
| Squid and prawn kebabs | 1 | 4 | 5 | Max | 6-8 | |
| Cod filet | 1 | 4 | 5 | Max | 10 | |
| Grilled vegetables | 1 | 3 or 4 | 5 | Max | 10-15 | |
| Veal steak | 1 | 4 | 5 | Max | 15-20 | |
| Cutlets | 1 | 4 | 5 | Max | 15-20 | |
| Hamburgers | 1 | 4 | 5 | Max | 7-10 | |
| Mackerels | 1 | 4 | 5 | Max | 15-20 | |
| Toasts | 4 | 4 | 5 | Max | 2-3 | |
| Gratin | Grilled chicken | 1.5 | 2 | 5 | 200 | 55-60 |
| Cuttlefish | 1.5 | 2 | 5 | 200 | 30-35 | |
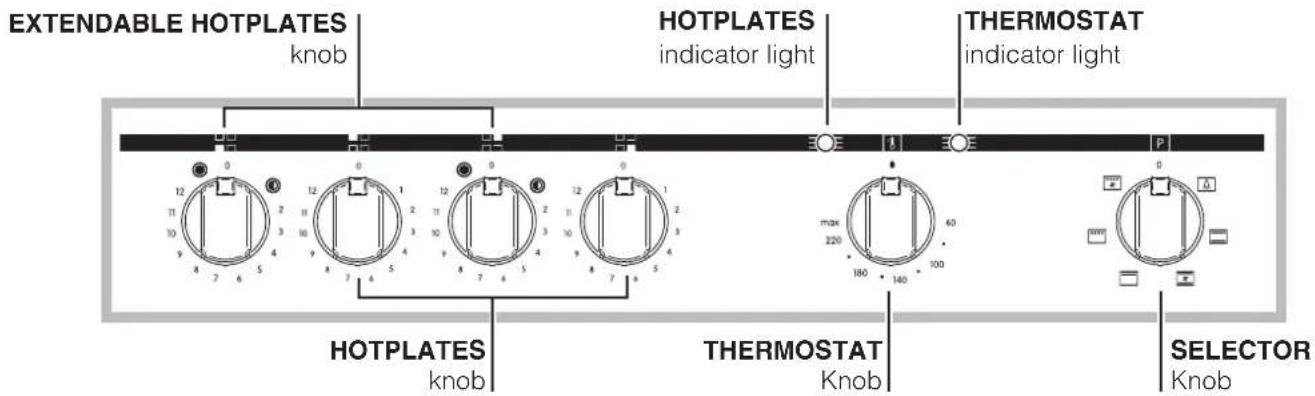
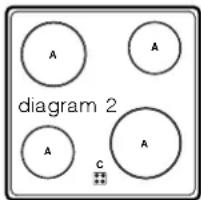
Type of hob
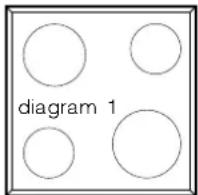
The oven is combined with a hob that can be made up of two types of heating elements: cast-iron electric plates (see diagram 1) or glass ceramic hobs, which may be traditional (see diagram 2) or with extendable cooking zones (see diagram 3).
Switching on the glass ceramic hob
Traditional cooking zones
Traditional cooking zones are made up of circular heating elements. They turn red approximately ten seconds after they have been turned on.
Each cooking zone is fitted with a control knob allowing you to select from 12 different temperature settings from a minimum of 1 to a maximum of 12.
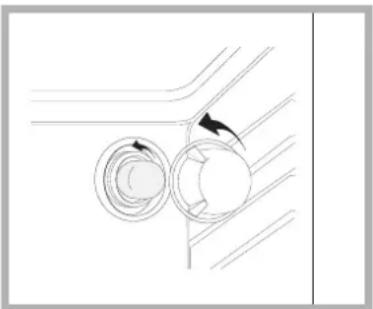
Extendable cooking zones
The extendable radiant elements (B) are recognisable by the fact that they have a double heating zone. You can turn on only the smaller internal cooking zone or both the external and internal zones.
The control knob allows you to choose between two power levels, which are both adjustable between a minimum value of 1 to a maximum of 12:
The lowest power level can be set by turning the knob clockwise from 1 to 12.
- Turn the knob to completely (●) until you hear a slight click, to enable the maximum power level, which in turn can be adjusted between 12 and 1 by turning the knob anticlockwise. To restore the minimum power level, turn the knob and set it back to position 0.
For double cooking zones, the first part of the knob movement activates the smaller cooking zone (internal). To activate both (internal and external), it is necessary to turn the knob completely () and then select the desired power level between 12 and 1.
Residual heat indicator lights (only available on certain models)
The indicator lights (C) indicate that the temperature of the corresponding cooking zones have exceeded 60^ , even after the heating element has been switched off.
Recommended power levels for various types of cooking:
| Set. | Radiant Burner |
| 0 | Off |
| 1 | To melt butter and chocolate. |
| 2 | To heat liquids. |
| 3 | |
| 4 | For creams and sauces. |
| 5 | |
| 6 | For cooking at the boiling point. |
| 7 | |
| 8 | For roasts. |
| 9 | |
| 10 | For boiling large pieces of meat. |
| 11 | |
| 12 | For frying. |
| ◎ | For utilising both cooking areas. |
Practical advice on using the glass ceramic hob
! The glue that is applied on the gaskets leaves some traces of grease on the glass. Before using the appliance, we recommend you eliminate these with a special non-abrasive cleaning product. During the first few hours of use there may be a smell of rubber which will disappear very quickly.
To obtain the best results with your hobs:
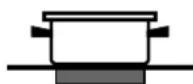
- Use flat-bottomed pans to ensure that they adhere to the cooking zone perfectly.
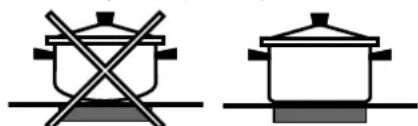
Always use pans with a diameter that is large enough to cover the hotplate fully, in order to use all the available heat.
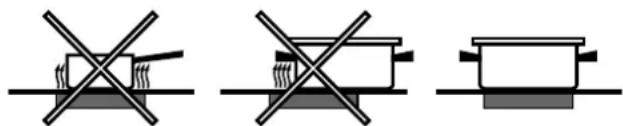
- Make sure that the bottom of the cookware is always dry and clean to guarantee correct adherence and long life, not only for the cooking zones but also for the cookware itself.
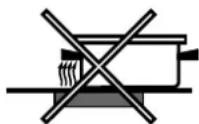
- Avoid using the same cookware that is used on gas burners: the heat concentration on gas burners may deform the base of the pan, causing it not to adhere correctly.
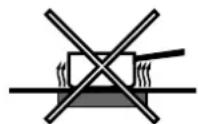
- Never leave a cooking zone on without cookware on it because as it heats up and rapidly reaches the maximum level, it could damage the heating elements.
GB
The appliance was designed and manufactured in compliance with international safety standards. The following warnings are provided for safety reasons and must be read carefully.
General safety
The appliance was designed for domestic use inside the home and is not intended for commercial or industrial use.
- The appliance must not be installed outdoors, even in covered areas. It is extremely dangerous to leave the appliance exposed to rain and storms.
- When handling the appliance, always use the handles provided on the sides of the oven.
- Do not touch the appliance with bare feet or with wet or moist hands and feet.
- The appliance must be used by adults only for the preparation of food, in accordance with the instructions outlined in this booklet. Any other use of the appliance (e.g. for heating the room) constitutes improper use and is dangerous. The manufacturer may not be held liable for any damage resulting from improper, incorrect and unreasonable use of the appliance.
- When the appliance is in use, the heating elements and some parts of the oven door become extremely hot. Make sure you don't touch them and keep children well away.
- Ensure that the power supply cable of other electrical appliances does not come into contact with the hot parts of the oven.
- The openings used for ventilation and dispersion of heat must never be covered.
Always grip the oven door handle in the centre: the ends may be hot.
Always use oven gloves to place cookware in the oven or when removing it.
- Do not use aluminium foil to line the bottom of the oven.
- Do not place flammable materials in the oven: if the appliance is switched on by mistake, it could catch fire.
Always make sure the knobs are in the "●"/"○" position when the appliance is not in use.
- When unplugging the appliance always pull the plug from the mains socket, do not pull on the cable.
- Never carry out any cleaning or maintenance work without having unplugged the plug from the mains.
- In the case of a malfunction, under no circumstances should you attempt to repair the appliance yourself. Repairs carried out by inexperienced persons may cause injury or further malfunctioning of the appliance. Contact a Service Centre (see Assistance).
- Do not rest heavy objects on the open oven door.
- The glass ceramic hob is resistant to mechanical shocks, but it may crack (or even break) if hit with a sharp object such as a tool. If this happens, disconnect the appliance from the electricity mains immediately and contact a Service Centre.
- Remember that the temperature of the cooking zones remains relatively high for at least thirty minutes after they have been switched off.
- Keep any object that could melt away from the hob, for example plastic and aluminium objects, or products with a high sugar content. Keep plastic or aluminium objects away from the hob: if you forget them on surfaces that are still hot, they may cause serious damage to the hob.
- The appliance should not be operated by people (including children) with reduced physical, sensory or mental capacities, by inexperienced individuals or by anyone who is not familiar with the product. These individuals should, at the very least, be supervised by someone who assumes responsibility for their safety or receive preliminary instructions relating to the operation of the appliance.
- Do not let children play with the appliance.
Disposal
- Observe local environmental standards when disposing packaging material for recycling purposes. Observe existing legislation when disposing of the old appliance.
The European Directive 2002/96/EC on Waste Electrical and Electronic Equipment (WEEE), requires that old household electrical appliances must not be disposed of in the normal unsorted municipal waste stream. Old appliances must be collected separately in order to optimise the recovery and recycling of the materials they contain and reduce the impact on human health and the environment. The crossed out "wheeled bin" symbol on the product reminds you of your obligation, that when you dispose of the appliance it must be separately collected.
Consumers should contact their local authority or retailer for information concerning the correct disposal of their old appliance.
Respecting and conserving the environment
- By using the appliance in the hours between late afternoon and early morning, you can help reduce the work load placed on electrical companies.
Always keep the oven door closed when using the GRILL mode to attain best results and to save energy (approximately 10% ). - Regularly check the door seals and wipe clean to ensure they are free of debris so that they stick properly to the door and do not allow heat to disperse.
Switching the appliance off
Disconnect your appliance from the electricity supply before carrying out any work on it.
Cleaning the appliance
- The stainless-steel or enamel-coated external parts as well as the rubber seals may be cleaned using a sponge that has been soaked in lukewarm water and neutral soap. If these stains are difficult to remove, use only specialised products. After cleaning, rinse and dry thoroughly. Do not use abrasive powders or corrosive substances.
- Ideally, the inside of the oven should be cleaned after each use, when it is still lukewarm. Use hot water and detergent, rinse and dry with a soft cloth. Do not use abrasive products.
- The accessories can be washed like everyday crockery (even in your dishwasher).
! Never use steam cleaners or pressure cleaners on the appliance.
Cleaning the oven door
Clean the glass part of the oven door using a sponge and a non-abrasive cleaning product, then dry thoroughly with a soft cloth. Do not use rough abrasive material or sharp metal scrapers as these could scratch the surface and cause the glass to crack. To clean more thoroughly, you can remove the oven door.
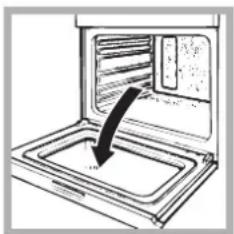
- Open the oven door fully (see diagram).
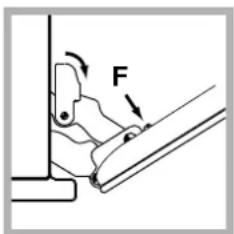
- lift up and turn the small levers situated on the two hinges; (see diagram).
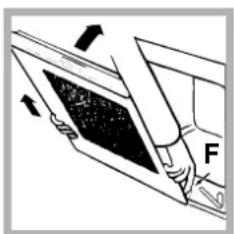
- Grip the door on the two external sides and close it approximately half way. Unlock the door by pressing on the clamps F, then pull the door towards you lifting it out of its seat (see diagram).
To replace the door, reverse this sequence.
Inspecting the seals
Check the door seals around the oven periodically. If the seals are damaged, please contact your nearest After-sales Service Centre (see Assistance). We recommend not using the oven until the seals have been replaced.
Replacing the light bulb
To replace the oven light bulb:
- Remove the glass cover of the lamp-holder.
- Remove the light bulb and replace it with a similar one: Wattage 25 W, cap E 14.
- Replace the glass cover (see diagram).
Assistance
Communicating:
- appliance model (Mod.)
- serial number (S/N)
This information is found on the data plate located on the appliance and/or on the packaging.
Sommaire


Installation, 13-15
Positionnement

EI OEEI AAI OEET I AI C
ETIaVATOTIOEHTNE TIV ETAALIK NPOOtaOia ETeTn OuvdoN TOI LAIOU. ZEPiTTWAn aPaipeoNc TOUT LAIOIou 0a PENTI VA EaVaBalaTE TO KOKKIO TOWa OTNV apxN PAwA ANTOV KOKKIO SuVdo.
EuupaOIoynoN kaIomega tropoosia
1.AvoIeToKouti
akpoEKTow
xpnoIooTovTacw
moXoEvaKaTaoboiTIC
TTAEupikeyawositoec
tou KATTAKIO: TpaBntTe
kai avoiTcTo KaTTAKI
(βAETE EIKOVA).
- XpnoioToinTo Kaawio TpoopooiaC:
EbiowTe Tn Bida aopaiionc Kaawoiou KAI TIC BiEc
twv Etnaipwv L-N- kai katottniv OTEPEWOTe ta
kawbia Katw anto TIC KEpaAEC Twv Biowv ME baoT a
XpomegaMaNtAE (N) Kae (L) KITpivo-npaoivo (1)
To kouti akpoδekTuV TPOOΦεpTaI yia ouvδeσ Ε 400 V TpiapoiKa (βλεπε EIKOVες πapakatw).
400V 3N~H05RR-F
5x2.5 CEI-UNEL 35363
3 L 2
Av n nAekptpiK nykataaon avtiotoiEi e aaaa
Xapakntpiotika (BETTE EIKOvec TnapaKATW),
dievepynote Tnv nAekptpiK ouvdeon xpooiotoiwvtac
TIC atoanxiocuvdeonnc Tou Biikovtau eo a oto kouti P.
230V 1N-H07RN-F 3x4 CEI-UNEL 35364
400V2N\~H05RR-F 4x2.5 CEI-UNEL35363
PporpaMMbl npnroTOBneHn
PpakTuueckne coBeTbI no npuroToBneHIO
Ta6JIuIa npriToOBJIeHn
HIM 50 EK.A
HIM 50 EK.A IX
Bapouhna nahanb, 64
MoJeN BapOuHoi nAHeN
BkIIOUeHne cTeKIOKepaMuecko BapOuHoPiHaJIe
IpaKaTnueckne peKoMeHdaaunn no IcNoJIb3OBAHIO
CTeKJIoKepaMnueeckO BapOuHOn NaHeJI
IpeoctopoxKHOCTn pekomeHdaun, 65
Obune Tpe6oBaHnK 6e3oNaChocTn
YTNIN3aUN
3koHOMma 3neKtpo3Heprn n oxpana okpykaioe
cpebl
Texnueckoe o6cnyxnbAHne uyo, 66
OTKIIIOUeHHe 3NEKTPoNTaHn
UncTa n3dennr
UncTkA DBepu
3aMeHa JAmNoUKN
CepBnchoe 06cnykubahne
!BaxHo coxpaHnTb daHHee pykoBDCTBO dIra erO nocJeDyUoNIX KOHCyNbTauN. B cIyuae npOdaXn, nepeDaun 3dEInna IIN npn peee3de Ha HOBoe MeTo XnTeJbCTBa Heo6xoDmO IpOBepNTb, yTO6bl pyKOBOCTBO OCTaBAIOCB BMeCTe C u3dEnneM, Jnro TOrO yTO6bl erO HOBBI BNaDeeneM OR O3HaKOMNTbcrC npaBnAm NkCNpyaTaUN IN COOTBeTCTBYUUMn npedynpeXkDeHNAMN.
!BnMaTeIbHo npOuNTaIe HNCTpyKUIM: B HIX coepkataBaxHbIe CbeEHHra 6yctaHOBe, 3KcPnyataUN 6e3oNaCHOCTUN3dJIIN.
PacnoJoxeHne
!He pa3pewaIte DeTm INpaTb C yNakOBOHyBIMMaTePnaIaMn. YNakOBOChbIe MaTePnaIbI DOJXHbI6bITb YNHHToKeHbIB COOTBeTCTBUN C npabuIaMpa3deJIbHorO c6opa Mycopa (cm. IpeodcmopoxHoCmu peKOMeHdaauu).
!YcTaHOBKa n3dJIy npOn3BODnTcB COOTBeTCTBn C DaHHbIMN HhCTpyKUmaN KBAJINΦuIpOBAHHbIMN cNeuaNaNCtAm. HenpaBUNbHa yCTaHOBA n3dJIy MoKeT cTaTb npUnHoN NOBpeKDeHna NMyueCTBa n pUnHHTb yuep6 IIOJMa N DOMaWHIM KJNBOThbIM.
BCTpoehHbIMoHTax
IЯ obecneueHnIcnpaBHorO yHKUHOHPOBaHnI 3JeJNRAKxOHbI 3JIeMeHT DOJIKeH NMeTb COOTBeTCTByIOUne xapakTePncTNI:
NaHEn KkyoONbIX 3nemeHTOB, pnpneraIOxNX K dYXOBOMy Wkafo, DOnJXhbl 6bITb BbINOJIHeHbI N3 TepMOCTOIKORo MaTePnana.
KJne KxyOHbIX 3JeMeHToB 3JeMeHToB N3
phaHepoBaHHoro DepeBa DOJKeH 6bITb yCTOuHBbIM
K TemnepaType 100^
-ДЯ BCTpbanBaHnIyXOBOrO WkaPAnoD KxOHbIM TOnOM (CM. pucyHOK) IINB KOLOHHY HmHa KxOHHO 3JIeMeHTa DonKHa NMeTb CNe dyUOupe pa3Mepbl:

!Iocne BCTpanBaHnB3deJnB KkyoHHbI 3JeMeHTdoJNkHa6bITb NCKJIooHeBA BO3MOXHOCTb KaCaHnK3JIeKTPuYeCKMn YacTmN.PacxOJD3NeKTPo3Heprnn, yKa3aHHbHa nacnpTHoTabNIyKe I3deJnB,6bl 3aMepeHdJaDHOrTO TnA MoHTaKa.
BeHTnJIaIur
IЯ obecneueHnHaJnxKaUe BeHTnuaHn HeoXoUMO CHrTb 3aHIOU NaHeJIb HmN KxOHHoro 3nemeHTa. PekomeHdyTeYcTaHOBtB DyXOBOn WkaΦ Ha DBa DepeBraHbIX 6pycka NnHa CnNouHoe OCHOBaHne C OTBepCTnem DnaMeTpOM He MeHee 45 x 560 MM (CM YepmeKu).
UeHTpoBka KpennneHne
IpnKpeHnNnNnNnK KxyOHHomy 3JemeHTy: OKnpoTe DBypUdyDxOBOrO uKaPnN3aBnHTnre 4 Wypna Inn DepeBnHbix NaHeJe B 4 OTBepCTnB pame.
!Bce3aunThbIe 3nemEnTbI dONKHbI 6bITb 3akpenneHbI TAKIM 06pa3OM, yTO6bI INX MOKHO 6BJNO CHrTb TOJbKO npn NMOUIN CNEuNAhBOHor HNCTpyMeHTa.
3Jektpnueckoe noCoeHHeHne
3NeKtpnueckoe noCoeHHeHne n3dEINBAIIOHNHEbC KxOHHo PnTOn, paCHTaHHo Ha nepemHHbTOK, c HAprrKeHNEM uacToToN, yKa3aHHbIMHa nacnopTHo TabNIuYe (cM. cNoyUycmpaHcy).BapouHnaHb coeHNrTeCn C KxOHHO nnTO npn NoMOUs CneuaHbHoro pa3beMa.
BCTPOEHbI DxyOBOU KkAΦ
YcTaHOBInTe Ha MeCTo 3aUnTHyIO MeTaNJIuYeCKyIO
3aRnlyKyu NocNe 3neKtpnueckoro NpOKNIOUeHnRA
BapOHyo NaHEn. B Cnyae DEMoHTaxa BapOHyo
NaHei Neo6xOdmo yCtAHOBuTB Ha CBOe MeCTo
KpaChyIO 3aRnlyKyu Ha KpacbI pa3bEm.
IopcoeHHeHne ceTeBOro Hhypa

1. OTkpoIe 3axmHyo Kopo6Ky, HaxaB npn NOMOuN OTBePKn Ha BbICTyNb C 60KOB KpbIuKN: NotAHnte N OTkpoIe KpbIuKy (CM. pucyHOK).
2. OTBnHTnte BnHT KaBeJbHOrO caJbHnKa M BbIHbTe erO, NOdEe OBtBeTko (CM. cxemy).
3.OTBHTNTe BHTbI KOHTaKTOB L-N- n 3aTeM npHKpeNtTe npoBOda nOIOBKAIMn BHTOB, CO6JIIOdaA qBeTOByo MapKnPOBky CnHn (N) KopuHeBbI (L) XKeJTo- 3eJeHbI (1一)
3aKHMHa Kopo6ka pacuHTaHa Ha TpexFa3Hoe 3JIeKTpOuNTaHne 400 B (cM. pucyHKu Hxke).
400B 3N~H05RR-F
5x2.5 CEI-UNEL 35363
Ecnn 3neKtpoPobOka nMeet dpyrne
XapakTepncTNI (cm. pucyHKu Hxke), dnnr
3neKtpnueckoro noCoeDnHEnr uCnoJb3ynte
coeDnHTeJIbHbIe nepembluKn, paCNoJIOKeHHbIe
BHyTpN Kopo6Kn P.

230B 1N-H07RN-F 3x4 CEI-UNEL 35364
400B 2N~H05RR-F
4x2.5 CEI-UNEL 35363
- 3aKpeHnTe ceTeBoi uHyp B cNeuHaIbHOM Ka6eJIbHOM caJIbHnKe.
- 3akpoTe KpbIuKy 3axmHOn Kopo6Kn.
IopcoeHHeHne ceTeBOro uHypa K cetn 3JeKTPoNtAHn
YcTaHOBnTe Ha CeTeBoi ShHyp HopMaIIN3OBAHHyIO
WTeNceBHyIO BnIKy, paCHTaHHyIO Ha HArpy3Ky,
yKa3aHHyIO Ha NacnOpTHoT TaBnUe (cm. C60ky).
B Cnyuae npAIMO NOkKnIOueHn K Cetn 3IeKTPoNTAHn
MeKdy KyxOHHO ITnToH n CeTbIO Heo6XODmO YCTaHOBtB
MyTbTIIOJrPHbIM BbIKIOHaTeNb C MmHMmaHBIM
pacSTOrHnEM MeKdy KOHTAKTam3 MM, paCHTaHHbIHn
DaHHyIO HArpy3Ky I COOTBeTCTByIOUm I DeIcTBYIOUIM
HOPMaTbAM (BbIKIOHaTeJIb He DOJKeH pa3MbikTa TpOBOD
3a3EmHeHn). CeTeBOI WnHyp DoJKeH 6bITb PaCNOIOKeTakIM
O6pa3OM, YTObI Hi B ODHOn ToH Ke erO TempePaTyPe He
IpeBBIIaIa TempePAtPy IomeUeHn BoJe eem Ha 50^
13neKtpoMoHTep Hecet OTBeTCTBHeHocTb 3a npabnIbHOe NOkNoUeHne N3DeNn K 3neKtpuuecko ceTu n 3a co6JIIOHeHne npabUN 6e3OnacHocTn.
PpeD noDCoeDHHHeHem cTeBOrO uHypa npOBepbTe CneDuouee:
- p03eTka DOnJXHa 6bItb CoeINHeHc 3a3eMJIeHNEm COOTBETCTBOBaTb HOpMaTHBAM;
- ceTeBa p03eTka DOnJXHa 6bItb paccuTaHa Ha MaKcImaJIbHyIO NOTpe6JIraemyIO MOUHocTb N3deJIINy, Yka3aHHyHO H naCnOpTHoT aBmNue (CM. HuKe);
HapjKeHcETn 3JekTpOnNTAHn DOJXHO HaxoHTbcB NpeJeNaX 3HaueHn, yKa3aHHbIX Ha nacnopTHo TaJIuYKe (CM. HuXe); - ceTeBa p03eTKa DOJXHa 6bIb cOBMeCTMa co WTeNcEhBn BUNKo N3JeNIA. B npOTNBom Cnyae 3aMeHnTe po3eTKy INN BUNKy; He NCNoJIb3yIte yDINHnTEJIN INI TPOHNK.
!N3dJIeNnEdoJNKHO6bIbYcTaHOBNeHo TaKIMo6pa3OM,
YTO6bI 3NEKTPnueckn npoBOn n ceTeBa po3eTka 6blIn JIeIKO DoCTyHbI.
13neKtpnuecknn npoBn n3dennn He doJKeH 6bItb coHrT nn Ckata.
!PeryIpaHIO npOBepaIte coCToAHne ceTeBOrO shypa nB cnyae Heo6xoDMOCtN NOpyHTe ero 3aMeHy TOJbKO yNoJIHOMOueHHbIM TexHnKam (cM. TexHuYeCKoe o6cnykuaHue).
!Pon3BOUnteH He Hecet OTBeTcTBeHHocTn 3a nocIeCTBna HecO6JIIODeHnpepeHCNeHHbIX Tpe6oBaHn.
3aropaeTc npn BbIbope npn NOMOu npyKoRTKn PPOrPAMMbI. Octaetc BKIOUeHNo npn BbIbope nporpaMMbl npuroTOBHeHn.
PpOrpaMmbI nprirotOBJIeHnA
!IINBcex nporpaMM MoXHO 3aDaTb TemnepaTy pO 60^ do MAKC Kpome:
- ΓΡΙЛь (pekOMeHnyeTcY yCTaHaBJIbBaTb TɔJIbKO MAKC. TemnepaTypy);
- NOДРУМЯНВАHNE (pekOMeHnyetcH He npEbIwaTb TemnepaTpy 200°C).

Поррамma TPAДИЦИОHAьНАДУХOBKA
BKnHouaOTc Da HArpeBaTeIbHbIX 3JeMeHTa: HnKHN u BepxHNI. B peXnme TpaDnUHOHaNbHOrO npriTOBHeHnpeKoMeHdyetc NcNoJb3OBaTb TOJbKO OINu yPoBeHb: pN nCNoJIb3OBaHn HecKoJIbKnx yPoBHeP pacnPedeJeHne TeMnpaTypbl 6yET HeONITMaJIbHbIM.

Pporpamma ODHOBPEMEHHOE
ПРИГOTOBЛЕNHМ
BKnHouaOTcBc HArpeBaTeIbHbIe 3JemeHTbI (BepxHn,HxKnHn KpyrIbI) n BeHTnJIaTOp.Tak KaK Xap RaJIaETcNocToaHHbIM Bo Bcem dYXOBOM uKafty,Bo3dyx o6ecneuHaet OndopOdHoe npiroTOBHeHne NnoDpymHnBaHne npOdykTa. OHOBPemEHNO MoXHo IcNoIb3oBaTb He 60Jee DByx ypoBHe dYXOBO rKaΦa.

Harpma HAPEB CBEPX
BknHouaetc BepxHn HarpeBaTeNbHbI 3neMeHT.3Ta cyHKmroMooKet 6bITb NcNoJb3ObaHa dIra DOBODKn roTOBbIX 6NIO.

Iporpamma PnJb
BkHouaetc BepxHn HarpBaTeIbHbI 3JeMeHT. 3HaunTeIbHaa TEmnpaTypa npMoro deiCtBn rpnIe IIO3BOJnEeT IOnyUHTb 6blcTpoe 06pa3OBaHne KopoQKn Ha NOBepxHocTN npOdyKta, KOtopa npEnrCTByET BbIXoY COKOB n CoXpAHReT npOdyKT HeKHBIM cOChbIM BHyTpN. NcNoJIb3OBAHne fYHKUNr pInIb B OOC6eHHocTN peKomeHdyeTc dJa 6JIoD, dI npIROTOBHeHn KOTOpbIX Tpe6yeTc BbcOkaar NobepxHOCTHaa TMnepaTypa: TeJIqbNX u ROBjXbNX 6mΦwTeKCOB, aHTpeKOTOB, Bblpe3KN, ram6yprepOB u T.D. B naparpaFe «PpAKTuYeCKne COBeTbI no npIROTOBHeHIO» npINBoJrTa CHeKOToptbie npImepbl IcNOJIb3OBAHn DyXOBOrO 6kaFa. FOTOBTe 6IIOda c 3AkpbITOn DBepce DxyOBOrO 6kaFa.

PporpaMa GRATIN (IopymaHbHne)
BknHuaeTcBepxHnHarpeBaTehBbI 3JeMeHT n BepTe. CoeTaet OJHOHaPnPaBneHoe BbIeJeHne Xapa c npHyDnTehBn UpkyJnaue Bo3dyxa BHytpn DxyOBO rkaΦa. 3To npenrTcByeT o6ropaHIO NOBepXHoCTn PpOyKTOB, NOBIIwaI npOHNaOuYIO CnOco6HOCTb Xapa. TOTOBTe 6NIOa c 3AkpyToN DBepceN DxyOBO rkaΦa.
PpakTnueckne COBeMbI NO nprirotOBJIeHHIO
!B pexnme BeHTnIuPyemOr npiroToBJIeHn He nCnoJb3yUte 1-bi n 5-bi ypOBHN: OHn NODBepraOTc npMOMy BO3DeNCTBnO rOpAero BO3Dyxa, KOToPbIM MoKeT CKeYb DeNkATHbIe npOdyKTbl.
!Pn nCnoJb3oBaHn HynKcui IPNJIb nIPODpyMRAHAHNE nomecnte npoTnBeHb HaypoBeHb 1 dJa c6opa KnuKocTei, BblJeJemaMoro npNjkapke (coK n/nn Jkp).
ODHOBPEMEHHOE INPIIOTOBJIENHE
- IVcnoIb3yIOTCa 2-0n 4-bi ypoBHN, Ha 2-0n NOMEuaIOCT npOdyKtbl, Tpe6yIoNe 6oJee nHTeHCNBHO zoapa.
- YcTaHOBnTe npoNTBeHb cHn3y, a peWetKy cbepxy.
PnIb
- YcTaHOBnTe peWeTKy Ha ypoBeHb 3 nnn 4, NOMecTnTe npOdyKtbl B UeHTppeWeTKn.
- PekomeHdyeTcB Bbl6paTb MaKcImaJIbHyo MOUHOCTb DyXOBKn. He 6ecNOKOIteCb, ecnBepxHn 3IeMeHT He ocTaetcNoCTOHHO BKIOUeHHbIM: erpapota ynpabJraTeTcR TepMOCTaTOM.
NIIUCA
IcnoB3yTe npOTuBeHb n3 JERKOro aHOMnHn yctaHaBnBa erO Ha npJlaraIOUycpeWetky. PnncNoJIb3OBaHM npOTuBeHb BpEma BblneKu ydInnHaeTc, YTO 3aTpUdHre TNOJyHeHne xpyCTaee NnCUpbl.
Bcnyae BbineyKn NnCbI c 6bnhno HauHko peKoMeHdyeTcNIOJXnTB Ha NnCuy cbip MOzapeJIbA CpeEInHe BbineyKn.
Ta6nua npiroTOBneHn
PekomeHdyemble ypoBn MOUcHcTn Ipa3JIuHbIX TINOB npiroTOBHeHH
IpaKTnueckne peKOMeHdaunno INCNoJIb3OBaHHO CTeKIOKePaMNUeCKoB BapOCHo NaHeJI
!Ha cTeKnHHO NOBepxHocTN BapOHO nAHeN MOrY 6bITb BnHbI cAnbHbe Cnebl OT KJIe, HAnecEHORo HA pOKnAdKn Ipeep NaaHOM kCcnnyatauIN u3dEINr CneDyET ydaNTb Cnebl KJIe npi NOMUc INeuaNBHorO Hea6pa3MBHoro MOUero cpeCTBa. B nepbIe Yacbl pa60Tb Bbl MoKeTe noUYBCTBOBaTb 3anax XkeHo Pe3NbI, KOtOpBl 6bICTpo npOnaJaet.
IJIa OTTIIMAIbHOH 3KcNpyatauM BApOHyo Hn TaHeH n CneJeYET.
CnOJIb3OBaTb NocCyD C NIOCKM DHom, IeaeIbHO npNJrAHOUIM K 30He HArpeBaHn.
IcnoJb3OBAbT KAcTpOJN C DHom TaKOrO DnAmEePa, YToBbI NOHOCbHO 3aKpbItb 30Hy HArpeBaHnJa DInr ONTMaJIbHoRIO cNoJb3OBAHnB Bcero BblJeAemoro Tennla.
- npoBepntb, yTo6bl dH0 nCnOJb3yEmoN nocdybl 6blno Bcerda coBepseHNO cyxIM uNCTbIM IJIa NDeaIbHOrO npuIerAHnK KOHΦopKe IN DnA DOJrro cPoka Cnyk6bl KaBapouHoN paHeM, TAK n CamoN nocdybl.
He cIeJeYeT IcNoJIb3OBAbTyKe NocUy, McIOJIb3OBAHHyHO Ha ra3OBbIX KOHΦOpKax: KOHcHTpaunr TepIIHa Ra3OBbIX KOHΦOpKax MoKeTe DeΦOpMnPOBaTb DHO NocUdb HApUuNTb npInerahne K HarpeBaTeNbHOn 3OHe;
HnKOrHa He ocTabnTb KaKyO-Jn6o 3Ony HarpeBaHHB KInHOeHHo, He NOMEcTINb Ha Hee NocyDu, TAK KA K OHa 6bIcTpdoCTnraeT MaKcMmaJbHoro HarpeBa, YTO MoKeT NOBpeNtBHarpeBaTeNbHbIe 3NeMeHTbl.

- DEGR
- RS
- Description of the appliance, 5
- Start-up and use, 6
- Cooking modes, 7-8
- Hob, 9
- Precautions and tips, 10
- Maintenance and care, 11
- GB
- Positioning
- Fitting the appliance
- Ventilation
- Centring and fastening
- Electrical connections
- Fitting the power supply cable
- Connecting the supply cable to the mains
- Starting the oven
- Cooling ventilation
- Oven light
- Cooking modes
- CONVECTION OVEN mode
- MULTI-COOKING mode
- TOP OVEN mode
- GRILL mode
- GRATIN mode
- Practical cooking advice
- MULTI-COOKING
- GRILL
- PIZZA
- Type of hob
- Switching on the glass ceramic hob
- Traditional cooking zones
- Extendable cooking zones
- Residual heat indicator lights (only available on certain models)
- Practical advice on using the glass ceramic hob
- General safety
- Disposal
- Respecting and conserving the environment
- Switching the appliance off
- Cleaning the appliance
- Cleaning the oven door
- Inspecting the seals
- Replacing the light bulb
- Assistance
- Communicating:
- Sommaire
- Installation, 13-15
- EuupaOIoynoN kaIomega tropoosia
- Bapouhna nahanb, 64
- IpeoctopoxKHOCTn pekomeHdaun, 65
- Texnueckoe o6cnyxnbAHne uyo, 66
- PacnoJoxeHne
- BCTpoehHbIMoHTax
- BeHTnJIaIur
- UeHTpoBka KpennneHne
- 3Jektpnueckoe noCoeHHeHne
- IopcoeHHeHne ceTeBOro Hhypa
- IopcoeHHeHne ceTeBOro uHypa K cetn 3JeKTPoNtAHn
- PpOrpaMmbI nprirotOBJIeHnA
- Поррамma TPAДИЦИОHAьНАДУХOBKA
- Pporpamma ODHOBPEMEHHOE
- ПРИГOTOBЛЕNHМ
- Harpma HAPEB CBEPX
- Iporpamma PnJb
- PporpaMa GRATIN (IopymaHbHne)
- PpakTnueckne COBeMbI NO nprirotOBJIeHHIO
- ODHOBPEMEHHOE INPIIOTOBJIENHE
- PnIb
- NIIUCA
- IpaKTnueckne peKOMeHdaunno INCNoJIb3OBaHHO CTeKIOKePaMNUeCKoB BapOCHo NaHeJI
- IJIa OTTIIMAIbHOH 3KcNpyatauM BApOHyo Hn TaHeH n CneJeYET.
Brand : INDESIT
Model : HIM 506 EK.A IX
Category : Oven