
SK200C - Frying Pan BLACK & DECKER - Free user manual and instructions
Find the device manual for free SK200C BLACK & DECKER in PDF.
| Product Type | Electric Multi-Cooker Skillet |
| Brand | Black & Decker |
| Model | SK200C |
| Power Supply | 120 V, 60 Hz (US/Canada models) |
| Capacity | Approximately 4 L (estimated for family use) |
| Temperature Setting | Variable control from 93 °C to 204 °C (200 °F to 400 °F) |
| Indicator Light | Heating indicator light |
| Coating | Non-stick |
| Lid | Glass lid with vent |
| Handles | Two heat-resistant side handles |
| Tiltable Foot | Yes (on certain models) |
| Plug Type | Polarized (U.S.) / Grounded (Canada) |
| Maintenance and Cleaning | Skillet and lid are dishwasher safe (lid top rack only) or hand wash with non-abrasive sponge |
| Replacement Parts Available | Temperature control (part #177805-00), handles (part #177804-00), lid (part #SK200C-01) |
| Warranty | 2-year limited (United States and Canada) |
| Usage | Household use only |
Frequently Asked Questions - SK200C BLACK & DECKER
User questions about SK200C BLACK & DECKER
0 question about this device. Answer the ones you know or ask your own.
Ask a new question about this device
Download the instructions for your Frying Pan in PDF format for free! Find your manual SK200C - BLACK & DECKER and take your electronic device back in hand. On this page are published all the documents necessary for the use of your device. SK200C by BLACK & DECKER.
USER MANUAL SK200C BLACK & DECKER
Register your product online at www.prodprotect.com/applica, for a chance to WIN $100,000! For US residents only
When using electrical appliances, basic safety precautions should always be followed including the following:
Read all instructions.
Do not touch hot surfaces. Use handles or knobs.
To protect against electric shock, do not spill on or immerse cord, plug, or temperature control in water or other liquids.
- Close supervision is necessary when any appliance is used by or near children.
Unplug from outlet when not in use and before cleaning. Allow to cool before putting on or taking off parts and before cleaning the appliance.
Do not operate any appliance with a damaged cord or plug or after the appliance malfunctions or has been dropped or damaged in any manner. Return the appliance to the nearest authorized service facility for examination, repair, or electrical or mechanical adjustment. Or, call the appropriate toll-free number on the cover of this manual.
The use of attachments not recommended by the appliance manufacturer may cause fire, electric shock or injuries.
Do not use outdoors.
Do not let cord hang over edge of table or counter when it can be accidentally pulled or touch hot surfaces.
Do not place on or near a hot gas or electric burner, or in a heated oven.
Extreme caution must be used when moving an appliance containing hot oil or other hot liquids.
Always attach temperature control to the skillet first, then plug cord in the wall outlet. To disconnect, turn any control to "off," then remove the plug from the wall outlet.
Do not use the appliance for other than intended use.
SAVE THESE INSTRUCTIONS.
This product is for household use only.
GROUNDED PLUG (Canada Models Only)
This product is equipped with a grounded plug, which will only fit into a three-prong outlet. Do not attempt to defeat this feature. Improper connection of the grounding conductor may result in the risk of electric shock. Consult a qualified electrician if you are in doubt as to whether the outlet is properly grounded.
POLARIZED PLUG (US Models Only)
This appliance has a polarized plug (one blade is wider than the other). To reduce the risk of electric shock, this plug will fit in a polarized outlet only one way. If the plug does not fit fully in the outlet, reverse the plug. If it still does not fit, contact a qualified electrician. Do not modify the plug in any way.
ELECTRICAL CORD
a) A short power-supply cord (or detachable power-supply cord) is to be provided to reduce the risk resulting from becoming entangled in or tripping over a longer cord.
b) Longer detachable power-supply cords or extension cords are available and may be used if care is exercised in their use.
c) If a long detachable power-supply cord or extension cord is used,
1) The marked electrical rating of the detachable power-supply cord or extension cord should be at least as great as the electrical rating of the appliance,
2) If the appliance is of the grounded type, the extension cord should be a grounding-type 3-wire cord, and
3) The longer cord should be arranged so that it will not drape over the countertop or tabletop where it can be pulled on by children or tripped over.
TAMPER-RESISTANT SCREW
Warning : This appliance is equipped with a tamper-resistant screw to prevent removal of the outer cover. To reduce the risk of fire or electric shock, do not attempt to remove the outer cover. There are no user-serviceable parts inside. Repair should be done only by authorized service personnel.
Note: If the power supply cord is damaged, it should be replaced by qualified personnel. In Latin America by an authorized service center.
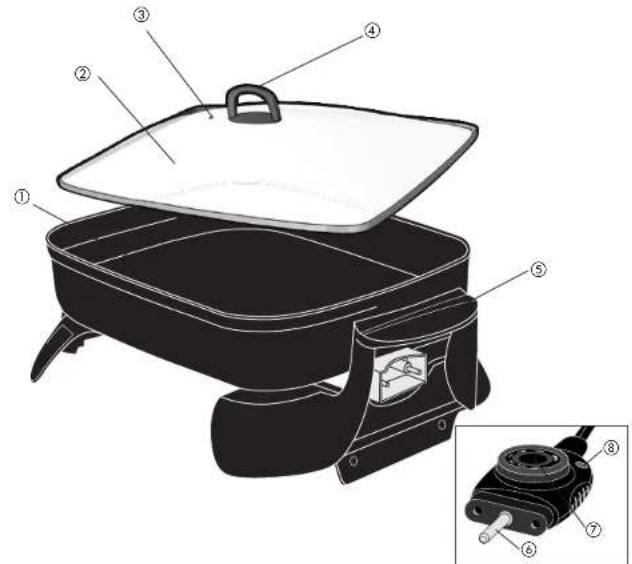
Product may vary slightly from what is illustrated.
- Skillet pan
† 2. Glass lid (Part # SK200C-01) - Vent
- Lid handle
† 5. Handles (Part# 177804-00) - Probe/plug
- Variable temperature control (Part# 177805-00)
- Temperature control/signal light
Note: † indicates consumer replaceable/removable parts
How To Use
This product is for household use only.
ASSEMBLE BEFORE FIRST USE
- Place the skillet pan upside down on a table or counter and remove the screws. Be sure the metal washers remain in place over the holes.
- Position each handle overhanging the edge of the counter for easier assembly so that the holes in the handles line up with the holes in the raised "mounting" area on the bottom of the skillet pan.
"Conditioning" The Pan
Important: Before first use, remove the control and wash the skillet pan and lid in soapy water; dry thoroughly. To preserve the nonstick coating, condition the pan by spreading a light coating of cooking oil over the inside surfaces. Wipe away excess oil with a paper towel. Do not use nonstick cooking spray to condition. You will not have to re-condition again after first use.
Note: Only use the temperature control provided with this skillet. Other controls may fit but will not provide proper performance.
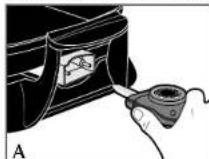
- Set the temperature control to "Off" and push the probe firmly into the socket on the skillet pan (A). Be sure the control is securely inserted. Always attach the control to the pan FIRST before plugging into an outlet.
- Preheat the skillet pan before adding any grease or vegetable oil unless the recipe says to add fats first.
Some foods do not require skillet preheating. Use the charts in this book as a guide for procedures. To preheat the skillet, turn the temperature control knob to the recommended setting. When the signal light goes out, the skillet is preheated. During cooking, the signal light will cycle on and off indicating that the temperature selected is being maintained.
- Some recipes call for simmering which means to cook foods in liquid just below the boiling point. The simmer point varies depending on the type of liquid and amount of food. To simmer, bring the food or liquid to a boil by turning the temperature control knob to around 350^ (177^) . When the liquid begins to boil, slowly turn the control knob back until the signal light goes out. Cover and simmer for the length of time necessary. The light will cycle on and off frequently to maintain the simmer temperature.
- While the handles and base "feet" are heat-resistant, do not cook on heat-sensitive surfaces. Once cooking is complete, you can remove the control to bring the skillet pan to a table for easy serving. To remove, be sure the control is unplugged and set at Off. Using a pot holder or mitt, hold the Skillet with one hand and the pull the temperature control out from the pan with the other.
Note: Some counter and table surfaces are sensitive to heat. Take care to avoid damaging linoleum, vinyl tile, painted or varnished surfaces. Heat-resistant formica and porcelain enamel surfaces are not affected providing the underside of the pan is clean. When in doubt, use a heat-resistant pad or hot plate under the skillet.
- Use plastic, rubber, nonstick coated, or wood utensils when cooking and serving. If using metal utensils, take care not to dig into the nonstick finish. Do not cut food on the surface using a knife to avoid scratching the nonstick coating.
- To prevent accidental burning, use pot holders when touching the lid and lift it only by the top handle. Use pot holders and extreme caution when moving the skillet if it contains hot liquids.

Tilt-Leg Feature (Certain Models Only)
The tilt-leg raises one side of the skillet slightly so that oils, fats, or other liquids will drain to the opposite side as they collect. This feature is great for pan broiling and basting foods while cooking. To use, pull the Leg straight down so that it stands under the handle (B). Be careful not to pull too far as you may break it.
Caution: Be careful not to push down on or strain the tilt-leg.
Care and Cleaning
This product contains no user serviceable parts. Refer service to qualified service personnel.
1. Unplug the cord, remove the temperature control by pulling it straight out, and allow the skillet pan to cool completely before cleaning.
Caution: The Control may be warm after long use so be careful when removing it. WHEN THE TEMPERATURE CONTROL HAS BEEN REMOVED, the pan and lid can be completely immersed in soapy water or placed in a dishwasher. The lid is dishwasher-safe - TOP RACK ONLY. Over time and use, the lid may discolor: this is normal.
2. If washing by hand, use a sponge or nylon pad with liquid detergent. Do not use any abrasive cleaners, coarse cleansers, or metal pads as they may damage the nonstick coated surface. After washing, dry the pan thoroughly giving special attention to the socket area. Do no use metal pads to clean electrical pins.
General Temperature Ranges
Warm Setting
Used to keep foods that have been prepared in the skillet at serving temperature for a short period of time. Adjust temperature up to keep foods warm for longer periods of time.
Low Heat - 200°F to 250°F (93°C - 121°C)
Use for warming, simmering, steaming, and gentle boiling. Some foods are started at higher temperatures then reduced to low heat to finish the cooking process. Use for cooking special dessert sauces, such as Cherries, jubilee, and puddings.
Medium Heat - 250^ to 325^ (121^ - 163^)
Use for eggs, bacon, and sausage, or to sauté vegetables such as onions, green pepper, or mushrooms. Also to cook roasts and other cuts of meat after they have been browned at higher temperatures.
High Heat - 325°F to 400°F (163°C - 204°C)
Use to brown, sear, pan fry (with fat), and pan broil meats without fat and to stir fry meats and vegetables (with fat). Breaded foods such as vegetables, meats, fish, and poultry are pan fried in this temperature range with a small quantity of fat.
Cooking Guides
The cooking temperatures and times in the GUIDES are approximate. You may have to adjust them depending on food size, quantity, temperature, and personal taste. Foods at room temperature need less cooking time than foods taken from the refrigerator. You might need to reduce the temperature/lime for small quantities of food.
| PAN FRYING AND COOKING | ||||
| Approx. Approx. Food Preheat Temp /Mins. | 325°F 10-12 | Place in COI- when position- necessary. | LD skillet. Separate slices ed in pan. Turn as necessary. Drain on top- welling. | |
| BACON Regular Slices, No up to 8 163°C | ||||
| CHICKEN 3½-4½ pounds 1.59 kg-2.04 kg Cut-up Broiler-Fryer | Yes 204°C Brown 325°F 30 163°C Finish | 400°F -40 | 20 | Dredge chicken pieces in mixture of ¾ cup flour, 2 tsp. salt, 1 tsp. paprika, ¾ tsp. pepper. Preheat at 400°F (204°C). Add 2 tbsp. oil; brown chicken, meaty since, for about 20 mins. Reduce temperature to 325°F (163°C); cover, 30-40 mins, or until chicken is tender. occasionally during cooking. |
| Approx. Approx. Food Preheat Temp Time/Mins. Directions | ||||
| EGGS Fried, up to 8 Yes skillet and spread over surface; fry eggs 135°C fry eggs until done. Turn as desired. | 75°F 4-6 Melt 1 tbsp. butter or margarine in crumble, 1 tbsp. butter spread over surface. For 8 eggs, beat % cup milk or water, % tsp. salt, | 375°F 1 tbsp. milk, the mixture begins to sol, stir bottom | 5-8 | Dip fish in mixture of 1 beaten egg and browned in 1 cup season |
| Scrambled, Yes 250 Mixture of 8 eggs thoroughly dash pepper, and sides until eggs are cooled to solid personal taste. | 4-6 Melt 1 tbsp. butter spread over surface. For 8 eggs, beat % cup milk or water, % tsp. salt, | 375°F 1 tbsp. milk, the mixture begins to sol, stir bottom | 12-14 | Place in COLD skillet. Turn carefully to browned on all sides. |
| FISH FILLETS 1 pound, 1/4" thick .45 kg/.64 cm fillets bread crumbs. Add 2 tbsp. oil to preheated skillet, Fry fillets until golden brown on both sides. | Yes 191°C | 375°F 1 tbsp. milk, the mixture begins to sol | 2-4 | Beat 2 eggs thoroughly with 2 tbsp. % tsp. salt. Dip bread slices in browned on all sides. |
| FRANKFURTERTS 10/package 163°C avoid breaking skin; turn often until browned on all sides. | No | 325°F 163°C | 5-8 | Slash fat edge at 2" (5 cm) intervals to prevent curling. Fry ham on both sides until lightly browned. |
| FRENCH TOAST Up to 6 slices 177°C milk and mixture, turning coated lightly greasy Precooked Slices up to 2, w" (1.27cm) to l" (1.91cm) thick | Yes | 350°F 177°C | 12-15 med 16-20 well | Add pallues to preheated skillet. Brown on both sides, tuming once. |
| HAM Precooked Slices Up to 2, w" (1.27cm) to l" (1.91cm) thick | Yes | 350°F 177°C | 2-4 Prepare each pancake, use cups look | your favorite pancake recipe. % cup batter. Tum when bubbles bleed from the pans. |
| HAMBURGERS % lb. (1.1kg) each, w" (1.27cm) thick, up to 10 | Yes done | 350°F 177°C | 12-15 med 16-20 well | Trim off fally edges. Brown chops, torture to 250°F (121°C). Cover and cook cook until well done, but not dry. |
| PANCAKES, Up to 6 177°C Lightly greasy vegetable oil. For about appear on top surface dry. Brown on other side. | Yes | 350°F 177°C | 10 Reduce temperature 15-25 | Trim off fally edges. Brown chops, torture to 250°F (121°C). Cover and cook cook until well done, but not dry. |
| PORK CHOPS, With Bone, Up to 10, w" (1.27cm) to w" (1.91 cm) thick 121°C Finish | Yes 177°C | 350°F 177°C | 10 Reduce temperature 15-25 | Trim off fally edges. Brown chops, torture to 250°F (121°C). Cover and cook cook until well done, but not dry. |
| Approx. Approx. Food Preheat Temp | Time/Mins. | Directions | ||
| POTATOES, 2½ lbs. (1.13 kg) (about 6) 4" (.32 cm) thick slices | Yes 177°C | 350°F or vegetable | 25-30 oil. Cook and brown, turning frequently. | Place in 2-3 tablespoons hot bacon fat, turning frequently. |
| SANDWICHES Grilled, Up to 6 177°C between bread slices, softened butter or margarine on outside of bread; place in each side until browned, about 3-4 minutes/side. | No | 350°F lightly spread on outside of bread; Grill. Grill. | 6-8 | Spread cheese or other favorite filling |
| SAUSAGE Links or patties, Up to 16 links, or 8 patties than patties. | No but not | 325°F 163°C dry. Links take slightly longer | 15-25 | Place in COLD skillet; turn carefully and often until golden brown and well done. |
| STEAK Cube, Up to 6, 4" (1.27cm) thick Sandwich, Up to 10, 4" (.64 cm) thick | Yes desired | 350°F 177°C doneness. Ticker steaks take | 3-8 | Slash edges to prevent curling, if necessary. Add steaks and cook to slightly longer. |
ROASTING
Because of variations in Skillets and cuts of meat and poultry, it is important to use a meat thermometer when roasting to accurately determine internal temperature. To test temperature, insert thermometer into the thickest piece of meat or poultry, making sure it does not touch a bone or any part of the Skillet.
| Food | Approx. Temp Roasting Time D | Rections |
| BEEF POT ROAST Boneless Rump or Bottom Round – accumulated About 5 lbs. (2.27kg) | 400°F 204°C Brown 300°F 154°C Roast | 30 mins. browning time 40-45 mins./lb.(kg) turn Preheat skillet at 400°F (204°C); add 1-2 tbsp. oil. Brown meat on all sides. Drain fat from skillet. Reduce temperature to 300°F (154°C). Cover, with vent closed. Cook, 1/2 hour, until meat is tender. Save drippings for gravy if desired. |
| CHICKEN 1 or 2 Broiler- Fryers, About 4 lbs. each (1.81kg) | 375°F 191°C Brown 300°F 154°C Roast | 30 mins. browning time 1:30-1:45 hours Preheat skillet to 375°F (191°C). Brown chicken on all sides. Reduce temperature to 300°F (154°C). Drain off accumulated fat, if desired. Cover skillet, with vent open. Halfway through cooking period, turn chicken and roast until well done. |
| PORK ROAST Boneless Pork Loin, About 3 lbs. (1.36kg) | 400°F 204°C Brown 300°F 2 hrs 154°C Roast | 30 mins. browning time purs accumulated fat. Cover, with vent open. Turn about every 1/2 hour during cooking. Roast well done. |
IMPORTANT MISES EN GARDE
For service, repair or any questions regarding your appliance, call the appropriate 800 number on the cover of this book. DO NOT return the product to the place of purchase. Also, please DO NOT mail product back to the manufacturer, nor bring it to a service center. You may also want to consult the website listed on the cover of this manual.
Two-Year Limited Warranty
(Appplies only in the United States and Canada)
What does it cover?
- Any defect in material or workmanship provided; however, Applica's liability will not exceed the purchase price of the product.
For how long?
Two years after the date of original purchase.
What will we do to help you?
- Provide you with a reasonably similar replacement product that is either new or factory refurbished.
How do you get service?
-
Save your receipt as proof of date of sale.
-
Check our on-line service site at www.prodprotect.com/applica, or call our toll-free number, 1-800-231-9786, for general warranty service.
If you need parts or accessories, please call 1-800-738-0245.
What does your warranty not cover?
-
Damage from commercial use
-
Damage from misuse, abuse or neglect
-
Products that have been modified in any way
-
Products used or serviced outside the country of purchase
Glass parts and other accessory items that are packed with the unit
-
Shipping and handling costs associated with the replacement of the unit
-
Consequential or incidental damages (Please note, however, that some states do not allow the exclusion or limitation of consequential or incidental damages, so this limitation may not apply to you.)
How does state law relate to this warranty?
- This warranty gives you specific legal rights, and you may also have other rights that vary from state to state or province to province.
NECESITA AYUDA?
- SAVE THESE INSTRUCTIONS.
- GROUNDED PLUG (Canada Models Only)
- POLARIZED PLUG (US Models Only)
- ELECTRICAL CORD
- TAMPER-RESISTANT SCREW
- How To Use
- ASSEMBLE BEFORE FIRST USE
- "Conditioning" The Pan
- Tilt-Leg Feature (Certain Models Only)
- Care and Cleaning
- General Temperature Ranges
- Warm Setting
- Low Heat - 200°F to 250°F (93°C - 121°C)
- Medium Heat - 250°F to 325°F (121°C - 163°C)
- High Heat - 325°F to 400°F (163°C - 204°C)
- Cooking Guides
- ROASTING
- IMPORTANT MISES EN GARDE
- Two-Year Limited Warranty
- (Appplies only in the United States and Canada)
- What does it cover?
- For how long?
- What will we do to help you?
- How do you get service?
- What does your warranty not cover?
- How does state law relate to this warranty?
- NECESITA AYUDA?
Brand : BLACK & DECKER
Model : SK200C
Category : Frying Pan