
CM4216 - Coffee machine Renkforce - Free user manual and instructions
Find the device manual for free CM4216 Renkforce in PDF.
| Product type | Filter coffee machine with timer |
| Brand | Renkforce |
| Model | CM4216 |
| Capacity | 1.5 L (approx. 12 cups) |
| Power | 1000 W |
| Supply voltage | 230 V / 50 Hz |
| Standby consumption | < 2 W |
| Cable length | 1 m |
| Display | Backlit LCD display |
| Timer | Programmable up to 24 hours in advance |
| Keep warm | Yes, approx. 30 minutes |
| Drip-stop | Yes, to remove the carafe during brewing |
| Filter type | Permanent (reusable) filter + compatible paper filter (standard size) |
| Carafe | Glass with shatterproof ring |
| Non-slip feet | Yes |
| Weight | Approx. 2.5 kg |
| Dimensions (W x D x H) | Approx. 30 x 20 x 35 cm |
| Protection class | II |
| Care and cleaning | Do not put in dishwasher; clean removable parts with hot water; descale regularly with a commercial product (no vinegar) |
| Safety | Overtemperature protection; do not use without water; do not immerse |
| Package contents | Machine, filter holder, permanent filter, carafe, measuring spoon, instruction manual |
Frequently Asked Questions - CM4216 Renkforce
User questions about CM4216 Renkforce
0 question about this device. Answer the ones you know or ask your own.
Ask a new question about this device
Download the instructions for your Coffee machine in PDF format for free! Find your manual CM4216 - Renkforce and take your electronic device back in hand. On this page are published all the documents necessary for the use of your device. CM4216 by Renkforce.
USER MANUAL CM4216 Renkforce
natural_image
Abstract geometric star-like pattern with five petal-like shapes and dot patterns (no text or symbols)renkforce
GB Operating Instructions
CM4216 Coffee machine with timer
Item no. 1374126
Page 17 - 31
© Notice d'emploi
www.business.conrad.at
text_image
QR code image containing encoded data, no visible human-readable text4. Symbol-Erklärung

text_image
Labeled diagram of a coffee maker with numbered parts for identificationb) Einstellpanel
2
text_image
C HOUR ON/AUTO/OFF B MIN 12:00 PROG A D E- Introduction......18
- Intended use....19
- Delivery content....19
- Description of symbols ...... 20
- Features and functions....20
- Important safety instructions .... 21
- Safety instructions....22
- Operating elements....24
a) Coffee machine 24
b) Control panel 25
c) LCD displayed content and modes....25 - Tips for perfect coffee taste....25
- Before first time use 26
- Operation....26
a) Installation and connection....26
b) Brewing and keeping warm coffee 27
c) Setting the clock 28
d) Using the timer function....28
e) Resetting the device....29 - Troubleshooting.... 29
- Maintenance and cleaning .... 30
- Descaling....30
- Disposal....31
- Technical data .... 31
1. Introduction
Dear customer,
Thank you for purchasing this product.
This product complies with the statutory national and European requirements.
We kindly request the user to follow the operating instructions, to preserve this condition and to ensure safe operation!

These operating instructions relate to this product. They contain important notices on commissioning and handling. Please take this into consideration when you pass the product on to third parties. Please keep these instructions for further reference!
All company names and product names are trademarks of their respective owners. All rights reserved.
If there are any technical questions, please contact:
International: www.conrad.com/contact
United Kingdom: www.conrad-electronic.co.uk/contact
2. Intended use
The product is intended for brewing and keeping warm drip coffee. Use the timer function to pre-set the start time for the brewing process. The anti-drip feature allows for brief interruptions of the brewing process in order to pour a cup of coffee during coffee preparation.
The product is only suitable for connection to isolated ground receptacles of 230 V/AC, 50 Hz.
It is intended for indoor use only. Do not use it outdoors. Contact with moisture, e.g. in bathrooms, must be avoided under all circumstances.
Please refer to chapter "5. Features and functions" for a complete overview of all features and characteristics.
Unauthorized modifications and/or alterations to the product are not permitted due to safety and approval reasons (CE). Use of the product other than for its intended use described here is prohibited and may result in damage to the product. It may also related to hazards such as short-circuit, fire, electric shock, etc. Read this user manual completely before first use and keep it for future reference.
3. Delivery content
- Coffee machine
- Filter holder
- Filter
- Glass jar
- Measuring spoon
- Operating instructions
→ Up-to-date Operating Instructions:
- Open produktinfo.conrad.com in a browser or scan the displayed QR code.
- Select document type and language and enter the item number into the search field. After submitting the query you can download displayed records.

text_image
QR code image containing encoded data, no visible human-readable text4. Description of symbols
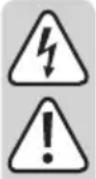
This symbol indicates health risks, e.g. due to electric shock.

This symbol informs you about specific risks when handling, operating or using the product.

This symbol warns against risks of burning or scalding and hot surfaces.

The “arrow” symbol indicates special remarks and notes for operation.
5. Features and functions
• 1.5 l capacity, equals approx. 12 cups
- Illuminated LCD with 4 operating controls
- Keeping-warm function
- Easy-to-read water level indicator
- Permanent filter
- Anti-drip feature for brief interruptions of the brewing process
- Clock with timer function
• Glass jar with fracture protection ring
- Anti-slip feet on the bottom of the device
6. Important safety instructions
- This appliance can be used by children 8 years old and above and by persons with reduced physical, sensory or mental capabilities or lack of experience and/or knowledge only if they are given supervision or instruction concerning use of the appliance in a safe way and understand the hazards involved.
- Children must not perform cleaning and user maintenance, unless they are above 8 years old and supervised.
- Keep the coffee machine including its mains cable out of reach of children below 8 years.
- Children should be supervised to ensure that they do not play with the appliance.
- Do not use the product within the reach of children.
- The device is intended for household use and similar applications, such as
- in staff kitchen areas in shops, offices and other commercial environments
- in farm houses
- by clients in hotels, motels and other residential environments
- in bed and breakfast places.
The device is not intended for commercial use.
- Clean the product after use. Never immerse in water! Do not immerse the product including the mains cable in water or other liquids!
- To prevent risks, damaged power cables may only be replaced by the manufacturer, a professional workshop appointed by the manufacturer, or a similarly qualified person.
7. Safety instructions
Read the operating instructions carefully and especially observe the safety information. If you do not follow the safety instructions and information on proper handling in these operating instructions, we assume no liability for any resulting personal injury or damage to property. Such cases will invalidate the warranty/guarantee.
- The device is not a toy. Keep it out of the reach of children and pets.
- Do not leave packaging material lying around carelessly. These may become dangerous playing material for children.
- Protect the product from extreme temperatures, direct sunlight, strong jolts, high humidity, moisture, flammable gases, vapours and solvents.
- Do not place the product under any mechanical stress.
-
If it is no longer possible to operate the product safely, take it out of operation and protect it from any accidental use. Safe operation can no longer be guaranteed if the product:
-
is visibly damaged,
- is no longer working properly,
- has been stored for extended periods in poor ambient conditions or
- has been subjected to any serious transport-related stresses.
- Please handle the product carefully. Jolts, impacts or a fall even from a low height can damage the product.
- Use original accessories only.
- The jar is made of glass. Handle carefully. There is a risk of fracture and hence a risk of injury!
- Make sure not to leave the product unattended when in use.
- Before connecting the product to the mains, check if the specifications on the rating plate (bottom of the device) match the power supply in your home.
- Never let the product get in contact with hot surfaces (e.g. stove).
- Do not let the mains cable hang over table edges or similar installation surfaces.
- Some parts of the product can become very hot and cause burning. Special care is required, if children and heat-insensitive persons are present. Hold the product by its designated grips and handles only.
- Connect the product directly to a wall socket. Do not use multiple sockets, extension cables, etc. The high power input of the coffee machine can cause such devices to overload when powering several appliances at the same time.
- Do not connect any additional remote switch control, timer switch or other devices that automatically switch on the product.
- Do not move the product during use. Move, transport and store the product only when it is fully cooled off.
- Hot steam escapes from the openings. Ensure sufficient ventilation and do not cover the product during use. There is a risk of scalding!
- Keep the openings on the bottom of the device clear. Do not insert any sharp objects. There is a risk of electric shock!
- Never touch the product with moist or wet hands during use. There is the risk of electric shock.
- Do not fill the product with hot water. Only use cold tap or drinking water. When not using the product for a longer period of time, remove remaining water. Always use fresh water only.
- Never use the coffee machine without water.
- Do not fill the water tank beyond the Max 1.5L marking, as water will otherwise escape from the opening on the rear of the device.
- Hold the filled glass jar vertically by its handle. Pour the coffee slowly and carefully. There is a risk of scalding!
• Zero potential only if plug is disconnected! - The glass jar is not suitable for use in microwave ovens.
- Never leave the glass jar empty on the warming plate. Risk of fracture!
- Unwrap the power cable fully during use. If not fully unwounded, the mains cable can cause overheating. This poses a fire hazard!
- The mains outlet must be located near to the device and be easily accessible.
- Never pull the cable when disconnecting the mains plug; always hold the plug by its designated grip areas.
- When not using the product for a longer period of time or when cleaning the device, disconnect the mains plug from the mains.
- For safety reasons, always unplug the device in case of a thunderstorm.
- Make sure that the mains cable is not squeezed, bent, damaged by sharp edges or put under mechanical stress. Avoid excessive thermal stress on the mains cable from extreme heat or cold. Do not modify the mains cable. Otherwise the mains cable may be damaged. A damaged mains cable can cause a deadly electric shock.
- Do not touch the mains cable if it is damaged. First, power down the respective mains socket (e.g. via the respective circuit breaker) and then carefully pull the mains plug from the mains socket. Never use the product if the mains cable is damaged.
- Never plug in or unplug the mains plug when your hands are wet.
- Guide the mains cable in such a way, that no one can trip over it or get caught in it. This poses a risk of injury.

- Consult a professional if you require assistance with product operation, safety or connection.
- Maintenance work, adjustments and repairs may be carried out only by a professional or at a specialist workshop.
- If you have questions which remain unanswered by these operating instructions, contact our technical support service or other technical personnel.
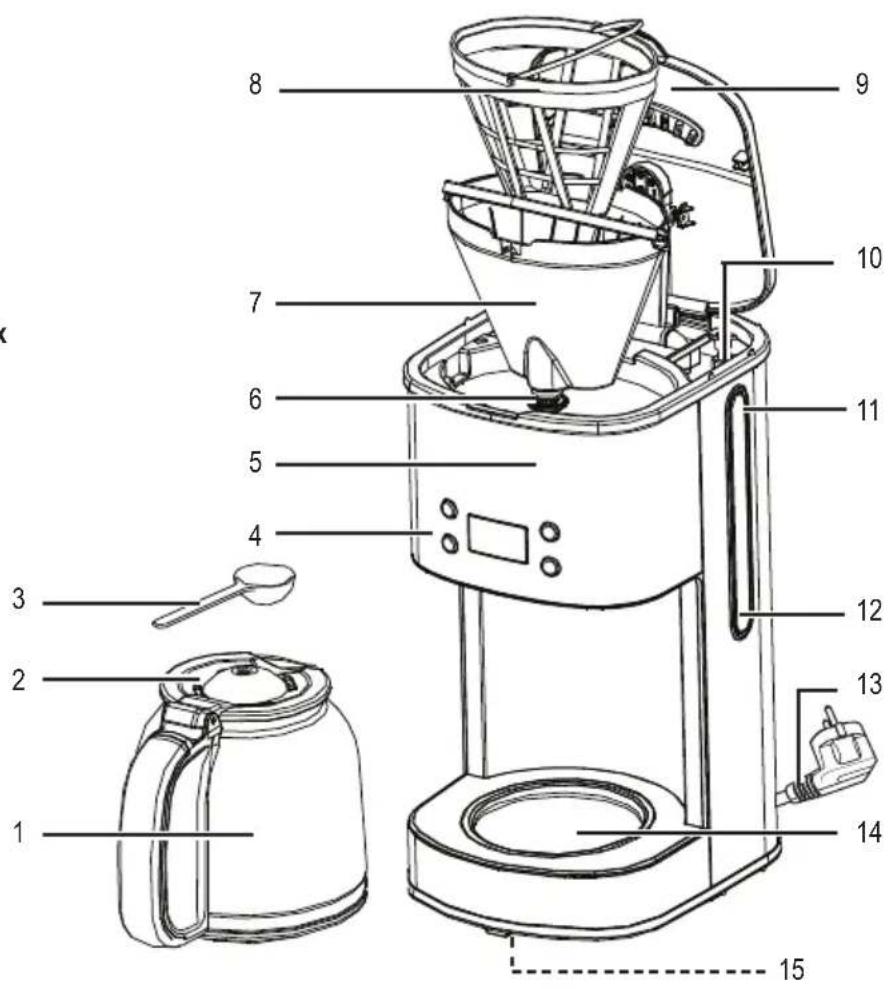
8. Operating elements
a) Coffee machine
1 Glass jar
2 Jar lid
3 Measuring spoon
4 Control panel with LCD
5 Coffee machine
6 Anti-drip feature
7 Filter holder
8 Permanent filter
9 Water tank lid
10 Water tank
11 Water level indicator with Max 1.5L marking
12 Minimum marking 0.6L
13 Mains cable with mains plug
14 Keeping-warm plate
15 Anti-slip feet
text_image
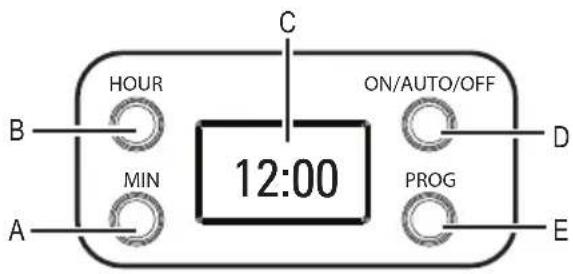
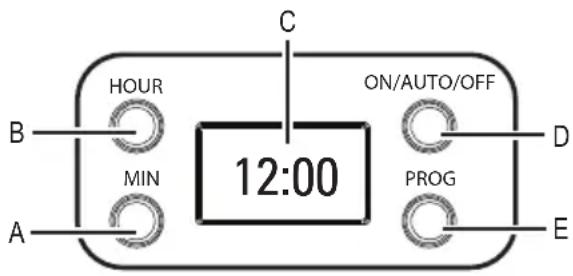
Labeled diagram of a coffee maker with numbered parts for identificationb) Control panel
text_image
C HOUR ON/AUTO/OFF B MIN 12:00 PROG A D EA MIN button with LED indicator
B HOUR button with LED indicator
C LCD
D ON/AUTO/OFF button with LED indicator
E PROG button with LED indicator
c) LCD displayed content and modes

Standby mode
The display shows the current clock time.
All LED indicators are off.
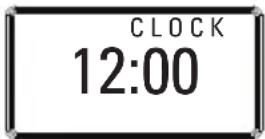
Clock setting mode
Adjust the hours and minutes as needed.
Timer setting mode
Adjust the hours and minutes for the timer function.
The pre-set timer can be displayed.
9. Tips for perfect coffee taste
• Always use fresh, cold water. Dispose of remaining water always and immediately.
- Coffee tastes best directly after brewing. Do not warm up cold coffee.
- Clean the product after each use and descale the coffee machine regularly.
- Grind coffee beans just before making coffee.
- Close opened packs of coffee airtight and store at a dry, cool location (e.g. refrigerator).
10. Before first time use
- Carefully unpack the product and check it for completeness and potential damage. Do not use the coffee machine or glass jar if damaged.
- Rinse the coffee machine before first time use: Refer to chapter "b) Brewing and keeping warm coffee". But do not fill the permanent filter (8) with coffee powder; leave it empty. After brewing, dispose of the hot water in the glass jar. Perform this procedure two times in order to remove any production residue.
- Clean the product and all removable parts as described in chapter "13. Maintenance and cleaning".
• The product is now ready for use.
11. Operation
a) Installation and connection

Never let the product get in contact with hot surfaces (e.g. stove).
Only use the product on a dry, flat, heat-resistant and stable surface.
There are anti-slip feet on the bottom of the device. If necessary, place a protective mat underneath the device in order to protect the surface of the worktop.
- Fully unwind the cable (13).
• Install the coffee machine (5) near a wall socket. - Place the glass jar in the center of the keeping-warm plate (14).
- Connect the mains plug to the wall socket.
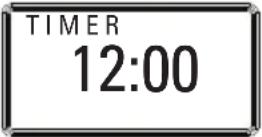
- The LCD (C) lights up. "12:00" appears in the LCD.
b) Brewing and keeping warm coffee

Do not fill the tank with hot water. Only use fresh, cold tap or drinking water.
Never use the coffee machine without water.

Do not fill the water tank beyond the Max 1.5L marking (11), as water will otherwise escape from the opening on the rear side.
Make sure the keeping-warm plate (14) and the bottom of the glass jar (1) are dry before starting brewing.
Water steam escapes during brewing. Keep sufficient distance to shelves, walls, and persons. There is a risk of scalding!
The keeping-warm plate and the glass jar become very hot during use.
Never leave the glass jar empty on the heated plate. Risk of fracture!
- Open the lid (9) of the water tank and fill the water tank (10) with water until the Max 1.5L marking. This marking must not be exceeded.
- Fill the permanent filter (8) with finely ground coffee; observe the instructions on the packaging. Make sure the permanent filter is properly installed in the filter holder. Then close the lid of the water tank.
- Place the glass jar with the handle facing to the center front on the center of the keeping-warm plate. Make sure the anti-drop feature (6) is aligned with the opening of the jar lid (2).
- Press the ON/AUTO/OFF button (D). The LED indicator of that button lights up and the device starts brewing. Coffee starts dripping. The keeping-warm plate keeps the coffee warm.

You may cancel the brewing process at any time by pressing the ON/AUTO/OFF button two times. The red LED indicator will then light up blue. After another 15 seconds the LED indicator turns off. In order to continue brewing, press the ON/AUTO/OFF button once. The LED indicator lights up red.
If you want to pour a cup of coffee during brewing, briefly remove the glass jar from the device. The anti-drip feature closes the coffee flow, once you remove the jar from the plate. The brewing process will not be stopped and the water continues flowing into the permanent filter. In order for the permanent filter not to overflow, the glass jar must be returned to the keeping-warm plate within approx. 30 seconds. Make sure the coffee continues to drip into the glass jar.
Please note that the final amount of coffee can be less than the amount of water filled in, as the coffee powder absorbs part of the water.
- Brewing will be finished once the entire water tank is empty.
- Wait until all the water has passed through the permanent filter and then remove the glass jar by its handle. Pour the coffee slowly and carefully.
- Coffee will be kept warm for up to 30 minutes. After that the coffee machine will activate standby mode and the red LED indicator will turn off.

If you want to cancel brewing or keeping-warm earlier, press the ON/AUTO/OFF button repeatedly until the LED indicator lights up steadily. After approx. 15 seconds later the coffee machine will activate standby mode and the blue LED indicator will turn off.
c) Setting the clock
- Push the PROG button (E). The LED indicator of the PROG button lights up blue and "CLOCK" appears in the LCD, indicating the clock time set mode is activated.
- Press the HOUR button (B). The LED indicator of the PROG button turns off and the LED indicator of the HOUR button lights up blue. In order to set the hours, press the HOUR button repeatedly until the desired hour setting is displayed.
- Press the MIN button (A). The LED indicator of the HOUR button turns off and the LED indicator of the MIN button lights up blue. Press the MIN button repeatedly until the desired minute setting is displayed.
- Press the PROG button for confirming your last setting. The LED indicator of the PROG button turns off. The clock time will be saved. After a few seconds "CLOCK" will disappear from the display. The clock time set mode is completed. The coffee machine will switch to standby with all LED indicators being off.

If not pressing any button within 15 seconds after activating the setting mode, the setting mode will be cancelled. The coffee machine will switch to standby mode. The clock time will appear and continues running from the last entered setting. All LED indicators are off.
The digits run faster when pressing and holding the HOUR or MIN buttons respectively.
The clock time is displayed in 24-hour format.
d) Using the timer function
Before using the timer, the clock time must be set!
- Press the PROG button repeatedly until "TIMER" appears in the display, indicating the timer setting mode is activated.
- Press the HOUR button. The LED indicator of the PROG button turns off and the LED indicator of the HOUR button lights up blue. In order to set the hours, press the HOUR button repeatedly until the desired hour setting is displayed.
- Press the MIN button. The LED indicator of the HOUR button turns off and the LED indicator of the MIN button lights up blue. Press the MIN button repeatedly until the desired minute setting is displayed.
- Press the PROG button for confirming your last setting. The LED indicator of the PROG button turns off. The start time will be saved. After a few seconds “TIMER” disappears from the display, indicating that the timer setting mode is completed. The coffee machine will switch to standby mode with all LED indicators being off and with the current clock time being displayed.

If not pressing any button within 15 seconds after activating the setting mode, the setting mode will be cancelled. The coffee machine will switch to standby mode with all LED indicators being off and with the current clock time being displayed.
The digits run faster when pressing and holding the HOUR or MIN buttons respectively.
- Press the ON/AUTO/OFF button two times to activate the timer. Brewing will start at the pre-set time. The LED indicator of the ON/AUTO/OFF flashes blue first and lights up red once brewing starts.
- You can display the pre-set time in timer set mode. Press the PROG button repeatedly, until "TIMER" appears in the LCD.
- If you want to cancel the timer function early, press the ON/AUTO/OFF button repeatedly until the LED indicator lights up blue steadily. After approx. 15 seconds the coffee machine will switch to standby with all LED indicators being off.
e) Resetting the device
- Disconnect the mains plug for more than 10 seconds from the mains in order to reset all settings.
12. Troubleshooting
No coffee drips from the machine.
- No or not enough water in the water tank. Fill the water tank with water till the minimum marking 0.6L.
- The anti-drip feature is not properly positioned on the glass jar lid. Place the glass jar on the center of the keeping-warm plate and make sure the anti-drip feature is sitting on the round opening of the jar lid.
- The coffee machine is calcified. Descale the device as described in chapter "14. Descaling".
Device does not start brewing.
- If the LED indicator of the ON/AUTO/OFF button lights up blue, the timer has been activated. Press the ON/AUTO/OFF button repeatedly, until the LED indicator lights up red in order to start brewing immediately.
Brewing does not start at the pre-set time.
- The clock has not been set correctly. Set the minutes and hours in clock time set mode before using the timer.
Water drips from the opening on the rear of the device.
- The water tank has been overfilled. Dispose of the excessive amount of water. The water must not exceed the Max 1.5L marking.
The coffee machine does not turn on.
- The coffee machine is not connected to the mains. Connect it to the mains by plugging the mains plug into the wall socket.
- The overheat protection mechanism might have been triggered. Disconnect the product from the mains and let it cool down to room temperature. Then reconnect the product to the mains and switch it on as usual. If the coffee machine still cannot be switched on, consult an authorized workshop.
13. Maintenance and cleaning

Neither the coffee machine nor the accessories are dishwasher-safe!
Clean the product after use. Do not immerse the product including the mains cable in water or other liquids!
Disconnect the product from the mains before cleaning and wait for the product to fully cool down to room temperature. Please note that the keeping-warm plate cools down slowly.
- Never use aggressive cleaning agents (except for suitable descaling agents), rubbing alcohol or chemical solutions, as those could damage the housing or even affect the functioning of the device. Do not use hard or scratching brushes, sponges, or similar.
- Despite occasional cleaning, the product is maintenance-free. There are no components located inside the product you need to maintain. Never dismantle the product.
- Open the lid of the water tank and remove the permanent filter and filter holder. Empty the permanent filter and rinse it under running water.
- Rinse the glass jar with lid, filter holder and measuring cup under warm water.
- Clean the exterior surface of the coffee machine and the keeping-warm plate with a clean, soft and slightly damp cloth. Clean the mains cable with a dry cloth.
- After having cleaned and dried all parts, reinstall the filter holder and permanent filter, close the lid of the water tank, and then place the glass jar with closed lid on the keeping-warm plate.
14. Descaling
Descale the water tank from time to time. The periods in-between depend on the hardness of the water and the frequency of use.
- Use a commercially available liquid descaling agent for descaling and dose according to manufacturer instructions. Never use vinegar.
- Fill the water tank with descaling solution and leave it according to manufacturer instruction.
- Turn on the product and start brewing with the solution of water and descaling agent.
- Then dispose of the descaling solution in the glass jar.
- After descaling, brew water for three or four times in order to remove any residue of the descaling solution.
- The descaling solution and its residue are not suitable for consumption. Pour the solution and the boiled water away.
- Then clean the glass jar, permanent filter and filter holder as described in chapter "13. Maintenance and cleaning".
15. Disposal
Electronic devices are recyclable waste and must not be disposed of in the household waste.
At the end of its service life, dispose of the product in accordance with applicable regulatory guidelines.
You thus fulfil your statutory obligations and contribute to the protection of the environment.
16. Technical data
Operating voltage 230 V/AC, 50 Hz
Power input.....1000 W
Power consumption in standby mode.....< 2 W
Capacity....0.6 to 1.5 l
Protection class ....I
Cable length ....1 m (without mains plug)
Operating/storage conditions....+5 to +40 °C, 10 – 90 % RH
Dimensions (W x H x D) 186 x 368 x 228 mm
Weight 2.6 kg
Table des matières
Page
France (email): technique@conrad-france.fr
Suisse:
www.conrad.ch
www.biz-conrad.ch
text_image
QR code image containing encoded data, no visible human-readable text4. Explications des symboles

text_image
Labeled diagram of a coffee maker with numbered parts for identification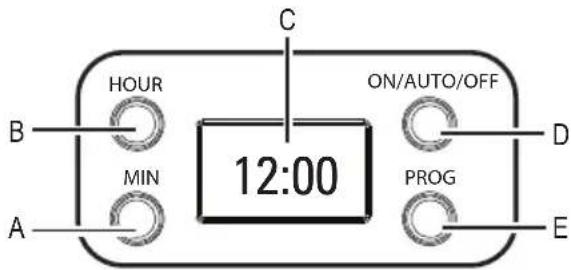
text_image
C HOUR ON/AUTO/OFF B MIN 12:00 PROG A D EDimensions (L x H x P)....186 x 368 x 228 mm
Poids....2,6 kg
Bladzijde
text_image
QR code image containing encoded data, no visible human-readable text- in bed and breakfasts
text_image
Labeled diagram of a coffee maker with numbered parts for identificationb) Regelpaneel

text_image
C HOUR ON/AUTO/OFF B MIN 12:00 PROG A D E© Copyright 2019 by Conrad Electronic SE.
GB Legal notice
This is a publication by Conrad Electronic SE, Klaus-Conrad-Str. 1, D-92240 Hirschau (www.conrad.com).
All rights including translation reserved. Reproduction by any method, e.g. photocopy, microfilming, or the capture in electronic data processing systems require the prior written approval by the editor. Reprinting, also in part, is prohibited. This publication represents the technical status at the time of printing.
© Copyright 2019 by Conrad Electronic SE.
© Copyright 2019 by Conrad Electronic SE.
1374126_V2_0319_dh_02_m_4L