Process L1 - Wristwatch ADIDAS - Free user manual and instructions
Find the device manual for free Process L1 ADIDAS in PDF.



| Brand | Adidas |
| Model | Process L1 |
| Product type | Digital and analog watch |
| Main functions | Time, date, day, chronograph, alarm, timer, dual time zones, electroluminescent display |
| Water resistance | 3 ATM (30 meters) - resistant to splashes and rain |
| Power source | Button cell battery (CR2032 or similar) |
| Case dimensions | Approximately 40 mm diameter, 10 mm thickness |
| Weight | Approximately 80 g |
| Case material | Resin or plastic |
| Glass material | Mineral or acrylic |
| Strap | Resin or silicone, adjustable |
| Care | Clean with a soft cloth, avoid salt water and chemicals |
| Safety | Do not expose to extreme temperatures, avoid strong impacts |
| Repairability | Battery replacement possible by a watchmaker, spare parts not provided |
| Warranty | 2 years (according to seller's conditions) |
Frequently Asked Questions - Process L1 ADIDAS
User questions about Process L1 ADIDAS
0 question about this device. Answer the ones you know or ask your own.
Ask a new question about this device
Download the instructions for your Wristwatch in PDF format for free! Find your manual Process L1 - ADIDAS and take your electronic device back in hand. On this page are published all the documents necessary for the use of your device. Process L1 by ADIDAS.
USER MANUAL Process L1 ADIDAS
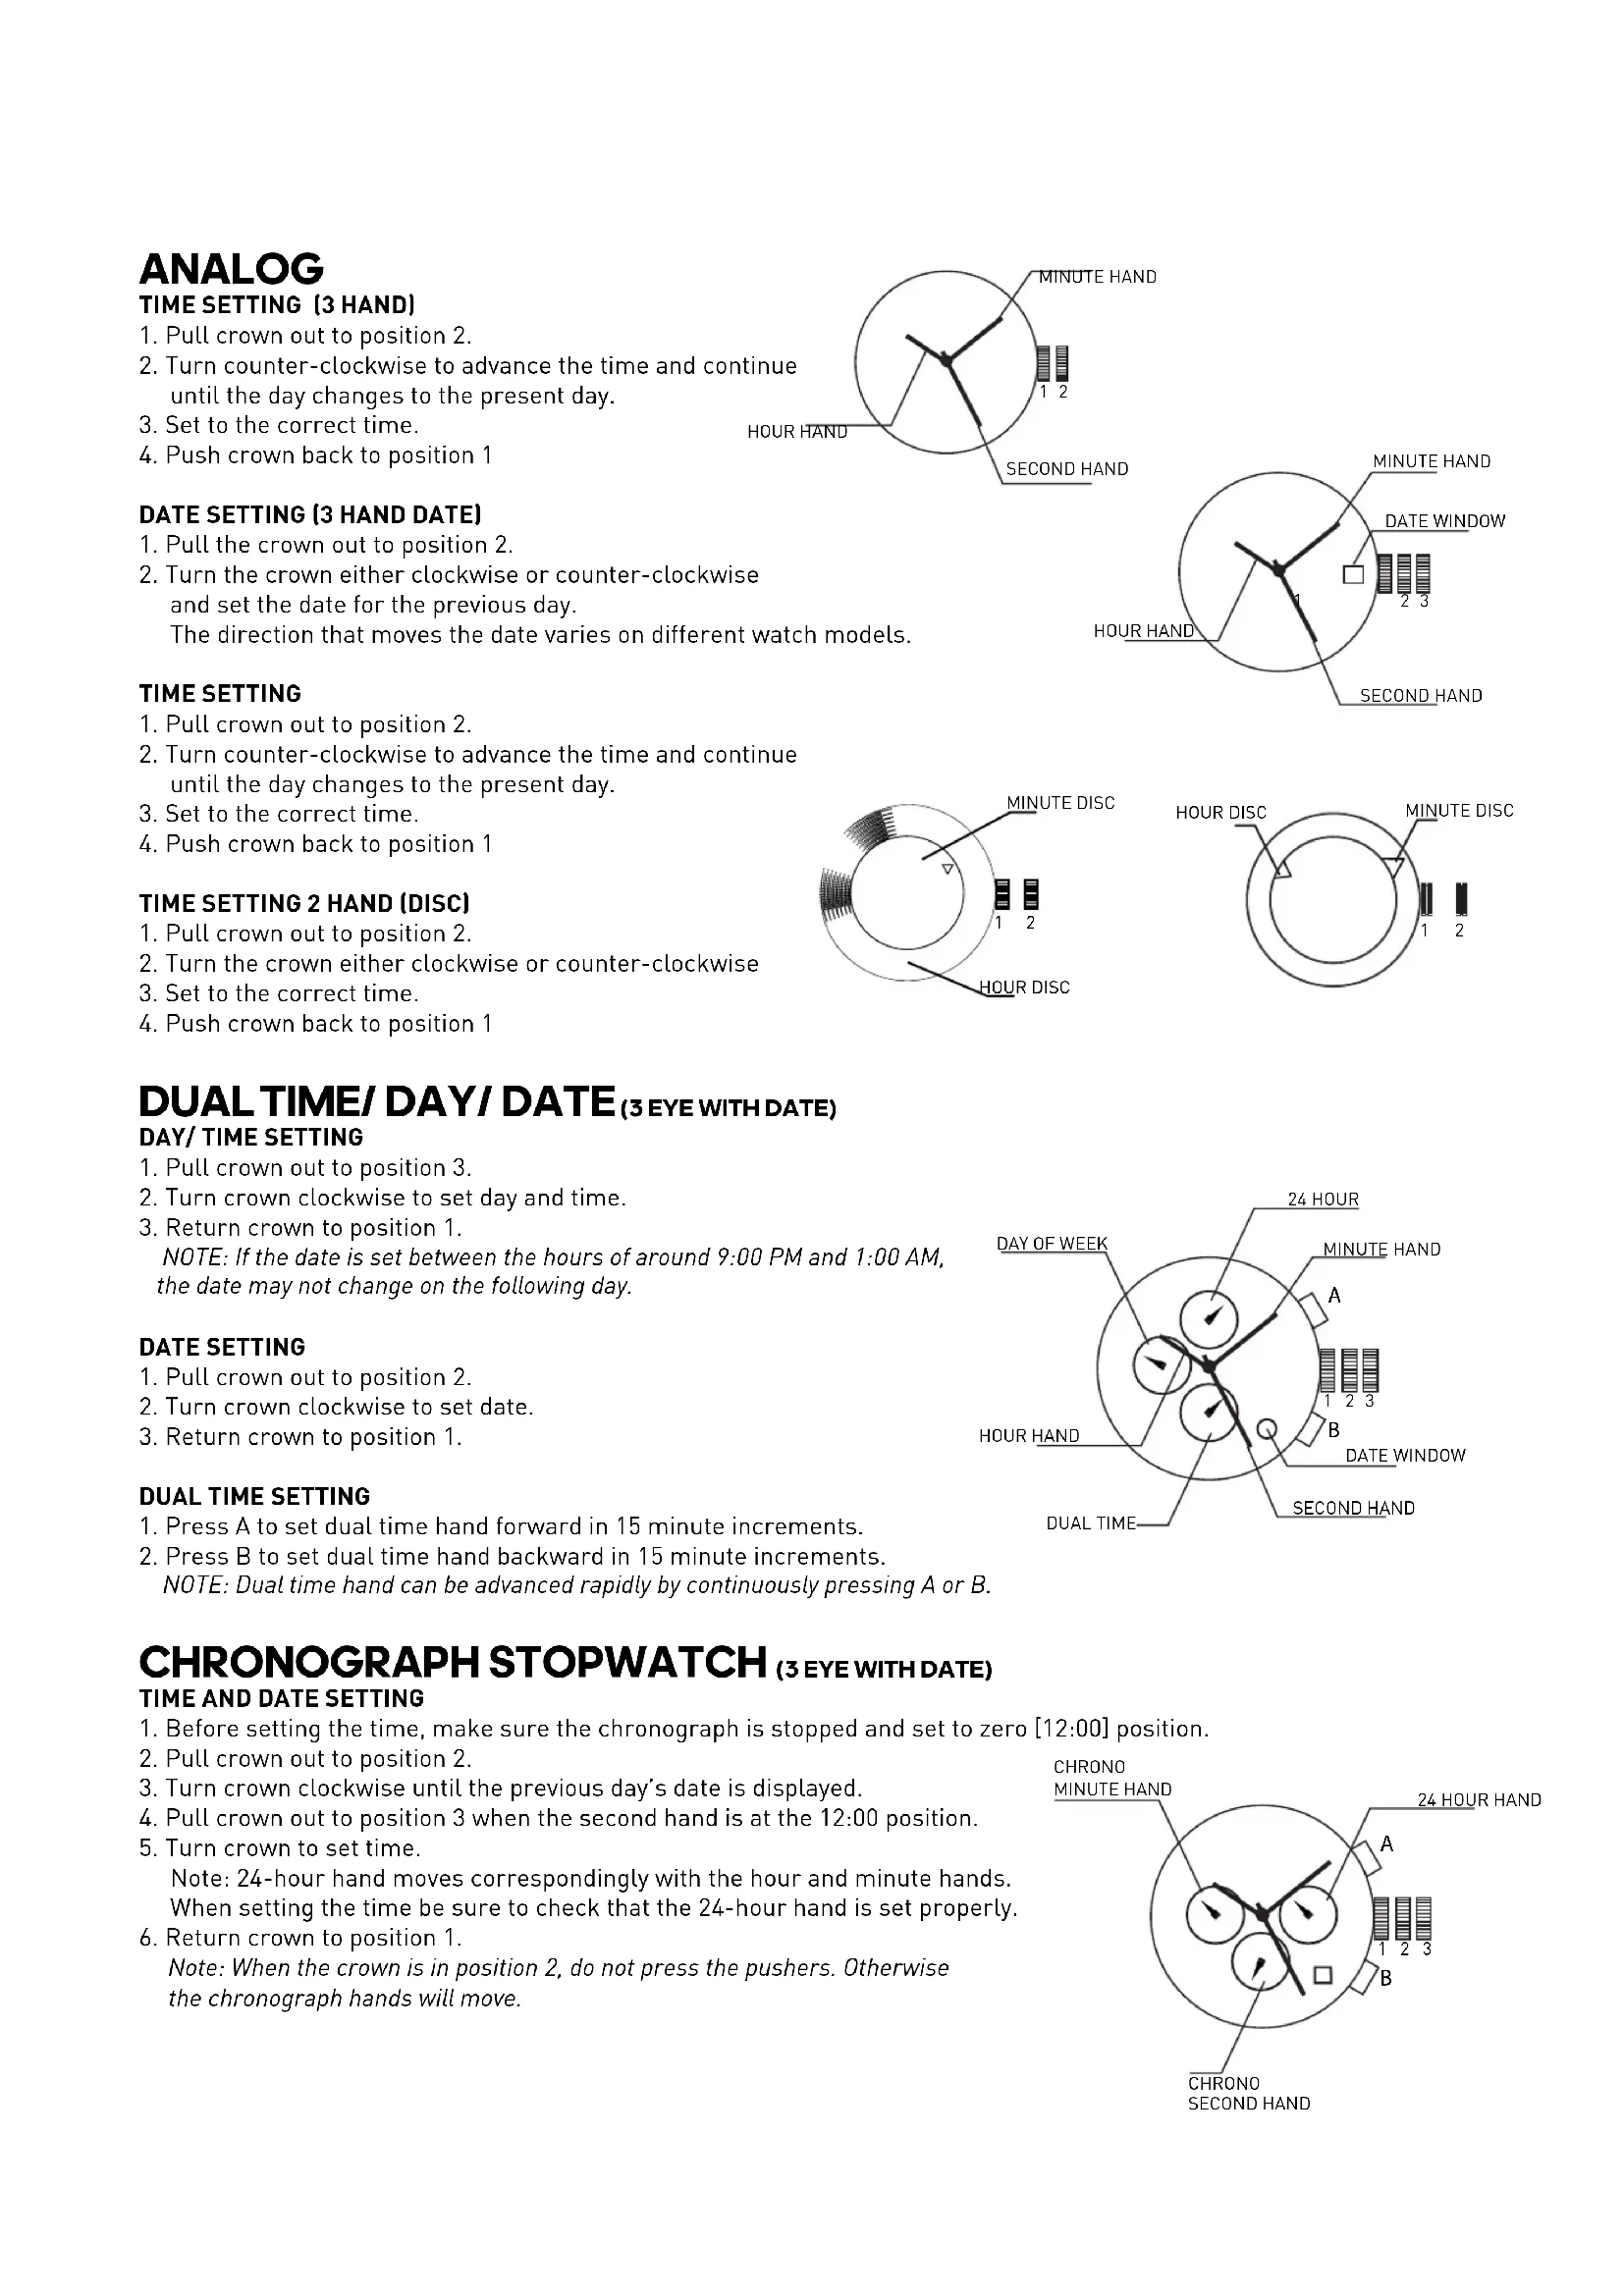
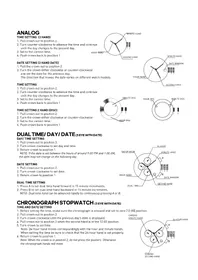
- Pull crown out to position 2.
- Turn counter-clockwise to advance the time and continue until the day changes to the present day.
- Set to the correct time.
- Push crown back to position 1


DATE SETTING (3 HAND DATE)
- Pull the crown out to position 2.
- Turn the crown either clockwise or counter-clockwise and set the date for the previous day. The direction that moves the date varies on different watch models.
TIME SETTING
- Pull crown out to position 2.
- Turn counter-clockwise to advance the time and continue until the day changes to the present day.
- Set to the correct time.
- Push crown back to position 1


TIME SETTING 2 HAND (DISC)
1.Pull crown out to position 2.
2. Turn the crown either clockwise or counter-clockwise
3. Set to the correct time.
4. Push crown back to position 1
DUAL TIME/ DAY/ DATE (3 EYE WITH DATE)
DAY/TIME SETTING
- Pull crown out to position 3.
- Turn crown clockwise to set day and time.
- Return crown to position 1. NOTE: If the date is set between the hours of around 9:00 PM and 1:00 AM, the date may not change on the following day.
DATE SETTING
- Pull crown out to position 2.
- Turn crown clockwise to set date.
- Return crown to position 1.
DUAL TIME SETTING
- Press A to set dual time hand forward in 15 minute increments.
- Press B to set dual time hand backward in 15 minute increments.
NOTE: Dual time hand can be advanced rapidly by continuously pressing A or B.

CHRONOGRAPH STOPWATCH (3 EYE WITH DATE)
TIME AND DATE SETTING
- Before setting the time, make sure the chronograph is stopped and set to zero [12:00] position.
2.Pull crown out to position 2. - Turn crown clockwise until the previous day's date is displayed.
- Pull crown out to position 3 when the second hand is at the 12:00 position.
- Turn crown to set time.
Note: 24-hour hand moves correspondingly with the hour and minute hands. When setting the time be sure to check that the 24-hour hand is set properly.
- Return crown to position 1.
Note: When the crown is in position 2, do not press the pushers. Otherwise the chronograph hands will move.

CHRONOGRAPH
- Press A to start/slop the chronograph.
- Press B to reset to zero.
CHRONOGRAPH ZERO RESET
- If either of the chronograph hands is not at the zero [12:00] position, pull crown out to position 3.
- Press A to move hands clockwise; press B to move hands counter-clockwise.
- Return crown to position 1.
CHRONOGRAPH 2 EYE WITH DATE (WITH OR WITHOUT DATE)
TIME AND DATE SETTING
- Before setting the time, make sure the chronograph is stopped
and set to zero [12:00] position.
2.Pull crown out to position 2. - Turn crown clockwise until the previous day's date is displayed.
- Pull crown out to position 3 when the second hand is at the 12:00 position.
Turn crown to set time.
Note: 24-hour hand moves correspondingly with the hour and minute hands.
When setting the time be sure to check that the 24-hour hand is set properly.
& Return grown to position 1
Note: When the crown is in position 2, do not press the pushers. Otherwise the chronograph hands will move.
CHRONOGRAPH
- Press B to start/slop the chronograph.
- Press A for Split time, Press A again to restart
- Press A to reset to zero.
CHRONOGRAPH ZERO RESET
- If either of the chronograph hands is not at the zero (12:00) position, pull crown out to position 3.
- Press A to move hands clockwise; press B to move hands counter-clockwise.
- Return crown to position 1
CALAGARY (QFL769BB/QFL873AC)
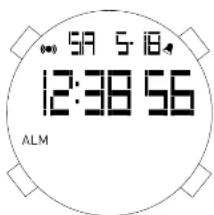
NORMAL TIME DISPLAY
- Press A for EL
- Press C to select T1 or T2 format.
- Press D to toggle chime on/off.
TIME/CALENDAR SETTING
- In time mode, press and hold D for 2 seconds to enter time setting; hour will begin flashing.
- Press C to increase selling value. Press D to decrease selling value.
- Press B to enter next setting field
- Setting sequence is hour, minute, second, year month, date,12/24 hr
- Press A to exit setting mode.
CHRONOGRAPH MODE
- Press B to enter chrono mode.
- Press D to select split or lap mode. Split mode will display the full time of all records after
each split. Lap mode will display only the new lap time after each record has been recorded. - Press C to start chrono.
- Press C again to split time.
- Repeat step 4 until desired number of laps have been reached (maximum 10).
- Press D to stop chrono.
- To review, press B to enter recall mode before resetting.
- Press D again to reset chrono

RECALL MODE
- Press C to recall each lap [10 maximum].
- Press D to return to chron.
ALARM MODE
- Press Big eniig alarm mode.
- Press C to toggle alarm on/off.
- Press D to select T1 Alarm 1 or T2 Alarm 2.
ALARM SETTING
- Press and hold D for 2 seconds to enter alarm setting; hour will begin flashing.
- Press C to increase setting value. Press D to decrease setting value.
- Press B to set minutes.
- Press A to exit setting mode
NOTE: Alarm turns on automatically when exiting setting mode.
TIMER MODE
- Press C to start countdown timer.
- Press D to stop countdown timer. Press D again to reset timer.
TIMER SETTING
- Press B to enter timer mode.
- Press and hold D to enter setting mode; hour will begin flashing.
- Press C to increase setting value. Press D to decrease setting value.
- Press B to enter next setting field.
- Setting sequence is hour, minute, second.
- Press to exit setting

PEACHTREE (FL1459B)
NORMAL TIME DISPLAY
- Press A for EL in any mode
- Press C to toggle between Time 1 and Time 2
- Press and hold C to set Time 1 or Time 2 as the default timer.
- Press D to toggle chime on/off.
TIME/CALENDAR SETTING
- In normal time display, press and hold A to enter setting mode; chime will begin flashing.
- Press C to increase setting value. Press D to decrease setting value.
- Press B to set and advance to next setting value.
- Setting sequence is chime, 12/24-hour time, hour, minute, second, year, month, date, Auto EL
- Press A to save data and exit setting mode.
CHRONOGRAPH MODE
- Press B to change to chronograph mode.
- Press C to start chronograph: press D for lap when the chronograph is running.
- Press D to change views while chronograph is running
- Press C to stop chronograph.
NOTE: When running, there is a maximum of 10 laps, afterward last lap will be overwritten each time
additionol tap is recorded.
RECALL MODE
- Press A to recall the memory when the chronograph is stopped.
- Press A to view the next lap.
- Press C or D to exit Recall Mode and go back to chronograph mode.
TIMER MODE
- Press B to change to timer mode.
- Press C to start timer.
- Press C to stop timer. Press D to reset the timer when it is stopped.
TIMER SETTING
- In timer mode, press and hold A to enter setting mode; timer type will begin flashing.
- Press C and D to select count down stop, count down repeat, or count up timer.
- Press B to advance to next setting field.
- Press C to decrease and D to increase.
- Press B to set and advance to next setting value.
- Setting sequence is timer type, hour, minute, second.
- Press A to save data and exit setting mode.
NOTE: Alarm will sound at 2 beeps per second, and will beep for 30 seconds after timer reaches zero.
ALARM MODE
- Press B to change to alarm mode.
- Presse C to loop between alarms 1, 2, 3, 4
- Press D to enable the alarm; press D again to disable the alarm.
- Press B to exit alarm mode.
ALARM SETTING
- In alarm mode, press and hold A to enter setting mode, hour will begin flashing.
- Press C to increase; press D to decrease.
- Press B to set and advance to next setting value
- Setting sequence is hour, minute.
- Press A to exit setting mode.
DENVER/CANDY/SYDNEY (UPCR-780A-P07/QUPCR-823A-P03/QUPCR-780A-3-P16)
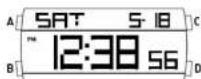
NORMAL TIME DISPLAY
-
Press A for E.
-
Press C to select T1 or T2 format.
TIME/CALENDAR SETTING
- In time mode, areas and holds 0 for 2 seconds to enter time
setting; hour will begin flashing. - Press C to increase setting value
- Press B to enter next setting field
- Setting sequence is hour, minute, day, year, month, date.
- Press D to exit setting mode.
ALARM MODE
- Press B to enter alarm mode.
- Press C to toggle alarm/chime on/off
- Press D to select Home Alarm or T2 Alarm.
ALARM SETTING
- Press and hold D for 2 seconds to enter alarm setting; hour will begin flashing.
- Press C to increase setting value.
- Press B to set minutes.
Press D to exit setting mode.
NOTE: Alarm turns on automatically when exiting setting mode.


CHRONOGRAPH MODE
- Press Big eni r chnp mode
- Press D to select split or lap mode. Split mode will display the full time of all records after each split.
Lap mode will display only the new lap time after each record has been recorded. - Press C to start chrono.
- Press C again in split limnc
- Repeat step 4 until desired number of laps have been reached (maximum 10).
- Press D to stop chrono.
7.To review,press B to enler recall mods before rsslling. - Press D again to reset chrono.
RECALL MODE
- Press C to rseall each lap [10 maximum]
- Press D to return to chrono.
TIMER MODE
- Press C to start countdown timer.
- Press D to stop countdown timer. Press D again to reset timer.
TIMER SETTING
- Press B to enter timer mode.
- Press and hold D to enter setting mode; hour will begin flashing
- Press C to increase setting value.
- Press B to enter next setting field.
- Setting sequence is hour, minute, second
- Press D to exit setting mode

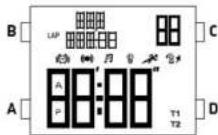
Seoul / Curitiba [9FL657]
NORMAL TIME DISPLAY
- Press A to change mode. Mode sequence is normal time,
shrnooggh, hmsr, alarm. - Press B for E.L.
- Press C to Flash time zone 2. Press and hold C 2 seconds
To logals normal time displaytime zone 2. - Press D to toggle key tone and/off.
NOTE: At any point in any setting mode, press B to exit setting mode. NOTE: In any setting mode, if no pusher is operated for 30 seconds, all changes will be saved and the setting will automatically return to normal time display.
TIME/CALENDAR SETTING
- In normal time display, press and hold B 2 seconds; auto EL
spall will begin fashng.
-
Press C toggle auto EL on/off.
-
Press to set and advance to next setting value.
-
Press C to increase digit; press D to decrease digit. Press and hold C or D for fast increment/decrement.
-
Repeat steps 3 and 4 through setting sequence. Setting sequence is: auto EL, chime on/off
12/24 hour format, hour, minute, second, year, month/date or date/month format, month and date.
- Press B to exit setting mode.
NOTE: Weekday is automatically updated upon exiting setting mode.
TIME ZONE 2 SETTING
- To set Time Zone 2, press and hold C 2 seconds to change to Time Zone 2.
- Press and hold B 2 seconds; time difference between time zone 1 and time zone 2 will begin flashing.
- Press C to increase value; press D to decrease value. Press and hold C or D for
fast increment/decrement. - Press B to exit setting mode.
CHRONOGRAPH MODE
- Press A to change to chronograph mode.
- Press B to recall lap data. Press B to scroll through laps.
- Press C to start/slop the chronograph.
- Press and hold D 2 seconds to reset to zero.
NOTE: Insert chronograph indicolor here will flash in all modes if the chronograph is running.
LAP COUNTING
- Press D while the chronograph is running for lap counting [up to 10 laps].
NOTE: After 8 seconds, display will show total chronograph time in the lower portion of the display; next lap running time will show in upper portion of the display. - Press C to stop chronograph
- Press B when the chronograph is stopped to recall chronograph lap data.
- Press C or D to exit recall mode and return to chronograph.
TIMER MODE
- Press A to change to timer mode.
- Press C to start/stop timer.
- Press D to reset the timer.
NOTE: Alarm will sound for 30 seconds when countdown reaches zero. Press any pusher to silence alarm.
TIMER SETTING
- In timer mode, press and hold B 2 seconds to enter setting mode; timer type will begin flashing.
Press C to select countdown-stop ("CD-STP"), countdown-repeat ("CD-REP"), or countdown-then up timer ("CD-UP"). - Press A to set and advance to next setting value.
- Press C to increase digit, press D to decrease digit. Press and hold C or D for fast increment/decrement.
- Repeat steps 3 and 4 through selling sequence. Setting sequence is: timer type, hour, minute, seconds.
- Press B to exit setting mode.
ALARM MODE
- Press A to change to alarm mode.
- Press C to select alarm 1-4.
- Press D to toggle alarm on/off.
ALARM SETTING
- In alarm mode, press and hold B 2 seconds; hour will begin flashing.
- Press C to increase digit; press D to decrease digit. Press and hold C or D for fast increment/decrement.
- Press A to set and advance minute.
- Repeat step 2.
- Press B to exit setting mode.
NOTE: Alarm will sound for 30 seconds. Press any pusher to silence alarm.
ANALOG
[UPCR-780A-P07/QUPCR-823A-P03/QUPCR-780A-3-P16]
[UPCR-780A-P07/QUPCR-823A-P03/QUPCR-780A-3-P16]
AFFICHAGE NORMAL DE L'HEURE
{UPCR-780A-P07/QUPCR-823A-P03/QUPCR-780A-3-P16}
VISUALIZACION NORMAL DE LA HORA
[UPCR-780A-P07/QUPCR-823A-P03/QUPCR-780A-3-P16]
SCHERMO CON L'ORA STANDARD
[UPCR-780A-P07/QUPCR-823A-P03/QUPCR-780A-3-P16]
VISUALIZACAO NORMAL DA HORA
[UPCR-780A-P07/QUPCR-823A-P03/QUPCR-780A-3-P16]
OTOBPAXEHNE ObbyHOro BPEMEHN
- Haxmte KhoNky A JEA EL.
- HaxmTe KhoNky C nIy Bb6opa foMpTa T1 nnT2.
YCTAHOBKA BPEMEHN
- HaxoJcB bpeKmE BpeMeHn, HaxMnte n ydepKnBaTe KhoNky D B TeueHne 2 cekyH, UTObI BoHTn B peKm ycTaHOBKn; uO3HaauOuNe Yacbl, HaHyT MrraTb.
- Haxmte KhoNky C, cyo6byyBennuTb 3Haehne yctahOBKn.
- HaxmTe KhoNky B, yTo6blpeuTn K cIeDyUOeMy npaMeTp ycTaHOKn.
- NocJeIOBATEbHOCTb yCTaHOBKN - Yac, MHyTa, DeHb, RoD, MeCra, DaTa.
- Haxmte KhoNky D IaI BbIXOa n3 peXnMa yCTaHOBKn.
PEXKIM BUDINJIbHnKA
- HaxmTe KhoNky B Dny BxOda B pexM 6yDnIbHnKa.
- Haxmte KhoNky C nBkLIOeHn/BBKJIIOeHn 6yDnIbHnKa/3ByKOBOrO cnHaJa.
- HaxmTe KhoNky D nIy Bbl6pa domaaHero 6yDnJIbHnKa nn 6yDnJIbHnKa T2.
YCTAHOBKA BydNJIbHnKA
- Haxmte u ydepunBaTe KhoNky D TeueHne 2 cekyH, YTo6bl BoTn B pexm ycTaHOBKn 6yDnIbHnka; Cnpbl, o03HaayIoune Yacbl, HauHyT MmraTb.
- Haxmnte KhoNky C, yTo6bIyBEnuHTb 3HaueHne yctaHOBKn.
- HaxmTe KhoNky B, yTo6bl yCtHaOBuTb MHyTbI.
- HaxmTe KhoNky Dnla BbIXoJa n3 peXIma yctahOBKn.
ПРМЕЧАНЕ:БудуньнКВКИЧаеТСАВТOMATУЧЕСКИпи ВБХОДЕИЗ pEXKUMA yCTAHOBKN.

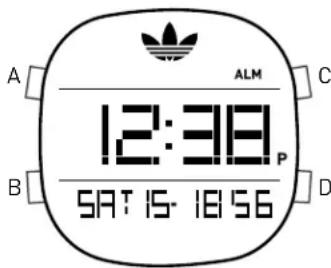

PEKIM XPOHOMETPA
- HaxmTe KhoNky B, yTo6bl BoTn B pexm xpoHometpa.
- Haxmte KhoNky D, YTo6bI Bb6paTb pexnmpomexkytoHoro fHHuHa nn Kpyra. PeknnpomexkytoHoro fHHuHa nokaket noJHoe BpeMa BCex pekopdoB nocne kKdoRo npomexkytoHoro fHHuHa. Pekn Kpyra nokaket tolbko BpeMa HOBO r Kpyra nocne 3aunC kKdoRo pekopda.
- Haxmnte KhoNky C, 4to6bI 3aNyCTnTb xpoHometp.
- Haxmte eue pa3 KhoNky C, yTo6bI pa36nTb BpeMra
- NOBTOPNE 4, NOKA He doctnHte XeJenaEMO KOJIueCTBa KpyroB (MaKcMym 10).
- HaxmTe KhoNky D, yTo6bl OctaHOBnTp xpoHometp.
7.ДЯ NOBTOPOHOro npocmoTpa HaxMnte KhoNky B, YTo6bl BoYTu B peXm 3aONMaHaHnpepeHOBou yCTaHOBkoI. - Haxmte eue pa3 KhoNky D nla o6hynn xpoHometpa.
PEKIM 3ANOMHAHNA
- HaxmTe KhoNky CДЯ 3aNoMHaHnKaJdOro Kpyra (MaKcMym 10).
- HaxmTe KhoNky D nIy Bo3BpTa K xpoHometpy.
PEKIM TAIMEPA
- Haxmnte KhoNky C, yTo6bl 3aNyctntb TaMep o6paTHoro OTCyeTa.
- Haxmnte KhoNky D, YTo6bI ocTaHOBntb TaMep o6paTHOrO oTcyeTa. Haxmnte eue pa3 KhoNky D dJa 06HyJeHn TaMepa.
YCTAHOBKA TAI MEPA
- Haxmte KhoNky B, YTO6bI BOITN B pexnM TaMepa.
- Haxmte KhoNky u ydepKnaBte KhoNky D nla BxOda B pexm yctahOBKn; uΦpbl, 06o3haaHoune yacbl, hauHyT Mrtatb.
- Haxmnte KhoNky C, yTo6bI yBEnuHTb 3HaueHne ycTaHOBKn.
- HaxmTe KhoNky B, TTo6bI nepeuTn K CneJeUoUeMy npaMeTp yctAHOBKn.
- YcTahOBKa npOn3BODnTCB CNeJeYIOeM nopJKe:HaCbI, MHyTbI, cKyHnbl.
- HaxmTe KhoNky DnBbIXoJa n3 pexIma yctahOBKn.
SEOUL/CURITIBA
(QFL657)
HACTPOIKA TEKYUJIEGOBPMEHNI
- HaxmTe KhoNky A dny n3MeHnpy pexnma. Pexn mocJeOBaTeJbHoro nepeKIOUeHnry - Tekyuee Bpem, xpoHOrpa, taMep, 6yDnIbHnK.
- Haxmte KhoNky B dny BKJIOueHn noCDBeTkn (EL).
- Haxmte KhoNky C, yTo6bI Bbl6paTb yacoBoi noC 2. Haxmte u ydepXnBaTe KhoNky C 2 cekyHdbI dny nepeKluyeHna B peKm TeKyUero BpemHu/acyoBOr o nOca 2.
- Haxmte KhoNky D nla BkIoueHn/ByIKIOueHn CnHaHa hXaTna KnaBn.
IPIME4AHHE: B JIO6oM MoeHT BpeMeHn, BHe 3aBcUmocTn OT peXmHaHacToPouKn, HaxMnte B, YTO6bI BbIuN u3 peXmHaHacToPouKn.
IPIIME4AHHE: B IIO6om pejxime HacTpoKn, ecnn KJIaBnHn He HaxmamOTcB B TeueHne 30 cekyHd, BCE n3MeHeHHa ByyT coXpaHeHb, a 3kpan ABTomatueckn BepHeTcB peXm OTo6paxeHHBpeMeHN.
HACTPOIKA BPEMEH N KAJEHAPRA
- BpeKnme oTo6paXeHnBpeMeHn, HaxMnte n ydepxnBaTe KhoNky B 2 ceKyHdb; 3KpaH aBTOMaTnuecKn HaHTe MraTaTb.
- Haxmte KhoNky C dIy BkIOueHn/ByIKIOueHn NoCBeKn.
- HaxmTe KhoNky A, yTo6bI ycTaHOBnTb n nepeuTu K hAcTpOKe cJeDyUoJero napaMeTpA.
- Haxmnte KhoNky C, yTo6bI yBeJnUHTb 3HaueHHe; haxmnte KhoNky D, yTo6bI yMeHbUHTb 3HaueHHe. Haxmnte u YdePknBaIte KhoNky C nnn D dJa 6bICTpO rO yBeJIuYeHn/ymeHbUeHn 3HaueHn.
- NOBTOPiTe 3n 4 nyTeM nocJeDoBaTeIbHOro nepeKIOueHnMaekDy onuMn.PeKIM nocJeDoBaTeIbHOro nepeKIOueHnCneJyUcN: aBTO noDCBeTka (EL), BkI/BbIKn 3ByKOBoRo cInHaJa, 12/24-ycaOBo JOpMaT, HaCbI, MInHyTbI, ceKYNDbI, rO,I, fOpMaT "MecaU/deHb" IIN "DeHb/Mecua", Mecau n data.
- Haxmte KhoNky B JnB bXoJa n3 peKmHa hAcToKn. PNIMEyAHVE:JeHb HeJeIn ABToMaTuYeCKn OShOBnEeTc npu BbIXOe n3 peKmHa hAcToKn.
HACTPOIKA YACOBOIO NORACA 2
- YTO6bI yCTaHOBNT bacOBn IORc 2, HaxMnte n ydePknBaTe KhoNky C 2 CEyHdbI, YTO6bI nepeTn K YacoBOmy Norcy 2.
- Haxmte u ydepknBaTe KhoNky B 2 cekyHdb; Ha 3kpaHe 6ydet MnraTb pa3Hua BO BpeMeHN Mekdy YacOBbIM NORCOM 1 u YacOBbIM NORCOM 2.
- Haxmte KhoNky C dIy yBeJIuHEny 3HaueHn; Haxmte KhoNky D nIy MeHbWeHn 3HaueHn. HaxmTe n yepKnbAitc KhoNky C nIy D nIy 6bictporo yBeJIuHEny/YMeHbWeHn 3HaueHn.
- Haxmte KhoNky B dny bixoHa n3 peKIma hAcToPoiKn.
PEKIMXPOHOPTPAΦA
- Haxmte KhoNky A dIy nepexoDa B pexm xpoHometpa.
- HaxMnte KhoNky BДЯ BbIbOda DaHHbIX O npdebldyuixx n3MepeHnX. HaxMnte KhoNky BДЯ npolncTbBaHnA daHHbx.
- Haxmte KhoNky C nla 3anycka/octaHObKn xpoHorpaa.
- Haxmte u yedejxuBaIte KhoNky D 2 cekyHdbI, YTo6bI c6pocntb Hactpoyn Do Hyna. IPIMEUAHIE: BCTaBtE xpoHorpaΦ. Ecn xpoHorpaΦ 3aNyueH, HndnKaTOp 6ydt Mrtatb B JIObOM peXmme.


I3MEPEHNE BPEMEHHbIX IPOMEKGTKOB
- Haxmte KhoNky D nocne 3anycka xpoHorpaΦa, YTO6bI n3Mepntb npomexytoK BpeMeHH [do 10-Tn npomexytkoB].
INPMEAHHE:Yepe3 8 cekyH, B HnXHeN qactn 3KpaHa 6yJeT BBBeDeHo
06uee Bpem pa6oTBxpoHorpa; 3aTeM Bpem ONpeIeHHO
npomexytka 6yJeT OTo6paKeHo B BepxHeN qactn 3KpaHa.
- Haxmte KhoNky C dIa octaHOBKn xpoHorpaFa.
- Haxmte KhoNky B noCle octaHOBKn xpoHorpaΦa nIy BbIOda daHHbIX o6 n3MepeHnX xpOHorpaΦa.
- Haxmte KhoNky Cnn D, yTo6bI Bbln n3 peXmAbBbOda daHHbx IN BepHyTbcK xpOHorpafoy.
PEKUM TAIIMEPA
- HaxmTe KhoNky AДЯпepexoDa Bpexm TaMepa.
- Haxmnte KhoNky C dIa 3aynck/aocTaHOBk TaMepa.
- Haxmte KhoNky D dny c6poca npaametpoB taMepa. PNMEUHHE: npu doctxkeHHn HyeBOrO 3naueHn 6ydt 3ByaTb CnHaH npotxkeHH 30 cekynd. Haxmte IIObYIO KhoNky dny npekpaeeHHcHnHa.
HACTPOIKA TAIIMEPA
- B pexnme TaMepa, Haxmnte u ydepxnbAte KhoNky B 2 cekyHdbI, UTo6bBoNTBpeXnHactpoKn;HaHTe MntaTb TIN TaMepa.
- Haxmte KhoNky C, qTo6b BbIbpaTb 6paTHbI OTCye-CTOn ("CD-STP"), 6paTHbI OTCye-NOBTOp ("CD-REP") nJn 6paTHbI OTCye-IPrMoI OTCye ("CD-UP").
- HaxmTe KhoNky A, yTo6bI yCTaHOBnTb n nepeuTN K hAcTpOKe cJeNyUoero npapaMeTpa.
- HaxMnte KhoNky C, yTo6bl yBeJnUHTb 3HaueHne; HaxMnte KhoNky D, yTo6bl yMeHbWntb 3HaueHne. HaxMnte n yDepKunBaIte KhoNky C nn D nn 6bICTporo yBeJnUHeHry/YMeHbWeHry 3HaueHnn.
- NOBTOPiTe 3 n 4 nyTem noCleJIOBaTeIbHOro nepeKIOUeHnMexyOnuMaM.HacTpoKn 6dyT nepeKIOUaTbcra B cIeDyIOSeI NOcJIeOBATeIbHOCTN: TIN TaIMepa, HAcbl, MInHyTbI, CeKYHbI.
- Haxmte KhoNky BДЯ BbIXOa n3 peXIma HacToPoiKn.
PEKIM BUDINbHnKA
- Haxmte KhoNky A dny nepexoDa B pexm 6yDnBnKa.
- HaxmTe KhoNky C, yTo6bI BbIbpaTb 6yDnJIbHnK 1-4.
- Haxmte KhoNky D IaB BkIIOUeHn/ByIKIOUeHn 6yDnIbHnKa.
HACTPOIKA BdyINbHNKA
- BpeKIme 6yUnIbHnka, HaxMnte n ydepxnBaIte KhoNky B 2 cekynbl; NaHyT MInraTb Yacbl.
- Haxmnte KhoNky C, yTo6bl yBeJnUHTb 3HaueHne; Haxmnte KhoNky D, yTo6bl yMeHbUnTb 3HaueHne. Haxmnte n yDepKunBaIte KhoNky C nn D nn 6bictporo yBeJnUHeHra/YMeHbWeHna 3HaueHna.
- Haxmte KhoNky A, yTo6bl ycTaHOBnTb n IpeuTn K HacTpOKe MHyT.
- Nobtopute war 2.
- Haxmte KhoNky B dIy BbXOa n3 peKIma HacTpoKn. PNIMEUHNE: CnHaI 6yDnBnKa 6yTe 3ByaTb B TeueHne 30 ceKyHd. Haxmte IIO6yIO KhoNky dIy npEkpaueHna CnHaIa.
ИСПОЛьзУITE МЕРы ПЕДОCTОPOЖHOCTN - BOДОCTОйKOCTь
CTeneHb BOHOHePOnHuaemocTu YacOB adidas yka3aHa B cneDuoue Ta6Iuue.
| ВОДОНРОПИЦАЕМOSTС KOТАKTС BOДОЛ | |||||
| Образиме на корпuce | Глобиha | ||||
| Мытbe рук | Принятыдuya, Ванньl | Пробavenе, поюdnoe плаваниоe | Нырainede с аквашиrom | ||
| - | - | X | X | X | X |
| WR | - | ✓ | X | X | X |
| 3 ATM | 3 бара, 30metroB | ✓ | X | X | X |
| 5 ATM | 5баров, 50metroB | ✓ | ✓ | X | X |
| 10 ATM | 10баров, 100metroB | ✓ | ✓ | ✓ | X |
| 20 ATM | 20баров, 200metroB | ✓ | ✓ | ✓ | ✓ |
| 30 ATM | 30баров, 300metroB | ✓ | ✓ | ✓ | ✓ |
| 50 ATM | 50баров, 500metroB | ✓ | ✓ | ✓ | ✓ |
| Всегда установайte завODныю rolовky в объчhoe (зakрытоe) поожени. Плотно затунITE завodныю rolobky do уpopa. | |||||
模拟
时间设置(3指针)
{UPCR-780A-P07/QUPCR-823A-P03/QUPCR-780A-3-P16}
正常时间显示
{UPCR-780A-P07/QUPCR-823A-P03/QUPCR-780A-3-P16}
五圣山阿五
- EL(前日告白福社)到自A
2.C将T10N T2F
#


- DATE SETTING (3 HAND DATE)
- TIME SETTING
- TIME SETTING 2 HAND (DISC)
- DUAL TIME/ DAY/ DATE (3 EYE WITH DATE)
- DAY/TIME SETTING
- DATE SETTING
- DUAL TIME SETTING
- CHRONOGRAPH STOPWATCH (3 EYE WITH DATE)
- TIME AND DATE SETTING
- CHRONOGRAPH
- CHRONOGRAPH ZERO RESET
- CHRONOGRAPH 2 EYE WITH DATE (WITH OR WITHOUT DATE)
- CALAGARY (QFL769BB/QFL873AC)
- NORMAL TIME DISPLAY
- TIME/CALENDAR SETTING
- CHRONOGRAPH MODE
- RECALL MODE
- ALARM MODE
- ALARM SETTING
- TIMER MODE
- TIMER SETTING
- PEACHTREE (FL1459B)
- DENVER/CANDY/SYDNEY (UPCR-780A-P07/QUPCR-823A-P03/QUPCR-780A-3-P16)
- Seoul / Curitiba [9FL657]
- TIME ZONE 2 SETTING
- LAP COUNTING
- ANALOG
- AFFICHAGE NORMAL DE L'HEURE
- VISUALIZACION NORMAL DE LA HORA
- SCHERMO CON L'ORA STANDARD
- VISUALIZACAO NORMAL DA HORA
- OTOBPAXEHNE ObbyHOro BPEMEHN
- YCTAHOBKA BPEMEHN
- PEXKIM BUDINJIbHnKA
- YCTAHOBKA BydNJIbHnKA
- PEKIM XPOHOMETPA
- PEKIM 3ANOMHAHNA
- PEKIM TAIMEPA
- YCTAHOBKA TAI MEPA
- SEOUL/CURITIBA
- HACTPOIKA TEKYUJIEGOBPMEHNI
- HACTPOIKA BPEMEH N KAJEHAPRA
- HACTPOIKA YACOBOIO NORACA 2
- PEKIMXPOHOPTPAΦA
- I3MEPEHNE BPEMEHHbIX IPOMEKGTKOB
- PEKUM TAIIMEPA
- HACTPOIKA TAIIMEPA
- PEKIM BUDINbHnKA
- HACTPOIKA BdyINbHNKA
- ИСПОЛьзУITE МЕРы ПЕДОCTОPOЖHOCTN - BOДОCTОйKOCTь
- 模拟
- 时间设置(3指针)
- 正常时间显示
- 五圣山阿五
- #
Brand : ADIDAS
Model : Process L1
Category : Wristwatch